There are a lot of reasons we hunt. Some people just love spending more time outdoors. Some like the adventure of chasing a wild animal. But come on, is there anything better than sitting around a table and sharing a wild game meal with your family and friends? Especially one that you or your child were able to harvest? It’s really something special. If you want to make it even more unique, try processing your deer yourself. That way, you know how the meat is handled from the field to the table and can make decisions on what kinds of meals you’ll prepare from it. Ground venison is always a staple for many hunters, but because deer meat is so lean, some get tripped up on the fat ratio for venison burgers. There are a few ways you can look at this, so let’s dive into the topic of venison burgers. In the video below, Michael walks you through his process of grinding deer burgers and why he loves to do this himself.
First off, as many hunters know, deer meat is darn close to fat-free. When you grind it alone, it produces a very lean mixture that could be too crumbly to stick together well. If you’re looking for ground venison to do chili or spaghetti with, that might be exactly what you’re looking for. It will be lean meat that crumbles nicely. But if you want to grill venison burgers, you’re going to need to add some fat.
Beef fat is the preferred source when making deer burgers. It adds some great flavor (especially if you add some trimmed ribeye fat), but it also helps bind the meat together better and helps it hold in the patty shape. You can usually find beef fat from your local butcher or the meat counter at the grocery store, so try asking around. In the finished ground meat, you’re looking for those chunks of white gold.
In terms of the right fat ratio for venison burgers, it’s a little subjective, but we have a general rule. Typically, we’ll mix in about 2 pounds of beef fat for 10 pounds of venison (12 pounds total). This comes out to about an 83/16 meat/fat mix. Now some people prefer their burgers to be fattier and juicier, so they might mix 2 pounds of fat to 8 pounds of venison. On the other hand, if you find the mix is too rich for you, you can scale the fat amount back a bit or add more meat. Play around with the fat ratio for venison burgers until you find something you really enjoy…and then write it down so you know how to repeat it the next time.
Process to Grind Deer Burgers
Obviously, this whole process starts with the right meat. Everyone seems a little different in their preferences when it comes to what meat goes in the grind pile, and it can be a hotly debated subject at deer camp. Some hunters trim every grind piece as if it were a pristine steak cut, while others just throw in ALL the extra bits – silver skin, sinew, and everything included. The bottom line is that the cleaner the meat is from all the connective tissue, the smoother it will grind, and the better texture it will have in the end. Does it have to be perfect? That depends on you, but try to clean it up fairly well.
Again, if you like a really lean grind and want to try to make some venison patties, you don’t need to add any beef fat. But you’ll probably have to be pretty delicate with it while grilling, as it might crumble to pieces. For a richer burger that holds together better, try the fat ratio for venison burgers that we discussed above (2 pounds beef fat to 10 pounds venison).
For grinding venison burgers:
Start by grinding the venison meat with a coarse dye plate to cut the meat up into small chunks. Then switch to a fine or medium dye plate, and send the venison back through with the fat.Alternate adding the venison meat and beef fat into the grinder as you go, which will help incorporate it better.At this point, you can also get creative. Add onions, garlic, and wet or dry seasonings to the grind as you go to create your perfect venison burger.When you finish a batch, try frying or grilling up a test patty to see how it holds together and see if you need to adjust the seasoning. If something’s not quite right, you can add more meat, fat, or seasonings to fix it.
As you can see in the video, we love Meat! Your Maker products. Whether you need a durable and high-quality grinder to make these patties or you need a vacuum sealer to package them at the end, they have the right tools for the job.
Packaging Your Venison Burgers
The final step in the process is packaging everything up so you can safely store it until mealtime. You can use plastic bags or freezer paper for this, but those methods are much more likely to result in freezer-burnt meat. The best way to preserve your food – whether wild game meat, store-bought meat, fish, or even other foods – is to vacuum seal it. A good vacuum sealer will suck all the air out and seal the bag securely, which will lower the chance of freezer burn greatly.
For a typical family of four, you might package the meat in 1- or 2-pound bags, which should be enough for an average meal. Or if you know you’re going to make venison burgers out of the mixture anyway, you might as well pre-shape them into patties and freeze them. That way, you just have to unthaw and throw on the grill when the time comes. Form the patties based on the sizes your family prefers, and then stack them in layers of 2 with some wax paper separating them, or just do a single layer in a vacuum seal bag. You get to make all the calls with this, which is why it’s so fun.
If finding the right fat ratio for venison burgers has been tricky before, we hope this guide will help. But at the end of the day, it’s just a guideline. Play around with the mixture of venison vs. fat until you find something you and your family truly like. And then fire up the grill and invite some friends over to share a hot meal, a cold beverage, and a few good hunting stories.What’s the Right Fat Ratio for Venison Burgers?
It’s officially the spring season! With beautiful weather outside people are trying to find different ways to get in some fresh air and exercise. Hiking is perfect for those who want to soak in the sun and get their bodies moving!
But heading out in the woods with the wrong hiking clothes can ruin your fun! Everyone knows you need a good hiking boot or hiking shoe, good socks, and a comfortable pack, but what about your shirt? The best hiking shirts are the ones that minimize friction, don’t restrict your movement, and feel great on your skin. It’s important to choose hiking clothes carefully because there are so many choices available on the outdoor apparel market. The key features to look for in hiking shirts are moisture management, odor control, and temperature regulation. All of these features can be paired with the best material, and you will be all set to start your hiking expedition!
So what is the best material for hiking shirts? Keep reading to discover the best material, top picks of the year, and a buyer’s guide before making your purchase!
When you walk into any outdoor clothing store, you will find a plethora of selections for hiking shirts, and it can get confusing! What is the best material, and how can you tell? Let’s break down each popular material for you:
Cotton material:
This fabric is simply not suited for hiking. A cotton shirt can stop your sweat from escaping in warm weather. If it gets wet, it will continue to stay wet for a very long time, causing discomfort while you are on the move. Although it may seem like a good idea to grab your go-to cotton t-shirt to hike in, it’s best to avoid that option if possible.
Pros:– When hiking in a desert, the wet fabric can give cool relief
Cons:– Prevents sweat from escaping- Not efficient at wicking and drying- Will make you feel clammy and sticky- Will lock in odor- Does not dry easily- Can cause chafing
Synthetic material:
Polyester and synthetic fabrics are popular choices for hikers. They are usually relatively affordable and the most common material you will find at outdoor clothing stores. Synthetic material is known for its moisture-combatting qualities, so if your shirt gets wet, it will dry quickly! The only problem with synthetic material is that if your shirt catches body odor, chances are it’s going to continue to stink until you throw it in the wash.Pros:– Affordable and popular- Great at wicking moisture- Does not hold water- Blocks UV raysCons:– Catches bad odors quickly- Does not provide warmth when wet- Production of synthetic fabrics has a negative ecological impact
Blend-material:
A hiking shirt with a blend material means a mix of nylon and spandex. These blend materials in a hiking shirt are usually more flexible than polyester and cotton and use thin, flexible, and soft material. If what you’re searching for is something that is fitted and will move with your body while hiking, a shirt that has a higher blend is what you need! The only downfall of blend materials is that it doesn’t have strong odor control and carries any bad odor until you wash it.Pros:– Flexible and moves with the body- Usually comes fitted- Does not absorb water/sweatCons:– Not breathable material- Usually does not have odor control
Merino Wool material:
This hiking shirt material is the clear winner when you consider all of the choices. Merino wool material is known for its highly breathable qualities and keeping moisture from locking in. It’s lightweight, comfortable, and usually elastic. This fabric has natural antimicrobial traits that will help prevent odors from accumulating. The main concern for most about merino wool is the fact that it’s the most expensive. If you’re seriously considering hiking regularly, merino wool hiking shirts will most definitely be a great investment for you.Pros:– Very breathable- Naturally antimicrobial- Moisture-wicking- Odour control- Temperature control- Provides warmth when wet- UV Protection
Cons:– Expensive- Takes a long time to try- Controversy over how wool is obtained
Top Picks
We’ve scoured the web to find the top hiking shirt picks of 2021. It will include two of each of the materials (except cotton) stated above.
Best Synthetic
1. Columbia Zero Rules Tee
Fabric: PolyesterAntimicrobial: YesUPF Rating: 30This short-sleeve hiking shirt has a classic fit and comfortable stretch. It has built-in blue rings that react with perspiration to lower the fabric temperature. Along with the cooling technology, it has sun protection. Available in multiple colors.
2. Arc’Teryx Men’s Motus
Fabric: PolyesterAntimicrobial: YesThis crew base-layer hiking shirt is a comfortable garment designed for high performance. Although on the pricier end of the spectrum, it is comfortable on the skin, quick to wick away moisture, and adds warmth to your body. It’s popular and usually sold out, but if that’s the case, you can check out other hiking shirts under this brand – all excellent selections.
Best Blend
1. ExOfficio Bugs Away Breez’r
Fabric: NylonAntimicrobial: NoUPF Rating: 30Additional: Insect shield technologyThis hiking shirt is a long-sleeve button front. It has built-in Insect Shield technology and flow-thru ventilation, which will keep you cool and prevent odor! Since it does guarantee to repel bugs, it does run on the pricier side. Available in a few different colors.
2. Columbia Silver Ridge
Fabric: NylonMicrobial: YesUPF Rating: 40This long-sleeve, button-front hiking shirt is great at moisture-wicking and rapidly evaporating any perspiration. With the button up, it has convenient venting and has an antimicrobial treatment to prevent bacteria growth – all for a relatively affordable price. You can check out their Silver Ridge collection for shirts for men and women, with varying designs!
Best Merino Wool
1. Icebreaker Merino Oasis Crewe
Fabric: Merino WoolMicrobial: YesUPF Rating:This long-sleeve crew hiking shirt uses 100% merino wool which is very breathable and good for all climates. It’s a base layer by design but can also be worn alone in hot weather. Available in a few different models, colors, and styles.
2. Smartwool Merino 150
Fabric: 87% Merino Wool, 13% NylonAntimicrobial: YesUPF Rating: 20This short-sleeve hiking shirt is a mix of merino wool and nylon, built for longevity and comfort. It uses a flatlock seam on the shoulder area and sides, which prevents any chafing from backpack straps. The merino wool naturally wicks away moisture and prevents odor and bacteria growth. Available in multiple colors and designs.
Difference Between a Hiking Shirt and a Regular T-Shirt
So what is the big deal? Is there a difference between hiking shirts and regular shirts?
Yes, there is a big difference.Hiking shirts have multiple technological features that are simply not present in regular t-shirts. The most effective hiking shirts usually use fabrics like merino wool or polyester because of their moisture-wicking and quick-drying tendencies. Regular t-shirts simply don’t offer this kind of technology to account for a comfortable hiking trip.If you’re going to opt for a regular cotton t-shirt the next time you go hiking, don’t expect the same comfort and performance as a hiking shirt. It simply does not compare!
#1 Design Feature to Look For
There are a few design features on shirts that make for the best hiking experience. But the most sought-after design that will increase the comfort and fit on your body is a flatlock seam.
These seams are made by putting two pieces of fabric beside each other and sewing the raw edges directly together. Flatlock seams are discreet and help prevent unnecessary chafing. Without these seams, hiking shirts would be too bulky and uncomfortable to wear for long periods.
Flatlock seams also help reduce the rubbing of backpack straps on shoulders. This feature allows for an overall great fit and flexibility, allowing you to have more pleasurable hiking adventures!
Buyer’s Guide
Before making your hiking shirt purchase, there are a few more things to consider. On top of selecting the right material for your hiking needs, other features will help you narrow down the perfect pick!
So what are some things to consider before buying a new hiking shirt?
1. Shirt Style
There are three common hiking shirt styles. It’s important to consider which one of the three will suit your hiking needs. There are short-sleeves, long-sleeves, and button-shirts.Short sleeve hiking shirts are a great choice for warm-hot temperatures and can even be used as a base layer for extra warmth under other pieces of clothing, meaning you can wear them both in summer and winter during your hiking expeditions.
A long-sleeve hiking shirt is a good choice to protect your arms from the sun during summertime hiking, keep you warm during winter hiking or protect your arms when trekking through bushes. The sleeves will give you extra warmth, and if it ever gets too hot, you can always roll them up!Button shirts are popular and the most flexible. It’s a good pick for temperature control and sun protection. When it gets too hot, it’s easy to unbutton the front of your shirt to cool your body down. The collar of a button-shirt can also serve as an added sun protectant when you pull your collar up over your neck.Opt for the type of shirt that will benefit your hiking demands. Since there are so many on the market, it all boils down to personal preference.
2. Sun Protection
Since hiking involves exposure to the sun, it’s important to consider your hiking shirt’s level of protection against UV rays. If you know you’re going to be under the sun, go for a shirt that is UPF 30 or higher. The higher the UPF, the better protection against UV radiation. If a hiking shirt has a UPF rating of less than 15, it is not providing any protection.Polyester and synthetic materials usually block UV rays. Pay close attention to their UPF rating before you make your selection. But merino wool naturally protects against the sun, again, making it worth what you pay!Although merino wool is the best material for hiking shirts, if sun protection is important to you, choose a shirt that’s rated higher than UPF 30!
3. Comfort
Being comfortable while on the move is so important. When considering which hiking shirt to buy, make sure you feel comfortable because you will be wearing it for a long time, sometimes under extreme weather.
A merino wool shirt is the best choice because it is lightweight and elastic. It will feel flexible on your body and easy to move. These shirts tend to be more fitted. Fitted styles move with you, while looser shirts give you more airflow. So choose a style that you feel the most comfortable in. One tip – try on the shirt first… if you don’t feel comfortable, don’t buy it!
The comfort of your shirt while piling on layers or even a backpack is almost important to consider. It’s typically agreed that some nylon blend materials feel uncomfortable on the skin when it brushes with a backpack, so think about that as well if you’re planning to carry a bag on your shoulders.
4. Wicking Properties
Wicking is a material’s ability to control the humidity level. A good hiking shirt will wick away moisture from your body and helps with evaporating any water or perspiration, an important factor to consider when purchasing a new hiking shirt.While polyester and nylon materials are good at moisture wicking, it’s agreed that merino wool is one of the best with wicking properties. It does a good job at transporting sweat and moisture away from your body as vapor.
5. Antimicrobial Properties
When hiking for longer periods, wearing a shirt that has antimicrobial properties is vital. It helps keep your body and shirt smelling fresh and helps prolong the life of the material. Effective antimicrobial fabric will fight off microorganisms and bacteria while promoting moisture movement, giving you an overall pleasurable experience hiking.
Some synthetic material shirts use anti-odor technology, so if that is important to keep that in mind when picking your shirt. The best material in terms of antimicrobial agents is, you guessed it, merino wool! Merino wool is naturally antimicrobial and will naturally fight off bacteria, keeping you and your shirt smelling clean for longer.
6. Odor Resistant
First-time hikers may not think of this particular feature until it’s too late. Cheap hiking shirts don’t have any anti-odor technology which aims to evaporate sweat and odor instantly. Purchasing a shirt that is not odor-resistant will result in an uncomfortable hiking experience.
So try to pay attention to all the features listed when you’re making your purchase. Any anti-odor technology will benefit your entire experience – especially if hiking in hot climates!
7. Durability
The durability of a hiking shirt means the ability to withstand any wear, pressure, or damage. Choosing a hiking shirt with excellent moisture-wicking and antimicrobial properties will help keep the longevity of it.Read up on how to wash and dry the shirt before making the purchase. The durability of a piece of garment lies in how you care for it after each use.
As you can tell, there are quite a few things to consider before buying a hiking shirt. Most tend to buy the most affordable or popular option without giving features a second thought. The features mentioned in this buyer’s guide may or may not be important to you. But what is important is narrowing down on the features that matter, thus helping you choose the best hiking shirt for you!
Final Verdict
Hiking shirts are usually lightweight so that they can be used as a base layer in cold climates and alone in warm climates. Having a shirt with a thin build ensures airflow through the fabric and prevents too much perspiration.
When you are looking for a good hiking shirt, you ideally want it to meet all the criteria stated above in the buyer’s guide. The best hiking shirt material should be able to check all of them off. The reality is that you’re going to have to compromise on one or more if you’re trying to prioritize one property over others.
The best material that certainly meets most of the important properties is Merino Wool. The only real downfall of merino wool is that it’s quite expensive. It would be an investment, seeing as it will last a long time and has so much more pros than any of the other material available on the market.Choosing the best hiking shirt for you, whether you’re going on a short hike or a long expedition, will keep you feeling comfortable and energetic. Wearing a shirt that doesn’t get wet easily, blocks odor, keeps you warm, has good ventilation, and is comfortable on the skin will ensure happy hiking adventures! So choose wisely and enjoy!
Have you tried any of the materials stated in this article? Which material would you want to buy next?
In the world of big bore air rifles, few names carry as much weight as the Dragon Claw. When Seneca announced the release of the Dragon Claw II, enthusiasts hoped for meaningful performance improvements rather than mere aesthetic updates. After extensive testing and evaluation, we can confidently say that Seneca has not only met but exceeded these expectations, delivering a powerhouse that maintains the cherished characteristics of its predecessor while significantly advancing its capabilities.
The Dragon Claw II maintains the classic aesthetic that made its predecessor popular, presenting itself as a harmonious blend of traditional craftsmanship and modern engineering. At first glance, you might struggle to distinguish it from the original model – a testament to Seneca’s respect for the platform’s heritage. The most noticeable external change is the redesigned cocking handle, a modification that proves to be far more than cosmetic.
Design and Construction
The rifle features a handsome Monte Carlo hardwood stock with a raised cheekpiece that favors right-handed shooters without alienating left-handed users. The checkering on both the forearm and grip provides positive control without being aggressive, demonstrating attention to both form and function. The metal action showcases detailed dragon imagery on the left side and the Seneca logo on the right, adding a touch of artistry to the utilitarian design.
The 21.65-inch rifled steel barrel terminates in a threaded muzzle protected by a removable cap, while dual air reservoirs beneath provide a substantial 500cc total air capacity. The integration of these components results in a well-balanced weapon that feels solid without being unwieldy.
Performance Analysis
Power Output: A Significant Leap Forward
The most dramatic improvement in the Dragon Claw II lies in its power output. Where the original model delivered 230-240 foot-pounds of energy (FPE), the new version was advertised to achieve 340 FPE. Our testing revealed even more impressive results:
Calibers
Pellets
FPS
FPE
.50
Air Venturi Round Ball 177 gr
630
156.03
.50
Air Venturi FP 336 gr
556
230.7
.50
300 grain Pellet
738
362.9
.50
Air Venturi 210gr
640
191.04
.50
Air Venturi 336 gr
545
221.66
These numbers represent a paradigm shift in big bore air rifle performance, with the first shot exceeding the advertised maximum by over 45 FPE. This kind of power puts the Dragon Claw II firmly in the territory of serious hunting weapons, capable of ethically harvesting a wide range of game.
The rifle demonstrates impressive versatility across different ammunition types:
With 177-grain round balls:
Peak velocities of 850-860 FPS
Maintains 800+ FPS for 4-5 shots
Continues above 700 FPS for 8-9 shots
With 336-grain slugs:
Delivers 3-4 shots above 300 FPE
Maintains hunting-worthy power throughout the string
With Air Bolts:
Achieves speeds over 600 FPS
Ranks among the fastest arrow-launching air rifles available
This flexibility in ammunition choice, combined with consistent performance across different projectile weights, makes the Dragon Claw II an exceptionally versatile hunting platform.
Practical Considerations
Air Management and Filling
The dual 500cc reservoirs operate at a maximum pressure of 3000 PSI, accessed through a female quick-disconnect foster fitting. While hand-pump filling is possible, it’s not practical for regular use given the volume. We strongly recommend either a carbon fiber tank or a personal compressor like the Air Venturi RovAir for both shop and field use.
Through extensive testing, we found that optimal performance often comes from slightly under-filling:
2850 PSI fills provided the most consistent two-shot groups
3000 PSI fills sometimes resulted in an errant first shot followed by 2-3 consistent shots
Shooting Characteristics
The Dragon Claw II demands a different approach than typical air rifles. Success requires:
A firm hold more akin to black powder rifles than traditional airguns
Proper follow-through technique
Understanding of pressure curves and their effect on point of impact
Regular monitoring of reservoir pressure
The learning curve is steeper than with smaller caliber PCPs, but the reward is exceptional power and accuracy once mastered.
Mechanical Elements
Trigger and Safety System
The non-adjustable single-stage trigger breaks at approximately 5 pounds 9 ounces – notably better than the advertised 7 pounds. While not match-grade, it’s entirely appropriate for a hunting-focused weapon. The manual safety, integrated into the trigger group, functions only when the action is cocked – a detail that users should keep in mind during operation.
Cocking System
The redesigned cocking mechanism represents one of the most successful upgrades. The longer cocking handle with its ball detent system provides:
Better leverage for managing the increased power
More positive engagement
Improved reliability
Two distinct cocking positions for different ammunition weights
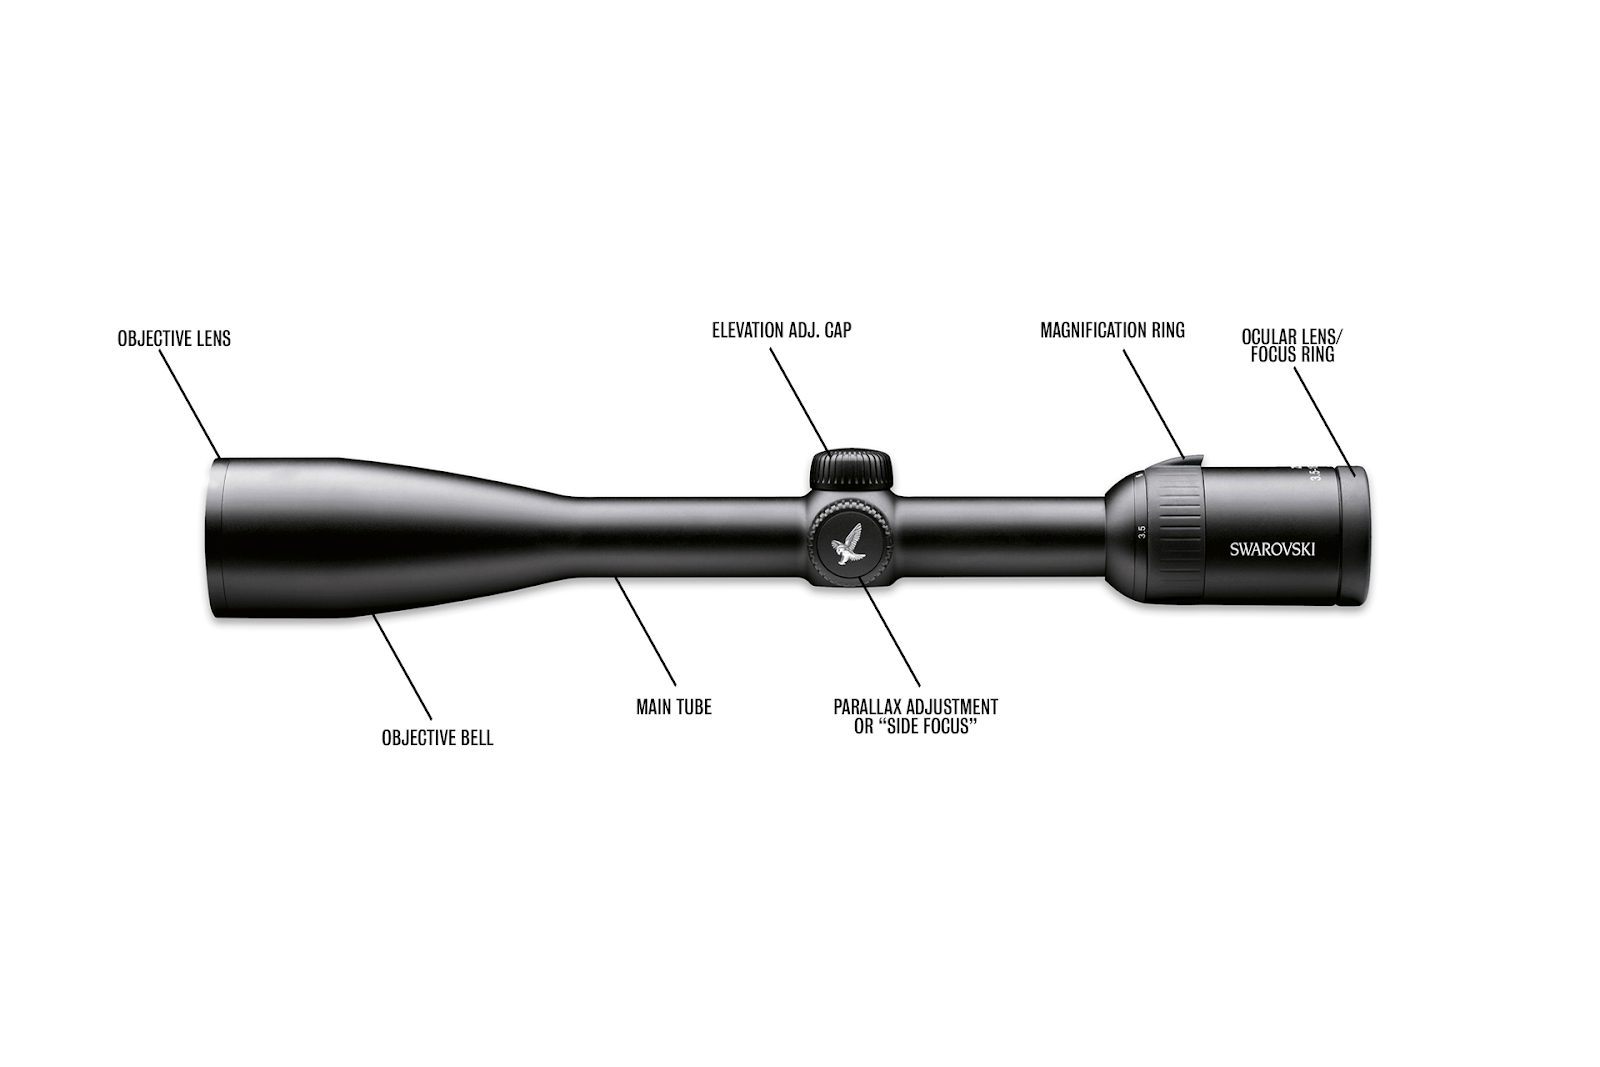
Sighting Systems and Optics
The rifle comes equipped with:
Fixed front sight
Fully adjustable rear sight
11mm dovetail rail for optic mounting
During testing, we used a Hawke Endurance 30 WA 1-4 x 24 scope, chosen for its:
Quick target acquisition
Excellent clarity
Compatibility with existing iron sights
Practical field-of-view for hunting scenarios
The scope mounting system accommodates compact optics without requiring removal of the iron sights in many cases, providing welcome flexibility for different hunting situations.
Hunting Applications
The Dragon Claw II’s power output makes it suitable for a wide range of game, including:
Whitetail deer
Feral hogs
Javelinas
Coyotes
Various small to medium game
The ability to use different ammunition types – from round balls to heavy slugs and air bolts – allows hunters to optimize their setup for specific game and hunting conditions. The power increase over the original model provides greater confidence in ethical harvesting at practical hunting distances.
Field Performance and Practical Use
Shot Management
Understanding the Dragon Claw II’s unregulated nature is crucial for field success. Users should:
Determine their optimal fill pressure for consistent first shots
Plan shot opportunities around the gun’s sweet spot
Maintain awareness of remaining pressure
Keep shot counts conservative for hunting applications
While the rifle can deliver multiple effective shots, treating it as a single-shot hunter’s tool tends to produce the best results.
Environmental Considerations
The rifle proves capable in various field conditions, though users should account for:
Temperature effects on pressure
Field filling requirements
Weather protection for the fill port
Practical shooting positions in hunting scenarios
Maintenance and Care
Regular maintenance should include:
Pressure system checks
O-ring inspection and maintenance
Proper lubrication of the cocking mechanism
Clean and protected storage
Regular inspection of the ball detent system
Target Market and Value Proposition
The Dragon Claw II clearly targets:
Serious big bore airgun hunters
Performance-oriented shooters
Users seeking maximum versatility in ammunition choice
While not primarily designed for target shooting or casual plinking, it excels in its intended role as a hunting tool, offering:
Exceptional power
Reliable performance
Versatile ammunition compatibility
Traditional styling with modern capabilities
Specifications
Precharged pneumatic (PCP)
Single-shot
Rifled barrel
Bolt-action with longer cocking handle
Fixed front sight
Fully adjustable, removable rear sight
Dual air chambers (500cc total air capacity)
3,000 psi max fill pressure
Built-in manometer (pressure gauge)
11mm scope rail (use only compact scopes)
2 power levels (first bolt stop is low power, second is high)
Up to 860 FPS with 177 grain round balls
Up to 600 FPS with Seneca Air Bolts
Up to 340 FPE with 336 grain flat nose slugs
Hardwood Monte Carlo stock with checkered forearm & grip
Raised right-hand cheekpiece
Includes Male Quick-Disconnect Foster Fill Connection on rifle
Recommended uses:
Small/medium/large game hunting: hogs, buffalos, deers, groundhogs, coyotes, javelinas.
Pros and Cons
Pros
Cons
Great looking
Powerful and consistent
Can shoot multiple projectiles (bullets or arrows)
The Seneca Dragon Claw II represents a significant evolution in big bore air rifle design. By maintaining the core qualities that made the original successful while substantially improving performance, Seneca has created a worthy successor to the Dragon Claw name. The power increase is not merely incremental but transformative, opening new possibilities for airgun hunters.
The rifle’s success lies not just in its raw performance numbers, impressive as they are, but in how those improvements have been implemented without compromising the platform’s fundamental character. The learning curve and shot management requirements might deter casual users, but for serious airgun hunters and enthusiasts, these are small prices to pay for the capabilities offered.
For those seeking a powerful, versatile big bore air rifle that combines traditional craftsmanship with modern performance, the Dragon Claw II delivers. It’s not just an upgrade to a successful platform; it’s a statement about what modern big bore air rifles can achieve.
The author with a buck he killed while still hunting during the gun season. If conditions aren’t ideal for tree stand hunting, still hunting can be a great alternative. Photo courtesy of Clint McCoy
When I was in my early 20s, I used to hang a couple dozen tree stands every summer. The work was tedious, hot and extremely time consuming. And I always felt like I was acting like an outfitter for myself and members of my hunting family at home. Sometimes these stands wouldn’t even get used in the fall, and I’d have to burn more time and energy pulling an unused stand in the winter. The entire process just seemed extremely inefficient. Now that I’m in my early 40s, I have even less time and energy than I did back then, and I desperately try not to waste either.
Now my family and I hunt much more mobile and hang 75 percent of our stands in real time.
Occasionally, I grow tired of passively sitting in a tree waiting for a big buck to come by for the ambush. Also, some conditions are just plain poor for a tree stand location, and the advantage of sitting aloft is lacking. In recent years, I’ve grown fond of switching up hunting techniques and giving the bucks in my area a different look. When I get to hankering for some action, grow bored with tree stand sitting or just need to do some in season speed scouting, my go-to method for chasing deer is old school still hunting.
Defining The Practice
I will preface the remainder of this piece with a statement of pure truth: I am by no means a master still hunter. I live on the prairie in southeastern Illinois, far removed from the big timber and rugged country where the method is used much more frequently. In my hunting youth, I read T. S. Van Dyke’s book from 1883, The Still Hunter. His tales and illustrations of sneaking up on whitetails on foot seemed like pure fiction to me. Around the same time, I read several books authored by Larry Benoit and his sons. They told spinning tales of tracking down monster Adirondack bucks on foot for miles, in the snow no less, before closing in on the animal for a kill shot with a rifle.
A mature whitetail cruising during mid-day in November. When the author has been tired of waiting in a tree stand, or if conditions aren’t ideal to be in a stand, he has successfully still hunted mature deer in Illinois. Photo courtesy of Clint McCoy
After digesting a pile of literature on the subject, I made up my mind. I was going to learn how to still hunt.
I’ve always thought the term still hunting was a bit of a misnomer, because you’re on foot and you’re moving very slowly. Still hunting is the simplest form of active pursuit there is, a process by which one literally creeps through a whitetail’s habitat on foot as slowly and methodically as possible. The goal is quite simple: use all your senses to see, hear and sometimes even smell the whitetail before they return the favor. But that’s only the first part of the still hunting equation, for the hard part is pulling off the shot at eye level. For my tastes, still hunting lends itself to be a fantastic method for the deer hunter with a firearm tag in his or her pocket. But, given the proper conditions, an archer can also use the still hunt. Let’s study these elements in detail.
The Proper Conditions
In order to up your odds of still hunting success, you need to have the proper conditions. In my opinion, a calm, sunny and dry day is just terrible for the task.
I want damp conditions to allow for quiet footfall in the timber on a calm day. Also, dry leaf litter under foot is less apt to spook game if the wind is up and covering your sound signature. Noise mitigation is paramount to the still hunter.
On sunny days, keeping the sun at your back and slowly working through the shadows is a fine way to get the drop on bedded deer. But cloudy days seem to make for better overall visibility. Keep in mind that shadows can help hide the human form, but they can also hide the whitetail just as easily.
Rain and snow can make for some excellent conditions to still hunt. However, if the ground is too wet and muddy, it can throw off your balance and make for a noisy boot slurping through the muck.
A deer bed in a freshly fallen snow. The author says that lightly falling snow can provide some of the best still hunting conditions, and the snow makes fresh sign more visible. Photo courtesy of Clint McCoy
Falling snow is my absolute favorite helper. While I’m wearing some white snow camo and easing through whitetail habitat on foot, the fresh powder helps dampen one’s noise signature and ups the odds of catching a big buck on his feet.
The terrain and undergrowth also need to be considered before attempting a still hunt. Too many snags make for difficulty in slow navigation where minimal movement is desired. Terrain that is pancake flat sounds advantageous, but it is not, nor is extremely sharp terrain. Flat ground gives game the advantage of seeing you way before you see them, and aggressive contours take your mind off the task of spotting game, and you become consumed with not slipping and falling. Gentle rolling timber or hill country is a still hunter’s best ally. Terrain should be diverse enough to allow for camouflaging hunter movement, but not so sharp it is extremely hard to traverse.
A word needs to be mentioned about the condition of the still hunter themself. Being in sound physical condition with a strong core, legs and feet is a good idea. If I still hunt for a few days straight, my hips and calves get tired and sore, and I am less balanced on the trail of game. Physical form aside, by far the most important condition of any still hunter is a soundness of his or her mind. On a still hunt, you must try and remain focused and adaptable. If your mind is on work, bills, your phone or other distractions beyond the woods, you will fail in this endeavor.
When I begin a still hunt, I try to mentally check out of day-to-day life and check into the metaphysical “force” of the hunt. I try to be hyperaware of the task at hand. If I can control my mind, I can control my pace. And if I control my breathing, I control my mind. Speedy travel and a racing mind are poison to the still hunter looking to bag a buck on foot. The mental aspect of still hunting cannot be overstated. If you have a slow foot and a calm mind, you can shoot any deer in North America on a still hunt given the proper conditions.
Still Hunting Gear
A minimalist approach to still hunting is usually a good idea when choosing essential gear. I prefer to still hunt with a short-barrel firearm with a 2-7X scope, or open sights, and a quality sling. A short barrel seems to balance in both hands well, and it wields nicely while sneaking through the timber. The scope is almost exclusively on 2X, and I find it much easier to zoom up in power to spot a deer at ground level than it is to have an encounter and need to quickly zoom down in a hurry up close.
Still hunting with archery gear is challenging, but it can be done. I use a short axle-to-axle Mathews with their quick detach quiver. Personally, I hate carrying a bow during a still hunt. And mine resides on my back attached to a backpack with a device called a Bow Spider. This allows me to quickly deploy it when action calls for it, but it also allows for more balanced and streamlined travel.
The author’s binocular pack and some lightweight footwear he uses for still hunting. The lightweight shoes help him walk quietly, while the binocular pack keeps his essentials close and organized. Photo courtesy of Clint McCoy
As far as other essentials, I like to still hunt with a Guide Series chest harness from Vortex. It houses a pair of their 8×42 binoculars, a range finder, a wind checker and my knife and tags. This leaves no gear in my pants to snag on brush and makes it easy to get to.
For camouflage, I prefer neutral tones of tan, brown, gray or olive green, opposed to commercially available patterns meant for tree stand hunts.
In the footwear department, I despise rubber knee-high boots for still hunting. They are helpful in the mud, but I like a nimble, lace-up boot like a Danner Pronghorn. If conditions call for ultimate silence, sometimes I go barefoot or with a thick wool sock. Then I’ll attach my boots to the back of my binocular chest rig with rubber coated wire gear ties. This fall, I plan on adding a pair of Silent Pursuit brand moccasins to the list. Ultimately, still hunting gear needs to be simple, functional, easy to access and silent.
Still Hunting Techniques
Still hunting your way to a big buck may sound simple, but it is quite challenging. Once you’ve got the proper conditions and gear, it’s time to start slipping through whitetail habitat. Whenever possible, the approach should begin with the wind in your face and the sun at your back or off to one shoulder. I tend to break up my approach in 10- or 20-yard increments, and I slowly creep forward step by step to the next landmark to stop beside. But these are not ordinary walking steps. I like to “fox walk” with a stride about half as long as a normal walking stride. The “fox walk” is a three-cadence stride, where you raise your knee high above the underbrush to step forward, then gently place the ball of the foot to the ground, and finally roll your foot to place it flat. Repeat the process with short strides from your trailing leg and feel the ground below your feet for obstacles as you go.
The process is slow and tedious, and it takes a lot of focus and balance. However, with enough practice, you can effectively sneak through the timber.
Spotting bedded whitetails can be immensely tough, and the reason for the snail’s pace is to take the time to visualize everything. Looking for an antler tine in the brush or the flicker of a white tail can be a giveaway for a bedded buck’s location. You must be as thorough as possible, scanning the terrain and habitat for sign of prey. Use the terrain to your advantage and slowly peek over the next ridge or down into the next bottom.
If you can get it, snow helps the still hunter tremendously. It more easily allows you to cut a big set of buck tracks and stalk their maker, creating a very intense hunting experience. Sometimes, I’ll stop and rest a spell in some natural cover and take a mental break. I’ve found this helps restore my vigilance when I continue. For added versatility, I’ve taken to still hunting with a stand on my back during the rut in somewhat of a hybrid combination.
Though I never climb very high on these hunts, one climbing stick or a couple screw-in steps can get me six to eight feet high up in natural cover very quickly. This method is a ton of fun when big bucks are chasing does all over, and I like to chase them too!
My Successes and Failures
Before everyone reading this figures me as some authority on still hunting whitetails, I assure you I’m not. Though I know how to do it, I fail more than I succeed. No doubt, when practicing this ancient method, I spook deer way more often than I kill. But like most things in whitetail hunting, it is the few and far between successes that make up for the struggle.
During muzzleloader season in 2013, I watched a big buck and a few does feed in a morning snowstorm. Then they headed into a small patch of cover to bed for the day. Around noon, I put some snow camo on and still hunted their way. Not an hour into the hunt, I peeked over a ridge to find the group bedded in a bottom out of the wind. I rested my smoke pole on a small tree and killed the buck when he stood from his bed.
In 2016, I still hunted my way through the timber on a sunny day during the rut, and I found an old target buck tending to a doe in a brush pile. He finally gave me a shot, but my arrow missed high. During the following year’s gun season, I took off on foot for that same buck in a drizzling rain. By luck, I found him in the back of a cattle pasture, down in a valley out of the weather and made my play. He spotted me in my final approach and sprang from the cover, giving me a short window to make a shot. And I dropped him before he fled. I knew the buck to be old, but to my surprise, using tooth cementum analysis, he was aged at 9 1/2 years old!
If I never live to shoot another trophy buck on a still hunt again, tagging an ancient whitetail with the most primitive of hunting methods is a feat I assume I will never top! Hopefully, you can apply this tactic with success, too.
If you live in the southeast and have a pond that you envision to be your “trophy fish factory” then it will only be a matter of time before you think about stocking some largemouth Tiger Bass that will aggressively and continuously hit lures and baits, are hardy enough to survive the occasional winter temperature dips and grow quickly, as much as one or even two pounds or more per year.
Tiger Bass is a hybrid freshwater fish that is a cross between a female Florida Bass (Micropterus floridanus) and a male Northern Bass (Micropterus salmoides). It was developed in private fish hatcheries as a sport fish and is known for its fast growth rate, aggressiveness, and large size. Tiger Bass have a unique and distinct appearance, with a tiger-like pattern on its scales, hence its name.
It has a deep, broad body, and a large mouth, making it an efficient predator of other fish, crustaceans, and insects. Tiger Bass were first introduced into the market in the late 1990s and has since become a popular game fish among anglers. It is stocked across the southern United States, where it has become a sought-after trophy fish due to its size and fighting ability.
Tiger Bass Growth Rate
Tiger Bass are known for their fast growth rate, and they can grow up to 16 inches in one year under ideal conditions. The growth rate of Tiger Bass can vary depending on factors such as water temperature, availability of food, and genetics. In general, Tiger Bass grow faster in warmer water temperatures between 75-85 degrees Fahrenheit. During the summer months, when the water is warmer, the growth rate of Tiger Bass can be accelerated.
The availability of food is also a crucial factor in the growth rate of Tiger Bass. Tiger Bass are a predatory fish and feed on a variety of prey, including fish, insects, and crustaceans. The more food available to a Tiger Bass, the faster it can grow. Genetics can also play a role in the growth rate of Tiger Bass. Fish hatcheries selectively breed Tiger Bass with the fastest growth rates, resulting in offspring that are genetically predisposed to grow faster than their wild counterparts. Overall, with proper management and optimal conditions, Tiger Bass has the potential to grow at an impressive rate, making it a popular sport fish for anglers.
Tiger Vs Largemouth Bass
Largemouth Bass are a native species of North America and are found in many freshwater lakes, rivers, and ponds. It is known for its large mouth and aggressive feeding behavior. Largemouth Bass can grow up to 29 inches in length and weigh up to 22 pounds. In terms of appearance, Tiger Bass have a tiger-like pattern on their scales, whereas Largemouth Bass has a greenish color with a dark stripe along its body.
While both species are popular among anglers, Tiger Bass is preferred by those who are looking for a more challenging and exciting fishing experience due to its aggressive behavior and fast growth rate. Largemouth Bass, on the other hand, is known for its size and is sought after by those who are looking to catch trophy-sized fish.
Northern (Native) Largemouth Bass
Northerns are tough fish that can survive in a wide range of water temperatures from “ice over” to warm summer water.
They have relatively fast growth rates that, depending on the pond’s forage fish base and if there are supplemental feeders utilized, can range up to two pounds a year. Even with relatively fast growth, the Northern strain bass rarely get over 10 pounds.
They readily strike lures and baits and are naturally aggressive.
Florida Strain Bass
Perfect for warm climates but not great for surviving colder weather conditions.
They add weight quickly and consistently, even in older age and can get up to the 20-pound trophy level.
When the water temperature drops, they become more lethargic and tend to lose aggressiveness in terms of biting lures and baits.
F1 Largemouth (Tiger Bass)
This is a hybrid mix between a Northern bass and a Florida bass and the result is the best of both strains.
Can survive colder water better than Florida bass.
Consistent growth rate over a longer period. F1s, like Florida bass, can grow upwards of 20 pounds and in well managed ponds can add two pounds a year. The U.S. record largemouth bass weighing 22 pounds 4 ounces was caught in Lake Montgomery, Georgia in 1932 is thought to be a cross between a Northern and Florida bass.
Brian Senn, host of the Great Days Outdoors weekly Alabama Freshwater Fishing Report. Senn has interviewed a number of sources regarding growing trophy bass in ponds and knows all about largemouth bass strains.
“They are aggressive feeders (not as aggressive as the Northern strain) and make for a good fishing quarry but they lose some of that aggressiveness as they mature and are a bit more reluctant to hit lures and become harder to catch. Consequently, you may need to restock them every four to six years to maintain the vigor of the Tiger population,” Senn said.
Are Tiger Bass the Solution to Your Problem?
Norman Latona is the founder and owner of Southeastern Pond Management, headquartered in Calera, Alabama with offices in two other states. Southeastern Pond Management offers full-service pond management services including fish stocking, fertilizing and weed control, electrofishing, pond design and construction and more.
“If you are catching a fish that has a bucket mouth, a five-pound head, and yet he weighs a pound and a half or catch a fish that weighs two pounds that isn’t plump and has a sucked-in belly, there probably is a balance issue,” Latona said. “That is what we refer to as bass or predator crowded and it is the most out-of-balance condition we run into,” he said. “The fish may be easy to catch, but it is frustrating and not that much fun when small bass is all that you catch.”
Latona points out that bass are like aquatic “saber-tooth tigers’ in that they are voracious feeders and if there are too many of them, they will eat themselves out of house and home. The result is a bass population of a bunch of “stunted” small fish. In a nutshell, to fix this problem you need to make a concerted effort to reduce the number of predator bass per acre, either by time and effort intensive “hook and line” methods (fishing) or the more efficient electrofishing, for which Southeastern Pond Management has the equipment and expertise to do. Once the predator population is at a manageable level then you can concentrate on the forage fish base.
“We utilize electrofishing and we can be very selective. It doesn’t hurt the fish. It just stuns them and we can pick and choose which fish we take out. So, in that respect, it’s probably even a better approach than hook and line and the process doesn’t damage any fish that we don’t want to remove,” Latona explained. “Electrofishing doesn’t really discriminate, it removes fish, not just the aggressive fish, not just the fish that don’t tend to be aggressive, we just select based on size. Obviously, we don’t take the seven to nine-pound fish, since these are the ones we are trying to produce.”
Tiger Bass Stocking Points to Consider
Both Latona and Senn pointed out that generally, the best time to stock F1 Tiger Bass is in the spring and early summer and, to avoid winter and high summer periods, which are greater fish stress times in order to keep mortality rates down.
The stocking issue is easier if you have a new pond than an existing one. In a new pond, there aren’t any predator fish present and it makes sense to stock your forage fish (bluegill and threadfin shad) first to allow them to get a solid base established before you introduce the bass predators. In an existing pond with a decent forage base, it is a good idea to remove as many of the “resident” predator bass as possible before you add the Tiger Bass… and the reason is size.
Senn said that in discussing this issue with a number of different sources, the typical size of a Tiger Bass brood fish is one to three inches which is the perfect size for dinner for resident predator bass. That defeats the whole purpose of introducing the new strain if they are going to be eaten before they can grow.
“The typical size of a Tiger Bass fish is one to three inches and the normal rate of stocking for that size fish is 50 to 100 per acre. Now if you haven’t reduced the predator bass presence in the pond it makes sense to stock Tiger Bass in the bigger six-to-eight-inch size so they won’t get gobbled up by the resident bass and more will survive.”
“I’ve found that, in general, the cost of a one-to-three-inch Tiger Bass is about $1.50, and for the six-to-eight-inch stock is about $6.00. So for a three-acre pond at 100 small fish per acre, it will cost you $450.00 but if you stock the larger fish at only 50 per acre the cost is twice that. It is a tradeoff depending on the situation. Southeastern Pond can help you determine the best route to take and advise you on the predator fish to forage fish ratio to get everything in balance and can help you fine-tune your pond depending on your goals.”
Do Tiger Bass Reproduce?
Tiger Bass, being a hybrid species, do not reproduce naturally. The crossbreeding of a female Florida Bass and a male Northern Bass is done through artificial propagation in fish hatcheries. The eggs of the female Florida Bass are fertilized with the milt of the male Northern Bass to produce the hybrid Tiger Bass offspring.
Since Tiger Bass is a sterile hybrid, it cannot reproduce naturally in the wild. This means that to maintain the population, they need to be produced in hatcheries and stocked into lakes, ponds, and rivers. However, some research has shown that in some cases, Tiger Bass may be able to reproduce with other bass species, producing hybrid offspring that have a different genetic makeup than the original hybrid.
Where Are F1 Tiger Bass for Sale?
F1 Tiger Bass are available for sale from Southeastern Pond Management and other private fish hatcheries that specialize in breeding and raising hybrid bass species. These fish hatcheries can be found in various locations throughout the southern United States, where Tiger Bass are most commonly stocked in lakes, ponds, and rivers for sport fishing. These hatcheries typically offer F1 Tiger Bass for sale in different sizes, ranging from fingerlings to adults.
If you are interested in F1 Tiger Bass stocking in your body of water, make sure you consult with a fisheries biologist to determine the appropriate strain of bass to stock and whether or not your lake or pond needs corrective action or amendments before you begin stocking. Done correctly, stocking bass can lead to years of enjoyment for you and your family. Done without proper planning, pond stocking may produce mixed results.
The 1998-99 deer season will probably be remembered for many things. The weather was scorching hot and bone dry throughout most of the season, white oaks were barren in many places where the deer season normally revolves around white oak acorns, and most hunters reported an absent, insignificant or off-schedule rut. Who would have guessed that such a season will also be remembered for a Telfair County buck that might be the best killed in Georgia in 25 years, maybe even a new state record?
Billy Joe Padgett, 23, of Jacksonville, Ga., killed the buck on Thanksgiving morning, Nov. 26. The non-typical rack has 36 scoreable points on what is a very high and wide 8-point frame, but it is the mass that is most striking. The circumference measurements at the base of each beam is in the neighborhood of 10 inches. The smallest of eight circumference measurements is greater than 6 inches.
These facts are leading experienced scorers who have looked at the rack to estimate that the deer, when officially scored, will approach or even surpass the current state record of 240 5/8 non-typical inches, which is the Hatton buck, killed by John L. Hatton Jr. in Monroe County in 1973.
The 60 days that must pass before the rack can be officially scored are slipping away fast, and we’ll know soon whether we have a new state record or not. And in case you are a Week 10 Truck-Buck entrant, here’s the answer to your burning question: Billy Joe is a GON subscriber, and yes, his buck is a Week 10 entrant.
Billy Joe killed the buck on the White Oak Plantation Sportman’s Club, an 8,800-acre tract on the Ocmulgee River in Telfair County that has been under quality deer management since it was established five years ago. Billy Joe’s father, Ernest Padgett, was a founding member of the club and helped develop a cooperative agreement among neighboring clubs that has resulted in quality management on more than 14,000 contiguous acres.
This summer, Ernest and his sons were posting and installing locks on a new 800-acre addition to the White Oak club when they came across some very impressive rubs from the previous season. Needless to say, Ernest and Billy Joe had a good idea where they would start hunting when the season came in.
On Oct. 27, the first Tuesday of gun season, Billy Joe got a look at the buck that was probably responsible for the rubs. Watching the buck walk across a field of young planted pines, Billy Joe thought that the deer must still be in velvet: the rack just seemed too big, heavy and dark. The buck crossed Billy Joe’s entrance path and began running for cover, and Billy Joe got one clear shot at 75 yards. He took it and missed clean.
Billy Joe and his dad began hunting the buck as often as they dared, hoping the pressure would not make the buck leave the area. In early November, Ernest got a look at the buck moving at a brisk walk at 175 yards. He shot and immediately saw dust bloom under the buck’s neck. Once again, not a hair was to be found.
Early in the week of Thanksgiving, Ernest heard a buck chasing a doe in a pine thicket, and a loud, deep, steady grin sounded convincingly like a mature buck. Ernest grunted in response, but the deer never appeared.
On Thanksgiving morning, Ernest would not be hunting, so he told his son how to get to the stand where he had heard the grunting buck.
Daylight had barely arrived when Billy Joe finished a short series on his grunt call and looked up to see the huge buck they had been hunting. At 50 yards, Billy Joe was given a broadside shot. When he fired, the buck raised its tail and bolted, and Billy Joe, like any of us would have been, was unable to sit still for a second. He scaled quickly down from the stand, leaped over the last few steps and ran to where the buck had been standing. Forty yards from that spot, Billy Joe began to breathe again when he located the first blood.
Moments later, he topped a small rise and found himself looking at the buck, which was lying on the ground, head up, watching him. The deer began to rise, and Billy Joe snapped of a shot at its neck. As the buck disappeared at a run into planted pines, he fired a third time, then ran after it.
Billy Joe lost sight of the buck right away, but ahead he could see pine sapling swaying in the buck’s wake, and he followed at a sprint. It was not far before he saw the buck again, now its massive rack of antlers had been caught up in a pine sapling. As it struggled to run, Billy Joe charged up and grabbed the left beam in his hand. With the rifle in the other hand, he fired point-blank into the buck’s chest, then turned loose just as the buck freed itself and disappeared again.
Once again, Billy Joe was running after it, but the chase ended only a few yards farther on when the buck piled up, and a fifth and final shot was placed. Fifteen minutes passed between the first and the last shot. Four of the shots had connected.
The rack must dry for a minimum of 60 days before it can be scored by an official Boone & Crockett measurer. Because the scoring of this unusual rack will be difficult and time consuming, and because the final score will be highly anticipated, no green score will be taken, and coming up with an eyeball estimate for a rack like this one is guesswork at best.
Just last season, Blake Voltz, of Columbus, came within 9 inches of matching the Hatton Buck with his Musgoee County non-typical buck that scored 231 2/8 inches. Will Billy Joe’s buck fall short as well or will the state record whitetail have a new name by February?
Editor’s Note: Kim Adams of the White Oak Sportsman’s Club contributed to this report.
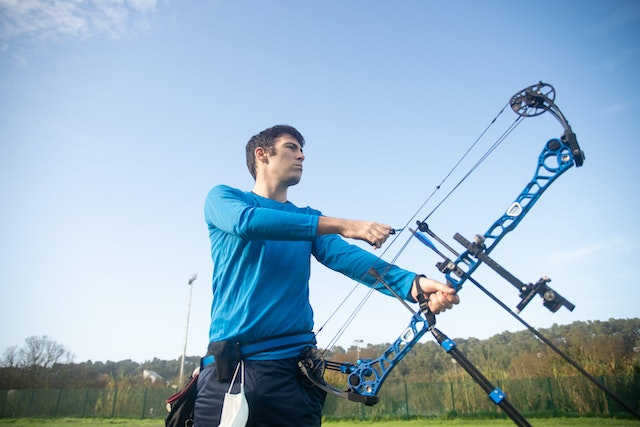
As you embark on your quest for archery greatness, it’s important to remember that progress is achieved through consistent effort, learning, and adaptation. In this guide, we’ll take a look at the many facets of becoming a better archer, hopefully equipping you with the knowledge and tools you need to elevate your skills and even surpass your own expectations. So, prepare to unleash your inner archer as we embark on this transformative journey together.
Starting the journey to becoming a better archer can be a rewarding endeavor filled with excitement, challenges, and hopefully some personal growth. By dedicating yourself to the continuous improvement of your skills, you’ll not only experience the satisfaction of hitting your targets with greater accuracy but also discover a passion that can last a lifetime. This guide is designed to help you unlock your full archery potential, offering insights into techniques, equipment, and practice strategies that can elevate your performance.
Navigating the Guide
This guide is split up into several different sections, each focusing on the different aspects of personal archery improvement. From perfecting your form and technique to choosing the right equipment, developing a personalized practice routine, and harnessing the power of mental focus, we’ve got you covered. Additionally, you’ll find answers to common questions on improving in archery, tips on learning from the experts, and advice on competing and growing as an archer. So, let’s get started on your path to archery mastery!
The Foundations of Archery Excellence
Let’s begin by examining the foundations that underpin all successful archers: form and technique. Mastering these crucial aspects of archery will give you a solid base on which to build your skills and develop your own unique style. From the subtleties of stance and posture to the intricacies of aiming and releasing, we’ll guide you through the key elements of archery excellence, ensuring you’re well-equipped to hit the mark every time.
Stance and Posture: The Building Blocks
A solid foundation is key to becoming a better archer, and it all begins with your stance and posture. Try to keep your feet shoulder-width apart, with your non-dominant foot slightly forward. Distribute your weight evenly between both feet, and maintain a slight bend in your knees. Keep your back straight and your head up, creating a stable and well-balanced platform for shooting.
Proper posture not only improves your stability and balance but also promotes consistent shot execution. Remember to maintain this posture throughout your shot, as any changes can affect your aim and overall performance.
Get a Grip: Mastering Bow Control
Developing the correct grip on your bow is crucial for accurate shooting. Your grip should be relaxed and consistent, allowing the bow to sit comfortably in the groove between your thumb and index finger. Avoid gripping the bow too tightly, as this can cause torque and negatively impact your shot. Instead, keep your hand relaxed and let the bow’s riser rest against the pressure point at the base of your thumb.
With a relaxed grip, you’ll minimize the chances of introducing unwanted movement or inconsistencies in your shots. Practice maintaining a consistent grip to build muscle memory and ensure better bow control.
Drawing and Anchoring: Precision from Start to Finish
Drawing and anchoring your bow correctly are essential for shot consistency and accuracy. To draw your bow, extend your bow arm forward while pulling the string back with your other hand, keeping your elbow in line with the arrow. Gradually draw the string back until it reaches your anchor point, which is a consistent point of contact between your hand and your face. Common anchor points include the corner of your mouth or the tip of your nose.
It’s crucial to establish a consistent anchor point for every shot, as this will help ensure your aiming is steady and reliable. Practice drawing and anchoring smoothly to develop a reliable, precise shooting process.
Bulls-eye Aiming: Hitting the Mark Every Time
Aiming accurately requires focus, proper alignment, and a steady hand. To aim effectively, align your bow’s sight pin with your target while maintaining your anchor point. Keep your eye on the target, and focus on a small, specific point rather than the entire target face. Remember to breathe steadily and relax your muscles to minimize any unwanted movement.
As you release the arrow, follow through with a smooth and controlled motion, keeping your bow arm extended and your drawing hand moving along the same plane. Consistency in your aiming and release will help you hit the mark with greater accuracy, leading to improved performance over time. If you really want a crash course in aiming, stance and more, I’ve written a full guide about archery tips for accuracy, check it out to improve your shots.
Gear Up for Success
As you hone your archery skills, it’s crucial not to overlook the role that the right equipment plays in your success. With an array of bows, arrows, and accessories to choose from, finding the perfect combination for your needs and preferences can be a game-changer. Below, we’ll help you navigate the world of archery gear, offering insights and advice on selecting the ideal equipment to complement your abilities and enhance your performance. Together, we’ll ensure you’re fully prepared to tackle any challenge that comes your way.
Finding Your Bow Soulmate
Choosing the right bow is a personal decision based on your preferences, goals, and style. Let’s explore the different types of bows available, so you can find the perfect match for your archery journey.
Recurve Bows: The Classic Choice
Recurve bows are popular among beginners and Olympic archers alike. They feature a simple design with limbs that curve away from the archer when unstrung. Recurve bows offer a balance of power and control, making them a versatile option for target shooting, field archery, and even hunting. If you’re looking for a traditional archery experience with a proven track record, a recurve bow might be your ideal choice.
Compound Bows: High-tech Precision
Compound bows are a modern innovation that utilize a system of pulleys and cams to provide a mechanical advantage. This design allows for a smoother draw, increased accuracy, and reduced holding weight at full draw. Compound bows are often favored by hunters and archers seeking the highest level of precision. If you’re drawn to cutting-edge technology and desire unparalleled accuracy, a compound bow could be your perfect match.
Longbows: Embracing Tradition
Longbows are the quintessential traditional bow, boasting a rich history that dates back centuries. These bows have a simple, elegant design with a long, gently curved limb. Longbows require more physical strength and skill to shoot accurately, making them a popular choice among traditional archery enthusiasts. If you’re passionate about history and enjoy the challenge of mastering an ancient art, a longbow may be the bow for you.
Your Essential Archery Arsenal
Equipping yourself with the right accessories can make a significant difference in your archery experience. Here are some essential items to consider adding to your arsenal:
The Right Arrows for Your Bow
Arrows come in various materials, lengths, and spine stiffness, which can significantly impact their flight and accuracy. Choose arrows that are compatible with your bow’s draw weight and length, as well as your specific shooting needs. Don’t be afraid to experiment with different arrow types to find the ones that work best for you. I’ve written a complete guide all about what type of arrows you should use, check it out for all of the details.
Protecting Yourself: Armguards and Finger Tabs
As an archer, ensuring your safety and comfort during practice and competition is paramount. Two essential pieces of protective gear that can greatly enhance your shooting experience are armguards and finger tabs. These accessories not only protect you from injury but can also improve your shooting consistency.
Armguards are designed to shield your bow arm from potential string slaps that can occur if the bowstring grazes your arm upon release. They are typically made from durable materials such as leather, plastic, or fabric and are secured to your forearm with straps or elastic bands. Choosing the right armguard involves finding one that provides adequate coverage and a comfortable fit without restricting your movement.
Finger tabs, on the other hand, protect the fingers of your drawing hand from the friction and pressure generated by pulling the bowstring. These small, often leather, pieces are worn on your fingertips and create a barrier between your skin and the bowstring, reducing the risk of blisters and calluses. Finger tabs can also enhance your shooting consistency by providing a smooth and uniform surface for the string to slide off during release. When selecting a finger tab, consider factors such as the thickness of the material, the fit on your fingers, and any additional features like an adjustable finger spacer or ledge for anchoring.
By always investing in quality protective gear, you’ll be safeguarding yourself from injury and discomfort while promoting a more consistent and enjoyable archery experience.
Bowstrings and Nocking Points: Fine-tuning Your Equipment
Smart Shopping: Quality Meets Affordability
Common Questions on Improving in Archery
Along the path to becoming a better archer, questions and uncertainties are bound to arise. Addressing these common concerns and providing practical guidance can be instrumental in boosting your confidence and refining your skills. In this section, we’ll tackle some of the most frequently asked questions in the world of archery improvement, and hopefully give you some valuable insights and tips to help you overcome obstacles and continue your upward trajectory. With clarity and understanding, you’ll be well-equipped to navigate the challenges and triumphs that lie ahead.
From what distance is it best to practice in order to increase your accuracy?
When starting out, it’s best to practice from a shorter distance, typically around 10 to 20 yards. This allows you to focus on perfecting your form and technique without the added pressure of hitting distant targets. As you become more comfortable and consistent, gradually increase the distance to challenge yourself and further develop your accuracy. Ultimately, the best distance for practice will vary based on your individual skill level, goals, and the type of archery you’re pursuing.
How can I improve my archery at home?
Improving your archery skills at home is possible with the right approach and resources. Here are a few tips to help you practice effectively at home:
Create a safe shooting area: Ensure you have a clear, unobstructed space to shoot, and always use a suitable backstop to catch arrows. Here’s my guide all about how to build a backyard archery range.
Focus on your form: Use a mirror or video recordings to assess and refine your stance, grip, and drawing technique.
Strength training: Work on building your core, back, and shoulder muscles, which are essential for archery performance.
Stretching and flexibility: Incorporate stretches that target the muscles used in archery to improve your range of motion and prevent injuries. Here are 15 exercises for archery that’ll really up your game.
Mental training: Practice visualization techniques and breathing exercises to enhance your mental focus and manage performance anxiety.
How many arrows should I shoot a day?
The number of arrows you should shoot daily depends on your skill level, goals, and available time. For beginners, shooting 30 to 50 arrows per session is a good starting point. More advanced archers may shoot between 100 to 300 arrows daily to maintain and refine their skills. The key is to focus on quality over quantity: prioritize proper form and technique, and avoid overtraining to prevent injuries. As with any sport, it’s important to listen to your body and adjust your practice routine accordingly.
Crafting Your Personalized Practice Plan
Developing a personalized practice plan is a crucial aspect of your growth as an archer. A well-structured and targeted routine will not only help you build and reinforce your skills but also foster a deep sense of commitment and discipline. Below, we’ll delve into the process of designing a practice plan that aligns with your goals, incorporates effective drills, and emphasizes the importance of rest and recovery. With a tailored approach, you’ll be on the fast track to achieving all of your archery related aspirations.
Mapping Your Archery Journey
Creating a customized practice plan tailored to your needs and aspirations is crucial for steady progress in archery. Start by identifying your short-term and long-term goals, and then break them down into manageable, achievable steps. Be realistic about the time you can commit to practice, and consider incorporating a mix of technical training, strength and flexibility exercises, and mental skills development into your routine.
Aiming High: Setting and Achieving Goals
Goal setting is a powerful tool for staying motivated and tracking your progress in archery. Set SMART goals (Specific, Measurable, Achievable, Relevant, and Time-bound) to provide a clear path to improvement. Monitor your progress regularly and adjust your goals as needed to ensure they remain challenging and relevant to your evolving skills.
Drills That Make a Difference
Incorporating effective drills into your practice routine can help you hone specific skills as well as enhance your overall performance. Consider trying out the following drills:
Blank bale shooting: Blank bale shooting involves practicing your shots at a close distance, typically 5-10 feet, without a target face. This drill helps archers focus on their form, release, and follow-through without the distraction of aiming. By concentrating solely on technique, you can develop consistent and accurate shooting habits that will translate to better performance when aiming at targets.
Endurance shooting: Endurance shooting drills involve shooting a high volume of arrows in a single session, building both physical and mental stamina. These drills help improve muscle memory, increase shooting endurance, and develop mental resilience under fatigue. Remember to maintain proper form and technique during endurance shooting to prevent injury and reinforce good habits.
Various distances: Practicing at various distances is essential for developing adaptability and improving accuracy across different shooting scenarios. Start at shorter distances, gradually increasing the range as you become more comfortable and accurate. This drill helps you understand how your sight picture and aiming techniques change with distance, ultimately making you a more versatile and confident archer.
Pressure drills: Pressure drills simulate high-stress situations, such as competition or hunting scenarios, to help archers improve their focus and performance under pressure. Examples of pressure drills include shooting with a time limit, competing against a partner, or setting specific scoring goals. By exposing yourself to pressure situations in practice, you’ll be better prepared to handle nerves and maintain focus during real-life events.
By incorporating these drills into your practice routine, you can target specific areas of your archery skills and make meaningful progress toward becoming a better archer.
How to Shoot Better Groups with a Bow
Consistently shooting tight arrow groups is a sign of excellent technique and accuracy. To improve your groupings, focus on the following aspects:
Consistent anchor points: Developing consistent anchor points is crucial for achieving accuracy and repeatability in your shots. Drills that emphasize finding and maintaining a reliable anchor point help reinforce muscle memory, allowing you to reproduce the same shooting motion every time. Practice drawing and anchoring your bow with your eyes closed, focusing on the feeling of your anchor point, and then open your eyes to check your alignment.
Smooth release: A smooth release is vital for accurate shooting, as any tension or jerking motion can disrupt your arrow’s flight path. To practice a smooth release, focus on maintaining a relaxed grip and using a consistent release aid, such as a finger tab or mechanical release. Work on releasing the string with a gentle and controlled motion, ensuring that your follow-through is consistent and relaxed.
Bow tuning: Regular bow tuning ensures that your equipment is performing optimally, which in turn improves your shooting accuracy and consistency. Bow tuning involves checking and adjusting various aspects of your bow, such as brace height, tiller, and limb alignment. By becoming familiar with the tuning process and making necessary adjustments, you can maintain your equipment’s peak performance and prevent shooting inconsistencies.
Patience and practice: Becoming a better archer requires patience and consistent practice. Dedicate time to honing your skills, focusing on specific aspects of your technique, and learning from your mistakes. Embrace the process and understand that progress may be slow, but with dedication and perseverance, you’ll see steady improvement in your shooting abilities.
Rest and Recovery: The Forgotten Keys to Improvement
Rest and recovery are essential components of any successful training plan. Schedule regular rest days to allow your muscles to recover and prevent overtraining. Listen to your body, and consider incorporating activities like yoga, meditation, and deep breathing exercises to promote relaxation and mental focus. Remember, balance is key to sustained growth and long-term success in archery.
Mind Over Matter: Mental Strategies for Archery Success
While physical skills and techniques are critical components of archery success, the power of the mind should never be underestimated. Cultivating mental strength and resilience can give you a significant edge when it comes to performing under pressure and overcoming challenges. In this section, we’ll take a look at a few mental strategies to help you build an unshakable mindset, harness the power of visualization, and conquer any performance anxiety. By embracing these techniques, you’ll be poised to unlock your full potential and excel in even the most demanding situations.
Building an Unshakable Mindset
A strong mindset is a crucial element of archery success. Cultivate a growth mindset by embracing challenges, learning from setbacks, and focusing on the process rather than just the outcome. Develop a pre-shot routine to help you mentally prepare for each shot and maintain consistency in your performance. Positive self-talk and affirmations can also reinforce your belief in your abilities and keep self-doubt at bay.
Picture This: The Power of Visualization
Visualization is a proven mental technique used by many top athletes to enhance their performance. By mentally rehearsing your shots and envisioning yourself hitting the target, you can train your brain to execute the desired movements more effectively. Practice visualization daily, both during your practice sessions and in your downtime, to reinforce positive mental images and improve your confidence on the shooting line.
Keep Calm and Shoot On: Conquering Performance Anxiety
Performance anxiety is common in archery, but it doesn’t have to hold you back. Learn to manage your nerves by incorporating relaxation techniques, such as deep breathing exercises and progressive muscle relaxation, into your routine. Focus on the present moment and avoid overthinking your shots. Embrace competition as an opportunity to grow and learn, and remember that even the most accomplished archers experience nerves from time to time.
Learn from the Pros: Their Experience Can Up Your Game
Learning from experienced archers and immersing yourself in the wider archery community can be a transformative experience, offering invaluable insights, inspiration, and camaraderie. Below, we’ll discuss the benefits of seeking professional coaching, attending workshops and clinics, and connecting with fellow archers both online and offline. By embracing these opportunities, you’ll not only expand your knowledge and refine your skills, but also find support and motivation to fuel your passion for the sport.
The Value of Professional Coaching
Working with a professional archery coach can greatly accelerate your progress and help you to really refine your skills. A coach can provide personalized guidance, identify areas for improvement, and offer invaluable insights from their own experience. Look for a certified coach through your local archery club or governing body and consider investing in regular coaching sessions to maximize your potential.
Sharpen Your Skills: Archery Workshops and Clinics
Attending archery workshops and clinics is another excellent way to expand your knowledge and improve your skills. These events typically cover a range of topics, from equipment selection and tuning to advanced shooting techniques and mental strategies. Keep an eye out for workshops and clinics hosted by experienced archers or coaches in your area, and seize the opportunity to learn from their expertise.
Your Archery Tribe: Connecting with the Community
Connecting with other archers can provide invaluable support, motivation, and camaraderie on your journey to becoming a better archer. Join a local archery club or participate in online forums and social media groups to share your experiences, exchange tips, and stay up-to-date on the latest developments in the sport. By immersing yourself in the archery community, you’ll gain access to a wealth of collective knowledge and inspiration to fuel your growth.
Rising to the Challenge: Archery Competitions
Competing in archery tournaments is a thrilling and rewarding way to test your skills, push your limits, and learn from both your successes and setbacks. In this section, we’ll look at the world of archery competitions, highlighting the importance of local and regional tournaments as stepping stones to higher-level challenges. We’ll also discuss the benefits of participating in competitions, as well as strategies for evaluating your performance and adapting your approach for continued growth. Embrace the excitement of competition and prepare to rise to the challenge on your journey to archery mastery.
Stepping Stones: Local and Regional Tournaments
Participating in local and regional archery tournaments is a fantastic way to put your skills to the test and gain valuable competition experience. These events provide a supportive and friendly environment where you can learn from fellow archers and measure your progress against others. Check with your local archery club or governing body for a schedule of upcoming tournaments, and don’t be afraid to take the plunge and sign up!
Embrace the Thrill: Why Competitions Matter
Competing in archery tournaments offers numerous benefits for your development as an archer. It exposes you to the unique pressures and challenges of competition, which can help you hone your mental skills and learn to perform at your best under pressure. Competing also provides opportunities to learn from other archers, gain inspiration, and forge new friendships within the archery community. Embrace the thrill of competition as an essential part of your growth as an archer.
Reflect, Refine, Repeat: Learning from Your Performance
After each competition, take the time to reflect on your performance and identify areas for improvement. Analyze your shooting technique, equipment setup, and mental approach, and seek feedback from coaches, peers, or even video recordings of your performance. Use this information to refine your practice routine and set new goals for your next competition. Remember, every competition is an opportunity to learn and grow as an archer, so keep striving for continuous improvement.
Putting It All Together
Becoming a better archer is not merely about mastering individual skills; it’s about embracing a holistic approach that encompasses technique, equipment, practice routines, mental strategies, knowledge, first hand experience and more.
Throughout your archery journey, you’ll encounter challenges and triumphs, but with dedication, adaptability, and passion, you can transform your archery skills and reach new heights of achievement. Remember to always be open to learning, refining, and evolving, as this is the key to unlocking your full potential in the sport you love. And as you continue to push your boundaries, take a moment to appreciate the incredible progress you’ve made and the exciting opportunities that await you on the road to archery mastery.
Keep Aiming Higher: Your Journey Continues
As you continue on your archery journey, always remember that improvement is a lifelong process. Keep setting new goals, refining your skills, and seeking out opportunities to learn and grow. Embrace the support and camaraderie of the archery community, and most importantly, enjoy the thrill of the sport. With persistence and passion, there’s no limit to how far you can go as an archer. Keep aiming higher, and let your journey to mastery continue.
23 Quietest Air Rifles That You Need to Know About
Different air rifles have different benefits to offer you. One rifle that may be good for small game hunting wouldn’t be suitable for big game hunting.
Similarly, you may also prefer a .177 pellet gun over a .22 one.
This list covers almost every type of gun for every type of air rifle enthusiast.
The best part about this rifle is its phenomenal accuracy. You can also adjust the velocity as per your requirements following the manual instructions.
As for the pellet size, the .177 version is suitable for paper. A .22 version is much more efficient for small hunting games, like squirrels, rabbits, and even raccoons!
At the maximum velocity setting and a .25 pellet, Benjamin Marauder is great for hunting coyotes too .
Another great thing is that you can easily buy a Marauder at an affordable price.
One major drawback is that if there’s less air pressure, you won’t have enough air in the reservoir to hunt an animal. So, you need to ensure that your tank is fully filled.
Pros
Cons
Very accurate
Highly customizable and adjustable in terms of velocity
Less noisy
Power-packed performance
Great for hunting
Less power in the pellets due to less air pressure
The Gamo Whisper Silent Cat is powerful, but also one of the quietest pellet guns for hunting squirrels and pest control. Presently, it is available in .177 caliber.
This rifle offers just the perfect accuracy for squirrels and other small game hunting animals.
It also has a maximum velocity of around 1200 ft/s which makes it extremely powerful.
This air rifle is also relatively easy to use as it has an easy to cock barrel, along with an efficient spring piston mechanism.
It is lightweight and well-structured. You can also expect this rifle to last for years due to its synthetic stock material.
As the name suggests, this air rifle is built with a Whisper Noise Dampener. This helps in reducing the sound by almost 52%.
From the price point of view, this air rifle is definitely on the cheaper side and is easily affordable.
It also doesn’t require much maintenance and comes with a one-year warranty.
There are only a few drawbacks to this air rifle that include an average or poor scope. It is quiet in the mechanism but may make some sound when the piston hits the barrel.
3. Hatsan AT44-10 QE Air Rifle – Quietest Air Rifle For Backyard Pest Control
Pests are certainly the worst of the lot for your backyard. Yet, you cannot use noisy air rifles to hunt them or your neighbors will have a lot to say. Maybe even the police too!
Thankfully, Hatsan AT44-10 is here to save the day with its accurate and powerful performance.
This air rifle comes in 0.22, and 0.26 calibers, both of which are excellent for backyard hunting and pest control.
The Air Arms TX200 is an extraordinary and quiet spring-piston rifle for neighborhood use. You get both .177 and .22 caliber guns here.
There are plenty of things to like about this air rifle.
First of all, it may even be more accurate than any other market in the gun as per hundreds of user reviews.
It also has a beautiful and high-quality structure and design. You can definitely see the value of money aspect here.
It has a maximum velocity of around 930 FPS with a .177 caliber and 870 FPS with a .22 caliber. So, you can use it for hunting birds or even backyard pests.
It also comes with a special shrouded barrel that dampens the sound. The loudness level here is 3-medium which is certainly good for neighborhood use.
Even though it is a spring-piston, it has minimal recoil. This is due to the presence of a ventilated rubber recoil pad.
There are mainly two drawbacks here. One, this air rifle weighs around 9.3lbs which makes it quite heavy. Two, it is very expensive but worth the money.
If you’re looking for a more advanced version of a spring-piston with .177 caliber and less noise, then Benjamin Trail NP2 won’t disappoint you.
This air rifle features a nitro-filled cylinder instead of a spring. Hence, you can see some positive modifications here such as high accuracy, increased power, and velocity.
This quiet air rifle offers a maximum velocity of around 1400 FPS which is higher than many other rifles!
Moreover, this air rifle is extremely quiet as its loudness is only around 2-low. It also features a shrouded barrel that dampens the sound.
It’s easy to use due to its quick cocking mechanism. This rifle is also on the affordable side.
You can use this rifle for hunting squirrels, large birds, and some small animals too.
A few drawbacks to this rifle include poor scope and trigger. Hence, it is better to buy those separately.
This rifle also consists of a sleek and smart design. The ergonomics make it comfortable and easy to use. It also has an anti-knock system to reduce air leakage when you drop the rifle.
As this rifle has an in-built Hatsan’s proprietary QuietEnergy Technology, it can dampen the sound by 32%. This is exceptional from a rifle as powerful as BullBoss.
Moreover, you can easily get this rifle at a good and budget-friendly price.
Some drawbacks to this air rifle include its heavyweight. You may have issues with the butt pad as it’s not adjustable either.
7. Hatsan 135 QE Vortex Air Rifle – Quietest .30 Cal Air Rifle
It’s hard to find a .30 caliber gun that is both quiet and powerful. Yet, the Hatsan 135 air rifle is an exceptional piece. It’s available in .177, .22, .25, and .30 calibers.
Hatsan 135 QE air rifle offers a fiber-optic sight mechanism for the best accuracy. It also comes with a scope for better accuracy.
The design and feel of this rifle are phenomenal with a fantastic walnut stock.
It also offers a maximum velocity of 550 FPS (.30 caliber) which is enough for an excellent performance.
The Beeman R7 Air Rifle is a spring rifle that offers both simplicity and ease.
Hence, if you don’t wish to have a complicated rifle with complex features, then this one would suit your requirements.
Currently, it is available in .177 and .20 calibers.
When it comes to the accuracy of the air rifle, you can expect excellent performance.
There are some limitations to the power as the velocity offered is only 700 FPS (.177) 620 FPS (.20) which isn’t enough.
Hence, this air rifle isn’t the best for hunting big or medium-sized animals. Instead, you can use it for plinking, target-shooting, and hunting rats and mice.
The best part about this air rifle is how compact and lightweight it is. So, if you’re a beginner who doesn’t want heavy rifles, just go for this one.
Spring rifles are a bit noisier than the rest. However, as Beeman R7 is on the simpler side with less power, the sound produced is backyard-friendly.
Its appearance is quite similar to R1 Supermagnum. But, this one has a simple look and feel. It’s also smaller.
The drawbacks of this rifle are quite obvious. It’s made for plinking and target purposes and not for hunting purposes. It’s also not so suitable for veterans and experts, being very much a beginner to an intermediate rifle.
Break barrel guns are quite famous in the air rifle industry today due to their great performance. One such amazing break barrel rifle that offers a quiet mechanism too, is the Gamo Swarm Whisper.
You can get a .177 and .22 caliber option in this rifle. It is mainly for plinking and small game hunting.
This rifle is quite accurate. The best part is that its accuracy is consistent with different pellets too.
As for the velocity, the maximum it can reach is 975 FPS (.22) and 1300 FPS (.177) with alloy pellets. Hence, you can expect excellent power and performance.
13. Benjamin Titan GP Nitro Piston Air Rifle – Quietest Nitro Piston Air Rifle
Nitro pistons or gas pistons have an edge over spring pistons.
Benjamin Titan GP is no exception. It’s one of the best nitro piston rifles and certainly the quietest too.
This rifle is usually available in .177 and .22 caliber.
As it is a break barrel, you can expect high-grade accuracy. It is because the barrel makes a bullet spin which increases stability and accuracy.
It also comes with a muzzle brake which gives the muzzle stability and reduces shakiness while firing.
This rifle has a maximum velocity of 1200 FPS (.177) and 950 FPS (.22) which shows in its phenomenal performance.
You can use it for small-game hunting and plinking purposes.
You can also expect this rifle to stay quiet as it produces only around 86 dB of noise compared to the 100 dB of other break barrels.
The Benjamin Titan GP has a lovely wooden finish. This makes it more durable and wear-and-tear resistant. It also requires less maintenance compared to other rifles.
This rifle is available at a much cheaper cost with excellent gas-pistol benefits like better storage, no spring fatigue, and easy cocking.
The only two drawbacks here are that the trigger may get too long and heavy for some. The scope is also poor.
You can expect a powerful performance as the maximum velocity reaches around 1000 FPS! In fact, the well-thought-out design increases the muzzle velocity too.
You can use it for small-game hunting and plinking.
Now, bear in mind that it doesn’t have an in-built silencer. Yet, according to user reviews, it is very silent with its 3-medium loudness and heavier bullets.
One of the major reasons why this rifle is great is because of its sleek and traditional design. The wood stock gives it a classic feel.
Keep in mind that it’s not very budget-friendly. Another drawback is definitely how heavy it is. The plastic moderator could also be improved.
15.Gamo Swarm Fusion 10X Gen2 Multi-shot Air Rifle – Most Powerful and Quietest Air Rifle
Another Gamo Swarm Fusion that exceeds expectations, without any noise, is the Gamo Swarm Fusion 10X rifle.
This air rifle is available in both .177 and .22 calibers.
The special feature of this rifle is that it comes with a 10-shot repeater. Moreover, it also offers consistency along with accuracy.
It offers excellent performance as the maximum velocity is around 1300 FPS (.177) and 975 FPS (.22)! The fiber optic sight also helps with better targeting.
This rifle also has a beautiful design and finish just like other Gamo rifles. As it is a gas-piston rifle, it also requires less maintenance than other rifles.
It has a loudness of 2-low-medium. Now, there are some complaints about the noise. But, it’s quite low considering the punch it packs.
This rifle definitely offers value for the price as it’s pretty affordable and comes with advanced features.
However, keep in mind that you need to put in more effort while cocking the gun. Moreover, the safety and scope could be improved too.
The Gamo Raptor Whisper air rifle is another masterpiece from the Gamo company. It’s one of the quietest and the most accurate rifles out there.
Currently, this IGT gas piston is available in both .177 and .22 options.
It offers extraordinary accuracy even at longer distances. You can use it for pest control or hunting smaller animals like rabbits.
It has a maximum velocity of 1300 FPS with .177 and 950 FPS with .22 caliber. Hence, it delivers great power with accuracy too.
Like other Gamo rifles, this one comes with a sound dampening technology too which reduces the noise by 52%.
The structure and finish of this air rifle are commendable. It is also lightweight. The metals used are durable enough. You can also use this rifle in extreme temperatures.
The Raptor Whisper air rifle is extremely cheap for the quality you get. So, if you’re looking for an affordable option, go for this one!
The only major drawback here is the poor scope (like in other Gamo rifles too). You may also not like the feel of the plastic trigger.
It has an astonishing level of accuracy with an even better-shot count of around 120 rounds.
The .22 caliber rifle specifically has a velocity of around 800 FPS. It is enough to kill a raccoon with the right technique (i.e. if you catch it in the right spot).
According to many users, this gun is deadly quiet. So, it won’t alarm the raccoon. It’s also very backyard-friendly for every hunter. It has a 2-low-medium loudness.
The structure of the gun has excellent ergonomics. It makes the rifle user-friendly and efficient.
Its price is somewhere in the middle as it’s not too costly nor too cheap.
As it comes with a plastic trigger, you may want to get a better one. The stock is average too.
Coyotes are bigger and you require a powerful gun to hunt them. The Hatsan Mod rifle with the .30 caliber is the one you should consider.
It has commendable accuracy. And, with the maximum velocity of 590 FPS in the .30 caliber rifle, you will be able to hunt a coyote for sure! You can use it for small-game hunting and plinking too.
Despite its excellent performance, it comes at a budget rate under $300.
The structure and finish of this air rifle have gotten mixed reviews. But for the most part, it is quite good. It’s up to you whether you like a synthetic stock or not.
As this rifle is more powerful for killing coyotes, the noise might be slightly more with 3-medium loudness. Still, it is less noisy than many other rifles for killing coyotes.
Keep in mind that this air rifle is a bit harder to cock. It’s also slightly heavy even for experienced hunters.
The maximum velocity offered is around 935 FPS for .177, 800 FPS for .20, and 740 FPS for .22. It may not be that much but the performance of the rifle makes up for it.
It also offers a very smooth trigger and cocking mechanism.
This rifle doesn’t come with a sound-dampening technology as such. Still, it is quiet in comparison to other rifles with 3-medium loudness.
This rifle is priced higher than many other rifles. But, it’s worth it for hunting rabbits.
The only issue with this rifle is the position of safety. Other than that, the users only praise this rifle.
Hence, you should opt for Benjamin Marauder in Synthetic Stock for noise-free hunting. It’s available in .22 caliber and packs a spectacular performance.
This PCP air rifle shoots with extreme accuracy.
It also has a maximum velocity of 1000 FPS which is uncommon in .22 caliber. You can also tune the muzzle velocity as per your requirements. So, you can expect a powerful shot.
The muzzle velocity consistency is less compared to other rifles here.
You will also be surprised by how quiet this gun is due to an internal shroud. It has received praises from various rifle testers as it’s a quiet pellet gun for sure.
It’s lightweight which makes it easy to operate and use. Just like other Benjamin Marauder rifles, this one is also affordable.
This rifle comes with a synthetic stock which is appealing. However, it could definitely be a bit better.
The one major drawback here is that this rifle is huge which may get uncomfortable for some users.
Big gun air rifles usually have a loudness between 4-medium-high or 5-high. There’s almost no big gun available below that.
The AirForce Texan Big Bore rifle is less noisy than other big bore guns. It has better accuracy than many other guns. Moreover, even at .45 caliber, it has a maximum velocity of 935 FPS which is simply mind-boggling!
It offers an ergonomic design that makes the rifle user-friendly and comfortable. It is also relatively lighter.
The moderator does an extraordinary job by reducing the rifle’s noise significantly.
Just like other big bore air rifles, this one’s definitely very pricey. There are no specific complaints but some users are asking for a bigger butt pad. You may also have to buy a better scope.
22. Gamo Whisper Fusion Air Rifle – Quietest Air Rifle For Hunting
If you’re an experienced hunter, then the Gamo Whisper Fusion won’t disappoint you. But, if you’re a beginner this rifle may not be the best one.
This rifle offers excellent accuracy with all types of pellets. So, it is certainly consistent.
The maximum velocity for .22 caliber is near about 975 FPS which is great!
Now, even though the muzzle velocity is high, the trigger is very easy to handle. The cocking mechanism is smooth too.
This rifle is mainly for hunting purposes and offers value for money. It’s also quite affordable.
Again, this Gamo rifle comes with special noise-dampening technology that reduces noise by 89.5%. Yet, there’s no proper proof for this right now except the manufacturer’s word.
The Gamo rifle has a shock wave absorber that can reduce recoil impact too.
There’s only one major drawback here that is of poor scope. Rest all user experiences are positive with this rifle.
All of this makes the rifle a must-have for hunting!
Bullpup rifles are known to be noisier than traditional ones. But, the Puncher Breaker air rifle breaks the norm with its silent mechanism.
This rifle provides great accuracy with power.
It also has an amazing maximum velocity of 1100 FPS for .177 caliber, 975 FPS for .22 caliber, and 825 FPS for .25 caliber. This assures a powerful shot.
It has a half-shrouded barrel which makes the rifle noise-free, unlike other bullpups.
The overall look and structure of the air rifle are pretty good too. However, it may be a bit heavy for some users. You may also have to put in more effort for cocking.
It’s a bit expensive but offers great value for money.
This concludes our list of the 23 quietest air rifles that you could find in 2021.
Thankfully, all of them have laudable accuracy and charged performance. Hence, you can easily find a silent air rifle that suits your requirements best.
Frequently Asked Questions
1.How Quiet Are Air Rifles?
Air rifles have a noise level between 74 to 90 decibels. Yet, you’ll find some less noisy models available too.
Air rifles are divided into loudness levels like:
2-Low-Medium for the quietest air rifles
3-Medium for somewhat quiet air rifles
4-Medium-High and 5-High for relatively loud air rifles
Most big bore guns have loudness levels around 4 and 5. Simpler ones have it around 2 and 3.
2.Which Type of Air Rifle Is The Quietest?
The answer totally depends on the rifle you’re using. But, PCPs are usually the quietest air rifles.
Moreover, if we observe the trend, gas piston rifles are quieter than spring pistons.
3.Who Makes The Quietest Air Rifles?
According to our research, Gamo and Benjamin offer some of the quietest air rifles. Both of them have special noise suppressing technologies that result in quiet and noise-free rifles.
4.What Is The Quietest Gamo Air Rifle?
Gamo Whisper Cat seems like the quietest Gamo air rifle, in general, as it produces only 64.6 dB of noise.
5.How to Quieten An Air Rifle?
If you wish to quieten your air rifle, you can consider getting a silencer or making a DIY one.
Keep in mind that you need to ask for a legal permit, be it readymade or DIY, for a silencer. This also depends upon where you live.
GON has now been around for almost 30 years, and a unique project started when the magazine first began was collecting, measuring and compiling a massive database of certified scores for Georgia bucks. Using this database, we developed a formula that provides an annual look at which Georgia counties are best at producing big bucks.
For the fifth year in a row, Worth County is the No. 1 county in Georgia for producing high-scoring bucks. It’s really not even close, although second-place Lee County is closing the gap.
Worth County’s big-buck production score of 188 is 28 points higher than the second-best Lee County. For perspective on just how good Worth County has been at throwing out high-scoring bucks the past 10 years, it takes a total score of 102 just to be a Top-10 county. Just the difference between No. 10 and Worth County is 86 points, which is more than the total score for 143 of Georgia’s 159 counties.
In addition to tallying a score for every Georgia county, GON also crunches the numbers to compare this year’s scores with the previous season (see the charts below). It is interesting to see which counties are moving up, and also to see which counties are dropping as bucks killed more than 10 years ago fall out of the formula.
Our formula uses official net scores from bucks taken in the past 10 years, and we also factor in the size of each county. Each county receives a score for its actual production of high-scoring bucks. Scores may drop from year to year because we only look at a 10-year window.
Worth County scores so well simply because in the past 10 years so many high-scoring bucks continue to be killed there. Take a look at GON’s County-by-County rankings (Worth County’s Top-10 list appears on page 94). It takes a Boone & Crockett buck to crack the Top-9 in Worth County.
Worth County has quality dirt—fertile soil along the Flint River corridor, and there is lots of agricultural farmland, with high-protein peanuts commonly in the rotation. The biggest factor for Worth’s dominance is the many large, well-managed plantations in the county. High-density hunting clubs are rare in Worth County. Old age is most important for a buck to grow a high-scoring rack, and combine that with bucks getting great nutrition and high-end genetic potential, and Worth County is prime for big bucks. That same formula is why Lee County is No. 2 and Dougherty County and Macon County rank four and five.
Dougherty County took a big jump, thanks to a Booner killed last season along with several other high-scoring bucks.
The remarkable chapter in Georgia’s big-buck story continues to be Fulton County, home to Atlanta but also the city’s northern suburbs where ribbons of mostly unhunted suburban habitat grow giant bucks that can only be bowhunted. It’s amazing that Fulton, which had no deer just two decades ago, is the No. 3 Georgia county for producing big bucks.
We realize individual bucks are not measured each season, maybe because the hunter doesn’t want publicity, but we are confident the buck-production formula works very well, and that it’s a great representation for big-buck production across the state. Adjacent counties and regions of the state have similar scores, and side-by-side counties typically trend together from year to year.
If you kill a good buck this season, contact GON as soon as possible. Call (800) 438-4663, or e-mail [email protected]. We’ll want to add your buck to this awesome database, and your buck might just be featured in the magazine.
Parallax correction is a feature available in nearly all modern rifle scopes. The effect of parallax is presented when your reticle appears out of focus with respect to your target, and to the focal plane of the scope. Although generally not an issue at ranges of less than 150 yards, this optical effect can greatly alter your point of impact at longer ranges.
The overall goal of parallax correction is to get your rifle scope reticle on the same focal plane as your target image. If these images are not in the same focal plane, either one can appear soft or out of focus when you look at the other through your scope. This causes eye strain and can lead to inaccurate shots or even target confusion for inexperienced shooters.
The image of your target is clear but your reticle appears out of focus.
The image is clear when looking head-on, but the reticle shifts left or right when you move your head or look through the scope at an angle.
How It Works
Light enters a rifle scope through the objective lens, is projected onto a prism, and is then flipped, reflected several times, and presented via the ocular lens. Your reticle typically lies between your eye and that projected image, regardless of the “focal plane” (FFP or SFP) of your scope.
When shooting at longer (>150 yards) distances, the focal length of your vision is adjusted by your brain to compensate for the distance to the target. This means that your reticle will appear slightly blurry or move when you adjust your viewing angle. It goes without saying, but if your reticle moves laterally and off-target when you move your head behind the scope, your point of impact will follow!
Focusing Your Reticle
Before attempting to adjust for parallax, ensure that your reticle is in focus. An easy way to do this is to look through your scope at a plain, ideally bright background that’s at least five yards away. Your scope likely has a reticle focus ring on the ocular lens – the one that you put your eye to. Adjust that ring as you would a binocular or camera focus until your reticle is sharp and clear to your eye.
This adjustment will ensure that your parallax correction is valid. This adjustment may vary from shooter to shooter, but as long as the current shooter has the reticle in focus, the parallax adjustment should remain constant.
Correcting Parallax
Most modern rifle scopes have a parallax correction system that involves a dial on the side of the main tube, often referred to as a “side focus.” These systems allow a shooter to adjust the image of the target backward or forward to match the focal plane of the reticle. Many of these dial systems are marked with yardage in increments of 50 or 100 yards to aid in correction.
A simple way to find the correct position of the dial is to set up a clear target that stands out well from the background, get your rifle in a secure rest position, and with the magnification at its highest level, look through the scope and begin to shift your head (and therefore your viewing angle) back and forth.
If your reticle appears to move or shift with your head movement, you have a parallax issue. The yardage indicators on your parallax adjustment will be a helpful starting point for corrections. Depending on your range and magnification level, the correction may be extremely fine or up to a full revolution of the dial.
Adjust until your reticle is sharp against your target and appears to lock on to your aiming point. You should be able to view both the reticle and the target without shifting focus. If you have made an adjustment and still have some play, continue making very fine corrections until you can move your angle as far as possible while maintaining a full image through the scope. The same process applies to an objective lens ring-style system, but it is not as precise as the dial type with yardage indicators.
Once you are satisfied with your adjustment at maximum magnification, LEAVE IT. You generally will not have to adjust it again unless the circumstances or shot range are extreme. These adjustments and changes are very slight, so keep that in mind when working to correct this issue.
When buying a rifle scope, be sure to consider the distances you plan to shoot and the ergonomics of its adjustment systems. The best way to familiarize yourself with a rifle scope is to physically hold one in your hands. The style of adjustment is not critical, but the adjustment itself will eliminate a lot of headaches when working to zero your rifle or make those critical shots.
"Unlock the Perfect Shot: Discover the Best Scope for Break Barrel Air Rifles. Enhance your shooting experience with precision and accuracy, as we delve...
")
")
")
")
")


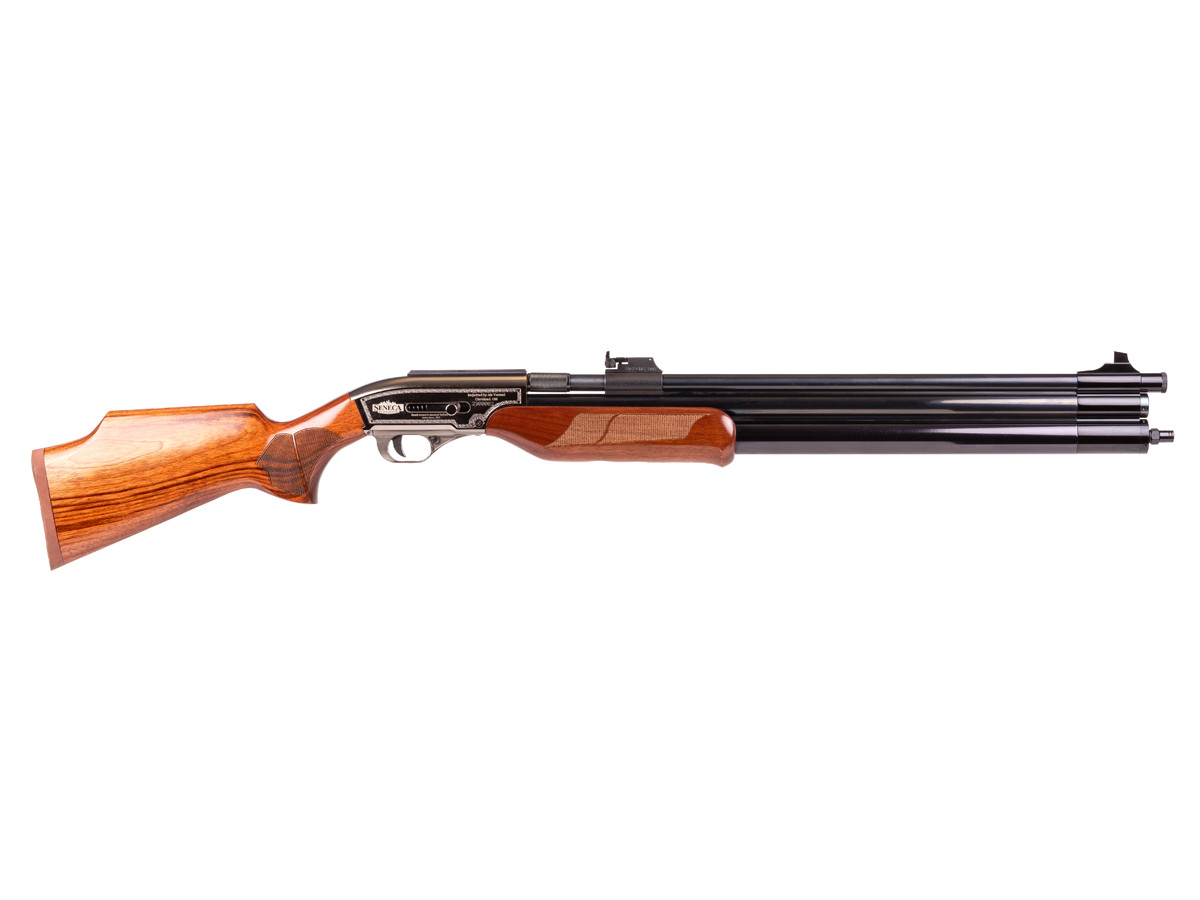

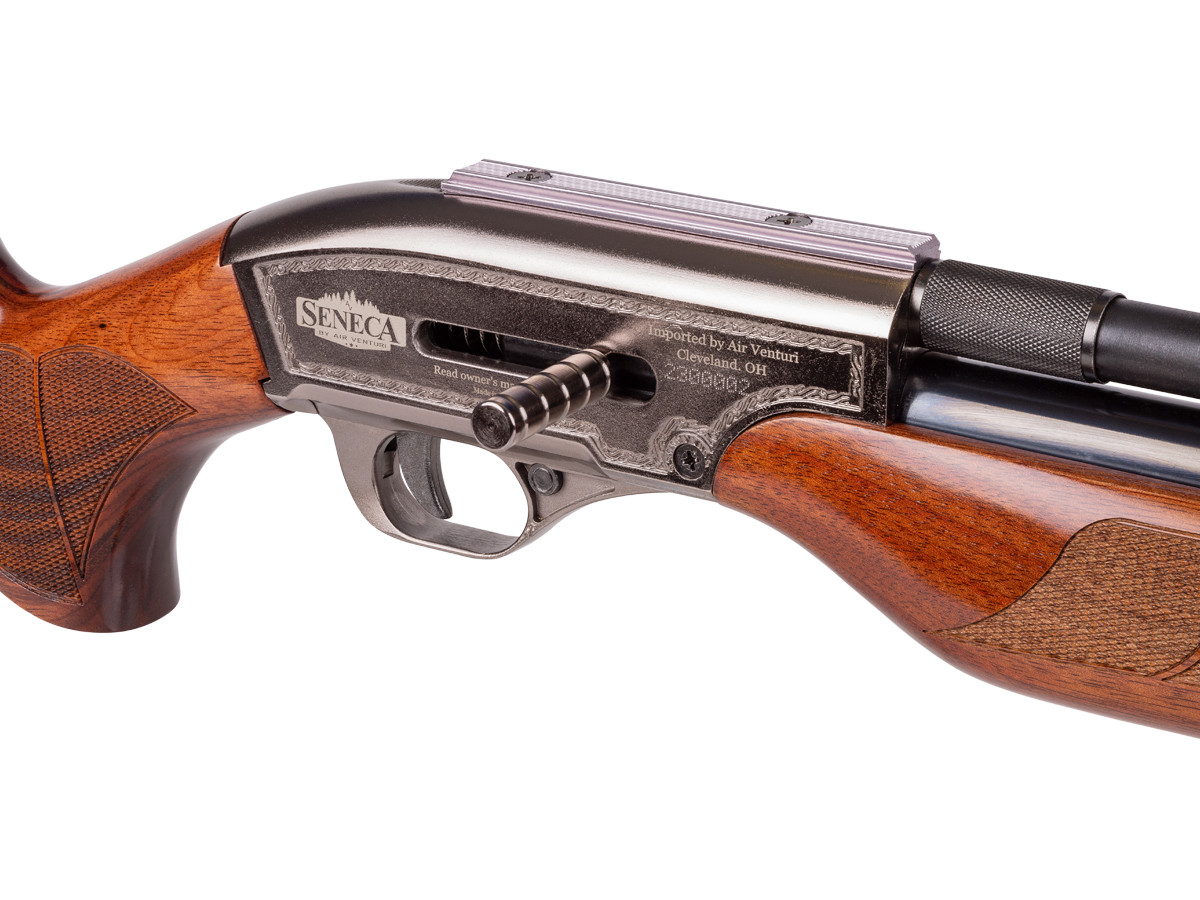
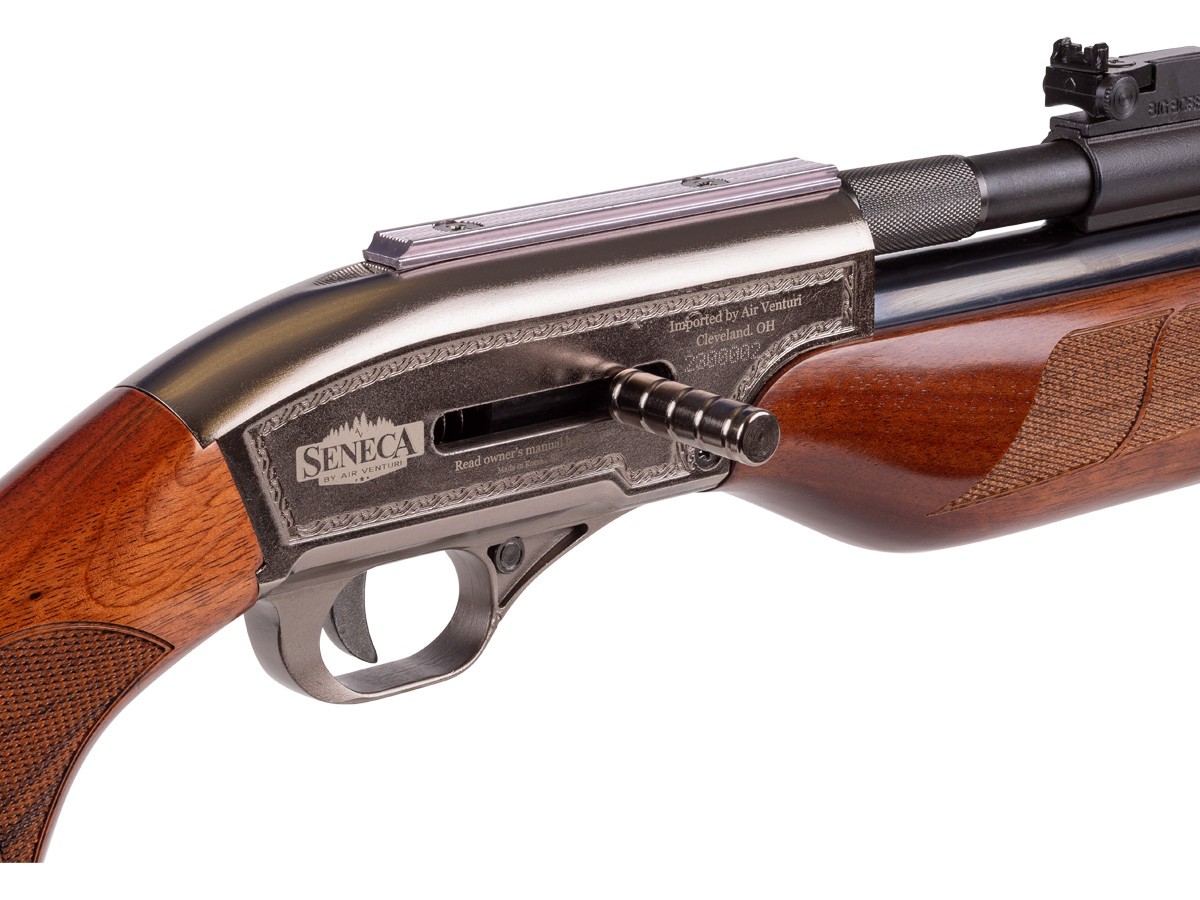
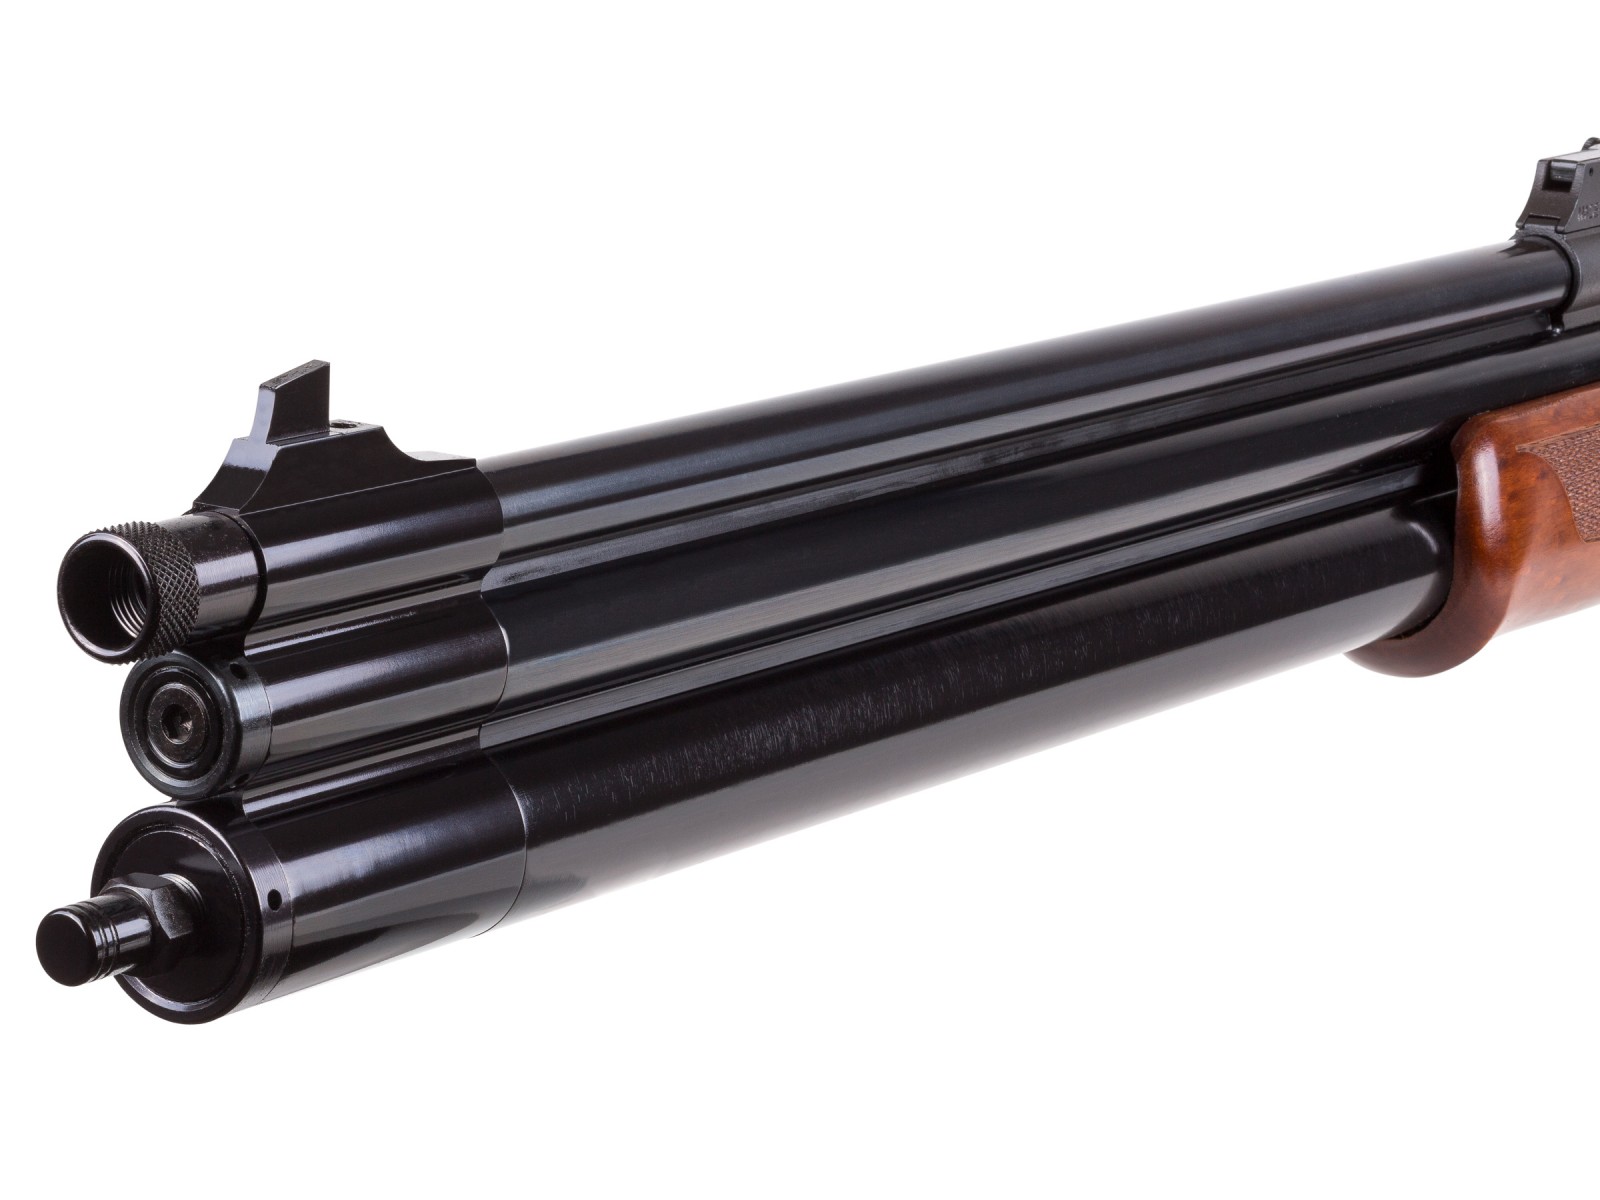
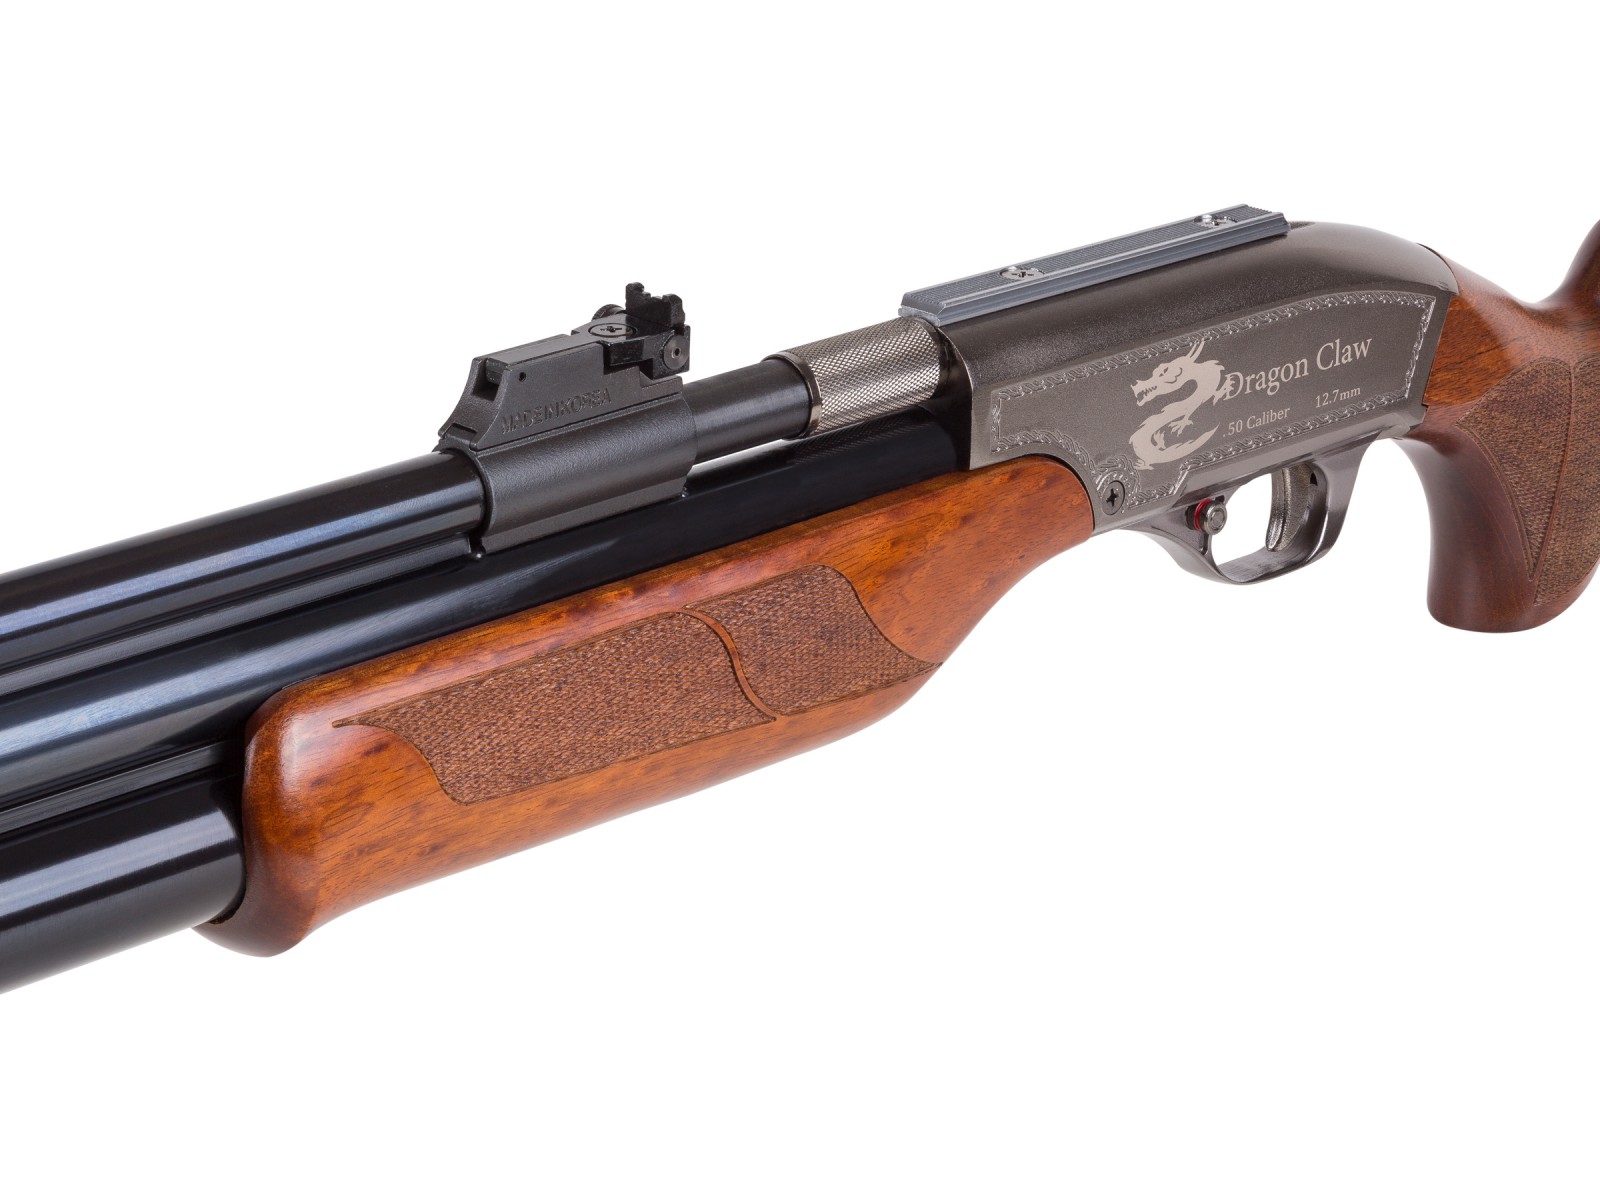


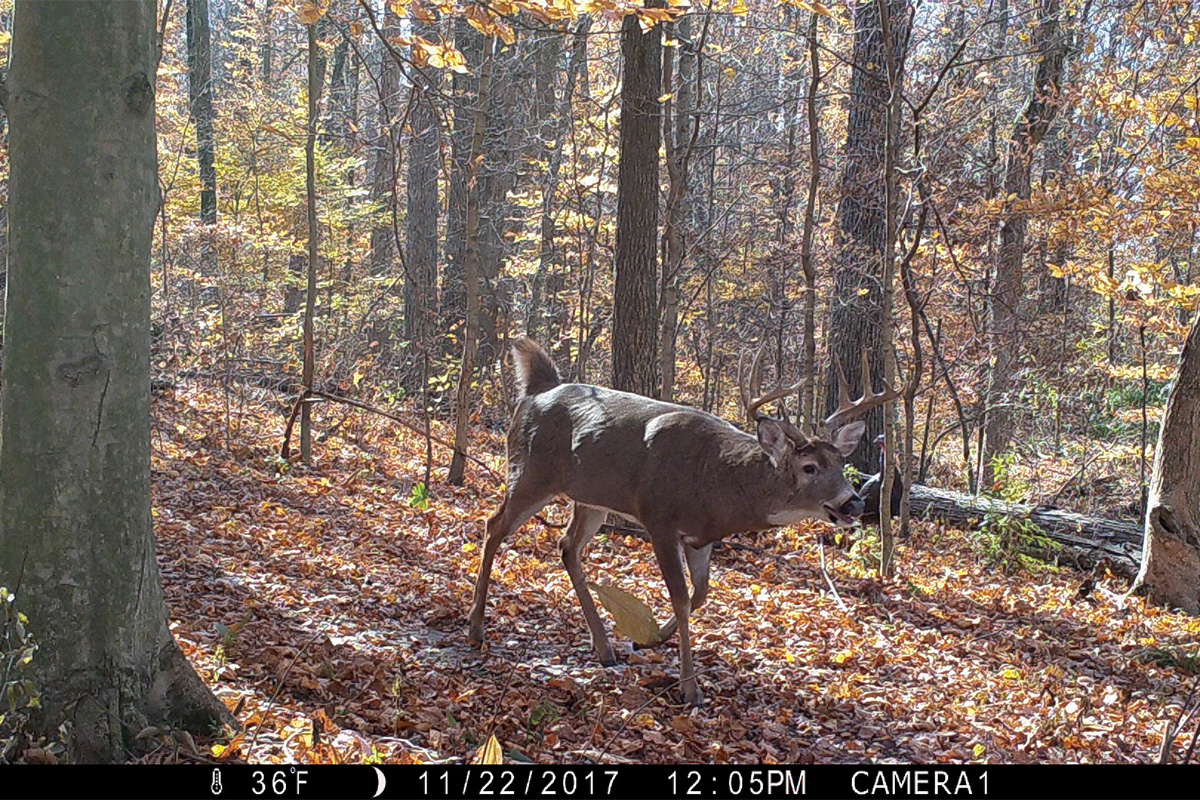
 The 60 days that must pass before the rack can be officially scored are slipping away fast, and we’ll know soon whether we have a new state record or not. And in case you are a Week 10 Truck-Buck entrant, here’s the answer to your burning question: Billy Joe is a GON subscriber, and yes, his buck is a Week 10 entrant.