There are two locations where a reticle can be installed within a rifle scope: the first focal plane (FFP) or the second focal plane (SFP).
With a first focal plane scope, the reticle is physically placed on the “front” of the erector tube assembly and magnification lenses. The first focal plane is furthest from your eye when looking down the sight.
How does that make a difference?
With a First Focal Plane scope, the size of the reticle will appear to grow or shrink as the scope’s magnification is increased or decreased, respectively.
Now that you’ve got the basics, let’s talk about the pros and cons…
First Focal Plane: Pros and Cons
With the first focal plane optics, the reticle size is going to scale up or down with your magnification adjustments.
This means your trajectory markings, or holdover values, are going to remain accurate regardless of what magnification setting you’re on. This is great news if you hate doing math!
But, it comes at a cost…Literally.
The price is often higher by virtue of its more complicated construction. A first focal plane reticle is also typically associated with higher-end scopes.
With first focal plane scopes, the reticle will look small and thin with less power while the reticle will be thicker at higher power.
It can be easy to lose those thin reticle lines, especially against dark backgrounds. Although, some of the best Leupold riflescopes have illuminated reticles for better visibility.
Also, the reticle can cover too much target at the highest setting. If this is a dealbreaker to you, that’s where Second Focal Plane comes into play…
What is the Second Focal Plane?
The most common design is SFP, or a Second Focal Plane scope. It’s also referred to as Rear Focal Plane.
With a second focal plane scope, the reticle is placed behind the magnification lenses on the erector tube assembly.
The second focal plane scope is closer to your eye. Therefore, the reticle stays the same size at any magnification range.
Now, let’s talk about the pros and cons of this…
Second Focal Plane: Pros and Cons
Its lightweight, great resolution, and durability against heavy cartridges make it a popular choice among hunters and law enforcement.
With the second focal plane, your units of measure per each hash mark (MOA or MRAD) represent the same value regardless of your magnification setting.
However, the spacing for holdover in the reticle is only correct at the highest magnification setting. So, it’s not always reliable for variable long-range shooting.
For example:
Let’s look at the Viper HST 4-16×44. This is a second focal plane scope with a magnification range of 4-16x. The Viper HST has hash marks representing 1 MOA but this is only true at its full magnification: 16x.
Of course, you can always do the math in between. But it becomes complicated and confusing and we all know that’s no bueno.
Second focal plane scopes are more commonly seen in the average riflescope and they’re easier to manufacture. That’s why they’re typically less expensive.
First Focal Plane vs. Second Focal Plane for close-range shooting
A second focal plane scope is more suited for close-range hunting and defensive shooting.
Why?
Because you have a strong and easy-to-see reticle even at the lowest magnification. With low-powered optics, like 1-4X optics, this is a highly undervalued feature.
When it comes to a First Focal Plane scope, you can easily lose sight of your marks at low power. This can be a hassle when you need to make adjustments for the wind or distance— especially for older eyes.
Since you’d have to zoom out to get the rest of the marks in the scope’s view, your target shrinks relative to your view. If you’re hunting small game, this can be an inconvenience.
First Focal Plane vs. Second Focal Plane for long-range shooting
First focal plane scopes are best for competitive and long-range precision shooting.
The hash marks represent the same value across all magnification levels. It allows you to use and trust those holdovers at any given point in your magnification.
This is an advantage for spotting impacts and misses for corrections. It’s also very helpful if you need rapid and precise follow-up shots.
Hitting something at longer ranges means getting as much precision as possible. With a second focal plane scope, making those fractional MOA adjustments becomes far more difficult.
Conclusion
The truth is— it’s a matter of preference and intended use. There is no “better” between the two focal planes.
Higher magnification ranges are better in a first focal plane scope. Lower magnification is fine for second focal plane scopes.
If you’re into precision shooting, especially in matches, and you don’t mind the cost: a first focal plane riflescope is great to have.
If you won’t be taking many shots where you need to “hold” for windage or elevation, a second focal plane scope is more than enough. Plus, it won’t necessarily break the bank.
There are other things you need to consider before buying an optic— like choosing the best quick detach scope mounts. At least when it comes to a SFP scope vs a FFP scope, you won’t be scratching your head anymore.
Since we’re on the topic of upgrades, my AR-15 A2 front sight removal guide is up. Go check it out!
For centuries hunting blinds have been used to hide the presence of hunters,enabling them to virtually melt into their surroundings and go unnoticed by passing animals. Be it piling sticks, logs, and rocks together or using a modern-day pop-up blind, these things work. And we can assure you, they aren’t stopping anytime soon.
We’ve been lucky enough to sit in our fair share of blinds and have taken away a few key ingredients in what makes a good blind. Without question, it needs to be easy to set up and durable, with adequate shooting windows and enough room for you and your gear. Lastly, it needs to have a quiet operation. We don’t want to alert an animal with the violent rip of separating Velcro.
If you still want to learn more about picking out the right hunting blind for you, as well as some setup/blind hunting tips, be sure to check out our Buyer’s Guide, FAQ, and comparison chart. Otherwise, you can scroll through or jump to whatever category matches your needs.
What was once a casual once-a-year pursuit has now turned into a lifestyle for me. Hunting is something I think about every day, and in light of getting better, critical thinking is at a high. In other words, if something on a hunting blind doesn’t work in my favor, it gets canned.
Through inclement weather, being hauled through the woods, and spending countless hours in them, hunting blinds are a tool I’ve used at full tilt. Be it alone or with a partner, I appreciate the advantages of these blinds, but always remember the disadvantages of certain designs.
When testing a hunting blind, I’m paying attention to setup time, durability, and if it’s both practical and functional. It can’t just work. It needs to work in my favor. Failure points need to be brought to light as they can mean the difference in the stars aligning or not aligning when an animal is in front of me.
Along with my personal experience, I also took into consideration the experience and opinions of seasoned hunters alike and respected hunters around me. With that, I paid attention to the top-selling blinds on the market and a variety of price points.
The hunting blinds listed above will fit the needs of a wide variety of hunters. If you’re reading this, and need a blind, there is something for you within it.
(Photo/Josh Kirchner)
Buyer’s Guide: How to Choose the Best Hunting Blind
A Few Good Practices for Hunting in a Blind
Hunting in a blind isn’t just about setting it up anywhere, sitting, and shooting a deer. It’s more than that. Here are a few things to keep in mind when planning to hunt from a blind.
Brush It In
Blinds are no doubt in the business of making us disappear to passing by critters. They do a fantastic job of making movements and blending into our surroundings. However, the fact of the matter is, animals are smart. They can spot something out of sight, even if it looks natural. For instance, I’m sure you’re very familiar with the furniture in your house. But, if someone came in and put the coffee table in the bathroom, you’d notice.
With that in mind, while our blinds are helping us disappear, it’s a good practice to try and make our blinds disappear too. This is known as “brushing it in.” Basically, it’s when you place your blind where you’d like to be hunting and either cover or tie the native vegetation to it to help it blend in even more. Not only will this help break up the overall outline of the blind, but it will add natural scents and give the blind more of a 3D look. Some blinds have preattached tie-downs for this very purpose.
(Photo/Josh Kirchner)
Make Sure You’re Comfortable
To hunt in a blind is to ambush hunt. And to ambush hunt is to sit in one place for sometimes what are 13-14-hour days dark to dark. So, we need to make sure that we are comfortable for the long haul.
Make sure you’ve got a comfortable chair. This is a big one for me. I’ve spent a lot of time sitting in minimalist chairs inside blinds, and I promise you it isn’t worth it. Get something that is going to provide back support, and that won’t make your legs fall asleep. On that note, a chair that isn’t noisy is also a plus. Remember, hunting. If you’re worried about weight, check out some of the ultralight backpacking chairs on the market. They pack down small, are lightweight, and you can sit in them all day long.
Another branch of staying comfortable is food. Staying all day in a blind is tiring, and the less movement in and out of the blind, the better. So, pack a full day of food in there with you, along with enough water. These are a few things that will drive folks to leave. No need to go grab a sandwich if it’s already in your pack.
Lastly, we’ve established that ambush hunting involves a whole lot of not moving around. A byproduct of that is you’re way more likely to get cold. Because of this, you’re dang sure gonna want to have warm clothes with you to ensure you can last in the blind. Not only that but if you’re bowhunting, you want to be able to physically pull your bow back. I’ve been in the situation of being so cold I couldn’t draw my bow. That’s my bad and easily remedied with forethought.
(Photo/Josh Kirchner)
Test Shooting/Aiming Beforehand
Perhaps the number one thing folks fail to do when purchasing or about to hunt out of a blind is making sure they can actually shoot out of it, particularly with a bow. For a gun, it’s pretty straightforward. A bow is different. Some bows are longer than others, requiring more headspace. Some people have longer draw lengths than others requiring more internal space. And some folks run longer stabilizers which are great at getting caught on the windows of a blind.
At the very least, if you’re at the store, see if you can get inside the blind and mock draw inside to get a feel. In the field, make sure to draw your bow back and turn your body from one side to the other, ensuring you’ve got clearance. With a gun, ensure your shooting rest is set and ready to go at the proper height. Practice aiming at various things in front of you to try and cover all of the angles you might need.
While the notion of hunting may be traditionally a more masculine activity, this list of girl names that mean hunter underscore the fact females can be successful at hunting endeavors as well. From Winda to Zarola to Cyrene and beyond, each name is unique and beautiful. Take a look!
RELATED: More Baby Names That Mean Hunter
Kacela- name meaning “African hunter,” Kacela is an optional version of the name Kayla. It’s a beautiful, sweet, yet strong name for a girl.
Aala- “she who protects and hunts,” the name Aala signals power for your little girl.
Brenda- Scandinavian and English, Brenda means “blade of the sword.” She, who is named Brenda, is fierce, dominant, and ready for the hunt.
Fianna – Fianna means “Warrior huntress” in Irish dialect.
Zarola- Arabic/Muslim heritage, the name Zarola means hunter. It rolls easily off the tongue and works as a modern girl name.
AlessiaThis name is of Italian origin and means “hunter or defender.”
Nujalik “Goddess of hunting,” the name Nujalik has a Chinese origin based on the “God on land.”
Kainda “Hunter’s Daughter, this name is often given to African girls born to powerful, influential fathers.
Dali- beautiful goddess from the mythology of the Georgian people, Dali serves as an amazing hunter name for a hunting goddess for baby girls. Dali serves as the patron of hoofed wild mountain animals.
Pakhet A goddess of war and hunt, she often is portrayed as a feline-headed woman who has sharp claws she uses to kill snakes.
Artemis- Goddess of wind, animals, and hunting, Artemis was a crucial figure in Greek mythology. The regal name is unusual though powerful.
Winda- Swahili name meaning hunter, Winda sounds as cool to say as it is to write on paper.
Brielle- French origin, Brielle is a girl’s name meaning “hunting grounds.” The name is sweet and kinds as well as having a relation to hunting.
Mielikki- God of forest and hunt, Mielikki is a skilled healer with a talent for healing animal paws. She is dainty and charming.
Rachel- demon hunter, Rachel wants to destroy all demons in her way. The name is feminine yet fierce.
Cyrene A cute, yet furious name for a girl, Cyrene is the name of Hypeseus’s daughter. She was a fierce huntress. Your little girl will grow up brave when she has this name.
Pinga- Intuit goddess of medicine, hunt, and fertility. She is strong, physically and mentally.
Sally “A short trip for pleasure,” Sally works well as a girl’s name if you’re looking for a name that means hunter. Hunters enjoy their trips to wooded areas to hunt down their prey.
Zarola- name said to mean hunter, Zarola was common for girls names at one time but is nearly unheard of these days. Zarola offers a unique name for your beautiful girl.
Neith- short, easy name that means hunter is Neith. It’s a charming name and that of the Egyptian goddess of the hunt. The name also means “Divine Mother.”
Flidais- of the Tuatha De Danann, she is the goddess of hunting and the woodlands or the goddess of all beasts.
Devana A stylish name for hunter girls, Devana is a Slavic goddess of the hunt. She is equal to the Roman goddess Diana.
Atalanta- Greek mythology, Atlanta was the daughter of Mainlo and Schoenus. She was left on the mountainside by her father because he wanted a son instead of a daughter.
Arnakuagsak- goddess who was in charge of making sure hunters had enough food, Arnakuagsak may take time to learn to pronounce properly, but certainly holds rank as a most unusual name.
Gwyn- Mythical figure known as the fair folk, he led wild hunts among his people. This name works well as a girl name in popular usage.
Peruse thousands of baby names on MomsWhoThink.com!And follow us on Pinterest for more parenting inspiration!
For outdoor enthusiasts, nighttime wildlife watching can be an unforgettable experience. It offers them unique insights into the world of nocturnal creatures. To make the most of these adventures, having the right gear is crucial – and night vision goggles are a must-have!
Here are ten compelling reasons why investing in night vision goggles is a crucial for thrill-seeking individuals who want to enhance their nighttime wildlife watching experience:
Night vision goggles amplify the available light. They make it easier to see in low-light conditions. This improved visibility is crucial for spotting nocturnal animals that might remain hidden.
Safety
Exploring the great outdoors at night can be risky. This is especially true if you are unfamiliar with the terrain. Night vision goggles help you navigate your surroundings more confidently, reducing the likelihood of accidents or getting lost in the dark.
See unique animal behavior
Many species are more active at night, and they showcase interesting behaviors that aren’t visible during the day. With night vision goggles, you will have the chance to witness these fascinating nocturnal activities up close.
Minimal disturbance
Unlike flashlights or headlamps, night vision goggles don’t emit bright light that could scare off animals. Using goggles allows you to observe wildlife in a more natural setting without disturbing them.
Extended observation time
Equipped with night vision goggles, you can continue your wildlife watching well into the evening. This increases your chances of encountering a wider variety of species.
Better photography and videography
If you’re passionate about capturing wildlife through your camera lens, night vision goggles can help you achieve amazing results. They make spotting and tracking animals in low-light conditions a lot easier. This gives you more opportunities for unique and captivating shots.
Educational insights
Night vision goggles can deepen your understanding of the natural world. With this, you will learn more about the habits and behaviors of nocturnal animals. This knowledge can be particularly valuable for students, educators, or anyone passionate about wildlife.
Versatile equipment
Night vision goggles are useful for outdoor activities beyond wildlife watching, such as hiking, fishing, or stargazing.
Tips for Choosing the Perfect Night Vision Goggles
To achieve the best possible experience while observing nocturnal wildlife, it’s important to invest in the proper night vision goggles.
The following are some tips on how to find the perfect pair:
Determine the generation – night vision goggles come in different generations, each offering varying performance levels. While Generation 1 devices are more affordable, they provide lower image quality than their Generation 2 and 3 counterparts. Take into account your needs and budget when deciding.
Check the image quality – look for goggles that provide a clear, sharp image with good resolution and minimal distortion. High-quality optics are essential for a satisfying wildlife watching experience.
Assess the field of view – a wider field of view allows you to see more of your surroundings, making it easier to spot and track animals. Consider goggles with a larger field of view for a more immersive experience.
Evaluate the battery life – longer life means more time spent enjoying the nocturnal world without interruption. Look for night vision goggles with an efficient power source and replaceable batteries.
Examine durability and weather resistance – the great outdoors can be unpredictable, so choosing goggles that can withstand the elements is important. Opt for a durable, weather-resistant design to ensure your goggles perform well in various conditions.
Read review – before purchasing, read reviews from other users to understand the product’s performance and reliability better – look for testimonials from people who have used the goggles for nighttime wildlife watching to ensure they meet your needs.
Compare prices – night vision goggles can vary significantly, so finding a pair that offers the best value for your budget is important. Research and compare models and brands to find the best deals.
Consult experts – if you need help deciding which night vision goggles to choose, seek advice from knowledgeable sources. This can include professionals in the field, experienced wildlife watchers, or customer service representatives from reputable companies like https://nightflightconcepts.com/.
Bonus: 5 Quick Tips for Successful Nighttime Wildlife Watching with Night Vision Goggles
As a bonus, we’ve compiled a list of five handy tips to ensure a successful nighttime wildlife watching experience with your night vision goggles.
These quick pointers will help you make the most of your nocturnal adventures:
Familiarize yourself with your goggles – understand the features and settings of your night vision goggles to ensure a smooth wildlife watching experience.
Plan around the moon and weather – schedule your outings during darker moon phases and be mindful of weather conditions that may affect animal behavior.
Research local wildlife – study the animals native to the area you’re exploring to know their habitats, behaviors, and unique features.
Practice patience and stealth – wait quietly for the perfect moment to observe animals, and move silently to avoid disturbing them or their environment.
Utilize all your senses – listen carefully for sounds that can provide clues about nearby wildlife, and rely on your sense of touch and smell to navigate and detect changes in your surroundings.
Final Thoughts
Night vision goggles are invaluable for campers seeking to experience the fascinating world of nocturnal wildlife. By investing in a quality pair of goggles and following the tips, you will be well-prepared to embark on unforgettable nighttime adventures.
So, gear up, venture into the night, and discover the hidden wonders of wildlife that come alive after the sun sets. Happy wildlife watching!
Interested in a hunting adventure? Look no further than Alabama, where the extended hunting season and large number of turkeys make for a thrilling adventure. The Alabama Turkey season provides a range of possibilities to bag a gobbler, whether you’re an experienced hunter or a novice. The prospects of a successful hunt are high since the bulk of turkeys are taken during the spring season and because both the fall and spring seasons have hefty bag limits of five gobblers each. Although decoys are only allowed in the spring, the longer season gives you plenty of time to manoeuvre.
Alabama has more wild turkeys due to conservation efforts that began in the early 1900s. Their initiatives have opened countless hunting opportunities. Controlled burning, wildlife openings, and timber harvesting have helped the turkey rebound. Most turkeys are harvested in Alabama’s lengthy spring. Hunters may take one gobbler per day throughout the fall and spring seasons, while decoys are only allowed in spring with limited usage limitations.
Below here are Schedule for the latest Turkey Season in Alabama.
ZONE-1
Alabama Turkey SeasonStart DateEnd DateNote Zone-1Saturday, March 25, 2024Monday, May 08, 2024Decoys allowed April 4
Counties: Autauga, Baldwin, Barbour, Bibb, Blount, Butler, Bullock, Butler, Calhoun, Chambers, Cherokee, Chilton, Choctaw, Cleburne, Coffee, Conecuh, Coosa, Crenshaw, Cullman (except north of Lewis Smith Lake and north of Cullman County Road 437 and west of Interstate 65), Dale, Dallas, DeKalb, Elmore, Escambia, Et
ZONE 2
Alabama Turkey SeasonStart DateEnd DateNote Zone-2Saturday, April 01, 2024Monday, May 08, 2024Decoys allowed April 11
Counties: Franklin, Lauderdale, Lawrence, Limestone, Madison, Morgan, and Winston. Colbert, Cullman (north of Lewis Smith Lake, north of Cullman County Road 437, and west of Interstate 65).
ZONE 3
Alabama Turkey SeasonStart DateEnd DateNoteZone-3Sunday, November 19, 2024Monday, November 27, 2024No decoys allowed Zone-3Sunday, December 10, 2024Sunday, January 01, 2024No decoys allowed Zone-3Saturday, March 25, 2024Monday, May 08, 2024Decoys allowed April 4
Counties: Covington, Monroe, Randolph, Clarke, Clay, Talladega, and Covington.
Note:
Type of HuntGobbler LimitNoteGobblers OnlyOne per day, four bag limitDuring combined fall and spring season Special Youth Hunt (Decoys Allowed)Saturday & Sunday the week prior to opening of spring season Special Disabled Hunt (Decoys Allowed)One day prior to all regular season opening days. Participants must meet medical requirements of regulation 220-2-.109(2)(d)
Bag Limit
Alabama Turkey Bag LimitNote The daily limit is one gobbler.There is a total of 4 gobblers that may be taken in the autumn and spring seasons combined. No more than two gobblers may be taken from any Wildlife Management Area, Conservation and Hunting Area, or National Forest Ranger District.N/A For the first ten days of each season, only one gobbler may be taken from each WMA, CHA, and National Forest Ranger District.N/A
License Requirements
License RequiredDescription All Game Hunting Licenseunless exempt Harvest Recordpaper form or on the app Wildlife Management License and map permitIF hunting on a WMA Harvest Reporting48 hours to report turkey harvest through Game Check
U.S. Forest Service Ranger & WMA Districts
AreaStart DateEnd DateTime Limit Bankhead Ranger District; WMAs – Lauderdale, Freedom Hills, Black Warrior, Coon Gulf, Riverton CHA and Martin CHASaturday, April 08, 2024Monday, May 08, 2024daylight – 1 p.m. REMAINDER OF NATIONAL FORESTS DISTRICTS (Talladega Ranger District, Shoal Creek Ranger District, Oakmulgee Ranger District, Tuskegee Ranger District and Conecuh Ranger District) and WMAs THAT ALLOW TURKEY HUNTINGSaturday, April 01, 2024Monday, May 08, 2024daylight – 1 p.m.
Hunting Regulations for Turkey in AL
Before going out to hunt for deer or turkeys, you must have a harvest record, whether it be on paper or an app. Additionally, it is against the law to transfer any deer or turkey before noting the harvest on the harvest record and to fail to report any deer or turkey taken via Game Check.
Except for turkey, all lawful game animals and birds may be hunted from elevated tree stands only with a bow and arrow or handgun.
Hunting migrating birds or turkeys without using live decoys is not permitted.
Hunting is not permitted when using electronic dove, turkey, or waterfowl calls. However, they can summon predators when that species is being hunted.
Those decoys used for turkey hunting that include mechanical or electrical components capable of creating sound or movement or that can be controlled to do so, including any that are portable or linked to weapons like fans or reapers, are forbidden. After the first ten days of the spring turkey season, as well as during the special spring hunts for disabled people and youngsters, legal turkey decoys are permitted.
It is against the law to import, possess, sell, or offer to sell live any species of mongoose, wild rabbit or hare, deer, raccoon, fox, skunk, coyote, wild turkey, wild rodents, wild goat, sheep, antelope, or other exotic game from any region outside of Alabama, as well as any fish from the genera Clarias, Serrasalmus, or Mylopharyngodon.
Any turkey, domestic or wild, may not be released into a state’s wild region.
For entire regulations you may read our Latest Alabama Hunting seasons article.
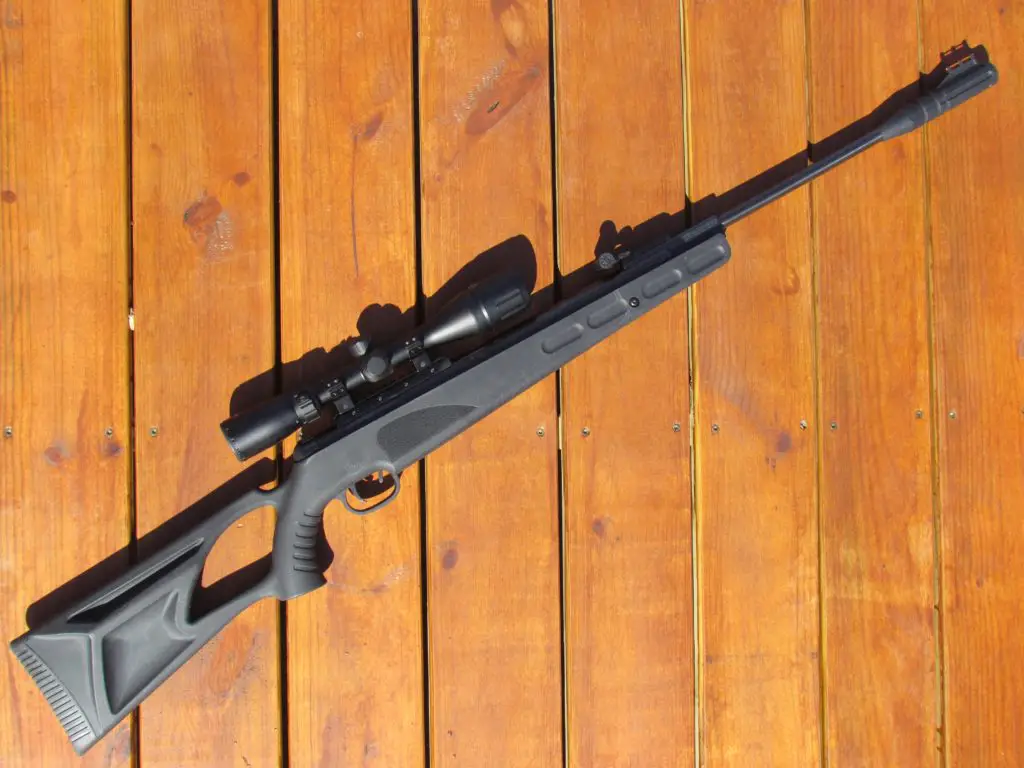
The caliber is available in both .177” (4.5 millimeters) and.22” (5.5 millimeters).
.22 caliber is the favorite choice for hunters.
While the .177 caliber offers more velocity, it usually doesn’t generate enough takedown power to kill an animal in 1 quick, clean shot.
On the other hand, the .22 caliber has more knockdown power transferred to the target’s body so it’s the go-to gun for field hunters and pest eliminators.
It gives the same shooting experience for both left-handed and right-handed shooters.
There is no difference whether you are left-handed or right-handed.
Besides, it has nice texturing on the forearm and grooves on the grip to prevent slippage from your sweat, enhance stability when aiming, and improve accuracy.
Moreover, the stock has a rubber buttpad to help absorb recoil, even the ReAxis gas piston has already cut the recoil to a great extent.
Last but not least, the stock has a thumbhole design that provides a more relaxed grip on your wrist by resting the stock on your wrist as opposed to holding it with your arm.
A thumbhole stock is best for varmint shooters and for anyone who spends a lot of time on shooting positions like bench rest shooting.
Ammo
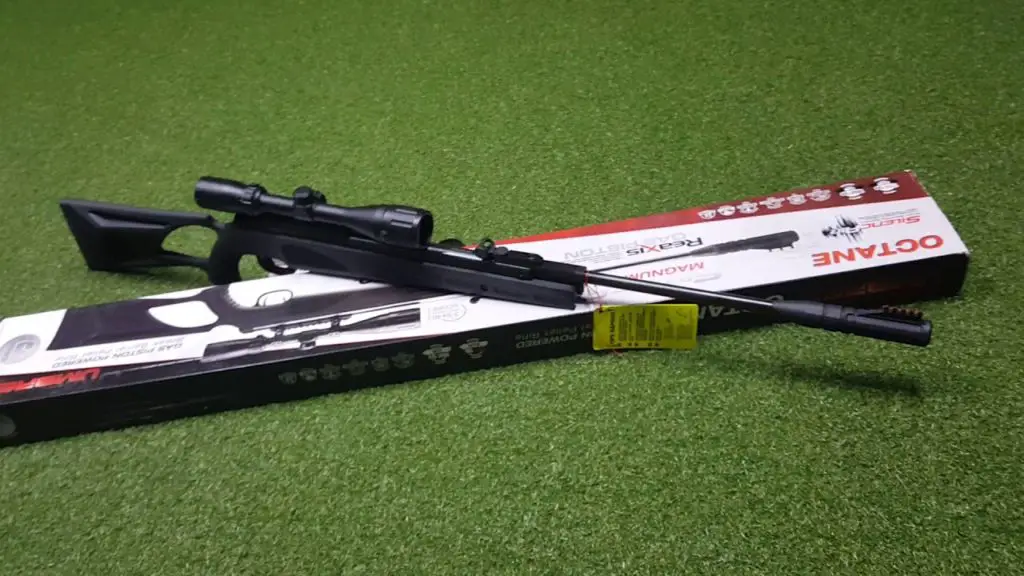
The Umarex Octane uses .177 and .22 pellets corresponding to its 2 types of calibers.
.177 pellets are damn cheap if not the cheapest pellet on the market: you can buy hundreds of high quality .177 rounds for just a few bucks
So .177 is the best choice for target shooting and plinking.
On the other hand, a .22 pellet is heavier and has more knock-down power than a .177 pellet so it is the go-to pellet of pest eliminators and small game hunters.
As if the full fiber-optic sight is not enough for dead-on accuracy, Umarex adds a 3-9×40 AO scope in the package.
40 is the diameter of the front lens, measured in millimeters.
3 and 9 mean that the scope has variable zoom-in power.
It magnifies the image 3 to 9 times bigger than the picture you see without the scope.
On top of that, this scope has parallax adjustment.
AO stands for adjustable objective so you can adjust the sight according to your own unique needs
Have you seen the Picatinny rail come with the integral dovetail in the same air gun?
This rifle has that feature.
Therefore, you can use whatever scope you like to mount on the Picatinny rail or remove the Picatinny rail and use the 11mm dovetail directly.
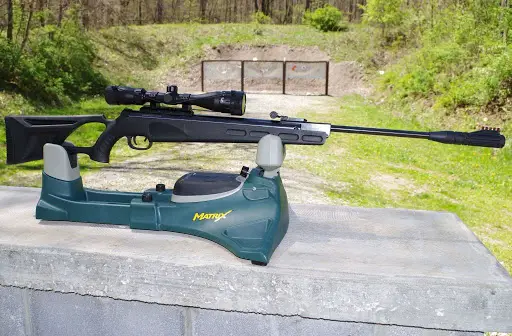
Velocity, accuracy and power
In .177 caliber, the Umarex Octane delivers velocity up to 1450 FPS with alloy pellet and 1250 FPS with lead pellet.
In .22, this rifle produces 1250 FPS with alloy and 1050 FPS with lead pellets.
These types of velocities put Umarex Octane into the ultra-magnum class of air rifles.
Besides, since the speed of sound is 1100 FPS (may vary with altitude and temperature), you can hear the loud crack when shooting because the superfast pellet breaks the sound barriers.
Chrony test has given us the following results:
In .177:
Pellet (.177)
FPS
FPE
Baracuda Match 10.65 gr
890
18.74
Crosman Premier 10.5 gr
1200
33.58
Crosman Premier Domed 10.5 gr
1154
31.06
In .22:
Pellet (.22)
FPS
FPE
RWS Hobby 11.9 gr
925
22.61
H&N Baracuda green pellet 12.5 gr
925
23.75
Predator Metalmag 17 gr
745
20.96
H&N Baracuda green 12.96 gr
925
24.63
JSB Exact Jumbo 18 gr
769
23.64
Benjamin Discovery HollowPoint 14.3 gr
863
23.65
JSB Jumbo Heavy 18.13 gr
776.52
24.28
Crosman Premier domed pellet 14.3 gr
993
31.32
Ruger pointed pellet 17 gr
899
30.52
Diabolo RWS 13.43 gr
781
18.19
H&N Hunter 18.21 gr
732
21.67
Crosman 14.3 gr Hollow point
842
22.52
JSB Monster Diabolo 13.43 gr
797
18.95
RWS SuperMags 9.3 gr Field line wad-cutter
944
18.41
RWS Meisterkugeln 8.2 gr
1065
20.66
Gamo Raptor 9.9 gr
1120
27.58
Gamo Match Diabolo wad-cutter 15.43 gr
875
26.24
H&N Field Target Trophy Green 9.57 gr
1038
22.9
RWS SuperDome 14.5 gr
800
20.61
Beeman Kodiak 21.14 gr
683
21.9
Crosman Premier Hollow Point 14.3 gr
902
25.84
JSB Exact Jumbo 15.9 gr
762
20.51
RWS Hobby 11.9 gr
889
20.89
Beeman Kodiak domed 21.14 gr
682
21.84
RWS Hypermax 9.9 gr
1029
23.28
For Umarex Octane, various shooting tests have been conducted by different shooters with positive results.
The common shooting groups are:
less than 1” in 20 yards,
0.891” at 20 yards with Predator Polymag,
0.675” at 20 yards with H&N Baracuda green,
1/2″ at 25yards with JSB Jumbo Heavy 18.13 gr,
0.2” at 65 feet with Crosman Premiere Hollow point,
nickel size at 50-93 feet,
1/2″ at 20 yards with Crosman Premiere Hollow Point,
same hole at 35 yards with JSB RS,
same hole at 33 yards,
1” at 10-15 yards,
2” at 25 yards,
penny size at 25 yards,
dime size at 10-15 yards,
dime size at 20 yards with JSB Monster Diabolo 13.43 gr,
clover-leaf size at 20 yards with RWS Super Mag 9.3 gr Field line wad-cutter,
1” at 25 yards,
1/4″ at 25 yards,
1/4″ at 50 feet,
1/4″ at 10 yards,
2” at 40 yards,
dime size at 30 yards,
nickel size at 30 yards,
1” at 30 yards,
penny size at 35 yards,
1/2″ at 30 yards,
1/4″ at 50 yards,
silver dollar size at 50 yards,
1/4” at 30 yards,
1/4″ at 45 yards,
penny size at 30 yards,
1/4″ at 45 feet with JSB Jumbo Diabolo,
1” at 50 yards,
1/2” at 30 yards,
3/8”-1/2” at 25 yards with Crosman Premiere Domed,
1” at 50 yards,
1/2″ at 30 yards,
1.25” at 50 yards,
0.581” at 10 meters with Beeman Kodiak,
0.368” at 10 meters with RWS Hobby,
1” at 10 meters with RWS Super dome,
0.982” at 10 meters with Predator Polymag,
0.245” at 10 meters with 14.3 gr Crosman Premiere Hollow Point,
1.067” at 25 yards,
0.292” at 10 yards with JSB Diabolo Exact 8.4 gr,
0.416” at 20 yards with JSB Diabolo Exact 8.4 gr.
Furthermore, this Umarex Octane can:
shoot AAA battery at 23 meters,
shoot battery LR44 at 23 yards,
penetrate 1/4″ plywood and go deep into 3/4″ plywood,
pierce through 3/4″ pine board,
hit penny at 24 yards,
blow through 1/2″ plywood,
hit crow at 40-50 yards,
kill squirrel at 40 yards,
kill squirrel at 25 yards,
go through 1/2″ plywood at 51 yards,
go through 2×4 cardboard box at 20 yards,
penetrate 4 soup cans (8 layers of corrugated metal) with the following pellets:
Beeman Crow Magnum Hollow Point 18.21 gr
Beeman Kodiak Extra Heavy 21.14 gr
H&N Baracuda 21.14 gr
JSB Match Diabolo Jumbo Heavy 18.13 gr
Polymag 22.16 gr
punch through 3/4″ plywood at 40 yards with Crosman Premier Hollow Point 14.3 gr,
penetrate 3/4″ board,
penetrate through 1” thick oak board at 10 yards,
blow through 1×4 pine board at 75 feet with Crosman Premier Hollow Point,
hit soft ball at 150 yards,
kill 2 starlings at 109 yards,
kill groundhog at 40 yards,
kill squirrel at 30 yards,
go through 3/8” plywood and destroy the wine bottle at 40 yards.
Loudness
Although being a supersonic air gun in both .177 and .22 calibers, Umarex Octane produces very little noise thanks to advanced technology for noise suppressors.
Therefore you can enjoy a successful hunting day or a fun plinking afternoon without startling your neighbors.
Shooting Ability
The effective shooting range of this gun is up to 100 yards. You can use it for target shooting, plinking, pest control, and small game hunting.
You don’t need to buy anything else for this gun. Everything you need is already in the box.
Maintenance
The Umarex Octane requires very little maintenance:
Just clean your gun every now and then, coat the barrel with RWS Spring Cylinder Oil every few hundred shots and you are all set.
Specifications
Caliber: Available in both 0.177 and 0.22
Velocity: In .177- 1450 FPS with alloy- 1250 FPS with lead / In .22- 1250 FPS with alloy- 1050 FPS with lead
Loudness: 3- Medium
Barrel Length: 19.5”
Overall Length: 48.5”
Shot Capacity:1
Cocking Effort: 42 lbs.
Barrel: Rifled
Front Sights: Fiber Optic
Rear Sights: Fiber Optic/ fully adjustable for windage and elevation
Scopeable: Picatinny
Trigger: Two-stage adjustable
Buttplate: Rubber
Suggested for: Target shooting/Plinking/Small game hunting/ Pest control
Trigger pull: 3.5 lbs
Action: Break Barrel
Safety: Automatic
Powerplant: Gas-piston
Function: Single-shot
Body Type: Rifle
Weight: 9.5 lbs
Warranty
Another point that I love about the Umarex rifle is the 3-year warranty.
While most guns with gas pistons have only a one-year warranty, Umarex goes the extra mile and provides up to 3 years of warranty.
Additionally, some shooters are hesitant to try new technology so they worry about support if anything happens in the future.
The extra 2 years of warranty take care of those concerns instantly.
Pros and Cons
Pros
Cons
Jaw-dropping velocity
Breath-taking power
Staggering accuracy for short and long distance
Brilliant sound silencer
Amazing fiber optic sight and scope
Ergonomic thumbhole stock
Heavy for small-build shooters
Import from another country
Price
The price for Umarex Octane is just about 200 dollars.
It’s a bargain if you consider the innovative ReAxis gas piston, advanced silencer that makes a supersonic sound no more a problem, heavy-duty power, eye-opening velocity, and extreme shooting range that every shooter dreams of.
There are a couple of different listings online with different prices but the listing I found with the lowest price is the cheapest price among online e-commercial sites like Amazon, PyramydAir, Walmart, etc.
Although different places have different laws, anything you find on public land (national parks, for example) is off-limits. What you find on private land that you have permission to look for arrowheads on is legal. Different laws apply in different places, but that is the general rule.
If arrowheads are on the surface, can you pick them up on public land?
No. Even if you don’t dig for the arrowheads, picking up arrowheads on public land is not allowed. There is always a fine per artifact if you collect arrowheads on public land.
It is not usually a felony to take arrowheads illegally, but you should look for arrowheads respectfully and legally. Look for arrowheads on private land with the owner’s permission.
A large majority of the land in Texas and elsewhere is privately owned, and a large majority of arrowheads can be found on this land. You aren’t missing out on anything special if you don’t look for arrowheads on public land.
In most states, you can’t dig up an archeological site even on private land that you have permission to use. There are laws against digging up archeological sites.
However, it can be legal to dig for artifacts in Texas because of property rights. The property owner gets to decide what happens to an archeological site on their land.
Any of the following are public land:
National parks
National forests
Bureau of land management land
National monuments
There are privately owned lakes that the public is allowed to use, where you may find arrowheads. It is usually legal to find arrowheads at these locations.
Are public waterways off-limits?
It depends on what state you are in. For example, it is legal in Missouri but illegal in Florida. Riverbeds are a good place to find arrowheads, but make sure it is legal.
Often, anything you find in a river is the property of the state, so it may be illegal to take anything you find. It can be illegal to dive for arrowheads without a permit.
Trespassing laws usually do not cover rivers. If the river is big enough to take a canoe down easily, it is usually legal to use the river. Check the laws in your state.
Is it legal to dig for arrowheads?
It is not legal to dig up archeological sites. Digging for artifacts on Federal land or Indian reservations is illegal under the Archaeological Resources Protection Act of 1979.
The act is there to protect sites valuable to archeologists from being dug up by amateurs who will not learn valuable archeological information. The laws also protect native cultural heritage sites. It is considered looting to dig up a burial mound.
Oddly, the laws do not apply to natural artifacts, such as dinosaur fossils. You can dig for fossils on public land. Fossils are considered paleontological rather than archeological, so the act does not apply.
Digging up burial mounds is disrespectful and illegal. You cannot dig up an area where you find human remains or assume you are likely to find them even on your own property.
It is not necessary to illegally dig up burial sites to find good arrowheads. One of the best places to find arrowheads is near rivers, where it is usually legal to look for arrowheads.
You can also find arrowheads after a flood, even a small flood that does not damage any property. When a river floods, it disturbs the ground and can uncover artifacts.
The 1979 act does not apply to private land, so it is legal to dig for arrowheads. The owner of the property must be willing to let you dig, or else you could be charged with damaging their property. You cannot dig up human burial sites even on private property.
How do the laws in Texas compare to laws in other states?
In Texas, property owners decide what happens to artifacts on their land. This reinforces the legality of digging up sites without having an archeological permit.
If you find artifacts on someone else’s property and you have permission from the owner to keep what you find, you can take and sell the arrowheads. Texas property rights mean that the owner can decide to do what they want with archeological sites on their property.
Do a lot of people look for artifacts illegally?
Yes, some antique dealers illegally dig up sites on private property to find artifacts to sell. Some even hire people to dig up sites at night. This is illegal and unethical for many reasons, including because it damages the owner’s property.
Artifacts found by archeologists are taken out of the ground carefully while collecting as much information as possible. They take detailed notes and photograph everything as it is removed from the ground.
If someone digs up a burial mound without notes and photographs, it stops being possible to learn as much about the site as archeologists could have.
Campsites are not quite the same as burial mounds. It may be more ethical or legal to dig up campsites. The best place to find arrowheads is on or near the surface.
How old are the oldest arrowheads in Texas?
Projectile points as much as 16000 years old have been found in Texas. These spear or dart points are some of the oldest tools ever found in the Americas.
This surprised the discoverers, who did not expect to find anything that old in Texas. The points are more than 2000 years older than anything previously found in the area.
How long ago people came to the Americas is not known for sure. A conservative estimate is still only about 16000 years, roughly as old as the recent finds in Texas. Most archeologists believe 20,000 years is the best estimate.
However, evidence is building up in favor of much earlier dates. There may have been people in the Americas for about twice that long.
Even how people reached the Americas is disputed. Arguably, some people reached South America from Australia and Melanesia at a very early date. Many people came from Siberia to Alaska, but other people may have reached the Americans in other ways.
A break barrel air rifle is a type of air rifle that uses a break action to load and unload pellets. It is one of the most popular types of air rifles because it is easy to use and doesn’t require a lot of maintenance. Many people who are new to shooting choose a break barrel air rifle because they are simple to operate and can be used for a variety of applications. Whether you’re looking for an inexpensive way to plink around or you’re serious about hunting, a break barrel air rifle is a great option.
A break barrel air rifle is a type of airgun where the barrel is hinged on a break action. It is operated by breaking the gun open at the breech, loading a pellet, and then closing it. This type of airgun is very popular because it is relatively inexpensive and easy to operate.
What to Know Before You Buy a Break-Barrel Air Rifle?
Before you purchase a break-barrel air rifle, there are several things you should take into consideration, such as the following:
Piston Type: There are two types of pistons used in break-barrel air rifles – metal mainsprings and nitrogen-filled cylinders (also known as gas rams or gas springs). Metal mainsprings are less expensive but require more maintenance than gas rams. Gas rams are more expensive but require less maintenance.
Ammo Caliber and Velocity: The caliber of the pellet you use will determine the velocity at which it is fired. The most common calibers for break-barrel air rifles are .177 and .22 calibers. The velocity of .177 caliber pellets ranges from 700 feet per second (fps) to 1,200 fps.
Noise: Some airguns are louder than others. If you are concerned about noise, you may want to purchase an airgun that has a silencer or sound moderator attached.
Synthetic or Wood Stock? Break-barrel air rifles come with either synthetic or wood stocks. Synthetic stocks are typically more durable than wood stocks and are not affected by changes in temperature or humidity. However, some shooters prefer the look and feel of wood stocks.
What to Look for in a Quality Break-Barrel Air Rifle?
When purchasing a break-barrel air rifle, there are several things you should look for, such as:
Pellet Capacity: Some models only hold a single pellet, so you need to reload them after every shot. Others may hold as many as 50 pellets, which will give you more shooting time before needing to reload.
Aiming Aids: Some break-barrel air rifles come with built-in Scope mounts or open sights. These can be helpful if you plan on using your airgun for hunting or target shooting.
Accessory Attachment Points: Some break-barrel air guns have additional attachment points that allow you to add a sling or bipod.
Recoil Pad: A recoil pad can help reduce felt recoil when firing your gun.
Cheek Rest: A cheek rest can help improve your aim by providing support for your cheek while you are looking through the scope.
How Much You Can Expect to Spend on a Break Barrel Air Rifle?
The price of a break barrel air rifle depends on several factors, such as the brand, model, features, etc. In general, you can expect to spend between $100 and $500 on a quality break barrel air rifle.
In bow hunting, weeks or months of preparation come down to a single moment. To capitalize on your opportunities, your body must be ready. Picking the right workouts can make the difference between a successful hunt and heading home empty-handed.
Preparing your body is just as important, if not more so, than picking the right gear and finding the perfect spot. Training builds trust in your physical capabilities, which gives you confidence heading into the backcountry.
This article will arm you with the knowledge you need to get ready for hunting season. You’ll learn which fitness qualities are important for an archer, and how to train them. Plus, you’ll we’ll share several of the best exercises that’ll make you a better bowhunter. Let’s start by looking at the muscles needed for shooting a bow.
A bowhunter’s legs must be strong enough to carry them great distances, which means they have to have endurance as well. The arm, shoulder, core, and back muscles all have to be strong enough to draw and aim the bow. Hunting is a full-body activity that requires strength and endurance.
The entire leg is engaged during hikes for backcountry hunting. From the quadriceps running down the front of your thigh, to the hamstrings on the back, powerful glute muscles above those, and your calves running down the backs of your lower legs. They’re all involved in hiking and trekking in the wilderness.
To handle your bow specifically, your back muscles need to be strong. The latissimus dorsi, rhomboids, teres major, and trapezius help you draw the string. Your biceps, triceps, and deltoids help you draw and hold the bow in place.
And to the surprise of many, your core muscles are also used in archery, including the obliques, which run down either side of your torso. These muscles help you turn and stabilize your spine when shooting.
As you can see, bow hunting is a full-body workout. From draw strength to leg endurance, high-performance bow hunters train year-round to get their entire bodies and mind ready for the season.
Is Archery a Full-Body Workout?
While bowhunting in the backcountry is a full-body workout, archery is more specific. You don’t really need your legs to shoot a bow. Your arms, back, and shoulders do almost all of the work. To be a great archer you need to be strong enough to draw your bow and hold it steady.
Consider this: you can probably shoot a bow just as well from a seated position as you can while standing. Plus, you might not have the luxury of shooting from a standing position while hunting.
For that reason, it’s important to incorporate archery-specific exercises into your workout routine. While you’ll need cardio and leg exercises for hunting in general, bowhunters and archers alike need to carve out space in their workout to strengthen the arms, shoulders, and back muscles.
3 Pre-Season Workouts for Bow Hunters
Hunting — and bowhunting in particular — places unusual demands on muscles we don’t typically use on a day-to-day basis. That’s why training needs to be specific to the needs in the field. We’ve created a specialized program that focuses on creating strength and mobility for carrying a pack and bow across miles of rugged terrain as well as for drawing and holding your bow steady. In the rest of this article, we’ve made 3 of our pre-season workouts available so you can get a better idea of what MTNTOUGH training is all about. While these are just a small sliver of what’s inside, you’ll at least be able to understand how an entire program will make you physically and mentally tougher for hunting season.
If you can get through these workouts one to two times ahead of the season, you’re going to be way ahead of the curve when you head to the hills with your bow. To build trust in your body, you need to build resilience in key areas.
For example, the hips and shoulders. The hips support your legs and help you cover miles of rugged terrain. Your shoulders allow you to draw a bow and aim with unwavering accuracy. On top of that, you need to incorporate strength training and cardio into your routine.
Workout #1: Hip Health Workout
This hip workout combines cardiovascular conditioning on the rower, followed by resisted hip movements and some extra hamstring strengthening to get your hips in shape for hunting season. You’ll build endurance in your legs and upper body while making your hips more resilient. Here are the exercises in the workout:
1. Row Ergometer
The rower is a perfect complement to this hip workout because it uses a mix of upper and lower-body muscles, meaning you won’t exhaust your hips because it’s low-impact. If your hips are bothering you, it should offer a relatively painless way to warm up.
Step 1: Strap your feet snugly into the rower
Step 2: Grab the handle
Step 3: Sit up tall in the seat and slide your body as close to the front of the rower as you can
Step 4: Press with your legs, pulling the handle
Step 5: Once your knees are nearly straight, lean back slightly and pull the handle into your chest
Step 6: Reverse the steps to return to the start position
2. Banded Hip Flexors
This exercise strengthens the hip flexors, the muscles in front of your thigh that lift your leg. They often lack strength, particularly if you sit a lot at your job. Strengthening them can help prevent hip injuries.
Step 1: Tie a band to a fixed object behind you, as low to the ground as possible
Step 2: Face away from the band and get into an elevated push-up position with your hands on a bench or wall
Step 3: Put your foot in the band
Step 4: Drive your knee up to the chest, pushing against the resistance of the band
Step 5: Return to the start position to complete one rep
3. Standing Fire Hydrants
Perhaps you want a visual, but this exercise looks a lot like what a dog does when it pees on a fire hydrant. It targets the gluteus medius, a muscle on the side of your hips, that’s ignored by many other leg exercises.
Step 1: Place a min-band around your knees
Step 2: Cross your arms in front of your chest, or keep them by your sides
Step 3: Slightly bend both knees
Step 4: Lift one leg as far as you can backward and to the side
4. Single Leg Hamstring Curls
Weak hamstrings can lead to muscle strains or sprains if you put too much force on them. Leg exercises like squats and lunges don’t target the hamstrings very well. In fact, not many exercises isolate them properly, but the hamstring curl does.
Step 1: Get a slider or roller that can glide under your foot
Step 2: Lie on the ground with one heel on the glider, crossing your arms over your chest
Step 3: Bridge your hips into the air a few inches
Step 4: Keeping your hips in the air, slide your foot away from your body until you feel the tension in your hamstrings
Step 5: Slide the glider back towards your body as far as you can to complete one rep
Now that you know the exercises, it’s time to combine them into a workout. You’ll row, do a hip strengthening exercise or two, then repeat. In total, you’ll row 3,000 meters.
250-meter row/10 banded hip flexors on each leg
250-meter row/10 banded hip flexors on each leg
500m row/3 sets of 10 standing fire hydrants on each leg/3 sets of 10 single-leg ham curls on each leg
500m row/3 sets of 10 standing fire hydrants on each leg/3 sets of 10 single-leg ham curls on each leg
250-meter row/10 banded hip flexors on each leg
250-meter row/10 banded hip flexors on each leg
500m row/3 sets of 10 standing fire hydrants on each leg/3 sets of 10 single-leg ham curls on each leg
500m row/3 sets of 10 standing fire hydrants on each leg/3 sets of 10 single-leg ham curls on each leg
Workout #2: Shoulder Health Workout
If you’re unfamiliar with the Assault bike, you’ll be well-acquainted after this workout. Similar to the hip health workout, you’ll alternate a cardio exercise with shoulder-strengthening movements.This workout targets the muscles that archers need to shoot with range and accuracy.
Here are the exercises you’ll see in the workout:
1. Assault Bike
This isn’t your average spin bike. It’s a full-body machine that uses a fan in the front to increase resistance as you pedal harder. In this workout, you’ll use calories burned as a measurement of distance. The assault bike mainly works the legs, but the upper body pushes to add power.
Step 1: Adjust the seat of the bike so that your knees are almost entirely straight at the bottom of each cycle
Step 2: Sit on the bike and put your feet on the pedals, gripping the handles
Step 3: Pedal with your feet, simultaneously pushing the handles on one arm and pulling with the other
2. Renegade Rows
As an archer, you need to push with one arm (the arm holding the bow) and pull with the other (the arm that draws). This exercise perfectly mimics that movement, strengthening your shoulder, back, arm, and core muscles. Generally speaking, rowing exercises are some of the best for archers.
Step 1: Get into a push-up position, holding a dumbbell in each hand
Step 2: Keeping your hips squared to the ground, lift one dumbbell up until your wrist hits your rib cage
Step 3: Lower the dumbbell to the ground, then repeat on the other side to complete one rep
Step 4: You can optionally add a push-up to increase the intensity
3. TRX Y’s
Strengthening the back of your shoulder is important for an archer. This exercise does just that, using the smooth resistance of the TRX to strengthen the muscles around your shoulder blade and the back of your shoulder joint.
Step 1: Hold the handles of a TRX and lean back, walking your feet forward so that your body is at an angle relative to the ground
Step 2: With a slight bend in your elbows, raise your arms straight overhead
Step 3: At the top of the movement, your arms should form a “Y”
Step 4: Lower your arms so that they point to the site where the TRX is attached
4. Push-Up +
The push-up+ is a regular push-up with a little something extra at the top. You’ll do a scapular protraction at the top, which is when you move your shoulder blades away from each other. This strengthens the pecs and rotator cuff muscles to make your shoulders more stable.
Step 1: Get into the push-up position
Step 2: Perform a regular push-up
Step 3: Once you get to the top, continue to press the ground away from you, lifting your upper back toward the ceiling
Step 4: Return to the regular push-up position, relaxing your upper back, to complete one rep
5. Weighted Superman
The superman exercise strengthens your lower back, glutes, and shoulders. This variation targets the shoulder muscles even more by adding weight. You’ll work the back of your shoulders, strengthening them through a wide range of motion to make them more resilient.
Step 1: Lie on the ground on your stomach with a weight in each hand
Step 2: Lift your legs and feet off of the ground
Step 3: Lift your arms off of the ground, holding your hands close to your ears
Step 4: Reach forward with the weights as far as you can, then return your arms to the start position
Step 5: Lower your arms and legs to the ground to complete one rep
For this workout, you’ll alternate the Assault bike with shoulder exercises. Each round you’ll do either an endurance ride on the bike or a sprint. And each round the endurance distance decreases by 10 calories. Renegade rows and TRX Y’s are performed after the endurance ride. After sprints, you’ll do the push-up+ and weighted supermans. This workout will wear you down and rebuild you stronger than ever before – you got this!
70 cal endurance bike
10 renegade rows on each arm, 10 TRX Y’s
10 cal bike sprint
3 rounds of 10 push-up+, 10 weighted supermans
60-cal endurance bike
10 renegade rows on each arm, 10 TRX Y’s
10 cal bike sprint
3 rounds of 10 push-up+, 10 weighted supermans
50 cal endurance bike
10 renegade rows on each arm, 10 TRX Y’s
10 cal bike sprint
3 rounds of 10 push-up+, 10 weighted supermans
40 cal endurance bike
10 renegade rows on each arm, 10 TRX Y’s
10 cal bike sprint
3 rounds of 10 push-up+, 10 weighted supermans
30-cal endurance bike
10 renegade rows on each arm, 10 TRX Y’s
10 cal bike sprint
3 rounds of 10 push-up+, 10 weighted supermans
20 cal endurance bike
10 renegade rows on each arm, 10 TRX Y’s
10 cal bike sprint
3 rounds of 10 push-up+, 10 weighted supermans
Workout #3: Mountain Man Workout
You’ve read through one workout to strengthen your hips and one workout to improve your shoulder strength for archery. This workout is designed to prepare your legs for hunting season so that they can take you as far as you need to go.
You’ll need a weighted pack for this workout to simulate the demands placed on your legs during hunting season. We’re big believers in functional fitness. Here are the exercises you’ll see in the Mountain Man Workout:
1. Treadmill incline/decline walking
To simulate walking up and down mountains, set your treadmill to an incline of 15. You must walk facing both forwards and backward to prepare for hunting season because walking down a mountain with heavy gear can be just as difficult as walking up.
Step 1: Set your treadmill to an incline of 15
Step 2: Set your speed to an even pace that you can walk at without feeling like you need to grab onto the guard rails
Step 3: Try to maintain a relatively upright posture as you walk
2. Lateral Step-Ups
You’ll need a box or bench for this leg exercise. Since you’ll already have a weighted pack on your back, you shouldn’t need extra weight. Rather than stepping straight forwards and backward, this movement prepares you for the often-awkward and unpredictable steps you’ll be taking in the wilderness.
Step 1: Stand next to a box or bench
Step 2: Place your inside foot on the top of the surface, slightly in front of your body
Step 3: Lean onto the elevated leg and step up by pressing down with that leg
Step 4: Once you have both feet on the box and are standing tall, step down with your outside foot
Step 5: Step your inside foot back to the ground to complete one rep
3. Walking Lunges
This movement prepares your legs for grueling, uphill treks. It works the quadriceps, hamstrings, and glutes, using the weight from the pack on your back to push the leg muscles to the point of fatigue.
Step 1: Find a clear space with room to walk forwards and backward
Step 2: Take a lunge step forwards, planting your front foot flat on the ground
Step 3: Bend your front and back knee, lowering your body towards the ground
Step 4: As you go down, lean over your front leg slightly with your torso
Step 5: Step forward with your back foot, coming up to a standing position with both feet together
Step 6: Lunge with the other leg to complete one rep
Benefits of Pre-Season Bow Hunting Workouts
Preparing your body for hunting season is essential if you want to hit the ground running. You don’t want to waste any opportunities you might have because your upper body muscles aren’t up to the task of accurately shooting your bow. If you find the perfect spot, your legs should be able to take you there without giving out and forcing you to quit.
Unlike hiking or other mountain athletics, you start the journey with a heavy pack, but if you’re successful, you’ll leave with a significantly heavier pack. Sure, you’ll shed some pack weight along the way as you munch through your rations, but with hard work and some luck, the toughest physical challenge will be hauling elk quarters down the mountain at the end. Thankfully a heavy shot of primal adrenaline will help you along the way, but if you want to truly breathe in the victory lap, you’ll need to be in peak physical condition far before bow season begins.
The workouts above prepare your body for the various demands hunting will place on it. A study performed on rugby players found that adding only 10 training sessions before their season started reduced the risk of injury by 17%. With even more time spent training, your injury risk should drop even further.
Even though it’s not viewed as a traditional sport, hunters are mountain athletes nonetheless. So prep your body the same way athletes of other sports would. This isn’t some marketing gimmick either. It’s backed by data and scientific research – in fact, preseason training is the key to improving performance. For instance, a study performed on soccer players showed that sprint training in preseason improved their performance more than playing small games. The take-home point is that going out on small expeditions won’t prepare you for the big hunt in the same way that time spent in the gym will.
Upper body strength is one of the most important factors in archery technique. The shoulder workout will build all areas of the shoulder so that you can use your upper body to draw the bow and confidently take a shot. Strength training improves your technique, and it makes you more confident in your shot. That self-belief is crucial for your next hunt.
Make Every Shot Count
To take advantage of each hunt, you have to prepare your body beforehand. Working out before hunting season can make you more confident in your shot and allow you to cover more ground. Each workout you do before hunting season will make your life a little easier.
With that being said, you won’t get results if you walk into the gym and start doing random exercises. You need a program that targets the specific qualities that a hunter needs, like leg muscle endurance and upper body strength. Plus, you have to take care of your joints to make sure you don’t get hurt.
For guidance, check out the Backcountry Hunter Series. It’s specifically designed for people like you to maximize your performance. If you’re not ready to commit to anything, try the free 14-day MTNTough trial for access to all fitness content.
When you see someone participating in an air rifle shooting competition, you may notice that they are wearing a particular type of clothing. This clothing is not just for show – it serves a specific purpose that helps the shooter to be successful. In this blog post, we’ll take a closer look at why air rifle shooters wear suits and how it helps them to improve their performance.
What’s with the funny outfits in the Olympic shooting?
The first reason why air rifle shooters wear suits is for support. The jacket and pants are usually made from a stiff material, such as canvas, which helps to support the shooter’s body and minimize movement.
This is important because small body movements can have a significant impact on the accuracy of the shot. The shooting jacket and pants also have rough material on contact points, such as the elbows and shoulders. This helps keep the muscles from getting tense while holding the gun.
Another reason why air rifle shooters wear suits is for consistency and accuracy. The shoes that shooters wear have very stiff, flat, oversized soles, which keep the feet from moving.
Lastly, the gloves that shooters wear help to protect their hands from getting blisters or calluses from holding the gun tightly for an extended period of time.
"Debate over whether a 22 air rifle can effectively take down a deer has sparked curiosity among hunting enthusiasts. With its lower muzzle velocity...
")
")
")
")
")