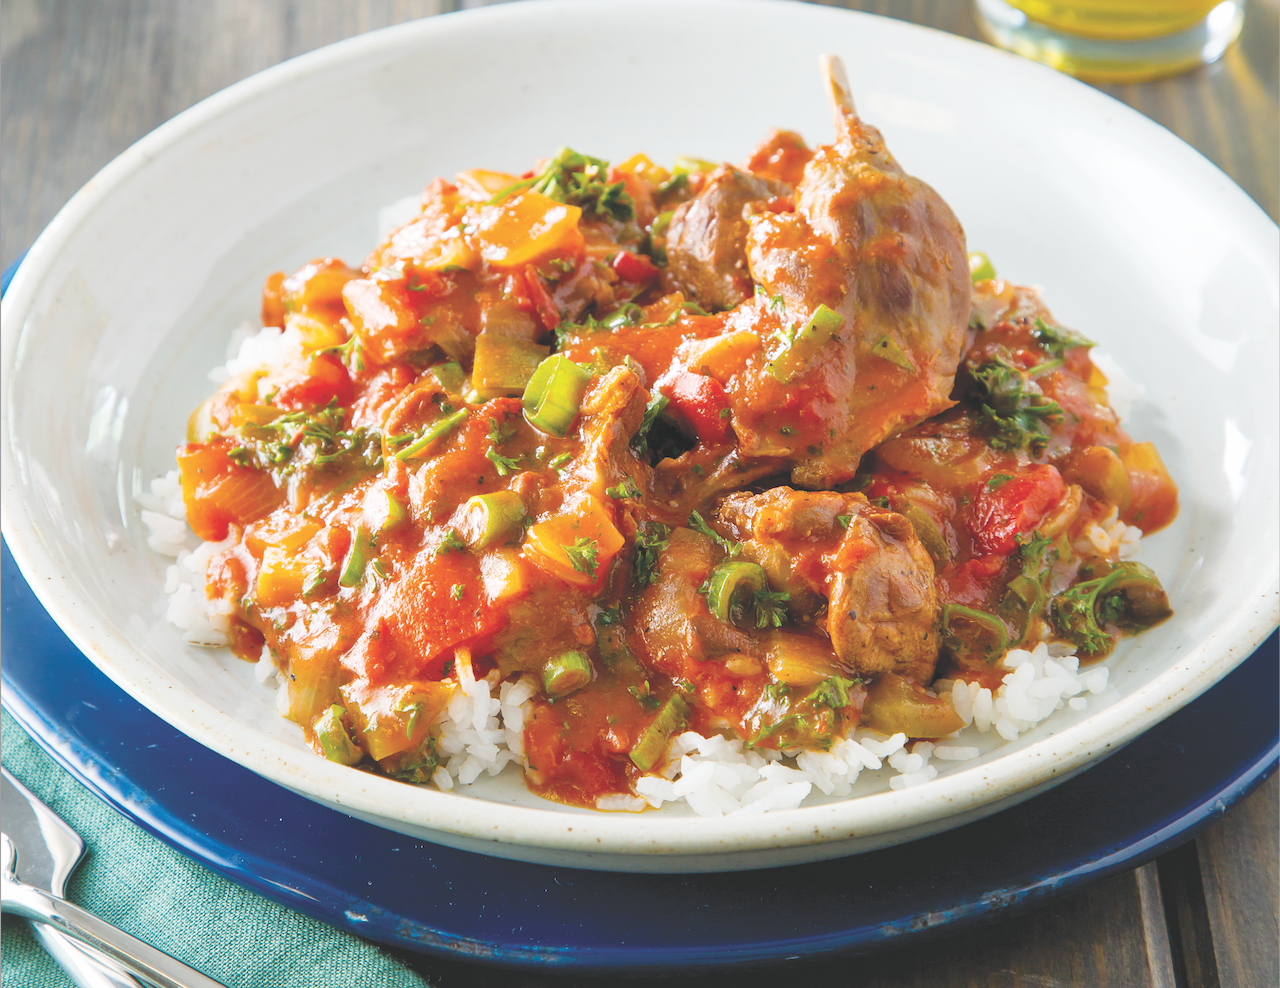
“You’re cooking what?” My dinner guests always ask this question. Yes, squirrel. And trust me, this overlooked meat might surprise you. I’ve spent years perfecting these recipes, and I’m here to share every juicy detail.
Let’s bust some myths. Squirrel meat packs more flavor than your average chicken dinner. Gray squirrels give you the best bang for your buck – they’re bigger and meatier than their red cousins. The meat tastes sweet and nutty (pun intended!), with a wild game kick that’s milder than rabbit.
First things first – you need clean meat. Here’s my straight-to-the-point guide:
Clean it fast after hunting
Wear rubber gloves
Split it into five pieces:
Two front legs
Two back legs
The back piece
Pro tip: Rinse that meat well! Nobody wants to bite into squirrel fur. Trust me, I learned this one the hard way.
The “Shirt and Pants” Method
Sounds funny, right? This trick makes skinning a breeze:
Cut the tail base
Pin the tail under your boot
Pull up on the back legs
Watch the hide peel off like a tiny sweater
Remove the “pants” (hide on back legs)
Let’s Get Cooking: My Top Methods
1. Southern Fried Squirrel
Think of this as the gateway recipe to squirrel cooking.
You’ll Need:
Squirrel pieces
Buttermilk
2 cups flour
Salt and pepper
Garlic powder
Cayenne pepper
Oil for frying
The Magic Steps:
Soak meat in buttermilk (1 hour minimum)
Simmer until tender (90 minutes)
Roll in seasoned flour
Fry until golden (10-12 minutes per side)
Hot tip: Don’t rush the simmering. Tough squirrel meat ruins dinner faster than my aunt’s politics talk at Thanksgiving.
2. Lazy Sunday Slow-Cooker Squirrel
Perfect for those “set it and forget it” days.
Grab These:
Quartered squirrel
Carrots, potatoes, onions
Chicken broth
Thyme
Bay leaf
Salt and pepper
Flour
The Easy Way:
Dump veggies in first
Add meat on top
Pour in broth
Cook low and slow (6-8 hours)
Thicken gravy at the end
3. Fancy-Pants Squirrel Rillettes
Want to impress your foodie friends? This recipe turns squirrel into a fancy French-style spread.
Shopping List:
Squirrel meat
Bacon (everything’s better with bacon)
Onions, carrots, garlic
Dry cider
Juniper berries
Fresh herbs
Salt and pepper
Get Fancy:
Crisp up the bacon
Cook your veggies
Brown the meat
Add cider
Pressure cook (30 minutes)
Shred and mix
Spread on toast
Smart Tips for Better Results
Age Matters
Young squirrels: Quick cooking works fine
Old squirrels: Low and slow saves the day
Make it Tender
Try these tricks:
Buttermilk bath (1-8 hours)
Salt water soak (overnight)
Pre-cook before frying
Slow cook until tender
Seasoning Magic
Basic: Salt, pepper, garlic
Southern style: Add some kick with Cajun spices
European flair: Juniper berries and herbs
Italian twist: Garlic, herbs, white wine
More Recipe Ideas
Grandma’s-Style Pot Pie
Nothing beats a bubbling pot pie on a cold day. The flaky crust hides tender meat and rich gravy underneath.
Squirrel Gets Fancy (Alfredo Style)
My Italian grandmother would roll in her grave, but this twist on classic Alfredo sauce works surprisingly well.
Backyard BBQ Squirrel
Slather it with your favorite sauce and cook it slow. Makes amazing sandwiches!
Stay Safe Out There
Important stuff:
Only cook legally hunted squirrels
Clean and cook right away
Watch for tiny bones
Keep everything cool and clean
Cook it through
What Goes Well With Squirrel?
Old School Sides:
Creamy mashed potatoes
Fresh-baked cornbread
Collard greens
Roasted root vegetables
Fresh herbs on top
Drink Pairings:
Light reds
Rich whites
Local cider
Common Goofs to Skip
Racing through young meat cooking
Rushing older meat
Skipping the soaking step
Leaving fur behind
Cooking too hot
Real Talk: Why Cook Squirrel?
Squirrel meat connects us to old-school cooking. It’s sustainable, tasty, and teaches patience in the kitchen. Plus, it makes for great dinner conversation!
From My Kitchen Disasters to Your Success
I’ll never forget my first squirrel cooking adventure. The meat was tough as leather, and my girlfriend (now wife) still teases me about it. But practice makes perfect. Start with the simple fried recipe, then work your way up to the fancy stuff.
The Final Bite
Cooking squirrel might raise eyebrows, but it rewards the adventurous cook. Each recipe tells a story – of hunters, home cooks, and hungry families making the most of what nature provides.
Don’t let its small size fool you. Squirrel meat packs flavor into every bite. Master these techniques, and you’ll add something special to your cooking skills.
Remember:
Clean it well
Cook it right
Share it proudly
The next time someone asks “You’re cooking what?” you’ll have quite a story to tell. And more importantly, a delicious meal to share.
One of the most often-asked questions in bow hunting is what peep sight size should I be using?
Sorry to disappoint, there isn’t a black and white answer that would instantly custom match you with the right peep size for your setup. There are more than a couple factors that you need to consider before you get all gung-ho on going with the smallest or largest size you can find.
Like everything to do with bows, there’s quite a bit that goes into answering this question since it has a lot to do with your setup, hunting style, and vision.
We’ll talk you through the ins and outs of big and small peep sight sizes. By the end, you may be closer to determining what size will do you right in the field whether you’re sticking it out during the day, you’re out at first and last light, in the stand, or long-range hunting.
You know this has to be addressed. For the many peep users out there, there are just as many that go without. But, what exactly is a peep sight? It’s a string attachment that ensures line of sight alignment between your eye using the peep, sight housing, and the target.
Peep Sight Pros & Cons
Pros:
Encourages consistent form/anchor point
Enhance sight picture focus
Can improve aim and accuracy
Easy to use
Inexpensive
Available in various sizes
Cons:
Can only use one eye
Darkens sight picture
Can twist out of place when string becomes worn
Of course, going peepless also has its own set of benefits. It forces you to become intimately familiar with consistent anchor points so you have the same form when shooting as when you sighted in your bow. You’ll also have instant low light visibility improvement, faster target acquisition time, and obviously you won’t have to deal with any peep sight alignment issues.
However, it takes practice and effort to get used to going peepless and making it an effective move on your part. Heavy emphasis on form can’t be overstated. Like many things to do with bows and shooting, you either like it or you don’t.
A vast majority of bow shooters still use peep sights, and they’re often pre-installed when you purchase your bow. With that in mind, here’s some peep sight sizes that could do it right for your type of hunting style.
Small Peep Sights for Hunting
Peeps with small diameter sizes are known to improve accuracy. Target and competition shooters may sport small peep sights because they offer a narrow aiming window.
During normal lighting conditions that are expected with daylight hunting, a small peep can actually offer better sight picture clarity since the aperture allows for enhanced focus on the target downrange.
However, if lighting conditions were to change such as going from open areas to thick timber with heavy shading or when it’s low light, your sight picture will become dark. Those with vision problems may not benefit from using a small peep right off the bat.
So, it goes without saying that a small peep would be suitable for hunters who require extreme accuracy, say for game with small kill zones. It would only be appropriate for daylight hunting when there’s as much light as possible, and only those with average to excellent eyesight could take advantage of a small peep.
Small peep sight sizes can include 1/32″, 3/64″, 1/16″, 3/32″, and 1/8″ being the largest of this lot.
It’s worth mentioning that long axle to axle bows would pair well with small peeps since the string comes closer to the eye.
Large Peep Sights for Hunting
Peeps with larger diameter sizes may not be as accurate-driven as small peep sights. They’re geared towards allowing more light in for a brighter sight picture in low light conditions or in heavily shaded areas. They’d also be appropriate for close range hunting to take advantage of the full field of view to appropriately aim your pin on the target.
Those with problematic eyesight and vision problems would be better suited with a large peep sight for hunting. Sacrificing the accuracy expected of a small peep size within forgivable boundaries in hunting is acceptable because of the large kill zones on animals such as deer and elk.
However, even if you prefer the larger peep size, you’ll still need it to properly fit your sight picture. If you have too much floating space around the sight housing ring while looking through the peep, you will run into accuracy and form issues.
If you’re a hunter that takes advantage of first and last legal light, may have aging eyes, and may be shooting from a stand and taking close range shots, then you might want to consider a bigger peep size.
Short axle to axle bows also pair well with large peeps since they have sharp string angles that forces the peep further away from the eye.
Large peep sizes can include 3/16″, 7/32″, 1/4″, and 5/16″.
How to Use a Peep Sight
Knowing how to use a peep sight might help you to determine what the best peep sight size will be for your setup. The most popular sizing method is to opt for the peep that fits the sight housing ring. What do we mean by this? There are two different ways to use a peep sight.
Method 1:
At full draw, you center the pin you need to aim with within the middle of the peep sight. Depending on what pin you use, you may or may not see part of the top or bottom of the sight housing within the peep sight view.
Method 2:
The entire sight housing ring must match the peep sight ring. You have an unobstructed view of all pins, full field of view, and the sight housing ring matches perfectly with the peep sight.
Method 2 is the recommended way to use a peep sight since it encourages you to choose the most appropriate peep size for your setup. It also ensures your anchor point remains the same regardless of what pin you need to aim with. Slightly move at the waist to get the right pin on your target’s kill zone.
Method 1 is still used by some, however, it can cause a drop in your anchor point to get your bottom pins centered. Moving your anchor point means inconsistent form, reduced accuracy, and can be a complete miss.
Trying out a few different sizes while at a dealer will also help to narrow down what size works best for your setup. If you plan on using the same bow for multiple activities no matter the time of day or lighting conditions, you can save time finding the right peep sight size and opt for a specialty peep sight.
Specialty Archery Peep Sights
These types of sights may be adjustable in diameter, easily interchangeable to be transferred from bow to bow, and are completely compatible to be used with different bow sights. They are typically more expensive than your average one-size peep, but the cost may be worth it if your needs require the specialty features.
You might also be interested in what peep accessories such as a clarifier and verifier can do for your sight picture.
Only You Know the Answer
Outfitting the perfect peep to match your setup is a personal touch. Your vision is needed to confirm whether a certain peep will work for you.
Although trying out different peeps might be tedious, it’ll be worth it in the end. Taking the time to properly prep your gear for the hunt will improve your odds for success. At the very least, you won’t be one of them who loses the shot for whatever reason because you have the wrong size peep!
Further Reading
How to Measure Scope Ring Height (With Pics & Calculations)
How to Adjust a Rifle Scope: 6 Scope Adjustments Explained!
How to Level a Scope on a Rifle [Step-by-Step With Pics]
What is a Rifle Scope Ruler (Mildot Master) & How to Use It?
Are you gearing up for your next hunting trip? There’s no question that hunting trips provide a unique and exciting opportunity to escape the everyday grind, but they also carry their fair share of pressure. Spending an extended amount of time away from home can be daunting — especially if you have poor planning skills! Before heading out into the wild, make sure to plan ahead and avoid some common mistakes so you can enjoy every second without stressing over things like supplies or accommodations. In this blog post, we’ll walk you through everything from pre-planning logistics to field experience tactics in The Ultimate Hunting Trip Prep: Mistakes to Avoid for a Stress-Free Experience. Get ready for success!
When it comes to preparing for a hunting trip, there are a few key things to keep in mind. Firstly, you’ll want to make sure you do your research ahead of time. This means reading up on the gear you’ll need, so that you’re fully prepared out in the field. For this reason, it would be smart to take a look at this guide to buying hunting boots and other gear, for example, so you know what kind of shoes to wear. Additionally, it’s important to be aware of any hunting regulations in the area where you’ll be hunting. Regulations and requirements can vary by region, so it’s worth checking out the relevant information before you set out. Lastly, it’s essential to keep safety front of mind. This means ensuring that you’re aware of any particular risks associated with your type of hunt, and knowing how to minimize them as much as possible. With a bit of careful planning and preparation, you’ll be able to enjoy your hunting trip to the fullest.
Pack a variety of clothing and gear
As any experienced hunter will tell you, it’s crucial to be prepared for whatever the weather may throw your way. Packing a variety of clothing and gear that will keep you warm and dry is absolutely essential if you want to be comfortable and focused while out hunting. From waterproof jackets to insulated boots, there are a variety of products on the market that can help ensure that you stay comfortable and protected, no matter what the conditions are like outside. So if you’re planning an upcoming hunting trip, be sure to invest in some high-quality gear that will keep you nice and toasty along the way!
Pack your weapons correctly
Ensuring that your firearms are stored safely and correctly is not only a legal obligation but also an ethical responsibility. Before taking off on your hunting trip, ensure your weapons are unloaded and stored in a case or container that is secure and protective. While accidentally accessing a loaded weapon during transportation may seem improbable, the repercussions could be life-changing. Failure to pack your weapons correctly can have not only legal consequences but also endanger you and others around you, making it essential to secure and handle them with care.
Don’t forget a first aid kit
When setting out on a hunting trip, there are certain essentials that you always remember to pack – your firearm, ammunition, binoculars, and perhaps your trusty hunting dog. But one item that should never be overlooked is a well-stocked first aid kit. Accidents can happen in the blink of an eye, and when you’re out in the wilderness, medical attention may be miles away. The basic supplies you need to include in your kit are bandages, antiseptic cream, and tweezers. However, it’s also important to consider the specific risks of your chosen hunt. For example, if you’re hunting in an area with a high risk of snake bites, then packing snakebite treatment could be a life-saver. So, before you hit the trail, make sure you’ve got a good-quality first aid kit and have stocked it with all the necessary items to keep you safe and healthy on your hunting adventure.
In conclusion, with the right preparations and considerations, a successful hunting trip is achievable. Taking into account the tips outlined in this post will ensure a stress-free experience and that you won’t forget any important supplies when setting out on your adventure. Especially important is to do your research – finding out about hunting regulations in the area, packing correctly for inclement weather conditions, preparing meals ahead of time, ensuring weapons are securely stored away, and restraining from taking unnecessary risks while hunting – will all contribute to an unforgettable time in nature. Lastly, but importantly too, make sure you double-check the necessary permits and documents needed before your journey starts. Even if you’re an experienced hunter eager to take on new challenges on your next hunt – following even these basics of hunting hunt preparation will give you some peace of mind as you wander off on an unpredictable adventure.
There are many benefits to night fishing for bass, especially during the summer months. Warm waters in evening hours make fish sluggish, so they are less skittish and more inclined to take your bait! Another great advantage to fishing at night is you usually have the water all to yourself—and after dark in high-summer is often the only time that is possible. While fishing at night may seem intimidating for those who haven’t done it before, it’s actually quite simple and easy to do. Ahead, get expert tips from angler extraordinaire Jerry Audet who shares important safety tips as well as secret tricks for the best success.
Many fishermen are surprised to know that bass can be caught easily at night, but the truth is that bass really never stop feeding (provided water temperatures are adequate for their metabolism). They may be more or less aggressive based on a variety of factors, but they’re always looking for a meal—especially when the Sun goes down.
Bass have excellent senses that extend beyond vision, and the night actually gives them an ambush advantage, so they are more inclined to do their own fishing in the dark. In fact, even in the daylight, bass don’t rely on their sight as a primary sense. Instead, they detect vibrations and sounds to zero-in on their prey. Sight is reserved for the end of the hunt. They are great nocturnal hunters because they don’t have to see their prey to chase it down.
Safety Is Important
Safety is important—especially if you’re in a kayak or a boat. Make sure you use night fishing lights (called “running lights”), a loud horn or air can in case of an emergency, and a very bright light that you can flash at a boater who may not be paying attention. Fish in waters that you know well so you don’t get lost. (Don’t explore at night. Save that for during the day.). Also, always go out with a fishing buddy. Night fishing is really simple and easy once you get used to it. But if you’re nervous, we suggest fishing from shore first (which is far less complicated).
Any Special Gear?
No special gear is needed to fish at night, except a headlamp. Don’t use it while you’re fishing, only when you need to change a lure, tie a knot, or release a fish. Try to keep the light off the water, as it can spook fish. I like using a red headlight for this reason. Plus, it helps preserve your night vision. (White lights are blinding.)
How About Lures And Bait?
As far as lures go, many anglers think a glowing lure is important, so the bass can see it. But this simply isn’t true and may actually be a deterrent as it looks unnatural. Color matters a lot less at night, as the bass track your lures by sound and vibration.
Fish actually have an easier time seeing a dark colored lure at night, as the contrast with dark water or sky is easier for them to detect. The best nighttime colors vary based on what you are doing, how dark the night is, and how deep your lure is in the water. The higher up in the water column, the lighter your lure’s belly should be. This simulates nature.
Most fish and frogs have white bellies and bass are most likely looking up at the lure from beneath it. If you’re mid-column or down deep, use a dark green, black, or purple lure. However if you’re just starting out at night, white is a perfectly fine color. It’s easier for you to see and work with (in and out of the water), and it will catch bass the vast majority of the time (day and night).
At night, use lures that ride high in the water. Fish will slide into the shallows after dark looking for food (because they’re less afraid of being spotted by predators) and working those skinny waters means you are more likely to get a snag.
Using a lure that stays near the surface really helps prevent this. Something that throws a wake on the surface really draws the fish’s attention after dark. Some of the best night fishing lures include wake baits and slow-sink weightless soft-plastics (usually jerk-bait style), but subtle poppers, walk-the-dog lures, and shallow-running crank baits all work great. However, chances are that your favorite day-time lure will work great at night too. It’s just up to you to give it a shot!
Good luck night fishing!
Join The Discussion
Have you ever been fishing at night?
Had much success?
Share your experience with your community here in the comments below!
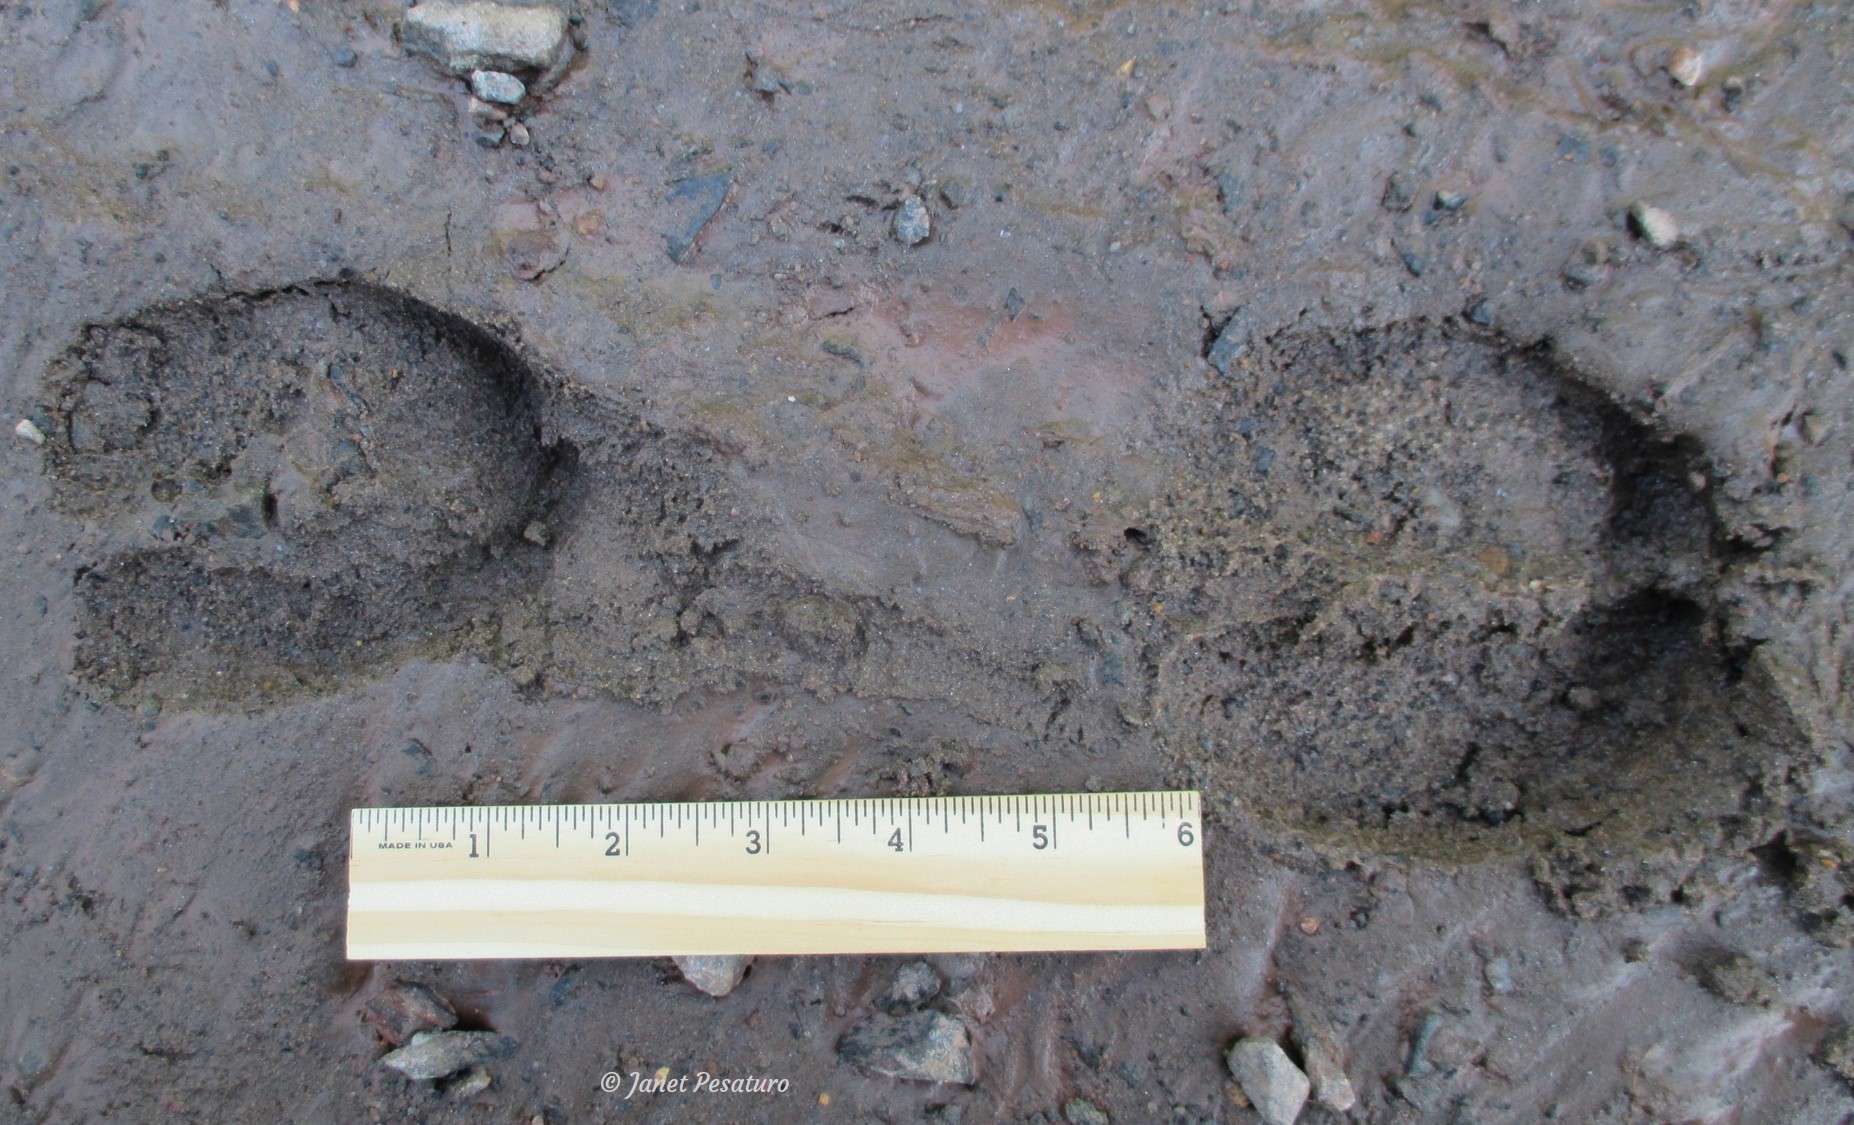
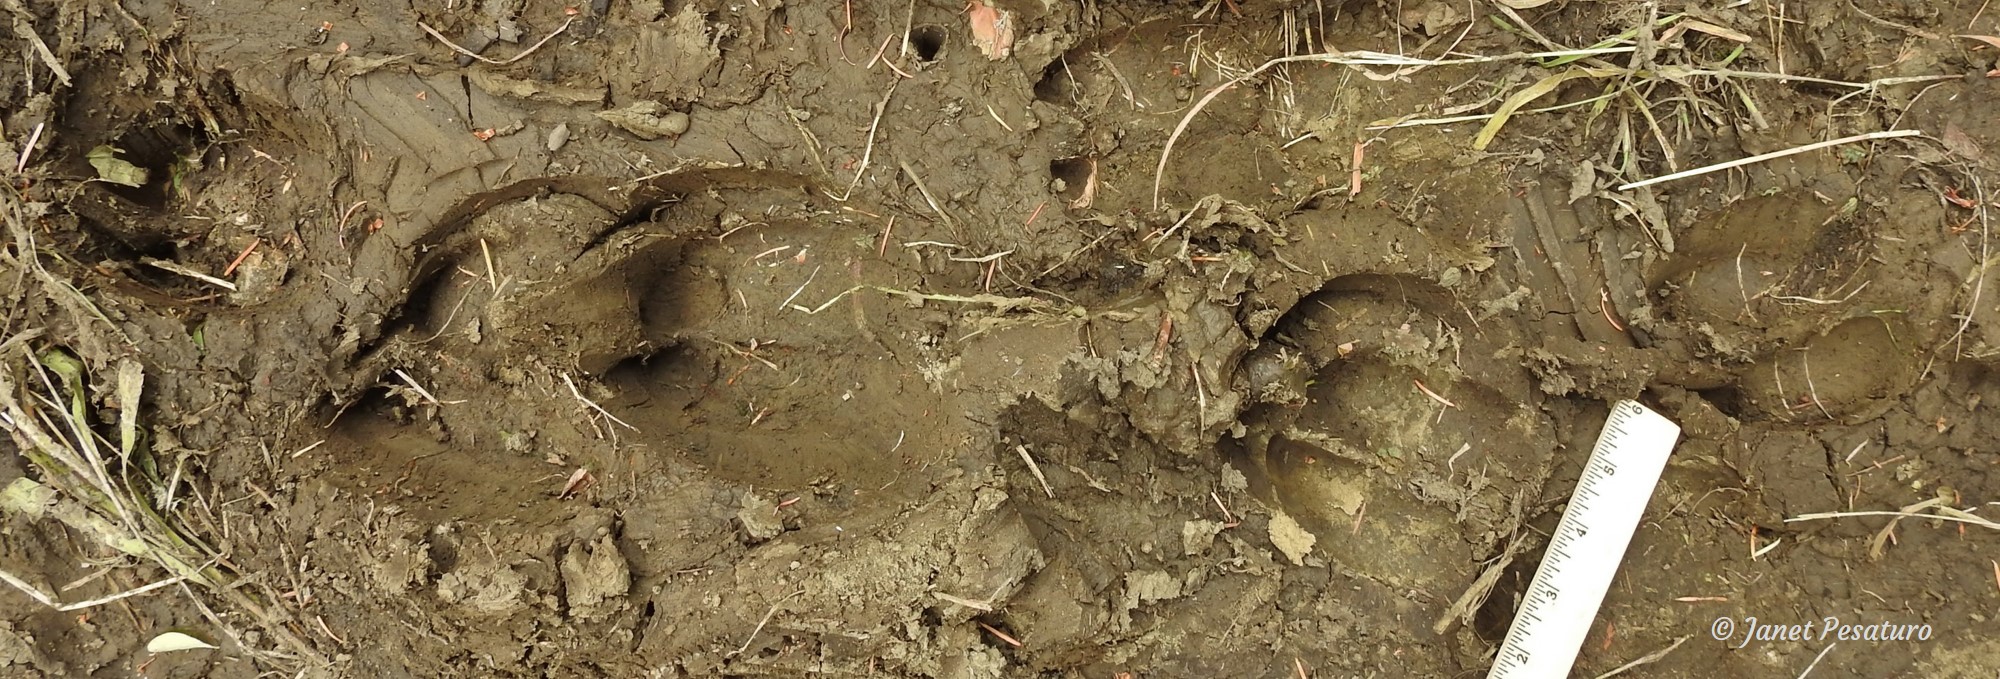
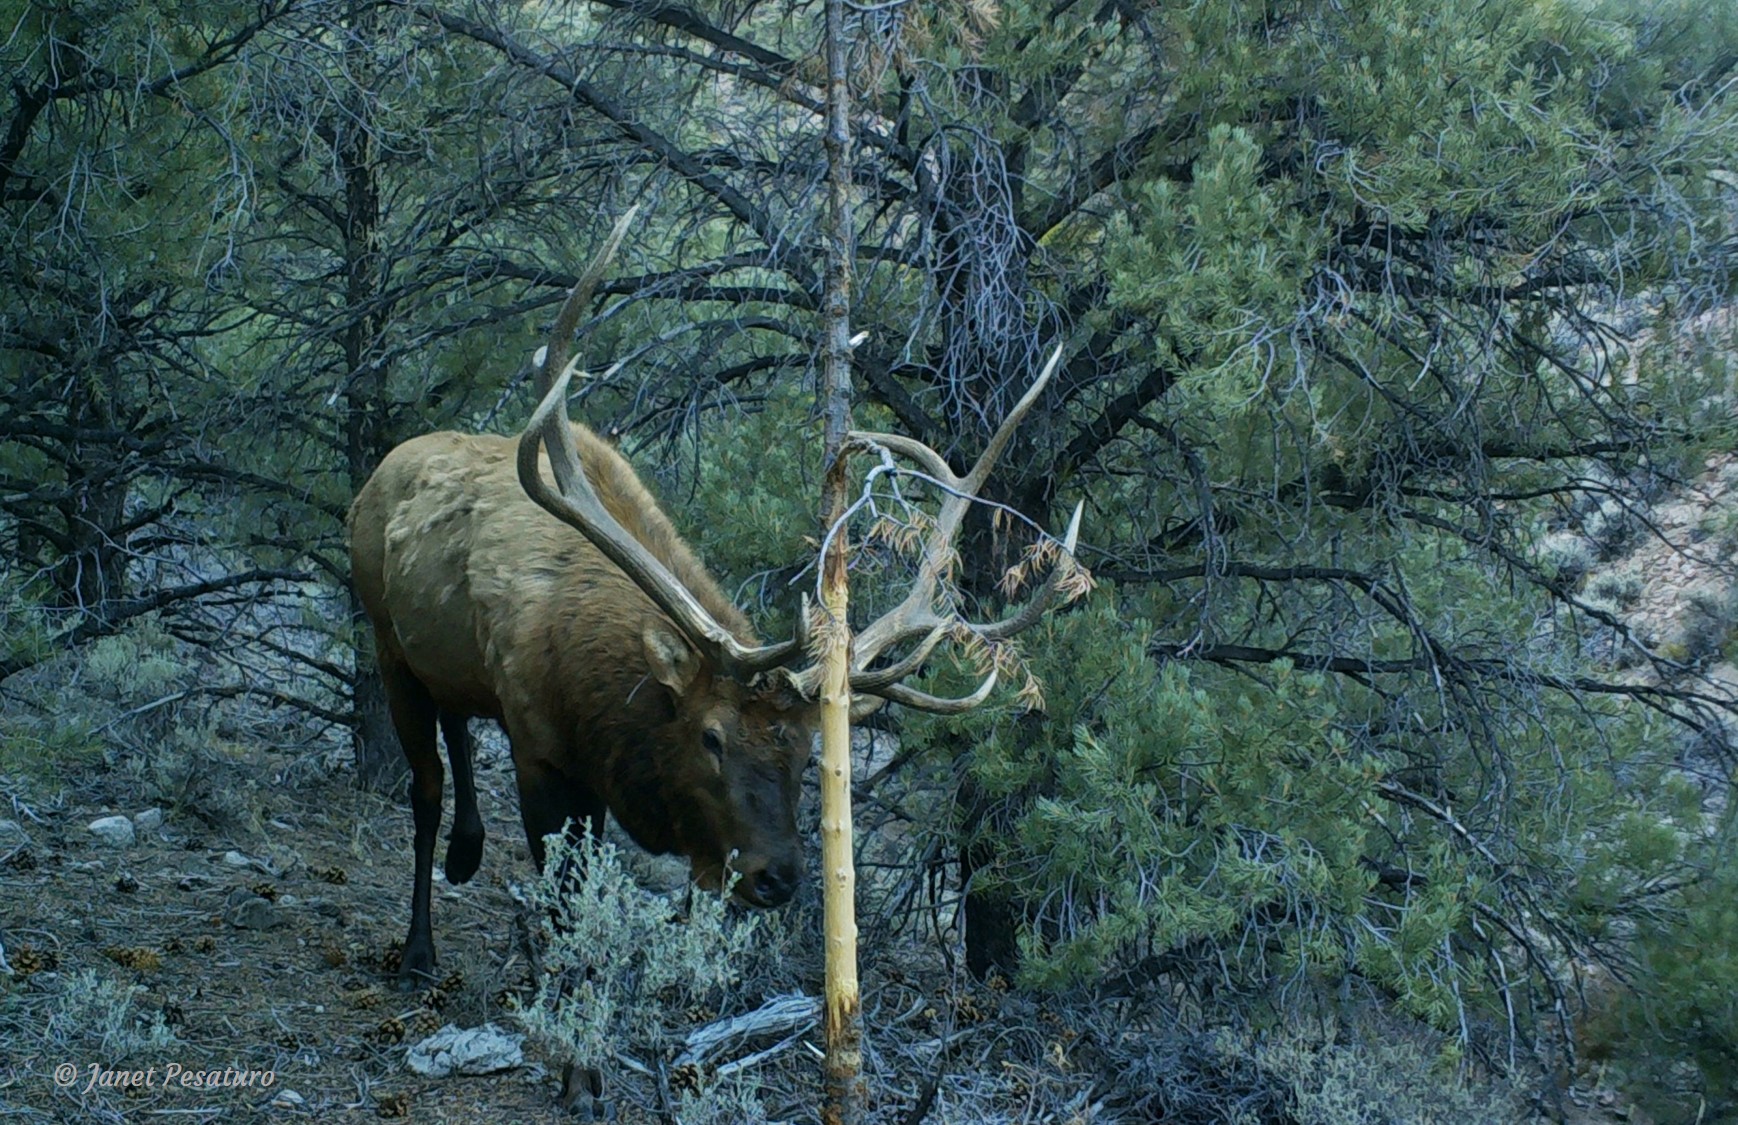
The elk, Cervus canadensis (formerly Cervus elaphus canadensis), is one of the largest members of the deer family. Its tracks and sign are similar to those of deer, but think larger hooves, longer strides, larger scat pellets, and look for feeding sign and antler rubs higher on trees. Identifying elk tracks and sign is essential for camera trapping the species and rutting sign is especially useful because animals tend to re-use these spots. The elk in the photo above was captured with a trail camera targeting the antler rub (see below under “rutting behavior”) because the bull was likely to return.
As members of the deer family, elk have cloven hooves. Elk tracks are larger than deer tracks and smaller than moose tracks, but overlap in size with both deer and moose tracks. However, elk tracks are noticeably rounder. Front tracks of an adult are about 4 inches long and wide. Hind tracks are smaller and narrower, about 3 1/2 inches long and 3 inches wide. Like deer and moose, elk have 2 dewclaws on each foot, situated higher up on the leg. In soft substrate or when the animal is running, hooves may splay and dewclaws may register.
Front and hind elk tracks. The larger, rounder track on the right is the front.
Elk usually travel in an alternating walk with a step length of 1 1/2 to 3 feet, and a trail width of 7-13 inches. But because they are social animals which travel in groups, you often find a mess of tracks left by multiple animals rather than a nice clear trail pattern of one individual.
Elk tracks left by multiple animals traveling together on a well-used run.
Scat
Elk excrete pellets measuring about 3/4 inch by 1/2 inch. Dry forage, commonly consumed in winter, results in discrete pellets. A diet of moist, lush vegetation results in clumped pellets or even pies.
Feeding sign
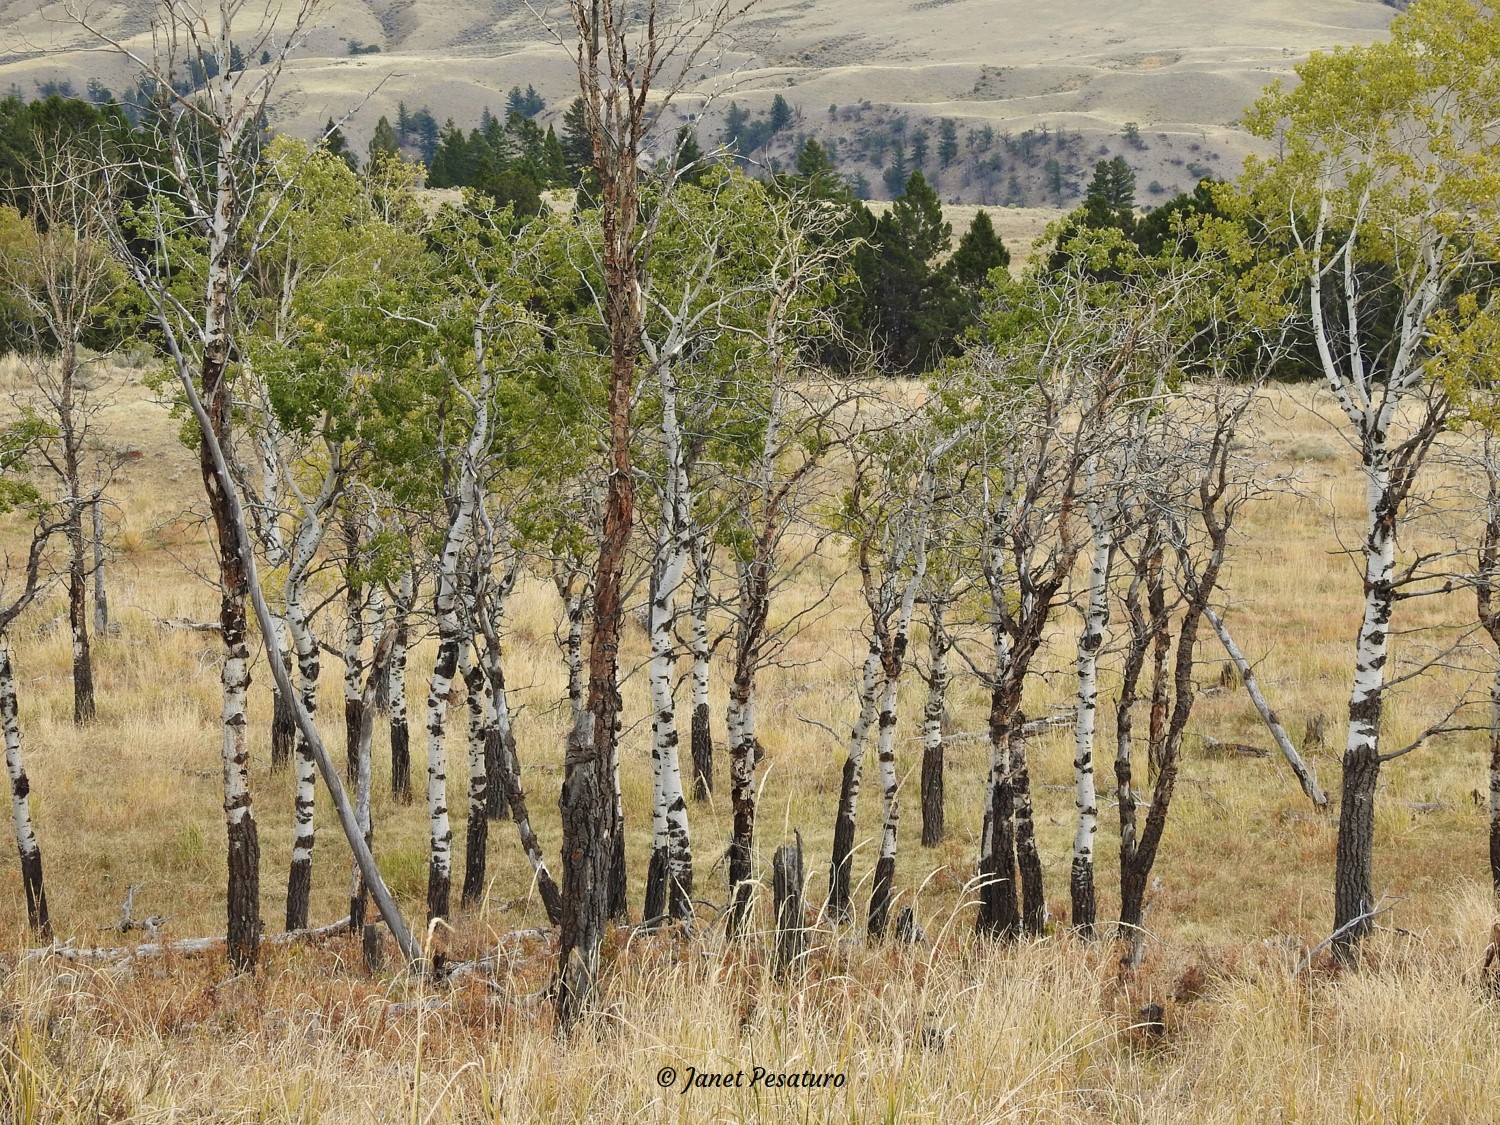
To find feeding sign, you must know the animal’s diet. In spring and summer, elk feed on grasses, sedges, forbs, aquatic plants, and leaves of trees and shrubs, such as aspens, willows, serviceberry, and chokeberry. In winter they paw through the snow for grass and eat the twigs and bark of trees, especially aspen. Grass makes up a larger portion of the elk’s diet than the deer’s or moose’s diet.
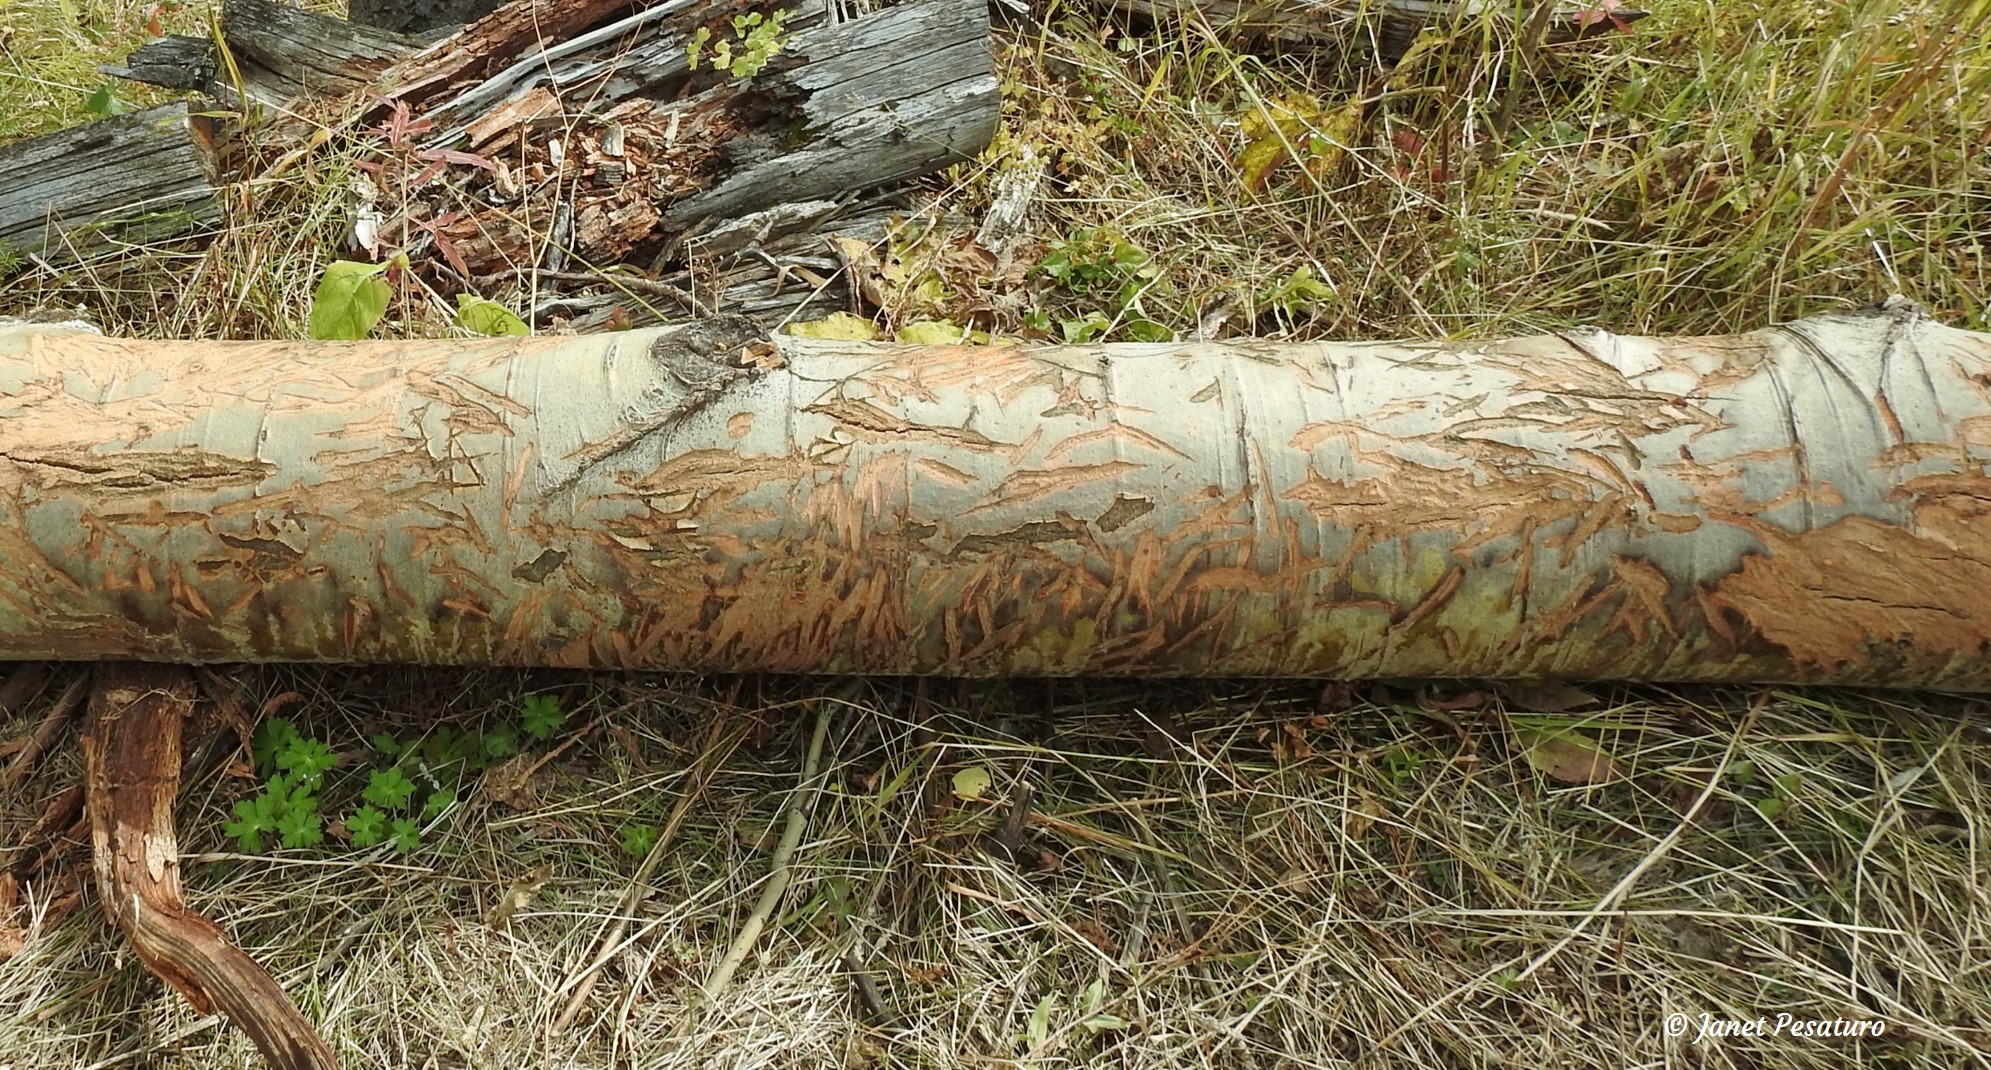
The key to find grazing and browsing sign is ragged ends: Like deer and moose, elk have lower incisors but not upper incisors, so they cannot make clean cuts through plants the way rodents and rabbits can. Instead, they tear vegetation between their lower incisors and the upper hard palate, leaving frayed ends. When consuming bark, they scrape upward with their lower incisors, often leaving frayed bark at the upper end of the scrape.
When you find ungulate feeding sign, consider the height. Deer feeding sign is usually 1-3 feet above the ground, moose sign 3-7 feet off the ground, and elk sign is in between, overlapping with both deer and moose. Snow pack allows each species to reach even higher. Obviously it’s not always possible to determine the species based solely on feeding sign, so look for scat and tracks, as well.
A grove of aspens with dark scarring where elk, and possibly deer and moose, have in previous years fed on bark by scraping with their lower incisors. The scarring goes as high as the animals can reach to feed.An aspen log with fresh sign of ungulate feeding on the bark by scraping with lower incisors.
Rutting sign
During the elk rut, spanning September and October in the north and more spread out in the south, bulls thrash and rub their antlers and foreheads on trees and shrubs, leaving behind broken branches, stripped bark, and sometimes hair. They also leave behind scent from their pre-orbital glands, thus communicating with other elk. Conifer saplings are often used, and the rubbed area is usually 2-5 feet above the ground. Bulls also create wallows in moist areas by churning up mud with hooves and/or goring with antlers. He urinates into the scrape and onto his neck and then sits down into the pit and rolls his neck, caking his mane with urine-soaked mud.
With head lowered, a bull elk approaches a conifer sapling used as an antler rub. Bulls may use the same trees repeatedly, even from year to year, so they make excellent trail camera targets. This and the lead photo of this article were captured with an Exodus Lift II trail camera.
Do you have any questions or pointers about finding or identifying elk tracks and sign? Feel free to share in a comment below.
Sources
Elbroch, M. Mammal Tracks & Sign: A Guide to North American Species. Mechanicsburg, PA: Stackpole Books, 2003.Rocky Mountain Elk Foundation: Elk Basics.
Related Posts
White-tailed Deer Scrape ActionMoose Hooves and LegsPronghorn Tracks and Sign
Here’s our review of the Ravin R10 crossbow. Ravin presents rifle-like crossbows that are significantly smaller and narrower than crossbows of other brands. The R10 is the successor of the R9 Predator. We also reviewed the Ravin R20 and the R26.
We were very excited to put the Ravin R10 to the test and can already tell you that we had a lot of fun with the crossbow for this review and we will have a lot of fun with the crossbow in the coming years because the R10 is built to last.
In the package we found the Ravin R10 crossbow with Predator Dusk Camo, a 100 yard illuminated long-range scope, three Ravin arrows(300 grain) with nocks and 100 grain practice points, a detachable cocking handle, mounting bracket, and a Ravin user manual.
The crossbow comes in the exclusive to Ravin crossbows, Predator Dusk Camo, and is also available in Gunmetal grey camo.
The Ravin R10 is significantly more compact compared to its predecessor, the R9 Predator. The R10 measures a total length of 33 inches, an axle to axle width of 10.5 inches uncocked, and only 6 inches when cocked. The Ravin R10 tips our scales at 6.8 pounds.
The Ravin R10 is a lightweight crossbow that is highly maneuverable, the crossbow is suited for run and gun situations and easy to handle in tight spaces such as hunting blinds,
Ravin is of course famous for its patented Helicoil technology. Crossbows with Helicoil have a number of design advantages, and it allows the Frictionless Flight system to work.
The R10 features Helicoil technology and the Frictionless Flight System. Helicoil allows the cams to rotate 340-degrees, generating higher speeds with better accuracy. With a traditional crossbow, the entire arrow rests on the rail.
The Helicoil system allows an arrow to float freely, eliminating energy loss due to friction. The Helicoil cams ensure that the cable barely touches the rails and there is no downward pressure on the cable. As a result, the cable is not slowed down and barely wears.
Scope
The Ravin scope is a high-end 100 yard crossbow scope that is made of high-quality materials. The scope features fully coated lenses with red and green illuminated reticles. The scope is crystal clear to look through and performs well. The Ravin scope is fog-free and waterproof and contains shock and kickback resistant technology.
Cocking mechanism
The R10 is equipped with a built-in crank cocking mechanism, the so-called Versa-Draw cocking system. This cocking mechanism reduces the crossbow’s draw weight to a mere 12 pounds of force. The cocking handle is of course detachable.
The Versa-Draw cocking mechanism also ensures that the crossbow is cocked 100 percent evenly for an extra clean shot. Cocking by hand is not possible, because of this you are not able to release half-cocked.
Trigger
The Ravin R10 comes with Ravin’s Tac Trigger Fire System. It is a crisp 4 pound trigger that gives you control over the shot. Shooting with the Tac trigger system is not noiseless but very quiet and with little vibration. The trigger system contains anti-dry fire technology to prevent the crossbow from dry firing.
Range Test
The Ravin R10 is a fast and powerful crossbow that shoots arrows with speeds up to 400 feet per second and is capable of delivering 142 KE knockdown power.
We used the Ravin arrows(300 grain) to speed test the Ravin R10. On our chronograph, we measured speeds in the range of 360-380 feet per second.
The R10 is an extremely accurate crossbow. The superb stability of the crossbow combined with Helicoil technology and the excellent 100-yard scope make the R10 one of the most accurate crossbows available on the market today.
WARNING: DO NOT USE NON-RAVIN ARROWS OR NOCKS WITH YOUR RAVIN CROSSBOW.
Assembly
The Ravin R10 comes fully assembled and with a Ravin crossbow manual. You only have to mount the scope, attach the side mount quiver, and accessory bracket. It takes a couple of shots to finetune the scope.
Install the scope
Tho install the scope first attach the bottom rings on the rail. Lay the scope into the bottom rings. Place the top rings on the bottom rings so the scope is surrounded. Lighty snug up the screws on the top rings so you can still freely move the scope in the rings. Adjust the scope until you find the furthest point forward to ensure maximum eye relief (at least 2 inches from your eye) that allows you to see a full field of view.
Remove the elevation turret cap and place a level on the elevation turret. Rotate the scope in the rings until it is level with your the crossbow limbs. Tighten the upper rings, alternating between front and back screws, while still keeping an eye on your scope levels. Keep slightly tightening and alternating from front to back until secure. Rotate the FPS selection dial to match the manufacturer’s advertised speed.
Attach the quiver
Attach the mounting bracket to the bottom of the Ravin R10. Screw the mounting bracket into the hole on the bottom of the Picatinny rail with the sloped surfaces on the mounting bracket pointing forward.
To attach the Quiver to the mounting bracket, press and hold the thumb release on the mounting bracket. Position the posts of the quiver in the holes on the mounting bracket with the hood facing forward. Release the thumb release to lock the Quiver in place.
Reverse the process to remove the quiver from your crossbow. The quiver can be mounted on either side of the mounting bracket. Most right-handed shooters prefer to locate the quiver on the right side.
Attaching and removing the cocking handle
To attach the Cocking Handle to the mounting bracket, press and hold the thumb release on the mounting bracket. Position the posts of the Handle in the holes on the mounting bracket with the Cocking Handle head facing forward. Release the thumb release to lock the Cocking Handle in place. Reverse the process to remove the Cocking Handle.
Recommended Accessories
Arrows & Broadheads
We recommend using 400 grain Ravin Arrows. These arrows are made from 100 percent pure carbon and offer quiet, hard-hitting performance. They feature brass inserts and aluminum nock bushings.
Combine the arrows with Ravin’s mechanical broadheads. These broadheads are optimised for crossbows with velocities of up to 450 feet per second.
Storage and Transportation
We recommend a Ravin R182 Hard-Shell crossbow case to properly store and carry the Ravin R10.
We recommend Ravin’s R260 padded crossbow shoulder sling. It is an adjustable 2 1/2-inch wide padded non-slip sling with a neoprene design.
Hunting is an exciting and rewarding activity that can bring together family and friends for a shared adventure. To make sure you have an unforgettable hunting experience, it’s important to plan ahead and be prepared. Here are five tips to help you get ready:
Going hunting can be an exciting and fulfilling experience. To make it even more enjoyable and successful, you must be sure to have the right gear. Having the ideal equipment for your hunt is essential for increasing comfort and effectiveness in the field.
In order to get the best out of a hunting session, it’s important to make sure that you are prepared with items such as firearms, boots, clothing, scopes, and camping supplies.
If possible, upgrade your rifle by getting a rifle sling, a bipod, laser sights, a cheek riser, a suppressor, etc.
Purchasing gear appropriate for your preferred game and location would go a long way in ensuring that your hunting trip is successful and memorable.
You can also rent a campervan from Travellers Autobarn, which will give you the freedom to explore and hunt in some of the most beautiful locations across Australia.
Practice Your Skills
An unforgettable hunting experience starts with preparing your skills. Practicing your shooting, tracking, and navigation methods can help you feel confident in the field. A few key elements to practice are accuracy, strength, and speed. Being accurate with your aim allows you to rapidly fire at targets without wasting too much ammunition or being off-target. Having physical strength means that you can move quickly between environments and easily carry any sort of equipment needed for the journey.
Lastly, having a good speed in target recognition gives you the advantage of spotting what it is you’re looking for faster and making better decisions about whether or not to continue pursuing a hunt. With enough hard work and dedication added into the mix, practicing these essential skills will ensure a successful and amazing hunting experience.
Know the Rules and Regulations
As with any activity, it’s important to know the rules and regulations set forth for a hunting experience. Being aware of local laws, conservation initiatives, and any other policies will help ensure a safe, effective trip. Understanding what type of game can be hunted in an area is essential, as well as knowing size requirements, season restrictions, and even daily bag limits.
Having this knowledge before heading out can help ensure that you have the best possible hunting experience. Additionally, knowing the rules can save hunters from potentially costly legal consequences if they are improperly informed about their state’s regulations. Learning the rules is an essential part of preparing for an unforgettable hunting experience!
Research Your Location
No matter what type of hunting experience you are embarking on, research is key to a successful experience. Before you even leave home for your hunting trip, knowing the land and potential areas where the game can be found is imperative for success. Researching the location can help you understand the local climate, terrain, and any regulations or rules placements that may be different from your regular hunting spot.
With advances in technology, such as online mapping systems, geolocation devices, and weather apps, it has never been easier to be knowledgeable about your target location. Gathering this information before setting out on your hunting adventure will ensure that you come prepared with all the necessary items for an unforgettable experience!
Make Safety a Priority
Hunting is an enjoyable and unique experience, but for it to be truly memorable, safety must come first. Before heading out on the hunt, packing the right items and checking them twice is key. A hunter should have basic medical supplies such as bandages and antiseptic wipes in their day pack, as well as a signaling device like a whistle or flare in case of emergency. Being aware of one’s surroundings and engaging in dialogue with other hunters are also important safety tips.
Additionally, hunters should carry a topographical map plus a compass or GPS system so they don’t get lost, wear blaze orange so that other people can visually identify them right away, and locate hunting areas that do not allow motorized vehicles in order to avoid injury from ATV crashes, and stay calm when wildlife spooks — the wet ground may result in slipping and tripping hazards. Taking these steps will help ensure that the hunt remains safe while retaining its special charm.
Bottom Line
Hunting is an incredible experience that requires preparation and dedication. With the right essentials such as accuracy, strength, speed, knowledge of the rules and regulations, research on your target location, and a sense of safety at all times — you can have an amazing hunting experience!
Last year I managed to take photos of *most* of the process of butchering deer. Butchering doesn’t include the hanging, skinning, gutting, that’s all done before and I’m usually at home with the boys while he does that. Mac has expressed interest in helping with it this coming fall which is neat as he’s always had a healthy fear of large animals, even when they’re dead.
Let me repeat again and again and again that we are not professionals. I do not know exact names of cuts. BUT, Marius and I have been butchering deer and other animals for ourselves, other family members and friends quite often so between growing up and our relationship together we have butchered deer, moose, bear, cows, pigs, sheep, turkeys, ducks, geese, grouse, chickens and there is probably others I’m forgetting! The deer where we live are Black Tails and give us about 40 pounds of meat off the bone, so please note that larger deer will probably be a little different in some areas. (Where we might cut into stew meat, might be big enough for a roast on a large Mule Deer.)
Butchering Deer: The Front Quarters and Backstraps
Unfortunately I was busy with the cow when he cut the front legs off, so this starts at the point where you have the front legs off. To get them off, the deer is hanging by it’s hind legs, and you simply cut straight up from the joint to detatch it. The meat in this area is grinding and stew meat so you’re not cutting into steaks if you mess up.
With the front legs, you start by simply deboning in as large of chunks as you can.
He then trims off what will be grinding meat, dividing it from stew meat. Stew meat has less sinew, but has ‘rough grain’ meaning it needs to be slow cooked. I’ll show a picture of it lower down.
He takes care to trim off some sinew/connective tissue so that the finished product will be nicer. It isn’t neccessary to do this everywhere, but this below will be stew meat and it’s nicer to have it without gristle.
Holding the foot between his legs makes it more stable to continue deboning the meat.
On the shoulder blade there is about as clean as it gets scraping the meat off. We let dogs chew on it afterwards so it doesn’t go to waste. If we have more than our dog can handle, we give it to other friends dogs. One friend cuts up and dehydrates bones from deer in their excalibur dehydrator. One day when I have my own dog and an excalibur I will do the same!
You can see the grain in the stew meat below is quite coarse in some pieces, but this will make excellent meals!
Then we have the grinding meat, which is quite often pieces that are trimmed off after the initial cutting of larger chunks off, and are too small to do anything else with. More of this could have been made into stew meat but alas, I wanted more sausage than stew meat.
Next, while this looks really funny, it works really well. We have what we call “The Hanger” which is a small log structure big enough to hang a few smaller animals or a cow. It’s open to the air, but in the shade of the woods and covered by a tin roof. My stepdad built in, then Marius outfitted it with pulleys, rope and hooks to make getting animals up and down easier. Marius simply takes the rest of the animals down (I would have to carry down in chunks, too heavy for me) and brings it down to the table. He doesn’t take the feet off when he hangs it because he doesn’t see the point, and it’s handy for this point. So the deer is resting by the rib cage on the table and you’re looking at it from behind.Right on either side of the spine you can see different a coloured stripe of meat and this is affectionately known as the backstrap! Some may call it a loin as well. (You can see the top left where he shot the deer in the vitals, there is a bit of blood shot. This will get trimmed and fed to dogs. If you see about where that stripe goes into a point, where it thickens, Marius cuts a horizontal line to the spine. This separates the tougher neck meat from the buttery backstrap. Below, look how he cuts along the spine, make smooth long motions to make it as neat as possible. This is a primo cut and we treat it so!
After cutting down the side of the spine to the tailbone, he cuts along the top of the ribcage freeing the backstrap from the carcass.
He then makes final cuts trimming away.
And slices it off at the end! You can now see below on the right a definitive marker for cutting apart the hind legs, which is handy.
What you’re left with is one long, gorgeous albeit hard to handle strip of backstrap.
To make this more manageable, I cut it into three even chunks. I do the same with the other backstrap, and wrap two to a package. One of these chunks is a dinner for our family so I usually cook two and make leftover cooked one into some sort of lunch. See the fine grain on this meat? Ridiculous I tell you. Makes me want to go cook up a backstrap right now!
The last part of butchering deer that I’m going to show you before keeping you hanging until next time, is cutting out the tenderloins. It’s never pretty to do so, and these tender morsels could be easily overlooked, but we find cutting them out, wrapping and then trimming up before cooking is the best way to not waste any. Same as on the backstraps, but this time on the inside, he cuts along the spine.
Then below, you can see where he has sliced them out. Gently fry or BBQ these up, keep them rare, and cut them with a fork. You won’t believe the flavour involved with these.
Home Butchering
Pan Fried Deer Heart
How to Package Meat for the Freezer
How We Safely Include Our Children When Butchering Meat
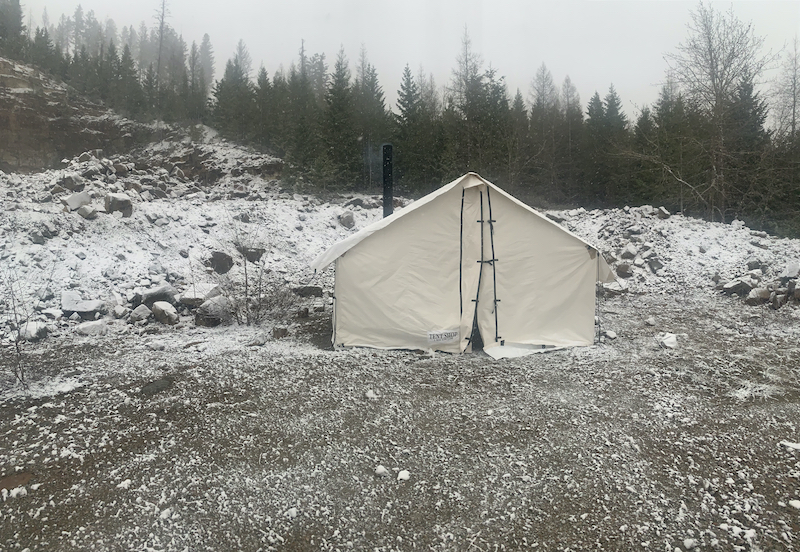
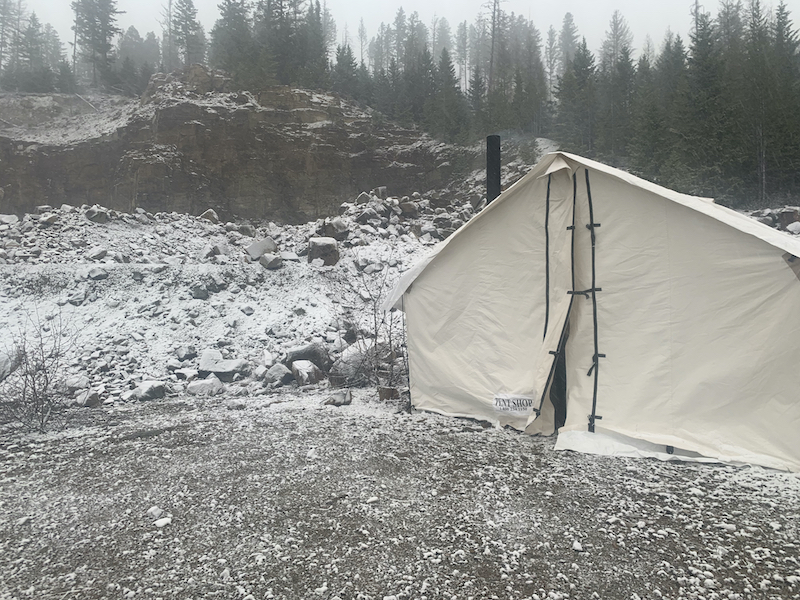
This past spring, we used the Wall Tent Shop’s 12’x14’ Wilderness Tent on a turkey hunt. When I hear the word “tent”, my mind naturally thinks lightweight, small dwelling that provides the minimum shelter essential for survival. A wall tent is a completely different story. It is literally a portable cabin. My family, friends, and I were impressed with how easy it was to set up and the ridiculous amount of room for living, sleeping, and storage. It was easily heated with a simple propane burner.
We also set it up for a spring bear hunt. We got smashed by unforeseen snow and spent an entire day riding out the storm. It was fantastic. We had no cell service. No internet. No agenda. I stoked the fire, slept, and stared at the stove for hours. We were warm and dry and comfortable. It was amazing how great it felt to unplug and disengage for the day.
The tent is currently set up in the backyard as a semi-permanent “yard cabin” where my boys can hang out and sleep out whenever they want. It also comes in handy when they have friends come over and want to add a little adventure into the mix.
This fall, we’ll be taking it to elk camp. I have an elk spot that I can barely drive to. Getting a camper back there is impossible. This year, instead of getting up extra early and riding the ruts to the trailhead, we’ll take The Wilderness Wall Tent. That means less wear and tear on the Silverado and easier access to the comforts of camp.
First Impressions
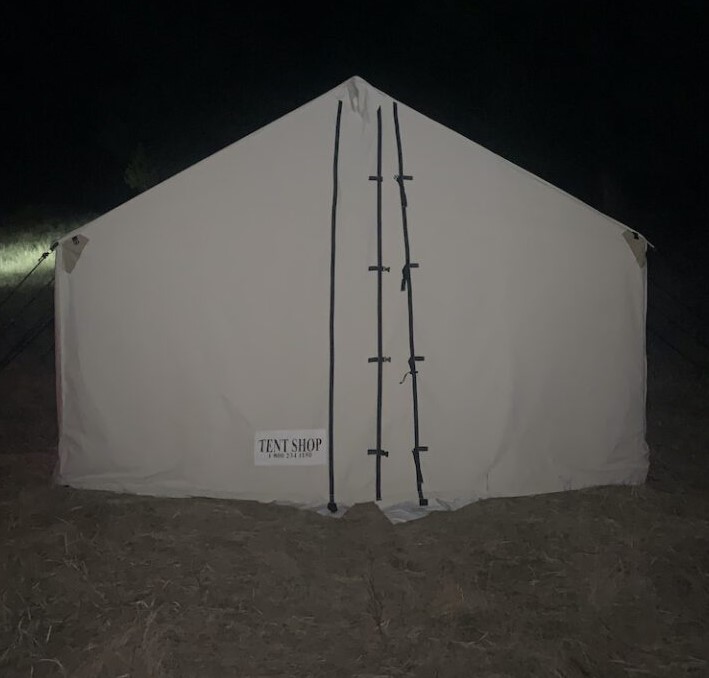
You can’t help but notice the Wall Tent Shop’s emphasis on quality and durability. They have extensively thought through their product. Every option is built for a specific reason. All their wall tents are built with “Army Duck-Double Fill Canvas”. I’m a simple man. All I really care about is strength, durability, and high-quality performance. But if you want the canvas details, here’s a link.
The upper corners of the walls and the roof ridge line (high-wear areas) are reinforced with an extra layer of canvas. This increases the overall life of the tent and protects the ridge from holes and tears especially when using a lodgepole frame.
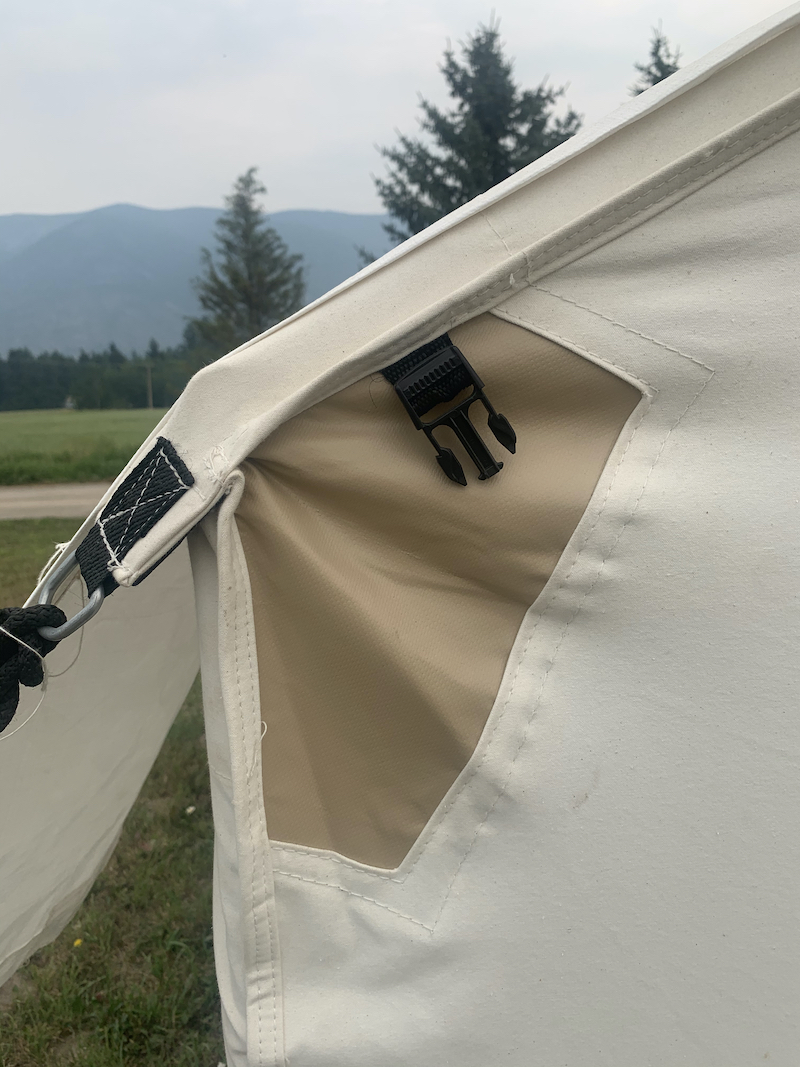
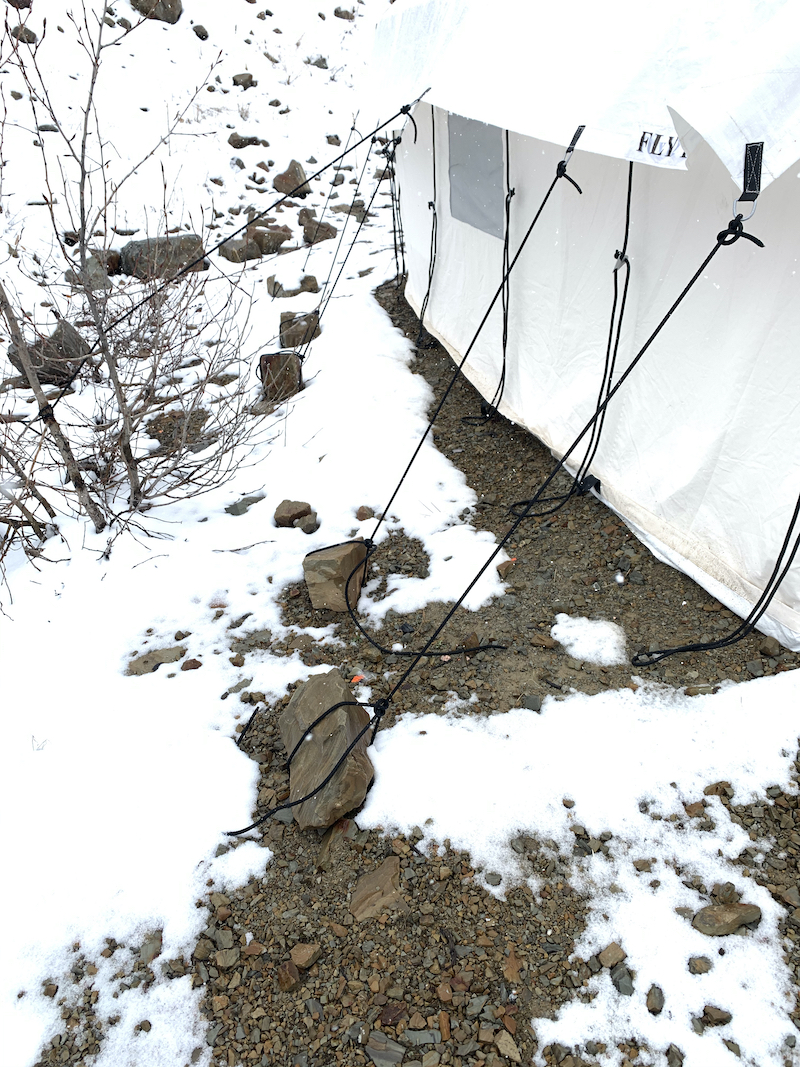
Some wall tents use grommets for tying guy wires, but a grommet cuts the canvas fibers creating potential weak points. Instead, the Wall Tent Shop sews webbing into the canvas with an attached D-ring as shown below.
Wall Tent Stoves
We’ve used propane burners in the past and they worked great. I have a double burner ready for this fall but for extended camp trips and colder weather, I want a wood stove. The Wall Tent Shop sells a variety of wood stoves available here. Their flat cooking tops would be a game changer. I’m a little jealous. Since my daughter can weld and my dad had a 35 gallon barrel, we decided to build our own. It was cheap and easy to build and it works. If you’re handy or on a budget, give it a try. I found the kit and all the necessary materials at our local hardware store.
Included Features
In addition to what has already been mentioned, each Wilderness Tent has a storm flap on the front and back of the main entrance protecting the YKK zippers from snow, ice, sand, etc. The flap has YKK buckles on both sides which gives you the ability to securely close the front door if the zipper were to become damaged or frozen.
A vinyl sod cloth is attached to the bottom of the walls. The sod cloth tucks inside the tent and creates both an air seal and a moisture barrier. This discourages the canvas walls from wicking ground moisture, and greatly increases the heating efficiency of a stove. You’ll burn less wood.
The stove jack comes standard. A canvas flap covers the chimney hole and can be held shut with Velcro or tied open. The stove jack includes a cut pattern to accommodate larger stove pipe sizes.
Wilderness Tents also come with the option of either a back window or a back door.
Additional Features (Take a Deep breath)
The extras are overwhelming and seemingly limitless. I get lost in the options. You can add doors and windows. You can have a kitchen cupboard, bow rack, gun rack, coat rack, fire mat, aluminum shelves, and a floor. Even add a porch for extra storage or outdoor cooking. They sell “T-angles” for adding a middle leg to the center of the tent if you’re expecting heavy snow loads … and the endless list goes on and on.
Each user will need to think through what options fit his individual needs. There are, however, two options that are essential in my opinion.
You Must Have A Rain Fly
Canvas tents are heavy. Once rain-soaked, they’re nearly impossible to load by yourself. Sewing the extra canvas to reinforce the ridges results in tiny pinholes that could leak. The tarp also helps keep the tent clean from pitch/sap, bird crap, pollen, and whatever else might fall from the sky. Thinking about the sticky-resin-buds that fall from cottonwood trees gives me nightmares. A spark hole in your tarp can easily be taped but a burn hole in the canvas would have to be sewn. In the long run, the UV light from the sun is your worst enemy. Just buy the rain fly!
The benefits of purchasing the Rain Fly far outweigh the costs
Screens
If you think that you might use your wall tent in the summer or early fall, then you’ll need airflow and bug protection. My tent has screen windows on three sides. The windows are 30” x 30” with zippers on the sides and Velcro along the top. The screen door is full-sized. D-rings in the corners secure the screen door out of the way when not in use. Airflow without mosquitos is a big deal.
Final Thoughts
There is a nostalgia that comes from hunting out of a wall tent and I like that feeling. It reminds me of my childhood. It reminds me of my roots and I remember where I came from. Those memories help me focus on the things that matter the most. Unfortunatley, memories don’t punch tags and fill freezers. The Wall Tent Shop reminded me that I can bring camper-level-comfort into the back country. The ability to get warm, dry off and rest in comfort makes the hunting trips last longer and sometimes a few more days is all it takes. If that peaks your interest, then I’d encourage you to look into a wall tent.
There are a lot of tips and tricks that come from experience. Too many to include in a review. Join me and others on the Rokslide forum and let’s discuss what we’ve learned. I’ll share more photos after the elk season. Hopefully, we’ll have an elk head leaning against the wall!
Comment on this review or ask Howard questions here.
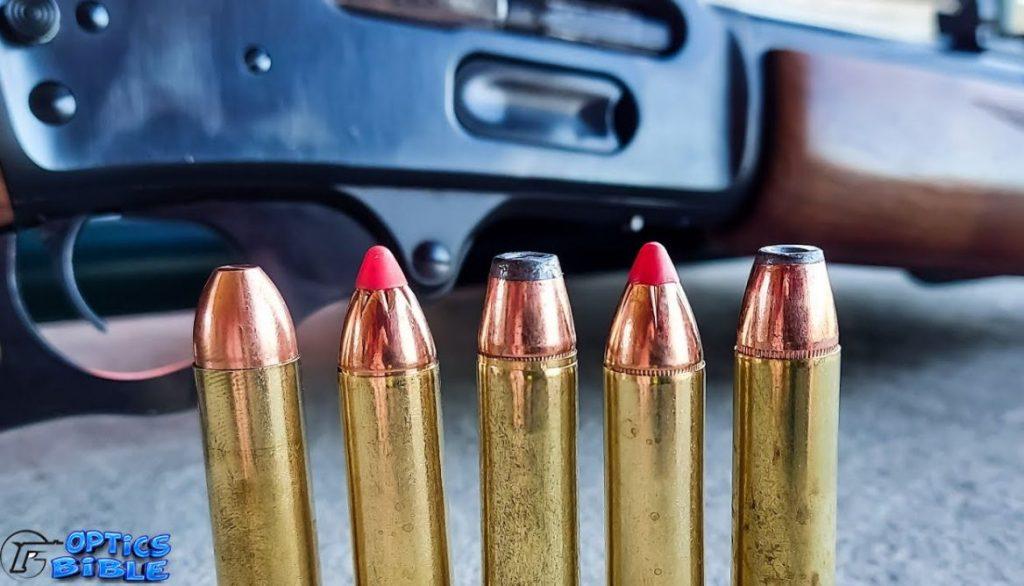
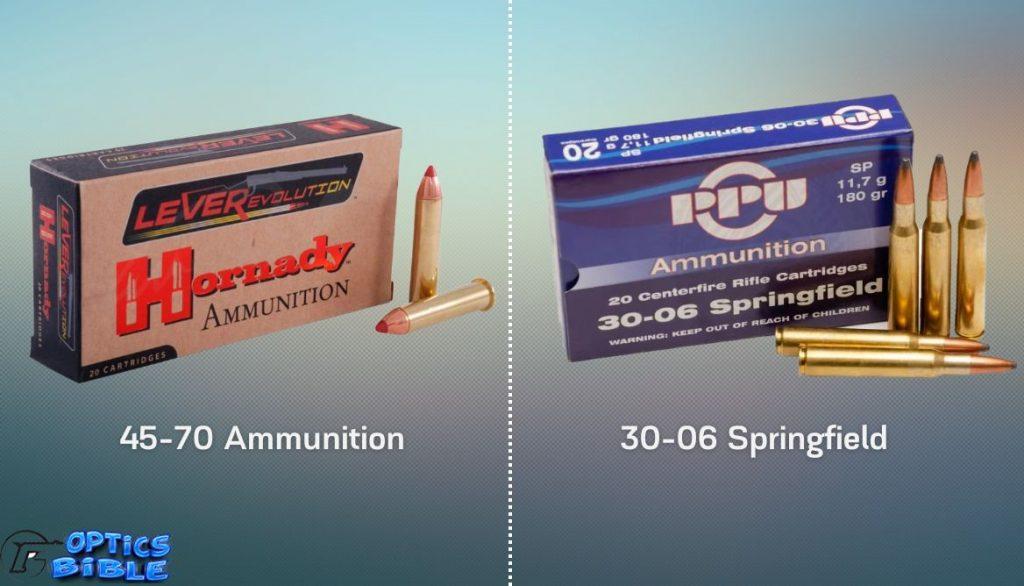
The ongoing battle between 45-70 vs 30-06 is distinguished with slim margins considering they are both quality cartridges.
These two black powder cartridges were originally designed for war and are now mainly used as hunting calibers. We’ll look at the best performer between 45-70 vs 30-60 to help you decide which is best for your needs.
Here’s an overview of what you’ll learn in the following article:
The most powerful ammunition
Which bullet has a higher velocity
What are the most significant differences between 45-70 and 30-06
The 45-70 and 30-06 are powerful ammunition initially designed for the American civil war and are now popular among modern-day hunters.
Their unique attributes, especially their penetrative ability and velocity, are perhaps their most distinguishing features.
Let’s take a look at a quick comparison analysis:
The two bullets can perform ideally for most shooting purposes but go for the lighter recoil variation if you have a standard rifle.
Therefore, how lever action rifles in use handle recoil matters. Take this as a safety measure for those around you if you operate in hunting groups.
In-Depth Analysis Between 45 70 vs 30 06
You’ll be pleased to know that the two quality cartridges are ideal for big-game shooting and only have small differences. The differences are easily tracked to the cons of either cartridge, recoil being one of the major distinguishing factors.
Gascho et al., (2019), in their research, further investigates their differences in terms of their characteristics at different energy levels.
Which Cartridge has the Better Velocity?
The 30-06 is a popular cartridge for its velocity, where its maximum flow speed is at 2820 fps. When targeting moving objects, the hunting cartridge comes in handy, bringing down mobile prey accurately.
When using a 150-grain 30-06, it bolts at a full velocity of 1,030 fps and increases significantly after 300 yards by 1,193 fps. This variety is a typical 325-grain ammunition with an average of 2,050 fps of muzzle energy.
On the other hand, the 45-70 Government rounds travel at 1680 fps. It, however, covers up for the compromised flow speed with excellent energy.
From 150 yards, the 45-70 Government performs effectively as one of the centerfire rifle cartridges, but its kinetic energy goes low at about double the distance.
So, ballistic performance comparisons are best made within 150-300 yards. Within the distance, the 45-70 bullet travels at 1,225 mph, which means the 30-06 is nearly twice as fast. It is outshined due to its heavier projectile and less powder charge.
You are lucky if you use marlin rifles for target shooting or participate in other activities utilizing similar ranges.
Also, when using a quality lever action rifle, you can achieve relatively more velocity from good muzzle power.
Muzzle Energy Comparisons Between 45-70 vs 30-06
The 45-70 round is a powerful cartridge for lever action rifles and is readily accessible. It has a shorter case length and features a straight-walled design.
Additionally, it has a larger bullet diameter and is heavier than other rounds, giving it more stopping power.
According to Hrdlicka (2003), when comparing stopping power, it’s obvious the 45-70 version works in your favor. However, the 30-06 caliber energy leads the two with 127-foot pounds out of the muzzle than the Government bullet.
Because the heavier slug loses velocity rapidly, this competitive edge rises to 543 ft. lbs. after 100 yards.
Research from Sanchez et al. (2016) adds that, at 300 yards, the 30-06 Springfield moves 865 ft. pounds faster than the 45-70, which is a significant difference.
As a result, the shorter and narrower 30-06 outperforms the government variety with more than twice the pressure.
The Availability of the Bullets
We found out that the 45-70 ammunition requires more material and has a larger dimension. This explains why this cartridge is expensive.
Additionally, these loads were crafted for use with lever-action firearms. The Marlin guide gun, since 1895, is one of the best guide guns for the 45-70.
Meanwhile, the 30-06 cartridges give you additional sure variations to select from compared to the government version. The 30-06 were military options, making them reliable for most uses, and their lower price point is a plus.
Moreover, they offer better variety in bullet weight categories (100gr-220gr) for small to big games.
Which has Better Trajectory
The trajectory of a bullet as it travels downrange is quantified in inches of bullet drop, impacting your ability to hit a target.
Due to its energy drop, the heavy bullet, 45-70 variety fails to match up well on long distances, but it gives back exceptional performance over short ranges. Here is the reason why:
Because these projectile models are less aerodynamic than a boat-tail Spitzer characteristic, they hemorrhage muzzle velocity at an astonishing rate.
As the ammo loses speed in flight, the gravitational pull has more opportunity to pull them toward the ground.
At 200 yards, the smokeless powder Government drops 10.3 inches.
The light 30-06 vs 45 70 excels in this category, having a much flatter direction of travel than the 45-70. As a result, these versions are among the commonly used cartridges in lever action rifles for mid-to-long-range hunting worldwide.
Therefore, flatter shooting ammunition is preferred over long-distance shooting. This factor is so because it needs fewer adjustments to the shooter’s scopes to make up the difference for bullet drop. A flatter path also implies that a cartridge is more tolerant of ranging errors.
The Bullets’ Recoil
Regarding the level of impact in 45 70 vs 30 06, the former has more recoil and can catch you off-guard if you’re not prepared for the blast.
When using a rifle with a smokeless powder 45-70 at rest, they’ll still produce a heavy recoil, even if you’re utilizing shooting sleds or sandbags.
Also, you should expect a worse experience when firing from a standing position. Unprepared shooters are frequently knocked backward when they fire in this position.
If necessary, take a wider stance and prepare before squeezing the trigger on a 45-70.
A photo showcasing various shooting positions and stances
When comparing 45-70 vs 30 06, the former appears to be a lightweight, despite having a significant recoil. A 30-06 will also cause a shooter’s flinch, maybe not with more recoil as a 45-70.
The 30-06 has approximately 14 ft-lbs of recoil energy, whereas the 45-70 Government variety has nearly 64 ft-lbs of energy imparted into a gunman’s shoulder. That’s twice as much.
The felt recoil is often forgotten or unrealized when you have a big bull, Cape buffalo, or black bear in your sights.
Target shooting on the range lacks the adrenaline rush that the thrill of the hunt can provide.
The Most Versatile Bullet
The 45-70 is effective against large game animal hunting but is a great cartridge between 200 and 300 yards. The massive slug of the government provides stopping power to bring down whitetail deer, bears, moose, bison, and elk at a close range.
If you intend to shoot at distances greater than 300 yards, opt for the 30-06 Springfield in your bolt action rifle. The 45-70 is ideal for large game hunting because it frequently requires stalking and closing the distance.
Accuracy Features
Accuracy is contextual when comparing 45 70 vs 30 06, which is highly dependent on the shooter and the gun used. Both factory loads are excellent for big game hunting.
The 45-70 has bone-crushing power at a short range. It is low in accuracy over long ranges due to its low velocity and less ballistic coefficient, which produce a relatively steep trajectory.
The 30-06 is a definite winner in terms of accuracy in long-range hunting due to its flatter trajectory. While using a quality bolt action rifle and scope within 300 yards, it gives exceptional accuracy per single shot.
These quality loads can maintain hypersonic speeds in a flatter trajectory for slightly more than 1000 yards before gravity and sit resistance impact it and begin to affect accuracy.
However, the contrast will become more difficult to ignore as the range increases.
Perhaps the 30-06 has a further advantage as you’ll unlikely flinch with its less recoil, while the 45-70 has a higher chance of distracting your stability/stance.
The Ballistics’ Coefficiency and Sectional Density
Simply put, the ballistic coefficient indicates a bullet’s aerodynamics. The higher the proportion, the greater your cartridge will perform in windy conditions.
Unlike the previous features, the 45-70 has a slight advantage in this situation as it is more powerful. Despite doing exceptionally well in the close and mid-range, 45-70 bullets suffer slightly in the long range.
As observed, heavier bullets typically have a higher coefficient count, but 30-06, as a lighter version, still finds a way to impress. Its aerodynamic model allows it to dominate the ballistic coefficient count even at longer distances.
Also, the bullet design plays a role in the ballistic coefficient factor. For instance, a 160 gr 30-06 will have more BC than a 325 gr 45-70 ballistic.
Social Density: Best Penetrative Power for Big Game Purposes
An ammunition’s Sectional Density (SD) determines how well it penetrates a target. This factor is critical in big hunting events because you need a bullet penetrating thick hide and bone.
Therefore, penetration is measured by comparing the mass and diameter of the projectile. The greater the SD, the further the bullet will infiltrate the target.
Consider this a simplified explanation of penetration because other factors, such as bullet expansion and velocity, are also in the picture.
The 45-70 is well renowned for its penetration, as it has been used successfully to hunt big games for bigger targets such as brown bears.
Is the 45-70 overkill? Yes, it may, but it accomplishes the task, and many buffalo hunters have successfully utilized it since the late 1800s.
When properly aimed, a large buck can get away after being hit by a 45-70 round. On the other hand, a deer will fall almost immediately if you hit it in the chest.
With the 30-06, it relies on its high-velocity power to form its ideal social density. It is suitable for deer hunting, having the edge for mid and long distances.
The high velocity and barely any disintegration localizes the penetration in one area to influence a deeper penetration.
Price Variations: Which is the Most Affordable?
Most of our comparisons revealed a recognizable disparity between the two ammunition, and the price section follows suit. Ironically, the government cartridge seeming to perform poorly is the most pricey.
On a 45-70 ammunition, you’ll have to use around $2.75/round for regular training versions and $5/round or more for premium hunting versions.
Regular 30-06 will cost about $1.50/round, while the premium rounds cost you double that.
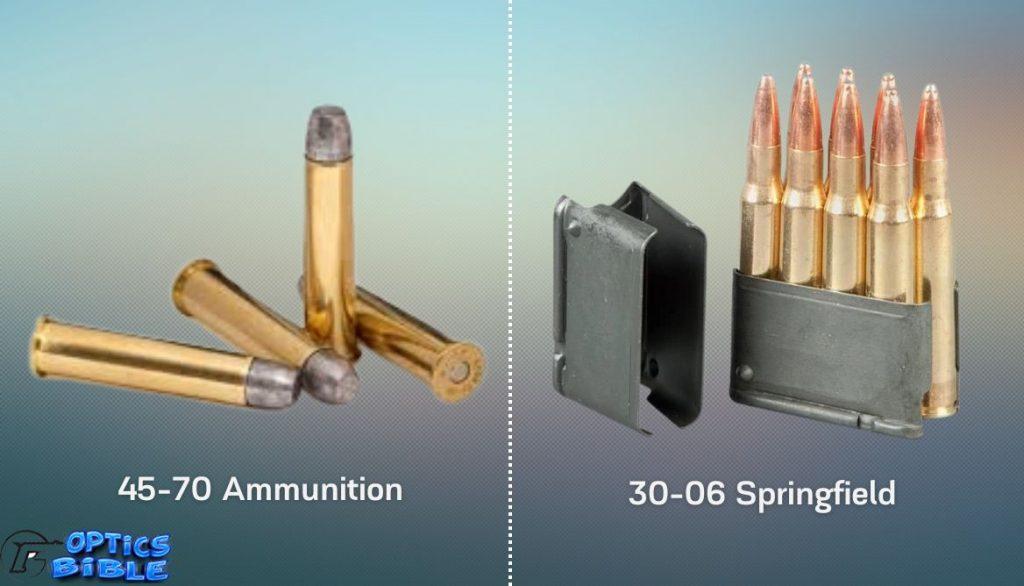
The Cartridges Size Differences
We have so far touched on how the bullets’ designs can impact their performance.
Their size also affects how they are chambered. As a heavier slug, the 45-70’s is normally chambered in heavy loads because its projectile diameter is 0.458 inches, compared to 30 06 at 0.308 inches.
The cartridge length for the Government variety is 2.105 inches, while the 2.494-inch 30 06 Springfield towers over it.
Although the 45-70 ammunition is heavier, it can be holstered in a lighter rifle.
Which is Better for Hunting Deer?
Without a doubt, the two cartridges are capable of taking down various targets during a hunt. So, which provides the better all-around performance for the deer hunting purpose?
The 30-06 deer rifle is superior to a deer rifle. It is far more accurate over long distances, does not leave a large hole in the target, and is easier to shoot.
On the other hand, a 45-70 with a lower velocity and more significant expansion isn’t a great option of the two, destroying much meat with a poorly placed shot.
Unlike its competition, when traveling at over 2500 feet per second, the 30-06 does not destroy much of the target’s meat.
The 30-06 is a clear winner regarding range, accuracy, less recoil, and ammunition cost.
Meanwhile, the 45-70 does the job but is more expensive and puts a little more strain on your shoulder from its heavier recoil.
Which of the Cartridges Would You Choose for Lever Action Rifles?
The answer varies from one shooter to the other.
For the 45-7, it is still relatively popular among big game hunters in heavy cover and black-powder silhouette shooters.
Having been utilized in the Spanish-American war, we clearly understand why these cartridges are still popular with users.
In justification of their higher price as a standard cartridge, the big game heavy loads deliver bone-crushing muzzle energy, capable of hitting any target within 300 yards. If you love its output while hunting and have no issues with its cost or impact, go for the 45-70 variety.
On the other hand, if you prefer long-range hunting, we recommend the compact 30-06 to go with your bolt action rifle. These popular cartridges stopping power and long-range prowess will make your shooting purpose more dynamic in various hunting scenarios.
Also, many modern rounds cannot compete with the 30-06’s prominence and raw stopping power. They can bring down every four-legged animal in the North American region.
The 30-06 bullets are affordable; they give the total value for your money and won’t let you down in major shooting events.
Finally, the 45-70 is excellent for close-to-mid-range shooting, while the 30-08 is ideal for long-range targeting.
FAQ
Conclusion
That’s all on our tropic, 45-60 vs 30-06, with the latter emerging clear winner in terms of its smooth operation. The heavier 45-60 cartridge should be supported as a quality rifle.
So, which bullet stands out, and you’d select it for your upcoming hunting event/plan?
Comment below with your thoughts on our topic, and suggest which varieties we should analyze next.
References
Sanchez, D. M., Epps, C. W., & Taylor, D. S. (2016). Estimating Lead Fragmentation from Ammunition for Muzzleloading and Black Powder Cartridge Rifles. Journal of Fish and Wildlife Management, 7(2), 467-479. https://doi.org/10.3996/092015-jfwm-086
Daryl Hrdlicka. (2003). How hard does it hit? A revised study of atlatl and dart ballistics. The Atlatl, 16(2), 15-18. http://www.thudscave.com/npaa/articles/howhard_10-04.pdf
Gascho, D., Zoelch, N., Richter, H., Buehlmann, A., Wyss, P., & Schaerli, S. (2019). Identification of Bullets Based on Their Metallic Components and X-Ray Attenuation Characteristics at Different Energy Levels on CT. American Journal of Roentgenology, 213(3), W105-W113. https://doi.org/10.2214/ajr.19.21229
30-30 vs 45-70 Which Lever Action Is Best For You? (2022, October 21). Big Game Hunting Blog. https://thebiggamehuntingblog.com/30-30-vs-45-70/
Herring, G., Eagles-Smith, C. A., Wolstenholme, R., Welch, A., West, C., & Rattner, B. A. (2022). Collateral damage: Anticoagulant rodenticides pose threats to California condors. Environmental Pollution, 311, 119925. https://doi.org/10.1016/j.envpol.2022.119925
An air rifle's effective shooting range depends on various factors, including the type of rifle, the caliber, and the power source. Generally speaking, most...
")
")
")
")
")


 This past spring, we used the Wall Tent Shop’s 12’x14’ Wilderness Tent on a turkey hunt. When I hear the word “tent”, my mind naturally thinks lightweight, small dwelling that provides the minimum shelter essential for survival. A wall tent is a completely different story. It is literally a portable cabin. My family, friends, and I were impressed with how easy it was to set up and the ridiculous amount of room for living, sleeping, and storage. It was easily heated with a simple propane burner.
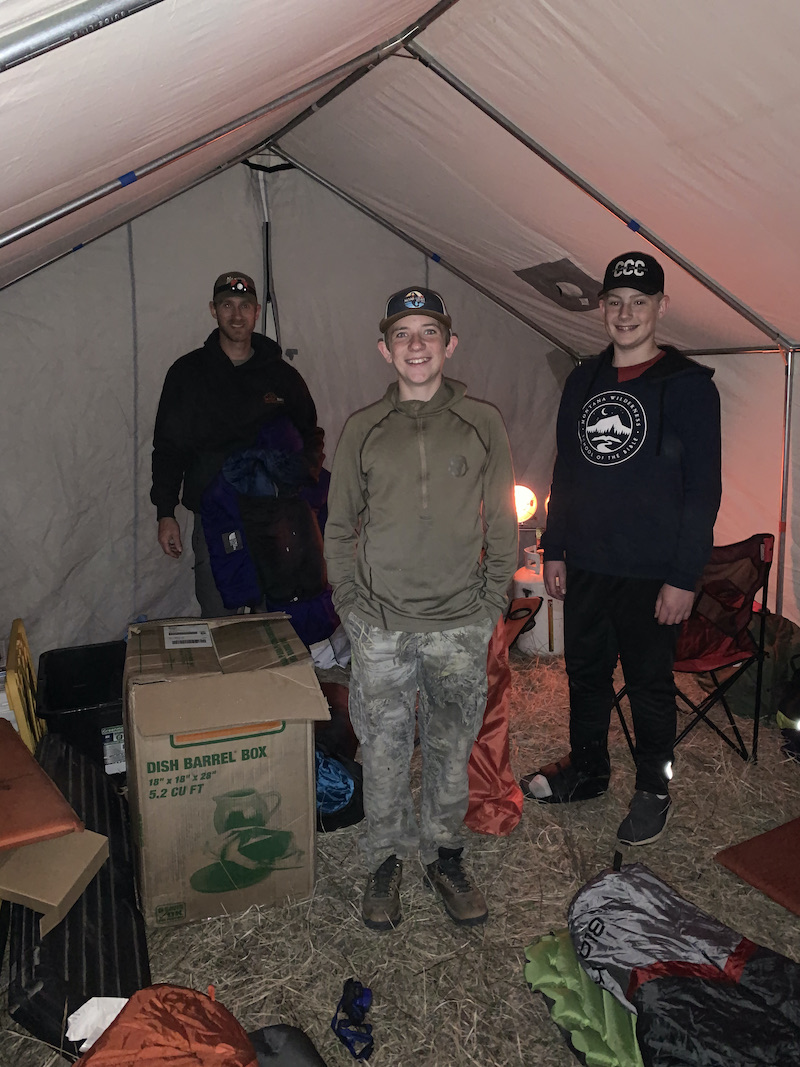
 The tent is currently set up in the backyard as a semi-permanent “yard cabin” where my boys can hang out and sleep out whenever they want. It also comes in handy when they have friends come over and want to add a little adventure into the mix.