Many people these days are transitioning from living in a city to living in the woods. And while it may seem like an unwise decision, living somewhere remote and secluded can give a lot of people the peace of mind they need. If you’re thinking of making the move to living in the woods, there are a few things that you should know to survive. Read on to find out how you can survive living in the woods.
If you’ve lived in the city for a long time, you might find yourself longing for the simplicity of life in the woods. Though it may seem challenging, surviving in the wilderness is possible with the proper preparation. Here are a few tips to help you survive living in the woods:
1. Secure Your Home
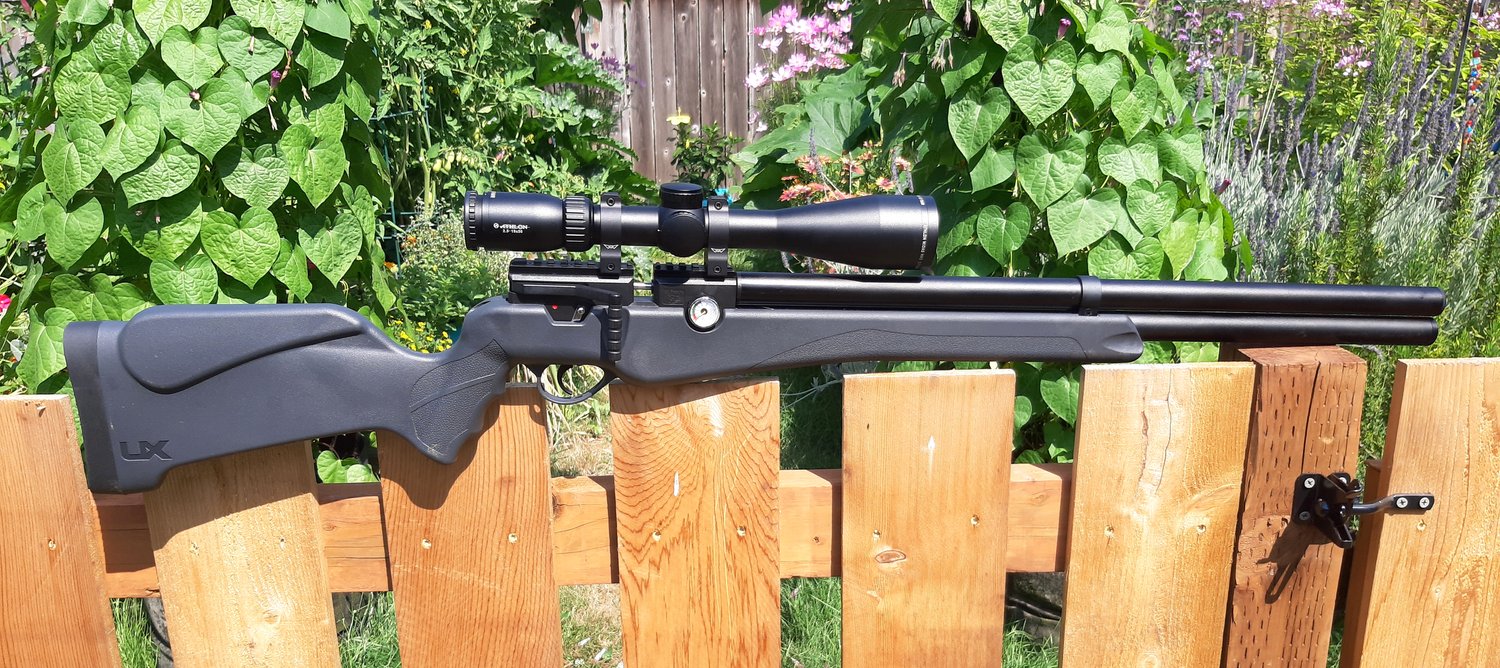
The very first thing you need to do is make sure your home is secure. If you’re living in a cabin or some other type of small dwelling, fortify it as much as possible. Board up the windows, build a strong door and stockpile supplies. It’s also essential to have a good stash of weapons and ammunition on hand in case you need to defend your home from intruders. Make sure to check a review of the best survival rifles so that you’re prepared for anything.
Having a good relationship with your neighbors is essential in an area like this. If you can, try to team up with them and create a fortress where everyone can be safe.
2. Know Your Surroundings
Another important tip is to get to know your surroundings. Learn which plants are edible, where the freshwater sources are, and what animals you can expect to encounter. It’s also a good idea to familiarize yourself with the area’s weather patterns to prepare for extreme conditions.
If you take the time to learn about your surroundings and prepare for the worst, you’ll be much more likely to survive living in the woods.
3. Find a Source of Water
When you first move into the woods, one of the most important things you’ll need to do is find a water source. This can be a stream, river, lake, or natural spring. Once you’ve found a water source, you’ll need to purify the water before drinking it. Boiling the water for at least five minutes will kill any harmful bacteria.
While it’s not to say that you won’t have access to clean water from where you’ll be living, there is a possibility that you might lose water often because of things like power outages or line breaks. So, it’s always good to have a backup plan in place.
Another way to ensure that you always have a clean water supply is to collect rainwater. This can be done by simply placing a few barrels or buckets outside during a storm. Once the rain stops, you can use this water for drinking, cooking, or even bathing.
4. Learn How To Catch Fish and Hunt
One of the best ways to ensure that you have a steady food supply is to learn how to catch fish and hunt. This will not only provide you with a fresh source of food but can also be a fun activity to do in your spare time.
If you don’t want to eat meat, you still have plenty of options. There are many edible plants and berries that grow in the woods. With some research, you’ll be able to identify which ones are safe to eat.
While you can always head to town to purchase food, it’s always a good idea to have some stored away in an emergency. Canned goods, dried fruit, and nuts are all great options for long-term storage.
5. Stock up on Essentials
Living in the woods means not having easy access to civilization. Therefore, it’s important to stock up on essential supplies like food, water, and medicine. You should also have a first-aid kit on hand in case of injury. This should include essential items like bandages, antiseptic wipes, and pain relievers. It’s also a good idea to keep a few extra blankets around in case the temperature drops.
6. Learn Basic Survival Skills
Living in the woods would not be possible if you didn’t know some basic survival skills. Building a fire, purifying water, and shelter-building are all essential for surviving in the wild. There are many resources available that can teach you these skills. You can find books, websites, and even YouTube videos showing you what to do in different situations. Make sure to check these resources out before your move. This way, you’ll be prepared for anything that comes your way.
7. Watch Out for Wild Animals
Wild animals are one of the most dangerous things you’ll need to watch out for while living in the woods. Many animals call the woods their home, and only some of them are friendly. Bears, cougars, and snakes are just a few of the potential dangers you’ll need to be aware of.
The best way to avoid run-ins with wild animals is to ensure you’re always aware of your surroundings. If you see an animal, make a lot of noise so that it knows you’re there and will hopefully avoid you. You should always carry a weapon with you in case you come face-to-face with an aggressive animal.
So, there you have it! These are just a few of the things you’ll need to know if you’re planning on living in the woods. With a little bit of preparation, you can make sure that your experience is a positive one. In time, you’ll find that living in the woods is an enriching experience. Make sure to take care of yourself and always be aware of your surroundings.
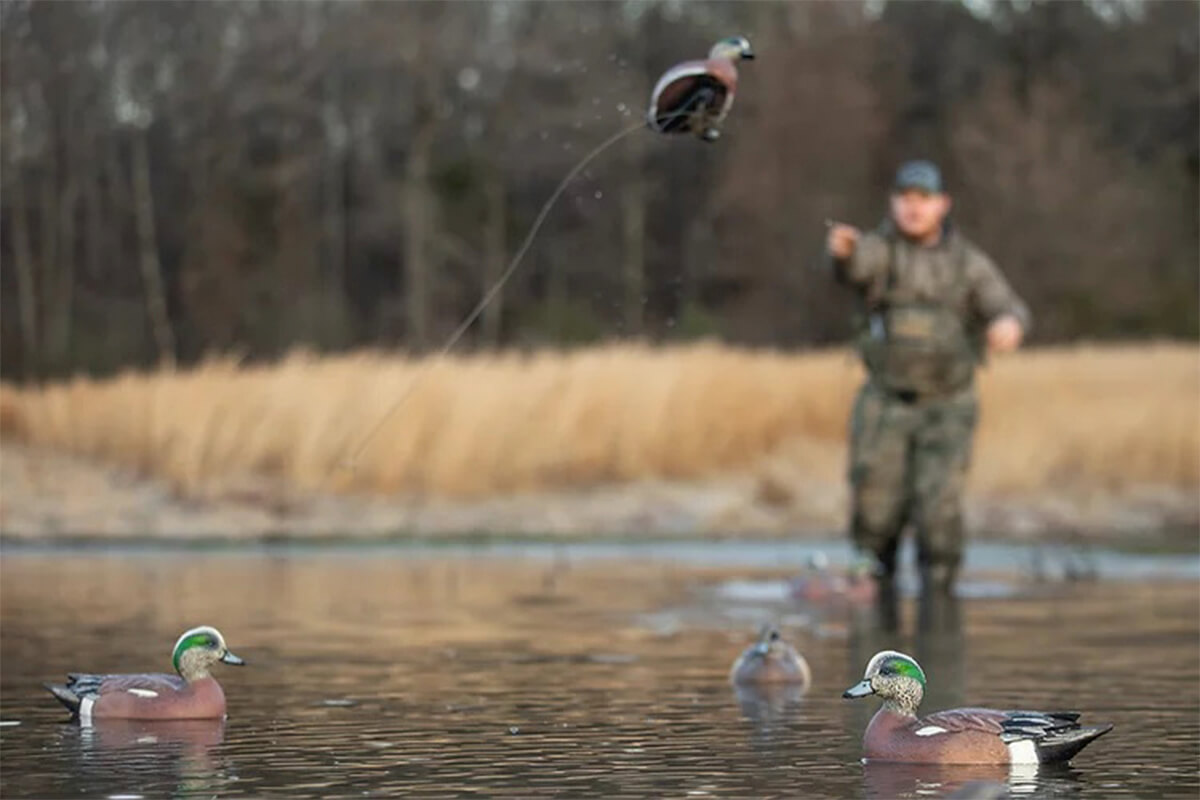
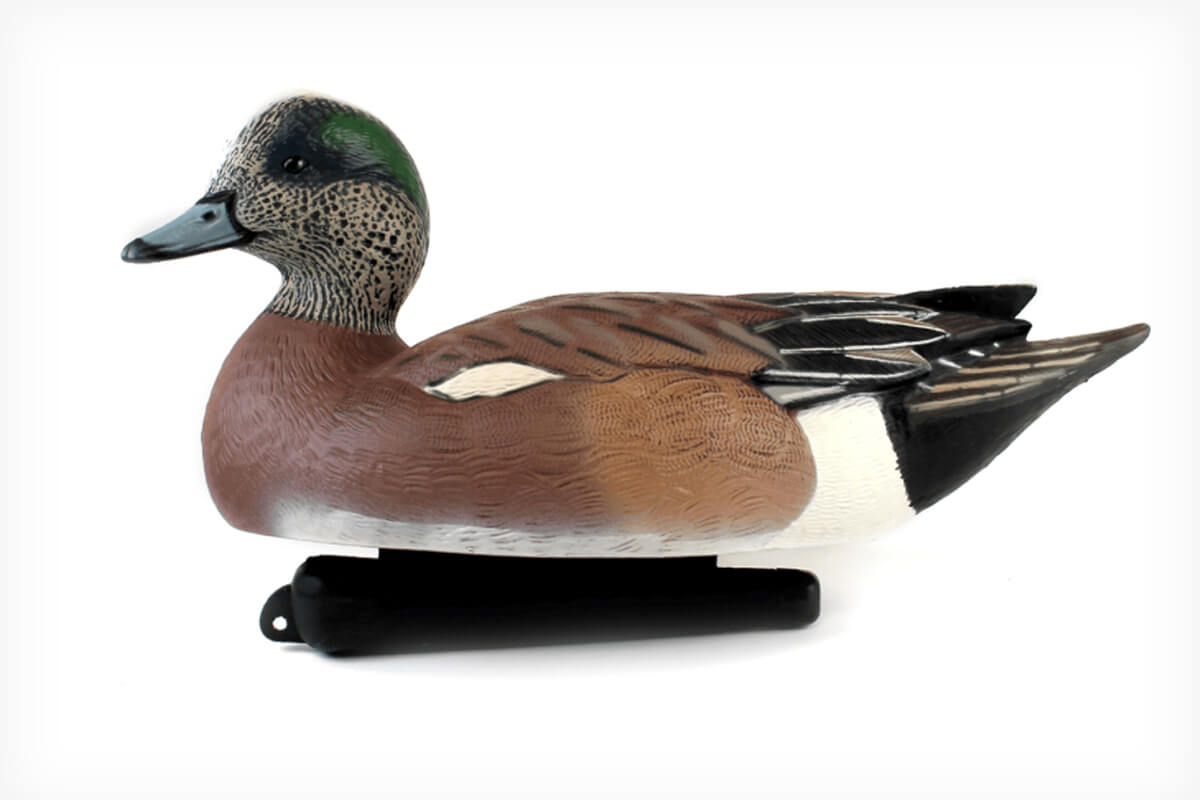
Many waterfowlers can’t think of duck and goose hunting without thinking about Dive Bomb, and for a good reason: their decoys work incredibly well. If it’s not already in your floater arsenal, one go-to should be the F1 Wigeon. A one-piece decoy that showcases lifelike perfection, these white-shouldered bad boys are sure to grab the attention of passer-by ducks and get them to put their feet down. These decoys have been hand-crafted by World Champion Jon Jones, and each six-pack comes with four upright drakes and a pair of active hens.
$75/6-pack | divebombindustries.com
Lifetime Decoys – FlexFloat Pintails
Lifetime Decoys – FlexFloat Pintails
Lifetime Decoys has recently rebranded themselves as Heyday, but their famous Hydrofoam decoys remain the same. Pintails are one of my all-time favorite ducks. The boy birds are beautiful, and I love to see that white chest and black sprig in flight. The problem for many is finding a decoy with a sprig that’s not brittle as an icicle. That problem, luckily, has been eliminated. Enter Lifetime’s damn near indestrucbile FlexFloat Pintail. Available in 12 packs with eight drakes and four hens, the Flexfloat design means the sprig won’t snap off the bulls or hang on decoy bags. At 8.9 pounds per dozen, light weight is another plus.
$300/dozen | heydayoutdoor.com
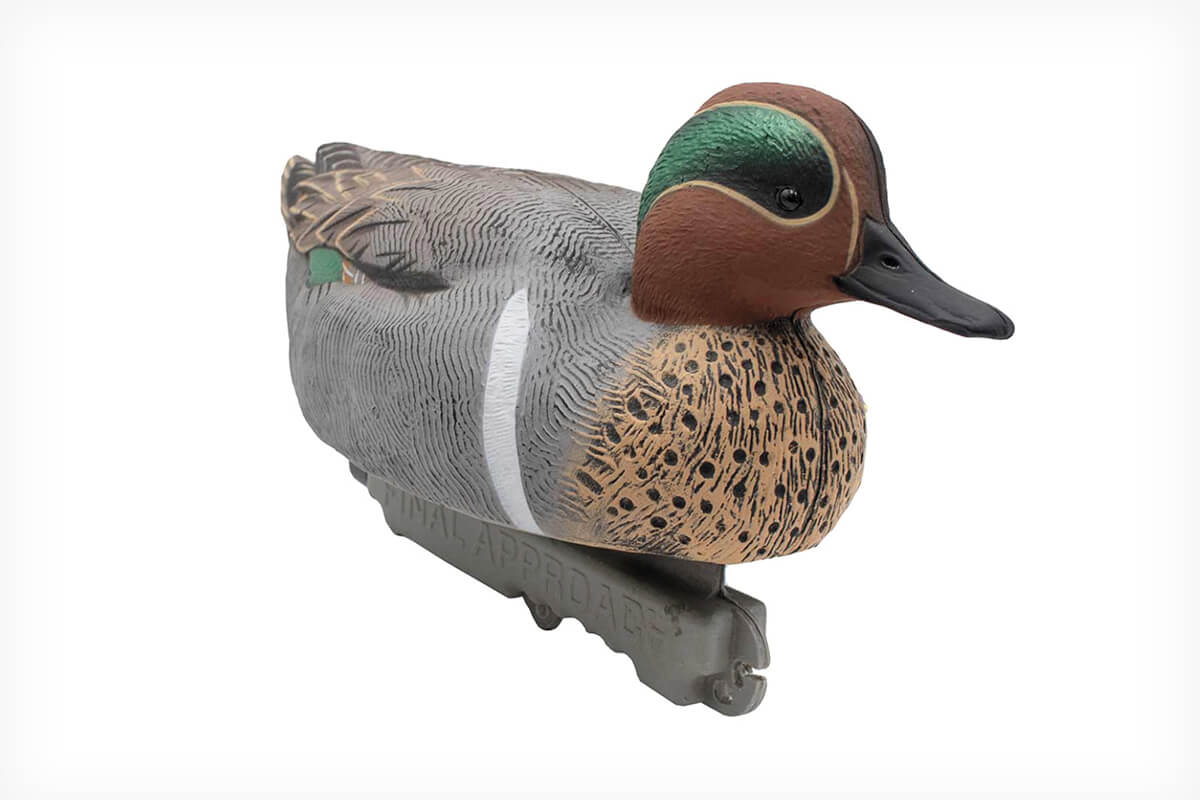
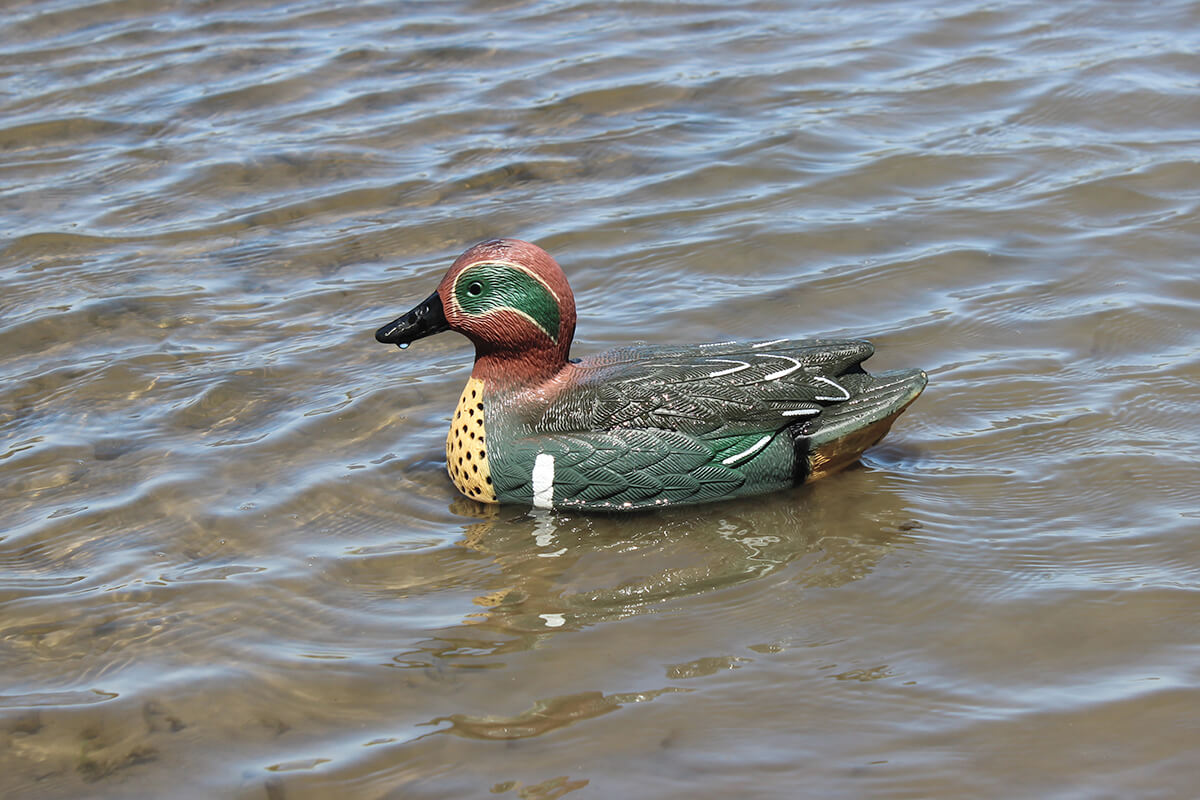
Final Approach – HD Green-Winged Teal
Final Approach – HD Green-Winged Teal
New from Final Approach are several duck species-specific floaters, but we love an excellent early-season teal shoot, and these caught our eye. Decoy realism is remarkable, and the waterfowl masses will appreciate the full-size, one-piece construction. These floaters work well for stand-alone teal sets and make great filler decoys, especially when you want more ducks in the spread and the walk from the truck is long, and weight and space are critical.
$100/dozen | fabrand.com
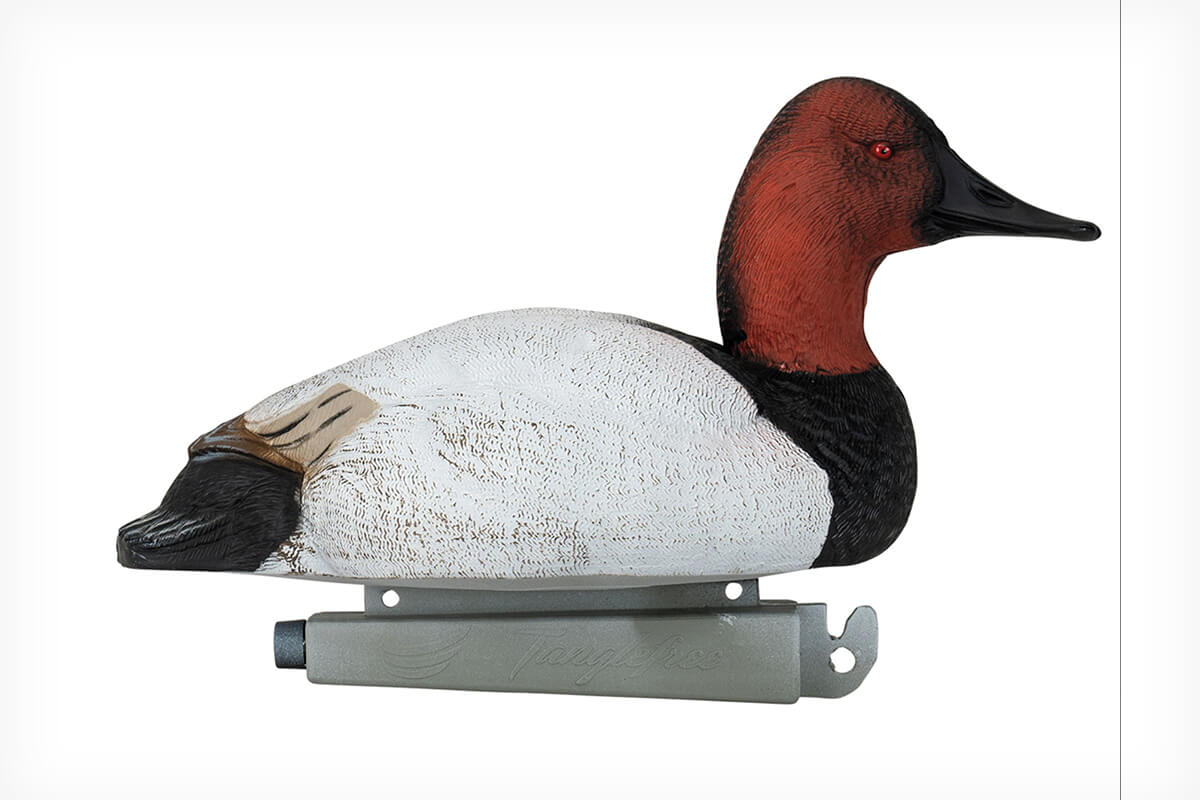
Tanglefree – Flight Series Canvasback
Tanglefree – Flight Series Canvasback
Most duck hunters, me included, get smitten when they see the large red head and coal-black bill of a drake Canvasback. It’s moments like these when having the most realistic fakes come into play, and it’s hard to beat Tanglefree’s Flight Series Canvasback Decoys. Carved by Michael Braun, these four males and three hens sport ultra-realistic paint schemes and feather detail. The high-density foam fill is tough to beat, as is the tried-and-true weighted keel.
$85/6-pack | tanglefree.com
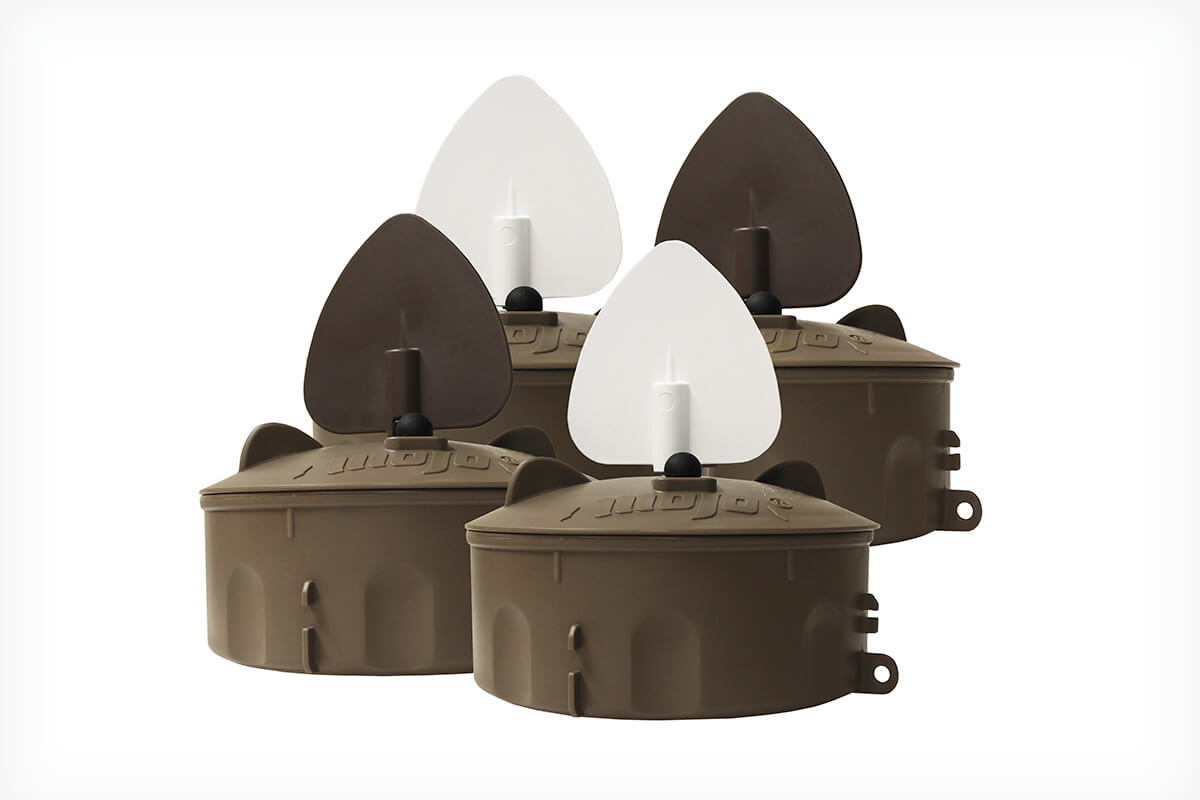
MOJO Outdoors – Flock-A-Flickers 2
MOJO Outdoors – Flock-A-Flickers 2
Waterfowl hunters refer to it as a “flash” or “flick” — that brief glint seen when watching content ducks sitting on a pond or field. When passer-by ducks see these glints of movement, it gives them the confidence to come in. MOJO knows a thing or three about helping hunters put ducks in the decoys, and the new Flock A Flicker 2 4-Pack features an improved design with the same effective spinning wing beats that create that flash and flick, and the unit will work in water or on dry ground. Each unit can be programmed to spin at different times via the random on/off timers, and each will operate for up to 30 hours on three AA batteries.
$100 | mojooutdoors.com
Lucky Duck – Super Swimmer HDi
Lucky Duck – Super Swimmer HDi
Realism on the water is essential to getting wings to cup and feet to drop, and one of the best tools you can add to your waterfowl arsenal to ensure this is Lucky Duck’s Super Swimmer HDi. This swimmer uses a jet-propulsion system to create natural swimming movement, and the decoy has a trio of timer modes. The durable EVA plastic handles wear and tear and promises no-fail use season after season. The Super Swimmer HDi includes a 12-volt lithium-ion rechargeable battery and a smart charger.
$180 | luckyduck.com
Decoy Central – Super Block Green-Winged Teal
Decoy Central – Super Block Green-Winged Teal
Super Blocks are tough, affordable decoys than can bulk up your spread by mixing them in with your more expensive, ultra-realistic decoys. Floaters have high-contrast paint for great visibility and realistic detail, and are available in Mallard drake, Greenwing Teal drake and Lesser Canada Goose. Mallard feeding butt and mini spinner also available. Floaters have weighted keel with multiple head positions.
Starting at $30 | decoycentral.com
Avian-X – Topflight Early Season Mallards
Avian-X – Topflight Early Season Mallards
Often, the difference between scratching out a few birds and filling duck totes is details. Enter Avian-X’s Topflight Early Season Mallards. These decoys accurately capture the early plumage of drake and hen mallards, and when this detail is combined with top-end paint adhesion, you get mallard imposters that bring ducks close. Each six-pack comes with a Feeder Drake, Feeder Hen, Swimming Hen, High-Head Drake, and a pair of Swimmer Drakes. The weight-forward swim-keel maximizes natural movement in the water.
$170 | avian-x.com
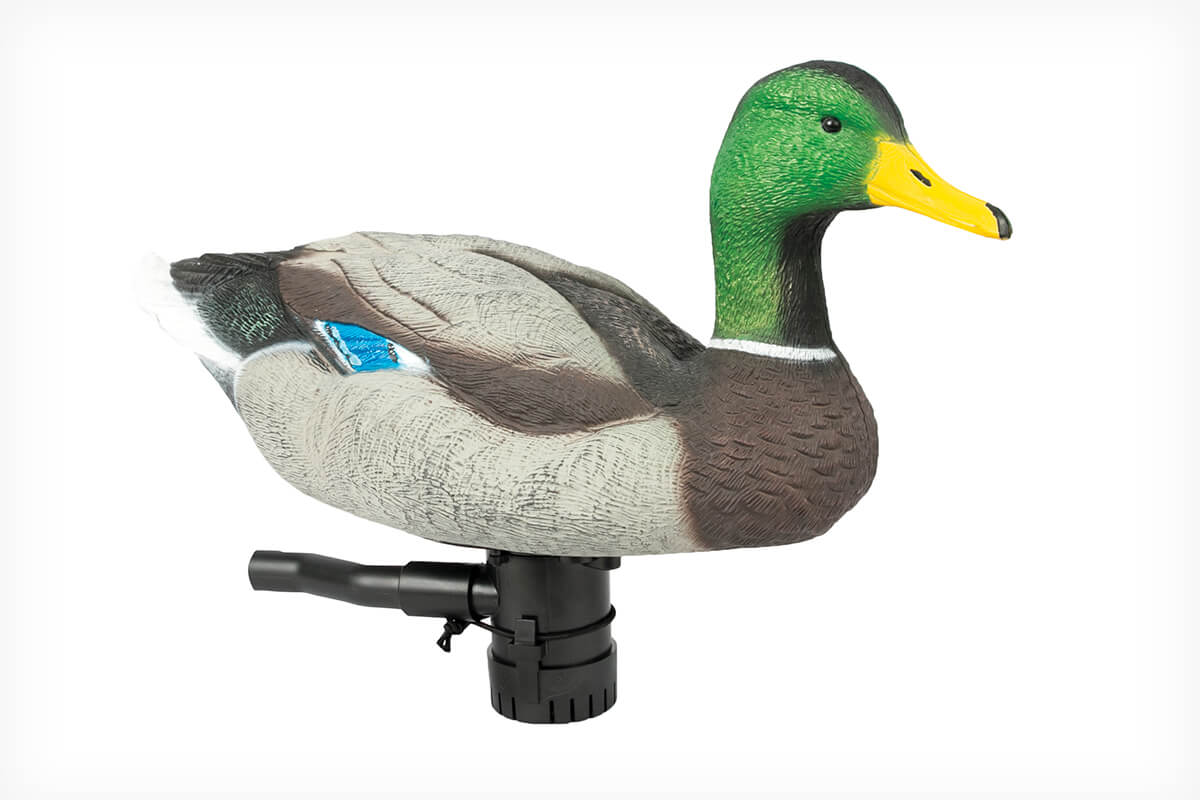
MOJO Outdoors – Mini Mallard Elite
MOJO Outdoors – Mini Mallard Elite
MOJO’s Mini Mallard Elite is a waterfowling win and a staple for many duck killers. Smaller in size, this decoy is remote-ready and a breeze to tote around. The position of the motor, battery, and other operating components ensure less wobble, and the cam lock support pole, drop-in battery and on/off magnetic wings make setup quick. This realistic-looking duck fake comes with MOJO’s Multi-Decoy remote/receiver.
For me, the worst thing that could happen after a successful hunt, is that gut sinking feeling you get, when you can’t find your knife? it’s only happened a couple of times in 40 years, but even once is one time too many…
The solution for me is to always carry a spare knife in my day pack or better still you could build in real redundancy, and carry a compact skinning knife set.A skinning set is what I would use if I wasn’t so happy with my current knives.
Best Skinning Knife Sets – Check Today’s Prices!
Whether I’m skinning deer in the field or butchering meat at home, my go-to knife at the moment is a 6″ Boning Knife or a Swingblade from Outdoor Edge, the Swingblade has a 3.6″ drop point skinning blade as well as a separate 3.2″ gutting blade, rather than the usual gut hook you would find on a Buck or Gerber Skinning Knives – I find the Swingblade fast and comfortable to use, excellent for field dressing deer!
Skinning Knives For Deer…
Deer Skinning Knife – My Pick…
Apart from the Skinning Knife Set from Jero USA, which I feel is a bargain for 3 quality knives – (Made in Portugal) ideal if you refuse to buy knives made in China? The bestdeer skinning knife I’ve seen on Amazon, so far, is this Victorinox Beef Skinning Blade, A popular, 5″ Swiss-made knife, it is a tough, well-balanced, from a top-quality brand, at a competitive price.The Victorinox Beef Skinner is the Knife I would buy if I was in the market for a single skinning knife?
Top Skinning Knife Set
I recently discovered this well priced, some might say very cheap, professionalskinning set from Jero Knives. Jero Pro 3 Piece Butcher Sets, made in Portugal, sold in the US, by JERO USA, the knife set has tough non-slip polymer handles [textured plastic] that is injection moulded over high-carbon knife steel! – these knives are made to work hard, all day every day. They sell with a Lifetime Warranty!
Jero Pro 3 Piece Butcher Set
Knife sets, such as the Jero Butcher Knife Kit, include no-nonsense skinning knives, designed for commercial meat processing – even with hard use, they will last for years! top quality knives at an amazingly low price!
For most hunters or farmers, butchering their own animals, a knife set or single skinning knife from the Jero Pro Series, is all you would need for processing large game animals like deer, moose, or elk – even skinning and butchering a hog or beef animal.
6 Skinning Knife Sets – Compare
Deer Skinning Kit – My Pick…
The 3 Piece Knife Set from Jero Pro Series In my opinion, is the bestskinning knife set, You will find on AmazonBuy Now – (3 Piece Skinning Set) Pro-quality butcher knives, made in Portugal Suitable for field dressing deer, moose, or elk… Jero USA, Supply A Full Range Of Quality Knives To ProfessionalsCHECK TODAY’S PRICES!___________
Best Budget Skinning Set
The 6 piece Deer Skinning Kit from Outdoor Edge would be my backup choice. I love the solid carry case, but in my opinion, the two main knives are a bit small for skinning the larger Red Deer that I hunt, Though this knife kit is still worth buying just for the convenient carry case, caping knife, and ceramic sharpener… The main skinning knives in the set could be your backup knives.
Popular Skinning Knife Types
Skinning Blade Types
Drop Point Skinning Blade
What is a drop point blade? Drop point blades are my favourite blade shape for skinning deer, a well-balanced drop point knife is fast to use when skinning, due to the curve of the blade, rather than a sharp tip or point as you get with a clip point knife – in most situations, I find there is less chance of rupturing the gut or cutting through the skin/pelt when you skin a large animal using drop point blades…
Drop Point is a common blade for skinning knives due to its looks, ease of use, and strength of the blade, the strength comes from the deep curve of the blade tip and the thickness or heft of most skinning blades is designed into the knife for processing larger animals like deer or elk.
These positive attributes transfer across to smaller knives either folding knives or small fixed blades they often sell with drop point blades for skinning small game or EDC work…
But for me, I tend to buy a clip point blade for skinning small game like rabbits.
Clip Point Skinning Blade
The next best blade to the drop point is the traditional clip point blade, in most cases, it is a more versatile blade shape, but not as strong as a large drop point knife.
The clip point is popular with people who only carry one skinning knife as it is suitable for many tasks…
Skinning or Beef Skinner
When I first started hunting, these large curved blades were a common sight on every hunter’s hip in my neck of the woods, Known by some, as the beef skinner, we just referred to them as butcher knives…they came standard from farm suppliers with a deep leather sheath, with sharpening steel attached.
Jero Knives or a Beef Skinner from Victorinox Knives, are two good knife brands that still produce quality versions of the beef skinning knife – without the sheath, its long sweeping blade will be familiar to many older hunters, In the past, I would expect to see a beef skinner above every chopping block in any good skinning shed…
Knife Handle Material
Wood Knife Handle
Wooden Knife handles are considered “Old School” by many, but in my opinion, wood is a great material for knife handles, it wears well stands a range of conditions, it is lightweight and feels nice in hand.
Plastic Knife Handle
Derided by some? but used by many top knife brands including Victorinox, who market their plastic handles as Fibrox, or as it states on their website [Thermoplastic Elastomers (TPE)] I have owned several hunting knives with plastic handles, they all survived hard use and on occasion a little bit of abuse. I still own one after 10 years, they are tough – Just don’t put them in the dishwasher! Hand Wash Only!
Skinning Knife 7 Key Features
7 Key Features You should look for when buying a skinning knife.
Look for a well-balanced knife with a comfortable handle, a skinning knife needs to feel nice in the hand with a good solid feel, but not blade heavy.
You, want a non-slip handle, either textured rubber or a polymer/plastic, such as Fibrox, found on some Victorinox Knives, these handle materials are light, cheap, and durable, – a popular choice for working knives.
A 3.5″ to 6″ drop point blade, or a stiff 6″ boning knife, works great for processing deer in the field.
For me, a skinning knife must be reliable, easy-care, a stainless steel blade makes maintenance simple – a quick wash and sharpen when the job is done – no fuss, no oiling the blade, stainless blades are always ready for work!
Skinning Knives with softer steel like 420HC or AUS-8 are tough in use, as well as quick and easy to maintain its edge with a high grit sharpening stone or touch up with a sharpening steel. – Hard steel like 01 Tool Steel or S30V is nice but softer steel is less brittle and easier to sharpen quickly…
Hunting knives must hold their edge, a blunt knife is frustrating to use and much more likely to cut the person who is using it!
Cheap to buy? Buying Cheap Skinning Knives… doesn’t have to mean crap, once you know what to look for! – Victorinox Knives are cheap, but of excellent quality, for example, all the knives in our comparison table especially the Outdoor Edge Knives and Victorinox, will give you good service for many years, but most are priced to suit a tight budget… (I use both Brands when deer hunting)
Well designed Skinning Knives, from well-known brands, will have all of these 7 features, they hold an edge, sharpen easily, have textured, non-slip rubber or plastic handles, You can expect them to be durable and reliable…!
F.A.Q
Summary
Choosing a single skinning knife to use on a variety of game is a difficult task. If you only hunt deer? or only hunt small game like rabbits or fowl…? the task is simpler, a single knife of the appropriate size is all you need.I like to cover all the bases with a knife set like this 6 Piece Skinning Set from Outdoor Edge – the gut hook for processing large game, the caping knife for small game animals or caping your trophy bull, the boning knife is versatile, useful for all game animals.If you Butcher Hogs or Beef Animals, as well as Hunt Deer, Elk, or Moose, the 3 Piece Butcher Set from Jero USA is a great choice for processing large animals.
Most of us long time hunters have a set, or if we’re lucky enough, a bag of elk ivories that we have laying around that we have always wanted to do something memorable with, but never have. I found myself in this exact situation, when I came across Autumn Fahnholz of Hammered In The Mountains. I was amazed by her attention to detail and her ability to capture the essence of a hunt through her work. I reached out to Autumn to learn more about her story, her work, and her life experiences. Autumn shared with me how far her work has come, and how it all began as a devoted hunter.
With a background and bachelor’s degree in Biology, she expressed that finding a year-round position that she was passionate about in Salmon, Idaho was not easy to come across. Her life experiences from working with the Idaho Fish & Game taught her a lot and led her to learning western bright cut engraving from a local silversmith. That is where Autumn’s interest with silver and becoming a maker was immediately sparked.
She expressed to me that she knew from the very beginning that engraving wasn’t what she wanted to delve into, so she went her own way carving her own path. At the time she did not have a lot of money to her name. In fact, her first hammers, files, and pliers were purchased from the trading post in Salmon. They were well used and had a little rust on them, but that was not going to stop her from using them. While working random jobs with not much to do in the evenings during the cold and dark winters, she found herself sitting at a makeshift workbench in a little primitive cabin in the mountains. Autumn spent countless hours and nights trying to figure out how to solder, saw, forge, and stamp silver by hand, and there it was, Hammered In The Mountains was born.
Teaching herself this skillset came with wasted silver, failure, frustration, and more experimentation than she could begin to mention. However, when she would finally start to see the end result of what she had imagined, that moment of joy significantly outweighed all of the bad. Two years ago, Autumn took a big chance and decided she wanted to become a full-time silversmith. Although she knew it was the right decision, it was not an easy task with losing a steady income. Her husband, Benjamin, was behind her 100% of the way and paid the bills until she could get on her feet. Benjamin and his family own and operate Life-Like Taxidermy in Carmen, Idaho. Her husband, his dad, and his brother have entered in many taxidermy competitions over the years and in 2019 Benjamin brought home a Best in World Title with a pedestal antelope, and his brother Brandon, a 2nd Best in World Title with a life-size Mountain Lion.
Their passion and attention to detail with their clean and precise work when recreating animals is something she looks up to. She learned a lot from those guys when it comes to detailed work and strives to keep her work neat and clean just like them. The passion and tradition with hunting in the Fahnholz family is something that runs deep through their blood. While the guys at Life-Like Taxidermy are recreating animals from memorable hunts, she has also found a way to relive those memorable hunts with her very own skillset involving elk ivory. The Fahnholz name values family, tradition, and the stories that come from their times afield and strive to create things that will not only last a lifetime, but can be passed down to the next generation with a story behind it.
In life there are small moments that cannot be summed up by simply looking at the physical actions that have taken place. There are times when those actions hold a meaning deeper rooted into our souls, forged into our hearts and minds by the preparation, determination, hard work and faith we put forth. One instance that Autumn recalls took place deep in the wilderness on one of the most physically demanding hunts Benjamin and her had ever embarked on. After sealing the deal on potentially the bull of her lifetime with a perfect cross canyon shot, they made their way up to the huge bodied bull elk. Flooded with emotions that one can only feel after taking part in such an amazing hunt, Benjamin got down on one knee and asked her if she would spend the rest of her life with him. Some may have questioned the fact that he did not have a ring in hand, Autumn however, knew that the moment they shared on that mountain could be forever symbolized by creating something with that bull’s ivories. Where a person lacking in the ability to relate to and know such feelings might just see a tooth from an animal, she saw an opportunity to memorialize a life changing experience. She has since made him a ring and still has the other ivory she plans to use in a very special piece for herself. Benjamin and his brother, Brandon, still wear matching pendants from a bull hunt that they shared together years ago. For their family, there is no better way to symbolize the bonds and ties created in the mountains and woods.
Autumn’s true passion with Hammered In The Mountains is to turn those elk ivories into wearable memories. As an avid backcountry hunter herself, she knows the significance of each hunt and how those memories are so meaningful to us all. Her handcrafted, rugged, and creative hard work is an extension of your hunts and celebrations. Three custom pieces that she just finished up for the Western Hunter Magazine are a men’s elk ivory ring, a talisman, and a Benchmade Hidden Canyon knife inlay.
Hammered In The Mountains jewelry is sawed, soldered, forged, hammered, stamped, filed, sanded, and polished all by hand making each piece irreplaceable. Her work is meant to be used and worn, and people are always asking the stories behind these pieces, which gives you an opportunity to relive each of the amazing hunts and experiences all over again.
If you’re interested in a custom piece, give her a call (814-221-2408) as she would be happy to hear about your hunt and work with you to capture exactly what you are looking for. You can also see and choose from any of her previous elk ivory work on her website Hammeredinthemountains.com Autumn’s work is meticulously designed, ruggedly crafted, and handmade for hunters, by a hunter.
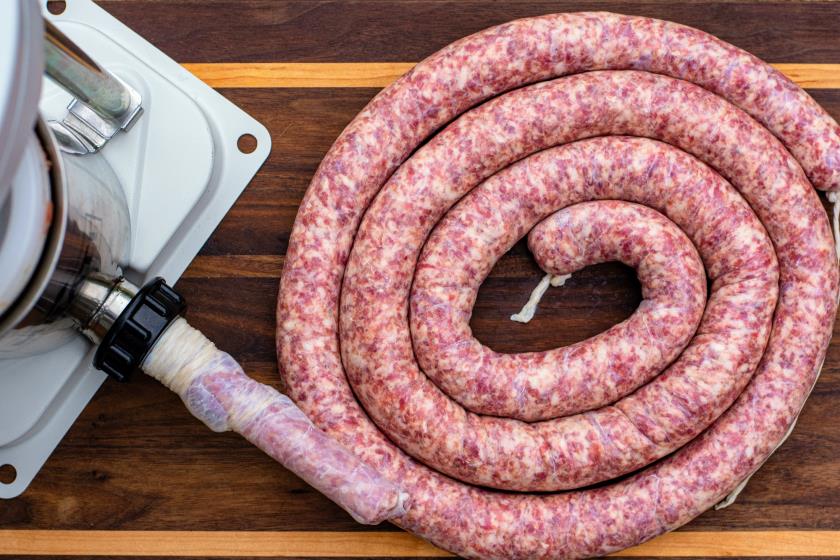
Once you learn the basics, making venison sausage at home is easy to do. (Photo courtesy of Jack Hennessy)
Print Recipe
Making great venison bratwurst, or any sausage for that matter, is an art form, in my opinion, one that begins with precision. While I feel most great wild-game cooking requires little else besides fire and salt, a greater degree of knowledge and patience is necessary for venison sausage. In my head, it’s the difference between a caveman and a chisel, versus an architect and his or her mechanical pencil.
Months ago I stood in awe – like a kid watching a clown making balloon animals – as Joshua Smith, co-owner of the Barred Owl Butcher & Table in Columbia, MO, took a coil of sausage and effortlessly tied and braided 15 pounds.
Later, he shared his bratwurst spice mix recipe with me, and I used it for a blend of whitetail and pork fat. End result: Amazing. Below are his insights:
“I prefer to use metric weights and a good digital scale (bonus points if it is accurate to the half or tenth of a gram) for measurement in my sausage and charcuterie projects,” Smith said, “as I find it to be much more reliable than a system of cups and tablespoons as it is both easily scalable (just move a decimal point) and because volume and weight don’t directly correspond from one brand/style of salt to the next.”
Amount (in grams)IngredientCharcutier’s Percentage 10,000 g 60:40 Venison to Pork Fat 100% 180 g Fine Sea Salt (or pure Kosher salt) 1.8% 30 g Ground White Pepper 0.3% 20 g Ground Ginger 0.2% 20 g Ground Nutmeg 0.2% 10 g Ground Marjoram 0.1% 10 g Ground Celery Seed 0.1% As needed 29-32mm Hog Casings n/a
Professional meat processors “build” their sausage using the percentage method, as shown in this recipe. Meat is always 100% and ingredients are based on that. For example, if five pounds of ground venison blend (three pounds venison, two pounds pork fat), reads 2,268g on the scale, I would need:
40.824g fine sea salt
6.804g white pepper
4.536g each ginger and nutmeg
2.268g each marjoram and celery seed
“I would round all of these to the nearest whole, half or tenth of a gram depending on the capabilities of my scale,” Smith suggested.
Yes, you can “fake it” without a digital scale, and I personally have done that, but you’re risking something being “off.”
Making venison bratwurst is more than just grinding and blending. There are a few rules to follow and some tips that make things easier. While it may look daunting, sausage making is actually easy once you have the basic process down.
Venison Sausage-Making Steps and Tips
Fat content is up to you. Some folks run with as low as 20%, while I know others go as high as 60% (or higher).
Inquire with your local butcher about picking up pork fat (not pork meat, but just the fat), as it is a must for quality wild sausage, in my opinion.
Invest in hog casings, not collagen, for bratwurst.
Use quality equipment. MEAT! (meatyourmaker.com) sells commercial-grade tools direct to consumers so there are offerings at a lower cost. I have found lower-quality equipment simply leads to quicker frustration.
Invest in a meat mixer, versus your hands, to mix together ground meat and spices.
Meat! offers affordable and quality meat processing equipment. (Photo courtesy of Jack Hennessy)
Plan to devote at least a few hours to this process. (Read: have ample beer on hand.)
Keep the meat VERY COLD throughout the entire process. I personally prefer to grind, mix, and stuff when the meat is still very slightly frozen. Others put thawed meat in freezer for an hour or two before starting, and freeze for an hour between each step.
If running a commercial-grade grinder (i.e., one with a motor that produces heat), consider freezing all grinder parts that will come in contact with meat (e.g., chute, grinding plates, etc.). Otherwise, if grinding several pounds, the motor can cause parts to heat up and thus potentially turn your meat to mush.
Some folks spice their meat before grinding. Some of these folks are the same who stuff sausage using their grinder. I opt to grind, then mix thoroughly with a meat mixer. It’s your call. (Meat mixer means you aren’t adding heat from your hands to meat.)
Follow the directions on your casings for rinsing and soaking and sliding onto stuffing tube.
After grinding, when meat mixing in mixer, add spices gradually and mix until spices are absorbed and meat is adhesive, almost sticking to your hand (but still, ideally, very cold).
When it comes to stuffing, sometimes it helps to work with a partner, though this isn’t essential. While one person cranks, the other can concentrate on easing the casing off the stuffing tube and filling at desired speed (this does require communicating with the cranker).
Leave tag end (one hanging off tube) untied, as air will come out stuffer ahead of the meat, and it needs to escape.
Error on side of under-stuffing versus over-stuffing casings. With over-stuffing, you risk breaking casings when filling or twisting to tie off links. With under-stuffing, you can always direct meat through casings when it’s time to twist and tie off links.
Let the meat come out in one long sausage and spin gradually so it settles in a coil.
When finished stuffing and ready to spin and tie links, tie your tag end with an overhand knot.
Use a fine needle of some sort to pop air bubbles (I’ve found this also helps prevent casing bursting when twisting).
Pinch links to size of 6 inches and spin one direction then alternate spinning direction for next link (so not to unravel previous link).
Tie other end when finished twisting links.
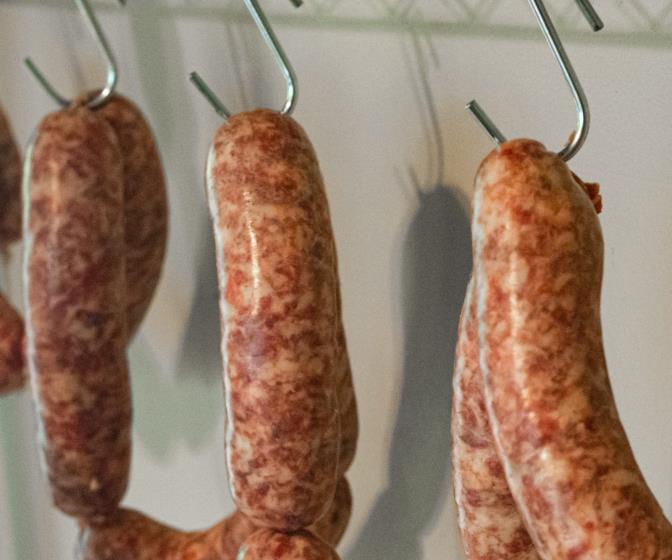
Hang your venison sausages overnight to allow the casings to tighten. (Photo courtesy of Jack Hennessy)
Ideally, allow sausages to hang without touching for a few hours then place in fridge overnight so casings can tighten. Casings must sit for approximately 24 hours before you can cut links.
Even if casings burst, don’t fret – those sausages are indeed salvageable, if not a huge burst, and great with this below recipe. (They just won’t look as pretty.)
Wisconsin-Style Venison Brats and Hard-Cider Kraut Recipe
Wisconsin-style venison brats topped with hard-cider kraut. (Photo courtesy of Jack Hennessy)
Ingredients:
4 (6-inch) venison brats
½ green cabbage head, core removed
36 ounces preferred beer
36 ounces preferred hard apple cider
1 tablespoon kosher salt
2 tablespoons freshly ground black pepper
1/2 cup malt vinegar
1 medium yellow onion, sliced
Get the Recipe: Wisconsin-Style Venison Brats and Hard-Cider Kraut
This firearm transported me back in time and reminded me how shooting can just be plain fun.
Twenty years of law enforcement have me constantly considering how I can be quicker to the draw, faster in my reloads, consideration of cover, and issuing commands while I’m handling my firearm.
My gun is a defender of my life and the lives of others, but there was a time when things were much simpler.
In fact, they were a hoot!
The Ruger Mark IV 22/45 took me back there and I’m going to tell you how it can take you there too.
Ruger took me back to simpler times when the .22 long rifle was the next logical progression from a BB gun.
Young people growing up in rural areas might be called upon to save their town from the ravages of Black Bart or some other villain.
I had known about the Mark series pistols for some time but had heard mixed reviews because of the engineering behind the handguns. Things have changed significantly.
Ruger Mark IV 22/45 Lite
The order of business when I received the pistol was to take it apart. It really couldn’t have been easier. I made sure it was safe and empty, pressed a button, and it disassembled into four distinct parts which I could tell would be easy to clean.
The worst of my fears abated, I endeavored to see what joy might be gleaned from this modernized shooter.
Outfitting
Heading out to the range a total of five times I endeavored to put the pistol through its paces with four brands of ammo as well as a suppressor to test the gun’s versatility (Ruger makes a variant with a threaded barrel for just such purposes).
Perhaps most importantly, I mounted a Vortex Razor with a 3 MOA dot to give it that modern accuracy, and quick sight acquisition flair.
The 22/45 comes with adjustable iron sights but I wanted to plink with the greatest of ease. It also has a Picatinny rail which I mounted, then bolted on the Vortex. With just a little bit of time to get the Razor adjusted, I dialed it in and soon was plinking away like the days of old. Or wait, not like the days of old, better than the days of old!
Ruger Mark IV 22/45 Lite, Red Dot
By dialing the red dot brightness up or down depending on the lighting conditions, I was able to pull up on target, find my red dot, and start shooting. This was much easier than aligning the front and rear sights like I was used to; it was a modern marvel!
Performance
The trigger had about 1.5 mm of slack before it started to snug, then broke at an average of 3.12 lbs on my Lyman Digital Trigger Gauge. Loading the magazine was interesting too until I learned to pull down on the spring tension release button which held the follower at bay.
The controls were all easily accessible, particularly because I had selected the Ruger Mark IV 22/45. Although I wanted to get away from the responsibility-laden shooting of law enforcement, this model made for an easier bridge.
With one magazine, once you shot the 10 rounds, you were done.
No need to conduct a rapid reload, no need to seek cover or call for some! I soon began to relax and enjoy the sheer simplicities of marksmanship, sending rounds downrange with great accuracy and little regard for heavy recoil or a booming percussion.
A moment of brilliance tugged at my mind’s edge. Hey, this is good enough that my kids might like it.
Ruger Mark IV 22/45 Lite, Cocked
Despite the attractive nature of the gaming world, most children still crave analog experiences whether they realize it or not—especially when those experiences are shared with loved ones. I took my kids to the range and let them try the Ruger Mark IV also.
My son liked it.
He was comfortable enough that neither the recoil nor the pop of the .22 LR was really an issue for him.
He was big enough to grip the pistol easily and used the Vortex red dot to narrow in on his target and press the trigger back to complete, consistently emptying the magazine, hitting most of what he was aiming for.
My daughter was a bit too small to truly get a good grip on the pistol and reach the trigger also. So, we compromised. She held the gun and aimed intuitively through the Vortex while I provided a little support and pressed the trigger when she was on and said “ready”.
2. Ruger Mark IV 22/45 Lite, Grip
The result was magnificent. Using an old west splatter target, she shot bad guys aplenty and even peppered an errant horse in the butt for being in the vicinity. Much fun was had by both and an entertaining experience was shared by all.
I eventually had to stop shooting for the sheer pleasure and needed to remember I was reviewing this pistol for you, dear reader. I took my four ammo types and set out a target 12 yards away, then carefully fired an entire magazine of each for accuracy.
It wasn’t supported but it was about as accurate a test as you’d need to utilize to measure this plinking marvel.
I used three brands and four types of .22 long rifle. First was CCI, the 40-grain gold standard of plinkers everywhere.
Next were two varieties of Aguila, both 40-grain, one being standard velocity and the other being high velocity.
Finally, I used Federal Premium, also in a 40-grain.
The last I used only during testing of the Gemtech suppressor, and this was Gemtech 42-grain subsonics.
The groupings came in as follows: CCI came in at two inches for ten whole rounds. The ammo was solid, reliable, and predictable with no failures to fire. Both Aguilas performed well, with only a slightly stronger pop distinguishing the high velocity from the standard.
With the high velocity, I achieved a 1.34-inch group and with the standard, I got approximately 2 inches. The Federal also averaged in at a group of 2 inches. All of these ammunitions were reliable and provided an economical level of fun with reasonable accuracy.
Heading to Liberty Firearms Institute on a slow day I was able to test the Gemtech GM-22 out with the Ruger Mark IV. This was a match made in heaven. Unscrewing the thread protector, I removed it and the crush washer before screwing on the suppressor.
I just so happened to be wearing a suit and tie at the time so admonishments from Q came ringing to my ears as a testy “double oh seven!”
I tried three ammo types and measured the difference in sound with a decibel meter about ear’s distance from the muzzle.
There was an ambient noise of approximately 70 dbl. in the range. Using various loads, I noticed a trend. The GM-22 took the rounds down in decibels to just above 100 decibels, removing the sonic crack one typically experiences.
Now, sound experts say 100 decibels will damage your hearing after 8 hours of steady exposure. All I noticed was a slight pop and the action of the bolt clicking.
For its diminutive size, the GM-22 is awesome.
Check out our field-strip video since there’s a few idiosyncrasies on the Mark IV.
By the Numbers
Reliability 5/5
I really racked up a tally with this pistol. Between me and my family, we ran approximately 1,500 rounds through the Ruger Mark IV 22/45. The only hiccup was shooter initiated. The base of the magazine sits deeply into the magwell and I failed to properly seat it once, causing a failure to feed. This was quickly remedied and not duplicated. The gun provided flawless performance and was only cleaned once during testing.
Ergonomics 4/5
The ergos on this pistol are wonderful. I like the slim profile of the grip, just like a 1911, and this also gives it less aesthetically in common with a Luger. The controls are all pretty easy to get to and even smaller hands can make use of them. There is a good design to the backstrap, protecting the shooter’s hand from the bolt that blows back. It is super easy to operate, from loading, firing, to cleaning.
Accuracy 3.5/5
I wouldn’t call the standard 22/45 a card splitting dynamo, but it does really well in what it is designed for. Imagine a few hours on a warm afternoon, plinking at bottles or cans set up in your favorite shooting spot. Or, perhaps you might hang a target such as Dastardly Dan, and work on fundamentals of shooting. The gun’s performance is solid and predictable. Using the Vortex Razor helped simplify things in my mind. For my children, only one address was necessary—put the red dot on what you want to hit!
Customization 4/5
There is a ridiculous amount to customization available to these guns. Ever hear the name Volquartsen or Tandemkross?
You can change out triggers, barrels, grips, heck, just about anything you’d like and upgrade this gun ‘til your heart’s content. I wouldn’t call the market robust, but there are plenty of options out these for those looking to upgrade. Having the ability to add optics like the Vortex Razor and GM-22 suppressor also widen the variety of customization possible with this gun.
Value 4/5
These little pistols are an excellent value. Listed on a few websites between $400 and $500 (depending on model) you can’t go wrong. Is this the all-time home defender pistol? No. Is this the gun you spend quality time teaching your wife or children how to shoot and have countless hours of fun? Yes.
Overall 4/5
Hats off to Ruger for bringing the joy of shooting back to me in a way that is difficult to express.
Field Strip & Reassembly
The field strip and reassembly is a little different so we made a quick video to help you out.
Conclusion
The Ruger Mark IV is fun and easy to shoot. It’s a breeze to clean, it’s economical to feed, the reliability is flawless, and we loved that this little .22LR pistol fits any shooter, even the kids. The accuracy could be tuned up a little, but for a plinker, it’s hard to go wrong.
Ruger Mark IV 22/45 Lite
You can spend a lot of time teaching important fundamentals on this firearm that later translate to other systems. You can bond with members of your family and have a blast while plinking away. You can upgrade it into a race gun also, but it’s simply wonderful just the way it is.
Special thanks to Liberty Firearms Institute for transfers and also for holding the Gemtech suppressor and allowing me to shoot it before my tax stamp was settled.
Do you run a suppressor on your .22lr pistol or rifle? What is your favorite plinker? Let us know in the comments or drop a review below! And if you need ammo for that .22, check out the Best .22 Long Rifle Ammo!
Or looking to mount a red dot? Check out Best Pistol Red Dots.
As a hunter, you want to score the deer with the highest number of points. Harvesting a 10-points buck is not only a matter of conquest but also of prestige. That brings us to the question, what are 10-points bucks?
Points on a buck are the distinct tines on its antlers. The more the tines, the more points a buck has. A 10-point buck has ten tines on its antlers.
For deer hunters keen on getting unique souvenirs from the animal, learning how to tell them apart by their points is a bonus. Not all bucks come with antlers that can be mounted as trophies. Continue reading as I explain what 10-point bucks are and how you can readily identify or even harvest one.
Are Buck Points Counted From the Size of His Antlers?
A deer’s antlers are made up of various parts. The main components are the beam, burr, brow tines, bay tines, tray tines, surroyal tines, plus the fork and crown. The beam or shaft is the central stem of the antler. The bony rim of the pedicle is known as the burr.
Brow tines refer to the place at which the first antler branches off. A bay tine is the second branching-off, while tray tines refer to the third branch-off. The fourth is the surroyal tine, and the fork is the point where an antler forks out into two tines. The tine at the top of a buck’s antlers is called a crown.
When antlers are developing during the late spring and summer, they have a consistent blood supply to help with growth. They’re usually covered with a soft hair-like material called velvet. In early fall, the blood supply declines, and the antlers harden.
A buck will rub its antlers against tree trunks, brush, and even rocks to get rid of the velvet. The points, therefore, refer to the number of tines on a buck’s antlers. That means that the rack will have ten points inclusive of all the tines and the central beam.
10-point Bucks Explained
10-point bucks are male deer that are mainly between three to five years of age. A 10-point describes the antlers’ size, not the weight or height of the buck. The size of these antlers is mainly determined by genetics, nutrition, and the deer’s age.
However, it’s important to note that some bucks, where there’s adequate food supply, manage to achieve the 10-points at an earlier age.
Typically, antlers start forming in April as the bucks get to enjoy more sunlight. During this growth period, they are covered by velvet, and their texture is spongy. The antlers become fully formed after only four months, and they harden completely during fall.
After the breeding season, that is, in between December and March, the antlers are now shed. A buck has a single antler on each side of the head, and each antler drops off by itself.
How to Count Bucks’ Points
A tine is any growth that protrudes from the main beam of the antler. Tines must be an inch long or more to qualify as a point. Any growths or nubs that measure less than one inch aren’t counted as points. So, for a 10-point buck, it will have ten tines, five on each side.
There isn’t an exact way to accurately calculate the age of a buck in the course of hunting besides examining its teeth. On the other hand, a buck between three and five years old will be a 10-point buck.
The antlers may start shrinking in size when the bucks reach approximately five and half years and above. As a hunter, you’ll need to consider other factors in distinguishing the bucks’ ages. Mostly, however, a healthy and mature 3 to 5-year-old buck will be a 10-point buck.
There are two methods of counting the points on a buck’s antlers. There is the Eastern Count and the Western Count.
Eastern Point Count
The Eastern Count takes into consideration all the total points on both antlers, including the eye guards. Therefore, in the Eastern Count, a 10-points buck will mean that the buck has 5 points on each side of its antlers, including the eye guards.
Western Point Count
The Western Count does not consider the eye guards and only counts the points from one side. So the same 10-points buck would be a 4-point buck when it is scored using the Western Count.
It is also essential to observe that most Whitetail deer are described according to the Eastern Count. The Western Count is usually applied for Mule deer and elk scoring.
How to Differentiate Bucks in their Various Age Brackets
Bucks in their different age brackets have other physical characteristics that make it possible to tell them apart. Hunters must learn how to tell the specific age of a buck by just looking at them. It comes in handy when making harvest decisions, which allows younger bucks a better chance of survival.
For instance, if you search for a 10-point buck, you need to know the exact physical characteristic to look out for.
The following are the age brackets of the bucks as well as their characteristics:
One-Year-Old Bucks
One-year-old bucks are very easy to identify. These male deer have similar builds with the does when you compare them to older bucks. They have thin necks, and their limbs appear more extended, which gives them a slim-looking body build.
There’s also a unique line that separates the shoulders and neck and some muscle definition. Their tarsal glands are slightly stained during the rut.
Two-Year-Old Bucks
Their waists are thin, and their legs still look like they are longer than their bodies. The tarsal glands are round, small, and stained moderately. The spread of antlers is similar in width to the ears.
For two-year-old bucks, there may be some slight muscle build-up on the neck during the rut.
Three-Year-Old Bucks
Three-year-old bucks have visible stomach lines, and backs are relatively taut and straight. Their necks are distinct from their shoulders, having thicker muscles. The chest starts to become deep compared to their hindquarters, but they still have thin waists.
Three-year-old bucks have legs that appear proportional to their bodies. The antlers now have an even spread outside or within the ears. The tarsal glands are dark and display plenty of staining during the rut.
These bucks have now achieved fifty to seventy-five percent of the maximum antler growth potential. Some of these deer qualify as 10-point bucks.
Four-Year-Old Bucks
Bucks in this age bracket will mostly qualify to be 10-point bucks. They have fully muscled necks that blend well into their deep chests and shoulders. Their backs and stomachs aren’t sagging, yet their high-end have rounded and filled-out appearances.
Four-year-old bucks have taut skin surrounding the jaws. The antlers are heavy, with many points, and they start to show off their potential. They have large, dark-stained tarsal glands during the rut that possibly extend to the legs.
Four-year-old male deer reach up to seventy-five to ninety percent of the maximum antler growth potential with proper nutrition. These bucks are different from their younger versions.
Five to Seven-Year-Old Bucks
Very few bucks live beyond five years except in some places with very favorable conditions. Bucks that are between five and seven years are mainly 12-point bucks. Five to seven-year-old bucks have very short legs for their bodies, and they have quite a number of the characteristics of four-year-olds.
The differentiating factor is that they may have pot bellies, sagging backs, and they have more rounded appearances making them look like small cows.
Eight-Year-Old and Above
A few of the free-ranging bucks will live beyond eight years, also known as the post-mature age. The bucks start to regress in their antler size and body. They also start losing the skin on the shoulders, necks, and faces. Additionally, they have pointy hip bones and shoulders while their antlers begin to show abnormalities related to aging, such as curvy or wavy tines or abnormal points.
While studying the specific physical characteristics of bucks in different age brackets, you’ll realize that there aren’t any specific age-related antler characteristics. Therefore, it’s a good idea not to rely mainly on the antler size when coming up with bucks’ ages.
Six Tips for Scoring 10-Point Bucks
It’ll soon be deer season, and there are ways to make your hunting more productive, with a pair of antlers to mount over your mantelpiece. The following tips will help you to hunt 10-point bucks more successfully. They include;
Scent Control
Bucks have susceptible protective systems in their noses that alert them when predators are close, including human beings. You must be invisible if you hope to hunt any of the 10-point bucks.
Use scent-free soap, which is highly recommended before going hunting. Even the towels you use to dry yourself up must be free from any scents. The same goes for your hunting clothes. Make it a habit of cleaning them with scent-free detergents, and remember to cover your face and head if possible.
Befriend the Wind
Paying attention to the wind is another superb strategy for controlling your scent. Failure to master the wind direction is a huge mistake that makes it difficult for hunters to hit their targets. The buck’s nose is the primary defense mechanism. If it smells a foreign scent, it will take off.
Observe Silence
Being quiet makes it hard for bucks to tell if the movement is from hunters or other animals. Bear in mind that bucks know precisely how human beings sound. Observe silence when getting your gun or bow up to the hunting stand.
It’s also a good idea to wrap metallic gear in duct tape to minimize noise while in the woods. In instances where you feel like coughing, try as much as possible to muffle it up.
Look for Coverage
Whether you are using lock-on stands or climbing stands, it’s advisable to select a tree that is close to another tree around it, behind it, or beside it. That offers some form of cover. Bucks have different lines of sight compared to humans.
If there are trees, leaves, or branches, use these for camouflaging your presence without blocking your shot. On a stand, hunting up in the trees is an added advantage since your scent will be blowing way higher above the ground.
Familiarize Yourself with the Hunting Ground
Be familiar with the hunting ground if you’re to find where the 10-point bucks are at any given time and where they are going. The buck trucks will always tell you if the bucks were already there.
Learn to Stalk the Does
Stalking the does is an excellent tip for any hunter hoping to bag a couple of 10-point bucks. That’s because when the rut is starting, bucks will generally go after the does.
Remember that the rut brings many changes, and most hunters know that this is the easiest time to hunt male deer. Bucks that mostly tend to move during the night will come out during the day.
There are several other tips that you can follow, but if you can faithfully follow the ones above, you’re bound to have an incident-free hunting experience. Most important is to have a keen eye, making it possible for you to point out a 10-point buck from a group of them.
Conclusion
When hunting, it’s advisable to give the younger bucks a chance to survive longer, which increases their chances of reproducing more.
If you are a hunter searching for a trophy, killing bucks eight years old and above isn’t advisable. The reason behind this is that their antlers will most likely have deformities. 10-point bucks are easy to pick out due to their distinctive features.
You’ve scouted and set up stands. You’ve sighted in your guns or practiced with your bow. Finally the buck you’re looking for comes in and the shot is made. How long will the trailing process take you? Will you find your buck?
Understanding how to track and find blood can make the difference between having meat in the freezer and a trophy to hang on the wall or coming home with nothing at all. You make a plan when you hunt to increase your chance of success, but if you attempt to track without a plan, your chances of success are greatly reduced.
I sell blood-detection products to law enforcement, and my business has given me a lot of information on what to look for and what a blood trail can tell you about the hit you’ve made on a deer. I’m often called to help look for wounded deer after all hope seems to be lost, because people know that I can find blood that is not easily seen.
POINTS TO PONDER
Blood trails can be misleading. A lot of blood does not necessarily indicate a mortal wound. Nor does a seeming lack of blood necessarily mean the animal isn’t dead. The reaction of the animal and the blood pattern will give us a better understanding of how to go about making a plan to recover an animal. Normally, deer do not bleed to death. An animal that weighs 160 pounds must lose 45-plus ounces of blood to die from blood loss alone. Deer will die faster from trauma than from blood loss, and a combination of both is by far the best scenario.
Most deer can travel very fast when wounded. They can hit 35 mph, and even if they die quickly after the shot, they can travel a long distance before collapsing. A wounded deer will not go far unless it is pushed. Therefore it’s always a good idea to sit still for at least a half-hour after the shot, unless you want to make the tracking job a lot more difficult.
Deer often travel in loose family groups, and those in the rear of the group can help by showing you where the wounded animal traveled. Spooking these deer could remove helpful clues as to the whereabouts of your trophy, so always use caution.
BE OBSERVANT
Pay attention to the reaction of the deer the moment it is shot, as this is your first clue to helping you know how to find it. The reaction can be deceiving, but it is still important. I have shot deer and had them look at me like nothing happened, only to watch them fall over where they stood. I have also had many hunters tell me that they knocked the animal down, only to watch it suddenly jump up and run off, leaving lots of blood. That’s the one that I hate to hear the most.
First of all, body shots that do not hit the neck or spine will rarely make deer drop, and if the neck or spine is hit, the animal is usually disabled and will not be able to get up. Experience from the “dropped and got up and left lots of blood” situations tells me it was most likely a low shoulder or leg shot. The falling down likely means the leg was broken. Leg-muscle hits leave lots of blood in the first 100 yards, but then the blood trail fades fast. There will be lots of large spots of blood as the animal stands in one spot or leans against a tree. Even with a broken leg (or two), a deer can run very fast.
FINDING BLOOD SIGN
Another common scenario is this: “I thought I hit him, but there was no blood.” Anytime there is a wounded animal, there will be blood, even if it cannot be seen. Blood droplets, which are forced out of the body by gunfire, produce a high-velocity-impact splatter pattern. The pattern can be smaller than 1mm at the beginning of the trail. Shots taken with a bow leave medium-impact blood splatter patterns and will leave droplets around 3mm in size. Both can be difficult to see, even in the snow, so trust your instincts and follow the trail the deer took.
If the deer was hit, the blood will appear soon. If it was a high lung hit, it can take time for the body cavity to fill and blood to be forced out. Lung-shot deer often run right after the shot, and this causes blood trails to be harder to see, as the blood is spread over a larger distance. If there is no visible blood trail, wait and let the animal bed down. It will not go far and should die quickly.
Another common animal reaction is the hind leg kick. Although many lung-shot deer kick out after the shot – whether the projectile that hit them was an arrow or a bullet – this reaction could mean that the animal was hit farther back in the gut. The blood pattern and the color of the blood will be very important. Darker blood is from the stomach or liver. A liver shot is always fatal, but liver-shot deer are often hard to find because they can travel a long distance.
Green matter or food is from one of the deer’s four stomachs. A stomach shot is also fatal, but it could take 24 hours or longer for the deer to die. Give this animal at least three hours to bed down and follow up for the kill in the daytime. Make sure to circle ahead from the downwind side.
The low forward double lung shot is the best-percentage shot to take. By hitting the arteries and lungs, it will cause massive internal bleeding and drowning, causing death within about 150 yards. This pattern can start out with little blood, but it will increase as the animal starts blowing blood out the mouth and nose.
10 TIPS FOR BLOOD TRACKING
Always try to pinpoint the exact spot where your deer was standing when shot.If you deer runs off, always try to pinpoint the spot where it was last seen.Unless your deer goes down within sight, always wait a minimum of 30 minutes before taking up the trail.Use trail markers and a compass while following a blood trail.Working in pairs is best. Never have more than three people follow a blood trail.In addition to looking at the ground while following a blood trail, always look at the brush and foliage on either side of the trail.Bright ref or pinkish blood indicates an artery or lung shot.Blood with green or brown matter in it indicates a liver shot.If you think your deer is still alive, send a shooter around and ahead of the animal to try to dispatch it as you continue tracking.When all else fails, consider getting a tracking dog (where legal) or use a luminol-based blood-detecting product like Bluestar.:
Quartering-away shots cause the most damage, as the projectile will travel a longer distance through the body. Shots from a raised area (tree stand) generally give a better blood trail, as the exit hole will be lower and allow blood to leave the body cavity in greater volume.
Shooting for the tail is the worst shot anyone can make, and it often leaves only a wounded animal or spoiled meat. If the shot hits the back of the thigh, it will bleed well but the deer will not die soon, as the muscle will tighten up and help stop the bleeding. A deer shot in the anus will spread bacteria all over its insides, and the damage will be even worse if the bladder is also hit. This type of shot requires the animal to be cleaned immediately and thoroughly washed out in order to save any of the meat.
OTHER TRACKING TIPS
Blood trailers spend a lot of time looking on the ground but little time looking at the brush, where more than half the blood is usually found. Blood on brush can reveal how high or low the shot hit, helping in the recovery plans.
No hunter should be without a compass. Use it to get a bearing on the trail taken, using a marker like a unique tree to track toward. Working in pairs is best as well. One tracker should circle downwind and ahead 75 to 100 yards in case the animal is alive. The second person should take the trail. Repeat this until the animal is recovered. Remember to be safe when tracking because deer can be dangerous when wounded. Proper gun handling and line-of-fire rules must also be followed to avoid injury.
Timing is very important. Tracking too soon is the No. 1 reason why mortally wounded deer travel long distances and make recovery difficult or impossible. Tracking too slowly will cause the meat to spoil. Reading the clues properly will make the difference in how good the meat tastes, since recovery shortly after death is important. Meat with a gamey taste can be caused by slow recovery, not cleaning properly or hanging in warm weather.
PAY ATTENTION TO THE SHOT
Adrenaline runs high after the shot, and humans have a hard time controlling it. Relax, breathe deeply and take a few moments to reflect about what happened. The beginning of the trail is the most important place to get the facts about what happened and how to proceed.
The first thing we do at a crime scene is cordon off the area to keep people from altering evidence. Then we use only a few people to process the scene – again, to keep from altering or destroying the evidence. Walking on a blood trail will transfer the blood pattern from its original spot to somewhere else, or destroy it completely. Never put more than three people on a blood trail unless you think it is hopeless to recover your deer without extra people.
Unless the animal drops within sight, no trail should be taken within 30 minutes. The deer you just shot will be looking at the spot where it was wounded to see what happened. It will bed down soon and try to lick or heal the wound, usually within the first 40 yards if there is good cover. Don’t turn a 40-yard trail into a 400-yard trail!
I’ve often been asked to follow a blood trail that had a small amount of blood that suddenly had twice as much blood, then nothing. This usually means that the deer has turned 180 degrees and walked over the same trail twice, then cut off downwind at a 45- to 90-degree angle after it decided the trail it was following was not safe.
The blood left on the ground or brush is important, as it can tell much about the wound. Bright red or pink blood has lots of oxygen, indicating an artery or lung shot. Many deer trails I have followed were from shots that hit low in the shoulder or leg, leaving large amounts of blood. The blood is slightly darker with a very narrow trail 4 to 8 inches in width. This deer will likely need a second shot. Make plans to get a person ahead to dispatch the deer.
READING THE SIGN
Trails of blood more than 2 feet wide are complete pass-through shots and increase the chances of recovery greatly. Blood trails that have squirts of blood on the side of the trail 2 feet or more indicate arterial shots in the neck, heart or other major artery. As mentioned, brown or greenish blood, or blood with green or brown matter, is always a gut or liver shot. In either case, the deer will need extra time to die before you attempt to recover it. A liver shot will kill faster, but may still take two hours or more. Blood with green matter should dictate a minimum five- to six-hour wait before tracking. The tracker should attempt to put a shooter ahead to dispatch the animal in case it is still alive.
Many visual blood trails disappear when the animal’s heart stops and the blood pressure drops, as the blood is no longer being forced out of the body. Most animals can still travel 30 to 45 seconds and cover 65 yards or more before dropping, and the blood trail will be almost impossible to find without blood-tracking aids.
Many times I have found animals within 40 to 50 yards of the stand. They died close by after having run 250 to 300 yards in a long, arching circle, trying to get back to the spot where they were safe before the shot. Knowing the bedding areas on your property helps a lot if you cannot find an animal. The wind is important to a wounded deer. They will always try to get downwind of the hunter.
TOOLS OF THE TRADE
There are tools we can use in tracking. Dogs are now legal in many states, and a dog can be great tool if there is no rain or snow. However, most people do not have dogs or have the time to train them, nor do they have the money to pay a dog tracker. Dog tracker fees vary but often end up costing in excess of $150. Lights made for finding blood do not work very well, as blood absorbs light. Regardless of what you see on TV, law enforcement officials do not use lights to find blood.
There are a few luminol-based products (Tink’s and Bluestar, notably) that make blood glow in the dark. I prefer Bluestar because it was first made for forensic use. Bluestar picks up hemoglobin. Hemoglobin transports oxygen to the cells. It contains iron, which is a basic element of earth and is nearly impossible to destroy without fire.
Much time was spent to produce a product like Bluestar that investigators could use with little or no training, and much time was spent developing a product that could tell the difference between blood and other items containing iron. Bluestar is sold in tablet form, and you simply add water. This is the best tracking agent I have found on the market today. At a cost of $19.95 to track up to four deer, the cost is very affordable. You can usually cover 100 yards in 10 minutes or less, and the time saved will be worth the money spent.
Small and lightweight and sold in packs of four, Bluestar gives the hunter enough product to cover even the longest trails. Bluestar also will work well in evergreens and moss. Because the reaction with blood is so much different from “false positives,” anyone can tell the difference.
ALWAYS PINPOINT THE SPOT
Hunters often have difficulty finding the beginning of a blood trail. Before you leave your stand, use a waypoint to know where the deer was standing when shot. Also, try to pinpoint the last spot where the deer was seen after the shot was taken. A compass is perfect for this, using a marker such as a tree to find the spot.
Many times I use Bluestar only to find the start of a blood trail. To do this, spray while walking across the trail as soon as you find the blood. See if you can follow it with your eyes. If not, continue to use the Bluestar. I often use it to regain a trail when an animal changes terrain, going from leaf litter to grass fields, for example. Bluestar will work in the rain or snow. You’ll learn a lot about trailing deer when using Bluestar since you’ll see the whole trail every time you use it. Another advantage of Bluestar is that total darkness is not needed. It works well in low light just after shooting light has faded.
Since Bluestar glows bright blue in the dark, even people who are colorblind or whose eyes are “not as good as they used to be” can follow the trail without any help. No glasses or lights are needed – just water and a spray bottle. Water can be taken from streams, lakes and ponds, along with any tap or bottled water. In extreme cold, you can use window washer solvent. When using, mix a set of tablets in a sprayer and spray on the ground where the deer was standing. If the deer was hit, there will be a bright blue glow.
Last but not least, always use trail markers. This will help if you need to leave the trail for any reason and will help anyone who is trying to join you later on. This also lets you see a pattern of travel. Most likely that pattern will be an arch traveling back to the bedding area downwind of the stand. Bedding areas are thick with a good view, and they always take advantage of wind direction. They provide a perfect area for a wounded animal to seek refuge in.
No matter what happens before or after the shot, these simple tools mentioned above cost very little and will save you lots of time. More importantly, they help us all remain ethically responsible by recovering game quickly and efficiently.
“Unveiling the Power: Exploring the Distance Capabilities of a 22 Air Rifle Pellet. Discover the fascinating journey of a 22 air rifle pellet as we delve into its remarkable traveling capabilities. From measuring velocity to analyzing factors influencing distance, join us on an intriguing exploration of how far this small yet mighty projectile can reach.”
how far will a 22 air rifle pellet travel?
A.22 air rifle pellet can travel a significant distance, depending on various factors such as the power of the rifle and the type of pellet used. On average, a.22 air rifle pellet can travel up to 400 yards (366 meters) when shot from a high-powered air rifle. However, it is important to note that the effective range and accuracy of the pellet decreases significantly beyond 100 yards (91 meters).
The distance a.22 air rifle pellet can travel is influenced by several key factors. The first factor is the power or velocity of the air rifle. Higher-powered rifles can propel pellets at greater speeds, allowing them to travel farther. Additionally, the weight and shape of the pellet also play a role in determining its range. Heavier pellets tend to have more momentum and can maintain their trajectory over longer distances.
It’s essential to consider safety precautions when shooting a.22 air rifle. Be aware of your surroundings and ensure you have a clear line of sight to your target. Always be mindful of potential obstructions or people in the vicinity that may be at risk if hit by an errant shot. Moreover, it is crucial to abide by local laws and regulations regarding shooting distances and designated areas for air rifle use.
In conclusion, the distance a 22 air rifle pellet can travel depends on various factors such as the velocity and angle of shot. On average, it can travel up to 1 mile, but its range decreases significantly after a few hundred yards. Safety precautions must always be taken when using air rifles to prevent accidents or damage to property.
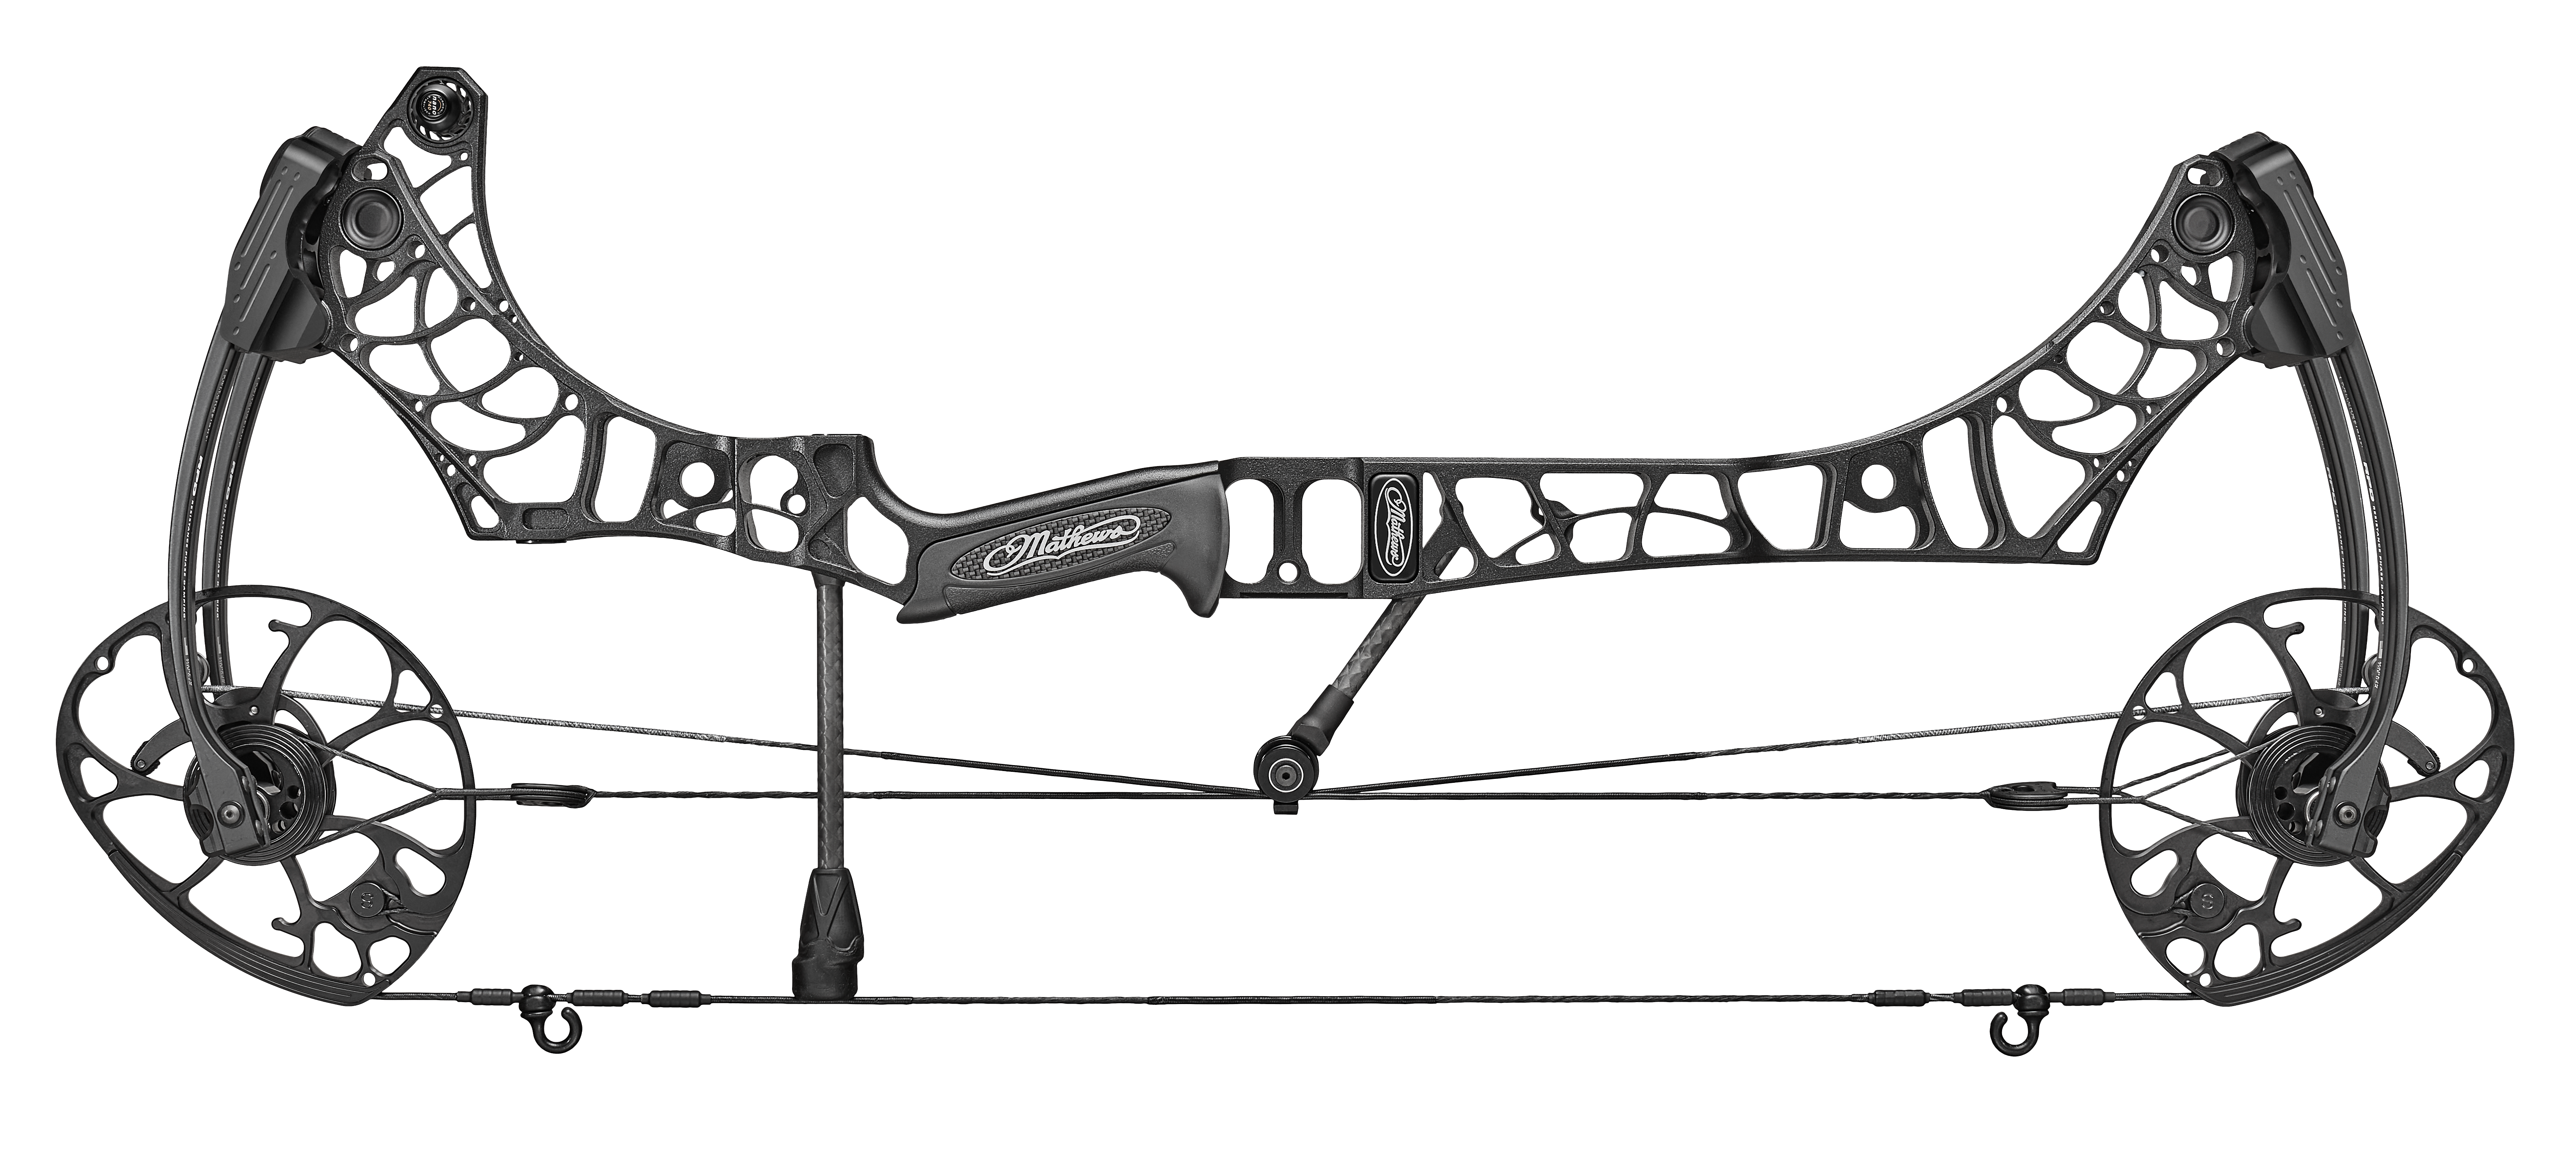
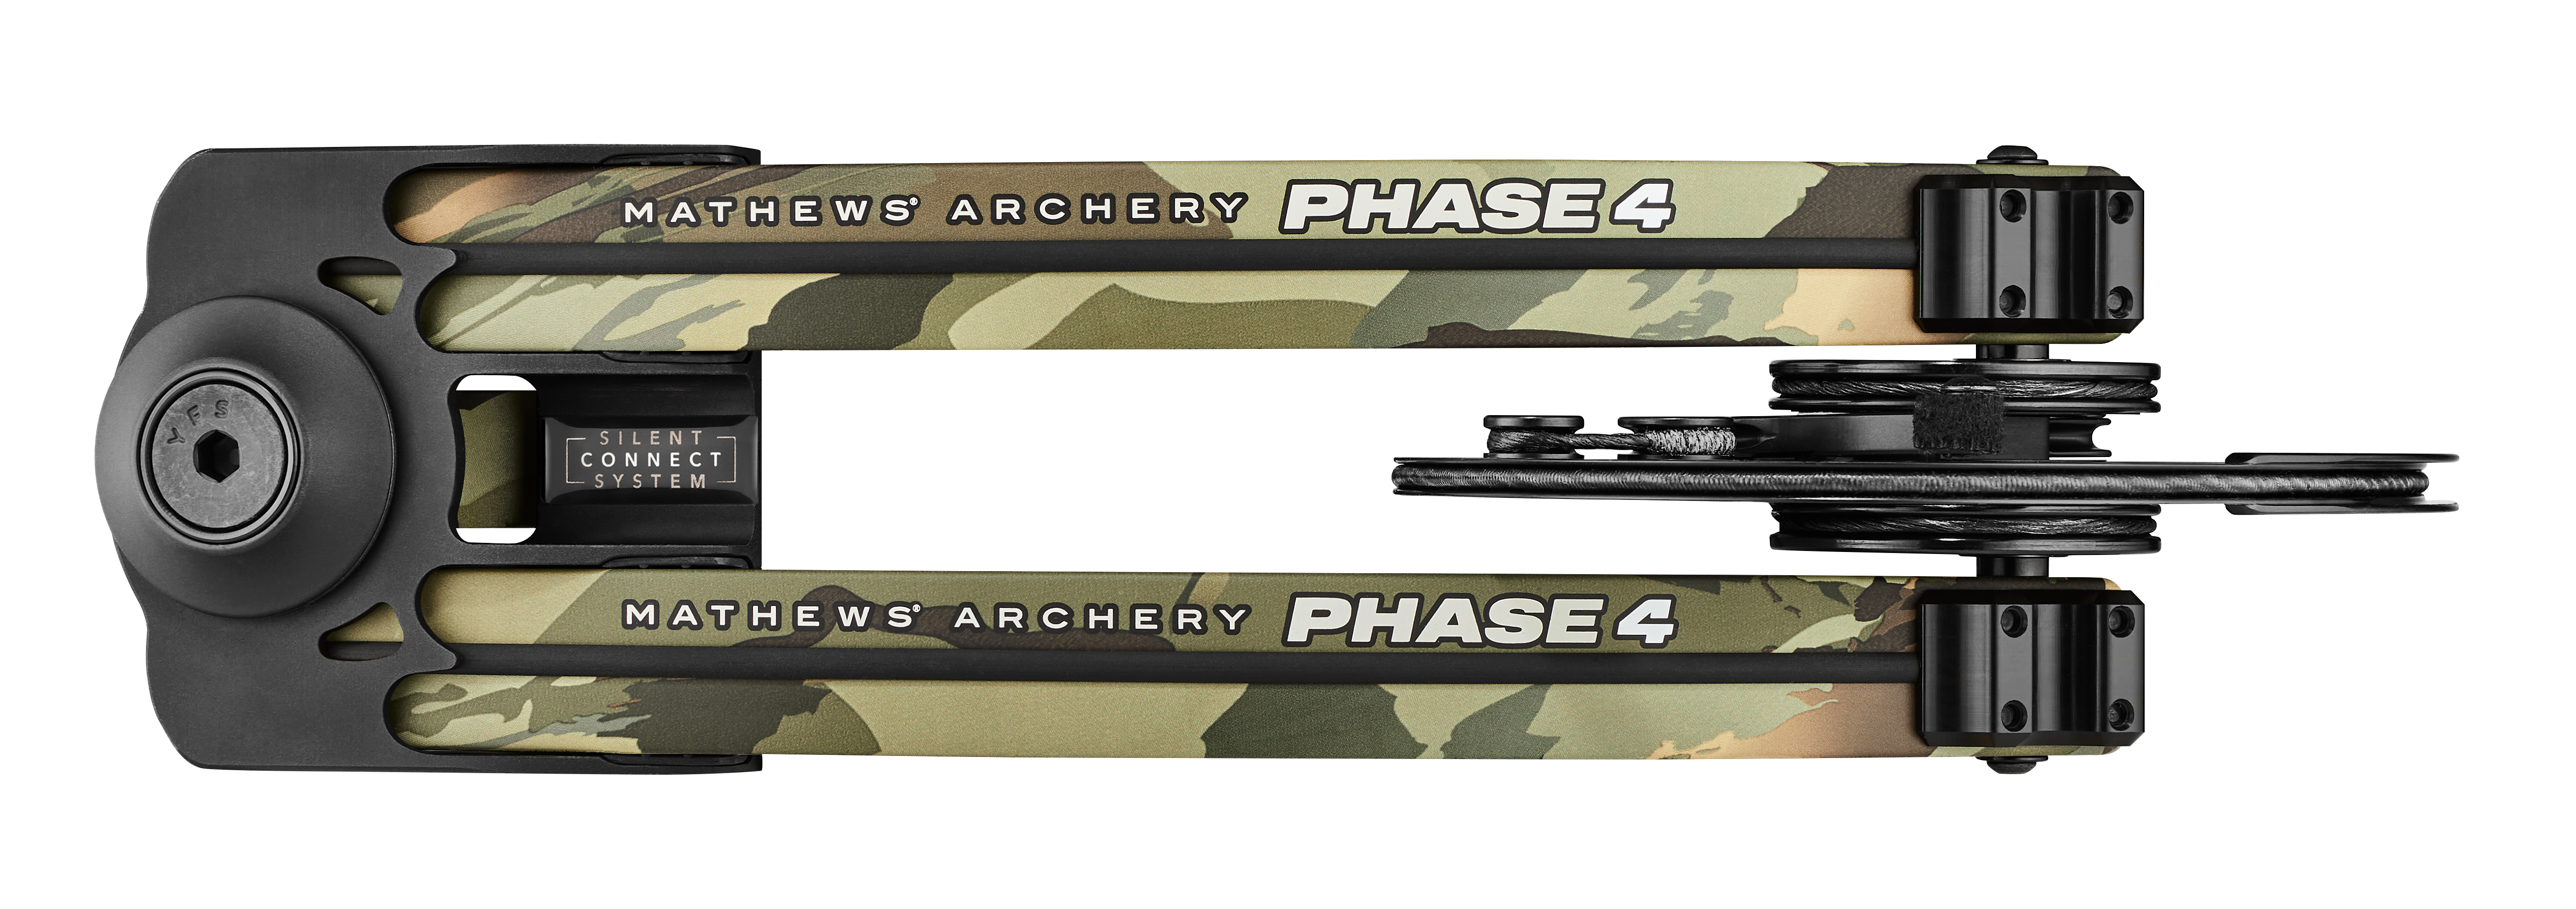
Mathews introduces its newest bow model — the Phase4™. Engineered with new Resistance Phase Damping™ Technology to drastically reduce vibration and built compatible with a completely redesigned line of Bridge-Lock™ Stabilizers, the Phase4 is the stealthiest hunting system to-date.
The all-new Mathews Phase4 in the Black finish. There are seven other finishes available. Photo courtesy of Mathews Archery.
“For 2024, we focused on building a streamlined hunting system that had the least amount of noise and felt vibration in a fully setup bow,” stated Mark Hayes, design engineering manager. “The result is a complete hunting system that is up to 13% quieter with 37% less vibration.”
The all-new Mathews Phase4 in the Granite finish. There are seven other finishes available. Photo courtesy of Mathews Archery.
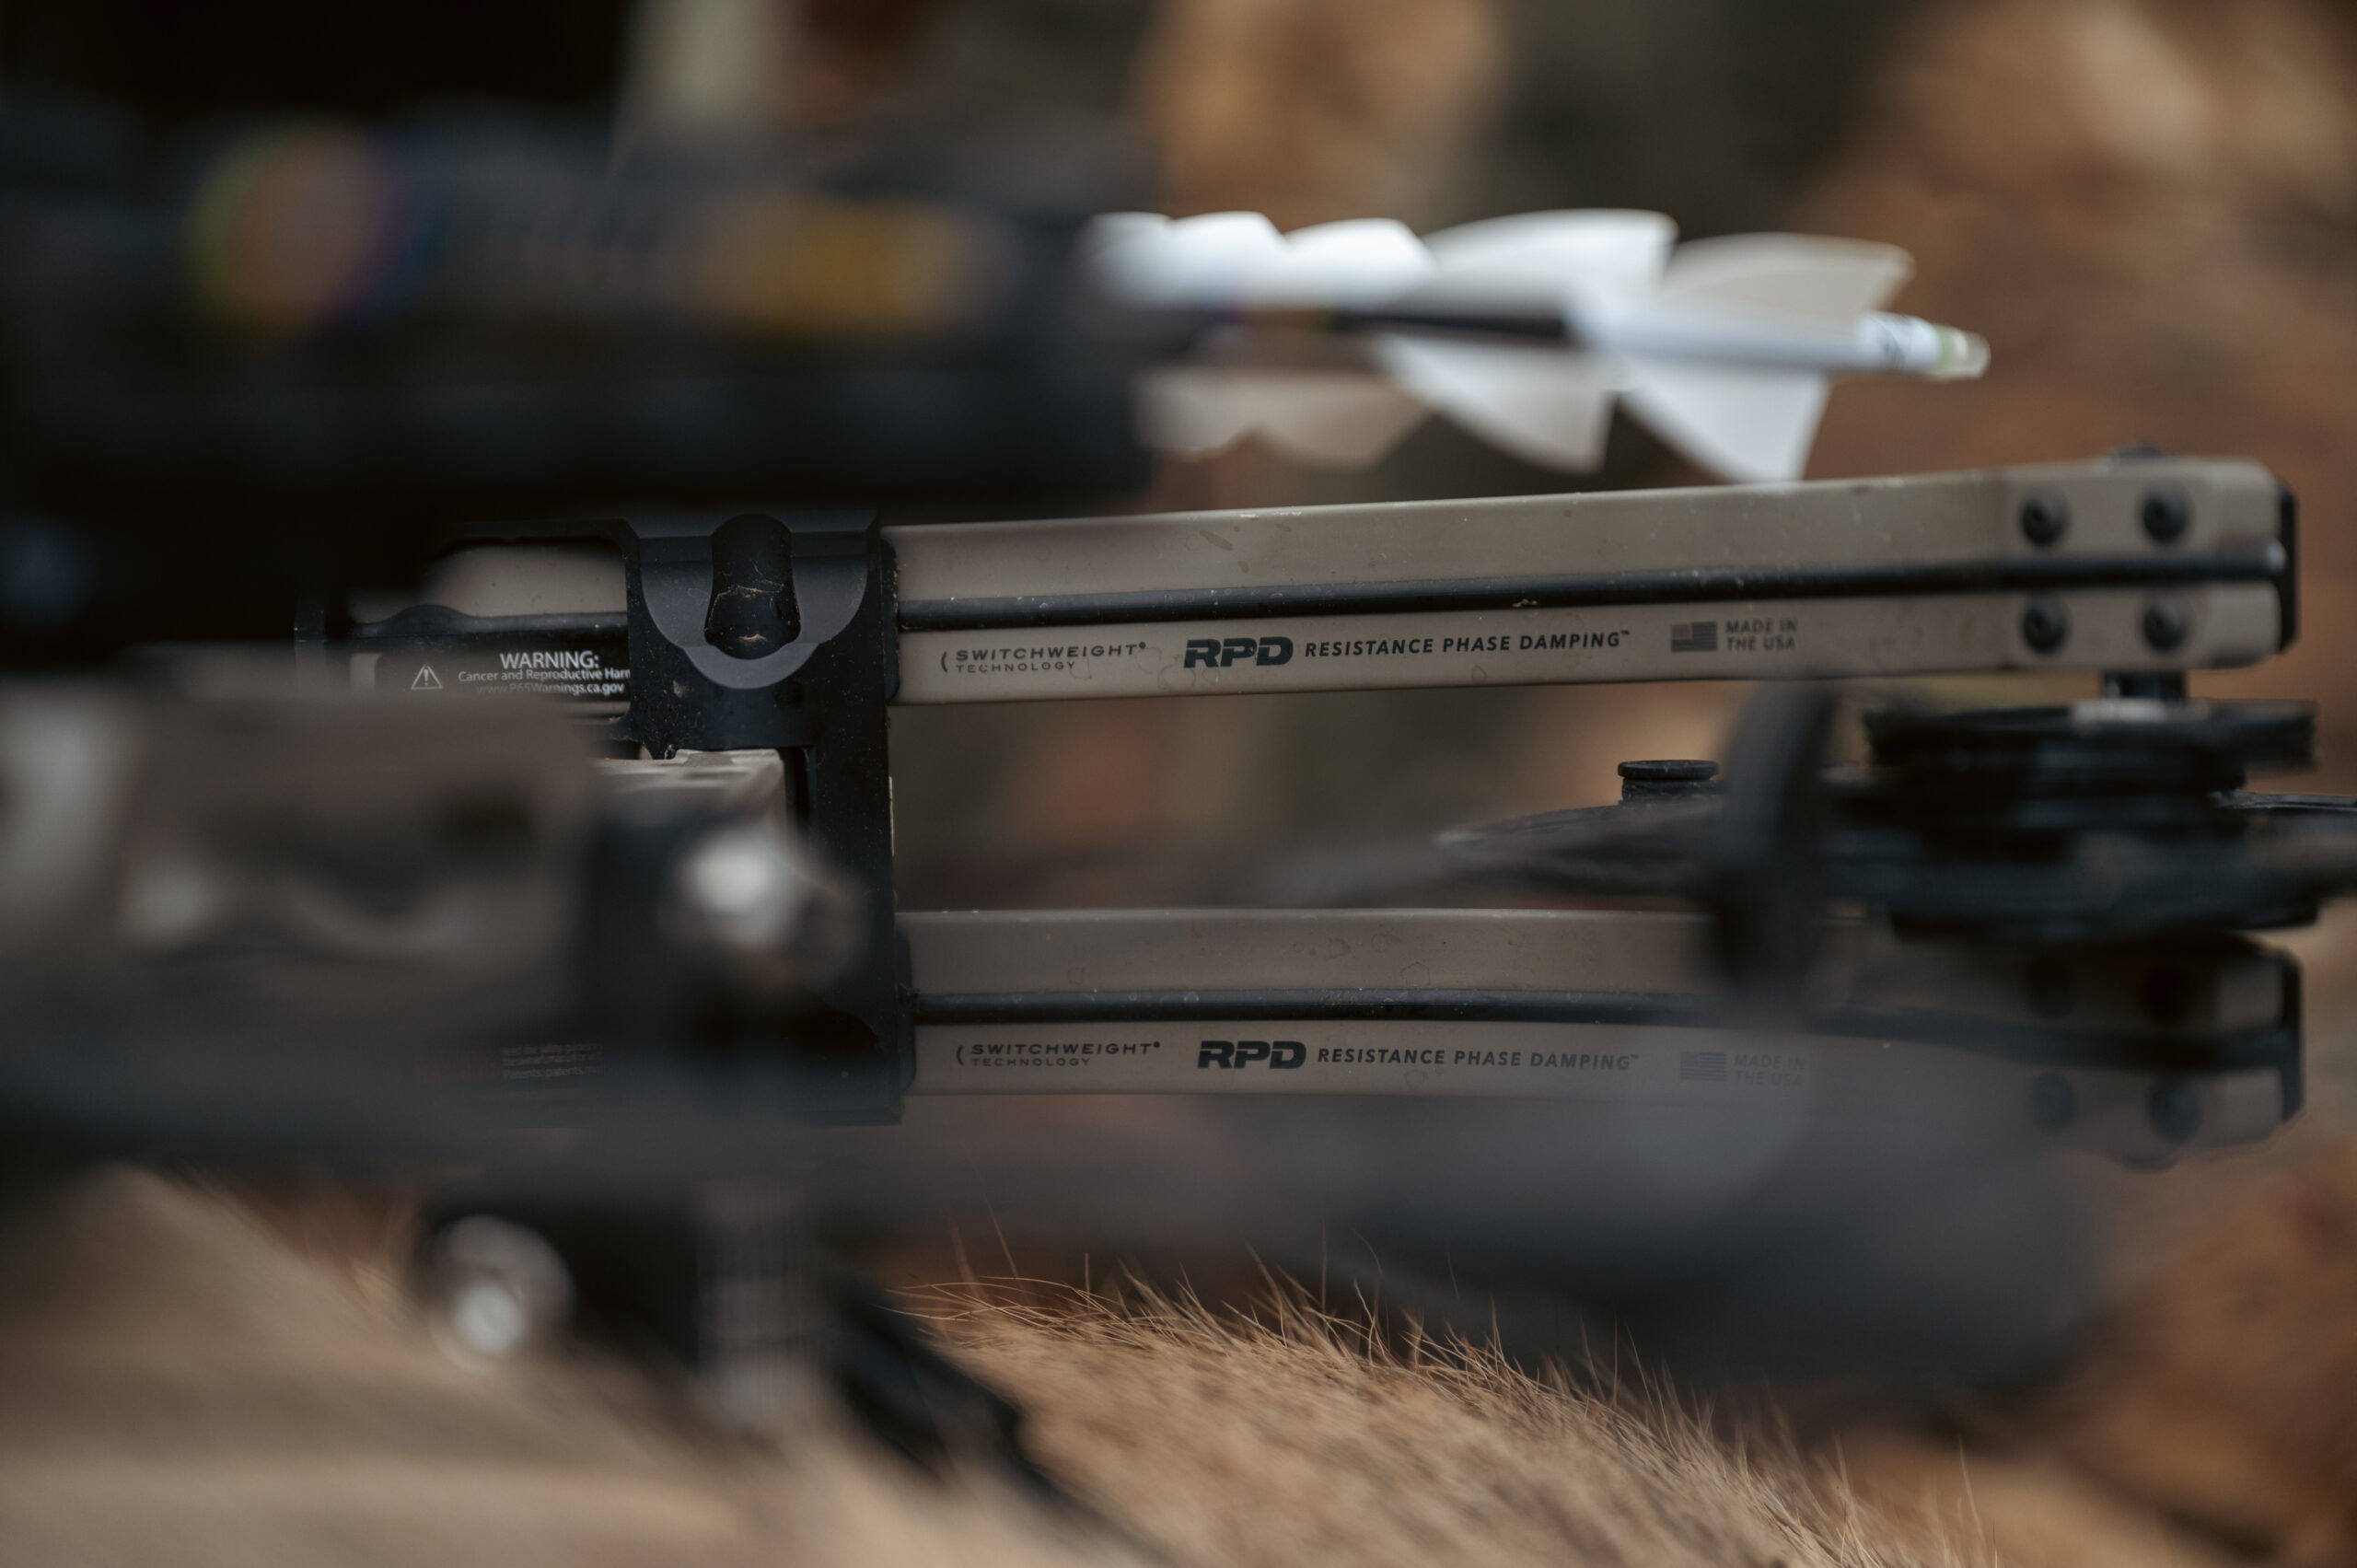
NEW Resistance Phase Damping™ Technology
Resistance Phase Damping™ (RPD) stops vibration at the source, resulting in the smoothest shooting archery system Mathews has ever created. This first of its kind innovation tackles excess energy directly in the limbs which significantly deadens and silences post-shot vibration.
Resistance Phase Damping™ (RPD) creates a smooth shooting experience. Photo courtesy of Mathews Archery.
“The real value of RPD is maximized when paired with our new Bridge-Lock stabilizers,” says Hayes. “We challenged conventional stabilizer design and ended up with a radically improved bar that is better balanced, absorbs more vibration and allows hunters to fine tune their setup like never before.”
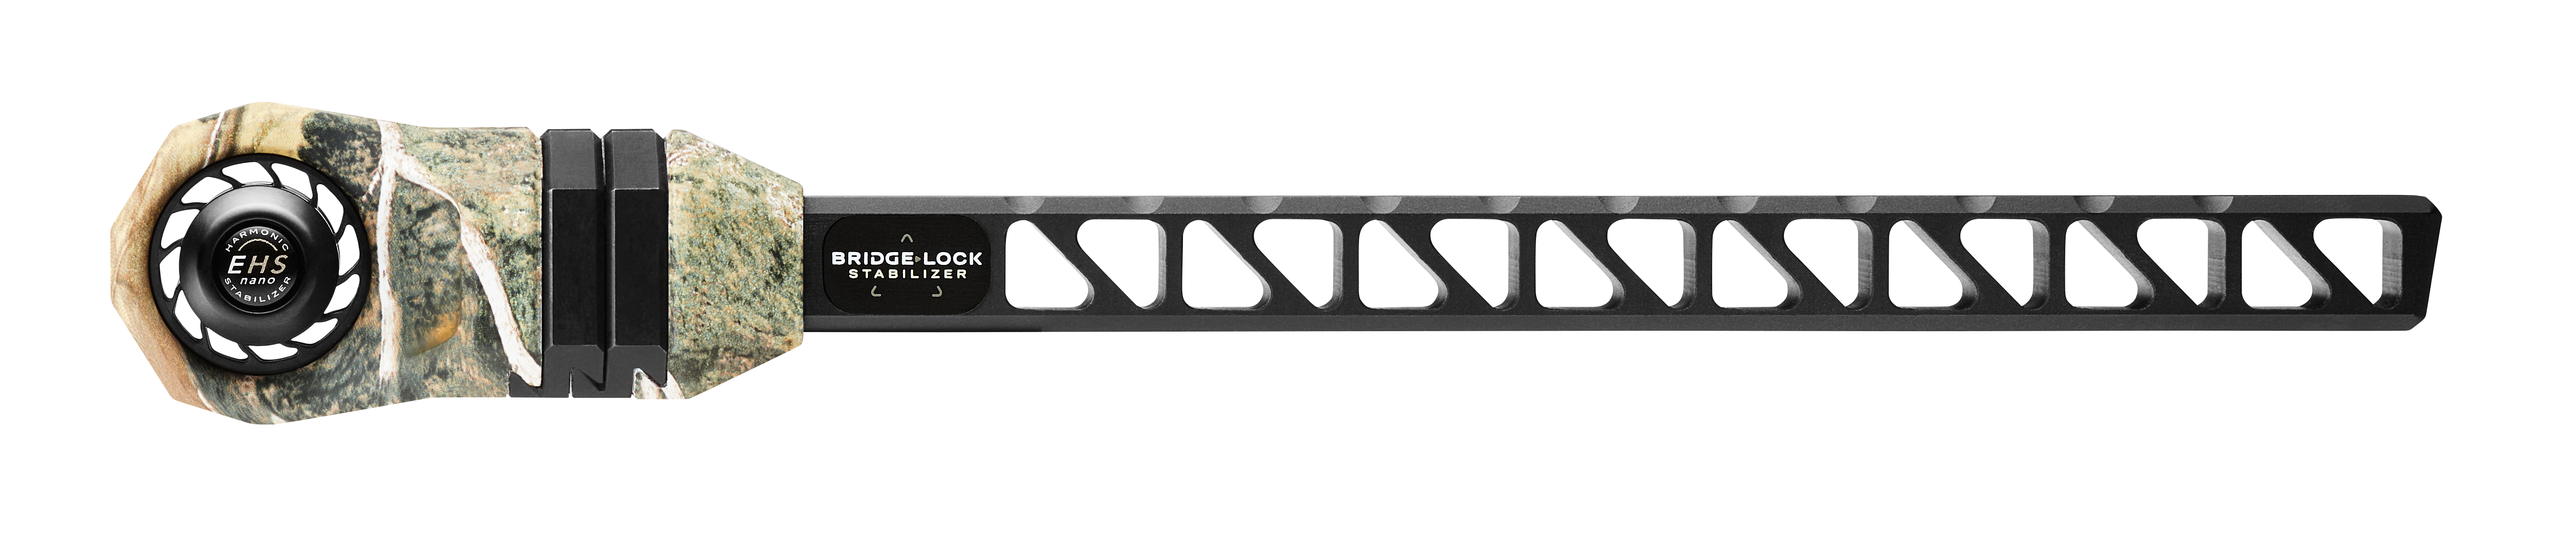
NEW Bridge-Lock™ Stabilizers
Expanding on Mathews exclusive Bridge-Lock Technology, the new Bridge-Lock Stabilizers offer improved balance points and a stiffer connection to your bow for added vibration dampening and enhanced stabilization. InterLink™ Weight Technology makes adding and removing stabilizer weights easier than ever before with a redesigned threadless, stackable weight system that only requires one set screw for quick adjustments. Completed with a quick-disconnect knob allowing adjustability in ½” increments, the Bridge-Lock™ Stabilizers offer a new level of harmonic tuning and customization in a single bar. Available in 8”, 10”, and 12” length options and eight finish options to complete your hunting system.
The new Bridge-Lock Stabilizers offer improved balance points and a stiffer connection to your bow for added vibration dampening and enhanced stabilization. Photo courtesy of Mathews Archery.
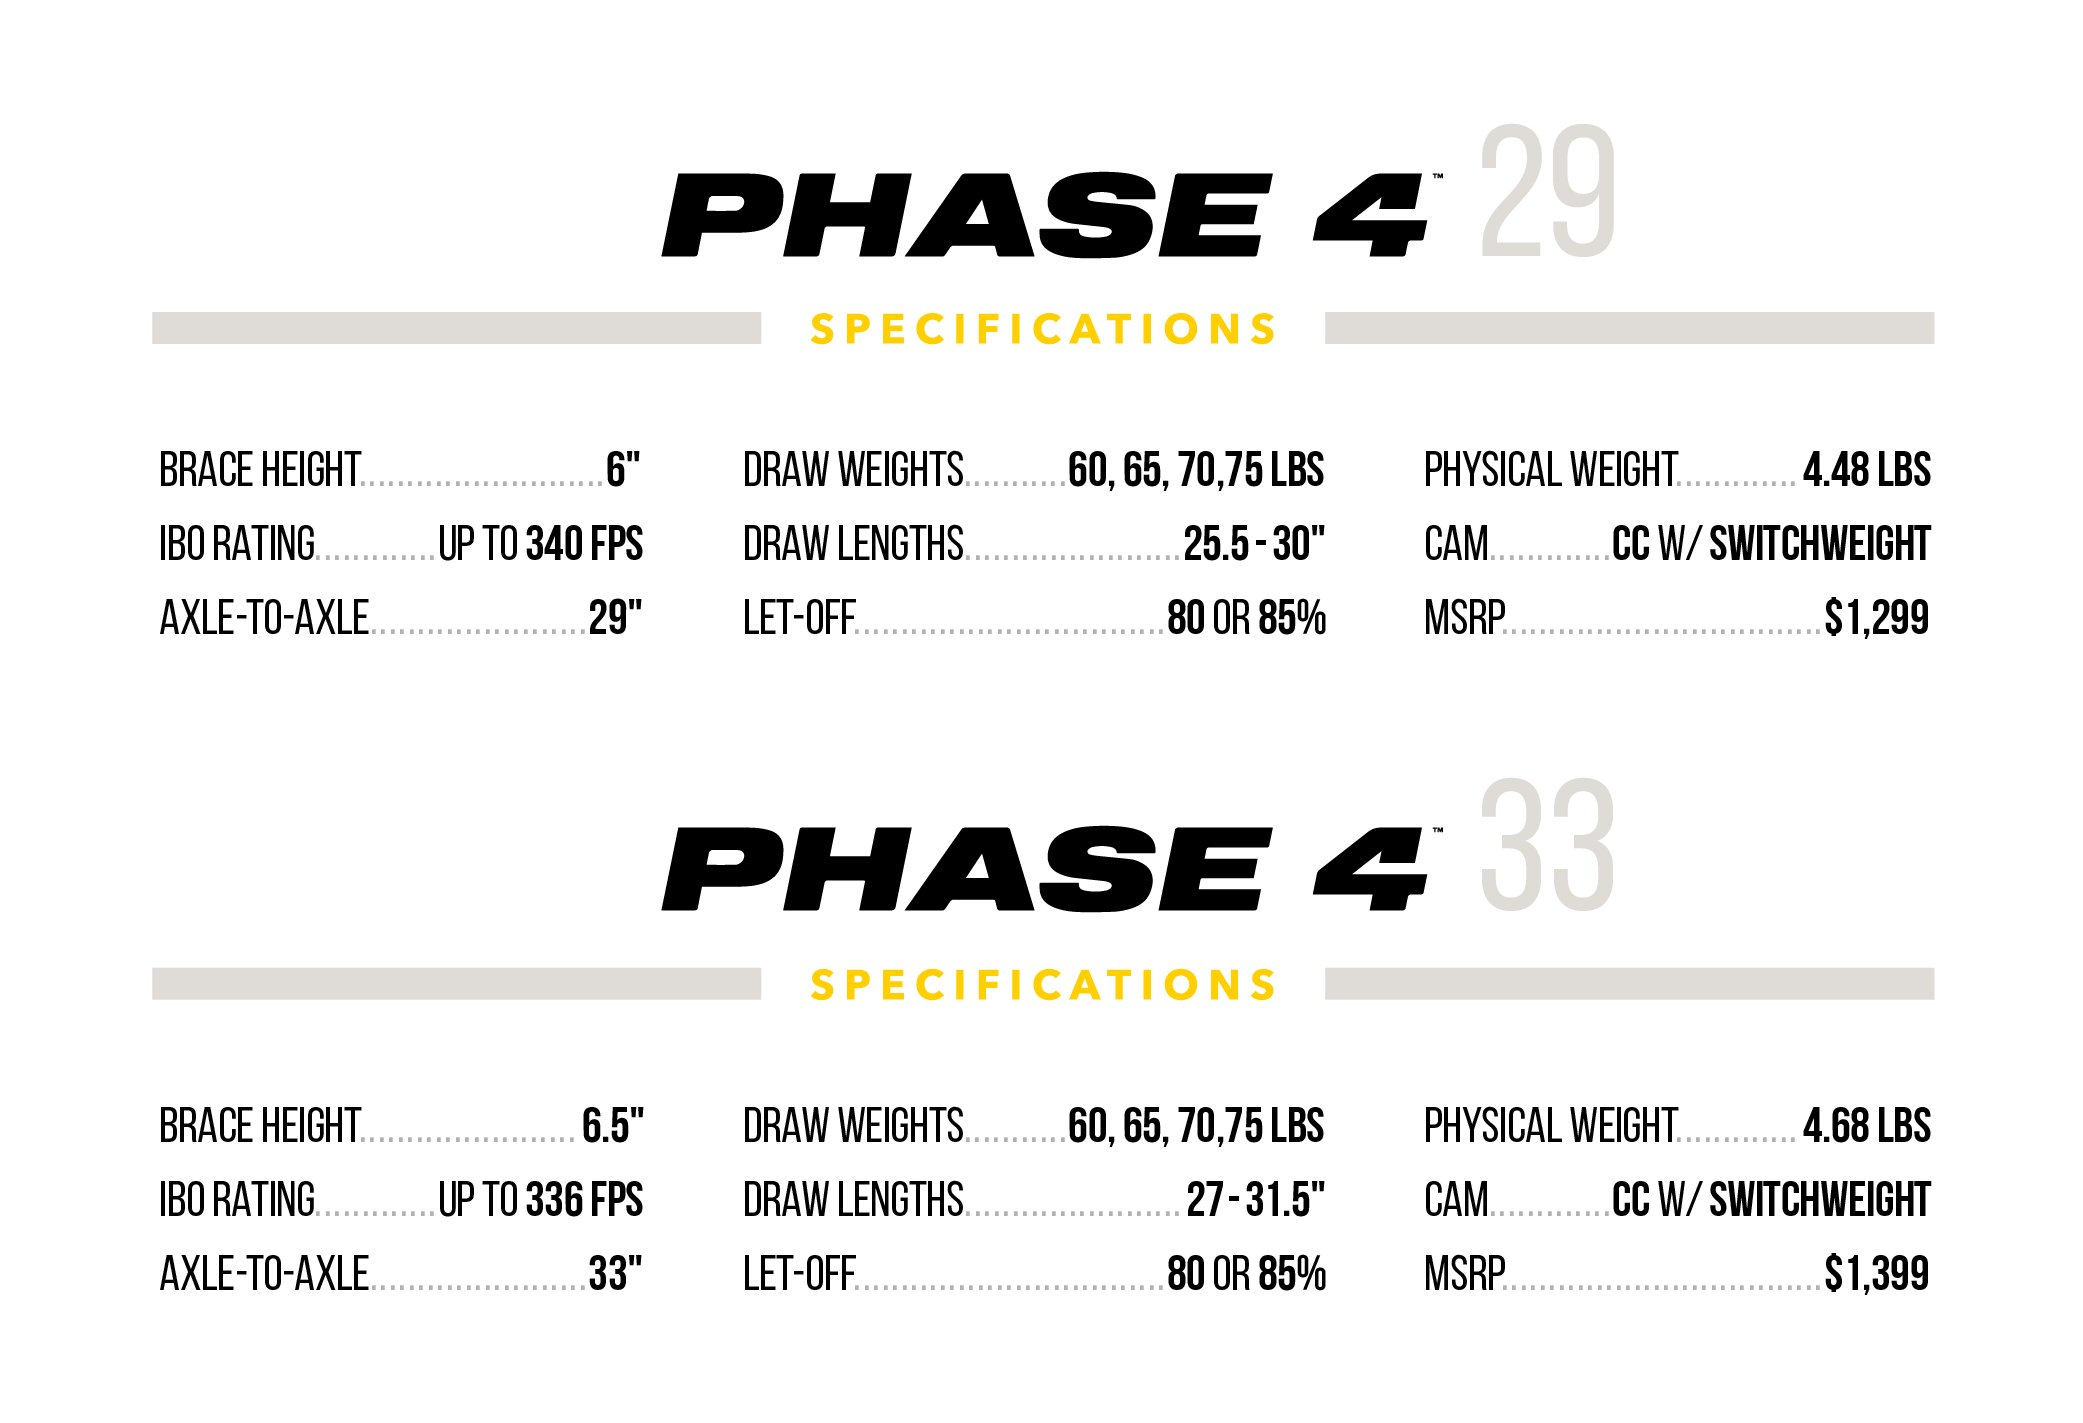
The new Phase4 is available in 29” or 33” axle-to-axle lengths. The Phase4 29 has a 6” brace height and accommodates draw lengths from 25.5”-30”. The Phase4 33 has a 6.5” brace height and accommodates draw lengths from 27”-31.5”.
The all-new Mathews Phase4 in the Forest All-Season finish. There are seven other finishes available. Photo courtesy of Mathews Archery.
The Phase4 is available in eight finish options. You can find more information on the 2024 Phase4 and new accessory line at Mathewsinc.com and experience them today at your local Mathews Retailer.
MSRP
Phase4 29: $1,299
Phase4 33: $1,399
Bridge-Lock Stabilizer (8”): $249.99
Bridge-Lock Stabilizer (10”): $259.99
Bridge-Lock Stabilizer (12”): $269.99
Bridge-Lock Adjustable V-Bar: $199.99
About Mathews Archery
Mathews Archery has been committed to elevating the archery experience for over 31 years. All Mathews bows are designed and built in Sparta, Wisconsin, U.S.A. and distributed through independent retailers around the world. Experience the full line of premier target and hunting bows at mathewsinc.com and take a look at the 2024 new product guide here.
Wyatt Earp has said:
Fast is fine, but accuracy is everything
And I just thought how many airgunners are obsessed with muzzle velocity and muzzle energy,...
"Air Rifle Scope vs Rifle Scope: Unveiling the Ultimate Precision Optics. Discover the essential differences and benefits of these two optical devices, empowering shooters...
")
")
")
")
")