This isn’t the best place to be if you’re a vegetarian or aren’t interested in venturing into more unorthodox meat choices for your dinner.
Now that you have been forewarned, let’s get on with discussing what does Porcupine taste like? Yes, this large rodent is a delicacy for many people in the South East Asian communities.
The spiky creature is also eaten in the west, but you’ll hardly ever see it on the menu of famous steak houses or corporate food networks.
Some have even labeled it an ‘acquired taste’ since it tends to overpower the palate if not cooked right.
If you haven’t seen a porcupine in real life and are trying to picture what it looks like, consider browsing a picture or two on the web for reference.
The animal is covered in spikes and looks like a giant guinea pig, minus the fluffy fur.
The mammal is part of the order Rodentia and is classified under two subspecies: Hystricidae and Erethizontidae.
Old-world porcupines or Hystricidae are native to Asia, Europe, and Africa.
Whereas New word porcupines, called Erethizontidae, are found in North America and South America.
Though they are divided into subfamilies, the typical characteristics to identify the beast are the same.
They have quills on their back, snots for noses, and are generally a dark grayish color.
While the latter is mainly arboreal, the other species are terrestrial and easier to hunt.
What Does Porcupine Taste Like?
Often compared to white and red meat, many have debated that porcupine is most similar to pork.
The meat is made up mostly of fat and is extremely rich in flavor.
Some even say there’s a certain sweetness to it.
Most of the food that we consume tastes like the nutrients that its body contains.
And, since porcupines are solely herbivores, it’s no wonder that their meat is succulent, clean, and vibrant.
While slicing into the meat, you’ll notice that the color is darker than usual captive-bred meat.
Wild meat usually has an off-putting muskiness, but while porcupine meat has a strong kick, it also has a subtle sweetness that helps offset the gaminess.
Ironically the name porcupine is a play on words meaning ‘pork of the pines’.
The word is derived from two Latin words, ‘ porcus’ and ‘spina,’ which translates to ‘pig’ and ‘spine.
‘ It could be a coincidence that the animal is named after pigs, or maybe people in the old days found resemblances in the look or taste.
Whatever the reason, most will agree with the similarity in flavor.
In the early days, the meat of this porky roach was compared to very strong-smelling cheese.
American Naturalist William Long even went so far as the say it was vile.
However, in recent years with many people trying to find healthier ways of consuming red meat, this exotic ingredient is now making the rounds in the local market.
How to Cook and Serve Porcupine?
Let’s first clarify the big question of how to prepare the meat for consumption.
Seeing as how the body is primarily covered in spikes or quills, it can take a lot of work to dress the meat for cooking.
You either have to skin the carcass or burn the skin and quills off.
The other methods of manually removing the spikes may be time-consuming and challenging to accomplish.
Great tutorials show you how to complete any of the steps mentioned above.
Once you’ve completed the demanding task of getting the meat ready to cook, it’s pretty easy to prepare.
Many people will separate the skin and Subcutaneous fat and roast it or grill it directly over an open fire.
Other methods of cooking require a bit more preparation time.
You can prepare porcupine stews if you have all the right accessories to flavor the pungent meat.
Or, you can coat them in batter and cracker crumbs and enjoy the deep-fried meat.
However, the most common cooking method would be to leave the skin on and roast it whole, just like how you would prepare a Lechon.
Adding this red meat to your diet can actually do you good because of its high protein content and other nutrients.
Conclusion
As wild game makes a comeback into our kitchens, the porcupine can be a great way to start your culinary experience with exotic meats.
They’re straightforward to cook and have been regularly consumed by people in the past.
It also pairs well with solid wines due to its rich aroma and taste.
The meat from this spiny animal is also highly coveted for all its health benefits.
So much so that it is a staple food item for indigenous people in South East Asia.
So, the next time you’re out browsing for something eclectic and different and see some fresh porcupine meat for sale, you should grab some for yourself.
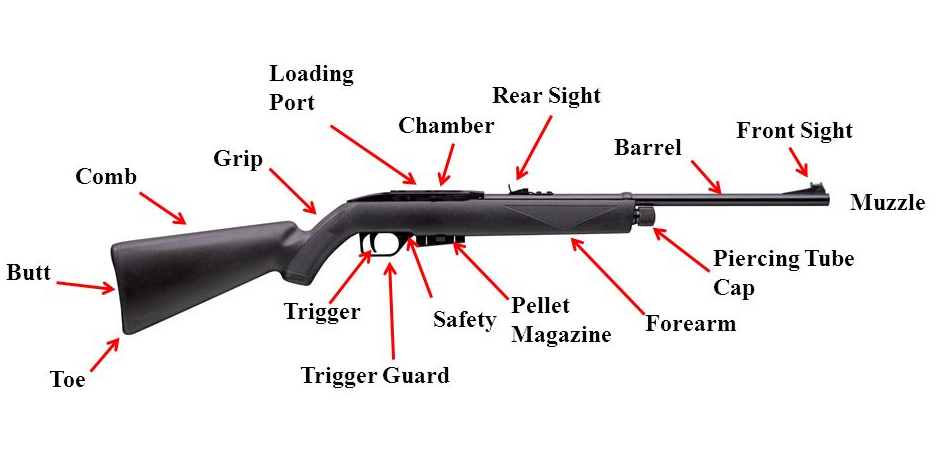
An air pistol is a type of BB gun that uses compressed air to shoot pellets. Air pistols typically have a shorter range and less power than other types of air guns, making them suitable for close-range target shooting. Most air pistols are semi-automatic, meaning they can quickly fire multiple shots.
Air pistols are often used for plinking, a type of target shooting involving shooting at small targets such as cans or bottles. Air pistols can also be used for pest control, as they are powerful enough to kill small animals such as rats and snakes.
While air pistols are not as powerful as other types of firearms, they can still be dangerous if used improperly. Always treat an air pistol with the same respect you would treat a real gun.
So, you’re in the market for an air pistol. Whether you’re looking for a new piece to add to your collection or your first gun, you should know a few things before you make your purchase. The five most crucial considerations for air pistol shopping are covered in this blog post.
1 . Types Of Air Pistols
There are many different styles and dimensions of air pistols, each with specific benefits. For example, break-barrel air pistols are air pistols with barrels that break open in order to load the pellet. This type of air pistol is typically very inexpensive and easy to use.
Another type of air pistol is the semi-automatic air pistol. This type of air pistol has a magazine that holds the pellets, and the gun is automatically cocked when the trigger is pulled. Semi-automatic air pistols are typically more expensive than break-barrel air pistols, but they are also more accurate and have a higher rate of fire.
Finally, there are CO2-powered air pistols. These pistols use CO2 cartridges to propel the pellets and are generally considered the most powerful and accurate type of air pistol. They are, however, also the priciest variety of air pistols.
Once you’ve decided on the type of air pistol you want, it’s time to start shopping around. Establishing a budget before you begin looking to prevent unintentional overspending is crucial.
Air pistols can range in price from $30 to $200 or more, so it’s important to set a budget and stick to it.
3. Shipping Restrictions
Anyone seeking to purchase an air pistol should be aware of the shipping restrictions in place. For instance, air guns can only be transported by ground in the United States.
Furthermore, a lot of retailers won’t deliver air guns to locations beyond the contiguous 48 states. Due to the possibility of abuse and mishaps, some regulations are in place. It is crucial to be aware of them before making a purchase.
By understanding the shipping restrictions, you can ensure that you select a retailer that can meet your needs and help you stay safe while enjoying your new air pistol.
4. Power Of The Air Pistol
Several different air pistols are available, each with special features and advantages. But before you purchase an air pistol, it’s important to consider how powerful of a weapon you need.
A lower-powered model will likely suffice if you’re only using the gun for target practice or plinking. However, if you plan on using the gun for hunting or self-defense, then you’ll need a more powerful option.
It’s also important to pick an air pistol that fits naturally in your hand and is simple to use. Finding the ideal firearm for your needs is crucial, given the variety of models available.
We also recommend you check out the most powerful air pistol to help you make your purchase decision.
5. Accuracy Of The Air Pistol
Some air pistols are designed for competition shooting and can be quite accurate, while others may be less precise but still suitable for casual use.
Factors that affect accuracy include the quality of the barrel, the type of pellet used, and the power of the air pistol. If you are serious about competition shooting or need to hunt small game, you will want to choose an air pistol with high accuracy.
However, a less accurate air pistol may be more suitable if you are simply looking for a fun way to spend some time at the range.
Conclusion
Buying an air pistol is a big decision. Before making a purchase, there are numerous things to think about.
We hope this post has given you some insight into some of the issues you should be aware of when purchasing an air pistol. Please feel free to use the comment section below if you have any additional queries.
Lake Trout Ice Fishing Tips and Tricks January 11, 2022 — Comments from resorts, outfitters and guests.
I used to fish for Lake Trout a lot more than I do these days. Not that I didn’t love it, I did, but since I became addicted to ice fishing for panfish, Laker’s sort of wound up on the back burner for me.
Lately though, not only readers, but some family members too, have been asking questions about how to get set up for ice fishing Lake Trout. Since it’s been a while for me, I decided that the best way to handle the questions by getting some tips from my friends who fish for Lake Trout a lot more than me. This way, I can do justice to their questions while I also use the project as a refresher course to help fill in gaps in my own knowledge.
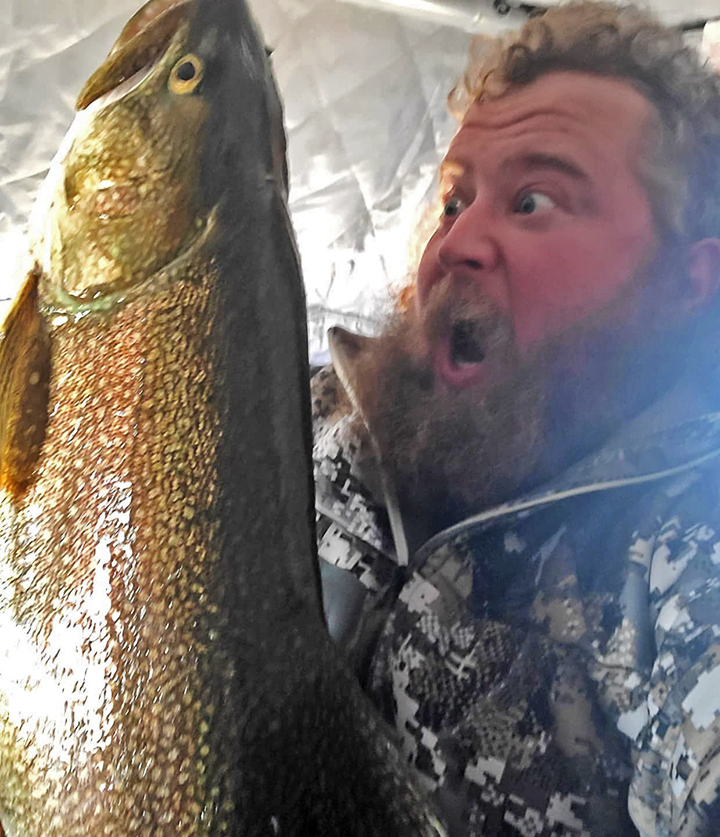
I started by calling my friend Andy Arola (photo left), he’d just returned home from a successful ice fishing trip for Lakers. As it happens, he and his crew were fishing on Clearwater West, a lake that I’ve fished in the past too, it gave us some familiar experiences to compare.
Before we get into the “how-tos” of catching them, let me interject this; the obvious best way to catch Lake Trout is to select a lake that has a lot of them. However, traveling to the best of the best Lake Trout Lakes takes commitment. So, if you’re planning on dabbling, learning the ropes so-to-speak, it might be a good idea to check out some of the lakes in your own back yard first.
No matter where you live in the Midwest, you can find them close to home. Obviously, some lakes are better than others, it pays to do your research ahead of time and pick the one that you believe offers a reasonable opportunity for you and your circumstances.
Once you arrive at the lake, Arola offers this advice; “My best overall depth range averages about 35 to 45 feet deep, especially during morning and evening. Sometimes, during midday, I’ll move out deeper, but I rarely fish water depths over 70 feet deep.”
Structure is important but differs from the type of spots that walleye anglers might choose to fish. Mid-lake structures, bars and humps for example get little attention from Arola. Shoreline related rock points or sandy shoals get the most attention. Early and late in the day, stick tight to the structures closest to shore. During mid-day, loosen up the perimeter and experiment in deeper water.
Judging how long to fish in a spot is subjective, the rule of thumb is to make short moves first but expand the search area when necessary. Arola; “If I’m seeing lots of baitfish on the screen and there is an occasional Lake Trout sighted, I’ll stick close to the area. When I do move, it will be typically short distances, 100 to 200 yards. But if the screen is blank and there are no signs of bait or predators on the locator, we will make both longer and more frequent moves, sometimes a couple of miles between stops. When you land on the right area, you will see fish roaming in and out of range.”
The gear he uses daily is somewhat lighter than you might expect. A 34 inch, medium to medium-heavy action rod paired with 15-pound test braid is standard. A 6 foot long, 8-pound test fluorocarbon leader is used to help give his lures the most natural appearance. Arola; “I’m a big believer in using reels with smooth and reliable drags, they protect the lighter line from breaking when a larger or stronger fish makes an unexpected run.”
Arola does have one heavier action rod rigged up and uses it when larger fish are observed. The heavy artillery is a 36-inch, heavy action rod with 30-pound test braid and an 8 foot long, heavier fluorocarbon leader.
Arola’s views about fishing gear echoes the advice I got from Grant Prokop, 1000 Lakes Sports, earlier this winter when I was shopping for Christmas gifts. Prokop: “Getting set up with heavier rods and line is great for when you’re hooking up with big enough fish. But most of the time, anglers encounter fish that average smaller, 3 to 7 pounds or thereabouts. Stiff rods don’t offer enough give and take to prevent giving the fish slack line. A lighter action rod stays loaded up much better and makes losing those average size fish a lot less likely.”
Personally, I’ve never had an ice rod which was devoted to lake trout fishing. A medium-heavy action Ugly Stick, 30 inches long I think and rigged with 10 pound test has served as my pike-walleye-trout combo rod. Admittedly, if I ever hooked a really big lake trout, I’d probably lose it. But so far, I have never hooked one big enough to give me that problem.
Arola’s array of trout fishing lures is fairly simple. “My #1 favorite lake trout lure is a ½ ounce white bucktail jig, white, it has to be white!” Arola says. “Some of my friends like using the white tubes with a 3/8 or ½ ounce tube head stuffed inside them, but I like the action of the bucktails better.”
Arola suggests that we should also have one rod rigged up with a jigging spoon too. It should be flashy, but not too heavy. I asked if something like a ¼ ounce Quiver Spoon would be a good choice. “Yes, you want it to flutter down slower and give off lots of flash, that allows fish more time to find and strike it.” Arola added.
Finally, I asked for an opinion about the weather and which, if any weather patterns were more favorable than others for finding trout in an active mood. Truthfully, I was hoping that he’d validate my observation that showed a preference for cold, clear weather patterns. But Arola didn’t go that far, he said, “I don’t really think that matters, the weather pattern might influence where or how we fish, but we catch fish when it’s cloudy just as often as we do when it’s clear. I think we may fish shallower on a cloudy day or deeper when it’s clear, but that’s about the only real difference.”
If you never tried it, you should, it is a hoot. For me, catching them is fun, and I like to eat them too. But the real thrill is getting the strike, one second nothing is happening and the next, there’s somebody shouting fish on!
So, with the lake trout season upon us, getting rigged and ready doesn’t sound that complicated, does it? Maybe this is your year to give a try.
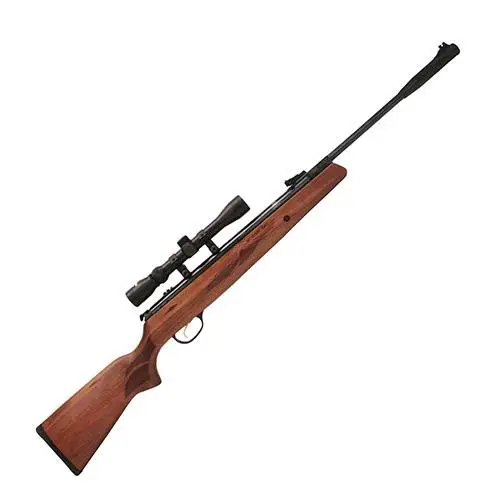
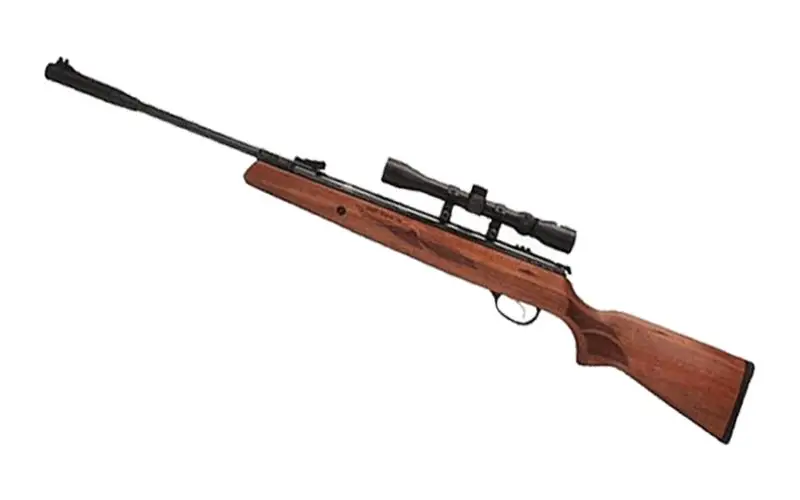
The excellent quality makes every shooter who has touched it know that they have found the best partner!
And if you don’t know about this gun yet, read this full review and decide if you want to be the first among your friends to own a world-class air rifle you have longed for.
Hatsan 95 also brings you SAS (Shockwave Absorber System).
It significantly reduces felt recoil and extends the life cycle of guns, optics, and accessories.
In addition, Hatsan makes this stock an ambidextrous design so left-handed shooters can share the same fun as the right-handed shooters.
Also, it has nice checkering in the grip and forearm to add friction to your arm when shooting, prevent slippage from the shooter’s sweat, and enhance accuracy.
Ammo
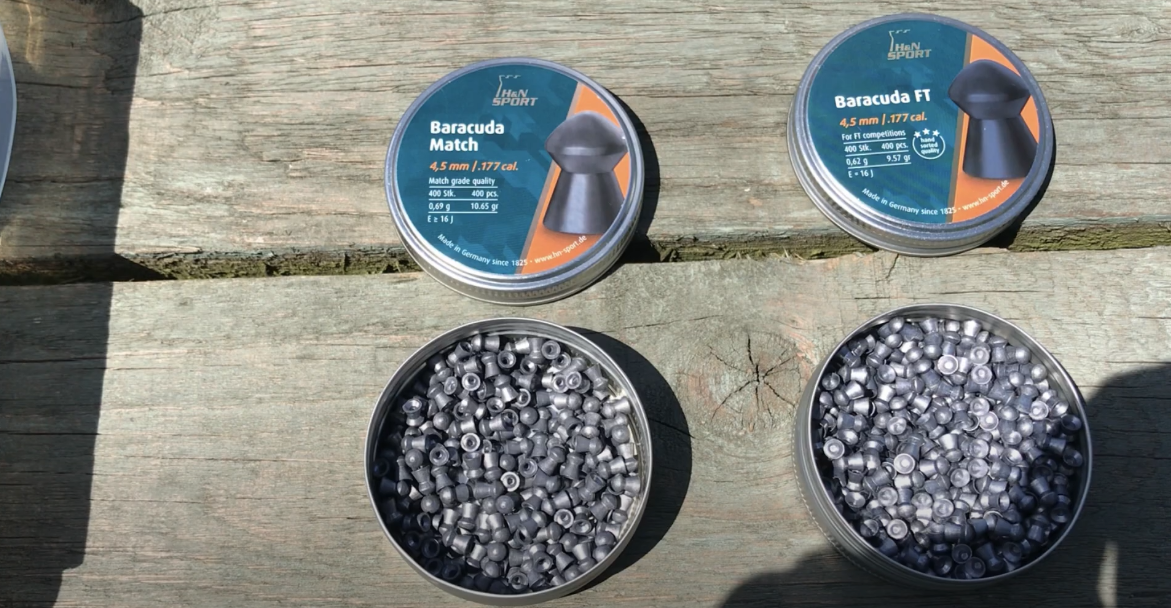
Since it has 3 types of calibers, Hatsan 95 has 3 types of ammo for each caliber: .177 cal uses .177 pelts, .22 uses .22 rounds and .25 uses .25 pellets.
.177 pellets are lightweight, popular and very cheap so it’s cost-effective for target shooting and plinking.
.22 is heavier than .177, more stable on its trajectory (the path the bullet travels toward its target), and delivers more knockdown power so .22 is a favorite caliber of field hunters and pest eliminators.
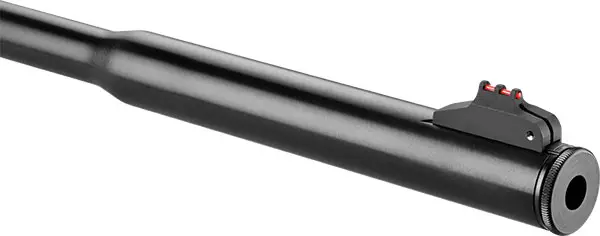
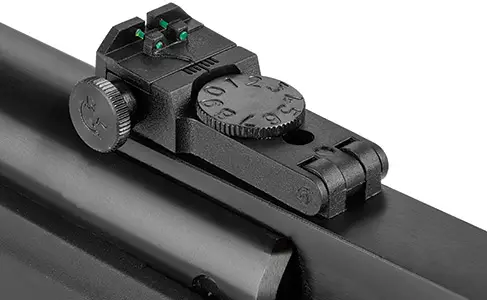
Although the full-function fiber optic sight is more than enough to achieve the desired accuracy, Hatsan carefully put the 3-9×32 Optima scope in it to lend more accuracy for every shot.
32 is the diameter of the front lens and 3-9 is the magnification of the scope:
It means that you can adjust the scope to magnify the picture 3 to 9 times than the image you see without it .
This variable power scope gives you and more dead-on accuracy and more confidence in long-range shooting.
Cocking effort and loading
Cocking the gun:
Hold the pistol grip with one hand, place the stock on your hip, and break the barrel all the way down to its limit
Loading the pellet:
With the breech opened after you cock the gun, put a pellet into the chamber (with the pellet’s nose lying forward),
Pull the gun up to its original position and you are ready to shoot.
Loudness
This gun produces very little noise:
It has hundreds of customer reviews without a single complaint about the noise.
You can definitely shoot it in the urban area and not worry about drawing attention to yourself
Shooting ability
The effective shooting range for the Hatsan 95 is up to 50 yards.
You can use this gun for target shooting, plinking, pest control, and small game hunting.
Maitenance
Hatsan 95 requires hardly any care for it:
Just remember to oil your gun every 250 shots and clean the barrel with a cleaning rod every 500 shots to make your rifle as good as new.
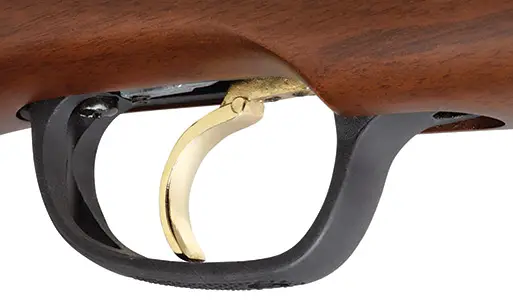
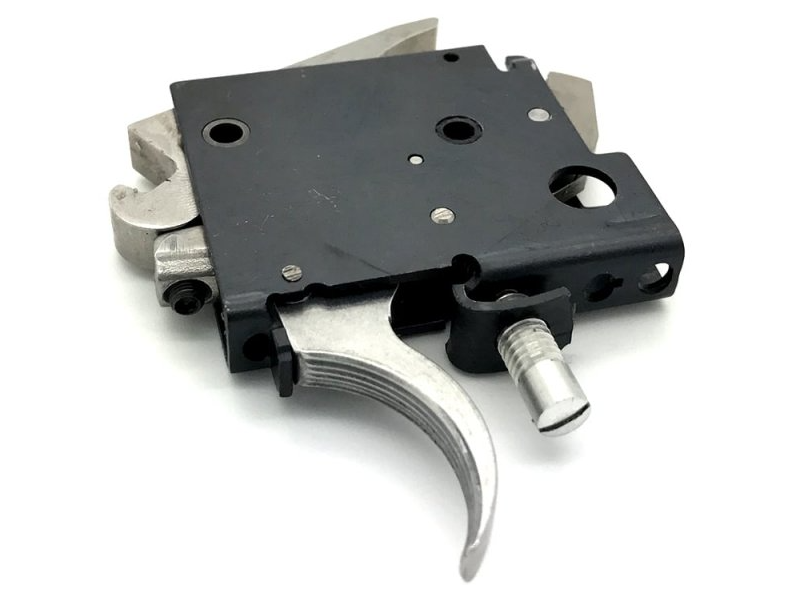
Trigger
The trigger is Hatsan’s unique features:
It’s the Quattro trigger which is an advanced gold-plated two-stage match trigger only available from Hatsan.
The remarkable thing about it is you can adjust the “trigger travel” and “trigger pull” to fit your custom needs.
No more worry or disappointment over the traditional factory trigger like other guns in the market.
Safety: a drop safety interlock device has been incorporated to eliminate the possibility of the air gun accidentally firing if it’s dropped (whether or not the safety is on)
So you can give this gun to your son knowing that the maximum level of safety is guaranteed.
Trigger Safety: Every time you cock the rifle, the safety will be engaged, you push it forward to fire.
It’s very intuitive once you cock it, you come back to aim, take your thumb and push it into place. Another plus point for this rifle.
Velocity, accuracy and power
The advertised velocity of Hatsan 95 is 1000 FPS, 800 FPS, and 650 FPS with .177, .22, and .25 calibers respectively.
Even though FPS rates may look the same from brand to brand, they may not always be the case.
Unlike most competitors who use lightweight alloy pellets to flatter the velocity, Hatsan tends to be conservative with their velocity figures.
They use lead pellets for all their velocity tests so your air rifle will deliver more takedown power than an alloy-tested air gun with the same FPS rating.
Chrony tests have given us the results as follows:
Pellets (.177 – .22 – .25)
FPS
FPE
7 gr Hobby pellet (.177)
995
15.4
14.3 gr lead pellet (.22)
806
20.63
14.3 Crosman Premiere Hollow Point (.22)
807
20.68
Crosman Premiere (.22)
734
17.11
RWS Hobby (.22)
801
16.96
Beeman Kodiak Dome (.22)
646
20.02
H&N Field Target Trophy 14.66 gr (.22)
782.6
19.94
26 gr Predator Polymag (.25)
604
21.07
JSB Exact 25 gr (.25)
605
20.32
Gamo Rocket 20.8 gr (.25)
696
22.38
JSB Exact King 25.4 gr (.25)
570
18.33
Benjamin dome 28 gr (.25)
538
18
Generally speaking, the velocity is so close to the advertised numbers, some velocities even surpass Hatsan’s stated figures- that’s how lead-tested air gun performs.
See how to store Chicken of the Woods in 3 simple ways. This will help you harvest a lot and still keep your mushrooms fresh for up to 12 months.
The season for Chicken of the Woods is typically from June to December. At least you can find them growing during this time frame. That means it is available for almost 6 months out of the year.
This means you can find it fresh a lot of the time. But you still may want to have some available the other 6 months of the year to eat as well.
Another thing about the Chicken of the Woods is when harvesting there will typically be A LOT of it.
Only harvest enough that you can eat in 7 days fresh.
Harvest all of it and learn how to preserve Chicken of the Woods so it doesn’t go to waste.
If you choose to leave some just be aware that if someone else finds it then it will be gone or it could dry out before you are ready to harvest the rest of it.
One thing to note is that Chicken of the Woods (laetiporus sulphureus) is completely different mushroom from the Hen of the Woods (Maitake).
Before we get into how to store Chicken of the Woods, lets take a look at how to clean it before you store it…
How To Clean Chicken of the Woods Mushrooms
When it comes to cleaning the Chicken of the Woods it really doesn’t change to much from any other mushroom that you want to clean.
The main goal is to get it clean without it being wet for too long. If it is wet for to long the mushroom will start to absorb the water and get mushy.
Cleaning procedures:
Trim away any tough or bug eaten pieces.
Brush off as mush dirt as you can with a semi-wet mushroom brush.
Give it a quick rinse and rub down to get any other dirt off.
Immediately dry it completely with a paper towel (gently).
Now let’s take a look at the different options on how to store Chicken of the Woods mushroom…
How To Store Chicken of the Woods Mushroom
The method you choose in storing Chicken of the Woods mushrooms will basically depend on how long you want it to stay fresh as well as how you plan to eat it… Let’s learn more about preserving Chicken of the Woods.
1) Refrigerator
If you plan on eating your Chicken of the Woods within the next 7 days then you could use the refrigerator method.
Storing procedure:
Place the Chicken of the Woods mushroom in into a paper bag.
Put the paper bag into you refrigerator’s vegetable drawer.
Some people have had them last up to 3 weeks this way but after 1 week you would be pushing your luck.
If you plan to eat it all year round then you could store it in the freezer… Let’s see how to freeze Chicken of the Woods.
2) Freezer: How to Freeze Chicken of the Woods Mushrooms
If you plan on harvesting a whole lot of Chicken of the Woods for future consumption then you might want to consider freezing Chicken of the Woods. This is my favorite method!
Storing procedures:
Cut up your Chicken of the Woods into half inch shanks.
Place as many pieces into a big zip lock bag as you can.
Place the bag into the freezer.
This method has been show to keep your mushrooms super fresh for up to 12 months. When your ready to eat them just take them out and throw them onto the skillet (No need to thaw them out first).
They don’t seem to lose their flavor after being frozen so you won’t have to worry about them.
The cool thing about the Chicken of the Woods is that it can be stored without cooking it first. Many mushrooms (like the button mushroom) need to be cooked prior to freezing or they will lose their texture and flavor. This one doesn’t!
3) Drying Chicken of the Woods
If you goal is to use Chicken of the Woods in Soups then you could consider using a food dehydrator to dry out your mushroom.
Drying procedure:
Slice your Chicken of the Woods into half inch chunks.
Place the chunks all over the dehydrator tray so they are not touching.
Set the temperature to low and allow to run for 8 to 10 hours.
Place the dried chunks into a sealed mason jar or a zip lock bag and keep in a cool dry place.
If you do decide to dehydrate them then you can later put them in a soup to reconstitute them. If you want to reconstitute them without putting them in a soup then you can soak them in water for 15 – 60 minutes and then strain the water out.
Conclusion
Now you should have the confidence to know how to store this choice edible mushrooms so that you can enjoy it all year round.
This means next time you are out and come across the Chicken of the Woods you don’t have to worry about harvesting more then you can eat because you know that you will have 12 months to eat what you pick.
If you will be eating your mushrooms within the next 7 days you would use the refrigerator method otherwise you would want to use the freezer or drying methods.
Once it is time to cook your mushroom you may be interested in checking out our other article on the top 3 healthy ways to cook the Chicken of the Woods here:
In that article we cover the following healthy recipes:
Deep fried Chicken of the Woods
Sauteed Chicken of the Woods
Chicken of the Woods soup
This meaty textured mushroom is packed with protein, tastes like chicken and is a great substitute for meat. Don’t eat it raw though because it could cause gastric distress. It also has some pretty amazing medicinal benefits.
Thanks for reading and if you have any other ideas on how to store the Chicken of the Woods we would love to hear about it in the comments below!
The difference between a 10 gauge and 12 gauge shotgun lies in the size of the bore, or interior diameter, of the barrel. A 10 gauge shotgun has a larger bore than a 12 gauge shotgun, which means that it is capable of firing larger and heavier shot.
The size of a 10 gauge shotgun barrel will vary depending on the make and model of the gun. However, in general, the bore diameter of a 10 gauge shotgun barrel is approximately 0.775 inches. This is larger than the bore diameter of a 12 gauge shotgun, which is typically around 0.729 inches.
The larger bore diameter of a 10 gauge shotgun allows it to fire larger and heavier shot than a 12 gauge shotgun. This can make it more effective for shooting larger game animals or for shooting at longer distances. However, the larger size and weight of a 10 gauge shotgun can also make it less maneuverable and more difficult to handle for some shooters.
Image comparison between 10 vs 12 gauge shotgun
10 gauge shotguns were once popular among hunters and were commonly used for shooting large waterfowl and other game animals. However, they have largely been replaced by 12 gauge shotguns, which offer a good balance of power and versatility.
One of the main differences between 10 gauge and 12 gauge shotguns is the amount of shot they can hold. A 10 gauge shotgun has a larger bore and is therefore able to hold more shot than a 12 gauge shotgun. This can be an advantage when shooting larger or more distant targets, as it allows the shooter to use more shot to increase the chances of a hit.
Another difference between 10 gauge and 12 gauge shotguns is the amount of recoil they produce. Because 10 gauge shotguns are larger and heavier, they tend to produce less recoil than 12 gauge shotguns. This can make them more comfortable to shoot for people who are sensitive to recoil or have smaller frames.
In terms of performance, 10 gauge shotguns are generally considered to be more powerful than 12 gauge shotguns. This is because they are able to fire larger and heavier shot, which can deliver more energy and penetration to the target. However, this added power comes at a cost, as 10 gauge shotguns are typically more expensive and heavier than 12 gauge shotguns.
What is the better for deer hunting?
It is difficult to say which type of shotgun would be better for hunting deer without knowing more about the specific circumstances, such as the type of terrain, the range at which the deer are typically shot, and the type of ammunition that will be used. In general, a 12 gauge shotgun is a more versatile choice for hunting because it can handle a wider range of ammunition and shot sizes than a 10 gauge. However, a 10 gauge shotgun may be a better choice for long-range shooting or for shooting larger shot sizes. Ultimately, the best choice will depend on the individual hunter’s preferences and needs. Here are more helpful tips on buying your first firearm.
The choice between a 10 gauge and 12 gauge shotgun will depend on the intended use and the preferences of the shooter. 10 gauge shotguns are powerful and versatile, but they are also more expensive and heavier than 12 gauge shotguns. On the other hand, 12 gauge shotguns offer a good balance of power and versatility and are suitable for a wide range of hunting and shooting applications.
I can confidently define air rifle accuracy as the ability of the air rifle to shoot ammo and hit the intended target. That’s all.
When you aim at a target, you really expect the pellet to land right where you wanted it to.
After all, you’ve learned how to use the open sights, or the scope, you’ve mastered the correct way to hold the airgun,
And you have great expertise in pulling that trigger – whether one-stage or two-stage.
And then it seems you can’t just hit the target.
Sometimes the pellet hits many inches above the target, sometimes below, sometimes to the right, sometimes to the left .
When that happens:
Some people blame the air rifle for inaccuracy
Some people blame themselves
Some people blame forces of nature
For your information, all the three groups of people are correct. But let us focus on the first group.
How is air rifle accuracy measured?
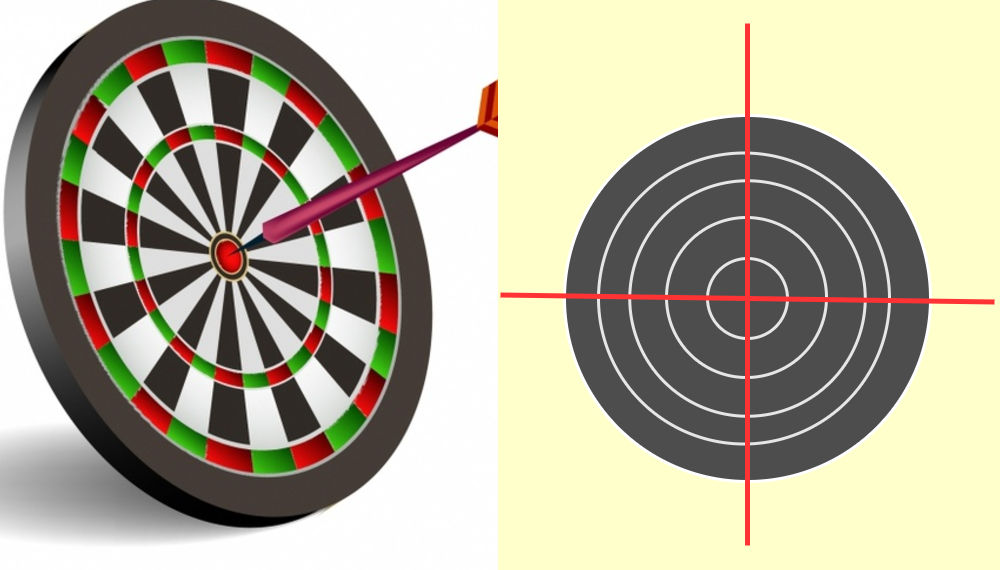
To measure accuracy, you need to have some paper target, preferably patterned like a darts board, with the bullseye at the very center.
Now stand with your air rifle at some specific distance from the target – 10 yards, 20 yards, 30 yards, 40 yards, 50, yards, 100 yards, or whichever distance you like.
This is because, when it comes to describing the accuracy-test results, you have to be specific regarding the distance from the target the test was done.
The results are not always the same for different distances.
Aim at the bull’s eye – in this case, the intersection of the 2 red lines. Fire 5 shots, each time aiming at the bull’s eye.
You can do 10 if you like.
The pellets will hit the target paper, but very unlikely at the very same spot.
You are likely to have the pellet marks spread as follows.
Use vernier calipers or a plain ruler to measure the distance between the two pellet marks that are farthest from each other.
Assuming this distance is ¾ inch and you took the shots standing 20 yards away from the target,
The accuracy of the air rifle can be stated as ¾” at 20 yards.
There must be some reason why all the pellets don’t hit the bull’s eye as intended.
Here are the reasons.
Main reasons for inaccuracy
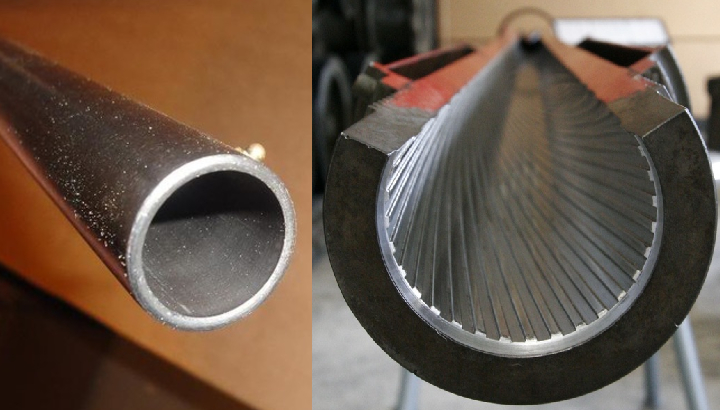
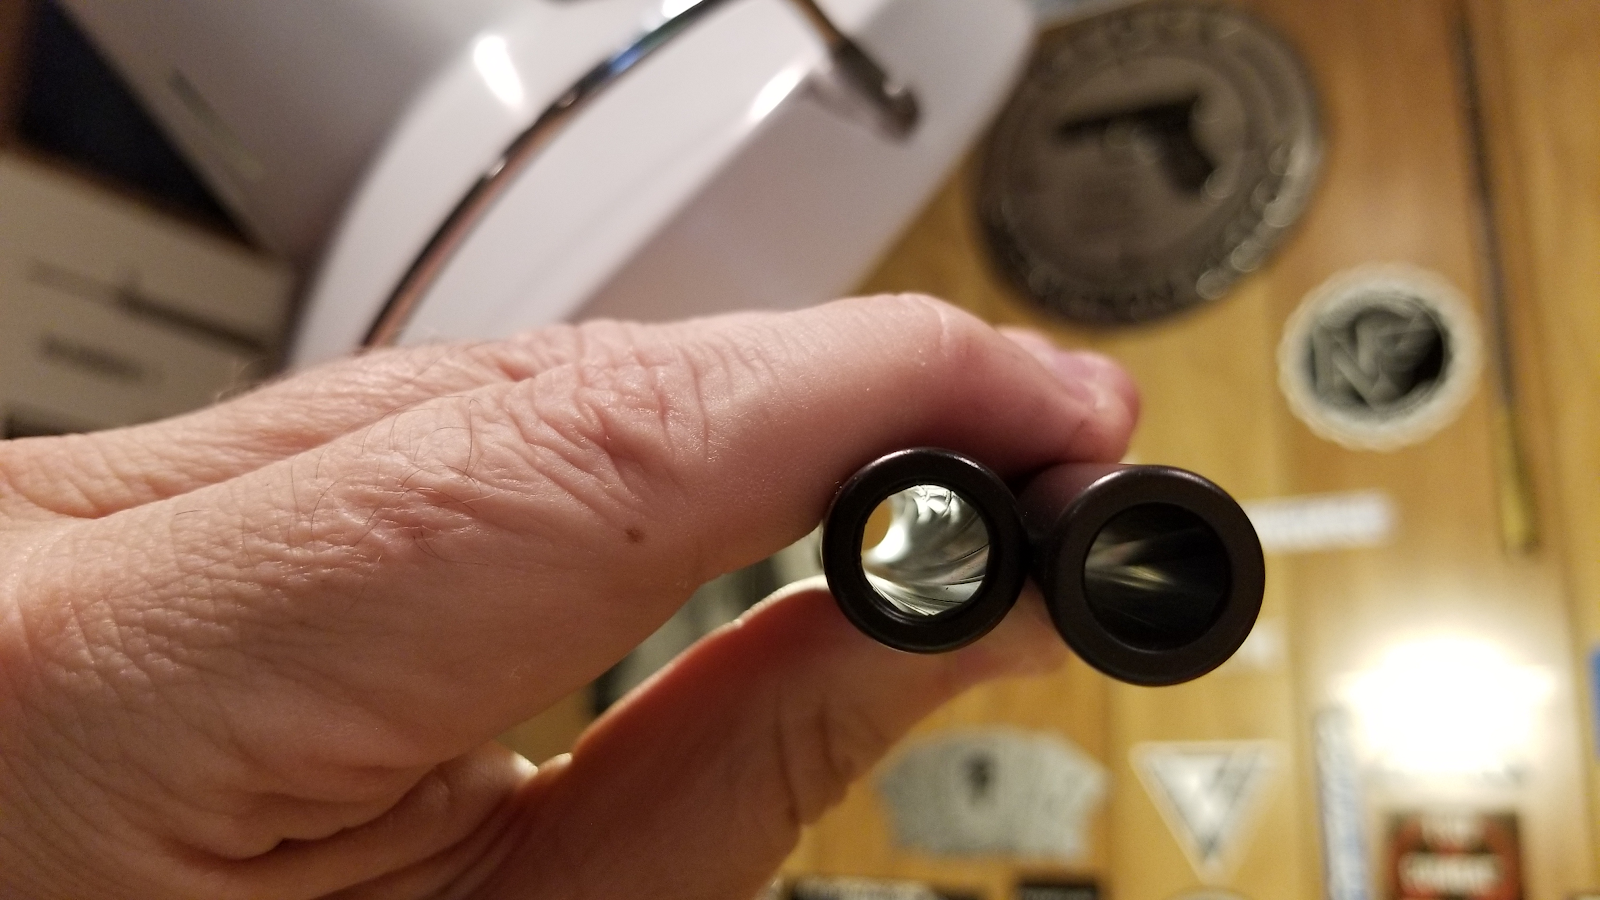
1. The barrel
When you pull the trigger and the pellet begins its ballistic flight, the very first component of the air rifle to guide the flight path of the pellet is the barrel.
Barrel design
The design of the interior of the barrel – what we call the bore – can affect the movement of the pellet within the barrel.
The three most common designs are:
Smooth bore barrel
Rifled barrel with spiral grooves
Rifled barrel with longitudinal grooves
The spiral grooves in rifled barrels cause the pellet to spin along its longitudinal axis as it flies out of the muzzle.
This makes the pellet fly a long distance and in a more straight flight path.
For smoothbore barrels, the pellet flies without this spin.
As such, it tends to lose energy after some short distance.
If the target is far, a pellet shot from a smoothbore barrel will most likely veer off its straight flight path.
This implies that air rifles with rifled barrels tend to be more accurate (even in long ranges) than air rifles with smoothbore barrels.
Imperfections in the barrel
Apart from the barrel design, the bore may have some burrs and other tiny imperfections, especially for brand-new rifles.
This is normal in many steel products and should not be taken as incompetency on the part of the manufacturer.
As a matter of fact, that is what led to the idea of seasoning air rifles after purchase – or rather breaking-in air rifles.
The process aims at shooting as many pellets as possible in the hope that the abrasive nature of the pellets will get rid of these burrs.
If the imperfections are more pronounced, they can have a significant effect on the ballistic flight of the pellet.
The pellet may bounce off a bump within the bore and change direction, as well as lose speed.
Barrel Alignment
Suppose the longitudinal axis of the barrel is not perfectly parallel to the longitudinal axis of the scope.
That means the barrel will be pointing in a different direction from your line of sight.
You don’t expect a pellet shot from such a rifle to hit the bull’s eye.
In line with this issue is barrels that are not firmly fixed to the stock. This can be a result of:
Poor machining quality by the manufacturer
Mishandling by the airgun user
Warping and thickening of the stock due to absorption of moisture – especially for wooden stocks
Loose screws
Whenever you fire a shot, the resulting action and reaction forces may cause the barrel to slightly move from its initial position, thus affecting the flight of the ammo.
Muzzle damage
The muzzle is the front-most part of the barrel from where the ammo exits into the air.
Any damage, corrosion, flaw, or obstruction around the muzzle can significantly alter the intended flight of the pellet.
The weather was perfect, the guy was good, and the gun was awesome.
He tried to shoot groups but it seemed the airgun was not just getting it right.
He tried different target distances – all this proved futile.
He used all his popular pellets – the shot groups still looked horrible.
As a last resort, Jock tried some pellet brands he rarely uses.
And that worked the magic.
It’s fantastic – or rather confusing – how two identical Benjamin Trail NP air rifles can fail to shoot with similar accuracy using a given pellet brand.
But that’s the reality of the matter – just like you can be a die-hard football fan while your identical twin brother has no idea who CR7 is.
The bottom line is that there is the most perfect pellet for your air rifle out there.
It is not guaranteed that even the pellets supplied with the airgun will work best.
It is upon you to test and test and test – until you find the perfect match.
3. The powerplant
It is now a popular saying in the airgun world that PCPs and gas piston airguns are more accurate than springers.
That might be true, but the actual culprit is the air rifle user.
Obviously, springers produce more recoil than PCPs and gas piston airguns.
Recoil is known to generate vibrations that destabilize the hold of the airgun.
If you hold a springer flimsily, it is very likely that your shots won’t be accurate.
The slight movements of the airgun affect the flight path of the pellet.
4. The trigger
The more confident you are on the trigger, the more accurate you are likely to turn out.
Some triggers are so perfectly made that you know the exact distance to pull them before the airgun fires.
The pull is likewise not too heavy nor too light.
That’s what brings accuracy.
If the trigger pull feels so heavy, it may be difficult to master exactly how much you pull it before it fires .
The same is the case with a trigger that is too light and those that are not crisp.
Tips to improve air rifle accuracy
To improve your air rifle accuracy, you basically have to rectify the problems mentioned above.
Do the following to boost the accuracy of your air rifle.
Use a spirit level to ensure that you are holding your air rifle as level as possible, and not in a slanted position.
Some airguns have their own in-built spirit levels, but for others, you’ll need a separate one.
If your trigger is adjustable, tune it to a position that is crisp and predictable enough – making sure it’s not so heavy nor so light.
Use good quality scope mounts that perfectly align the scope with the barrel.
Have some adequate eye relief when shooting – don’t place your eye too near the rear lens, or too far from it.
Make yourself as stable as possible before shooting.
Perhaps kneeling will give you more stability than standing – or even leaning your body against a tree.
Master the correct way of holding your air rifle and stick to that.
Try out different pellets until you find the brand and type that your air rifle likes.
Then stick with it, as long as it serves the purpose.
Tighten loose screws on the stock to ensure the point of aim is as close as possible to the point of impact.
Clean your barrel in case the inaccuracy problems are caused by leading.
Master your trigger control.
Pull it steadily – rather than snatch it vigorously.
Invest in a good air rifle scope specifically designed for either target shooting or hunting
Don’t buy the most powerful air rifle if you are just starting out in this shooting hobby.
Powerful airguns usually produce much recoil and may be heavy and longer than the rest.
You’ll need to be a skilled shooter to shoot accurately with them.
From experience, it is good to sight in your rifle at around 30 yards if you are using a .177 or .22 caliber air rifle.
You won’t have accuracy problems for targets that are a bit farther or nearer by 15 yards.
Don’t use junk pellets for sighting in and then your preferred pellet brand for the actual shoot.
Use the same pellets all through for more accuracy.
Practice with your air rifle until you can consistently achieve 1-inch shot grouping at your typical target distance.
In conclusion
There are several factors that can affect the accuracy of airguns.
Some of these factors relate to the airgun itself, while some concern the user of the air rifle.
For the rifle-related factors, the barrel and pellets cause nearly 90% of all the accuracy problems.
Do all the other factors contribute a mere 10% to the air rifle accuracy issues?
That tells you to wisely choose your air rifle by considering the quality of the barrel, as well as purchasing quality pellets from trusted brands.
Once these two are sorted, work on your shooting skills until you get it right.
Frequently Asked Questions
1. What affects air rifle accuracy?
Airgun accuracy is mainly affected by the following factors:
The type of barrel – whether rifled or smooth bore
The presence of imperfections within the bore of the barrel
The brand, shape, and weight of pellets used
Whether or not the air rifle has been sighted in properly
Whether or not the scope is mounted properly
The bedding quality of the barrel on the stock of the air rifle
The preciseness of the trigger
The capability of the shooter to properly hold the air rifle, aim at the target, and make a confident shot
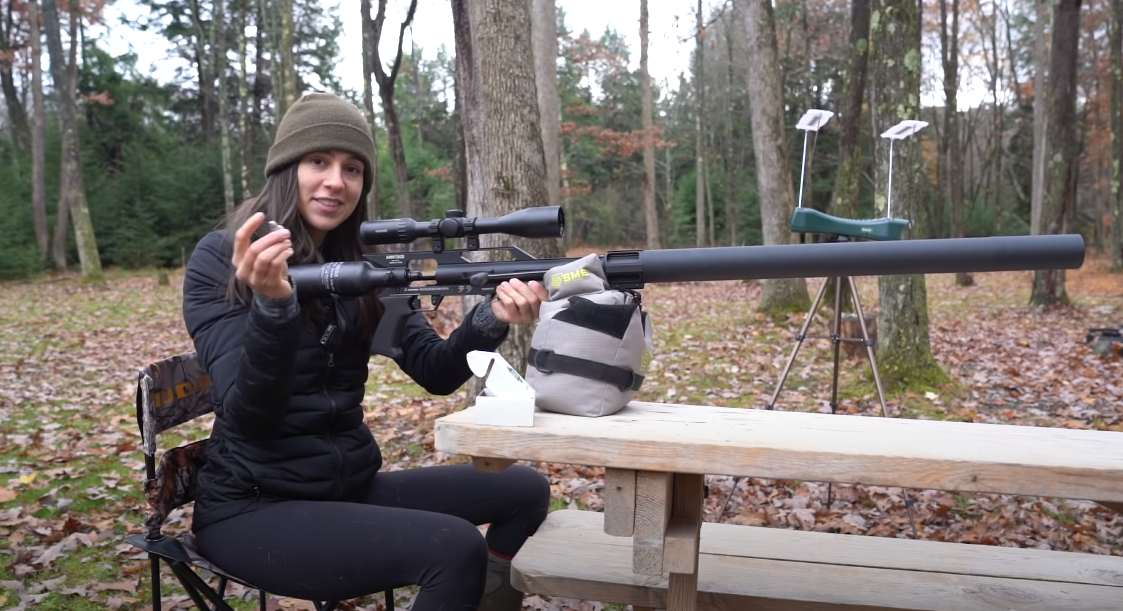
3. How to hold an air rifle for accuracy?
If you are right-handed, follow the following steps.
If you are left-handed, replace every ‘left’ with ‘right’ and every ‘right with ‘left’.
Place your left palm under the forearm of the air rifle. Leave the palm open rather than tightly clenching the gun.
Wrap your right hand around the pistol grip with your forefinger gently resting on the trigger
Let the butt pad rest on your shoulder and gently press your cheek against the stock.
You can now breathe in, breathe out, pull the trigger.
This is what we refer to as the artillery hold.
Watch Tom Gaylord below for more details on the artillery hold:
You may also wish to use some fixed support for the air rifle instead of your palm.
Virtually any support can work, but you better go with a custom-made bipod stand.
4. What is the highest-rated air rifle in accuracy?
The Benjamin Marauder PCP air rifle is one of the highest-rated airguns in terms of accuracy.
It is capable of 1.5” shot groups at 100 yards. And it gets even better at closer shooting ranges.
Great shooters have even achieved 1’ groupings at 70 yards.
One famous shooter, Ted, was able to achieve the following shot groups with the .25 Benjamin Marauder at 100 yards.
In addition to the general air rifle accuracy tips just discussed, CO2 air rifles beg a little more simply
Because they use CO2 cartridges as their main power plant.
The CO2 in the gas cylinder exists as both a pressurized gas and a liquid.
When some of the gas is released upon firing a shot, some more liquid CO2 turns into a gaseous form.
The pressure within the cylinder, therefore, remains somewhat constant until all the liquid is used up.
Now, the pressure of CO2 depends on the temperature.
A decrease in temperature will cause the pressure to drop.
And that means less velocity for the pellet.
Imagine you sighted your gun at 35 degrees celsius and you are now shooting the gun at 25 degrees Celsius.
You will very likely not hit the point of aim.
Therefore, the best practice is to sight in your CO2 air rifle at the same temperature you’ll be doing the real shooting.
For semi-automatic air rifles – which allow you to fire multiple shots in quick succession – it’s a good practice to allow some seconds to elapse before making the next shot.
Every time you fire a shot, some CO2 changes from liquid to gas.
This cools the air rifle and tends to reduce the pressure in the cylinder.
Therefore, each subsequent shot becomes less and less powerful.
Lastly, ensure all seals are tight enough to hold the gas without leakages.
7. How far can a pellet gun shoot accurately?
Some high-end pellet guns are known to have great accuracy even up to 300 yards.
However, a great majority of pellet guns are limited to shooting ranges less than 100 yards.
The less powerful ones will not shoot accurately beyond 30 or so yards.
8. How far can a .22 air rifle shoot accurately?
The current world record for the longest airgun hit stands at 1400 yards.
That’s a whopping 1.28 km!
The air rifle used was the .22 Altaros M24 – which mimics the legendary M24 sniper rifle.
However, note that this is an isolated shot.
It may be difficult to get a measurable group of shots at that distance.
As a matter of fact, the manufacturer states that the accuracy of the Altaros M24 is 1 MOA up to 200 yards,
Which is equivalent to 2” groupings at 200 yards.
Other high-end .22 air rifles boast 1” groups at 100 yards, while others claim to be as accurate as ½” groups at 50 yards.
Repeatedly getting such good accuracy results is challenging.
You rather set your mind to something like 1” groups at 30 yards, 2” groups at 50 yards, and 4” groups at 100 yards.
9. What is a good accuracy for a .22 air rifle?
As elaborated in the previous question, some expert air gunners have achieved exceptionally good accuracy with their .22 air rifles.
1” groupings at 100 yards is considered exceptional accuracy
0.5” groupings at 50 yards is also considered exceptional accuracy
Good accuracy for a .22 air rifle is something in the range of:
1” shot groups at 30 yards
2” shot groups at 50 yards
4” shot groups at 100 yards.
11. .177 or .22 – which is more accurate?
At some fixed distance, say 50 yards, a .22 pellet will more likely hit the point of aim than a .177 pellet.
You see, the .22 pellets are heavier than the .177 pellets, and therefore are less likely to be swayed by the wind.
But in yet another twist, the speed of .177 pellets is usually higher than that of .22 pellets.
As such, the .22 pellets tend to lose their flight power faster than the .177 pellets.
In such a scenario, the .177 air rifles can be said to be more accurate than .22 air rifles.
Additionally, it is now known that airgun manufacturers give better attention to .177 air rifles so as to boost their accuracy beyond what the .22 air rifles can achieve
Since the .177 airguns are mostly used in target shooting competitions.
With all these facts in mind, neither of the two air rifles can be openly termed as more accurate than the other.
This is possible with the 1035 fps muzzle velocity and 3626 PSI PCP power plant.
A single fill gives you 40 fully-powered shots. You will however have to cough a colossal 2,000 USD to acquire this beast.
If you have less than 200 bucks but are still enthusiastic about great accuracy, go for the likes of the Hatsan 95 Break Barrel Air Rifle.
20. Air rifle barrel length vs accuracy?
As highlighted in the intro section of this piece, the notion that air rifles with longer barrels are more accurate than those with shorter barrels is nothing but a myth.
There are air rifles with shorter barrels that are more accurate than their counterparts with longer barrels.
It’s rather the quality and design of the barrel that matters when it comes to accuracy.
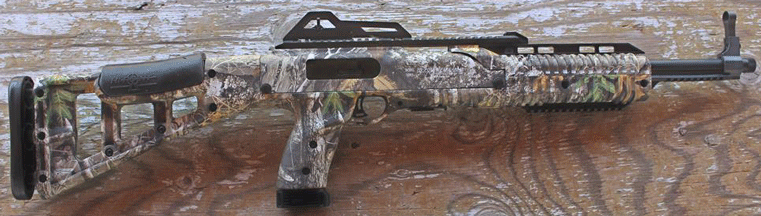
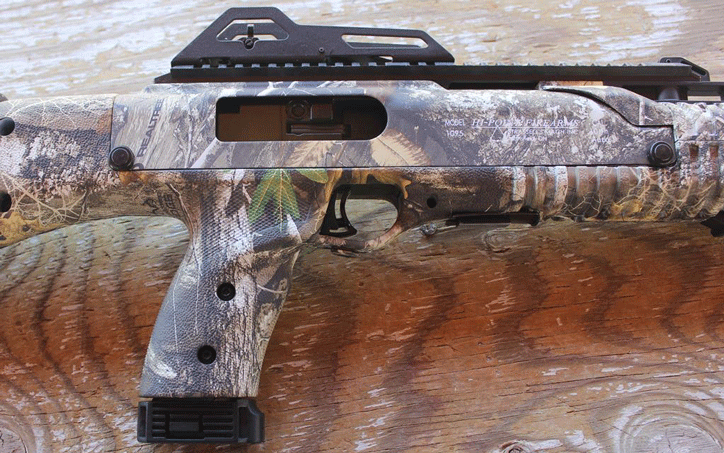
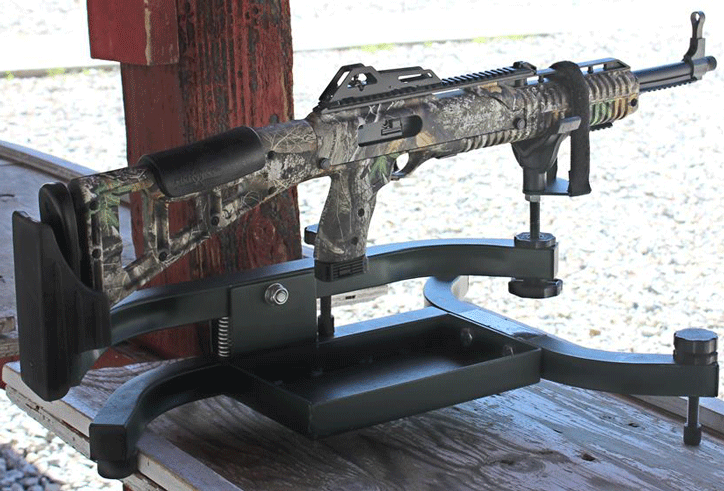
Hi-Point Firearms has been manufacturing some of the most budget-friendly semi-automatic pistols and carbines available for more than two decades. While the aesthetics of the guns may not gladden the eyes of all who gaze upon them, they are loaded with features, constructed from 100-percent American-made components and assembled by a U.S.-based labor force. This year, Hi-Point decided it was time to ramp up the power potential of its carbine line with the addition of a brand new 10 mm version called the 1095TS. As of this writing, the 10 mm is available in either a standard flat black or Realtree Edge camouflage finish. This review takes a closer look at the Realtree Edge version.
Like its predecessors, the 1095TS Edge is a blowback-operated, striker-fired semi-automatic carbine with a single-action trigger. The striker mechanism, bolt assembly, trigger group, external controls and single-stack magazines all take their cues from Hi-Point’s pistols. However, there is no magazine disconnect in the carbine and the monolithic grip cannot be swapped out or modified.
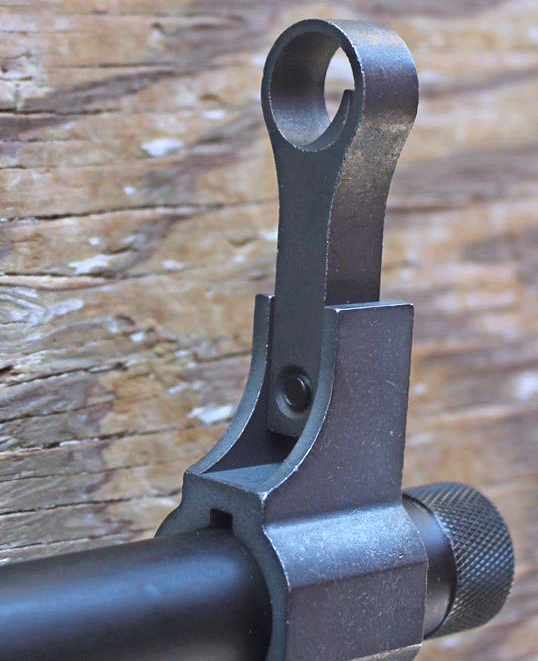
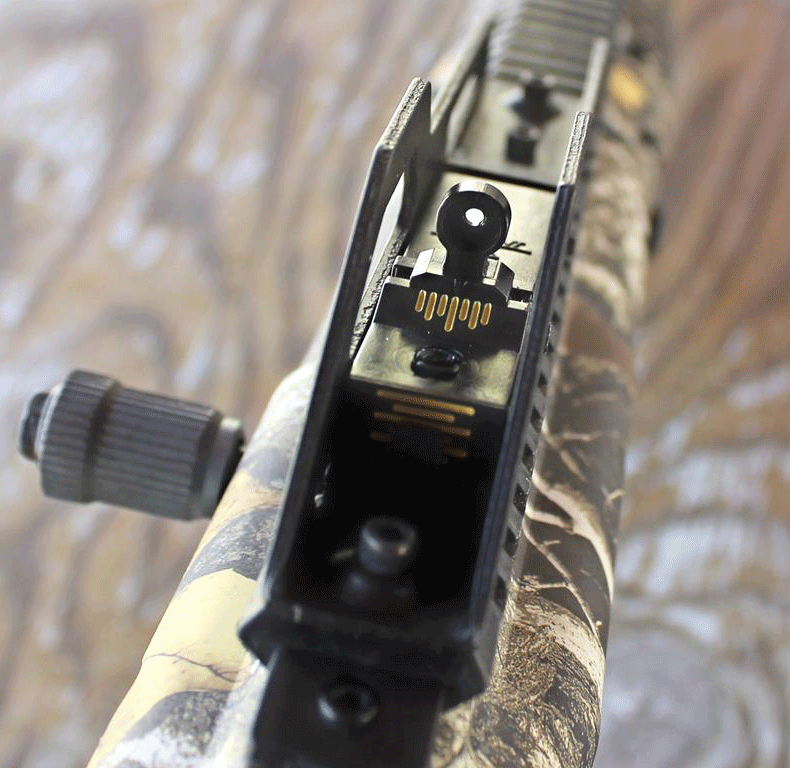
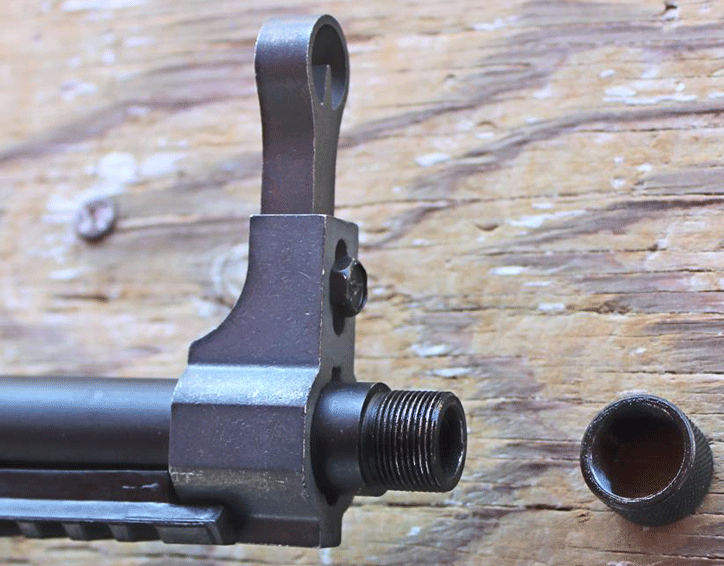
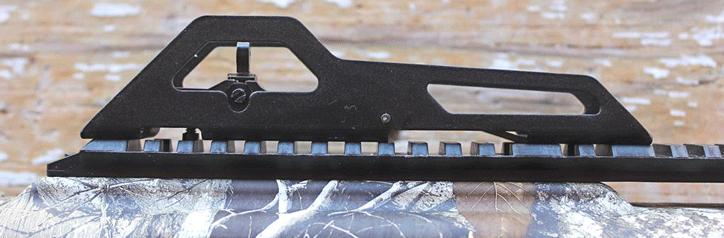
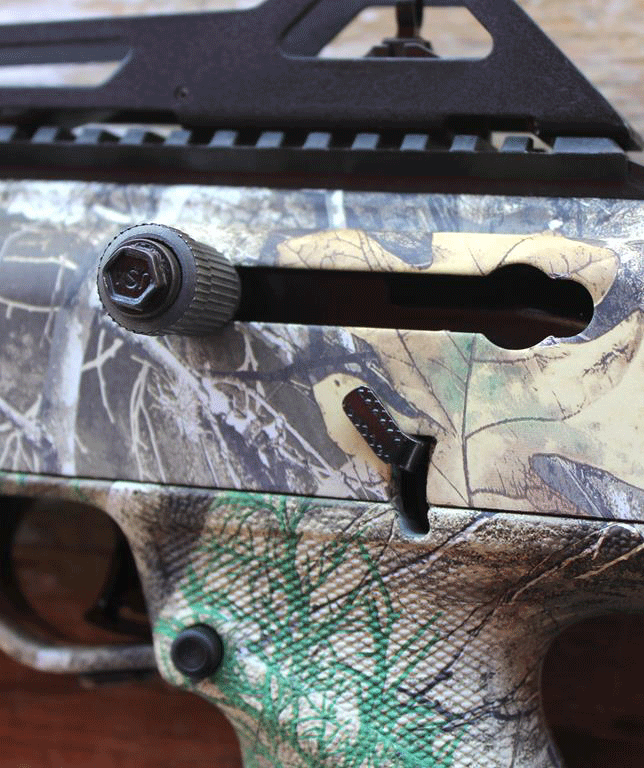
The round profile 17.5″ blued steel barrel has a muzzle threaded at .57×28 TPI in order to accept muzzle accessories. A knurled thread protector is provided. The factory iron-sighting system consists of an adjustable hooded post attached to the barrel and a fully adjustable peep sight at the rear. The rear sight is set into a stamped sheet steel housing which can be removed in order to install a magnified optic or red-dot sight.
The receiver is cast from Zamak 3 alloy which is, apparently, strong enough to handle the increased pressure (SAAMI Max: 37,500 PSI) of the 10 mm cartridge. Each caliber of Hi-Point carbine is rated for +P ammunition so as to be able to fire all factory-manufactured, SAAMI-spec ammunition. However, history has shown that 10 mm pistols of all types tend to wear out more quickly than similarly sized models chambered for 9 mm, .40 S&W and .45 ACP because of the increased pressure levels and bullet velocities. It seems likely that a 10 mm carbine, no matter which company makes it, is going to reach the end of its working life span more quickly than other pistol-caliber models.
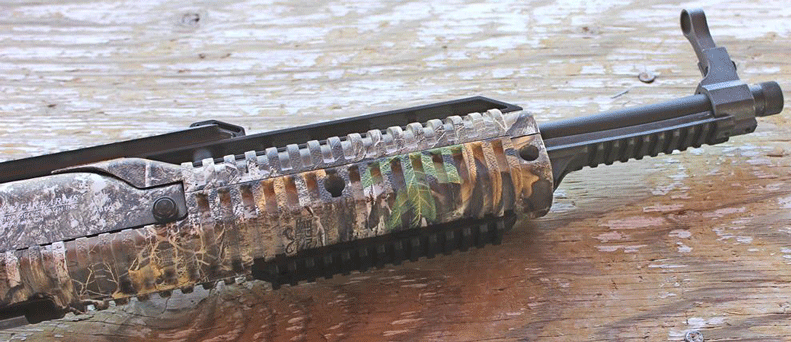
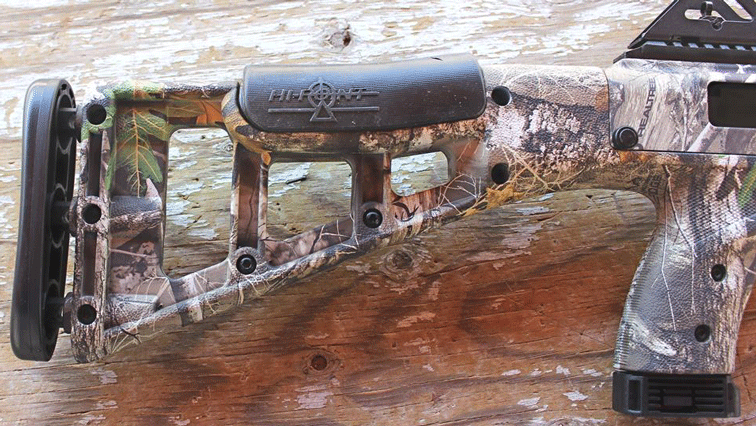
A sheet steel shroud is placed over the receiver to keep out dirt and to support the back end of the sight rail. In this case, the shroud has been given the same hydro-dip camouflage treatment as the polymer stock to create a unified appearance. The ribbed fore-end, pistol grip and shoulder stock are all constructed from a single piece of textured high-impact polymer. A polymer handguard, which is ribbed to match the fore-end, is clamped over the barrel to lend support to the front end of the 9.5″ Weaver-style sight rail. A 3.5″ accessory rail is mounted under the barrel along with a 4.5″ rail attached to the fore-end of the stock.
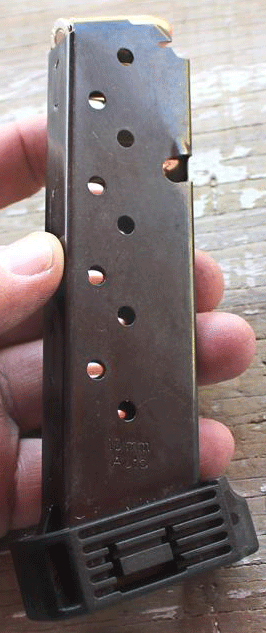
Hi-Point carbines are configured to eject spent shell casings to the right of the receiver with the manual controls installed on the left. The round, reciprocating charging handle is simply twisted into the bolt assembly and tightened using the provided combination wrench and sight adjustment tool. The manual safety swings up into the Safe position and down, exposing a red-dot, to fire. The polymer round-button magazine release allows the magazine to drop free of the pistol grip when pressed. The 1095TS Edge arrives with one blued steel 10-round, single-stack magazine with an oversized black polymer baseplate.
The black polymer trigger is best described as having a single-action trigger pull even though the arch of travel is a bit longer than most single-actions. The trigger feels surprisingly smooth and breaks with 5 lbs. 11 oz. of trigger pull. The skeletonized shoulder stock provides a 14.5″ length of pull (LOP) with a soft rubber cheek pad. The black polymer recoil plate is supported by three extensions, each of which is fitted with a recoil reduction spring. The carbine arrives with a simple nylon web shoulder sling and a set of removable blued steel sling swivels.
The two features that keep Hi-Point carbines selling like hot cakes are their low sticker prices and the platform’s reliability. At the shooting range, the 10 mm 1095TS Edge experienced two failures to feed in the first 50 rounds. After that, it merrily munched its way through whatever it was fed from relatively low velocity (1,150 f.p.s.) practice-grade imports to premium hunting and defense loads. The carbine feels good to hold, it points well, the sight system is easy to use and the recoil reduction system built into the shoulder stock kept felt recoil to a comfortable moderate level. The Realtree Edge camouflage finish has been properly applied and provides a refreshing alternative to a flat black finish.
In most cases, I conduct formal pistol-caliber carbine accuracy testing at 50 yards from a benchrest. However, much like the Hi-Point 4595TS PRO carbine chambered in .45 ACP that I tested three years ago, the five-shot group sizes of the 1095TS Edge opened up to around 5″ at 50 yards when firing practice grade ammunition. But I wanted to know the distance at which this 10 mm carbine could produce practical group sizes of 3″ or less. Once again, the practical target distance proved to be 25 yards when shooting less expensive ammunition.
Although I stuck with budget-priced loads during the .45 ACP carbine test, this time around I broke out some premium-grade ammunition in a variety of bullet weights to see if the 1095TS Edge’s accuracy could be improved. I was also curious to see how its 17.5″ barrel would affect bullet velocity, which was measured for 10 consecutive shots using a Lab Radar chronograph with a 12″ offset from the muzzle of the carbine.
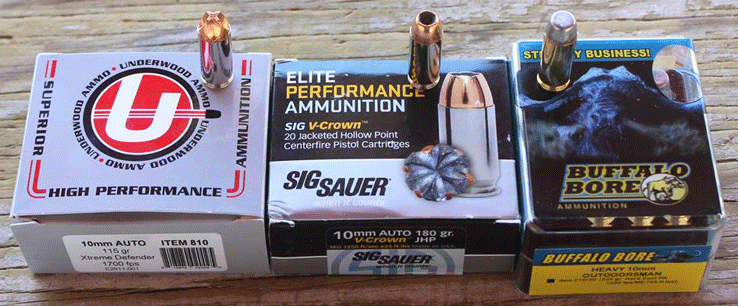
Formal accuracy testing began with one of the heaviest-bulleted commercially-available cartridges loaded to a maximum safe velocity for its weight, Buffalo Bore’s Heavy Outdoor 220-gr. hard-cast flat nose with a listed pistol velocity of 1,200 f.p.s. at the muzzle. This round’s velocity was upped to 1,325 f.p.s. by the carbine-length barrel for 858 ft.-lbs. of muzzle energy with a best single group of 2.31″ and a five-group average of 2.53″.
The fastest and lightest bullet of the day was an Underwood Ammunition’s Xtreme Defense 115-gr. CNC-machined solid-copper Xtreme Penetrator with a listed pistol velocity of 1,700 f.p.s. These rounds scooted right along at 1,912 f.p.s. for 933 ft.-lbs. of energy at the muzzle. It printed a best group of 1.35″ with a group average of 1.47″. SIG Sauer’s Elite Performance 180-gr. V-Crown jacketed hollow point loaded to 1,250 f.p.s. is a top-notch, multi-purpose load which is accurate and reliable in pistols and carbines. Bullet velocity increased to 1,400 f.p.s. for 783 ft.-lbs. of muzzle energy with a best single group of 1.56″ and an average of 1.70″.
The Hi-Point 10 mm 1095TS brings a new level of punch to a platform favored by those who are looking for a reliable pistol-caliber carbine at a rock-bottom price. Although this gun’s best accuracy potential is realized at around 25 to 30 yards, instead of a more typical pistol-caliber carbine distance of 50 yards, quality 10 mm loads will get the job done within that range. I’m glad to see that fans of the 10 mm Auto have a new, less-expensive way to put this terrific cartridge to work. With suggested retail prices starting at $389.99, it’s certainly the most affordable carbine in this potent caliber.
[an error occurred while processing this directive]
Salting has always been one of the most common methods for preserving meats, so after coming across reference after reference to salted meats in medieval cookbooks, I decided to try it out.
The theory is simple – a sufficiently high amount of salt will dehydrate the meat and prevent any bacteria or mold from growing. However, to the modern mind which is accustomed to refrigeration, the practice of leaving raw meat out on the counter for a couple of weeks seems more than a bit creepy.
Each time I’ve done this, the end result has been safe to eat (or at least apparently so – it tasted good and I stayed healthy). For anyone following these directions though, you do so at your own risk. If the end result smells nasty, you eat it anyways, and you get sick and die, then don’t come complaining to me.
For this experiment, I took approximately one pound of raw venison cut into half inch thick steaks. It had been previously frozen, but was thawed completely, rinsed, and patted dry with a paper towel.
raw venison
I put a thick layer of salt into the bottom of a glass baking dish, put the venison on top, and covered it with more salt. I then repeated this with a second layer. I then covered the whole thing with plastic wrap and left the dish out on the counter for 24 hours.
venison packed in salt
the same dish a day later
The next day the salt had developed a disturbing pink color and there was a layer of thick red liquid at the bottom. I pulled the steaks out and brushed the salt off them, dumped the pink salt and nasty red liquid down the drain, and re-packed the steaks with fresh salt.
steaks after one day in salt
I was prepared to repeat this process the next day, but the salt didn’t discolor at all and no further red liquid formed.
fourteen days later
After two weeks I decided it was time to check the results. The salt had solidified into a crust, and the venison had turned dark and was very hard.
salted venison steaks
I cut one of the steaks in half to check the inside, and while it was a lighter color than the outside, it was still just as hard and dry. At this point the meat smelled substantially better than it did when raw. It’s worth noting though that throughout the whole process it never smelled unpleasant.
steak cut in half
the inside is lighter in color
The proof of course is in the eating. I rinsed the steaks in water and then boiled them in a mixture of water and cheap red wine. After an hour of this, I dumped the liquid out and did it again. The liquid tasted quite salty after the second boiling, so I replaced it once more and boiled it for another 20 minutes.
I then cut the meat into thin slices and served it with mustard. The venison was slightly salty and had developed a bit of a smoky flavor. The whole process was somewhat tedious, but very easy. I’ll have to see how well it works for camp cooking.
Source [Le Ménagier de Paris, J. Hinson (trans.)]: Venison of Deer or Other Beast, If you wish to salt it in summer, it is appropriate to salt it in a wash-tub or bath, ground coarse salt, and after dry it in the sun. Haunch, that is the rump, which is salted, should be cooked first in water and wine for the first boiling to draw out the salt: and then throw out the water and wine, and after put to partly cook in a bouillon of meat and turnips, and serve in slices with some of the liquid in a dish and venison.
[an error occurred while processing this directive]
A good friend of mine will occasionally give me updates on how many arrows he has shot throughout the year. He keeps track, and is the kind of guy who simply loves the process of shooting. He’ll shoot 10,000 arrows in a year, which is a lot.
I’m jealous of him, because while I also love to shoot, I get bored easily. Standing at a set distance and shooting groups at bull’s-eyes is not my thing. I do it every year, especially at the beginning of the summer when I’m trying hard to get into the daily groove, but it doesn’t take long for my mind to start wandering and my desire to toe the line with a full hip quiver wanes.
It’s at that point in the summer when I know I need a change of pace. This used to involve a lot more trips to a nearby target range, where I could get my change-of-scenery fix by shooting the walk-through courses there. I still love them, but these days I have less free time to devote to a range trip.
Where I live in the suburbs, I’m lucky in that I can stagger several targets out to a distance of 50 yards beside my house. I also can stand on a sidehill for angled shots, and I can mess around with plenty of different shot angles.
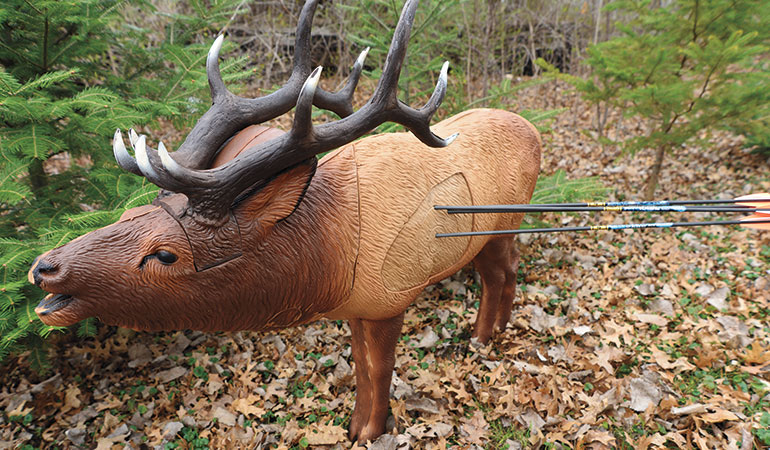
Those quartering or obstructed shooting sessions tend to increase my confidence for real-world shots when critters are in play. That’s also why my favorite target right now is the 1⁄3 Scale Woodland Elk ($220) from Rinehart. This dwarf bull stands 38″ tall, looks just like the real thing, and is a great way to tighten up your groups if you have an elk hunt planned for the fall. Rinehart targets aren’t the cheapest option out there, but they last so long they’re worth the investment.
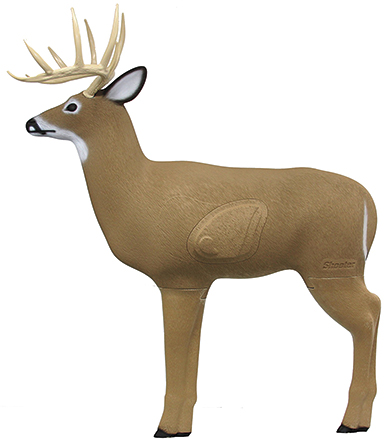
If you’ve got an elk target, you better pick up a deer target like the Big Shooter Buck ($100) from Shooter 3D Archery Targets. This 48″-tall target will stop all fieldpoints and broadheads, and is lightweight enough that you can move it around to work on different angles and varying distances. It’s also designed with a replaceable insert.
While it’s easy to love 3-D targets, you should probably also own something with a few bull’s-eyes on it, like the High Roller ($120) from Morrell Targets. When it comes to this style of target, it’s hard to beat the High Roller, and for some reason my little girls love shooting it as well. Maybe it’s the very visible bull’s-eyes, or simply the nontraditional color scheme? Either way, this six-sided, 100-percent weatherproof target is a great backyard option — especially when you consider it’s designed to handle both fieldpoints and broadheads.
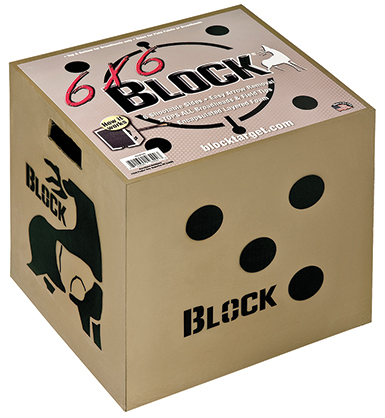
Of course, you can’t get into this target category without mentioning an offering from BLOCK. Their 6X6 is one of the best deals going, considering you can own it for a cool $100. This target is designed to handle fieldpoints and broadheads as well, offers up easy arrow removal, and with its six-sided shooting allows you to fling away for years without worrying about blowing it out.
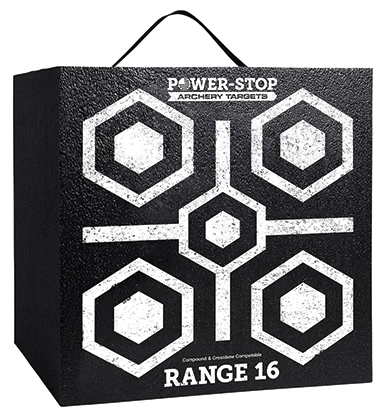
Power-Stop Archery Targets also has a $100 arrow-stopper that’s perfect for a quick evening session in the backyard. Their Range 16 can be used with broadheads or fieldtips, is made right here in the USA, and in addition to offering up traditional bull’s-eyes, it also has a Battleship face. This is a great target for competing with your buddies, or simply honing your skills with tiny aiming points.
By far one of the best deals going this year in new targets is from Delta McKenzie. Their Wedgie ($55) is half the price of most targets, weighs 36 lbs., and is printed on both sides with multiple aiming points. It draws its name from its wedge shape, which allows it to stand up easily and stay standing during every shot, unlike most bag targets that will tip over not only when you shoot them but when a slight wisp of a breeze blows in their direction.
A target company you may not be familiar with but that is producing some killer products is Walk-On Archery. Their MarXMan 6 Sided Field Point Target with Broadhead Windows ($90) allows you to shoot six sides with fieldpoints, and two sides with broadheads. It weighs only 28 lbs., is covered in a durable, weather-resistant polypropylene cover, and is built with a bonded, high-density foam core to withstand the abuse of thousands of shots.
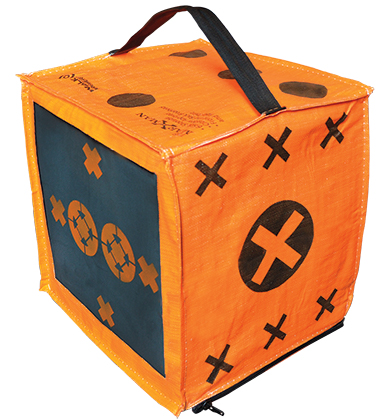
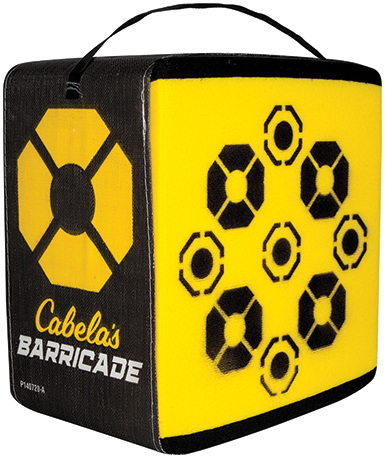
Cabela’s churns out a lot of products, and they’ve got a few in the target market. Their Barricade Archery Target ($45) is a good choice for anyone looking for a cheap, highly portable target. It weighs only 7 lbs. but it’s built to withstand both fieldpoints and broadheads. Several different aiming options on the four shootable sides allow you to go precise if you wish, or give yourself a bigger bull’s-eye for dropping long-range bombs.
"Unleash the Power: Mastering Break Barrel Air Rifles for Maximum Performance. Discover expert tips and techniques to enhance the power and precision of your...
")
")
")
")
")


 I used to fish for Lake Trout a lot more than I do these days. Not that I didn’t love it, I did, but since I became addicted to ice fishing for panfish, Laker’s sort of wound up on the back burner for me.
 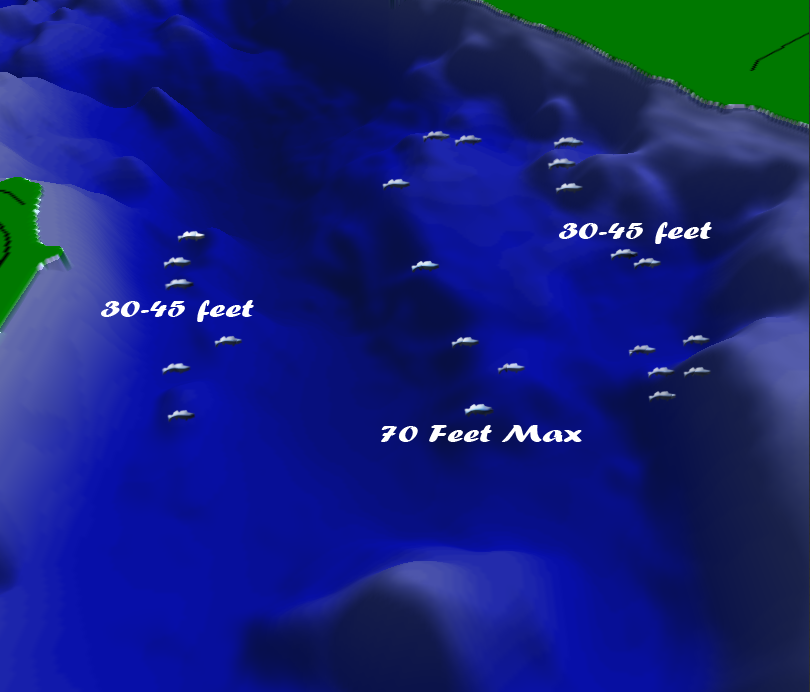 Structure is important but differs from the type of spots that walleye anglers might choose to fish. Mid-lake structures, bars and humps for example get little attention from Arola. Shoreline related rock points or sandy shoals get the most attention. Early and late in the day, stick tight to the structures closest to shore. During mid-day, loosen up the perimeter and experiment in deeper water.
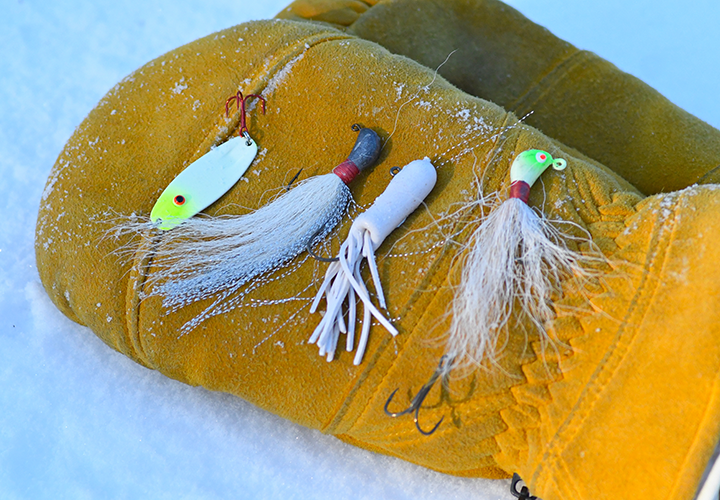 Personally, I’ve never had an ice rod which was devoted to lake trout fishing. A medium-heavy action Ugly Stick, 30 inches long I think and rigged with 10 pound test has served as my pike-walleye-trout combo rod. Admittedly, if I ever hooked a really big lake trout, I’d probably lose it. But so far, I have never hooked one big enough to give me that problem.


 raw venison
  venison packed in salt
  the same dish a day later
  steaks after one day in salt
  fourteen days later
  salted venison steaks
  steak cut in half
  the inside is lighter in color