Introducing the Game-Changing 1200 fps Air Rifle: Precision and Power Combined! Discover an elite firearm designed to elevate your shooting experience with unparalleled velocity. With a remarkable firing speed of 1200 feet per second, this air rifle is engineered to deliver exceptional accuracy and strength. Whether you’re a seasoned marksman or a passionate hunter, prepare to revolutionize your shooting prowess with the ultimate tool for speed and precision.
1200 fps air rifle
A 1200 fps air rifle is a high-velocity weapon that offers an exceptional shooting experience. With its impressive muzzle velocity of 1200 feet per second, this air rifle delivers outstanding power and accuracy. Whether you are using it for hunting or target shooting, this firearm ensures a reliable and effective performance.
The high FPS (feet per second) rating of the 1200 fps air rifle provides several advantages. Firstly, it enables the shooter to achieve greater range and trajectory control, making it suitable for long-distance shooting. Additionally, the higher velocity increases the likelihood of hitting targets swiftly and more accurately, resulting in cleaner kills during hunting activities.
Furthermore, a 1200 fps air rifle often incorporates advanced features such as adjustable triggers, ergonomic grips, and superior optics to enhance user comfort and overall shooting experience. These rifles are typically designed for experienced shooters who demand precision and power in their firearms. Whether you are a seasoned hunter or a competitive shooter, the 1200 fps air rifle is sure to meet your expectations with its exceptional performance capabilities.
In conclusion, the 1200 fps air rifle offers a powerful and accurate shooting experience. Its high velocity allows for greater precision and longer range, making it an ideal choice for target shooting or small game hunting. With its advanced features and reliable performance, this air rifle is a top choice for enthusiasts looking to enhance their shooting skills.
Ruger precision rifles are so versatile yet easily affordable that they make for a great choice for entry-level precision shooters. Because of their versatility, your scope choice will also differ based on your intended use.
For instance, for the Ruger Precision Rimfire .22lr where you’ll be doing mostly short-range shooting and plinking, a magnification range of 3-9x or 4-12x will be fine for you. On the other hand, scopes with magnifications in the range of 6-24x or 5-20x are often preferred for mid to long-range shooting when your RPR is chambered in .308 or 6mm Creedmoor.
But no money is ever wasted when invested in quality optics. We reviewed some of today’s best scopes for Ruger Precision Rifles that budget-conscious shooters will love to check out. Here comes our findings.
Our Reviewed Best Scopes for Ruger Precision Rifles
Vortex Optics 2-7×32 Crossfire II riflescope (Editor’s Choice)
The Ruger Precision Rifle is top-drawer stuff. The high-end rifle chassis is designed from the ground up. Chassis guns are those where the barrel and stock are bolted. A beauty like The Ruger Precision Rifle needs a perfect scope, one that delivers at extreme range accurately. The Ruger has a flattop profile that makes it pretty easy to mount a scope.
Crossfire II is a darn good choice. Coming from the reputable Vortex stable, this 2-7 X 32 scope is what you can score with at 1000 yards
With its multicoated lenses, and great waterproofing, this scope made of aircraft-grade aluminum is highly durable that is low weight. However it a Second Focal Plane scope.
What we liked and did not like:
The turrets are adjustable, are capped, and present a low profile. But they are rather squishy and do not have audible clicks. The turrets track poorly and the maximum magnification is 12x because of this.
We quite liked the BDC reticle. It is a great choice as you can extend the range without messing around without adjusting the turrets.
Another bothersome on higher magnifications upwards of 7x is the eye box of the Crossfire II. It has to be exact to fully take in the sight picture. Furthermore, the edges of the glass get blurry.
We found it pretty disadvantageous that the reticle is not illuminated.
Our team pretty much liked the fast-focus eyepiece.
We decided to compare the performance of Crossfire II. So we lined it up with the similar priced Vortex Diamondback. The glass is a great deal clearer and the reticle crisper. The eye box for the Diamond is a lot more forgiving. When we tested them at dusk, the Diamondback proved to be brighter. The Diamondback also scored higher on turret adjustment with its clear clicks.
Specifications
Pros
Affordable
Illuminated and BDC reticle options
Zero resettable turrets
Vortex transferable lifetime warranty
Cons
Glass not good enough with higher magnification
Eye box inadequate on higher magnification
Light transmission not so good in low light conditions.
Turrets do not track well
Our Verdict
The Vortex Crossfire II is a budget scope. It can help in getting your hunting and range shooting done well without breaking the bank. We can say that it is an okay scope for entry-level. It is great value for money though.
Vortex Optics Diamondback Tactical First Focal Plane Riflescopes (Great Value)
The Diamondback Tactical is the ideal objective Vortex for the RPG. It is a First Focal Plane scope that promises superior performance and ensures that all the requirements of you – the user – are met. Made of premium materials, the Diamondback has great loadbearing capacity.
With this high-quality scope, downing prey at a distance can be quite accurate.
The reticle is an EBR-2C MOA. This primary and important feature is pretty effective in determining ranges, windage corrections, holdovers, and leads to moving targets. Laser etchings that boast ultra-precision on the glass that ensures MOA specs tolerances are kept to the minimum possible.
It is made of aircraft-grade aluminum that is hard anodized. Fog-proof, waterproof, and shock-free, this scope passes all checks with flying colors.
Other noteworthy features are the Precision- Force Spring system and the Precision Glide Erector system make it easier for the hunter.
We find that the most awesome aspect of this scope is its optic system. The 6 – 24x magnification coupled with a 50 mm objective makes us sit up.
Another huge plus we find is the sturdy construction and well-mounted turrets. When twisted into position are near impossible to dislodge even if you bump into things or move around in the undergrowth.
We quite found the reticle crosshairs an optimum balance between precision aiming in poor light visibility. The windage reference dots on the droplines are a major improvement.
This beauty is lightweight to boot.
Care shows. It comes with both lens covers, a lens cloth, and a sunshade
By far what appealed to us the most was their guarantee policy. Vortex products come with their VIP guarantee which is a Very Important Promise. It bypasses how it happened, whose fault, or where it was purchased. Vortex undertakes that if repair is not a viable option, they will replace it. No questions asked.
Specifications
Pros
Has a 30 mm shock-proof tube
Comes with a glass that is low-dispersion
Reticle focusing is effortless
Cons
Light may be lost at higher magnifications
Our Verdict
In one sentence, the Vortex Diamondback is a marvelous piece of work. Just what the doctor ordered to partner with the Ruger Professional Gun. Vector has once again furthered their credentials in the field of optics. And wonders, it is budget-friendly too. Their warranty offered speaks volumes about their confidence in this scope. We are truly enthralled with it.
The CVLife 6-24×50 offers plenty of features for the price it comes at. The turrets are capped, are of solid construction, and easily adjustable. The zero holds well even after many shots.
Adjustments for elevation and windage are in 1/18 inch increments with every click at 100 yards. The illumination type of this scope is AOE(around the objective end) red and green.
It is made of high-strength aluminum alloy. The reticle is a red and green mildot with 5 levels of brightness controls. A parallax adjustment is not provided. The eyepiece has accurate dioptric adjustment.
The multicoated optics enhance picture quality. The coating is scratch proof and protects from dust, smudges, and other damage.
We found that the adjustment range is overall sufficient but unfortunately the parallax adjustment is not provided.
We also found the glass quality a bit lacking and not what more expensive scopes provide. However, we admit it’s better than what we expected.
Another plus is that this scope is easily adjustable and once you have sighted it, hitting the target constantly is easy.
The mounts are not a universal fit. They are for weaver dovetail and Picatinny rails. The provided manual is not very helpful so you have to play around to figure it out. The mount scopes provided are simply not great. You have to buy additional rings and mounts to do away with the problem.
Specifications
Pros
Great for long-range shooting
Easily adjustable
Easily zeroed
Satisfactory zoom quality
Cons
Glass quality could be better
Not suitable for all rifles
Our Verdict
The CVLIFE 6-24 x 50 is one of the best scopes for Ruger Precision rifles for long-range hunting and shooting with a solid construction. The adjustments are simple and easy. You will not be handicapped getting a shot at the target once you have zeroed the scope. This scope is suitable for use in low-light conditions. The optics on other similar scopes are better though but they cost a whale lot more.
Pinty 3-9X40 Red Green Rangefinder Illuminated Optical Rifle Scope
Pinty is an optics company that is situated in China. The scope rings can be easily fitted on any 20mm Picatinny or Weaver rails. The reticle type is the Rangefinder rather than a Mildot and is AOE red and green with 5 levels of brightness.
It is made of aerospace aluminum and is pretty sturdy and versatile. Lens covers are provided. Warranty conditions do not get a mention anywhere.
One huge letdown is the lack of parallax adjustment. This boils down to efficient shooting within 100 yards. Beyond that, your estimate of drop distance comes into play.
We found that the lenses could slip out of position darkening and blurring the objective.
We did discover a rather simple way to zero. Spin the focus knob on the rear till the crosshairs are visible clearly and you are good to go. But this is an area the makers need to take a keen look at. If it can zero and hold it, we are looking at a deal changer.
We dig the colored reticle that works superbly in low light conditions. Great value honestly.
We were disappointed with the limited adjustment. The problem was with the crosshairs which hamper zeroing.
Also, we were not impressed with the seals. They appeared somewhat flimsy. There is the danger of the nitrogen purging escaping, rendering the fog proofing and water-proofing appear dicey.
The included rings are of poor quality.
In its praise the build quality is sound.
We also found that the Rangefinder capabilities could be better but it’s not a deal-breaker. The calculatable range hash marks provide an alternative.
We loved the zoom feature. It worked pretty fine.
Specifications
Pros
Relatively inexpensive
Water and fog-proof
Easy to mount
Ideal illumination
Cons
A bit on the heavier side
Objective not adjustable
Our Verdict
Considering the price point, the Pinty appears to be of decent quality. However, we feel they may not last your entire shooting career. But then again there are few scopes, even expensive ones that may not last forever. We would welcome being more informative and come out with more details. Right now, it’s a bit sketchy and they need to be more forthcoming. A riflescope is not a toy. Hopefully, as more shooters use their scope and reviews pour in, they will get wiser. For now, have a blast on a budget.
Simmons 3-9x32mm .22 Waterproof Fogproof Matte Black Riflescope (511039)
The Simmons 3-9 x 32 .22 Mag is pretty suitable for small game hunting, varmint hunting, and target shooting. Nevertheless, the optics Simmons has put into the .22 has large-game optics into much-favored rimfire scope, the Mag .22.
This scope is far from cheap, ordinary, or flimsy. The body is constructed of one piece for unmatched durability under the most trying field conditions. It is still a budget scope but comes with a terrific booster- the lens coating that is HydoShield and can weather it all.
That’s not all. The eyepiece is Quick Target Acquisition with an eye relief of 3.75 inches for a swift and immediate sight picture. Make things a good deal comfy when out in the field, SureGrip adjustments can be used even with gloved hands.
The included rings are 1 inch with ? dovetail mounts that will fit most .22 rifle grooves.
We found the reticle somewhat wanting. The reticle is what Simmons terms a Truplex. The crosshairs are thick and extend all the way to the edges of the field of view. The crosshairs thin out towards the center of the reticle without a stadia line or dots to figure out ballistic yardages. A big letdown.
Another sore point with us is that the adjustments are somewhat non-responsive.
The other thing that got us a bit disappointed was the lack of a parallax adjustment feature. However, there is a Matte Black and Silver finish in this line that does feature parallax adjustment by way of an objective that is adjustable.
The Simmons .22 Mag is ultra-light which is a big winner.
A big thumbs up to this feature-packed riflescope.
Specifications
Pros
Affordable price
Body of one-piece
An eyepiece that is Quick Target Acquisition
Reliable SureGrip
Coating of HydroShield
Cons
Issues with the reticle
Issues with adjustment
Our Verdict
The Simmons .22 Mag riflescope hits the bullseye when it comes to the best scope for ruger precision rimfire 22. Simmons does offer what recreational hunters and shooters look for in a budget scope. Keeping it right on the money where the cost comes into play, and outperforming on quality are their hallmarks.
How to Find the Best Scopes for Ruger Precision Rifles?
1. Magnification
The right magnification is undoubtedly desirable for owning a profitable and perfect scope for the Ruger Precision Rifle. Excellent magnification translates into precise zooming in and out capabilities. Magnification plays a prime role in achieving your target with zero errors and zero difficulties.
A wider range of magnification provides a clear and crisp image of the object even when the range is far. A scope with adequate versatility can be used for both short and long-range shooting effectively.
Compare your options carefully and settle for the magnification called for in the situation. Initially, you need to figure out how to best use the optics system and you should make sure of the purpose of the scope. Don’t fall for the misconception that the widest magnification range is the most ideal to bag the target easily. Opting for wider magnification will result in blurry visuals.
In our experience, a magnification range of 12-18x gives a great field view and the right high elevation adjustment opportunity. This illustration can be of help.
And how much of objective diameter is required.
2. Distance
This factor is at the fore when looking for the best scope for Ruger Precision rifles. Depending on your shooting style, determine the average shooting distance first. Employing a short-range scope for a long-distance target will result in weak and blurred images that will leave you pretty much frustrated.
Mid-range shooting can be anything from 600 yards to 1500 yards. Over this range, we are looking at long-range. There are quite a few scopes in the market catering to short-range and mid-range.
You need to be a bit picky when it comes to a long-range scope. They are expensive but serve your purpose well.
3. Construction
The Ruger Precision Rifle calls for great scopes constructed of aircraft-grade aluminum. This ensures ruggedness. These scopes have to possess multiple standard proofs that ensure the scope’s capability to overcome adverse weather conditions and other trying external influences.
Performance and durability are furthered by reliable O-ring sealing and efficient gas purging. These features play an important role to detect targets without bothering about moisture and fogging issues.
4. Clarity and Glass Quality
Clarity, needless to say, is another crucial touchpoint when homing on that perfect scope for your Ruger Rifle. Obviously, if the clarity is missing in the sight or image, the entire effort put in to capture a target gets tossed out.
A clarity scope is one that will render strong and clear visuals even on max magnification. The resulting detailed imagery can help you shoot a flea off your prey. So choose wisely.
5. Multiproof Technology
All adventure aspects of a scope can be accomplished perfectly if good care has gone into the gas filling and purging as well as O-ring sealing. Multiproof in the scope is a measure of good O-sealing arrangements that ensure nitrogen or argon purging offers optimal protection and performance in different weather conditions.
6. Reticle Style
In the industry, the term “reticle” simply refers to the crosshairs. The design of reticles is for many purposes, such as general hunting and low-light shooting and everything in between. There are so many different types of reticles that it is impossible to cover all of them.
To name a few, there is the original reticle, the Bullet drop Compensation reticle, the Millidot Radian reticle, The MIl reticle, the Minute of Angle reticle, the illuminated reticle, and so on.
We are interested here in what the suitable reticles are for the Ruger Precision Rifle. The starting point is that they must be practical, uncomplicated, and convenient visually for tactical operations and long-range competitors. Our research puts the Vortex EBR-2 at the forefront.
The MOAR reticle is another held in much favor.
This reticle offers great precision at extreme ranges. It allows accurate range-finding and holdover estimations at the longest destinations.
Great for beginners
The three main reticle types
7. Turrets
The fundamental and important role of the turret is that it serves to initialize your scope to zero. This is the procedure to finetune your scope’s reticle adjustment so your rounds make an impact with the target bang on. The key to understanding your optics is in understanding your turrets.
Turrets are important as they define the accuracy of your scope. Just screwing up the turrets will result in zilch. There are 3 important things to look for in a reliable turret:
Reliability
An audible “click’ sound
Repeatability means that the turret adjustment is immediate. This is the hallmark of a high-quality turret.
These, simply put are knobs for adjustments to your scope on the horizontal and vertical planes. Each adjustment or click is measured as a measure of MOA or MRAD. Let’s take a look at the different types of turrets:
Windage Turret- This aligns your scope’s aim from left to right.
Elevation Turret – This adjusts your scope’s aim from the top to the bottom.
Parallax Adjustment Turret- This kob eliminates parallax.
8. Ease of adjustment
The sight picture has to be pretty perfect before you fire that first shot. There are a lot of adjustments that have to be pat before you press that trigger.
The reticle should be centered and upright first of all. We are looking for a crisp and clear image. Blacking or smudging at the ends needs to be symmetrical. If that is not the case, we do need to readjust.
The next thing to have a look at is eye relief. Looking through the scope, it should be within 3-9 inches. If you are uncomfortable with how close the eyepiece is to your eye, try adding an inch more. You don’t want the recoil to give you a black eye.
The final adjustments will come when you take that first shot. The bullet can hit a bit high or low than anticipated. If the bullet hits high, the reticle has to be adjusted slightly higher and vice-versa. Yes, you heard that right. It’s a hit-and-trial endeavor.
Windage adjustments work the same way. If you score a hit to the left of the target, you want to adjust the reticle to the left.
Zeroing in is the sum result of the above mentioned. Set up your rifle in a static, immovable position. Fire 3 shots.
Check the results, make further adjustments to elevation and windage knobs till you score that perfect bullseye.
You are up for business now.
9. Lens coating
Cutting to the chase, lens coatings are integral. They have to be foolproof. There are four basic ways this is done:
Coated- A single layer covers only one surface of the scope.
Fully-Coated- All the external glass is coated in a single layer.
Multicoated- Several layers coat one surface
Fully Multicoated- All the external glass on the scope is coated in several layers
10. Warranty and Budget
Buy once, cry once – the only thing you need to remember when setting up a budget for your rifles. For long-range shooting and hunting, you’ll need quality glasses, and they don’t come cheap. In fact, these types of optics often end up costing more than the firearm itself.
However, not everybody can afford the best scope for Ruger Precision rifles. That’s why most of our choices were made keeping the budget-conscious gun enthusiast in mind.
Scope care and maintenance tips
A well-designed riflescope is fog-proof and water-proof. A well-designed scope is made for taking a beating. They can sure deal with a little bit of dirt and grime. But what can harm them seriously are gun cleaning solvents and powders. These will wreak havoc and cause irreparable damage. The solution- quality lens caps.
Now some Dos and Don’ts
Never touch your scope with your hands. This is a surefire way to mess things. Whenever there are smudges or dirt, we instinctively use our shirtsleeves to clear them off. Big, big mistake. You will scratch the lens. Use a microfiber cloth or a lens pen, please.
You spent big bucks for your hunting rig. Just spend a few minutes after each outing cleaning up.
Do not forget to examine the scope. Report any cracks or any external issues to the makers immediately. The equipment can fail so this correction/ repair/ replacement is imperative.
How you stow away your scope is another vital action. Make sure it is well-wrapped in a solid scope cover and we are good.
FAQs
1. What magnification do I need for my Ruger Precision Rifle?
Ans: This mainly depends on your intended use. For long-range shooting, you’ll need a higher magnification scope such as a 5-25x or 6-24x. For closer range shooting or hunting, 1-6x or 2-10x will do.
2. How Much Should I Spend on a Scope for a Ruger Precision Rifle?
Ans: By current market estimates we are looking at anything from $800 to $1500. But then there is a 2 to 1 rule; if your gun costs $1000, you should spend $500 on the scope.
3. Should I use MOA or MIL?
Ans: Both MOA or MIL have their own place. Both are linear values to decide upon. There are no clear winners here. Shoot with whatever you are comfortable with.
4. How far can the Ruger precision rifle shoot?
Ans: Out of the box, it can easily touch the coveted 1000 meter mark. The current CEO of Ruger Professional Guns, Mike Fifer pegs it at 1600 meters. Why don’t you check it out yourself?
5. Do I need to use a specific size scope rings for the Ruger Precision Rifle?
Ans: The Ruger Precision Rifle usually uses 30mm scope rings but some models may require 34mm or other sizes depending on the scope and the rifle configuration.
6. Can I use a red dot sight on a Ruger Precision Rifle?
Ans: Yes, you can use a red dot sight on the Ruger Precision Rifle if you prefer a simple and lightweight sighting system. But since most people use this bolt-action rifle for long-range shooting, a red dot sight won’t do any good in long ranges.
And it clearly states the highest pressure needed for your reservoir.
I advise you not to go above that because with extreme pressure, your air gun will jam.
It is always wise to follow the manual while using an air gun.
It will help you understand your weapon on a deeper level.
The tank in your marauder can be filled with a hand pump or air compressor.
While a hand pump is a cheaper option, it will tire you down to fill a 215cc air reservoir.
On the other hand, there are numerous air compressors available that will do your job efficiently and faster, leaving you to focus your energy on shooting.
I will discuss the compressor details in the accessories part.
And this serves you better than any conventional spring-piston gun, which takes a lot of effort to reload frequently.
Now I will give you a better insight into some very important parts of the air gun so you will know if it’s the right investment for you.
Stock
As the name suggests, this Benjamin marauder gen 2 model comes with a synthetic stock.
It is lighter than the gen 1 wooden stock.
Though it lacks the authenticity of the wooden stock, it has several advantages over the first one.
The synthetic stock comes with a powder coating of black for better weather resistance.
The metal parts have bluing on them as to not get affected by rust.
Honestly, though, the synthetic stock does look less charming than the wooden one.
However, let us discuss the pros of having a synthetic stock.
Firstly, they are lighter.
You can carry it easily here and there.
Get a sling loop and a sling with it and you are all set.
The synthetic is an entire pound lighter in weight than the wood stock.
Secondly, you can use them in extreme weather conditions.
Wooden stocks are more easily affected by weather, and wood can be easily damaged in snow or rain,
Whereas this synthetic stock will serve you long term and has unquestionable durability.
Therefore, even if it lacks class, it is more practical to get a synthetic as a Marauder is not to be shown as a trophy but to improve your shooting experience.
Another feature that the marauder offers is an ambidextrous stock.
This is a huge upgrade compared to other products available on the market.
You reverse the bolt according to your dominant hand and you are good to go.
The stock has padding too so you can have a comfortable experience and a comb that can be adjusted vertically.
Sight
Sight is one of the most important deciding factors in the shooting.
Your success depends on the right kind of scope and the perfect adjustment of it.
The proper alignment of the target, illumination, and surveying equipment with range can do wonders for your shooting.
In Benjamin marauder synthetic stock gen – 2, across the receiver top, there is an 11 mm dovetail rail.
It does not come with an open iron scope, which should be duly noted.
However, you get an open door to choose your favorite scope, which would also fit your purpose and pocket.
If you are getting a marauder which comes with a Lothar Walther barrel, then it will feature a Picatinny or Weaver rail.
You can always switch between rails and scope with a simple use of an adapter.
If it gets too confusing for you to get a perfect scope, you can always order a marauder premium package that will include all the necessary accessories.
This package offers the CenterPoint 4-16x40mm Rifle Scope.
Although you can go for Lothar Walther barrel with Picatinny or Weaver rail, I don’t think you would need one
As there is very little recoil to handle with the Benjamin Marauder.
Velocity, accuracy and power
An air gun is chosen for its power and accuracy, and velocity is another important point you simply cannot avoid while judging an air gun.
The Benjamin Marauder comes with huge possibilities if properly tunes.
I am strictly prohibiting anyone who has no profound knowledge of air guns to tamper with the tuning.
You only change things when you know what you are doing.
There is a huge potential with simple tuning in this air gun, and proper tuning of things like hammer spring tension, striker ravel, or valve output would open new doors for you.
However, note this carefully, you only change the tune with a proper chronograph, profound technical knowledge, and ample time in hand.
For the rest of us, who are just beginning, we are fine to go with the preset tune which is also wonderful and keeps your performance level constant.
With tuning, you can get variable muzzle velocity but one thing you must remember is that you have to monitor the air pressure throughout the process,
Or you will end up with faulty muzzle velocity or air pressure that hampers your performance.
Here I am sharing my test results of Benjamin marauder .22 calibers with different pellets
So you get a thorough idea of its power and velocity along with accuracy.
I used seven different pellets of varying weights and got a range of velocities of 1041.83 FPS to 843.85 FPS.
The power range was from 23.38 ft-lbs to 33.43 ft-lbs.
.25 is so far the most suitable one for gaming and with proper tuning and informed settings, it could get you some coyotes or other big games.
Rick Eutsler from AirgunWeb took an in-depth look at the Benjamin Marauder Synthetic stock here:
Trigger
Can we just all take a second to grasp the fact that Benjamin marauder not only offers us a metal trigger, but they are also adjustable!?
Oh, don’t let me stop there — they also have two-stage adjustable triggers.
When we think about the positive let off or crisp functioning of any air gun the topic comes to an end at the trigger feature.
What kind of trigger your device has can make a huge difference in your shooting, and you will feel this once you get to the field and start the actual job.
A two-stage trigger offers you two basic facilities that any conventional trigger fails to deliver.
The first one is accuracy.
Two-stage triggers do wonders when it comes to accurate shots.
Their working principle is the key here.
There are two pulls required from your end.
If you do not make the target in the first pull then you can pause, make the adjustment and then go for the second pull.
BAM! That’s your target.
The minimal effort required for this inter-stage adjustment makes a huge difference in shooting experience and success.
The second advantage is safety.
When it comes to shooting, we have to be very careful all the time of accidental or undesired discharge.
A two-stage trigger lowers the possibility of such incidents because of its heavier pull weights.
It weighs around 3 lbs and unless you pull it with intention, there are very few chances of accidental fire.
The Benjamin Marauder also features a safety that is in direct contact with the trigger.
Moving on to trigger settings, you can change the pull weight or trigger blade position according to your needs.
The Crossman manual is very detailed and user-friendly with all the information one might need to make any change in any setting.
However, just like tuning, I would suggest you do it only with adequate knowledge.
A trigger is something you should not mess with in any firearm.
It could lead to several undesired incidents and the worst you can expect is an accident.
Do not go hard on your trigger.
Change one thing or two at a time, understand what you did, give your system time, and let it work on it,
And then you understand how it changes the output.
Throughout the process keep a sharp eye on safety. Care will always reward you
Cocking and loading
Cocking and loading is a simplified process in a marauder.
Like all other air guns or rifles, you start with pulling the bolt back, slide the magazines like a pro
And push it back to its initial position, and you are good to go.
Now while talking about magazines, I will mention some practical issues which may seem funny but in real life makes a lot of difference.
First, what you should know is the size of magazines and pellets that you will use in your marauder synthetic stock gen 2.
They are comparatively on the smaller side, and you may end up losing a lot if not careful throughout the process.
If you have bigger hands, it could add to your troubles.
However, this is nothing that could stop you from loading a marauder, just don’t end up wasting too many pellets.
They know circular magazines loading could be tricky, so they have an elevated aluminum breech to make it less messy.
The bolt is reversible, which could be a new feature to you and may take some time, but you will get used to it before long.
Loudness
This heading should be quiet because a marauder does not deal with loud business.
The barrel of Benjamin marauder synthetic stock gen 2 is fully choked, and this makes this gun awfully quiet.
In the updated version, they have used an in-built de-pinger which eliminates the sharp ping of a shot, and instead, you hear a dull thud.
The USP of a Marauder should be quietness and accuracy.
People claim to kill squirrels with it without scaring off anything else from the lawn.
Shooting Ability
At the beginning of the Benjamin marauder synthetic stock gen 2 reviews, I mentioned it is a 10-shots-gun with auto-indexing.
Anyone finding this alien? Fear not, they have single shot trays available too,
Though you will never need one once you start using the multi-shot feature and realize how great it actually is.
Another shooting feature present in the Marauder which steals the show is how it shows the number of remaining pellets in the magazine.
This not only helps you in planning your shots but also keeps you safe from double feeding and jamming.
Double feed control is often absent in air guns, and this particular feature comes in handy for avoiding jamming.
Double feeding jams the air gun, and clearing this stoppage is a different job altogether.
Therefore, it is better you keep a track of your shooting.
The above feature also helps to eliminate the accidental double discharge.
You can use the cheek weld for higher accuracy, and this is possible because of the adjustable stock comb height which I mentioned earlier.
This also helps in mounting scopes.
The ambidextrous stock helps both right and left-handed shooters and goes perfectly with a wide range of accessories available in the market.
Durability
Benjamin marauder is well known for its durability.
This is a gun that will cost you little to keep in good shape.
A marauder, with just a little care, will keep you busy in hunting for a really long time.
The first one is more conventional though it could be very tiring.
The reservoir is 215cc, and the air ranges over around 2000-3000 psi. which is a modest amount in terms of air pressure.
It also depends on your physical ability.
You can always use a scuba tank or air compressor to do the job for you so you can save your energy for shooting.
Numerous air compressors are available on the market.
Some of the most popular air compressors are venturi compressor 4500 psi, Benjamin traveler 4500 psi compressor, air venture nomad portable air compressor, etc.
But you can also go for a Marauder value pack if you want something cheaper.
In the case of hand pumps, Air Venturi g6, g7 or Hill MK4 could be your options.
Another accessory which you will need is scope as it does not come with one.
Scopes are an important deciding factor, and you can use your preferred one that goes with the factory dovetail rail.
You can go with Hawke sports optics, UTG-3 9*32 1” Bugbuster scope, Winchester products, etc.
Maintenance
As I have already mentioned, the Benjamin marauder synthetic stock gen 2 is not a high-maintenance air gun.
It is very little you have to do to keep a marauder functioning.
After some hundreds of pellets, clean the magazines and cock so there is no lead build-up.
You can use any good air rifle lube, and it will be as good as new.
For other metallic parts, keep a microfiber handy and wipe the gun off occasionally for it to have a shiny and print-free look.
Pros and Cons
Pros
Cons
Extremely quiet functioning.
Outstanding accuracy and performance.
Durable material.
Ambidextrous stock.
Reversible bolt.
Multi shot gun.
Low maintenance.
Wide range of accessories available.
Variable muzzle velocity and energy.
With the decrease in air pressure, the performance graph falls, and it shows signs of malfunctioning.
With the higher caliber this air gun somehow becomes noisy.
There is no attached scope.
While using hand pump filling the enormous reservoir could be tiring.
The synthetic stock does not look classy.
Price
A marauder offers you the best price while giving the performance of an elite rifle.
When we talk about air rifles, we talk about a price range that starts from $100 to several thousand.
A Benjamin combines superiority with affordability.
I am not saying you can’t get a better air rifle, but I’ll bet you can’t get one in this price range.
Anything better with the same features will cost you at least twice if not thrice this price.
You can get a marauder for between $500-550 depending on your choice of barrel and stock.
Accessories like compressors or scopes will cost you another $200-250 but can go up if you can afford higher-quality materials.
Specifications
So far, I have discussed all the features of this marauder upgraded model in detail,
But in case you are in a hurry and have to take it all in one go then here are the specifications that you will get in this air gun.
Benjamin marauder synthetic stock gen 2 air gun weighs around 7.3 lbs, which is almost 1lb less than the wood stock which is about 8.2lbs.
It is about 42.8” long, which is not what is recorded in the manual.
This is a PCP gun with a reservoir of 215 cc.
It uses compressed air pressure, which is around 2000-3000 psi for the best performance.
The velocities can vary depending on the air gun setting, which, in other words, mean this rifle offers you variable velocities.
Benjamin marauder has an inbuilt pressure gauge to keep track of the pressure inside the air tank.
There is a quick disconnect arrangement on the air tank so while filling the tank you can use one female quick disconnect and finish the job easily.
Internal shroud mechanism makes it one of the quietest air guns available in the market.
The choked barrel is all about accuracy.
Aluminum breech is elevated so as to load circular magazines easily.
This model of Benjamin offers 10 repetitive shots with an auto indexing feature.
It comes with two-stage adjustable metal trigger for better safety and accuracy.
The stock is ambidextrous and suitable for both left and right hand shooters.
The bolt is reversible, which makes it open to all kinds of accessories available in the market and can be used by both left and right handed shooters easily.
You get a magazine along with swivel sling stud with Benjamin marauder synthetic stock gen 2 air gun.
Customer review
Customers from all over the world love Benjamin marauder synthetic stock gen 2 air guns and there has been a little complaint against it.
You know the drill: Pull out the bag. Untangle the tent. Snap the poles together. Fumble with keeping one side still while you try to secure the other. Setting up your tent is kind of a chore, if we’re being honest. Same goes for putting it away, except now it’s also dirty, and probably wet, too.
Instant tents change all that by cutting your setup and break down time down to as low as 60 seconds. These are the most convenient shelters money can buy, and will elevate your car camping experience by giving you more time to focus on enjoying the wilderness around you.
With that being said, finding the right instant tent can be as much of a chore as pitching a regular one. Lucky for you, we’ve already spent countless hours researching and analyzing all the best and most popular models out there so you don’t have to.
Our favorite instant tent currently available is the Caddis Rapid 4 instant cabin. We love the Caddis because it combines a large interior and stand-up height ceilings with upgraded materials, reliable weatherproofing, and a fast-as-lightning setup.
We’ll dig into the details of instant tents in our buyer’s guide down at the bottom to help you decide if the Caddis Rapid 4 is the right tent for you. If it isn’t, that’s ok: We’ve also included several other popular models in our list below, so you’re sure to find the right size and style tent for your next outing down there somewhere.
All right, let’s talk instant tents.
Best Instant Tent OverallHighest Quality OverallBest On A Budget
Specs:– Weight: 20.5 lbs lbs (9.3 kg)– Packed size: 50” x 9” x 9” (127cm x 23cm x 23cm)– Floor size: 96” x 96” (244cm x 244cm) – Peak height: 80” (203cm)– Rooms: 1– Shape: Cabin– Occupancy: 4 (6 also available)– Best for: Three season camping– Price: $
Taking our top honors as the best instant tent overall is the Caddis Rapid 4, a well-rounded shelter that combines simplicity, performance, and durability, and does it all at a price that’s tough to beat
The Caddis follows the same essential design of the classic Coleman Instant Cabin below with its lightning-fast attached pole design and large square floorplan, but then adds in all the things Coleman left out in the name of cost-savings. That includes a nice long rainfly, an open mesh ceiling for sunny days and clear nights, and stand-up height ceilings throughout the interior.
We also love that Caddis cuts no corners in terms of material quality and durability here. The Rapid 4 uses a thicker 190D polyester taffeta in its canopy, the same fabric in the rainfly, and an even thicker 210D polyester in the floor. This instant tent also benefits from upgraded hardware, and we’re particularly impressed by the Caddis’ 21mm thick steel poles.
As far as instant tents go, this is a tough one to complain about, especially if you’re considering the classic Coleman Instant Cabin below, which is easily its closest competitor. The materials are thicker, the floor is larger, the ceilings are higher, and a large rainfly is included for the price. Of course that price is a bit higher than the Coleman, which would be the only real drawback for us, but if you’ve got the extra cash to spend, you really can’t go wrong here.
Specs:– Weight: 32 lbs ( 14.5 kg)- Packed size: 67” x 8” x 8” (170 cm x 20cm x 20cm)- Floor size: 94” x 94” (239cm x 239cm)- Peak height: 78” (198cm)- Rooms: 1- Shape: Cabin- Occupancy: 4- Best for: Three season camping for two- Price: $$$
Taking our top spot for highest overall quality is the latest Gazelle T4 instant tent, the Gazelle GT400R T4.
The T4 gets our vote for its highly durable materials, which include rugged 210D polyester fabric in both the canopy and rainfly, a full 300D oxford polyester material in the floor, and YKK zippers on every door and window.
Interestingly enough, the Gazelle is the first tent with fiberglass poles The Wise Adventurer has ever given the “highest quality” designation, but in Gazelle’s case, there’s a reason for it. Gazelle tents use a unique “pop-out hub” design for their tents, which consists of a sturdy metal hub at the center of each wall or roof panel attached to four independent poles connected to each of the four corners. By using fiberglass, Gazelle is able to get enough flexibility out of their tent frames to allow them to bend under tension without breaking, which makes the freestanding hub design possible. You’ll definitely want to stake out the Gazelle from every angle, but the pole material isn’t a quality concern in this case.
Aside from the unique (and incredibly easy to pitch) pop-out design, the Gazelle T4 has a few other standout features. For one, it’s a four-person tent with two separate doors, which always earns bonus points in our book. It’s also got well over six feet of headroom inside, and tons of interior space due to the convex shape of the walls. Ventilation is solid thanks to six interior windows and a mesh roof, and storage is plentiful with four large interior pockets and a mesh gear loft.
Our main complaint with the Gazelle T4 is that although its removable floor is convenient for cleaning, it’s also attached using velcro. Granted, the velcro is thick, and the T4 holds up just fine during rain, but you’ll want to be careful about where you pitch this tent as it’s just not built to keep standing puddles of water at bay.
Pros:Cons:
Teton Sports Vista 2 Person Quick Tent: Best On A Budget
Specs:– Weight: 6.3 lbs (2.9 kg)- Packed size: 33” x 7” x 7” (84cm x 18cm x 18cm)- Floor size: 82” x 60” (208cm x 152cm)- Peak height: 41” (104cm)- Rooms: 1- Shape: Dome- Occupancy: 2 (1 person also available)- Best for: Portable shelter for 1-2 persons- Price: $
Want a fast-pitching tent but don’t need a ton of space? Check out the Teton Sports Vista Quick Tent.
The Vista is essentially a classic backpacking-style tent that uses a pre-attached pole design where you’d normally find a standard collapsible pole set. Set-up is pretty cool to watch, as you just unfold the tent then pull the drawstring and watch the tent magically spring into shape.
Pretty much everything else about the Teton Sports Vista is classic backpacking tent style, including the tall tub-style waterproof floor, the lightweight mesh ceiling, and the seam-sealed rainfly. This tent comes in both one and two-person models, but we prefer the two-person for the extra space, and love that Teton sports included double doors for the Vista to add livability for two.
We don’t really have any complaints with the Teton other than the limitations of its size and weight. At just over 6 pounds, it’s a little too heavy for serious backpacking duty, especially considering it can’t be meaningfully split between two hikers due to the pre-attached pole design. On the other end of the spectrum, it’s smaller than your average car camping tent, although it will comfortably sleep two just fine. Still, if you like the sound of a compact tent that goes up in about 60 seconds, this one won’t break the bank.
Pros:Cons:
Core 9 Person Instant Cabin
Specs:– Weight: 27.6 lbs (12.5 kg)- Packed size: 48” x 11” x 12” (122cm x 28cm x 30cm)- Floor size: 168” x 108” (427cm x 274cm)- Peak height: 78” (198cm)- Rooms: 2- Shape: Cabin- Occupancy: 9 (12 person also available)- Best for: Large family/group camping- Price: $$
Core camping tents have become widely popular in recent years, and the Core 9 is a great example of why people love them. It’s a huge tent with two rooms, two doors, tons of floor space, and stand-up ceilings.
Setup is a breeze thanks to the pre-attached hubbed pole design, meaning all you have to do is unfold this instant tent and then extend its telescoping steel legs into place. Weatherproofing is solid all-around thanks to Core’s “H2O Block” technology, which uses a combination of heat-sealed seams and water-resistant fabric to keep the wet at bay.
Several long-term owners report weathering many a rainy night without a single drop getting into the Core 9, and surprisingly the Core even does well in moderate winds (25-30 mph) despite its near-vertical walls and tall stature.
Complaints with the Core 9 are minor, but our biggest one is the use of 68D polyester fabric throughout the tent. Sure, it’s much stronger than your average backpacking tent, but it’s also lower than several of the other instant tents on our roundup.
Our second gripe is with the windows and doors. The Core 9 has plenty of nice big windows, but there aren’t any toggles to roll them up and secure them to when you want to open them up, so they just hang down. It’s far from a deal-breaker, and the Core remains a great tent to have!
Pros:Cons:
Zempire Pronto 5 V2
Specs:– Weight: 32.3 lbs (14.7 kg)– Packed size: 28” x 16” x 10” (71cm x 41cm x 25cm)– Floor size: 109” x 109” (277cmx 277cm)– Peak height: 75” (191cm)– Rooms: 1– Shape: Dome– Occupancy: 5– Best for: Three season camping– Price: $$$
While most instant tents find a clever way to get their poles up as quickly as possible, the folks at Zempire do things their own way. Specifically, they throw out the poles altogether, and replace them with rigid inflatable beams.
This means pitching the Zempire Pronto 5 is as simple as staking it out and then pumping it up, and the entire production can be done in under three minutes with one person after a practice run or two. The same goes for taking it down, and thanks to Zempire’s use of multiple deflation points along the tent’s airframe, it takes about as long as putting away your favorite sleeping pad.
Aside from the unique airframe design, we’ve also gotta give Zempire some props for making one of the most well-ventilated tents on the market. Four massive zippable windows (and a full mesh ceiling) convert the Pronto 5 from a dark cave that’s ideal for sleeping into an open and airy screen room that competes with the best in the business. A reliable rainfly with dual vestibule storage rounds out the package, and we’re particularly fond of the massive convertible awning Zempire worked into the fly at the front door.
In terms of drawbacks, the main issue with the Zempire Pronto 5 is that the futuristic airbeam technology comes at a premium price, making this one of the more expensive tents on the market. We’ll also note that while the Zempire’s durability is outstanding overall (the entire tent is covered by a 2-year warranty), they still use fiberglass poles to prop up the sides of the fly for added ventilation, and at this price, aluminum DAC poles don’t seem like too much to ask for.
Pros:Cons:
Coleman 4-Person Cabin with Instant Setup
Specs:– Weight: 18.2 lbs (8.3 kg)- Packed size: 40” x 8” x 8” (102cm x 20cm x 20cm)- Floor size: 96” x 84” (244cm x 213cm)- Peak height: 59” (150cm)- Rooms: 1- Shape: Cabin- Occupancy: 4 (6 and 10 person versions also available)- Best for: Fair weather camping for two- Price: $
Few instant tents deliver on their claims for setup time, but the Coleman 4-Person Cabin literally goes up in under 60 seconds. Just pull the tent out of the back, unfold it, and extend the poles. You’re done. There’s no rainfly to mess with, no vestibules to stake out, and no accessories to set up.
And while the fast and easy character of the Coleman is a selling point for many, we’ll also give this instant tent props for its surprisingly durable materials. Coleman specs their instant cabin with all-aluminum poles as well as tough 150D polyester fabric in both the single-wall canopy and tub-style tent floor. The zippers are a little lackluster, and we wouldn’t trust the guylines in any serious storms, but at a price this low, we’re willing to overlook those details.
And while the price is fantastic, the budget build comes with a few shortcomings you’ll want to be aware of. First, the tent uses an “integrated rainfly” rather than a separate/full coverage style fly. That means that the water-resistant outer fabric can’t be removed, which limits the amount of stargazing you’re able to do on clear nights. That also means the tent has no vestibule to shield the entrance from rain, and that the Coleman Cabin’s weatherproofing relies entirely on its canopy construction. Some owners report getting through extended rains without issue, while others experience the occasional leak. All things considered, we recommend adding an additional waterproofing treatment to this instant tent before taking it out in the field.
Pros:Cons:
Bushnell Shield Series 9 Person Instant Cabin
Specs:– Weight: 44lbs (20kg)- Packed size: 42” x 24” x 24” (106cm x 61cm x 61cm)- Floor size: 15’ x 9’ (457cm x 274cm)- Peak height: 78” (198cm)- Number of rooms: 2- Shape: Cabin- Occupancy: 9 (12 person also available)- Best for: All-weather three-season family/group camping- Price: $$$
The Bushnell Shield Series 9 is a spacious instant tent that’s got all the features you want in a plus-sized shelter. We’re talking two separate doors, two separate rooms (using the included divider), plenty of integrated storage for as many people as you want to host, and enough ventilation to keep it comfortable through three seasons.
We’re also big fans of the tough 150D polyester fabric that Bushnell uses throughout the body of the Shield instant tent. We’re talking floor, canopy, rainfly: Everything. That same quality is continued through the instant/preattached pole design, as Bushnell uses aluminum poles throughout the Shield’s construction.
Setup for the Bushnell Shield 9 is as simple as it gets. Just take it out of the bag, unfold it, then extend each of the four corner poles to its full height. Throw the rainfly on if you’re expecting any questionable weather, or leave it off for maximum ventilation from the fully-mesh ceiling.
Speaking of the rainfly (and questionable weather), weatherproofing is the only semi-common complaint we’ve heard about the Bushnell Shield series. On the one hand, the rainfly design is great, provides ample coverage, and even features a reflective backing that keeps the interior cooler in hot summer months. On the other hand, some customers report moisture getting past the rainfly and making its way into the tent. Bushnell builds their entire Shield line with fully-taped and sealed seams as well as water-repellant fabric, but it seems to struggle with extended or wind-blown rainfall. We recommend hitting the main canopy with an extra layer of waterproofing, and taking extra care to properly tension the included rainfly if you’re expecting any serious weather.
Pros:Cons:
Moon Lence Instant Pop Up Tent
Specs:– Weight: 10.3 lbs (4.6 kg)- Packed size: 33” x 7” x 7” (83cm x 18cm X 18cm)- Floor size: 114” x 121” (290cm x 308cm)- Peak height: 52” (133cm)- Rooms: 1- Shape: Dome- Occupancy: 4 person- Best for: Light use in good weather- Price: $
While the Moon Lence Instant Po Up Tent wouldn’t be our first choice for a shelter (or even our first choice on a budget), it is the least expensive instant tent money can buy.
This tent is severely limited by its budget build (we’ll get into that down below), but it’s got a few highlights worth mentioning as well. First, the pop-up design is as simple as they come, and only takes about a minute to unfold and click into place. Second, we were pleasantly surprised to find that the Moon Lence Instant Pop Up specs a thick 210D oxford polyester floor, which is as solid as it is waterproof.
Unfortunately, water tends to fall from the sky rather than the ground, and the rest of the tent isn’t built to handle any wetness outside of a mild to heavy fog. The zippers leak, the seams leak, and the rainfly is just a strange little hat that covers up the hub for the tent poles.
Speaking of the tent poles, the Moon Lence uses thin fiberglass poles mounted to cheap plastic hubs, neither of which is going to hold up to any serious wind or the test of time. Ultimately this instant tent is better suited as a backyard play place for children or an easy-up sunshade for beachgoers. Still, if you only camp once or twice a year on clear sunny days and don’t want to invest in a serious shelter, the Moon Lence is a small investment with an even smaller learning curve.
Pros:Cons:
Coleman Tenaya Lake Fast Pitch Cabin Tent
Specs:– Weight: 33.2 lbs (15.1 kg)- Packed size: 40” x 12” x 12” (102cm x 30cm x 30cm)- Floor size: 156” x 84” (396cm x 213cm)- Peak height: 80” (203cm)- Rooms: 2- Shape: Cabin- Occupancy: 6 (8 person also available)- Best for: Three season family camping- Price: $$
The Coleman Tenaya Lake is a back-to-basics style instant tent with some unique extra features built-in.
We say “back-to-basics” because with the Tenaya Lake, Coleman takes the old-school approach to fast setup, opting for a central hub design using detachable poles rather than the standard pre-attached/permanently attached designs. Some owners look at this as a con, but personally, we’re fans of the design. That’s because without fixed hubs, it’s less prone to failure, and should anything happen to break you can replace the parts instead of replacing the entire tent.
As far as unique features go, our favorite is probably the dual “gear cabinets” on the Coleman Tenaya Lake. These pop-out organizers are permanently attached to the tent about where the “headboards” of two air mattresses would be, and give you a place to stash your gear and essentials without taking up any floor space. It’s like vestibule storage with 360-degree protection from the elements.
This Coleman instant tent also comes with a fully-framed free-swinging door for entry and exit, which stays shut using velcro during the day for easy access, but can be fully sealed using a zipper from inside as well.
As far as cons go, we’ve got a few complaints with the Coleman Tenaya that we’ll share. First and foremost, Coleman’s “Fast Pitch” design is much quicker than your average tent of this size, but it’s not nearly as fast or easy as the pre-attached pole and hub designs you’ll see elsewhere on our list. You’re probably looking at about a ten-minute setup once you get used to pitching the Tenaya Lake.
Some customers also report a few drips making their way past Coleman’s “Weathertec” system and into their living space. Other customers report the exact opposite, so we recommend taking this tent for a shakedown in the backyard before actually sleeping in it out in the woods. An extra water-resistant treatment won’t hurt anything either.
Pros:Cons:
Instant Tents Buyer’s Guide
What Is An Instant Tent?
Put simply, an instant tent is any tent that’s been designed with the easiest setup possible in mind. Typically, that means the tent poles are already attached to the both through one mechanism or another, and you won’t need to spend any time putting them together or threading them through loops, hoops, or sleeves.
Manufacturers use a few different strategies to achieve these easy-pitching tents, so let’s dig into the specifics to find which is right for you.
Instant Tents vs Pop-up Tents:
These two terms get used interchangeably sometimes, but they’re actually two very different things.
Interestingly enough, if one of these types really deserves to be called “instant” it’s going to be pop-up tents. That’s because pop-up tents literally go up instantly, requiring zero effort on your part. Their entire pole system is under constant tension, which is held back by restraining straps when not in use. Undue the straps, and your tent instantly “pops” into its correct shape, leaving you to simply stake it into the ground and call it a day. If you’ve ever used a spring-loaded sun visor for your automobile, the design should be familiar to you.
Ultimately instant tents are much better suited for serious camping though, as the simplified nature of pop-up tents doesn’t lend itself to reliable performance in bad weather. We strongly prefer putting an extra minute or two into setting up an instant tent, especially considering they’re designed to go up as easily as possible while still providing a reliable frame. You’re still saving a ton of time and effort over traditional tent pole systems, and you’ll be happy you did if the weather goes south.
Ease Of Set-up
A fast and simple setup/take-down is the main selling point of just about any instant tent. There are a few things to keep an eye out for when shopping, however.
The first and most important is that just because a manufacturer says their tent is easy to set up doesn’t mean it’s true. You’ll often see claims that the best instant tents can be set up with one person, set up in 60 seconds, or maybe even both. For some instant tents that may be accurate, but for others, it’s far from the truth.
The best way to determine an instant tent’s ease of set-up (aside from actually pitching it yourself) is to find a video of the tent being pitched in real-time. Not all manufacturers supply one, and those that do have a habit of making setup look easier than it is, but watching someone else pitch the tent in question takes a lot of the guesswork out of the buying process.
Portability: Weight And Packed Size/Shape
Instant tents tend to be a bit larger and heavier than traditional tents of the same size. That’s due to their attached frame designs, which typically incorporate hinges or hubs that add weight and bulk to the overall size of the tent.
That means instant tents aren’t a viable choice for backpacking, so weight and packed size only need be limited by your ability to transport, carry, and store your instant tent. Larger “cabin-style” instant tents add bulk as they add room, so if you’re considering getting a four-person or larger size, you’ll definitely want to confirm that the total packed size will fit in your car or truck (along with all your other gear) before purchasing.
Weather Protection
Try as we might to plan our camping trips around good weather, if you sleep outdoors for long enough, you’re going to deal with some rain.
That’s where good weather protection comes into play, and this is one of the features that separates a good tent from a bad purchase. There are a few basic indicators you should be familiar with that keep a tent watertight.
The first is the use of fully taped/sealed seams in a tent’s construction. Taped/sealed seams prevent water from creeping in through the vulnerable spaces between overlapping materials. The best instant tents will use sealed seams throughout their construction, while more budget-conscious models typically feature them in the rainfly and/or tent floor, but don’t include them in the tent canopy.
The second factor is water-repellant treatments. Ofter referred to as “DWR” coatings (short for “durable water repellant”), these treatments add additional protection to the natural water repellency of materials like polyester, and increase a tent’s wet-weather performance all-around. As an added bonus, these coatings can be purchased separately and applied to your tent to bolster wet weather protection from the factory.
Ventilation And Condensation
Like any other camping tent, ventilation plays a major role in keeping your tent comfortable year-round.
In the summer months, good ventilation allows a tent to create a cross-draft, pulling cooler air into the tent from outside while pushing the hot air accumulating inside the tent back out.
In the cooler months, when your tent typically stays fully covered under the vestibule to keep heat inside, ventilation plays the important role of managing condensation build-up. That’s because as you sleep, you constantly exhale warm, moisture-rich air into the tent. Over the course of the night, this moisture builds up inside the tent, and collects on the tent ceiling. Good ventilation helps this moisture evaporate before it builds up and starts to pool.
Durability
All the usual rules on tent durability apply to instant tents, but there are also some unique ones you’ll need to consider.
First off are the tent materials themselves, which include both the fabrics used in the tent body as well as the poles used in the tent frame. Instant tents also typically include some form of hinge or hub in their design, which you’ll want to consider carefully as they can be potential points of failure.
Tent fabrics are typically synthetic materials like nylon or polyester whose durability is mainly dependent on their overall weight/thickness. If you want to get a good idea of the durability of a tent’s fabric, just look for the “denier” rating assigned to the canopy, floor, and rainfly.
Denier, which is typically expressed as the letter “D” after a number (like 30D, 70D etc), tells you the durability of a given fabric. So with all other factors equal, a tent with a 50D polyester canopy will be more durable than one with a 30D polyester canopy.
Sturdy fabrics are important, but they aren’t much use without quality tent poles to hold them up. The best instant tent poles are made from metal, with aluminum typically being the highest quality and steel being a heavier but similarly durable choice.
As tents go down in price, you’ll start to see them use poles made from fiberglass as well. Some tents use fiberglass in low-stress areas to keep both the cost and overall weight of the tent down, while others use them throughout the tent’s construction. Generally speaking, the less fiberglass you can get in your setup the better, as these poles are much more prone to breaking under stress from factors like wind and rain.
Conclusion
For all the factors described above, we found the Caddis Rapid 4 to be the best all-around instant tent for its outstanding durability, lofty ceilings, and fast and drama-free setup. The price of the Caddis Rapid 4 certainly didn’t hurt its case either.
Of course if the Caddis still isn’t fast enough for you, we recommend considering the Gazelle T4. There’s just no faster way to set up a full-sized tent than Gazelle’s pop-out hub design, and both the T4’s canopy and floor fabrics double down on durability, delivering some of the thickest and most abrasion-resistant materials in our lineup.
And, if you’re looking to go fast-and-light or just want a great instant tent on a budget, we’re big fans of the Teton Sports Vista and its backpacking-style take on the pop-up tent category. If you want to learn more about how to set-up the perfect campsite, don’t forget to check out our camping checklist!
A: Yes. Under federal law it is perfectly legal to make, sell and purchase “armor-piercing” ammunition as long as you have the proper licensing. However, there are some nuances to the definition of “armor piercing” ammunition that we’ll explore in this article, along with the licensing requirements for making ammunition for sale.
To explore this topic, we’ll first discuss the federal definition of armor piercing ammo (which actually applies to armor piercing bullets) and then we’ll cover what licensing is needed in order to make ammunition for sale (whether it is AP ammo or regular ammunition).
What is armor-piercing ammunition?
Before we discuss AP ammunition, we first need to look at the federal definition for ammunition:
18 USC 921(a)(17):(A) The term “ammunition” means ammunition or cartridge cases, primers, bullets, or propellant powder designed for use in any firearm.
As you can see, the legal definition for ammunition includes all the components of ammunition… it isn’t just the completed round of ammunition.
The components of ammunition are:
Bullet – this is the projectile that is fired from the firearm – it is not the entire cartridge
Primer – this is the part the ignites the powder when it is struck by a firing pin
Powder – this is what burns and build gas pressure which propels the bullet down the barrel
Case – this is the part of ammunition that holds everything else together. It is usually metallic (most often made of brass, but can be aluminum, steel, or polymer)
Knowing that each component is ammunition by itself is an important distinction here. First, as we’ll discuss next, the bullet alone is what is regulated as “armor piercing ammo.” Second, certain people can not posses ammunition (e.g. felons and other “prohibited persons“) and therefore the possession of an empty case is enough to cause trouble. Third, there are licensing requirements for making ammunition for sale. Often folks think that they don’t need an FFL to make only a component of ammunition, however, you can now see why this thinking is wrong.
Under federal law, “armor piercing ammunition” is:
18 USC 921(a)(17):(B) The term “armor piercing ammunition” means—(i) a projectile or projectile core which may be used in a handgun and which is constructed entirely (excluding the presence of traces of other substances) from one or a combination of tungsten alloys, steel, iron, brass, bronze, beryllium copper, or depleted uranium; or(ii) a full jacketed projectile larger than .22 caliber designed and intended for use in a handgun and whose jacket has a weight of more than 25 percent of the total weight of the projectile.
As you can see, there are two parts to the definition of AP ammo and both apply to the projectile (bullet):
Any bullet, or bullet core, which may be used in a handgun and is made of certain metals (e.g. steel, brass, etc.)
A full-jacketed bullet larger than .22 caliber designed and intended for use in a handgun and whose jacket is more the 25% of the total weight.
Both definitions involve the use of a bullet in a handgun. This is because this law was adopted as part of the Law Enforcement Officer’s Safety Act and was intended to regulate “cop-killer” bullets from easily concealable firearms (handguns).
Note the distinction (emphasis added) between the first and the second definition. One requires a design intent to be used in a handgun, while the other applies if a bullet could possibly be used in a handgun.
The ATF has defined many bullets, that are typically rifle bullets, as able to be used in a handgun. For example, a .223 Remington cartridge, which is what most AR-15s fire, is a rifle cartridge. However, with the popularity of AR-15 pistols, the ATF has cracked down on certain .223 Remington bullets – for example, brass bullets. This is because a brass bullet for a .223 Remington cartridge is now “armor piercing” in the eyes of the ATF because it can be used in a handgun.
There is an exemption for some bullets:
18 USC 921(a)(17):(C) The term “armor piercing ammunition” does not include shotgun shot required by Federal or State environmental or game regulations for hunting purposes, a frangible projectile designed for target shooting, a projectile which the Attorney General finds is primarily intended to be used for sporting purposes, or any other projectile or projectile core which the Attorney General finds is intended to be used for industrial purposes, including a charge used in an oil and gas well perforating device.
For example, “green tip” 5.56 ammunition (the military/NATO variation of .223 Remington) has been exempted by the ATF even though it has a tungsten steel “armor piercing” core.
Can you make and sell armor-piercing ammunition?
In order to make any ammunition for sale, you must have a Federal Firearms License (FFL) Specifically, you’d need a Type 6 or 7 FFL. If you’re only making standard ammunition for yourself, no license is needed.
The good news is that an FFL is fairly easy to get, even out of your home! Also, an FFL doesn’t cost as much as you might think. If you’re interested, check out our Get Your FFL Course.
If you want to make or sell AP ammo, you’ll need to get a Type 9, 10, or 11 FFL, and you’ll also need to become a Special Occupation Taxpayer (SOT). Don’t worry, we’ve got a course for that too. 🙂 As a manufacturer of AP ammo, you’ll need to accurately track and keep a log of every AP bullet you make, and you’ll only be able to sell to specific customers (typically government/LE) with approval.
If you’d like to learn more about how to make, sell, or even import AP ammo, please check out our ATF compliance course.
Have you ever seen a moose in person? If not, you might not realize just how HUGE these creatures are! Moose make humans look tiny in comparison. In this article, we’ll explore how moose size stacks up to the average person.
Moose Height vs. Human Height
First, let’s talk about moose height versus human height. Bull moose, which are the males, stand a whopping 6 to 7 feet tall at the shoulders. That’s before you even count their antlers! Cow moose, the females, are just slightly shorter at around 5 to 6 feet tall.
Now let’s compare that to the size of a typical human. The average adult man is about 5 feet 9 inches tall. That means a bull moose can be over 2 feet taller than a man! If an average man walked up to a bull moose, he would just reach the moose’s shoulder. A cow moose is still at least several inches taller than a man.
Already from the height alone you can tell that moose are huge compared to us. But it gets even crazier when you look at their weight.
The Immense Weight of Moose
Bull moose tip the scales at 800 to 1,600 pounds on average. Cow moose weigh between 600 to 800 pounds usually. How much does a typical grown man weigh? Around 180 pounds.
So if you did the math, you’d find that one bull moose outweighs an average adult male human by 8 times! Picture 8 grown men standing on a scale. Then picture one moose on the other side. The moose side would drop way down with all that weight!
The Incredible Length of a Moose
The moose’s giant body isn’t just tall and heavy either. They also have an incredible length. From their nose to their tail, moose measure between 6 to 8 feet without the tail included. Add another 1 to 2 feet with the tail, and you get a moose length of 7 to 10 feet. How long is the average man? Around 5 feet 9 inches tall.
So a moose is longer than a full grown man is tall! If a man lay down head to toe next to a moose, the moose would be spilling over extra on both ends. These creatures are absolute giants!
Visualizing the Size Difference
Now that you know the basic height, weight and length of moose, let’s imagine what it would look like if a moose and human stood side by side. Picture it: a 6-foot-tall moose shoulder towering above the man’s head. The massive moose weighs 8 times more than the human. And the moose’s body is so long it’s spilling over the man by several feet in both directions.
When you visualize the size difference, it really paints a picture of how small we are next to these giant animals. If you ever saw a moose in the wild, you would have to crane your neck back just to see to the top of its back. And you could stand between its legs with plenty of room to spare.
Comparing Measurements
Another way to get a sense of scale is to think about specific measurements. For example, a bull moose can have an antler spread of up to 6 feet wide. That’s wider than some bedrooms! Their huge antlers alone could cover an entire person underneath.
Or consider that a moose’s shoulder is often 6 to 7 feet high. That’s the same height or taller than a basketball hoop! Imagine a creature the height of a basketball hoop but much, much bigger. That’s a massive moose!
Respecting the Size Difference
Now I know some of you might think, who cares how big moose are? Why does it matter if they’re so much larger than us? Well, the size difference has some important impacts on how we interact with moose.
For one thing, the immense size of moose means they need to be respected. Because they are so giant and powerful, moose can be very dangerous if they feel threatened. They do not run away from humans like deer often do. Instead, their size makes them confident enough to stand their ground if they perceive a confrontation.
There have been instances where moose have seriously injured or even killed people when they felt cornered or provoked. Given their gigantic stature, it’s easy for a moose to view a human as a pest rather than a threat. So people must be mindful to keep their distance and never purposefully approach or chase moose.
The huge size of moose also determines how we have to hunt them. Special rifles and ammo are required to successfully and ethically hunt such enormous game. And once they’re harvested, the meat and antlers are so bulky that machinery is needed to transport them. It takes serious manpower and equipment to hunt an animal as big as a moose!
Conclusion
So in summary, moose are massive creatures, especially in comparison to us humans. A bull moose can stand over 7 feet tall, weigh up to 1,600 pounds, and span almost 10 feet long. That makes them taller, bulkier, and longer than any person.
The next time you see a picture or video of a moose, take a moment to appreciate their immense size. It takes seeing one in person to fully grasp just how much they dwarf us humans. We must respect the incredible stature of these giants whenever we share their wilderness habitat. So think how tiny and fragile we are relative to these mammoth mammals roaming the northern forests!
FAQs
How tall is a moose compared to a human?
An adult bull moose can stand 6-7 feet tall at the shoulders, not including antlers. Cow moose are slightly smaller at 5-6 feet tall. The average adult human male is around 5 feet 9 inches tall. So a bull moose can be over 2 feet taller than a man.
How much does a moose weigh versus a human?
Bull moose weigh 800-1,600 lbs on average. Cow moose weigh 600-800 lbs. The average adult human male weighs around 180 lbs. A bull moose can weigh over 8 times more than a man.
How wide are moose antlers compared to humans?
Bull moose antlers can span 5-6 feet from tip to tip. That’s wider than some door frames and bedrooms! Moose antlers alone can cover an entire human underneath them.
As a huge fan of Glocks I am excited to write this post about the Glock 43X MOS and the G48 MOS. If you purchased one or are thinking of purchasing one, they are one of the best sub-compact optics ready pistols you can get your hands on.
What you are probably wondering is which red dot and green dot optics fit it and which are the best to put on it. Well in this article I am going to explain everything you need to know so keep reading.
What’s the difference between the Glock 43X MOS and the G48 MOS?
I want to quickly mention that the only difference between the Glock 43X MOS and the G48 MOS is the length of the slide. The G48 is longer. The optics footprint for both is exactly the same so all the optics and adapter plates mentioned in this article will fit both the G48 and G43X the same.
What footprint is the Glock 43X MOS and G48 MOS?
The Glock 43X MOS and G48 MOS have an RMSc footprint. This means it has four recoil lugs, two in the front and two in the rear. The optics we recommend are the Holosun 407K, 507K, and EPS Carry. The only issue is these optics have a “modified RMSc” fooptrint which means they have spots for recoil lugs only on the front. This means you will need to use an adapter plate or need to file down the rear lugs (which we will explain below) in order to fit these Holosun Optics.
Learn more about Holosun’s Modified RMSc footprint here.
Why do we recommend the Holosun Optics vs other options?
They are affordable but not cheap.
They are built sturdily with strong aluminum housings and glass.
They have convenient features like Shake Awake and Side Mounted Batteries.
They have a Limited Lifetime Warranty.
They are reliable.
They are waterproof.
When you compare them to other options like Crimson Trace, Bushnell, or others you will find prices are similar but the other options do not have as good of a track record and do not have as many features.
How do you mount a Holosun 407K/507K or EPS Carry to a G43X MOS or G48 MOS?
There are two options to mount the Holosun optics to your G43X MOS or G48 MOS.
1. Buy an adapter plate.
You can buy a Glock 43X/48 MOS Adapter Plate which will give you everything you need to mount a Holosun K Series footprint optic to your Glock 43X or 48 MOS. These plates act like a shim which gives you the correct footprint. They also comes with the proper screws.
Calculated Kinetics Glock 43X/G48 MOS to 407K/507K/EPS Carry Adapter Plate
CHPWs Glock 43X/G48 MOS to 407K/507K/EPS Carry Adapter Plate
CHPWS Glock 43X/G48 MOS to EPS Carry Adapter Plate
DPP Glock 43X/48 MOS to 407K/507K Adapter Plate
2. Modify your slide (at your own risk)
The second option is to modify your slide. You can do this by grinding down the rear recoil lugs and possibly the front ones a bit. We have heard this could void your warranty but aren’t sure, and we don’t recommend doing this, but if you did feel comfortable doing it – have at it!
Here is a video that shows someone doing it on their G43X so you can get an idea of what to do and how much is involved.
The Best Holosun Red & Green Dots Optics for Your Glock 43X MOS and G48 MOS That We Recommend.
In our opinion these are the best bang for your buck optics for your Glock 43X MOS and G48 MOS. Just make sure you understand how to mount them based on what we mentioned above.
1. Holosun 407K. Most Budget Friendly Option.
Buy the 407K At The Best Price
Available in Red Dot or Green Dot
Features:
6 MOA dot
Shake Awake
50,000 Hr Battery Life
Removable Side Battery
IP67 Waterproof
10 Daylight Brightness Settings and 2 Night Vision
Aluminum Housing
The 407K is an affordable optic. It’s lightweight, made out of aluminum, and has really nice controls. The 6 MOA dot is a great size for a pistol.
2. Holosun 507K. The Next Step Up.
Buy the 507K At The Best Price
Available in Red Dot and Green Dot.
Features:
MRS Reticle – 32 MOA Circle + 2 MOA Dot
Shake Awake
50,000 Hr Battery Life
Removable Side Battery
IP67 Waterproof
10 Daylight Brightness Settings and 2 Night Vision
Aluminum Housing
This optic is exactly like the 407K except it has Holosun’s famous MRS reticle which is a 32 MOA circle and 2 MOA dot. The MRS reticle can be toggled by hitting the “-“ button. So you can use the 32 MOA circle plus 2 MOA dot, just the 2 MOA dot, or just the 32 MOA circle.
3. Holosun EPS Carry – Closed Emitter Option
Buy the EPS Carry At The Best Price
Available in 2 MOA Dot, 6 MOA Dot, and MRS, Red Dot or Green Dot.
Features:
MRS Reticle or 2 MOA Reticle or 6 MOA Reticle
Shake Awake
50,000 Hr Battery Life
Removable Side Battery
IPX8 Waterproof
8 Daylight Brightness Settings and 4 Night Vision
Aluminum Housing
Enclosed Emitter
The EPS Carry is very similar to the 407K and 507K except it has one major difference, it is an enclosed emitter optic. This means the laser emitter is protected by a hood. So dirt, mud, or debris will never get in the way of the emitter to distort the reticle.
There are 3 versions of the EPS Carry. The 2MOA, 6MOA, and MRS Versions
The MRS version has a solar panel on it which acts as a solar fail safe to power the reticle of the battery dies. It also gives you an extra auto brightness feature which can be toggled on or off.
4. Holosun 507K ACSS Vulcan Green & Red Dot
Buy the 507K ACSS Vulcan At The Best Price
The 507K ACSS Vulcan is exactly like the 507K except is has the ACSS Vulcan reticle. This reticle has a 230 MOA dotted outer ring and a 3 MOA center dot.
The purpose of this reticle is to help you find the center dot quickly if you are off center. To learn more about the ACSS Vulcan check out our article here.
The dotted outer ring can be turned off by holding down the “-” button for 3 seconds.
The main advantage of the ACSS Vulcan reticle is to be able to find the center dot quickly when drawing the pistol.
All the features are the same as the 507K except for the reticle, and this is available in both red & green.
Choosing between Red or Green Reticles
You may be wondering if you should get a red or green dot reticle. We get this question a lot so I am going to list a few bullet points for you to consider.
Green reticles are less straining for the eye to see.
Green reticles can help with astigmatism. If you have astigmatism you will see a blurry dot, we have been told by a few customers that Green dots help with their astigmatism, making the dot look more crisp than the red version.
Green will not washout on backdrops like green grass, foliage, or green colors.
In theory Green dots can have a longer battery life because Green is brighter, so for example a green dot on brightness setting 6 may be the same brightness as a red dot on setting 7 – which would save battery life.
If you want to learn more check out our full article about Red vs Green Dot Pros & Cons here.
Choosing between Open vs Closed Emitters
The simplest way we can break down open vs closed emitters is to look at how you plan on carrying the pistol. If you plan on being outdoors in the elements with rain, snow, sleet, then a closed emitter will be beneficial.
If you plan on carrying OWB most of the time and plan on being outside then closed emitter would be beneficial.
If you plan on carrying IWB or don’t plan on being outside using your red dot in the pouring rain or heavy snow then an open reflex is fine.
Open reflexes will still work in the rain or snow but the closed emitter will give you extra peace of mind.
An open reflex can collect dust and debris on the inside of the reticle over time, so you’ll want to clean it out from time to time. An enclosed emitter is easier to clean in this aspect.
To learn more about Open vs Closed emitters you can check out our Open vs Closed Emitter Guide here.
How to decide which reticle style is best for you
In this guide we covered a few different reticle options. If you need some help deciding which is best for you here are some of our thoughts on each.
2 MOA only (EPS Carry 2 MOA): This dot is quite small which makes it precise. The downside is that it can be hard to “pick up” upon drawing the weapon. If you are experienced shooting red dot sights on pistols then this may not be an issue for you. If you are new, we recommend you practice “finding the dot” at home to become proficient. If you can train your muscle memory to find the dot then 2 MOA is a great choice.
6 MOA only (407K, EPS Carry 6 MOA): This dot is decently larger than the 2 MOA dot. We classify this as more user friendly than the 2 MOA dot as it’s a bit easier to pick up upon drawing. The 6 MOA dot will not be as precise as the 2 MOA dot at long distances (50+ yards) but it is still plenty accurate at all distance ranges. The 6 MOA dot is a nice size and it gives you a less cluttered reticle. Some people prefer it over the MRS.
MRS Reticle (32 MOA Ring + 2 MOA Dot) (507K, EPS Carry MRS: This reticle is a good combination of both large and small. You have the 2 MOA dot to be precise with, and the 32 MOA Ring to help “find the dot”. The 32 MOA Circle is quite hard to miss. The nice thing about this reticle is the flexibility. You can use the 32 MOA Ring only or the 2 MOA dot only or both together. This way you can find what you prefer and stick to it.
ACSS Vulcan with 3 MOA Dot and 230 MOA Dotted Outer Ring (507K ACSS Vulcan): This reticle is going to have a 3 moa dot and the 230 MOA dotted outer ring. The outer ring is only visible when the dot is not centered. The purpose is to help you find the dot quicker upon drawing the weapon. The 3 MOA dot give you a slightly larger dot than the 2 MOA dot, but it’s not that noticeable. The real value to this reticle is the outer ring and it’s assistance with helping you get on target faster by quickly adjusting your grip to “find the dot”
Conclusion
All of these optics are fantastic for your Glock 43X MOS and G48 MOS. You won’t find a better combination of quality and affordability.
Each optic also has it’s unique features and benefits. I wouldn’t say one is better than the other.
The 407K’s 6 MOA dot is really nice and some people prefer it over the MRS Reticle. The MRS reticle is larger which makes it easier to pick up when drawing. The EPS Carry is super cool because of the enclosed emitter.
If you have any questions, reach out to us on chat or leave a comment!
Mule deer and elk are two large deer species in North America. They may look similar at first glance since they both have antlers that are shed once a year, and both are popular for sport hunting. Even though they’re both deer, there are some key differences between the two species. This article will compare the mule deer vs. elk so that you will be able to recognize their differences and even identify them.
These two deer species are similar in many ways, but they also have many characteristics that set them apart. Continue reading to learn more about mule deer vs. elk.
1. Differences In Size
Elk in the grass | Image by Brigitte Werner from Pixabay
The main difference you will notice between elk and mule deer is their size. Elk are some of the largest deer in North America, coming in second to moose. Mule deer are much smaller in size and stature.
Adult bull elk stand around 5 feet tall at the shoulders. They can weigh 700 to over 1,000 pounds.
Female elk are called cows. They weigh anywhere from 500 to 600 pounds and stand over 4 feet tall at the shoulders.
Mule deer stands about 3.5 feet at the shoulders, with does being slightly shorter than bucks. A buck can weigh over 300 pounds and does typically weigh up to 200 pounds. Needless to say, mule deer weigh a few hundred pounds less than elk.
The overall appearance of an elk also differs greatly from a mule deer. Mule deer look like other deer typical of North America, like the whitetail deer. In comparison, elk look more like big reindeer or are similar to caribou.
Elk, in appearance, is a bigger animal with a broader body, wider stance, and bigger features all over, like a bigger nose and hooves. Mule deer, while also large, look thinner compared to elk and have smaller bone structures and stances.
2. Color Differences
Pair of mule deer at rocky mountain arsenal
Mule deer and elk differ greatly in their colors. Mule deer are reddish brown or dark grayish brown in the summer and then fade to gray in the winter.
Elk, on the other hand, have more red in their color. In the summer, they’re darker reddish brown and then turn lighter tan in the wintertime.
Elk also don’t have any of the white on their backside and underbelly like mule deer. Elk are darker brown on their neck to their face, almost appearing to have a mane. Their belly and legs are also darker browns in color.
3. Bucks And Does vs. Bulls And Cows
Male Mule Deer at the National Bison Range, Montana | image by Astrophoto Andy via Flickr
Male mule deer are called bucks and females are called does. This is pretty typical of most deer. Male elk, on the other hand, are called bulls, and females are called cows.
This comes down to the etymology or origins of the names of the animals. Bucks in deer comes from a relation to male goats and the bleating sound made. Bull in elk comes from their bugling sound that compares to a bovine.
4. Diet
Both elk and mule deer are ruminants which means they eat plants and vegetation and then regurgitate it to chew the cud as a stage in their digestion. However, they have different feeding habits.
Mule deer tend to be browsers and foragers. They pick and eat as they move. They have a varied diet depending on their habitat but mostly feed on shrubs, grasses, and weeds that grow in desert areas and higher elevations.
Elk are mostly grazers but also forage occasionally. They primarily feed on grasses and will sometimes eat bark or other low-hanging vegetation from trees.
Elk prefer grasslands that produce lots of native grasses for their grazing. Many migrate to the same areas to feed during different times of the year.
5. Antlers
image: Pixabay.com | male and female elk
Elk and mule deer antlers are significantly different. In both species, only the males grow antlers and shed them every year.
Elk antlers are tall and dark-colored. The tines grow from one large main beam that is much wider at the base than mule deer. One adult elk antler can weigh over 10 pounds and measure over 4 feet tall.
Mule deer antlers are not nearly as elongated as the elk’s and are much shorter. They also spread out more, with more tines forking off of one another for more points. Mule deer antlers are lighter gray in color.
6. Herding Behavior
Behaviorally, there are some key differences as well. Elk are known for their herding behavior. They will often form large herds of up to 100 animals.
Some elk herds have reached upwards of 500 members. Interestingly, elk will separate by gender in their herds, with males in one area and females in another while grazing together.
Mule deer, on the other hand, tend to be more solitary creatures. While they are social animals, they rarely remain in large herds year around. They will usually only travel in small groups of 4 to 7 animals.
Mule deer may gather in group feeding areas during certain times of year and mating season but move in and out of larger family groups. Young bucks leave the group once reaching sexual maturity.
7. Sounds and Calls
Elk and mule deer make entirely different sounds and calls, especially when it’s time to find a mate. Generally, you’ll only hear males calling for females.
Elk are generally much louder than mule deer, and their calls can carry for miles. Mule deer calls are usually softer and shorter-range.
Mule deer grunt, snort, and bleat out sound, especially during the rut. The rattling of antlers is a good way for hunters to attract mule deer since that’s another common sound for bucks to make.
Elk make a signature bugling sound in addition to grunts and barks. Bull elk bugle to show dominance and attract cows for mating. It’s a loud, hollow, multi-tone call.
8. Habitat
Mule Deer at the Malheur National Wildlife Refuge in Oregon | image by USFWS via Flickr | CC BY 2.0
Mule deer and elk have overlapping habitats, but their preferences vary greatly. Mule deer ranges are much broader than those of elk.
Elk primarily remain in the Rocky Mountains further north than the mule deer range. Mule deer live in the western part of the continent ranging from Canada to Mexico.
Mule deer like dry areas with shrubs to forage. They are well-adapted to living in arid conditions and can be found in desert scrublands, sagebrush steppes, and rocky mountain slopes.
Elk prefer meadows and open ranges in mountainous regions with thick grasses. They’re less likely to be seen in dry arid deserts where mule deer are found.
The .22 Short and the .22 Long are some of the oldest American metallic cartridges around, being invented in 1857 and 1871 respectively. Unlike other early rimfire designs, the .22 caliber options can still be found today. The problem is, it is hard to find rifles chambered in these cartridges, so a natural question to ask is can a rifle use both .22 Short and .22 Long?
Generally, .22 Short, .22 Long, and .22 Long Rifle can be safely used in the same firearms. However, some designs such as semi-automatic rifles may not cycle reliably due to lower gas pressures.
How can these cartridges be used in the same rifles? Unlike most modern centerfire cartridge designs, .22 rimfires technically straight wall designs. The only dimension which varies between the Short, Long, and Long Rifle is the length of the case and overall length. When chambered, the bullets aren’t fitted into the throat of the barrel and instead must move slightly forward before engaging the rifling.
A Brief History of .22 Rimfires
In the later half of the 19th Century, firearms manufacturers were making the transition from muzzle-loading projectiles to metallic cartridges. The Alamo in 1836 was fought with long rifles using percussion caps and flintlocks. By 1898 when Teddy Roosevelt was blazing his way through Cuba the official US military cartridge was the .30-40 Krag. In between, US firearms underwent a remarkable evolution.
This is where the .22 rimfire calibers come into play. Rimfire cartridges were an early metallic design and the link between the modern metallic cartridges we have today and the early paper cartridges used before 1850. There are also cartridges known as “pinfire” which were mostly composed of paper but this design was really a paper cartridge with a percussion cap at the base rather than a metallic design.
The .22 Short was conceived in 1857 primarily as a personal-defense round and for use in gallery guns which per popular at fairs of the time. It consists of a .222 caliber bullet between 25 and 30 grains in a rimmed case 0.421 inches long containing 4 grains of black powder. The .22 Long uses the same bullet in a case 0.613 inches long using 5 grains of black powder.
In contrast, the .22 LR uses a .222 caliber bullet between 30 and 40 grains in the same case as the .22 Long but with 6 grains of powder. All three share the same specs, though the .22LR is faster and has more energy. In a classic case of ‘third time’s the charm’, the .22LR took off like wildfire and has remained popular to this day.
Given the immense popularity of the .22 Long Rifle cartridge, this brings up an important question. Why go with older, slower, and more expensive cartridges?
A Couple of Benefits
Using the .22 Short and the .22 Long does have a couple of advantages. To start with, more ammunition of both can be stored. Bulk rimfire ammo is often bought and stored in buckets and boxes. Just like with nails and screws, a slightly shorter overall length means the same bucket can hold more rounds and sometimes will even weigh less.
Let’s be real here though, most people aren’t going to go through a trash can full of .22 rimfire cartridges in any reasonable amount of time. I suppose a competition shooter or someone who shoots a particularly high volume for practice will need this much ammo, but 95% of gun owners out there with a rimfire will use their gun for occasional plinking.
Besides high volume shooters, ‘preppers’ might want to take notice. The volume difference between the .22 Long and .22 Long Rifle is negligible, but the volume difference between the .22 Short and the .22 Long is basically 40%. Packing in a lot more bullets into the same space can come in handy if you are one of those people who expects to need decades of ammunition at the ready.
Similar to the advantage in storage, ammo capacity in some guns is greater with the .22 Short. Pump actions and lever guns which use a tubular magazine can be loaded with more .22 Short cartridges in the same magazine compared to either the .22 Long and the .22 Long Rifle.
One example is the Pump Action rifle offered by Henry. On the Gun’s webpage, the rifle can hold 15 Long Rifle cartridges in the tubular magazine, but it can also hold 21 Short cartridges! For squirrels, rats, and other pests this is a huge advantage!
One other advantage, if you can call it that, is some old rifles made prior to the invention of the .22 Long Rifle are specifically designed for .22 Long or .22 Short. If you collect firearms from the period and want such a rifle, getting ammunition for it is going to be cheaper than modifying the bore to accept .22 LR. Such modifications are common and can ruin the value of the rifle, or make the gun dangerous to use.
There are also situations where .22 Short or .22 Long might be preferred to .22 LR. Short range pest control doesn’t need .22 LR to be effective, and the smaller cartridges tend to be quieter in the same gun since they usually don’t exceed the sound barrier. However, the .22LR can be loaded up or down to a wide range of velocity and energy, effectively eliminating this advantage.
A Lot Drawbacks
While both cartridges can still be used, there’s no question that the .22LR has supplanted both of it’s predecessors for almost every use. The .22LR can be made subsonic, is cheaper due to mass production and wider market demand, and has enough power to reliably kill animals up to the size of coyotes.
Heck, the 22LR can even be used for self defense and hunting medium game like hogs and deer, though these uses are not recommended and may be illegal! The point is, the .22LR is accurate, popular, more powerful, and far more flexible than the .22 Short and .22 Long.
Flexibility
As stated, the .22LR can be used for a wide variety of tasks. Can the .22 Short and .22 Long technically do the same things as the Long Rifle? Sure. They can be subsonic, lethal to people and critters, and both have their own niche market. If there was no use for these rimfires then no one would be making them in 2022. However, the use of both the Short and Long is limited.
Range
The .22 Short is good to around 70 yards or so as a squirrel round. Basically, if you can find a squirrel in a tree, the .22 Short can kill it. Similarly, the .22 Long has a slightly longer range. Figures vary wildly but they seem to average out at around 100 yards. That isn’t too shabby and shouldn’t be overlooked for a varmint hunter taking game in the woods or from the roadside.
However, the .22LR can be reliably used out to 200 yards at squirrel-sized game and can reliably take a coyote at 30 yards or so. That’s pretty impressive for such a small, cheap round. The Long Rifle makes for an excellent farm and ranch gun as well as a target gun, hence why Olympians use the .22LR and precision rifle organizations like NRL22 exist.
Speed and Energy
The .22 Short is limited to around 1,050 fps at the muzzle. An especially hot load in a long barrel might reach 1,100 fps but those are outliers. The .22 Long has a slightly heavier bullet offsetting the slight increase in powder, so it’s velocity is in the same league as the .22 Short. 1,070 fps seems to be about average in modern offerings, but realistically it isn’t any different from the Short.
In contrast, the .22LR can be loaded really hot, achieving 1,700 fps. It can also be loaded slow, down to around 950 fps. This is a big reason why the .22LR is more flexible.
While the .22LR produces about 130 ft-lbs of energy at the muzzle on average, with the round touching 200 ft-lbs with hyper-velocity cartridges. The .22 Short maxes out at around 80 ft-lbs at the muzzle and the .22 Long can’t do much better. The .22 Long can be loaded hotter than the Short but that brings up another issue…
Accuracy
All three .22 rimfires are not exactly speed demons. That is actually a good thing though because the rounded nose bullet shape travels much better at slower speeds. A well balanced .22LR is very accurate out to 200 yards or so, with 300 yard accuracy still being pretty good in a match gun.
While both the .22 Short and Long can be accurate in purpose-built rifles, most people will use these calibers in a gun designed primarily for .22LR. Since the rifling isn’t engaged instantly with the shorter cartridges there is more room for a bullet to become slightly unbalanced or engage the rifling off-axis.
Like a football thrown with a less-than perfect spiral, an off-axis bullet will wobble in the air and become more susceptible to wind shear. It will also naturally deviate from it’s path. At short range, this isn’t an issue since we are talking about a fraction of an inch at 20 yards. But at longer ranges the altered flight path can significantly change point of impact in relation to point of aim.
Action Cycling
By far the biggest disadvantage to using the .22 Short and .22 Long in the same gun as a .22 Long Rifle is that auto-loading guns like the Ruger 10/22 likely won’t cycle properly.
The main issue is that the smaller powder volume produces less expanding gases in the chamber. Most semi-automatic rifles utilize a simple blowback action that requires a narrow range of gas pressure to work properly. Too much pressure, like from a 22 Mag, can break the action. Too little pressure, like from a .22 Short, and the action won’t cycle.
While not explicitly dangerous, making a semi-automatic rifle a single shot is quite annoying. What’s even more annoying though is having magazine feeding issues. Long Rifle magazines are designed for the .22LR cartrdige. Most can use the .22 Long without much issue but the stubby .22 Short has problems with a lot of magazine designs.
Recommended Rifles for .22 Short and .22 Long
With all these issues, it’s important to note that as long as the cartridge is properly fed into the chamber, any rifle designed for .22 LR will safely shoot a .22 Short or .22 Long cartridge. The risk of blowing up your gun is about as close to zero as operating a firearm can be. Still, I wouldn’t recommend using anything other than .22 LR in a semi automatic. They are finicky enough as it is.
A good lever or pump action design certainly gives the benefit of increased capacity via a tube magazine. If buying a modern gun and wanting this advantage, the Henry above is a good choice as are Henry’s lever gun variants.
Personally, I’m a bolt action guy. It’s a strong, safe design capable of tremendous accuracy. CZ USA is a good place to start for a modern bolt action rimfire, but there is one gun I have in mind that is plentiful, cheap, and simple enough that a child can use it.
The Winchester Model 67
The Model 67 is not an especially noteworthy gun. It is a cheap, single shot .22 rimfire rifle capable of using .22 Short, .22 Long, and .22 Long Rifle. It was produced from 1934 to 1963. The action and barrel are held in with a single screw, and the rifle is equipped with a decent set of iron sights.
We have one in the family that was a first generation model, produced somewhere between 1934 and 1937. This rifle is “Uncle Pete’s Gun”, but that was my Mother’s uncle, so my great uncle. It shot game through the later half of the great depression in North Dakota and most likely was the gun that put food on the table at a time when affording groceries from the store wasn’t always a possibility.
This gun has been in continuous use for almost a century with minimal cleaning and only one refurbishment 20 years ago. Even figuring this gun has spent half it’s life in storage, I’d put the barrel at over 20,000 rounds and still going strong.
Looking at Gunbroker, the Model 67 can be found somewhere between $200 and $300. At a pawn shop or gun show it can likely be found for less. This is in line with the cheapest brand new 10/22 variants! It’s also better quality than a Savage rascal, so this would be a good gun for kids to learn on.
Conclusions
To answer the question in it’s simplest form, yes, 22 Short and 22 Long can be used in the same guns. The difference in pressure is minimal and besides length their dimensions are identical. Using one or the other in a gun that is chambered for both and/or 22 Long Rifle is possible. Occasionally, such a substitution can even be a good thing!
However, it is best to use the appropriate cartridge most of the time. A gun chambered for 22 Long Rifle should be use with 22 Long Rifle in most circumstances. Similarly, a rifle chambered for 22 Short or 22 Long only should NOT have 22 Lon Rifle placed in the chamber lest there be pressure issues or damage to the throat of the barrel.
When buying a gun that can use all three cartridges, look for one which says “For .22 Short, Long, and Long Rifle” or “For .22 S/L/LR”. Rifles chambered for other 22 caliber rimfire cartridges such as 22 Mag are NOT interchangeable and should be avoided.
"Debate over whether a 22 air rifle can effectively take down a deer has sparked curiosity among hunting enthusiasts. With its lower muzzle velocity...
")
")
")
")
")


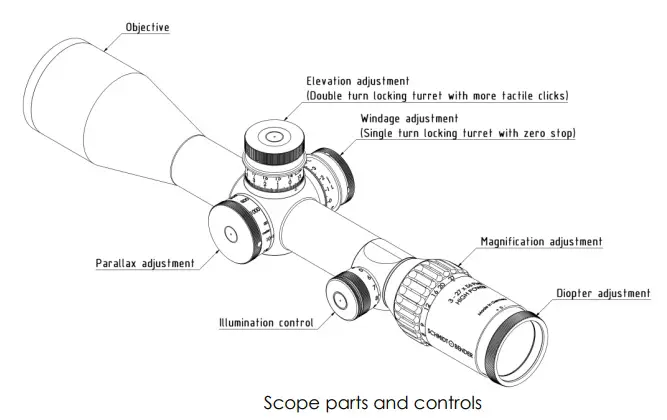
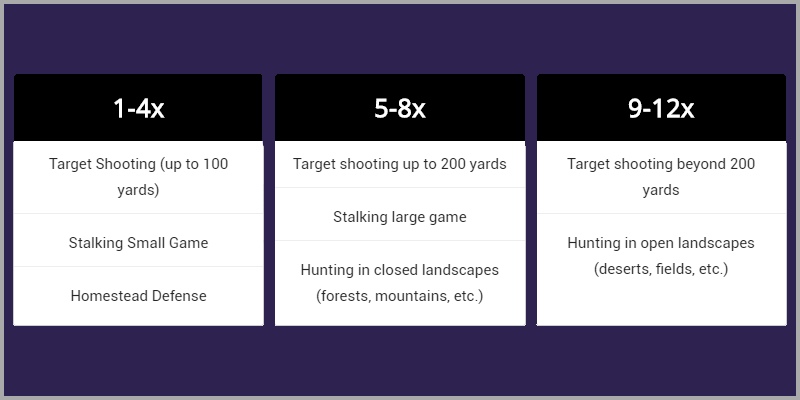 And how much of objective diameter is required.
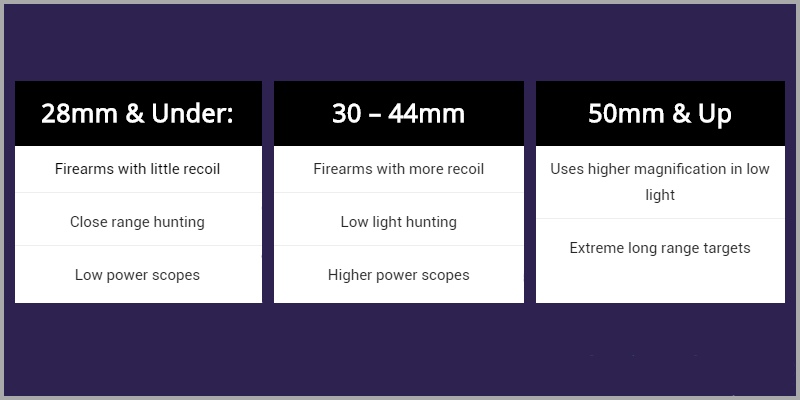
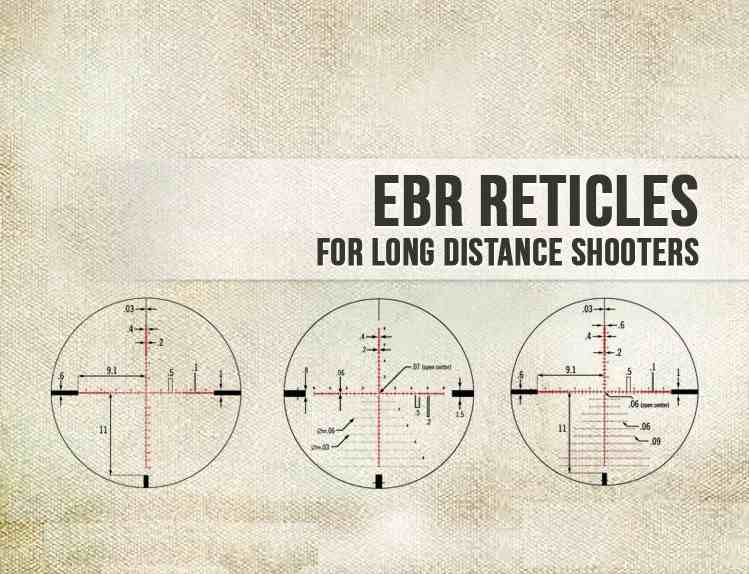 The MOAR reticle is another held in much favor.
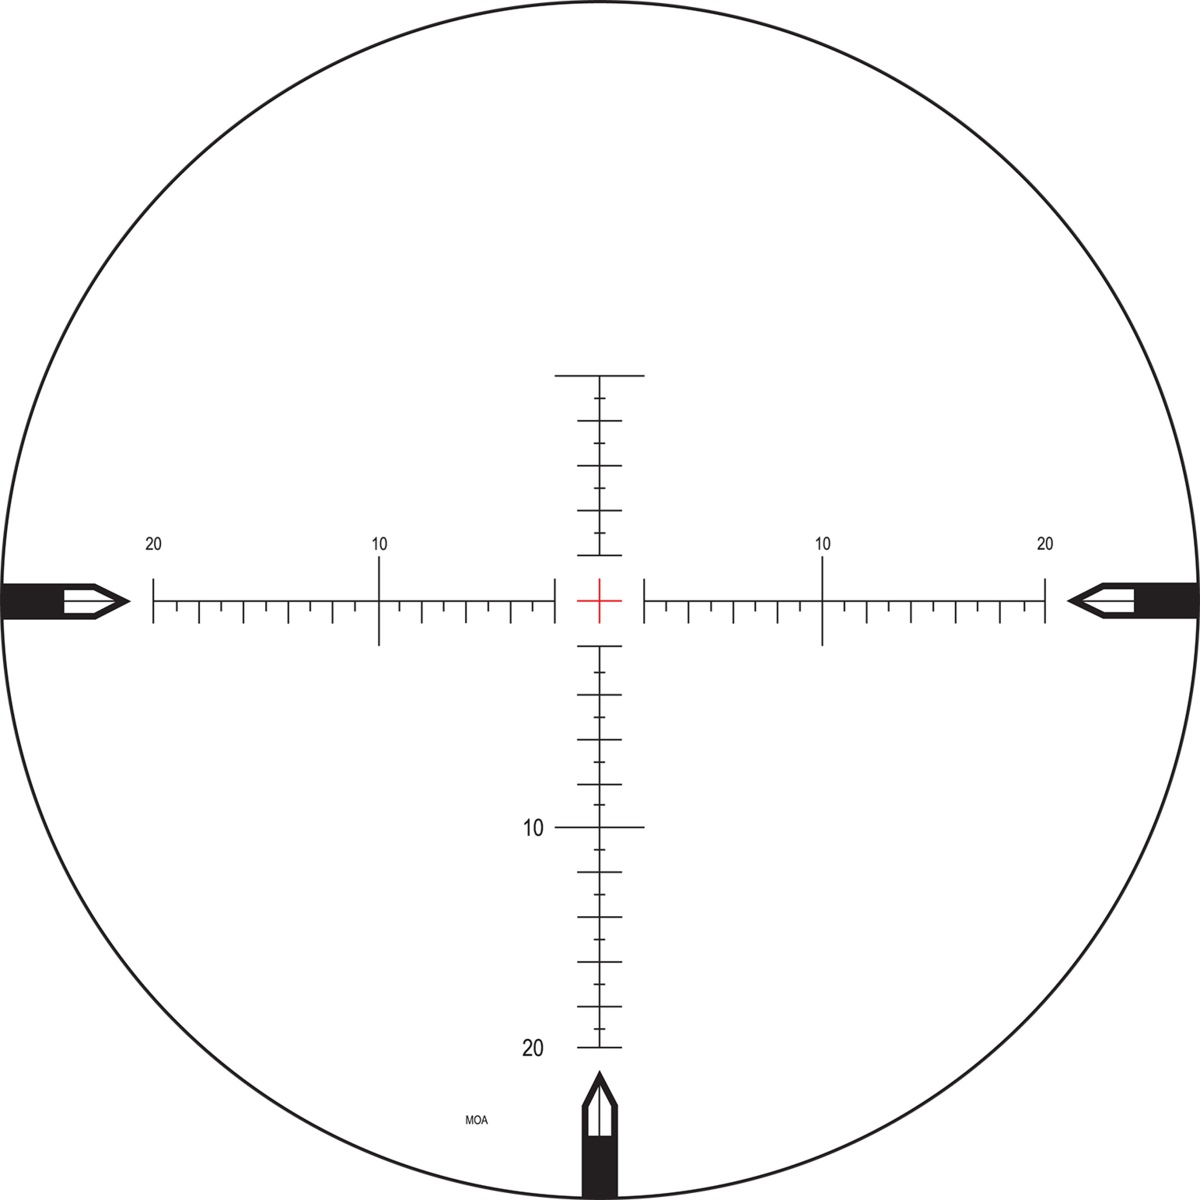 This reticle offers great precision at extreme ranges. It allows accurate range-finding and holdover estimations at the longest destinations.
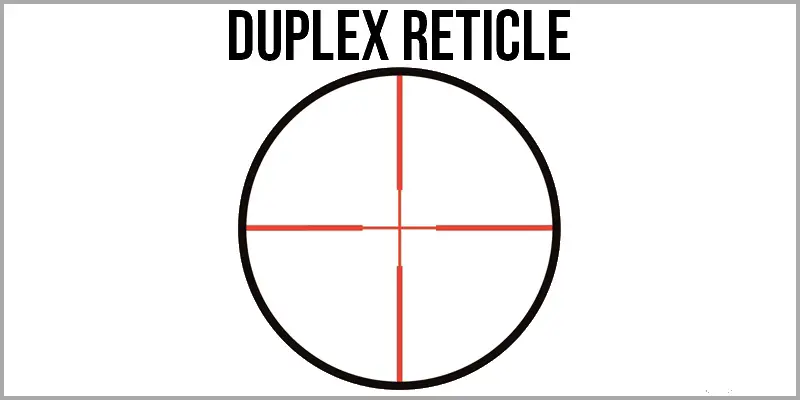
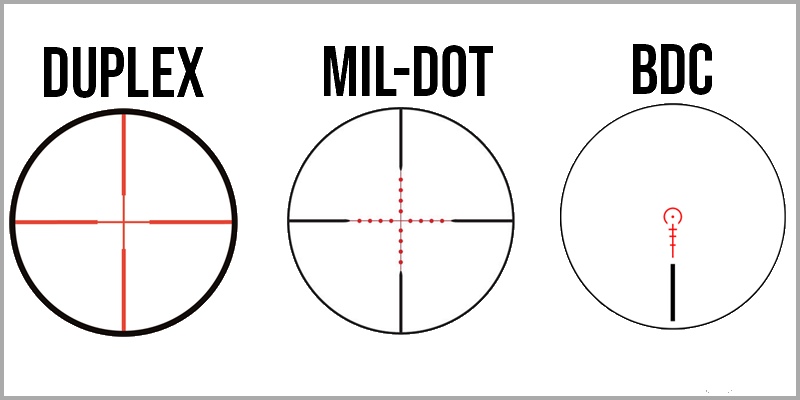
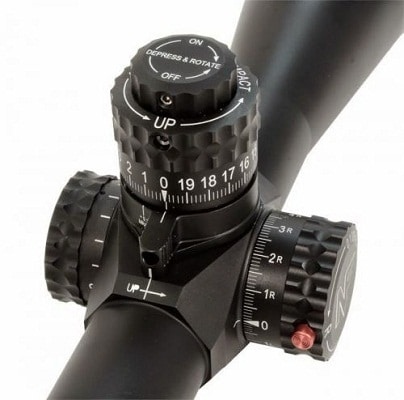 These, simply put are knobs for adjustments to your scope on the horizontal and vertical planes. Each adjustment or click is measured as a measure of MOA or MRAD. Let’s take a look at the different types of turrets:
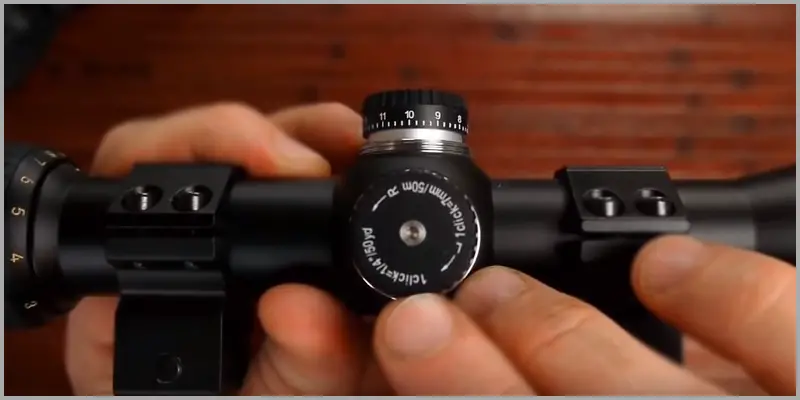 Elevation Turret – This adjusts your scope’s aim from the top to the bottom.
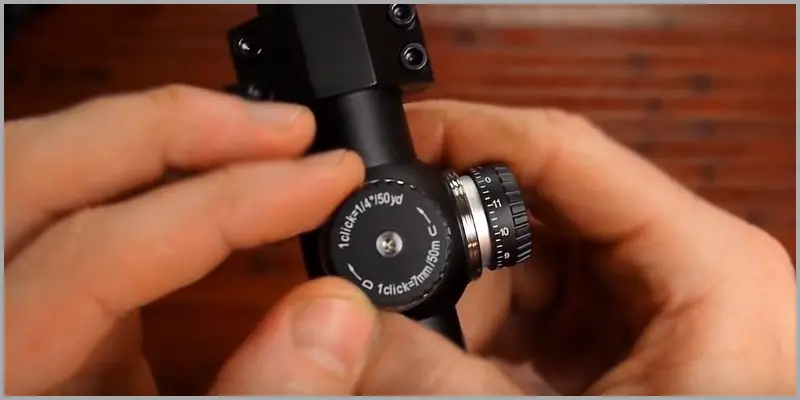


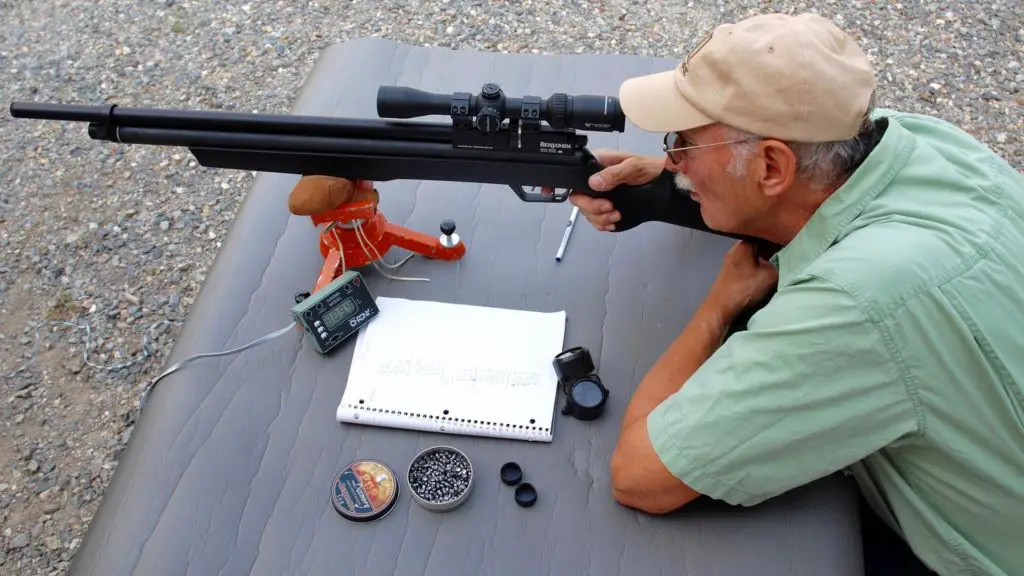
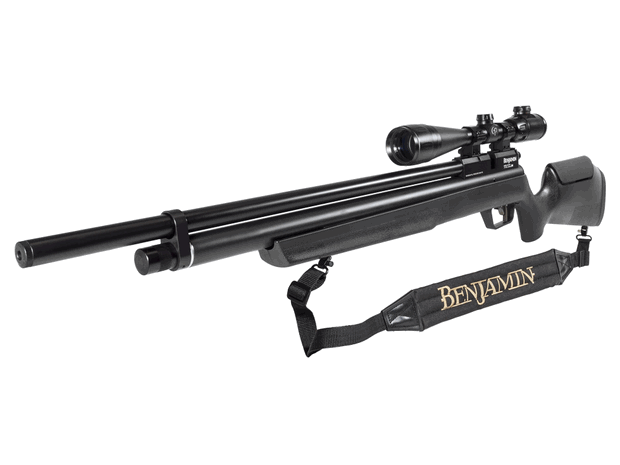
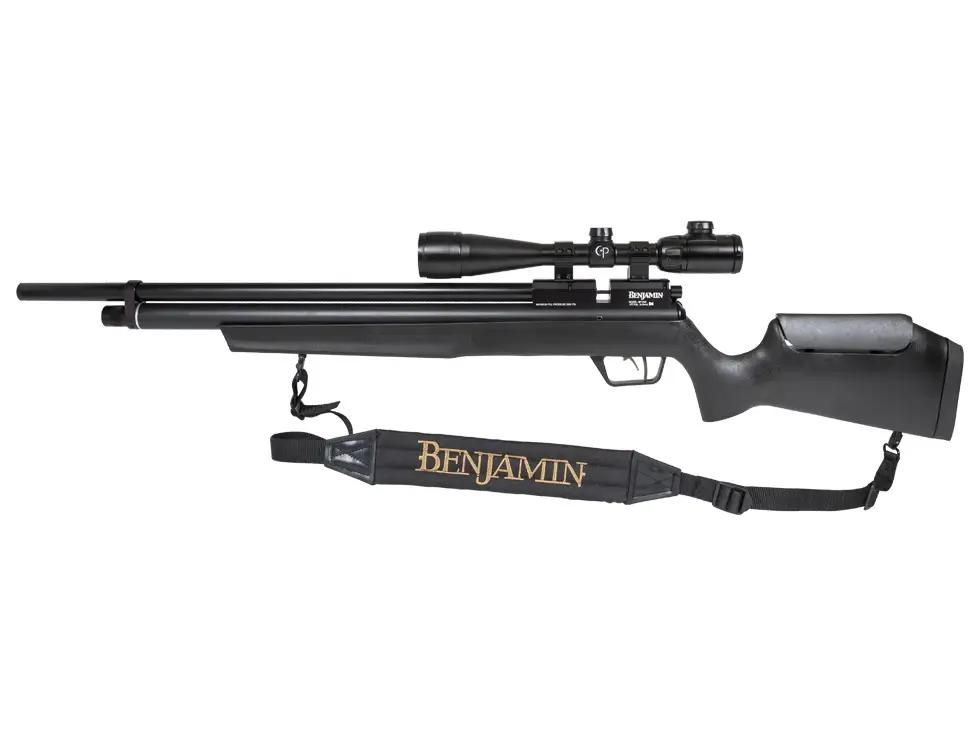
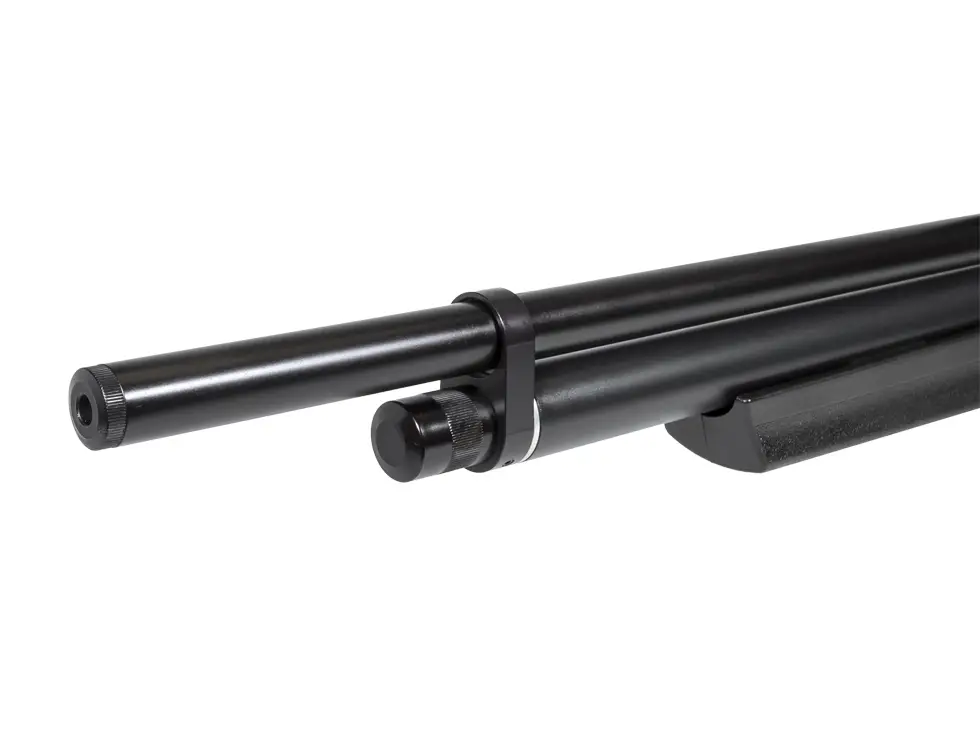
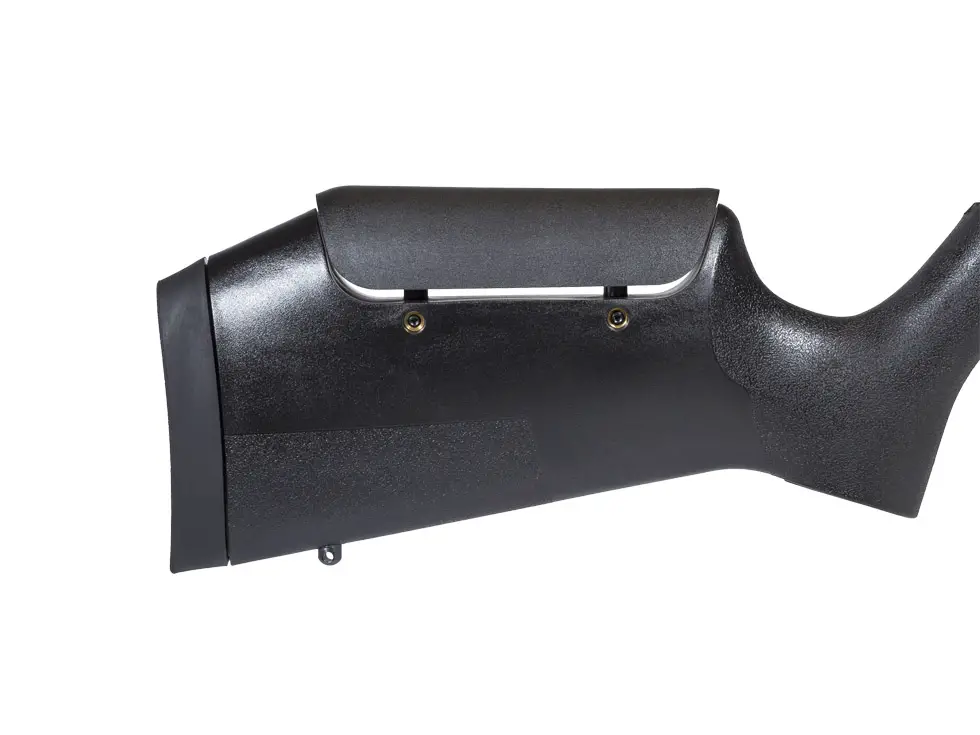
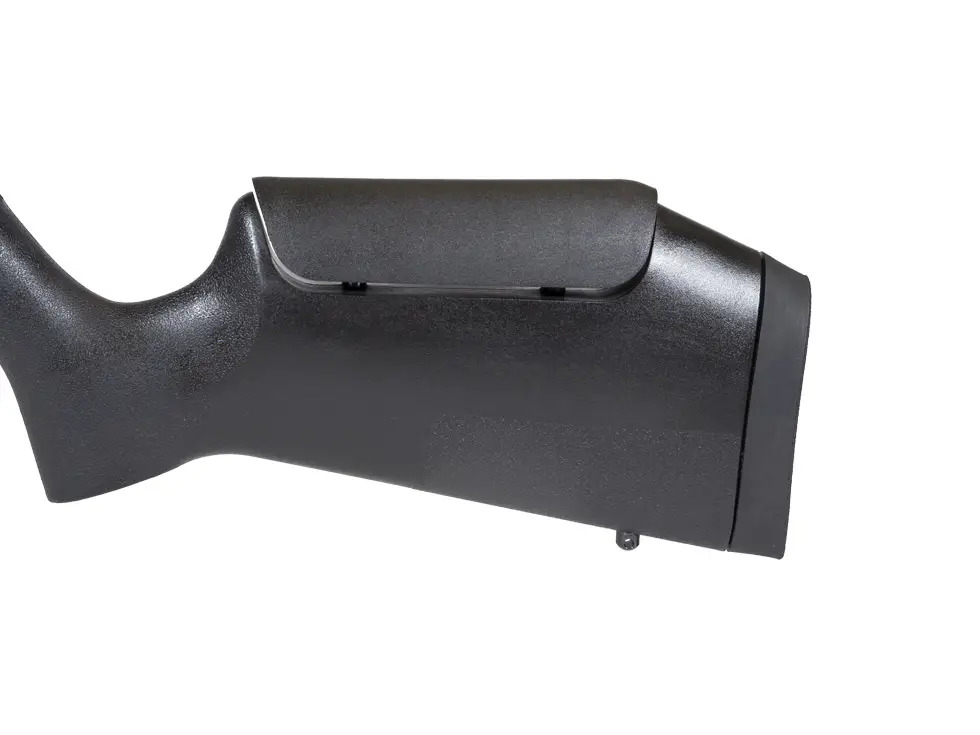
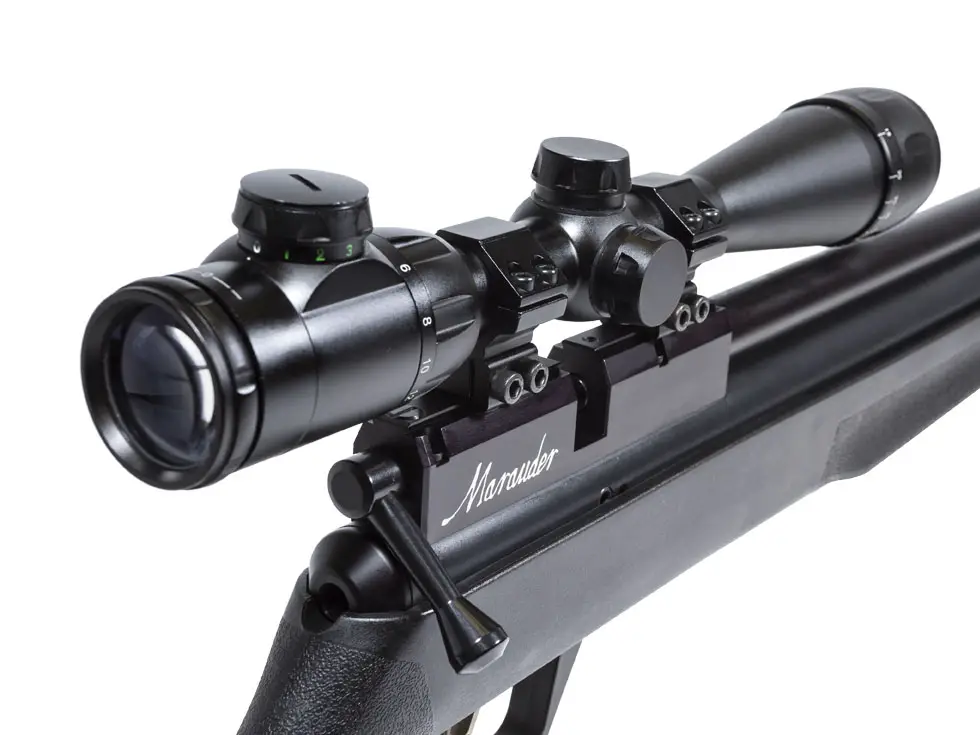
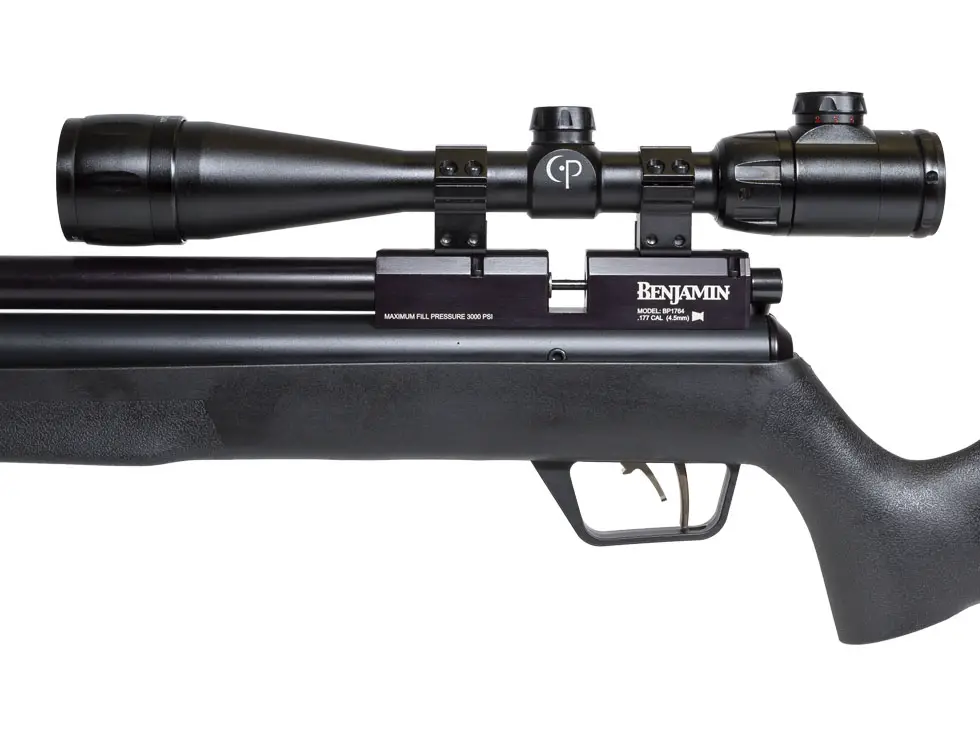
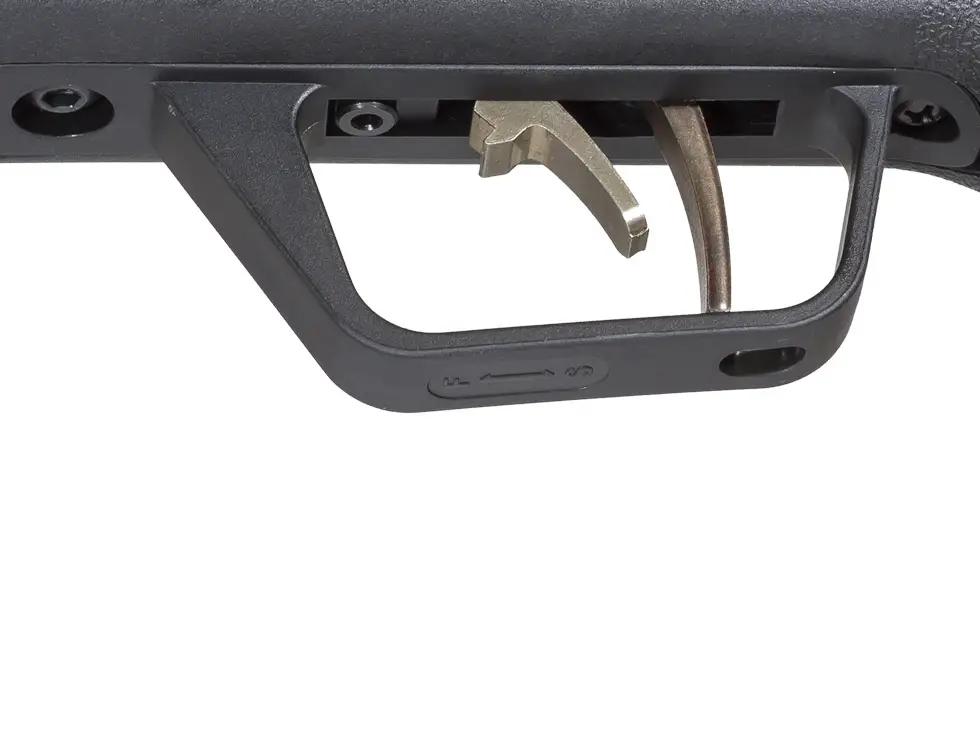
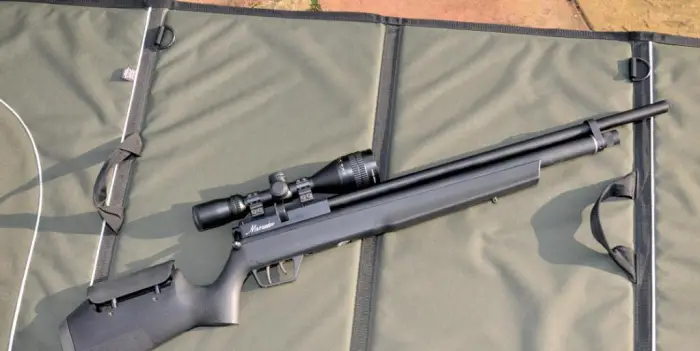
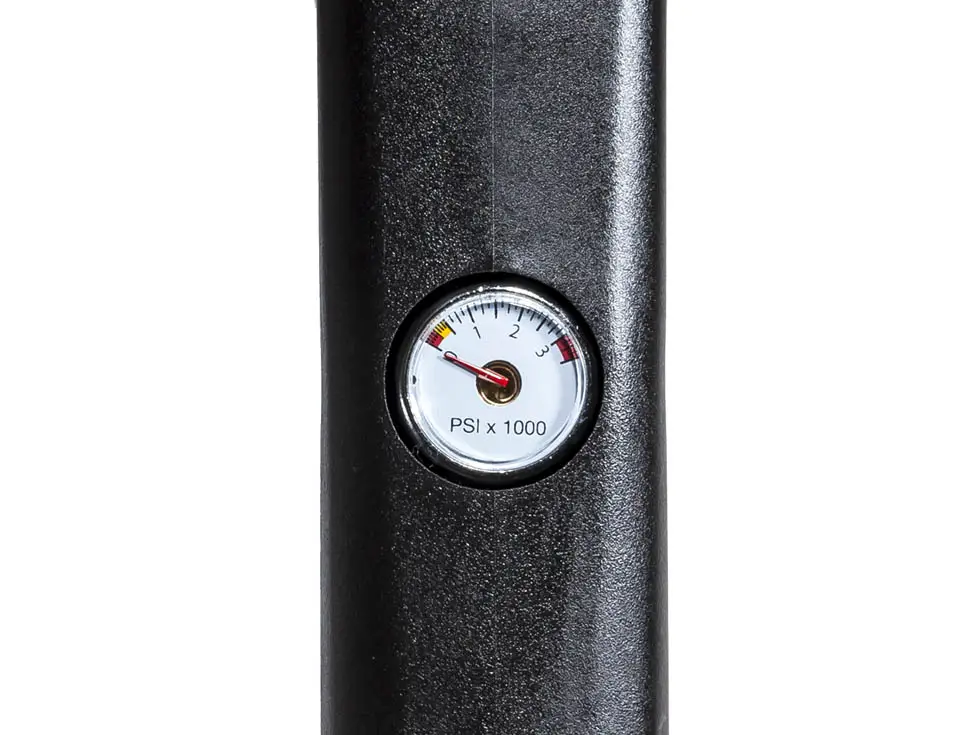


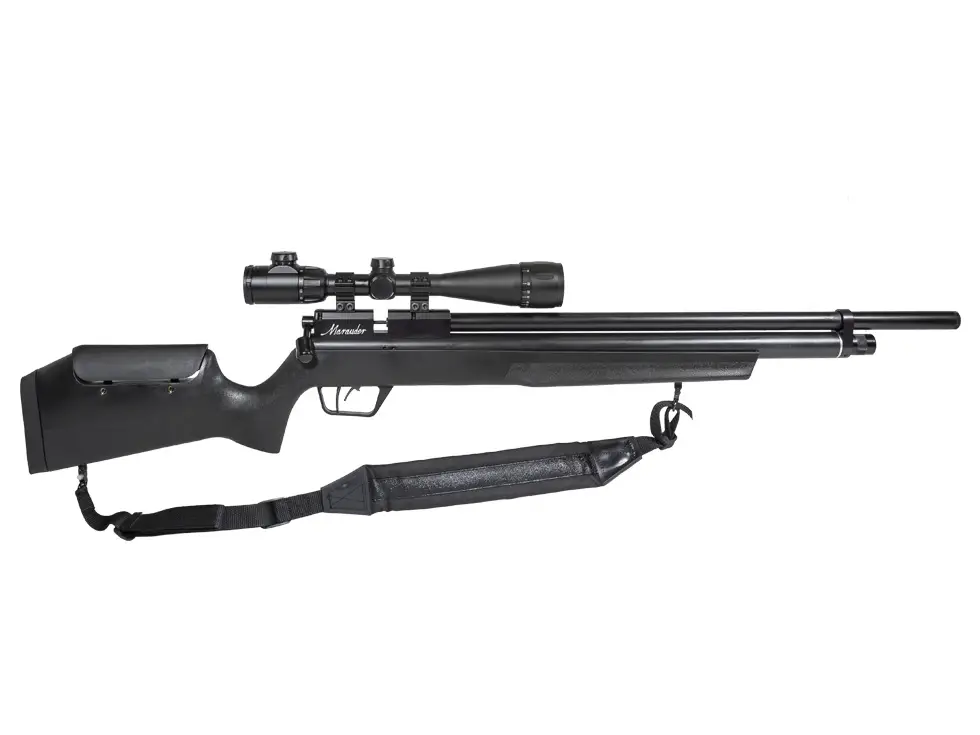


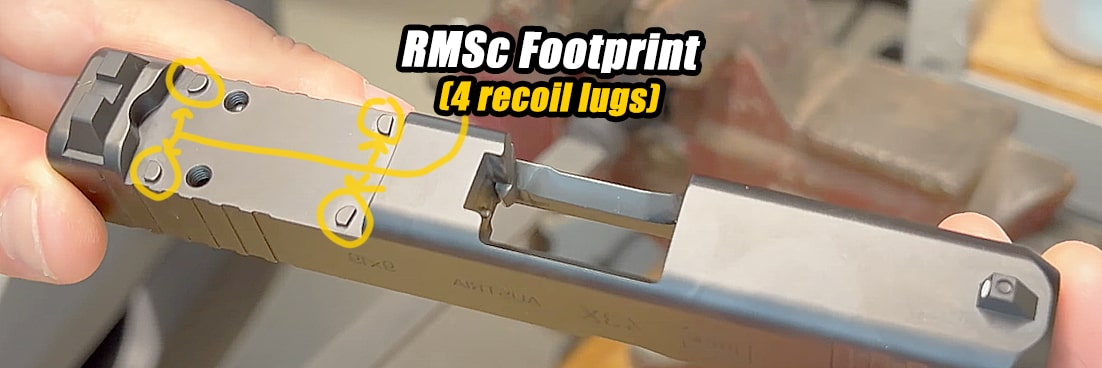
 Buy the 407K At The Best Price
 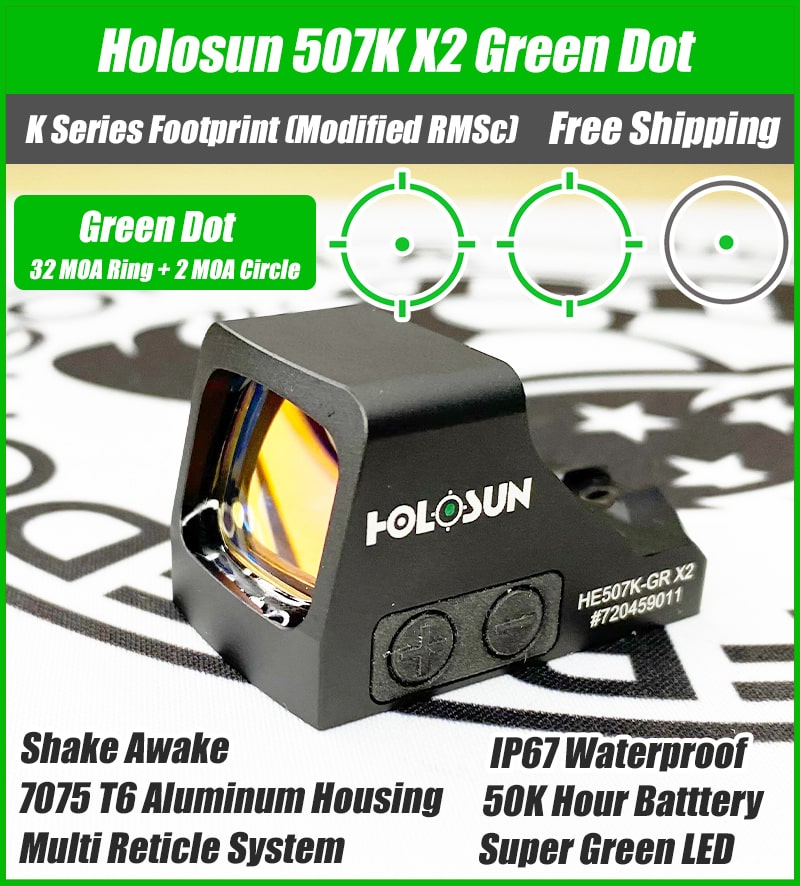 Buy the 507K At The Best Price
 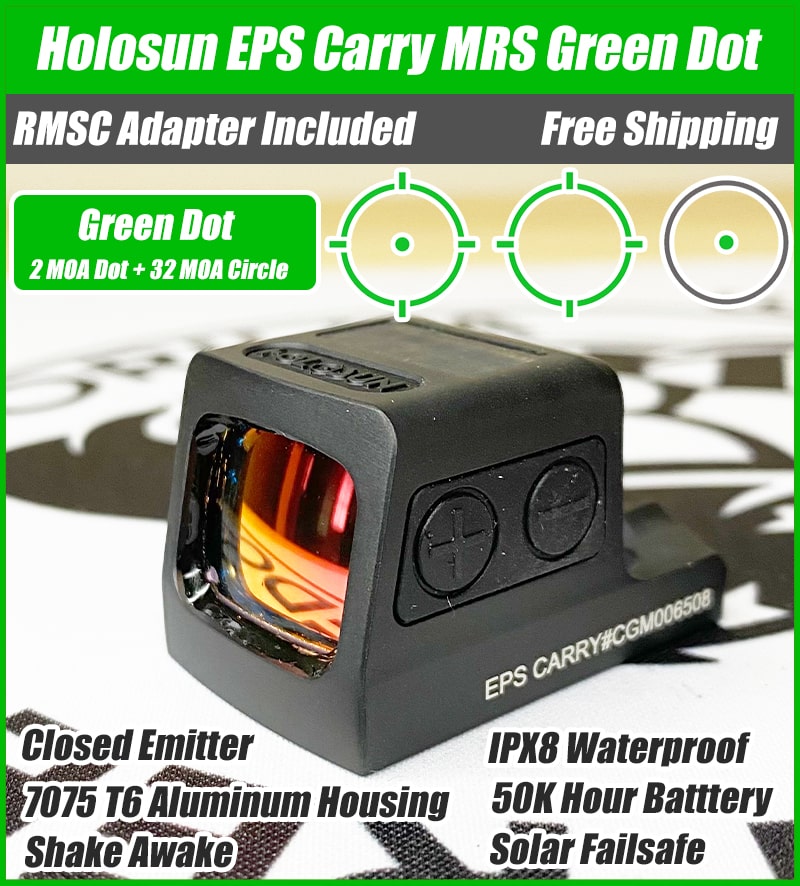 Buy the EPS Carry At The Best Price
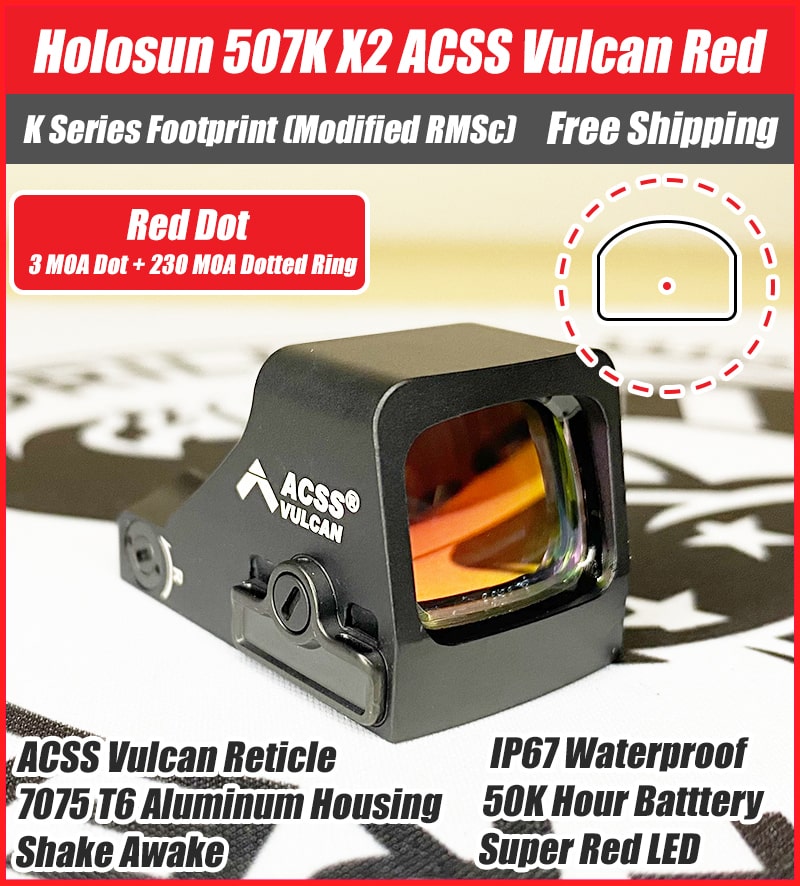
 You may be wondering if you should get a red or green dot reticle. We get this question a lot so I am going to list a few bullet points for you to consider.