“Enhance Your Precision: Explore the Best Break Barrel Air Rifle Scopes for Unparalleled Accuracy and Target Acquisition.”
Break barrel air rifle scope
A break barrel air rifle scope is a crucial accessory for any shooter using a break barrel air rifle. Designed specifically to enhance accuracy and precision, this type of scope is mounted on top of the rifle’s barrel and provides magnification for better target acquisition. With its advanced optics and adjustable features, a break barrel air rifle scope allows shooters to make precise shots over longer distances.
One of the key advantages of a break barrel air rifle scope is its ease of use. The break barrel design allows for quick and simple reloading, making it an ideal choice for both beginners and experienced shooters. The scope ensures that every shot counts by providing clear visibility of the target, even in low light conditions. Whether you are hunting or participating in target shooting competitions, a break barrel air rifle scope greatly enhances your chances of hitting your mark with accuracy and consistency.
In conclusion, a break barrel air rifle scope is a valuable accessory for enhancing accuracy and precision in shooting. It offers improved visibility, adjustable magnification, and reliable performance. Whether for hunting or target practice, investing in a compatible and high-quality scope can greatly enhance the overall shooting experience with a break barrel air rifle.
During my 20 years in the outdoor industry, I’ve witnessed a pile of incredible arrow builds. Most of those builds have come from arrow-mastermind Easton. From arrows designed for speed to carbon shafts wrapped in a penetration-boosting metal jacket, the hits keep on coming.
A tried-and-true staple in the lineup and a quiver-filler for throngs of archers, the Axis ranks as one of the finest shafts ever created. Why? Side of filling thousands of freezers and making massive taxidermy bills, this arrow is a do-all. The 5MM build is micro, which means the shaft can buck the wind and find its mark even at extended distances. Plus, the micro-profile focuses kinetic energy into the frontal area, which creates less friction and ensures maximum penetration. Then there’s the fact the arrow is offered in seven spine sizes, meaning most any archer can pair the Axis with their stick-and-string setup. Bottom line: The Axis is a durable, accurate and dependable big-game wrecker that countless bowhunters put their trust in. It just doesn’t get any better.
Or does it?
Enter the Axis 4MM Long Range. I could hear the excitement in Easton’s Gary Conrnum’s voice as he gave me the 411 on this new-for-2021 arrow. Cornum is an arrow guru, and when he gets pumped about a product, people should take note.
“It’s our best Axis build to date,” he said. “Now Axis lovers can get a super micro-diameter shaft with a front-of-center boosting aluminum point outsert that has standard 8-32 threads. This arrow is as accurate as they come and delivers incredible downrange penetration.”
True to Form
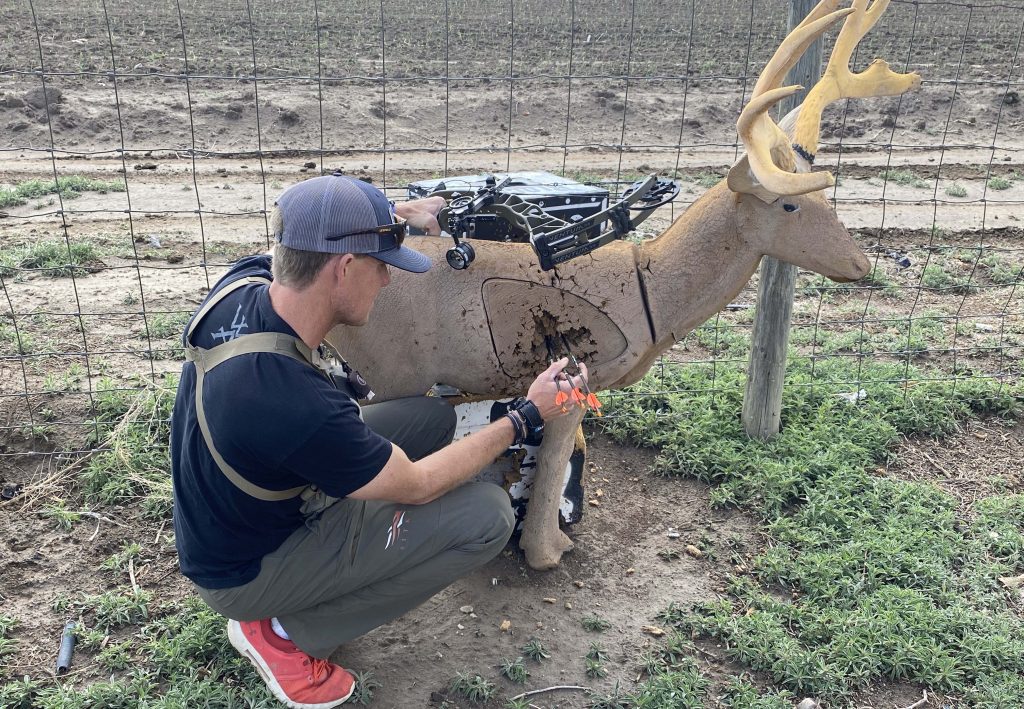
The literature I’d read and my conversation with Cornum had my mind buzzing, and when my Axis 4MM Long Range bare shafts arrived, I couldn’t wait to put them through the paces. The 100-percent carbon cut with ease, and the aluminum point half-out outserts glued in without hassle. The outsert measures just a tick over an inch, so if you’re cutting your arrows, be sure and compensate for this. If you shoot a 29-inch arrow, you’ll want to cut your 4MM shafts at 28-inches if you plan to use the included aluminum half-out outsert.
This was my first Axis build that didn’t require the use of Easton’s chamfering stone, HIT Epoxy, and HIT Insert Tool. Instead, I used 91 Isopropyl Alcohol to clean the inside of the shafts, applied insert glue to my aluminum outserts, and twisted them into the shaft to distribute the glue evenly to the inner shaft wall. The process is super simple and saves a lot of time. The fletching process was a breeze as well. I opted not to use wraps, and my AAE Hybrid 23 vanes grabbed the carbon wonderfully.
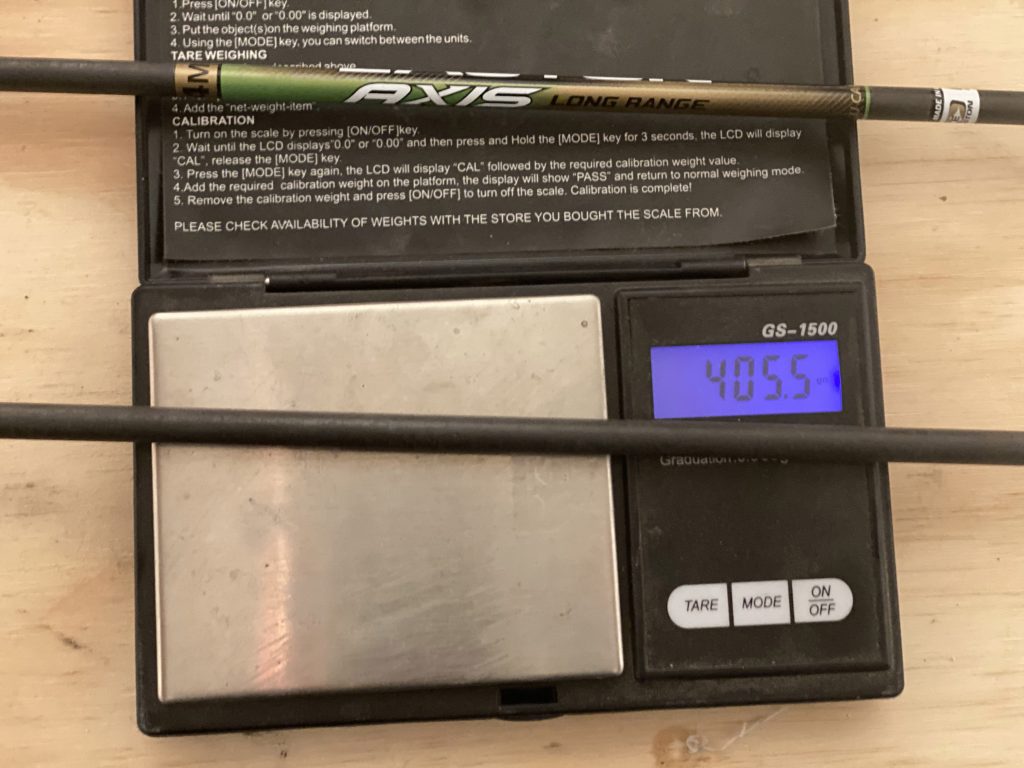
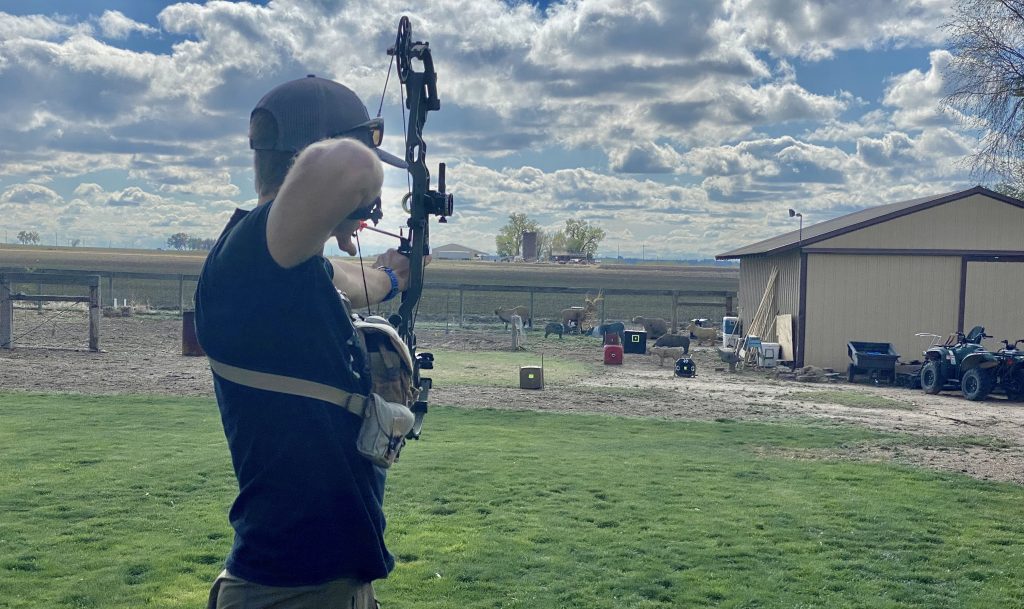
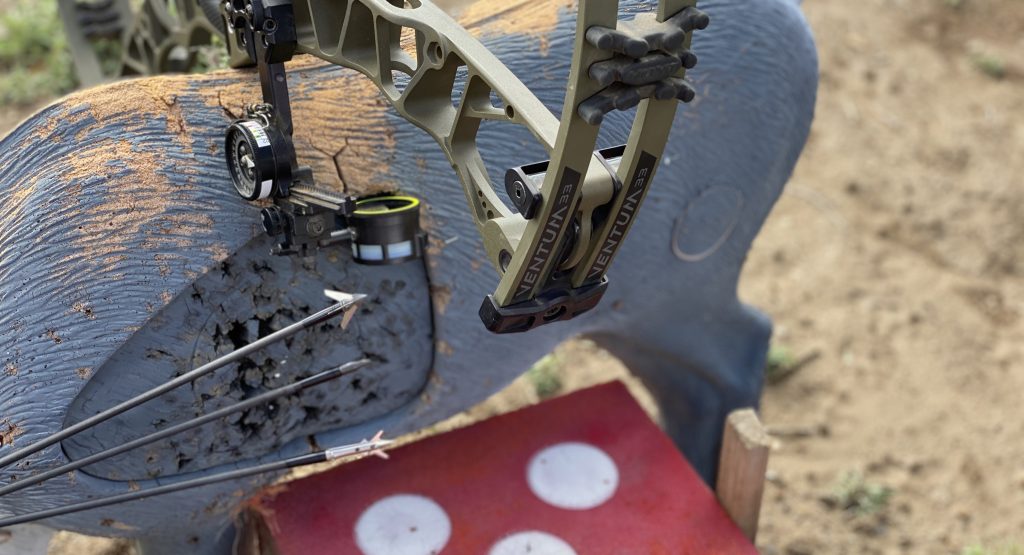
With my 4MM Long Range soldiers ready to fly, I first conducted a speed test. Tipping the scale at 405.5 grains, my 28 ¾-inch 4MM Axis Long Range arrows powered by Hoyt’s Ventum 33 set at 68 pounds of draw weight and a 29-inch draw length propelled shafts at an average speed of 302 fps. Plenty fast, and my kinetic energy rating was an impressive 82-foot pounds. The ACU-Carbon build blended with the aluminum half-out outsert system ups velocity and helps the arrow deliver more energy downrange. Plus, each shaft passed the spin test and popped perfect bullet holes through paper after a bit of rest adjusting. More impressive was the accuracy factor. From distances between 20 and 100 yards, my four-fletched arrows found the mark.
For a week, I shot the Axis 4MM Long Range in crosswinds, tailwinds and headwinds, and there’s no question the shaft’s ultra-micro diameter build resists side-to-side wind drift. I also shot fixed and mechanical broadheads out to 100 yards. My fixed-blade heads hit a tad right of the mark starting at 50 yards, which is normal, but even though they were a tad right, each fixed-blade shaft grouped. The SEVR 2.0 mechanical-tipped shafts hit right with my field points out to 100 yards. The 4MM MicroLite Nocks are tough; attach brilliantly to the string and leave it cleanly. After the tuning process, I detected zero nock travel. Warning! Shooting groups with these shafts, especially with fixed-blade broadheads, is not advised. The Axis 4MM Long Range is without a doubt the most accurate arrow I’ve ever fired, and unless you have unlimited funds and lots of time to build arrows, I would suggest shooting individual spots.
Satisfied with the accuracy of the arrow, I moved on to some penetration tests. I received the arrows late in the spring, and with turkey tags punched and no bear hunts on the horizon, I used a new Block foam target to conduct a few penetration tests. With a calculated F.O.C. of precisely 12.6 percent, my Axis 4MM Long Range arrows drove deeper into foam when shot head-to-head against my standard 5MM Axis arrows. It’s important to note that bowhunters should shoot for an F.O.C. between 11 and 18 percent. I have no doubt the optimized F.O.C. build blended with the arrows speed and micro-diameter construction will lead to big-game pass-throughs, even at extended distances.
Those who favor the HIT system blended with Deep Six technology can separately purchase 4MM Deep Six Steel HIT Inserts (20 grains). If you’re looking to up arrow weight and increase your F.O.C. but want to stay with the outsert system, 4MM Titanium Half-Out Inserts (55 grains) can also be had for a few more greenbacks. The Axis 4MM Long Range is available in spine sizes of 250, 300, 340 and 400, and straightness ratings of +/- .003” and +/- .001” can be purchased. The Axis 4MM Long Range can be purchased by the dozen (bare) or half-dozen (fletched).
If you’re looking for a do-all hunting arrow that will perform at extended distances on medium-sized and large big-game animals like elk, moose and grizzly, the Easton Axis 4MM should line your quiver come fall.
B3 Air Rifles: Unleash Your Precision and Power in Every Shot! Experience the ultimate shooting performance with B3 Air Rifles, crafted with cutting-edge technology and exceptional accuracy. Whether you’re targeting small game or honing your marksmanship skills, these rifles guarantee unparalleled precision and power. Elevate your shooting experience with B3 Air Rifles today!
b3 air rifles
The B3 air rifles are a popular choice among airgun enthusiasts for their accuracy and power. These rifles are known for their sturdy construction and reliable performance, making them suitable for both beginners and experienced shooters. With a maximum velocity of up to 800 feet per second, the B3 air rifles offer excellent range and precision.
One of the key features of the B3 air rifles is their affordability. They provide great value for money without compromising on quality. These rifles are available in various models and calibers to cater to different shooting preferences. The ergonomic design ensures comfortable handling, allowing users to shoot with ease for extended periods.
Additionally, the B3 air rifles come with adjustable sights, enabling shooters to customize their aim for improved accuracy. Whether used for target practice or small game hunting, these rifles deliver consistent results. Their simplicity and ease of use make them an ideal choice for those new to airgun shooting.
In conclusion, b3 air rifles offer a powerful and accurate option for shooting enthusiasts. With their robust construction and affordable price point, they provide an accessible entry into the world of air rifles. Whether for target practice or small game hunting, b3 air rifles deliver consistent performance and reliability.
Using the right fishing rig is essential for catching trout successfully, and knowing which rig to use for what conditions can make the difference between catching your limit or getting skunked.
There’s a perfect trout rig for almost every situation, and that’s why it’s so important to master rigging for trout, as this will allow you to choose exactly the right fishing rig for your purposes.
In this article I’ll cover the 9 best trout rigs, and will discuss what each of them is ideally suited for.
In order to rig for trout, you need to choose one of three basic types of rigs:
Rigs that present your bait suspended underneath a bobber or float
Rigs that present your bait close to the bottom with a weight
Rigs that enable you to cast and actively retrieve an artificial lure
While these three types of fishing rigs cover almost all trout fishing applications, they come in a variety of different shapes and forms, each of which is best suited for slightly different trout fishing setups.
So if you’re a beginner, chances are that you’re confused about all the different options of rigging for trout.
However, the great thing is that you can get started with just two or three of the most versatile trout fishing rigs, and then add more specialized rigs once you know what kind or rig works best for your pond, lake or stream.
Now let’s look at each of the most important trout rigs in more detail, to help you choose the best rig for your purposes.
And in case you’re also looking for the best bait to use with your trout fishing rigs, check out our article on what is the best bait for trout?
Trout fishing rigs with bobbers
Bobber rigs are among the most effective trout fishing set ups, and work especially well when fishing in shallow ponds and streams, as well as in shallow bays of bigger lakes, or basically in any situation where trout are active close to the water surface.
Now let’s look at the two main types of bobber rigging for trout.
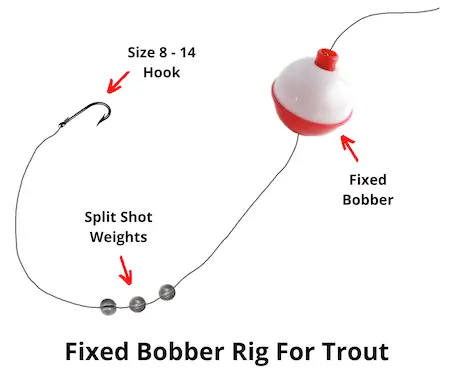
Trout rig with fixed bobber
This is one of the simplest trout rigs, and consists of a fixed bobber attached to the line, as well as a hook and sinker to weigh down the baited hook in the water.
The depth at which the bait is presented depends on the distance between the hook and the bobber.
How to tie it: Attach the bobber to the line, and then tie the end of the line to the hook. The most common type of bobber used for this fishing rig is a round red and white bobber, but you may want to choose a pencil shaped bobber instead, which offers less resistance when a trout takes the bait.
If you’re not sure how to rig a fishing line for trout, take a look at our article on what fishing line should you use for trout?
When to use it: This is a great fishing rig to use in shallow ponds and streams, as well as any situations where trout are feeding close to the surface. It’s very easy to set up and a lot of fun to fish with, which makes it an excellent choice for beginners who want to try trout fishing in a stocked pond.
But keep in mind that the maximum depth you can fish this rig corresponds to the length of your rod, since you can’t cast the fishing rig effectively if you set the bobber higher than that.
How to use it: The best way to use this fishing rig is to cast it out with a baited hook and wait for a trout to bite, which is indicated by the bobber being pulled down underwater.
When you see this, set the hook immediately, so the trout doesn’t have a chance to spit out the hook when it feels resistance on the line. This is the best setup for trout fishing in streams and rivers, where you can use it to drift your bait into the best locations that hold trout.
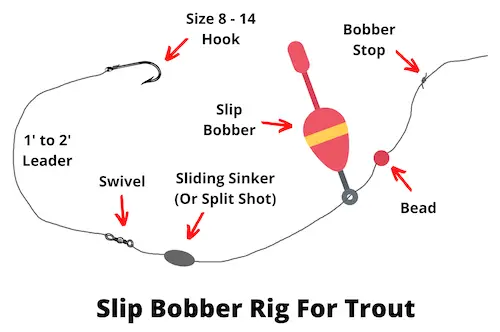
Slip bobber rig
This is another commonly used trout rig, and should be part of every trout angler’s arsenal of fishing tools.
Using a slip bobber rig (aka sliding float rig) makes the fishing rig more compact and easier to cast with than a fixed bobber rig.
How to tie it: Tie a bobber stop on to your main line, and then thread the line through your bobber and tie the line to the hook. The best hook size depends on your bait, but generally lies somewhere between size 8 and 14.
If you’re unsure about choosing the right hook size for different trout line setups, take a look at our article on the best size hook for trout.
Attach a split shot or two to the line between the bobber and the hook. This stops the bobber from sliding down onto the hook and it also weighs down your bait, helping to present it at the right depth to the trout .
Keep in mind that some baits (like powerbait) float in the water, and you may need to add extra split shots to make the baited hook sink down to the desired depth.
When to use it: The slip bobber rig is the best choice when trout are feeding in midwater, and if you can’t reach them with either a fixed bobber rig or with a bottom fishing rig.
The great thing is that you can fish practically any depth with this fishing rig, as you just need to move the bobber stop up the line to whatever depth you want to set the bobber.
How to use it: Estimate the depth of the water you’ll be fishing in, and set the bobber stop to that depth. Then bait your hook and cast out your fishing rig to the desired spot and wait for a fish to grab the bait.
Bottom fishing rigs
Bottom fishing rigs are often the best choice when trout are found in deeper water, as they tend to feed close to the bottom most of the time. There are several options available to you in this rig category, so now let’s look at the most important ones.
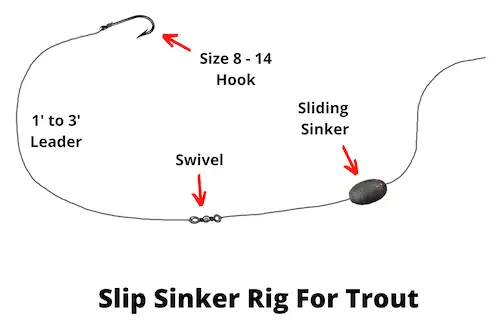
Slip sinker rig
This is the simplest bottom fishing rig around, and is the one most often taught to novice trout anglers. This rig has been in use for more than a century, and continues to perform well in many situations where trout hold close to the bottom.
How to tie it: Thread a 1/8 or 1/4 oz sliding sinker (either a bullet or egg sinker) onto your main line, and then tie the line to a barrel swivel. Attach a leader to the other end of the swivel, and tie your hook to the leader. Choose the type and size of hook depending on the type of bait you want to use.
When to use it: This rig is most commonly used in lakes where trout hold in water deeper than 5 or 10 feet. It’s a great rig to use from shore, since you can cast it relatively far, and cover a lot of water with it.
It’s important to use this fishing rig with floating bait, since you don’t want your baited hook lying on the bottom where trout won’t notice it. You can use it with either powerbait (which is designed to float), or worms injected with air to make them float.
How to use it: This is the most common bait rig used for trout fishing setups, and is usually fished passively. Most anglers cast it out to a promising fishing spot and then wait for a bite. If you do this, make sure to check your rig regularly to see if the bait is still on the hook, and also test different fishing spots.
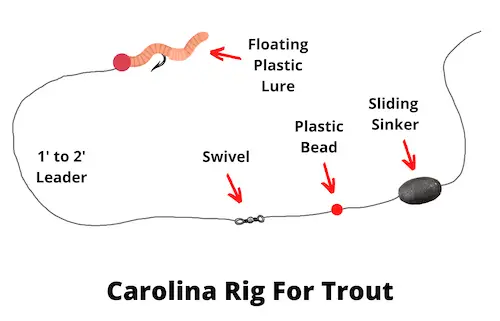
Carolina rig
This rig is very similar to the slip sinker rig, but unlike the slip sinker setup it is often fished actively with artificial lures instead of passively with bait, which is why we list the two options separately.
How to tie it: Start by threading your main line through a 1/8 to 1/4 oz sliding sinker. Next, thread the line through a plastic bead, and then tie it to a swivel or snap swivel. The bead stops the weight from banging into the swivel during retrieval, which protects the knot on the swivel from being damaged while fishing, and this is more important if you want to fish it actively.
When to use it: You can use this option anywhere where trout are feeding close to the bottom. It’s a great option to use when fishing in lakes, reservoirs and ponds, but you can also use it in rivers.
How to use it: While you can also use this fishing rig with a baited hook and fish it passively until a trout comes by and bites, the strength of the Carolina trout fishing rig lies in fishing it actively with a floating lure.
You can use a floating jig head with plastic lures such as trout magnets or power worms. After casting out, let your rig sink to the bottom, and then slowly retrieve it with a jigging movement.
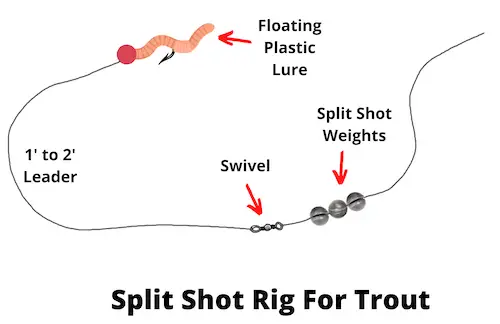
Split shot rig
This is basically a finesse version of the Carolina rig, and instead of a sliding sinker it uses one or more split shots attached to the line. Since trout can be finicky at times (especially when fishing in heavily fished waters), it’s always great to have some finesse techniques up your sleeve.
How to tie it: Tie your main line to a swivel or snap swivel, and then add one or two split shots to the line right above the swivel. Next, tie a 1 to 2 foot long fluorocarbon leader to the swivel, and then tie your hook to the other end of the leader.
Next, thread a soft plastic lure onto the hook, and your trout fishing line setup is good to go.
In most cases you’ll want to use a floating lure on this rig, which will result in presenting your lure right in the strike zone every time the split shots sink to the bottom.
When to use it: This rig is a great option if you notice that the trout are finicky. This is most often the case in heavily fished waters, and especially in clear water it can be advantageous to use a finesse rig that’s harder for the fish to spot. It’s also a great trout fishing set up for small creeks.
How to use it: Cast the rig out and let it sink to the bottom. Then slowly retrieve it with jigging movements of your rod tip. The main disadvantage of the split shot rig is that it can’t be cast as far as the Carolina rig, since it comes with less weight on the line. Because of this, it’s better to use it when fishing in smaller lakes, rivers and streams.
Drop shot rig
This is another great trout fishing rig setup for bottom fishing, and one of it’s key advantages is that it allows you to place your lure in the strike zone and keep it there for a long time. Similar to the two previous rigs, it’s most often used with soft plastic lures.
How to tie it: Start by tying your main line to a 4 or 5 foot fluorocarbon leader with a double uni knot, and then tie the end of your trout leader to a 1/8 to 1/4 drop shot weight.
Next, take a bait hook and place it facing upwards, and form a loop with the leader line about 1 foot above the drop shot weight.
Pass the loop through the eye of the hook from below, and then tie an overhand knot with the loop. Finally, pass the hook through the loop, wet the line, pull tight, and you’re ready to start fishing.
When to use it: While the drop shot rig was originally developed for vertical fishing in deep water from a boat, most bass anglers can tell you that this rig works equally well for fishing from shore, and can even be fished in very shallow water. It’s a great trout fishing setup for beginners fishing in lakes and rivers.
How to use it: Cast the rig out and slowly retrieve it by hopping the weight along the bottom, while jigging the lure up and down. If you figure out where the strike zone is, you can keep the drop shot fishing rig there, and simply wiggle the lure in place without moving the weight. That way you can keep your lure right in front of the fish for a long time, without having to retrieve it and cast again.
Lure rigs
While all of the fishing rigs discussed above can be used as trout fishing setups with either natural bait or artificial lures, some options for rigging for trout are only intended to be used with lures. Let’s take a look at the most important rigs of this type that you should know.
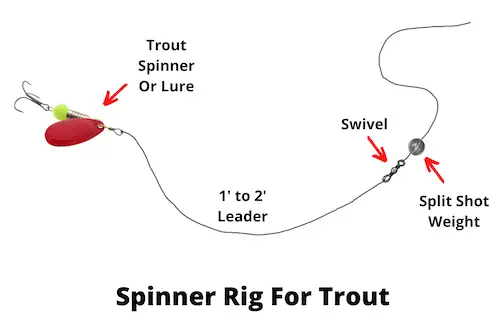
Spinner rig
The spinner rig is the most commonly used lure fishing rigs for trout. It is most often used with spinners (such as a rooster tail or panther martin), but it can also be used when fishing with any other artificial lure designed for casting and retrieving.
How to tie it: Tie your main line to a swivel or snap swivel, and add one or two split shot weights just above the swivel. Next, tie a 2 to 4 foot fluorocarbon leader to the other eye of the swivel, and then tie your lure to the other end of the leader.
Depending on the size and weight of your lure, adjust the number of split shots to achieve the right depth during retrieval. The swivel prevents line twist of your main line, but if you’re using a lure that doesn’t generate twist, you can also tie the main line directly to the leader.
When to use it: This is one of the most versatile trout set ups, and can be used in almost any setting, from small streams to deep lakes. In most cases you should try to fish this rig in the middle of the water column, but can also go deeper than that if the trout are holding close to the bottom.
How to use it: Simply cast out the fishing rig and start retrieving. Depending on how deep you want to fish it, you can adjust your retrieve speed, and you can also experiment with letting the rig sink to the bottom before you start reeling it in. However, if you’re trout fishing over weed beds, make sure to keep your lure above the weeds.
If you’re interested in fishing with trout spinners, check out our complete guide to trout fishing with spinners.
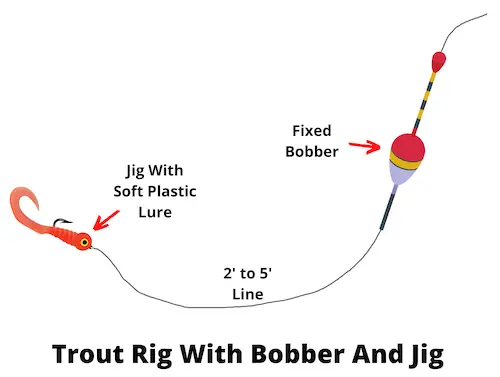
Trout fishing rig setup with bobber and jig
This is a great rainbow trout rig to use if you’re fishing over weeds, as you can fish it slowly without getting the jig snagged in the weeds.
How to tie it: Depending on the depth of the water, you can use either a fixed bobber or a slip bobber.
So start by setting up one of the two bobber rigs (as described above), and instead of tying a bait hook to the end of the line, tie a 1/16 or 1/8 oz jig head to the line. Next, you can bait the jig head with any of a wide variety of plastic lures, and you’re ready to start fishing.
When to use it: This is a great trout fishing setup for beginners when fishing over weed beds, and when want to keep your lure just above the weeds. You can achieve this by setting exactly the right depth with your bobber.
This trout rig setup is also great for drift fishing in streams and rivers, and again you should adjust the setting of your bobber to present the lure just above the bottom.
How to use it: If you’re trout fishing in a lake, cast out the fishing rig and let the jig sink as far as it can (at which point the bobber stands up straight). Then lift your rod tip to retrieve the fishing rig about 4 to 5 feet, and then pause to let the jig sink down again.
What this trout fishing setup achieves is that your jig will be slowly pulled up and then allowed to sink again. In the case of a plastic worm, this results in the worm wiggling through the water, which is highly attractive to most trout.
See also: How to rig when trolling for trout
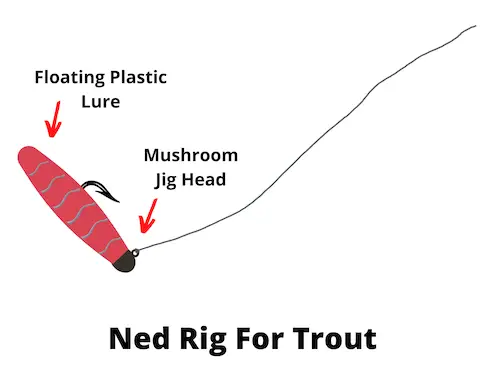
Ned rig
The ned rig is most familiar to bass anglers, but few people know that it also works really well for catching trout. The key feature of the ned rig that makes it so effective when fishing for trout is that it is usually fished with a floating plastic tail, which is ideal for catching trout.
How to tie it: This is the simplest fishing rig to tie in this collection. If you’re using fluorocarbon as your main line, you can tie that directly to the mushroom jig head of the ned rig and you’re ready to start fishing. If you’re using braided line as your main line, it’s best to use a 2 to 4 foot fluorocarbon leader, since that’s much less visible in the water.
When to use it: You can use this rig whenever trout are feeding close to the bottom, and it works equally well in lakes, rivers, and streams. The only situation when you shouldn’t use this rig is if you’re fishing in a lake with a lot of vegetation on the bottom, which is likely to get your ned rig snagged.
How to use it: Cast it out and let it sink to the bottom, then retrieve it for 3 or 4 feet with a jigging motion, and let it settle on the the bottom again. Repeat this until you get a bite.
What are the best trout rigs?
The 3 best trout rigs are:
Slip bobber rig
Slip sinker rig
Spinner rig
Between them, these three setups cover all the three main types of rigging for trout, and if you can set each of them up and fish them effectively, you’re off to a great start.
The slip sinker rig is perfect for presenting a bait close to the bottom, which is the best depth to target trout in most situations.
The slip bobber rig, on the other hand, can be used to present a bait suspended underneath a bobber, which is great when fishing for trout that are active higher in the water column.
And the spinner rig is a great basic setup for active trout fishing with lures, which is an ideal way to cover a lot of water in search of hungry trout.
If you’re currently looking for a new trout rod, check out our article on what is the best rod for trout fishing?
What are the best trout bait rigs?
The 3 best trout bait rigs are:
Slip sinker rig
Slip bobber rig
Fixed bobber rig
Each of these fishing rigs is well suited for baiting your hook with natural baits like worms, maggots, minnows, corn, salmon eggs, or scented baits like powerbait.
In addition, all of them can be used for fishing passively, by casting out your fishing rig and then waiting for a trout to pass by and take the bait.
Trout worm rigs
The best rigging for trout to use with worms is either the slip sinker rig, or the slip bobber rig. The former rig is the ideal choice if you know that trout are feeding close to the bottom, and the latter rig is better if trout are feeding higher in the water column.
When using a slip sinker with a worm as bait, it’s important to make sure that your baited hook floats in the water, as trout will not eat it if it’s lying directly on the bottom. Traditionally, this has been done by injecting air into the worm with a worm syringe (which you can get in most tackle shops).
More recently, many anglers are fishing with floating jig heads baited with worms to make their bait presentation float in the water, and another great trick is to put a small marshmallow on the tip of your hook, which also makes it buoyant.
Finally, no matter which trout worm rig you use, it’s usually best not to use a whole nightcrawler on your hook, as this is too big to fit into the mouth of a trout. Instead, cut off a 1 or 2 inch piece of the worm, and thread it onto the hook.
The best hook type to use for this rig is a baitkeeper hook, which prevents the worm from sliding down the shank of the hook.
Minnow rigs
The best trout rig to use with minnows is either the slip bobber rig, or the fixed bobber rig. Your hook size should be between size 8 and 12 (depending on the size of the minnow). The best way to hook a minnow for trout is through the upper lip.
Small fish form a large part of the diet of many trout species, which is why they can be such a good bait.
Bobber rigs are great for fishing with live minnows, since you can easily spot a trout bite when the bobber goes down, and this allows you to delay your hook set long enough to give the trout a little extra time to get the minnow fully inside its mouth.
Which one of the two bobber fishing rigs you choose depends on the depth of the water you want to fish in, and on the depth at which trout are active.
When fishing with live minnows as trout bait, it’s important to weigh them down with split shots, so they stay at the right depth.
Salmon egg rig
The best trout rig setup to use with salmon eggs is one of the following:
Slip bobber rig
Fixed bobber rig
Drop shot rig
Your hook size should be between size 8 and 14, and if you use a larger hook, you can thread several salmon eggs onto your trout hook. No matter which fishing rig you choose, you need to cast very gently in order to avoid ripping the eggs off the hook during the casting process.
If you’re trout fishing in a lake or pond, the best choice is a bobber rig, as that allows you to present the salmon eggs suspended in the water. But if you’re trout fishing in a stream or river, you can use a bobber rig to drift the salmon eggs with the current.
Alternatively, you can also use a split shot rig to drift the salmon eggs right on top of the bottom of the stream. The latter approach is better for getting it right in front of the trout, but it’s harder to detect bites with this style of fishing.
Egg rigs also work very well for steelhead fishing, and it that’s something you’re into, check out our article on how do you rig for steelhead bank fishing?
Final remarks
This concludes our article on rigging for trout, and hopefully we’ve helped you find exactly the right rig for your fishing technique.
Different trout rigs are ideally suited for different trout fishing tactics – bait fishing, lure fishing, trout fishing from shore, trout fishing from a boat, as well as fishing in diverse bodies of water, ranging from small streams to big lakes.
Now that you understand the basics of what each of these fishing rigs is designed for, this should help you to choose the best trout setups to help you to catch more fish in your local trout fishery.
Humans are typically afraid of bears and for good reason. They are big, loud, powerful, and downright intimidating. Figurately, our fear of bears is not typically warranted because bears pose little threat to us overall. Black bears, which are the most common bears humans tend to come across, are responsible for an average of one human death each year in the United States. Being around bears in the wild is less risky than driving in a vehicle.
The truth is that a bear would rather run away from a human than engage with them. So, if they try to avoid humans, do they do the same with cats? The short answer is yes, bears will almost always ignore or distance themselves from a cat that they might come across. But there is more to the story, so continue reading to find out!
There are multiple reasons that bears are not big threats to cats. First and foremost, cats do not usually reside in areas where bears are found unless they live near the woods or on a rural farm. Secondly, large wild cats have been known to attack bears and win, so bears may be naturally inclined to avoid felines, no matter their size. Cats are typically too fast for bears to catch up with, so they probably could not attack a cat even if they come across one. Chances are that they would run away from a cat that tried to approach them.
Image Credit: Karin Jaehne, Shutterstock
Why Would a Bear Attack a Cat?
The biggest reason that a bear might feel the need to attack a cat is if the cat does something that is perceived as threatening, like getting between a mother and her cubs. Trying to take control over a source of food could be another reason for a bear to attack any living creature, even a cat. The threat of danger or control over food would have to seem imminent to get a reaction out of a bear. However, the chance of your cat doing anything to enrage a bear is slim.
Would a Bear Eat a Cat That They Attack?
Bears are omnivores but they eat little meat. Most of their protein comes in the form of fish and small land mammals, like rabbits. So, they may or may not eat a cat that they attack. To them, it would simply be a source of food if they are hungry. If they have recently eaten, they may leave the cat and move on. It all depends on the specific circumstances.
What You Can Do to Enhance Your Cat’s Safety
If you are worried about your cat coming across a bear that could harm them while spending time outside, there are a few things that you can do to help protect them. Start by attaching a large bell on your cat’s collar so they will make constant noise whenever they are moving around outside. This will help ensure that a bear does not get caught off guard and react more intensely than is necessary if your cat goes near them. The noise should also help keep bears from getting too close to your cat.
If bears are commonly seen around your property, it is a good idea to keep an eye on your cat whenever they spend time outdoors. If they tend to wander off on their own, consider using a leash to ensure that you can keep tabs on them. Keep bear spray on hand just in case you come across a bear during your outings, as it will help protect you both and provide you with extra peace of mind.
Summary
Fortunately, we do not have to worry about bears attacking and eating our cats. The chance is extremely low, even when living in “bear country.” However, it is always good to know about the risks of bear attacks on cats and how to minimize those risks. Do you live near bears, or have you ever encountered one close up? If so, we would love for you to tell us about your experiences by leaving a comment.
Related Reads:
Do Bears Attack and Eat Rabbits?
14 Bear Attack Statistics & Facts to Know: How Many Attacks Happen Every Year?
12 Canada Bear Attack Statistics & Facts to Know: How Many Attacks Happen Every Year?
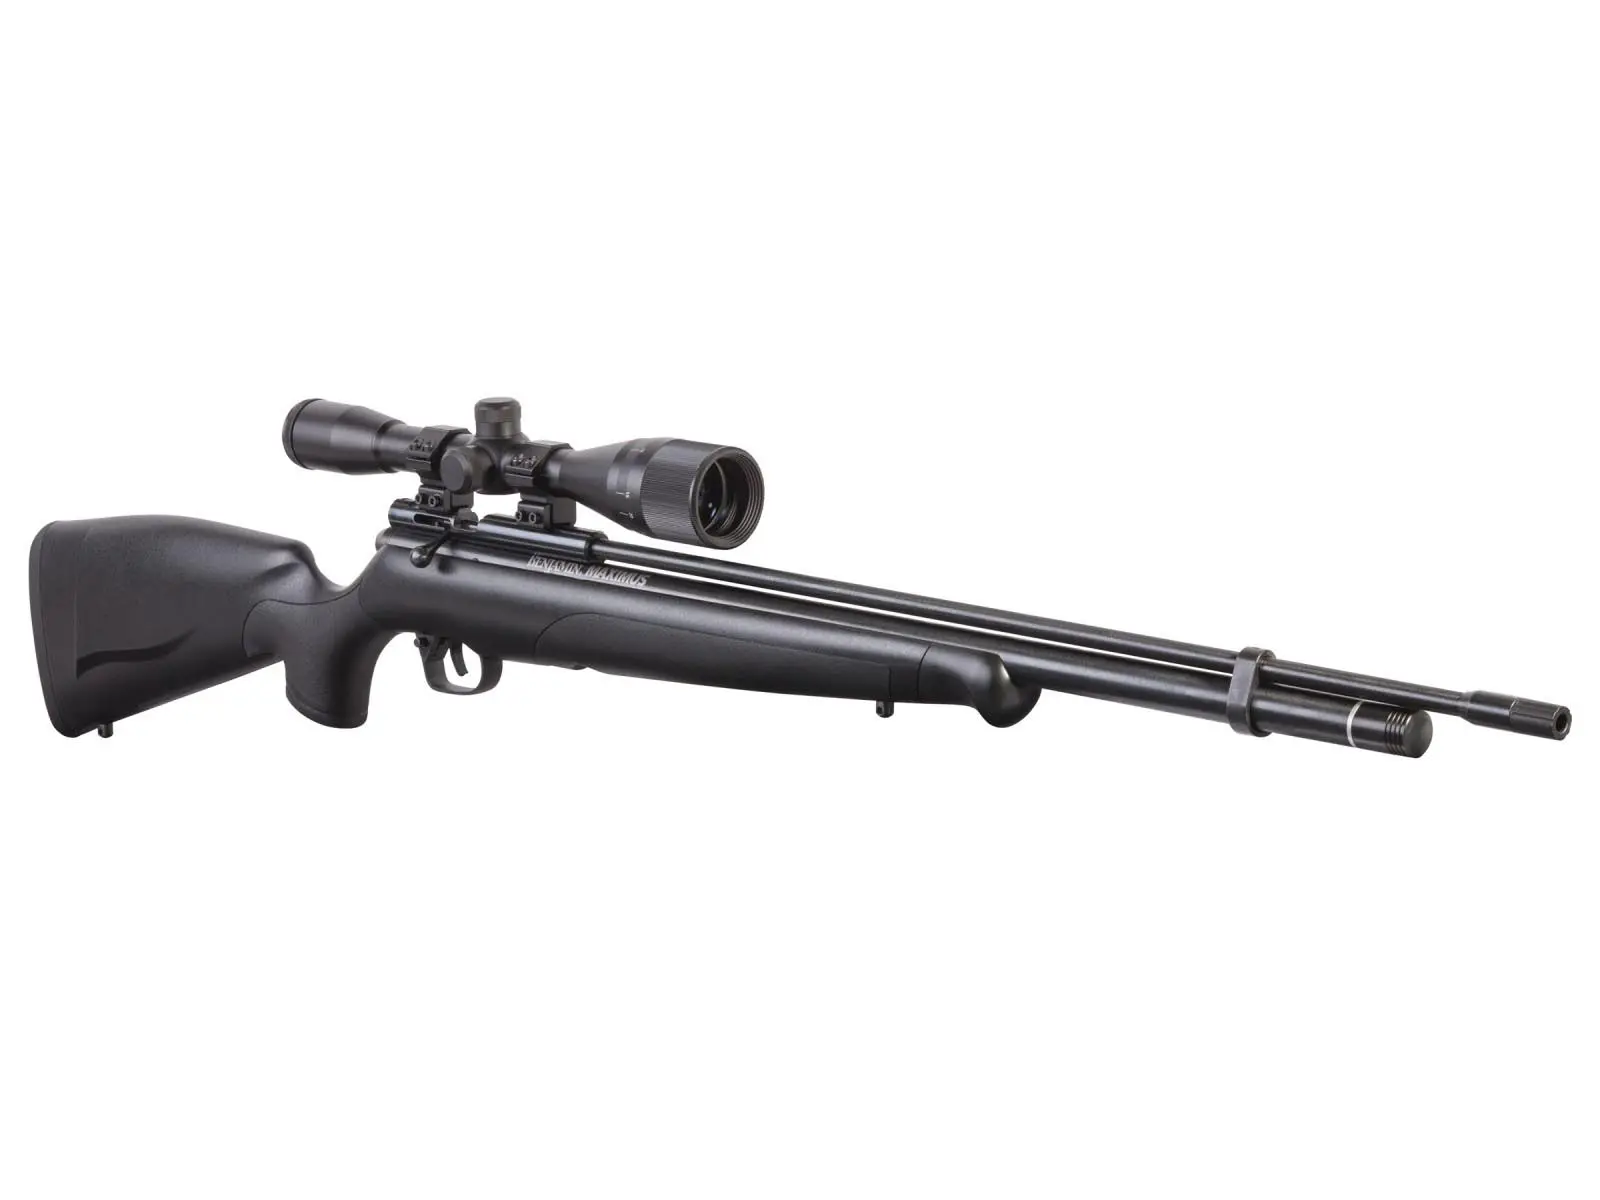
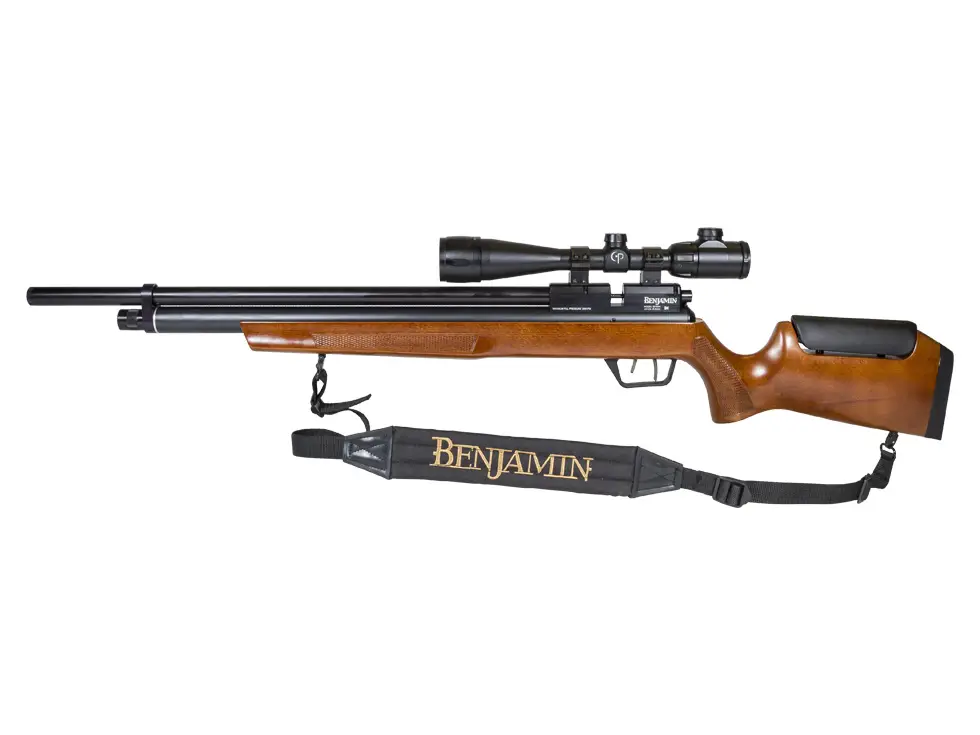
3. Benjamin Maximus – Best Budget Air Rifle Under $500
The Benjamin Maximus Air Rifle may not be packed with extra features, but it sure is one of the best-rated air rifles under $500 for its price!
It’s a no-frills entry-level air rifle that offers the decent necessities any beginner shooter will enjoy.
Even advanced shooters will be impressed with what this air rifle has to offer.
Value For Money
I know how pricey air rifles can be, but it doesn’t mean you have to purchase the priciest air gun out there to get value.
The Benjamin Maximus proves just that, offering one of the most affordable rifles available
Without compromising on quality and performance.
Granted, it isn’t the quietest and it requires a high-pressure air supply all the time,
Though the rifle makes up for it with its price and ease of filling up.
Excellent Accuracy
The accuracy is spectacular, and it had standard muzzle energy when we tested it.
It offers a maximum muzzle velocity of almost 1,000 FPS, with an energy of between 19-22 ft per lb.
Its consistency is just as admirable, best used with mid-to-heavy weight lead pellets for both accurate and consistent shots that vary only by an ounce or so.
However, you can also use lightweight pellets and still produce similar results.
Just take note, this isn’t a regulated PCP so the velocity drops after firing.
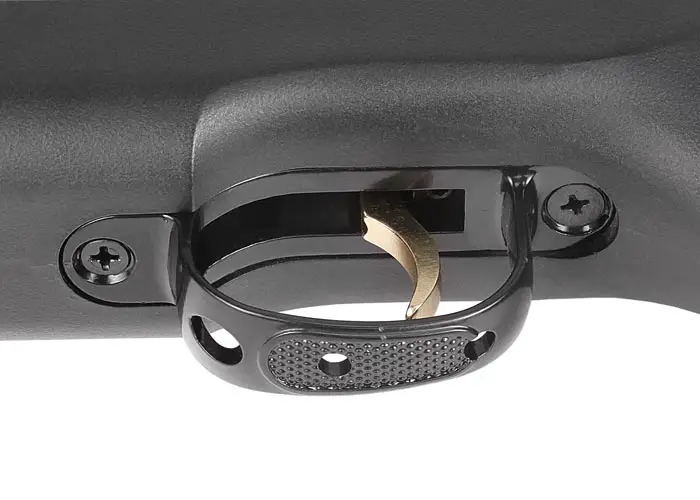
Simple and Efficient
The air rifle is long and pretty lightweight to handle.
For its price and shot performance, it’s easy to hold and maneuver.
Plus, it only requires a 2,000 PSI fill pressure, which makes it easier to fill using hand pumps.
Additionally, it’s easy to shoot with as it offers adequate grip and stability.
The only con is the breech design, which renders it a bit difficult to load pellets.
The Benjamin Maximus only requires a 2,000 PSI fill pressure, which makes it easier to fill using hand pumps.
Pros and Cons
Pros
Cons
One of the most affordable air rifles available
Has an easy to fill pressure of up to 2,000 psi
Offers satisfactory consistency and accuracy
Has no noise suppressor and is quite loud
The air rifle's sight is unprotected
Final Verdict
The Benjamin Maximus Air Rifle offers good value for your money but is best recommended for beginners in training.
If you’re on an extreme budget for an air rifle, this is a satisfactory choice that offers amazing accuracy and ease of use.
Many users have raved about its top-notch performance, though you should be wary of the noise it can make!
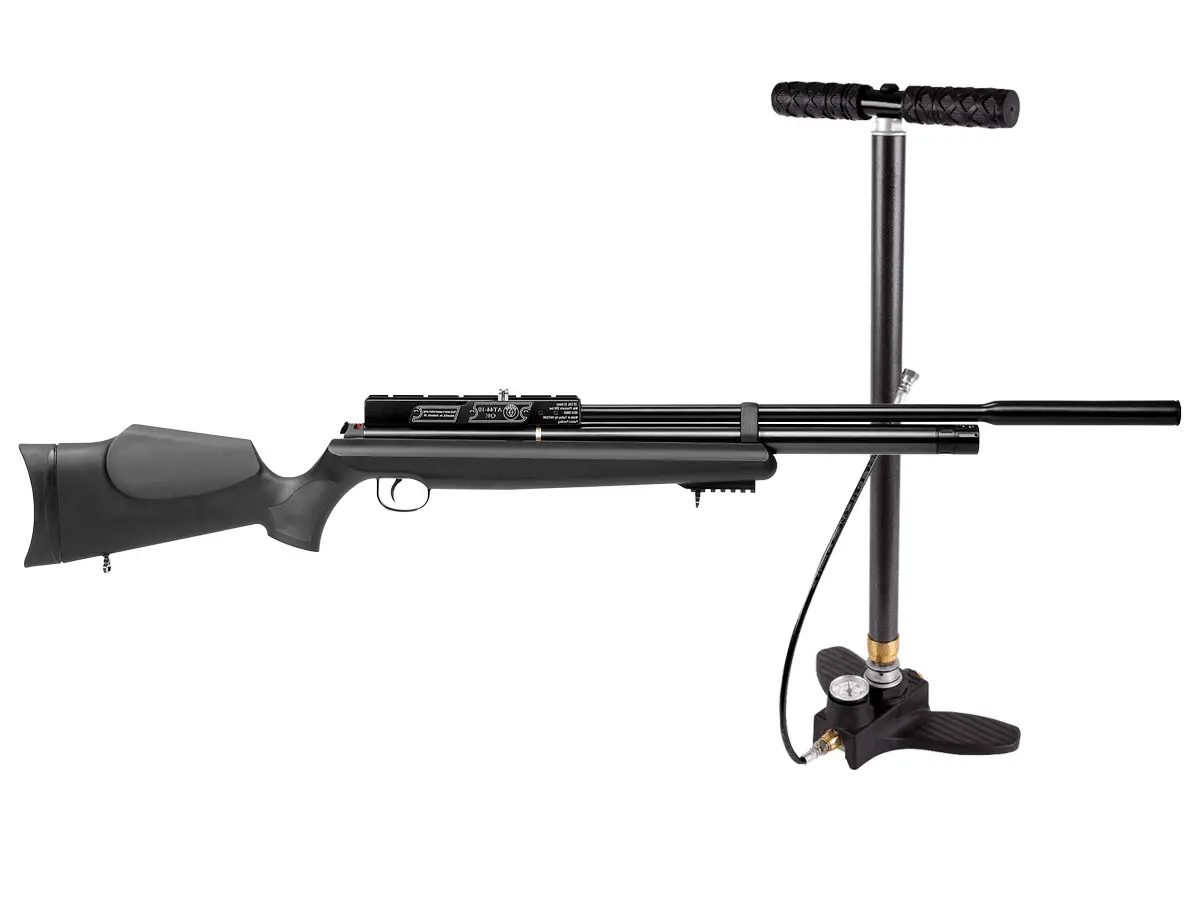
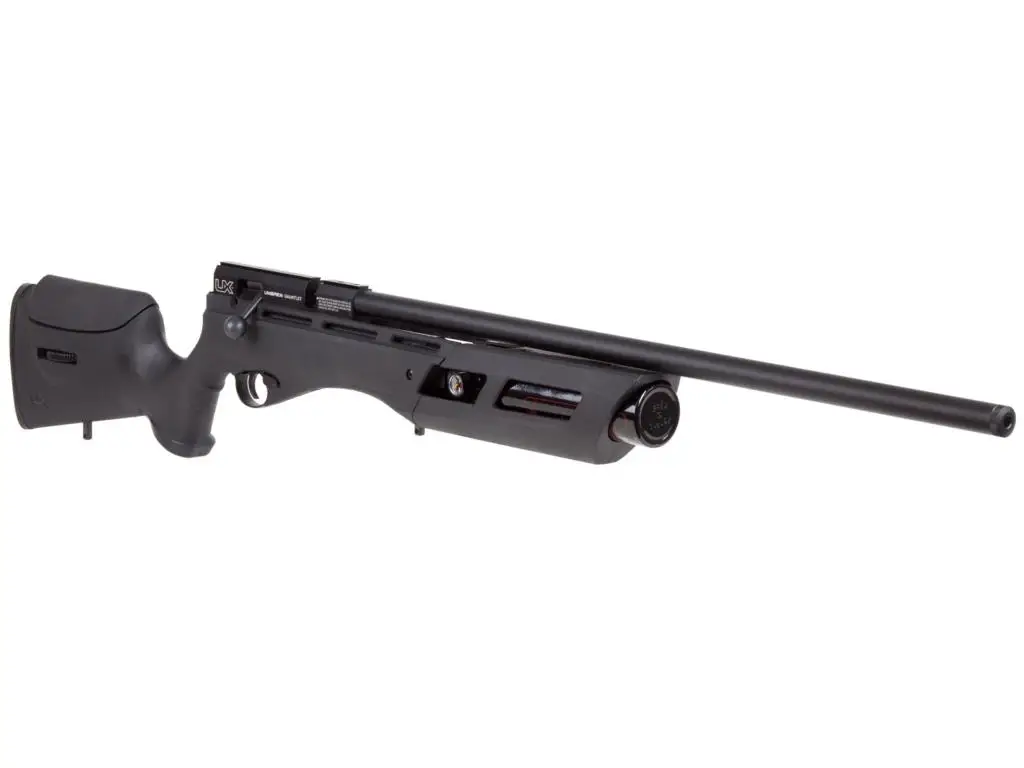
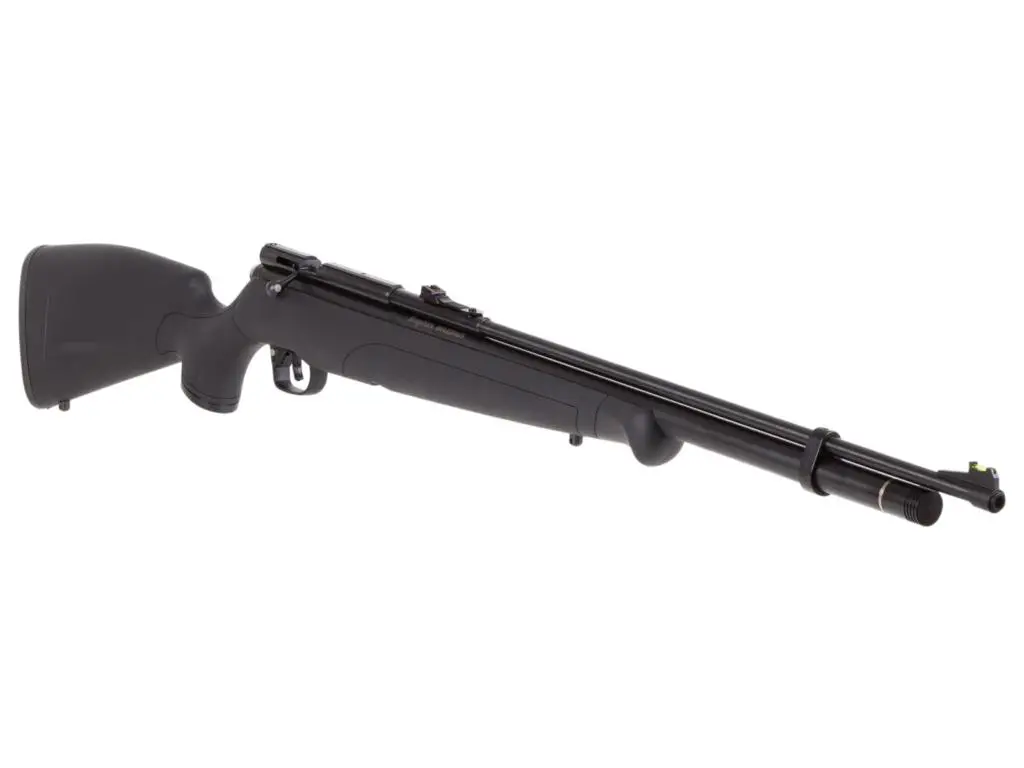
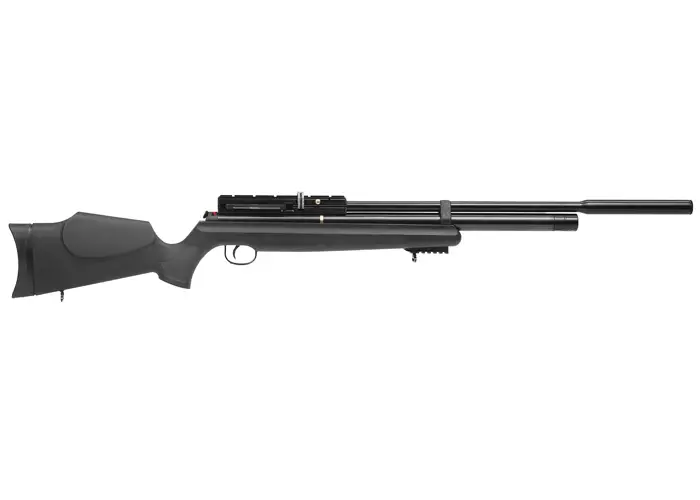
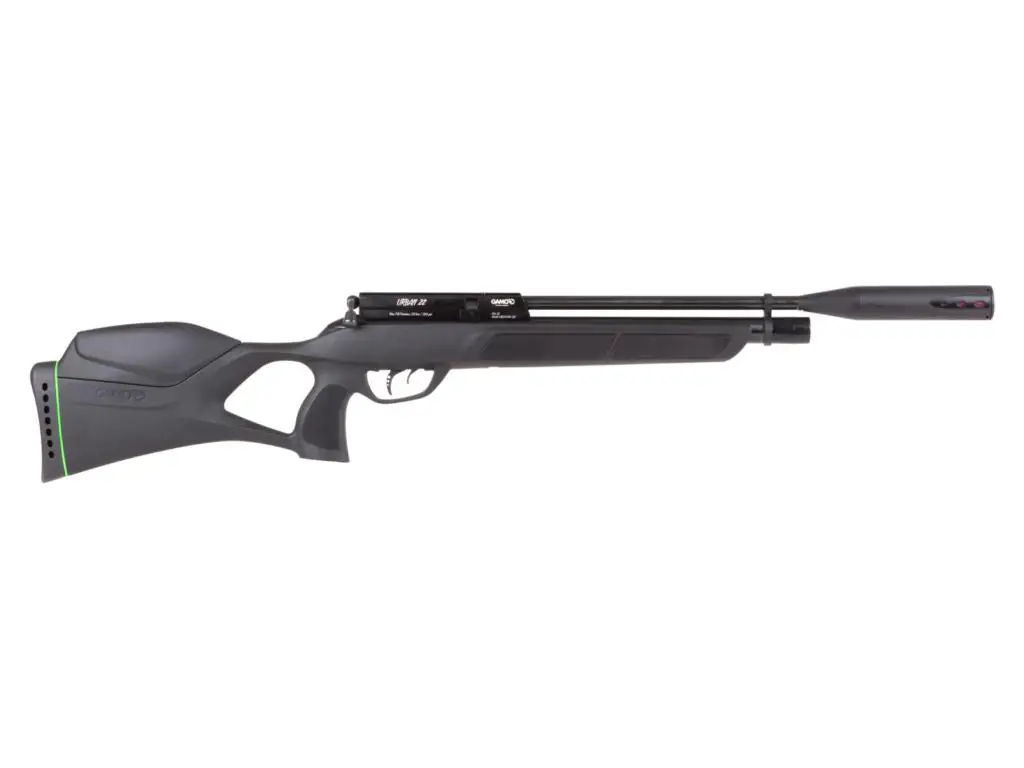
I admire the air rifle’s body, which is lightweight and easy to carry around, as it’s only 42 inches long and weighs less than seven pounds.
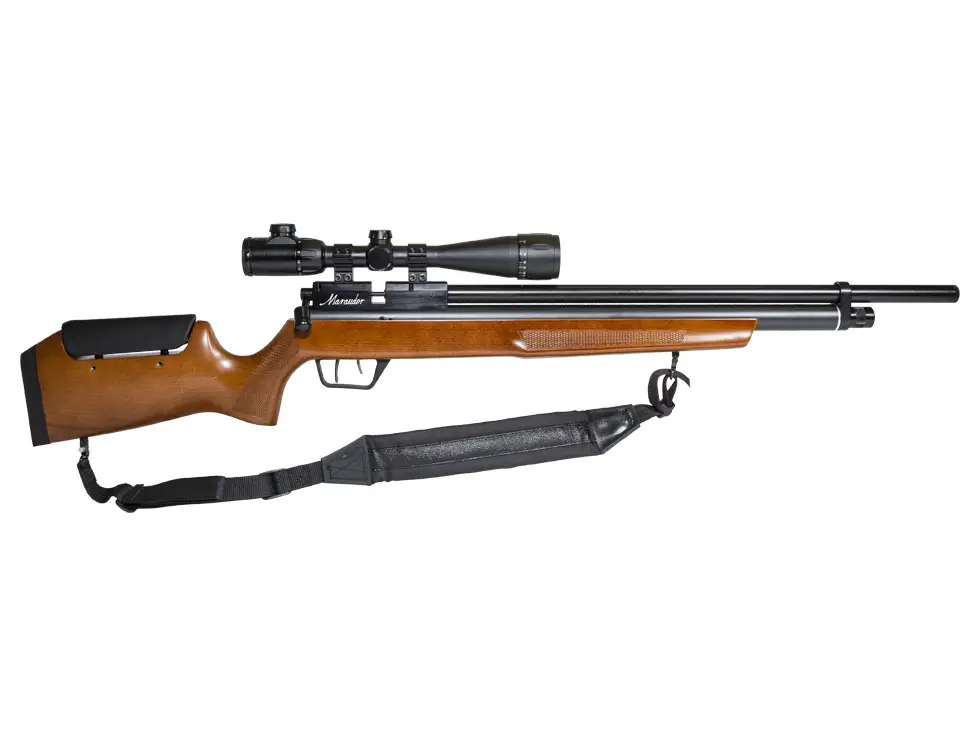
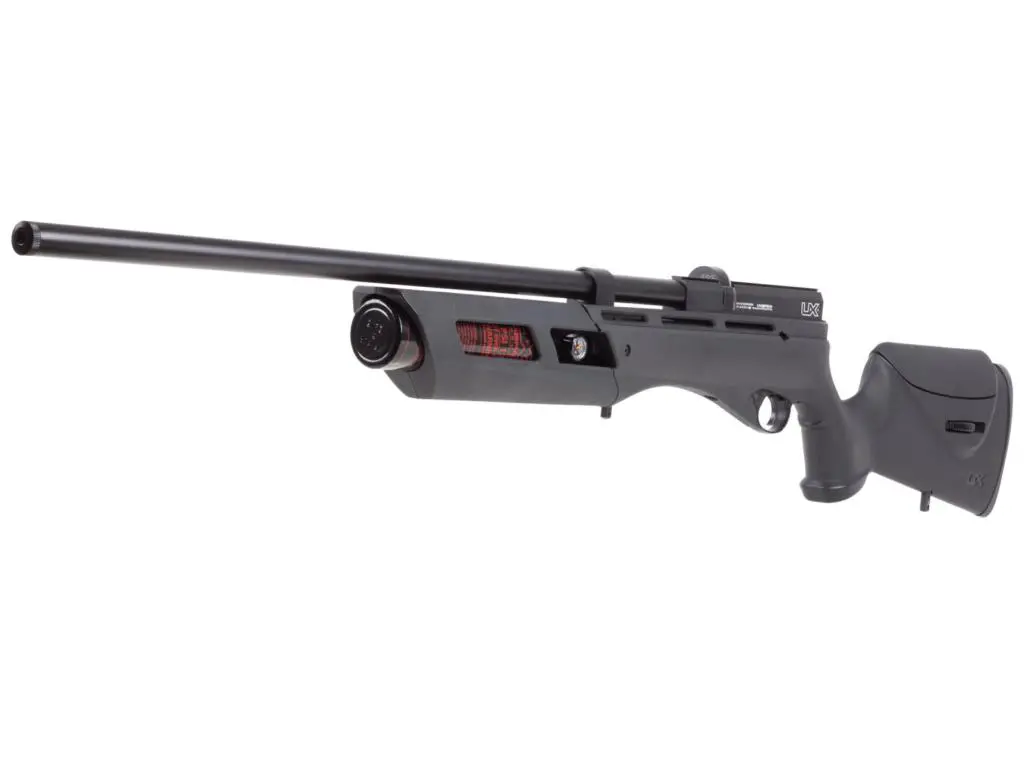
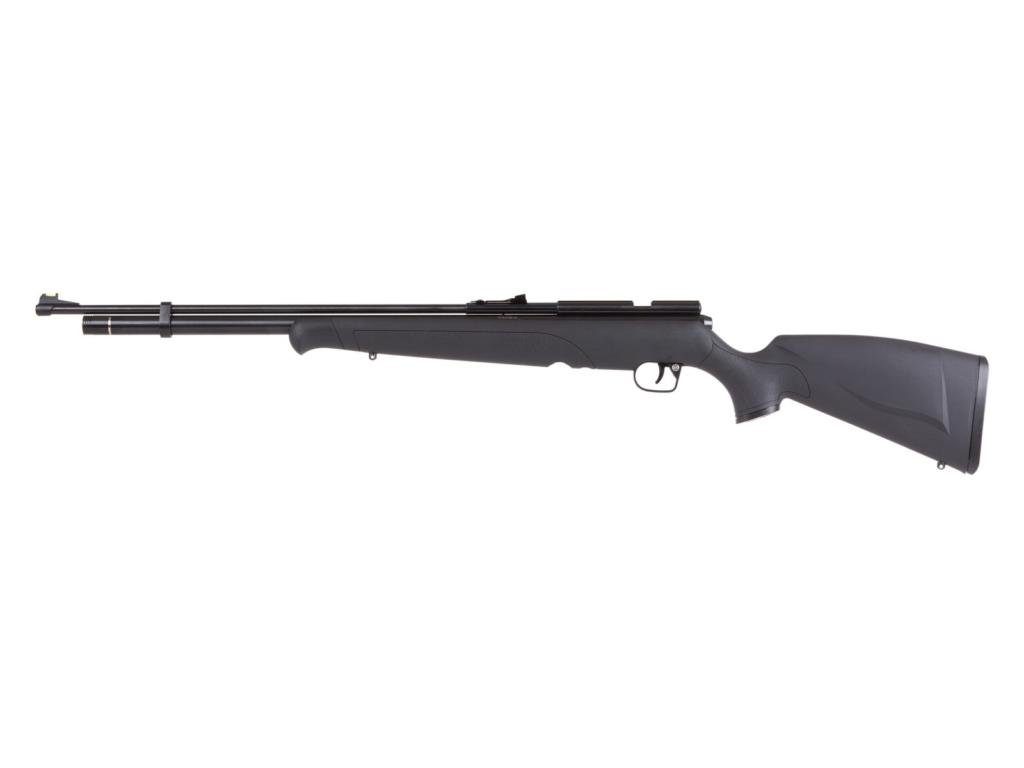
For an entry-level air rifle at a more affordable price, it has a ton of features to offer, including:
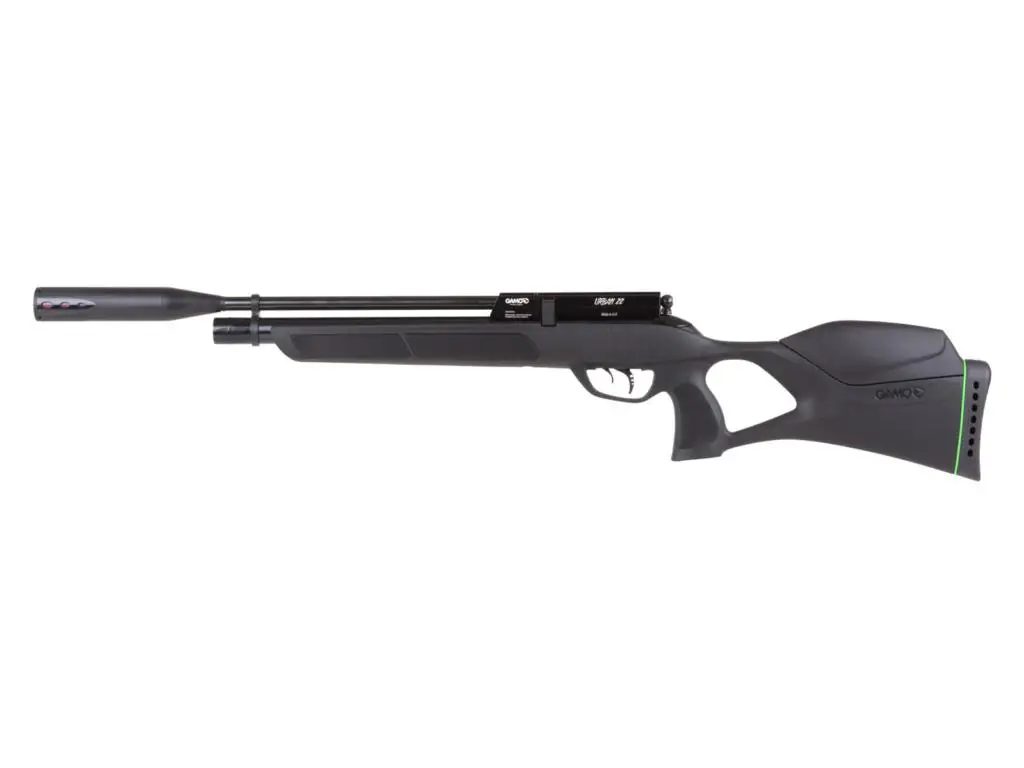
The removable rotary magazine, a velocity of up to 800 FPS, as well as a fill pressure that can take up to 3,365 PSI.
That’s definitely not bad for a cheap air rifle for beginners.
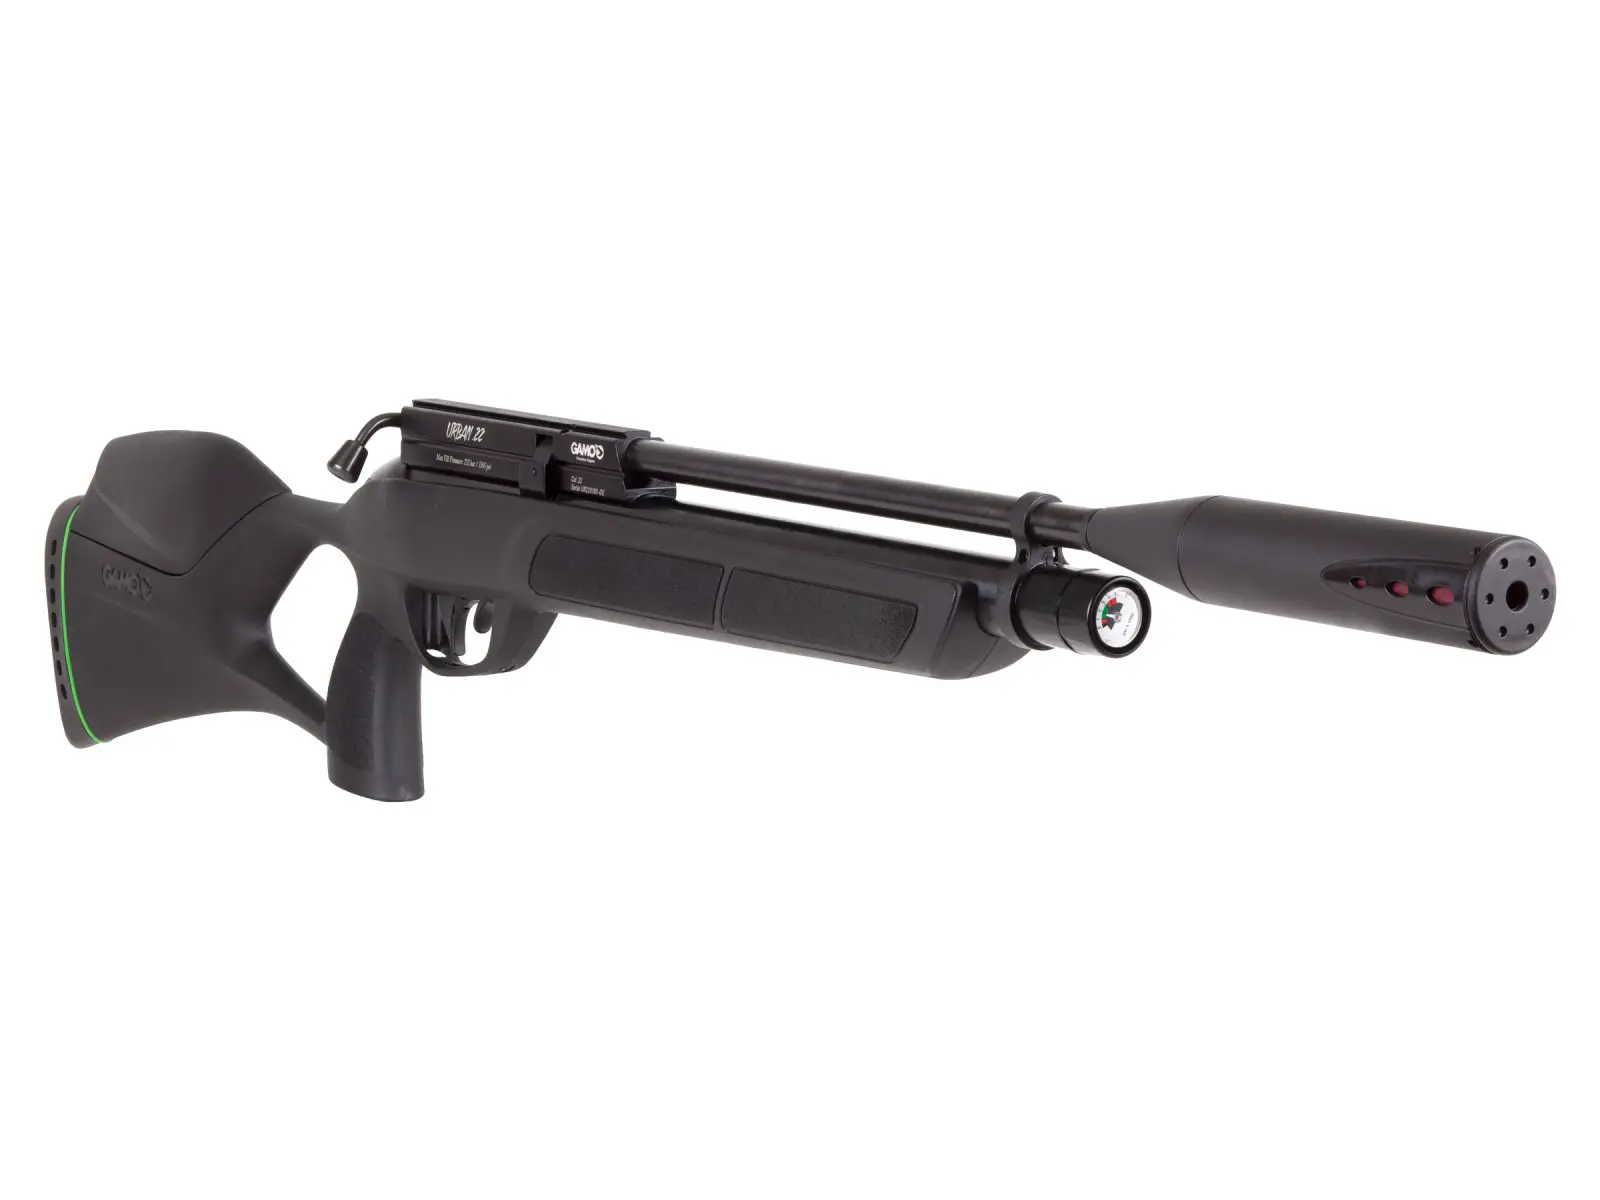
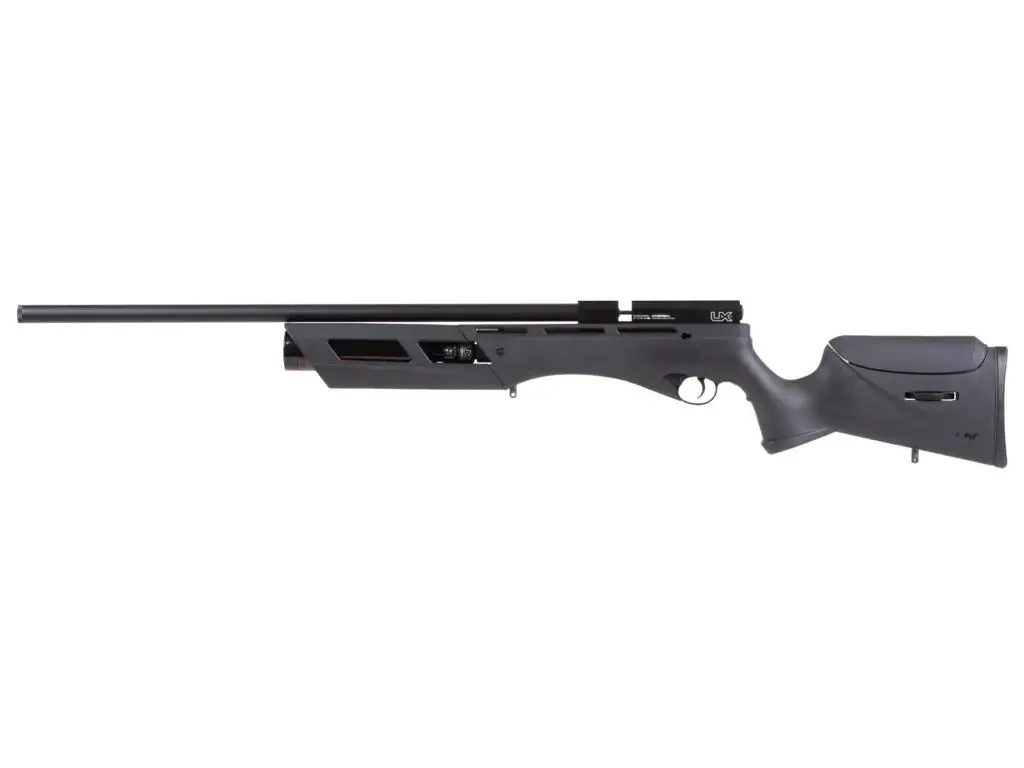
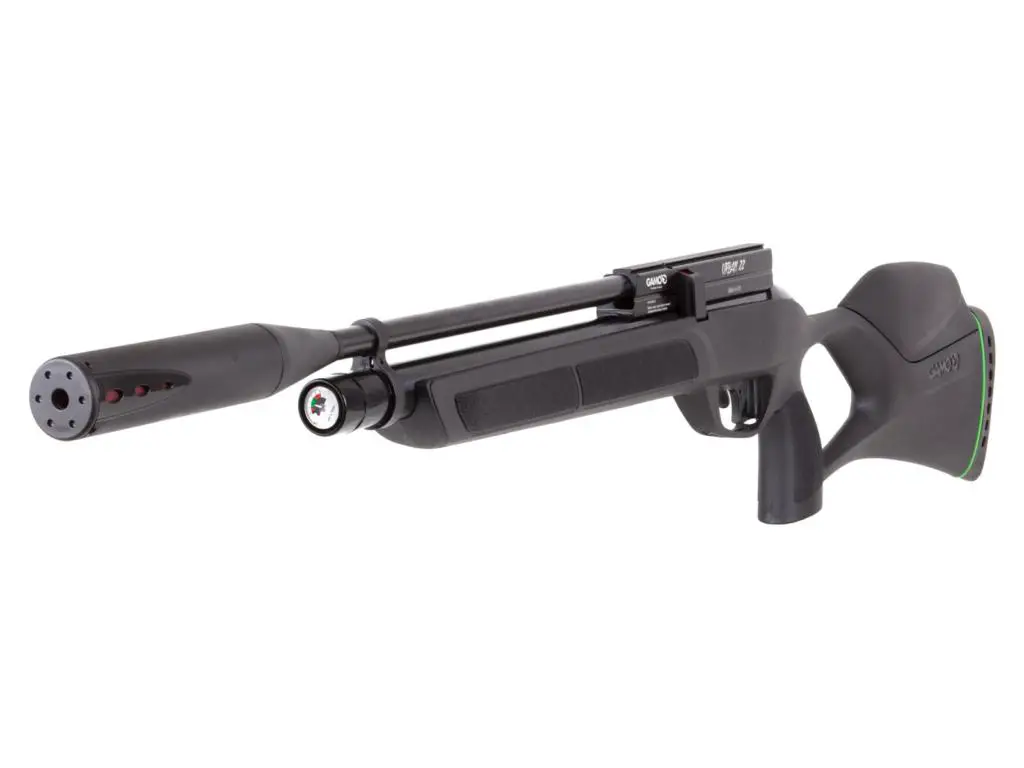
The Gamo Urban has a ton of features to offer, including a removable rotary magazine, a velocity of up to 800 fps, as well as a fill pressure that can take up to 3,365 psi.
Pros and Cons
Pros
Cons
Strong hits and accuracy when shot
Great for beginners with exceptional accuracy
Easy to fill and lightweight body
Quiet operation for added comfort
Not the best pressure gauge and shot count
Some complaints of the trigger comfort
Final Verdict
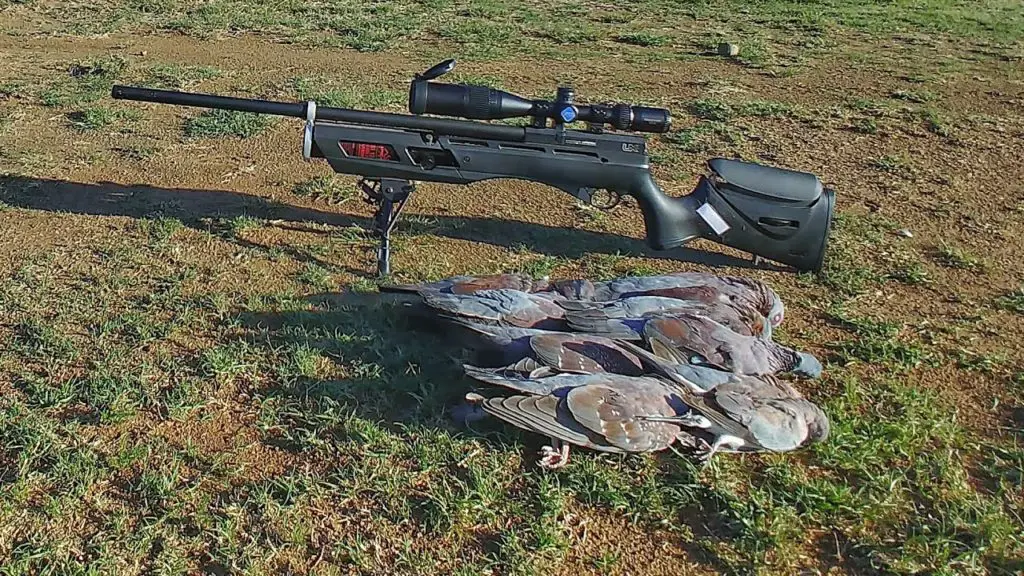
This entry-level PCP air rifle packs a punch for the cost, handling well regardless of the shooting scenario you’re in.
With its lightweight feel and the beastly power that shoots repeatedly with accuracy, beginners will definitely enjoy practicing with this one.
The only thing I wish is that it had a higher shot count and better pressure gauge.
At first glance, moose and horses look somewhat similar. They’re both ungulates, or mammals with hooves, walk on four legs, and have a similar body and head shape. That’s about where the similarities end, though.
In the U.S., horses are almost exclusively pets, while moose almost exclusively live in the wild. Male moose have antlers; horses don’t. And while there are a few different species of moose, just like there are many horse breeds, horses are faster while moose are larger. Generally, a moose weighs up to 1,400 pounds (635 kg), while horses typically weigh a maximum of 1,200 (550 kg) pounds.
Here are 11 photos that help showcase the size difference between moose and horses.
On average, a moose will be heavier, taller, and longer than a horse. In fact, they’re the largest species in the family Cervidae, which also includes elk and deer.
2. There Are Some Exceptions
Image source. Instagram
While moose are typically larger than horses, there are some horse breeds that have the moose beat. The Shire horse, for example, is one of the largest horse breeds and can greatly outweigh a moose. A stallion Shire horse usually ranges from 1,950-2,400 pounds (900-1100 kg). The largest Shire horse, a gelding named Samson, topped the scales at 3,360 pounds (1,524 kg)!
3. A Little Bit Taller
Image source. Instagram
While the moose is closer to the camera in this photo, it’s still pretty clear that it’s taller than the horse. The average height of a moose at the shoulders is between 4 feet 7 inches (1.3 meters) and 6 feet 11 inches (2.1 meters), while horses, on average, are about five feet tall (1.5 meters).
4. Just a Bystander
Image source. Instagram
Though there have been people throughout history who have managed to domesticate moose, it doesn’t happen often. This moose seems perfectly content to watch his fellow ungulates pull a wagon.
5. Different Sizes for Different Climates
Image source. Instagram
Domesticated horses can be found all over the world today, but modern horses originally came from central Asia. Moose, however, are only found in the wild in the northern parts of North America and Eurasia. They stay warm thanks to their thick fur but also their massive size, which helps their bodies retain heat.
6. Watch the Road
Image source. CNN
While moose are usually larger, both moose and horses are big enough to cause big problems on the road. Both are typically taller than a sedan, and moose can be as tall as or taller than a pickup truck. While not as common as hitting a deer, there are still about 500 incidents involving moose each year in New England alone. Moose can also do much more damage to vehicles and are more likely to result in fatalities than an accident with a dear.
While it’s much less common to hit a horse, as they don’t often roam free, there are still a handful of incidents each year. They most often happen between October and December and usually on main roads. Things are especially bad in Amish country, where they use horse-drawn carriages instead of vehicles. Pennsylvania calculated that between 2007-2016, there were 633 crashes that involved horses and buggies, with a total of 23 deaths.
To avoid colliding with a moose or horse, use caution when driving through wilderness, farmland, or areas where horse-drawn carriages are common.
7. Keep a Safe Distance
Image source. Instagram
It’s hard to say what would happen if a moose and horse were to meet; there isn’t a lot of research done, and it would depend on the specific horse and moose. However, moose are known to be aggressive at times and, because of their size, can inflict serious damage. If you’re riding your horse and run into a moose, it’s best to keep your distance and get away as quickly and calmly as possible, especially if your horse spooks easily.
8. Watch Out for the Antlers
Image source. Naturally Gaited
While the body of a moose is typically going to be taller than the body of a horse, that size difference only grows when you factor in a moose’s antlers. The antlers, which are made of bone, average between four and five feet (1.2-1.5 meters) wide and can weigh between 25 and 30 pounds (11-16.5 kilograms). Only male moose, or bulls, have antlers, and they typically use their antlers to assert dominance.
9. An Aggressive Moose is a Dangerous Moose
Image source. Instagram
Most often, the male moose, or bulls, are the aggressive ones. While moose typically will leave you alone, they can also carry a parasite called a brainworm that increases their aggression. If an angry moose attacks a horse, the moose may fight using its antlers or by kicking with its front hooves. Moose can kick both straight ahead and sideways. Combined with their muscular build, this makes them particularly dangerous in a fight.
10. Sometimes, They Get Along Just Fine
Image source. Instagram
Just because moose are bigger and stronger doesn’t mean they can’t get along with their distant cousins. Blogger and horse trainer Carola Sossdorf adopted an orphaned moose named Emma when the moose was just a few days old. While a female moose is less likely to be aggressive anyway, being raised among other horses likely helped her get used to having horses around.
11. Care to Share?
Image source. Equine Ink
This photographer managed to snap a photo of a horse and moose sharing a meal, but that doesn’t happen often, in part because the two animals have different dietary needs. Both are herbivores, meaning they exclusively eat plants, but they choose different plants for their diets. Horses typically dine on grass and hay, as well as the oats in horse feed.
Moose, however, typically eat leaves and twigs from woody plants they can find in their natural habitat. Leaving food out for moose is not advised, as offering them food outside of their diet can cause them harm.
Final Thoughts
On average, you’ll find moose to be taller than horses, but there are always exceptions. Part of the reason moose are built to be larger is that their body mass helps them survive in the colder climates they inhabit. Because horses are domesticated in North America, they’re usually more used to being around people. Moose, however, can sometimes become aggressive, so it’s best to avoid them when possible.
Both animals are beautiful creatures with majestic, strong natures. While you can snuggle up to a horse, given the tendencies of moose, it’s best to watch them from a distance.
A lot of animals, over the years, have proved to be quite intelligent but none has measured up to humans. Of all mammals, humans are said to be the smartest. Having said that, there are some animals that display behaviors that make us wonder what goes on in their head. A deer is one of them.
If you’re here, you’re probably asking the same question. So, how smart are deer?
In this article, we will look at whether or not deer are smart and try to measure the level of their intelligence.
Deer are ruminant mammals belonging to the Cervidae family. Some species belonging to that family are White-tailed deer, mule deer, black-tailed deer, elk, moose, red deer, caribou, fallow deer, roe deer, pud, and chital among others.
Since deer are mammals, they can be said to be somewhat intellectual animals. They might not be as smart as you think but yes, they are quite smart. You see this intelligence playing out in how they search for food and various survival tactics they display in order to evade predators in the face of danger.
How smart are deer?
Deer are believed to have an EQ of 1, which indicates that they are averagely intelligent. So, they are actually smarter than most people give them credit for. They are intelligent enough to detect changes in the weather and have developed various means to survive in different seasons.
For instance, they know where to find food and have a keen sense of smell to detect humans and food from miles away. Deer are also known to have acute hearing and good vision, which are all signs of smartness.
Deer brain size
The brain is the controlling organ of a human being. The same can be said about ruminants such as deer. A deer’s brain measures around 4 by 3 inches, or the size of a person’s fist.
A deer’s brain is where it assimilates and processes information gotten from other sensory organs in the body.
Most sensory information that can trigger a deer’s response is obtained through vision and auditory mechanisms. When this information is obtained, their brain quickly processes it and responds. This helps them in evading hunters and other predators.
What is the smartest deer species?
Based on research and the experiences of several hunters, the whitetail doe is tagged as the smartest deer in the woods.
In fact, old does are the hardest to kill because of their keen senses and wariness, which is often seen in their swift, crafty movements and response in the face of danger.
In case you don’t know, a doe is a female deer. Older female whitetails don’t just look out for themselves, but also for other deer. So, they’re always on high alert!
How smart are deer compared to humans?
Deer brains are roughly 1/6th the size of human brains. While they have a heightened sense of smell compared to humans, they lack our capacity for critical and metacognitive reasoning.
They seem to be very good at finding food and evading predators. But humans possess far more superior cognitive capacity. For instance, humans have languages but deer don’t.
How smart are deer compared to dogs?
Even though deer are smart, they are not as smart as dogs. Several dog species, like huskies, are so smart that they can imitate English words spoken by their owners. This is something we don’t know deer to be capable of.
Also, like deer, dogs can seek food and evade predators. It’s quite easier to train a dog compared to a deer. Besides intelligence, another reason for this is that deer are wild animals.
Having said that, some dog breeds are not as smart as others, but in general, I will always bet on a dog’s intelligence over a deer’s.
How smart are whitetail deer?
Also known as Virginia deer, whitetail deer is a medium-sized deer that is endemic to North America, Central America, and South America, as far south as Peru and Bolivia. It primarily occupies high mountain environments.
When we observe the level of smartness in a whitetail deer, there are a lot of characters that show proof that they do indeed have the ability to reason, take rational actions, remember, and react. If this were not the case, the lineage of deer would never have survived.
Whitetail deer have very sharp senses of smell, vision, and hearing, which makes it difficult for hunters to catch them, as well as predators. More so, when a doe births, even for the first time, she takes care of the affair as if she herself had handled the delivery of babies before.
Also if you miss a shot on a mature whitetail from your aim or startle the deer, it would be almost impossible to get it at the same spot. The deer might continue to use the area around, but it will stay well away from that spot because it recalls the incident.
Are deer smarter than cows?
Cows are one of the smartest domestic animals. They possess adept problem-solving skills. They are as intelligent as a three-year-old child.
Compared to cows and other domestic farm animals, deer are more intelligent. They are capable of adjusting to food shortages and can avoid hazardous conditions.
One of the things that distinguish a deer from a cow is their good sense of smell. They are thought to have an almost identical sense of smell to dogs. Their excellent sense of smell helps them to find food easily and escape predators.
I’ve never intentionally gone shed hunting, but my daughter, Vayda, and I have been lucky enough to find antler sheds in the spring on a couple of occasions. Vayda has an eye for deer antler sheds.
She was only four years old when she found her first deer antler. We were walking through a cornfield at my grandma’s house in early spring during one of our Thursday visits. At the time, there were a couple of miniature ponies in the pasture adjacent to the cornfield and Vayda liked visiting them. She picked up the broken antler and asked why her stick looked so funny. I was shocked when I confirmed it was an antler on closer inspection.
She was proud to show off her find to my grandma and mom. And she was even more pleased when my dad told her how impressed he was later that evening.
I wouldn’t say a hobby was born. She didn’t find her next antler sheds until she was eight years old, and again, by total coincidence. This time a couple of mature bucks had each dropped an antler next to our house, just out of the yard under the cover of the pine trees sheltering where they liked to bed down.
We had only moved in six months prior to the find. Although we regularly observed the deer feeding on the apple trees in the backyard at dawn and dusk, we hadn’t realized they slept and migrated through the pines that bordered our yard.
When Vayda came running out of the woods with the large antlers, we thought she may have found a set. But after further inspection, we realized the antlers she had found had to have come from two different deer.
Every year a buck deer grows a new set of antlers. The process starts after they shed last year’s rack sometime between late January and early March. Their antlers fall off because their hormone levels decrease after breeding season. If winter has been particularly tough and food sources have been scarce, deer may shed their antlers earlier than normal.
Once their antlers have been shed, they begin growing a new rack. Most bucks will have noticeable velvet-covered nubs by May. The new antlers will continue to grow through September. During late summer, the antlers will harden and the velvet outer covering will be rubbed off on small trees and shrubs. Bucks also use their antlers to spar with competing bucks in their territory and establish dominance in preparation for breeding season that begins in October and ends in December.
February through March is an ideal time to look for deer antler sheds because they will be in the best condition and the easiest to spot. After the snow melts before the spring vegetation starts to green up and grow thicker deer antlers will be the easiest to see. Additionally, finding them soon after they are shed is better because rodents will find antlers that have been laying on the ground for a while and gnaw on them for their minerals and to wear down their teeth.
How to find deer antler sheds
Scout during winter. Deer often seek places with food availability and cover during the winter. Looking for deer tracks in the snow is a great way to locate the places they frequent. Deer are most active at dusk so this is the best time to try and observe active deer.
Bucks stick together. Bucks separate from does and fawns during winter and travel in groups with other bucks. An area where you found one shed will often have others from bucks in the same group.
Look in areas that aren’t heavily hunted. Fewer bucks survive in heavily hunted areas, so areas that are not hunted can be the best places to find antler sheds.
Locate food sources. Locating food sources is a great way to narrow down places deer have frequented throughout the winter. But they aren’t necessarily the same places deer frequented during the fall. Sometimes agricultural fields become hotspots after harvest; however, woody browse in woodlots are also a favorite food source for deer in winter. Learn to identify which plants deer prefer. Oak and other late-producing mast trees attract deer during winter.
Look around bedding areas. Deer spend a lot of time in their beds conserving energy during the winter. They prefer coniferous woodlots because they provide dense cover from the wind and snow. Tall grasses, brushy thickets and heavily wooded areas are other common bedding sites. They also prefer areas that are south-facing to maximize the amount of direct sunlight they get. The southern edges of a forest or the south face of a hill would be ideal for deer during winter. The best time to check bedding areas is around ducks when deer vacate them to forage.
Check around obstacles on travel paths. Deer make travel paths from their food source to their bedding area. Once you’ve located a travel path, look for sheds near obstacles like fences or ditches. Sudden movements caused by jumping and running can knock antlers lose.
Walk slowly and have a keen eye. Walking slowly allows your eyes more time to separate antlers from broken sticks and corn stalks. Train your eyes to look for parts of antlers instead of the entire antler, so you don’t walk past a shed.
Looking for the perfect hunting air rifle? Look no further! Discover our high-performance air rifles with impressive FPS (feet per second) rates. Whether you’re a seasoned hunter or a beginner, our selection offers accuracy, power, and reliability. Explore our range now and elevate your hunting experience to new heights.
hunting air rifle fps
When it comes to hunting with an air rifle, the FPS (feet per second) of the rifle plays a crucial role. The FPS determines the velocity at which the pellets are propelled, and this directly affects the impact and effectiveness of your shots. For hunting purposes, it is important to choose an air rifle with a higher FPS as it ensures greater accuracy and power.
A high FPS allows for a flatter trajectory, meaning that your shots will maintain their accuracy over longer distances. This is particularly advantageous when hunting small game or varmints that require precise aiming. Additionally, a higher FPS provides more kinetic energy upon impact, delivering sufficient force to effectively take down your target.
However, it’s important to note that each state or country may have specific regulations regarding the maximum FPS allowed for hunting purposes. It is crucial to familiarize yourself with these regulations before purchasing an air rifle for hunting. By selecting an appropriate air rifle with the right FPS within legal limits, you can ensure a successful and ethical hunting experience.
In conclusion, when it comes to choosing a hunting air rifle, the FPS (Feet Per Second) is an important factor to consider. A higher FPS can provide greater accuracy and velocity, resulting in more effective shots. However, it’s crucial to find the right balance between power and safety regulations. Ultimately, selecting a hunting air rifle with an appropriate FPS will enhance your shooting experience and improve your chances of success in the field.
An air rifle's effective shooting range depends on various factors, including the type of rifle, the caliber, and the power source. Generally speaking, most...
"Unleash the Power: Mastering Break Barrel Air Rifles for Maximum Performance. Discover expert tips and techniques to enhance the power and precision of your...
")
")
")
")
")