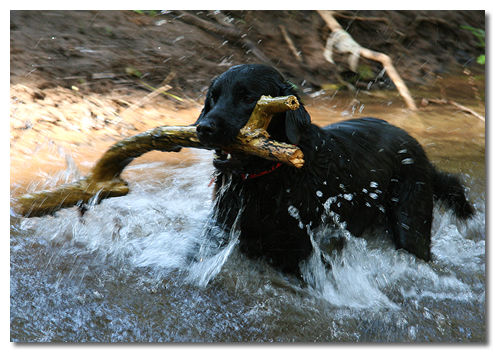
Dogs are considered man’s best friend for a number of reasons; they are loyal, loving, affectionate, and they can be trained to do amazing things. Police departments and law officials use them to locate narcotics, firearms, and explosives with their keen sense of smell. But did you know that dogs can help you find antler sheds as well? If you’re interested in training your dog to find antlers, continue reading and I’ll tell you how you can train them to become your new favorite shed hunting buddy.
A dog’s sense of smell is far superior to that of a human’s. Using their nose, they can sniff out and locate shed antlers that people like you and me wouldn’t be able to find.
Dogs are able to get into thick, dense brush to retrieve antlers.
It’s a heck of a lot more fun taking a dog with you to hunt for sheds than doing it alone!
My Antler-Hunting Dog
Let me first start off by saying that I’m not a professional dog trainer, and when I got my Golden Labrador Retriever, Jesse, I had no intention of training her to become a shed-hunting dog. In fact, I originally wasn’t even aware people trained dogs to find antlers. Not long after getting her, though, one of my hunting buddies saw my dog and was telling me about how he had seen someone train their Lab to sniff out sheds in the woods. With this knowledge at hand, I thought I might as well try and train Jesse. After all, the only thing I had to lose was time, and I enjoyed spending time with Jesse.
After talking with some people who trained their dogs to find antlers, and scouring the internet for advice on training Labradors, I had a good idea of how to train her. What I didn’t know, though, was just how quickly she would catch on. Jesse now goes on every antler hunt I go on and is almost certain to find more sheds than I do. Anytime I bring along buddies or guests on shed-hunting trips, they are always amazed at her uncanny ability to find sheds.
Which Breeds Are The Best Shed Hunters?
I’ve only trained my Lab, Jesse, to find sheds, so I really can’t say what the best shed-hunting breed is. I do know Labrador Retrievers are one of the most popular breeds for this because of their intelligence, sense of smell and ability to obey commands. I’ve also heard that Dachshunds can be trained to be effective shed hunters.
The most important thing, though, is making sure your dog will obey and follow your commands in the woods. Dogs that run off at the sight of a squirrel or any other animal create a dangerous situation.
The Basics of Training
Before you start, you’re going to need lots of treats (milk biscuits work well) and lots of antlers. You can either go out and try to find some sheds in the woods, or you can buy them online. Remember, only authentic antlers work, as fake ones don’t carry the same scent and feel. Try to get ones that are fresh and not completely sun bleached or dried out. Old antlers are likely to have lost a significant portion of their scent, making it difficult for your dog to locate them by smell.
Step #1 – Introducing Deer Antlers
You’ll want to give deer antlers to your dog as early as possible to get them used to the look, feel, and scent that they give off. This is one of the keys to successfully training your dog to find sheds in the wild. Try tossing some deer antler sheds out in the yard and say a command, such as “go get it” or “get the antlers.” If your dog obeys your command and successfully retrieves the antlers, give them a treat followed by lots of petting and praise. Positive reinforcement goes a long way when it comes to any form of dog training and/or obedience.
Don’t worry if your dog won’t immediately go after the antler. You may need to get them used to playing with it by putting it under their nose and almost teasing them with it. This shouldn’t be difficult, as most dogs will grow fond of playing antlers pretty quickly. Dogs instinctively love to fetch items thrown by their owners, so toss them out in the yard and let them chase them. Once they bring it back, give them a treat.
Step #2 – Hide-And-Seek
Once your dog is accustomed to the scent of deer antlers, it’s time to step up its training to the next level. Assuming you have access to some woods or a forest, hide a couple of them in moderately difficult areas. Place them underneath some leaves about 30 to 40 yards apart and give your dog the fetch command that you’ve previously trained them with.
If they don’t immediately go after the antlers, which they probably won’t on their first try, just walk over to the areas with the antlers and see if your dog can sense it. When they’ve found it, them a treat and lots of praise. Keep doing this once a day and you should see start to see improvements in how fast your dog is able to uncover the antlers.
Step #3 – The “Real” Thing
Once your dog has some training under their belt, it’s time to take them out on a real antler hunt with you. Just go about your search as you normally would, walking down trails and scanning your surroundings. Hopefully, your dog will pick up on the scent of a nearby shed and follow it. Keep your dog in sight and call them back if they try to run off without you. Once they find an antler, continue with the reward and praise. Alternatively, if you see an antler that your dog doesn’t, say the fetch command and let them uncover it.
That’s really all there is to training your dog to find antlers. Just keep taking your dog out there on your hunts and give them the opportunity to find the sheds. Keep rewarding your dog when they make a find and before you know it, your dog will be uncovering sheds left and right.
Tips For Training Your Dog To Find Antlers
Always be positive and reward your dog with a treat and praise when they find an antler. If they don’t find anything, don’t punish or scold them.
Keep your training sessions short. Typically, a single 20-to-30-minute session per day is more than enough needed to train.
Let your dog play with antlers and use them as chew toys. Not only will this allow them to get used to the antlers, but antlers contain beneficial nutrients like calcium.
Always keep your dog in sight, and if they run too far away, call them back. It’s dangerous for dogs to chase after animals in the woods.
If you haven’t done so already, you’ll want to train your dog basic commands, such as sit, stay and come. This will help make sure your dog is obedient and will obey your commands when you’re out in the woods.
The new crossbows for 2024 are faster, more accurate and quieter than ever.
1. TenPoint Flatline 460
TenPoint’s new Flatline 460 Oracle X with the Burris Oracle X rangefinding crossbow scope gets the job done quickly and efficiently. It launches arrows at 460 fps from a stable, comfortable platform measuring only 26.5 inches long and 7.5 inches wide, with a 14-inch power stroke. The RX8-Cam™ system produces such high speeds, and Vector-Quad™ cable technology utilizes four cables, eliminating cam lean and generating straight-nock travel for pinpoint accuracy. A new, 1.5-inch longer dovetail and new aluminum Scope Struts provide a rock-solid foundation for optics mounting. Plus, the center-mounted riser eliminates the nose-heavy feel of traditional crossbows. Its ultra-light, two-piece TEC-TACTICAL stock is built for comfort, with an adjustable buttplate of up to an inch for a perfect fit. The included Burris® Oracle X™ Rangefinding Crossbow Scope features a built-in laser rangefinder that is activated via wireless remote. It instantly ranges game up to 200 yards away, and allows for 20-yard aiming in the event of a battery failure. Other features include an ACUslide with Auto-Brake Gear System for safe de-cocking, S1 zero-creep 2-stage trigger, Veil Alpine camo and more.
MSRP: $3,299 | tenpointcrossbows.com
2. Wicked Ridge Blackhawk XT
The Blackhawk XT from Wicked Ridge provides numerous features and the power to take down big game at an affordable price. Made in America, it is equipped with the built-in ACUdraw or ACUdraw 50, making cocking and de-cocking the bow quiet and easy. The ACUdraw is a fully integrated, user-friendly crank cocking device that reduces the draw weight to 5 pounds. The ACUdraw 50 takes the 50% reduction rope-cocking concept to an easy-to-use level with self-retracting cords and hooks that magnetically store in the buttstock’s unit when not in use. The bow’s 175-pound draw design consists of a lightweight riser and machined aluminum limb pockets fitted with 11-inch WRX laminated limbs. Powered by heavy-duty, machined 5S Cams and DynaFLIGHT 97 string and cables, the Blackhawk XT measures a narrow 15 inches wide and drives arrows downrange at speeds up to 380 fps. Other features include a fully integrated fore-grip backed up with elongated safety wings to keep the shooter’s hand safely below the bowstring’s path. The fully enclosed triggerguard provides added safety from accidental discharge. Its stock also features a picatinny rail below the front of the barrel to mount additional accessories. The package includes a TenPoint 4×32 scope, three Alpha-Nock Carbon arrows, a cocking device, and a quiver.
MSRP: $549 with ACUdraw; $449 with ACUdraw 50 | tenpointcrossbows.com
3. Barnett Hyper XP 405
This new crossbow utilizes the HyperFlite narrow-diameter arrows for deeper penetration, less wind drift, increased durability and engineering for delivery of maximum kinetic energy. The Hyper XP 405 features a narrow, 10-inch-wide profile when cocked. The parallel limb configuration, combined with a track-mounted string damper, significantly reduces recoil and noise while enhancing accuracy. Pairing the Hyper XP 405 with 22-inch, .204-diameter HyperFlite arrows increases the arrow’s flight and improves downrange accuracy with speeds to 405 fps and 138 foot-pounds of energy. Other features include a metal-injected molded trigger and TriggerTech Frictionless Release Technology. This provides a reliable, crisp, 3-pound pull for consistent shots and improved accuracy. An Anti-Dry Fire (ADF) system and a nock sensor ensure the crossbow cannot fire unless the arrow is loaded correctly. It also comes with finger safety reminders above the fore-grip, an adjustable buttstock for length-of-pull, and a 4-5x32mm red/green illuminated scope for bright or dim light.
MSRP: $599 | barnettcrossbows.com
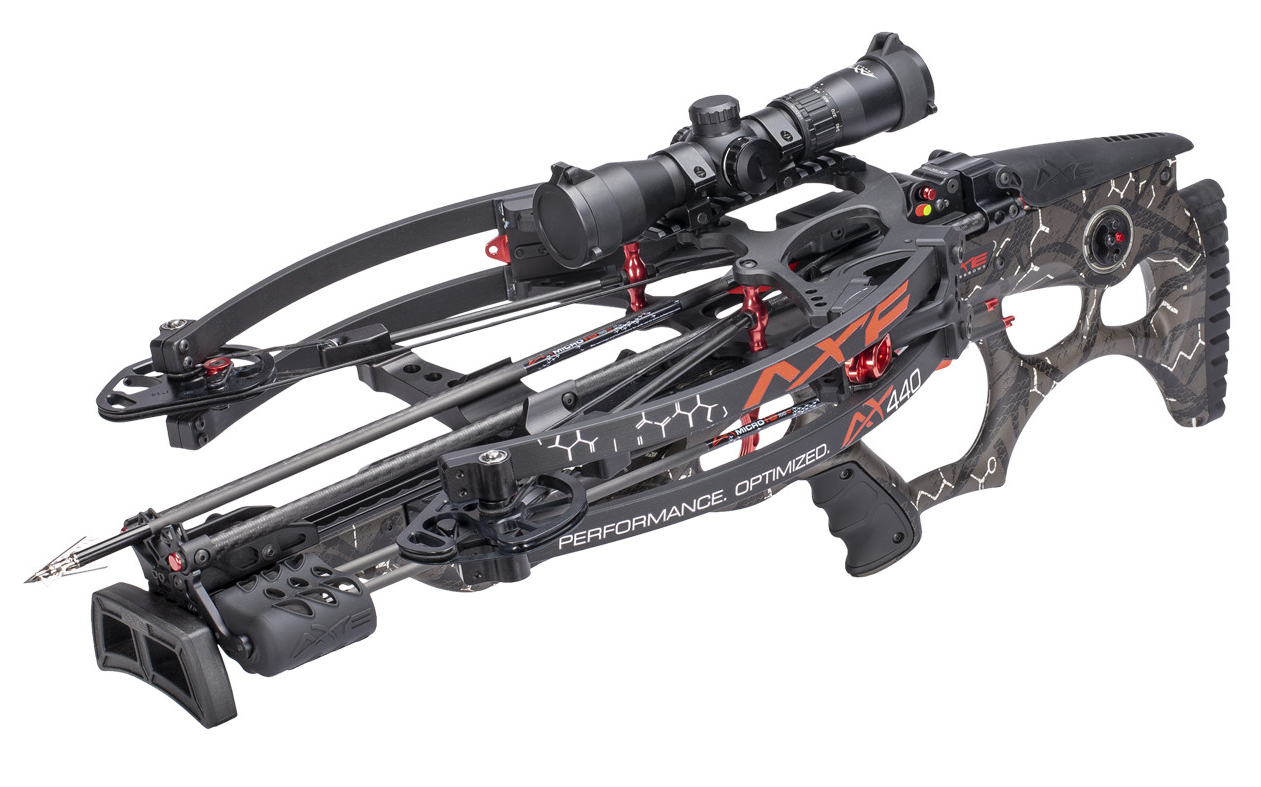
4. AXE Crossbows AX440
Axe® Crossbows continues to define performance with the introduction of the AX440. At a maneuverable, stable and easily shouldered 30.5 inches long and less than 12 inches axle-to-axle (cocked), the weight of the 440 is centered over the shooter’s hand by way of a balanced shoot-through stock and riser design, and reverse limb system. This configuration empowers the most efficient part of the split limb system from just 15 inches of power stroke to launch bolts at 440 fps. The Axe cam system is linked by cables that run parallel to each other, rather than from the top of one cam to the bottom of the other. This design eliminates cam lean and limb torque, and is further enhanced by a cable brace that engages the riser to aid in the limitation of flex away from the center of the crossbow. The stock of the AX440 also eliminates the rail and utilizes dual carbon guide rods along the entire length of the stock. Combined, all of these features create a free-floating arrow system that minimizes contact, friction and torque along the arrow’s entire path. The result: greater efficiency, accuracy and speed.
MSRP: $2,099.99 | FERADYNE.COM
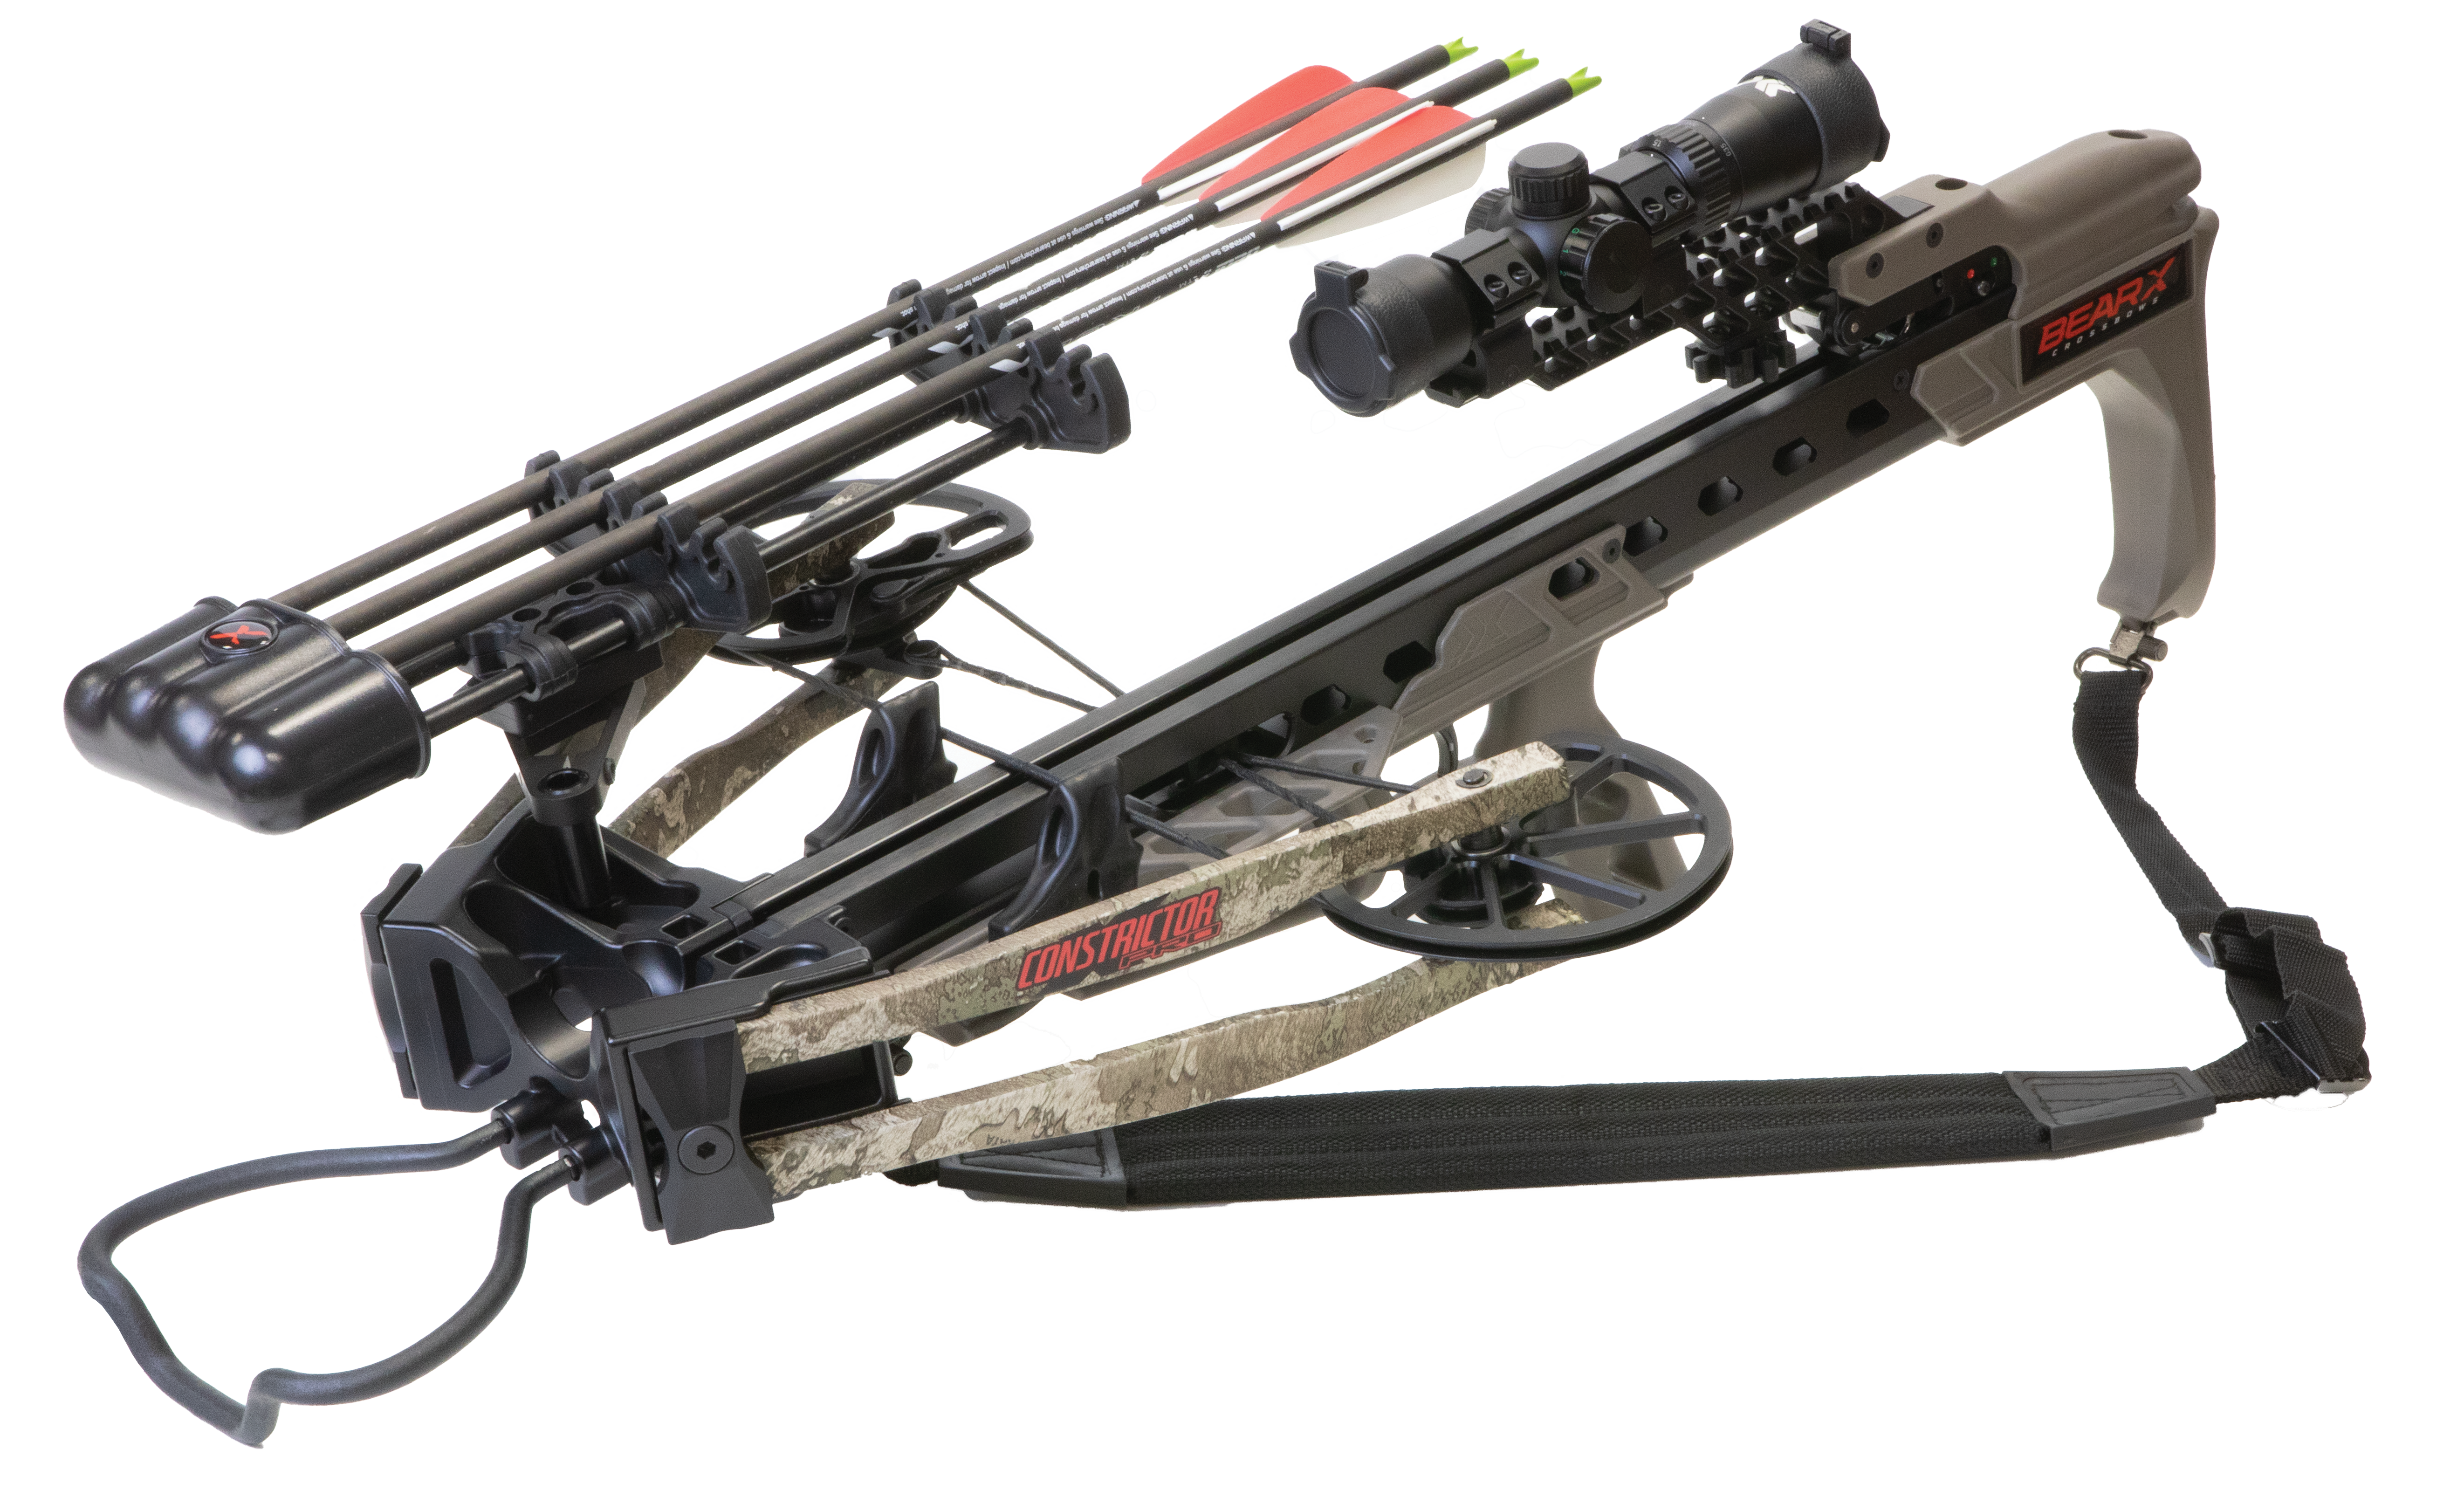
5. Bear Archery Constrictor Pro
The Constrictor Pro is a proven performer, redesigned for even more power on an extremely compact frame. The Constrictor Pro measures a mere 8.125 inches wide cocked, and roughly 12 inches wide uncocked, making it perfect for hunting in tight quarters. The crossbow is equipped with an ambidextrous top mount quiver that sits on a 360-degree pivot and allows the hunter to position the quiver in any orientation. This ready-to-hunt package includes Illuminated Reticle/Speed Adjustable Scope, three Bear X TrueX arrows, a four-arrow quiver, sling, manual cocking sled and arrow lube/string wax. Available in Stone/Veil Whitetail or Stone/TrueTimber Strata color and camo combinations.
One of the principal elements of ammunition that you should be aware of is muzzle velocity. This is the speed at which the bullet is traveling when it leaves the barrel of your gun, measured in feet per second (ft/s) or meters per second (m/s).
Whether your ammunition is subsonic or supersonic determines to a significant degree how quietly or audibly the bullet travels through the air.
Subsonic vs. Supersonic Ammunition
When you fire a cartridge, the propellant charge burns, generating high-pressure expanding gases that drive the bullet through the barrel. These powder gases are the primary source of a firearm’s report (the sound of the gunshot.)
When you ask, “What is subsonic ammo?” the answer is simple. If the bullet exceeds the speed of sound, thereby breaking the sound barrier, it’s supersonic. If, however, the bullet leaves the muzzle at a speed slower than the speed of sound, it’s subsonic.
Why Does This Matter?
Whether your ammunition is subsonic or supersonic is important because when a bullet breaks the sound barrier, it creates a miniature sonic boom.
You may be familiar with this phenomenon if you’ve ever witnessed a supersonic jet fly overhead and cause a sound similar to a thunderclap. The sonic boom produced by a bullet can’t cause the same level of disruption and is more akin to the crack of a bullwhip — which also creates a sonic boom. When your priority is reducing the report of your firearm to a minimum, this requires the use of subsonic ammunition.
Suppressor Use
The sound of a gunshot can cause permanent hearing loss, even with infrequent exposure, and comprises several variables. Many shooters use sound suppressors, also known as silencers, to reduce the risk to the shooter and bystanders.
If you own or are interested in owning a sound suppressor, the question “What’s subsonic ammo?” is an important one to answer. A suppressor can only moderate the sound of the gunshot at the muzzle by slowing and cooling the powder gases. Once the bullet leaves the suppressor and enters the air, the suppressor’s job is done. To optimize the functionality of a sound suppressor and render your firearm as quiet as possible, you should select ammunition that is reliably subsonic.
Subsonic Ammo
What constitutes subsonic ammunition depends on several factors. The speed of sound is not a fixed value. It varies according to environmental factors, such as ambient temperature and barometric pressure.
The higher the temperature, the higher the speed of sound. Likewise, the colder the temperature, the lower the speed of sound. For example, at 68° F, the speed of sound is approximately 1,125 feet per second. At 32°F, this drops to 1,086 feet per second.
Increasing to 100°F, the speed of sound changes to 1,159 ft/s. The latter speed corresponds to the muzzle velocity of many standard-pressure 9×19mm Parabellum loads using 124-grain bullets. However, all of these velocities are considerably higher than standard pressure .45 ACP using 185-, 200-, and 230-grain bullets.
Subsonic 9mm loads usually substitute heavier bullets — 147-150 grains — to reduce the muzzle velocity to approximately 1,000 ft/s to avoid causing additional noise. The original 230-gr. .45 ACP ball load achieves a muzzle velocity of between 830 and 860 ft/s in an M1911A1 subsonic at all temperatures that a person is likely to face.
Due to fluctuations in the speed of sound according to environmental factors, it’s essential that you choose ammunition that generates muzzle velocities sufficiently below the threshold to take full advantage of sound-suppressor technology. Ammunition uniformity is also worth monitoring.
Cartridges from the same lot do not demonstrate 100%-consistent muzzle velocities from shot to shot. You should account for this lack of uniformity and determine if you can, the extent of the variance from one round to another.
Supersonic Ammo for Suppressors
While supersonic loads will not be as quiet as subsonic loads when using a suppressor, that doesn’t mean that you can’t use them. The primary function of a suppressor is to reduce, not eliminate, the sound of the gunshot. If your priority when using a suppressor is to mask your location, the miniature sonic boom won’t reveal your position to a game animal or adversary — it’s directionless.
Rifles
Rifle ammunition often uses high-velocity loads that far exceed the sound speed to achieve flat trajectories, long-range accuracy, and satisfactory terminal performance. Suppressing rifles poses a special challenge because, unlike handguns, rifles need to shoot far.
In self-loading rifle actions that use gas pressure, modifications to the weapon may be necessary to cycle reliably using comparatively low-pressure subsonic ammunition. In the AR-15 platform, this may include changing the buffer assembly.
An example of a suppressor-optimized rifle caliber is the .300 AAC Blackout. This cartridge is available in both subsonic and supersonic loads for this purpose. In its supersonic form, it’s an intermediate cartridge capable of outperforming the 7.62×39mm Soviet. Its subsonic form delivers heavy bullets, some exceeding 200 grains, at a slow enough speed to match pistol ammo.
Suppressor-Specific
Whether you need subsonic or supersonic ammunition will depend on whether you intend to run a suppressor. If the answer is no, you can, under most circumstances, simply use standard loads in your firearms — whether it’s subsonic or supersonic will be less critical. In 9mm, most loads are supersonic, whereas most .45 ACP loads are the opposite. The .40 S&W cartridge is available in both, as are many other handgun cartridges.
Protect Your Hearing and Conceal Your Position
Subsonic ammunition can seriously improve your performance with a sound suppressor, whether in a rifle or a handgun. However, if you don’t intend to use a suppressor, the benefits of selecting subsonic ammunition are limited. Your gunshots will be somewhat quieter. But you still need to wear hearing protection.
You can also check:
Ammo 101: Types and Characteristics (See Full Article)
By: Dylan HaywardOne of the first things my old man went over with me when I first started turkey hunting at the age of 10 was how to tell the difference between a Jake and a Tom. And I am glad he did, because when you’re out there for the first time and the adrenaline is rushing, it’s easy to mistake the two. Avid turkey hunters will claim there are tons of ways to differentiate a Jake from a Tom, but I have 4 key identifiers to help you determine whether it’s a longbeard you’re looking at, or a young jake. The Turkey’s BeardThis one seems to be the most obvious and useful identifier of a Tom. Jakes are young turkeys, it’s a general consensus that a Jake is a one year old turkey, so he hasn’t had much time to grow his beard out. Thus, a Jake will typically only be sporting a 2-4 inch beard. This can sometimes get confusing with hens in the field, as they can also sometimes have a thin, short beard, but more on that later. Toms are more mature turkeys which can grow beards up to 11 inches in length or more. In most states, you are legally allowed to harvest any bearded turkey, and that includes hens. This likely boils down to how difficult it would be for a hunter to spot the difference between a hen and a Tom that both have beards, however, that doesn’t mean there aren’t any. The front breast feathers on a Tom are a very deep black, while the hens tend to be more of a dark brown. If you’re ever uncertain on whether or not it’s a bearded hen or a Tom, that’s a great identifier to know. A lot of hunters will keep the beard and hang it using a Big 8 Turkey Beard Hanger so make sure you keep the beard to display your trophy.
The Turkey’s SpursThe spurs on a turkey are a tough characteristic to identify while you’re hunting, although I think it’s worth noting the differences between a Jake’s spurs and a Tom’s. Jakes will generally have shorter, half inch spurs that are rounded at the end, almost resembling mounds. While the spurs of a Tom are usually much longer, getting up to one and a half inch, with sharp ends that will typically curve.The Turkey’s GobbleWith some careful listening, an experienced turkey hunter can distinguish a Tom gobble from a Jake gobble at a good distance away. Jakes tend to gobble a lot softer with a quick drop off. A Tom has a longer drawn out gobble that is significantly louder. From my experience turkey hunting, a Jake tends to gobble a lot more frequently than a Tom, like a child that won’t stop asking his parents for something. The Turkey’s FanI saved this for last because this is generally the last identifier I use, and I only use it if I am really on the fence about a turkey, and my other three identifiers haven’t convinced me yet. The fan of a Jake typically looks a bit uneven and awkward. At around the 4 or 5 month mark, a Jake begins to molt his fan. Meaning their small feathers get replaced by longer ones as they mature. Come spring time, the center fan feathers have already been replaced by longer feathers, which makes the outer feathers look uneven and out of place. When a Jake is in full strut, this becomes very easy to identify.Overall, one of the best ways to tell the difference between a Tom and a Jake is experiencing both of them in the same field while you’re hunting. You’ll quickly be able to identify which is the mature bird, and you can see first hand the differences between the two, which will help you on all of your future hunts.
“Unlock precision and power with the best German-made air rifle. Crafted with unmatched engineering expertise, this exceptional firearm combines unrivaled accuracy, superior craftsmanship, and cutting-edge technology. Elevate your shooting experience to new heights as you embrace the excellence of a German masterpiece.”
best german made air rifle
Germany has long been known for its excellence in manufacturing precision instruments, and air rifles are no exception. When it comes to choosing the best German-made air rifle, the options are plentiful. These rifles are not only built with exceptional craftsmanship but also incorporate cutting-edge technology to deliver unmatched accuracy and performance.
One of the top contenders for the best German-made air rifle is the renowned brand, Weihrauch. Their air rifles are highly regarded for their reliability, durability, and exceptional shooting experience. With their advanced engineering and attention to detail, Weihrauch rifles consistently prove themselves as a favorite among shooting enthusiasts worldwide.
Another notable mention in the realm of German-made air rifles is Diana. For decades, Diana has been synonymous with quality and precision. Their air rifles combine classic design with modern innovations, offering shooters an unmatched combination of elegance and performance. Whether you are a seasoned hunter or a target shooter, Diana’s range of models caters to every individual’s needs.
In conclusion, German-made air rifles are widely regarded as the best in terms of quality, precision, and performance. These rifles exhibit exceptional craftsmanship and innovative technology, ensuring consistent accuracy and reliability. With a strong reputation for excellence, choosing a German-made air rifle guarantees a superior shooting experience for enthusiasts and professionals alike.
If you have a hole or tear in your mesh fabric, don’t worry! You can mend it yourself with a few simple steps. First, locate the hole or tear. Then, cut out the faulty section of the mesh fabric with a pair of scissors.
Finally, use a seam ripper to remove any unwanted stitches from the hole or tear. Now you’re ready to mend your mesh fabric.
If you have a torn mesh fabric, the first thing you should do is clean the area with soap and water. Then, apply adhesive tape in a crosshatch pattern and press mesh onto the adhesive tape.
Allow to dry.
Clean Area With Soapy Water And Clorox
Cleaning mesh fabric is easier than you think. All you need is soap and water, and a few drops of clorox. Soak the mesh for about five minutes in warm soapy water, then rinse it off with cool water.
Don’t use hot water or bleach on mesh fabric because it can damage the material. When washing your mesh fabric, make sure to get all the dirt, dust, and stains off of it. Always shake out any excess water before hanging or placing your mesh piece back on the rack.
If needed, you can spot clean areas on the fabric with a damp cloth or sponge. To keep your mesh looking new, avoid getting liquids and moisture onto it; this will cause fading and wear over time. Make sure to store your mesh fabric away from direct sunlight and heat sources to avoid damaging it even further.
Apply Adhesive Tape In A Crosshatch Pattern
If you have a mesh fabric shirt that needs to be mended, there is an easy way to do it. First, take the shirt to a dry cleaner and ask them to remove the stain or damage. Next, apply adhesive tape in a crosshatch pattern to the affected area.
Then wait for the adhesive to set before removing it. Repeat this process on any other areas of the shirt that need attention. Finally, wash the shirt as usual and enjoy your newly repaired clothing item! Adhesive tape can be used on most fabrics, so be creative when applying it so that it doesn’t look too noticeable.
Keep in mind that adhesive tape will not last forever, so replace it regularly as needed. And last but not least, remember to always test a small area first before using it on a larger piece of clothing! Mending mesh fabric can be a simple task with the right tools and instructions—and sometimes just some patience.
Press Mesh Onto Adhesive Tape
When repairing mesh fabric, it is important to adhere the mesh to adhesive tape in order to prevent it from shifting or tearing during the repair process. To do this, first take a piece of adhesive tape and place it on one side of the mesh fabric.
Then carefully place the mesh over the adhesive tape, making sure that all edges are fully covered. Next, press down firmly on the mesh with your hands so that it adheres tightly to the adhesive tape. Finally, use a sharp object such as a knife to make any necessary cuts in the mesh fabric if needed.
Be careful not to puncture the adhesive tape when performing this step! Repeat these steps for any other areas of the mesh that need repairs. Once all repairs have been made, dry the mesh completely before re- installing into your garment or home decor project
Allow To Dry
If you notice any threads coming out of the mesh fabric, don’t panic. All you need to do is gently pull on the threads until all the evidence of the fray is gone. Once all the threads are pulled out, allow the fabric to dry completely before continuing with your project.
If there are still visible strands or holes in the mesh, fill them with a patching material and sew it down. When repairing mesh fabric, be sure to use a thread that matches the color of your mesh fabric and avoid using too much tension when stitching. After completing your repair, be sure to wash and dry your repaired fabric properly to avoid further wear and tear.
Remember: never leave mesh fabrics unattended while they are being patched – they can become damaged even faster if left untreated! And finally, if you ever have any questions about how to mend mesh fabric or any other sewing emergencies, don’t hesitate to reach out for help.
Remove The Fabric From The Mesh
Remove the fabric from the mesh by following these simple steps: Pry off the adhesive with a flathead screwdriver or scraper. Be careful not to cut yourself on the sharp edges of the adhesive residue.
Wipe down any dust or debris that may have gathered on the mesh during removal. Place a new piece of adhesive onto the mesh and press it into place firmly with your fingers or a blunt tool such as a Credit Card.
Hold in place for seconds, then release the mesh and gently pull off the adhesive backing. If necessary, reposition and re- adhere the fabric to ensure a tight fit against the mesh surface. Finally, use a vacuum cleaner to clean up any leftover adhesive residue.
Repair The Fabric With Sewing Supplies
If you’ve got a tear or hole in your mesh fabric, there are a few supplies that you need to mend it with. Bias tape is one of the most common supplies used to repair mesh fabric because it’s both strong and flexible.
You can use sewing needles and thread to sew the bias tape directly onto the mesh fabric. Once you have sewn the bias tape in place, use a hot iron to press it down and seal the repairs. Finally, use a seam ripper to remove any unwanted stitches or threads from the repaired area.
If you don’t want to rely on bias tape for your repairs, there are other options available such as Velcro strips or zippers. Always test a new repair before you go all-in and start stitching! If something goes wrong while you’re repairing your mesh fabric, be sure to have some replacement supplies on hand in case needed.
Be patient when repairing mesh fabric-it may take some time but it will definitely last longer if done correctly! When repairing mesh fabric, always make sure that there are no loose threads or areas that could come loose during wear and tear.
Wash And Dry The Fabric
When it comes to repairing mesh fabric, the most important thing to remember is to wash and dry it as soon as possible. Soak the fabric in warm water for a few minutes before washing it with your regular detergent.
Rinse the fabric thoroughly and then hang it to dry. If there are holes or tears in the fabric, patch them as soon as possible using a seam binding or zigzag stitch. If you notice any fading or yellowing of the fabric, treat it with a laundry stain remover before laundering it again.
Make sure that you store your repaired mesh fabric in a cool, dry place away from direct sunlight and heat sources. And lastly, if you ever have any questions about how to mend mesh fabric, don’t hesitate to ask a professional.
Apply A Patch
If you have a tear in your mesh fabric, the first step is to try to mend it yourself. There are a few different ways that you can mend mesh fabric, and each one has its own advantages and disadvantages.
One of the most common methods for repairing mesh fabric is by using a patch. When using a patch, be sure to follow the instructions that come with it so that the repair will last. Another option is to have your mesh fabric replaced entirely.
This is usually the best solution if the tear is large or multiple pieces of mesh have been damaged. If you choose not to replace the mesh fabric, be sure to keep the repair clean and free from moisture so that it lasts longer. Finally, if you do manage to mend your mesh fabric on your own, be sure to document the repairs so that you can re-create them if needed in the future.
Always remember: when repairing mesh fabric, take care not to stretch or tear the underlying fabric. If your are repairing pant fabrics, be careful doing so as they are expansive.
Conclusion
The best way to mend mesh fabric is by using a safe and effective method such as steam.
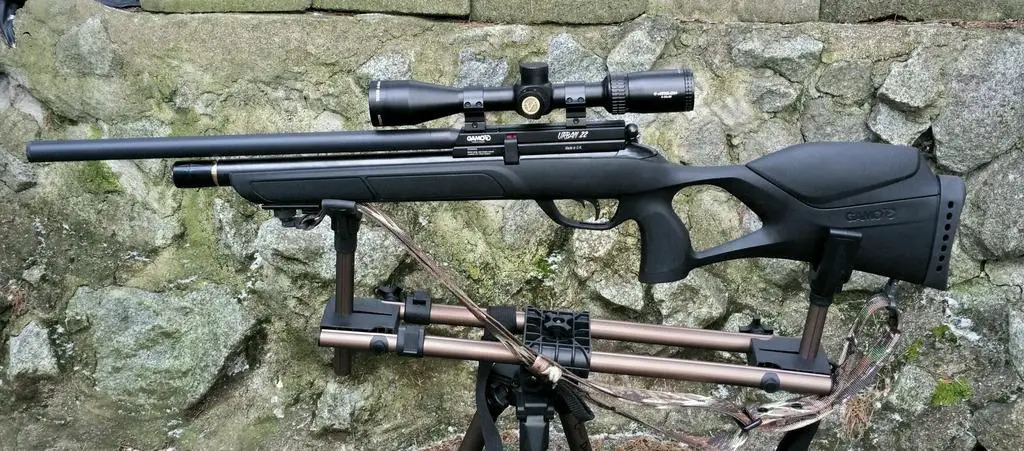
The Gamo Urban air rifle has a Cold-hammer forged barrel.
It is wonderfully smooth, accurate, and vigorous at 35000 hammer strikes that forge a barrel.
Cold Hammer Forging refines the surface of rifling, the structure of the grains producing the mirror-like finishing in the bore, presenting an accurate and reliable air rifle.
The accuracy permits that you can shoot adequately for a sustained time.
Urban is the first gunning brand that has introduced the Cold-hammer forged barrel at such a reasonable price.
Gamo urban air rifle comes with a silencer, which is integrated with whisper maxim.
It allows the rifle to work silently without any hindrance or disturbance.
Accordingly, it can be said that Gamo Urban .22 cal is noise-free when compared to other guns.
Gamo Urban Vs. Benjamin Marauder
The Gamo urban air rifle is worth $299, and is a silent, accurate, and reliable air rifle. At PyramydAir, it has the lowest price in its class along with shipping charges.
It fits comfortably in the hands and easily handles.
The accuracy can be improved but is pretty good at this price.
Due to PCP, magazines are much more expensive to refill.
You must first go for a detailed analysis of the product to understand its reliability.
The Gamo Urban PCP review provided by the customers mostly ends up with positive feedback because the rifle is basically in a very stylish black color.
Moreover, the customers like the concept of silent shot introduced in the Gamo urban air rifle.
This allows them to shoot in the backyard or their gardens during weekends or the evening without any noise especially.
When you are uninterrupted while shooting your rifle, with no noise, then you perform well without any hindrance.
The Gamo Urban .22 review shows that there is less noise, but they are not claiming that rifle shoots with zero noise.
Another thing that is liked is the accuracy of the Gamo Urban .22 cal, particularly from 25 yards.
The higher prices of pre-charged pneumatic rifles have often kept customers away from the weapon,
But the reasonable cost with quality features attracts more customers.
The Gamo Urban PCP air rifle reviews are positive which urges the shooters to at least try once.
Moreover, the shooters call the Gamo Urban .25 the perfect gun for the backyard.
The customers with negative comments talked about the magazine, as maybe they did not know precisely about the refills.
As per the magazine, there is a $50 cost.
But, if they tend to read this article, all their confusion may vanish eventually.
Those who did not have accuracy in shooting, gave a try to .22 Gamo Urban PCP air rifle,
And it is impressive to read the reviews that their shooting accuracy has genuinely developed, and their confidence has improved.
In addition to this, the combo introduced by the manufacturers is also liked by customers a
As they have significant accessories where they can change anything according to their requirements.
Concluding thoughts
With the high quality and the great look, the Gamo urban air rifle .22 is a market leader.
It’s reliable and affordable, granting you a great time shooting!
Introducing the Fastest 22 Air Rifle – Unleash unparalleled speed and precision with our cutting-edge air rifle. Engineered with state-of-the-art technology, this high-velocity firearm delivers unmatched performance, allowing you to hit targets with exceptional accuracy. Join the league of sharpshooters and experience the power of the fastest 22 air rifle on the market today.
fastest 22 air rifle
If you are in search of the fastest.22 air rifle on the market, you have come to the right place. A.22 caliber air rifle is an excellent choice for various shooting activities, including hunting and target practice. However, finding a model that offers both power and velocity can be a daunting task. Fortunately, we have compiled a list of the fastest.22 air rifles available to help you make an informed decision.
One of the top contenders for the title of fastest.22 air rifle is the GAMO Magnum GR Model. With its advanced technology and innovative design, this rifle can reach incredible speeds. The combination of its high-powered spring mechanism and precision engineering allows it to propel pellets at astonishing velocities. Additionally, it boasts exceptional accuracy and a durable construction, making it ideal for both beginners and experienced shooters.
Another noteworthy option is the Gamo Swarm Magnum 10X GEN3i Inertia Fed .22 Caliber Break Barrel air Rifle Model, renowned for its impressive speed and reliability. This air rifle utilizes a gas-piston system that delivers maximum energy with each shot. Its sleek design incorporates features such as adjustable triggers and ergonomic stocks for enhanced comfort and control. Whether you are looking to take down pests or hit targets with extreme precision, this high-velocity.22 air rifle is sure to exceed your expectations.
In conclusion, the fastest 22 air rifle offers unparalleled speed and accuracy for shooting enthusiasts. Its high velocity and precision make it a top choice for various activities such as target practice or small game hunting. With its advanced features and impressive performance, this air rifle guarantees an exceptional experience for users seeking speed and efficiency in their shooting endeavors.
If you have already become a happy owner of a pneumatic gun or are just about to become one, this article about handling weapons safely is for you. Remember that any gun is not a toy, and you should follow a number of rules regarding the installation and removal of the tank, loading, and unloading of the gun, handling and taking care of the guns.
Do not demonstrate the gun in a large crowd of people, as this may mislead those around you, and they may mistake it for a firearm. Be sure to read all instructions before using a gun and remember that you must follow all of them (handling & possession). 90% of all accidents with air guns are due to careless handling, the perception that a gun is not loaded when it actually is and aiming it at an inappropriate target. All these cases can be avoided if a shooter handles a weapon responsibly and correctly.
1. Handle the gun as if it is loaded, just like you would handle a firearm .
2. Always aim in and keep the barrel pointing in a safe direction. Choose only a target that cannot be shot through and make sure that pellets will not bounce off it because of its hard surface. Never shoot into water even if you are in your own backyard.. Never point your gun at people or animals, or anything else that you are not going to shoot.
3. Keep your grip safety activated until you are ready to shoot. Do not pull the trigger when the grip safety activated (a pellet can get stuck in the barrel). As in any mechanical devices, the grip may fail. Even when the grip safety is activated, handle it with caution. Never point the gun at anyone or at anything you do not want to shoot.
4. When you take the gun from someone or from a safe, check if it’s discharged and the grip safety is activated.
5. Do not touch the trigger until you are ready to shoot.
6. Use special goggles while shooting.
7. If you wear eyeglasses, put the goggles on top of those.
10. Keep the trigger, if any, locked when storing.
11. Keep your gun in a safe place at your house without pellets and CO2 cylinders.
12. Before storing the gun, make sure it is discharged and secured.
13. Do not forget that any repair of the gun is carried out only in special workshops.
14. Never let a loaded gun out of your hand.
15. An air gun, together with its instructions, may only be handed over to persons over 18 y/o and familiar with the principles of handling weapons.
16. Do not modify your gun. Changes may not be compatible with the design of the gun and will be contrary to these instructions. The use of such weapons can cause serious injury or death. It will also void the warranty on the gun.
17. If you have dropped your gun, inspect and check it carefully before using it again. If something changes, like the stroke of the trigger, it could mean damage to or destruction of parts of the gun. If this happens, contact a service department.
CO2 Cylinder Installation and Removal
Keep your hands and face out away from vaporizing CO2 gas. If the gas gets into contact with the skin, it can cause rapid cooling and frostbite. Before removing the cylinder from the air gun, make sure that the CO2 cylinder is empty. Slowly turn the cap counterclockwise until the noise of the vaporizing CO2 gas stops.
When installing and removing the CO2 cylinder:
Make sure that the air gun is not loaded and its grip safety is activated.
Slowly turn the cap counterclockwise until the noise of vaporizing CO2 gas stops. Make sure it’s all out.
Open the tube lid and remove the empty CO2 cylinder with the air gun barrel pointing down.
Insert a new cylinder/cartridge into the air gun mag with the neck facing forward.
Screw in the gas cylinder cap.
Point the air gun in a safe direction, remove the safety catch and pull the trigger.
If the air gun does not pop after pulling the trigger, the cylinder has not been pierced. Slightly screw the cap, slingshot the slide, and fire again until the pops are heard, it means that gas is released each time the trigger is pulled.
Check the grip safety.
Do not store your air gun with the cylinder inside.
Important: The CO2 cylinder may explode at temperatures above 50°C. Do not deform or burn cylinders. Do not heat or store them at temperatures above 50C°.
Pellets Loading and Removal
Always use .177 (4.5) caliber diabolo pellets with a maximum length of 6.5 mm when firing air guns. Do not use BB (metal balls), darts, or other unsuitable projectiles for rifled barrels. The use of non-standard bullets may cause damage to you or your gun. Never reuse bullets.
Loading the pellets:
Check the grip safety.
Point the gun in a safe direction.
Follow the instructions of your air gun to load the pellets.
Before shooting, make sure that the slide is pushed forward and locked.
Discharge by shooting is the easiest way to remove a pellet. Shoot in a safe direction.
Discharge without shooting:
Activate grip safety.
Remove the CO2 cylinder.
Pull the slide back and open the barrel.
Insert a suitable size brush into the barrel. The barrel may be damaged if you use an incorrectly sized brush.
Push the pellet into the pellet ejection port direction.
If a pellet does not come out of the gun, it does not mean that there are no more of them in the mag. Shooting with insufficient CO2 pressure may cause a pellet to stuck in the barrel. If it is not possible to make a shot, it could be due to a dud caused by a pellet.
Handling
Before cleaning your air gun (grip safety) make sure there is no pellet in the barrel and remove the CO2 cylinder. The external metal parts of the gun should be cleaned from time to time. Use a soft cloth and gun oil for this purpose. The gun must be lubricated regularly after every 250 shots in order to function properly and avoid corrosion. Apply 2 to 3 drops of gun oil on external parts and inside the compression chamber. Use only airgun-rated oils. With proper care and proper handling, your gun will bring you pleasure for many years.
Author bio: Roy Emerson is a technology enthusiast, a loving father of twins, a programmer in a custom software company. Editor in chief of TheHomeDweller blog, greedy reader, and gardener.
With their bright orange color and meaty texture, chicken of the woods mushrooms are one of the most exciting edible mushrooms out there, and if you catch them at the right time they can be some of the best mushrooms you’ll ever eat. They’re a perfect wild mushroom for beginners, and something to look forward to every year.
Chicken of the Woods mushrooms (Laetiporus sulphureus) are a parasitic fungi that decays dead trees and causes a brown heart rot in living trees, making it both a parasitic and saprobic mushroom.
The fruiting body appears as a fan-shaped mushroom growing in large brackets on stumps, fallen logs, and the base of dead trees. They’re widespread across North America, but also enjoyed around the world.
The chicken of the forest.
Famous as the mushroom that tastes like chicken, they’re a great mushroom meat substitute in many dishes, making them perfect for using in vegetarian and vegan mushroom recipes. Some people like to treat them like crab or lobster.
They can grow to a massive size. In 2009 the Guinness Book of World Records listed a chicken mushroom found in United Kingdom weighing over 100 pounds.
White chickens are sometimes confused for an orange hen of the woods.
Chicken of the Woods Species
As of this writing, there should be 7 species in North America. New varieties are identified around the world regularly, and there’s at least 14 species identified in the world to date including L. xinjiangensis from China, L. cremeiporus, from Japan, and L. caribensis from the Carribean.
East Coast and Great Lakes
Laetiporus sulphureus is the type species, and are the best example of what a chicken mushroom will look like. It has yellow pores and grows on dead and dying hardwoods, especially oak, but can also grow on poplar, willow and locust.
L. sulphureus.
Laetiporus cincinnatus or white-pored chickens often grow from the roots of oak trees in a basal rosette shape, but can grow directly from trees as well. Many foragers prefer their texture and bug resistance over yellow varieties. Unlike other chickens, it causes root or butt rot instead of heart rot. It has a peachy-orange color, and cream to white spores.
L. cincinnatus.
Laetiporus huroniensis is newer addition to the genus. L. huroniensis has pale yellow pores and grows on old-growth conifers in the northeastern U.S. and Upper Midwest. It’s bright orange color is similar to L. sulphureus.
Laetiporus persicinus, or the white Chicken of the woods. L. persicinus is the only species to grow on hardwood and softwood. It has a white to pink-salmon cap that darkens to brown with age with white pores. It’s found in the southeastern United States, Australia, Asia, and South America the Caribbean.
West Coast
Laetiporus conifericola. A recently named species with a range from California to Alaska. It’s preference for conifer trees like hemlock, spruce and fir set it apart from others in the genus. The caps are the classic bright orange to peach, and and has yellow pores.
L. conifercola.
Laetiporus gilbertsonii Grows on eucalyptus or oak and is found in the Southwest as well as the west coast. Some avoid it as it can cause allergic reactions for those sensitive to it. A cousin (L.gilbertsonii var. pallidus) has white pores and grows along the Gulf Coast.
L. Gilbertsonii.
Where to Find Chicken of the Woods
You can find sulphur shelf mushrooms anywhere a tree has been infected. In the Midwest, chicken of the woods season begins in late Spring, continuing through Fall. Each host tree has its own “clock” and they’ll fruit at different times.
In Minnesota and Wisconsin I find them growing on red and white oak, but also cherry or beech are possible. On the west coast and up into Canada they grow on Coniferous trees.
Harvesting Chicken of the Woods (Video)
Finding chicken mushrooms is easy. Finding them at the perfect stage for eating is not. Young mushrooms harvested before the shelves form are the most tender.
Stages of growth: perfect, middle aged, and too old.
To harvest, cut the tender portions of chicken mushroom off with a sharp knife. The mushrooms get tough and woody quickly as they grow, and the excitement of finding one can fool you into bringing home a tough, woody mushroom. If you find a large mushroom, trim off dirt from the base.
Mushroom Bugs
Fungus gnat larvae (Sciaridae and others) will infest the mushroom quickly. Some species are more prone to them than others. As you cut, inspect the mushroom for tunneling, keep cutting until you can’t see any bug holes.
Very fresh, young mushrooms may bleed yellow juice when cut
Store fresh chicken of the woods in a Zip Loc bag with a paper towel and they can last for a week in the fridge. Larvae are harmless, but they’ll make your mushrooms go bad faster.
Mushrooms covered with flies will contain maggots/larvae.
Chicken of the Woods Look Alikes
There are no real look alikes, and there’s no false chicken of the woods. The mushroom most commonly confused with chickens are hen of the woods. The difference is easy to see: chicken mushrooms are orange or yellow and hen of the woods are brown.
Chicken of the Woods vs Hen of The Woods
Cooking Chicken of The Woods
Chickens can be substituted for chicken in any recipe, as well as other mushrooms after cutting into bite-sized pieces. They can be sauteed, breaded and fried, pickled, and cooked just about any way you could imagine.
Cooking Tips
Always cook thoroughly, at least 5-10 minutes.
Often only outer 1-2 inches of mushroom is edible.
Very young mushrooms are the best, and the whole mushroom can be tender.
Young mushrooms can be cooked in thick slices for mushroom steaks.
Young chicken mushrooms can have a lemony taste, and pair well a little acid.
To show off the mushrooms, saute them and put them on top of a dish.
Young mushrooms can be cooked in large pieces, older mushrooms must be trimmed. See below for examples.
Young Mushrooms
Young mushrooms may not need trimming.
Older Mushrooms
Only use the tender edges of older mushrooms. Save woody parts for stock.
Allergic Reactions to Chicken of The Woods
Chicken of the woods are edible, but some people have an allergic reaction no matter what species is eaten. Vomiting, nausea and diarrhea are the usual symptoms, but individual sensitivity varies. Another possible reaction is a numbing sensation in the lips after eating chicken of the woods.
Always eat a small amount of food that’s new to you. Start by eating a small serving or 1-2 ounces of cooked mushroom.
How to Preserve Chicken of the Wood
The mushrooms can be dehydrated, pickled, or frozen. Pickling is a good option that keeps the fresh texture of mushrooms. Use my Pickled Chicken of the Woods recipe.
You can dry chicken of the woods but they become very tough. Use dehydrated chicken mushrooms for soup or roasted chicken or hen mushroom stock. You can also use them to make mushroom powder, but it isn’t as good as mushrooms that are more tender.
How to Freeze Chicken of the Woods Mushrooms
Freezing is the best way to preserve these mushrooms. To freeze chicken of the woods, cook until wilted in butter and season with salt, portion into Zip Loc bags. Put the ziploc bags into a vacuum bag and then vacuum seal. Frozen mushrooms will keep for at least 6 months and often longer. You can also freeze them after making Wild Mushroom Duxelles.
Chicken of the Woods Recipes
I have lots of recipes on this site beyond what’s shown below. See the link after the recipes to go to the archive.
Chicken Fried Chicken of the Woods
Crispy, golden brown mushrooms everyone will love are a fan favorite on this site.
Wild Chicken Mushroom Thai Red Curry
Mushrooms simmered in rich coconut milk sauce with kaffir lime and spices. Many different mushrooms can be used.
Sicilian Chicken of the Woods
In Italy the mushrooms are known as fungo de carrubo and grow from carob trees. They’re traditionally simmered in a spicy tomato sauce, served with grilled bread.
More Chicken of the Woods Recipes
FAQ
References
USDA: A new species of Laetiporus (Basidiomycota, Polyporales) from the Caribbean basin
MycoKeys: Phylogeny and taxonomy of Laetiporus (Basidiomycota, Polyporales) with descriptions of two new species from western China
"Debate over whether a 22 air rifle can effectively take down a deer has sparked curiosity among hunting enthusiasts. With its lower muzzle velocity...
An air rifle's effective shooting range depends on various factors, including the type of rifle, the caliber, and the power source. Generally speaking, most...
")
")
")
")
")


 The Turkey’s BeardThis one seems to be the most obvious and useful identifier of a Tom. Jakes are young turkeys, it’s a general consensus that a Jake is a one year old turkey, so he hasn’t had much time to grow his beard out. Thus, a Jake will typically only be sporting a 2-4 inch beard. This can sometimes get confusing with hens in the field, as they can also sometimes have a thin, short beard, but more on that later. Toms are more mature turkeys which can grow beards up to 11 inches in length or more. In most states, you are legally allowed to harvest any bearded turkey, and that includes hens. This likely boils down to how difficult it would be for a hunter to spot the difference between a hen and a Tom that both have beards, however, that doesn’t mean there aren’t any. The front breast feathers on a Tom are a very deep black, while the hens tend to be more of a dark brown. If you’re ever uncertain on whether or not it’s a bearded hen or a Tom, that’s a great identifier to know. A lot of hunters will keep the beard and hang it using a Big 8 Turkey Beard Hanger so make sure you keep the beard to display your trophy.
 The Turkey’s FanI saved this for last because this is generally the last identifier I use, and I only use it if I am really on the fence about a turkey, and my other three identifiers haven’t convinced me yet. The fan of a Jake typically looks a bit uneven and awkward. At around the 4 or 5 month mark, a Jake begins to molt his fan. Meaning their small feathers get replaced by longer ones as they mature. Come spring time, the center fan feathers have already been replaced by longer feathers, which makes the outer feathers look uneven and out of place. When a Jake is in full strut, this becomes very easy to identify.Overall, one of the best ways to tell the difference between a Tom and a Jake is experiencing both of them in the same field while you’re hunting. You’ll quickly be able to identify which is the mature bird, and you can see first hand the differences between the two, which will help you on all of your future hunts.