A few years ago, I was listening to the Range podcast made by two of my friends—Julia Ritchey and Amy Westervelt. It’s a great show about life in the West, and this particular episode was about the controversies surrounding coyote hunting, but about halfway through the podcast, I noticed that people were pronouncing “coyote” two different ways: the three syllable “coyote” and the two-syllable “coyote.” Here are two clips:
Julia Ritchie (podcast host): After their first petition to get a coyote hunting ban failed, they tried again in November of last year, and about 40 people spoke. I tallied it up. (3:51-3:57)
Fred Knowlton (a retired professor who studied coyotes for 40 years): Personally, I don’t believe any of the coyote hunting expeditions by the general public are effective in reducing coyote numbers. (6:42-6:52)
I did some research and didn’t find anything definitive, and then I put the question out to the Grammar Girl Facebook page, and got more than 1,800 responses, which is why it’s nearly three years later that I’ve gone through all the comments, made a map, and am now telling you about it. Wow. Thanks for all that! I didn’t word the question in a way that makes this a scientific study, but 1,800 responses certainly rivals things I’ve seen published in journals.
Since then I’ve also done more research, so here’s what I found.
There are actually more than two different ways to pronounce it. You have “kai-oat-ee” and “kai-oat,” which you heard in the clips, but then some people pronounce it with a little bit of a different ending—“kai-oat-eh”—and people honoring the Spanish origin or who live near the Mexican border in the United States might pronounce it the Spanish way: “coy-yoh-tay.” And the Cambridge Dictionary says the British pronunciation is “coy-oh-tee.” So we can safely say there are at least five—five—different pronunciations that people are regularly using to describe this animal, and I bet there are some I haven’t even found. And that’s just in current times.
A publication from the late 1800sopens TEXT file by the American Dialect Society notes that at that time the word was often mispronounced as “cayote.” Although I’m guessing at the pronunciation. The “cay” part at the beginning is clear, but your guess is as good as mine as to how they meant people pronounced the last part. It could be “cay-oat.” It’s just spelled C-A-Y-O-T-E.
Most of what I’ll talk about next is just about the first two pronunciations because that’s what I asked people about, and I made a map of the responses. What will jump out at you first is that the “kai-oat” pronunciation is much more prominent in the middle of the United States than anywhere else—it spans a somewhat expanded Great Plains region.
All along the coasts and in the South and through the whole Minnesota-Wisconsin-Ohio region, people primarily seem to say “kai-oat-ee,” but in Montana, Wyoming, the Dakotas, Kansas, Nebraska, and Iowa, “kai-oat” seems dominant. Colorado, Texas, Oklahoma, and Arkansas seem like a mixed bag.
People from the University of South Dakota told me their mascot is the “kai-oat,” but that his name is Charlie, and sometimes they also call him Charlie “Kai-oat-ee.”
But when I started reading the comments themselves, two patterns emerged beyond big-picture geography.
Coyote: The Urban-Rural Divide
First, there seemed to be a clear rural-urban divide. People in cities are more likely to say “kai-oat-ee” and people who live in rural areas are more likely to say “kai-oat.” There were quite a few comments from people who said something like this:
I am from Los Angeles, and we say “kai-oat-ee,” but we would say “kai-oat” when we’re trying to sound like cowboys.
The Wile E. Coyote Influence
Second, there seems to be an age-related divide, with older people saying “kai-oat” and younger people saying “kai-oat-ee,” which, of course, leads us to Wile E. Coyote, the Loony Toons character who’s always getting an anvil dropped on his head by the Road Runner. That cartoon first appeared in 1949.
Many people speculate that younger, urban people say “kai-oat-ee” because the only experience they’ve had with coyotes is from the cartoons, and that may play a role, but I believe the three-syllable version is actually the older version since the word comes to English from the Mexican Spanish word “coy-yoh-tay,” which ultimately goes back to the Nahuatl word “coyotl.” (“koy-OH-tehl”)
I found one radio interview that said “kai-oat” was the original pronunciation in English, but it didn’t provide references, and I’m not convinced. The earliest citations in the Oxford English Dictionary seem to be a mix of the two-syllable and three-syllable version. It’s a mess. The first eight citations spell it seven different ways.
Noah Webster’s original dictionary, published in 1828, doesn’t appear to include the word. The Imperial Dictionary by John Ogilvie published in 1885 (an extension of Webster’s original dictionary), shows two pronunciations with the “kai-oat” pronunciation first, but Webster’s 1913 Unabridged Dictionaryopens TEXT file flips that around and shows the three-syllable pronunciation first, likely pronounced “coy-oh-te,” and then also appears to include an alternative two-syllable pronunciation. It seems that at least in the United States, people have pronounced it both ways for a long time.
For what it’s worth, the “kai-oat” pronunciation seems to be mostly limited to the United States and Canada. Nobody outside those two countries reported saying “kai-oat,” and the Oxford English Dictionary doesn’t include a two-syllable pronunciation. (But the Collins Dictionary does. Argg.)
‘Coyote’: Singular and Plural
And then there were a few comments that don’t fit any of the patterns, but seemed interesting enough to pass along. Two people, for example, said that they use “kai-oat-ee” as the singular, but “kai-oats” as the plural. And another person reported doing the exact opposite. I’m not sure what to make of that except that people are adapting the pronunciations to have different meanings.
‘Coyote’: Smugglers
Along the same lines, at least one person from southern California said he uses “kai-oat” for the animal and “kai-oat-ee” for a person who smuggles immigrants across the border.
‘Coyote’: A Mix of Pronunciations
Finally, there were multiple people who realized they say it both ways, and said they always feel like they aren’t even sure how it should be pronounced, and after going through all the comments and possibilities, I can say that I’m not surprised people are confused!
Quite a few people seem to use two different pronunciations depending on the context, whether they are talking about one or more animals, or even just randomly. Merriam-Webster calls the “kai-oat” pronunciation “chiefly Western,” but that’s not exactly what I found. Among my responses, almost nobody in California or Arizona reported saying “kai-oat,” for example. It could just be that the people in those states who say “kai-oat” aren’t active on my Facebook page, but that seems unlikely.
How to Pronounce ‘Coyote’
So after all this research, what do I think you should do?
If you’re in the U.S., both the two syllable and three syllable versions are fine. Use whatever you prefer or what’s dominant in your region.
But if you’re outside the U.S., it’s probably better to stick with a three-syllable version like “coy-oh-tee” or “kai-oat-ee.” But my research outside the U.S. isn’t as extensive, so if it’s important, you might want to look into it more.
Mignon Fogarty is Grammar Girl and the founder of Quick and Dirty Tips. Check out her New York Times best-seller, “ opens in a new windowGrammar Girl’s Quick and Dirty Tips for Better Writing.”
Buckwheat can make the soil easier to till. Moreover, it can produce flour for making pancakes, and if you’re gluten-free, growing this cover crop is undoubtedly a nice thing to consider.
So when to plant buckwheat? The ideal growing season for this plant is spring, though summer and early fall are also possible. Read on for more details.
In fact, many people grow buckwheat during the hot months to suppress garden weeds. If you plan to do the same, make sure to irrigate the plant frequently to safeguard it against high heat.
For example, Columbia in PA has the last frost on May 5 and the first frost on October 5. As a result, the planting dates in this region are May 19 until October 4.
2. When the soil is warm, neutral or acidic, and well-drained
In terms of temperature, the soil should be 70℉ or warmer for ideal germination. If you can’t meet this exact requirement, a range of 45 to 105℉ is acceptable.
At the same time, the garden bed should have a pH of 4 to 6 and be neither too wet nor too dry to nourish buckwheat. And because we’re talking about dampness, one factor that influences it is the soil’s drainage.
To test how quickly your garden bed releases moisture, dig a trench with a depth and width of 12 inches and pour water into it.
If the hole you dug doesn’t lose an inch of water an hour, add three to four inches of compost to the ground.
Hardiness Zones for Buckwheat Growing
Buckwheat best grows in hardiness zone 3 to 7. To determine which zone you’re living in, go to planthardiness.ars.usda.gov and look up the map for your state.
For example, if you live in Greensboro in NC, your residence would fall under zone 7. On the other hand, Hancock in Iowa would be in zone 5.
Both of these areas can support buckwheat.
How to Plant Buckwheat?
That said, it’s possible to select buckwheat seeds for planting according to your region.
As an example, the Manisoba cultivar is very popular in the Northeast of the US.
Also, note that a distribution of 55 pounds of seeds per acre will bring excellent results, whether you’re growing buckwheat as a cover crop or as produce.
Harvesting Buckwheat
Buckwheat is ready for harvest when ¾ of the seeds are brown and ripe. To make sure this is the case, check the seeds carefully and ensure they’re not empty hulls. Otherwise, you may think you’ve reached the ¾ criterion when you haven’t.
Then, follow the steps below to harvest buckwheat:
Conclusion
When to plant buckwheat? The answer should become apparent as long as you know the frost dates where you live.
In addition, it’s essential to give your plant the right soil temperature, pH, and care. This includes adjusting the ground’s acidity and watering it when necessary, for instance.
With these tips in mind, you should be able to grow buckwheat in your garden without trouble.
Besides, you also can refer more to other topics about the best time to plant other flowers such as azaleas, allium bulbs, roses and etc.
Field judging black bears is notoriously difficult. They might just be one of the most difficult species to judge. Not only can it be hard to tell a big one from a little one, but sows and boars look very similar…and sows can get big!
If you’ve ever put yourself in a fast decision, quick draw scenario, then you know what it’s like to sit at a high stakes black bear gambling table. But, with a bit of pre-game day know-how and the help of a few tricks, those all too commonly experienced ground shrinkage issues should be no problem to steer clear of.
Hunt an area that consistently produces big boars.
Learn how to know the difference between a sow and a boar.
Look for a stout neck and a wide head with “small” ears on the sides.
Look at the size of the body.
Watch how they move.
Compare them with the bait barrel.
Watch for rutting activity.
Hunt an area that consistently produces big boars.
Big bears are very particular about where they live. If you’re not hunting in those areas, you won’t kill a mature boar.
It is the giant super intellectual, predatory boars that keep every hunter daydreaming, and these old un-hunted crankers are our objective and goal. While these specific bears are choosy about a lot of things, much the same as any other big old age class animal, they are firstly very particular about where they live.
These giant boars will hold and defend prime areas.
If you are not in an area that has big bear, and focusses calculated strike effort specifically at them, you may as well have stayed home.
How to tell the difference between a sow and a boar.
The first thing when your field judging black bears is to determine whether it’s a sow or boar. At times this is exceedingly easy when it’s a mature boar, but it can sometimes be difficult to tell difference between a battle hardened old sow and a big boar. Age catches up to us all. Until boars start approaching adult weights at 7-9 years old, it can be very tough to tell them from sows.
When you hunt with an outfitter that targets large, age class boars, and discourages shooting sows will tip the odds in your favor. This management ideology just makes sense. After all, sows are crucial to population dynamics, they are the best big boar bait available.
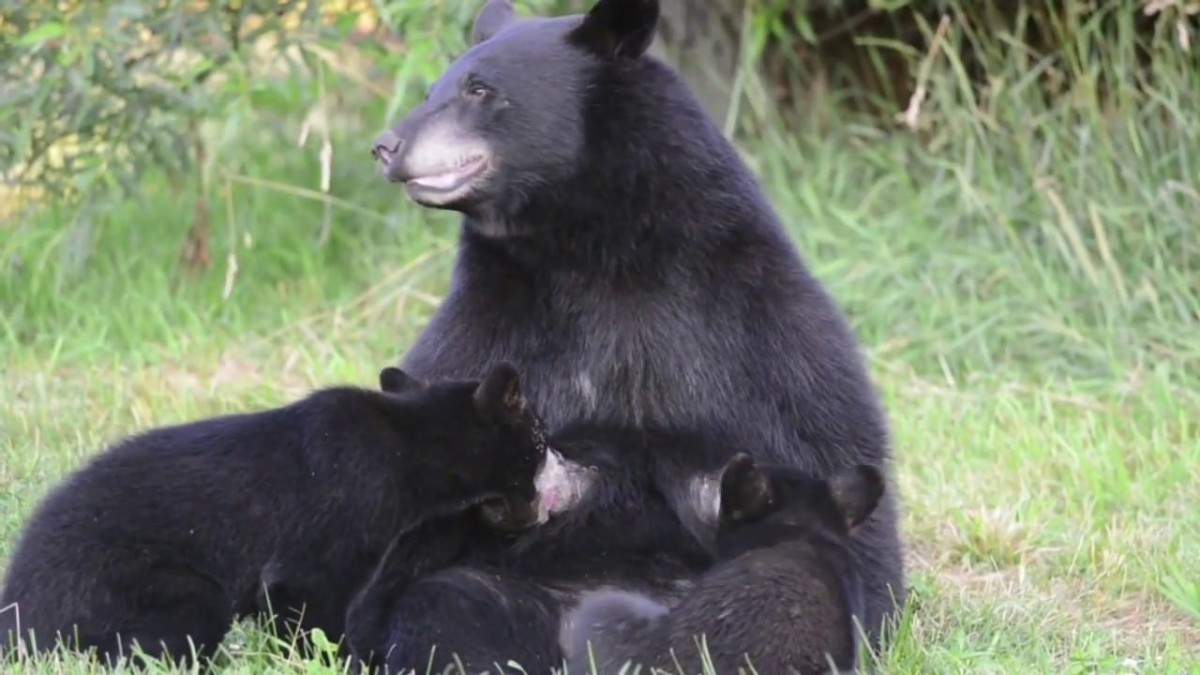
If a bear has cubs with it, it’s a sow.
In every case where you see a larger sized bear with one or more quite notably smaller and obviously dependent bears, the larger bear is guaranteed to be a sow. However, many sows will have young of the year that they won’t bring with them into a bait site. They’ll stash their cubs in a tree before coming into the bait. Given any opportunity will kill cubs, a mature boar will kill and eat her cubs, so as to bring a sow into estrus cycle.
A dead ringer with sows is the visible presence of nipples.
On wet (nursing) sows with young, the cubs pull out hair around the nipples which can profile them, making them visible, even from broadside, and this can be especially evident on older, larger sows. A good outfitter will set up the bait to give you “angle views” that can really help in obtaining this visual.
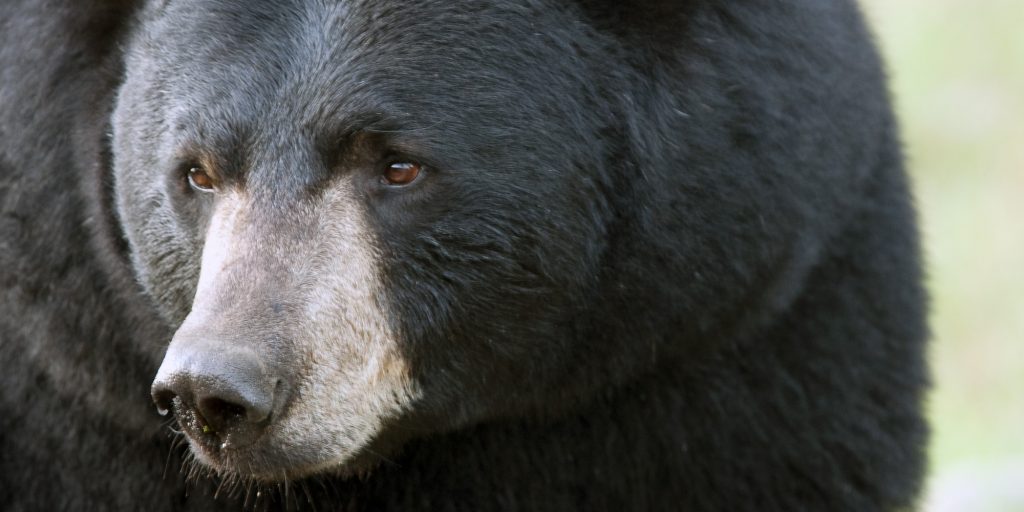
Look at the head.
Female black bears have broad heads and narrow muzzles.
Females’ faces are slender and more pointed than males. The smaller the ears look and the farther apart they seem, the better the bear. If you can envision an imaginary upside down triangle on the bear’s head going down to its nose, and all sides are equal, then it’s a mature bear.
A mature boar’s head is quite wide, and will have a thicker, stouter neck.
Boars with some years under their belt will always appear to have smaller ears that are off more to the side of the head than up top. They can show a quite distinct center line crease that runs down their forehead from between their ears. This muscle structure can be quite predominate and noticeable on some big boars.
The smaller the ears look and the farther apart they seem, the better the bear.
If you can envision an imaginary upside down triangle on the bear’s head going down to its nose, and all sides are equal, then it’s a mature bear. A young bear’s head will look big and its ears will look huge and almost touch. Young bears also move at a quick pace and seem skittish and clumsy.
Body Size
Look at length of legs, chest size and how big the head is in comparison to the body.
If his head and ears look small in comparison to his body he’s a giant. If his legs look thick top to bottom, that’s a good sign. A boar’s leg will look as big below the knee as above the knee. A sow’s legs will have a V shape from top to bottom.
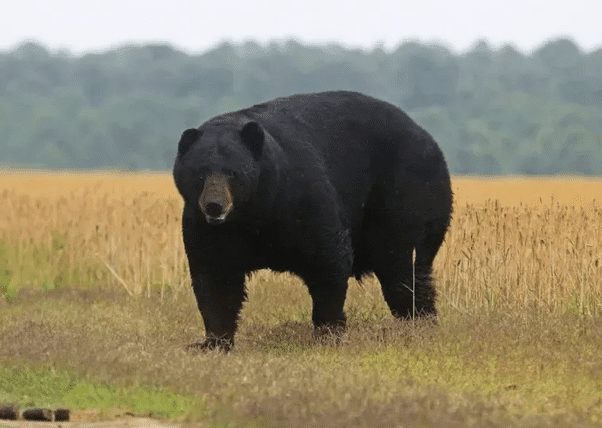
Mature boars will exhibit what appear to be blocky, low to the ground profiles.
Watch for bears that are exceptionally wide across the brisket with heavy, wide set front legs. Watch for what appears to be shorter more evenly tipped hair. Big boars do not normally look shaggy with longer ratty looking coats as do younger bear, though belly hair will hang low pronouncing the big belly look. Magnum old sows can exhibit these same profile traits though, so nothing is static. All of these confirmation dynamics are affected by genetics and range factors, and black bears are diverse creatures with individual traits, similar to people in that way.
There is nearly no mistaking a big boars, how they move and how they conduct themselves, especially when around other bears. Big is big. Nearly anyone can identify a true giant boar.
They will rule every roost they roll into. Other bears will openly display caution and fear when they make an appearance at the party. Yes they look just like that discovery channel monster on TV. Really big bears will have a crease down the center of their forehead, and often scars on their faces. A giant boar can also appear so big it looks like he’s dragging his belly when he moves.
If the neck looks almost as big in front of the shoulder as his body does behind the shoulder, he’s a shooter.
That said however, it’s an entirely different issue with a medium to large bear. Field judging black bears of this caliber becomes difficult. Even younger, smaller framed bear often look like they belong in this class without the strong utilization of visual sizing aids.
Big bears move like they are big.
Large bears also move slowly, swaying side to side with a big belly and an air of confidence about them.
They can display indecisiveness, but all animals including people take pause when thinking and processing info, however, they will not be the bear that gets jumpy at every sound out there. If a bear comes in and has all other bears clear and undivided attention, promoting rapid submission or displays of fear, it will be a boar.
The body language of a non-submissive large male in any specie is a rapid telltale of dominance, and such intolerant mannerism is as well the case with dominant big boars.
If you see ripped up ears and/or heavy facial fight scarring on a big bear, do not waste any more time looking, it is show time. If you see a larger profile bear moving and trailing a smaller bear into the bait site, take the time to be sure, but it is virtually guaranteed to be a boar following a hot sow in.
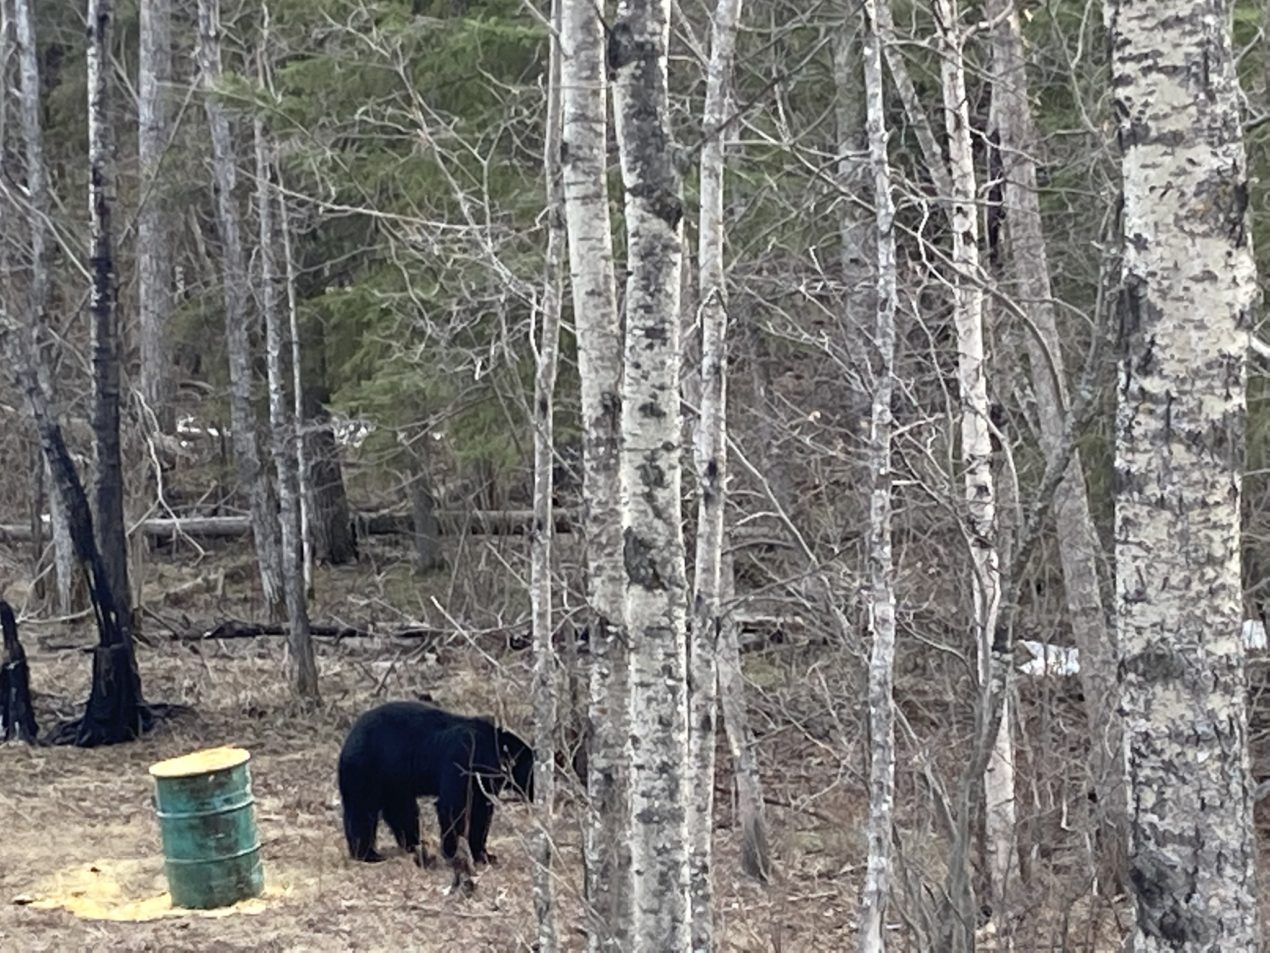
A great method for field judging black bears is to compare them to the bait barrel.
If a bear is as tall as a barrel standing on its end, shoot!
Bait barrels are a great tool to use in size determination. In addition, it really helps to cut logs at each bait site that are 5 feet in length. If a bear meets/exceeds the length of these on the ground, it will likely be a shooter.
To aide in sex identification, strategically placed tree mounted “candy” jars provide a standing, unobstructed belly view.
Hopefully this overview can help a bit with this notorious subject of field judging black bears.
Big black bears can be a challenge to successfully square off with, but so long as moves are calculated, one nearly cannot go wrong. The hope is for giant net book 21 inch boars to be the first bear to walk in on everyone out there, but until that happens, keep looking those bear over and have fun!
Are you interested in booking a bear hunt?
Ask For Pricing or More Information
Here are some hunts that you might like:
Ask Us About a Hunt Request pricing and availability
“Rain or Shine: Unveiling the Habits of Whitetail Deer During Rainfall” – Discover whether these majestic creatures retreat or persist in their movements when faced with precipitation, as we delve into the intriguing behavior of whitetail deer amidst rainy conditions.
Hunting Whitetail in the Rain: Strategies for Success
Hunting whitetail in the rain can be a challenging but rewarding experience if you employ the right strategies. One key strategy is to remember that rain does not significantly affect deer behavior. While their activity patterns may change slightly, deer still need to feed and will resume their normal routine once the rain subsides. Therefore, if you are willing to endure a little rain, you have a good chance of catching a big buck on your trail camera as soon as the rain stops.
Another important strategy is to take advantage of the increased daytime movement of mature bucks after the rain quits. Rainfall is one of the few factors that can increase deer activity during daylight hours, giving hunters a prime opportunity to spot and target these elusive creatures. Additionally, fewer hunters are likely to be out in rainy conditions, further reducing competition and increasing your chances of success.
The wet leaves caused by rain can also work in your favor when hunting whitetail. The noise dampening effect of wetness and suppressed scent conditions due to wind give hunters an advantage over deer. Bucks may move more freely and less methodically due to the slippery terrain, making them more vulnerable to being spotted by alert hunters.
To hunt successfully in the rain, it is crucial to come prepared with proper rain gear and a waterproof blind or shelter. Staying dry while waiting for that monster buck is essential for comfort and focus. Additionally, anticipate a longer sit than usual since deer can move at any given time during rainfall. Be patient, bring snacks, and mentally prepare yourself for an all-day hunt.
Tracking a wounded deer in rainy conditions requires extra attention and care. Rain can wash away blood trails, making it harder to follow the wounded animal’s path. It is crucial to ensure clean shots and pay close attention to every movement after pulling the trigger. Depending on the shot placement and circumstances, you may choose between waiting for the buck to fall or immediately tracking it.
In conclusion, hunting whitetail in the rain can be a promising and rewarding experience if you approach it with the right strategies. Don’t be discouraged by rainy forecasts; instead, prepare ahead of time, utilize hunting apps like HuntWise to plan your stands, and take advantage of this less popular time for hunting. With the right gear, patience, and tracking techniques, you can increase your chances of landing that big buck even in wet weather conditions.
Do Whitetail Deer Move During Rainy Weather? The Truth Revealed
When it comes to hunting whitetail deer, many hunters wonder if rain affects their movement. The truth is that rain does have an impact on hunters, but not so much on the deer themselves. While rain may alter the times when deer are normally active, they still need to feed and will resume their regular activities as soon as the rain stops.
Whitetail deer are always on the move, except in severe weather conditions such as heavy downpours and strong winds. They prefer to move when they can hear what is happening around them, which is why they tend to avoid heavy rain and wind. This means that if you can endure a little rain, you have a good chance of catching a big buck on your trail camera right after the rain subsides.
One important thing to note is that mature bucks tend to be more active during daylight hours right after the rain stops. Rainfall increases daytime movement for deer, which gives hunters an advantage. Additionally, fewer hunters take advantage of hunting in rainy conditions, giving bucks another reason to move more freely.
The wet leaves caused by rain also affect how bucks move. They tend to veer away from stopping frequently or reacting to noises due to the slippery ground. This allows them to move more freely and unpredictably. As a hunter, this combination of reduced noise and suppressed scent conditions due to wind gives you an advantage over the deer.
To hunt successfully in rainy weather, it’s crucial to be prepared with appropriate gear such as good rain gear and a waterproof blind. Staying dry while waiting for that monster buck is essential for your comfort and focus. Make sure you have everything you need to stay warm and dry during your hunt.
Anticipate a longer sit than usual when hunting in the rain because deer can move at any given time during rainfall. Sometimes there might be short breaks in the rain, and then it starts again unexpectedly. Challenge yourself to sit all day long, bring snacks, and be ready for action. Patience is key because deer will move whenever there’s a brief break in the rain.
When it comes to tracking a deer after a successful shot in rainy weather, it’s important to ensure a clean shot and pay attention to every little movement after pulling the trigger. Rain can wash away blood, so you need to be extra careful during tracking. You have two options: either wait for the buck to fall or start tracking immediately. Choose the best strategy based on your situation.
With these tips in mind, hunting in rainy weather can be just as promising as a crisp fall morning. Don’t let rain discourage you or make you give up on your hunt. Prepare ahead of time, take advantage of this less popular hunting time, and use tools like the HuntWise app to plan your stands and find the most ideal conditions. Rainy weather can offer unique opportunities for landing that big buck you’ve been dreaming of.
Rainy Day Hunting: How to Take Advantage of Whitetail Movement
When it comes to hunting whitetail deer in the rain, many hunters may feel discouraged or opt to stay home. However, with the right strategies and preparation, hunting in the rain can actually be quite advantageous. Here are some tips to help you make the most of rainy day hunting:
1. Understand Deer Behavior in Rainy Conditions
While rain may affect hunters’ spirits, it doesn’t really impact deer behavior significantly. Deer still need to feed and carry on with their daily activities even during light rain. They may alter their activity patterns slightly, but they will continue moving as long as the weather is not severe. Keep in mind that heavy wind or downpouring rain might deter deer from being active.
2. Take Advantage of Post-Rain Activity
Mature bucks tend to start moving right after the rain stops, often during daylight hours. Rain increases daytime movement for deer, making it an opportune time for hunters to be in the field. Since many hunters avoid hunting in the rain, there will be fewer people out competing for deer sightings.
3. Utilize Stealth and Scent Suppression
Wet conditions provide an advantage for hunters due to reduced noise caused by wet leaves and suppressed scent carried away by wind and rain. Move quietly and take advantage of these conditions by using scent control methods such as scent eliminators or playing the wind effectively.
4. Be Prepared with Proper Gear
Before heading out for a rainy hunt, make sure you have appropriate rain gear that will keep you dry while waiting for your target buck. Being prepared with waterproof clothing and a waterproof blind will ensure you can withstand the elements without getting soaked.
5. Be Patient and Plan for Longer Sits
Rain can be unpredictable, with periods of heavy rain followed by brief pauses. To increase your chances of success, be prepared for longer sits in the field and bring snacks and necessities to make yourself comfortable throughout the day. Remember that deer will move whenever there is a break in the rain, so patience is key.
6. Track Effectively After a Shot
When hunting in the rain, it’s crucial to pay close attention to your shot placement and track the deer effectively. Rain can wash away blood trails, making tracking more challenging. Make sure you have a clean shot and choose either to let the buck fall before tracking or immediately start tracking while paying attention to every movement.
By following these strategies and being well-prepared for rainy day hunting, you can take advantage of whitetail movement during less popular hunting conditions. Don’t let rain deter you from pursuing your hunting goals – embrace the challenge and use it to your advantage.
Maximizing Your Chances: Hunting Whitetail in Wet Conditions
Hunting whitetail deer in wet conditions can be a challenging but rewarding experience. With the right strategies and preparation, you can increase your chances of success even when it’s raining. Here are some tips to help you make the most of hunting in wet conditions:
1. Be Prepared with the Right Gear
Before heading out for a rainy hunt, make sure you have the appropriate gear to keep yourself dry and comfortable. Invest in good quality rain gear that is waterproof and will protect you from getting soaked. Additionally, consider using a waterproof blind or shelter to wait for that monster buck without getting wet.
2. Anticipate a Longer Sit
During rainy weather, deer can move at any given time as the rain may hold off for short periods before picking back up again. To maximize your chances of encountering deer, challenge yourself to sit all day long. Bring snacks, use the bathroom before heading to your stand or blind, and be prepared for unpredictable weather patterns.
3. Pay Attention to Tracking Techniques
When hunting in wet conditions, it’s important to pay extra attention to tracking techniques after making a shot. Rain can wash away blood trails, making it more challenging to track wounded deer. Ensure that your shot is clean and take note of every movement after pulling the trigger.
4. Choose the Best Tracking Strategy
After making a successful shot, you have two options for tracking in the rain: either give the buck some time to fall or immediately begin tracking. Assess the situation based on your shot placement and make an informed decision on which strategy is best for you.
5. Take Advantage of Less Popular Hunting Times
Many hunters may choose not to hunt during rainy weather, giving you an advantage. Whitetail deer will still be active and on the move, especially when the rain starts to subside. By being willing to endure a little rain, you increase your chances of encountering that big buck while others stay home due to the weather.
6. Utilize Technology for Planning
Make use of hunting apps like HuntWise to plan your hunting strategy in wet conditions. Plot your stands, compare which stand has the most ideal conditions for hunting in the rain, and make informed decisions based on weather patterns and deer movement predictions.
Remember, hunting in wet conditions can be just as promising as a clear fall morning if you are prepared and adaptable. Don’t let rain discourage you or cause you to call it quits. Instead, embrace the challenge and take advantage of this less popular time for hunting whitetail deer.
Whitetail Deer and Rain: Understanding Their Behavior and Patterns
When it comes to hunting whitetail deer in the rain, understanding their behavior and patterns can greatly increase your chances of success. While rain may put a damper on your spirits as a hunter, it doesn’t necessarily affect the deer in the same way. Deer still need to feed and go about their business even when it’s raining, with the exception of severe weather conditions like heavy downpours or strong winds. Therefore, if you’re willing to endure a little rain, you may have the opportunity to catch that big buck on your trail cam just as the rain begins to subside.
One important factor to consider is that mature bucks tend to move right after the rain stops, increasing daytime activity. This is a great advantage for hunters as rain is one of the few things that can boost deer movement during daylight hours. Additionally, fewer hunters are likely to take advantage of hunting in the rain, giving bucks another reason to move more freely. The wet leaves also cause bucks to move less methodically, veering away from stopping frequently or reacting to every noise they hear. This combination of reduced noise due to wetness and suppressed scent conditions due to wind gives hunters an advantage over the deer.
To successfully hunt whitetail deer in the rain, preparation is key. Make sure you have good rain gear and a waterproof blind that will keep you dry while waiting for your target buck. Being prepared before heading out for a rainy hunt ensures you stay warm and somewhat dry throughout your hunting expedition.
Another important aspect is being mentally prepared for an extended sit. During rainfall, deer can move at any given time as showers might come and go unpredictably. To maximize your chances of success, challenge yourself to sit all day long. Bring snacks with you, use bathroom facilities before heading out to your stand or blind, and get ready for potential action. Remember, rain is unpredictable, and deer will move whenever there’s a break in the weather. Patience is key, and sitting all day can greatly increase your chances of encountering a buck.
Once you’ve successfully landed a deer, tracking becomes crucial. Rain can wash away blood trails, making it challenging to track the animal. Ensure that your shot is clean and pay close attention to any movement after pulling the trigger. Depending on the situation, you may choose to let the buck fall before tracking or immediately begin tracking. These are two of the best options for tracking in rainy conditions.
In conclusion, hunting whitetail deer in the rain can be just as promising as hunting on a crisp fall morning. Don’t be discouraged or give up when you see rain in the forecast. Instead, prepare ahead of time with proper gear and take advantage of this less popular hunting time. Utilize tools like the HuntWise app to plot your stands and compare which one has the most ideal conditions for hunting in the rain. With these strategies in mind and a good understanding of deer behavior during rainfall, you’ll increase your chances of landing that big buck even when it’s wet outside.
Rain or Shine: Hunting Tips for Tracking Whitetail in Wet Weather
Tracking whitetail deer in wet weather can present unique challenges for hunters. However, with the right strategies and preparation, rain can actually provide an advantage for those willing to brave the elements. Here are some tips to help you track whitetail in wet weather:
1. Be Prepared with Proper Gear
Before heading out into the rain, make sure you have the appropriate gear to keep yourself dry and comfortable. Invest in good quality rain gear that is waterproof and breathable. Additionally, consider using a waterproof blind or tree stand cover to provide extra protection from the elements.
2. Anticipate Longer Sits
During rainy conditions, deer may move at any given time as the rain comes and goes. Be prepared for longer sits in your hunting spot, as deer may become active during periods of lighter rain or when it temporarily stops. Bring snacks and necessities to ensure you can stay in your hunting location without having to leave due to discomfort.
3. Pay Attention to Deer Behavior
Deer behavior may be altered during rainy weather, but they will still need to feed and go about their daily activities once the rain subsides. Keep in mind that mature bucks tend to move right after the rain quits, increasing daytime movement opportunities. Take advantage of this by positioning yourself strategically during these times.
4. Utilize Reduced Noise and Scent Conditions
Wet leaves dampen noise, making it harder for deer to detect your presence. Take advantage of this by moving more freely without worrying too much about noise disturbances scaring away deer. Additionally, rainy conditions often suppress scent, giving you an advantage when it comes to staying undetected by wary bucks.
5. Ensure Clean Shots
In wet weather, blood trails can be easily washed away, making tracking more challenging. To increase your chances of a successful track, focus on making clean shots and paying close attention to the deer’s movements after the shot. Take note of landmarks or other identifiable features to help you locate the downed deer.
6. Choose the Best Tracking Strategy
After making a shot, you have two main options for tracking in the rain: either wait for the deer to fall before beginning your track or immediately start tracking. Evaluate the circumstances and make a decision based on factors such as shot placement, distance traveled by the deer, and visibility in the rain.
By following these strategies and being prepared for wet weather conditions, hunting in the rain can prove to be just as successful as hunting on clear days. Don’t let rain deter you from pursuing your trophy buck – embrace the challenge and increase your chances of a successful hunt.
In conclusion, whitetail deer are known to move less during heavy rain due to reduced visibility and decreased hearing abilities. However, they may still be active in light rain or seek shelter until the weather improves. Their movement patterns may vary depending on local conditions and the individual deer’s behavior.
In the animal kingdom, there are many creatures with impressive characteristics, but few can match the mighty bite force of a hippopotamus. With an astonishing capability of exerting around 1,800 psi (pounds per square inch) of force, the bite of a hippo is nothing short of extraordinary. Surprisingly, hippos surpass the likes of lions, tigers, and bears in terms of bite strength, and their jaws possess the ability to open at an astonishing 150 degrees with a mouth width ranging from 4 to 5 feet. As fearsome herbivores, hippos rely on their powerful bite not only for crushing and chewing tough vegetation but also as a formidable defense mechanism against potential predators like crocodiles, lions, and even humans. In fact, these powerful creatures are responsible for the tragic death of approximately 500 individuals every year, making them one of the most dangerous animals in Africa.
Hippos, known for their massive size and intimidating presence, possess one of the most powerful bites in the animal kingdom. With a jaw strength capable of producing around 1,800 psi (pounds per square inch) of force, their bite can be quite formidable. This bite force surpasses that of even apex predators such as lions, tigers, and bears, cementing the fact that hippos are not to be underestimated.
Hippos’ Bite Force in the Animal Kingdom
Amongst the diverse range of animals in the animal kingdom, hippos stand out with their incredible bite force. The sheer power of their jaws allows them to exert immense pressure, making their bite force one of the highest recorded. This extraordinary ability showcases the strength and adaptability of these remarkable creatures.
Comparison to Other Animals
When comparing the bite force of hippos to other animals, it becomes evident just how formidable they truly are. While predators like lions, tigers, and bears are known for their strength, the bite force of a hippo surpasses even these mighty creatures. It is a testament to the immense power that resides within the jaws of a hippo.
Ability to Kill a Crocodile
Despite the formidable nature of crocodiles, hippos possess the strength and ability to defy the odds and overpower these reptilian predators. There have been recorded instances of hippos successfully killing crocodiles, showcasing their dominance in the animal kingdom. The combination of their powerful bite force and their natural defensive instincts enable them to prevail in these encounters.
The Anatomy of a Hippo’s Mouth
Understanding the anatomy of a hippo’s mouth provides valuable insights into the mechanisms behind their exceptional bite force.
Size of Their Mouths
One of the defining features of a hippo’s mouth is its size. With the ability to open their jaws up to 150 degrees, hippos possess large mouths that are designed to accommodate their substantial teeth and aid in their feeding habits. This generous mouth size contributes to their ability to generate such astonishing bite force.
Jaw Flexibility
A hippo’s jaw boasts impressive flexibility, allowing for a wide range of movement. This flexibility is essential in capturing and gripping food, as well as defending against potential threats. With a combination of strength and flexibility, hippos can maneuver their jaws with precision and force, maximizing the effectiveness of their bite.
Width of Their Jaws
In addition to their considerable size, a hippo’s jaws also possess significant width. Their mouths range from 4 to 5 feet wide, providing ample space for their teeth and facilitating the crushing and chewing of their food. The breadth of their jaws contributes to their ability to generate substantial bite force and aids in their overall feeding process.
Defense Mechanism Against Predators
Hippos’ powerful bite force serves as a formidable defense mechanism against potential predators, enabling them to protect themselves and their young.
Using Their Powerful Bite Force Against Predators
When confronted with threats such as crocodiles, lions, or humans, hippos utilize their powerful bite force as a primary line of defense. With the ability to inflict significant damage with a single bite, hippos can deter predators and potential attackers. The sheer force behind their jaws serves as a warning to those who dare approach.
Potential Threats Faced by Hippos
While hippos are known for their strength, they are not without vulnerabilities. In the face of predators, they must remain vigilant and cautious. The primary threats encountered by hippos include crocodiles, prides of lions, and even humans, who may encroach upon their territory or pose a danger to their calves.
How Their Bite Force Aids in Defense
The formidable bite force possessed by hippos plays a critical role in their defensive strategies. With a bite that can cause severe injury or even death, hippos can effectively deter predators. By utilizing their strong jaws, they can inflict significant damage upon attackers, giving them an advantage in confrontations. Their bite force allows them to establish dominance and protect their territories and young.
Hippos’ Diet and Their Bite Force
While hippos’ bite force is often associated with their defensive capabilities, it also plays a crucial role in their herbivorous diet.
Herbivorous Nature of Hippos
Contrary to their imposing stature and powerful jaws, hippos are herbivores. They primarily feed on grass and vegetation, spending several hours each day grazing and consuming large quantities of plant matter. Despite their voracious appetites, their diet consists entirely of plant-based material.
Specifics of Their Diet
The immense size and strength of a hippo’s jaws aid in their ability to crush and chew their food effectively. With their incisor and canine teeth adapted for grasping and tearing grasses, hippos rely on their molars and premolars, situated towards the back of their mouths, to grind and crush the fibrous vegetation. Their powerful bite force assists in breaking down the tough plant matter into more manageable pieces.
Role of Powerful Jaws and Teeth in Crushing and Chewing Food
Hippos’ strong jaws and teeth are essential tools in their dietary process. The crushing force generated by their bite allows them to break down the tough plant material, aiding in digestion. Additionally, their large teeth and wide jaws provide the necessary leverage to not only grip vegetation but also effectively chew and grind it down to a more easily digestible form.
Testing Female Hippos’ Bite Force
Due to the inherent risks associated with testing male hippos, researchers have focused on measuring the bite force of female hippos instead.
Implications of Testing Female Hippos
Testing the bite force of female hippos provides valuable insights into the capabilities of these creatures without posing unnecessary risks to the researchers involved. By focusing on female hippos, the data obtained can still provide a comprehensive understanding of their bite force and contribute to the overall knowledge surrounding these impressive animals.
Reasons for Not Testing Male Hippos
Male hippos, known for their territorial nature and aggressive behavior, represent a significant threat when it comes to conducting bite force tests. Their unpredictable nature and potentially volatile responses make it unsafe to engage in such measurements. As a result, researchers opt to study female hippos instead, ensuring their safety while gathering valuable information.
Procedure and Results of Bite Force Testing on Females
To measure the bite force of female hippos, researchers employ various methods. By equipping a specialized device with pressure sensors, they can capture the force exerted during a bite. By carefully provoking a bite response from a cooperative female hippo, researchers can obtain accurate and reliable data regarding their bite force. Such measurements contribute to our understanding of hippos’ capabilities and behaviors.
Hippos: One of Africa’s Most Dangerous Animals
While hippos may be perceived by some as lovable creatures, they are, in fact, one of Africa’s most dangerous animals, responsible for a significant number of fatalities each year.
Annual Death Toll Caused by Hippos
Hippos are responsible for approximately 500 deaths annually, making them one of the most dangerous animals in Africa. Their imposing size, territorial nature, and aggressive behavior contribute to these fatalities. It is essential to exercise caution and respect their space when encountering these animals in their natural habitats.
Comparison to Other Dangerous Animals in Africa
When comparing the danger posed by hippos to other notorious African animals, such as lions, elephants, or crocodiles, it becomes evident that hippos rank high on the list. Their confrontational nature and incredible strength make them a formidable force, and encounters can quickly escalate if precautions are not taken.
Factors Contributing to Hippos’ Dangerous Nature
Various factors contribute to the dangerous nature of hippos. Their territorial behavior, especially when defending their young, can lead to aggressive encounters. Additionally, their powerful bite force, which can cause severe injury or even death, further enhances their dangerous reputation. Understanding these factors is crucial in promoting coexistence and ensuring the safety of both humans and hippos.
Hippos’ Bite Force in the Animal Kingdom
To understand the significance of hippos’ bite force, it is important to delve deeper into its measurements and comparisons to other animals.
Overview of Hippos’ Powerful Bite Force
Hippos’ bite force is measured in pounds per square inch (psi) and typically registers at around 1,800 psi. This measurement places hippos amongst the upper echelons of the animal kingdom in terms of bite force capability. Their jaw strength and the pressure they can exert showcase the remarkable power packed within their formidable bodies.
Measurement in Pounds Per Square Inch (psi)
The bite force of a hippo is measured in pounds per square inch, which indicates the amount of force exerted over a given area. With hippos demonstrating bite forces of approximately 1,800 psi, it is clear that their bite is a remarkable force to be reckoned with.
Impressive Strength Compared to Other Animals
When comparing hippos’ bite force to other animals renowned for their strength, such as lions, tigers, and bears, hippos emerge as the clear victors. Their surpassing bite force showcases the immense power they possess and establishes them as one of nature’s true heavyweights.
Comparing Hippos’ Bite Force to Other Animals
To further appreciate the astonishing bite force of hippos, it is worthwhile to compare them to other formidable predators.
Hippos vs. Lions
While lions are often lauded as the kings of the animal kingdom, their bite force falls short in comparison to that of hippos. A lion’s bite force typically ranges from 600 to 700 psi, making them significantly less powerful in this regard. In a direct confrontation, a hippo’s bite force would undoubtedly give it the upper hand.
Hippos vs. Tigers
Tigers, renowned for their prowess as apex predators, possess a bite force that is greater than that of lions but still inferior to that of hippos. A tiger’s bite force ranges from 1,050 to 1,200 psi, making it formidable in its own right, but unable to match the jaw strength of a hippo.
Hippos vs. Bears
Bears, known for their strength and size, possess a bite force that rivals that of lions but still falls short of a hippo’s bite force. With a bite force ranging from 700 to 1,200 psi, bears are formidable predators, but they are outmatched by the sheer power generated by hippos when it comes to biting.
Hippos’ Bite: Capable of Killing a Crocodile
One of the most astonishing demonstrations of hippos’ bite force is their ability to kill crocodiles, despite the reptiles being known for their powerful jaws.
Unique Ability to Overpower Crocodiles
Crocodiles, being formidable predators themselves, are not easily overtaken. However, hippos possess the strength and bite force required to successfully overpower and kill crocodiles in certain circumstances. This ability showcases the exceptional power and force generated by a hippo’s jaws.
Evidence of Hippos Killing Crocodiles
Various instances have been documented showcasing hippos successfully killing crocodiles. While this might seem surprising given the reputations of both species as fierce predators, it highlights the superior bite force of hippos and their capacity to dominate encounters with crocodiles.
Factors Enabling Hippos to Prevail in These Encounters
Several factors contribute to hippos’ ability to prevail in encounters with crocodiles. Their massive size, combined with their powerful bite force, gives them a significant advantage. Additionally, the territorial nature of hippos when defending their territories, particularly against crocodiles, further solidifies their dominance in these interactions. Ultimately, it is the combination of strength, force, and strategy that allows hippos to overcome crocodiles, solidifying their position as apex predators.
The Physical Features of a Hippo’s Mouth
Exploring the physical features of a hippo’s mouth provides a deeper understanding of its capabilities and adaptations.
Size and Dimensions of a Hippo’s Mouth
A hippo’s mouth is a marvel of nature, characterized by its substantial size and dimensions. With jaws that can open up to 150 degrees, hippos possess mouths capable of accommodating their powerful teeth and aiding in their feeding habits. The vast expanse of their mouths is a crucial factor in generating the remarkable bite force for which they are known.
Range of Jaw Movement
In addition to their size, hippos’ jaws boast a remarkable range of movement. This flexibility allows for effective capturing and gripping of food, as well as facilitating defensive actions. The extensive range of jaw movement contributes to the overall functionality of a hippo’s mouth, enhancing their capabilities in various aspects of their lives.
Mouth Structure and Adaptations
A hippo’s mouth is specifically adapted to its herbivorous diet and its overall lifestyle. From the positioning and shape of their teeth to the structure of their jawbones and muscles, every aspect of their oral anatomy is optimized for crushing and chewing vegetation. These adaptations ensure their mouth’s effectiveness in both defensive situations and feeding processes, further emphasizing the significance of a hippo’s bite force.
In conclusion, hippos possess an impressive bite force that exceeds that of many other animals in the animal kingdom. Their powerful jaws, large mouths, and immense bite force make them formidable predators and a force to be reckoned with. Whether defending themselves against predators or exhibiting their dominance among rivals, hippos showcase unparalleled strength and adaptability. With their powerful bite force, hippos can hold their own against other apex predators, overpower crocodiles, and establish their dominance in their natural habitat. Understanding the anatomy, diet, and defensive capabilities of these incredible beings sheds light on their significance and the inherent dangers associated with their presence.
In my previous life in professional baseball, I worked with ballplayers who exhibited incredibly strong affinities to particular brands and models of gloves, bats or cleats. Some of those affiliations had to do with sponsorship (some with superstitions), but mostly those loyalties derived from success on the field. As I’ve written before, I continue to be amazed by the correlations between bird hunters and ballplayers. Another one of these parallels exists in pheasant hunters’ brand loyalty and that’s what my focus is today.
In my estimation, pheasant hunters are largely gear junkies and that gear, in priority of importance, revolves around: their favorite breed of bird dog, shotguns, boots, ammunition and hunting vests.
So today’s blog post surveys the nation’s most well-renowned bird hunters to poll their favorites in each of these five categories. My assumption as I send out this survey is that like baseball players, expert pheasant hunters have a wide array of affiliations and there likely won’t be too many common answers. Let’s find out.
To start, here are my favorites:
Bob St.Pierre, Vice President of Marketing at Pheasants Forever and Co-host of FAN Outdoors radio on KFAN
1) Bird Dog Breed: German shorthaired pointer
2) Shotgun: Beretta 686 Onyx 12 gauge over/under with skeet chokes in both barrels
Ron Schara, Host of The Flush presented by Pheasants Forever on Outdoor Channel
1) Bird Dog: Raven, the black Lab, whistle trained
2) Shotgun: Benelli Super Black Eagle or Benelli Vinci with Carlson choke tubes
3) Boots: Irish Setter
4) Ammo: Federal Ammo’s Prairie Storm 2-3/4” lead 5 shot
5) Vest: Still looking for a good one; need deep pockets for ammo; easy reach for bird carrying pouch
Bill Sherck, Co-Host of The Flush presented by Pheasants Forever on Outdoor Channel
1) Bird Dog: My love of hunting dogs is pretty basic. I want a dog that can find downed birds, always. That’s A-1 in my book.
2) Shotgun: I have a 1929 LeFever Nitro Special 20 gauge that became a best friend of sorts. It is, by far, my ugliest, most beat up shotgun, but I shoot it well and I love the history. Serious patina.
10) Vest: Gander Mountain Guide Series Hunting Strap Vest
Chad Hines, Owner of Willow Creek Kennels
1) Bird Dog: German shorthaired pointer
2) Shotgun: Beretta 686 Onyx over/under 20 gauge
3) Boots: Merrill Moab Hiking boots – I use these for almost all hunting.
4) Ammo: Federal’s Black Cloud
5) Vest: Bird ‘n Light Vest
Matt Kucharski, Pheasants Forever National Board Member
1) Bird Dog: A tandem of German Shorthair Pointer and Labrador, trained to honor each other of course!
2) Shotgun: Ruger Red Label 20 gauge early season, 12 gauge late season. Skeet and IC chokes early season, IC and modified chokes late. Sadly, they’re not making them anymore.
3) Boots: Red Wing Irish Setter (short uppers) early season and Meindl Scotland GTX (or similar) late season
4) Ammo: Federal Upland Steel 4 shot. 3 inch in the 20. 2 ¾ in the 12.
5) Vest: Filson mesh strap vest for short walks, Bird ‘n Lite strap vest if I’m in the field all day or carrying Bob’s birds.
Jeff Fuller, host of Sporting Dog Adventures
1) Bird Dog: Labrador Retriever
2) Shotgun: Benelli
3) Boots: Danner Pronghorn
4) Ammo: HEVI-Shot Upland
5) Vest: Browning vest
Now it’s your turn. What are your favorites?
The Pointer is written by Bob St.Pierre, Pheasants Forever & Quail Forever’s Vice President of Marketing. Follow Bob on Twitter @BobStPierre and listen to Bob and Billy Hildebrand every Saturday morning on FAN Outdoors radio on KFAN FM100.
It’s always open season when it comes to shooting magpies. Unlike game birds, such as pheasant and grouse, which may only be hunted during open season, magpies are grouped with crows and woodpigeons in the category of pest and may be controlled at any time of year.
You don’t need to apply for a licence to shoot magpies, as they are covered by general licence issued by government. However, if you don’t already know the details, you should familiarise yourself with the licence so you know where you stand. The licence stipulates certain conditions and is a permit to landlords, occupiers, and authorised persons only, so if you are not the owner or occupier, you will need their permission.
The licence allows for the control of magpies to prevent damage to specified items only, which include livestock, crops, timber and fisheries. So quite apart from safety considerations, you’d have some difficulty in justifying shooting magpies in a small town garden. You can find further information about licensing on the Natural England website at www.naturalengland.org.uk.
Getting Started
Once you’ve established there are magpies in a particular area, find a suitable place to lure them to near to a spot where you can settle down to wait. An ideal place to wait for magpies would be close to trees adjacent to a clearing or open field. Dawn and dusk are when you’re likely to see birds displaying bolder behaviour, as it is generally a quieter period in terms of human traffic.
One of the best ways to get a good shot at a magpie is to catch it while it is eating. Entice the magpies to within your range by leaving out a food supply such as a freshly killed rabbit or squirrel. Alternatively, you could make use of a decoy magpie bird. Magpies are highly territorial birds so will often come down to investigate an unknown magpie in their area. Artificial magpie decoy birds are a good option, as they are realistic and easy to transport.
You may need to spend several hours to get a shot at a magpie, so consider using a portable hide. If you plan to shoot early in the morning you might prefer to set up the hide the day before to avoid disturbance when you arrive for shooting. Use a good quality camouflage hide net and peg it down at the base so that it won’t rustle in the wind.
Other considerations
It sounds obvious, but make sure you stay on the right side of the law. You must comply with the requirements of the Firearms Act as well as the Animal Welfare Act. If you use live decoy birds, be sure to treat them in accordance with legal requirements. This is an area currently under review by European legislators, so keep abreast of any changes which might be introduced in the near future.
Magpie numbers have tripled over the last three decades and are considered by many to be the vermin of the bird world, but even though they are not the most popular bird, you never know who might take umbrage with seeing them being shot. As with all hunting, be respectful and make sure you kill quickly and cleanly. If you know the law and work within it, you will have no cause for concern when controlling the burgeoning magpie population.
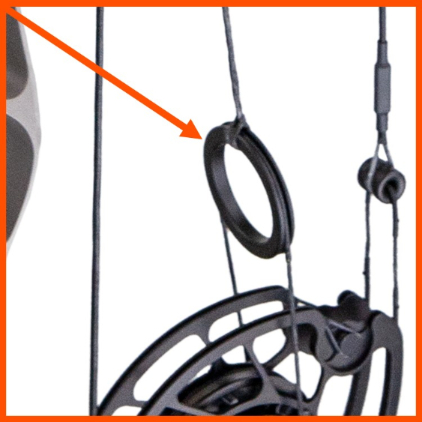
Check out our interactive diagram below to test your knowledge!
You might be new to the sport of bowhunting and be looking to learn all you can about it.
Or, maybe you are a seasoned bowhunter wanting to test your knowledge.
Either, way this one’s for you!
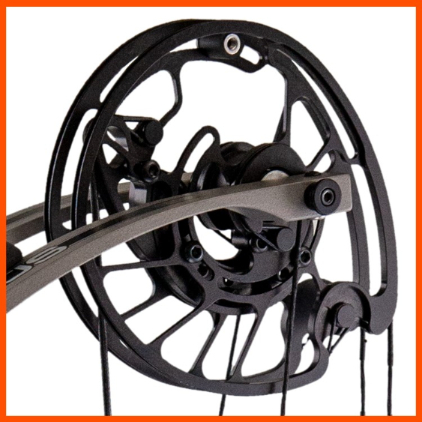
In the interactive diagram below, you can click/touch the NUMBER of the parts in the chart below to reveal the names of each item. You can read more about what each part is and does in the sections below the diagram.See how many you can get right!
In the above diagram of the Nexus2 by Prime Archery, you can view the parts of a compound bow. Find out more about what each part does by clicking the words below:
Cams
Limb Dampeners
Limbs
Limb Pivot
Limb Pocket
Limb Bolt
Riser
Sight Mounts
Cable Guard
Rest Mounts
Arrow Shelf
Stabilizer Mount
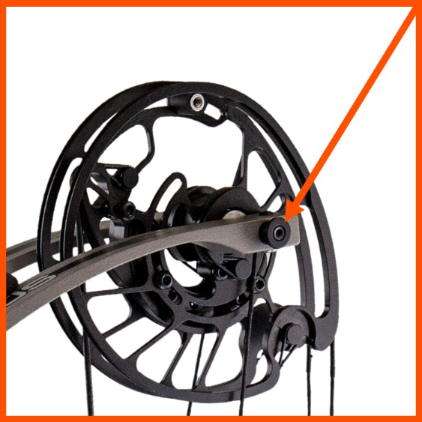
Axle
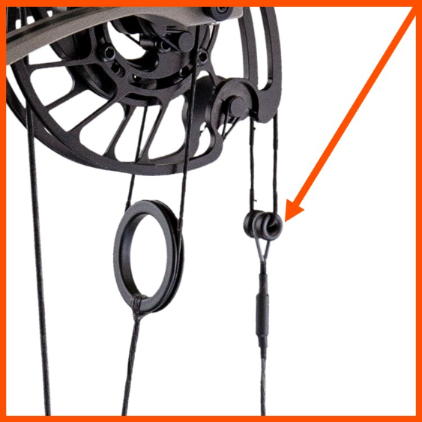
String Splitter
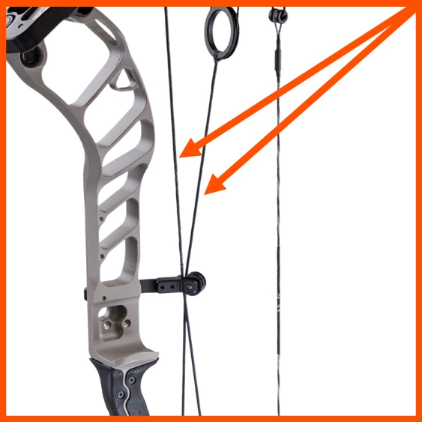
Cables
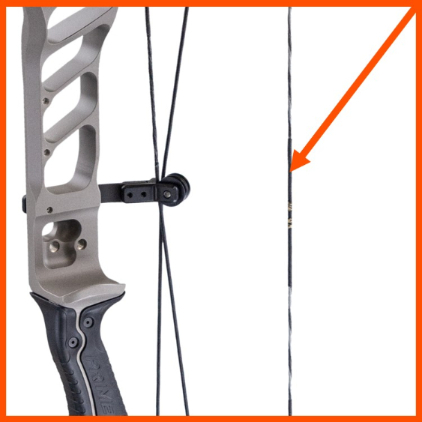
String
Serving
Nocking Point
Grip
String Stop
Cable Splitter
Axle-To-Axle Length
Brace Height
1. Cams
On a compound bow, the cams are the round, or oval-shaped discs that work much like a block-and-tackle pulley system. The cams are connected to the axles of the bow.
The cams act as the “multiplier” of the energy of the person pulling the bow string. This allows the bow to store more energy than the person pulling the bow string is actually exerting.
The bow has a “back wall” where the cams will not turn any more. This is where the archer is at “full draw.” At this point, there is a percentage of “letoff” that allows the archer or hunter to hold the force of the bow at a fraction of the actual pounds of pull being exerted.
For example, a bow that is set to a 70-lb draw weight with a 70% letoff will only take 21 lbs of force to hold at full draw. The energy is stored in the bow’s limbs until the archer releases, which unleashes the multiplied energery, propelling the arrow toward its target.
So, the cams of the bow are what change the bow in essence from a traditional bow to a compound bow.
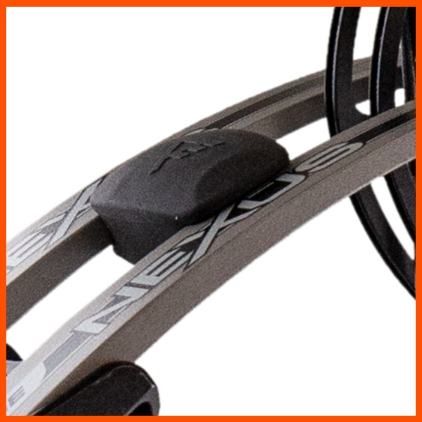
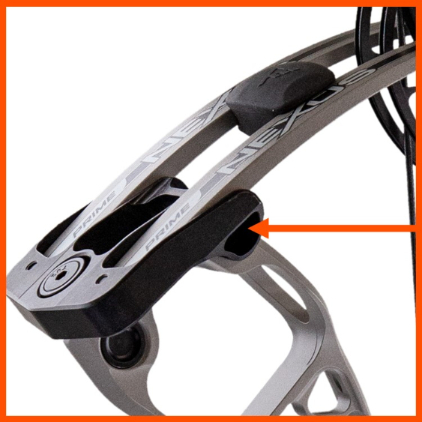
2. Limb Dampeners
Limb dampeners reduce the noise and vibration throughout the limbs and riser of the bow.
When the hunter or archer releases the arrow the sudden and powerful uncoiling of the string on the cams produces vibration, which causes noise. The limb dampeners help to absorb that vibration, resulting in a quieting of the bow.
This absorption by the limb dampeners is especially helpful in reducing noise when hunting deer or other wild game and also reduces the amount of vibration that is transferred to the archer.
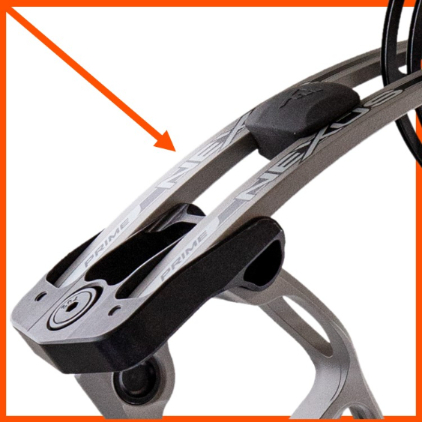
3. Limbs
A compound bow’s limbs are connected to the riser and store the energy that is collected when the string is pulled and the cams turn. When the string is released, the energy from the limbs is transferred to the arrow, which propels it through the air.
Most compound bow limbs are made up of fiberglass or composite material. Some bow limbs are solid, one-piece limbs. Others are “split,” having a gap between both sides of the upper and lower limbs.
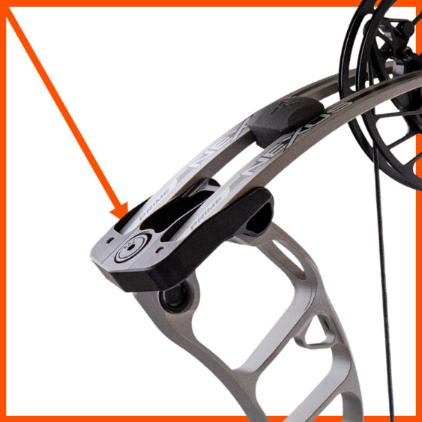
4. Limb Pivot
Where the limbs pivot and flex on the riser.
5. Limb Pocket
The limbs of the bow rest in the limb pocket. These can be made of machined aluminum, ABS plastic or other composite materials. The limbs of the bow are secured in the limb pocket by the limb bolts.
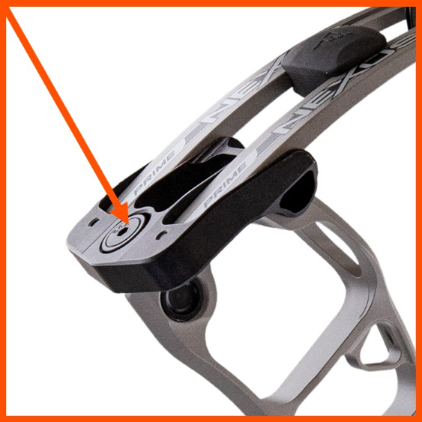
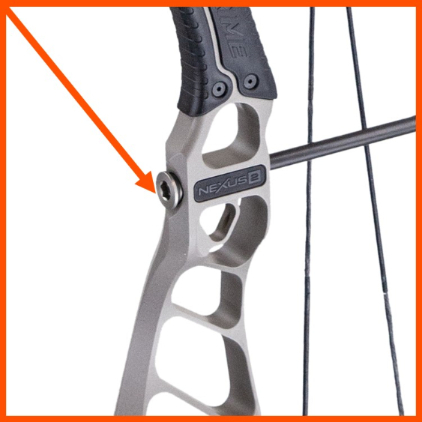
6. Limb Bolt
The limb bolt is the crucial piece in connecting the limb pockets, which hold the limbs of the bow, to the riser.
Limb bolts are typically allen wrenc adjustable. Tightening the limb bolts increases the draw weight poundage of the bow. Loosening the limb bolts will decrease the draw weight poundage.
It’s very important that any adjustment to the limb bolts be made in the same increments. If the adjustments are uneven, the bow’s cams could get out of time, causing an improper tune.
If you need to adjust your bow’s draw weight, it’s a good idea to back the limb bolts all the way down and then start moving them both up the same amount.
7. Riser
The riser is the vertical portion and foundation of a compound bow. The limbs attach to it and it also serves as the fastening point for accessories such as the sight, arrow rest, grip, stabilizer, quiver, etc.
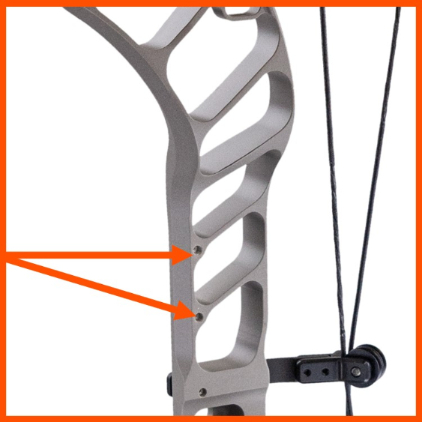
8. Sight Mounts
Sight mounts are holes in the riser that serve as the attaching point for the bow’s sight. The archer will look through the peep on the bow string and at the pin(s) of the sight to aim at the target or game animal.
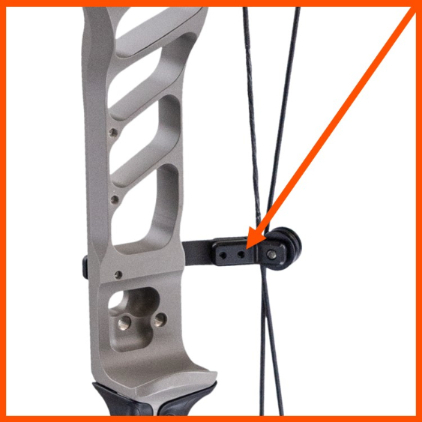
9. Cable Guard
The Cable guard runs perpendicular to the bow’s riser. It keeps the bow’s cable out of the way of the arrow’s line of fire. It typically has rollers and/or slides attached to it to aid in keeping the cable on track.
10. Rest Mounts
Rest mounts are holes in the riser that serve as the attaching point for the bow’s rest. The rest is what holds the arrow in place while the archer is drawing and releasing the arrow.
There are many different types of rests. Some use prongs that the arrow will rest on, while others hold the arrow up and then fall out of the way when the arrow is released. Others, called containment rests, completely surround the arrow until it is fired and typically have no moving parts.
11. Arrow Shelf
The arrow shelf is the area of the riser where the arrow sits on the rest. While the rest typically holds the arrow off the shelf on compound bows, traditional bows (non-compound) usually have the arrow resting directly on the arrow shelf.
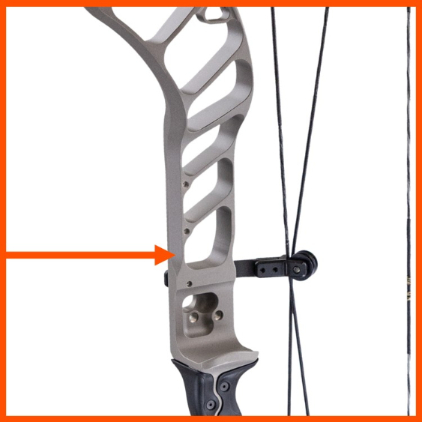
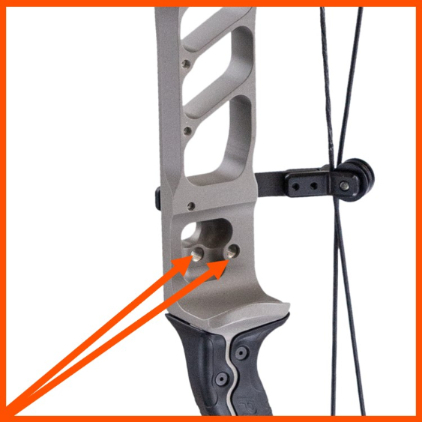
12. Stabilizer Mount
The stabilizer mount is a universal size threaded hole in the riser that is used to attach a stabilizer to.
The stabilizer helps balance and thus “stabilize” the bow when drawing and shooting, and also typically has vibration dampening properties. In essence, it helps the bow resist movement during the draw cycle and when shooting.
The back of the stabilizer also typically serves as the fastening point for the wrist sling.
13. Axle
The Axle is what holds the cams, in the same way a car axle holds its wheels. The cams have a hole in the center. The axle goes through the center of the axle and attach to the limbs.
14. String Splitter
Bows with parallel limbs (which eliminate cam lean) will have a string splitter. On these types of bows, the main part of the string that the archer attaches the release to “splits” just before the cams.
The splitter is what essential turns the single string into two strings, each going around its respective cam.
15. Cables
The cable(s) runs between the bow’s cams. They assist in moving the cams of the bow when the string is pulled back by the archer. It’s important to replace your cable(s) as well as your string as recommended per the bow manufacturer’s instructions or on the advice of your local bow shop.
16. String
The string serves several functions. It is where the archer will connect their release. It is what the archer pulls (or draws) back and releases to launch the arrow.
Many archers will utilize a “D loop,” which attaches to the bow string and serves as a way to quickly attach the release to the string and also improves accuracy.
You should always inspect your string before and after shooting and hunting. A damaged string could end up being a broken string, which could result in serious injury to the shooter or others.
Any cuts or fraying should be addressed immediately and it is recommended that you take to your local bow shop for an assessment.
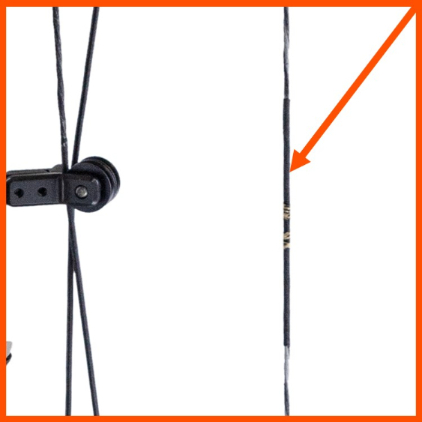
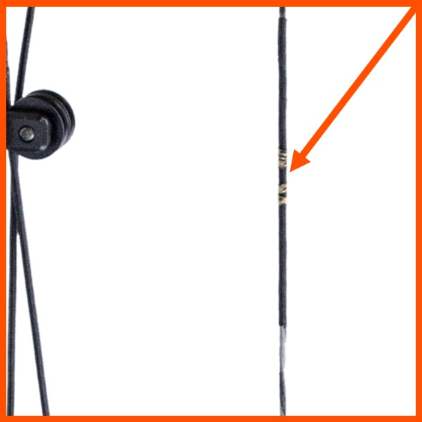
17. Serving
The “center serving” is coiled thread wrapped around the center portion of your string where you would nock an arrow and attach a D-loop. The center serving protect the center section of the string from wear and tear that results from nocking arrows as well as drawing and shooting the bow.
There is also serving material on areas of your bow string that go around the cams or through rollers that are attached to the cable guards. This helps the bow string stay together, especially in places that are likely to received the most friction.
18. Nocking Point
The nocking point is where the arrow, by way of the arrow nock, attaches to the bow string. The D-loop attaches above and below the nocking point.
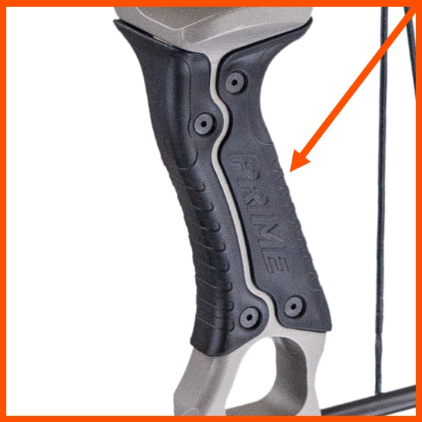
19. Grip
The grip is the part of the bow that you hold while shooting. Grips are made of various materials such as wood, rubber, plastic, metal, etc.
The grip can also be a source of inaccuracy. For example, if you hold the grip too tightly, or twist the grip while shooting, you can cause your arrow to go off-course from where you were aiming.
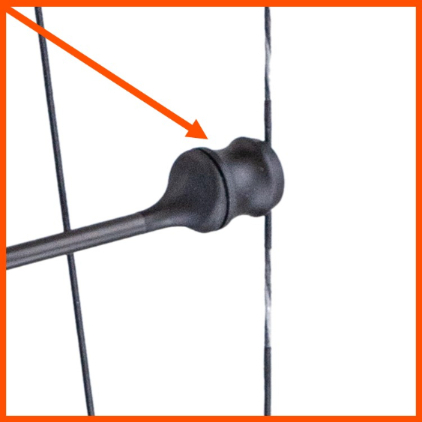
20. String Stop
String vibration is a large cause for noise when a bow fires. A string stop helps dampen that vibration and thus reduces unwanted noise. The string stop is a rubber part that is often mounted on a post that is directly opposite of the front stabilizer.
The string stop not only helps dampen vibration, but also aids in better accuracy for the shooter, often resulting in tighter arrow groups at the target.
21. Cable Splitter
On some bows, the cable splitter is a ring that connects the cable to two separate cables, thus dampening vibration and noise of the cable during shooting.
22. Axle-To-Axle Length
“Axle-to-axle” is not a part of a compound bow, but rather a reference to measurement. Axle-to-axle is the measurement from the center of one cam to the other. The axles go through the center of the cams.
This axle-to-axle measurement is often used to determine how forgiving the bow will be in regards to arrow flight accuracy when taking farther shots.
A bow with a longer axle-to-axle height may be more forgiving that a shorter one, but may also be difficult to maneuver in tight-quarter hunting scenarios.
23. Brace Height
The “brace height” is not a part of the bow, but rather a measurement, in inches, of the distance between the “throat” of the grip to the center of the bow’s string.
A shorter brace height means a longer “power stroke,” which is the distance from the grip to the center of the string when the archer is at full draw. A longer power stroke typically means a faster bow, as it increases the amount of time that the arrow is attached to the string.
Parts Of A Compound Bow Conclusion
Whether you are just a beginner bowhunter or looking to brush up on your bow component knowledge, we hope this has been a helpful tool for you!
The Hellcat is a formidable carry pistol that provides a compact carry option with exceptional performance. And since Springfield released the Hellcat OSP (Optical Sight Pistol) version along with the standard, its optics options have expanded quite a bit.
Holosun offers excellent optics for Springfield Armory pistols. In this review, the author tests the EPS Carry with some serious drop tests and more.
One of my favorite features has always been the iron sights that come standard on the pistol. The tritium/luminescent U-Dot sight picture makes the perfect daytime and nighttime set of irons for fast target acquisition.
But, as good as irons can be, as technology has advanced, the use of red dot pistol optics has gained in popularity. This could be because of the ability to gain fast target acquisition, having an illuminated sight, or even the moderately low cost compared to similar optics in the past. None of these are specific to the Hellcat, but a general statement for all pistols used in defensive applications.
No matter what the reason for wanting to explore and use red dot pistol mounted optics, there is no denying their ability to assist aiming. When defending oneself and others, milliseconds matter.
Today, we are considering two Holosun micro red dots released in 2022 — the EPS and EPS Carry. Since then, it’s been requested in many gun shops across the country. There is a lot to like about these optics. Holosun has developed a reputation for good quality in their products, and the EPS and EPS Carry are no different.
The EPS optic (left) is slightly larger than the EPS Carry (mounted). Visually, it’s not much different, but a larger acquisition window makes a difference.
The EPS family, which stands for “Enclosed Pistol Sight”, come from the factory with a host of features. Each model offers several different options. While standard shake awake features, 50k hour battery life, parallax free objective glass and other various features come standard on all, one of Holosun’s claim-to-fame offerings is the optional solar back-up.
General features of the line include CNC-machined 7075 aluminum housings, Shake Awake Technology with last setting recall, CR1620 battery offering up to 50,000 hours of continuous use, multi-coated lenses, IPX8 water and dust resistance, aspherical glass lenses, and good window sizes (0.90 x 0.63 on the larger EPS, and 0.77 x 0.58 on the smaller EPS Carry). Weight of the EPS is 1.4 oz., and the EPS Carry comes in at 1.23 oz.
Holosun EPS Carry Mounting Options
C&H Precision Weapons has been in the firearms industry for quite some time, with a focus on slide milling and optics mounting plates. Some of their biggest clients has been various federal law enforcement agencies. Currently, they have a large lineup of optics mounting plates that work with most of the big names in pistol-mounted optics.
The Holosun EPS Carry mounts to the Springfield Armory Hellcat with simple hand tools and the C&H Precision plate.
There is no standard plate that comes with the EPS lineup that will fit directly to the Hellcat. Holosun has partnered with C&H Precision to offer a plate marrying these two powerhouses. A kit can be purchased directly from C&H that provides the plate, screws and red Loctite or alternative. FixIT sticks and torque limiters are recommended. Overall, installing the EPS Carry on the Hellcat using C&H Precision plates is straightforward and as simple as possible.
Off and On the Pistol
There is a difference between the EPS, and EPS Carry. Holosun sent one of each for photos and examination. The EPS we received did not have the solar backup system and featured a simple 6 MOA dot. The EPS Carry did have the solar backup and a 2 MOA dot with a 32 MOA circle. All options are available on both platforms. Side by side, the EPS is slightly larger than the Carry in overall width and height. While not a drastic difference on paper, it can make a difference on a micro-compact pistol.
The reticle is sufficiently large for fast sighting, and you can co-witness while being modified for user preference.
The Hellcat is known for being one of the smallest micro-compact pistols with a larger-than-average capacity. Due to the overall size, the EPS Carry was mounted to the Hellcat OSP. Dimensionally, the EPS Carry is 1.09” wide and the EPS is 1.19” wide, while the Hellcat is reported to be exactly 1” wide. No matter which optic was chosen, it would protrude over the side of the rounded slide edge slightly.
When mounted, a full view of the iron sights was still possible. The EPS Carry had slight wings that helped to line up the iron sights while protecting the elevation adjustment knob. This was something missing from the EPS which offered a flat surface, despite the deck being the same height. For intended use on a Hellcat, I would lean toward the EPS Carry, and save the EPS for a larger pistol.
Drop Testing the Holosun EPS
7075 T6 aluminum makes up the overall housing on both models. They’re robust and lightweight without looking like a set of “birth control” glasses from the military. Despite the look, the real test represents how they perform after a drop.
Shown is the Hellcat and Holosun after a drop test from chest height. There were minimal abrasions and minor damage to rubber components.
No optic is designed for excessive drops. They will all fail at some point. So, the most realistic option for a drop test would be the most probable type of fall for a concealed carry pistol — from waist height to shoulder height. As the Hellcat itself has been well-tested for drops and falls, it deserves an optic that can match that.
Taking the EPS Carry, the sight was adjusted out to 25 yards while being mounted and matched to the factory irons for co-witness. Firing two magazines seemed enough for the first accuracy test. The upcoming goal wasn’t to be as accurate as possible, but to see if the reticle will drift after a fall.
From the Waist: I dropped the chamber-empty Hellcat OSP three times from waist high onto a hard — but not abrasive — surface. Physically, it appeared nothing was wrong with the optic, even cosmetically. The reticle did not move.
From the Chest: Moving to chest height, the pistol was again dropped three times onto compacted dirt at the range. No reticle movement was witnessed when firing. It appeared as if the housing was even tougher than advertised.
After a dozen impacts, the EPS Carry wasn’t pretty, but it still functioned flawlessly.
From the Shoulder: The final tests came from shoulder height. With an outstretched arm, the Hellcat was dropped onto a tiled floor three times, leaving some small dings and a few compacted pieces of rubber in the optic. I test-fired the pistol and noted no reticle movement. Next, the pistol was dropped on the compacted gravel roadway leading to the range from this height. The exterior of the optic had some impacts, with slightly marred rubber pieces. There was no intentional attempt to hit any specific area. The entire test also caused some cosmetic damage to my personal Hellcat.
After the shoulder height tests, the optic didn’t appear to have any issues with reticle movement. While no longer as pretty or “new,” the reticle didn’t move and the buttons were still fully operational with the glass intact. Anodized coatings are great, but not impact-proof.
Concealing the Hellcat and Holosun RDS
With a 1.09” width, it’s not hard to see why this is a perfect choice for concealed carry pistols. This minimal protrusion over the slide of the Hellcat is so small it’s barely noticeable. When tucked away in an IWB holster designed for an optic, the pistol was comfortable with little to no noticeable difference. However, not all holsters used were able to secure the Hellcat with the optic attached. Some of these were just too narrow to even adapt that extra .09 inches of width over the slide.
Not all CCW holsters are designed for use with pistol optics. Since the Hellcat was designed with a red dot sight in mind, most companies support optics in their Hellcat holster builds.
When looking for a holster for any pistols with mounted optics, it’s best to find one with an open top adaptable for any width pistol optic.
EPS Carry Review — Conclusion
Both the EPS and EPS Carry are excellent pistol optics. The size, durability, and price are the perfect trifecta. When utilizing the EPS Carry, I found that it is not only exceptionally well built for the size, but the options available and solar back-up make it extremely appealing. To me, an adaptive solar back-up takes the worry out regarding the battery performance.
For me, the real stand-out feature with Holosun is the solar back-up. Ranging from an MSRP of $389 to $506, these Holosuns break the mold. For the Hellcat, an additional adaptor plate from C&H Precision Weapons also adds $50 MSRP. Overall, I think this makes for the perfect conceal carry combo.
Editor’s Note: Please be sure to check out The Armory Life Forum, where you can comment about our daily articles, as well as just talk guns and gear. Click the “Go To Forum Thread” link below to jump in and discuss this article and much more!
First off, it is now officially called the 8.6 BLK or 8.6 Blackout, dubbed such by the very creator Kevin Brittingham. Kevin, owner of Q and inventor of the .300 Blackout cartridge first came up the with idea of a .338 caliber cartridge like the .338 Federal, but better because it has a shorter 6.5 Creedmoor based case, so it could accommodate larger and longer bullets than the .338 Federal in normal magazines, which would mean it could provide for a cartridge that could be effective at both subsonic and supersonic muzzle velocities. Not only does this owe for interesting low-noise subsonic rifles, but also for short barrel, high-punch rifles and even a cartridge being able to feed in a semi-auto configuration.
Back in 2018 when Kevin initially developed the cartridge and worked with the idea, trying to get Hornady to start manufacturing the cartridge, he intended to call it the 8.6 Creedmoor, but in June 2021 when Q made the official announcement of the cartridge on their Instagram account, they dubbed it the more appropriate 8.6 BLK or 8.6 Blackout, owing to their own unique .300 Blackout, but necked up to accommodate the 8.6 caliber bullet, and also uniquely identifying it as separate from the Creedmoor sports developed cartridges like the 6.5mm Creedmoor and the 6mm Creedmoor.
The reason why Q and Hornady are only now officially bringing it to market in 2021, is mainly because of the ammo crisis that hit since early 2019, which meant that they could not even keep up with demand of current cartridge ammo, let alone start manufacturing or marketing a new cartridge.
Brass
Why a New Cartridge
Yes, it feels like every week someone is just necking some other cartridge up or down and “bringing out a whole new cartridge”, but this time, it is really a game-changer. The 8.6 BLK is not just an improvement on previous designs or a wildcat, it changes what was thought best for hunting cartridges and tactical military cartridges all together. It shows that large long bullets can work out of small cases, and even better, high energy effective hunt kills can be made out of short barrels, even at what would be considered long range distances for hunting.
Create Your Own
There aren’t really any large scale manufacturers making a 8.6 BLK Factory Rifle yet, however, if you jump on the waiting list now, you may be able to snag one of the early ones when they become available soon from Q and Faxon firearms, or you can even just buy a barrel conversion from them if you already have a Fix by Q.
The other manufacturers should jump on the band wagon offering 8.6 BLK chambered barrel pretty soon after Hornady starts making the brass available, and you can even have your own build on a .308 bolt face, standard-length action, by chambering a .338 / 8.6mm barrel in it once reamers become available (just remember the tight twist rate needed to make the most of this cartridge).
8.6 BLK Twist Rate
Very fast twist rates like 1:4 and even 1:3 are used for the 8.6 BLK, as this provides greater energy at supersonic velocities, and greater accuracy at subsonic velocities, thus enabling the use and stabilization of such long and large bullets out of such short barrels. The fast twist rate, also ensures good bullet expansion even at slower velocities.
8.6 BLK Ballistics
When loaded with a 210gr Barnes TTSX bullet at a conservative 2000fps from the short 16″ barrel, you still have over a 1000 ft/lb energy on target at 375 yards, although this round is not really made for such long distances. The designers also claim that the normal energy on target figure is not applicable as the incredible rotational energy of the projectile spun at such a high speed because of the 1:3″ twist rate, multiplies the energy on target, see this video to show that.
EDIT: Ballistic figures, chart and graph was updated in June 2022 to get closer to actual achieved muzzle velocity figures now that the round has been tested more, and showing that the initial muzzle velocity figures claimed by Q were a little overstated.
8.6 BLK for Hunting
Although very practical as a new do-all military cartridge, hunting is where the 8.6 BLK really shines. It redefines the general purpose hunting and utility rifle genre. Even during testing and R&D hunts, Kevin Brittingham and the guys from Q have been making waves online with their small Fix 8.6 BLK taking down everything from smaller CXP1 sized animals like a Black Backed Jackal, CXP2 sized game like deer, CXP3 sized animals like a large Kudu bull, all the way through to the very large and thick-skinned CXP4 sized African Cape Buffalo. Proving the versatility of the cartridge and rifle platform for a single, compact, do-it-all hunting rifle.
8.6 BLK Barrel Length
8.6 BLK vs .338 Federal
Most people that first read or heard about the 8.6 BLK, quickly asked why, given the similarity or superiority (as they thought) of the already available .338 Federal cartridge. Well, the 8.6 BLK is the quieter and more efficient version of a .338 Federal, basically with a trimmed back case and improved shoulder so you can get longer heavier subsonic bullets than you can with the .338 Federal. Overall it’s a more efficient and versatile design than the .338 Federal.
Whilst the case length of the .338 Federal is 2.015”, the 8.6 BLK case is 1.685” in length, allowing the ability to run heavy subsonic loads, 280 to 360 grains or more, whilst the longer 338 Federal case will put the ogive of those long projectiles back inside the case, which will perform badly.
Although having a smaller case capacity, the 8.6 BLK offers more consistent ignition of the powder thanks to more case fill, which gives you more consistent performance, especially with those heavy subsonic loads. Another big upside due to the shorter case and cartridge length, the 8.6 BLK will feed out of .308 Winchester length magazines, allowing greater compatibility. Even the fact that the 8.6 BLK uses the same bolt face as the .308 Win, means you can change your barrel on your Fix or other current rifle and have your own 8.6 BLK.
Lastly, when looking a long bullets like the Berger 300gr Hybrid with a nose length of 0.955 inches, but the case to OAL length of the .338 Federal is only 0.785 inches, meaning that those bullets or similar cannot be reliably fed from a magazine, whereas it can in the 8.6 BLK.
An air rifle's effective shooting range depends on various factors, including the type of rifle, the caliber, and the power source. Generally speaking, most...
")
")
")
")
")