SPANISH LAKE, Mo. (KTVI) – Joshua Jones Jr. is taking it all in after a recent midnight miracle on the Missouri River.
Inspired by a contest, and with support from his father, Joshua made a once-in-a-lifetime catch around midnight Wednesday, reeling in a 108-pound catfish from the river near the St. Louis suburb of Spanish Lake.
Joshua had actually dozed off when the catch happened, exhausted after a long night of fishing.
“I was sleeping when the fish got on, so it kind of woke me up,” said Joshua. “And then I felt the pull and drag, which really woke me up.”
It took about 20 minutes of fighting the line, but Joshua was able to reel in a monster-sized catfish and get it on the boat.
“It was pretty exciting at first when I was fighting the fish,” said Joshua.
He developed his passion and fishing skills through a bond with his father, Joshua Jones Sr. The two have spent countless hours out on the water.
“I had him on the bank before he could walk, trying to catch bluegills,” said Joshua Sr.
A love for angling is something Joshua Sr. learned from his father, driving his inspiration to teach his own two sons.
“I couldn’t wait to have a boy to take out with me and fish and be my best friend out on the river,” said Joshua Sr.
A best friend, also ready to battle the bite. “Take your time. Take your time. Take your time,” said Joshua Sr. recalled telling his son as they worked to tire the massive fish.
Joshua Jr. recalled several instances where he had to grab the catfish with his own hand, guiding it in the right direction. After grueling minutes of toggling with the fishing rod, the small boat’s crew conquered the catfish.
“It’s a monster! It’s a monster!” both said in a video they recorded of the encounter.
What did young Joshua do with his big catch? He took a photo with it, then released it in hopes of entering it into a contest.
“He was determined and always told me, ‘I’m going to catch the record. I want to catch a 100-pound fish, and he caught it,” said Joshua Sr.
“We come out here to fish, but we also come out here to hunt for those big fish,” said Joshua Sr.
They were hoping for a $500 reward in a Mad Katz fishing contest. Joshua Jr. and his father thought they’d be making history and getting a few extra bucks for their bait. Unfortunately, they were disqualified due to a rule violation – judges were unable to visually see the bottom of the net while the pair completed the weigh in.
“A lot of guys search for a fish like that for a long time,” said Joshua Sr.
The whole Jones family has caught countless catfish out on the Missouri waters, but they haven’t seen anything of this size before. Joshua Sr. realizes that no matter how big the catch, fishing is more about the connections.
“To get out here and experience such a thing, to throw a fishing rod, big fish, small fish — a lot of times, it doesn’t matter. Just love the experience itself,” he said.
According to CatfishEdge.com, the largest catfish ever caught in the Missouri River weighed 130 pounds. Greg Bernal caught the catfish in 2010, a one-time world record.
The number of surf casters and light tackle enthusiasts casting soft plastics for striped bass is increasing each season. Whether the application is a weedless bait on light tackle in the early season or rigged on a jig head for a summer night in the surf we see more use of soft plastics now than ever. Along with the advances in soft baits themselves have come innovations in rigging soft plastics for striped bass.
The popularity and innovation stem in large part from the versatility of soft plastics. There are a wide variety of profiles with soft, pliable bodies that produce a life-like action. Some argue that the supple materials also give soft plastics a better mouth-feel than hard lures. The benefit being that the gamefish would be less likely to let go immediately after striking. Also, many manufacturers impregnate their soft plastics with scents of bunker and sand eel when creating baits to target striped bass and other northeast gamefish. In the simplest terms there are three designs used in saltwater:
Jerk Baits with inline tails of various shapes. When fishing jerk baits the rod tip creates the action, and it is more subtle.
Paddle Tails with a wide flat tail oriented horizontally to the body of the bait. Paddle tails are a much more active bait, and the design of the bait creates the action.
Grub Tails or pigtails also have a lot of action and are used in smaller soft plastics and to enhance a bucktail jig. Very popular in freshwater.
Beyond this point, there are a dizzying amount of options and would require a series of articles to scratch the surface.
Pre- Rigged Soft Plastic Options
Anglers can purchase some soft plastics pre-rigged on a jig head; examples include the Savage Gear Sandeel and the Ron Z Original Soft Baits.
Also, some baits like the Hogy Slow Tailand the Tsunami Swim Shads that have the weight molded into the bait. If you are just getting into soft plastics one of these options might be the place to start. These baits are optimized for action and casting efficiency and eliminate the trial and error of matching hooks and heads with different baits.
Rigging Options for Soft Plastics
Centering Pin Springs are a simple way of attaching the hook to the head of a soft plastic bait. Rigged right these can be tossed in skinny water and are effectively weedless.
The Owner Beast Hooks are popular for this application as are the center pin hooks developed for Albie Snax. Worm Hooks also create a weedless presentation through simple rigging, and the length helps stiffen the body of the lure which allows for better casts. So anglers will make a few turns with tying thread behind the hook eye to create a surface to apply Zap A Gap Thin just before they permanently seat the hook in the bait. The Mustad Big Bite Soft Plastic Hook is a popular choice for this application. Here’s our selection of swimbait hooks.
Additionally, there is an assortment of jig heads on which to secure your bait, you may prefer one or another based on hook strength, size, the preferred method of attachment or color. MagicTail Kill Shotshave been among our more popular due to its heavy 8/0 hook and with a ridged collar designed to provide a secure attachment. The Jeck’s Bullet Bucktail has built a strong following in short order in part because the rear of the jig head is flat allowing a flush fit with the bait. This improves durability, and the flush fit positively impacts castability. With any jig head, it’s a good idea to super glue the area used to secure the soft plastic to the jig. Here’s our selection of jig heads.
Soft Plastic Rigging Tips
Let’s address a common challenge when rigging soft plastics for any gamefish regardless of the hook and method selected. That is “Where to enter the bait to ensure it swims properly?” Ideally, you do not want to pull the plastic off the hook/ jighead repeatedly in an attempt to get it right, but an improperly rigged soft plastic will twist on the retrieve creating an unnatural action in the water and sending the twists up your line causing “wicked tangles” in your braid in the future. The first step is to lay the hook or jighead on top of the plastic, to see where the hook and ultimately the bend would exit the body with the bait snug to the head while maintaining a straight but not overly stretched bait. Mark that point either with your forefinger and thumb or some anglers nick that location using the hook point to maintain orientation.
Rigging Weightless Soft Plastics
When rigging a weightless hook, you want to start and stay in the center of the bait until you reach the target location and then exit the bait through the center as well. Staying on the center line is all the more critical with unweighted hooks.
Rigging Jig Heads
When using a jig head hold the bait with your thumb and forefinger start in the center and thread the body onto the jighead, pushing the hook through the marked point and continuing to slide the bait forward until it contacts the jig head. If you have a flush connection a little Zap A Gap at the juncture will enhance durability.
A Word of Caution When Rigging Jig Heads
Many jigheads have some type of retention ridges or hooks to secure the soft plastic. Some excellent examples are the Z-Man TT Headlockz HD, Hogy Barbarian Jig Hook and Mustad Elite Bullet Jig Head; but with some materials or on smaller, thinner profile baits these retention methods can split and ruin the bait. So be mindful of using a strong hook with a bulky retention method with smaller and harder plastics as they may split. Probably the perfect time for a jig head with a bare hook utilizing the thread and super glue method described above or one of the jig heads from Owner mentioned above. At the end of the day when rigging soft plastics, “practice makes perfect.” Now more than ever, you can rig a soft plastic bait easily and for just about any surf or light tackle situations.
A lot of firms out there are building custom bolt-action rifles for big game hunting. There is seemingly no end to high-end production, semi-custom and custom rifles on the market. Prices and quality run the gamut. In 2015, Andrew Foster set out to be different from the rest. He founded AllTerra Arms in Boise, Idaho, with the hope of “designing, patenting, and building the most accurate and reliable rifle on the planet.”
AllTerra’s Mountain Shadow Carbon is one of the rifle designs that evolved from Foster’s vision. Customers can choose from off-the-shelf rifles or use AllTerra’s website to custom-configure their own creations. Choices begin with choosing the basic rifle model, a right- or left-handed action and chambering. The stock is next, and buyers can customize length-of-pull, various camo patterns and even choose the style of sling swivel stud or hardware desired.
Barrel length is the next choice, followed by several trigger and floorplate options. Eight different metal finishes are available, all of them Cerakote. The final choice is which mount and optic are desired, with options from Leupold, Nightforce, Steiner, Swarovski, Kahles and Zeiss. AllTerra will mount a customer-provided scope for a fee.
AllTerra’s Mountain Shadow Carbon is built on the company’s precision-made Convergence action. The action is CNC machined on pre-hardened 416 stainless steel. This is tough on tooling and is more expensive to produce, but it eliminates the possibility of warpage during the heat-treat process.
The bolt raceways are EDM cut, another expensive and time-consuming process that produces excellent results. The Convergence has an integral recoil lug, a side-mounted bolt stop and a TriggerTech Primary trigger. This trigger is user-adjustable, and my sample broke cleanly at 2.1 pounds right out of the box.
The action uses a dual opposing lug bolt setup, similar to that of the Remington 700 and its clones. The bolt is machined from hardened 4140 chrome-moly steel. The bolt handle is machined from the same billet as the bolt body, eliminating a potential failure point. The bolt handle is skeletonized.
A mini M16-type extractor is used along with two plunger-style ejectors. In addition, the ejection port is machined oversize to allow plenty of room for loading or unloading the chamber. Unlike some rifles out there, the Mountain Carbon Hunter cleanly ejected loaded rounds, something that is sometimes necessary in the real world. The entire feeding, ejection and extraction system proved to be very reliable during my testing.
Although detachable magazines are available as an option, the standard Mountain Shadow Carbon uses an internal magazine with a hinged floorplate. I prefer an internal magazine over the detachable variety on a hunting rifle because it’s one less thing to lose in the field.
The steel magazine box is extended in length to allow for the long VLD-style bullets that are becoming so popular thanks to their ballistic properties. The bottom metal is fully machined from aluminum as is the magazine’s follower. The floorplate can be released using the button inside the trigger bow, dumping the magazine all at once. In 6.5 PRC, the magazine has a 3+1 capacity, which is pretty standard for that chambering.
As the name suggests, the 20-inch barrel on the Mountain Shadow Carbon is carbon-fiber-wrapped. The contour is similar to the Proof Sendero Light that I’ve used on several rifle builds. I am a fan of the shooting and handling characteristics of this contour. The barrel is threaded 5/8×24 at the muzzle. The test rifle included an eight-port muzzle brake that all but eliminated the felt recoil of the 6.5 PRC.
The stock on the Mountain Shadow Carbon is a proprietary design that is available in various colors and camouflage patterns. The stock has a semi Monte Carlo-style cheekpiece and some reverse drop on the comb. The pistol grip is a comfortable compromise between that of a traditional sporter and many of today’s nearly vertical designs.
The fore-end swells outward to a semi-beavertail profile that is conducive to shooting from rested positions. Both the fore-end and pistol-grip sections are textured to make things less slippery when wet. On my test rifle there is a traditional sling swivel stud at the toe of the stock and a Picatinny rail section where the forward stud would usually be found. This not only allows for the easy mounting of a bipod or tripod, but also offers a QD-style female sling swivel attachment point.
The barreled action is pillar-bedded inside the stock, and the barrel is free-floated the length of the fore-end.
The base rifle weighed six pounds, four ounces without an optic or mounts. With a Zeiss Conquest V6 3-18x50mm mounted in Talley lightweight bases, the overall package came to seven pounds, 13 ounces. The whole package balanced very well and would be pleasant to carry in steep terrain.
There’s little doubt that this rifle was built using top-quality parts. AllTerra didn’t just select the best components that it could source, though. It also deviated from well-established machining techniques in hopes of building a more accurate rifle.
On most bolt-action rifles, barrels are mated to the action using threads. A turned-down section of the barrel at the breech end called the tenon is threaded to match the threads on the receiver. When the barrel is torqued into place on the action, proper headspace is established.
I know from building my own bolt-action rifles that the alignment between the threads, the chamber, the bolt face and the receiver ring can all be critical factors in accuracy as well. To that end, AllTerra added a few steps to the barrel fitting process. Two sections of the tenon, one ahead of the threads and one behind, are turned to a specified diameter. These “seating rings” interface precisely with sleeves in the receiver.
Using this method, the barrel not only is threaded into place, but also there’s press-fit contact at both ends of the tenon. AllTerra calls it the Dual-Lock Barrel Seat. If any other builders are using such a method, they are not advertising it. AllTerra claims this design provides superior harmonics, making the rifle less sensitive to various types of ammo.
Fitting the barrel is one thing; cutting the chamber is another. Chamber-to-bore alignment is one of the most critical elements of accuracy. AllTerra’s standard is to coaxially align the bore to within 0.0001 inch before cutting the chamber. Chambers are then drilled and bored before the finishing reamer cuts to the final dimensions. This helps prevent the reamer from wandering as it cuts its way down the bore. It is a time-consuming process, but it pays big dividends on the range.
The innovation doesn’t end there. Beyond excellent accuracy, AllTerra wants its rifles to be reliable in the field. The same ultra-tight tolerances that are conducive to accuracy can often be detrimental to reliability.
Practically speaking, if two parts fit together perfectly the tiniest bit of dust, dirt or grit will gum up the works. Since it’s impossible to avoid such things in the real hunting world, clearances must be built in to allow for environmental debris. The bolt’s profile is full size at the front and rear, where it locks into the receiver, but it’s relieved 0.050 inch toward the center of the bolt body to provide such a clearance. Spiral flutes cut into the bolt also give debris a way of migrating out of critical areas.
The action lugs on the Convergence are conical and lock securely into the elliptical raceway on the receiver while allowing additional tolerances where needed. Finally, the bolt body is coated in nickel boron, a super-slick and corrosion-resistant finish.
The base price for the Mountain Carbon Hunter is $6,250. According to the custom configurator on AllTerra’s website, my rifle as tested would retail for $6,550. Adding the Zeiss optic would bring the total up to $8,449.
While $6,550 is nothing to sneeze at, it is comparable to the price of rifles built by competing companies. With this price comes an explicit guarantee of both accuracy and reliability. AllTerra guarantees that rifles will shoot sub 0.5-m.o.a. three-shot groups with premium factory ammunition and sub 0.25-m.o.a. groups with AllTerra Arms’ own handloads. It also pledges that the rifle will cycle in all conditions and will show no significant change in accuracy when shooting different bullet weights.
I tested the Mountain Carbon Hunter with three different hunting loads: AllTerra’s own handloads that used a 143-grain Hornady ELD-X bullet, Hornady’s new Outfitter 130-grain CX load and a 140-grain Berger load from Gunwerks.
The test rifle came with a test target showing two three-shot groups with an average of 0.17 inch shot on two different dates by two different shooters. I have no reason to doubt the veracity of those targets, but I was incapable of shooting groups that tight with this rifle.
My best results came with AllTerra Arms’ own ammunition and averaged 0.48 inch. That is absolutely nothing to sneeze at, and I would happily hunt with this rifle and load all day long.
I have yet to encounter a hunting scenario where the ability to shoot a 0.25-m.o.a. group was necessary. That said, I was unable to shoot the rifle to a level that would meet the company’s strict accuracy guarantee with this optic and any of the three loads I had access to. As for the other elements of the guarantee, I can report that point-of-impact shifts were minimal between the three ammo types, and reliability was 100 percent.
This is an obviously well-built and well-thought-out rifle. I can find no flaws with its construction or performance. It is light and portable without losing practical shootability, and the fit and finish are excellent. In this chambering, this Mountain Carbon Hunter could be a do-it-all rifle for all but the largest of North American game. At this price point, it’s not a rifle for everyone, but the premium components and quality construction displayed throughout come at a premium.
There are dozens, if not hundreds of different models of rifles chambered in .308 Winchester, so finding the best 308 hunting rifle for you can be overwhelming. On top of that, today’s gun purchasing environment is complex and many rifles have been in short supply. So I dove deep in researching the best .308 rifles that are currently manufactured and can be readily purchased in the United States.
I went all out and got eight of the .308 rifles on our short list. Then I teamed up with renowned hunter and outdoorsman, Ron Spomer of Ron Spomer Outdoors, to help test all these guns and provide expert input on what they’re each good for. He had a brand new .308 rifle himself that was more than worthy of consideration, so that gave us a pool of nine of the top 308 rifles to put head to head.
Ron and I have handled and fired all of these rifles at the range and used some of them in the field on hunts. In this post, I’ll share our research to help you find the best 308 rifle for the money based on what you want to do with it.
DISCLOSURE: As an Amazon Associate I earn from qualifying purchases. Many links in this article are affiliate links. If you click on a link we may earn a commission if you make a purchase, at no additional cost to you.
The 9 BEST 308 Rifles of 2024: Tested and Reviewed
Best Overall: Wilson Combat NULA Model 20
Best Budget: Ruger American Predator
Editor’s Pick: Browning X-Bolt Speed SR
Best for the Money: Tikka T3x Lite Stainless
Best Bolt Action: Springfield 2020 Waypoint
Best Precision: Savage 110 Tactical
Best Semi-Auto: PSA PA10 Gen3
Best Crossover: Bergara B-14 HMR
Also Great: Remington 700 SPS
Editor’s ChoiceBest OverallBudget PickBest Precision Browning X-Bolt Speed Suppressor ReadyWilson Combat NULA Model 20Ruger American PredatorSavage 110 Tactical Barrel Length18 in20 in18 in24 in Weight6.3 lbs5.3 lbs6.2 lbs8.9 lbs Threaded BarrelYesYesYesYes Capacity4+14+14+110+1 Bottom LineTricked out hunting rifle that can do just about anything at a mid-range price point.Ultra-light hunting rifle made of high-end materials with remarkable accuracy.Accurate lightweight hunting rifle at a low price, but with premium features.Affordable long-range rifle with consistent accuracy, more target-oriented. PriceCheck PriceCheck PriceCheck PriceCheck Price
How We Tested
For more than a year I have been researching, purchasing, and shooting .308 rifles. On paper, I’ve compared specs, price points, and features of more than 40 of the most popular 308 rifles. Once we had nine of them in hand, Ron and I tested and compared them barrel to barrel.
Since Ron is the expert rifleman, he shot three groups of three rounds at 100 yards with each .308 rifle to compare accuracy. He let the barrel cool between groups. He shot the following three types of factory ammo in order to give each rifle a fair opportunity at finding a load it can group well with.
Typical deer hunting load: Hornady American Whitetail 150 gr InterLock
Match grade: Hornady Match 168 gr ELD
Elk load: Federal Premium 180 gr Trophy Bonded Tip
Upper left: Springfield 2020 Waypoint. Upper right: Browning X-Bolt Speed SR. Bottom left: Wilson Combat NULA Model 20. Bottom right: shoot-off between NULA (center), Savage 110 Tactical (left), and Ruger American Predator (right).
Then we compared the actions, barrels, stocks, triggers, weights, and features of each rifle side by side.
Ron and I also created a series of videos that show these top .308 rifles in action, including the range tests and a summary of their pros and cons. Be sure and check out all the shooting fun on the Ron Spomer Outdoors YouTube channel or from right here on outdoorempire.com!
This is essentially the video version of this article if you’d rather watch than read!
If you follow Ron Spomer, you know that he doesn’t hesitate to give the .308 Winchester cartridge a hard time. So if he likes these rifles in this caliber, that’s saying something!
1. Best 308 Rifle for Hunting
The Wilson Combat NULA Model 20, selected by Ron Spomer as the best .308 rifle, excels in both backcountry hunts and range performance. Its surprising accuracy, despite its lightweight design, makes it a superb lightweight 308 rifle for hunting.
Many folks expect accurate .308 rifles to be heavy with long barrels, but the NULA (New Ultralight Arms) Model 20 defied that expectation. It shot MOA or better groups with all three loads we tested, outperforming all the other rifles. Later, Ron tried five different loads and got several 3/4-inch groups with the best group being only 0.62 inch.
Despite popular beliefs, the saying “kicks like a mule” doesn’t apply to the NULA, even with 180 grain bullets. This rifle is slightly muzzle-heavy, which is advantageous for steady aiming compared to a butt-heavy rifle. Its design ensures it’s comfortable and balanced to carry by hand. The NULA features a comb that rises slightly toward the rear, allowing the rifle’s recoil to push the butt under your cheek instead of snapping back against it. This, along with the Decelerator recoil pad, allows you to shoot this lightweight rifle comfortably without feeling beaten up.
Look at how narrow the diameter of the bolt is on Ron’s NULA Model 20. This is one of the ways they shed weight.
Ron Spomer’s preference for this rifle is rooted in history. He’s used Melvin Forbes’ original Ultralight Arms rifle (4.75 lbs) since 1988, hunting various North American game effectively. Despite its light weight, he’s consistently found it to be highly accurate.
Forbes sold the company to Wilson Combat, who maintained the original vision and further improved the design. The name “Model 20” refers to the weight of the action at only 20 ounces, remarkably light compared to typical bolt actions. Wilson Combat achieved this through expert miniaturization, yet ensuring safety and top-notch performance. This makes the NULA Model 20 perhaps the lightest .308 rifle, perfect for backpack hunting but versatile enough for other tasks.
Contrary to what you might expect, the current price of the NULA is less than the original. If you can afford it, I don’t think you’ll regret shedding 3 or 4 pounds when you’re hiking up a mountain on a hunt. The Wilson Combat NULA Model 20 stands up in accuracy to any high precision .308 rifle.
Despite its affordability, the Ruger American Predator offers both core and extra features typically seen only in higher-priced firearms: a free-floated barrel, picatinny rail, threaded muzzle, and adjustable trigger, to name a few.
If you’re considering a Ruger American 308, the Predator model stands out with its added perks. It comes with a factory-installed picatinny scope base, saving the hassle of separate purchases, and its shorter barrel is suppressor-ready.
The rifle’s slick bolt features a three-lug extractor which results in a low-lift (70-degree) bolt handle. This facilitates better scope clearance and faster cycling, even when shooting from the shoulder.
Ron originally picked the Tikka as his favorite among the .308 hunting rifles under $1000. But later he switched to the Ruger because it’s a lightweight 308 rifle that’s ergonomic, quick to draw, and well-balanced for both shooting and carrying in the backcountry.
Watch Ron and I compare three budget-friendly .308 hunting rifles against each other!
This Ruger 308’s 18-inch barrel offers greater maneuverability when hunting in wooded areas and reduces vibration while shooting for improved accuracy. Testing confirmed its precision, with a 1-inch MOA group at 100 yards using 150 gr bullets. Performance dipped slightly with larger bullets, but it still shot respectable 1.25-inch groups with 168 and 180 grain rounds. Ruger’s Power Bedding “V-block” in the stock secures the action and ensures a free-floated barrel for consistent accuracy.
This Ruger 308 isn’t flawless, however. We experienced more recoil compared to the other rifles we tested and there’s some mush in the trigger, for lack of a better word. It’s a bit soft before breaking, but there’s no roughness or creep.
Regularly available below MSRP (I purchased mine for $530), the Ruger American Predator is an accessible, value-packed, inexpensive .308 hunting rifle for both new and experienced shooters.
3. Editor’s Pick: Best 308 Hunting Rifle
Among eight top .308 rifles, my choice for deer hunting this year is the Browning X-Bolt Speed Suppressor Ready (SR). I prefer it for its lightweight design and simple operation, coupled with a blend of functional and cool high-end features.
The three-lug bolt of the Browning X-Bolt Speed (SR) provides a shorter bolt throw and a smooth-cycling action. I especially appreciate the bolt release button that allows ejecting rounds without disengaging the safety. This feature adds peace of mind, as I can safely unload the rifle without switching off the safety, especially after a shot or while repositioning during a hunt.
Its lightweight and sleek stock design offer traditional hunting rifle aesthetics, making it easy to carry and quick to shoulder, even from a sitting field position. The rifle looks and feels premium with OVIX camo, Browning’s gold trigger, and a bronze cerakote finish. Enhancements like a light, fluted, and threaded barrel for suppressors or brakes, along with being free-floated and cerakote finished, add just about all the mountain hunting rifle barrel optimizations you could imagine. When I put my new PWS BDE .30 caliber suppressor on it, I feel like the coolest biped in the woods.
My .308 hunting rifle of choice complete with suppressor.
It shoots well too. In our tests, Ron shot only one MOA group with it, but later with my suppressor and Hornady Superformance 165 gr SST bullets, the performance improved significantly. With some practice and Ron’s tutelage, I managed to accurately hit targets at 300 and 400 yards for the first time ever! This was a new achievement for me and a serious confidence booster for my hunt.
The Browning X-Bolt Speed Suppressor Ready is comparable to our overall best .308 rifle pick, the NULA Model 20, but it’s more moderately priced (57% cheaper). It’s an excellent choice for hunters seeking a high-quality .308 hunting rifle without the need for an overly extravagant investment.
4. Best .308 Hunting Rifle for the Money
The Tikka T3x Lite Stainless stands out as one of the best 308 hunting rifles under $1000. It’s durable synthetic stock and stainless barrel can withstand all weather conditions and it’s free of distracting bells and whistles.
Compare prices at: Bass Pro Shops, Cabela’s, Palmetto State Armory (left hand)
The Tikka T3x Lite, one of the most popular .308 rifles, is available in around 300 variations considering all the calibers it’s produced in. People, including myself, favor this bolt action for its dependability and smooth operation. It flawlessly handles both ejecting and loading rounds and it’s easy to remove for boresighting and cleaning.
It features a two-lug bolt face, yet the bolt handle doesn’t rise too high, providing ample scope clearance and enabling quick cycling of the action. This is handy for guys like me that sometimes botch the first shot and need to put another one in the chamber pronto.
Here I’m at the range getting some last-minute practice in with the Tikka T3x Lite last year on my way to hunt.
During our range tests, the Tikka notably preferred 150-grain bullets, achieving a sub-MOA group, though larger bullets slightly exceeded MOA. In my experience, this rifle consistently performs well with various types of ammunition. Even as an average shooter, I’ve found it shoots reliably and predictably, both at the range and in the field. I took my deer with it last season and I’ll use it again.
Ultimately, Ron would choose the Ruger over this rifle, primarily due to the Tikka stock feeling “a bit clunky” for him. The flat-bellied forend, similar to a target rifle, divides opinion among hunters. However, from all the .308 hunting rifles under $1,000 that we reviewed, my personal choice is the Tikka T3x Lite Stainless. Its simplicity, reliability, and low maintenance make it our top pick for the best 308 for the money. Just do yourself a favor and get a light scope to complement this lightweight rifle.
5. Best .308 Bolt Action Rifle
The Springfield Model 2020 Waypoint stands out as potentially the best .308 bolt action rifle of 2024, thanks to its blend of versatility, superior components, and consistent accuracy. It’s not officially a custom rifle, but it sure feels like one.
Compare prices at: Bass Pro Shops, Guns.com, Brownells, Palmetto State Armory
The Springfield Model 2020 Waypoint is available in various configurations including adjustable or fixed stocks and steel or carbon barrels. My Waypoint, with a fixed stock and carbon barrel, is excellent for target shooting since the barrel cools so quickly. And, of course, you can throw a suppressor on it if you wish.
The carbon fiber stock, featuring a pistol grip, wide forend, and high comb, hints at a target rifle, yet its simplicity and light weight gear it towards hunting. The 2020 Waypoint’s duality as both a target and hunting rifle makes it a top .308 bolt action rifles, though its higher price may deter budget-conscious or casual shooters.
Springfield promises 0.75 MOA accuracy, which we verified with lighter bullets, although heavier bullets showed slightly lower accuracy with about 1.25-inch groups. Despite this, with some ammunition experimentation, practice, and sight adjustment, I’m confident it would compete well with the most accurate .308 rifles.
Watch the three lightweight mountain hunting rifles compared head-to-head!
The rifle’s mild recoil and flat-bellied stock make it comfortable for bench shooting. Its protruding magazine can be cumbersome for one-handed carry while spot-and-stalk hunting or when slung over the shoulder, but its QD flush cups offer various sling configurations for better comfort. This might not be an issue at all for backcountry hunts where the rifle is primarily transported in a pack.
Balancing weight, precision, and stock features, the Springfield 2020 Waypoint excels in long-range hunting and shooting. It’s an excellent choice for pursuing game like sheep in Alaska or elk or mule deer in the rugged terrain of the Mountain West. And it’s equally proficient at target shooting from a bench or whitetail hunting from a stand.
6. Most Accurate .308 Rifle for the Money
At a relatively inexpensive price point, the Savage 110 Tactical was consistently the most accurate 308 factory rifle we tested right alongside our top pick, the NULA. While it’s on the heavy side for a dedicated hunting rifle, it can certainly do the job. And at the same time, it’s a versatile target and long-range .308 marksman rifle.
Trigger: Savage AccuTrigger, adjustable 1.5 to 6 lbs
Safety: 2 position, locks bolt, on tang
Stock: Synthetic AccuStock, adjustable comb height and length of pull spacers
Magazine: 10 round drop out, AICS
Weight: 8.9 lbs
Overall length: 42 inches
MSRP: $919
The Savage 110 Tactical is an upgrade from the standard Model 110 with the same action dropped into Savage’s Accustock. It includes dual forward sling swivel studs for bipod and sling attachment, an Evolution Gun Works Picatinny rail with 20 MOA elevation, and a 10 round Magpul P-MAG magazine. These features are generally premium or purchased aftermarket upgrades on other rifles. Note that hunting regulations in some areas may require a 5-round magazine instead.
In our range tests, this Savage 308 consistently delivered MOA and even sub-MOA groups, shooting better than the more expensive Bergara B-14 HMR and Springfield Waypoint 2020 under the same conditions. This accuracy can be partially attributed to Savage’s floating bolt head, which ensures precise cartridge alignment with the bore. Admittedly, the bolt requires some effort and a third hand to remove and reinstall, but the big bolt handle makes it easy to find and chamber a new round while your eye remains on target.
The Savage 110 Tactical is a long-range capable rifle.
What makes it a contender for the most accurate .308 rifle is its fluted, medium-contour barrel which balances heat-resistance and weight. This improves accuracy but keeps the weight manageable if you decide to hunt with it. The barrel is threaded for a suppressor and it even has a simple nut-driven barrel replacement system.
We loved the tactile feel of the bladed Accutrigger which, like the butt stock, is highly adjustable. For under $1,000, you get the fit of a custom rifle.
While there would certainly be debate about it being the most accurate .308 rifle, the Savage 110 Tactical is our top pick for the best Savage 308 rifle for its accuracy, affordability, and suitability for both new and seasoned long-range shooters.
7. Best Crossover .308 Rifle
The Bergara B-14 HMR (Hunting and Match Rifle) is a tricked out precision rifle. Though heavy for active hunts, it’s a versatile, affordable target gun, perfect for those seeking a single multi-purpose .308 rifle that can basically do it all.
Compare prices at: Bass Pro Shops, Guns.com, Palmetto State Armory (left hand), Brownells
Barrel: 20-inch, 4140R steel, black cerakote finish, free-floating, threaded
Trigger: adjustable 2-4 lbs (pre-set at 3)
Safety: 2 position, non-locking bolt
Stock: molded polymer, adjustable cheek piece and length of pull spacers
Magazine: 5 round drop out, AICS
Weight: 9.5 lbs
Overall length: 40.5 inches
MSRP: $1,199
The Bergara B-14 HMR’s action is remarkably smooth and robust. Its polymer stock, similar to McMillan’s precision models, includes an internally bedded chassis. The ergonomic pistol grip and rear hook differ from traditional hunting rifles, promoting a straight-wrist position and lighter trigger touch. Its on-the-fly adjustable comb height allows for a comfortable cheek weld even with high-mounted target scopes. Among the .308s we tested, the B-14 HMR stood out for its solid feel and stability, especially from a bench, without the forestock movement we saw in cheaper models.
This is the episode where we pit the three more target-style rifles against each other!
Bergara’s heavy target barrels are renowned for repeatable accuracy. In our testing, the rifle favored 150 gr bullets, achieving a sub-MOA hole-touching group. Surprisingly, however, the 168 gr match bullets went haywire with a 2.5 in group and the 180 gr bullets didn’t shoot MOA either. Finding a load it likes may require extra range time and ammo. But this may not be a big deal for hand loaders.
Additionally, the B-14 HMR features QD flush cups and dual sling studs, accommodating a wide range of slings and bipods. It’s a fun gun to set up and shoot, so it will appeal to gun-tinkering enthusiasts interested in mods and upgrades. I purchased mine well below MSRP, making it an affordable choice for both hunting and competitive shooting.
8. Best 308 Semi-Auto Rifle
The largest cohort of .308 semi auto rifles is the AR-10 family. The PSA GEN3 PA10 is a far cry from your traditional hunting rifle, but it’ll do the job, it’s surprisingly accurate, and it’s a ton of fun at the range.
Stock: synthetic butt stock, adjustable length of pull
Magazine: 20 round PMAG drop out, AICS
Weight: 8.2 lbs
Overall length: 36-39.5 inches
MSRP: $1,310
AR-10s often get a bad rap for accuracy compared to precision-oriented bolt-action .308 rifles. However, our testing showed the PA10 shooting MOA with 150 gr bullets and sub-MOA with the 168s, but the 180 group was unimpressive. We even had a misfire, but it’s unclear whether the rifle, ammunition, or shooter was at fault.
This rifle stands out with its smooth, responsive two-stage trigger and gentle recoil. Its adjustable stock can comfortably accommodate virtually any shooter, making it an enjoyable firearm for the entire family to use.
Despite how accurately it shot, this was Ron Spomer’s expression when I asked him if he was ready to hunt with an AR-10.
Palmetto State Armory manufactures nearly all components of this rifle themselves right here in the USA and sells directly to customers at remarkably low prices. Typically, it retails around $900, a fraction of the cost of alternatives from gunmakers like Daniel Defense or Wilson Combat.
Thanks to extensive aftermarket support and ease of modifying optics and parts, the PSA GEN3 PA10 is versatile for hunting, competition, target shooting, and more. Yet, for a semi-auto .308 hunting rifle, the included 20-round magazine gets in the way and the gun feels heavy and cumbersome compared to lighter options like the Ruger American. But if you love the AR platform, its value for money makes the PA10 our top choice for the best .308 semi-auto rifle.
Take note that you should check the regulations in your state before purchasing a gun like this. Some states place restrictions on semi-automatics or magazine capacity, especially for hunting. Look it up and follow the regs.
9. Also Great
The Remington 700 SPS (Special Purpose Synthetic) has all the makings of a classic .308 caliber hunting rifle. Its slender stock, reliable action, and prolific array of aftermarket support make it a great starter rifle.
Compare prices at: Palmetto State Armory, Brownells
Barrel: 24-inch, carbon steel, sporter weight, bedded to stock
Trigger: X-Mark Pro adjustable trigger
Safety: 2 position, non-locking bolt
Stock: synthetic with rubberized grips
Magazine: 4-rounds, internal hinged floor-plate
Weight: 7.25 lbs
Overall length: 43.6 inches
MSRP: $950
This Remington 308 bolt-action rifle, while consistent, was the least accurate in our tests, with 100 yard groups between 1.5 to 3 inches. The shots varied in height and direction. It’s still good enough to hit a deer at 200 yards, but it may be somewhat unreliable for long-range shooting. The barrel is bedded to the synthetic stock, not free-floated. Sometimes this stiffens the barrel and is good for accuracy, but with a somewhat flimsy plastic stock, it may be an issue. Sanding under the barrel to increase barrel clearance may improve accuracy. We were a little disappointed in its precision, but it could do better with the right ammo.
It has a sleek stock, similar to the Browning X-Bolt, which I like in a hunting rifle. And there are tons of aftermarket accessories for the Remington 700.
The Remington 700 SPS is not all that different from a 30 year old 700.
Drawbacks include some creep in the trigger and some reports of rust on the matte black barrel finish. We also discovered the bolt operation can be a little rough, though it may smooth out in time with use.
There may be some debate about our inclusion of the Remington 700 SPS since Remington got sloppy in their quality control and went bankrupt before being acquired and promising to restore the brand’s reputation. Despite this, the Remington 700’s significant influence in hunting, sport shooting, law enforcement, and military sectors can’t be overlooked. As one of the most produced civilian rifles, with a variety of models available, the Remington 700 SPS should be given a place as one of the best bolt action .308 rifles.
Honorable Mentions
It was hard to narrow down my long list of noteworthy .308 rifles to a short list of candidates to buy and test. Then, based on lack of availability in some cases and my meager attempt to practice some budgetary restraint, I had to draw the line somewhere. Here are a few more popular .308 rifles that we didn’t get to test, but wish we could have. One of these may be just as worthy of your attention as some of those above.
The Winchester Model 70 would have been in the hands-on test group if I could have found one available for purchase. I am particularly interested in this Featherweight Stainless version. It takes the classic wood stock and hunting rifle design from the developer of the very cartridge we’re interested in here, the .308 Winchester, and it adds just enough modernity to it. The corrosion-resistant barrel and the lighter weight are two things I value most in a hunting rifle. If you find one comes available, used or new, don’t hesitate to give it a go.
The Ruger No. 1 may be more of a collector’s item now than an every man’s gun, but it sure is intriguing. They have been made in .308 Win before, but I wouldn’t make any promises to anyone that you’ll find one. A single shot, lever-action .308 rifle that has endured the test of time, it has my attention.
The .308 lever action rifle I was really interested in trying out due in large part to the fact that it is still in production is the Browning BLR Lightweight. If you’re looking for a lever action and were disappointed that we couldn’t test one out, take a good look at this Browning BLR.
There are a number of others I would have liked to test too, like the Mossberg Patriot, Howa Hogue, Winchester XPR, Savage Axis, CZ American, and the Kimber Hunter. Stay tuned.
How To Choose the Right .308 Rifle
There are many reasons choosing a .308 rifle makes sense for a hunter or shooter. It’s sufficiently powerful for almost any use, the recoil is tolerable, a variety of ammunition is readily available, and the cartridge fits in a short action receiver.
How to choose the right .308 rifle for you depends on your needs. Key considerations include:
Intended Use: Define whether you’ll primarily hunt, target shoot, or balance both. Your primary activity influences the rifle’s ideal setup.
Physical Suitability: Look for a rifle that fits you comfortably. Adjustable stocks can aid in achieving a good fit.
Shooting Style: Choose a rifle suited to your preferred shooting style. For example, a rifle for stalk hunting may not be ideal for competitive shooting.
Attachments: Consider future attachments, like suppressors. Opt for rifles with pre-threaded barrels to avoid extra costs down the road.
Caliber: While .308 is versatile for big game and long-range shooting, a smaller caliber could be a good choice for other uses.
Rifle Features: Pay attention to action, barrel, stock, trigger, safety, weight, accuracy, and customization options.
Ammunition: Think about the type of .308 ammo you’ll use, as it will affect the rifle choice and performance.
Price: Budget is always a factor and while you shouldn’t spend more than you can afford, it may be worth saving up to get the rifle you really want.
Make your choice based on a holistic assessment of these factors.
Recommended reading: Pros and Cons of .308 Rifles: Great Gun, But Not For Everyone
What Are You Gonna Do With It?
You don’t want to buy an expensive, high-end competition rifle only to dread lugging it through the woods on a hunt. You also don’t want to worry if you can trust it to make the shot you need.
Start by considering what you actually want to do with your rifle, then you’ll know which features and characteristics to focus on.
Hunting
Hunting rifles are designed to be carried for long distances, function reliably, and hold up to use in extreme outdoor environments. They should generally be lighter and easier to handle than target rifles, and you don’t need to fret if that comes at the cost of a little accuracy. The barrels are typically thinner, so they are more susceptible to point of impact shift due to barrel heating if they are fired rapidly.
I appreciated the relatively light weight of the Tikka T3x Lite when hiking on my 2022 deer hunt.
Typically, .308 hunting rifles will accept only a small number of rounds and many states place a limit of 5 rounds on rifles used for hunting. This results in a rifle that is sleeker, easier to handle, and has fewer moving parts.
Target Shooting
Target .308 rifles, typically heavier and larger than hunting rifles, are built for stability and accuracy with thick, long barrels and heavy, adjustable stocks. Customization options like attachment points and rails allow for accessories such as bipods and high-powered scopes. Their weight, beneficial for reducing recoil and stabilizing sight pictures, is less of an issue in non-maneuverable, long-range shooting scenarios.
Precision .308 rifles designed for target shooting like our Bergara B-14 HMR shown here often have heavier barrels and are more customizable than most hunting rifles.
Tactical-style .308 rifles balance the agility of hunting rifles with the precision of target models. Despite their lightweight design, they don’t compromise on accuracy, durability, or adaptability. Suited for a range of applications from professional military use to competition shooting, these rifles maintain effective performance from 30 to over 1,000 yards. Their high cost reflects the advanced technology and top-tier performance demanded by users in challenging, rapid-fire shooting environments.
Action
The most common action for a .308 caliber rifle is a bolt-action. Hunting rifles and many target-oriented .308 precision rifles have a bolt action. Bolt action .308 rifles are simple to operate and have fewer moving parts than a semi-auto or lever action, which makes them less prone to failure. This reliability makes them the most common type of action for a hunting rifle.
When choosing a .308 bolt-action hunting rifle, consider if it has a 2-lug or 3-lug bolt. This choice impacts bolt lift height, affecting cycling speed and scope clearance. For faster action and compatibility with larger scopes, a 3-lug bolt, like those on the Browning X-Bolt Speed SR and Ruger American, usually offers a lower lift.
An entire ecosystem has been built around the Remington 700 bolt action which is known for being strong and reliable.
A .308 lever-action rifle like a Browning BLR is quicker to cycle than a bolt-action in experienced hands. This is useful for bear hunting or in thick wooded areas. But there’s a lot more moving parts which makes them harder to clean and maintain. They can also get mucked up more easily in rain or snow.
If you’re into target shooting or hunting coyotes and varmints, the AR-10 platform is a great choice for semi-auto fans, especially since it was designed around the .308 Winchester cartridge. The AR-10 is known for its modularity, ease of use, low recoil, and accuracy. But, remember, laws vary — in some states, the AR-10 can be restricted or even illegal, and it might not be lawful for hunting. Always check local laws before buying.
Barrel
More and more hunters want a threaded barrel these days and I’m one of them. It’s nice to have the option, for now or later, to add a suppressor or a muzzle brake which can help reduce recoil and even improve accuracy. I definitely found that to be true when I added a suppressor to my X-Bolt Speed SR.
Free-floated barrels are generally more desirable for a lightweight hunting rifle with a synthetic stock or for a heavy target rifle like the Bergara B-14 HMR or Savage 110 Tactical. Like we saw on the Remington 700 SPS, flexible plastic stocks with a rifle bedded to them doesn’t do any favors to accuracy. It should either be free-floated, or fully bedded to a stiff stock.
Barrel length might not matter a whole lot for most hunting purposes, and if it has a threaded muzzle a suppressor can give you some added length if you want it. Long barrels can be great for target shooting, but a nuisance when you’re brush busting through the deer woods.
Carbon fiber wrapped barrels like this one on the Springfield 2020 Waypoint we tested help stiffen the thinner-than-usual steel barrel underneath.
Sporter weight barrels are typically fine for hunting rifles whereas thicker heavier barrels ore often desirable for target guns. Gun makers often try to shed some weight by fluting a barrel, which is great. Carbon fiber-wrapped barrels are another attempt to shed weight and maintain stiffness, but they drive the price up quite a bit.
For hunting you also want a corrosion-resistant barrel. Some older blued barrels can rust through the finish whereas newer guns with cerakote or other fancy finishes like the ArmorTough used on the NULA Model 20. A stainless steel or carbon fiber barrel will do the trick too.
Stock
A flat-bottomed forestock, found on rifles like the Savage AccuStock and Bergara B-14 HMR, is great for stable bench shooting. It’s also favored by some long-range hunters. However, traditional hunting stocks, with their curved forends, are easier to carry and use in various field shooting positions. Rifles like the Tikka T3x aim for a balance between these styles. Your preference might depend on how you plan to use your .308.
Hunting rifle butt stocks are usually straight and slender, but adjustable stocks are gaining popularity for their customizability in length of pull and comb height. This is particularly useful for different sized shooters or when using high-mounted target scopes.
Adjustable stocks like on our Bergara B-14 HMR are especially appreciated by target and long range shooters.
Materials also matter. Synthetic stocks are light and weather-resistant, while wood stocks require more care. Stiff molded polymer stocks like on the Bergara B-14 HMR can add significant weight compared to an ultralight carbon fiber stock like on the NULA.
When choosing, consider how the rifle feels when shouldered. Try it out in a gun store before purchasing if you can. And check for a good recoil pad to ease the kick.
Trigger
Those who enjoy customizing their setup may appreciate an adjustable trigger. Most hunters tend to stick with the factory-set trigger pull weight (usually about 3 pounds) and don’t necessarily need to scrutinize that feature too much when making their purchasing decision.
Safety
A lot of hunters, including Ron Spomer and I, like a bolt that locks with the safety on. It prevents accidentally lifting or pulling back the bolt while moving through thick brush, which can be a safety issue or cause unintentional ejection of your round. So, if you like the sound of that, look for a rifle with either a 3-position safety or a 2-position safety that locks the bolt.
The downside of a locked bolt is that you must take the gun off safe to remove a round from the chamber – something you do often when moving or before getting back into a truck. I really like the Browning X-Bolt because even though it has a bolt-locking 2-position safety, it also has that bolt release button that lets you eject a round without taking the gun off safe.
Target shooters may not get too picky about a bolt-locking safety.
Weight
If you’re often hiking or navigating rough terrain when you hunt, you’ll likely appreciate less weight, especially if backpacking. Spending more money on a rifle with a lightweight carbon fiber stock and carbon fiber-wrapped barrel might be worth it to you in these instances. For stand hunting, spending extra for a lighter rifle isn’t really necessary.
Generally speaking, carbon fiber stocks are lighter than synthetic plastic or polymer stocks, which are lighter than wood stocks.
A traditional .308 bolt-action hunting rifle weighs 7-8 pounds without an optic. A lightweight rifle weighs around 6 pounds. That NULA Model 20 may just be the lightest .308 rifle you’ll find at a hair over 5 pounds. The Tikka, Ruger, and Browning from this review are also very lightweight, which was a main reason we selected them as some of the best .308 hunting rifles.
Target and long-range shooters, whose primary objective is precision, probably don’t need to worry about weight and may even prefer a heavy rifle that won’t move as much when dialed in on a target from a bench rest. Though, something like that Springfield Waypoint rather attractive to long-range mountain hunters because it’s a precision .308 rifle that weighs relatively little.
Also keep in mind that any optic or scope you put on your rifle can add considerable weight. It doesn’t make a lot of sense to pay for a super light hunting rifle only to slap a behemoth target scope with a 34mm tube and a 54mm objective lens on top.
Accuracy
Accuracy matters for any .308 rifle, but it ought to matter more to a target shooter than a hunter. When hunting, your objective is to hit the vital organ zone of a big game animal which can be the size of a dinner plate or larger. That gives you some leeway and allows you to favor things like weight and reliability more than a precision target shooter might.
Lucky for us, almost all modern .308 rifles are plenty accurate for hunting, even for around $500 like that Ruger American Predator. There are many highly accurate .308 rifles to please the target shooters too.
Price
Most rifles are sold at prices below the Manufacturer Suggested Retail Price (MSRP) by retailers such as sporting goods stores and gun shops. I recall paying the listed MSRP for only two of the rifles in this review. I bought the others at lower prices. So shop around if possible.
A quality .308 rifle doesn’t have to cost an arm and a leg, as proven by this Ruger American Predator.
Any .308 rifle under $1,000 is a very reasonable, if not budget-friendly, price. The least expensive .308 rifles start around $400, but I paid $530 for my Ruger American Predator and it offers a ton of value for that amount. Mid-range .308 rifles will cost roughly $1,000-$2,000 and anything over that I would consider high-end. But don’t get me wrong, you could spend several thousand dollars on a tricked out competition, custom, or precision rifle.
Ammunition
When choosing a .308 rifle, it’s better to consider ammo types after selecting your gun. Think about your intended use and the bullet weights that suit your purpose. This will help you find a gun that pairs well with what you expect to shoot.
In our experience shooting 3 different types of ammo through 9 different .308 rifles for this review, the 150 grain bullets seemed to produce the best accuracy overall. So that’s where I’d start experimenting with a new .308 rifle. If you think 180 grain bullets are too light for what you want to hunt, you might need to explore other calibers because that’s about where .308 Winchester ammo tops out.
Background on the .308 WIN Cartridge
Ron Spomer dives deep into the ballistics and background on the .308 Winchester cartridge!
Introduced in 1952, the .308 Winchester is one of the most popular rifle cartridges not only in America, but worldwide. At the time of its introduction, developments in powder technology allowed it very similar power and ballistics to the .30-06 Remington. All in a short action package!
Two years later, the .308 was adopted by NATO as the 7.62X51mm NATO. The difference between these cartridges and their interchangeability has been a subject of much debate in the gun community.
In truth, there are only very minor differences between the two cartridges. They are just exacerbated by differences in testing methods between civilian and military standards. Overall, the .308 Winchester has a slightly shorter chamber specification as well as thinner case walls. SAAMI (Sporting Arms and Ammunition Manufacturers’ Institute) considers the two cartridges safe to interchange. Just be aware it can lead to issues.
The .308 Winchester is considered a highly versatile and capable cartridge. Its intermediate length enabled it to be adapted to bolt-action, semi-automatic, lever action, and other types of firearms easily.
The cartridge is considered powerful enough to humanely kill almost any large game in North America. It even has competent ballistics for shooting out to 1,000 yards and potentially beyond. These characteristics have made the .308 highly popular for sporting, hunting, and tactical purposes.
Popular .308 Brands
If you are looking to buy a .308 rifle, you want a dependable brand. Of course, the rifles we recommend above all come from reputable companies, but here are a few manufacturers that have been making quality .308 rifles for a long time.
Winchester
The Winchester Arms Company has been active in America since 1866. Winchester introduced the .308 Winchester caliber cartridge with the bolt action Model 70 rifle and the semi-automatic Model 100 rifle. The Model 70 is still one of the best .308 hunting rifles today. Winchester rifles retain their reputation for quality and craftsmanship.
Ruger
Ruger offers a number of .308 rifle models, from budget hunting combos to fine hunting rifles to tactical rifle setups. Recently, they have been a fierce competitor in the budget rifle field with the introduction of their Ruger American series. These rifles produce accuracy that is difficult to beat in the budget firearms game.
Remington
As mentioned earlier, the Remington 700 is one of the most widely sold .308 bolt-action rifles in American history. Remington actions are commonly used for custom rifle builds. The company has faced criticism in the past due to their handling of potentially dangerous issues with their trigger system. Regardless, Remington still has many fans in the rifle world.
FAQ
Why Trust This Review
Unsponsored: This review is not sponsored and no company has paid us to recommend their product.
Our money: I spent thousands of dollars of Outdoor Empire’s money to purchase these rifles.
Hands-on: Ron and I handled, shot, and used the nine .308 rifles in this review ourselves.
In-depth research: I have researched and compared more than 40 of the most popular .308 rifles.
Expertise: I learned about and handled dozens of rifles from factory reps at SHOT Show and gun counter guys at sporting goods stores.
Experience: We have spent well over 120 hours working on this review (that’s just what I remember).
Trust: I work hard to bring you honest, unbiased content. I recommend the same 308 guns to you that I do to my friends and family.
We bought, tested, and compared all of these rifles firsthand.
As an outdoor enthusiast, I see guns as tools for my hunting hobby, but I’m no expert. So I enlisted Ron Spomer, fellow Idahoan and seasoned expert in firearms and hunting, to evaluate these nine .308 rifles. With a successful career in outdoor writing and TV hosting, Ron has educated millions about firearms and conservation, benefiting hunters like me through his YouTube videos. As it turns out, he’s just as pleasant to hang out with as he seems on camera.
If you want to see more hands-on outdoor gear reviews, I also host Outdoor Empire’s YouTube channel about outdoor gear.
Recommended reading: Best .17 HMR Rifles Tested and Reviewed
Hey there my fellow fishing enthusiasts and welcome to my post discussing an important question when it comes to fishing… can you eat Walleye? Now, the short answer is absolutely, if fact, it is one of the most popular and sought after fresh water species to consume…
So let’s check out the ins and outs of eating Walleye below…
So, before we start, let’s just quickly recap what we are talking about here. Walleye are a freshwater gamefish native to the United States and Canada. Also known as also called the yellow pike or yellow pickerel, they live predominately at the bottom of lakes and rivers and are known as one of the most prized freshwater table fish you can catch.
Walleye have a long, thin body that is primarily gold and olive in color with a white belly. They posses two dorsal fins on the top of their bodies with a large mouth and sharp teeth. Their name comes from their eyes which are cloudy-looking which is caused by a reflective layer of pigment.
They generally live for around 15 – 20 years depending on their habitat and can reach sizes of up to 80 cm (31 in) in length.
Note: Due to their popularity as a sport fish and for consumption, many States and jurisdictions have seasonal restrictions or slot limits in place. To avoid fines, always check local regulations before hitting the water.
In short, absolutely they are. In fact they are one of the most popular and sought after freshwater table fish in the U.S. Their flesh is clean, sweet and extremely versatile. However, as with most freshwater species (such as Largemouth Bass etc.), the following should be considered:
They will take on the flavour of their surroundings – so avoid eating if they are caught in murky, stagnant or dirty water.
The older varieties tend to taste a lot stronger or ‘fishier’ so if you are planning to keep one for dinner, it doesn’t necessarily have to be the biggest one you catch.
Larger varieties are also more susceptible to worms, parasites and increased absorbsion of waterway contaminants.
In most cases, as long as the water is clean and you are within your slot limit, then you are generally good to go.
As with most white meated fish, Walleye do not need to be bled upon capture however if you plan to consume it, then it is always a good idea to place them on ice as soon as possible after it is landed. Many use an ice slurry in a cooler which is generally a ratio of 2 parts ice to 1 part water for this purpose.
Due to their eating habits, freshwater fish must be thoroughly cleaned and rinsed prior to consumption. From here, preparation will be determined by how you plan to eat it. If they are to be eaten whole then you will need to clean and scale them beforehand. If you plan to pan fry, then you can either scale and fillet or fillet and skin. Keep the meat refrigerated or on ice at all times before and after preparation.
Yes – Raw Walleye fillets can be frozen for 6 – 12 months. It must at the very least be gutted and cleaned and placed in an airtight bag (ziplock bags are good here – try to remove as much air as possible) prior to being placed in the freezer. They will last longer (up to the full 12 months) if vacuum sealed instead.
Can they be eaten raw?
Technically yes, if it is caught in clean water and prepared with the utmost care until eaten then it can be ok – although the taste does not match that of saltwater species such as Tuna, Salmon and Kingfish. The issue here however is that freshwater fish tends to contain more bacteria and parasites which are killed off by cooking.
To be honest, if sashimi is your meal of choice then I would look for a species such as Striped Bass or those listed above and leave the freshwater catches for the frypan.
At the end of the day, due to its white flesh and versatility, Walleye can be prepared in the same manner as most other fresh or saltwater species in that they can be:
Grilled
Walleye fillets can be cooked over charcoal or gas grills with any and all spices and seasonings as you see fit. Below is a common recipe:
Heat a grill hot but not smoking.
Pat fillets dry then spread butter or oil over the non-skinned side (or both if fillet is skinned) along with salt and pepper.
Grill fillets until just cooked (fillets start to flake) – Do not overcook as the meat will go dry.
Consume with salad or grilled vegetables.
You can of course use any other herbs or spices on the flesh to taste.
Pan Fried
As above, but in a pan – I like to add garlic to the butter when I pan fry white fish fillets with the salt and pepper as well. I have seen many Walleye recipes with Asian spices or Italian herbs used too so that is also worth a try. Of course, they can also be crumbed as well which entails:
Gather three bowls and in the first, place some flour, eggs (beaten) in the second and breadcrumbs in the third.
Pat dry each fillet (skin on or off to preference) and then cover in flour.
Sink the flour covered fillets into the egg mixture and then cover in breadcrumbs
Shallow fry in the oil of your choice in a pan large enough to hold the full size of the fillet.
Spritz with lemon juice and consume with fries (chips), salad or whatever else takes your fancy.
Note: For extra flavour, add salt and pepper to the flour or even some grated Parmesan cheese to the breadcrumbs. I have even seen some good recipes using BBQ rubs on the fillets as well.
Baked
For this last option, the fish is cooked whole in the oven. A cooking example is as below:
Make sure the fish is cleaned and scaled.
Score the skin with a sharp knife (This will stop it shrinking too much from the heat).
Cover the outside with a lubricant such as butter or oil.
Fill the cavity with whatever takes your fancy (common options are garlic, herbs, spices, lemon, tomatoes or mustard).
Bake in the oven until just cooked – again, it will dry out if left too long.
Note: Based on my research over a number of recipes, a 1.5lb Walleye will take around 15 – 30 minutes in a 375F oven.
And there you go – my response to the question of whether you can eat Walleye. I hope it has been helpful and as usual, please let me know of your experiences – or recipes – would love to see your recipes below too.
Also, please do not hesitate to comment below if you have any questions, concerns, corrections, or would like me to check anything else out for you.
Bull Shoals Reservoir is one-of-a-kind. It’s character doesn’t resemble many other man-made lakes in the country. It’s banks are, for the most part, void of docks or buildings. It seems as if it’s lost in time when the Ozark Indians used to use the once White River for their source of life.
Bull Shoals Reservoir is one-of-a-kind. It’s character doesn’t resemble many other man-made lakes in the country. It’s banks are, for the most part, void of docks or buildings. It seems as if it’s lost in time when the Ozark Indians used to use the once White River for their source of life.
What about the fishing?! As many lakes in the midwest, white bass are a sought after trophy, for their meat and for their fight. I remember years ago in Oklahoma, to name one state, white were considered a trash fish and not fit to eat. No limits on this abundant fish didn’t seem to deter the population on most lakes and rivers. There seemed to be an endless number schooling up and down the flats, devouring and schools of shad in their way. Times have changed, as they do, and the white bass, or called sand bass in some other parts of the country, have become coveted as crappie and walleye (well- almost). Most anglers come out of the woodwork on warm, sunny days in March and April to line the banks and fill the channels with their boats to do what? Chase whites.
When do the whites start their march? All depends on the weather. In January, we start to see white bass show up when fishing for winter crappie off mud flat banks or fishing for walleye off the flat channel in deeper water. On into February, more start to show from K-Dock up to Beaver Creek in the main channels and you can usually depend on finding them close to the bottom. How do you locate them? Find them through countless days of drifting and trolling in this 4 to 6 miles stretch… or… read my reports and I’ll tel you where I’ve either caught them or heard of other catching them. I don’t know about you but I can’t afford to spend countless anything but working here at the resort! Once found, they won’t move too far too fast- especially if they are close to say Beaver Creek where they will run up to spawn.
How to catch pre spawn whites- as I said, they will be close to the bottom of the lake. **Bull Shoals is designed to be the holding basin for the White River Chain of lakes- it can hold lots of water. About 15 years ago, they put 40 feet of water over the normal pool- that’s allot of water!! Then normal thin lake went sprawling all over the place and it was difficult to find anything in so much water.** You need a good depth finder, not necessarily to find the whites but to see what kind of depth you’re in. Finding the fish is good too. Lures and techniques- your preference from here. I like jigs. I use 1/18th and even 1/4th oz jigs, depending on the depth and wind conditions. I use marabou mostly when vertical jigging. White, blue, chartreuse, gray, yellow, purple…. I switch around until I find a color to their liking. Some people like to jerk spoons. I’ve never got the hang of that but I know it works. One thing to remember when working either a jig or spoon up and down- look for it to stop before it hits bottom. You won’t feel the proverbial tap like when retrieving a lure- they usually take the lure on the drop. Drifting minnows on the bottom is good. Either with the wind or current. Careful not to use too much weight so as to get hung on the bottom a lot. Trolling deep diving crank baits is also good- blue/silver hot-n-tots, shad raps and heavy rooster tails. If the lake level is low enough, use 1/8th oz lead heads and swimming minnows and work them slowly across the bottom. We use several colored minnows including motor oil, blue, purple, chartreuse and smoke. Powersite will start holding white bass early in the season. Either fishing from a boat or the banks, working crank baits or swimming minnows is current or not can be productive. You really never know what you’ll catch up there too- whites, crappie, black bass, rainbow or brown trout, drum, carp, catfish, walleye- even striper now. That’s why they call it the “Pot Hole”.
Night fishing for pre spawn whites is very popular and productive closer to the spawn. I’ve headed out in my boat from River Run on many a night, while others are heading in. I head down to the “Willows” and anchor in current along the mud bank in about 18 feet of water. I throw a purple swimming minnow (1/16th oz lead head in medium current and 1/8th in heavy current) towards the bank almost at a 90 degree angle and let the lure drop close to the bottom before retrieving it. When the lure makes the swing at the back of the boat, I usually get the strike. This is when we catch a lot of the “sows” or female whites- big whites!! Conditions do have to be just right for this to happen but in most years- we do get water generation at night and we do catch whites this way. Other ways to catch whites at night- off the banks- the same willow bank, the mouth of Swan Creek, up close to Powersite Dam and the mouth of Beaver Creek. Use slow-moving lures like jigs, grubs or swimming minnows and work them close to the bottom. Darker colored lures usually work best.
Spawning whites- when does it really happen? Water conditions in the creeks need to be: warm- 60 degrees or higher; running water preferred; water color- I believe anything but extremely muddy. In the spring, weather fronts and rains play havoc on fishing. “The whites and running- now their not- it’s too muddy- water is too high- too low- too clear- too cold- new moon- old moon.” If you’re like me, you spend half your time chasing “stories” about what happened yesterday and coming up empty. In early to mid April, our white bass are usually in peak spawn and most of the time, you’ll find white spawning on up into May. Whites will certainly stay in the creeks into June sometimes feeding on minnows.
Early mornings and late evenings in low light times, whites generally make a run up in our creeks and are easy pickings. Night time too. Whites will moving up in creeks and then hold in deep pools before continuing on their trek. People wading using minnows in holes below riffles usually do real well. Use 4 lb line with a small split shot and #8 hook. Toss the line in the current and let it settle in the pool. If the pool isn’t real deep, blue rebels are a hot lure to use. Jerk it erratically, triggering the strike. This technique works on post spawn whites too in the main lake and in creeks. Working swimming minnows through these pools also is good. Use different colors- depending on water color- till you find a color they will hit. Fly fishing is a blast for whites in the creeks now. Fly fishing is the best technique for fishing the fast riffles and pockets along these riffles. Use small jigs, streamers and even nymphs like stones and hellgrammites. Whites usually like flashy flies.
Whites bass hang around the same areas for weeks after spawning, usually out closer to the mouths of the creeks and in the main lake. After spawning, they are vivacious feeders and very aggressive. Jerk baits like the blue rebel and sluggos are a blast to use. We fish up in Swan Creek with small sluggos into the month of June and in clear water, you can see the white swarming the lure as you twitch it in. Main lake- rattle traps is one of the best lures to locate and catch whites.
Bottom line- white bass is a great sport fish to fish for and even to eat. I hope this helps you have a successful fishing trip this spring.
When it comes to duck hunting, we have to admit that weather matters a great deal. Seemingly inconsequential changes in outside conditions can greatly influence a hunter’s success. Do you know that light rain and wind is not likely to harm your hunting success? In fact, light rain and wind can even bring you additional chances. Surprised? Yes, we are not joking. At first, you might be thinking that ducks don’t like to fly in the rain and wind, but in reality, it’s not true. Have you ever heard such an impression as “ducky” weather. Generally, ducky weather means windy and rainy weather as ducks become less scared and start flying lower thinking that nobody could hunt for them in such bad weather.
Notably, if you are about to duck hunt, wind and precipitation can aid you, but you need to make sure you are well-prepared for hunting in the rain. And here we mean not only the proper camouflage, but you need to be well prepared. Mastering a few things can put plenty of birds in your bag. By the way, we’ve found an expert duck hunter who is going to share his 5 tactical secrets and the gear he uses to keep himself comfortable and wind and rain/wind protected.
So, let’s check what he has to share.
5 Top Tips To Duck Hunt In The Rain And Wind
Tip 1: Learn more about the birds’ weather-driven migration patterns, and determine their preferable places in different weather: check out where the ducks may be flying when it’s raining and spot where you can find them once the rain has stopped. Just for the record, rivers and lakes are excellent places to jump shoot ducks. But you can hardly expect a duck to fly somewhere over a big lake during the rain, but it is likely to fly around smaller bodies of water that have a good tree line blocking out at least some of the wind and rain. By the way, the Duckr application can tell you exactly which direction the wind is coming from so you can set up your blind correctly. Never again will you set up your blind facing the wrong way!
Tip 2: Consider investing in proper duck hunting gear to enjoy maximum, leak-proof protection. Typically, must have gear for duck hunting in the rain includes the following items: waterproof chest waders and a rain jacket, a fleece pullover, and weatherproof ultra light packable down vest, waterproof long boots, as well as balaklava,
along with gloves for cold rainy weather. Of course, there are several other items that duck hunters adore using, such as a pair of good binoculars, for instance.
Tip 3: Check the nearest weather forecast and remember that it’s only the rain that is good for duck hunting, but not thunderstorms. In a big scheme of things, go hunting it’s going to run but if a big storm is expected, it’s always better to stay at home.
Tip 4: Remember that ducks almost always fly into the wind. So it would be a wise move to place yourself where you have a shot at birds flying up or down the river. Makes sense, doesn’t it?
Tip 5: Ensure you hunt from a ground blind where you can stay warm and dry. But still don’t forget to wear the proper weather suitable clothes.
Finally, here is one extra tip from our expert hunter: Try to be where the birds want to be, stay hidden and use decoys effectively.
Key Takeaways
Despite the popular misbelief that rain and wind prevent you from successful duck hunting, if properly prepared, they can be a hunter’s best-friend. As a matter of fact, hunting in the rain keeps ducks flying low, making your job even easier. Follow the tips we have mentioned above and you will have all chances to succeed.
Hey, do you think we have missed some important duck hunting in the rain tips? Don’t keep them secret, please do share them with us.
P.S. To avoid any duck hunting issues with your local authorities, don’t forget to get permission to hunt.
Levi Morgan won his first professional archery tournament in 2007, when he also went on to win the Archery Shooters Association Shooter of the Year and World Champion titles that year. Since then, he has won the Shooter of the Year title 11 years in a row. Levi is the host of Bow Life, airing on Sportsman Channel.
The following topics are from the column, “Changing the Game” in Petersen’s Bowhunting.
by Levi Morgan
In the following article, I will address:
How to Overcome Target Panic: The Aiming Drill
Achieving Perfect Bow Balance
How to Grip a Bow
Shooting a Bow: Pushing and Pulling
Anchoring a Bow: Three Steps to Success
Write It Down
Serving a Bow String
How to Stand When Shooting a Bow
Paper Tuning a Bow
Preparing Your Mind for Success: Mastering the Mental Game of Archery
If you’ve shot a bow long enough, you’ve probably heard about – or experienced for yourself – the demon we call “target panic.” The main form of target panic is best described as the inability to hold your pin on the target and squeeze the release slowly enough to cause surprise when it fires. Essentially, you punch the release prematurely. While there are many forms of target panic and just as many ways to cure it, there are a few things you can do to prevent or beat this horrible condition. Surprisingly, the one solution I’m most fond of doesn’t even require you to fire an arrow.
The main form of target panic derives from what I call “anxious aiming.” This occurs when the pin settles in where you want it to and you feel like you have to fire that release immediately. The problem with firing a release on command (the way 90 percent of people trigger their release) is that from the time your mind tells you to fire that shot to the act of your finger actually doing it is enough time to move off the spot. Generally, this is the main cause of inconsistent groups. You may say you don’t have target panic, but if you can’t aim in the middle and slowly fire that shot, then I’ve got some bad news: you have target panic. Luckily there is a cure for this.
You are probably wondering how I can suggest solving this problem without even shooting an arrow, but the fact is, the problem lies between your ears, not in the act of shooting. What you need to do is commit two weeks to the cure; every day or every chance you get, go out in the yard with an arrow nocked, just like you would normally practice. You will simply draw the bow and address the target, aiming with your finger on the trigger – but don’t pull that release; you want to focus only on aiming. Keep that pin where you want to the arrow to hit until your aiming starts to break down. Then let down and reset, never firing the arrow. Treat this just as you would any practice session, except never actually shoot your bow.
This will do two things that benefit you greatly as an archer. First, it will teach your mind that it is OK for that pin to settle on the bulls-eye without firing that arrow. Second, it will increase the length of time during which you can effectively aim before your shot breaks down. Over time, you will be able to add shooting back into your routine, but if you ever feel those anxious or rushed feelings, take a few days and just commit to this simple drill.
Target panic is a horrible thing, and if you don’t know how to cure it, it can really mess with your confidence, taking the fun out of shooting your bow. Even if you aren’t struggling with target panic, this aiming drill can and will make you a better archer, regardless of whether you are a novice or a top-level competitor.
Achieving Perfect Bow Balance
Maybe you are new to archery and trying to learn everything you can. Maybe, however, you have been a successful archer for years and are simply reading this because you are addicted and can’t get enough. Either way, we all want to be better shots, and if you say you don’t, I’d say you’re not a passionate archer/hunter.
There are many things that make up a great archer, but no one thing is more important than having a perfectly balanced bow. The overall goal of finding perfect balance is to be able to draw the bow with your eyes closed, settle in and open your eyes to a perfectly level bubble. This takes away human influence or torque that is necessary to level your bow otherwise. Proper balance will better your aim in all areas. Better aiming then leads to improvements in every aspect of your shot and can even cure most forms of target panic.
To achieve perfect balance, you will need a front stabilizer bar (I’d recommend at least 10 inches), a V-bar bracket that will allow you to adjust side to side and up and down, and a rear stabilizer bar that’s at least 8 inches. In addition, you will want a few weights to play around with.
First, you will need to put the stabilizers on and level the bow from side to side. I would recommend trying 4-5 ounces of weight on the front bar and 10-15 ounces on the back bar. You can fine-tune the weights from here, but this is a good ratio to start with.
Next, draw the bow with your eyes closed, anchor with a relaxed grip and open your eyes. If the bubble on your sight is not level, then adjust the rear stabilizer accordingly until you can repeat this process and your bow is perfectly level from side to side.
Leveling your bow front to back is a little different because you will adjust by adding or removing weights rather than adjusting the bars from side to side. To level your bow front to back, come to full draw aiming at a horizontal line. If your pin wants to dip or bounce below the line then add weight to the back bar or take the weight off the front. If your pin bounces above the line, do the opposite. After this step is complete, your bow should be very close to balanced. While you probably won’t be aiming perfectly still, your aiming pattern should be centered on that horizontal line, not bobbing up or down.
Obviously, we all want to be the best archer we can be. Balancing your bow properly will help you tremendously. Some people say balancing your bow makes it too heavy, but I’d rather carry a few more ounces and hit where I aim.
How to Grip a Bow
The grip is the only part of your bow you actually touch during the shot process, meaning the way you handle it is critical. Despite that, I believe grip remains one of the most overlooked aspects of good shooting form.
Over the years, I’ve seen many variations of how people grip their bows, and guess what? None of them are necessarily wrong. Just like any other aspect of archery, the proper grip is simply one that can be repeated consistently shot after shot. However, there are several things that can make that task much easier. One is to keep the entire grip on the thumb side of your lifeline. Then you want to point your thumb at about 2 o’clock (10 o’clock for left-handed shooters), making sure it isn’t riding up against the shelf of the riser. Lastly, you want to have a loose hand, not squeezing the grip and not with your fingers stuck straight out; just let your hand relax.
There are two main muscles in your hand, one on each side of your lifeline. If your grip crosses over onto both, then it’s a lot easier for you to torque the bow just by tensing your hand slightly. It’s very important to keep the bow on the thumb side of that lifeline only, making it almost impossible to torque with the muscles in your palm.
The best way to do this is to make a thumbs up sign, turn your thumb to 2 o’clock (or 10 o’clock for lefties), open your hand and place it on the grip. This will help prevent your thumb from pressing too hard against the shelf, which can create sideways torque and cause inconsistencies in your balance while aiming.
Now, your bow isn’t going anywhere. So, stop holding onto it for dear life at full draw. Just relax your bow hand. Now, squeeze the grip again and see what it does to the bow and level. That’s called torque, and it’s bad. You want a completely relaxed hand. Just allow your fingers to lie softly on the back of the grip. Don’t stick your fingers way out trying to avoid torque, because when you do that you can’t help but tense up those muscles, which defeats the entire purpose. It’s OK if your fingers are touching the riser, as long as they aren’t influencing it.
Again, there is no right or wrong way to grip the bow if you can do it the same every time, and the method I just described will help you achieve consistency. Keep the grip on one side of the lifeline in your hand, keep your thumb from pressing too hard up into the shelf and relax your entire hand. A consistent grip is absolutely crucial to accurate shooting.
Shooting a Bow: Pushing and Pulling
We all realize that to shoot a bow, some form of pushing and pulling has to take place – but probably not as much as you’ve been told. My entire life, I was preached to on how I needed to push my bow arm at the target and pull on my release arm firing the shot using my back muscles. I quickly realized that doing that the same way each time was next to impossible. Archery, as I’ve always said, is a game of repetition, and trying to rip the bow in half just wasn’t something I could repeat. One day I’d do great, the next I’d be pulling harder and hit to the right or pushing shots out to the left. The inconsistency was really frustrating.
Now, many of my struggles were from the equipment I was using combined with this push/pull method. But mainly, it was
because this entire method is flawed, in my opinion. Back when this “back tension” method was introduced, bows had hardly any let-off and spongy back walls. Pushing and pulling really hard probably was the most consistent way to shoot that setup. These days, however, bows are built with solid back walls and high let-off, and when you start pushing and pulling on something that doesn’t give, it just doesn’t work. Think about it; you’re shooting a bow with a solid wall, and when you pull, something has to give. In this case, that would be your bow arm. And when you push and the bow can’t give, then the movement is transferred to your release arm. I truly believe this is the reason so many people struggle with this technique. It’s not that they’re doing it wrong. It’s that the entire process is no longer necessary.
I understand that to keep the bow at full draw, some form of “back tension,” or pushing and pulling, has to take place. I also believe that’s about all you need, just enough to keep the bow at full draw. You have to look at your cam system, holding weight, bow weight and type of draw stop to come up with a consistent push/pull method that suits you. However, if you’re shooting a bow made in the last decade, more pushing and pulling probably isn’t the answer to making you a better shot.
If you are struggling with aiming or consistent groups and you have been taught to push and pull on the bow, let’s try a different approach. Try to relax a little more in your shot. Pull just hard enough to keep the string against the stop and let the bow do the rest. After a while, you should find a really comfortable, less stressful way to fire the shot. This will be way more repeatable for you, and you will be engaging fewer muscles than before. Yes, the fewer muscles during the shot the better. When you’re nervous, that’s what causes tension and shaking, and that’s what gets us tired. So, the fewer muscles used the better. The days of ripping the bow apart are over. It’s time to relax and let these bows shoot themselves.
Anchoring a Bow: Three Steps to Success
If you know archery, you know how important a consistent anchor is. Most people just think of anchor as a being only one thing. But the truth is, having a repeatable anchor position involves three major components. Everyone’s anchor involves – or at least should involve – the following: release-to-hand contact, hand-to-face contact, and string-to-face contact. If you have these three components down, you will have a solid anchor position.
Release-to-hand contact is very crucial in all parts of your shot, but none more so than your anchor. If you are shooting a handheld release, that importance doubles. You can literally change your draw length and entire form just by positioning the release differently in your hand from one shot to the next. It is critically important to find a comfortable spot in your hand where the release just seems to fit. It’s not a bad idea to even mark that on your hand with a marker or tape while you practice. Make a conscious effort each shot to place that release in your hand exactly the same. Soon, that will be the only place you can comfortably place the release, and any slight change will be noticed immediately. At this point, the marking and/or tape is no longer needed.
A consistent hand-to-face contact point can be a little trickier. I’ve seen guys and girls mash their hands into their faces, and I’ve seen them completely avoid any contact with their face at all (both are disasters). You want to find a comfortable pressure point somewhere along your jawbone. I like to slide my jawbone between my first knuckle and middle knuckle. I don’t mash my hand to my face. I just very lightly touch my hand to that spot on my jaw so I can execute my release properly. I’ve found that the more pressure I put on my face, the harder it is to execute the shot. On the other hand, no contact or a floating anchor even worse, in my opinion. How can you ever know when you are anchored if you can’t feel any contact with your hand?
The final piece of the anchor is the contact between your face and the string. While you need this contact, you absolutely can’t press on the string with your face, as this will cause nightmares with shooting consistency. The absolute best and most repeatable string-to-face contact point I’ve found is to very lightly touch the string to the tip of your nose. If you use your cheek or the side of your nose, it’s hard to put the string in the exact same spot every time. The tip of your nose is always in the same place.
Just like every other aspect of archery, there is no right or wrong anchor – if you can repeat it from shot to shot. Having the correct draw length is very crucial in comfortably anchoring with the method I’ve just described. Assuming your equipment fits you perfectly, this three-part anchor method is, in my opinion, the best way to go about fine-tuning your archery game. Always remember your release-to-hand, hand-to-face, and string-to-face contact points. Stay consistent with all three and your anchor position will never fail.
Write It Down
Everyone has had that one setup that was money – that one bow they always shot better than any other. The problem is once you replace the strings, cables or limbs, it’s never the same. You can go to the same model, poundage and draw length, but it still doesn’t feel right. If only you had taken notes on everything. There are some key things you always should write down once you have that dream setup you are in love with. First, write down all the measurements on the bow. Then take notes on how your arrows are built. Lastly, take notes on other things in your shot more along the lines of feel and execution.
When we have the best set up of our lives, we need to realize that bows change with use, and before it’s too late, we need to write down everything about the setup. Some of these things are draw length measured from the throat of the grip, d-loop length, peep height from the loop, nock height from axles, draw weight, holding weight, axle to axle, brace height and let-off. Then, move on to things like stabilizer lengths and weights, sight choice, fiber size, lens magnification, peep aperture size, rest location from burger hole and, if you shoot a blade rest, what size launcher. Nothing is too small or unimportant to write down about this setup.
Next up are your arrows. Nothing is more critical to a forgiving and accurate setup than your arrows. You need to log all of this info as well. How long are your arrows carbon to carbon? What model arrow are you shooting, including spine? Vane selection and the helical or offset on those vanes are very important. Write down what nock, what grain point and then overall arrow weight. Arrows come in so many sizes and spines these days that if you can’t remember what arrow you had, all the other info isn’t nearly as important.
Lastly, you need to log every part of how you are executing your shot. Are you relaxed at full draw or are you pulling hard on the wall? What is your bow arm positioning? Straight arm or slightly bent? Same goes for release arm and even how you hold your release. Write down how you are anchoring in and what release you’re shooting. Bow grip is another crucial piece, but it’s very hard to write down specific details about
The markings on the reticle inside a rifle scope tell you many things. The first (and most important) is they show you where you’re aiming. Some scopes, however, have reticles that are set to do much more than that. These scopes have angular units of measure marked on the reticle that track how much a rifle’s point of impact needs to move relative to the point of aim of the scope to properly zero it. Besides helping shooters set a proper zero, understanding these angular units of measurement and their relationship to both target distances and bullet trajectories is crucial for getting the most performance from scoped rifles as they help remove the guesswork from all ballistic adjustments. The two most common types of reticles used in these types of scopes are Minutes of Angle (MOA) or Milliradians, or MRAD. Let’s take at the differences between MOA vs MRAD, and why you would want one over the other.
Circles, Subtensions And Angular Units of Measurement
Angular units of measure come from trigonometry, the branch of mathematics concerning triangles and circles. The circumference of a circle is wholly or partially measured either with degrees or radians. All of us know that a circle has 360 degrees. However, each degree can break down in smaller sub-units called minutes and seconds. A degree has 60 minutes or 3600 seconds, which is where we get Minute of Angle One from, or MOA. A full circle can also be measured as 2π radians (6,283 milliradians). Like degrees, radians also break down into fractions, and for marksmanship, shooters use milliradians (1/1000th of a radian), or MRAD.
Minutes and mils work well for shooting because they allow shooters to determine the size of targets, the distances to targets, and the trajectories of bullets by using trigonometric principles and proportions. Angular subtension is the concept that ties everything together, and they work equally well with MOA vs MRAD. This concept refers to the physical amount of space covered by an angle at a certain distance. These spaces remain in proportion regardless of distance. Thinking of subtensions as circular areas (or targets) makes it easier to understand. For example, at 100 yards, a target measuring 1 MOA will correspond to an area the size of a 1-inch circle. At 200 yards, a 1 MOA target would cover a 2-inch area. At a distance of 500 yards, a 1 MOA target will cover a 5-inch circle, at 1000 yards it will cover a 10-inch area, and so on.
One Inch At 100 Yards Vs One Meter at One Kilometer
In the United States, minutes of arc have traditionally been the more popular and traditional angular units of measure due to the simple fact that at the distance of 100 yards, 1 MOA happens to subtend precisely at 1.047 inches. For practicality’s sake, this is rounded off to 1 inch. Since degrees, minutes or seconds themselves do not mix directly with yards or inches, this is more of a lucky happenstance that has been clearly advantageous to American marksmen for a long time. MOA-based optics are generally available with adjustments in ½, ¼, or ⅛-inch increments depending on their intended use. Most MOA scopes for precision shooting typically have ¼-minute adjustments. At 100 yards, every four clicks will move the reticle one inch in the desired direction. Minutes are so embedded into American shooting culture to the extent that the accuracy potential of both rifles and cartridges is also expressed in these units. For example, a ½-MOA rifle means that the rifle can print ½-inch groups at 100 yards or 5-inch groups at 1000 yards.
At 100 meters, 1 mil subtends to 10 centimeters, so at 1000 meters (or one kilometer), 1 mil will subtend to 1 meter. The majority of MRAD based optics are conveniently set up to adjust at 1/10th increments of a mil. As a result, 1/10thof a mil subtends to 1 centimeter at 100 meters, and 10 centimeters at 1 kilometer. For reference, one mil is equivalent to 3.6 inches at 100 yards. Because milliradians work so well with the metric system, they are the go-to angular unit around the world. The use of Imperial measurements (inches and yards) compared to metric units is one of the biggest differences with MOA vs MRAD reticles, but there are others.
Comparing MOA vs MRAD
Neither MOA or mils are necessarily better than each other. They are solely two units that measure the same thing, namely a sliver of the total circumference of a circle. However, there are practical considerations to why a shooter may select a riflescope with an MOA vs an MRAD reticle. For shooters who are comfortable with inches and yards or who make shots at predictable, known distances, MOA based riflescopes can suit them just fine. Adding to that, most rifle ranges in the United States are marked in yards, which makes using these scopes very convenient. Other shooters choose MOA optics compared to MRAD-based optics, because ¼- or ⅛-minute click optics provide a finer level of precision and adjustment since they require more clicks to move the reticle the same distance: four or eight clicks to move one inch at one hundred yards as opposed to only three clicks for an MRAD optic.
On the other hand, at longer distances, many shooters prefer shooting with MRAD optic because a dependence on overly-fine units becomes impractical. According to Michael Branson, Director of Optics for JSD Supply, having to dial a turret with more clicks means that the likelihood of error increases and can also add extra wear and tear on the mechanical components of a rifle scope. Branson also mentioned that because MRAD optics work off of base-10 numbers and have “coarser” adjustments, they are more practical for longer distance shooting. Lastly, Branson added that the base-10 aspect makes MRAD optics more beginner friendly to new shooters looking to try long distance marksmanship.
The Takeaway
MOA-based optics have served American shooters for a long time and will continue to do so into the future. The fact that minutes of arc integrate so seamlessly with inches and yards is not taken for granted as our American rifle culture was built on this system. Specialized precision and rifle match shooters will continue to take advantage of the higher amount of adjustability these optics afford them.
However, MRAD-based rifle scopes have reached a golden age. Long distance shooters chose these optics due to their usefulness in that role, as milliradians are easier to divide or multiply by 10, they are easier to range targets with a reticle and the common measurement standard makes it simpler for all shooters around the world to communicate with this metric friendly system. Also of note is that virtually all spotting scopes with ranging reticles are marked in mils so spotters calling out numbers in mils to shooters using MRAD-based optics would also have an easier time.
Combine this with the widespread by the US military, the plethora of ballistics apps, programs and information now available to shooters that read in MRAD and the surge in popularity of distance, with the fact that gunmakers are selling all manner of hyper accurate, course-ready rifles out of the box for precision shooters and long-range hunters, and the time to take full advantage of milliradian-based sighting systems has never been better.
These features are suitable for field hunting and pest control.
The .25 pellets are heavier than .22, but they produce less velocity than .22.
If you’re hunting small game, the .25 will surely take down critters with a single shot.
There isn’t much difference with the .22.
However; if you’re larger critters like raccoons, there is a substantial difference in placement and range
Because .22 requires a precise headshot while .25 can do the job with a chest shot.
The .30 pellets are the heaviest and slowest of the pack, and they produce greater knockdown power than the .22 and .25
Provided that the shooter is within the required range of the target.
Sight
The Hatsan 135 QE Vortex has a very cool open-sight technology: the sights are fiber optics front and rear.
The front sight is a red TruGlo fiber-optic sight and it uses optical fiber for the dots.
This channels the ambient light to the rear sight in a way that makes your target brighter than the dark surroundings.
The rear sight is a green TruGlo fiber-optic sight and fully adjustable for windage (adjust it left and right) and for elevation (adjust it up and down).
Fiber optic sights are the brightest sights in the air gun industry. It provides greater sight contrast under diversified shooting circumstances.
This gives you quicker sight alignment, faster target acquisition, and a clearer view of targets.
Fiber optic sight is great for shooting in low light conditions and is a preferred model for hunting.
Although the fiber optic sight is more than enough for the desired accuracy, Hatsan has included a 3-9×32 Variable scope to provide more accuracy for every shot.
The diameter of the front lens is 32 and the magnification of the scope is 3-9.
This means that the image on the scope can be magnified 3-9 times for added shot clarity.
The variable scope gives you more accuracy and more confidence in long-range shooting.
Scope Base:
Hatsan has had a reputation for producing a wonderful scope base for many years.
The base on the Hatsan 135 accepts both 11 mm airgun scope rings and Weaver rings because of its two-tiered design.
Hatsan 135 Trigger
The trigger on the Hatsan 135 is the Quattro trigger, an advanced gold-plated two-stage match trigger exclusive to Hatsan products.
This amazing trigger allows you to adjust the pull weight of the first and second-stage travel.
It also allows you to adjust the weight of the first-stage pulls to fit your custom needs.
Safety: a drop safety interlock device has been added to prevent the possibility of your air rifle firing when dropped whether the safety is on or not.
Trigger Safety: a trigger safety device has also been incorporated to prevent accidents that might occur because of accidental discharges.
This ensures that the rifle is only fired when intended.
The trigger safety engages immediately once the gun is cocked back into place.
Cocking and Loading
To cock the gun, place the bottom of the stock on your lap and slap the barrel, pulling it down until it reaches its limit.
To load while the breach is open, put a pellet into the chamber, swing it back into its original position and you’re ready to shoot.
Velocity, Accuracy and Power
The velocity of the Hatsan 135 is 1,250 FPS with 0.177 caliber pellets, 1,000 FPS with 0.22 caliber pellets, and 750 FPS with 0.25 caliber pellets.
Many competitors use lightweight alloy pellets to improve their velocity ratings.
Hatsan, however, tends to be conservative with their velocity figures.
They, therefore, use lead pellets to avoid misleading information.
With the numbers it provides in velocity and power and the amazing technology it boasts of, it’s probably one of the best break barrel air rifles on the market today.
"Unleash the Power: Mastering Break Barrel Air Rifles for Maximum Performance. Discover expert tips and techniques to enhance the power and precision of your...
")
")
")
")
")


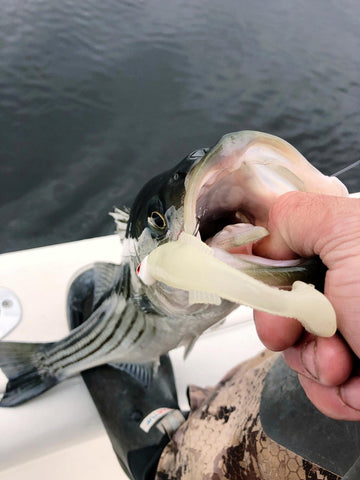


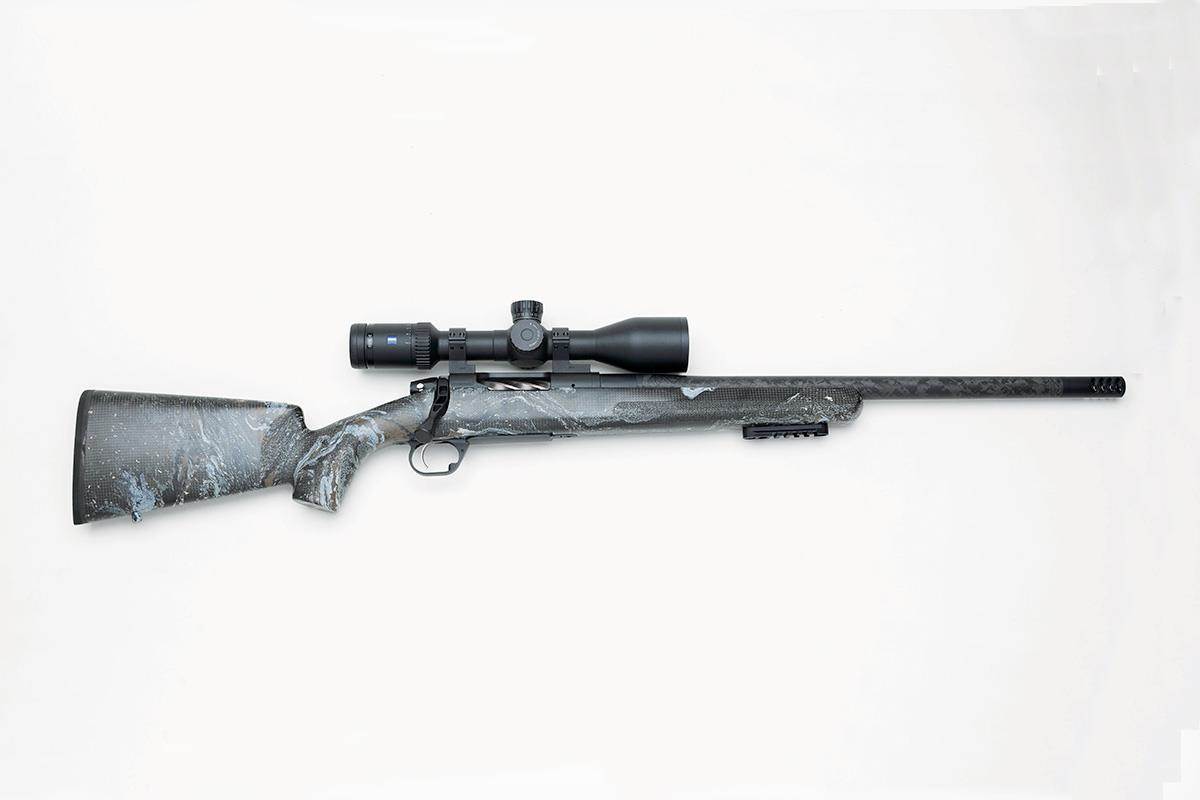


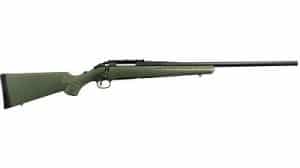

 Browning X-Bolt Speed Suppressor ReadyWilson Combat NULA Model 20Ruger American PredatorSavage 110 Tactical Barrel Length18 in20 in18 in24 in Weight6.3 lbs5.3 lbs6.2 lbs8.9 lbs Threaded BarrelYesYesYesYes Capacity4+14+14+110+1 Bottom LineTricked out hunting rifle that can do just about anything at a mid-range price point.Ultra-light hunting rifle made of high-end materials with remarkable accuracy.Accurate lightweight hunting rifle at a low price, but with premium features.Affordable long-range rifle with consistent accuracy, more target-oriented. PriceCheck PriceCheck PriceCheck PriceCheck Price


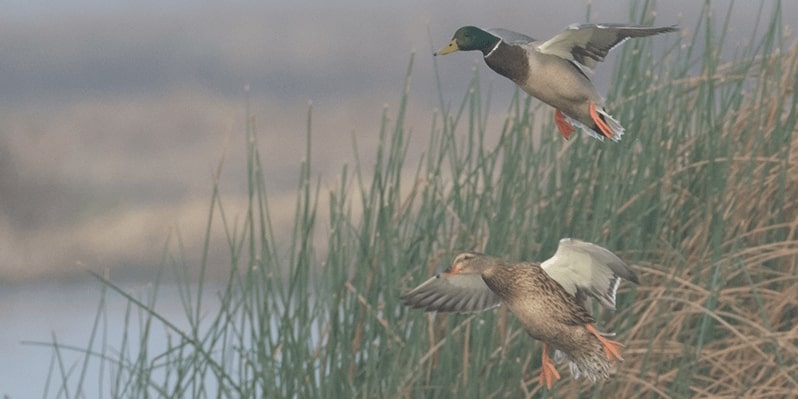
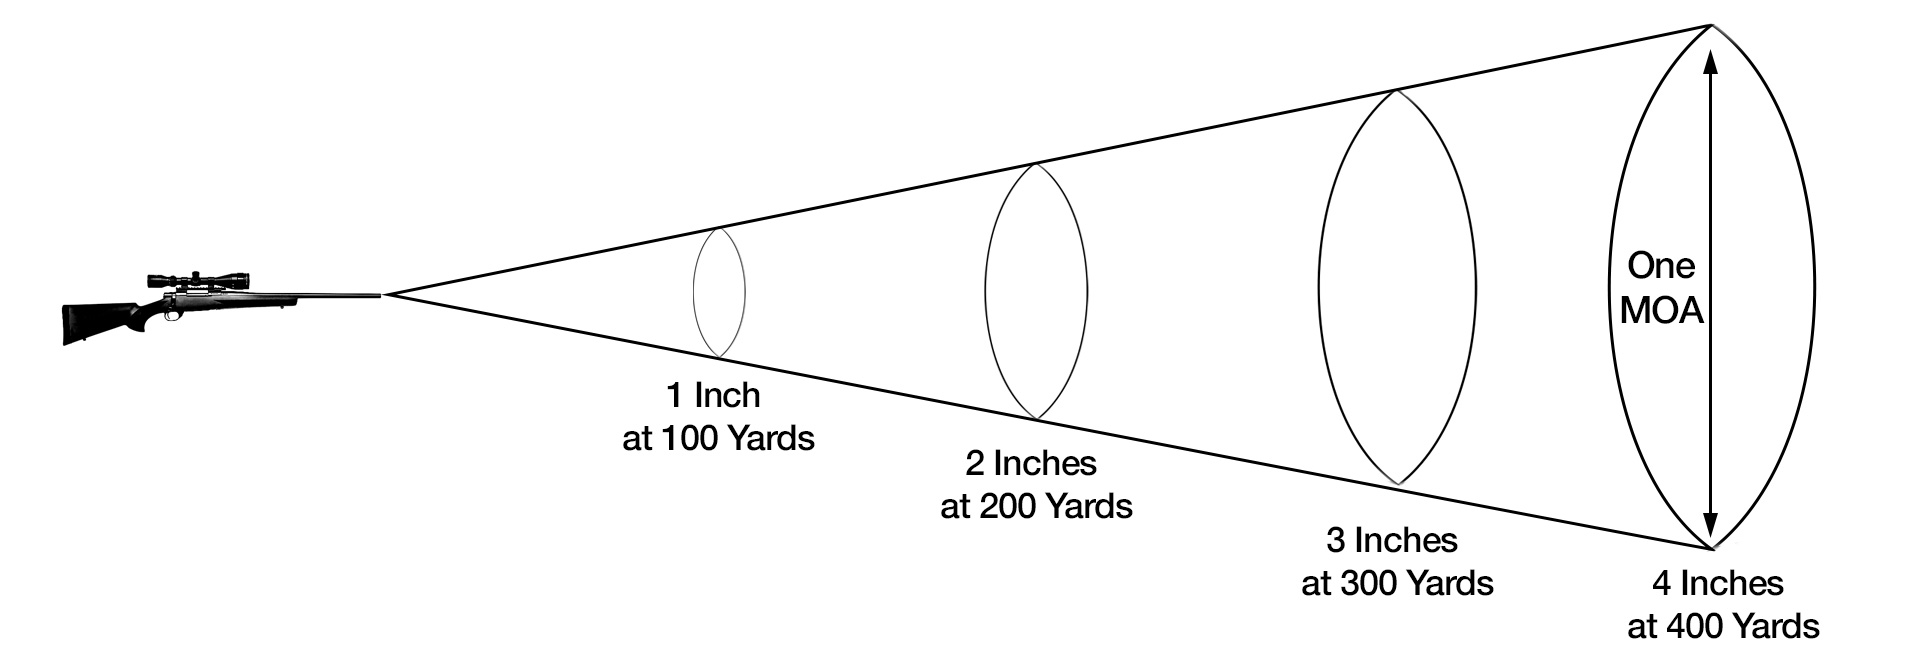
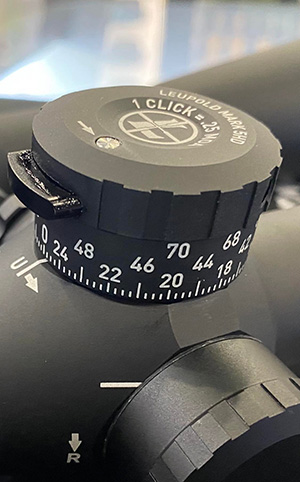 In the United States, minutes of arc have traditionally been the more popular and traditional angular units of measure due to the simple fact that at the distance of 100 yards, 1 MOA happens to subtend precisely at 1.047 inches. For practicality’s sake, this is rounded off to 1 inch. Since degrees, minutes or seconds themselves do not mix directly with yards or inches, this is more of a lucky happenstance that has been clearly advantageous to American marksmen for a long time. MOA-based optics are generally available with adjustments in ½, ¼, or ⅛-inch increments depending on their intended use. Most MOA scopes for precision shooting typically have ¼-minute adjustments. At 100 yards, every four clicks will move the reticle one inch in the desired direction. Minutes are so embedded into American shooting culture to the extent that the accuracy potential of both rifles and cartridges is also expressed in these units. For example, a ½-MOA rifle means that the rifle can print ½-inch groups at 100 yards or 5-inch groups at 1000 yards.