Hardworking outdoor apparel and gear, supported by partnership with American Hiking Society
MOUNT HOREB, Wis., April 6, 2022 /PRNewswire/ – Duluth Trading Company is relaunching its Alaskan Hardgear brand under a new brand name, AKHG™. The reintroduced AKHG™ will showcase an expansion into womenswear, extended sizes, all-weather performance apparel and gear alongside a commitment to conserving the outdoors with a two-year partnership with the American Hiking Society. Inspired by the Alaskan wilderness, AKHG™ is built to perform year-round in a variety of conditions – from the harshest to the most serene – and celebrates the rewarding moment arriving at camp and every bit of leg work it took to get there.
“There’s an undeniable growing desire across communities to explore the world around us and partake in the activities that come with being outdoors,” said Neala Shepherd, Senior Vice President, Customer Experience, Duluth Trading. “AKHG™ aims to provide clothes and gear for those who love the rolled-up-sleeves side of adventure and embrace the work that goes with exploring in the wild.”
With more size-inclusive offerings, weather-shielding fabrics, convertible features, and technical design elements that boost versatile, long-term use, each new AKHG™ style delivers superior quality, comfort, and function to let wearers Live Life Less Soft™. The brand continues to feature the ingenuity and innovative technology that Duluth Trading customers have come to know and love.
This spring, brand fans are encouraged to get outdoors and discover the latest from Duluth Trading and AKHG™:
The Crosshaul CollectionWith an exceptionally strong TOUGH COTTON™ finish, the Crosshaul Collection is three times more abrasion-resistant than regular cotton without sacrificing softness or breathability. New styles include the Women’s Plus AKHG™ Crosshaul Collection Cotton Short Sleeve Tee ($34.50) and the Men’s AKHG™ Crosshaul Cotton Hoodie ($64.50).
The Renew Bamboo CollectionThe eco-friendly Renew Bamboo Collection debuts with the Women’s AKHG™ Renew Bamboo Short Sleeve Shirt ($29.50) and similar styles. Transforming bamboo into a modern performance rayon, the fabric is blended with recycled polyester and spandex to enhance moisture-wicking and sun-blocking power, while still feeling supremely soft and flexible.
AKHG™ Olympic Coast Rain GearSeam sealed with a 2.5-layer fabric designed to prevent clamminess, the rugged-yet-soft Olympic Coast Raingear features 15K waterproofing and breathability. Built to withstand high winds and rain, the collection is durable and remains lightweight enough to pack into its own pocket. New styles include the Women’s AKHG™Olympic Coast 2.5L Rain Jacket ($129.50), Men’s AKHG™️Olympic Coast 2.5L Rain Jacket ($129.50), Women’s AKHG™Olympic Coast 2.5L Rain Pant ($119.50), and Men’s AKHG™️Olympic Coast 2.5L Rain Pant ($119.50).
Perfection Loop Fishing ShirtsMade with a lightweight, free-moving nylon blend, AKHG™️ Perfection Loop Fishing Shirts are sweat-wicking, fast-drying, and snag resistant. Featuring a generous amount of pockets, adjustable cuffs, convertible sleeves, a hook-and-loop rod holder for hands-free fly tying, and back vents, the new fishing shirts offer portable performance for long days on the water. New styles include the Men’s AKHG™️Perfection Loop Fishing Shirt ($89.50) and the Women’s AKHG™️ Perfection Loop Fishing Shirt ($89.50).
Strengthening its investment in making the outdoors accessible, AKHG™️ simultaneously launches as the Exclusive Apparel Sponsor of the American Hiking Society’s National Trails Day® for 2022 and 2024. American Hiking Society is a national organization empowering all to enjoy, share and preserve the hiking experience. Aimed at advocacy and trail service, National Trails Day® improves trail access for millions nationwide, hosting events across all 50 states with participation by hikers, bikers, rowers, horseback riders, trail clubs, federal and local agencies, land trusts, and businesses.
About AKHG™AKHG™ is an outdoor apparel brand within the Duluth Trading Co. family that was created for those who roll up their sleeves for adventure and Live Life Less Soft™️. The brand’s collection of apparel, accessories and gear offer functional design inspired by life in the vast Alaskan wilderness. Built to withstand the harshest of climates and toughest terrain, yet versatile enough for varied outdoor recreational uses like hiking, fishing, camping, and snow sports, AKHG™️ is dedicated to honoring the work of play. All products built by Duluth Trading Co. are backed by the company’s “Superior Standard” and supported with outstanding customer service under the “No Bull Guarantee.” To learn more, visit www.duluthtrading.com or one of the 65 Duluth Trading store locations nationwide.
About American Hiking SocietyFounded in 1976 American Hiking Society is the only national nonprofit organization dedicated to empowering all to enjoy, share and preserve the hiking experience.
“Food safety is a top priority, especially when it comes to meat. Leaving raw ground venison in the fridge for 5 days and subsequently refreezing it raises concerns about its edibility. Let’s delve into whether it is safe to consume and understand the potential risks involved.”
1. “Is it safe to eat raw ground venison left in the fridge for 5 days and then refrozen?”
It is not recommended to eat raw ground venison that has been left in the fridge for 5 days and then refrozen. Raw meat, including ground venison, can harbor harmful bacteria such as E. coli and Salmonella. These bacteria can multiply rapidly at temperatures between 40°F and 140°F (4°C and 60°C), which is known as the danger zone.
When raw meat is left in the fridge for an extended period, even at refrigeration temperatures, there is a risk of bacterial growth. The longer the meat stays in the danger zone, the higher the chance of harmful bacteria multiplying to dangerous levels.
Refreezing thawed meat can also affect its quality and safety. Each time meat goes through the freeze-thaw cycle, its texture and taste may be compromised. Additionally, refreezing can lead to moisture loss, making the meat dry and less palatable.
To ensure food safety, it is best to follow proper handling guidelines for venison. Thawing should be done in a refrigerator or microwave for immediate use. If raw ground venison has been left in the fridge for more than 2-3 days, it is advisable to discard it rather than risking potential foodborne illness.
In conclusion, it is not safe to consume raw ground venison that has been left in the fridge for 5 days and then refrozen. It is important to prioritize food safety by following proper handling practices and discarding any potentially unsafe food items.
2. “The safety of consuming raw ground venison left in the fridge for 5 days and refrozen”
When it comes to the safety of consuming raw ground venison, it is important to follow proper handling and storage guidelines. Leaving raw ground venison in the refrigerator for 5 days can pose a risk of bacterial growth and contamination. Bacteria such as E. coli and Salmonella can multiply rapidly at temperatures between 40°F and 140°F, which is known as the “danger zone” for food safety.
Refreezing thawed venison can also affect its safety. When meat is frozen and thawed, ice crystals form within the muscle tissue, causing damage to the cell structure. This damage can lead to moisture loss and potential bacterial growth when the meat is thawed again. Therefore, it is generally recommended not to refreeze thawed venison.
To ensure the safety of consuming raw ground venison, it is best to follow proper storage practices. Store unfrozen venison in the refrigerator at 40°F or below and use it within 2-3 days. If you are unsure about the freshness or safety of the meat after being stored for 5 days in the fridge, it is advisable to discard it rather than risking foodborne illness.
It is always important to prioritize food safety when handling and cooking any type of meat, including venison. Following proper storage guidelines, using calibrated thermometers to ensure thorough cooking, and avoiding cross-contamination with other foods are essential steps in preventing foodborne illnesses associated with raw or undercooked meats.
3. “Proper handling of raw ground venison: Can it be consumed after being left in the fridge for 5 days and refrozen?”
When it comes to handling raw ground venison, it is important to follow proper food safety guidelines to ensure its safety for consumption. According to the recommendations provided, raw venison should be stored in the refrigerator and consumed within 2-3 days. In this case, if the raw ground venison has been left in the fridge for 5 days, it may not be safe to consume.
Leaving raw meat, including ground venison, in the refrigerator for an extended period can increase the risk of bacterial growth and spoilage. Bacteria such as Salmonella or E. coli can multiply rapidly at temperatures between 40°F and 140°F (4°C and 60°C), potentially causing foodborne illnesses.
Additionally, refreezing thawed venison is not recommended as it can affect the quality and texture of the meat. The process of freezing and thawing can cause moisture loss and lead to a less desirable eating experience.
Therefore, based on these guidelines, it is advisable not to consume raw ground venison that has been left in the fridge for 5 days and then refrozen. It is always better to prioritize food safety and discard any meat that may pose a risk of contamination or spoilage.
Recommendations:
– Follow proper storage practices by refrigerating raw ground venison promptly after purchase or processing.
– Consume raw ground venison within 2-3 days of refrigeration.
– Avoid refreezing thawed venison to maintain its quality.
– When in doubt about the freshness or safety of any meat product, it is best to err on the side of caution and discard it rather than risking potential illness from consuming spoiled or contaminated meat.
4. “Understanding the risks: Raw ground venison left in the fridge for 5 days and refrozen”
When raw ground venison is left in the refrigerator for five days and then refrozen, there are several risks involved. Firstly, leaving raw meat in the fridge for an extended period can increase the growth of bacteria, such as Salmonella or E. coli, which can cause foodborne illnesses if consumed. These bacteria can multiply rapidly at temperatures between 40°F and 140°F (4°C to 60°C), known as the “danger zone” for bacterial growth.
Refreezing previously thawed meat also poses a risk because it can lead to further bacterial growth. The process of freezing and thawing causes ice crystals to form within the meat, damaging its cellular structure and creating an environment where bacteria can thrive. Additionally, each time meat is frozen and thawed, its quality deteriorates, resulting in a loss of texture and flavor.
To ensure food safety, it is crucial to follow proper handling guidelines for venison. Raw venison should be stored in the refrigerator for no more than 2-3 days before cooking or freezing. If you plan to freeze the meat after refrigeration, it is essential to do so within this timeframe to minimize bacterial growth.
If you accidentally leave raw ground venison in the refrigerator for five days, it is best not to refreeze it. Instead, discard the meat to avoid any potential health risks associated with consuming spoiled or contaminated food.
Risks of consuming improperly handled raw ground venison:
– Increased risk of foodborne illnesses caused by bacterial contamination
– Loss of quality in terms of taste and texture due to repeated freezing and thawing
– Potential waste of food if spoilage occurs
It is important to prioritize food safety by properly handling and storing venison throughout its preparation process. This includes promptly refrigerating or freezing raw meat, avoiding extended periods of storage in the refrigerator, and refraining from refreezing previously thawed meat. By following these precautions, you can ensure that your venison is safe to consume and enjoy its full flavor and quality.
5. “Food safety concerns: Raw ground venison stored in the fridge for 5 days and then returned to the freezer”
When it comes to food safety, it is important to handle and store raw ground venison properly. In this specific scenario, where raw ground venison has been stored in the fridge for 5 days and then returned to the freezer, there are a few concerns that need to be addressed.
Firstly, storing raw ground venison in the fridge for 5 days can increase the risk of bacterial growth. The longer meat sits at temperatures between 40°F and 140°F (the temperature danger zone), the more opportunity bacteria have to multiply. This can potentially lead to foodborne illnesses if consumed.
Returning the thawed ground venison back to the freezer after being stored in the fridge can also affect its quality. Freezing and thawing meat multiple times can cause moisture loss, resulting in a dry texture and decreased flavor.
To ensure food safety, it is recommended not to refreeze thawed venison. Once meat has been thawed, it should be cooked or consumed within a few days. If you have thawed raw ground venison that you cannot use within this timeframe, it is best to cook it thoroughly before freezing again.
To prevent any potential health risks associated with improper handling or storage of raw ground venison, always follow safe food handling practices. Thaw frozen meat in the refrigerator or using a microwave for immediate use. Store unfrozen venison under refrigeration and cook within 2-3 days.
It is important to prioritize food safety when handling and cooking venison to ensure that it remains safe for consumption while preserving its quality and taste.
6. “The importance of proper storage: Is it safe to eat raw ground venison after being refrigerated for 5 days and then frozen?”
Introduction
Proper storage of venison is crucial to ensure its safety for consumption. This includes both refrigeration and freezing techniques. In this article, we will discuss the importance of proper storage and address the question of whether it is safe to eat raw ground venison after being refrigerated for 5 days and then frozen.
The Importance of Proper Storage
Proper storage of venison is essential to prevent the growth of harmful bacteria that can cause foodborne illnesses. When raw meat, such as ground venison, is stored in the refrigerator, it should be consumed within 2-3 days to minimize the risk of bacterial contamination. After this period, it is recommended to either cook or freeze the meat.
Refrigeration and Freezing Techniques
If you have refrigerated raw ground venison for 5 days, it is not advisable to consume it raw due to potential bacterial growth. However, if you want to extend its shelf life, freezing is a suitable option. Venison can be safely stored in a freezer for 9-12 months when properly wrapped or packaged.
When thawing frozen venison, it should be done in a refrigerator or microwave. Thawed venison from the microwave should be used immediately while thawed venison from the refrigerator can be stored for an additional 2-3 days before cooking and consuming.
Conclusion
To ensure the safety and quality of your venison, proper handling and storage are paramount. It is not recommended to eat raw ground venison that has been refrigerated for more than 2-3 days due to potential bacterial contamination. Freezing can help extend the shelf life of venison, but it is important to follow proper thawing techniques before cooking and consuming. By following these guidelines, you can maximize the safety and enjoyment of your venison dishes.
In conclusion, it is not recommended to consume raw ground venison that has been left in the fridge for 5 days and then returned to the freezer. The extended time at room temperature increases the risk of bacterial growth, which can lead to foodborne illnesses. It is essential to prioritize food safety by properly storing and handling perishable items.
How to make a trotline. Trotlines are one of the old time-tested methods when you want to catch a lot of catfish in a hurry. When you need to make a “meat haul” or just want to fish around the clock while spending your vacation time doing other things, set out a trotline or two and you will always come home with fish! Here are some simple instructions on how to rig up and set out a trotline.
A lot of folks ask me how to make a trotline. I have tried various methods and styles but I always come back to the simplest version and it just plain works. A trotline is nothing more than a long piece of heavy main line that has short lines or drops tied to it at regular spacing intervals. These drops have one hook each. State rules vary, but in my state (Texas) you can have a maximum of 25 hooks per trotline. Other methods to catch catfish include jug fishing which is very similar to trotlines, but more mobile so to speak. You can read about how to jug fish here.
How you set out the trotline in the water depends on where you are fishing. In a creek or small river you simply tie each end of the mainline to each bank via a stake or a tree limb. The line spans the creek or river and is submerged with small weights along the length to take it underwater. In open water such as a lake you have to tie empty jugs to each end and then anchor each end with heavy weights. then you have the smaller weights in the middle to take the mainline under the surface. The floating jugs help keep the mainline accessible when you get ready to run the line for fish. Trotlines can be dangerous if you are careless. They can drag you out of the boat and underwater in a heartbeat. I recommend always fishing with a partner when fishing trotlines.
To make the trotline I use just a few simple supplies. For the mainline I like to use a heavy 700 lb. test, tarred, braided or twisted nylon line. The heavier the better in my opinion. This line is relatively cheap and strong as well. Texas regulations state that the drop hooks must be a minimum of 3 feet apart. So a 25 hook mainline will need to be at least 100 feet long. I usually just use a standard 120 ft. long mainline to account for tying each end and also to account for the spacing knots to be discussed later.
For convenience I like to remove my drop hooks from the mainline for storage. That way I can ball up the mainline and not have to fight sharp hooks for safety. To keep your drops evenly spaced along the mainline I simply tie two knots about an inch apart at three foot intervals. This is simple and does not require clips and other extra parts.
The drops are simply constructed of a piece of 100 lb. test tarred twisted nylon line cut in 3 ft. lengths and the ends tied together to form a loop. I always cut lines with a good pair of sharp scissors and the burn the ends with a flame to prevent unraveling. I then loop a snap swivel on one end and a trotline clip on the other
.
The hook is a matter of personal choice depending on your bait, but big is always better in my opinion. The trotline clips make it easy and safe to assemble or disassemble the trotline while out on the water. I use them all the time and have never had one come apart yet.
I like to store my trotlines in a 5 gallon bucket. I store the mainline balled up in the bottom of the bucket along with the weights and then hang 25 drops and hooks around the top edge. Everything stays untangled and easy to use in a boat. I always store just one complete trotline in a bucket so I know that I have everything in one place per bucket.
To set out the line just use my diagrams below and bait her up and then sit back and relax. I usually run my lines every 4 or 5 hours apart. I also bait the lines just a dusk and go back at dawn to load my boat up (usually) with a good haul of cats.
You now know how to make a trotline. One thing I would strongly suggest is stopping by our fishing discussion board at TexasRiverData.com and ask any questions you may have and get more trotline instructions and tips. You can read and discuss the latest information there.
Try this method for yourself and stay safe and watch those hooks!
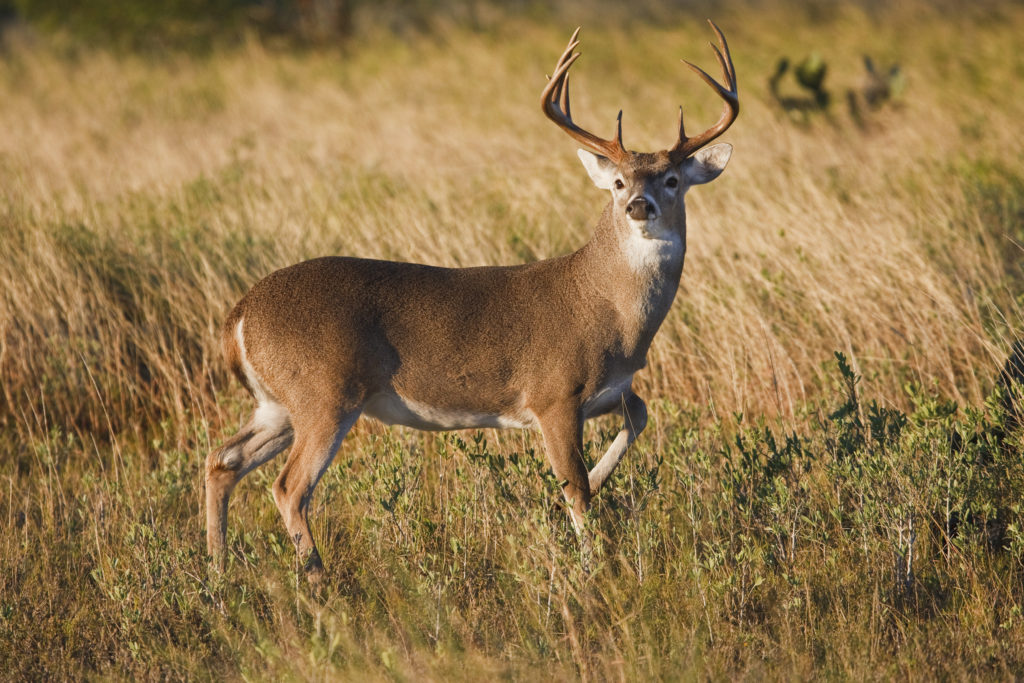
All whitetails react differently to pressure from humans, especially during hunting season, but research shows some clues into what they do and where they go during these months of intrusion into their areas. (Photo: Getty Images)
Recent biological studies demonstrate very clearly that white-tailed deer not only perceive their environment in fine detail, but are able to respond immediately to risks and pressure.
Legal light ends in just a few minutes, but you dare not move. You’ve heard a few deer staging around you for the past half hour, and not long ago you heard the bark of your brother’s rifle from a stand not a quarter mile away.
By Dr. Stephen Ditchkoffand Jeff Sullivan
Yet, like many nights before, you’ve been left with nothing but an aching back and a dream of what might have been, while the deer that so patiently waited for darkness to fall feast upon the food plot you leave behind. This spot used to be packed with deer, but as the season comes to a close it seems that what was once your secret honey hole has lost its magic. Now you can do nothing but wonder what gave you away, and what to change for next season.
Not surprisingly, though deer hunters across the country come from a myriad of backgrounds they all seem able to relate to one issue — sometimes it feels like the deer know where you will be before you get there. While this is an often perplexing and frustrating phenomenon for hunters, biologists have been studying the reactions of wildlife to predators for decades and have developed a theory that appears to explain the activities of whitetails during the hunting season.
LANDSCAPE OF FEAR THEORY The landscape of fear theory suggests that animals are consistently at risk from predators, which in this case would be human hunters, and that the level of risk changes based upon two main factors. First is the animal’s location: While wild predators such as wolves might be more dangerous along grassy meadows, human hunters often concentrate near roadways and open areas, and often hunt repeatedly from the same location.
The second major factor influencing risk is the time of day. For instance, human hunters are limited by legal hunting times, and most often sit only during the periods around sunrise and sunset, abandoning their stands during the midday hours. This theory can be visualized as a mountain range where mountain peaks are areas of greatest risk and valleys are areas of greatest safety. Throughout the course of a day, each area’s height changes as the risk levels associated with that area change. The objective for prey species is to stay at the lowest possible elevation while still accessing all of the resources they need to survive and reproduce.
Previous studies have long confirmed what hunters already know; deer can recognize changes in risk and react as one would expect under the landscape of fear theory. Studies ranging as far back as the 1960s have demonstrated that when hunting pressure is sufficiently high, deer increase their use of dense cover areas such as thickets or hardwood drains and then use risky areas such as bait piles only during safe periods, such as nocturnal hours. Similarly, studies have found that activity patterns of deer are such that they are more active when hunters are not in the woods and less active when they are.
A fellow researcher, Kevyn Wiskirchen, with Auburn University, recently wrote an article (in the September 2016 issue of Deer & Deer Hunting) documenting just such a pattern. He detailed how white-tailed deer suppress movement during the weekend to minimize exposure to humans. But when hunters are absent from the woods during the week, the deer become much more active.
While these studies have provided great insight into larger behavioral trends, they have all examined hunt- ing pressure in relation to an entire property or large landscape, leaving the question of how deer respond to risk at specific locations unanswered. Essentially, until now scientists have not been able to account for the potential that deer could recognize risk at a spatial scale as fine as individual hunting locations and respond accordingly. It is quite possible that the responses seen at the landscape scale are completely different from what is seen in relation to actual locations of risk, especially when hunting pressure is kept very low across a property. Fortunately, advances in technology now enable scientists to investigate such detailed behaviors.
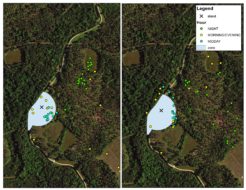
With each additional hunting event at a given stand, deer became increasingly less likely to use the vulnerability zone around that stand during mornings and evenings (Figure 1).
RESPONSE TO LOCALIZED RISK Due to the general lack of data, and thus, understanding of how white- tailed deer respond to localized risk, we, with financial support from the South Carolina Department of Natural Resources, set out to examine this aspect of deer biology and determine the movement patterns of adult does during the hunting season with respect to hunting stands.
To accomplish our goal we darted adult female white-tailed deer and fit each with a GPS collar programmed to collect locational data every 30 minutes, allowing us to gather highly detailed information on deer movement relative to hunting pressure. Hunting on the property was strictly managed, with hunters taken to and picked up from permanent stands by guides.
We determined the GPS coordinates of every hunting stand, food plot and automatic feeder on the property, and determined the area around each stand in which a deer would be visible to a hunter (which we called the vulnerability zone). We then combined all of this information with the movement data collected by the GPS collars, and imported it into a data visualization tool known as ArcMap. This software enabled us to actually see how deer moved each day, and where they were located on the property.
We were interested in understanding how deer moved during three specific periods: Morning/Evening (from legal light to 8 a.m. and 3 p.m. to legal light), Midday (from 8 a.m. until 3 p.m.), and Night (from end of legal light to beginning of legal light the next morning). These periods were based upon changes in risk, as hunters were present only during the Morning/Evening period, a scenario likely to be true for most regions of the country where hunters choose not to sit throughout the midday hours.
Traditional knowledge, and the landscape of fear theory, would suggest that repeated hunting events at the same location would force deer to recognize that area as being of greater risk, and subsequently deer would reduce their usage of that area during times when hunters would be present, namely surrounding sunrise and sunset. This is precisely what we observed. With each additional hunting event at a given stand, deer became increasingly less likely to use the vulnerability zone around that stand during mornings and evenings (Figure 1).
Similarly, following the day that a stand was hunted, deer use of the vulnerability zone around that stand during the Morning/Evening period was at its least. But deer use of that area progressively increased with each passing day. This result was also expected, because the fear response of an animal should decrease over time, especially in hunting environments where most stands are associated with a food source such as a food plot or corn feeder. When the areas of risk are associated with a food reward, the animal must balance the trade-off of avoiding risk with miss- ing out on the nutritional benefits of visiting that location.
Next, we looked at movements during the Midday period. Interestingly, previous studies at the landscape scale had reported conflicting results. Some studies suggested that deer increase activity during midday hours as a way to make up for lost opportunities when they avoid moving during crepuscular periods, while others have claimed that deer remain cryptic during all daylight hours, thus reducing usage of risky areas.
We found that deer followed the same trends during the Midday period as they did during the Morning/Evening period. That is to say that they decreased usage of vulnerability zones around hunting stands following each additional hunting event, but increased usage as time passed. Surprisingly, we observed that deer were far less likely to utilize the vulnerability zone around a stand during the Midday period than during the Morning/Evening period.
After a fourth hunting event at a given location, deer became less likely to use the vulnerability zone immediately following a hunting event and slowly increased usage with each passing day (Figure 2).
This might seem surprising at first, because deer could safely use these areas during the midday without the risk of being exposed to hunters. We believe that this response is due to the natural feeding behavior of deer being focused on crepuscular periods and the fact that vehicle traffic through the property might have been sufficient during the Midday period to make the vulnerability zones appear risky even if they were not.
While the responses we observed during the Morning/Evening and Midday periods were much as one would expect, a very interesting trend emerged during the Night period. We have all heard a hunter complain that “all of the deer have gone nocturnal” and you might very well be that hunter yourself. If so, it probably wouldn’t surprise you to hear that deer initially increased their usage of a vulnerability zone around a stand following the first few hunting events at that location and decreased usage with each passing night since hunting had occurred. Yet this trend changed with additional continued hunting pressure at that stand. After a fourth hunting event at a given location, deer became less likely to use the vulnerability zone immediately following a hunting event and slowly increased usage with each passing day (Figure 2).
Essentially, after continued hunting pressure at a particular stand, deer changed their behavioral response at night to the same avoidance we observed during the Morning/ Evening period. This suggests that deer respond to initial hunting events by simply accessing the area during a safe time and their fear decreases as time passes. But as hunters use the area more, deer respond by avoiding the area altogether. Perhaps the deer decide, in essence, to move on to safer pastures where they may be able to feed during Morning/Evening hours instead of confining themselves to nocturnal hours only.
BEHAVIOR MODIFICATION Our findings provide us with unique insight into the behavior of white-tailed deer in response to pressure from human hunters. While hunters have long known that white- tails have the ability to modify their behavior and space use in response to hunting pressure, this study has allowed us to document exactly how deer respond to spatially explicit risk and how that response differs from responses visible at the landscape level.
While one could look at the landscape level response of this population and assume that hunting pressure was not sufficiently strong enough to force deer to alter their behavior, a more thorough investigation reveals that deer are in fact recognizing and responding to the risks posed by hunters: They are merely doing so at a small enough spatial scale to reduce the impacts on their regular activities.
It’s this minor variation in their movement and activity patterns that make it seem as though there aren’t any deer in the woods. Some might view deer as creatures randomly moving through the woods from one field to the next, but this study demonstrates that white-tailed deer not only perceive their environment in fine detail, but are able to respond to risks immediately and use infor- mation about past risk at a location to make informed future decisions about using or avoiding that location.
No matter how little you are hunting an area you are influencing the likelihood of a deer using that area again, at least for a few days. Even if you never fire the gun, there is a strong likelihood that you were still detected by at least a few deer.
TAKEAWAYS FROM THE STUDY So what does this mean for you as a hunter? Well, there are a few clear takeaways from this study that you can use to aid your quest this fall. First, no matter how little you are hunting an area you are influencing the likelihood of a deer using that area again, at least for a few days. Even if you never fire the gun, there is a strong likelihood that you were still detected by at least a few deer.
While you might have still had plenty of deer come and go blissfully unaware of your presence, others might have been spooked off as they approached from downwind, or smelled the disturbance along the path you used to reach your stand. Therefore, after hunting a location try and give that stand a few days off so that the fear response can decrease before your next hunt.
Secondly, understand how the length of your season might impact deer behavior. If you live in a New England state with shorter seasons you can expect deer to have a much stronger reaction across the landscape to hunting pressure than in Southern states with more prolonged seasons. When the season is shorter, deer can afford to avoid high value areas (food plots and feeders) for the brief season and return when it’s safer, but such avoidance might be nutritionally prohibitive in states with longer hunting seasons.
Finally, consider moving your hunting stands between seasons, while this study did not investigate if the number of hunting events at a stand the year prior caused deer to avoid an area more quickly the next season, it is a good idea to reduce your predict- ability as much as possible.
We as hunters attempt to pattern deer almost every way imaginable, from extensive scouting and note taking from years on a property to a network of game cameras trying to locate that trophy buck. Yet, with all of the effort we direct toward patterning them, it can become all too easy to forget that deer are also capable of patterning us. So this coming season, as the days grow shorter and your heart gets restless, yearning for an all too brief escape into the peaceful hunting grounds, do your best to be aware of your own patterns and embrace the opportunity to outwit your prey — not by attempting to understand their predictability, but by limiting your own.
— Jeff Sullivan completed his M.S. degree in 2016 at Auburn University studying white-tailed deer under the supervision of Dr. Steve Ditchkoff. He is currently employed by USGS at the Patuxent Wildlife Research Center.
— Dr. Steve Ditchkoff is a professor in the School of Forestry and Wild- life Sciences at Auburn University. He manages the deer research program at Auburn and has been conducting research on white-tailed deer for 25 years.
Fish finders are the single greatest advantage you can use on the water. Understand how to use them to find bass activity and patterns and you’ll be catching more fish in no time.
How to Read a Fish Finder (The Right Way)
Sidescanning sonar has grown tremendously over the past few years, leading to a nearly endless supply of choices of fish finders.
With brands like Garmin, Lowrance, and Humminbird flush with money, the technology also continues to grow with the competition.
With that, confusion also comes along. When you are trying to figure out what the fish are doing while managing everything else on the boat, the last thing you want is a confusing fish finder.
That’s why understanding a fish finder is a game changer. If done correctly, it will lead to serious results. You will find yourself catching more, and the fish that you do catch will be much bigger.
No serious bass fisherman can expect to compete without one.
Further, they will help you grow as a fisherman since they will teach you about the lakes you are fishing. When you combine sonar with GPS, you can virtually map the bottom topography of any body of water. Developing that understanding will prove to be more valuable than anything else when it comes to catching fish.
Properly Reading and Understanding a Fish Finder ✅
You need to understand that your fish finder displays actual fish. Many people doubt their equipment, but fish finders don’t lie. Not only do fish finders display actual fish, but they display them so accurately that researchers are harnessing them to conduct research on bodies of water.
The challenge becomes telling things apart. More advanced fish finders will attempt to do this for you, but with the complexity of variables below the boat and lack of a powerful enough artificial intelligence in fish finders, this is usually inaccurate at best. Therefore, you need to develop your own eye for what fish look like on your fish finder.
If your fish finder displays arches, you know you at least have fish under your boat. Fish taper in mass from one end to another. As the boat passes over them, they return signals that begin weak and then grow strong before weakening again. This results in an arch on the screen. When you are scouting new areas to fish for largemouth bass, this can be a very good sign.
Understanding the size of the arch is essential to determining what the arch actually represents. Looking at the length and thickness of the arch will help you figure out what sort of fish you are looking at, or even if it is a fish at all.
The arch length and color are two crucial features that are instantly recognizable as some sort of fish in the water. From there, you will have to leverage your knowledge as a fisherman to discern what type of fish it is.
Color is also a factor if you have one of the more advanced fish finders. The darker the color, the more dense the thing returning the signal is. This will help you gauge the density of the fish arches. It will also help you determine if the arch is just a big wad of grass that is floating along or if it is an actual fish.
However, just finding arches is only a part of the equation. Having the requisite knowledge to pick out bass from other types of fish is critical. Bass, walleye, catfish, and shad all behave differently and pursue prey in wildly different manners. This results in different patterns being displayed on your fish finder.
For instance, when bass sits on the bottom of the lake, they tend to want their space. This results in dots that are typically congregated near a structure of some sort. However, catfish, carp, and other bottom feeders typically look for depressions. The reason is both are pursuing food in their way. Depressions gather trash, and the structure brings in baitfish.
A note on baitfish, you will often see baitfish in open water as a large cluster of little dots. These large bait balls are easy to identify, and if you see larger, darker arches next to them, you can bet that there are fish feeding on them. However, this does not mean that it is the only place to find baitfish. Often when viewing underwater structures, you will see tons of little dots all around it. This is more often bait fish that feed on the aquatic life growing on the structure.
This is why FISH-ID is viewed as less than accurate. If a fish is swimming along, far away from any sort of cover, then you will likely have a positive identification of a fish from FISH-ID. However, the slightest bit of debris can cause it to misidentify or simply not recognize the fish at all. This is where the operator’s interpretation of the data becomes critical.
Reading Depth and Temperature 💡
There are two primary factors you need to understand with any fish finder. These fundamental factors are depth and water temperature. A mobile vessel such as a high-performance fishing kayak will allow you to reach new fishing areas; seeing what’s under the water is crucial.
While there are a variety of different ways they’re shown, here’s everything you need to know.
Colors 🌈
What do colors mean on a fish finder? We have already touched on how color denotes density on a fish finder. Generally speaking, the denser something is, the brighter the color is. Understanding density will help you discern hardened structures that can be targeted with soft plastics from other, often muddier, elements that hold little to no fish.
Yet, many fish finders offer different color palettes to choose from. Since there is so much information being transmitted on a fish finder screen, you need to make sure that everything is optimized for efficient, fast reading. Choosing a color palette that will allow you to read it no matter if your sunglasses are on or off, the sun is out, or its not, or if you are sensitive to certain colors over others are all factors that should be considered when selecting a color palette.
You should also not be loyal to any one color palette. Many times, conditions will cause you to have to change your color palette. Exceptionally muddy water or soft bottom lakes will often demand you dial up the sensitivity to pick out the hardened structure from the debris. Certain color palettes will make this much easier to read.
Fish Size 📏
Everyone wants to use their fish finder for spotting trophy bass. Though it may seem impossible to the new user, many people know that sonar has been used by researchers for years to find fish and determine their size. This comes down to paying attention to detail and knowing the fish you are pursuing.
That being said, a fish finder is just that, a fish finder. It is a useful tool, but it can only tell you that there is something below the boat returning sonar waves at a rate that is consistent with a fish. It is up to you to make sense of those returns and take action.
Arches will show the size of the return on the screen. If your fish finder is equipped with FISH-ID, it will likely identify a very strong return with a fish icon. However, it will never tell you what type of fish it is simply because it is nearly impossible to know from an algorithmic standpoint. This is where knowing your target fish and their habits come into play.
Trophy bass don’t typically school or move around in open water. This is because it is mostly inefficient to support their mass. Those fish will want to stay close to a structure that is conducive to catching frequent, easy meals. Finding quality structure is key to finding trophy bass.
Another detail that you should always pay attention to is temperature. There is likely not a fish finder on the market that won’t tell you how hot or cold the water is. It is typically displayed proudly on the screen, no matter what setting you have it on. Water temperature is one of the most important numbers to fish as they set their feeding, spawning, and movement plans based solely on water temperature.
If you see a fish that is outside of a depth, water temperature, and away from the structure that would be common to largemouth bass, it probably isn’t one. Many other fish that get quite large behave totally differently from the ambush-loving largemouth. Always keep this in mind when you are trying to decide what kind of fish are showing up on your fish finder.
Bottom Structure 👇
Knowing how to determine bottom structure is one of the key things you should learn early on when getting used to using a fish finder. Knowing what type of structure you are likely to encounter is one of the many things that will suggest the exact variety of fishing line you will need to use, be that monofilament, braided, or fluorocarbon.
Vegetation and mud are the most confusing things to discern on a fish finder screen. This is because they lack density and clearly defined edges that are able to be seen in detail. However, sunken tree tops, logs, stumps, and rocks will have clear edges that are hard to return a bright color. Telling these from other structures is fairly straightforward.
The key thing to know is that you need to match your boat’s speed with the speed and angle the fish finder is set at. Going too fast with a high-frequency, narrow beam will likely produce a lot of noise and less detail than is usable. However, going slow with the fish finder set to a wide, low-frequency rate will make for clear images, but you will be missing out on the detail that the fish finder is capable of producing.
Reading Different Types of Underwater Structure 🎯
Fish finder technology is continually evolving. The military has a unique interest in developing sonar technology as it helps detect an enemy’s presence in the water. However, as DARPA and the Department of the Navy develop technology that supersedes something it already has, it will sometimes allow for older tech to be released to the public.
One such development was the release of CHIRP sonar in July of 1960. When the Navy allowed the civilian sector to see what CHIRP was capable of, a series of papers were published exploring how it could be used and improved.
Today, CHIRP sonar has changed the way marine biologists identify marine sediment. Biologists, geologists, and other interested parties regularly used high-end CHIRP sonars to explore waters that would otherwise be completely inaccessible. However, it wasn’t long before the word was out, and the recreational fish finder market began to explode.
For years, the common man’s fish finder could tell that there was something on the bottom, but it was very difficult to tell what it was. Modern fish finders have changed this dynamic drastically. Today we can tell what vegetation, muddy bottoms, depressions, points, and underwater structures with relative ease.
Vegetation 🌿
Vegetation is one the most confusing things to read on a fish finder, but one of the most important. This is especially true if you are fishing with bass jigs and need to be precise about where your lure is placed.
Baitfish and vegetation often look very similar since they are assembled similarly and have comparable densities. Therefore, their color and distribution can often result in confusion between the two.
Vegetation is most easily identified by where it is relative to the bottom. Typically, vegetation will always be attached to the bottom. Therefore, when you see a large distribution of dots that seems to ascend from the bottom of the lake, you can guess it is likely some sort of vegetation.
Muddy Bottoms 🐾
Muddy bottoms are also a crucial part of bottom terrain that is advantageous to identify when fishing. One of the most crucial things in any sort of fishing is to figure out what the fish are feeding on. Once you understand the common diet of largemouth bass, then you will know that a muddy bottom is not something you want to pursue.
Muddy bottoms are identified by the color the fish finder returns. Depending on your individual color palette, they could look slightly different from unit to unit. However, the main thing you need to pay attention to is the density of the bottom.
If your unit returns a color that indicates a dense bottom, you can bet there is gravel or rock down there. However, if weaker colors are returned, you know the bottom is muddy.
Depressions 🗺
Another key terrain feature you will want to look for is depression. Depressions are simply low points on the bottom of the lake that gather trash that the current pushes along. This can become a major point of interest for fish, depending on the type. Downed tree tops that collect in depressions will bring in the bass, but bottom feeders also will find them since that is where most of the biomass ends up.
Depressions are easy to locate on a fish finder. As you troll along, pay attention to the depth that the boat is at. When you see a sudden drop in depth, zoom out to get a bigger picture.
This will allow you to chart the size of the depression and make sure it is not a drop-off. As the depth comes back up, mark it and turn the boat around. Then go back over the depression and mark the other side.
Points 💡
Every bass fisherman knows and loves points. Points provide fish with multiple escape routes if danger comes, are often choke points for bait fish that can be food, and provide quick and easy access to all depths of water. If you aren’t fishing over underwater points, you are likely missing the fish of a lifetime every time you motor on by.
Yet how do you find a point on a fish finder? Luckily, it is incredibly easy. A point is a terrain feature that jets out into the water, making an arrowhead shape. The point can either be above or below water. Finding points of terrain features below water is where your fish finder really pays for itself.
Look for areas that have rapid changes in depth. There will be a generally shallower area that gives way to the depths. Somewhere in that shallower area, there is likely to be an arrowhead-shaped structure that sticks out.
Run your boat over it, bisecting the long axis of the point. If using a lighter boat such as a kayak, use a trolling motor optimized for kayaks to quietly navigate over the area, ensuring you’re not spooking any fish. Each time you notice a depth drop-off, mark it. After a few passes, you will have a good understanding of where the point is and how best to leverage the tools in your tackle box to fish it.
Hidden Fish and Beam Width
It is easy to find fish when they are just sitting on the bottom, in a depression, or swimming in open water. However, largemouth bass live in structures that really come in all shapes and sizes. This puts the fisherman in a conundrum. You want to fish that structure, but you also don’t want to waste a lot of time on a structure that hasn’t attracted any fish.
The answer to this is beam width. While fish will hide in stumps, trees, and other structures that can be detected by a wide beam angle, they can’t be picked out. You will need a higher frequency, more narrow beam to be able to detect the fish that are held up in the cover.
Think about the beams like a flashlight. You will use a flood light if you want to see a lot. It doesn’t show the detail of anything, but it will let you see enough to know where everything is. However, in trying to find hidden fish, you will need a high-intensity spotlight to see the differences between the structure and the fish.
You should troll, cruise, and scout using a low-frequency, wide-beam setting on your fish finder. Once you have located some structure, mark it and then turn around with a high frequency, narrow beam setting enabled. Go slower on the second pass, and you will be able to pick apart the fish from the structure with relative ease.
Reading Chirp Sonar
One thing to note about CHIRP sonar is that it is incredibly powerful. CHIRP is powerful enough to even read the grain size of sediment on the bottom of the ocean. This is very helpful in finding transition zones in the bottom sentiment. These transition zones often bring in a variety of different types of fish, including bass.
While CHIRP is nothing more than an enhanced way to read sonar returns, this means that there is nothing different that you have to learn or do, just that your fish finder will provide you with a more powerful readout than a non-CHIRP fish finder. However, always defer to the CHIRP-enabled fish finder since it will give you a clear picture of the bottom, which is helpful when a rainy day completely disrupts your surface presentations.
Conclusion
There is no magic bullet when fishing. Even if you get a top-of-the-line fish finder, you still have to know how to fish. In a two-day study of crappie fishermen, researchers found that using a state-of-the-art fish finder had no real impact on the angler’s ability to catch fish. This means that if you control the environment, a good fisherman catches more fish with a fish finder, but a bad fisherman still catches no fish.
The lesson to take away is that a fish finder is just a tool that helps you be more efficient and effective when fishing. It will not be the answer to all your fishing challenges, but if you know how to properly employ it, it can be a great asset.
Understanding a Fish Finder: FAQs
What do bass look like on side imaging?
Bass generally appear as a dot on side imaging. Due to their behavior and preferences for being somewhat distant from other fish, it is often easy to find them sitting on the bottom or around cover. This method of identifying fish can be very effective. Side scan imaging is used widely to determine fish species on artificial reefs.
What’s the best frequency for a fish finder?
The best frequency for a fish finder is around 125 kHz. Fish finders generally range from 50 to 200 kHz. The lower end of the spectrum is better for wide-angle searches, but the higher end is good for high-fidelity imaging of certain areas or targets. Using a fish finder that straddles those two extremes gives you the most versatile tool available on the market today.
Can you see a lure on side imaging?
You can most definitely see a lure when you are using live sonar, but side imaging does not have the high level of fidelity required to give that level of detail fast enough to show your lure. While they are much more expensive, live sonar can be a highly beneficial upgrade to catch fish when they would otherwise be inaccessible.
How do you spot fish on sonar?
You spot fish on sonar by looking for arches or lines on the screen that are above the bottom of the lake. Depending on your setting, speed, and location of your transducer, fish detection can look much different from setup to setup. However, generally, a moving boat will show fish as arches, and a boat that is still will show them as lines.
Do you have to be moving for a fish finder to work?
You do not have to be moving for a fish finder to work. However, it is vital that you have your fish finder settings adjusted to properly compensate for the movement of your boat. If you anticipate moving at a fairly brisk pace, you want to set your fish finder up so that it also scans more frequently. However, if you have your transducer mounted to a trolling motor and don’t anticipate moving very quickly, then you will want to slow the scroll rate down to match the speed of your boat.
What do fish look like on a fish finder?
Fish look like arches on fish finders, generally speaking. However, depending on the setup and speed of the boat, fish can have a slight variance in how they look. As the boat moves over the fish, the fish is hit multiple times by sonar waves. Since they generally taper in size since the tips of tails and noses don’t have as much mass as the middle of a fish’s body, the first returns show a smaller creature. The returns increase the size of the creature it is encountering as it works its way to the middle point of the fish. After this, the returns show the fish decreasing in size. The graphic result of this is an arch.
“It’s not the size of the dog in the fight that matters – but rather the size of the fight in the dog.”
But in the air rifle world, it is now clear that both matter.
After all, why is there all this debate on the .177 vs .22?
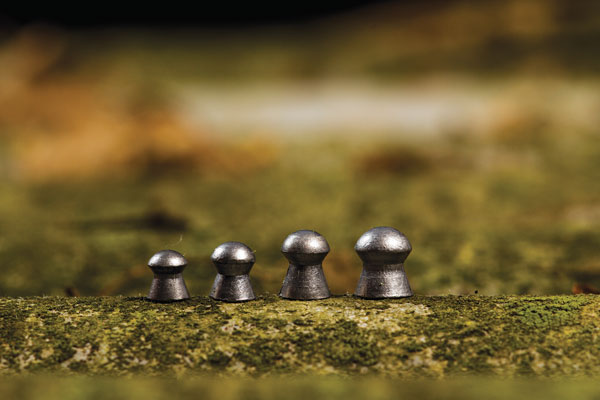
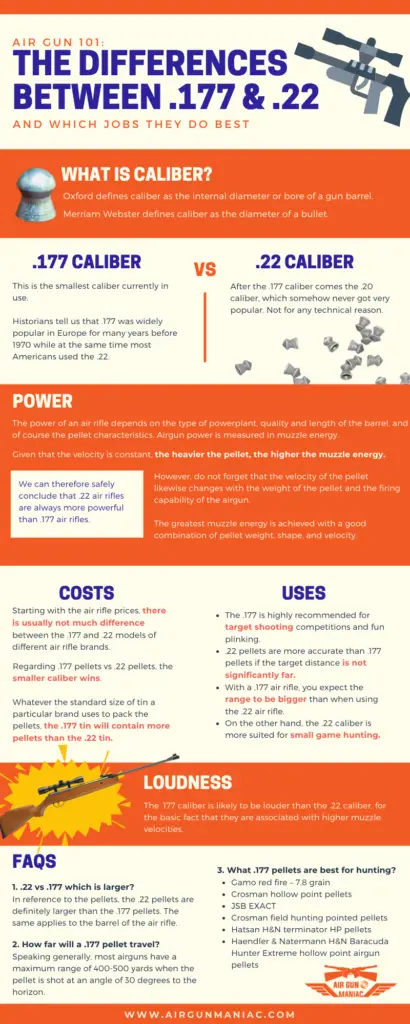
Being the most popular air rifle calibers in the world right now, new shooters, as well as experienced ones, raise many questions regarding the performance of these two calibers.
However, do not forget that the velocity of the pellet likewise changes with the weight of the pellet and the firing capability of the airgun.
The greatest muzzle energy is achieved with a good combination of pellet weight, shape, and velocity .
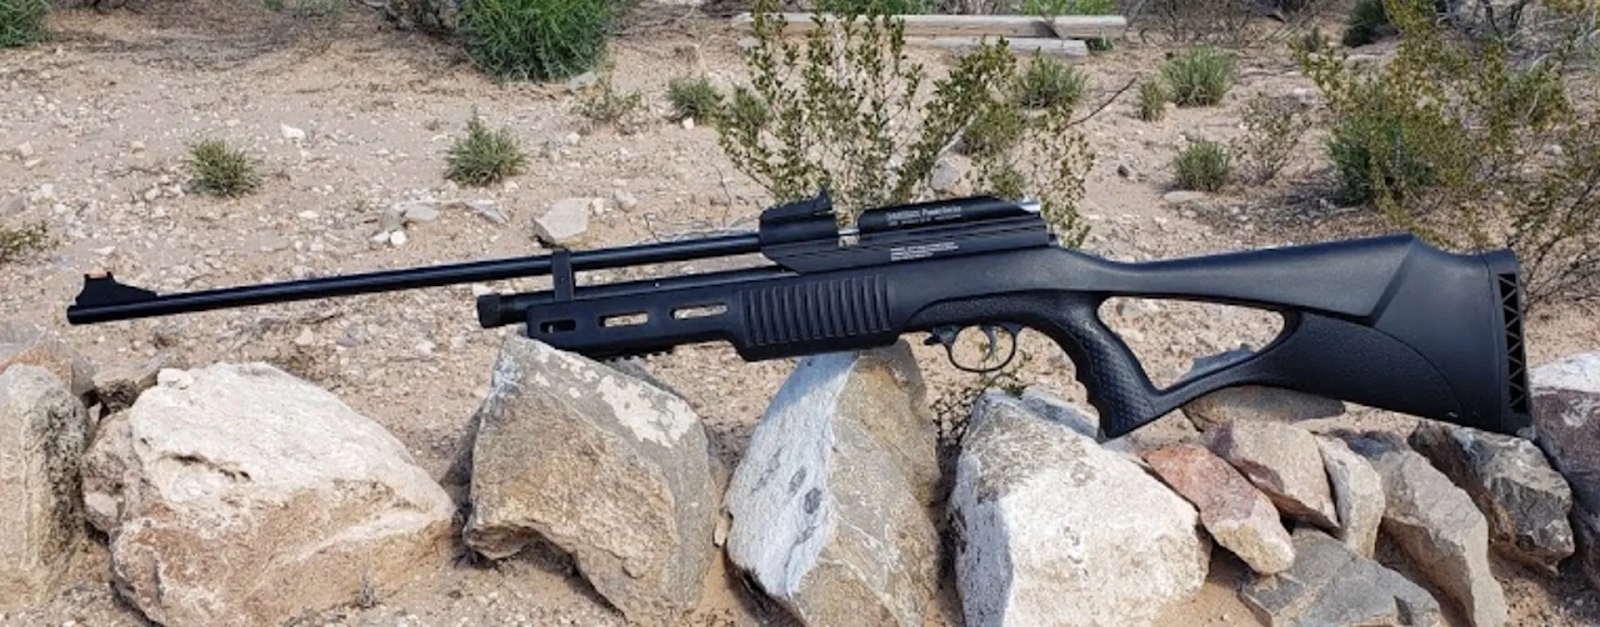
See below some typical muzzle energy values for values obtained by testing the .22 model of Stoeger X50 air rifle with different pellets:
Pellet Brand
Type
Weight (grain)
Average muzzle velocity (fps)
Average muzzle energy (fpe)
The Peak
Pointed
12.1
900
21.8
The Peak
Domed
13.7
890
24.1
Daisy Max Speed
Pointed
14.2
890
25.0
Stoeger X-Field
Domed
14.7
860
24.1
Crosman Premier
Domed
14.3
850
23.0
RWS SuperPoint
Pointed
14.5
850
23.2
Beeman Model 1249
Pointed
15.5
820
23.1
Stoeger X-Power
Domed
21.1
690
22.3
And now typical muzzle energy values obtained by testing the .177 model of Air Arms Pro Sport Air Rifle:
Pellet
Pellet Weight (grain)
Average Muzzle Velocity (fps)
Average Muzzle Energy (fpe)
Gamo Raptor Platinum
4.7
1090.73
12.42
H&N Field Target Trophy Green
5.56
1100.43
14.94
RWS Hobby
7.00
961.77
14.38
Crosman Premier HP
7.9
909.20
14.50
JSB Exact Diabolo
8.44
830.84
12.94
H&N Field Target Trophy
8.64
846.77
13.67
H&N Baracuda Match
10.65
768.50
13.97
Though the above two sets of tests are not from the same air rifle brand, it is highly evident that .22 air rifles are generally more powerful than .177 air rifles.
Experts claim that manufacturers give the .177 air rifles some little more attention so as to achieve accuracy levels that cannot be matched by any .22 model.
This is at least logical if you have some understanding of what the accuracy of airguns entails.
Accuracy in air rifles is usually measured by firing a given number of pellets at the same target and analyzing how far from each other the shots hit the target.
If the shots are tightly clustered together, this is an indication of high accuracy.
If the shots are wide apart, the air rifle is said to be less accurate.
A number of factors influence the accuracy of airguns.
First and foremost is the machining quality of the air rifle.
The barrel must be quality enough to ensure it propels the pellet in the intended trajectory.
Some manufacturers tackle this by using rifled barrels.
Another factor that influences accuracy is the muzzle velocity.
An airgun with a higher muzzle velocity is likely to be more accurate than one with a lower muzzle velocity.
Of course, the pellet has to move as fast as possible to the target before it is distracted by air resistance.
In line with this is the weight of the pellets.
If the pellet being used is very light in weight without sufficient muzzle velocity Fildena
It tends to be somewhat overcome by air resistance and drift significantly from the intended trajectory.
The .22 pellets are generally heavier and less likely to be swayed by the wind.
However, their muzzle velocity is generally less than that of .177 air rifles.
For this reason, we can conclude that .22 pellets are more accurate than .177 pellets if the target distance is not significantly far.
This introduces to us another aspect of air rifles referred to as the range.
The range is basically how far your target is from the point you are shooting from.
With a .177 air rifle, you expect the range to be bigger than when using the .22 air rifle.
Aside from target shooting, the .177 caliber is excellent for fun plinking.
It is normally thrilling to hit those soda cans with precise accuracy.
And in case you got some nuisance pests lingering around your yard
You can still eliminate them one by one with your .177 airgun.
We are talking here about rats, squirrels, and magpies.
Quite a number of air rifles have muzzle velocities that surpass this figure.
Science tells us that whenever a moving object surpasses the speed of sound, the result is a loud noise referred to as the sonic boom.
This said the .177 caliber is likely to be louder than the .22 caliber, for the basic fact that they are associated with higher muzzle velocities.
Note however that the loudness of air rifles depends on other factors such as:
The presence or absence of silencers, machining quality of the barrel, type of powerplant, and recoil effect of the airgun.
Frequently Asked Questions
1. .22 vs .177 which is larger?
In reference to the pellets, the .22 pellets are definitely larger than the .177 pellets.
The same applies to the barrel of the air rifle.
However, regarding the size of the whole air rifle, you’ll be surprised that a majority of the rifles have the same weight and length for the different models.
See the manufacturer’s specifications below for some of the most popular air rifles.
Air Rifle
.177 model
.22 model
Barrel Length (inches)
Overall Length (inches)
Weight (lbs)
Barrel Length (inches)
Overall length (inches)
Weight (lbs)
Air Arms S510 XS Xtra
19.75”
43.5”
7.2 lbs
19.75”
43.5”
7.2 lbs
Hatsan BullBoss QE
23.0
36.8
8.6
23.0
36.8
8.6
Airforce Condor PCP
24.0
38.75
6.1
24.0
38.75
6.1
Airforce Talon SS PCP
12.0
32.75
5.25
12.0
32.75
5.25
Beeman R9 Elite Series Combo
16.5
43.25
8.5
16.5
43.25
8.5
Gamo Magnum Air Rifle
21.3
48.0
6.88
21.3
48.0
6.88
Diana 460 Magnum
18.44
45.0
8.3
18.44
45.0
8.3
Evanix Rainstorm II PCP
17.0
39.0
7.2
17.0
39.0
7.2
Wingman115 did an in-depth comparison between .177 vs .22 here:
2. How far will a .177 pellet travel?
This information is very crucial as you need to know how far you need to stand away from the target.
There are a number of factors that affect the distance of travel of the pellet.
The first factor is the angle with which you shoot.
If you shoot downwards from your position, the pellet will soon be stopped by the ground or vegetation.
If you shoot in an upward trajectory, the pellet may go further than the intended distance as there may be no obstacle to stop it.
The maximum distance is usually achieved when the pellet is shot at an upward angle of 45 degrees.
The second factor is the muzzle velocity.
Obviously, the higher the muzzle velocity the further the pellet will travel.
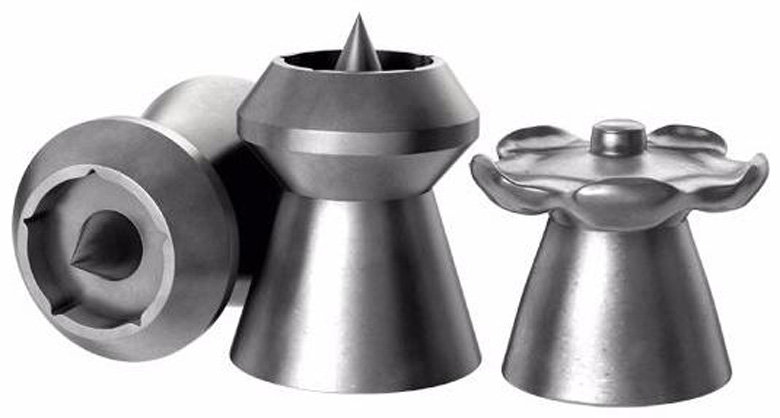
Next is the pellet shape .
The more streamlined the pellet is, the farther it will travel as the air resistance will be minimal.
Think of the general shape of the front of cars.
No high-speed vehicle is designed with a square front.
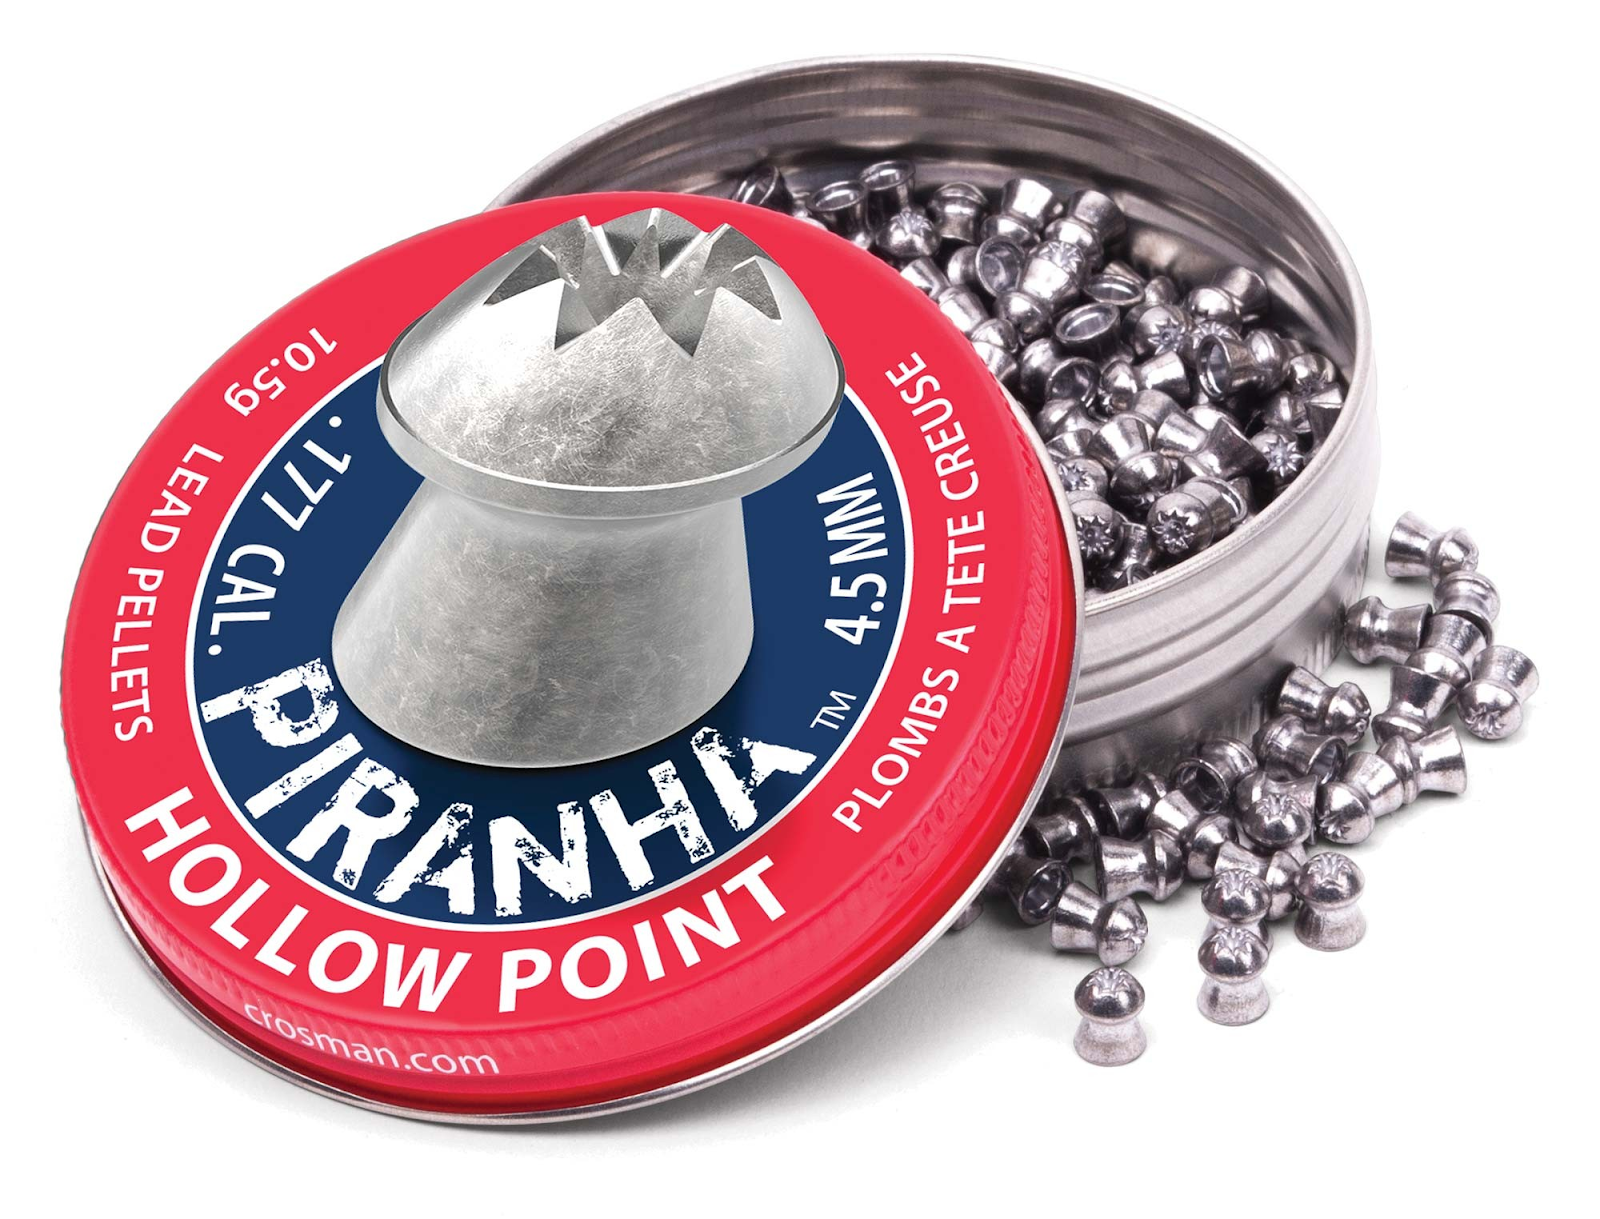
Pellets come in different shapes, the most popular being wadcutter, pointed, domed, and hollow point.
Still, on pellets, the weight matters.
Lighter pellets are more likely to be swayed by the wind so that they often don’t reach their maximum possible distance.
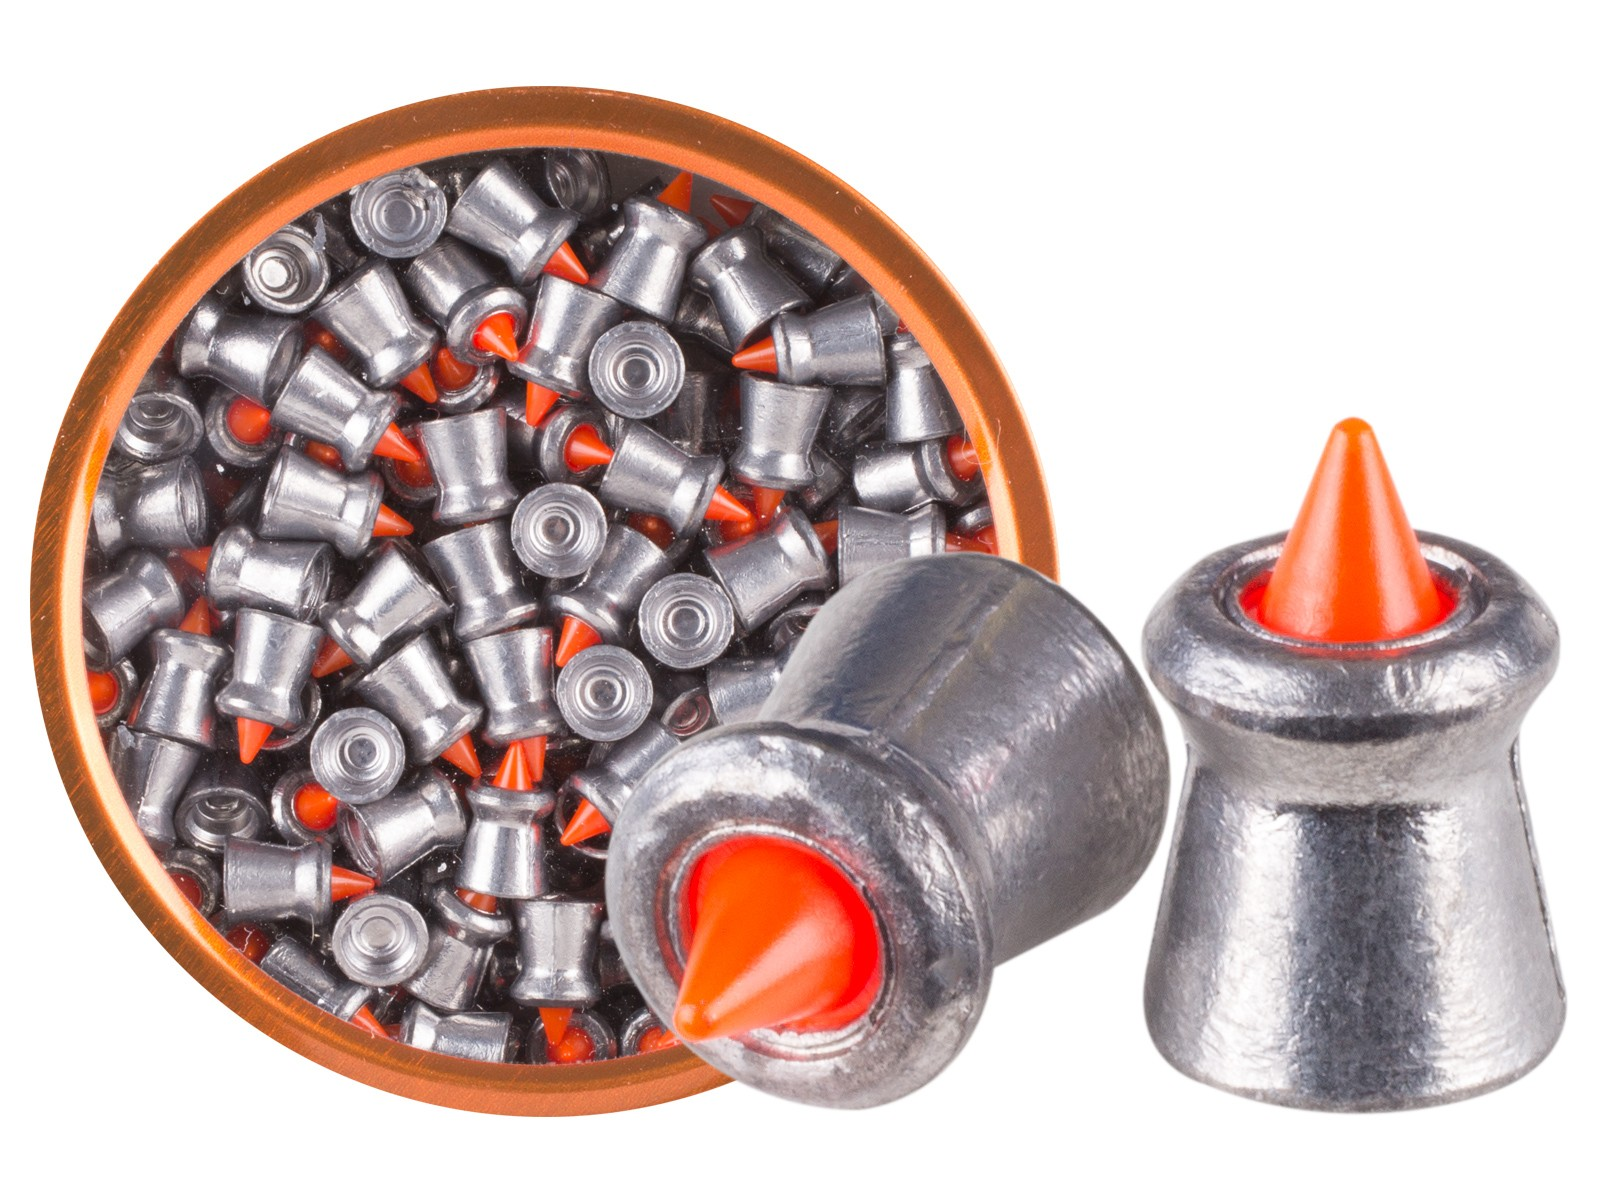
We already established that with .177 pellets, you are looking to hunt animals such as birds, rabbits, squirrels, skunks, and rats.
These are the top 5 .177 pellets I recommend for small game hunting:
Gamo red fire – 7.8 grain – these have a diamond-shaped polymer tip that easily penetrates the target.
Crosman hollow point pellets – the hollow pointed gives a greater impact than the pointed pellets, and this has a devastating effect on the vermin.
JSB EXACT – The diabolo shape adds more weight to the pellet compared to the hollow point pellets, and the result is higher impact energy on the prey.
Crosman field hunting pointed pellets – Made of the finest quality lead but still priced fairly
Hatsan H&N terminator HP pellets – It combines a hollow point shape with a sharp raised tip at the center of the hollow for deeper penetration and high impact.
Haendler & Natermann H&N Baracuda Hunter Extreme hollow point airgun pellets – With a 9.57-grain weight and consistent quality, these are perfect pellets for both target practice and small game hunting
4. How lethal is a .177 air rifle?
It was just last year that Stanley Metcalf, a six-year-old boy from Sproatley, was shot in the abdomen by his grandfather, Albert Grannon.
The kid died hours later in the hospital while undergoing treatment.
Back in 2000, one rooftop sniper in the East New York section of Brooklyn used a pellet rifle to kill 30-year-old Joffre Cedeno and severely wound four others.
This list of airgun fatalities can go on and on, but the bottom line is that air rifles are dangerous, period.
Never play around with them like toys, be it a .177 or .50 caliber.
Carefully follow all safety precautions required when handling weapons.
Spring is my second favorite season. The winter weather is finally loosening its grip. The rivers are breaking up, the grass is starting to poke through the snow patches on south-facing slopes, and bears are crawling out of their dens. Yet my favorite part of spring is shed antler hunting.
Deer, elk, and moose go through the annual ritual of losing last year’s antlers in late winter and begin to grow new bone through spring and summer. This cycle starts after the breeding period when the bucks and bulls drop testosterone, signaling the beginning of the shedding of their antlers. The pedicel, or point where the antler meets the skull, degrades and eventually the antler drops off, usually one at a time.
Shed hunting or antler hunting or horn hunting (even though antlers aren’t horns) is the spring search for these castoffs after the snowmelt. Shed hunting has boomed in popularity in recent years as more people have realized the benefit of outdoor spring exercise — and the thrill of finding a castoff antler. Here are some tips for getting started.
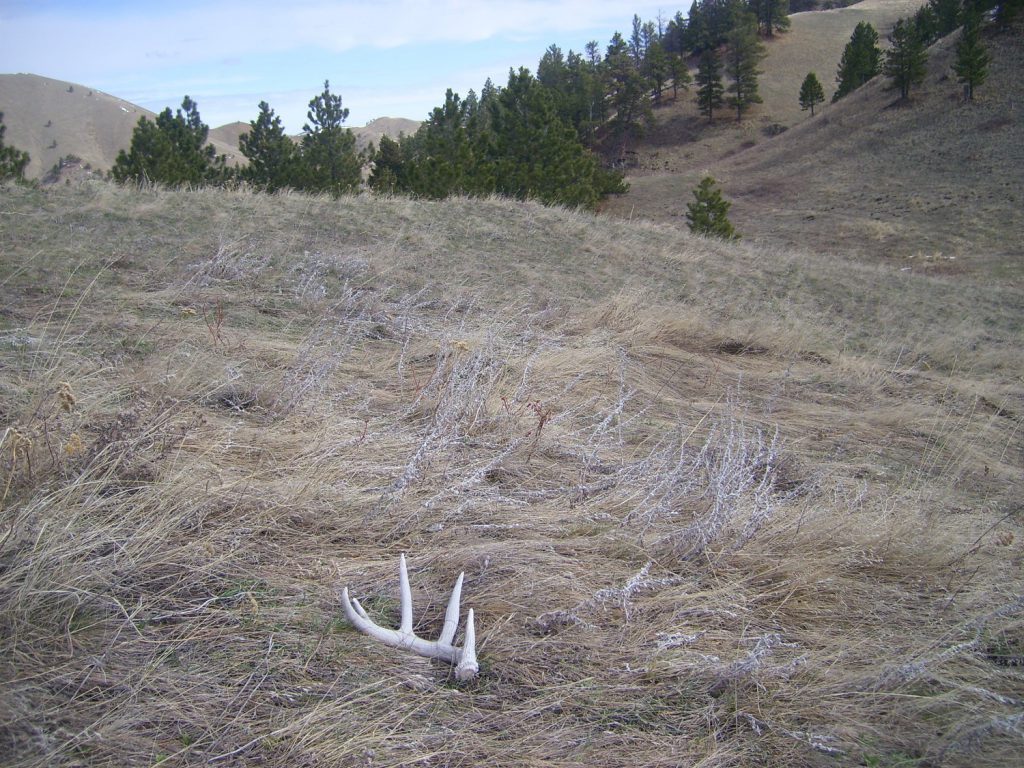
A whitetail shed that’s been lying on a sun-soaked ridge for a year or more. Photo by Jordan Voigt for Free Range American.
Deer and elk have historic areas they use for different aspects of their life: breeding grounds, summer feed, winter feed, etc. Paying attention to where you see the male animals in winter will give insight into where to start your search in spring. It’s important to note that animals are stressed during the winter more than at any other time of year. They’re weakened from the long, cold several months of just trying to get by in many areas. For this reason, several states have made it illegal to go into winter ranges before a certain date. Check state law before you make off for the mountains.
Find the Feed
If you’ve done your homework and seen some deer or elk wintering, that’s a great place to start looking. Animals try to winter where getting to feed is easiest for them, and they need to spend more time searching for food due to the stressors of winter. By becoming familiar with an animal’s food sources and at what time of year they’re using each source, a person can find spots to look for dropped antlers based on what’s on the menu.
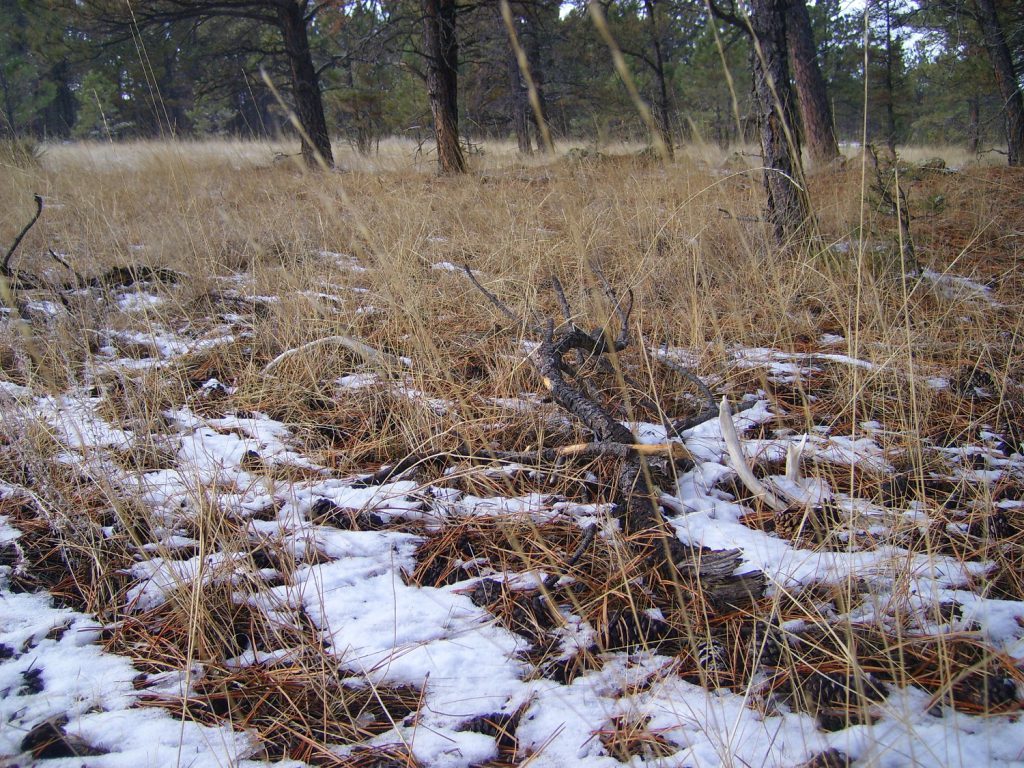
Can you see them? Two antlers on a winter feeding bench. Photo by Jordan Voigt for Free Range American.
Break Into the Bedroom
After feeding, animals spend the most significant portion of their day in their beds, resting and digesting their food. Looking for bedding areas that are close to feeding spots will pay off for the patient antler hunter. Most animals bed in fairly thick cover, so bedding areas can require more patience to work through but provide just as much opportunity at an antler as a food source.
Run Fences
Another place to check frequently are fence lines. As antlers loosen on the skull, a sudden jolt, such as jumping a fence, can jar them from their owner, leaving the patient and observant walker a chance at finding them. My son found his first matched set of deer antlers this way. After picking one up in a field, he started to walk the adjacent fence lines until he found the first antler’s mate tucked in the grass by a barbed wire fence.
Bring the Binos
Investment in a good pair of binoculars can pay dividends as well, depending on the country a shed antler hunter frequents. Instead of walking all over that big field or mountainside, get above or across from it and use your glass to pick it apart. In the early to mid-spring, the new grass hasn’t grown up enough to obscure most freshly shed antlers, allowing a detail-conscious person to find them from afar.
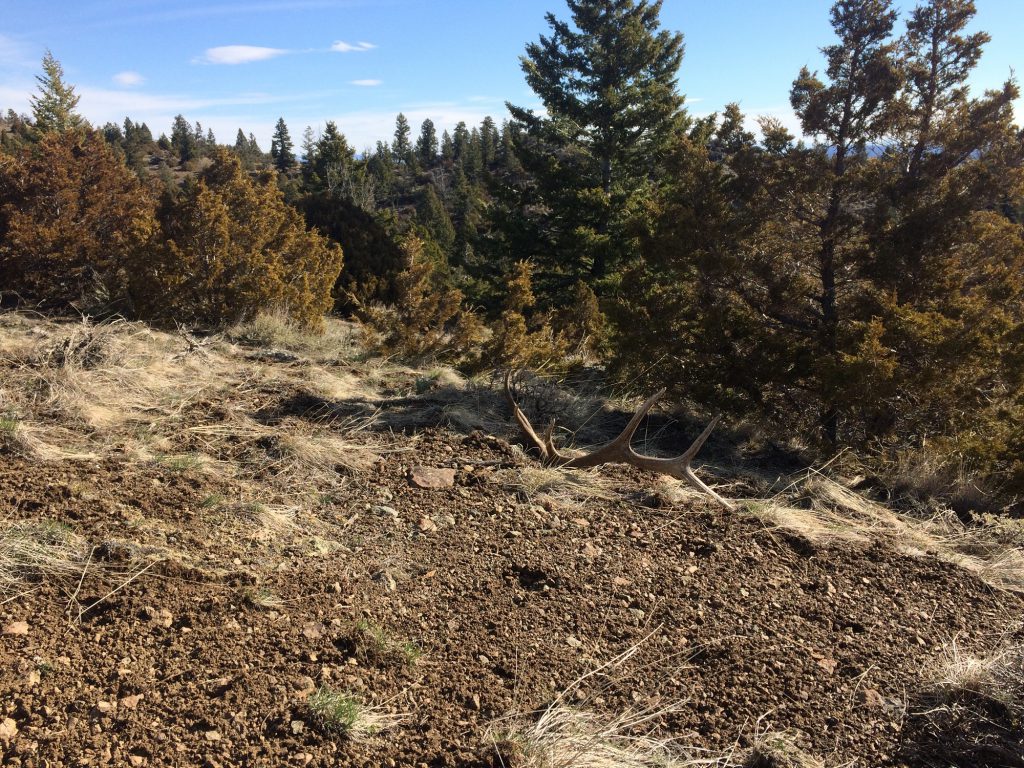
A fresh elk shed on the edge of a winter feeding area. Photo by Jordan Voigt for Free Range American.
Know Your Colors
It’s important to note that the length of time the antler has been lying on the ground and its location can determine the color. An antler shed on a south-facing slope, exposed to the sun, will turn white within a year, making it easier to see — whereas one lying in the shade on a north-facing slope with limited sun may stay mostly brown up to a year or more. This can be a clue to determine how long ago an antler was shed.
Freshly dropped antlers have pink or bloody pedicels, due to the recent separation, and can carry a unique aroma of the vegetation the deer or elk was rubbing on before they shed. Year-old antlers have begun to turn or are totally white due to sun bleaching but are smooth and haven’t begun to develop exterior faults. After more than a year in the sun, antlers naturally begin to break down, soften, and crack. Once they get to this stage, they’re sometimes referred to as “chalk” due to their propensity to leave white pieces in one’s hand after handling.
Antlers are all unique in their own way, like the many reasons people have for picking them up. Some like the exercise, some the challenge of finding bigger ones than last year, while others may depend on the collection and selling of antlers as part of their yearly income. Whatever your reason, get out and incorporate some of these tips with your own ideas and enjoy searching for some brown gold.
Read Next: Off the Couch and Into Life: Get Children Excited About the Outdoors
It might be known as the Sunflower State, but Kansas also grows monster bucks by the bushel. More than 50,000 archers hunted deer there in 2014, harvesting nearly 27,000 whitetails. Of these, roughly 15,000 were bucks.
Archery season begins in mid-September and runs through December, providing plenty of time for hunters to identify and pattern deer carrying trophy antlers.
When most hunters think of Kansas, they picture unending flatlands. But the state actually has a surprisingly diverse topography, ranging from the Great Plains in the West to the Smoky Hills in the center, to the Flint Hills and Arkansas River Lowlands in the southern and eastern reaches.
Roy McCraw’s 172-inch Chautauqua County bruiser taken in 2012 has everything you could ask for, and more. (Photo courtesy of Realtree)
“There are fertile soils and a good mix of natural vegetation and croplands that provide deer with ample nutrition,” explains Kansas Department of Wildlife, Parks and Tourism deer biologist Lloyd Fox. “The state also has many acres of tall grass and CRP fields [Conservation Reserve Program] that provide perfect fawning areas.”
Kansas has long had a reputation for growing monster bucks – and for good reason. The No. 6 and No. 8 non-typicals in Pope & Young both came from here.
At 264 1/8 inches, Dale Larson’s non-typical has occupied the top of the Kansas records since 1998. Dale arrowed the buck during the rut in Pottawatomie County, one of the top counties for big deer. This giant, widely known as “Dagger,” has 31 points, an impressive 24 2/8-inch inside spread, and a long, spiraling drop tine.
Three years after that buck fell, Brad Henry of Topeka bagged a typical state record scoring 193 7/8 inches. Brad was hunting in Wabaunsee County when the largest deer he’d ever laid eyes on walking within bow range. The buck is currently No. 13 in P&Y.
Just about every county in the state has produced at least one P&Y buck. Many have produced dozens. The counties with the most all-time entries include Butler (129), Barber (107), Comanche (87), Greenwood (74) and Sumner (73).
Josh Harden passed up multiple 140-class bucks during the Kansas rut to hold out for his 187-inch Booner. (Photo courtesy of Realtree)
But what’s happened recently? Entries made from 2010 until now reveal bowhunters in the eastern and south-central parts of Kansas are taking the most P&Ys.
In that time span, Bourbon and Marshall counties have produced the most (17 each), with Kingman (16), Comanche and Pottawatomie (14 each), Barber (13), Butler and Coffey (12 each) not far behind. In all of these counties, adequate escape cover, ample nutrition and low hunter densities combine to provide ideal behemoth buck prospects.
“Anywhere in the eastern third of the state has potential for producing a buck that breaks the (state) record,” says Marvin Whitehead, president of the Kansas Bowhunters Association. “I green score for a lot of guys who have no intention of entering their buck into the record books, so there are a lot more trophies taken than hunters realize.”
With over 200 deer taken by bow, Bobby Johnson’s 226-inch bruiser taken in Council Grove is a testament to the quality bucks Kansas consistently produces. (Photo courtesy of Realtree)
Despite the fact more than 95 percent of the state is privately owned, there are some good options for public bowhunting. In northeastern Kansas, Tuttle Creek’s 12,000 acres of walk-in hunting provide plenty of room to find mature whitetails. This area is prone to flooding in the fall, creating temporary islands where big bucks like to hide out.
Also, the 7,684-acre Marais des Cygnes Wildlife Area to the southeast is a public-land whitetail haven. Thick wetlands and oak and hickory stands give deer there cover and food.
With some areas having experienced herd decline as a result of drought and/or epizootic hemorrhagic disease several years ago, it shouldn’t have much overall effect on 2015 prospects, according to Lloyd Fox. But there figures to be some tweaking.
“We will make some minor adjustments in shortening or eliminating antlerless-only seasons in some units, and reduce the number of antlerless permits in other units,” he notes.
Kenny Fowler Buck
Taken in south-central Kansas, Kenny Fowler’s 23-point monster buck is a spectacular whitetail that demonstrates the state’s trophy potential. Check out this Big Buck Profile segment from NAW TV:
For updated deer-hunting rules and regulations, including information on seasons, bag limits and quotas, visit the KDWP website. For more information on P&Y bucks taken in Kansas and the rest of North America, check out pope-young.org.
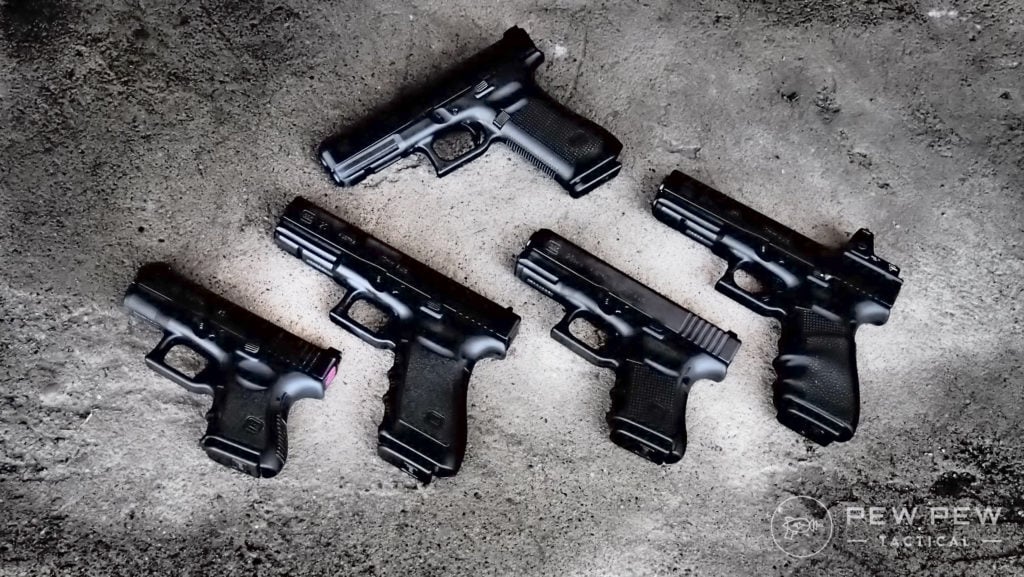
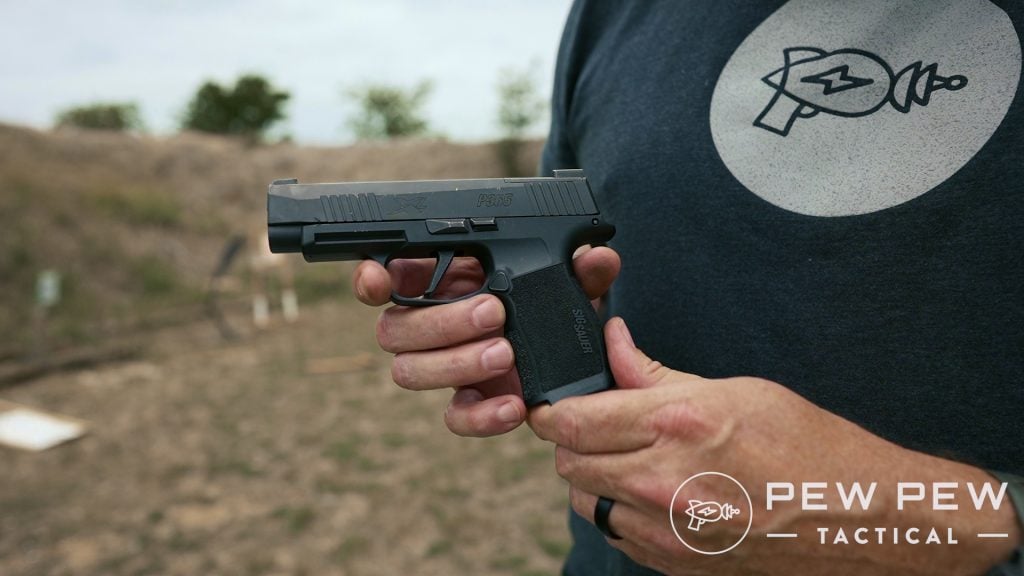
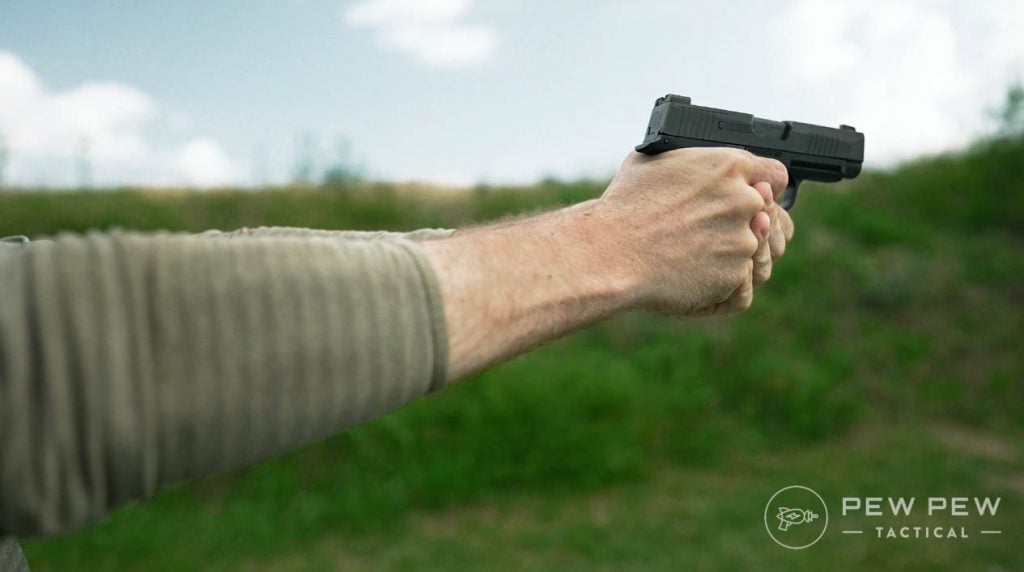
Compact is a term that’s seen as rather relative in most things. In the gun world, the term compact pistol seems firmly rooted as a firearm’s descriptor.
What size is compact?
Sig Sauer P365XL
Typically, a compact pistol has a barrel length between 3.7 to 4 inches. It also sports a double-stack type magazine with a capacity of at least 15 rounds (if 9mm) and features similar to a full-sized gun – like a rail for lights and optics compatibility.
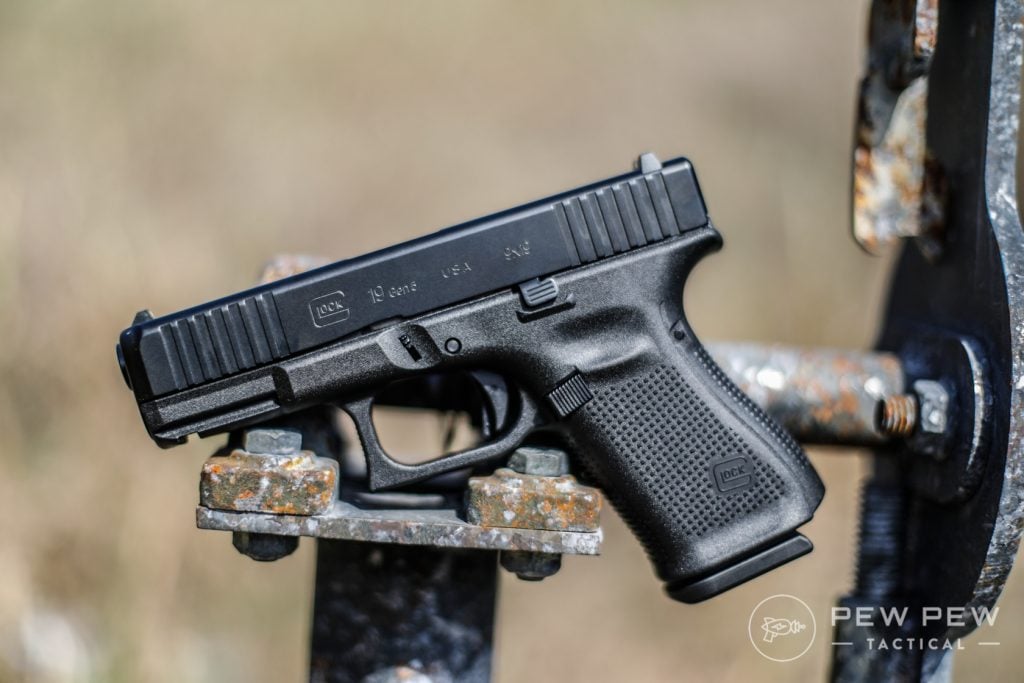
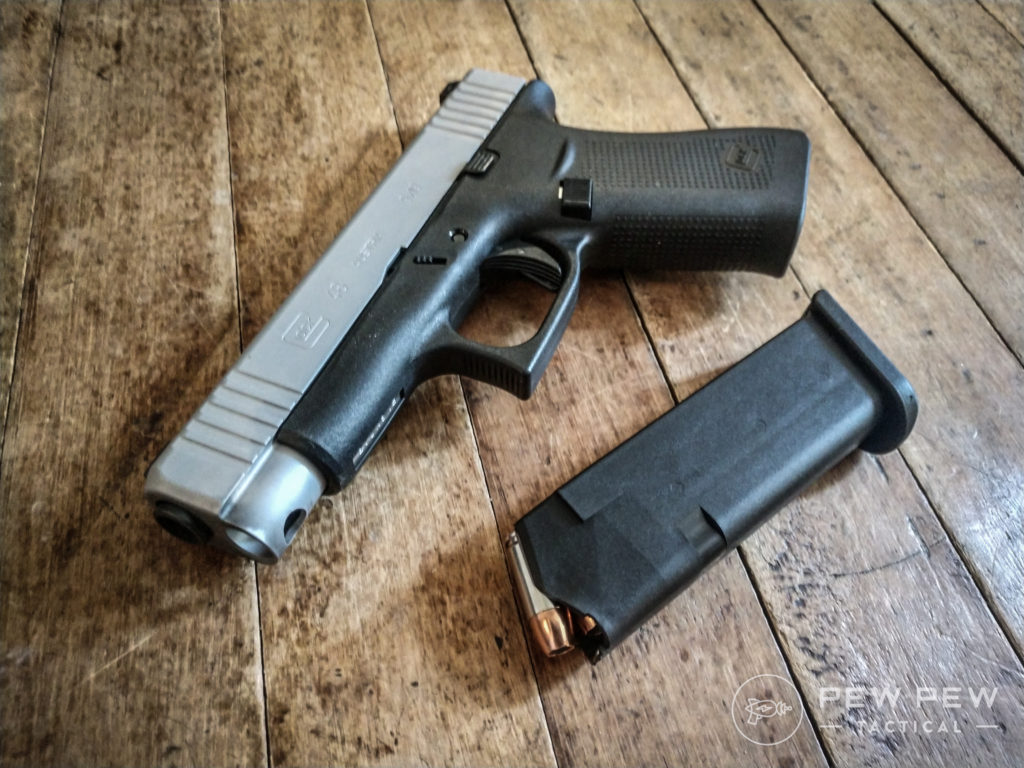
The Glock 19 defined an entire generation of pistols as the standard-bearer for what a compact pistol should be. It’s small enough to be carried concealed but big enough to be a duty or home defense pistol.
Glock 19 Gen 5
New generations have seen a rail for lights and a cut for optics.
Being a standard-bearer meant you were innovative enough to be successful. However, does that mean the Glock 19 is the best compact pistol on the market?
I don’t think so.
Here a Glock, there a Glock…
I appreciate Glocks, and I own them, but I think Glock has gotten complacent. They still equip those not-so-great sights to their guns, and they won’t release the MOS 3 to us average joes. Not to mention, they ignore most ergonomic complaints until a big contract calls for changes.
With that in mind, if the Glock 19 is no longer the best, what is?
That’s tough. The compact handgun genre has become incredibly popular and is filled with outstanding options.
I can’t tell you which is the very best, but I can tell which guns are gunning for Glock’s top spot.
So, keep reading to see some Glock 19 alternatives in the compact realm.
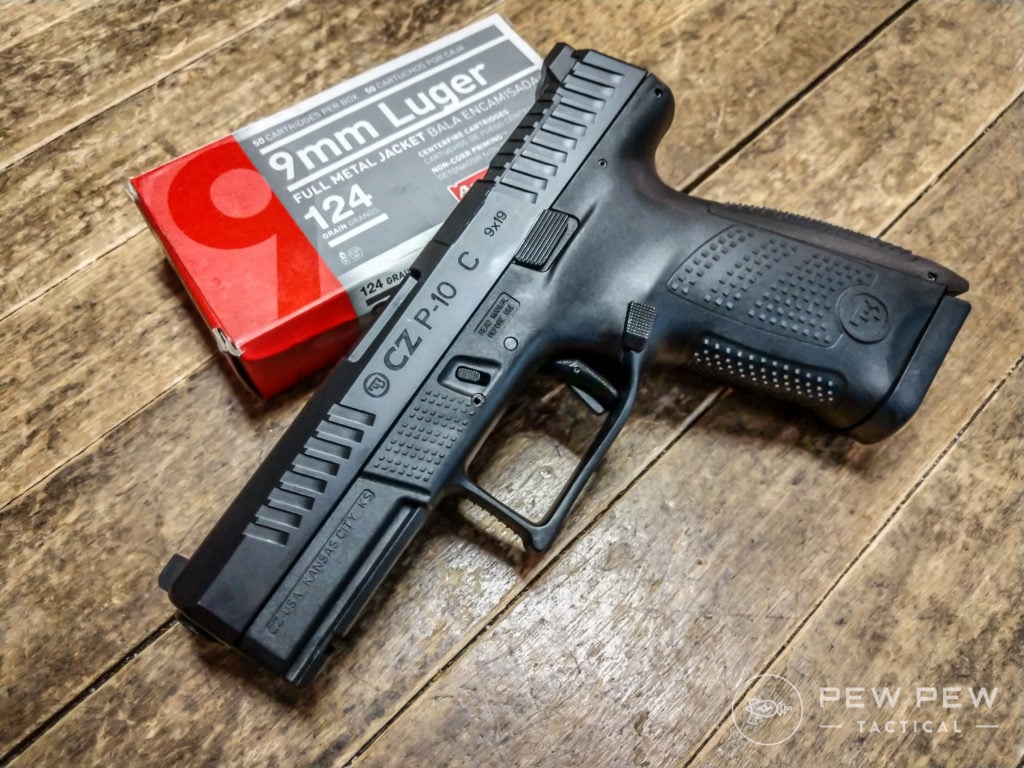
CZ produced a striker-fired pistol before, but we don’t talk about the CZ 100. What the CZ 100 got wrong doesn’t matter because the CZ P-10C got it right. The latest and arguably greatest strike-fired from CZ hit all the right marks.
The CZ P10C
The C stands for compact, and the barrel measures 4.02 inches long, the capacity of flush-fitting magazines is 15 rounds, and the pistol is 1.26 inches wide.
Optics-ready options are available, and the gun comes with a Picatinny rail and backstraps to adjust for different hand sizes.
On top of that, CZ makes numerous models with different features, including suppressor height sights, threaded barrels, and different frame colors.
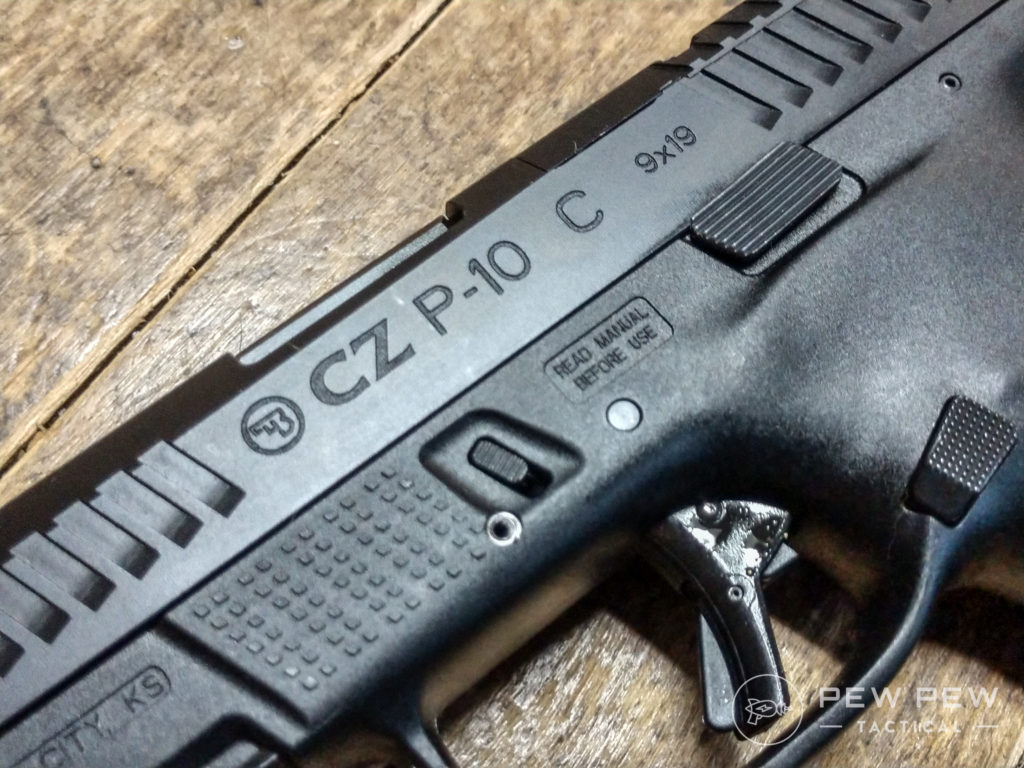
The P-10C does a few things notably better than the Glock…
First, the trigger is superior. It’s a cleaner break with a flat-faced trigger that performs better and feels better in hand.
Second, I find the ergonomics to be phenomenal. This includes the slide lock placement, the magazine release size, and the ultra-aggressive grip texture.
Capacity matters. The CZ P10C OR has a 15 +1 capacity and ships with two mags.
Oh, and the sights are made of metal — not plastic.
Glock still has CZ licked in simplicity and magazine prices as CZ mags are pricey. While the P10-C can be upgraded with new controls, triggers, etc., the Glock is still the easier gun to work on.
Even so, the P-10C offers more features, better ergonomics, and more configurations, and they do so for about the same price as a Glock 19.
Want to learn more? Check out our review of the CZ P-10C.
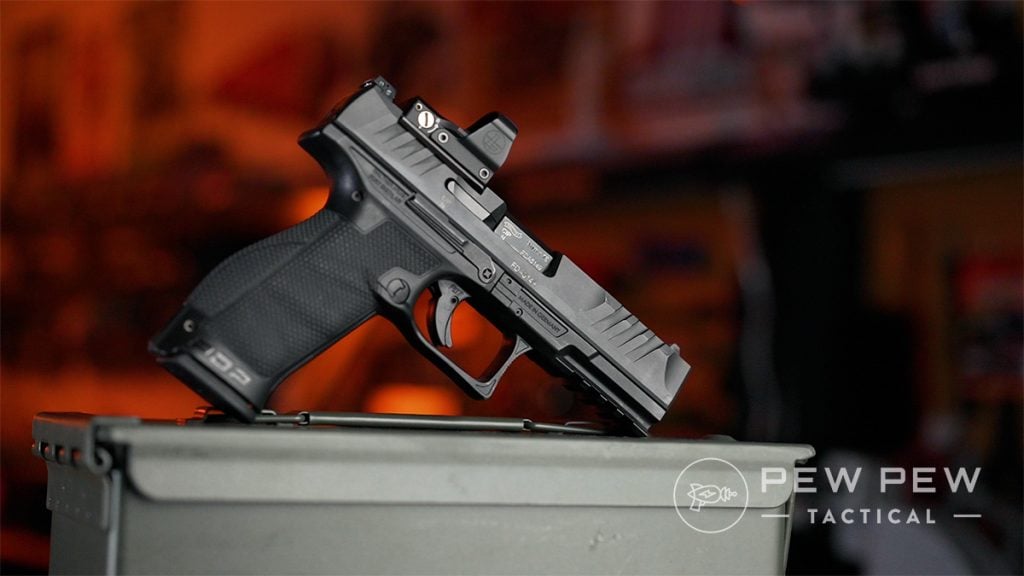
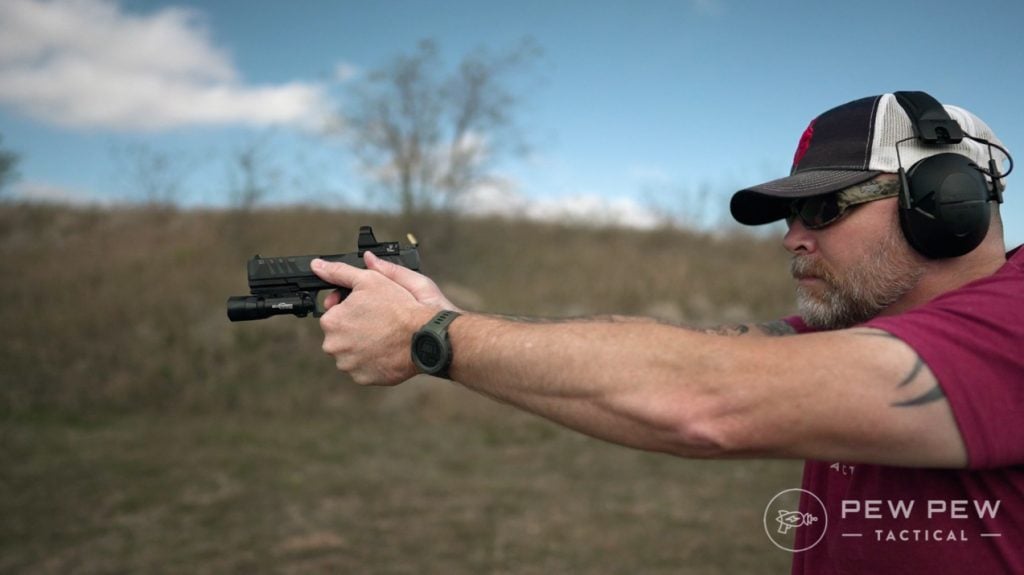
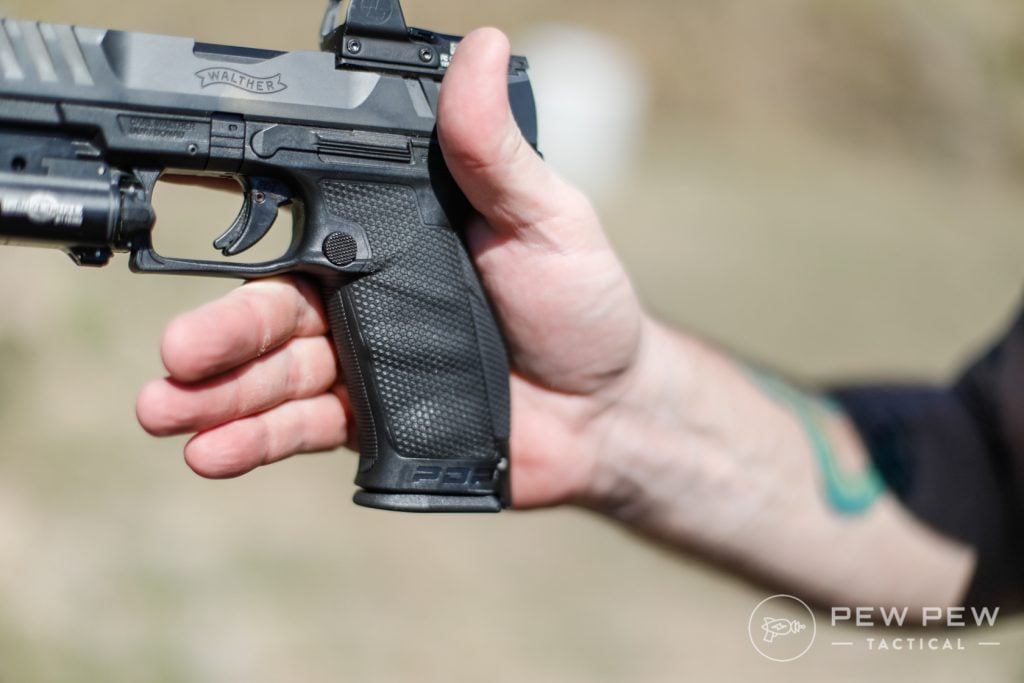
2. Walther PDP Compact
PDP might as well stand for Pretty Damn Perfect because Walther blew it out of the park with this gun. The PDP is a successor and evolution of the PPQ.
It’s the first pistol I know of designed with the use of red dots in mind.
Walther PDP
That said, of course, it’s red dot ready and outfitted with a plate system superior to the Glock MOS system in design.
The PDP compact features a 4-inch barrel, a width of 1.34 inches, and a magazine capacity of 15 rounds.
Walther designed the gun’s grip ergonomics around using a red dot, which shows.
Finding the dot and completing a good presentation of the gun makes it easy to find and quick on target. That by itself is innovative and makes the PDP Compact stand out.
Like the PPQ, the PDP features an amazing trigger. In fact, it’s even better than the PPQ with a shorter travel and a tactile reset you can’t miss.
Hot dang, the ergonomics of the PDP are awesome, and the gun feels so good in the hand. Besides feeling gun, the grip texture and the slide serrations are aggressive and sticky.
All the controls are large and easy to engage, especially the slide lock. Walther also allows you to swap frames and slides to create numerous gun configurations.
Glock does come in cheaper at both gun and magazine prices, though.
The Glock MOS series provide the plates to the shooter, while the PDP forces owners to order their free plate from Walther. Glocks are also easier to find and widely available.
Walther PDP Grip with pinky extension
The Walther PDP continues Walther’s tradition of being very underrated and under-appreciated.
In most respects, Walther’s Compact model blows the Glock away and is an awesome gun.
Want to learn more? Check out our written review here or watch the video review below!
3. Sig Sauer P320C
If one gun has been eating Glock’s lunch, it’s been the P320C.
Every day it seems like law enforcement departments are adopting the P320 — and we can’t forget the military’s adoption of the pistol.
P320-M17
I’ll give you two guesses at what the C in P320C stands for, and here is a hint, it doesn’t stand for cat. The compact variant hits us with 15-round magazines, a barrel length of 3.9 inches, and a width of 1.4 inches.
Sig loves to make a variety of configurations, and the P320C comes in seemingly half a dozen different variants.
The standard model is what we’ll be referencing today. The gun’s main draw will be its modularity.
The internal FCU is the actual “gun” portion. So this lets shooters easily remove the FCU and swap grip modules and slide sizes. I use a number of grip modules with my P320C, including one that allows the use of P365 mags.
Besides that, Sig includes real, all-metal sights that are almost always Sig LITE night sights. They also offer numerous optics-ready models, ambidextrous or reversible controls, and that 1911-like angle we all adore in the good ole US of A.
What does Glock do better? Provides magazines at a decent price point.
Glock mags are kinda hard to beat.
Sig is quite proud of their Italian-made mags. Beyond that, it’s tough to justify the Glock 19 in favor of the P320C.
I’m hoping guns like the Sig Sauer P320 force Glock to innovate and release those innovations to us. (Where’s the Glock 46 Gaston?)
4. HK P30
I will defy the article I’m writing by introducing a DA/SA hammer-fired gun instead of a striker-fired model.
The P30 doesn’t have a “compact” designation but fits the bill. HK gives us a 3.9-inch barrel, a width of 1.37 inches, and 15 rounds of 9mm in the magazine.
John Wick’s P30L
The DA/SA action of the HK P30 means the gun’s outfitted with a decocker. It’s not a conventional decocker, but it’s one of my favorites. HK placed it at the rear of the gun, right by the hammer, for easy engagement.
It also offers an awesome European magazine release that sits on the trigger guard — ambidextrous and easy to manipulate. The controls, in general, are massive and easy to engage.
This is one of the few pistols I can shoot with a thumb’s forward grip without pinning down the slide lock.
On the ergonomic front, a gun with replaceable backstraps is nothing new. However, HK went a step further with replaceable backstraps and side panels.
You can definitely customize the gun to fit your hand beyond what Glock offers.
Thankfully, HK got rid of their proprietary rail and gave us a true Picatinny rail.
I mean, if Wick rocks as P30 variant, it’s probably alright.
Beyond that, Glock does a few things better. Like the magazines, which is a recurring theme. Also, Glock makes an optics-ready model — HK doesn’t do the same with the P30.
The HK P30 differs slightly with its DA/SA design, but it’s a fantastic firearm with interesting ergonomics. It might not appeal to everyone, but it’s a winner in my book.
5. Beretta APX Centurion
Poor Beretta deserved a lot more recognition for the APX series. It’s easy for striker-fired pistols to get lost in the mix, but the APX presented a fantastic pistol.
The Centurion model uses 15-round magazines, a barrel length of 3.7 inches, and a width of 1.3 inches.
Beretta APX Centurion
This model delivers the closest we get to a compact pistol in this lineup. (Beretta’s actual compact APX is more of a subcompact.)
The APX was Beretta’s entry into the MHS trials and, like the P320, uses an integral chassis from easy-grip swaps.
Beretta released a few different frame sizes and frames with finger grooves and without. APX Centurion owners can swap the back strap, which also changes the side panels of the grip.
The APX trigger might be average and on par with Glock, but holy crap is it an accurate and controllable gun.
This little fella is super easy to shoot accurately and quickly. The APX ergonomics and configuration make it easier to control with more accuracy than I expected.
Size-wise it’s a little smaller than the Glock 19 and easier to conceal, but we still get a rail system.
The RDO model allows the shooter to top it off with a red dot on demand, and the ergonomics lend themselves well to adding a red dot.
Tested Pistol Red Dots
Glock’s G19 still…you guessed it, makes magazines cheaper. And the Glock 19 is much more readily available. Finding the APX Centurion can be tough, and finding the RDO model can be even tougher.
Beretta makes them…allegedly.
The APX Centurion is a top-tier Italian stallion; believe it or not; it’s one of the most affordable pistols on this list.
Right now, you can purchase it for less than $400 — that’s a lot of guns for such a low price.
6. Sig Sauer P365 XL
You may claim the Sig Sauer P365 XL isn’t a compact pistol. You might be right, but then what is it?
The P365 XL has a 3.7-inch barrel, a 15-round magazine, and a width of 1.1 inches. It’s smaller than the Glock 19 but still meets the dimensions of a compact pistol.
P365XL
This gun packs a rail…even though it’s proprietary, it can mount a TLR 7 SUB. Don’t forget, you can also attach a red dot, and every P365 XL is optic ready.
The main benefit is that the P365 is much thinner than the Glock 19. It easily pulls double duty as a self-defense handgun and a concealed carry pistol.
Not to mention, it conceals easier…and that matters to a lot of smaller shooters.
Besides being a little smaller, it packs the same style of FCU the P320 does. You can use multiple grip modules from Sig and the aftermarket to get various grip sizes, terrains, features, and more.
Heck, I have an all-metal grip for my P365. What’s not to love?
Besides being optics ready, we also get great Sig Day/Night sights, a great trigger, an ergonomic grip, and multiple options for magazines. The 15-rounder fits, but so do 12-rounders which shrink the gun.
Micro Compacts Sig Sauer P365XL
What Glock does better, besides magazines, is control. The larger, wider grip offers better control over the gun, making it easier to fire faster and more accurately.
The Sig Sauer P365 XL redefines a compact handgun and offers an option for someone who might prioritize concealment more than control.
7. Glock 48 MOS
So, for those who MUST have a Glock but still want to scoot around the Glock 19…check out the Glock 48 MOS.
Standard G48
It’s basically a single-stack Glock 19 in size – with a slightly longer barrel at 4.17 inches but a width of only 1.1 inches.
The stock magazines only contain 10 rounds, but a company called Shield makes a flush-fitting 15-round all-metal magazine that gives it Glock 19 capacity.
The MOS model tosses on an optic’s cut and a rail for mini lights like the TLR 7 SUB.
The Trijicon RMR Type 2(left) and Burris Fastfire 3 (right) are great MOS options.
Basically, this version, alongside Shield mags, gives you a Glock 19 that’s smaller than the Glock 19.
The main thing the G48 does better is concealment. It slips under clothes very easily and makes the gun-friendly to carry. Even though it’s more carry-friendly, the hand-filling grip makes it easy to control and manage.
Like the Glock 19, the Glock 48 is simple, reliable, and robust.
It’s customizable, and numerous companies produce magazines for the weapon. However, the Shield mags are the only option that offers you compact capacity with a flush-fitting design.
Final Thoughts
Though the Glock fanguys and girls will lament the fact that I’m suggesting anything other than Gaston’s Glory, the PPT team likes options.
P365XL and P365XL Spectre Comp
So, when you want something that’s just as good (or even better…yeah, I said it) than Glock, check out the options above.
Which gun do you think out Glocks the Glock 19? Or have I committed sacrilege even suggesting such a thing? Let me know below. If you need a Glock, check out our list of the Best Glock Models or the Glock Clones we think are worthy of your attention.
Ravin introduced the Ravin R500 as their 2021 flagship model during the 2021 ATA Virtual Show Lancaster Archery hosted back in January. Unfortunately, it was pretty hard to get our hands on a Ravin R500 crossbow, so we couldn’t write a review any sooner than today.
Ravin introduced their new proprietary cam system; the HexCoil cam system. During the ATA virtual show, Ravin claimed it breaks the 500 feet per second barrier. Today we’ll be taking this crossbow out to the range and giving it a full review! Hopefully, we can see our first ever 500+ fps rating on our chronograph!
Wow! Does this …thing still qualify as a crossbow? Ravin did an amazing job at designing the R500! It’s extremely narrow because of their brand new HexCoil cam system and this new tech was also key in making this a 500 feet per second crossbow.
The crossbow can be cocked entirely electronically by the push of a button, but it can also still be cocked manually with a detachable draw handle.
Ravin introduced this crossbow with 2 different scopes. The cheapest option comes with a 100-yard illuminated scope that’s speed rated at 550 feet per second. The more expensive option comes with an “Adjustable Turret Scope”. You might be thinking what the heck may that be, but we’ll explain it all in the #OPTICS section.
The Ravin R500 only comes in the color option “Slate Gray”, but it looks incredible!
Ravin ships the R500 and the R500 Sniper fully assembled and pre-tuned.
Design and Durability
With a length of only 28 inches, the R500 is slightly longer than Ravin’s most compact crossbow the R26. Because of Ravin’s new HexCoil Cam System that can rotate 360 degrees, the width of this crossbow is a lot narrower and comes in cocked at 3.6 inches and uncocked this crossbow has a width of just 7.6 inches.
Weighing around 10 pounds, the Ravin R500 isn’t the most lightweight of crossbows. High-performance crossbows require stronger materials and this often results in a heavier weight. Actually, for what you’re getting, this crossbow isn’t even that heavy and it has a comfortable hold.
We do think that the Ravin R500 crossbow feels a bit front-heavy. After an hour or so in our range test, we already got used to it. When taking this crossbow out to the range, we recommend using a tripod.
Optics
As we mentioned earlier, Ravin offers the Ravin R500 with 2 different scopes. The “basic” R500 comes with an illuminated 100-yard scope that’s speed rated for crossbows up to 550 feet per second. This scope has a range of 30 to 100 yards and features red or green illumination. Fully multi-coated lenses, waterproof, fog-resistant, shockproof, and recoil-proof is what makes this scope an excellent option for this crossbow.
As for the more expensive option, the R500 Sniper package, Ravin installed an adjustable “Turret Scope.” This is currently the best scope Ravin has to offer. It might not be as advanced as the Garmin XERO X1i that TenPoint installed on a couple of their crossbows, but it’s the best non-electronic scope you can currently get. You can adjust the yardage via the top elevation turret and it includes all the premium features you could ask for.
Cocking
With the Ravin R500 you’ll be able to cock the crossbow with the push of a button:
Ravin equipped the R500 with their new “VersaDrive Cocking System” that utilizes a new dual screw-driven system. The VersaDrive cocking mechanism is driven by an electric cocking motor that includes a removable battery and a charger. “The internal clutch within the VersaDrive System eliminates over-cocking and allows the cocking and decocking process to be stopped or resumed at any time.”
When we first emailed Ravin about the battery pack, they replied that we should be able to get about 50 cocking/decocking cycles from 1 full charge. Depending on temperature and weather conditions, a battery may perform worse and in a new promotional video, Pete Scobell mentions a battery life of 30 to 50 cycles.
If the battery is dead, or if you’d rather cock it manually, you can simply attach the removable draw handle. The manual cocking effort is just 17 pounds with the R500 draw handle.
Performance
Now that we’ve covered the features of the new Ravin R500, we can take it out for a test and rip some arrows down the range!
With a Powerstroke of 15 inches and kinetic energy of 222 FT-LBS, Ravin claims this is the first crossbow that breaks the 500 FPS mark. As we’re confident that Ravin properly pre-tuned the crossbow, we’ll be placing a target at 100 yards and shooting a couple of test groups first.
Ravin includes 6 Ravin .003 Arrows & Field Points with all R500 packages. There are no broadheads included and currently, it’s extremely difficult to find broadheads that are speed rate for up to/over 500 fps. We’ve found 1 set of broadheads that mentioned handling speeds of up to 500 fps and those are the Thorn RIFT 2.2” expandable broadheads. We’ve ordered a couple of sets and are testing these as well!
After the first couple of shots and a couple of small adjustments, we got an extremely tight grouping. The Ravin R500 with adjustable turret scope is insanely accurate. It’s the most powerful crossbow we’ve ever fired! The arrows were buried deep inside the target, even with the Iron Man 24″ Xtreme 500 target.
We did get some issues with the nocks of the arrows. We started the day with six arrows and ended the day with two undamaged arrows. We’ve contacted Ravin and we’re waiting for new nocks to arrive. We’ll update this section once we’ve received and tested the new nocks.
When we took the R500 out to the range it was a pretty cold day and after about 36 shots our battery drained and we had to manually crank-cock the crossbow for the rest of the day. If you’re planning on going to the range on a cold day, we advise bringing an extra battery pack.
Do not shoot arrows with broadheads when shooting at targets. Your targets will wear out very quickly and it’s not worth it. Use the field points that Ravin includes with the package instead and use your broadheads for a hunt!
Recommended Accessories
Because of the insane amount of power the Ravin R500 generates, you probably need some more durable accessories. We had a hard time finding the more durable crossbow accessories, but we’ve compiled a list of accessories we recommend for this crossbow.
Arrows & Broadheads
Ravin includes 6 Ravin .003 Arrows & Field Points with the R500 packages. It’s best if you just use the Ravin arrows. If you want to take this crossbow out for a hunt, you’ll probably want some broadheads. There aren’t many broadheads that are speed-rated at 500 fps, but we’ve found a couple. We’ve tested the Thorn RIFT 2.2” expandable broadheads and they hold very well. Another set of broadheads that work very well is the Ravin Titanium broadhead.
Special 500+ FPS Targets
We tested the R500 with the Big Shot Iron Man Extreme 500 Target. This high-quality and durable crossbow target is rated for crossbows up to 500 feet per second and stops the arrows from the R500 quite well.
Another target we can recommend is the SpyderWeb ST-24XL High-Density No Speed Limit. This crossbow target does not have a speed limit. We reviewed the smaller one, the ST-18XL, this target also stops the arrows surprisingly well.
Storage and Transportation
As always, we only recommend using the official case for the crossbow unless the manufacturer doesn’t offer a case for the crossbow. Using the official case guarantees a snug fit and a properly secured and protected crossbow.
Ravin suggested we use the Ravin Soft Case R26/29/29X or the Ravin Hard Case R10/R20 for the R500 crossbow. This seemed a bit odd to us, but these crossbows almost have the same dimensions. We can confirm that the Ravin R500 fits in both cases.
"Master the art of precision shooting with dry firing air rifles. Enhance your aiming skills, trigger control, and muscle memory without using ammunition. Discover...
")
")
")
")
")