Being a good archer is all about consistent form, which requires muscle memory. And to build muscle memory, you need repetition through practice. Trouble is, it’s not always convenient to set up a target and shoot arrows.
Enter AccuBow, the first augmented reality archery training device, no arrows required. I tested it, and here is the lowdown.
MSRP: $169.99 (AccuBow only) / $224 (phone mount and warranty included)
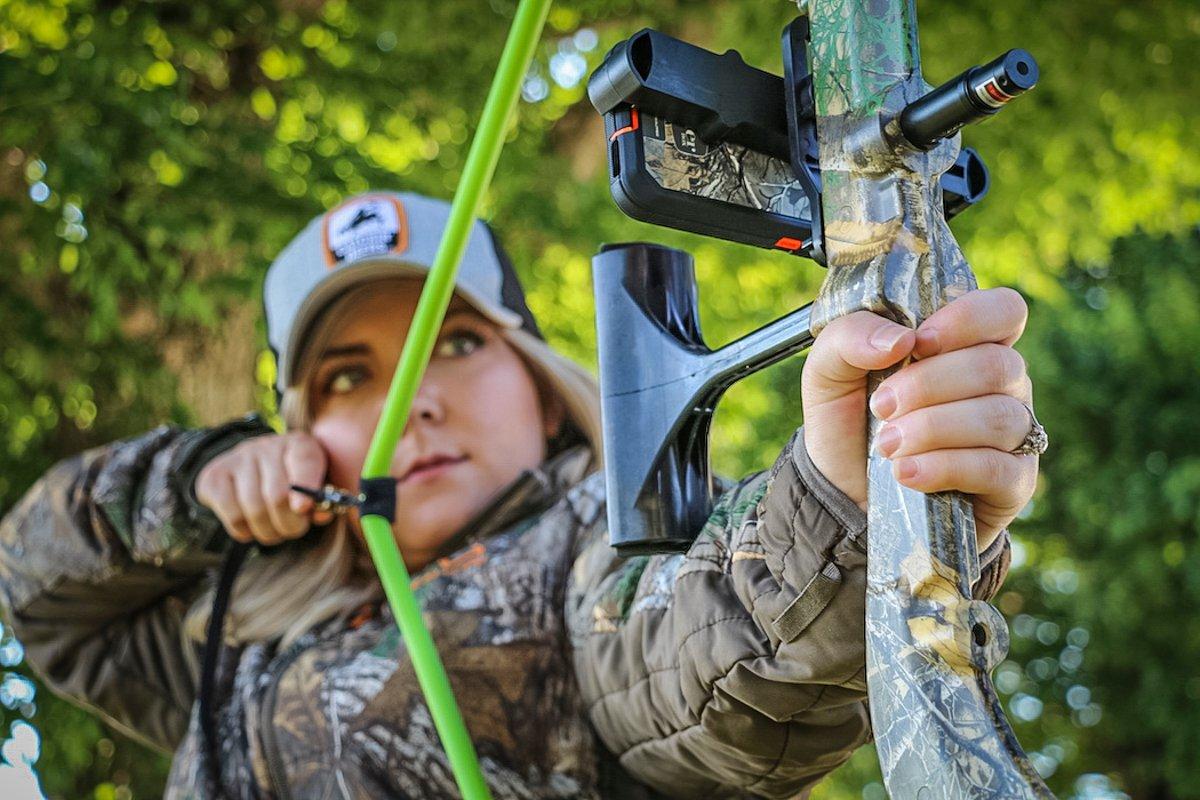
Personally, I like that this bow feels real. At a little over 4 pounds and 32 inches axle to axle, it’s the same size as a modern hunting bow, with a pragmatic shape and style. It isn’t going to feel like your new Mathews Vertix, but it’s designed to be as realistic as possible, which makes practicing with it more effective.
Gear Included
The main unit
D-loop attachment for your release aid
Dry-fire dampening rod
Hand grip (like most modern, ergonomic grips)
Laser sight (not legal for real bowhunting, mind you)
Level bubble
Resistance band (bow string)
Resistance dial (bow cam)
Stabilizer port (accepts real stabilizers)
Phone mount accessory (fits most smart phones)
AccuBow app (digital download)
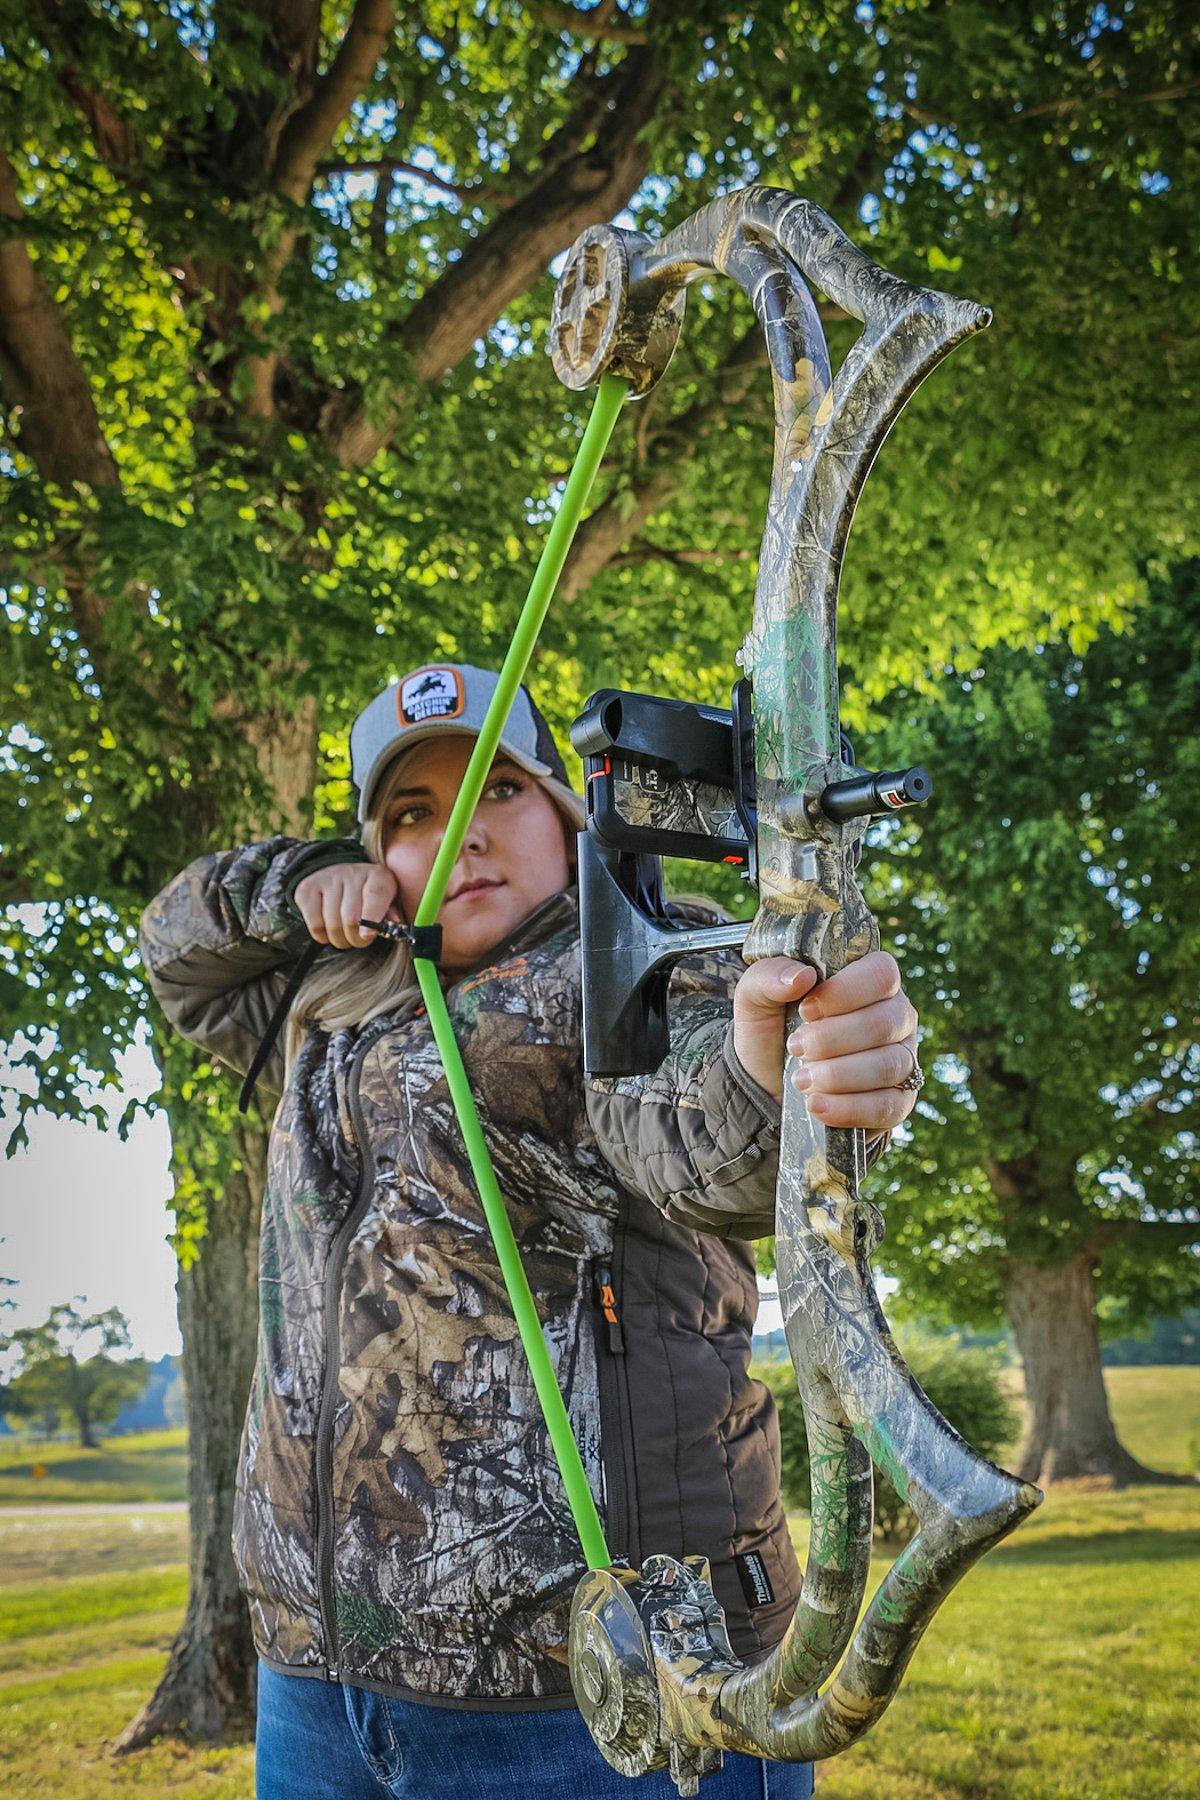
The available phone mount accessory is for virtual archery practice. It’s easy to install. The bracket rests at a 45-degree angle, meaning the phone will be horizontal during use. You may have to remove some phones — such as the iPhone plus models — from the case for them to fit. But in most cases, that OtterBox case in Realtree EDGE will look pretty as you shoot digital bucks, buffs and bushytails.
Key Features
Augmented reality is a key feature of the AccuBow, and it adds a little spice to the practice regimen. I really enjoyed it. It allows you to practice virtual bowhunting, target archery and more with an incorporated scoring system so you can compete with yourself, and track your performance over time. I think this is a key feature that’s especially important for youth and new bowhunters.
The practice modes include:
Bowhunting
Bowfishing
Bow sight customization
Olympic target shooting
Moving target
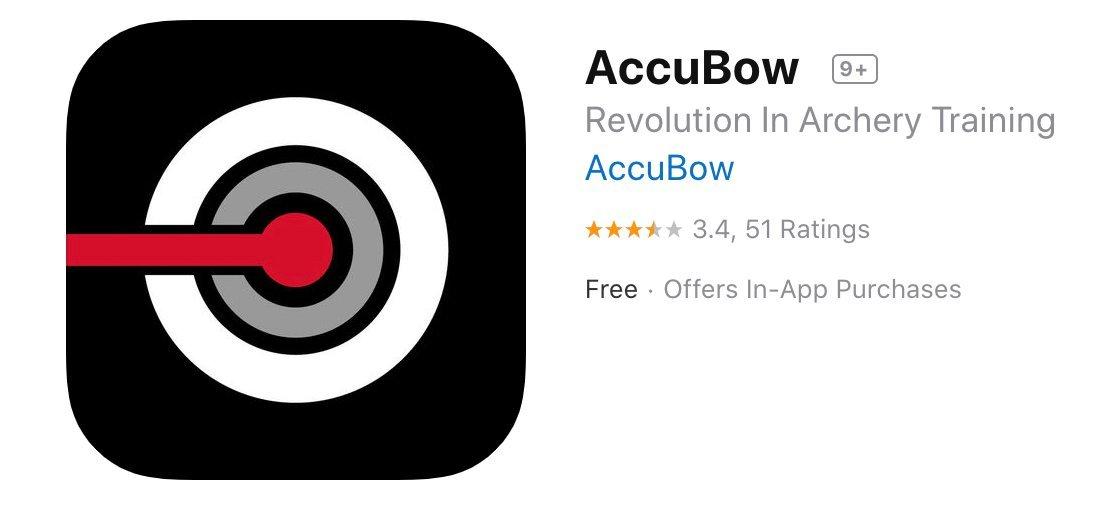
The hunting modes have a variety of real-life challenges that include elements like wind direction, wind speed, big deer and more. They make the practice realistic, and even introduce a touch of adrenaline. If you choose to use your phone and phone mount, download the AccuBow app, available on the iPhone App Store and Google Play for Android phones. It’s user-friendly.
Special Considerations/Takeaways
Keep the following in mind if you decide to purchase an AccuBow:
Laser activation: Unscrew the laser assembly from the AccuBow. Remove its battery cover, and then pull the battery isolator tab. Replace the cover and reinstall to activate the laser.
Phone mount: In some cases, this is sold separately. Check to see if the phone mount is included before purchasing. This phone mount expands to secure most iPhone and Android models.
Adjustments, maintenance and repair: Be very careful anytime you’re working with the inner components. Handle the resistance dial with care.
Test Conclusion: AccuBow Solves Problems
Everyone has different improvement goals. While this product is more limited in teaching proper draw form, grip and stance (without third-party instruction), it shines at teaching and reinforcing other valuable archery skills including focus, holding form, stamina, stability and strength. The laser pointer training technique helps you to see whether or not you’re aiming properly. It is a great tool for shooters with target panic, as it improves your focus and form, but reduces the anticipation that comes from firing arrows.
Repetition is the key to archery practice, and the AccuBow works indoors or outdoors, day or night. I tested it inside and it worked just fine. I didn’t even annoy my wife during the process. In fact, she tried it out for herself and put her own stamp of approval on it.
This product impressed me most in the strength-building department, though. The muscles we use to draw a bow are specialized, and the AccuBow excels at working those, ultimately building them up so you can either increase draw weight or pull your current poundage with more ease. I noticed a small strength increase during the short test period.
Adjustability makes the AccuBow versatile and great for most age groups. Go to AccuBow.com for more information. Click here for tutorials and instructional videos.
Don’t Miss: Tested: Midway USA Stealth Clothing Line
Check out more stories, videos and educational how-to’s on bowhunting.
Many of those who tucked into a large turkey on Thanksgiving will have fought over the tiny end part of the cooked bird. They may even have waged a religious war over its name.
In an article in June in The Arkansas Democrat Gazette, David Lipschitz recalled an old family meal. “I loved chicken skin, and remember well fighting with my sisters for the vestigial tail of the chicken or turkey, what we called the Parson’s Nose – pure fat.”
In an article last April in the British newspaper The Independent, food writer Clarissa Dickson Wright wrote: “When I was a child, chicken was what you had for best – for Sunday lunch. There was great excitement about having it and, if you were very lucky, you got the pope’s nose.”
In the same month, Bennett Kirkpatrick wrote in The News and Observer in Raleigh, N.C., of “a syringe for injecting the liquid into the ‘Pope’s nose’ of the turkey’s tail.”
The expressions are certainly not new. In Tales of Old Dartmoor, a memorable 1956 episode of the British radio program The Goon Show, hero Ned Seagoon shouted, “Men, load all guns with roast turkey, with the parson’s nose outwards.” To which the villain Moriarty replied, “Sapristi, you devil! With the parson’s nose outwards? If you hit him with those, he’ll go to the bottom.”
The derogatory expression “pope’s nose” appears to have been coined in Britain as a result of anti-Catholic feeling after the reign of James II (1685-88). It was well in place by 1796, when Grose’s Dictionary of the Vulgar Tongue defined it as “the rump of a turkey.” The expression “parson’s nose” appears to have arisen as a response, wry or otherwise, directed at the Protestant clergy. Other variations over the centuries have included bishop’s nose and recorder’s nose (after a form of British judge). It’s enough to put more than a few noses out of joint.
Elsewhere, sound-alike words continue to cause trouble. Consider NBC’s written transcript of a segment that Today co-host Katie Couric devoted on Tuesday to the death of actor Christopher Reeve.
The text includes excerpts from a 2002 television interview in which Reeve, recalling his movie role of Superman, told Couric that he supported the superhero’s devotion to “truth, justice and the American way.” However, “the American way is a little bit confusing right now. So is the word patriotism – confusing because patriotism should not be confused with, you know, the right to descent.”
Reeve was not, as you will have divined, referring to the right of Superman to touch down after flying across town faster than a speeding bullet. He meant dissent.
“In other words,” he continued, “it’s equally patriotic to challenge what our government is doing, what our politicians are doing.”
One thing that politicians are doing, along with the rest of us, is speaking of brainstorming sessions in which ideas are generated. Republican Senator Mitch McConnell told the U.S. Senate on Oct. 6 that he worked with other politicians “to brainstorm new ideas and improvements to our oversight of the intelligence community.”
(Yes, well, we already know about a few of the intelligence community’s oversights.)
In Britain, at least one political-correctness patrol has begun an assault on this sense of “brainstorm,” a sense that dates back at least to 1925 in North America. The magazine Private Eye reports that, in a training session at the British Broadcasting Corporation, a course director told a junior manager the word was no longer allowed in its colloquial sense, because “it is offensive to those suffering from epilepsy.” She was told instead to use “thoughtshower.” It would be fascinating to read a dictionary written by that director.
Red dot sights work using a LED emitter that shines a beam of light onto a specially coated, slightly angled piece of glass.
The glass reflects the light from the LED onto it, creating the reticle. It offers many advantages that aren’t available with traditional iron sights.
The term “red dot sight” is a catch-all for a few types of optics, mainly reflex and holographic sights. We group these sights by how they operate. Reflex sights are reflective sights that use traditional lenses, while holographic sights utilize lasers.
Reflex Sight
The reflex red dot sight is the most popular.
It works via a small light that’s projected from the rear of the scope, which the front lens reflects back into the form of a red dot which you use to aim with.
Most reflex sights are often cheaper than holographic sights and are also available for battery-free use.
On the downside, reflex sights aren’t magnified, but you could always combine them with the best red dot magnifiers. It also comes in a wide variety of sizes and weights, meaning you can easily find a budget reflex sight to fit your firearm.
Holographic Sight
The second most popular red dot is the holographic sight, with Eotech leading the industry (Enter: EXPS 2 and 3).
It uses a powerful laser emitter to illuminate a glassed-in reticle, which is very precise, accurate, and easy to use. Holographic sights also tend to favor those with blurry vision and astigmatism.
Because of its technology, holographic sights require more battery life. That’s why it rarely lasts more than a few hundred hours. It’s a big difference when compared to 10,000+ hours of a quality reflex sight.
One of its best features is that it can still function even if the front lens is damaged. On the other hand, the most expensive red dot reflex sight on the market is still cheaper than most holographic sights.
Since the needed technology requires more internal structure and larger housings, holographic sights tend to be heavier and bulkier.
As of now, only two companies produce true holographic sights which also limits your options.
To make your life easier, I have compiled a list of the best holographic sights for you to check out.
Both reflex and holographic sights have their similarities as well as distinct differences. Choosing the best red dot sight for your specific need can mean the difference between success and failure.
How to Choose the Best Reflex Sight
With so many options on the market today, it can get overwhelming.
But don’t worry, we’re going to cover all bases: starting with how to choose the best reflex sight…
Reticle Size
A reflex sight gives you the ability to acquire and hit a target incredibly quickly.
The size of the reticle pattern can affect how quickly you can locate the dot and how much of the target it covers. These two factors have a big impact on accuracy.
The most common dot size ranges from 2 to 6 minutes-of-angle (MOA). Larger dots are ideal for speed competition, steel shooting, or if you have tired eyes. For precision shooting at medium ranges, choose a smaller dot.
If you’re unsure: 3 MOA is a popular, standard choice for target shooting and self-defense. The dot will cover 3 inches at 100 yards, 1.5 inches at 50 yards, or 6 inches at 200 yards.
Reticle Color
A reflex sight comes with a colored reticle and thanks to modern technology, there are a variety of options.
Holosun specifically designed a “gold” reticle for color-blind shooters while UTG has optics that come with 30+ different color options. But today, we’ll stick to the two most common colors: red and green.
When deciding between the two, consider your shooting environment and eye condition. If you’re in a forested area or someplace that’s dominated by green, then a green dot wouldn’t work too well. However, it’s easier on the eyes and works great for daylight use.
The red dot is highly visible at night and in low-light conditions, but people who suffer from astigmatism may see a blurred dot or experience eye strain. A popular budget reflex sight comes with the classic red dot. For more details, read my Best Red Dot Sights review.
Housing Construction
The reflex sight comes in two styles: the traditional open style and the tube or pipe style.
An open-style sight offers a wider field of view. The compact design also helps you focus on your target while maintaining situational awareness. On the other hand, it’s vulnerable to the elements.
Tube-style reflex sights look like miniature scopes and have an enclosed system. This protects it from weather conditions and accidental drops. Unfortunately, it has a more limited scope of vision than the former.
Battery Life
The battery life is a crucial aspect since no dot is visible if you run out of power.
Normally, a reflex sight uses LEDs. That’s why a single battery can last 10,000+ hours. Take note, your mileage will vary depending on your brightness setting.
Some reflex sights have auto-on/off features that are driven by motion sensors, allowing it to always stay on and ready for use while conserving battery life.
Those sights are typically more expensive but extremely reliable.
Durability and Weight
A reliable red dot reflex sight should be water-proof, fog-proof, and shock-proof. It should also withstand high recoil rounds, and be durable but lightweight.
Lastly, always buy a product with a good warranty. Not all manufacturers provide coverage or excellent customer service, so make sure you check!
Choosing one that works best for you can be tricky – and finding one that fits in your budget can be trickier! Therefore, I’ve compared the best reflex sights and listed them below.
The Best Reflex Sights
If you’re pressed on time, here’s a quick list of the best reflex sights:
Aimpoint Pro: Best Reflex Sight for AR-15
Trijicon RMR Type 2 RM06: Best Reflex Sight for Pistol
Bushnell TRS-25: Best for the Budget
Vortex Venom: Best Shotgun Reflex Sight
1. Aimpoint Pro: Best Reflex Sight for AR-15
The Aimpoint PRO is the best reflex sight for the AR-15.
This patrol rifle optic is widely known for its impressive features and reasonable price point.In fact, it’s actively being used by the military, law enforcement, and armed authorities alike.
Glass Clarity & Reticle Patterns
The Aimpoint Pro’s glass is clear and crisp.
It comes with a slight blue tint for enhanced contrast, and I’ve experienced no distortion whatsoever, so no complaints there.
It features a threaded front lens opening which, get this: allows you to screw on another anti-reflective device. The Aimpoint Pro comes with a 2 MOA dot with ten brightness settings: 6 daylight and 4 night settings.
This red dot sight is also compatible with all generations of night vision devices. As awesome as the Aimpoint PRO is, the red dot sight can be less favorable for individuals with astigmatism.
In that case, you’d want to look at a holographic reflex sight like the Holosun HS510C.
Eye Relief & Eye Box
The Aimpoint Pro has unlimited eye relief.
The eye box is a bit smaller compared to other reflex sights but it has a wide field of view. The Aimpoint Pro can be co-witnessed with iron sights and it comes with an extra spacer.
In fact: The red dot perfectly lined up with my AR’s iron sight. I was able to zero within the first ten shots at 50 yards. 500 rounds later, I was still shooting dead center without issues.
Durability and Weight
The Aimpoint Pro is extremely durable.
Thanks to its anodized aluminum construction, it can withstand heavy rain, fog, and is completely waterproof up to 150 feet.
Additionally, the single CR2032 battery of the Aimpoint Pro is rated to last 30,000 hours (over 3 years) of constant operation.
On that note: I’ve used mine for almost two years now, and I haven’t swapped batteries yet.
The Aimpoint Pro is 3.2 inches tall, 5.4 inches long, and weighs about 12.7 oz with the spacer. This optic is not as lightweight as other red dots, but its design works best on full-sized rifles.
Elevation & Windage Knobs
The elevation and windage knobs are robust and tactile.
They’re easy to tighten or loosen, even with gloves on. Plus: they have an audible click and can be easily reset back to your desired setting.
Parallax & Magnification
The Aimpoint pro features a 1x magnification.
It was easy to shoot with both eyes open, and the red dot sight was parallax-free.
You can also use the Aimpoint Pro with any magnifier of your choice. I used both Aimpoint’s 3X Magnifier
and Vortex Optics VMX-3T Magnifier with Built-in Flip Mount and it improved my long-range accuracy tremendously.
Mounting & Rings
The Aimpoint Pro comes with a standard AR-15 riser (which is removable) and a dual-height, torque-perfect QRP2 mount.
It took me a total of 15 minutes to install everything.
Also, the box includes flip-up lens covers – the front is solid and the rear is transparent. This allows you to shoot with the lens caps closed and both eyes open in case of an emergency.
Is the Aimpoint PRO worth it?
If you’re looking for a high quality reflex sight that won’t fail on you or your AR-15, I highly recommend the Aimpoint Pro.
Why? It’s got:
Pinpoint accuracy
Clear and crisp lens
30,000-hour battery life
Easy installation and removal
Excellent durability and construction
On top of that, the reflex sight is covered by Aimpoint’s 10-year warranty. If it ever breaks, their excellent customer service will repair or replace it for free.
Overall, the Aimpoint Pro is one of the best scopes for the AR-15. You definitely won’t be disappointed with the quality and reliability you’re paying for.
2. Trijicon RMR Type 2 RM06: Best Reflex Sight for Pistol
The Trijicon RMR Type 2 is the best reflex sight for the pistol.
Whenever I’m looking for a top-tier optic, you can always find me browsing at Trijicon. Compared to a lot of contenders, this red dot sight has proven to be extremely accurate, durable, and reliable.
This is why the Trijicon RMR Type 2 is one of the best pistol red dot sights…
Glass Clarity & Reticle Patterns
The Trijicon RMR Type 2 glass is super clear and bright.
This reflex sight comes with a 3.25 MOA red dot, perfect for shooting precisely without covering too much of my target.
The RMR Type 2 has easy-to-use plus and minus buttons for quick illumination adjustments. I can also manually adjust its brightness, up to eight different settings. All the controls are side-mounted for easy access.
I also tried switching to the auto-adjust mode, and it worked perfectly. It detected the ambient light and gave me a red dot that suited my shooting conditions.
On the other hand, I was hoping the Trijicon RMR Type 2 would come with “shake awake” motion sensing technology (like the Holosun HE508T-X2). This would’ve been a great addition.
But, it’s not a big deal considering this reflex sight has a long list of impressive features.
Eye Relief & Eye Box
The RMR Type 2 has unlimited eye relief.
The eye box is forgiving and has a large field of view. You can easily achieve quick target acquisition with both eyes open, perfect for enabling rapid engagement.
Durability and Weight
The Trijicon RMR Type 2 is lightweight yet durable.
The RMR Type 2 is waterproof and fog proof. Plus: it’s proven to withstand the stresses associated with recoil on high-power firearms.
I’ve personally done multiple drop tests and one-handed reloads on this optic and found no problems. The Trijicon RMR Type 2 is equipped with long-lasting battery life.
You can expect up to four years of use from its single CR2032 battery. I recommend replacing it every year, though.
The drawback: The battery compartment is on the bottom of the reflex sight…so you have to unmount and re-zero when you swap them out.
If that troubles you, a red dot sight with a top-loading battery option like the Burris Fastfire III is a great alternative.
Elevation & Windage Knobs
The RMR Type 2’s knobs are solid with audible clicks.
Windage and elevation changes are made with 1.0 MOA clicks over a 150 MOA range. I was able to zero within the first 15 rounds.
After firing over 1,000 rounds, I can personally confirm there were no flickers or loss of zero.
Parallax & Magnification
The RMR Type 2 sports a 1x magnification.
It’s factory adjusted to be parallax-free at approximately 100 yards. This setup works very well for a pistol.
Mountings
The RMR Type 2 doesn’t come with mountings.
However, there’s a wide selection you can purchase online. I used the Trijicon AC32064 RMR mounting kit—not included—which comes with a gasket that mounts between the unit and the mounting plate.
At least, that’s what I used to marry the Type 2 to my Glock 17 MOS. Depending on your slide, I recommend buying the Mount Sealing Plate to avoid water getting in. It gives your pistol a perfect seal with the reflex sight.
Is the Trijicon RMR Type 2 worth it?
If you’re looking to mount a professional-grade reflex sight on your AR pistol, get the Trijicon RMR Type 2.
Here’s why:
Multi-coated lens
Long-lasting battery
Night vision compatible
Low profile and lightweight
Manual/Automatic brightness mode
Also, this red dot reflex sight comes with Trijicon’s Limited-Lifetime Warranty. You won’t need to worry if you require repairs or a replacement.
If the red dot reflex sight on my pistol could be a matter of safety or survival, I’d pick the Trijicon RMR Type 2 reflex sight in a heartbeat.
But if you’re looking for the best budget reflex sights alternative, I have a detailed comparison on the Burris Fastfire 3 vs Trijicon RMR. Highly recommend checking that out!
3. Bushnell TRS-25: Best for the Budget
The Bushnell TRS-25 is the best reflex sight for your money.
It costs less than $100 and performs as well as optics twice its price. In fact, it’s got 12,000 reviews on Amazon, with customers raving about this affordable red dot. And I agree with them.
Glass Clarity & Reticle Patterns
The Bushnell TRS-25 provides superb optical clarity.
It features amber-bright lens coating that prevents glare and improves light transmission. Amber-coated optics will help you distinguish what you are aiming at, be it a brown tree or brown critter. Super helpful on hunting trips!
The TRS-25 is equipped with 11 brightness settings, illuminating the 3 MOA dot reticle inside to better help you with target acquisition.
I did notice that the dot intensity tends to get a bit blurry when the setting is high. It’s not ideal but it’s acceptable at this price point.
Eye Relief & Eye Box
The Bushnell TRS- 25 sight sports unlimited eye relief.
I’m able to comfortably shoot with both eyes open. It also comes with a wide field of view and is parallax-free.
Durability and Weight
The Bushnell TRS-25 is both durable and lightweight.
The aluminum housing is filled with dry nitrogen gas and sealed with O-rings which makes it fog-proof, waterproof, and shockproof. Also, I have put this optic through the wringer.
If I were to drop it from 5 feet, the glass would probably crack but keep in mind, it’s a low-cost red dot. With regular use, it passes the torture test. On the downside: the battery life isn’t so great.
Bushnell says it comes with 5,000 hours of battery life on the medium setting, but I’ve been swapping out batteries every year. An auto-shutoff feature would’ve been ideal with the low battery life.
Still, not bad for a $70 optic!
Elevation & Windage Knobs
The elevation and windage knobs have an audible click.
You will need a screwdriver or coin to turn the adjustments. Every click on the dials equals 0.5 MOA. After 10 rounds, I was zeroed in.
I’ve tested it using AR-15 assault-style rifles and even shotguns, and it held the zero throughout.
Parallax & Magnification
The Bushnell TRS-25 comes with 1X magnification.
If you want to add some magnification, the UTG 3x Magnifier is the way to go. I own one and it’s affordable and reliable. It’s also parallax-free.
No matter where my eye was positioned, the dot didn’t move.
Mountings
The Bushnell-TRS 25 is a pretty versatile accessory that can be easily mounted on any Picatinny rail system or weaver style.
However, you may need a riser mount if you are shooting an AR-type rifle. I personally recommend the UTG 1″ Riser.
For absolute co-witness, the UTG .83″ Riser is my go-to.
Is the Bushnell TRS-25 worth it?
If you’re looking to get an affordable reflex sight that does it all, get Bushnell TRS-25.
Why? It’s got…
Clear reticle
Affordable price tag
Multi-coating on lenses
Easy to mount and easy to detach
Shockproof, fog-proof and water-proof
Plus, the TRS-25 is protected by Bushnell’s Lifetime Warranty. If the sight arrives with a defect, they will either replace or repair it. If you’re interested in this red dot, you can find more information on my in- depth review of the Bushnell TRS-25.
4. Vortex Venom: Best Shotgun Reflex Sight
The Vortex Venom is the best shotgun reflex sight.
Not only is it affordable, but it’s packed with amazing features. In fact, I’ve used it on a wide variety of hunting applications including casual target shooting and I loved it.
Glass Clarity & Reticle Patterns
The Vortex optics glass is clean, crisp, and bright.
This optic comes in either a 3-MOA or 6-MOA red dot reticle. I prefer the 3-MOA dot for hunting. The precise dot permits fine-tuning for true target acquisition.
In my opinion, the 6-MOA dot is too big, definitely for shots over 40 yards because it just covers too much of the vitals. But this is also a personal preference.
The Venom has 10 brightness settings in total and offers manual or automatic brightness adjustment.
There’s one thing I’m not a fan of: When you aim from a dark place into a brightly sunlit area, the dot tends to wash out as the light sensor sees a low level of light and automatically adjusts the brightness down.
For battery preservation, the durable sight is designed with an automatic shutoff function after 14 hours. So far, I’m happy with that trade-off.
Eye Relief & Eye Box
As a red dot sight, the Venom comes with unlimited eye relief.
It also has an ultra-forgiving eye box and shooting with both eyes open was a breeze. If you can see the red dot, you’ll hit your target.
Durability and Weight
Vortex’s Venom sight is inexpensive, but it’s compact and robust.
It’s made of aircraft-grade aluminum and is nitrogen purged, making it waterproof and shockproof. The sealed O-rings prevent dust, debris, and moisture from entering the device.
It withstood every shake, rattle, and roll I threw at it. The Vortex Venom is rated between 150 (at the brightest setting) to 30,000 hours (at the lowest setting) of battery life.
With its top-mounted battery compartment, there’s no need to remove the optic to replace the CR 1632 battery.
But what if the battery life isn’t enough for you? Check out its cousins: the Sparc 2 and Strikefire 2.
Elevation & Windage Knobs
The knobs are easily adjustable with audibly crisp 1 MOA clicks.
I was able to zero in the scope within 5 minutes. Even after 1500 rounds, it still held zero.
Parallax & Magnification
The Vortex optics don’t come with any magnification- as is the standard with a reflex red dot.
This is ideal for short-range shooting. But, if you want to add 100 yards, I recommend the Vortex VMX 3T Magnifier.
Although the Venom is labeled as “parallax free”, there is slight parallax. But it makes a negligible difference in performance.
Mountings
The Vortex optics will directly attach to any shotgun with a Picatinny/Weaver Rail.
The box also includes a T-15 Torx wrench, Rain cover, Lens cloth, Mounting screws, one CR 1632 battery, and a screwdriver.
Is the Vortex Venom worth it?
If you’re in search of a low-profile yet rugged reflex sight for your shotgun, the Vortex Venom is it.
Why? It’s got…
Clear glass
Crisp 3- or 6- MOA dot
Auto brightness setting
Long-lasting battery life
Waterproof, fog-proof, and shockproof
And to top it all off, if you’re worried about it breaking, Vortex optics’ Lifetime VIP warranty has you covered: they will repair or replace it without charge, no receipts required.
Overall, I consider the Vortex Venom to be a bang for your buck.
If you’re looking for another great option for your shotgun, I highly recommend checking out my Vortex Sparc AR vs Sig Romeo 5 review!
Now It’s Your Turn
I hope you enjoyed my Best Reflex Sights guide.
Now I want to turn it over to you: Which reflex sight will you pick for your AR-15, pistol or shotgun? Or perhaps you already have one and would like to share your thoughts.
Either way, let me know by leaving a quick comment down below.
It is a fair assumption that most people who shoot rarely consider shot string. Yes, they may think of the pattern and the speed at which it travels. But the pattern to most mind’s eyes is a plate-shaped circle, with hopefully not too many holes in it.
This is precisely what you see when you test a gun on a pattern plate. You get a pretty good idea of how your gun and cartridge combination are performing. But not entirely. For as the pellets fly through the air, they not only do so in the shape of an ever-widening plate but in a long string which extends in flight. In approximate terms it can be around 5 feet in length at 20 yards extending to 8 feet at 30 yards.
The variation is as a result of deformation of pellets as they pass along the barrel. Those at the bottom of the load in the cartridge will suffer most, as a consequence of which their flight will not be true, nor will they travel at quite the same speed as the front end of the load which will consist of still fairly perfectly spherical pellets.
In effect you are sending a column of pellets in front of the intended target. I’m not normally in favour of getting too bogged down in the technicalities of ballistics, I am more interested in getting the string to the right spot. But I do think that it is useful to understand the dynamics of shot string, as it can give you more confidence in placing your shot ahead of a crossing bird. Ideally you will connect with the centre of the string, where there will be a good concentration of pellets. But you can give a little more forward allowance than you might think is necessary, and the shot string will look after you. Not to mention a good spread of pellets across a 30” circle. Basically it’s a wonder we ever miss!
Of course we are talking about a shot charge travelling at 1100fps, so it’s not as simple as it sounds, but nevertheless an understanding of the dynamics of the content of your cartridge can only help.
The quality of the cartridge can also make a difference. It is worth trying a few different makes to find which one is the most compatible with your gun. Performance can vary. Generally, as with most things in life, the more expensive cartridges are better, but it may well be that the ‘own brand’ cheapies from your local farm shop will do the trick. Once you have found what suits you then stick with it.
Then provided your gun fits you properly, your confidence with your chosen cartridge will blossom. You will not be filled with doubt about your combination – you can just get on with your shooting. The odd misses will be inevitable – forget them. It’s the next shot that counts. Have confidence.
Many of you will enjoy some partridge shooting in the coming weeks. Footwork is crucial for all shooting, but for low ground partridge never more so.
We all know the shot. The guns are lined out about 30-40 yards back from a tall hedgerow. The birds appear as if from nowhere. Ideally you take your shot in front, but miss with your first barrel, then attempt to take a bird as it retreats into the distance behind you. Miss! And you end up practically tied up in knots.
Just why are those birds behind you so difficult? I am often asked this question and the answer is quite simple. Footwork.
The speed at which the birds approach induces a degree of panic, but in reality there is a lot more time than you think. We all know that when you shoot a bird in front, for a right hander your left leading foot will be pointing in the direction of where you intend to take the shot. The same applies to any shot. So you have to move your body to get into position. You simply need to be alert to what is happening.
Let’s go back to the beginning. You arrive at your peg for the drive. From this moment you need to be focused. Forget about chatting to the guy at the next peg, or fiddling with your gunslip, sorting cartridges or talking to your dog. Get ready, look around you for any possible picker-ups or other hazards behind you. Get loaded and be fully tuned for what’s happening. Otherwise if an early covey bursts over the hedgerow, you may miss a chance of a good right & left, that might well be your only opportunity of the day. If you are chatting with your neighbouring Gun, this is also an insult to your host. So be ready.
Keep a sharp lookout from where you expect the first birds to appear. Your shot in front will be practically, move, mount shoot. There is no conscious effort to give lead. Your gun speed will do what’s needed providing you have the gun properly mounted and are looking at the bird’s beak.
But should you miss, don’t simply follow it. Turn, with your gun down but muzzles pointing safely upwards. Let your feet take the body round so that your leading leg is pointing towards the bird, your eyes fixed on it, then mount onto it and shoot.
If however there is gale blowing, and the bird is quartering between you and the next Gun, this really can be a tricky shot. It might well be 45 yards out before you are able to pull the trigger. On a grouse moor this can be exaggerated. I was out in a strong wind in September, and a quartering bird behind the line was at least 60 yards distant by the time you could safely pick it up. It was therefore paramount to shoot in front.
For most of these shots your body and feet need to be turned, so that you can pick up the bird with your gun muzzle at least 30 degrees past the line of the Guns.
If you are still standing with your body facing frontwards, and then turn and twist without moving your feet then you will be lucky indeed to connect with anything.
An easy analogy can be made with cricketers and tennis players. In order to make a good shot they get their feet and body into position before striking the ball. The really good players seem to have so much more time.
The same applies to shooting. Keep your cool and give yourself time. If you feel the shot must be taken behind, adjust your feet and turn round on your peg so that the point of taking the shot the body is completely comfortable.
Of course the same applies to high crossing pheasants, but the whole procedure is exaggerated with hedgerow partridges.
Vibrant blooms that will be smothered in butterflies and hummingbirds! You’ll be amazed by these extremely fragrant and ornamental vines! The sturdy twining vine Goldflame Honeysuckle (Lonicera x heckrotti ‘Goldflame’) is an incredibly hardy, native Honeysuckle Vine!
This vine has the scent of succulent sweetness as it drifts through the air from the long tubular blooms. Your Honeysuckle will easily grow to full length each year and start blooming in spring, lasting all summer long.
With no worry about invasiveness like other native species, Goldflame will fit perfectly into any garden design and size. The long tubular blooms are dark-pink and yellow and hang in bold clusters that absolutely smother this plant!
These 2-inch blooms appear in the hundreds and you will be amazed by these exotic flowers! They are a favorite among pollinators, butterflies and hummingbirds that will not be able to resist!
This is a vital source of nectar for all your beneficial insects and birds! With a longer bloom time than other Honeysuckle, you’ll have these visitors for weeks!
This vigorous vine can also be trained into a shrub or left to trail along the ground. It’s so adaptable to many conditions and very easy to manage.
These tropical flowers cling to a vigorously growing vine with reddish stems, and are absolutely vibrant as it twists and turns around your garden trellis and arbors.
Goldflame is a rugged semi-evergreen climber that’s virtually indestructible, even with haphazard pruning. Resistant to powdery mildew, Goldflame even tolerates some drought.
Each year, from June to September, you can look forward to lightly fragrant masses of deep pink and yellow, tubular flowers that give way to small inedible red berries in the fall which the songbirds just love.
How to Use Goldflame Honeysuckle In The Landscape
Despite being a fast-growing climbing vine, it won’t get into trouble in the landscape, Goldflame will ramble up trellis, fences and any place you encourage it to do so.
The Goldflame Honeysuckle is most often grown as a trailing vine with incredible flowers. It would create a dramatic effect climbing a trellis or your front porch rail.
Reaching near full height in a single growing season, this type of Honeysuckle is an amazing grower! Filling an area with deep blue-green foliage and bright blooms, these even work amazingly well in containers and act as both the upright thriller or a flowing spiller.
Lovely climbing over fences and hiding unsightly views while enhancing your own! These act as semi-evergreen in warmer growing zones and provide lush backdrop plants among your beds and borders. Beautifully spilling over retaining walls and rambling over hardscapes as an informal groundcover.
A delicious blend of hot pink and golden, exotic flowers smother this vigorous vine of vibrant blue-green as it twists and turns around your garden supports. Adapting to any style garden, these tame natives fill your landscape with color quickly! The long-lasting blooms are even suitable for indoor floral arrangements, filling your bouquets with sweet-smelling blooms.
Incorporate into your garden beds and borders on a trellis or an obelisk among your other planted flowers and perennials to add height, color, fragrance and drama throughout your landscape!
Looking fantastic growing up the columns of your pergolas and gazebos. No pollinator garden should be without something to attract butterflies and other visitors!
#ProPlantTips For Care
Deer resistant and extremely hardy, Goldflame Honeysuckle thrives in a wide range of USDA 4 through 9 hardiness zones. Just provide good air circulation and water to keep these bi-color pink flowers going strong all summer!
Loving the full sun, these are also tolerant of partial sun, especially when planted in hotter climates; appreciating the relief from the summer sun.
Goldflame is highly disease resistant and adaptable. Not particular about soil type, Honeysuckle Vines loves any well-drained soil that ranges from acidic to alkaline.
Take care when applying lawn fertilizers near flowering shrubs. These high nitrogen formulas are designed to produce foliage, but will not support flower development. Instead, apply an all-purpose fertilizer for blooming plants in early spring. Reapply in mid-summer, following label directions for application rates.
Flowering best in average moisture, Goldflame is very drought tolerant once established. Extremely easy care and low maintenance, these won’t need pruning but are highly conducive to pruning if needed.
Sometimes a plant performs just a bit too well in certain areas. Rest assured, Nature Hills uses Plant Sentry™ to track all federal, state and local regulations on invasive materials. We will always protect you and your community.
We’re happy to offer this selection for sale into areas where it will work beautifully without any concern. To check your availability, simply type in your Zip Code to Find Your Growing Zone in the section above the Plant Highlights.
You won’t go wrong by adding height, drama, color, and fragrance with these exotic blooms for your landscape! Goldflame Honeysuckle Vine is just the bold addition your garden beds have been craving! Order yours today from Nature Hills Nursery!
A shock collar can help you resolve most of your dog’s behavior problems. From obedience to excessive bark training, a good shock collar will help you achieve quick and fast results when combined with correct training methods.
Since Golden Retrievers are active and playful dogs, you need the best quality shock collar to wean your dog off unsafe and negative behavior safely. To help you with that, this article reviews 7 shock collars suitable for a Golden Retriever.
Also, the buying guide will give you a deeper insight into how you can evaluate the features offered by a shock collar.
You can try multiple combinations to create the perfect training for your Golden Retriever.
This shock collar offers a super-long ¾ mile range that can easily cover wide outdoor areas.
So you can train your dog while letting it have the freedom to explore a massive area.
An interesting feature of this shock collar is the ‘Remove the shock function‘ feature. Yes, you can opt out of the shock function by swapping the metal prongs with the plastic ones. It converts the shock into vibration so that you can use this training unit as a beep and vibration-only system.
This shock collar has a memory function that lets you resume the training session where you left off. The anti-bark function comes in handy when your dog barks unwantedly. And the night mode guides you on night walks with the help of the LED light.
You can also accessorize the collar with extra-long prongs to improve skin contact. It eliminates the need to trim your dog’s fur. It comes in handy for dogs like Golden Retrievers.
These training collars are made of the highest quality materials to make them completely waterproof, meaning your dog can take them for a swim all year around. The collar is adjustable for Golden Retrievers 15 lbs and over.
The Pet Resolve PTS1200 was rated no.1 because, unlike other shock collars, it lets you opt out of using the shock but is available when needed. Other shock collars will always have the shock to be combined, but you can’t skip it.
The fact that you skip this function as you see fit makes it a crucial versatility because you are here shopping for the best shock collar for your Golden Retriever.
2. Halo 2+ Training Collar
Like other collars with a remote/transmitter, the Halo 2+ has the Halo app as the control unit. To use this shock collar, you have to first create virtual fences, and that’s done through the app.
You can create fences wherever you want: your backyard, the play park, the beach, the mall, etc. Also, the app has a location tracking feature that allows you to keep track of your dog even when you are away.
The Halo 2+ collar comes in three sizes small, medium, and large, so it can fit neck sizes ranging from 11 to 30.5 inches. And the collar gives a runtime of 21 hours per charge. So at the end of the day, you can recharge it along with your other smart devices.
As for comfort and durability, the Halo 2+ shock collar is made of extremely durable material that is chew-resistant, slobber-proof, and waterproof at IP67.
3. Educator E-Collar Humane Dog Training Collar
And the transmitter has a range of ½ mile for long-distance communication.
Powered by rechargeable Li-Po batteries, the collar and remote have a quick 2-hour recharge. And the low battery indicators will keep you informed of the battery status.
These shock collars have a fully waterproof construction that is also shock resistant to withstand long-term and frequent use, even around water.
4. SportDOG Brand SportTrainer Remote Trainers
This dog shock collar features tone, vibration, and10 levels of static stimulation to allow the trainer to customize a training process accommodating varying learning curves of different dogs.
You can use the static mode on continuous, momentary, rising, or boosted continuous static stimulations options.
The collar and transmitter run on rechargeable lithium-ion batteries with a quick 2-hour recharge period and long working life. And the use of DryTek® Technology keeps the system waterproof and submersible up to 25 feet, so it is usable through various wet conditions.
5. PetSpy Dog Shock Collar With 1950ft Remote
The blind design of the remote featuring easy-to-use buttons ensures full focus on the training while allowing long-distance control over 650 yards for safe training even when off-leash. Also, the collar is adjustable for dogs weighing 10 lbs to 120 lbs.
This shock collar’s durable and waterproof quality makes it great for all outdoor enthusiasts. The high-quality construction ensures frequent use even in the rain.
Rechargeable Li-ion batteries power the collar and the remote. And the fast charging technology, you have a collar with a long-lasting battery life ready to use whenever.
6. My Pet Command Dog Training Collar
And you can also train in the rain. The bright beacon flashing lights on the collar will help keep track of your dog at night. Also, the collar is adjustable to fit neck sizes of 8.2” – 26.5″.
7. DT Systems IDT-Plus Micro Dog Trainer Collar
The collar is lightweight, compact, fully waterproof, and adjustable. The collar also has an internal antenna system to notify the maxx range and a smart LED light that is especially handy for nighttime use.
A Buyer’s Guide to Help Choose the Best Shock Collar for Your Golden Retriever
Before you decide on a collar, you must consider a few factors and the functionality of these factors to determine if the collar can fulfill your needs. Below are a few factors that will help you make the best purchase for your Golden Retriever.
1. Purpose of Purchase
Shock collars should strictly be used as a training tool for behavior modification like excessive barking, aggressive behavior, or basic day-to-day obedience.
Determining the purpose of purchase will help you choose the most suitable shock collar to fulfill your purpose effectively.
For example, if you need a shock collar to correct unwanted barking, a collar like the Pet Resolve would be the best bet, as it includes an anti-bark function targeted at such corrections. Besides, you can use the same collar for overall obedience too.
2. Effective Coverage & Range
Having a long-range to work with is a good thing when working with playful dogs like Golden Retrievers. It will allow your dog more ground area for fun and play.
Choose a shock collar that can effectively cover your regular surroundings and the areas your dog is allowed to roam in so that you don’t lose a connection even if your dog goes far.
It is also important to note that timing is everything regarding training. A standby mode although conserves battery affects the timing of the correction delivered.
So for effective and timely corrections, I’d recommend a collar like the Pet Resolve PTS1200, which no longer includes the standby mode.
3. The Size of Your Golden Retriever
Golden Retrievers are moderately big dogs with long fur. For the collar to have a reliable effect, the shock should effectively reach the dog without causing any discomfort or pain.
A collar that is adjustable and features longer prongs to allow good contact with the dog’s skin is what you should look for.
4. Efficient Training Modes With Adjustable Intensity Levels
5. Durability and Reliability
A shock collar should be a long-term investment. To ensure it stays long-term, look into the materials used to craft a collar. Leather, biothane, nylon, sturdy buckles, and metal fixtures contribute to the collar’s durability.
Also, check for waterproof and impact-proof qualities for added durability so you can use them in various weather conditions.
6. Battery Life
Longer the battery life, the longer the use you can harvest out of it before recharging again. And this is important because it saves your time and energy from having to recharge recurrently.
So ideally, choose a shock collar with a high-capacity rechargeable battery for long battery life.
7. Function to Price Ratio
So many shock collars are available from various brands. And all these collars offer something that makes them different from each other. But do you need all those features?
No, you don’t. But you have to know what features you will best benefit from. Accordingly, you can weigh the price tag against the collar’s features to determine if it’s worth the price.
Frequently Asked Questions
Conclusion
You can gain effective results from training only when the shock collar is used as humanely as possible.
With consistent training, starting from mild stimulations, you can set the right tone for your Golden Retriever to understand the whole point of training.
Eventually, you may not even need the shock function because dogs are intelligent creatures. They only need a little nudge to push them in the right direction.
My recommendation for you to achieve reliable results is the Pet Resolve PTS1200. It has all the features you need for a thorough conditioning process to help train your dog.
Spring pistons are the traditional type of guns that you may have seen commonly used. They are the most basic of guns and are easily available at a low price – hence proving themselves very beginner-friendly.
To get a better understanding of the spring piston, let us look at exactly how it works and whether the mechanism will be well suited for you.
There are two main components inside the gas chamber – the piston and the spring.
Upon cocking the gun, the spring starts undergoing compression. This compressed gas causes the air stuck behind the piston to start getting pressurized.
When you pull the trigger, the spring gets decompressed and causes the piston to move forward when the trapped air behind it is released at high pressure.
The pellet then comes out of the muzzle at full speed due to this pressurized air .
This is how the spring in the system works to fire the pellet inside.
Pre-charged Pneumatic Guns and its Working Procedure
The term ‘pre-charged’ in PCP guns comes from the fact that instead of a regular piston, there is a gas cylinder that is fixed beforehand and does not require continuous reloading.
The air inside the cylinder keeps a valve closed which also keeps the air trapped and tight inside the tank. Here is how the procedure works:
Upon the trigger being cocked, a hammer inside is ready to fall onto a plunger in front of the valve. The valve is pushed to open due to the energy from the hammer .
After the shot, the pressure in the tank pushes the valve close. In the beginning, the pressures can be high enough to cause the valve to close quickly.
After each shot, the pressure in the tank is reduced along with the amount of air stored, which will need to be refilled after it has completely been exhausted.
Differences Between PCP vs Spring Piston
The primary difference between PCP vs spring-piston air rifles is the recoiling. Recoiling is the backward and forward movements of the arm caused by the pressure of continuous shooting. There is minimum recoiling and movement in PCP guns, causing them to be very comfortable for their purpose, whereas spring pistons are known for their continuous recoiling.
The spring piston recoiling is at risk of injury from its movements, but it is a common misunderstanding that PCPs do not recoil. Recoil is present in the latter, but the difference in comparison of PCP vs spring-piston air guns shows that the contrast in pressure is huge and greatly affects how you need to shoot the rifle.
A spring-powered rifle needs to be shot in the same manner for maximum accuracy, with the most gentle and perfect grip on it to only ever be truly accurate. When gripped too hard, there can be a difference in recoil which can lead to misfiring and accidents as well. This is the risk that spring pistons pose when not held properly.
A PCP gun, on the other hand, is a more advanced option, so the recoil is minimal and there is better accuracy for the shooter as long as they keep their head and eye position behind the sight remain consistent.
Usually, the muzzle energy that is sufficient for all organized target shooting and hunting sprees is expected to be 12-foot pounds. Though some short-range target disciplines can restrict their muzzle energy to six-foot pounds.
Most PCPs will be adjusted to deliver around 11-foot pounds of muzzle energy or even more! The FPE usually depends on the caliber. For instance, some .25 caliber rifles can deliver up to 50 FPE.
Hence, high-caliber PCPs offer more FPE. Thus, they become ideal for small, medium, or large game hunting.
The air pressure in PCPs is also compressed to between 2700 to 3000 pounds per square inch.
The most common spring-piston caliber for shooting today is still .177 and .22. Depending on whether the hunter is shooting a high-velocity projectile or one with a more arched trajectory, spring pistons give the shooter their choice.
PCP vs Spring: Accuracy
Another misconception about the PCP vs spring-piston debate is that the PCP will be far more accurate than the spring-piston gun.
However, that is not the case and springers are just as accurate as PCPs. They have excellent shot-to-shot consistency and can rival or sometimes even outperform a PCP when their respective muzzle velocity is tested.
Why then, is this debate still prevalent? It mostly comes down to the way the guns are to be used.
Where air pistons require a lot of practice with grip, aiming, and getting used to the recoil, PCPs have covered some of the hard work required to shoot and seem more accurate. It is not the rifle that guarantees the accuracy, but just the way it is being shot.
PCP vs Spring: Noise Level
If you wish to practice a lot with your gun, it is important to keep in mind the noise factor of guns as you would not want to disturb the area or catch unwanted attention.
PCP guns have an advantage over their spring-powered rifle rivals as the latter makes a lot of noise upon firing.
The coiled spring inside the spring pistons can lead to more sound when the pellet is released. Hence, they are not very advisable to keep if you want to hunt or practice your shooting skills. The sound may, however, dampen with time.
On the other hand, PCPs are quite noiseless and hence perfect for keeping at home, going hunting, or practicing shooting. The credit goes to the noise reduction system or sound suppression system present in PCPs.
These systems work by creating several air chambers inside the shroud. As the air passes through each one, the air gets stripped away. Therefore, when the air finally comes out, there’s very little noise.
PCP vs Spring: Upkeep Cost
There is a vast amount of PCPs and air-powered rifles to choose from these days, but the cost is not as appealing to the eye as the varieties may be.
Spring pistons are comparatively known to be much cheaper than PCPs, but the gap is narrowing as due to demand for the traditional guns, good spring-piston guns are also in the market at big-budget prices.
However, it is still more economical to start with a spring gun rather than a PCP as PCPs require high maintenance and expenditure for it as well. Besides, some spring pistons offer a degree of high accuracy at a lower price which makes it far more beneficial in the long term.
PCP vs Spring: Which One is Better for Pest Control?
Pests can be troublesome considering they usually come in huge numbers. For this use, a PCP will be more beneficial if you have a whole infestation. They shoot silently and can do the job quicker in case you need to aim or need repeated shots to take care of multiple targets.
However, it would be a rather expensive choice to waste precious PCP ammo on pests as the gun requires high maintenance and frequent charging.
Spring guns, though at risk of hard recoil, are cheaper and can be kept just for pest control as they are always ready to use and would not hurt your pockets for maintenance.
PCP vs Spring: Which One is Better for Hunting Game?
When it comes to choosing PCP vs spring piston pellet guns, most hunters prefer the former due to its obviously advanced machinery with minimal recoiling and sound.
Moreover, PCPs offer excellent power that is required for medium or large game hunting. On the other hand, spring pistons are better for small game hunting only most of the time.
A newcomer in the hunting game would be rewarded more quickly if they start with a PCP, which might ensure that their interest in shooting will remain.
One way to go about it is to master the PCP gun before taking on the challenge that is the spring piston.
Despite being an earlier gun, a lot of hunters still prefer it for its extreme accuracy that comes with mastering the grip and recoiling. The other way around can be done as well, but if you do not know gun holding and its technicalities, it is advised that you go for the safer option.
Conclusion
Considering that PCPs and spring pistons are still the two most widely used and approved hunter guns, there can be no correct answer to which one is better. There are pros and cons of both depending on what your priorities are, so to narrow it down, here is the conclusion.
Pros of buying a PCP gun:
Constant firing with no recoil problems
Cocking the gun is easy
Smooth, soundless shooting with better safety
Home-house friendly
Good for hunting
Powerful for hunting large/medium game
Cons of buying a PCP gun:
A more expensive choice than springers
Equipment for charging is needed
Special maintenance and repair are required frequently
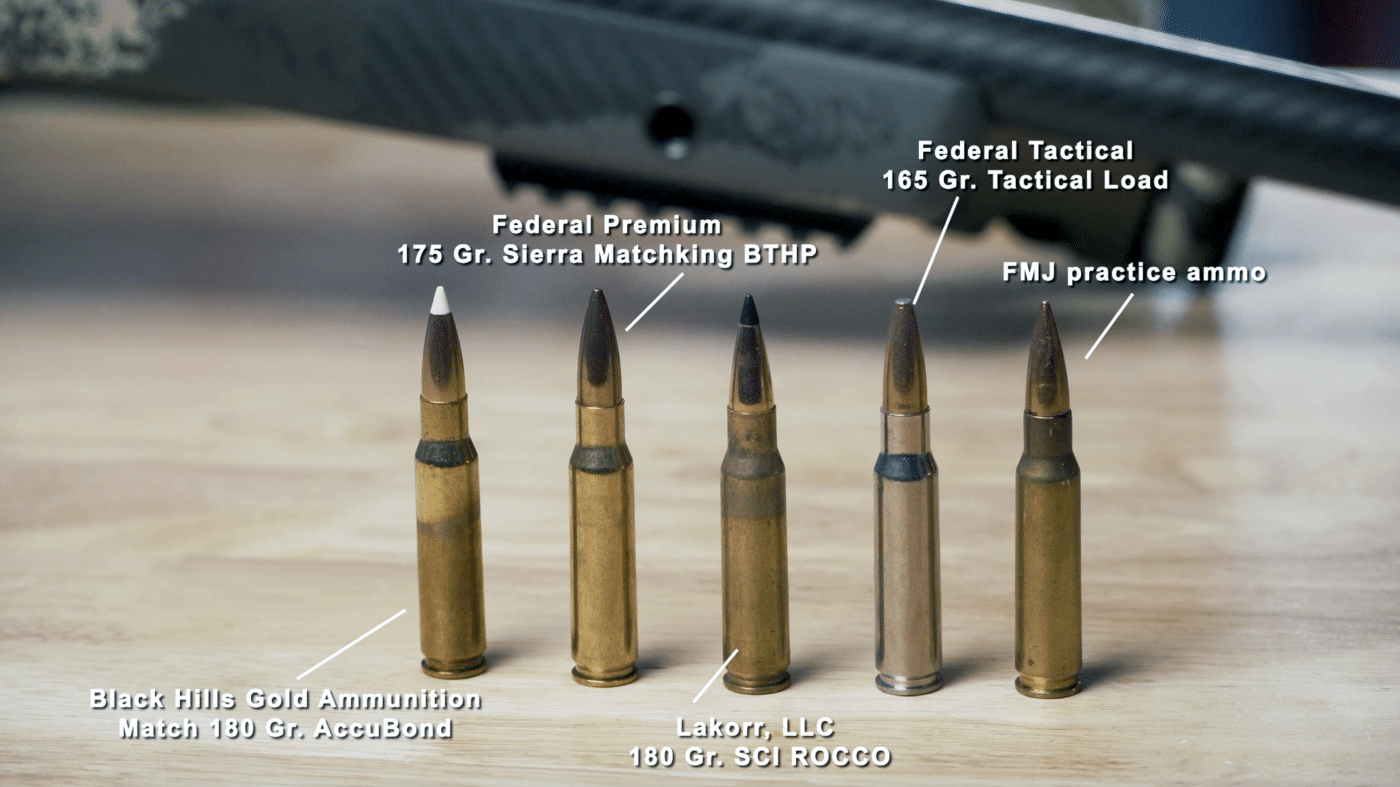
In the late 1890s, the U.S. military began using a newly developed round that would command the battlefield all the way to World War II. The .30-06 caliber was a cutting-edge ammunition technology now that smokeless powder had almost completely replaced blackpowder. It served well on the battlefield chambered in the 1903 Springfield bolt-action rifle during the First World War and, of course, in the M1 Garand during the next World War.
With new advancements, forces needed the performance of the .30-06 150-gr. load, but in a shorter cartridge — which required a shorter action. That is how the 7.62x51mm NATO round, and its .308 Winchester civilian sibling, was born. In 1952, the round was introduced commercially after being developed for the military. Two years later it was adopted by NATO with its new designation being 7.62×51 NATO.
Different .308 loads can affect the long-range accuracy of the round. Additionally, matching the ammo to the rifle can improve your effective range.
The United States has long loved the .30-caliber round and it has been used in standard-issue rifles and machine guns for decades. In fact, militaries around the world have used guns chambered in .308. Popular guns like the M14, M60, M1919 and countless others. The .308 caliber is fast and carries one heck of a punch. But how effective is the caliber at distance?
In this video and article, I explore the effective range of the .308.
Reaching Out
The .308 Winchester is the most popular sniper/counter-sniper round by far. It far outweighs any other caliber when it comes to standard-issue rifles.
.308 Winchester is the most popular counter-sniper round by far. It far outweighs any other caliber when it comes to standard-issue counter-sniper rifles.
But first off, let’s define what “effective” is. When we talk about the effectiveness of a caliber, we are usually referring to the distance that the round can still humanely kill.
In a hunting scenario, it’s not good sportsmanship to wound your game, only leaving them to die a slow death or live the rest of their lives maimed. If you are hunting prairie dogs, .308 would be lethal easily out to a mile. However, if we are talking about shooting that medium-size North American game like a whitetail deer, the distance would be much closer. In fact, I argue that the effective range of .308 on deer is 300 yards.
308 has a maximum range that is relative to the type of animal you are hunting. A prairie dog could be hit at a mile while a grizzly bear would need to be much closer.
The round easily has enough energy to kill whitetail deer at 300 yards. But by 500 yards, the bell-shaped trajectory of the .308 makes the shot unethical for the majority of shooters. Now, before you .308 lovers hate on me, that doesn’t mean you couldn’t do it. But if your skillset doesn’t include high accuracy at that distance, it wouldn’t be right for you to take the shot.
We asked Maximum Life Expectancy’s Chief Instructor, Grant LaVelle, about his past as a Marine and SWAT sniper. In the Marine Corps, they would shoot .308 to 1,000 yards; however, in SWAT it was much closer. What was preached to SWAT snipers was that in a law enforcement capacity there were no second shots. In certain military situations, that might be acceptable. But in law enforcement, snipers need immediate incapacitation to save lives.
In the U.S., .30 caliber rounds have been used in standard-issue military rifles and machine guns for decades. The .308 is extremely effective in many roles, including sporting purposes.
When a sniper fires a round, he needs complete de-amination of the threat. So, we are talking about 100% accuracy in the cranial vault that houses the brain. If hostages are involved, which they often are, the police can’t have there be any chance of causing harm to innocent lives. Grant stated they were never granted clearance to take a shot over 200 yards. In most cases, that would require a special circumstance, special permission and thoughtful consideration.
Conclusion
So, what is the effective range of .308? It depends on the need.
If we are talking about putting down a moose versus taking down a prairie dog, the distance will vary. Can it kill at one mile? Yes, but it depends on what you’re shooting.
If you want to just hit a steel target it could even shoot farther than a mile. In a law enforcement sniper application, however, it seems they won’t take a shot over 200 yards unless absolutely necessary.
Editor’s Note: Please be sure to check out The Armory Life Forum, where you can comment about our daily articles, as well as just talk guns and gear. Click the “Go To Forum Thread” link below to jump in and discuss this article and much more!
Located in the northeastern part of Florida, Lake George is an alligator haven that will leave you in awe.
With its vast expanse of dark, mysterious waters and dense vegetation, it’s no wonder that this lake attracts alligators from far and wide.
Lake George is known as the jewel of alligator habitats, boasting the highest concentration of these fascinating creatures in the state.
As you paddle along in your kayak or cruise in a boat, you’ll witness the true beauty and raw power of these prehistoric beasts.
Imagine the thrill of seeing a massive alligator gliding through the water, its eyes fixed on you with an intensity that sends shivers down your spine.
Are There Alligators or Crocodiles in Lake George?
When it comes to alligator populations, Lake George takes the crown.
Known for its robust alligator population, this lake is teeming with these prehistoric creatures.
From sunbathing on the banks to gracefully gliding through the water, alligators thrive in the diverse ecosystems of Lake George.
The Florida Fish and Wildlife Conservation Commission conducted a recent census, and the numbers are jaw-dropping:
Lake Alligator Population Lake George 4,200+ Lake Okeechobee 3,800 Lake Kissimmee 3,300 Lake Trafford 2,900
As you can see, Lake George reigns supreme when it comes to alligator populations in Florida.
Its impressive numbers make it a must-visit destination for thrill-seekers and nature enthusiasts alike.
Now, let’s talk about crocodiles.
While crocodiles are indeed present in certain parts of Florida, including the Everglades, Lake George is not their preferred habitat.
Crocodiles tend to favor brackish or saltwater environments, such as coastal regions or estuaries, where they can satisfy their unique needs.
So, when it comes to Lake George, it’s all about the alligators!
They are the true reptilian rulers of this magnificent lake. With their impressive size, powerful jaws, and distinctive presence, encountering an alligator in Lake George can be an awe-inspiring experience.
When visiting Lake George, keep your eyes peeled for these magnificent creatures. You might spot them basking in the sun or gracefully gliding through the water, showcasing their ancient charm.
Remember, while alligator sightings are not uncommon in Lake George, it’s crucial to admire them from a safe distance and respect their natural habitat.
Appreciate their beauty and observe their behavior without causing any disturbance.
So, if you’re planning a visit to Lake George, get ready to witness the power and majesty of the alligators that call this stunning lake their home.
Keep your camera ready and your sense of wonder heightened!
Tips for Surviving Lake George Gators
If you dare to venture into the realm of Lake George, here are a few tips to keep you safe and make the most of your experience:
Always maintain a safe distance from alligators. Remember, they’re not looking for a cuddle.
Never feed the alligators. It’s not only dangerous but also illegal.
Keep your pets on a leash and away from the water’s edge. Alligators might mistake them for prey.
Be cautious during mating season, which typically runs from May to June. Male alligators can become more aggressive during this time.
Consider joining a guided tour or hiring a local expert to explore Lake George. They can provide valuable insights and ensure your safety.
Gator Alert: Florida’s Most Infamous Alligator Lakes
Lake Alligators # Characteristics Lake George Estimated 4,200+ Abundant alligator population, prime location for observing alligators Lake Jesup Estimated 4,000+ Known as the “Alligator Capital of Florida,” home to countless alligators Lake Okeechobee Estimated 3800+ Largest lake in Florida, known for sizable alligators Lake Kissimmee Estimated 3300+ Rich alligator habitat, popular for alligator sightings Lake Trafford Estimated 2900+ Alligator-friendly environment, offers opportunities for alligator encounters Lake Tohopekaliga Estimated 1500+ Alligators coexist with recreational activities, striking a balance in the ecosystem Lake Walk-in-Water Estimated 1200+ Alligators thrive in this serene lake, a treat for wildlife enthusiasts Lake Istokpoga Estimated 1100+ Supports a significant alligator population, renowned for trophy alligators Lake Miccosukee Estimated 700+ Alligator-friendly habitat, adds a touch of wildness to the lake’s serenity Lake Hatchineha Estimated 500+ Offers glimpses of alligators, a treasure for nature enthusiasts Lake Tarpon Estimated 400+ Occasional alligator sightings, adds a touch of wildlife to the lake’s charm Lake Apopka Estimated 300+ Alligators play a significant role in the lake’s ecosystem, a haven for birdwatchers Lake Seminole Estimated 200+ Minimal alligator presence, popular for fishing and boating activities Lake Placid Estimated 150+ Occasional alligator sightings, known for its clear waters and scenic beauty Lake Monroe Estimated 100+ Minimal alligator presence, ideal for boating and fishing enthusiasts
Lake Jesup: Alligator Viewing
This hidden gem located in Central Florida is a haven for gator enthusiasts like you and me. Trust me, you’re in for a scaly treat!
When it comes to alligator populations, Lake Jesup is the real deal.
With over 4,000 alligators calling this vast water body home, it’s like stepping into a real-life Jurassic Park (minus the dinosaurs, of course!).
This lake is no joke when it comes to gators, making it the ultimate destination for alligator viewing.
As you venture into the depths of Lake Jesup, be prepared to witness the spectacle of alligator galore.
The sun shining above as you cruise along the water, spotting massive gators sunbathing on the banks or stealthily gliding through the murky depths.
Not convinced yet? Let me hit you with some data.
A recent study conducted by the Florida Fish and Wildlife Conservation Commission revealed that Lake Jesup boasts the highest concentration of alligators per square mile in the entire state of Florida.
That’s right, we’re talking serious alligator business here!
But don’t worry, my friend, you’ll be safe on your adventure. Lake Jesup offers various guided airboat tours that allow you to get up close and personal with these incredible creatures while ensuring your utmost safety.
These knowledgeable guides will entertain you with fascinating facts about alligators and the lake’s ecosystem, leaving you both informed and entertained.
Oh, and let’s not forget about the unique wildlife you’ll encounter during your Lake Jesup expedition.
Keep your eyes peeled for bald eagles soaring through the sky, turtles lazily basking in the sun, and a variety of bird species showing off their vibrant plumage.
It’s like being in a nature documentary, but in real life!
Encountering Lake Kissimmee Alligators
You’re gliding along in your kayak, the sun shining brightly overhead, when suddenly, a mighty splash breaks the silence.
Your heart skips a beat as you catch a glimpse of a massive alligator emerging from the water, its powerful tail propelling it forward with astonishing speed.
Welcome to the realm of Lake Kissimmee alligators!
These formidable creatures have made Lake Kissimmee their home for centuries, and they aren’t shy about making their presence known.
With a population of over 3,300+ alligators, you’re in for an exhilarating adventure like no other.
But don’t worry, you’re in safe hands—I’ve had my fair share of encounters with Lake Kissimmee alligators.
Once, I witnessed a jaw-dropping wrestling match between two male alligators, their powerful bodies thrashing in a battle for dominance. It was like watching a heavyweight championship match, only with scales and teeth!
Now, let’s talk numbers.
According to the latest data from the Florida Fish and Wildlife Conservation Commission, Lake Kissimmee boasts an impressive alligator population of 2,300.
These scaly residents range in size from a few feet long to over 12 feet in length. That’s longer than a stretch limousine!
So, what can you expect when encountering Lake Kissimmee alligators? Well, be prepared for some up-close and personal wildlife encounters.
These stealthy predators can often be spotted sunbathing on the banks of the lake, their reptilian eyes keeping a watchful gaze on their surroundings. But remember, it’s their turf, so approach with caution!
One thing’s for sure—Lake Kissimmee alligators certainly know how to keep the ecosystem in balance.
By controlling the population of prey species like fish and turtles, they play a vital role in maintaining the delicate harmony of the lake’s ecosystem.
It’s nature’s very own game of predator and prey!
Getting Up Close with Lake Okeechobee Alligators
Hold onto your hats and prepare for a wild ride as we dive into the fascinating world of Lake Okeechobee alligators!
Trust me, these gators are no small fry, and they’ll leave you in awe with their toothy grins and impressive size.
As someone who’s had my fair share of encounters with these magnificent creatures, let me tell you, Lake Okeechobee is where the gators reign supreme!
Imagine cruising along the expansive waters of Lake Okeechobee, its marshy shores teeming with life.
Suddenly, you spot a monstrous alligator basking lazily in the sun, its scaly body stretched out on a log. You can practically hear it whisper, “Don’t even think about disturbing my nap.”
With an estimated population of over 3,800+ alligators, Lake Okeechobee holds the title for being one of the largest alligator habitats in the entire United States.
Now that’s a whole lot of chompers to contend with!
Just picture this: the average adult male alligator in Lake Okeechobee measures around 10 to 15 feet in length—that’s like having a semi-truck swimming next to you! But don’t worry, they’re more interested in sunning themselves than nibbling on unsuspecting swimmers.
As you explore the lake’s intricate channels and hidden coves, keep your eyes peeled for these magnificent creatures.
Spotting an alligator in its natural habitat is like finding the golden ticket in a chocolate bar—only much, much wilder!
But wait, there’s more! Lake Okeechobee isn’t just a playground for alligators. You’ll also encounter a variety of other wildlife during your adventure.
Keep an eye out for the majestic bald eagles soaring above, the graceful wading birds dancing in the shallows, and the quirky turtles popping their heads up for a breath of fresh air.
How Many Lakes in Florida Have Alligators?
When it comes to lakes teeming with alligators, the Sunshine State doesn’t disappoint!
Florida boasts an astonishing number of lakes – over 30,000 in total. And guess what?
The vast majority of these lakes are home to our scaly friends, the alligators!
From the renowned Lake Okeechobee to the lesser-known gems hidden in the Everglades, it seems like there’s an alligator lurking in every corner of this alligator paradise.
Now, you might be wondering just how many of these lakes in Florida actually have alligators. Well, my friend, hold onto your hat as we dive into the fascinating data!
Out of the 30,000+ lakes in Florida, it’s estimated that a staggering 22,000 lakes are inhabited by alligators.
That’s right – over two-thirds of Florida’s lakes are gator territory!
Imagine taking a leisurely stroll around one of these lakes, and suddenly you spot a snout breaking the surface, followed by a pair of beady eyes fixed on you.
It’s a sight that can make even the bravest adventurer’s heart skip a beat!
But wait, there’s more! Among these alligator-infested lakes, some stand out with larger populations and higher sighting probabilities.
For example, Lake Kissimmee, located in Central Florida, is known for its dense alligator population, making it a hot spot for gator enthusiasts and wildlife photographers.
Then there’s the legendary Lake Okeechobee, often referred to as the “Big O,” which not only holds the title of Florida’s largest lake but also harbors a massive alligator population.
With over 3,800 alligators calling it home, you can bet your boots that Lake Okeechobee is a gator-lover’s dream come true!
So, as you explore the beautiful lakes of Florida, always keep an eye out for those telltale signs of alligator presence – a ripple in the water, a distinctive bellowing sound, or the sunbathing reptile on the lake’s edge.
You never know when you might come face-to-snout with one of these ancient creatures!
Are there Alligators in Every Lake in Florida?
Florida is undoubtedly a paradise for alligator enthusiasts, with its abundant wildlife and diverse ecosystems.
However, contrary to popular belief, not every lake in Florida is home to alligators.
While it’s true that Florida has a significant number of lakes – over 30,000 of them – it doesn’t necessarily mean that each one hosts a gator population.
Alligators have specific habitat preferences, and certain lakes may not meet their requirements for food, shelter, or suitable breeding grounds.
However, it’s safe to say that alligators have managed to establish their presence in a substantial number of Florida’s lakes.
With their remarkable adaptability, these reptiles have colonized a vast range of freshwater habitats throughout the state.
So, while not every lake in Florida is home to alligators, a significant portion of them does indeed harbor these ancient creatures.
It’s always wise to exercise caution and be aware of your surroundings when exploring Florida’s lakes, as you never know when you might encounter an alligator.
For a better understanding, let’s consider the data. According to research and wildlife surveys, it’s estimated that approximately 22,000 lakes in Florida have alligators.
That means around two-thirds of the state’s lakes provide suitable habitats for these magnificent reptiles.
For instance, Lake George in northeastern Florida boasts a high concentration of alligators, making it a prime location for observing and studying these creatures in their natural environment.
However, there are also lakes in Florida that have minimal or no alligator presence.
Some lakes may be too small, too deep, or lacking in suitable vegetation for alligators to thrive.
The Ichetucknee Springs Alligator Attack: A Real-Life Encounter
It was a sunny day at Ichetucknee Springs when a group of friends set out for a leisurely tubing adventure down the beautiful river.
Little did they know that an unexpected encounter awaited them.
As the group floated along, enjoying the scenic surroundings, they noticed an alligator sunbathing on the riverbank. Curiosity and a desire for a closer look got the better of one member, who approached the alligator, mistakenly thinking it was docile.
Suddenly, without warning, the alligator swiftly lunged towards the individual, catching them off guard. Panic ensued as the friends scrambled to help their companion and seek safety.
In the chaos that followed, the alligator released its grip and retreated back into the water.
The injured individual was promptly rescued and received immediate medical attention.
While the incident was undoubtedly frightening, the quick response from the group and the assistance provided by park rangers played a crucial role in ensuring their safety.
This real-life encounter at Ichetucknee Springs serves as a reminder that alligators are wild creatures with their own instincts and behaviors.
It emphasizes the importance of maintaining a respectful distance and adhering to safety guidelines when encountering wildlife.
Instances of alligator encounters in Florida, including at popular destinations like Ichetucknee Springs, highlight the need for you to exercise caution and be aware of your surroundings.
Parks and wildlife authorities continuously work to educate the public about alligator safety measures.
Remember, when exploring Florida’s natural wonders, always stay vigilant and informed. Enjoy the beauty of these habitats while respecting the wildlife that calls them home.
By doing so, you can have a safe and memorable experience in the great outdoors.
FAQs
Can I swim in Lake George?
While it’s not advisable to swim in Lake George due to the high alligator population, you can enjoy various water activities such as kayaking, boating, and fishing.
How big can alligators in Lake George get?
Alligators in Lake George can reach impressive lengths of up to 15 feet. That’s longer than a small car! Give them the respect they deserve.
Are there any camping options near Lake George?
Absolutely! There are several campgrounds around Lake George where you can set up your tent and immerse yourself in the beauty of the surrounding nature.
Just make sure to follow the guidelines and precautions provided by the park authorities.
Can I spot other wildlife at Lake George?
Yes! Lake George is not only home to alligators but also hosts a diverse range of wildlife.
Keep an eye out for bald eagles soaring above, turtles sunbathing on logs, and various bird species making their presence known.
Are there any restrictions for boating on Lake George?
Boating on Lake George is permitted, but it’s essential to familiarize yourself with the local regulations and safety guidelines.
Be mindful of the marked channels and potential hazards in the water.
Where are the most alligator attacks in Florida?
The highest number of hunted alligators in Florida within the last 15 years is in Lake Poinsett.
What part of Florida has no alligators?
Only in freshwater spring-fed rivers will you not see alligators or sharks among the popular waters of Central Florida.
These freshwater spring-fed rivers are Ichetucknee Springs, Madison Blue Spring, Withlacoochee, and Big Bend Saltwater Paddling Trail.
Can you swim in lakes with alligators?
Nerve allows your kids or dogs to get close to the edge of any body of water you know alligators are living in.
An alligator always believes that any splash on the water means the arrival of food.
You should not think of swimming in any water in an area known as alligators’ habitat. At best, do not swim alone if you must swim.
The Alligator Kingdom: Florida’s Most Infested Lake
So, are you ready to embrace the wild side and come face-to-snout with the most alligator-infested lake in Florida – Lake George?
This enchanting water body offers an unforgettable experience for those seeking an up-close encounter with these ancient reptiles.
Remember to respect their habitat, follow safety precautions, and enjoy the thrill of this extraordinary adventure!
You know you made a solid shot but can’t find a drop of blood. Now what? It happens to everyone at least once. Whether you’re bowhunting or rifle hunting, going after mule deer or whitetail, every deer hunter knows this is a risk they take. For one reason or another you will eventually find yourself trying to track a deer that doesn’t seem to be bleeding, no matter how observant you were or how positive you were that you hit your target. You have to do everything you can to retrace your steps to avoid the risk of losing your deer, but how long do you look for blood or a downed deer before being able to confidently determine you actually missed? Well, there are ways to be especially thorough in your search to at least feel like you aren’t walking away from a freezer full of meat. It won’t be easy, but you can use these tips to hopefully get your buck.
The first thing you need to do is get back to where you made your shot. Replay the moment in your mind. How was your shot placement? Did you hit it too far forward or too far back? How did the deer react? Did it hunch like a gut shot or bolt like a vital hit?
Once you have that image in your head, look at the ground for disruptions where you hit it. It should be torn up, and there will hopefully be a clear track of your wounded deer. Look for your arrow or immediate signs of blood, but don’t get too far from the shot site. One of the biggest mistakes a hunter can make when tracking a wounded deer is to rush it. I typically wait half an hour before searching for blood outside twenty yards.
Running the risk of bumping a wounded deer is never a good idea. Give the deer time to bed down, and they will likely expire in their first bed. One bump can give a deer enough adrenaline to run another 500 yards and possibly out of your life forever. Be patient.
Circle downwind
To clarify this statement, when deer are shot, it is an instinct for them to circle downwind, roughly 50 to 60 yards. This can be a great starting point to check for blood. If you lose track or can’t find it, start walking in a 40-yard circle from the last place you remember seeing it. Look for white hair sticking out or brown hair if it’s snowing. Move slowly and keep your eyes open for the deer, tracks, or any possible blood.
Look for water and bedding
If blood is scarce, there are other reliable places to search for a downed whitetail. After being shot, deer seek water to replace the fluids lost in their blood. Finding a primary water source, such as a flowing creek headed downhill from the site of the shot, is a great place to search for blood.
Another great place to search for a downed whitetail is in a core bedding area. After being shot, it’s natural that a deer will want to go to a site where they feel safe. If you have a good idea of where that deer was bedding, there’s a good chance that’s where it is headed. Give it time and cautiously approach the area from downwind, looking for signs of blood along the way.
Call the dogs and friends
If it is legal, get tracking dogs. They aren’t a guarantee, but their sense of smell is much better than yours and might get you closer or bring you right to the deer. If you can’t get tracking dogs, get friends to substitute as hunting dogs. Just don’t tell them that they are playing dog for you. Getting more eyes and more experience in the woods is always a good idea.
As we all know, making the perfect shot on a big game animal is tough, especially one that makes blood trailing completely easy. But we should always strive for such a shot and be able to adapt if it doesn’t happen the exact way we want it to.
Deer hunting doesn’t end after the trigger is pulled or the arrow is released. It’s the deer recovery tasks that can often spoil things. Although sometimes necessary, waiting to track a wounded animal until the following day can be agonizing, and finding zero red blood signs without a clue of the animal’s direction of travel, is never a situation we want to encounter.
Here’s hoping these tips contribute to your luck if you do.
")
")
")
")
")