")
")
")
")
")


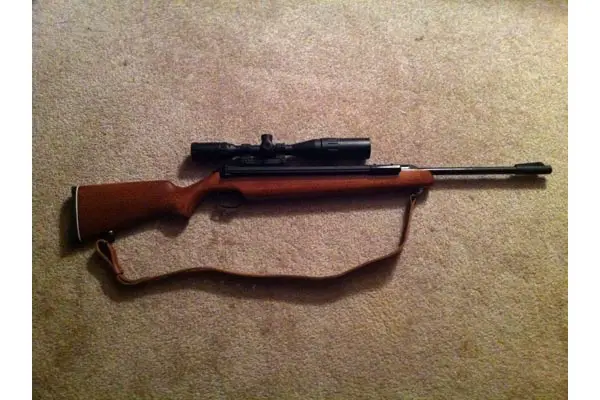
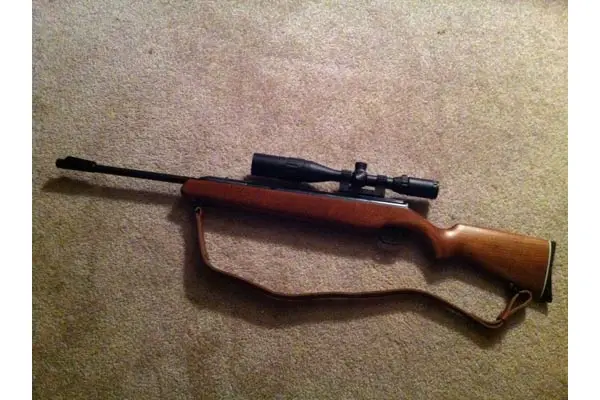
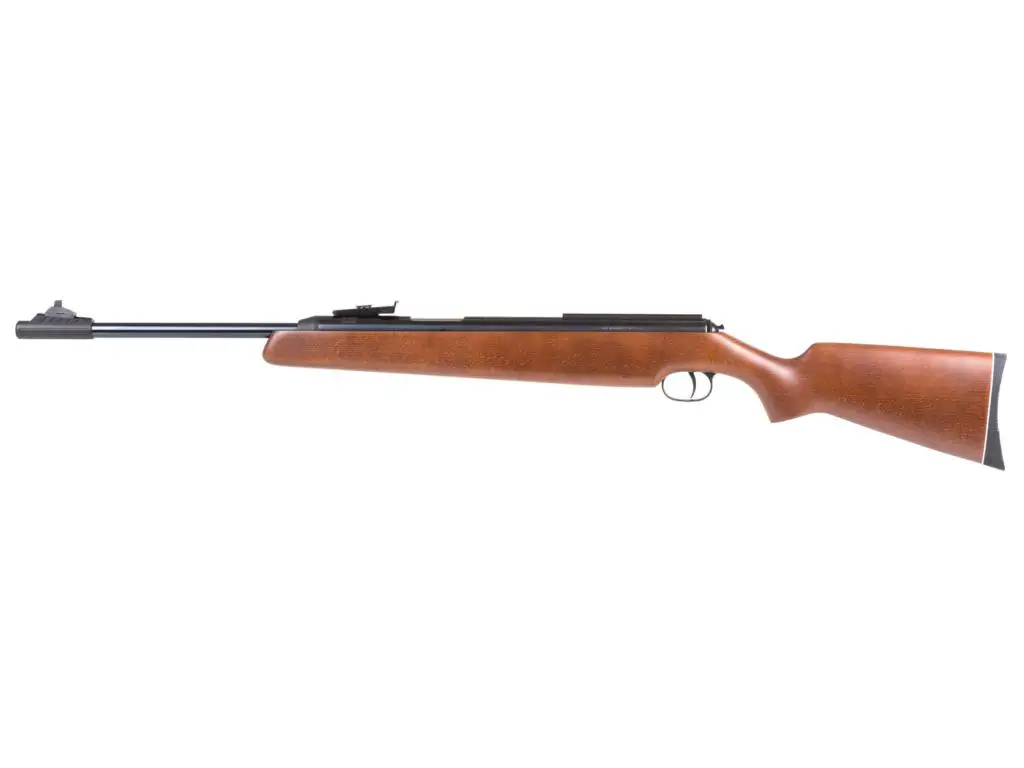
Not designed for the faint-hearted, the Diana RWS 48 air rifle is an impressive gun.
Built with beautifully crafted German engineering, this gun stands out both in performance and presence.
It fulfills its purpose as a potent, full-sized sporting air gun suitable for small game hunting, pest control and plinking.

Table of Contents
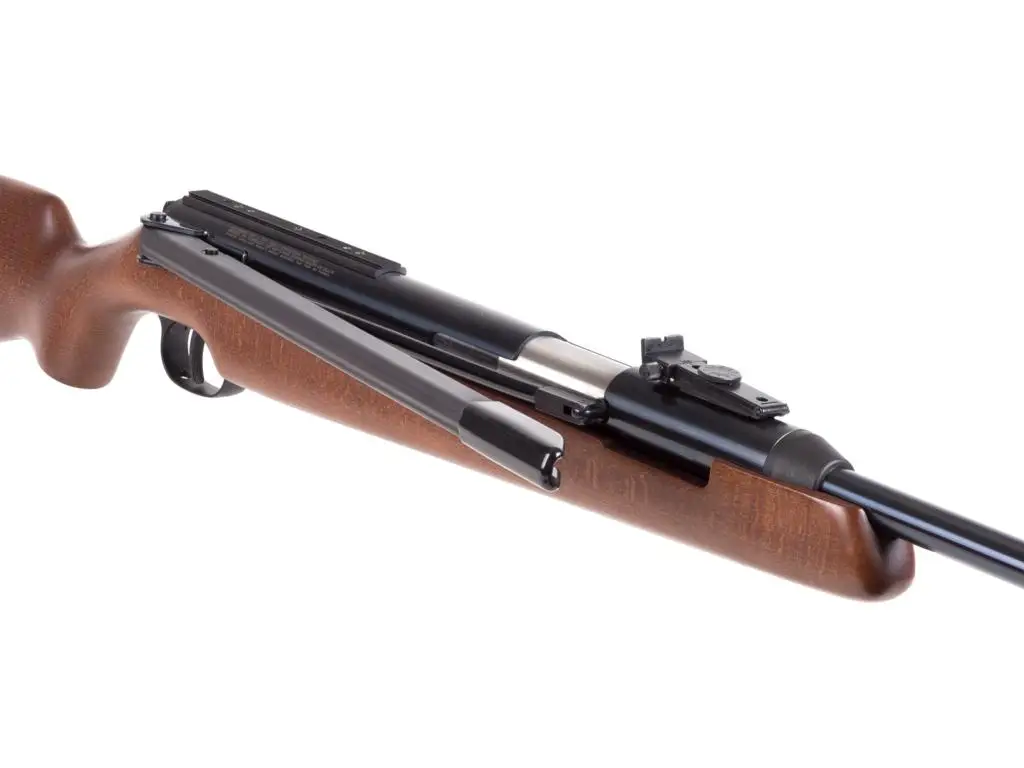
Diana RWS 48 – Gun type
A spring-powered gun is easy to use and has impressive accuracy.
(For more on 5 types of air rifles you need to know before buying, see this post)
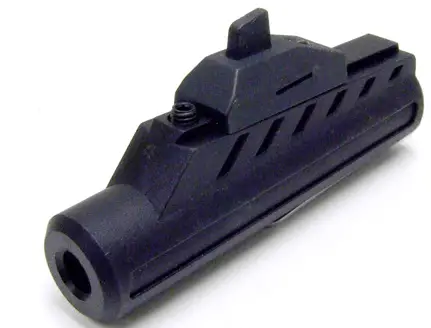
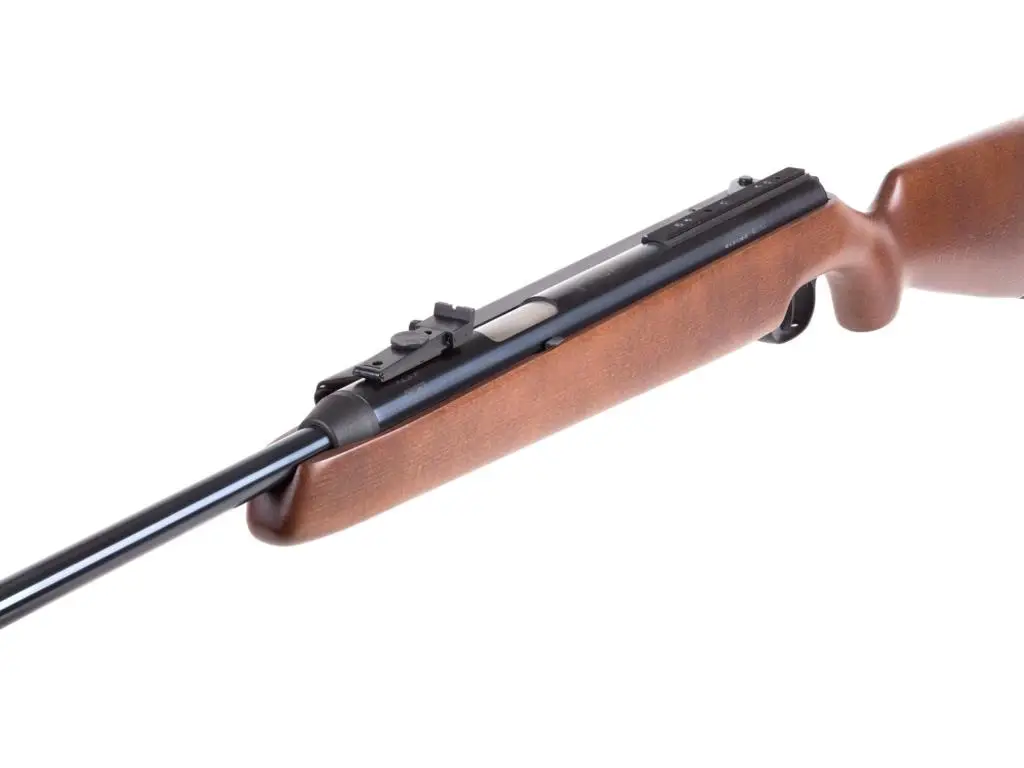
Diana RWS 48 is also a side lever gun.
So in order to cock it, you need to pull the lever downwards while holding the gun upwards.
After that, you insert the pellet, push down the lock to release the lever, and put it back up.
It may seem complicated at first but after a couple of times, you’ll be able to work it perfectly.
The RWS 48 allows you to shoot as much since you won’t be worried about running out of gun powder like some of the other rifles .

Wooden stock
The stock is made of beautiful beech wood.
Beech stock provides a lot of advantages compared to synthetic stock, see more in this post
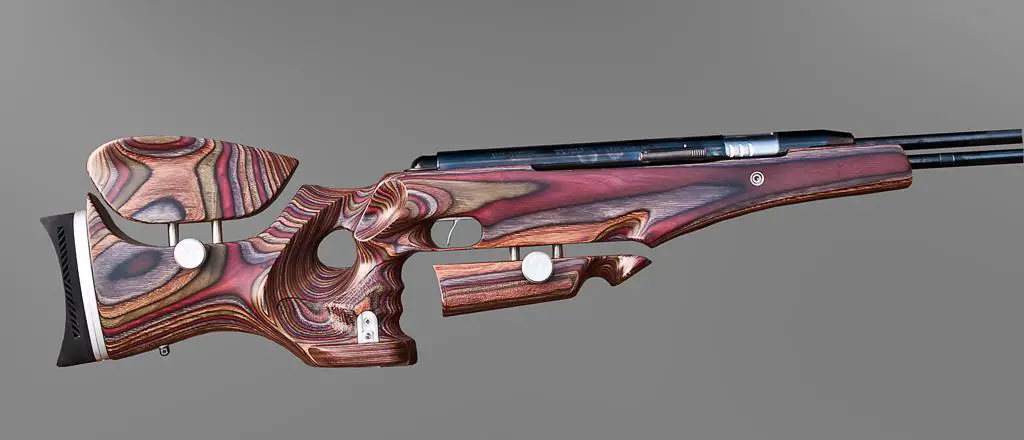
The Diana RWS 48 has an ambidextrous stock, so whether you are a lefty or a righty, you will have no problem shooting it.
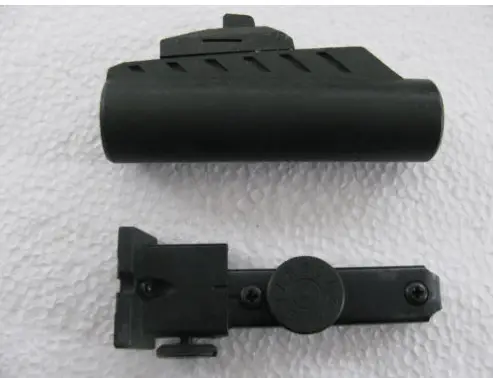
Comes with impressive sight
The Diana 48 has a very cool sight.
The front sight rides are on a dovetail and are held down with a dove screw.
The dovetail is sleek and appealing, and it allows you to aim directly at your target.
The rear sight has standard RWS all metal and it has a spring-loaded ball bearing that helps it to stay put.
It also allows you to adjust for windage (allows you to adjust sight left and right)
And for elevation (allows you to adjust the sight up and down) .
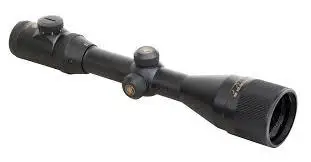
If you like extra magnification then you’ll love that the Diana 48 comes with a standard RWS brand scope to provide extra magnification and improved accuracy.
Equipped T05 trigger
This two-stage adjustable trigger is made of plastic (weapons-grade plastic).
So don’t worry about the trigger snapping back on your fingers in cold weather.
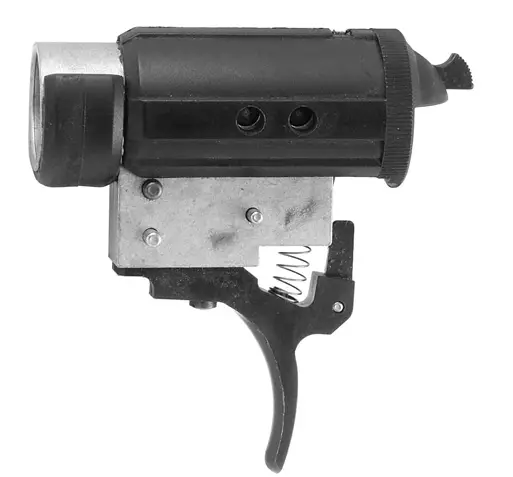
With a trigger pull of two pounds 13 ounces, it’s probably the best trigger for an air rifle.
The T05 is adjustable so you can be sure to modify it to your liking, even though I don’t see where any changes would be necessary.
Velocity, accuracy and power
Velocity: the maximum velocity of the RWS Diana 48 is 1100 FPS (feet per second) for the 0.177 cal and 900 FPS for the 0.22 cal.
These are high-end velocities compared with other air rifles on the market .
Chrony tests gave us the results as follows:
In 0.177 caliber:
| .177 Pellet | FPS |
| 6.60 gr Baracuda Green Lead free pellet | 1141 |
| 7.10gr Super H-point pellet | 1094 |
| 7.00 gr R10 Lite pellet | 1083 |
| 7.10 gr Hobby pellet | 1104 |
| 7.00 gr Meisterkuglen Pistol pellet | 1075 |
| 7.00 gr Silver Bear pellet | 1075 |
| 6.90 gr Meisterkuglen Pistol pellet | 1075 |
| 7.30 gr H&N Match Hs pellet | 1039 |
| 7.90 gr Premier Lite pellet | 1050 |
| 7.90 gr JSB Express pellet | 1014 |
| 8.20 gr JSB Predator pellet | 989 |
| 8.30 gr H&N Match pellet | 1003 |
| 8.20 gr SuperPoint pellet | 1029 |
| 8.20 gr R10 Heavy Pellet | 1036 |
| 8.30 gr Meisterkuglen Rifle pellet | 1031 |
| 8.20 gr Superdome pellet | 1035 |
| 8.40 gr JSB Exact pellet | 983 |
| 8.40 gr Silver Sting pellet | 984 |
| 8.00 gr Spitkugel pellet | 1006 |
| 8.60 gr Field Target Trophy (FTT) pellet | 990 |
| 8.60 gr Field Target Special (FTS) | 986 |
| 8.70 gr FTS Double Gold pellet | 970 |
| 8.10 gr Crow Magnum pellet | 978 |
| 8.10 gr Super Mag pellet | 938 |
| 10.40 gr Kodiak Double Gold pellet | 879 |
| 10.30 JSB Exact Heavy pellet | 886 |
| 10.50 gr Baracuda Hunter pellet | 899 |
| 10.50 gr Premier Heavy pellet | 899 |
| 10.10 gr Kodiak Match Pellet | 897 |
| 10.10 gr Kodiak pellet | 904 |
| 11.50 gr Silver Arrow pellet | 832 |
| 13.30 gr JSB Monster pellet | 779 |
| 15.60 gr Baracuda Magnum pellet | 603 |
In 0.22 caliber:
| .22 Pellet | FPS |
|---|---|
| 14.40 gr Super H Point pellet | 886 |
| 14.30 gr Crosman Premier pellet | 886 |
| 14.40 gr JSB Express pellet | 818 |
| 14.50 gr Superdome pellet | 884 |
| 14.40 gr SuperPoint pellet | 863 |
| 14.80 gr FTS pellet | 856 |
| 14.80 gr FTS Double Gold pellet | 840 |
| 15.20 gr Napier ProHunter pellet | 834 |
| 16.00 gr Silver Sting pellet | 817 |
| 16.00 gr JSB Exact pellet | 767 |
| 16.30 gr JSB Predator pellet | 811 |
| 16.30 gr Silver Arrow pellet | 779 |
| 18.20 gr JSB Exact Heavy pellet | 762 |
| 18.10 gr Crow Magnum pellet | 747 |
| 21.30 gr Kodiak pellet | 659 |
| 21.40 gr Kodiak Double Gold pellet | 648 |
| 25.40 gr JSB Exact Monster pellet | 597 |
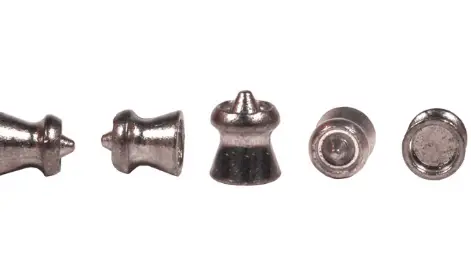
The velocity of the RWS Diana 48 differs by the caliber size but is consistent between pellet grain size, which is a very impressive quality.
So be sure to choose the caliber and pellet size that best fits your usage.
(For more on the differences between .177 & .22 and which jobs they do best, see this post.)
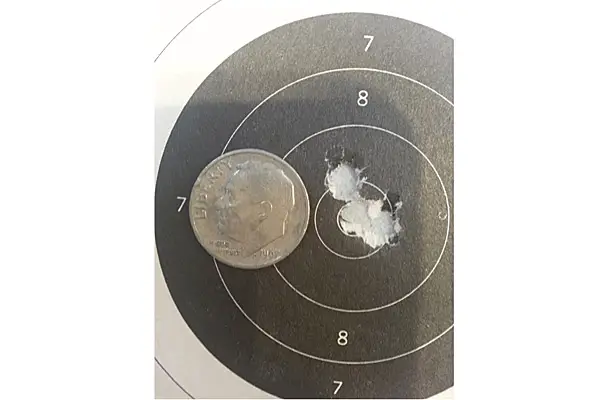
Accuracy: The RWS Diana 48 has a great reputation for accuracy.
Shooting from rest at 25 meters, five JSB Exact pellets as a group measured 0.875-inch edge to edge (just under 0.7-inch center to center).
That’s certainly good enough for defending the garden and hitting small hunting targets.
Fun fact: the Bullseye Airgun club in Louisiana used to have a huge contingent of shooters who shot 48s and 54s in field target competitions.
Power: on testing, I registered a high of 22.73 foot-pounds of muzzle energy on a new 0.22 cal model 48 when shooting 14.3 grain Crosman Premiers.
Noise: The RWS Diana 48 is very quiet.
Throughout all of the customer reviews, not a single user complained about the noise.
This means that it won’t be too loud for indoor target practice and can be taken out to the hunting field for a nice stealthy hunt.
Features and Benefits
Here are some of the main features of the RWS 48 and their benefits:
Features:
- Ambidextrous stock
- Automatic safety
- Side lever cocking
- Two-stage adjustable trigger
- Beechwood stock
- Standard RWS rear sight with spring loaded ball bearing
- Single shot rifle
Benefits:
- Ambidextrous Stock: The ambidextrous stock is nice because it allows both lefties and righties to use it conveniently with no awkwardness.
- Automatic Safety:
- Another exciting feature about the RWS 48 is the automatic safety.
- The automatic safety assures that you only shoot when intended to, thereby protecting you accidental pellet discharge and potential injuries.
- The automatic safety engages immediately once a pellet is inserted and the side lever is cocked back into place.
- Lever Cocking:
- the side lever cocking allows shooting to be more accurate because it’s less sensitive to handling.
- It also accepts longer scopes for better magnification because the barrel doesn’t tip up and get in the way.
Two-Stage Adjustable Trigger: the adjustable trigger allows you to manipulate the amount of force it takes for the trigger to break and the shot to go off.
- Beechwood Stock:
- the beautifully finished beechwood stock on the RWS Diana 48 had high hardness, is heavily packed and has high resistance to abrasion.
- So you don’t have to worry about the stock wearing out.
Standard RWS Rear Sight with spring-loaded bearing: the spring-loaded ball bearing on the RWS Diana 48 holds the setting of your site so it stays where you put it.
There’s no need to worry about losing your precious sight.
It also allows you to adjust for windage and elevation.
Single shot: the RWS Diana 48 is a single-shot rifle, meaning it only allows you to shoot one pellet at a time.
The single-shot helps with accuracy because you’ll always want your first shot to count.
Shooting Ability
The effective shooting range of RWS Diana 48 is up to 50 yards.
Some customer reviews said that it can take out squirrels with one shot from 40 yards.
It is suitable for target shooting, small game hunting, and pest control.
Unbelievable warranty
As of this date, the Diana 48 has a limited lifetime warranty.
Diana 48 – specs
- Calibre: 0.22/0.177
- Velocity: 884 FPS with 0.22, 1,100 FPS with 0.177
- Stock: beechwood
- Barrel length: 17.0 inches
- Overall length: 42.13 inches
- Barrel: rifled
- Front Sight: blade and ramp
- Rear Sight: adjustable for windage and elevation
- Buttplate: rubber
- Suggested for: small game hunting/ pest control
- Trigger pull: two pounds 13 ounces
- Action: side lever
- Safety: automatic
- Powerplant: spring piston
- Function: single-shot
- Body Type: rifle
- Weight: 8.5 pounds
- Cocking effort: 39 pounds
Customer review
There are lots of customer reviews on the Diana RWS 48.
The majority of users love its accuracy, power, and fantastic design .
Shooters also emphasize the smooth cocking action of the RWS 48.
Its barrel gives enough space for your thumb so you don’t have to struggle when inserting the pellets.
The bluing on this rifle is dark and even, and the overall metal finish is perfect as well.
Many reviewers also boast about how the Diana 48 stands the test of time.
One owner stated that he has been using the rifle for 20 years, of which he never needed any extensive repairs.
And after years of constant use, the gun still fires as well as it did when it was new.
| Pros | Cons |
|---|---|
|
|
RWS 48 Price

The RWS 48 has a price range of about $400.
It is a reasonable price for a gun that provides attractive design, extreme accuracy and can last for generations.
There are a couple of different listings online with different prices, but the listing I found below is the most reasonable deal amongst e-commercial sites like Amazon, Pyramyd Air, and Walmart.
Diana RWS 48 – Conclusion
With its remarkable numbers on power, accuracy, and velocity, the Diana RWS 48 is one of the best rifles on the market.
RWS has really delivered this masterpiece.
The Diana 48 is certainly a gun any shooter would be proud to have and watch your shooting buddies get knocked off their socks.