Every subspecies of wild turkey has different behaviors. They all populate a variety of landscapes, live in different weather, and are hunted by different predators — all of which shape their overall behavior. One thing every wild turkey has in common — and something every hunter needs to take advantage of — is the need to fill their bellies. Turkeys have to eat and, much like a whitetail deer, are very patternable on food sources. Once a pattern is found, you must strike.
Several seasons back, my trail cameras were picking up a flock of hens and a trio of gobblers every single day between noon and 2:30 p.m. It was like clockwork. It was the early season, and the birds were scratching through a smattering of fallen cottonwood leaves. They were after invertebrates, which I later discovered to be a massive beetle hatch, along with some ants. The problem was, I waited too long. I took notice of the pattern on a Sunday, confirmed it on a Tuesday, and by Friday the birds had moved to new scratching grounds. If you find a hot food pattern, call in sick and kill your gobbler.
What wild turkeys eat, like all animals, is dictated by what’s available to them. Here’s a breakdown of wild turkey food favorites by subspecies.
RELATED – Escarole and Beans With Smoked Wild Turkey Wings
There are two species of turkey today, the wild turkey and the ocellated turkey. The Merriam’s turkey is a subspecies of wild turkey. A mountain/canyon dweller, Merriams have food sources that vary significantly from year to year based on snow accumulations, snow line melt, spring moisture, and temperature.
During early spring, birds follow the snow line up mountain slopes and take advantage of freshly-sprouted mountain greens. Grasses make up a large part of the birds’ diet. Bugs are also an essential food source; these turkeys will feast on:
Grasses, clover, vetch, flower heads, cactus blooms, and tubers
Grasshoppers, spiders, mosquitos, caterpillars, and other insects
Ponderosa pine seeds, snowberry, bearberry, hawthorn, and chokecherry
Rio Grande Turkeys
The Rio Grande turkey subspecies has adapted well to multiple landscapes; and food, of course, varies based on geographic location. Roughly 35% of the Rio Grande diet is grasses, 20% is mast, and 29% is bugs. In Nebraska and Kansas, harvested corn, bean, and winter wheat fields see constant bird action.
Grains are high in carbohydrates, which attracts the birds, and winter wheat is an excellent protein source. Popular Rio states like Oklahoma and Texas, where ag fields are fewer, force birds to dine on acorns, cedar elm, prickly pear cactus, spiders, and ticks. In cattle country, pastures full of cow crap are red-hot Rio spots. The birds love to dig through semi-dried and dried dung in search of undigested grains, beetles, and other bugs. Look for:
Beetles, grasshoppers, spiders, ticks, roly polys, ants
RELATED – Poutine Recipe Twist: Use Wild Turkey Wing Meat and an Air Fryer
Eastern Turkeys
The most widespread wild turkey subspecies, and one of the largest, the Eastern will eat just about anything it can get its beak around. Hardwood dwellers love acorns and other nuts like chestnuts and black oaks, but Eastern birds that dwell in ag-heavy Midwest locales spend time in cut corn and bean fields.
Eastern birds devour leeches, snails, and spiders. I’ve also seen giant Eastern birds pound salamanders and small snakes. Look for:
Grasses and seeds of native grasses and hedges make up about 36% of their diet
Seeds of white ash, ironwood, water beech, witch hazel, flowering dogwood, corn, soybeans
Found only in Florida, Osceolas have feeding grounds that are relatively simple to find: Look for cow pastures. Any seasoned Osceola hunter will tell you that finding these turkey grocery stations is one of the best ways to kill a bird. Cattle farming is a big deal in the Sunshine State, and birds will often fly, sometimes distances more than 300 yards, from a cypress swamp to an open cattle pasture.
In these pastures, birds can scratch through cow pies searching for seeds, grains, and bugs, but they can also find other food sources like carpet and chufa grass.
Like Eastern birds, Osceolas devour small snakes, aquatic bugs, and insects. Other delicacies include live-oak acorns, berries of cabbage palm, pine seeds, and black gum fruits. You’ll find Osceolas when you find:
Panic grasses, carpet grass, chufa
Black gum fruits, berries of cabbage palm, pine seeds, acorns
Aquatic insects, dragonflies, snails, snakes
RELATED – Escarole and Beans With Smoked Wild Turkey Wings
Gould’s Turkeys
Like the Osceola, the Gould’s is not widespread; it’s found in New Mexico, Arizona, and Mexico. Like the Merriam’s turkey, the Gould is a mountain dweller. The Animas and San Luis Mountains of New Mexico and the Peloncillo Mountains of New Mexico and Arizona hold the most prominent US population.
Food sources in these areas are limited, and birds take advantage of what they find. Various species of grasses fill their craws, as do nuts and insects. Find the following to find Gould’s turkeys:
Mustard forbs and grasses
Piñon nuts, juniper berries, cactus, wild grapes and berries, fruits of manzanita
beetles, ticks
Please keep in mind, this doesn’t cover absolutely everything a wild turkey eats. All subspecies of wild turkey are opportunistic feeders. One of the best ways to find what birds in your area are eating is to harvest one, plug your nose because it stinks, and open the birds’ craw. Separate what you can, and record your findings in a journal.
READ NEXT – New Sitka Turkey Hunting Gear for 2022
Private land ownership and property information is a key value of onX Hunt—and, for many, one of the key reasons they choose to continue their onX membership. Hunters, hikers, and anyone heading into the outdoors depend on the onX Hunt App to show them an array of information, including public/private boundaries and land ownership information.
We have a variety of in-house teams here at onX who spend their days aggregating and managing data from various sources; information which then flows into our three apps. Day in and day out, we’re working within our system to ensure we remain the source to which you can confidently turn when you’re heading into the field and need accurate information.
While we source all information from a broad variety of sources, one of the most challenging is maintaining updated private land ownership information. We’re beholden to external sources for this information, and can only update our information within the onX Hunt App when these sources themselves are updated.
In an effort to ensure the most accurate land ownership information enters the App, we work with a variety of data sources around the country to gather information, including several private data providers as well as directly from a state and/or a county. Some government sources only update their files once a year, while others update weekly or not at all. The ownership info found in the 3,143 U.S. county databases doesn’t always match other databases—we know, because we check. Utilizing private data providers in addition to government sources allows us to unlock new methods of update delivery and frequency that, put quite simply, government sources sometimes lack. For some counties and some states, accurate and updated government public parcel data is challenging to source, and private sources can help us bridge those data gaps.
This parcel data comes in two different categories: spatial and attribution. Changes in spatial data means the parcel size itself has changed (for example, a single parcel has split in half, or two parcels have merged), and this information always comes from the relevant county. Attribution, as the name would suggest, represents the name of the parcel owner and other details such as address, tax ID, and additional details. We use both private and county sources to source this attribution information, as sometimes private vendors have faster ways of updating this information than the counties themselves. Eventually, the county will update attribution information and send it out; however, that process has been known to take years.
At onX, we have individuals who seek out and vet sources throughout the year to determine whether the data they provide would be better than whatever data a given state or county is currently supplying. Each of these sources is updated at various intervals depending on the state or county, and then we take their updated data and verify it through our own systems before moving it into the apps.
Once we have the updated private parcel data information, our in-house mapping team works to confirm the changes using a mixture of manual and automatic review processes, cleaning the parcel geometries and ensuring boundaries match. If there are issues, our curation team will step in and assist with the process. Once the data is ready, we adjust the information within our system, and then confirm the alignment of the new boundaries to existing public lands boundaries. Once the information is confirmed and verified, it will then be added to the next App update flow.
In short, if an official data source has not updated its land ownership records, we don’t have new information to flow into our Apps.
So, what does this mean for you if you or a friend has a property that’s showing incorrect ownership information in the onX Hunt App? While we may be waiting for new data to process through the county or state level, you can reach out to our team directly and submit a map error. Include as many details as possible—the more information, the better! The error report is sent directly to our mapping team, who will verify the information. If the report is verified, it will be corrected the next time we update the area. We continually work to help make all of these processes more efficient so we can move data more quickly while maintaining our high standard of quality.
Map accuracy is a cornerstone of how we work at onX. While many of our competitors only pull ownership data from a single source, we utilize a variety of different sources, cross-referencing and doing our own in-house comparisons to ensure the data that makes it into the Hunt App is as accurate as possible. However, we’re still held to relying upon the counties and our other data partners to keep their information up-to-date and accurate. It takes a great deal of time and effort to gather the data, format it for use in our maps, double-check everything and finally release the update, so we appreciate your patience throughout the process.
Thank you for helping us correct any errors from our data sources. You have the power to help us correct these errors—help us find the mistakes and to keep the information updated. We take the data within our maps very seriously, and work intently to ensure you’re getting the best possible information within our apps.
This stock has dual raised cheekpieces on the left and right sides so it’s extremely useful for left-handed shooters.
Besides, it has checkering on the grip and forearm to add friction to your hand when shooting, prevent slippage from the shooter’s sweat, and enhance accuracy.
Furthermore, the stock has a pistol grip:
It orients the hand in a forward, vertical way similar to the position one would take with a conventional pistol
So it gives you a natural and comfortable hold of the gun.
The Bone Collector’s stock features SWA – Shock Wave Absorber.
Let’s talk about it for a moment.
There is an entire industry centered around making after-market recoil pads.
Their intents are to reduce felt recoil because constant recoil pounding to your shoulders is painful and will stop you from shooting as much as you want.
While the gas piston is going to seriously reduce the vibration, the SWA buttplate will stop you from feeling most of the recoil and from the remaining movement of the gun.
In fact, it provides up to 74% more recoil absorption than a standard buttpad.
Moreover, it’s an adjustable buttpad with three removable absorption cells so you can customize it according to your own need.
Now you can shoot comfortably and enjoy long-hour shooting without pain on your shoulders.
More on the Gamo Bone Collector IGT here:
Ammo
With 2 types of calibers available, Gamo Bone Collector Bull Whisper has 2 corresponding types of pellets:
.177 caliber uses .177 pellet and .22 caliber use .22 pellet .
As you may know, a .177 pellet is cheap: you can buy a bunch of .177 pellets for half the money for the same amount of .22 pellets.
Besides, .177 is lighter and gives you higher velocity so it’s great for plinking and target shooting.
On the other hand, .22 pellets are heavier, more stable on their trajectory, and have more than enough muzzle energy to get the job done.
In the past, Gamo customers have swapped out their triggers for aftermarket ones.
There’s no need to do that anymore.
The Smooth Action Trigger (SAT), is light years better than the previous version.
It’s smooth and predictable.
What will that do for you?
It’ll improve your grouping because a heavy, unpredictable trigger is responsible for delivering large groups.
You’ll be amazed at how good a shot you are when you shoot the Bone Collector with the brand-new SAT trigger.
Velocity, accuracy and power
Gamo Bone Collector produces velocity up to 1300 FPS with .177 pellets and 975 FPS with .22 pellets.
These are exceptionally high velocities compared to other air guns on the market
And it puts this rifle belonging to the magnum class in the air gun world.
In addition, since the speed of sound is 1100 FPS (varying with altitude and temperature),
You may hear the loud crack if you buy a .177 caliber because the lightweight pellet breaks the sound barriers.
If you buy a .22 one then this is not an issue at all.
Chrony tests with both types of pellets give us the following results:
In .22:
Pellet (.22)
FPS
FPE
Crosman Premiere 14.3 gr
745
17.63
18.2 gr pellet
640
16.56
PBA 9.7 gr
975
20.48
In .177:
Pellet (.177)
FPS
FPE
Beeman laser 7.1 grains
926
13.52
PBA Gamo Raptor 5.4 gr
1300
20.27
Red Flame 7.9 gr
1000
17.55
As you can see, the velocities match the advertised numbers and even surpass them!
This is a phenomenon you don’t usually see because the advertising velocity is often the highest speed an air gun can achieve with its already-made capacity.
For this IGT pellet rifle, various shooting tests have been conducted by different shooters with positive results.
The common shooting groups are:
1/4″ at 20 yards,
1 1/2″ at 30 yards,
dime size at 20 yards,
dime size at 30 feet,
1/4″ at 20 yards,
1” at 30 yards,
1/2″ at 10 yards,
cloverleaf group at 15 yards,
1/2″ at 60-70 feet using RWS 7.4 gr,
nickel size at 30 yards,
1/4″ at 75 feet,
3/4″ at 30 yards,
nickel size at 50 feet with H&N Field Trophy and Baracuda Match pellet,
1.5” at 50 feet with Crow Magnum,
1/4″ at 10 yards,
1/2″ at 50 yards using Crosman Ultra Magnum 10.5 gr,
The package includes a 4×32 scope, mounts, elasticized lens covers, hex wrench, cleaning cloth, and dozens of PBA ammo.
Specifications
Caliber: Available in both .177 and .22
Velocity: 1300 FPS with .177cal. 975 FPS with .22 cal.
Loudness: 3- Medium
Barrel Length: 19.13”
Overall Length: 43.75”
Shot Capacity: 1
Barrel: Rifled
Front Sight: None
Rear Sight: None
Scopeable : 11mm dovetail
Trigger: Two-stage adjustable
Buttplate: Rubber
Suggested for: Target shooting/Plinking/Small game hunting/Pest control
Trigger Pull: 3.74 lbs
Action: Break Barrel
Safety: Manual
Powerplant: Gas-piston
Function: Single-shot
Body Type: Rifle
Weight: 5.95 lbs
Cocking Effort: 32 lbs.
Customer review
There are lots of mixed customer reviews about this gun.
In positive reviews, we see that people love its outstanding features, awesome technology, great fit and finish, quality stock, incredible accuracy, and power.
In negative reviews, people mostly complain about 2 things.
The first is the low-quality scope: you can solve this issue simply by attaching another scope of your choice to it.
The second is the loud noise, and much louder than what they expect from a “whisper” gun.
There are effective solutions for those problems:
Make sure you clean the barrel several times to get rid of diesel in the bore,
And use heavier pellets instead of lightweight ones to make the gun go subsonic and doesn’t break the sound barrier.
Pros and Cons
Pros
Cons
Astonishing IGT and ND52 technology
Sensational forest-theme design
Incredible composite stock with rubber grip insert
Excellent trigger
Fantastic velocity
Jaw-dropping power
Decent scope
Not quiet as "whisper" with lightweight pellet
Dirty barrel out of the box
Price
The price for Gamo Bone Collector is about 200$.
It’s a bargain for a unique rifle that integrates a bunch of proven technology and produces superb power and dead-on accuracy.
Besides, there is little difference between the prices of the 2 calibers so you can choose the one that you like most.
Also, when you buy from PyramydAir, you save a whopping 90$ more than buying from Gamo’s site.
Conclusion
The Bone Collector has made quite a buzz in the air gun world.
Endorsed by iconic TV personalities, this gun paved its own way into the best-selling air rifle list on many retailer sites such as Amazon, Walmart, Pyramyd Air, etc.
Even if you are not a “Bone Collector” like Travis Turner, you will love this gun for its aesthetically pleasing look and extraordinary quality.
Twenty years ago, suppressors were a rarity in the civilian shooting world. The legal challenge of owning a suppressor made them unattractive to most shooters, and few if any major manufacturers produced them. Today, suppressors seem to be everywhere. Competitive rifle shooters, defense-minded individuals and hunters can be seen with these sound-reduction devices attached to their firearms.
As great as they are, suppressors have a problem. They can control the muzzle blast and report of a rifle cartridge, but they can do nothing to mitigate the crack associated with a bullet passing through the sound barrier. Technology can’t trump physics.
The solution is to slow down the bullet below the supersonic threshold. That is easier said than done, especially when you don’t want to sacrifice terminal performance. Ammunition manufacturers have had a tough time solving this, but Hornady, with its Subsonic rifle line, threads the needle.
Most of the time I’m hunting or shooting with a suppressor, I am not interested in making the rifle as quiet as possible. For range or general hunting use, it is sufficient that the suppressor reduces the recoil and muzzle blast as well as brings the report down to hearing-safe levels. For these needs, subsonic ammunition is not necessary.
Tons of bolt actions like this Ruger American Ranch are now threaded for suppressors, which can be a real boon in the field in terms of preserving your hearing.
There are times, though, when I want things to be as quiet as possible. For me, this usually applies when I am hunting feral hogs that are destroying a farmer’s field. In such circumstances, subsonic ammunition can be a game-changer.
As we have seen suppressor use skyrocket in this country among hunters and shooters, specialized cartridges and loads have entered the market. The most popular cartridge that was purpose-built for suppressor use is undoubtedly the .300 BLK.
Though Advanced Armament Corporation gets credit for standardizing the cartridge, much of the innovation happened years earlier. J.D. Jones of SSK Industries developed the .300 Whisper cartridge specifically to perform in semiautomatic, bolt-action and single-shot rifles at subsonic velocities.
Though there are slight dimensional differences between the two cartridges, the .300 Whisper and the .300 BLK are both based on the .221 Fireball case, necked-up to 0.308 inch. By going to a far heavier bullet than the case was designed for, SSK and AAC were able to achieve subsonic velocities while still maintaining a safe and reliable powder capacity.
One of the most attractive elements of the .300 BLK is its compatibility with standard AR-15s and magazines. Since ARs have become the most popular rifles in America, this is not a small thing. If an AR owner wants to dip a toe into the subsonic water, buying a .300 BLK upper is all it takes. For deer-size game at reasonable ranges, this cartridge offers plenty of power in a handy package.
The .300 BLK can be very effective when subsonic use is preferred, but it is by no means the only option. When Hornady launched its Subsonic line of rifle ammunition in 2018, it began with the .300 BLK. This year the company added several more options.
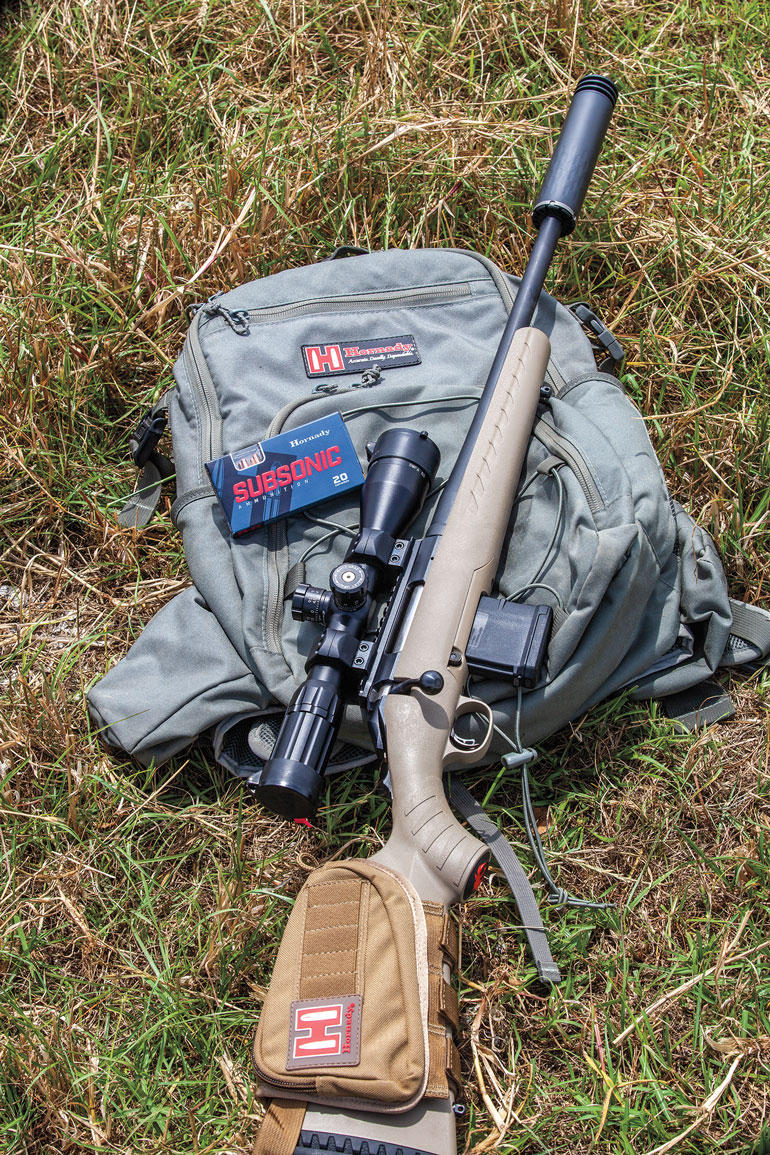
For 2020, Hornady’s Subsonic rifle selection comprises four loads: the 190-grain .300 BLK, 175-grain .30-30 Win., 395-grain .450 Bushmaster and 410-grain .45-70 Gov’t. I sampled the .300 BLK and .30-30 Win. loads using two popular and commonly available rifles: a Ruger American Ranch Rifle and a Marlin Dark Series 336.
The Ruger American line has built a reputation for performance, often outshooting guns that retail at far higher prices. My .300 BLK sample was one of the newer Ranch models, with a five-round detachable box magazine, Picatinny rail and a 16.12-inch threaded barrel. I mounted a 3-9x42mm scope from SWFA in Burris Signature rings. With a suppressor attached, the Ranch Rifle measured 42 inches overall and weighed 8.9 pounds.
The .30-30 test rifle was a modern twist on an age-old design: the Marlin Model 336 Dark Series. This rifle is a tricked-out Marlin lever gun with a threaded barrel, black painted stock, XS optic rail and ghost-ring sights.
If you are in the market for a suppressor-ready lever-action .30-30, this rifle is about the only lever-action game in town. Yes, the Mossberg’s 464 SPX Flex is threaded for its standard A2 flash hider, but you would need to buy an adapter because that thread pattern is 1/2×28 while almost all centerfire suppressors are 5/28×24. You can find adapters at retailers like SilencerShop.com.
The optic rail on the 336 Dark Series provides a great deal of mounting real estate, but the rifle’s stock geometry is such that a scope must be mounted low for a proper cheek weld. After experimenting with various options, I chose Leupold’s VX-5HD 1-5×24 for its useful magnification range and an objective lens that allowed me to mount it down low. This scope is equipped with a CDS elevation dial, which is particularly useful given the rainbow trajectory of subsonic rifle loads.
Both rifles came suppressor-ready right out of the box with 5/8×24 threads at the muzzle. I mounted my SilencerCo Omega 300 suppressor and traded it between the two rifles for the testing.
With the suppressor in place, recoil was almost nonexistent with both rifles. The “thump” of the bullets impacting the dirt backstop was louder than the shot. The combination of soft recoil and slow velocities allowed me to consistently see my rounds impact on target at 100 yards. This low recoil and mild report demonstrates just how valuable suppressors can be for training new shooters and hunters, particularly younger individuals.
In case you’re wondering, subsonic rifle ammunition isn’t noticeably quieter than standard velocity loads unless a suppressor is used. If you fire it without a suppressor in place, it’s going to damage your hearing just like standard ammo would.
I grew up in and still hunt frequently in Florida where feral hogs have been present since the Spanish brought them over in 1540. They can be extremely destructive to habitat, and we pursue them aggressively.
When the .300 BLK came onto the scene, many of my friends and I began using it with suppressed AR-15s, hoping for the chance of taking out several members of a sounder without alarming the group. We found the sound reduction to be excellent but the terminal performance lacking.
Early attempts at subsonic ammunition often used off-the-shelf .30 caliber bullets that were designed to expand at the far faster velocities of the .308 Win. or .30-06. These bullets would pencil through the hogs, causing minimal trauma. Ethically, this was not acceptable.
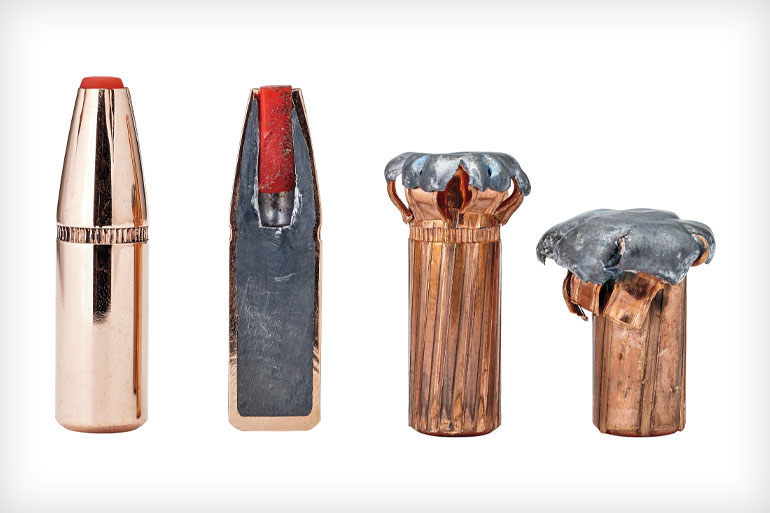
This is the exact problem that Hornady’s ballisticians sought to solve when they developed this product. When they set their sights on developing their Subsonic rifle ammunition, they started from scratch in terms of bullets. The result of their research and testing was the Subsonic-eXpanding or Sub-X bullet.
The .300 BLK Sub-X bullets are designed to reliably expand at subsonic velocities. (From l.): Unfired bullet, sectioned bullet, recovered at 950 fps and recovered at 1,100 fps.
Sub-X bullets use a traditional lead core and a thin, grooved gilding metal jacket. There is a generous hollowpoint fitted with a polymer Flex Tip insert that aids expansion and allows the bullet to be safely compatible with the tubular magazines found in most lever guns.
From top to bottom, this bullet is engineered to expand. The exact definition of subsonic depends on some environmental factors, but it is generally just below 1,200 fps. This combination of features on the Sub-X allows it to reliably expand at subsonic velocities, even down to 900 fps. With an impact velocity of 1,020 fps, Hornady has achieved 16 to 18 inches of penetration on ballistic gelatin with 90 percent weight retention.
I chronographed both loads on a reasonably warm day, with temperatures hovering around 85 degrees. The .300 BLK load had an average velocity of 1,087 fps, which meant it was consistently subsonic. At this speed, the Sub-X bullets would expand out to about 400 yards. With 200-plus inches of drop at that range, I don’t see myself taking such a shot on game. Accuracy was good, with the best group of the day measuring at under a half-inch and an average of three three-shot groups right at an inch.
The .30-30 load actually moved quite a bit faster, with the average velocity from the Marlin 336 being 1,198 fps from the 16.25-inch barrel. When I shot on hotter days, some of the .30-30 rounds actually broke the sound barrier, making for a noticeably louder report downrange. When temperatures were in the 70s or lower, this was a non-issue. This illustrates just how difficult it is to construct ammunition that will perform consistently in a wide variety of firearms under wildly different conditions.
I tried to connect with a wild boar while I had the guns in my possession, but fortune didn’t smile on me. However, I know Hornady’s Neal Emery and several others took pronghorns with the Subsonic in .30-30 and .300 BLK—each with just one shot. Emery’s buck was shot at 87 yards, and he found his Sub-X bullet fully expanded against the off-side hide, and it had mushroomed just as advertised.
That kind of performance represents a stark contrast to what I’ve seen from other manufacturers’ efforts at subsonic ammunition. My son will hunt deer for the first time this fall, and given the performance I’ve seen from the Hornady Subsonic rifle ammunition, I won’t hesitate to let him use it.
Barring some legislative catastrophe, suppressors are here to stay. For good reason, too. Size and cost aside, why wouldn’t you want something that reduces recoil and muzzle blast? And to maximize the utility of suppressors, subsonic ammunition is a key element in the equation.
Hornady has been a leader in its field for decades and is once again driving innovation. The company’s Subsonic rifle ammunition allows for a minimum sound signature without a subsequent loss in lethality.
Hornady Subsonic Rifle Ammo Accuracy Results
Notes: Accuracy results are averages of three three-shot groups at 100 yards from a benchrest. Velocities are averages of 10 shots recorded on a LabRadar Doppler chronograph placed adjacent to the muzzle.
It has a single-shot action so you can shoot only once at a time.
The barrel is rifled which means that it has helical grooves inside the bore to make the bullet spin.
Moreover, the barrel is made of brass (an alloy made of copper and zinc).
Brass barrels give you lots of advantages:
First, it is pretty much non–corrosive and doesn’t rust easily.
Second, it is self-healing; as small scratches from inside the barrel, subsequent firing will smooth out these imperfections and give you much better accuracy.
In summary, having a brass barrel is a huge advantage that can make your gun last for years .
The Benjamin 397 doesn’t have a scope rail to mount the scope, so if you insist on using one, you will need either a Crosman 3/8 Intermount or the Air Venturi Weaver/Picatinny Intermount.
One thing to remember here is that you have to mount the ring in the center of the base to keep it solid,
And if the scope were any further back, it would interfere with the bolt handle
So you should get a forward-mounted scope to be able to pump the rifle in the normal way.
Even when you do mount the scope this way, the long eye relief will make the scope too hard to see through
So do yourself a favor and get theWilliam peep sight (shown below) instead
Air Venturi Williams 64 Peep Sight – 1
Air Venturi Williams 64 Peep Sight – 2
Because “pumper and peep are a match made in air gun heaven”, ya know.
Velocity, accuracy and power
The maximum velocity of this gun is 800 FPS.
This is a medium velocity compared to other .177 pellet guns on the market
And how about accuracy?
Chrony tests give us the results as follows:
.177 Pellets
Number of pumps
FPS
FPE
7.4 grains pellet
3
570
5.34
7.9 gr pellet
3
540
5.12
10.5 gr pellets
3
475
5.26
7.9 gr pellet
4
600
6.32
10.5 gr pellet
4
535
6.68
7.4 gr pellet
6
725
8.64
7.9 gr pellet
6
680
8.11
10.5 gr pellets
6
610
8.68
7.4 gr pellet
8
775
9.87
7.9 gr pellet
8
740
9.61
10.5 gr pellet
8
635
9.4
Crosman Premier Hollowpoint 7.9 gr
8
699
8.57
Dynamit Nobel Gecko 7 gr pellet
8
740.4
8.52
Crosman SSP 4.0 gr
8
894.8
7.11
Gamo PBA Raptor 5.4 gr
8
789.8
7.48
10.5 gr CP Ultra Magnum
8
643.4
9.65
Crosman Premier Hollow Point
10
752
9.92
Crosman Premiere 7.9 gr
10
741
9.63
RWS Superdome
10
780
11.22
As you can see, the actual velocities are so close to the advertised numbers. That’s a good sign for buyers.
See the video below for more numbers:
Next, let’s take a look at the performance of this rifle – The common shooting groups achieved with Benjamin 397 are:
0.5” at 33 yardst,
3/4″ at 30 yards,
1” at 25 yards,
2” at 20 yards,
1 1/2” at 35 yards out of the box,
2” at 30 yards,
1/4″ at 40 yards,
1/4″ at 25 yards,
1/4″ at 15 meters with Crosman Premiere Hollow Point,
1/4″ and dime size at 30 – 40 yards.
Moreover, it can:
headshot a squirrel at 50 yards,
kill moles, squirrels,
hit a milk cap at 12-13 yards,
shoot a dove at 20-30 yards,
kill 2 birds with Crosman pointed 7.9 gr at 41 yards,
penetrate 3/8” in a phone book 2” thick with RWS target at 10 feet for 5 pumps,
penetrate 1/2″ phone book 2” thick at 10 feet for 5 pumps,
penetrate 1/2” in a 2” phone book with RWS target at 10 feet for 8 pumps,
penetrate 5/8” in a 2” phone book with Gamo gold pellet at 10 feet for 8 pumps.
This gun packsone hell of a punch and if you have a problem with backyard varmint then this is a quiet, fast way to get rid of them and have some fun in the process .
Shooting Ability
The effective shooting range of the 397 is up to 50 yards.
It is ideal for spinning paper targets, casual plinking, or pest control
Loudness
Many owners report that the Benjamin 397 is relatively loud.
You can try using a heavier pellet, more of the energy will be absorbed launching the pellet and it should be a little quieter
Maintenance
To maintain the seal for a long time, always remember to put 1 pump of air into the gun when you are done shooting whether you plan to shoot again the next day or not again for another 2 years.
Specifications
Caliber: .177
Velocity: 800 FPS
Loudness: 4 – Medium – High
Barrel Length: 19.25”
Overall Length: 36.25”
Shot Capacity: Single shot
Cocking Effort: 3-8 pumps
Barrel: Rifled
Front Sight: Blade and Ramp
Rear Sight: Adjustable for windage and elevation
Scopeable: No
Trigger : Two-stage non-adjustable
Buttplate: plastic
Suggested for: Small game hunting/plinking
Trigger pull: 5.5 lbs
Action: Bolt-Action
Safety: Manual
Powerplant: Multi-pump pneumatic
Function: single-shot
Weight: 5.5 lbs
Customer review
Customers are generally satisfied with the quality of this gun.
In positive reviews, they love this gun because of its classic design, ease of handling, superb accuracy, and exciting knockdown power.
Nothing arises as a serious issue.
There are a few complaints here and there about mounting the scope on this gun
But as I said earlier in this review, you’re better off getting the William peep sight for maximum performance.
Pros and Cons
Pros
Cons
Handsome woodstock
Solid construction
Ergonomic Monte Carlo design
Long-lasting brass barrel
Actual velocity close to advertised numbers
Impressive accuracy
Fantastic power
Quiet
Decent open sight
No scope or accessory rail but you can fix this problem as I said earlier in this review
Price
The price for this rifle is about 150 dollars.
It’s a good price if you consider all the pros and cons of this gun.
Oh, and remember to save some bucks to get the Intermount if you insist on using the scope on this gun.
It’s built to last for years with the simple but effective operation, classic design, great power, and amazing accuracy.
For those interested in firearms and ammunition, you might want to explore more on 357 magnum brass to enhance your knowledge of ammunition components and reloading options. Additionally, if you’re looking to optimize your shooting experience, it’s essential to stay informed about the various ammunition choices available.
South Africa isn’t often associated with long-range hunting. Many of the game ranches in this vast country are covered with dense bush that limits shots to a couple hundred yards or less. There are exceptions, however, and the Umkomaas Valley is one of them. Located in the KwaZulu-Natal province on the eastern edge of South Africa, the Umkomaas Valley is a 120,000-acre wilderness that borders its namesake river. KwaZulu-Natal is the homeland of the Zulu people, whose warrior King Shaka developed new weapons and tactics, allowing the tribe to gain control over many of the surrounding areas stretching as far north as Mozambique and deep into the interior of South Africa. It’s been said the Zulu stopped the southward expansion of East Africa’s powerful Masai warriors—or perhaps the Masai stopped the northward expansion of the Zulu.
Our hunting party flew from Johannesburg toward the city of Durban, one of the busiest ports on Africa’s Indian coast, passing over a patchwork of agricultural fields perched on the east and west rims of the Umkomaas Valley. The valley itself is a dark, irregular scar on the landscape with high, rocky cliffs and steep slopes covered by snarled thorns. With no fences and minimal hunting, the valley is home to a wide array of endemic African antelope species including Cape bushbuck, Cape kudu, zebra, eland, duiker, and others.
There are also many warthogs, a half-dozen of which were kneeling on their forelegs and trimming the grass around Crusader Safaris’ Umkomaas Valley tented camp when we arrived. The sun was already behind the canyon rim when we began unloading our gear. Crusader Safaris owner Andrew Pringle directed me toward my own canvas tent while a baboon barked in the high rocks above us. By the time I was settled the only sounds in the valley were the hum of insects and the sloshing of the river.
Of the dozens of species of game to pursue in the Umkomaas, a big bull nyala was what I wanted most. Properly referred to as the common nyala (which doesn’t do this species justice: How could a 400-pound animal with ivory-tipped horns, striking chestnut, gray, and white markings, and a magnificent mane qualify as common?), this spiral-horned antelope exists naturally in few places in Africa, and nowhere does it exist in higher concentrations than in KwaZulu-Natal. In fact, some of the biggest nyala bulls on record were killed within a few miles of Crusader’s Umkomaas camp.
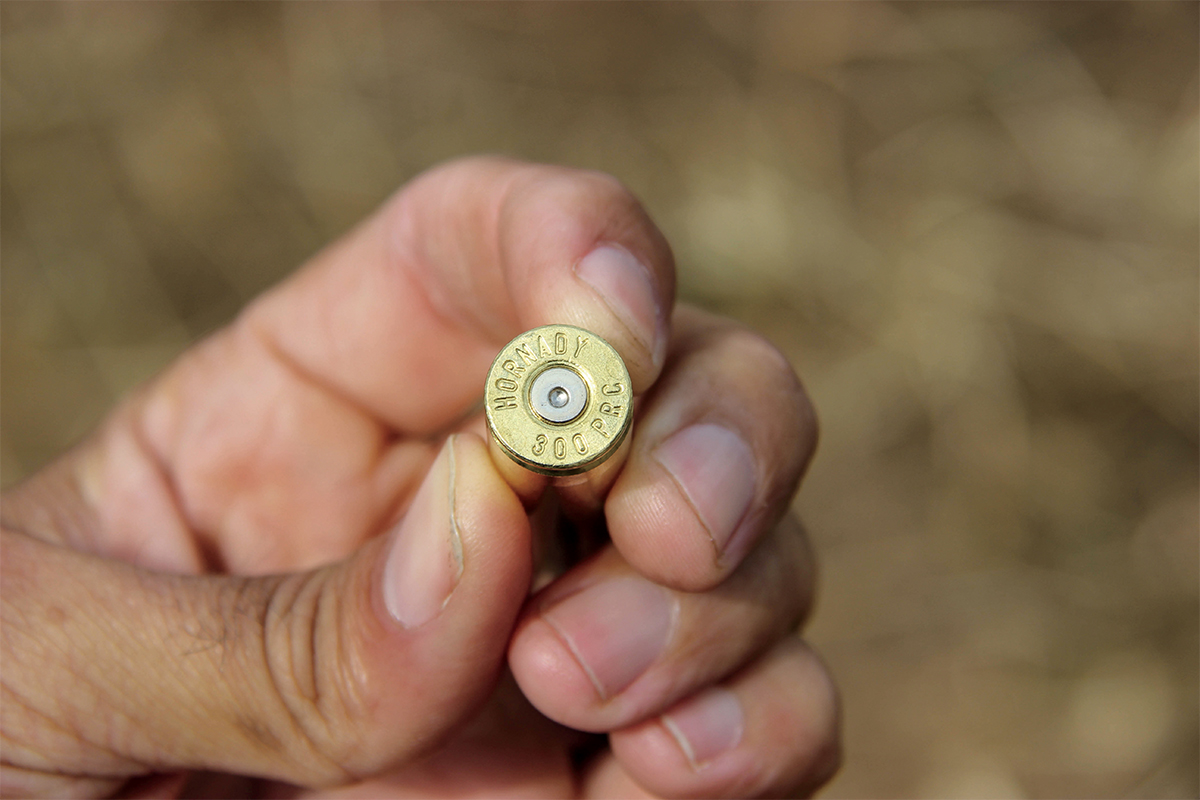
By the time I arrived in South Africa in late 2018, the .300 Precision Rifle Cartridge (PRC) had been announced to the public and a handful of long-range shooters were already using the round to ring steel out past a mile. The powerful new cartridge promised good things: based on a .375 Ruger case, the .300 PRC requires a magnum bolt face, but unlike belted magnums, the full-diameter .375 Ruger case allows for substantial powder payloads. The .300 PRC headspaces off its 30-degree shoulder and chamber drawings are precise. Hornady’s initial match load pushes a 225-grain, polymer-tipped ELD Match bullet with a ballistic coefficient of .777 (G1) at 2,810 feet per second, which is nipping at the .338 Lapua’s heels.
The Lapua excels at long-range shooting, but there are only a handful of hunters that carry Lapua rifles in the field. What about the .300 PRC? I wondered if it would make a sensible all-purpose rifle, especially given the popularity of established rounds like .300 Win. Mag., .300 Weatherby Mag., and the .300 WSM. The .300 PRC hadn’t been used extensively in the field to that point. It was powerful and accurate, but was it practical? And did it offer any real advantage over older rounds?
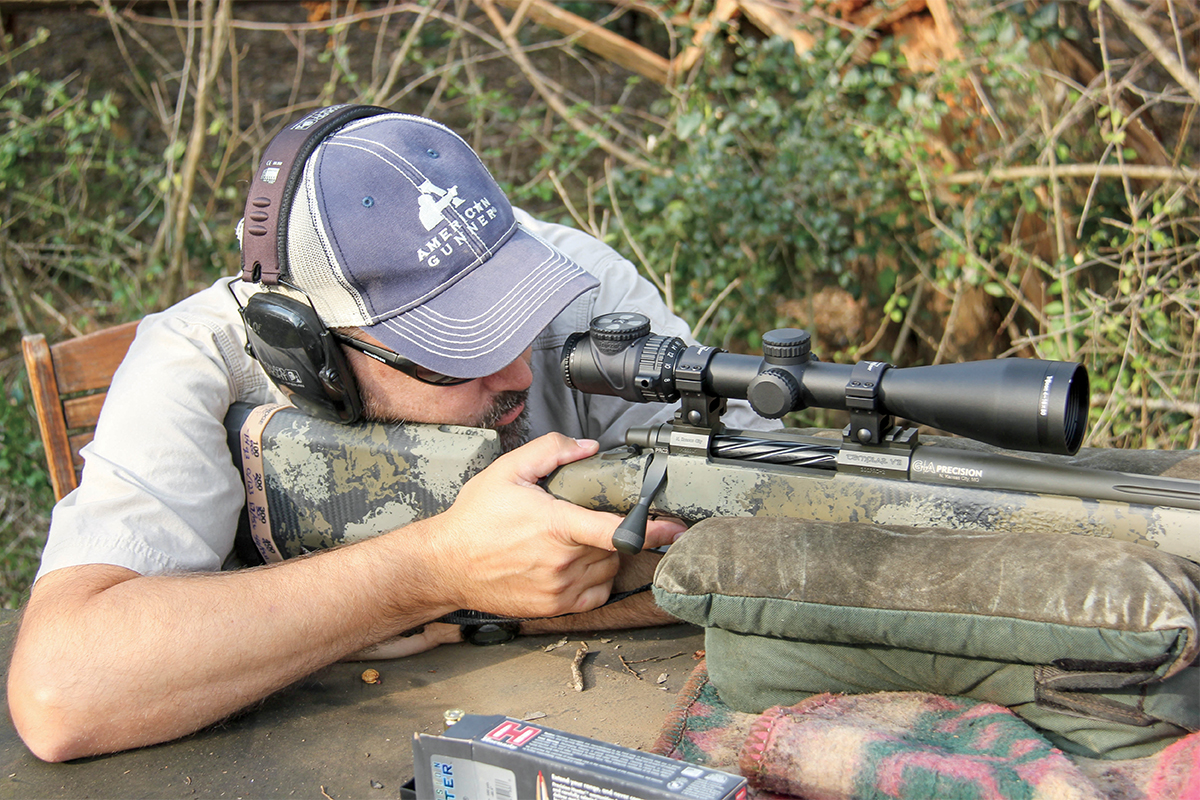
George Gardiner at GA Precision built several early .300 PRC rifles using Templar V2 actions and I carried one of those guns in the Umkomaas. It wasn’t particularly light, with its 26-inch barrel and removable brake, but it was supremely accurate. At 100 yards the GA rifle would place three 212-grain ELD-X hunting bullets close enough to touch, and five shots under an inch was no problem. The early adopters of the .300 PRC said it was the most accurate of the .30-caliber magnums they’d shot, and I’ve found the same to be true.
I topped the rifle with a Trijicon AccuPoint 2.5-12×42 with a green illuminated reticle. For dedicated long-range testing, I would have chosen greater top-end magnification, but the Trijicon’s low 2.5x magnification was important. While I might shoot a nyala at 400 yards, a 40-yard shot through thick brush was also possible. For that, I needed the additional field of view. I also needed a scope that could withstand being bounced around in the bellies of planes, abuse from baggage handlers, and heavy recoil. The AccuPoint checked all those boxes. I double-checked my zero at 100 yards when I arrived at camp and there was no shift in point of impact.
The Nyala Trail
African winter nights can be quite cold. As dim purple light brightened the eastern horizon and the jackals yapped on the crest of the ridges, I slipped from my bed and pulled on extra layers of clothing. After coffee at the main dining patio, I met Professional Hunter Rad Robertson and together we loaded my gear into his Toyota Hilux pickup. We were hunting farther up the valley and needed an early start. The rest of the camp began to stir as we left and began climbing to the rim of the valley.
By sunrise the Hilux was bouncing through dry watercourses along the river’s edge. I’d seen a half-dozen nyala that morning, including what I thought was a particularly good bull, but one that Rad elected to pass. Nyala are creatures of habit who follow the same trails and prefer to hide in familiar patches of thorn. Late in the morning Rad and I found one trail that was particularly well-worn. We climbed through a forest of tombstone-gray eucalyptus trees and settled on a narrow hummock—an ideal glassing point. We did see several nyala cows, which are lighter in build and color than bulls, browsing along the edge of the primary trail that wound through the trees along a dry riverbed below.
It was late in the day when Rad decided to move and check a narrow bowl higher up the mountain. The higher country was much more open and if we found a bull the shot might be 400 yards or more. It wasn’t long until we saw game: A herd of dusty-gray kudu cows were browsing in the blackthorn trees halfway to the top. Their broad ears flapped as they stretched their long, thin necks up to pick the choicest leaves.
Rad, who was resting against the base of an aloe tree, told me he saw a bull. Above the cows a single dark animal moved through the knee-high, winter-dry grass. I looked at the bull through my binocular and waited in silence for Rad’s decision. When the bull started down the spine of the hill 300 yards away, Rad decided the horns measured between 25 and 26-inches. We could find a bigger bull.
We were ready to pull stakes and head back to camp for a braai when Rad told me saw another nyala. He had seen this bull before and recognized its wide, heavy horns which measured perhaps 27 inches in length, which wasn’t much better than the first. But the second bull’s horns were much wider with deeper curls and greater girth. The animal’s shaggy body was noticeably larger than the first, too.
The bull vanished into a thin band of trees and our only course of action was to drop down into the valley and slip back up the other side. With all the game scattered throughout the bowl and across the ridge it would be hard to avoid detection, but we decided to try our luck.
Grey columns of clouds pushed inland from the Indian Ocean and darkened the hills. Carefully avoiding the wait-a-bit thorns and ever vigilant for snakes in the hip-high grass we made our way up through the forest, past the kudu herd and into the trees where we’d last seen the nyala. The bull had moved and Rad spotted him just 70 yards away. I shouldered the rifle, but could plainly see a single bent branch that had been invisible to the naked eye. The branch covered the bull’s vitals, and I held my shot until the bull disappeared into the dark forest.
Minutes later we saw a bull come out along the far edge of the trees farther down the slope. Rad insisted on glassing the animal first because he didn’t want to shoot the smaller bull by accident, but soon confirmed the animal walking across the ridge below us was indeed the older bull.
With shooting sticks to stabilize the rifle and an aloe tree serving as a brace I was quite steady and could see the seam of the front leg. Holding a third of the way to the top of the shoulder I pressed the safety forward, slowed my breath, and shot.
There was a flash of orange flame from the muzzle and all I could see was a halo of light impressions dancing in my eyes. The tracker initially reported that he didn’t find any blood or signs that the nyala had been hit, which concerned me, but in the tall grass thirty yards from where the bullet struck, the bull lay stretched out dead in mid stride. Nyala are impressive animals, but being close enough to touch one offers a close look at their striking features.
The horns are deep walnut in color with semi-translucent tips and are neatly curved. White marks like warpaint dot the face (including the characteristic chevron) and the long hairs of the animal’s mane are banded in shades of black, gray, and tan. At nightfall, we headed down the mountain with my bull.
Mixed Bag
With a bit of luck and some good shooting, a hunter in the Umkomaas Valley could harvest more game in a week-long safari than most North American hunters collect in a decade. Modern safaris are a great way to experience Africa as it was in the glory days, and it’s an important means to feed a community where cattle are scarce and beef is costly (which, in turn, prevents the need for poaching).
These hunts are also a great way to test bullet performance because you have animals of varying sizes offering differing shot angles and ranges. Hornady’s Neal Emery hung around the skinning shed collecting .300 PRC ELD-X bullets from the game that he and I shot. We had a broad selection of animals, too. By the middle of the week, I’d killed a cape bushbuck ram with a high uphill shot measuring about 320 yards, and I tagged an incredibly old common reedbuck ram under almost the same conditions the following day at the far end of the valley.
On the day I killed my reedbuck, Emery shot a larger ram in the same area at about 400 yards. Interestingly, we were able to collect bullets from other hunters in camp who were using .300 Win. Mag. and .300 H&H rifles, and the .300 PRC performed well compared to those older rounds. The .300 PRC didn’t create excessive wound channels and terminal performance was superb on animals ranging from 100 to 450 pounds at distances from 50 yards to over 500 yards. We finished the safari by shooting across a canyon at distances to 1,400 yards. The .300 PRC shines as a target round, of course, and the extraordinarily accurate GA Precision rifles made hitting targets at long range no chore.
The .300 PRC is indeed a great target round, but it’s an equally adept big-game cartridge capable of taking most any game at extended ranges. I came away from the Umkomaas Valley with an appreciation not only for the forward-thinking design of the cartridge but a sincere appreciation for its outstanding versatility.
If you own a good rifle chambered in .300 PRC there’s little you can’t do with it so long as you can handle the recoil, which is substantial but manageable. Hornady makes a compelling case that they’ve developed a multi-purpose cartridge that’s perfectly suited for the shooter who wants a target gun that’s also capable of tackling big-game hunts in every corner of the globe.
If you’ve ever wanted to try a lion’s mane mushroom you’d be hard-pressed to find one at the local supermarket. Yet, these unusual mushrooms are tasty and healthy, and there are numerous health benefits from consuming them.
If you’d like to learn how to grow these mushrooms yourself, then keep on reading. We’re covering their characteristics, health benefits, storage, and step-by-step instructions for cultivating lion’s mane mushrooms indoors and on logs.
The lion’s mane mushroom (also known as Hericium Erinaceus) is a white, pom-pom-like fungus that resembles the mane of a lion.
Individual mushrooms can grow to be fairly big, weighing as much as half a kilogramme. The spines, or “teeth,” begin short but become longer with age. The mushroom is spongy and semi-hollow at times.
These unusual-looking mushrooms are found on rotting hardwood trees and logs throughout the northern hemisphere and are native to Asia, Europe, and North America.
Lion’s mane mushrooms are edible as well as medicinal, with a variety of potential health benefits. These potential benefits include protection against dementia, protection against stomach ulcers, reduced risk of heart disease, diabetes symptom management, and many more.
It’s pretty much impossible to buy fresh lion’s mane mushrooms in the UK due to the fact that it’s a relatively unknown species. Your best bet is to find a specialist farmer, or, the easier option, is to grow this species of mushroom yourself.
Is Lion’s Mane Mushroom Easy to Grow?
Lion’s mane is a reasonably simple mushroom to cultivate, but it can be a challenge for novices because the mycelium takes longer to develop than other mushrooms, creating an increased risk of contamination. It can also be challenging for first time growers to determine whether the lion’s mane is fully colonised and ready to produce fruit.
If you’re new to mushroom growing, we suggest you should get some hands-on experience first. The easiest way to practise mushroom cultivation is by growing your own! Oyster mushrooms are a great place to start. Alternatively, you can use a Lion’s Mane Mushroom Growing Kit if you’re keen to try lion’s mane at home without the hassle of growing your own from scratch!
Growing in bags vs on logs
The two most popular methods of growing lion’s mane mushrooms are in bags or on logs. They both have their positives and negatives, but the answer to the best way to grow lion’s mane mushrooms is dependent on your experience and the harvest time you are hoping for.
If you’re growing lion’s mane on logs, you should expect to harvest your first batch in one to two years following inoculation. You can harvest lion’s mane mushrooms from a single log for up to six years after they begin to grow. It’s important to note growing mushrooms on logs generally requires more effort and resources to set up, but are relatively easy to maintain during incubation.
It takes far less time to grow lion’s mane indoors in a bag or container. The lion’s mane mushroom can be harvested in about 6 to 8 weeks after inoculating your substrate. Growing in bags is debatably the easier option if you are just starting out, but if you already have some growing experience under your belt then consider when you want your mushrooms to be harvestable.
It’s worth noting that bags can be used to grow mushrooms indoors, whereas logs have to be grown outdoors.
How to Grow Lion’s Mane Mushrooms Indoors
Below we’ve put together a step-by-step tutorial to help you grow lion’s mane mushrooms in a bag or container.
Buy Now Lion’s Mane Mushroom Grain Spawn From £15.99
Step 1. Preparing Your Supplies & Growing Space
It’s essential that you keep your work environment clean and sterile during the inoculation procedure. When you have spent time preparing your mushrooms, the last thing you want to do is introduce competitive bacteria into your substrate that could outcompete your spawn. Before you start, wipe everything down with isopropyl alcohol or another cleaning solution.
After you have cleaned your workplace, you need to assemble all the equipment and supplies needed.
There are several ways you can choose to grow Lion’s Mane mushrooms but growers typically opt to begin the process of substrate preparation, inoculation and incubation within a mushroom growing bag. This makes life a lot easier when handling aspects like sterilisation and pasteurisation too.
From there, it is really a preference in growing technique. Some growers prefer to keep their Lion’s Mane growing from the bag, some prefer to use jars, others choose fruiting chambers. The key considerations are ensuring that the substrate has successfully been inoculated and colonised and that the eventual growing environment has sufficient humidity.
Some supplies we recommend
A Pressure cooker
Kitchen Scales
Measuring cups
Lion’s mane grain spawn
Mushroom growing bags or buckets
Hardwood pellets
Soy Hulls
Step 2. Preparing Your Mushroom Substrate
Preparing your mushroom substrate correctly is a critical step in the cultivation of any mushroom. It is where most new growers experience problems, as this is where bacteria or competing organisms are first introduced. This is especially true in the case of Lion’s mane mushrooms as the fungus takes much longer to develop than other commonly cultivated mushrooms. As a result, there is a often a much greater window of time for contamination to occur.
There are several types of substrate you could opt for when growing Lion’s Mane mushrooms. In this guide, we’ll be focusing on hardwood fuel pellets (HWFP) but you can learn about more types of substrates here.
A good substrate should provide the sustenance your fungi need to thrive and produce delicious mushrooms. It provides all of the nutrients, nitrates and hydration, so it is key you start on the right foot. Supplemented substrates are usually preferred by experienced growers when working with Lion’s Mane.
Whilst some prefer to use bran or oat supplements, one of our favourite and most recommended substrates for growing Lion’s Mane is Master’s Mix.
What is Master’s Mix?
Master’s Mix is a blend between hardwood pellets and soy hulls, which is ideal for Lion’s Mane as it naturally occurs on hardwood trees and the added soy provides an excellent source for the nitrogen and protein for the fungi.
It also provides a structure that is well suited for mycelium growth, allowing for fast colonisation and greater yield sizes.
Whilst sterilization isn’t strictly necessary for hardwood pellets, it is best practice that you do so to maximise your chances of success. Plus, if you do opt for a mixed blend like Master’s mix, you will most certainly need to sterilize your substrate mix.
We have a detailed guide to Master’s Mix in the works, but following the steps below will give you everything you need to know to get started.
Making your Master’s Mix Blend
To produce a simple master’s mix, prepare even amounts of hardwood fuel pellets and soy hulls. The recommended hydration level for a Masters’ Mix is 60% but if you’re using hardwood pellets, you will need to allow for additional water to redhyrate the pellets sufficiently.
Below are the supplies and weights need to produce a 2.3kg substrate:
450g hardwood pellets
450g soy hulls
1.4L clean water
A growing container (we recommend using a mushroom growing bag)
A pair of weight scales
A pressure cooker (Optional)
Latex gloves (Optional)
The first thing you will need to do is to mix your hardwood pellets and soy hulls together in a sterilised container or bag. Next, you will need to add the clean water to the mix. Allow this to sit for 5-10 minutes (or as long as required) to rehydrate the pellets into a sawdust-like mix. If you’re using a mushroom growing bag, it is easiest to hydrate your pellets and mix the supplies directly in the bag.
Sterlising your Substrate Mix
The next step is to sterilise your substrate mixture. There are several ways to sterilise and pastuerise a substrate, but it is recommend that you use a pressure cooker to do so.
If your mix has now hydrated, simply fold and seal the growing bag and place it into your pressure cooker. It is recommended to leave the mix in the cooker for at least two hours at a pressure of 15PSI.
Once your substrate mix has been in the cooker for 2 or more hours, you will need to carefully remove the growing bag and allow it to completely cool in a sanitary environment.
When the substrate has fully cooled, it is time to begin the inoculation process.
Step 3. Inoculating Your Mushroom Substrate
Before starting the inoculation process, use soap and water to thoroughly clean your hands before handling any of your growing materials. You should also ensure that the working environment has been sanitised prior to unsealing the growing bag.
We also recommend continuing this next step in a controlled decontaminated space, such as a flow hood or a DIY container (such as a sterilised clear box with embedded gloves).
For a 2.3kg substrate, we would recommend using 200 grams of grain spawn mix. We stock grain spawn in sizes from 600g to 3kg, so you will have plenty to work with.
If using grain spawn, carefully break apart the spawn and mix throughout the substrate mix, ensuring even coverage and layering.
Once your lion’s mane spawn has been mixed into the substrate, seal your growing bag or cover your container.
A better way to do this is to open the bag following pressure cooking, rapidly add the spawn, seal it immediately, and then mix the material within the sealed bag. This is ideally done in front of a flow hood and reduces exposure time.
Step 4. Incubating Your Lion’s Mane Mushrooms
Now that you’ve prepared and inoculated your substrate, it’s time to let the fungi do its thing.
Place your growing bag in a dark space away from direct sunlight and store at room temperature (18-25°C), although consistently at 23°C is ideal.
How long does it take for Lion’s Mane mushrooms to colonise?
It can take between 14-21 days for your Lion’s Mane to colonise the substrate mix but this could take longer depending on a number of factors, such as the amount of spawn used, the substrate hydration level, and external storage conditions and the quality of the spawn.
How to tell if Lion’s Mane is fully colonised
When compared with other commonly cultivated mushrooms, Lion’s Mane mushroom mycelium threads (known as hyphae) are somewhat finer in appearance and can make it harder to determine whether it has fully colonised the substrate.
Ideally, you will see the substrate mix even coated in a white mycelium, but other ways of testing include feeling the mix to test whether it has become firmer to the touch.
Step 5. How to Help Your Lion’s Mane To Fruit
While your Lion’s Mane is perfectly capable of fruiting their mushrooms when ready, it can be helpful to provide a helping hand by creating conditions that encourage a flush to appear.
For Lion’s Mane, this can be achieved by increasing the humidity of the growing environment. Whilst keeping the growing bag in a shady area, try misting the substrate several times a day with water.
You can also place your growing bag into a plastic liner and spray the inside lining to create a contained humid environment. Pro tip: if you’re not able to mist your substrate every day, place wet tissue paper or cloth inside of the outer lining to maintain humidity.
We suggest cutting a small (5 cm) hole on the side of your bag rather than the top. If you cut the top of the bag or open the entire top, the substrate dries out faster and you get a lot of smaller mushrooms instead of a few large groupings.
Only one hole in your bag is required for every 750 grams of substrate. For most bags, one hole is sufficient. However, if you have a really large bag, you may want to cut more holes.
If your bag has any extra room at the top, we recommend folding it down and taping it in place. Mushrooms may attempt to grow from the top if this is not done.
How to Grow Lion’s Mane Mushrooms on Logs
Growing lion’s mane on logs is a low-cost approach to ensure a consistent, long-term supply of fresh lion’s mane.
Everything you need to know about growing lion’s mane on logs is included in the step-by-step guide below. For a more in-depth guide on growing on logs, check out our full article on the topic.
What you’ll need:
Lion’s mane mushroom plug spawn
Comprising dowels, wax and wax applicator
Hardwood logs, which are 2-6 weeks old
Hammer
Drill with 8mm bit (depending on the size of dowels)
Gas cooker (if not near to a domestic stove)
Pan for heating the wax
Buy Now Lion’s Mane Mushroom Plug Spawn From £7.98
Step 1. Preparing Your Supplies & Growing Space
As mentioned above, it’s essential to keep your growing space clean to avoid contamination of your spawn.
When growing lion’s mane mushrooms, always use hardwood logs, we suggest beech or oak logs.
It’s vital to choose healthy trees while selecting logs and to never use logs older than 6 weeks. Any tree with rotting wood or symptoms of infection faces an increased risk of competition with pre-existing fungus in the logs.
Start by drilling a row of 15 cm holes down the length of your log. This is deep enough that when you hammer your plug into the wood, it will leave a little space underneath it, giving an ideal environment for the mycelium to thrive.
After you’ve finished the first row of holes, place the following row of holes in a staggered pattern. Begin the next row of holes 6 cm apart from the first, staggering the rows to create a diamond or checkerboard pattern.
Step 2. Inoculating Your Logs
Getting your plug spawn dowels into the hole should now be a breeze. All you have to do now is gently tap them in with a hammer to secure them.
Your plugs should be flush with the log’s timber and just beneath the bark’s surface. You’ll be able to plug the hole with wax this way.
This is an important step in keeping your mycelium safe and uninfected. The most common form of wax used to fill holes is soy wax; however, other waxes such as cheese or beeswax can also be utilised.
Once the wax has melted, use a wax applicator to apply it to your holes. You can buy them inexpensively or make your own with a cotton ball or rag, or a small brush.
Step 3. Incubating Your Lion’s Mane Mushrooms
Once you have inserted the spawn into your logs and sealed them with wax, your logs are pretty much ready to be left for incubation.
There are several options for storing logs during incubation. Shaded areas like beneath a tree or the side of a house are ideal places to keep your logs.
The most important thing is to keep your logs in an area with good air circulation and a high humidity level.
In dry weather, water your logs with a hose once or twice a week for 10 minutes to maintain the proper moisture level. If they dry out, your mycelium will die.
Step 4. How to Help Your Lion’s Mane To Fruit
You can speed up the growth of your mushrooms by initiating or ‘shocking’ your logs. This can be accomplished by soaking them in cold water for 12-24 hours. This can be done in a stream or pond, a kiddie pool, or even bathtubs or boats!
To ensure that the mycelium has colonised the majority of the log, wait at least a year before shocking it. Instead of waiting two or three years for mushrooms to grow normally, shock is a great technique to accelerate their growth.
When should you harvest Lion’s Mane Mushroom?
It won’t be long before you can harvest and enjoy your lion’s mane mushrooms as they begin to fruit. You might be eating excellent, fresh lion’s mane mushrooms in as little as 4 weeks.
A Lion’s mane mushroom has reached maturity when it stops expanding in diameter and its spines start to lengthen and thicken.
Harvest them before they turn pink or brown for the best taste. To achieve various mane textures, harvest the lion’s mane at various stages of growth and maturity. Younger lion’s mane mushrooms are firmer than their older counterparts.
Cut the “ball” off close to the base of the Lion’s Mane using a sharp knife, being careful not to injure the fruit. If handled gently to avoid bruising, lion’s mane will stay considerably longer in the fridge.
How should Lion’s Mushroom be stored?
Fresh lion’s mane keeps for about a week in the refrigerator. If you have more lion’s mane mushrooms than you can use in a week, dry them out in a food dehydrator or oven to store them.
Fresh vs Dried
Keep them refrigerated and away from water if you’re storing them fresh. Keep in mind that they will only survive a few days in the fridge.
If you want to keep the mushrooms fresh, put them in a paper bag that isn’t too full. They must be able to breathe and keep away from direct dampness; otherwise, they will absorb it like sponges.
If you discover any dark or soft places on a mushroom, or if the mushroom feels squishy and slimy, it’s a dead giveaway that it’s going bad.
Consider drying your mushrooms for a longer-term approach to storing them.
You must finely slice your mushrooms after properly washing them. After that, you set them on your tray and dehydrate them. They’ll be there for the next 6-8 hours. Once completely dry and crisp, seal in a jar and store until ready to eat.
Although this is a straightforward method for long-term storage, it can be time-consuming.
Lion’s Mane Mushroom FAQs
Are Lion’s Mane Good for You?
Lion’s mane mushrooms are a type of medicinal mushroom with a variety of health advantages.
According to research, lion’s mane mushrooms can strengthen the immune system which protects the body from pathogens that enter through the nose and mouth.
Are Lion’s Mane’s Mushrooms Legal?
Lion’s mane mushrooms are perfectly legal. It’s only that fresh lion’s mane is hard to come by, and you’re unlikely to find them at your local supermarket.
What substrates does Lion’s Mane grow best on?
The following are the best types of substrate for growing your Lion’s Mane:
Hardwood logs (I.e. Ash or Beech)
Hardwood fuel pellets (HWFP)
Master’s Mix Supplemented
Other Growing Guides
How To Grow Oyster Mushrooms
How To Grow Shiitake Mushrooms: Everything You Need To Know
How To Grow Mushrooms In Coffee Grounds
How To Grow Mushrooms In Buckets
How To Grow Mushrooms Outdoors With A Mushroom Bed
“Unraveling the Legality: Felons’ Possession of Air Rifles in Washington State”
Can a felon own an air rifle in washington state?
In Washington state, the ownership of firearms by felons is regulated by both state and federal laws. However, when it comes to air rifles, the laws are slightly different. While traditional firearms are generally prohibited for felons to possess, air rifles may be allowed under certain circumstances. According to Washington state law, felons can legally own and possess an air rifle as long as they have completed their sentence and do not have any restrictions that explicitly prohibit them from possessing any type of firearm.
It is important to note that while felons may be allowed to own an air rifle in Washington state, there are still some limitations and restrictions in place. For example, individuals who have been convicted of certain violent crimes or offenses involving domestic violence may still be prohibited from owning any type of firearm, including air rifles. Additionally, if a felon is on probation or parole, their supervision conditions may include specific restrictions on firearm possession.
In summary, while felons in Washington state may be able to legally own and possess an air rifle under certain circumstances, it is crucial for them to thoroughly understand the applicable laws and consult with legal professionals if they have any doubts or concerns regarding their eligibility to possess such firearms.
In Washington State, felons are prohibited from owning firearms, including air rifles. The state’s laws prioritize public safety by imposing restrictions on individuals with criminal records. It is important for felons to be aware of these regulations and comply with them to avoid further legal consequences.
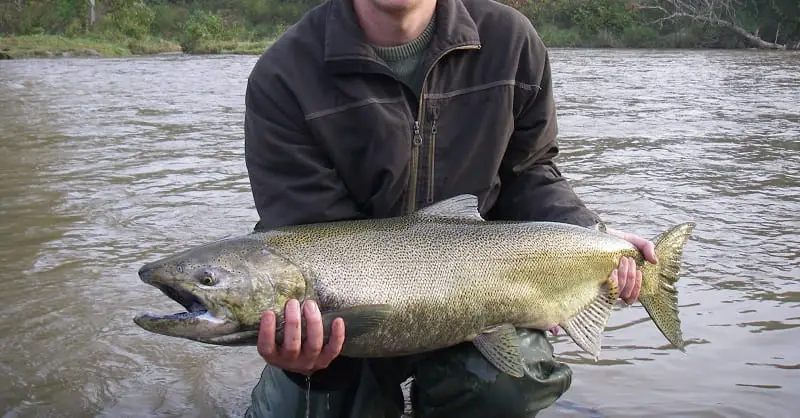
It’s not uncommon for anglers and my clients to ask about the best baits for salmon fishing on rivers around the great lakes. Therefore I thought I would write an article about the best baits for salmon that I and other river guides use, and include how and when to choose certain baits, and how I rig them.
The 4 best baits for fishing salmon in rivers are the spawn bag, the trout bead, a nymph or egg fly, and the plastic worm. These baits come in different sizes and colors and some will fish better than others depending on the conditions. Other baits like shrimp, grubs, and skein can be deadly effective.
I will discuss all 10 baits that I use annually.
These are just 4 of the best baits for salmon but there are a few other great baits that I will discuss and a bonus bait that at times might be better than all the other salmon baits. Look for my Guide Tip to see this hot bait.
I will also discuss the best hooks and leaders for each bait because a great bait can be often an ineffective bait simply using the wrong hook or a leader that is too thick or doesn’t work well.
In the picture above I show you how to put a bait on a hook properly and why this way is better. There are 2 things you need to consider when putting your bait onto the hook and these are both important if you want to get the maximum effectiveness out of your bait and if you want to get better hook sets.
Hook Size
The first problem with an oversize hook is that the fish are more likely to see your hook and refuse the bait. It might not matter how great the bait is if they spot the hook.
An extra-large hook is also heavy and that may not allow your bait to flow naturally in the current because it might act like an anchor weight that keeps dragging your bait to the bottom which may result in fewer bites and also too many snags.
Just like trout, salmon almost always look and feed up or sideways and they rarely feed downwards so a bait that is constantly on the bottom of the river will likely not get eaten. A lighter hook will allow your bait to stay off the bottom and in the strike zone.
Something else to consider is that your bait should be proportionate to the hook and the bait should be covering at least 50% of the hook.
Bait Placement
Another mistake many anglers make is blurring the hook point into the bait. On very soft baits like skein or spawn that might be OK, but on plastics and firmer baits, it’s a problem.
Covering the hook point can and likely will prevent soft-biting fish from getting hooked or it can impede the hook from going into the fish which might affect how well the hook holds.
The Best Hooks For Salmon Baits
I have always found that short shank wide gap hooks are the best hooks for salmon fishing in rivers when using most baits and under most conditions.
A short hook means less hook exposed at the top and the bottom and a wide gap improves hooking percentage and tends to hold the fish better.
However, an exposed hook point can sometimes hook itself even without a hook set.
Myself, my guides and other guides that I know like to use hooks like these and we recommend them to our clients.
The best hooks for salmon baits are:
#1 – Raven Specimen hook – A wide Gap hook that has become very popular with my guides. It hooks and holds well, and it’s strong for big salmon.
#2 – Gamakatsu Octopus hook – A hook that has been around for many years and is a proven good hook for salmon and steelhead and liked by many anglers.
#3 – Raven Specialist hook – Another great hook that is used by many anglers around the great lakes. It’s bit thinner
#4 – Redwing Tackle Blackbird Sabretooth Premium hooks – similar to the Gamakatsu and Specialist, this is a good hook for salmon and steelhead and is well like by many anglers
#5 – Daiichi 1150 Heavy Wide-Gape Hooks – This is my go-to hook when fishing beads or when fishing gin clear water for nervous salmon, steelhead, and trout. It’s a thinner lighter wire hook so it’s not the hook you want to be dragging big salmon in with, but it’s a low-profile hook that allows your bait to move more naturally and is less visible than the other hooks above.
For great lakes salmon fishing in rivers I would recommend having one or two of these hooks in sizes from size 6, size 8, and size 10, and be sure to match the size of the hook to the bait size.
The Best Baits For Salmon Fishing In Rivers
When I fish for salmon, steelhead, and even trout and I catch a ton of fish, if another angler asks how I did when I tell them how many fish I caught they often ask what bait I was using. Often, these anglers didn’t do so well, so they think the reason I did so much better is because of my bait.
The honest truth is that 9 out of 10 anglers that are not catching much fish are because of things not even related to their bait. Things like a bad presentation or a bad leader setup, and even a bad hook can be a reason for not catching any fish.
How you present your bait is often more important than the bait itself.
I tell my clients that the bait is only as good as your presentation, and your presentation is only as good as your leader setup, therefore you need to get it all correct if you want to catch more fish.
That means that if you drag your bait through the pool, or your bait is way over their fish’s heads, or you cover the water poorly, or even if your leader is too thick or not built properly, your great bait could become less effective and maybe not work at all.
If you think your presentation needs some work, or you would like to see my proven leader setup for salmon and steelhead be sure to check out my page How To Fish For Salmon.
The reason why spawn bags catch more salmon than any other bait is that 90% of anglers use spawn bags. If 90% of anglers used beads, or flies then they would be the best bait. I’m not saying that spawn isn’t the best bait, it’s just that there are times when it’s not.
I find that too many anglers are one-sided and only fish spawn and that mentality could limit the amount of salmon you catch. Many times I have outfished the spawn bag guys, even standing right beside 10 of them with other baits.
If 10 guys are running spawn bags through a pool for hours, those salmon will quickly get smart and stop eating spawn bags.
This is why I can often walk into a pool that everyone has fished with spawn bags and I will use a small fly, or a pink worm, or something that is different, smaller, or less intrusive, and I will catch a bunch of salmon that the spawn guys couldn’t catch.
However, spawn is often the best bait for new anglers and I discuss the reasons why I think this, as well as my color and size preferences in different types of water on my page Spawn Bag Tactics And Secrets.
For most spawn bag sizes I prefer to use a size 10 or size 8 hook.
Single Salmon Eggs
There are times when single eggs on a small size 12 Daiichi Salmon Egg Hook can be the best bait for salmon fishing in rivers. The store-bought single eggs are prepared in a way that allows them to scent well and stay on the hook.
My preferred single salmon eggs are the Pautzke Balls O’ Fire Salmon Eggs, and my most effective colors are Natural or Yellow, but other colors like Chartreuse, Pink, and Red have been very effective, especially in dirtier water.
Single eggs are most effective in low clear water when salmon are holding, but they can be great in any type of water, deep, fast, dirty, and clear.
If you don’t live near a tackle store and you need to buy your single eggs or spawn bags or even loose trout eggs online these are your best options:
Salmon Fishing With Beads
Fishing with soft and hard beads has become a very popular way of fishing for salmon, steelhead, and trout. The reason beads are so popular is that they work very well.
The belief is that salmon will occasionally eat eggs that float past them out of instinct, aggression, or even hunger, and they might eat just to maintain energy to prolong their spawning duration which can allow them to spawn longer and spawn more often.
Beads are a great way to imitate those loose salmon eggs drifting in the current, and based on my experience, beads will often outfish bigger spawn bags.
There are a few different brands of beads as well as soft and hard plastic and glass beads that anglers can use.
There are also a few good ways to rig beads. Anglers also have a ton of different colors and sizes to use and I discuss all of this and how I fish beads for steelhead and salmon on my page Advanced Bead Fishing For Salmon: Guide Tactics and Setup.
Or, if you are a trout angler, I go into detail on how to fish beads for trout on my page Bead Fishing For Trout.
Plastic Worms For Salmon Fishing
For many years, three and 4-inch plastic worms have been my secret hot bait for steelhead and trout, but worms are also one of my best baits for salmon fishing in rivers and I use them all the time. In fact, many of my buddies and guides swear that beads are often their top bait for salmon.
I have seen salmon hit a worm that is swinging across the pool at the end of a drift, and I have seen salmon hit a worm as it’s being reeled in, and I have even seen salmon chase a worm to the surface.
These 3 brands are great when fishing with the pink and red are my most effective colors.
Pink worms are my go-to color most of the time when I am fishing for salmon, but I have had days when the salmon prefer the red or brown worms, and Chartreuse worms can be very effective some days.
Also, If you are looking to try other colors like orange and white, both have worked for me, the Berkely Trout Worms have a lot of interesting colors.
I discuss my tactics, setups, and my favorite worms for steelhead, trout, and salmon on my page Fishing With Worms.
Flies Are A Great Bait For Salmon In Rivers
There are times when the anglers are all using spawn bags or brightly colored baits and that can sometimes stop the fish from feeding. This is when a black or brown nymph can really shine.
Most often I will use size 8 and 10 flies but will sometimes drop down to a smaller size 12 when the fish are pressured and nervous.
Some of the best flies for salmon fishing are: (click the link to see or buy the fly)
Wooly Bugger – Like this in a size 8 or 10 but have done well with smaller size 12 and 14 sizes. I also like them with or without a gold or silver bead head. I do find that the pattern in the link with the flash on the sides works the best. I have found that black and olive work the best, but there are some days when white and pink will be hot.
I like the flash on this fly because the salmon seem to be more attracted to flashy flies.
Prince nymph – This is a fantastic attractor nymph pattern that has been great for salmon and steelhead. I think the combination of the greenish shine on the body and the white wing gets their attention.
Stonefly – I tie my own and have a pattern that seems to worm better than most. This Bead Head Copper John Nymph in the link is the closest that I have seen to the stonefly pattern that I tie and use.
Copper John – Another great fly that seems to work in most colors however the red body version is the hot fly some days.
Zug Bug – Something about the peacock herl on this fly that drives big salmon crazy some days. I will always have some of these on hand. In fact, I have found that peacock hearl seems to work very well on salmon, so I use and do well with other flies with peacock herl like the Pheasant Tail Nymph.
If you want to see more of the flies that I use and recommend when fishing for salmon around the great lakes, be sure to check out my page on the Best Flies For Salmon Fishing On The Great Lakes: COMING SOON, or if you want to learn to fly fish for salmon check out my page How To Fly Fish For Salmon.
Using Shrimp For Salmon Fishing
Shrimp are recognized as effective bait for salmon fishing, with anglers enhancing their effectiveness by adding colors, scents, or attractants. Different types of shrimp, such as Coon Shrimp, Stripped Shrimp, Sand Shrimp, and Salad Shrimp, have proven successful in catching salmon.
While shrimp work well in faster currents, they are not as effective in slower or stagnant water.
Curing shrimp is a simple process, and ready-to-use cures and brines are available for consistent results.
Properly cured and dyed shrimp can prolong their lifespan and entice salmon to strike. Rigging shrimp involves using a size 6 or 8 hook and attaching the shrimp once in the head area.
See Salmon Fishing With Shrimp for more cures and info on this bait.
Various methods can be employed for salmon fishing with shrimp, including bottom fishing, plunking, side drifting, and float fishing. Each method has its advantages and requires specific techniques. Adding a floating bead to keep the shrimp off the bottom can be beneficial.
While shrimp have their place in salmon bait options, they may not have equal success rates compared to proven baits like spawn bags or skein when float fishing.
Using shrimp as an additional bait option is recommended when other baits are not producing desired results, but they should not be the primary choice.
Professional guides have found success with shrimp and many guides will use shrimp on the middle hook of plugs when side drifting or plunking for salmon.
Minnows and Minnow Patterns For Salmon Fishing
I have used live, dead, and even dead salted minnows with some success on fresh-run salmon that have just entered the river.
The best minnow imitation for salmon fishing and what I prefer to use most often is the Berkley Gulp! Alive Minnow or, if I want more action the Berkely Gulp Alive Paddleshad. I will fish these minnow imitations under a float or when bottom bouncing in shallow runs and pockets.
Other good options for minnow patterns are the Berkley PowerBait Pro Twitchtail Minnow and the Cabela’s Fisherman Series Go-To Swim Minnow which has a little extra movement in the tail in faster currents.
Most of the time I use minnows that are natural shad or minnow colors like silver with back, green or blueish backs. However, orange and chartreuse can be hot some days.
With these minnows, I will use a size 8 or 10 hooks and will hook it mid-body at the top of the back so that it rides more horizontally in the current.
Plastic Grubs and Plastic Flies Are Great For Salmon
Something that not a lot of anglers use is plastic grubs and plastic flies, however, I have had very good success with these baits under a float or when bottom bouncing. I use them in medium to fast-moving water mostly.
Salmon, like many river fish, are opportunistic and will grab anything that is presented well and looks edible.
The Mad River Steelhead Grubs, the Berkley Gulp! Crickets and the Berkley Gulp! Pinched Crawlers have all been good for me.
I have also done very well some days with the 3.5″ Vudu Rattle Shrimp in the colors gold, natural, and magic. I have also done well with Tsunami Holographic Shrimp in colors rootbeer, silver glitter, and red glitter.
Another bait that fits into this category is the leech. Yes, I salmon fish with leeches. I don’t use real leeches but there are some great fake ones. My favorite is the Berkley Gulp! 3” Leech or the Gulp Alive Leech.
Plastic Eggs, Fake Eggs, and Egg Clusters
Just like the beads and spawn sacks, these are just imitation eggs and at times they will work great for steelhead and salmon.
Plastic single eggs and egg clusters like the Sac Attack Imitation Cluster Eggs, or the Mad River Single Eggs and the Berkley Gulp! Floating Salmon Eggs.
Other potential baits Include:
Salmon Fishing With Corn
Salmon Fishing With Powerbait
Salmon Fishing With Marshmallows
Salmon Fishing With Minnows
Jigs For Salmon Fishing
You can fish with jigs for salmon a few different ways. There are times when casting a bass or walleye-style jig with a spinning rod and then slowly swinging it and bouncing the jig off the bottom and across the river can be deadly for salmon, steelhead, and even for trout.
For this tactic, I used Chompers Skirted Football Jigs, or the No-Alibi Pearl Alien Jigs, or the Missile Jigs Ike’s Mini Flip Jig. I have also done well with a jig head and a plastic minnow like the Berkley Gulp Alive minnow or even a twister tail type grub like the 4 inch Strike King Rage Tail Grub.
There are other times when drifting a jig under a float will be very effective and I use this method the most.
I will also use the bottom bouncing method and will dead drift the jig or use a bounce and dead drift presentation.
I’ve also done very well with the Steelhead Worm Jigs, or Kalin’s Marabou Jigs, or the Mimic Fry Jig, and the Fly Jig. These are all good options when salmon fishing under a float.
Using Skein For Salmon Fishing
A very hot bait for many anglers and a bait that often works when other baits don’t is Skein.
There are many salmon guides and anglers that will tell you this is the most effective bait that you can use for salmon, and at times, I will 100% agree with them.
Skein is the immature eggs of salmon, steelhead, or trout. Skein eggs are stuck together by a fine membrane and as the salmon get close to spawning the eggs will start to loosen from the membrane so they can be dropped when the salmon spawns.
Many anglers know that skein can work better than any other bait, especially with fresh salmon that are just entering the river. I drift skein under a float or when bottom bouncing.
All of my guides love to use skein when fishing for great lakes salmon and on days when the salmon are being difficult skein is often the only way to get the salmon to bite.
Most anglers will use Coho or king/Chinook salmon skeins from fish that they have caught but not all anglers have access to skein which is ok because you can buy salmon skeins in whole or in chucks.
Some of the best skeins you can get are the Pro-Cure Salmon Roe or the Pro-Cure Vacuum Packed Salmon Skeins eggs on Amazon.
.
Lures For Salmon Fishing
If you are the type of angler that likes to throw lures at salmon and want to know my best lures and my tactics check out my page Lure Fishing For Salmon and don’t forget to check out my page Best Gear For River Fishing where I discuss all the release gear, waders, boots, vest and more.
Putting The Best Salmon Baits To Use
How you use the bait is as important as the bait itself. When I fish baits in the river for salmon I either use the float fishing method or I use something known as Bottom Bouncing.
You can see how to do both of these methods well on other pages. Check out my page Float Fishing For Salmon – Great Lakes Tactics From A Top Guide and my page Bottom Bouncing – 5 Proven Guide Tips For More Fish.
Want more on what bait to choose and when, see below.
FAQs About The Best Baits For Salmon
I received this message from a reader and thought I would share it with you since it’s related to the best baits for salmon and how to fish them in certain situations.
Question: Could you please elaborate a bit on when would the Salmon prefer a minnow style bait over eggs or rubber worms.
And targeting them on the fly like the woolly bugger and gulp minnows, is a complete dead drift better than say a retrieve where you trot the float in minuet steps of slow and fast speeds thus causing small up and down jigging motion on the buggers and other streamers to get a reaction bite?I came across a pod of 3-4 salmon and tried dead drifting, worms/woolly buggers/egg-sucking leeches, I couldn’t get them to bite at all except for one swipe at the egg-sucking leech.
Hi Durvesh,
I dead drift baits that don’t normally have movement in the river and on occasion, I might bounce or jig a bait like a minnow, a fly, or a jig to get a reaction strike. However, it will depend on the spot. 3 or 4 salmon holding in a smaller clear pool are likely to be nervous fish, therefore jigging or causing any type of commotion on the surface can spook them even more.
In larger faster flowing spots, jigging or holding back and releasing your float might work but 90% of the time I will dead drift a bait and it seems to work well.
I will often use smaller less intrusive baits like flies in low clear waters and bigger brighter baits in bigger pools or faster water.
Trying to determine if the fish want a worm or an egg or a minnow is trial and error and I will often rotate baits in each spot until I find something that works.
Make sure you use the right type of float for the type of water you are fishing, make sure you have the right leader set up and the right size leader for the spot, and make sure you fish well and don’t spook the fish.
Sometimes salmon can be very aggressive when something enters their space so they may hit an aggressively retrieved fly, jig, or lure out of anger or a territorial thing, so sometimes a switch to a lure will do the trick. However, that is always my last resort since that can also spook the fish.
Honestly, some salmon just won’t eat once they enter the river no matter what you do or try.
Ask A Guide About The Best Baits For Salmon Fishing
If you have a question, comment, or even a suggestion related to the best baits for salmon fishing in the river, let me and other readers hear it in the comment section below and I or one of my guides will get back to you.
Just like you, we’re itching to get back out in the stand, sporting our favorite colors—camouflage and/or blaze orange. We’re ready for those pulse pounding moments of securing a monster in our cross hairs. But, knowing how to clean, butcher, preserve, serve, and display your harvest are action items that need to be addressed ahead of time.
There are a number ways to display your season’s trophy in a sustainable manner. Perhaps the most popular method—the shoulder mount, will give you the most realistic outcome. However, at a well-established taxidermist, shoulder mounts can also cost upwards of $700. On the contrary, a Euro mount is inexpensive, can be done at home, and supports sustainable hunting by using the animal’s entirety. Follow along as we make a European skull mount.
How to Make Your Own Euro Skull Mount
Products You Will Need
•Butchering knife set
•High Powered Outdoor Cooker
•Large Aluminum Stock Pot
•Washing Soda, 1/2 cup / gallon of water used
•Heat Resistant Gloves
•Hose with jet spray setting
•Bleach or Whitening Agent, Optional
•Basting Brush or Paint Brush
•Skull Hooker for display
Instructions
Boil with CAUTION. Boiling too long may result in nose bones coming off.
While you’re harvesting your deer, separate the head from the body so that you can begin to work on the skull. With your hunting knife, carefully skin the head by removing the hide, fat, and flesh off the skull. Pro Tip: we do this step as we are harvesting the deer in the field or back at camp. The longer you wait to remove the flesh, the more difficult it is to clean and whiten since it discolors the bone.
Continue your dissection by removing the eyes, tongue, connective tissues, and brain matter as best as you can. Be strategic when doing this. You may need to concoct a tool to scrape out the gray matter such as a hanger. Use the hole where the spinal cord enters the base of the head. After you’ve finished, let the skull dry out a couple hours in the sun.
Next is the boiling process. Right now, the skull appears brown and rather discolored—this is normal and will be remedied during the whitening process. Fill a medium to large stock pot with water (just enough to cover the skull, not the antlers), add in your Washing Soda, place on your cooking system, and bring to a rolling boil over medium to high heat. Boil for 30 minutes. Monitor this to ensure the entire skull remains below the water line.
Remove from the pot. There may be some tissues and particles left on the skull. (This is fine.) Spray the skull with a jet hose setting, working around the nooks, crannies, and cavities. Be prepared. This can be a dirty job especially when cleaning the spinal cord opening.
With a fresh batch of water, boil the skull again (30 minutes.) Repeat the boiling and jet spraying process up to three times, until the skull is completely clean.
This step is optional. If your skull is not as white as you’d like you can take a basting brush and brush the skull’s entirety with the bleach or whitening agent. If you choose to do this step, make sure to get the front, back, sides, and creases, all while avoiding the antlers at all costs.
Bring it outside and hang it in the sun for 24 hours. You can repeat this process of painting and drying in the sun up to three times. Be weary of where you hang your skull as animals may be prone to walk off with your hardwork.
After you’ve whitened your skull—it’s time to show it off! Use a Skull Hooker to effortlessly mount to your prize to the wall. The Little Hooker® is the perfect size for housing mid-sized European skulls and game such as hogs, aoudad, alligator, black bear, deer, antelope and exotic medium game such as gazelle, and impala just to name a few. Your fall harvest will be the conversation piece at every gathering.
")
")
")
")
")