Choosing hunting boots can be a challenge, especially if you’re pressed for time. After all, there are many factors to consider before lacing up a pair of boots, whether it’s for a hunt through rugged terrain or a spring turkey hunt in a field. We’re here to help you narrow down the possibilities with recommendations for boots suited to various purposes. Each has been put to the test in the field. Consider this your one-stop guide for picking out your next pair of hunting boots.
Vaprtrek boots with a height of eight inches are offered by Irish Setter Boots in both men’s and women’s sizes. After years of using both men’s and women’s Vaprtreks, I can safely say they’re equally comfortable, durable and useful. These boots have 400-gram Primaloft insulation to help keep feet warm—but not too warm. They are made using full-grain leather and ArmaTec XT, an abrasion-resistant, tough material. The boots have a Mossy Oak Break Up Country camouflage exterior to reduce the risk of game animals catching glimpses of movement.
These are the boots to get when you want durable yet fairly lightweight boots for spring or fall hunts. They have an exceptionally long life, even for those of us who hunt heavily. I’ve been so impressed by these boots that I now have a pair in each truck, in the mud room and on my boot rack. They are that versatile and dependable.
Most Versatile Hunting Boots (Best Hunting Boots for multiple terrains)
This boot style provides a bit of a “two-fer” because it covers both the 400-gram and 1000-gram Thinsulate boots. There’s simply no better boot for truly cold weather or challenging mountain hunts than the Kenetrek Mountain Extremes. These boots are more rigid than lighter-weight boots that are meant for less strenuous hunts. Their rigidity and impressive toughness is very useful when you’re chasing predators or mountain goats. The 400-gram boot is, of course, a bit lighter and not as toasty as the 1000-gram version. However, each has its purpose depending on the temperatures you’re facing.
Kenetrek Mountain Extremes are the perfect cold weather boot that are also tough enough to withstand seriously rugged terrain, like you need when chasing mountain goats. (Photo credit: Kenetrek)
When you pair the Mountain Extreme with Kenetrek’s Ultimate Liner Lightweight Over-the-Calf Sock, (with or without a heavier boot sock over it), you have the perfect combination for difficult winter hunts. Features of the Kenetrek Mountain Extreme include 10-inch uppers with a one-piece vamp construction tongue. That means there aren’t openings where water or snow can get in. They have double- and even triple-stitching at high-stress points and K-Talon outsoles. Yes, these are heavier boots on your feet than some others, but they are well worth that facet when you’re braving snow and ice. While others in your hunt team are suffering, your feet will be doing great. These boots are made in Italy and they last for quite some time.
Most Comfortable Hunting Boot
Dryshod Evalusion Hi Super Lightweight ($174.95)
The Dryshod Evalusion Hi Super Lightweight Hunting Boot gets the top pick for the most comfortable hunting boot on the market. They have a Dureva technology/compound that eliminates the need for a secondary rubber sole and provides extreme comfort in most any situation. Aside from comfortable it is also an extremely quiet boot due to their multi-lug tread resulting in silent flexing and bending when curving over the ground’s elements. The lugs provide good traction, but are not too aggressive that they pick up and retain mud. This boot maximizes air circulation and prevents moisture builup with its Densoprene Foam that both keeps your foot warm and keeps moisture out.
For those of us who like a rubber boot for the beginning of white tail hunting season, this one comes out on top for several reasons. The insole has a good, supportive arch, making them comfortable to walk long distances without having sore arches. Their 16-inch height makes it easy to ford wet areas or even small streams. The outsole design is wide, giving you a firm support underfoot, and helping to prevent ankle twists when traversing rugged ground. The wide heel sole provides great stability, plus gives a convenient point to grab when you are trying to kick off the boots. The design of the boot upper helps to keep your calf area warm, which in turn keeps your lower foot warm. Yet the shape of the upper hugs your calf just enough to not have the boot “slap” against your shin and back of your calf while walking, and allows a hunter to let rain pants come down over the outside of the boot, rather than tuck them into the upper. Experience has shown they are comfortable in temperatures from 30’s to 60’s. They run true to size, I would recommend buying a half size larger to allow for the use of a good wool sock.
The Dryshod Evalusion comes in Super Lightweight Ankle length and Hi in brown, black, camo, and more. Prices vary from $129.95-$192.39 depending on color and sizing options. Dryshod is known for dependability and durability and this shoe should withstand the test of time and hours spent walking.
Aside from dry, warm, comfortable, and breathable – the shoe is also extremely light making it an easy walk. What keeps it from being best overall is just simply preference. We haven’t found a non-lace shoe that stands up to lace shoes when it comes to those on the go but from a slip-on option this shoe rises to the top.
Snake boots are more of an issue in the southern part of the country, but these boots prove useful anywhere across the nation.
The Rocky Prolight Hunting Waterproof Snake Boot is designed for unisex wear. It spans sizes from 4 to 15, medium or wide. (You need to read the size chart to determine men’s sizes, because that’s how Rocky sizes these boots). These boots have 16-inch uppers. Unlike some snake boots, they’re made in lace-up style, which is nice if you prefer to keep your boots secure and keep out more than just snakes.
Mine (female) have served me well in numerous states and have proven to be the correct height for blocking any snakes that are froggy enough to try striking as you walk by. (The worst you might feel from that is a quick bump as they bounce off the boot.) This aspect is especially useful in Texas, where seeing venomous snakes is never a surprise and is always expected. So, when it’s prime snake time, you want these boots.
Rocky Prolight Hunting Waterproof Snake Boots are a solid choice for terrain that’s likely to contain some venomous creatures. (Photo credit: Rocky)
These boots utilize Rocky’s waterproof system. It’s one that remains breathable, so the boots are able to resist mud and rain, keeping your feet dry. They’re constructed from full-grain leather and nylon, and they have a polyurethane and rubber outsole. With a total weight of about 1.5 pounds, they’re really not excessively bulky, especially when you consider their height. These aren’t awkward or uncomfortable snake boots, either. Do your legs get hot with these? I’d say yes, but not ridiculously so, and that is a small price to pay for protection from our fanged friends. Rocky gives these boots a Mossy Oak Break Up camo outer layer to help them blend in and uses tan leather over the stress points.
Best Hunting Boots for those on the go:
Danner Pronghorn ($246.46)
The Danner Pronghorn boot is produced in men’s sizes, but I’ve found that the sizing works just fine for women, too. That’s not something you can say about all boots, since women do tend to have narrower feet.
These boots are considered the foundation of the company’s hunting boot line-up. They are now in their fifth iteration, which is impressive. Danner Pronghorns are made to keep you comfortable and stable during your hunt—both important elements. These boots are great for deer hunts and any hunt that involves light to moderate hiking. Their 400-gram boots with a GORE-TEX waterproof liner.
Looking for a nice mid-weight boot that’s ideal for fall days? You’ll want the Danner Pronghorn. (Photo credit: Danner)
Their eight-inch, full-grain leather upper is resistant to wear and also delivers fantastic longevity. The 400-gram PrimaLoft insulation helps keep your feet from getting excessively cold without being too much for warmer weather. These boots also have a Realtree Edge camo pattern, so the colors are great for most terrain. A Vibram midsole cushions feet during the hiking portion of hunts and a TERRA FORCE NEXT platform gives users solid arch support. Danner Pronghorns are excellent boots for hunts, whether you’re chasing feral hogs, whitetail deer, or turkeys. These are the kind of boots that will have you wanting to buy multiple pairs (believe me).
Best Hunting Boots for around the house:
Lacrosse AlphaTerra ($154.65-$170.56 depending on size)
It’s a tossup whether to list the massive benefits of Lacrosse’s muck boots or focus on the AlphaTerra, because this is a company that produces some wonderful mud boots.
The AlphaTerra by Lacrosse is a nice, shorter boot that’s great for transitioning from the woods to home or vice versa. The AlphaTerra is a slip-on, but it does have a side-zip closure as shown here. (Photo credit: Lacrosse)
We’re focusing on the AlphaTerra because these are the ankle-height boots that should literally live in your truck or by the back door. Who among us hasn’t decided to go on a hunt at the last minute, or forgotten their favorite hunting boots at home? Lacrosse AlphaTerras come in men’s and women’s sizes. The women’s version is currently only offered in black and white. If you’re a woman who wants camo or boots that don’t have high-visibility strips of white, you may want to stick to men’s sizes.
The Mossy Oak Bottomland-patterned AlphaTerra has a six-inch height. It’s a one-piece, pull-on boot with no laces or buckles, although it does have a zipper closure on the side. They’re made from rubber and insulated neoprene with an EVA midsole. They offer stellar water protection (as long as you remember their shorter height). These boots also make wonderful transition boots between a muddy field and home, or from a hunt to your kid’s soccer practice. They’re comfortable enough to wear just about anywhere and they are also a lot easier to clean than many other boots. For those of us who have a tendency to wear hunting boots more often than not, the Lacrosse AlphaTerra is a nice option that doesn’t quite scream, “I’d rather be in the woods,” and manages to look and serve as a functional, useful shorter boot.
Best Hunting Boots for Muddy Terrain:
Frogg Toggs Ridge Buster Mud Boot ($68.13-$169.99 Depending on Size and Color)
The Frogg Toggs Ridge Buster Mud Boot makes the list for best muddy terrain but could almost make it for its cold weather applications as well (depending on which Thinsulate you choose on the 600/1200 options). Although it’s a higher boot it boasts all day comfort and has the option as mentioned above to be a warm boot (1200g thinsulate) or a breathable boot (600g thinsulate) for the springtime mud hunts.
These boots come available in Mossy Oak, RealTree Edge, Brown, and RealTree Timber. There are available options as a Mud Boot, a Knee Boot, and a Lite Mid Boot. and they make both men and women’s models. Frogg Toggs is a brand you can trust with excellent customer service and response should you need it. Their boots are durable, dependable, and made for most any conditions – including fishing boots as well!
It’s always exciting when any branch of the US military starts flirting with a new cartridge, and it’s hard to think of a recent cartridge that has generated more excitement than the SIG .277 Fury.
On paper, this round has some truly staggering statistics, and there are rumblings that the Army is eyeing it to at least partially replace the much-beloved 5.56 NATO.
Today, we’re going to take a look at this new round, the guns that go with it, and what it means for us average Joes and Janes in the civilian world.
In April 2022, the US Army announced that they’d selected SIG Sauer’s XM5 rifle and .277 Fury ammunition to partially replace the M4.
So does that mean the M4 and 5.56 are on the way out?
Not even close.
For one, the .277 Fury and the XM5 are only partial replacements.
For two, the Army has hemmed and hawed about replacing the M16/M4 off and on for the almost six decades, and nothing comprehensive has happened yet. The M16/M4 is just too hard to beat in terms of versatility, reliability, and affordability.
While the adoption announcement came in 2022, our story actually begins back in 2017, when the US Army launched the Next Generation Squad Weapon Program (NGSW) to find a common system of 6.8mm cartridges, along with arms to go with them, to replace the 5.56mm M4 carbine, the M249 SAW light machine gun, and the 7.62mm M240 machine gun.
The Army invited firearms manufacturers to submit a new cartridge and accompanying rifle system that met a few different requirements.
SIG XM250 and XM5
The rifle could be no bigger than 35 inches long and 12 pounds (with attachments), able to accurately hit targets out to 610m, able to suppress targets out to 1200m, and able to use small arms fire-control systems.
The ammo needed to match that accuracy, pierce near-peer body armor out to 500m, and use a 6.8mm projectile.
.227 Fury was SIG Sauer’s design for the program, hoping to be adopted. Clearly, that worked out. The round was accepted by SAAMI in 2020, then the round, along with the accompanying XM5 and XM250 LMG rifles, was adopted by the US Army in 2022.
But let’s talk about what the round can do.
.277 FURY CONSTRUCTION & BALLISTICS
When looking at .277 Fury’s ballistics, it’s likely that one of the first things you’ll notice is the round’s incredibly high chamber pressure, 80,000 PSI.
In contrast, the chamber pressure of 5.56 NATO is only roughly 75% of that, at about 60,000 PSI, while 6.5 Creedmoor and .308 Win have only slightly higher chamber pressures at 62,000 PSI. Even a .338 Lapua Magnum is only about 60,000 PSI. In fact, SAAMI recommends that cartridges don’t exceed 65,000 PSI.
So to accommodate for this much higher-than-usual chamber pressure, SIG had to make some unusual design choices.
At first glance, the case seems pretty normal. The body is brass, and while it’s thicker than you’d typically see, it’s not too unusual. Where things really get shaken up is the base of the case, which is made from a separate stainless steel piece, allowing the case to tolerate the higher pressure. The pieces connect with a locking washer.
But what does that higher pressure mean for the performance of this round?
Well, .277 Fury sends a 140 gr round down range at 2,950 ft/s (900 m/s). For comparison, a similarly sized 6.5 Creedmoor round will achieve only about 2,710 ft/s (830 m/s).
That allows the Fury to maintain accuracy at significantly further distances than even Creedmoor, which was specifically designed for long-range target shooting. .277 Fury has a -41 inch drop at 500 yards, compared to 6.5 Creedmoor’s -53 inch drop.
At 1000 yards, SIG says the .277 Fury will drop a whole six feet less than 6.5 Creedmoor and hit the target with 25% more energy.
The real kicker? To reach that speed at the muzzle, Creedmoor needs about a 24-inch barrel, while the Fury will come out of a barrel that’s 8 inches shorter.
If you send a 6.5 Creedmoor out of a 16” barrel you’re looking at more like 2,450 FPS Vs. .227 Fury’s 2,950.
We see higher velocity, around 3,100 f/s, from 5.56 NATO, but with a much smaller projectile, around 62 gr, and the 5.56 NATO doesn’t maintain its trajectory nearly as well either, with a drop of about -90 inches at 500 yards.
All in all, the .277 Fury sounds a whole heck of a lot more effective than 5.56, and looks to be a marked improvement over even something like 6.5 CM…but I still don’t see 5.56 getting replaced anytime soon.
Downsides?
While all that performance sounds great, it’s key to remember that a lot of it comes from the fact that the bullets are about 3 times as heavy as 5.56 NATO. From a boots-on-the-ground perspective, that weight is a lot. We’re already sending our armed forces into harm’s way, carrying a lot of weight. Equipping them with .277 FURY either means a lot more weight or a lot less ammo on their person.
This demands the question, can this really be a viable 5.56 replacement for the average infantry? The Army seems to think so. For now.
Also, the idea of defeating body armor at 500 yards is a big part of the development here, which is a need our military hasn’t really had in most recent conflicts. It’s clear with this requirement that the Army is looking ahead to modern battlefields against better-equipped opponents than what we’ve seen in the last several decades.
SIG Spear is their civilian version of the XM5. Think of it as the AR-15 to the military’s M4. This one is chambered in 6.5 Creedmoor.
Then again, based on what the world has seen in Ukraine for the last year, past reports of “near-peer body armor” might be overstated.
All in all, the .277 Fury is a pretty incredible round, especially for long ranges, but it’s more of a specialty round, while the 5.56 NATO is more of a generalist. Of course, for what .277 Fury is for, it’s very, very good.
The bottom line is that .277 Fury is something of a monster. 6.5 Creedmoor is nothing to sneeze at, and .277 Fury makes 6.5 Creedmoor looks like its kid brother.
WHAT DOES ALL THIS MEAN FOR NORMAL PEOPLE?
Honestly, not much…for now.
The .277 Fury hasn’t had a huge impact in the military as of yet, and it’s certainly not going to replace the AR-15 platform for civilians. And even if you do want to replace your AR with a .277 Fury rifle, there aren’t a lot of options available.
From the time the round was first introduced for civilian use at the end of 2019, Sig had the bolt-action CROSS available for it. At around $1,600 to $1,800, it’s not outrageously priced.
If you can get your hands on it, that is, and that’s a big “if.” While researching for this article, I couldn’t find one in stock anywhere.
Then early last year, SIG introduced the MCX-Spear (SIG’s civilian version of the XM5) chambered in .277 Fury, and just this week added the .308 Win and 6.5 Creedmoor versions. All 3 have an MSRP north of $4,000.
Ammo is a bit easier to get your hands on, but it’s still pretty pricey, generally running at least $1.65 per round for the cheapest stuff. And, of course, you have to get your hands on the rifle first.
On the other hand, other similar rounds like .308 Win and 6.5 Creedmoor are much cheaper and easier to find, and the difference in ballistic performance just isn’t enough to tempt me to pay the higher price for .277 Fury.
So if you’re in the niche group of hunters pushing the 600 to 800-yard range, you might find it worth it, but personally, I’m going to hold off for a while until the price comes down (if it ever does).
Of course, we’ve seen explosions of popularity in rounds adopted by the military, and what the US Army uses has a huge effect on what other service branches pick up. If we start seeing the USMC, Navy, and Air Force picking up .277 rifles, that’s a whole different ball game.
If 6.8×51 becomes a standard NATO cartridge? Forget about. It’ll be around for a hundred years. Will that happen? SIG certainly hopes so, I’m sure, but right now, the Army has only bought into the tune of about $20 million.
Which, in terms of military acquisitions and spending, is basically the equivalent of tipping your Uber Eats driver with a stick of gum.
Still, the round definitely has potential, and it’s one of the most interesting developments in cartridge design that we’ve seen in quite a while, from the hybrid-material case to the insane 80,000 PSI case pressure that blows almost everything else out of the water.
LOOSE ROUNDS
The SIG .277 is a marvel of cartridge development and firearms engineering, but that doesn’t mean it’s a home run just yet. On paper, things look great for this round to succeed and maybe replace some issued M4s.
There are some logistical hurdles in the way of that goal, but it’s always interesting to see a major manufacturer like SIG SAUER really pushing the envelope in terms of cartridge design and putting out something completely new that we haven’t seen before.
Do you prefer vacuum-sealing your meat as it is less likely to become oxidized and discolored? But what about freezing it again after thawing. Will it remain tender and juicy?
Refreezing is a complicated process, and you might hesitate to place your meat back in the freezer as it is in a delicate state. We are here today to uncover this myth for you and let you discover, can you refreeze vacuum-sealed meat?
You can refreeze different meat kinds after vacuum-sealing them in bags/containers. If you leave it to thaw in the fridge, it will refreeze for five to six months without turning rancid. Ensure to check and seal the meat properly when you finally twice freeze it. You can also opt for heavy-duty freezer bags to maintain freshness. Avoid letting it sit at room temperature for a longer span.
Before you start to refreeze the meat, there are certain aspects that you need to know. It is crucial to perform the procedure with the correct technique. Else, all the blood and sweat you put into it will waste away. Let’s discover together the pros and cons of refreezing sealed meat.
When it comes to keeping your meat for long-term storage, vacuum sealing is the most effective option. It prevents the formation of ice crystals, and it remains tender for a decent amount of time. Vacuum sealing removes most of the excess air from the packaging that can cause the food to spoil. It also prevents the build-up of bacteria that can ruin food.
By looking at the benefits, vacuum sealing is a go-to option for many people for bulk storing meat in the freezer. Once you thaw the required amount, you can refreeze without worrying about spoilage. Yes, vacuum-sealed protein freezes, thaws, and freezes again as it has minimal exposure to air contamination.
You might notice a quality loss in the meat, but it is still edible and won’t go to waste. Besides, refreezing requires careful handling. If you keep it at room temperature for longer durations after thawing, it might not be fit for refreezing. So, it is necessary to thaw vacuum-sealed meat in the fridge if you intend to freeze it again.
Can You Refreeze Meat That Is Vacuum-Packed At Home?
Nowadays, many people prefer sealing their food with a vacuum-sealing machine. This method is easy, effective, and provides satisfactory results. When you vacuum-seal meat, it lasts fresh for longer and takes up less space inside the freezer.
Let’s suppose some guests arrive, and you defrost meat in a hurry for preparing a delicious steak. Later you realize the quantity is far more than you require. No worry, you can place the leftover back in the freezer as long as it thaws in the refrigerator. But, if you leave it to defrost on the kitchen counter, the meat might not survive twice freezing.
When the meat comes in contact with air, it is prone to degrade faster due to the spread of bacteria. So, if you seal it properly afterward, it might serve no purpose and will spoil ultimately. Thus, in such a situation, you should toss the meat and drop the idea of refreezing.
Can You Refreeze Meat In Vacuum-Sealed Supermarket Package?
If your store-bought meat comes in vacuum-sealed packaging, you can refreeze it right away and place it directly in the freezer. The packaging design allows it to remain intact in the harsh freezer environment and keep your meat as good as new.
But, in case you have already opened the packaging, you can still refreeze the meat. Ensure to wrap it in a high-quality freezer bag to protect it from forming ice crystals. Also, if your meat thaws on the way back home, transfer it immediately to the freezer without delay.
When the meat stays in the open environment for more than two hours, bacteria might start lurking inside, and it is no longer safe for storage. The vacuum-sealed packaging can slow down the spread to some degree, but it is still on the verge of spoilage.
Thus, you need to thoroughly check the meat to observe a change in the smell and texture. If you notice such changes, it is better to discard them immediately.
The Right Method To Refreeze Vacuum-Sealed Meat
If you decide to refreeze the meat that you vacuum sealed before, all you need to do is
Gently take the meat out from its vacuum packing. As vacuum-sealed beef usually comes in large, folded packages, it might stick with the packaging.
Avoid causing any damage to the packaging as you will require it later on for storing the meat.
Once you remove the vacuum seal, wrap the meat in aluminum foil or plastic wrap.
Cover and fold all the edges securely and put the meat back in the original packaging.
The additional layer of protection will prevent the meat from getting freezer burns and keep it fresh for a longer span.
You can directly refreeze the store-bought meat if the packaging was unopened previously. If it is open, you need to cover it in freezer bags.
Ensure to label the bag with the date of refreezing and place it in the safest corner of the freezer. It will remain there for as long as you prefer.
How Long Can Meat Remain Refrozen After Vacuum Sealing?
Although vacuum-sealing your meat is an effective way to increase its shelf life and keep it fresh and flavorful. But, to achieve the desired results, you need to consider a few things. Firstly, it is vital to thaw the meat in the refrigerator, not other techniques. The fridge provides a safe environment for the meat and reduces the chances of air contamination.
If you thaw vacuum-sealed meat in a refrigerator, it will refreeze with ease for more than five months. Other methods, including thawing on the counter, cold water, or a microwave, do not complement the refreezing process. Even if the meat is in vacuum packaging, there is still a high probability it spoils after freezing, and your efforts go to waste.
Secondly, leaving your raw/cooked meat at room temperature is like inviting the microbes to infest it, and you do not want it to happen. So, to avoid the outcome of unnecessary food wastage, shift the meat to the freezer after thawing as quickly as possible.
How Many Times Can You Refreeze Vacuum-Sealed Meat?
Generally, people prefer sealing their protein-based food for long-term storage, and the same rule applies to your meat.
If you regularly thaw and freeze it, the benefits of vacuum-sealing get limited.
No matter how cautious you are, there is still a chance of contamination. Thus, once you refreeze vacuum-sealed meat, avoid doing it again. Besides the food safety problem, there is also a noticeable degradation in the overall quality.
Food safety and inspection authorities do not recommend freezing meat repeatedly, even if vacuum-sealed. A much better alternative is to freeze it in portions according to your requirement and thaw only that specific amount. It will save time and also reduce the occurrence of spoilage.
Conclusion
To sum up, you can refreeze meat that you store in vacuum-sealed bags. As vacuum sealing food means removing the excess air, it minimizes the chances of spoilage. Thus, refreezing meat is a safe option, but you need to thaw the meat in the refrigerator.
Other defrosting methods do not go well with the refreezing process. For instance, if you thaw meat by running hot water over it, freezing it again is not ideal. To yield the exact results you are looking for, follow all the mentioned steps in this article and do not skip them.
Refreezing can alter the tenderness of the meat and turn it somewhat bland and chewy. Thus, it is better to avoid constant thawing and freezing. Also, always check if you sealed food properly, or else it might be prone to freezer burns and loss of flavors.
Freezing is a great way to prevent leftovers from wastage and maintain the cleanliness of the environment.
It seems as though there aren’t many new methods for taking a buck these days. It almost seems as though every tactic for killing big bucks has already been brought to the table. That is what I thought until I spoke with Iowans Todd Pringnitz and Ted Miller from White Knuckle Productions. What they taught me was that there is an exciting new method out there for drawing in bucks. It is the horizontal rub post. That’s right. Horizontal.
We are all familiar with rubs. They are as commonplace in the deer woods as the deer themselves, but rarely does hunting rubs alone bring in a buck. Horizontal rub posts do. They were the creation of Ted Miller, and he actually discovered them by mere happenstance.
While filming elk in Yellowstone National Forest nearly ten years ago, Miller got repeated footage of bulls that were attracted to certain areas with blown down trees. They would rub their antlers on those trees or on branches shooting out horizontally. He wasn’t looking for this behavior at all. He was just observant enough to pick up on what the elk were doing, and it got him thinking, “I wonder if I can try this at home on whitetails.”
When he returned home he started putting his idea to work. What he found was pretty interesting. “I didn’t have any experience making these posts, so for my very first one, I went to one of my food plots and drove two posts into the ground and wired a limb to the posts about knee high or a little higher,” he recalls. “That was back when trail cameras were really just catching on. I didn’t have a trail camera at the time, so I just went back two or three days later and checked on it.” The limb had been worked.
So, he set up a ground blind at that spot, and on his first night sitting in the blind with his son, a large buck came and worked the post right in front of them. They got some good video footage of the deer working the rub but when it came time to shoot, the deer spooked. Regardless, the experience was one Miller will never forget, and is likely the very first time a hunter has ever used a horizontal rub post. It set the stage for many more such encounters for Miller. “That was the very first one I ever did and over the years I have figured out what the deer like and want out of them. I have been able to improve them along the way.”
The main thing that Miller found was that the type of limb can make all the difference. “Most hunters in Iowa were using cedar trees in their posts. The adage is that bucks prefer to rub on cedars, but they weren’t having a lot of success with them. I have found that Scotch pine limbs work the best.” The reasons are brilliant when you think about it.
First, when using scotch pines, there is no need to cut down the whole tree as you would with a cedar. Mature scotch pines are bigger, allowing you to simply cut off a limb rather than take the whole tree. Plus, they are not native to the area. They are more of a Christmas tree and are planted and easy to find if you look around. Miller has several planted in his yard, making finding them a cinch!
He also notes that the limbs should be about the size of your wrist or slightly larger in diameter so they won’t break when a buck gets aggressive with it.
Another thing that he has learned over the years – and probably the most important thing – is that once you find the limb you are going to use, cut it longer than the gap between your posts. “I like to run my limb about two feet or so past one end of my posts so it sticks out from the end on the side I want the bucks to work. I found that they prefer working the end that is sticking out past the posts much more than they do the part of the limb that lies between the posts. I think it is just more convenient for them.”
Another trick that he has discovered is to attach the limb loosely to the posts so it has some play in it. “Different bucks have different personalities. Some like to get aggressive and fight with it a little bit, so when I wire my limb up, I do so that it will move up and down about six inches to a foot or so. This gives it some give and allows the limb to rock up and down when a buck wants to fight with it and such.”
The last couple of years Miller has been adding a licking branch to his horizontal rub posts. “I just run another limb above it to act as a sign post. I’m just trying to give a buck everything that he wants in order to hold his attention.” He usually just attaches the licking branch above the end of the limb that sticks out past the post, but he says that if your posts are tall enough you can attach it to one of them and have it hang down. Or, you can also position your set-up underneath a tree that has a limb hanging down above your horizontal limb. Any situation will work.
An Added Benefit
A really great thing about using these rub posts is that they actually hold a deer in a certain spot for a while. A great plus for Miller who enjoys getting video footage of deer. “It’s really hard to get a buck to stop long enough to get any decent footage of him, but with these rubs, they tend to stay there and work it for a little bit. This really helps me out when I am filming. It also allows you to learn a lot about buck behavior.”
What Bucks Use It?
Miller has seen everything from spikes to Boone and Crockett bucks use his horizontal rubs, so no matter what type of buck you are after, it will work. He does note, however, that some bucks, especially smaller ones, will come in cautiously as they might be intimidated at first. But nonetheless, it attracts bucks of all calibers.
Scent?
Nope. Miller doesn’t use any on his limbs, noting that the Scotch pine itself is a sticky, sappy type of tree anyway and will absorb and hold the scent of the deer that use it. That is all that is required to help draw more deer in.
Where and When to Use It
Obviously they are most effective towards the rut, but they are effective earlier than that as well. Miller notes that bucks will begin hitting them as soon as they shed their velvet, although the most active times are from mid-October until the rut is completed, so be sure to set yours up around the first of October or so.
As for where to place your horizontal rubs, Miller doesn’t feel that a buck is going to get up and walk a half-mile just to hit it, so he says to set them up anywhere you feel that bucks want to be or in areas where you plan to hunt and see high buck activity. Food plots and staging areas are prime examples.
The Bottom Line
Miller found his horizontal rub post system by accident, and he has perfected it over the years. In my opinion, this may be one of the most under-utilized tactics for drawing in bucks, and perhaps, one you should be trying this fall.
To learn more about Miller’s horizontal rub posts, check out www.whiteknuckleproductions.com.
There are endless fishing line choices out there but picking the right fishing lines for crappie fishing can and will make your fishing way more successful.
The best crappie lines include monofilament lines like Berkley Trilene XL or Stren Original, with a 4-6 pound test and in clear or low-visibility colors. Fluorocarbon lines like Seaguar InvizX or Berkley Vanish also work well, with a 4-6 pound test and in clear or green colors.
In this article, I will break down monofilament, braid, fluorocarbon, and copolymer lines and how each apply to crappie fishing to include their drawbacks. I will also provide some great recommendations to buy.
Crappie activity levels can vary due to water temperature, light, and food. They’re usually more active and hungry in the morning and late afternoon, but they’ll go deeper or hide in the shade as the day heats up. So, make sure you’re using the right fishing line for the conditions, like lighter line during low light and heavier line when the sun is high.
Crappie can see fishing line, and some fishing lines are more visible than others. Generally, monofilament and fluorocarbon lines are less visible in the water, while braided lines are more visible due to their color and lack of stretch.
When it comes to color, clear and low-visibility green are good options for both monofilament and fluorocarbon lines. On the other hand, brightly colored braided lines, such as yellow and orange, can be easier for anglers to see and detect bites, but they may also spook crappie in clear water.
Crappie Fishing Lines: Big Picture Overview
When it comes to crappie fishing, there are different types of fishing line you can use. Let me break it down for you.
Monofilament line is a popular choice because it’s affordable and versatile. It has good strength and sensitivity, making it easy to feel those subtle bites. However, it does have some stretch, which can make hook sets a bit more difficult.
Fluorocarbon line is another option known for its low visibility and excellent sensitivity. It’s more expensive than monofilament, but its abrasion resistance and strength make it ideal for fishing around cover.
Braided line is incredibly strong and has zero stretch, which means you can set the hook with ease. It’s perfect for deepwater crappie fishing because you can feel every little movement. However, it’s visible to fish and can be more challenging to work with.
Copolymer line, which is a combination of monofilament and fluorocarbon. It has the best of both worlds, with good strength and sensitivity, low visibility, and a bit of stretch to help with hook sets.
In summary, monofilament is affordable and versatile, fluorocarbon is low visibility and abrasion-resistant, braided line is incredibly strong, and copolymer combines the best of both worlds. Each type of line has its strengths and weaknesses, so it’s up to you to decide which is best for your crappie fishing needs.
Monofilament Fishing Line
Monofilament line is a good choice for crappie fishing because it’s affordable and versatile, but it does have memory and a lot of stretch.
Monofilament fishing line is popular for crappie fishing because it’s affordable and versatile. The benefits of using monofilament line are that it has good strength and sensitivity, making it easy to feel those subtle bites. However, it does have some stretch, which can make hook sets a bit more difficult.
Generally, a 4-8 lb. test line is suitable for crappie fishing, but the pound test can vary depending on your fishing conditions. For color, clear or low-visibility green are good choices because they’re less visible to fish. As for brand/model, some popular options include Berkley Trilene XL, Stren Original, and Sufix Elite.
To buy Berkley Trilene XL from Amazon, click here to check out the product page and read customer reviews.
Pro Tips: Choose a line with a smaller diameter. This will make it easier to cast lighter baits and feel more bites. Another tip is to replace your line regularly, especially if you’re fishing in abrasive conditions or using heavier baits.
Fluorocarbon Fishing Line
Fluorocarbon line is a good choice for crappie fishing because it’s virtually invisible and has low stretch, but it can be more expensive and difficult to tie knots.
Fluorocarbon fishing line is another popular option for crappie fishing because it’s virtually invisible in the water and has low stretch, which makes it easier to feel bites and set the hook. One drawback of using fluorocarbon line is that it can be more expensive than other types of line, and it can be more difficult to tie knots because it’s stiffer than monofilament.
Generally, a 4-8 lb. test line is suitable for crappie fishing, but the pound test can vary depending on your fishing conditions. For color, clear or low-visibility green are good choices because they’re less visible to fish. As for brand/model, some popular options include Seaguar Red Label, Berkley Vanish, and P-Line Fluorocarbon.
To buy Seaguar Red Label from Amazon, click here to check out the product page and read customer reviews.
Pro tips: Choose a line with good knot strength. This will help prevent the line from breaking when you set the hook on a big crappie. Another tip is to use a lighter line when fishing in clear water, as the fish may be cautious and less likely to bite thicker diameter line.
Braid Fishing Line
Using braid fishing line for crappie fishing has some benefits, such as its strength, sensitivity, and small diameter, which allow for long casts and better hook sets.
However, braid line can also be visible in the water and may spook fish, and it has less stretch, making it easier for the fish to pull off the hook. When selecting braid line for crappie fishing, it’s important to choose a small diameter line with a pound test appropriate for the size of the fish and the fishing conditions.
Some popular braid lines for crappie fishing include PowerPro Super 8 Slick, Spiderwire Stealth, and Sufix 832, typically in a 4-8 pound test and a low-visibility color like green or gray.
Pro Tip: I recommend using a fluorocarbon leader when fishing with braid to increase the invisibility of your line to fish.
Copolymer Fishing Line
Copolymer fishing line for crappie fishing balances the benefits of monofilament and fluorocarbon lines, with good strength, low visibility, and sensitivity. It also has some drawbacks, such as higher cost and reduced casting distance compared to monofilament.
When selecting a copolymer line for crappie fishing, look for a brand that offers low memory and good knot strength, with a pound test appropriate for the size of the fish and the fishing conditions. Some popular copolymer lines for crappie fishing include P-Line Floroclear, Seaguar InvizX, and Yo-Zuri Hybrid, typically in a 4-8 pound test and clear or low-visibility color.
To buy Seaguar InvizX from Amazon, click here to check out the product page and read customer reviews.
Are Leaders Needed for Crappie?
Leaders are not always necessary for crappie fishing, but they can be useful in certain situations. A leader can be helpful in clear water or when the fish are particularly wary. A light fluorocarbon leader in the 2-4 lb test range can be effective in these conditions.
Some anglers prefer to use leaders made from monofilament or copolymer as well. The length of the leader can vary, but I recommend using a leader that is at least the same length as your rod.
Best Crappie Line for Night Fishing
When fishing for crappie at night, choose a line that is highly visible in low-light conditions. Fluorescent or hi-vis yellow monofilament lines in 4-6 pound test are great options. Berkley Trilene XL, Stren Original, and Sufix Siege are popular and effective brands for night fishing.
Best Ice Fishing Line for Crappie
When it comes to ice fishing for crappie, a good choice is a clear or low-visibility monofilament line with a pound test of 2-6. Some popular options include the Berkley Trilene Micro Ice line, Sufix Ice Magic line, and Stren FluoroCast line. It’s also important to use a light line to detect subtle bites, as crappie can be sensitive to heavier lines.
Line Strength & Diameter
Choosing the right line strength and diameter is crucial for crappie fishing success, as it affects the sensitivity of the line, how easily the fish can detect it, and the ability to feel bites and set the hook.
Thicker lines may be more visible to the fish but can handle heavier cover and larger fish, while thinner lines are less visible but may be more prone to breakage or snapping.
When selecting the line strength and diameter for crappie fishing, consider the fishing conditions and the size of the fish you target. 2-6 lb test line is recommended for crappie fishing, with a smaller diameter for increased sensitivity and less visibility.
To select the best fishing line for crappie, consider the time of day, water clarity, and depth of the fishing area. Monofilament, fluorocarbon, copolymer, and braid are all suitable options, each with their own strengths and weaknesses. Choosing the right pound test and diameter for your fishing needs is important.
For a complete breakdown of the best lines for walleye fishing, check out this guide. For a complete breakdown of the best lines for striped bass fishing, check out this guide. For a complete breakdown of the best lines for carp fishing, check out this breakdown. For a complete breakdown of the best lines for pike fishing, check out this guide. For a complete breakdown of the best lines for crankbaits, check out this guide. For a complete breakdown of the best lines for jigs, check out this guide.
Howdy, fellow hunters and outdoor enthusiasts! Are you itching to go coyote hunting in Pennsylvania but don’t know where to start? Look no further because this ultimate guide has got you covered! As a proud resident of Pennsylvania and an avid hunter myself, I’ve spent countless hours tracking and stalking coyotes in this beautiful state. And let me tell you, there’s nothing quite like the thrill of the hunt in the Keystone State! So grab your gear, pack your sense of humor, and let’s dive into the wild world of coyote hunting in Pennsylvania together.
From the best hunting spots plus the essential equipment you’ll need to the coyote hunting laws in Pennsylvania, this guide has everything you need to know to become a successful coyote hunter in the great state of Pennsylvania. So, let’s get started and show those cunning coyotes who’s boss!
Hey there, friend! Are you ready to learn why hunting coyotes in Pennsylvania is an adventure you don’t want to miss? Let’s dive into the exciting world of coyote hunting in Pennsylvania, where you’ll get to experience the thrill of the chase, improve your hunting skills, and contribute to the conservation efforts of the state.
The Impact of Coyotes on Pennsylvania’s Ecosystem
Coyotes are an invasive species that have been expanding their range throughout Pennsylvania since the 1930s. They are predators that prey on a variety of animals, including deer, rabbits, and rodents, and can have a significant impact on the ecosystem. Overpopulation of coyotes can lead to a decrease in the population of other animals, which can have a ripple effect on the entire ecosystem. This is why coyote hunting in Pennsylvania is not only a fun and challenging activity but also an essential conservation measure.
The Benefits of Hunting Coyotes in PA for Conservation
Hunting coyotes in Pennsylvania helps manage their population, which, in turn, has a positive impact on the ecosystem. Hunting can also help prevent coyotes from becoming habituated to human activities, which can be dangerous for both humans and pets. Additionally, coyote hunting in Pennsylvania helps generate revenue for the state’s conservation efforts, which can be used to support programs that protect wildlife and their habitats.
All in all, Coyote hunting in Pennsylvania is an exciting and rewarding activity that not only allows you to experience the thrill of the chase but also contributes to the conservation of the state’s ecosystem. With its beautiful forests, rolling hills, and vast open spaces, Pennsylvania offers the perfect setting for a memorable coyote hunting trip. So what are you waiting for? Grab your hunting gear and head to Pennsylvania for a wild and unforgettable adventure!
Coyote Hunting Laws and Regulations in Pennsylvania
Coyote hunting in Pennsylvania is a topic that definitely gets a lot of attention among hunters and outdoor enthusiasts. Whether you are a seasoned hunter or just starting out, coyote hunting can be a thrilling and challenging experience that tests your skills and knowledge. However, before you grab your gear and head out to the woods, it’s important to know the laws and regulations related to coyote hunting in Pennsylvania.
Here’s a quick rundown of the basics:
What is the hunting season for coyotes in Pennsylvania?
The hunting season for coyotes in Pennsylvania is open year-round. However, there are some specific regulations that apply to different hunting methods, such as trapping, night hunting, and using electronic calls.
What are the regulations for coyote hunting in Pennsylvania?
To hunt coyotes in Pennsylvania, you need a valid hunting license and a furtaker license. You are allowed to hunt coyotes during daylight hours and with any legal firearm or archery equipment. Hunting coyotes at night is strictly prohibited in the state of Pennsylvania. However, there are some restrictions on using bait or live decoys to lure coyotes.
In addition, you must wear at least 250 square inches of fluorescent orange material on your head, chest, and back combined, visible from all directions, during the firearms deer season and from November 15 through December 15. This requirement does not apply to archery deer season or coyote hunting.
What are the rules for night hunting and electronic calls?
If you are planning to hunt coyotes at night in Pennsylvania, you must obtain a special permit from the Pennsylvania Game Commission. You also need to have a light source that emits white or green light and is handheld or worn on your head.
The use of electronic calls is allowed for coyote hunting in Pennsylvania, but they must not mimic sounds made by game animals during their breeding season.
What are the penalties for violating coyote hunting regulations in Pennsylvania?
Violating coyote hunting regulations in Pennsylvania can result in fines, suspension of hunting privileges, and even imprisonment in some cases. It’s important to follow the rules and regulations to ensure the safety of yourself and others, as well as to protect the environment and wildlife.
Overall, coyote hunting in Pennsylvania can be a great experience if you follow the rules and regulations set by the Pennsylvania Game Commission. Remember to always be safe, responsible, and respectful of nature while enjoying this exciting outdoor activity. Happy hunting!
Best Coyote Hunting Spots in Pennsylvania
If you’re looking for some thrilling coyote hunting in Pennsylvania, you’ve come to the right place! Pennsylvania is a state with abundant wildlife and excellent hunting opportunities. But when it comes to coyote hunting, not all hunting spots are created equal. So, let’s explore some of the best coyote hunting spots in Pennsylvania.
1. Allegheny National Forest
If you’re a fan of public land hunting, then the Allegheny National Forest is the place for you. The forest spans across 513,175 acres, providing ample space for hunters to explore and pursue coyotes. The area is known for its dense forests, rolling hills, and numerous streams and rivers, making it an ideal spot for coyotes.
2. State Game Lands
Pennsylvania’s State Game Lands are a network of public hunting grounds spread throughout the state. With more than 1.5 million acres of land, it’s not surprising that some of the best coyote hunting spots are located here. One of the advantages of hunting on state game lands is the abundance of prey species that attract coyotes, including deer and rabbits.
3. Private Lands
While public land hunting has its advantages, hunting on private land can be a game-changer. Pennsylvania has plenty of private land available for hunting, but you’ll need to obtain permission from the landowner first. One perk of hunting on private land is that there is less hunting pressure, which means you’ll have a better chance of bagging a coyote.
4. Local Farms
Local farms can also be excellent coyote hunting spots in Pennsylvania. Many farmers welcome hunters onto their land to help control coyote populations, which can prey on livestock. These farms often have large fields and pastures that provide ample opportunities for spotting coyotes.
5. Wildlife Management Areas
Pennsylvania’s Wildlife Management Areas are public lands specifically managed to promote wildlife habitat and hunting opportunities. These areas often have well-maintained trails, food plots, and water sources that attract coyotes. Plus, hunting in these areas helps support the state’s wildlife management efforts.
When it comes to coyote hunting in Pennsylvania, there are plenty of options to choose from. Whether you prefer public or private land hunting, there are abundant coyote hunting spots across the state. Just make sure to obtain the necessary permits and licenses before heading out, and always practice safe and ethical hunting practices.
Preparing for the Coyote Hunt in Pennsylvania
Are you ready for an adventure in the Keystone State? Coyote hunting in Pennsylvania is not for the faint of heart. But with the right gear and knowledge, you’ll be ready to take on these elusive predators.
Choosing the Right Gear for Coyote Hunting in Pennsylvania
First things first, you need the right gear. You’ll need a reliable firearm, preferably a rifle or a shotgun, with a scope or iron sights. Make sure you check Pennsylvania’s hunting laws for the specific caliber and ammunition you can use.
You’ll also need warm and comfortable clothing, especially if you’re hunting in the winter. Dress in layers, and don’t forget about a good pair of boots. You don’t want your feet getting cold and damp while you’re waiting for your prey.
Finally, you’ll need calls and decoys to attract the coyotes. Electronic calls work great, and some hunters swear by mouth calls. Decoys can also help bring coyotes into range, but make sure you use them wisely.
Understanding Coyote Behavior and Habitat in PA
Knowing the behavior and habitat of coyotes in Pennsylvania is crucial for a successful hunt. Coyotes are adaptable creatures and can be found in a variety of environments, from urban areas to rural farmland.
One of the best places to hunt coyotes in Pennsylvania is near farmland, especially during the winter months when they are looking for food. Coyotes are also more active during the night, so plan your hunt accordingly.
Scouting for Coyotes in Pennsylvania
Before heading out for your hunt, it’s a good idea to scout the area. Look for tracks, droppings, and other signs of coyote activity. You can also talk to local farmers and hunters to get an idea of where the coyotes are most active.
Once you’ve found a good location, set up your calls and decoys and wait patiently. Coyotes are smart animals and can be difficult to lure in, but with a little patience and persistence, you’ll be sure to have a successful hunt.
Overall, coyote hunting in Pennsylvania can be a thrilling and rewarding experience if you’re well-prepared and have the right knowledge. So grab your gear, head out to the countryside, and get ready for an adventure like no other. Good luck and happy hunting!
After the Hunt in Pennsylvania
Congratulations, you’ve bagged yourself a coyote! Now it’s time to move onto the next steps. Field dressing and processing a coyote in Pennsylvania can be a bit of a challenge, especially if you’re new to hunting. My advice? Take it slow, and don’t be afraid to ask for help from a more experienced hunter.
Once you’ve got your coyote processed, it’s time to think about transportation. Pennsylvania has strict regulations when it comes to transporting coyotes, so make sure you’re up to date on the latest rules and regulations.
But what about the meat and fur? Don’t let anything go to waste! Coyote meat can be quite tasty when prepared correctly, and the fur can be used for a variety of purposes, from clothing to home decor. Get creative, and don’t be afraid to experiment with new recipes and craft ideas.
Overall, coyote hunting in Pennsylvania can be a challenging and rewarding experience. With the right gear, planning, and mindset, you’ll be well on your way to a successful hunt. And remember, always hunt responsibly and ethically, and follow all state and federal regulations. Good luck, and happy hunting!
Final Thoughts
As we wrap up our discussion on coyote hunting in Pennsylvania, I must say, I have thoroughly enjoyed this topic. Hunting coyotes can be an exciting and challenging experience that requires skill, patience, and a bit of luck. Plus, it’s a great way to connect with nature and appreciate the beauty of the outdoors.
Now, let’s talk about coyote hunting in Pennsylvania specifically. The Keystone State is home to a healthy population of coyotes, making it an excellent destination for hunters looking to bag a few. However, there are some things to keep in mind when hunting coyotes in this state.
First and foremost, make sure you have the proper permits and licenses to hunt coyotes in Pennsylvania. The state’s Game Commission has specific regulations and requirements for hunting coyotes, so be sure to check them out before heading out into the field.
Additionally, be mindful of your surroundings and the local wildlife. Coyotes are smart and adaptable creatures, but they are also known to be territorial and protective of their young. Be respectful of their habitat and avoid disturbing their dens or breeding grounds.
Finally, when it comes to coyote hunting in Pennsylvania, it’s always best to go with a buddy or a group of friends. Not only is it more fun to share the experience, but it’s also safer to have someone watching your back in case of any unexpected situations.
In conclusion, if you’re an avid hunter or just looking for a fun outdoor adventure, coyote hunting in Pennsylvania is definitely worth considering. Just remember to do your research, be respectful of nature, and above all, have fun! Happy hunting!
Let’s look at some of the methods that can aid in getting rid of the squirrels:
Repellants
If you visit any pet store you can be sure to get a repellant that gets rid of squirrels.
Apply them to the bark of the trees in the backyard for the squirrels to sniff as they come to steal your birdseed.
Pros
Cons
Cheap to procure
Easy to use
Washes away with the rain
The repellants may affect some other pets like dogs and cats
Bottle-spraying individual trees is tiresome
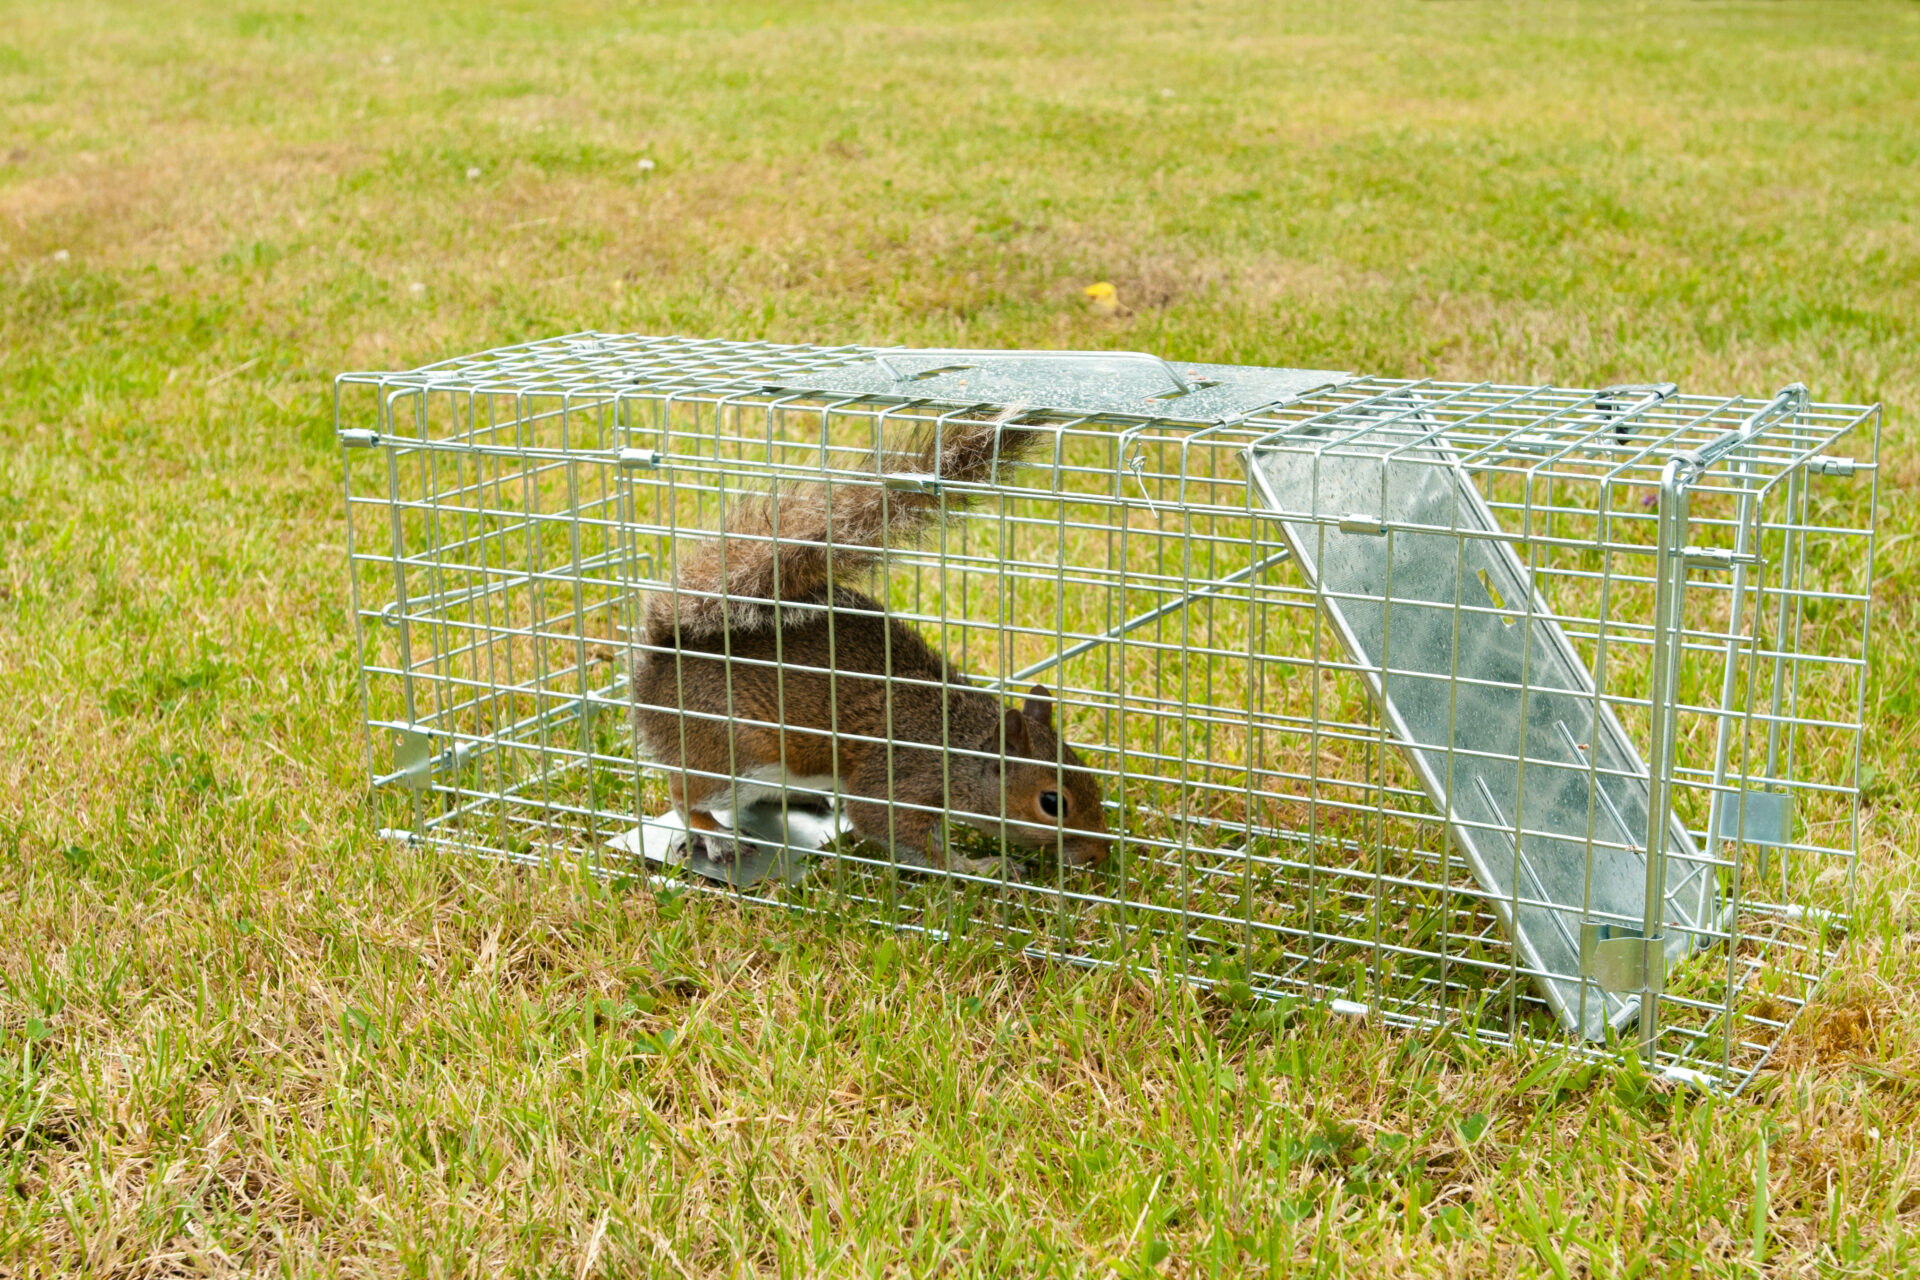
Trapping the squirrels
A Grey Squirrel rodent in a wire trap ready for release in another location
This is used in situations where the squirrels are not high in population.
The traps work easily because the squirrels are curious once they spot anything that resembles a hole.
They want to go through and that’s how you catch them.
Pros
Cons
Efficient if the squirrels are not densely populated
Easy method since it naturally attracts the squirrels
Some are difficult to set up
Trapping does not eliminate the squirrels
You have to check with the state laws for catch release laws
Deterrent odors
This acts as an augmentation of other methods.
If you hang ammonia bags or use cotton balls soaked in ammonia you are likely to keep the squirrels from approaching your house.
Pros
Cons
The smell keeps the squirrel away
They irritate the squirrel’s nose and eyes enough to keep them off
You have also to put up with the ugly odor yourself
It is not wise if other pets are around
Ammonia is corrosive and thus requires more attention and care
Shooting the squirrels
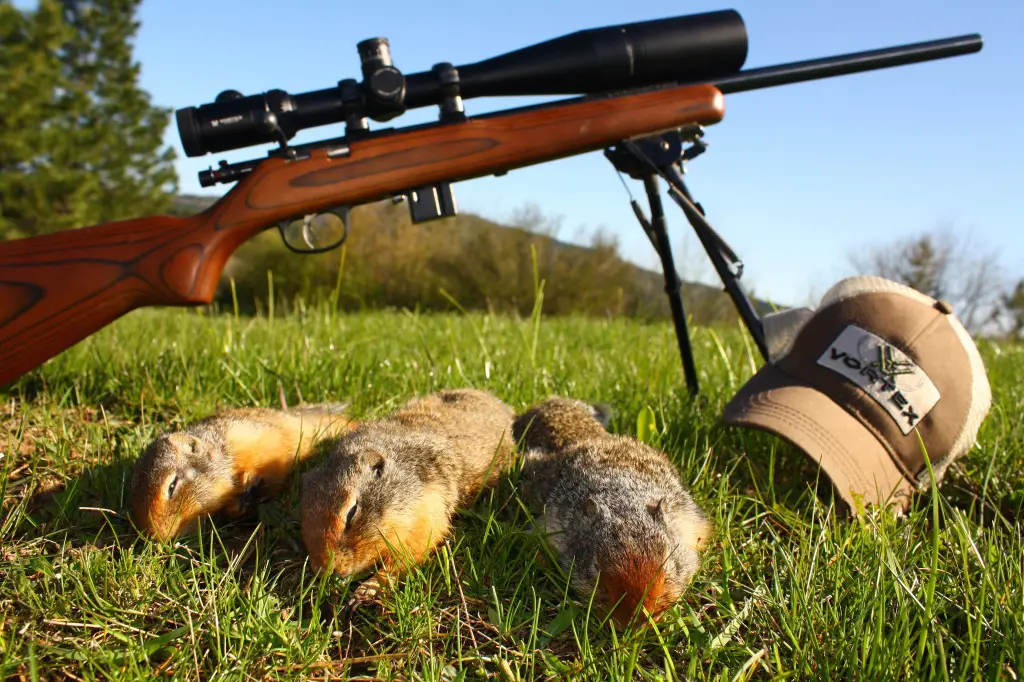
You only need some pellets and an airgun.
The hunting method helps you get rid of the squirrels, all sizes considered, and at any time.
Pros
Cons
The smell keeps the squirrel away
They irritate the squirrel’s nose and eyes enough to keep them off
You have also to put up with the ugly odor yourself
It is not wise if other pets are around
Ammonia is corrosive and thus requires more attention and care
In the opinion of many, shooting squirrels is great because it does not involve the use of chemicals that additionally pose danger to other animals and people.
Also, shooting directly eliminates the squirrels, rather than keeping them away.
You also get to treat yourself to a sumptuous meal if you’re feeling adventurous, provided you ascertain that the squirrel meat is safe.
Their meat is easy to prepare and could certainly make up a part of your diet .
An air gun is your go-to weapon for squirrel eradication.
Read along to find out which are the best air rifles to hunt squirrels.
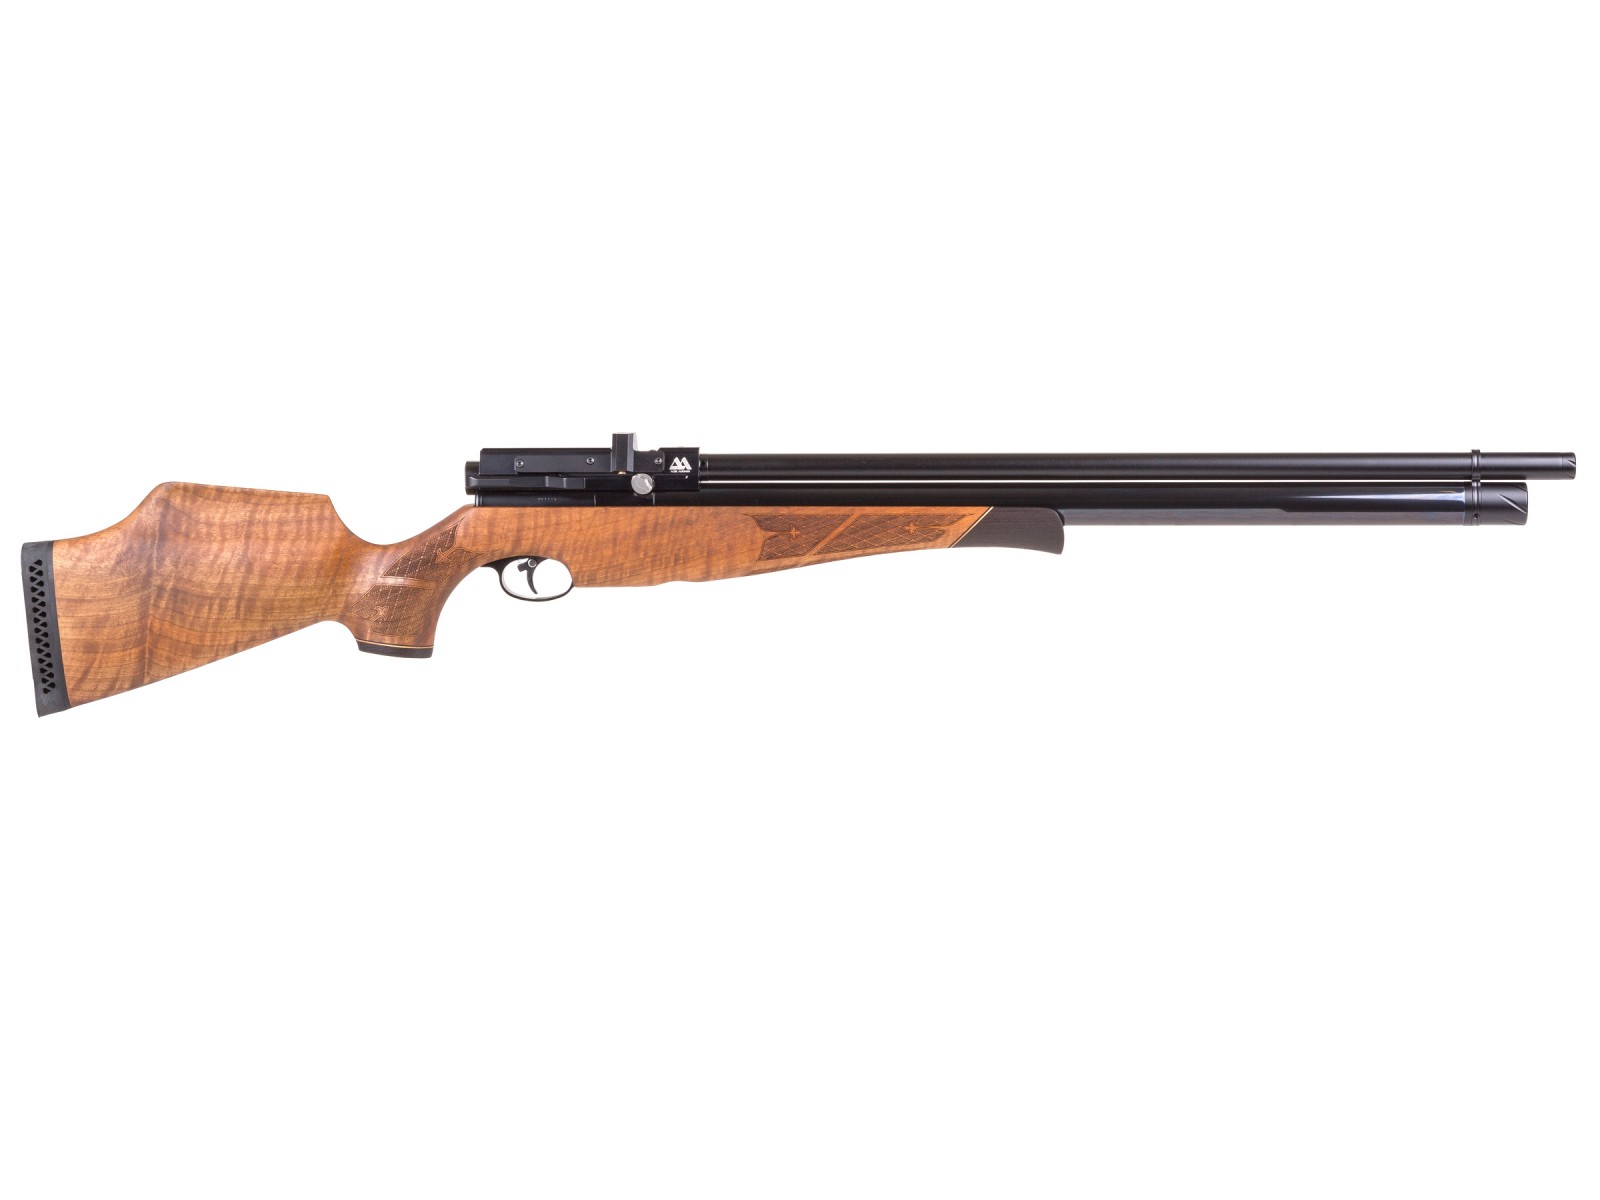
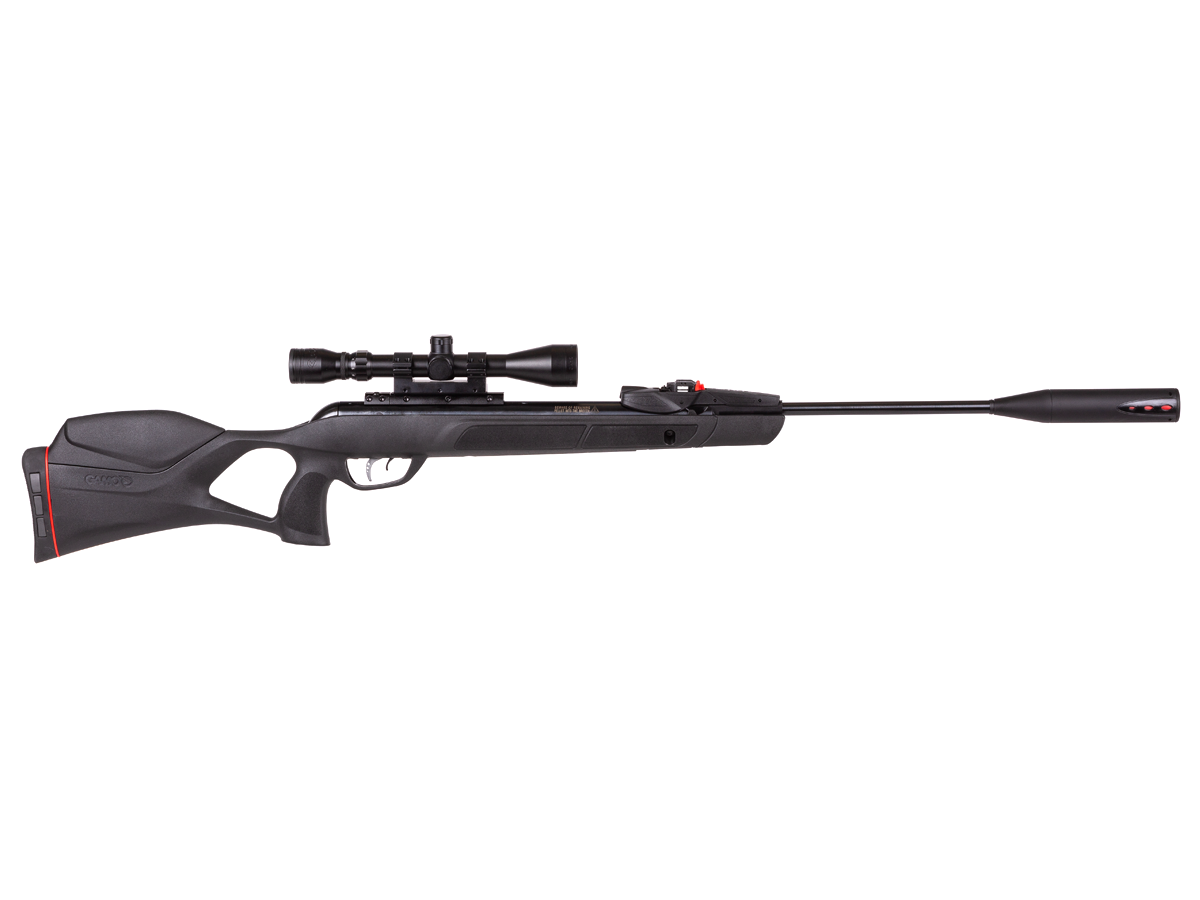
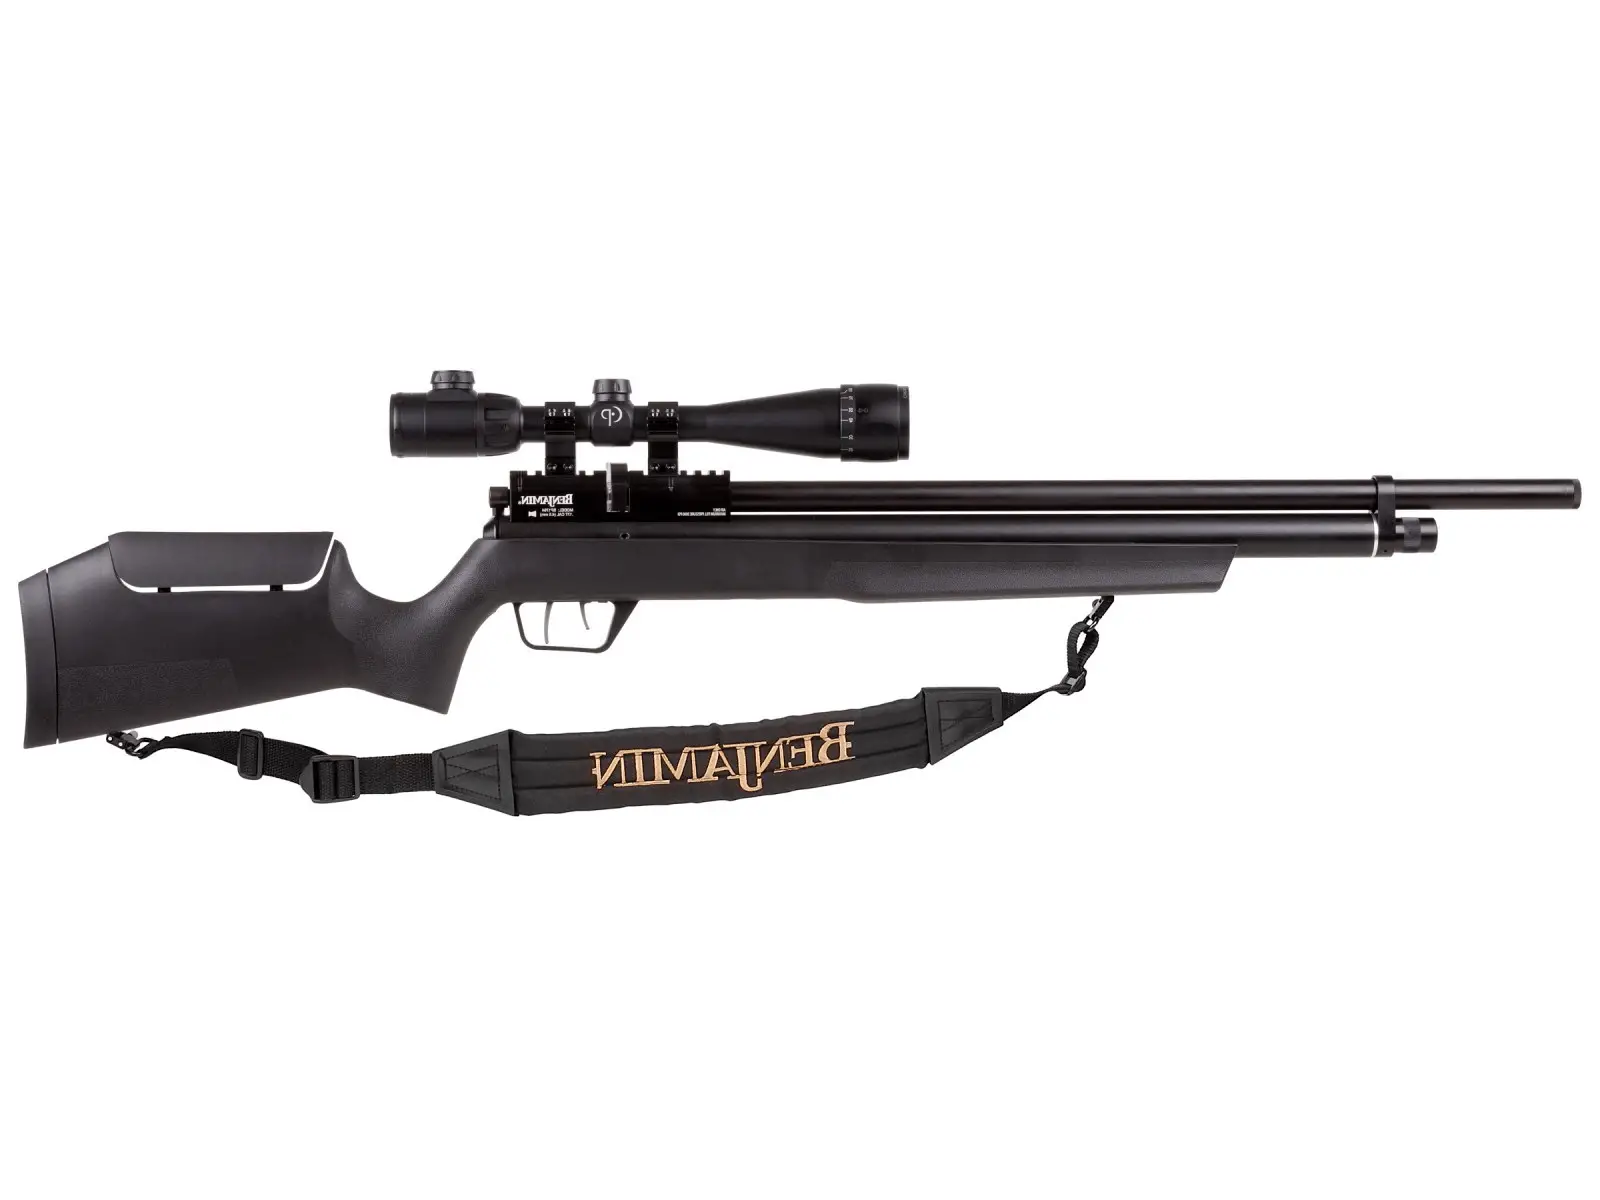
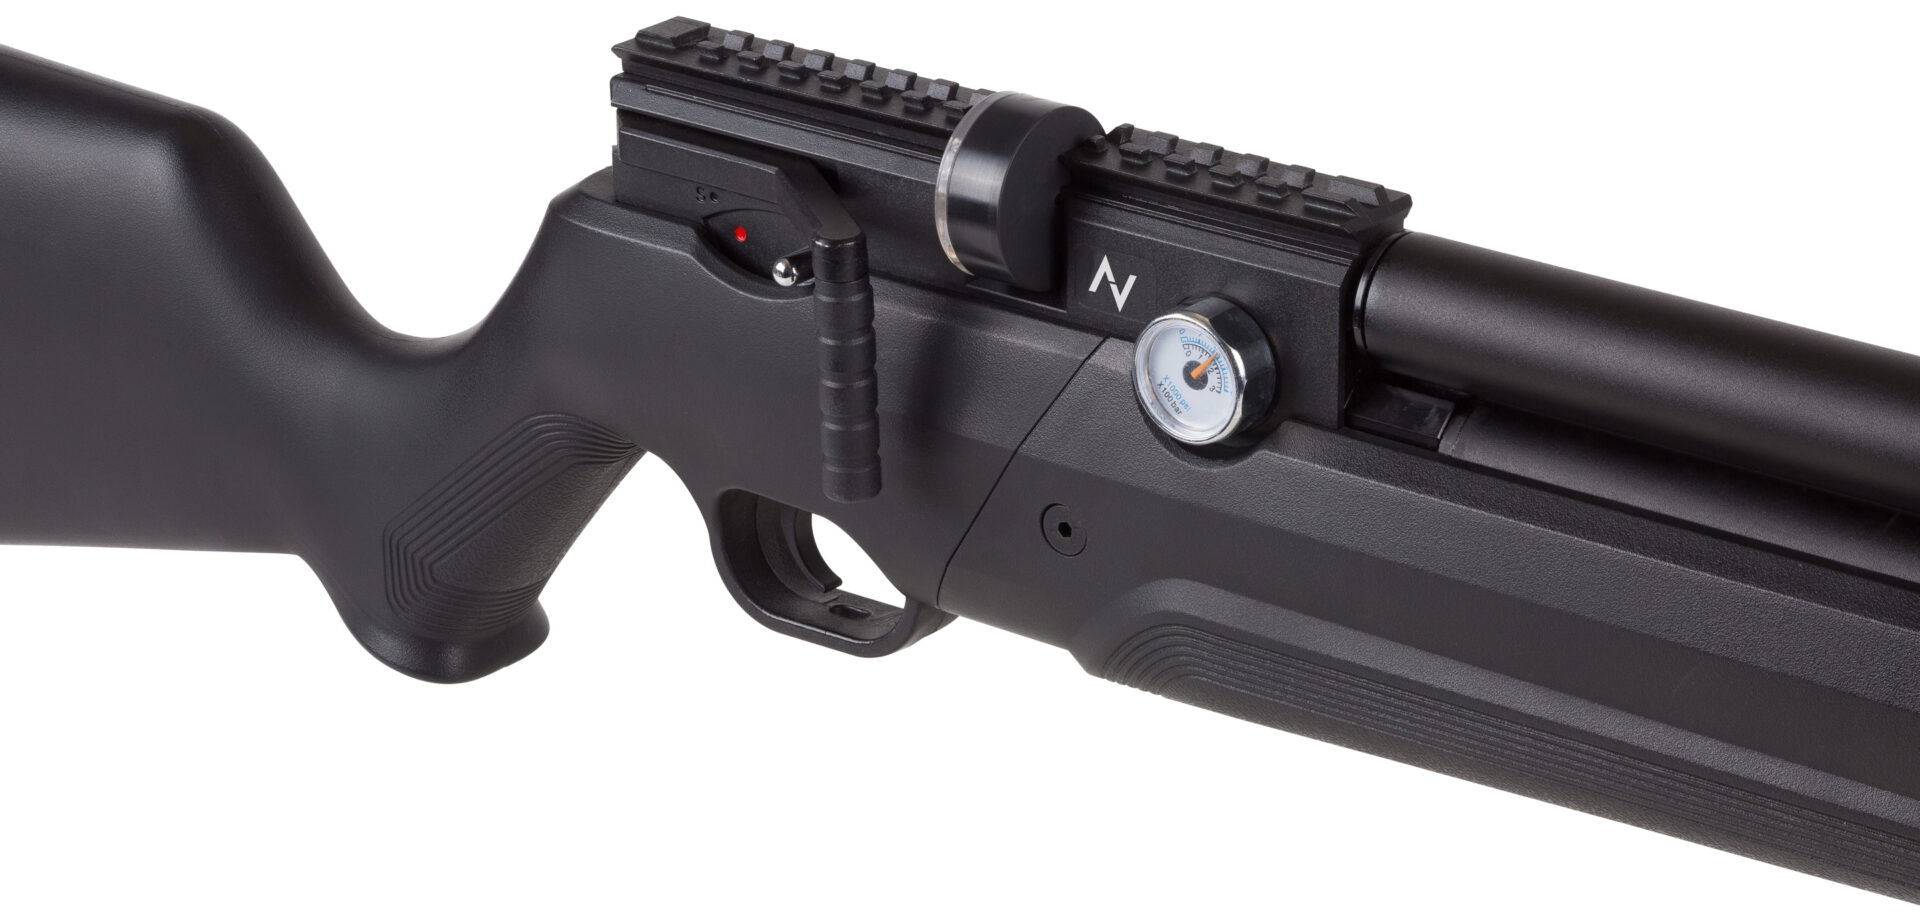
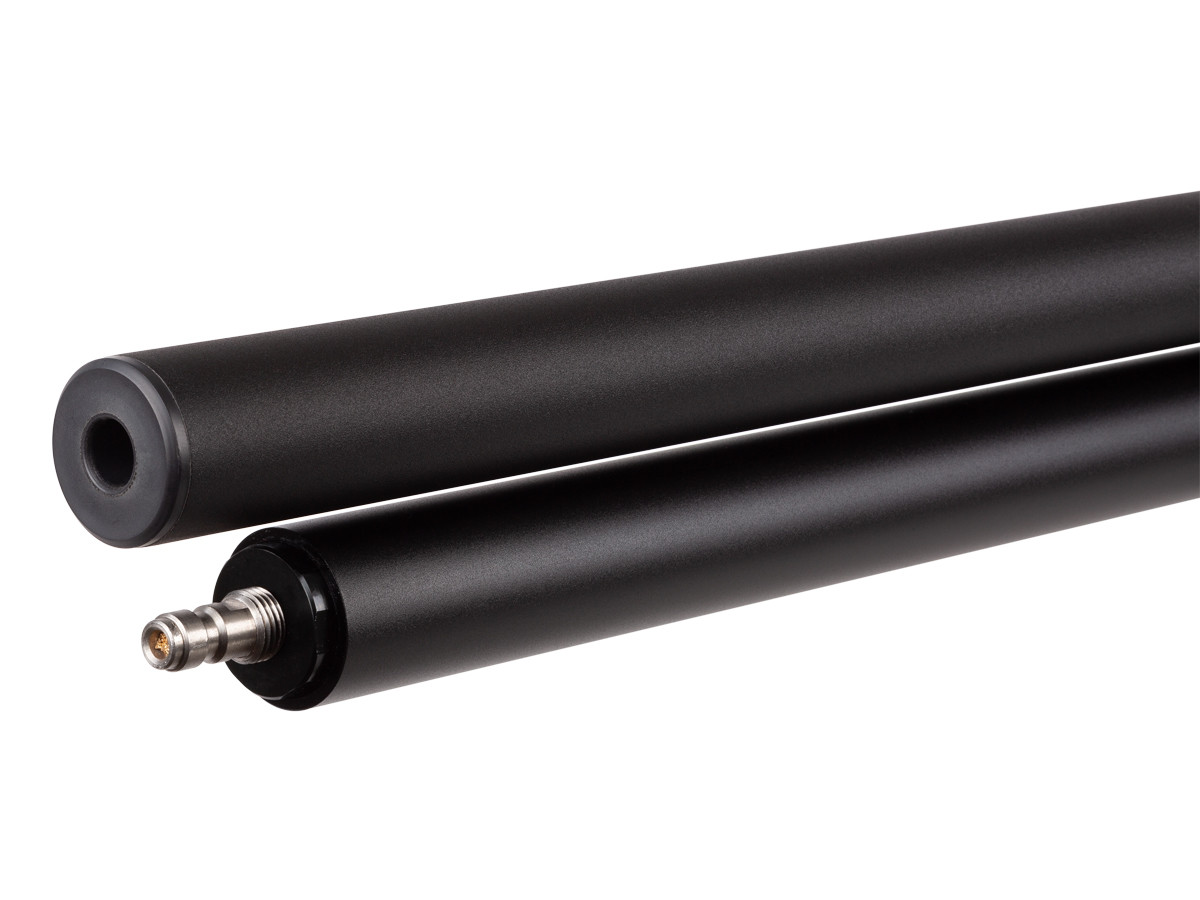
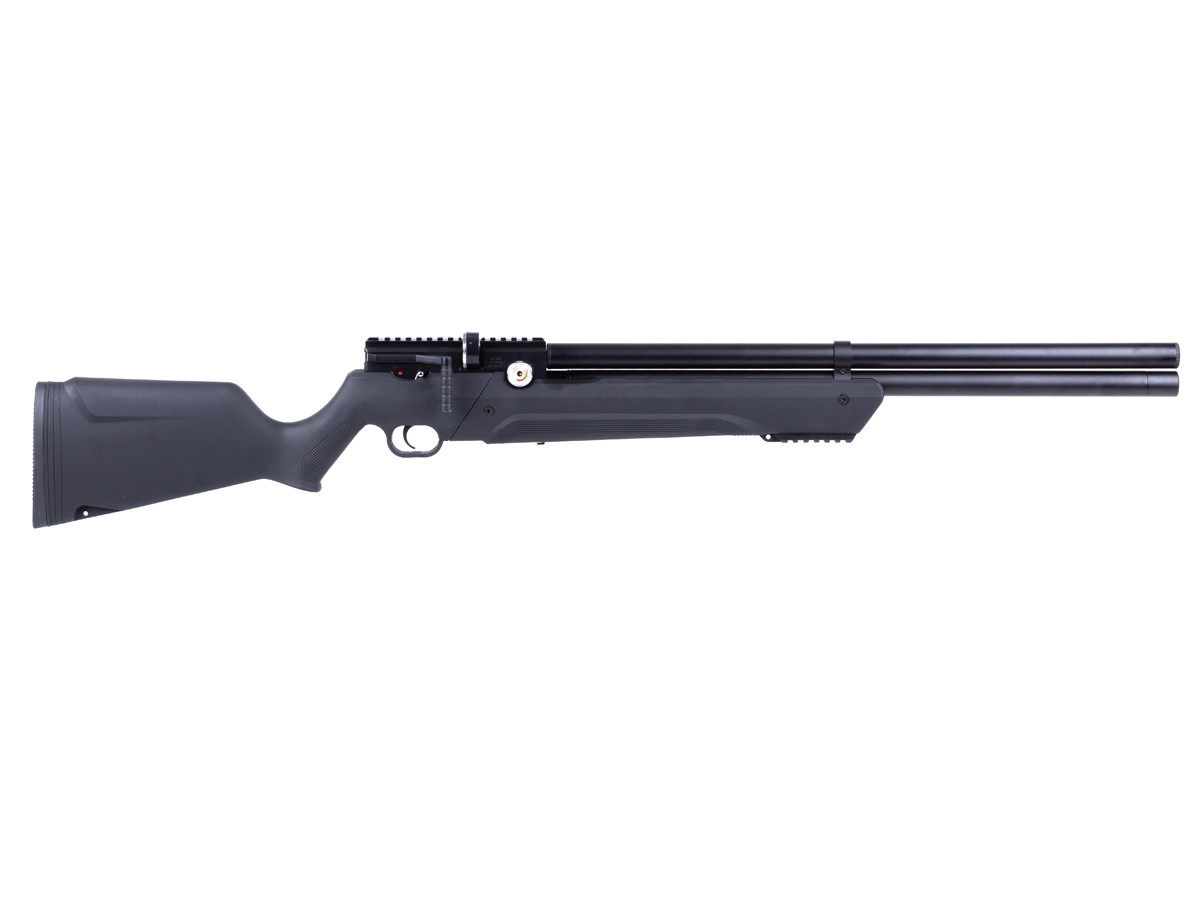
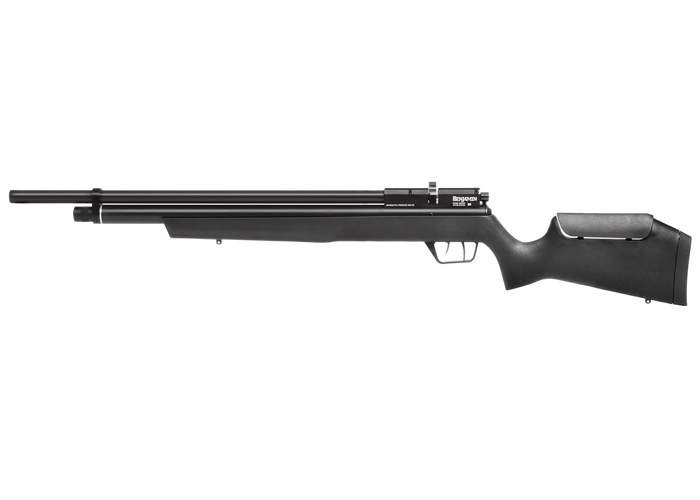
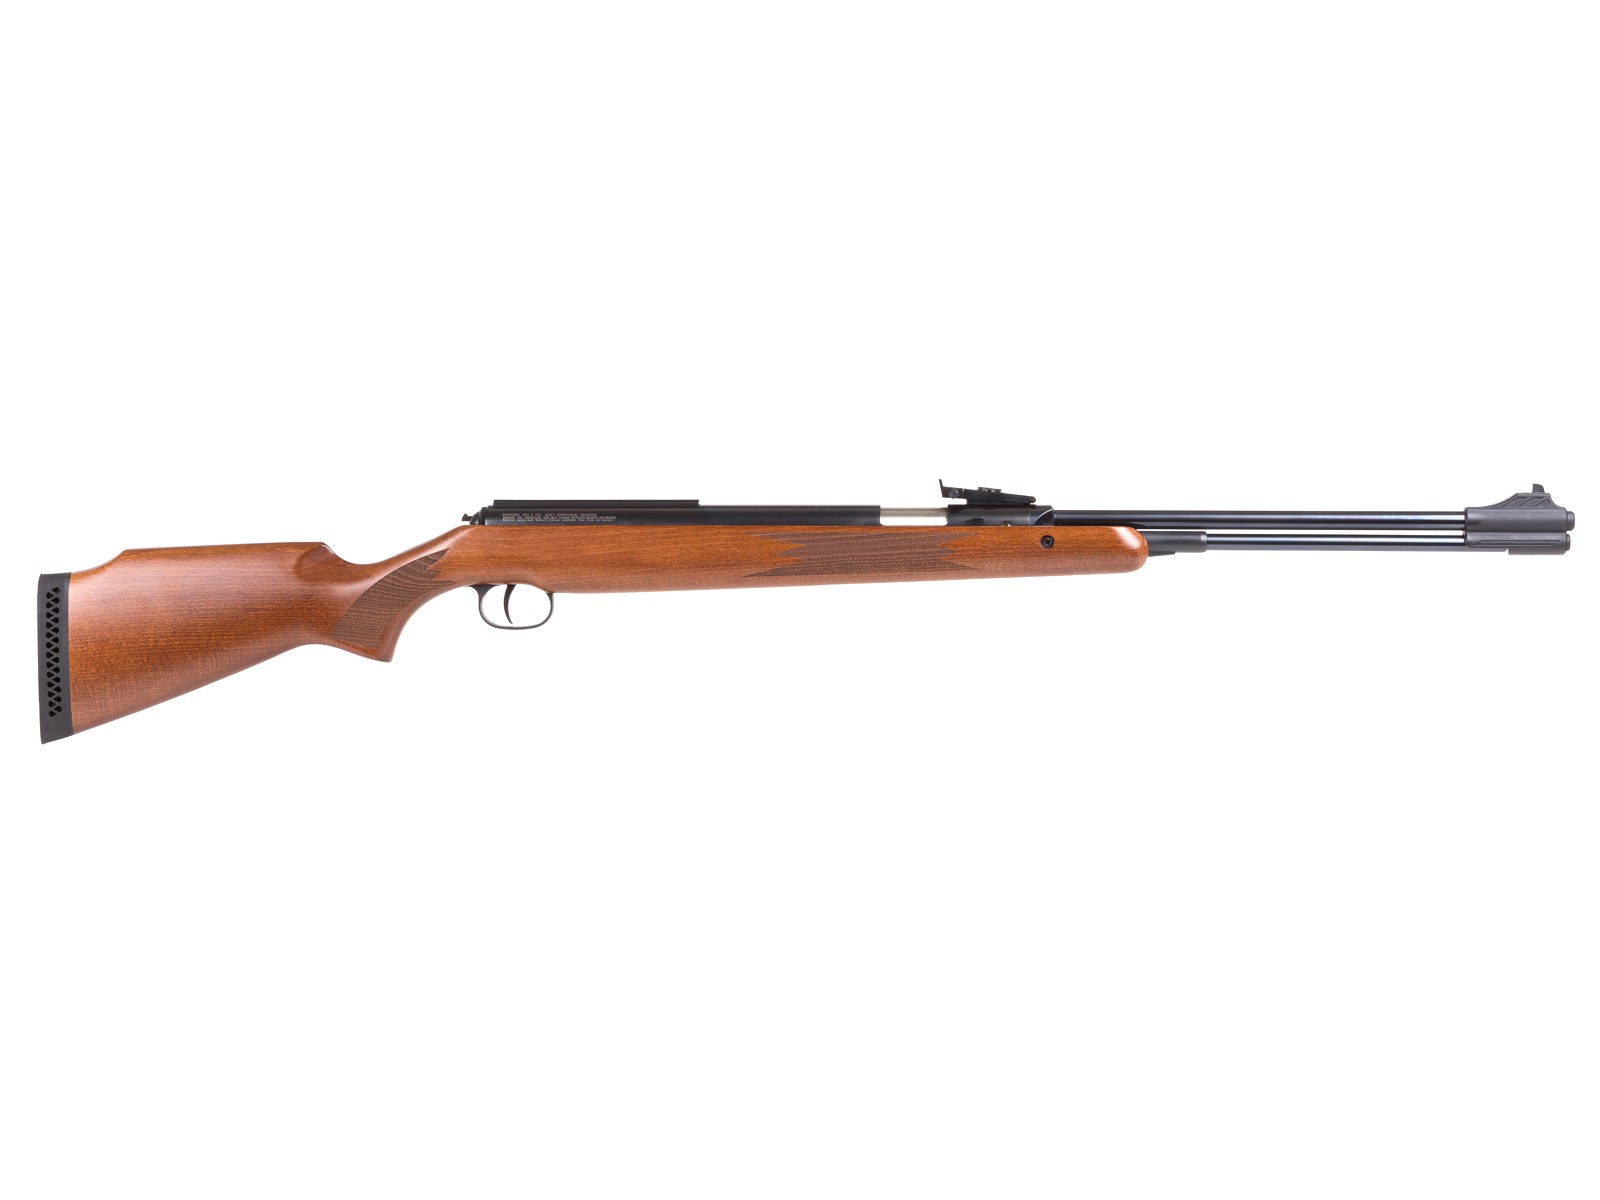
With high-end features at an entry-level price, the Avenger sets a new standard for similarly priced PCPs to live up to.
Featuring an externally adjustable regulator and externally adjustable hammer spring, the Avenger provides the user with a seemingly infinite amount of performance adjustability never seen at this price point.
A smooth side lever action allows for quick follow-up shots, and the fully shrouded barrel keeps your shooting quiet. Available in .177, .22, and .25 caliber.
Features
Pre-Charged Pneumatic
Sidelever Cocking
Synthetic Stock
Externally Adjustable Regulator (Up to 3,000 PSI / 210 BAR)
Easily accessible Hammer Spring Adjustment Screw
Two-Stage Adjustable Trigger
Max Fill Pressure: 4,351 PSI (300 BAR)
Fully Shrouded Barrel
Picatinny Rail on Fore-end of stock
Holes in front and rear of stock for mounting swivel studs for a sling
Dual Gauges – Reg Pressure (RH Side) and Fill Pressure (LH Side)
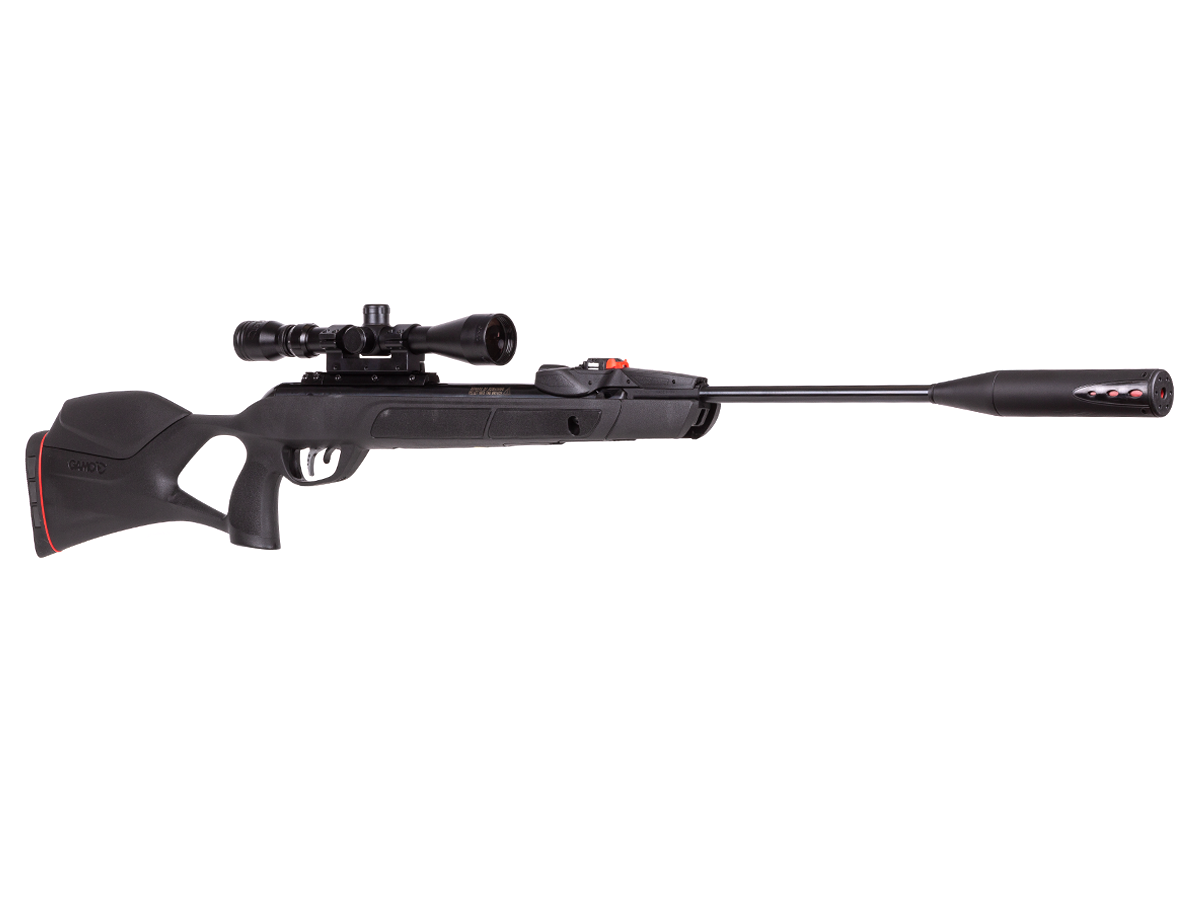
The Gamo Swarm Magnum 10X GEN3i Multi-Shot Air Rifle is an ideal choice for shooters looking for an affordable break barrel airgun to take care of squirrels.
With velocities of up to 1650 FPS (with alloy) in .177 caliber, this rifle offers superior accuracy and power. Furthermore, the 10X GEN 3i Quick-Shot inertia-fed magazine makes reloading a breeze – allowing users to make 10 shots without needing to fumble with pellets.
Thanks to its IGT Mach 1 inert gas piston powerplant, you get smoother cocking than with traditional spring piston air rifles, while an adjustable two-stage Custom Action trigger offers independent adjustments of the first and second stages for travel.
Features
10X GEN3i Quick-Shot inertia-fed magazine
Break barrel
Max. velocity (.177): 1650 FPS with alloy
Max velocity (.22) 1300 fps with alloy, 975 fps with lead
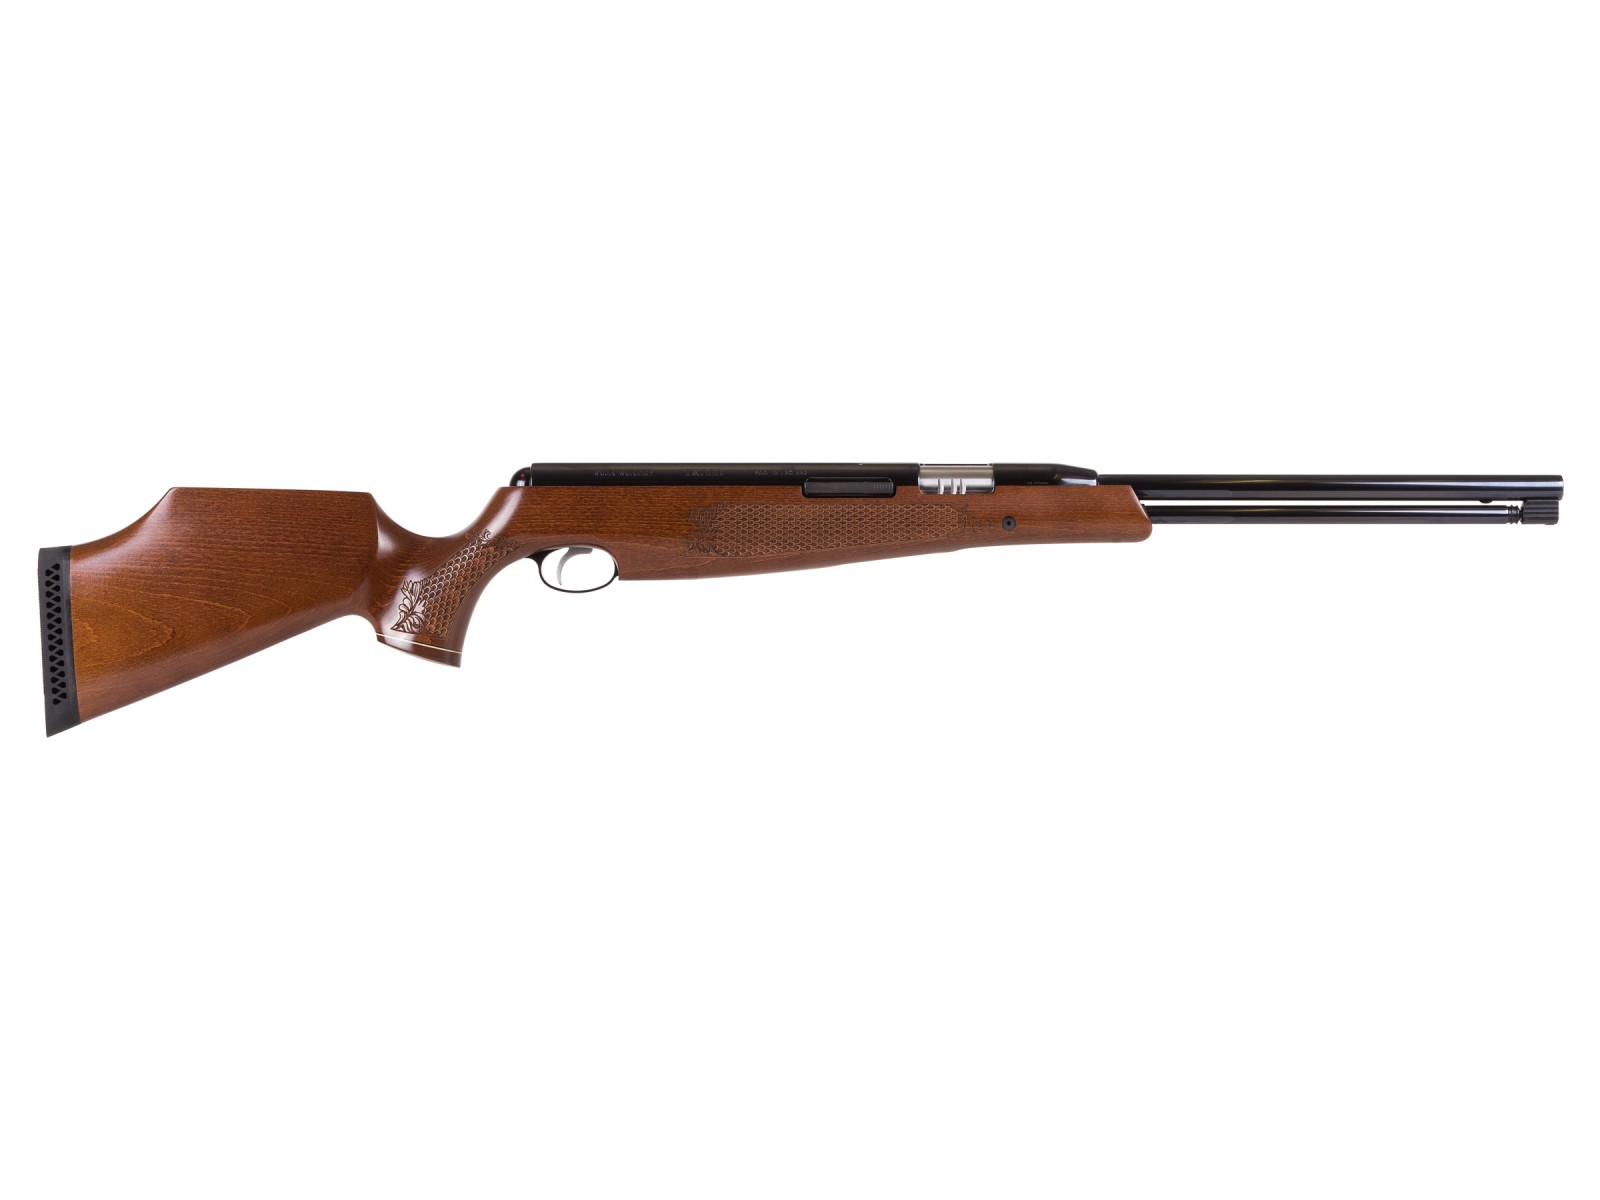
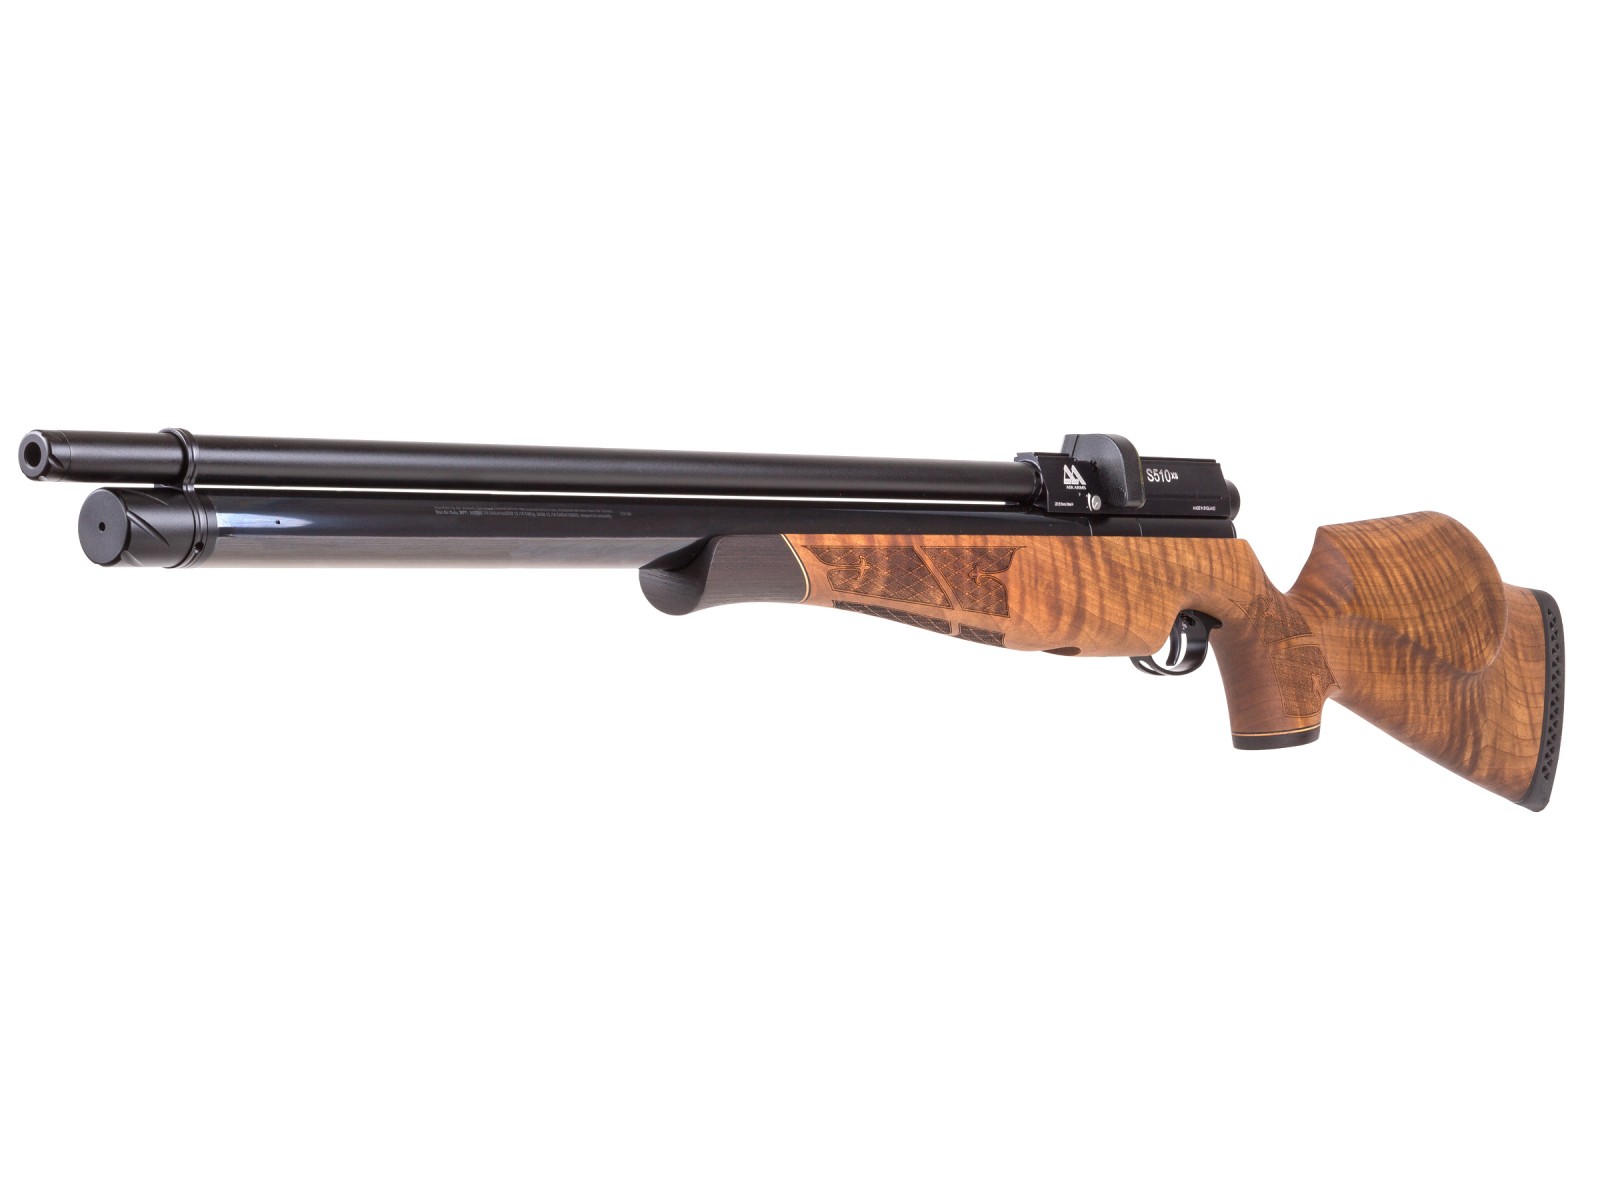
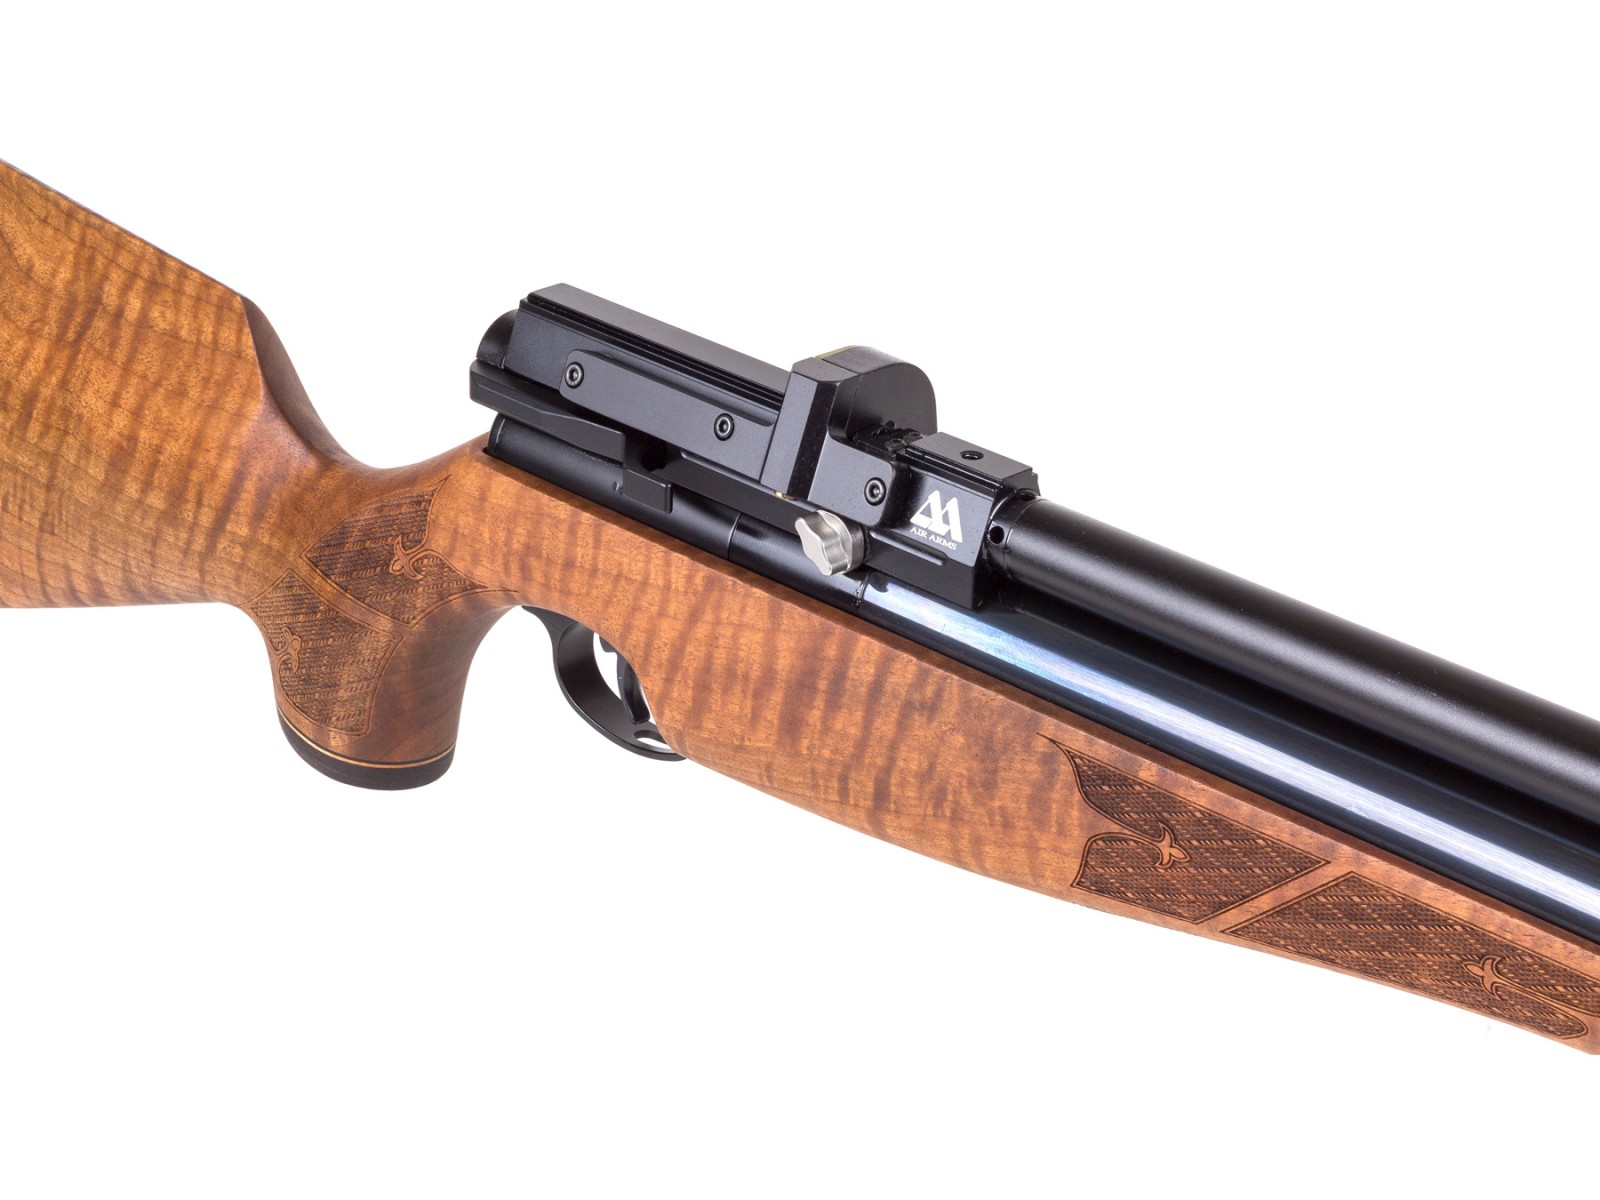
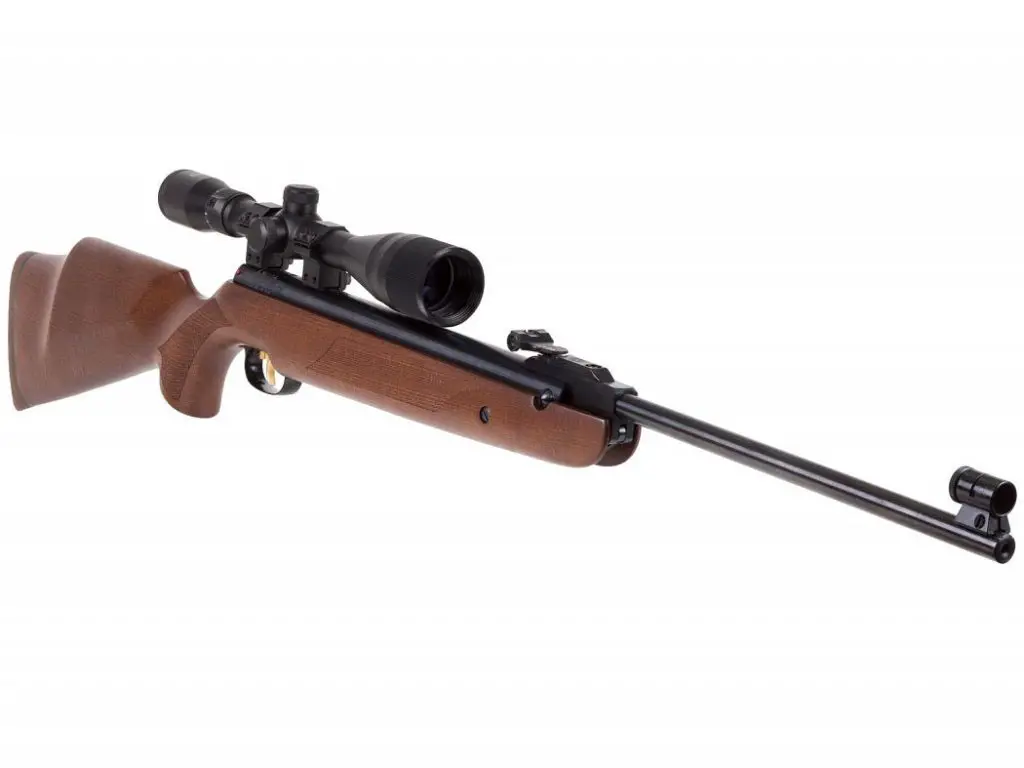
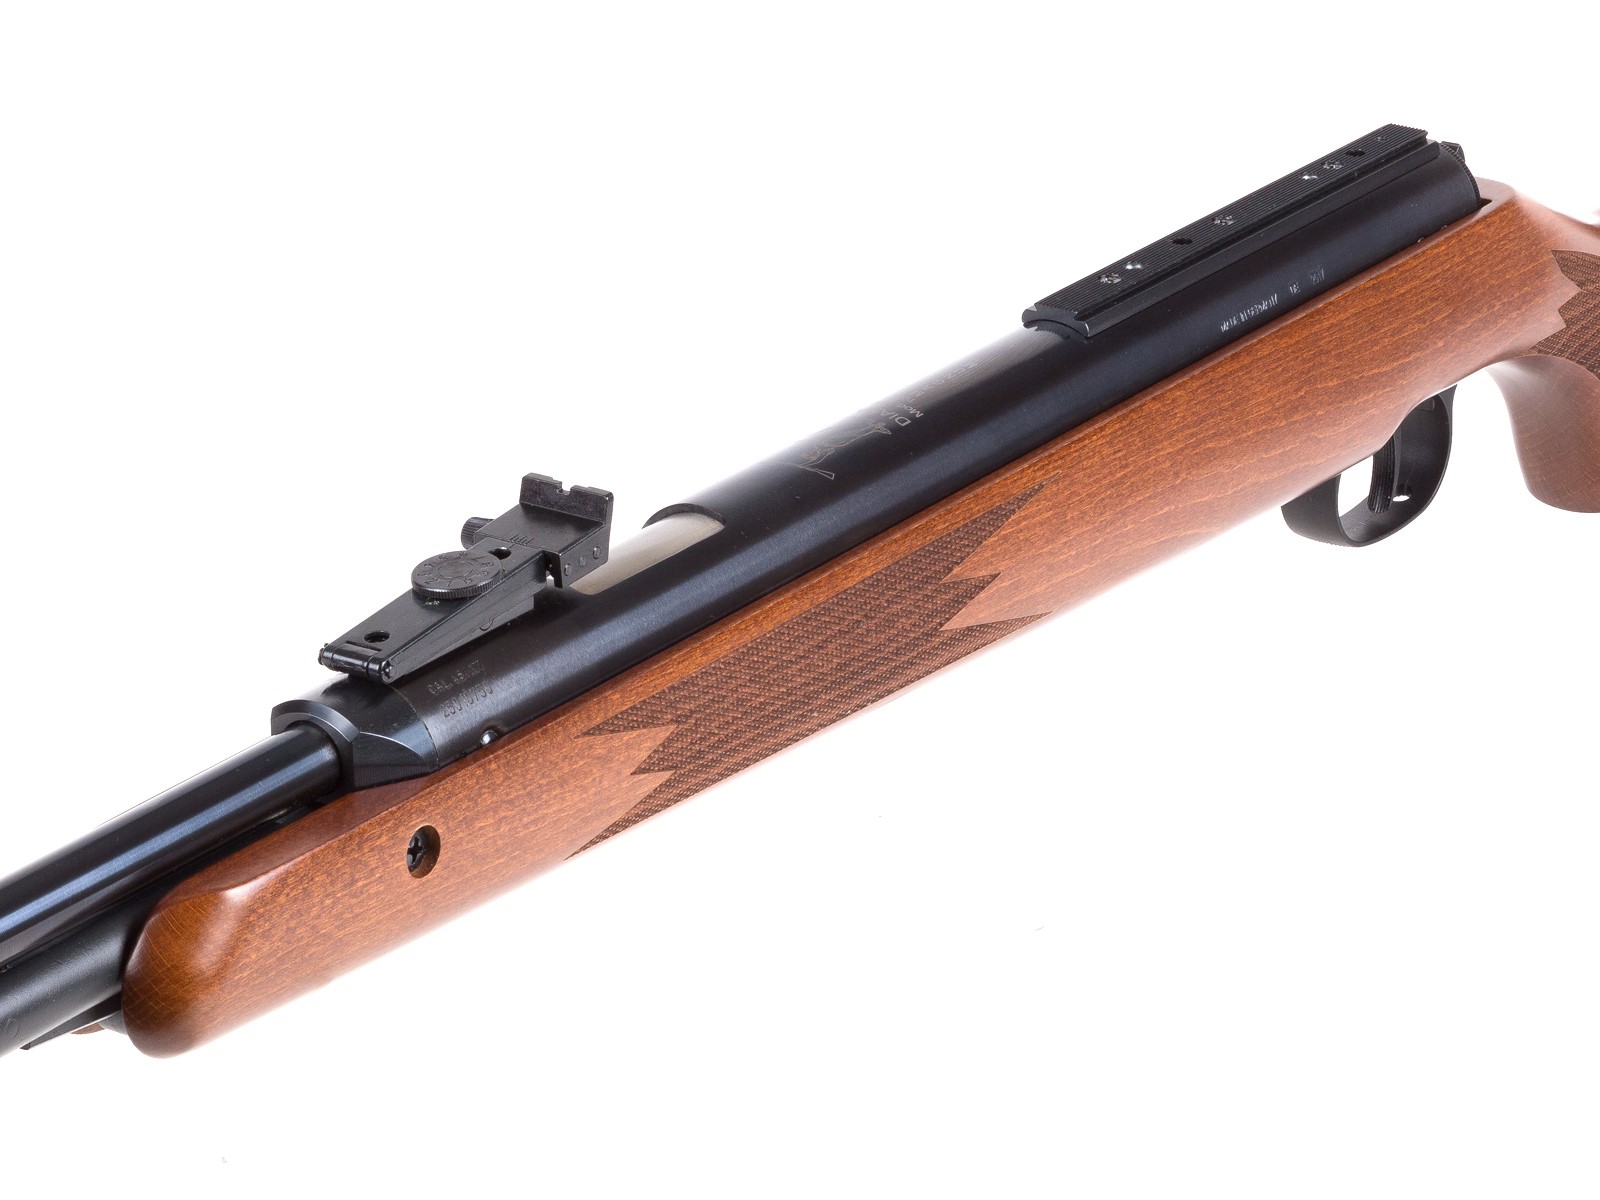
The Diana RWS 460 Magnum Breakbarrel Air Rifle is an engineering masterpiece from the fabled German airgun manufacturer.
From the powerful .22 caliber spring-piston set-up to the beechwood Monte Carlo stock with the checkered forearm and pistol grip, every detail of this air rifle was meticulously considered in its design.
Each shot you take will go downrange with a whopping 900 fps velocity, ensuring precise accuracy for varmint hunting and pest control.
With only 36 lbs. cocking effort, you can comfortably spend afternoons outdoors spending your time efficiently and accurately shooting those pests away.
And with its 11mm dovetail mounting, you can rest assured that your scope won’t easily come off making it easier to get small groupings.
The RWS 460 Magnum is a break-barrel air rifle that is perfect for any outdoor enthusiast looking to stay on target every time they shoot!
Features:
Underlever action
1100 FPS (.177), 900 FPS (.22)
Loudness: 3 – medium
Single shot
Cocking effort: 36 lbs.
Blade & ramp front sight
Micrometer adjustable rear sight
11mm dovetail scope mount
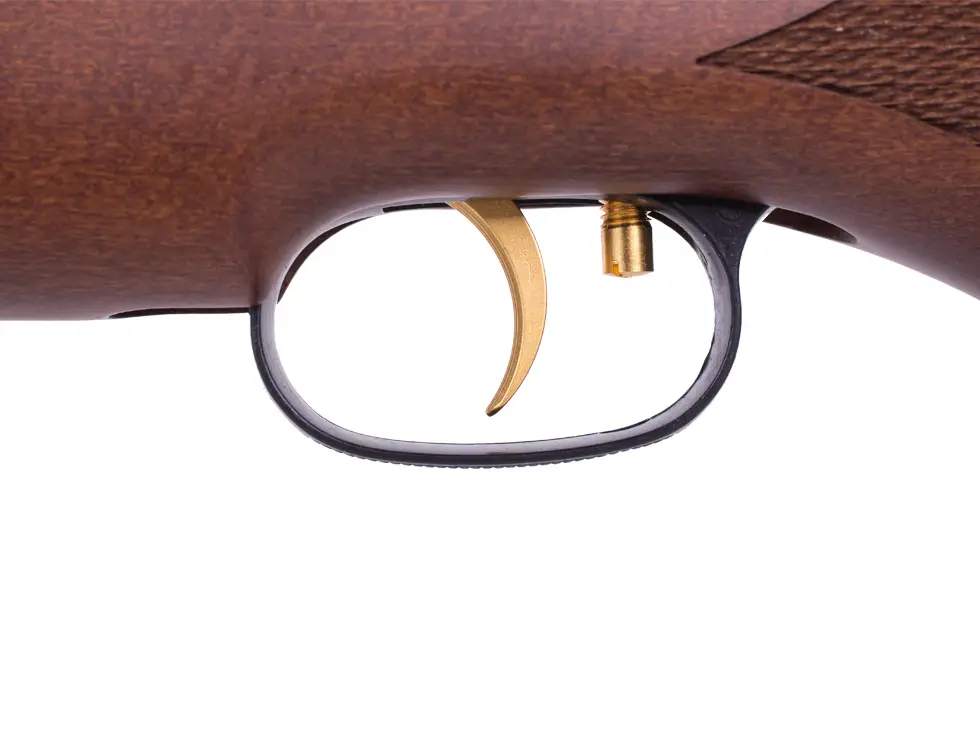
Two-stage, adjustable T06 trigger
Rifled steel barrel
Ventilated rubber buttplate
3.3-lb. trigger pull
Automatic safety
Spring piston power plant
Hardwood stock
Checkered forestock and grip
Monte Carlo stock with raised right-hand cheek piece
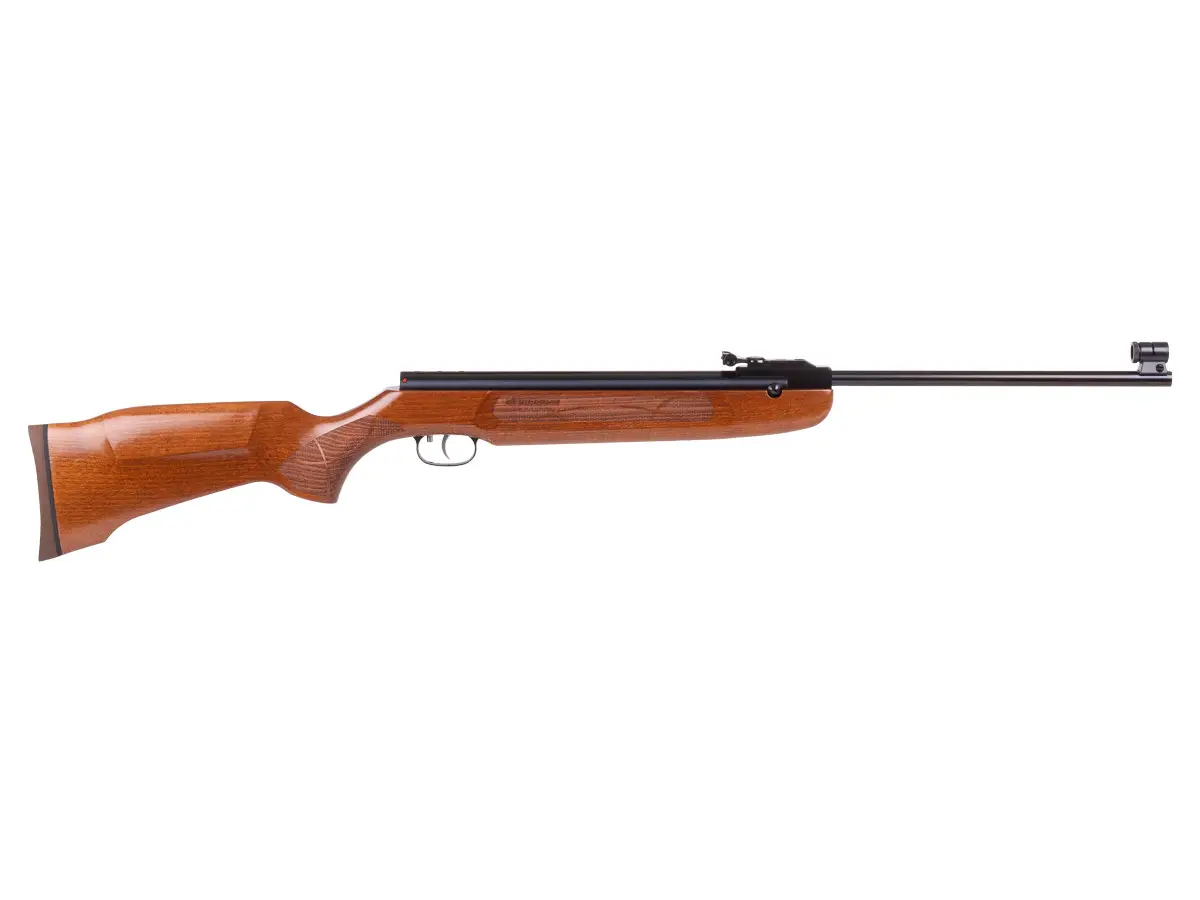
The HW50S spring piston air rifle from Weihrauch Sport is a high-quality gun perfect for plinking and hunting small rodents. With a state-of-the-art German design and construction, this gun is built to last.
The HW50S features a precision rifled barrel, making it accurate and reliable. The rugged stock is made from durable hardwood, making it sturdy and stable.
The HW50S also has an adjustable trigger, so you can customize it to your specific needs. Whether you’re looking for a gun for plinking or hunting, the HW50S is a perfect choice.
You can easily avoid fatal accidents if you inform people.
Airguns are low-powered in comparison with other types of guns.
This makes them safe for backyard practice. But people can be scared of guns.
You should not use your hunting activity as a means to disrupt your neighbors.
If you are hunting in your backyard you should ensure you have limits for your pellets range.
You can also use a pellet backstop to keep the pellets within limits.
You can also target the clang your metal makes to avoid noise pollution.
Handle with caution
You should always treat a rifle as loaded.
To be human is to err.
You might think a rifle is not loaded and cause the worst mistake of your lifetime.
Never point a gun at any person.
Air rifles can cause considerable damage if not well handled.
Before storing your airgun, ensure it is not loaded.
This helps to avoid indecisive decisions before your hunting begins.
You can even hurt yourself if you mishandle a rifle.
Once you are out there, never load a rifle until it’s time to fire it. Before firing, ensure that you have a safe shot and no one is around or in the direction, you aim at shooting.
The length of time it takes for a deer to decompose varies greatly according to environmental factors around the carcass. A deer carcass that is left to decompose without interference from scavengers may take around six months to completely decompose to bones.
Scavengers play a very important role in the decomposition of deer. They help eat the flesh from the bones and scattered the pieces exposing them to other agents of decomposition.
By puncturing the skin, they help in the circulation of oxygen into and out of the body which plays a big role in its decomposition.
Weather is also known to affect the rate of decomposition. Carcasses are known to decompose faster during summer when temperatures are high. Cold temperatures are known to preserve the body.
Decomposition is the process where dead organic matter is broken down into simple organic and inorganic matter
All organic matter once dead needs to be broken down. If this did not happen, bodies and dead plants would be all over the world.
Decomposition helps in returning nutrients ingested back to the ground. Farmers have been known to decompose compost and add it to their to the soil in their farm to increase nutrients in the soil. Dead leaves that decompose on the forest floor add nutrients back to the soil which helps the forest to thrive.
Factors That Influence The Rate of Decomposition
Various factors influence the rate of decomposition. Below are some of them.
1. Temperature
Warmer temperatures promote decay. This is because they are favorable for bacteria activities. Cold temperatures inhibit bacterial activity. It is not uncommon for decomposition not to occur at extreme cold temperatures.
2. Moisture
Research shows that moisture plays an important role in the decomposition of dead matter. The higher the moisture content in the carcass the faster it is able to decompose.
Mummification occurs when the body has low moisture content and is exposed to extremely high temperatures. The body is normally preserved at this state because bacterial activities are not able to complete.
3. Oxygen
Oxygen influences aerobic bacterial activity. This means that the higher the oxygen levels the faster the rate of decomposition.
4. Insects
Insects like blowflies are attracted to rotting matter. They lay their eggs on open surfaces of the carcass which hatch into maggots.
The maggots crawl into the body, damage soft tissue while burrowing into them, liquefying the body and increasing heat. They feed on the dead body and later on emerge as adult flies.
5. Season / Climate
During fly season decomposition rates are higher. This is because of the availability of more flies which means that more maggots will be present to helping the decomposition of the carcass.
6. Animal Activity
scavengers are known to pick through dead bodies and find whatever is edible and eat it. While feeding, they end up scattering some of the body parts exposing them to other agents off decomposition.
What Decomposes a Deer?
A class of animals known as decomposers are responsible for the breaking down of dead matter. They include, fungi, bacteria, worms and insects.
Decomposers are animals that get their energy by feeding on dead plants and animals. They are also known for breaking down animal waste from which they get energy.
They play a very important role of keeping energy flowing throughout the ecosystem. By breaking down organic matter into simpler inorganic matter they make nutrients available for primary consumers.
Worms do not necessarily fall under decomposers. They are commonly known as detritivores. Worms, unlike bacteria who absorb the nutrients directly from their surroundings, feed on and digest their food internally.
What Happens When a Deer Decomposes?
When a deer decomposes, their flesh, internal organs and skin is completely broken down leaving behind only bones which take longer to decompose.
The dead body passes through several stages before it is completely disintegrated too bones. Below at the five stages in which the body Undergoes.
Stage One: Fresh
This is the stage a few hours after the animal dies. Blood stop circulating throughout the body and the limbs start stiffening due to chemical changes in the muscles.
The remains are free of insects. Blood flows and settles on the lower side closest to the ground. Body temperatures either drop or rise to match those of the surroundings.
Stage Two: Bloat
It is during this stage that bacteria present in the human body begins to digest the tissues. This activity causes them to release gases that fill the body making it to bloat.
The body starts emitting a foul smell as the bacteria do their work. The pressure exerted by the gases in the body forces fluids out through openings in the body.
The foul smell attracts blowflies which come and lay their eggs in the body. The maggots hatch and start feeding on body tissues that detach from the skin causing it to slip.
Stage Three: Active Decay
As bacteria and insects breakdown muscles and other organs a lot of mass is lost. Liquids released into the surrounding also contributes to the loss of body mass.
Body tissues liquefy and the skin turns black.
Stage Four: Advanced Decay
It is during this stage that the decomposition of tissues and cells together with the liquefaction of the body is almost complete. Most of the remains have darkened.
A lot of nutrients have been released into the soil surrounding the body increasing its fertility.
Stage Five: Dry Remains
Most of the body tissues and skin have already been decomposed and all that remains is a dry skeleton with perhaps some hair left.
Insects like beetles come and eat anything that might be left. The bones change in color and lighten up because of exposure to the sun. They are eventually covered up and disappear into the earth.
What to Do with a Decomposing Deer?
It is advisable to try and dispose of the body before it starts decomposing. This is to avoid other animals coming into contact with the dead body and avoid the foul smell from filling the area.
When other animals accidentally come into contact with the deer they might get infected by diseases carried by the dead deer. The sickness might spread throughout the herd causing many animals to get sick and die.
The best thing to do is to try and bury the body leaving it to decompose in the soil. This will release nutrients directly into the soil while avoiding anything coming into contact with the body.
If the animal died in a hard to reach place like at the bottom of a ledge, you can speed up the decomposition process by piercing the skin, increasing air circulation in and out of the carcass.
To avoid the foul smell, try pouring large amounts of lime and if possible vinegar to neutralize the smell.
Related Deer Articles:
Are Deer Rodents?
Can Deer Be Domesticated?
Why Do Deer Stare At You
Do Deer Hibernate?
Conclusion
Deer decomposition has its own advantages as it means that nutrients are able to return to the earth which will be used by other organisms.
It however produces foul smells and attracts disease spreading insects like blowflies. It is however a natural process that must occur.
Tony Adams, of Eufaula, Alabama, is one of the best catfish catchers I know. In four hours, using what he considers the best jug line setup, Tony can produce 200-400 pounds by jug line fishing for catfish in Alabama and most of them individually will range from 8-20 pounds or better.
Tony jug fishes water that most catfishermen don’t fish, including the edges of underwater river channels, 20-60 feet deep, with jugs on Lake Eufaula. One of the most-important components of catching catfish while jugging southeast Alabama on the Chattahoochee River is the bait.
Great Days Outdoors asked Adams to test Fishbites Yeh Monn! Freshwater Catfish Baits that are biodegradable and made from all-natural ingredients to compare their catchability to his best jug fishing setup.
“I’ve discovered that the most-productive bait for deep-water catfish is hickory shad, often called skipjacks,” Adams explained. “We can catch them with a cast net here on Lake Eufaula, but they’re hard to find. Not only that, but after we get them, they must be frozen quickly and placed in the freezer, which requires a lot of time and effort that I don’t have. So, instead of trying to catch these hickory shad, I buy them from a guy who catches them on the Tennessee River, vacuum seals them and freezes them, while they’re still fresh. But, I have to pay $3 per shad.”
When Adams is jug line fishing for small catfish, he can get 20 baits out of one shad. However, if he’s fishing for big catfish, he only may get 12 baits out of one shad. To test Fishbites, Adams used the same number of jugs that he did while fishing with skipjacks on his best jug fishing setup.
“There was no difference between the amount and the size of catfish I caught with the Fishbites compared to those I caught with skipjacks,” Adams said. “I also liked how the Fishbites were more accessible, cost less and didn’t have to be kept frozen. I actually found more reasons to use the 5/8-inch-wide and 12-inch-long ribbons of Fishbites’ Yeh Monn! Freshwater Catfish Baits that are available in crawfish, liver, shad and worm scents than to go through all the trouble required to get, keep and fish with frozen skipjacks.”
Tony Adams moved to Eufaula, Alabama, in 1989, and when he arrived, he decided he would learn where and how to catch catfish there.
Today, during the hot summer months, Adams runs the lines coming from his jugs down to 40-60 feet deep, and in the fall, 18-60 feet deep, because he says, “The bigger catfish at Lake Eufaula and other lakes will hold in that deeper water. I’ve caught cats weighing from 20-60 pounds each on 60-foot deep lines.”
How to Rig and Bait Jugs for Catfish
Generally when Adams goes jug line fishing for catfish in Alabama, he puts out about 72, 20-ounce plastic jugs that he often rescues from ballpark garbage cans.
“During the summer months, we’ll catch about 300 pounds of cats by putting out those 72 jugs and fishing for 4 hours,” Adams said. “Then during the fall, I’ll usually catch 150-200 pounds of catfish in a 4-hour period to have a fine fish fry.”
Adams can produce that many fish in that short time, partly because he uses a Humminbird Helix 12 depth finder that features down imagining as well as side imaging.
Adams Puts his Best Jug Fishing Setup out on the Edge of the Main River Channel
Adams paints all his 20-ounce Gatorade and Pepsi plastic bottles orange. The jugs then fit neatly into the racks that drink salesmen use to carry Gatorade and Pepsi into the stores, and they’re stackable. So, Adams’ jugs don’t take up very much room in his boat.
“My jugs are easier to see on the water when they’re painted orange than any other color,”
Adams explained. “I use 50-60 pound test line coming off my jugs and either No. 5/0 or No. 6/0 stainless-steel circle hooks.”
Adams fills the insides of some of the jugs with foam, especially when he’s jug line fishing for very-big catfish in Alabama.
“A big catfish can pull a jug down so deep that the sides of the jug will collapse. So, by spraying foam in the jugs when I’m fishing for big cats, I solve that problem. The foam creates more flotation, and even if the jugs are pulled down deep in the water, the sides of the jugs won’t collapse.”
Why Place Your Best Jug Fishing Setup in a Straight Line
On some of his jugs, Adams uses an egg sinker above a swivel with about 18 inches of leader line below the swivel going to the hook.
According to Adams, “The weight helps the bait reach the bottom faster, and the swivel prevents the cat from rolling up in the line. On some of my jugs, I won’t use any lead, and I’ll only have a swivel to keep the cat from twisting the line. So, when the catfish picks-up my bait, the fish won’t feel any resistance on the line, until it gets the bait well into its mouth.
“I like to use No. 5/0 or No. 6/0 stainless-steel circle hooks when I’m trying to catch big cats – generally larger than what most anglers use. When I want to catch eating-size cats, I use a No. 7/0 or a No. 8/0 hook. I’ll also put about three turns of electrical tape around my jugs to have a place to put the points of my hooks when I take in my lines. Putting the points of the hooks under the electrical tape keeps the line on the jugs from unrolling, and it gives me a good place to store my hooks after I’ve finished fishing. I have reflective tape on some of the jugs to spot them easily when I fish at night.”
I also noticed that Adams tended to put his jugs out in a straight line, and he told me, “The easiest way to determine if you’ve got a cat on a jug or not is to put your jugs out in a straight line. Then when you start running your jugs, if you see a jug off to the left or to the right of that line, you know you’ve either caught a cat, or a cat has taken your bait. However, most of the time, if a jug isn’t in that straight line where you’ve put it, it will have a catfish on it.”
Adams uses a fiberglass Bream Buster pole with a large bass hook on the end of the pole tied to the last eyelet on the pole to pick-up his jugs quickly and play a catfish down. Then he can get the catfish to the surface quicker and up to the side of the boat.
Where to Put Out Your Best Jug Fishing Setup to Catch Catfish
When I fished with Adams, we started putting our 72 jugs for catfish out in the mouth of Barbour Creek. Then we headed north toward the railroad trestle. Adams uses his depth finder to pinpoint the water depth where the shad are concentrating on a river channel.
“When you put your jugs on the edge of a river channel, the wind either will blow the jugs on top of the river channel or out over the river channel,” Adams explained. “The catfish will relate to that river channel, especially in the hot summertime, as well as in the fall of the year when they’ll often suspend over the river channel.”
Adams cuts his baits into two sizes, big baits for big catfish and smaller baits for catfish 1-1/2 to 8 pounds.
“I put my bigger baits out in the deeper water, and my smaller baits in the shallow water,” Adams said.
As we put out the jugs, I saw that the main river channel had a bend on it. Instead of placing the jugs in a straight line there, Adams motored his boat around the bend and placed a few extra jugs in that bend of the old river channel.
“I’ll place a few more jugs in this spot than I do when I’m putting them out in a straight line,” Adams mentioned. “For the last 2 years, I’ve hooked a ‘gorilla-size’ catfish that stays in this bend. Once this catfish gets hooked, it goes to some underwater structure and breaks my line. I’ve watched for my jug to come up for 30 minutes before, but that ole catfish will keep it down underwater, and I’ll lose my jug. But I’ve never seen this large catfish.”
Why Use Large Baits to Catch Big Catfish
I asked Adams, “How often do you lose a jug when you put jugs out to catch catfish?
“If there’s little or no wind, I may not lose any jugs,” Adams said. “But on a windy day, I may lose three or four jugs, even if I’m working them, taking fish off the jugs and rebaiting, for the full 4 hours. There have been days when I’ve jug fished just ahead of a storm, and the big catfish have been biting actively. When that happens, I easily can lose as many as 12 jugs out of the 72. When those big catfish feel the pressure of the jug, they will run to structure and hang my jug up underwater.”
When I asked, “Tony, how often do you change out your hooks when you are jug fishing for catfish in Alabama?” he answered, “I usually change my hooks about once per year. But when I break a line off from a jug that’s gotten into structure, I’ll change out the line, the weight and the swivel and put a new hook on that jug. I fish with stainless-steel circle hooks, because they don’t rust, and they’re really strong.
“The lines on my jugs will get my hook and bait down to 18 – 60 feet deep. Most jug fishermen don’t fish with lines that long. I use lines that long from the springtime until the weather starts to cool down in early winter. Once winter arrives, the cats will move into the creeks. Then, I’ll put my jugs out in the creeks and shorten my lines to 8-16 feet deep. I can catch catfish all winter long jug line fishing for catfish in Alabama on Lake Eufaula.”
Adams likes the skipjack’s head for a big bait. He doesn’t catch a big catfish on every skipjack head he baits with, but if a big catfish does find that bait, it really will enjoy the head of a skipjack for breakfast or lunch. And, the same is true of the Fishbites Yeh Monn! Freshwater Catfish Baits Adams tried for “GDO.”
What Tips Will Help You Jug Fish for Catfish Better
* A 20-ounce Gatorade or a soft drink bottle with the cap screwed on is an ideal size of jug for the best jug fishing setup. It’s not too big and doesn’t take up much space in the boat.
* Those 20-ounce jugs rigged and ready to fish can be put in a drink case they’ve been designed to fit in and take up far less room and are much easier to handle than gallon jugs or bigger.
* The line will free-spool off the end of the jug just as fast as line free-spools off a spinning reel, by throwing the bait in the water and keeping your big engine running. (No lead necessary).
* Deep-water fishing produces more and bigger catfish than fishing in shallow water, or at least, when fishing Lake Eufaula.
* Stainless-steel circle hooks require much less maintenance and can help you land bigger cats than wire hooks will.
* A Bream Buster pole with a large bass hook tied to the end of it makes picking up jugs, as well as fighting and landing big cats, easier and quicker than trying to pull the cats in hand-over-hand with the line.
* A strong, oversized rubber-coated dip net is a must for success when jug fishing for catfish in Alabama.
* You must spend about 4 hours of the day baiting and landing the catfish you catch on your jugs to take the most catfish. However, using Fishbites’ Yeh Monn! Catfish Baits saves time.
* Jug line fishing Adams’ style is one of the quickest ways I’ve ever seen to catch the most catfish in the shortest time for both the table and the freezer.
Classic lever-action deer rifles are undoubtedly cool. My first was a Winchester Model 94AE XTR in .30-30 Winchester, that timeless rimmed cartridge that has accounted for innumerable amounts of game. It was a gift from my father for my 15th birthday, and—at least to the young man who received it—marked a passage into manhood. I’d be hunting deer with my father the following season, and that alone was a dream come true. Like any inquisitive young man, I delved into the history and nostalgia of the .30 WCF, or .30-30, and the many names it has carried, and was honored to take my first deer—a whitetail doe—with the same cartridge that my father took his.
I’m old enough to remember when the lever guns were still highly popular among deer hunters, and my own rifle, as shiny and unproven as it was in comparison to the older gents’ worn pieces with bluing rubbed off and stock finish dulled by the elements, was a source of pride. In the deer camp mix of Savage 99s, Marlin 336s and a selection of Winchesters, many cartridges were represented, including some rarities like the .348 Winchester, but the main rivals were the .30-30 Winchester and the .35 Remington. As a matter of fact, that may have been the first campfire cartridge argument I was privy to; if only those gentlemen would’ve realized the fire they’d kindled. Let’s take a look at the two champions of the deer woods, and perhaps finish the conversation started three-plus decades ago.
The .30-30 Winchester has the unique claim of being the first cartridge designed to run on both black powder and the revolutionary smokeless powder. Deriving its name from a combination of the caliber and the powder charge (.30 caliber, 30 grains of powder) the .30-30 was introduced in 1895, in the John Browning-designed Model 1894 Winchester. At the time, .32 caliber cartridges were actually more popular than were the .30s, but it didn’t take long for the .30-30 to establish itself as a perfect deer hunting cartridge. Driving a 160-grain jacketed bullet to a velocity of just over 2300 fps, it represented a fantastic hunting cartridge for its time. Soon after, the classic 150- and 170-grain loads took root, and due to the tubular magazines of so many popular rifles, round nose bullets were employed. It has accounted for almost all, if not all, North American game species, and the famous African PH Wally Johnson used one to kill lions in his early years in Mozambique.
The .35 Remington was released—as one of a quartet of rimless cartridges from Remington—in 1906; it is a rimless affair designed for their Model 8 autoloading rifle. Alongside the .25, .30 and .32 Remington, the .35 would be the only survivor. While it has been chambered in many different rifles, the combination of the Marlin Model 336 rifle and the .35 Remington has achieved true classic status, in spite of the fact that the rifle was introduced 1948. This combination offers an affordable, hard-hitting rig which is capable of taking most common game animals, albeit at short range. The .35 Remington uses the 180- and 200-grain .358″caliber bullets, and while light-for-caliber, they are effective at the ranges a .35 Remington is used, which is usually inside of 150 yards.
Which is the more useful cartridge? Of the two, which serves the hunter better? Traditionally, the tubular magazines of the popular lever-rifles restricted the cartridges to using round or flat-point bullets, to avoid the possibility of magazine detonation, should a pointed spitzer bullet hit the primer of the cartridge ahead of it in the magazine. The exception to that rule is Hornady’s LeveRevolution ammo line, which uses a pliable tip on a spitzer bullet to afford a much flatter trajectory in both cartridges. With the traditional loads, the .30-30 will drive its 150- and 170-grain bullets to a muzzle velocity of 2400 and 2250 fps respectively, while the .35 Remington launches its 180- and 200-grain bullets at 2100 and 2080 fps. Both generate between 1,800 and 1,900 ft.-lbs. of muzzle energy with traditional loads, and the hot-rod LeveRevolution will certainly offer an improvement in ballistic figures, but the advancements are parallel between the two cartridges.
I feel the cartridges offer very similar performance, at similar ranges. If you were to give the edge to the larger frontal diameter of the .35 Remington—.358″ versus .308″—you would have a valid point. If you were to vote for the .30-30 Winchester based on its higher Sectional Density values—the 170-grain .308 bullet has an S.D. figure of .256 versus the 200-grain .358’s S.D. figure of .223e—I’d have to agree with you as well. Personally, at the ranges that these cartridges are used, I could easily call it a draw. Both come in light, handy rifles that are a pleasure to carry in the forested mountains and wooded areas where these guns shine. But, there is an issue: It seems the .35 Remington ammunition has begun to fade away. There seem to be fewer choices each year, and that’s a shame.
I give the edge to the apparently timeless .30-30 Winchester for the availability alone; there are dozens of factory loads to choose from, and being .30-caliber is never a bad thing. It’s just about perfect for the deer woods, and you can easily teach a youngster the art of shooting an iron-sighted lever rifle without punishing recoil. It will handle black bears and feral hogs—as will the .35 Remington—but sourcing ammunition is far easier if you own a good old thutty-thutty. My own 94 Winchester is coming out of the safe this year, freshly adorned with a new front sight and rear peep from Skinner Sights; even middle-aged eyes get a new lease on life, and I’m having lots of fun from the bench with my old friend.
If you shoot a .35 Remington, I see no reason whatsoever to stop doing so, just make sure you keep an ample supply of whatever load your rifle likes. However, even after 123 years on the market, the .30-30 Winchester remains the king of medium caliber lever guns; it has been in the top ten selling cartridges for Federal Premium to this day, and with millions of rifles out there chambered for the cartridge, that will probably be a fact decades from now.
Looking for previous installments of our “Head to Head” series? Click here.
"Unlock the Perfect Shot: Discover the Best Scope for Break Barrel Air Rifles. Enhance your shooting experience with precision and accuracy, as we delve...
")
")
")
")
")