“Unveiling the Truth: Are Air Rifles Considered Firearms? Dive into the intricate world of air rifles and explore the legal classification of these weapons. Discover the key factors that determine whether air rifles are deemed firearms or fall under a different category. Gain insights on their regulations, potential uses, and implications for gun ownership enthusiasts. Unlock the mystery surrounding air rifles and arm yourself with knowledge in this compelling exploration.”
Airguns are a popular choice among enthusiasts for various recreational activities such as target shooting, pest control, and small game hunting. However, there is often confusion surrounding the legal classification of airguns and whether they are considered firearms. In many jurisdictions, the status of airguns falls into a gray area between firearms and other types of weapons.
The classification of airguns as firearms largely depends on the specific laws and regulations of each country or jurisdiction. In some places, airguns may be subject to the same restrictions and licensing requirements as traditional firearms. This means that individuals may need to obtain a license or permit in order to purchase or possess certain types of airguns. On the other hand, in some jurisdictions, airguns may be classified as non-firearms or treated differently from traditional firearms due to their lower power levels or different mechanisms.
UK, Canada & Australia
The United Kingdom, Canada, and Australia are three English-speaking countries that share historical, cultural, and political ties. These countries have a long history of collaboration and cooperation in various fields such as trade, education, and defense. The close relationship between the UK, Canada, and Australia is often referred to as the “Anglosphere” due to their common language and shared values.
In terms of education, these countries have renowned universities that attract students from all over the world. The UK is home to prestigious institutions like Oxford and Cambridge University. Canada boasts top-ranked universities such as the University of Toronto and McGill University. Australia also offers high-quality education with institutions like the University of Melbourne and Australian National University.
Furthermore, these nations have strong economic ties through bilateral trade agreements. The UK has historically maintained close economic relations with both Canada and Australia due to their shared membership in the Commonwealth of Nations. Trade partnerships have led to increased investment flows and business opportunities among these countries. Additionally, they collaborate on various international issues such as climate change, security concerns, and promoting human rights globally.
USA Laws
The legal system in the United States is based on a complex framework of federal, state, and local laws. These laws govern various aspects of life in the country, including criminal offenses, civil disputes, and regulations for businesses and industries. The USA has a common law system, which means that legal decisions are based on precedent set by previous court cases. This system allows for flexibility and evolution in interpreting laws to meet the changing needs of society.
One important aspect of US laws is the Constitution, which serves as the supreme law of the land. It outlines the basic rights and freedoms of individuals and establishes the structure of the government. The Constitution also grants certain powers to the federal government while reserving others to the states. This division of power between federal and state governments helps maintain a balance between national unity and regional autonomy.
In addition to federal laws, each state has its own legal system with statutes and regulations that may vary from one jurisdiction to another. State laws cover a wide range of issues such as education, healthcare, marriage and divorce, property rights, and traffic regulations. While some laws are consistent across all states, there can be significant differences in certain areas depending on local customs, traditions, or priorities.
In conclusion, air rifles are not considered firearms in most countries due to their lower power and limited range. However, regulations and classifications may vary depending on the jurisdiction. It is essential to understand the specific laws and regulations in your region regarding air rifles to ensure compliance and responsible usage.
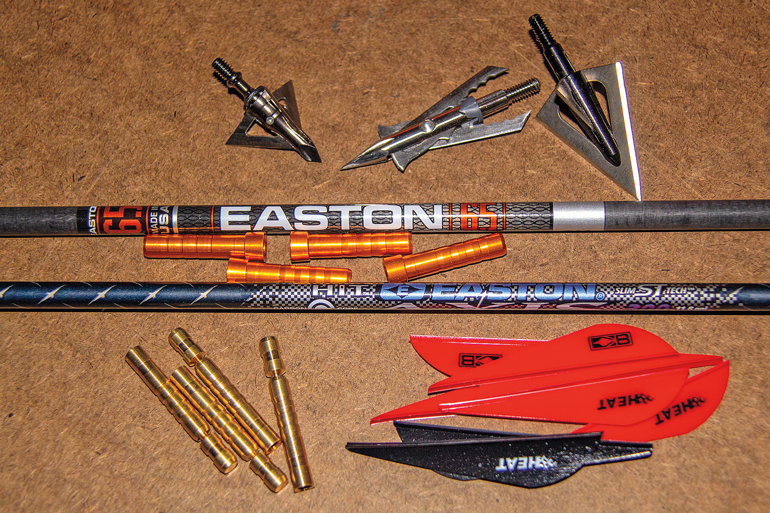
Building the perfect elk arrow depends on many factors, including broadhead design, arrow weight, front-of-center balance, and the draw weight and draw length of a well-tuned bow.
Q: I am an avid reader of Bowhunter Magazine, and I look forward to each issue and the information and hunting stories you and the other writers contribute! I am planning an elk hunt in Montana with my brother, nephew, and close friend. Could you make some recommendations on arrow/broadhead choices for the hunt? Scott Cool, via e-mail
A: Thanks for your e-mail. First, let’s establish the number-one goal of every elk hunter — a bilateral pneumothorax — otherwise known as a double-lung collapse. If you only puncture one lung on an elk, the odds of recovery are close to zero. That makes maximum, and hopefully two-hole, penetration more important than on just about any other North American big game animal.
There are many factors to consider: draw weight/length, arrow speed/weight (both kinetic energy and momentum), and broadhead construction. All of these factors are intertwined in their importance. If you shoot low poundage, or a short draw length, your arrow speed will be adversely affected, necessitating a heavier arrow and a broadhead designed for maximum penetration. Heavier draw weights and longer draw lengths make the other factors less critical, but they are still important.
Personally, I tend to vary my arrow weight according to the species I am hunting. I may want a flatter trajectory for antelope, deer, or caribou, but for a very tough animal like an elk, I prefer an arrow in the 500-grain range. I have a 30.5-inch draw, and I typically shoot 67 pounds. Because this setup delivers plenty of energy and momentum, I can shoot most any quality broadhead from fixed blades to heavily built mechanicals like the Rage Trypan and not worry about penetration.
We don’t have the space to get into all the physics, and there is plenty of dispute among bowhunters on this topic, but without knowing your specifics I would recommend an arrow weighing at least 450 grains (total arrow/broadhead) for elk. An arrow’s front of center (FOC) is also important to penetration, and I strive for at least 12 to 13 percent or more.
Yes, if your draw weight and arrow speed are exceptional (well over 300 fps), you might get by with a lighter, flatter arrow, but I still wouldn’t go below 400 grains under any circumstances. Will it work, yes, but if the shot is in any way marginal, a lighter arrow will not likely bail you out. If your draw weight and arrow speed is average (under 280 fps), your total arrow weight should go up. I know that sounds counterintuitive, but consider the recurve archer who is shooting only 190 to 200 fps and using arrows of 600 grains and up. They certainly don’t go down in arrow weight. In almost any scenario, a heavier arrow will penetrate better on a live animal. And no test medium can replicate the real thing.
Broadhead design does matter, but mostly in a basic sense. If you start with a well-tuned bow, there is no question the best penetrating broadhead is a cut-on-contact, fixed two-blade design like a Muzzy Phantom, Magnus Stinger, or Iron Will broadhead. A fixed-blade broadhead and certain mechanical heads are next, and then comes the really wide-cut mechanical broadheads. If you hope to drive a two-inch-wide broadhead completely through an elk, you had better have some energy and a heavy arrow behind it. If you do, it’s devastating.
By now, you can see that all these factors are codependent, which is why there is so much debate. If you’re an average archer shooting 65 pounds at a 28-inch draw, I would shoot an arrow/broadhead combo that weighs around 475 grains (with decent FOC), and a strong, super-sharp broadhead that gives you confidence. Then hunt your way close and drive it through both lungs. Good luck.
A break barrel air rifle is a great investment for anyone who enjoys hunting or shooting. However, like any other firearm, it requires regular maintenance to keep it in good working condition. In this blog post, we’ll walk you through the steps of how to clean a break barrel air rifle so that you can keep it in a top shape.
Use a bore guide to protect the muzzle and chamber of your air rifle while you clean the barrel. Insert a cleaning rod into the bore guide, and attach a patch jag to the end of the rod. Soak a cleaning patch in gun solvent, and run it through the barrel from breech to muzzle several times. Repeat this process with a dry patch until the patches come out clean. Finally, run a few patches soaked in gun oil through the barrel to protect it from rust.
Clean the Barrel (External)
Use a soft cloth to wipe down the outside of the barrel. Be sure to pay special attention to the breach area, as this is where dirt and debris are most likely to build up.
Clean the scope
Use a soft cloth or lens brush to remove any dust or fingerprints from the surface of your scope lens. If there is any build-up on the lens, you can use lens cleaner and a soft cloth to gently remove it. Never use harsh chemicals or abrasive materials on your scope lens, as this could damage it.
Clean The Woodwork
Use a soft cloth or polish specifically designed for wood surfaces to wipe down your air rifle’s stock. Be sure not to use any harsh chemicals or cleaners, as these can damage the wood.
Clean The Action
The action is the part of your air rifle that loads, cocks, and fires the pellets. To clean it, start by removing any dirt and debris with a soft brush or cloth. Once you’ve removed all of the visible dirt, lightly lubricate all moving parts with gun oil before reassembling your air rifle.
Clean The Trigger
Remove any dirt or debris from around the trigger using a small brush or toothpick. Then, lightly lubricate the trigger mechanism with gun oil before reassembling your air rifle.
Conclusion
By following these simple steps, you can easily clean your break barrel air rifle and keep it in good working condition for years to come. Regular cleaning and maintenance will also help increase its accuracy and lifespan. Thanks for reading!
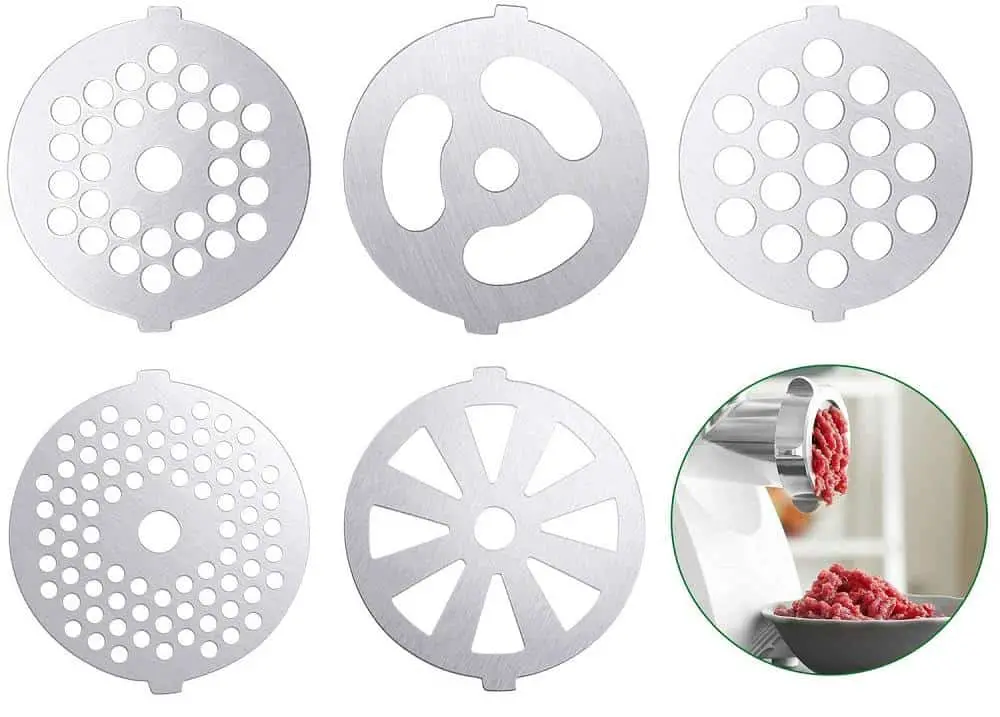
Whether I’m grinding wild game from the hunt, or a whole cow from my local farmer, meat grinder plates allow me to take control and customize your grinds.
Meat grinder plates are circular discs with holes across them, and the texture of the grind depends on size of the holes in the plate.
Depending on what item you’re grinding the meat for, you will need one or more plates to achieve the right texture.
For example, if I’m grinding meat for summer sausages, I use a 2 ½” grinder plate, but I need both 1/4″ & 5/16″ grinder plates to grind meat to make fresh burgers.
Whether you’re using a manual or electric meat grinder, you will need to load the machine with appropriate grinder plates to produce the final texture.
When you load the food tray of your meat grinder, it is pushed down through the feeding tube, and through the blade, which cuts down the meat.
If you don’t install meat grinder plates, then the grinding results will be thick and not consistent.
After the meat is processed by the blade, it goes through the holes of the grinder plates to give the ground meat coarse or fine texture.
The main and only job of the blade of a meat grinder is to mince the meat, so that it can smoothly go through the grinder plate holes.
Complete Meat Grinder Plate Size Chart
You can use the chart below to find the right meat grinder plate size for your needs.
Grinder Size NumberPlate DiameterHole DiameterType of GrindIdeal for Grinding Meat for#5 2-1/8″ 6mm (1/4″) Coarse Sausages such as summer, salami, pepperoni and snack sticks #8 2-3/8″ 10mm (3/8″) Coarse / first grind Chili, chorizo and linguisa #8 2-3/8″ 4.5mm (3/16″) Coarse / second grind Hamburger. Regular sausages # 10/12 2-3/4″ 10mm (3/8″) Coarse / first grind Chili, chorizo and linguisa # 20/22 3-1/4″ 4.5mm (3/16″) Coarse / second grind Hamburger. Regular sausages # 20/22 3-1/4″ 3mm (1/8″) Fine Hamburger, bologna, hot dogs # 20/22 3-1/4″ 12mm (1/2″) Coarse / first grind Chili and stewed meats # 20/22 3-1/4″ 10mm (3/8″) Coarse / first grind Chili, chorizo and linguisa # 20/22 3-1/4″ 6mm (1/4″) Coarse Sausages such as summer, salami, pepperoni and snack sticks # 32 3-7/8″ 3mm (1/8″) Fine Hamburger, bologna, hot dogs and jerky #42 5 1/16″ 4mm Commercial use / coarse Hamburger, salami, summer sausage, pepperoni and bratwurst
What Meat Grinder Plate Sizes Should You Typically Have?
This completely depends on what you will making with the ground meat. If you’re going to be making franks, hamburgers, bologna and beef jerky, 1/8″ or 3/32″ fine grinder plates should be in your arsenal.
You can even make hamburgers and breakfast sausages with 3/16″ or 5/32″ hole size medium grind plates.
For coarse ground meat, that is to make items such as salami, chorizo, bratwurst, sausage, etc., you will need a grinder plate with a bigger hole size such as 1/4″, 5/16″, and 3/8″.
How do I Know What Size Meat Grinder I Have?
The numbers on your meat grinder refer to the size of the grinding head. Depending on the manufacturer, you can find the size of your meat grinder emblazoned on the appliance itself or in the owner’s manual.
In case you cannot find any size number on your grinder plate then just take a measuring tape and measure the diameter of the round plate and also use the same method to measure the diameter of one of the holes. Now use this information to lookup the plat size from the meat grinder plate size chart above.
The most common sizes of meat grinders for home use are #5, 8, 12, 22, and 32, whereas #20, #22, #32, #42 and #52 size meat grinders are mostly used in commercial settings.
Smaller size meat grinders come with smaller feeding tubes, and larger feeding tubes with large size grinders.
If you’re only grinding meat for burgers and sausages, then a smaller size meat grinder will do the job, but if you’re looking to grind wild game several times a year, then you should opt for a larger size meat grinder.
What is the Grinder Plate Size for Sausage?
This depends on the texture of sausages you’re making such as whether you like them with a fine or chewy texture. If you’re grinding meat for bratwurst sausages or summer sausages, you will need coarsely ground meat with a 2 3/4 inches grinder plate.
For chorizo, you will again coarsely grind meat, but this time with a 3 1/4 inches size grinding plate.
But if you’re grinding meat for breakfast sausages, Polish or Italian sausages, you should use a 3/16″ coarse grinding plate and also check out my previous article which covers meat grinder plate sizes for various sausages in detail.
How to Sharpen Meat Grinder Plate?
The grinder plates of a meat tend to get worn out after a period of use, hence need to be sharpened. If you grind with dull plates, great chances are that you won’t get the best texture and consistency from the respective plate.
The best and easiest way to sharpen your meat grinder plates and even knife is with the Sausage Maker sharpening system.
Soak the stones in the sharpening system in water for roughly five minutes. You have to be very gentle with them because they can get damaged easily.
There are two plates in the pack—one with the square hole is for the knife, and the round hole stone for the grinder plate.
If you just want to sharpen the grinder plate, place the stone into the grinder head of the meat grinder first, and then place dull grinder plate over it, and secure them both with the retaining ring, but not too tight.
Power on the meat grinder for only five seconds or so, and voila—the grinder is plate is back to new.
Now repeat this process for the other side of the grinder plate to ensure both sides are sharpened.
There are other ways to sharpening grinder plates as well such as with a sharpening stone, but these will require a fair bit of elbow grease, so it’s better to do the job effortlessly with the Sausage Make sharpening system.
The .22lr is one of the most bought and shot calibers in the United States. This caliber is available in a variety of rimfire cartridges and is used from casual plinking to small game hunting. In any shooting situation, the use of a .22lr scope can be extremely beneficial. Because of this, it is in your best interest to become familiar with the best scope for 22lr rifles that are available.
In this article, we will take a look at some components and performance characteristics that are associated with quality rimfire scopes. We will then take a look at four scopes that can easily be considered the best scope for 22lr rifles.
DIANA 2-7×20 HD Riflescope
High quality and clear vision
With multiple adjustment from 2-7x
Weather resistant
Thick aiming reticle
Small eye relief
$98 Shop NowClick to read my review Nikon P-Rimfire Scope
Weather resistant
Incredible low light performance
Crisp reticle
Heavy
Poor field of view at higher magnification range
$179 Shop NowClick to read my review Leupold FX-1 Rimfire Scope
Compact and lightweight
Excellent field of view for quick target acquisition
Top quality lenses
Pricey
$299 Shop NowClick to read my review Vortex Crossfire II Rimfire Scope
Purpose: Letâs take some time to discuss the purpose of optics on rimfire, specifically .22lr chambered firearms. There are a lot of scopes that are going out on the market that might seem like better options than the scopes we are going to list here.The bottom line is that you don’t need extreme magnification. This is because this caliber is not going to reach out to 500 yards and high power magnification scopes are generally much more expensive. The best 22 scope is going to be durable, reliable, lightweight, and have the necessary performance standards for any scope.
Durability: Any scope that is going to be put on your firearm, whether a rimfire or high caliber, needs to be built of quality materials that can handle environmental conditions as well as stand up to bumps and scrapes that accrue over trips to the woods.You want a scope built from a single piece tube, as this helps increase durability and you want the scope built from materials such as aluminum or possibly a high-quality graphite. You also want to these scopes to be purged and sealed in key areas to keep the scopes water and fog proof. And even though we are only dealing with a .22 caliber you want a scope that is going to hold zero consistently over many outings.
Glass: A scope is going to worthless unless is has the lenses able to perform in a variety of conditions and be able to provide a bright and clear image. You are going to want a scope that can transmit a good deal of light from the ocular lens to your pupil, especially for those with hunting purposes in mind. It always seems the most squirrels are out at those first rays of light coming down through the trees.Lens coatings help as well as the diameter of the objective lens with most scopes that work well for rimfire rifles being 33mm or less in diameter. Lens coatings also help cut down on glare and light reflection on your lens and an abrasion resistance coating will help increase the longevity of your glass and make those frustrating scratches less likely.
Weight: For optics going on your .22, itâs important that your scope of choice does not throw off the balance. .22 rifles are generally lightweight and throwing on a heavy scope can throw the balance of the rifle off.You shouldn’t have an issue with any of the scopes we will cover in this article being too heavy for your .22 rifle, but it is something you should keep in mind if you decide to venture out and look for a 22lr scope. While we can’t tell you what the cut off is without handling your particular rifle, and scope used on a .22 shouldn’t be over 15oz.
Magnification Power: As we keep saying, for most shooting scenarios that occur with a .22lr rifle are not going to be over 150 yards. Because of this, the need for high-powered magnification scopes is overkill. A 3-9X variable scope is going to be more magnification than you will ever need and it also provides enough settings for most target shooting scenarios.A lot of plinkers or hunting situations do not even require a variable powered scope, and a fixed scope has a lot of benefits. They are most often cheaper, and they are also more durable as there are less moving parts. Weâre not here to tell you which type of .22 rifle scope you should put on your rifle, but simply let you know there are options and to think about the shooting applications you have in mind.
Reticle: Building of the purpose section, remember what you are shooting. A .22lr chambered rifle is not meant nor is it capable of taking shots at long distances. There might be situations where you want a more technical reticle that features bullet drop compensation, but for the most part, a simple and crisp duplex reticle is more than enough for .22lr chambered firearms. Now, if that’s not what you’re about then more power to you and go with a reticle that you feel the most comfortable with.
The 4 Best Scopes for .22lr Rifles
Following the criteria outlined above, the next section will provide a selection of scopes that perform well in combination with the .22lr caliber.
DIANA 2-7×20 HD Riflescope
Diana 2-7×20 HD is one of the most popular brands on the market today. This scope is suitable for your .22lr chambered rifle. This is a well-made, durable aluminum alloy scope that can handle most of the abuse you put it through on a day out. In fact, when it comes to its quality, we can say that it can definitely give a good fight to other brands out there. It is also sealed to be water and fog-proof. So whatever the weather conditions, it can be used properly.
This scope features a variable magnification range of 2-7X. Making it ideal for hunting and range shooting. You will see your target in focus and clear at 100 yards using its parallax adjustment. It has an excellent optical coating that changes how light is reflected. And transmitted in the optic to improve transmission, reflection, and polarization qualities. Another benefit of this scope is its high precision and enhanced shooting target. Which allows you to have a better shooting experience.
This is a compact and lightweight scope that is easy to carry everywhere. However, one of its drawbacks is the small eye relief. Nonetheless, for us, this isn’t a major concern, so we can say this scope is still an excellent pick. After-sale, it will provide you with the finest guarantee. Thanks to the strong impact test that Diana scope assured. Because we experience it firsthand, which is why this scope is worth an investment.
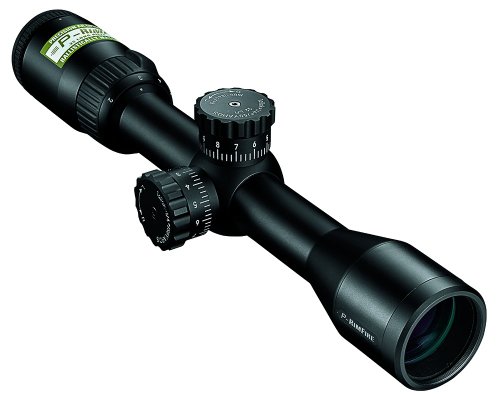
Nikon P-Rimfire Scope
This 22 rifle scope is a 2-7X variable powered scope that is specifically designed for use with smaller rimfire rifles. It is both fog and waterproof and performs well in less than ideal weather conditions often encountered when hunting.We love the lenses used in this scope. They transmit a lot of the light through the scope tube, and at low light settings, the image appears brighter through the scope than the surrounding field of view.
At the 7X magnification the field of view drops off, and you’re not going to be able to key in on the target directly from the 7X and will need to work your way through the magnification range. For target shooting, it’s not a problem, but while hunting small game long distance shots can be difficult to zoom in on your target quickly.
This scope has high tactical turrets that are extremely easy to adjust while in the field and also have audible finger clicks that make it much easier to adjust when keeping your sight down the scope.
The Nikoplex reticle, which is a simple duplex reticle is extremely crisp and clear throughout the scopes magnification range and is very easy to center targets.The biggest issue we have with this particular scope is that it is pretty heavy at 16.1oz. It will fit just fine on your .22 rifle and has great eye relief. If you are using a heavier .22 tactical rifle, this is one of the best 22lr scopes on the market, and the heaviness helps keep recoil down when rattling off dozens of shots in a small time frame.
Leupold FX-1 Rimfire Scope
If you havenât noticed, we really like Leupold scopes and for good reason. The quality and performance of Leupold glass are unrivaled.We have presented two variable scopes, but a lot of hunters/marksmen prefer a simple fixed scope on their .22 chambered firearms. Like we mentioned in our buyerâs guide itâs all personal preference and what type of shooting you will be doing. 2.5X, 4X, or 5X fixed power all have their advantages and disadvantages.
The FX-1 Rimfire Scope by Leupold is a 4X fixed magnification scope. 4X is an excellent small game hunting magnification power for small game in more wooded environments. This particular scope is great with a 25.5′ FOV at 100yards. What this allows is quick target acquisition which is important when chasing after smaller game. We also like the fine duplex reticle that features thick bases that taper into fine lines along the crosshairs that help you center your shot quickly.
This is a compact and lightweight scope that balances well with just about any .22lr rifle. It also has very generous eye relief that allows you some flexibility for where on the rail you mount the scope and provides you the chance to set up the outfit for comfortable shooting.Like any Leupold scope, the lenses are fantastic and give you optimal low light performance. You won’t have an issue with these lenses fogging up and will be pleased with the how water beads and rolls right of the lens.
All of this technology and scope features result in a highly accurate and precise scope once zeroed. This is a contender for the best 22 rifle scope as it paired with a reliable firearm can be a tack driver from 50 to 100 yards.
Vortex Crossfire II Rimfire Scope
Our final scope for 22lr rifles is the Vortex Crossfire II. This is another variable powered scope with a magnification range of 2-7X. This is a well-built and sturdy scope made from anodized aluminum. It is also treated and sealed to be water and fog-proof. You shouldn’t have any issue with this scope throwing off the balance of your firearm, and it has fantastic eye relief so you should be able to place this scope to give you optimal shooting posture.With the size of the objective lens and the lens treatment, you will be happy with this scope’s performance in low light conditions.
This scope has a fast-focus eyepiece although there is some issue with keeping the scope in focus at its highest magnification setting. The V-Plex reticle can be a pro or con depending on your personal preferences. Itâs a simple duplex reticle, but it features bold lines with little tapering that we think feels a bit bulky when trying to line up a shot.
Once you get this scope zeroed it holds it extremely well. The problem you might run into is getting it zeroed in at 50-75yards. The windage and elevation turrets are easy to adjust and have a useful zero resettable turret feature for quick adjustments in the field, but some users have had trouble with the reliability of adjustments.
Winner & Conclusion
Before we wrap up the article, we need to decide which of the four scopes wins top honors. The title for best 22 scope goes to the Leupold FX–1 Rimfire Scope. As far as scopes for 22lr rifles go, this scope excels in all categories. Right out of the gate it comes with all of the top qualities associated with Leupold optics. Itâs going to hold up in any weather conditions and take all kinds of passive abuse our shooting and hunting gear often encounters. You have a wide range of magnification power with each setting providing a clear and crisp image in minimal light conditions. It will be compatible with nearly every .22 rifle, it zeroes with little effort, it holds that zero, and is a tack driver when paired with a good rifle.
The only real downside with the Leupold is its price. If you are in the market for a bit more wallet-friendly version we recommend the DIANA 2-7×20 HD Riflescope. It gets the job done and costs less than $100.
There are a ton of different stabilizers types, styles, sizes, and mods out there, so it can be difficult navigating the world of stabilizers. We’ll go over everything you need to know and give you all the juicy details.
Make sure to check out our in-depth guide on how to build a keyboard.
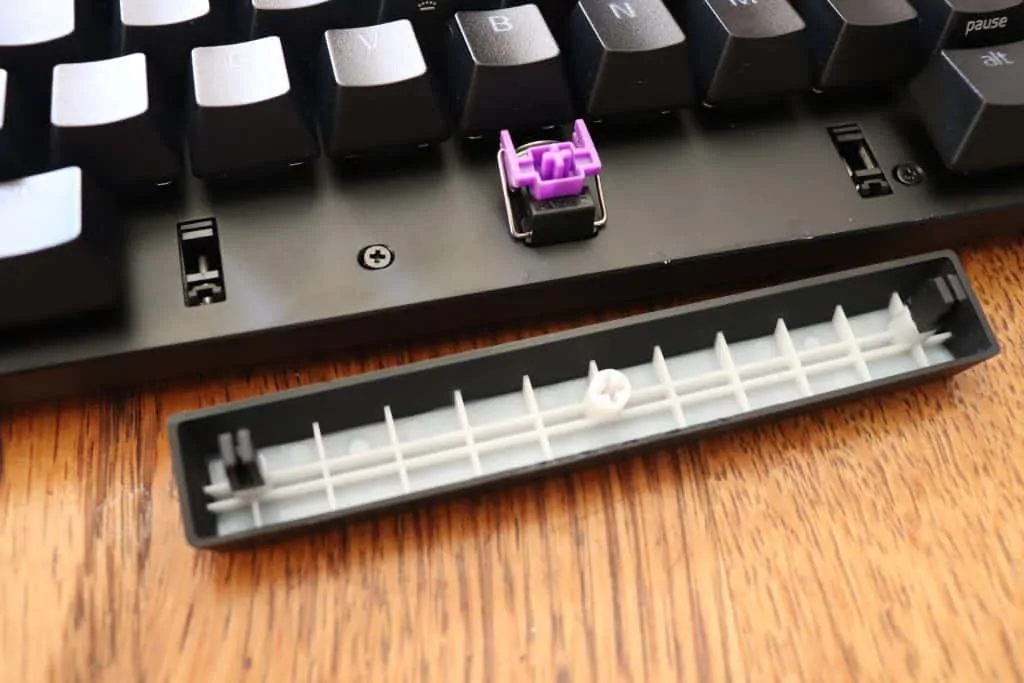
Stabilizers are a essential keyboard component placed under the larger keys such as space bar, backspace, and shift, to keep the keys from shaking, rattling, and tilting while typing. The stabilizers keep the keys balanced so you can have a stable typing and gaming experience.
The Different Stabilizers Types
There are a few different stabilizer types out there, Cherry style, Costar, and Optical. They are each significantly different, so we’ll explain what makes them unique.
Cherry Style Stabilizers
Cherry style stabilizers are the most common stabilizers out there. They are the preferred stabilizer type as they are easy to mod and have a lot of different options when it comes to mounting styles, colors, and material types.
Cherry stabilizers have the shape of a Cherry MX switch stem, hence the name Cherry style stabilizers. They make adding and removing keycaps a breeze.
In this guide, we’ll be focusing primarily on the Cherry stabilizer type when explaining all of the different options available. It’s possible to get Cherry style stabilizers in screw-in, snap-in, or plate-mounted variations.
We highly recommend getting a keyboard with Cherry stabilizers as they are the most versatile stabilizers out there.
Costar Stabilizers
Costar stabilizers are a less common stabilizer type, as they are primarily only found on older keyboards, although some newer keyboards may have them.
Costar stabilizers are quite difficult to use and have to be hooked into the keycap to fit. Getting the stabilizer bar to insert properly into the keycap can be a frustrating and lengthy process.
If you like to remove your keycaps and clean your keyboard regularly, these stabilizers can be quite the headache.
They are also difficult to mod and makes replacing the keycaps on your keyboard quite difficult.
Costar stabilizers are great if you want to install them and forget about em. No modding required, pretty good performance, and are affordable to replace. However, not the best if you enjoy tinkering with your keyboard and swapping out your keycaps regularly.
We talk about installing a spacebar with Costar stabilizers here.
Optical Stabilizers
Optical stabilizers are typically only found on keyboards with optical switches, and have a funky design (such as the Razer Huntsman Mini). They have small clips that insert into the keycap that you snap into the stabilizer bar under the plate of the keyboard.
There isn’t a good way to modify these stabilizers to improve them, although you could apply a small amount of lubricant to reduce the sound and rattle noises.
From our experience, these stabilizers are quite rattily, but if you use optical switches, you’re pretty much stuck with them. Not much else to say about these stabilizers.
Stabilizer Size Guide
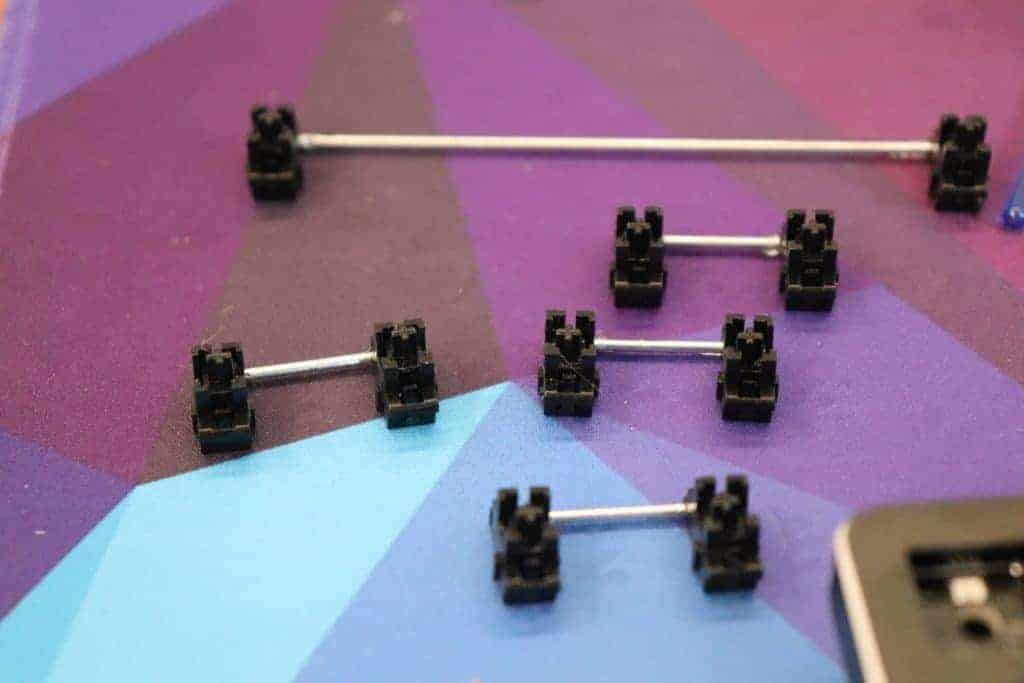
There are three stabilizer sizes you can purchase: 7u, 6.25u, and 2u.
The stabilizers follow the same measuring system as keycaps, where 1u = the width of one keycap.
The 6.25u size is what you’ll need for a standard spacebar, unless you have a non-standard keyboard layout, in which case you’ll need the 7u size. For the most part you can ignore the 7u size, unless you have a custom keyboard.
All of the other larger keys on your keyboard (that aren’t the spacebar) will require a 2u stabilizer.
If you have a full-sized keyboard, you’ll need:
6.25u stabilizer x1
2u stabilizer x7
If you have a tenkeyless keyboard, you’ll need:
6.25u stabilizer x1
2u stabilizer x4
For the smaller layouts, the stabilizers required can vary based on the layout of the keyboard, so there is no exact amount.
A Closer Look at Cherry Style Stabilizers
Now that we’ve gone over the three main stabilizer types, let’s take a closer look at the Cherry style stabilizers as they are the most common and the go-to stabilizer if you’re building a keyboard.
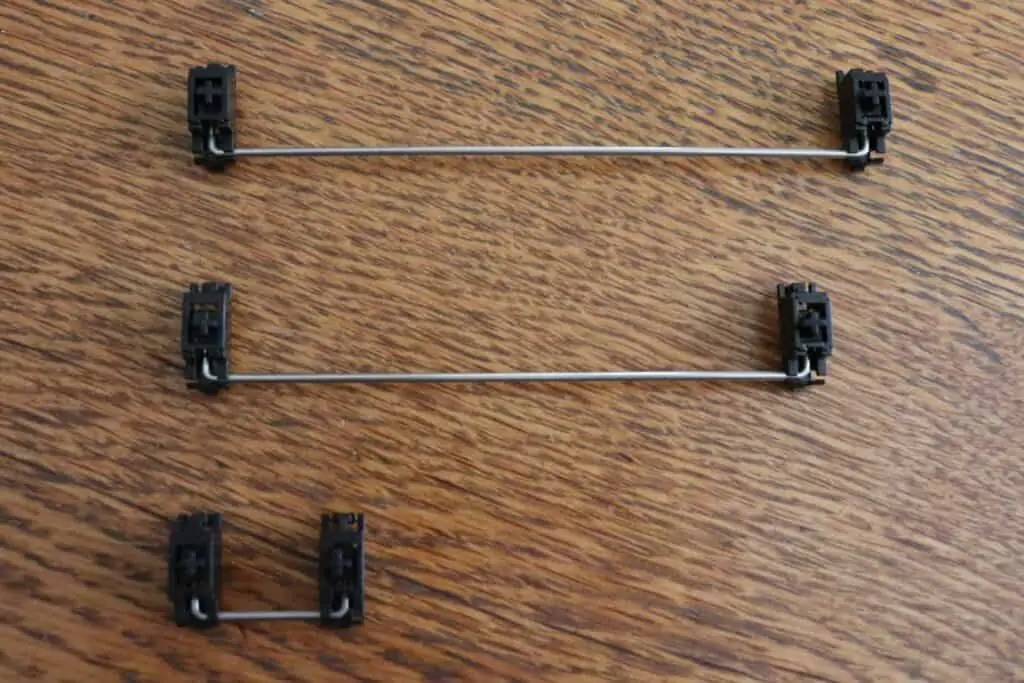
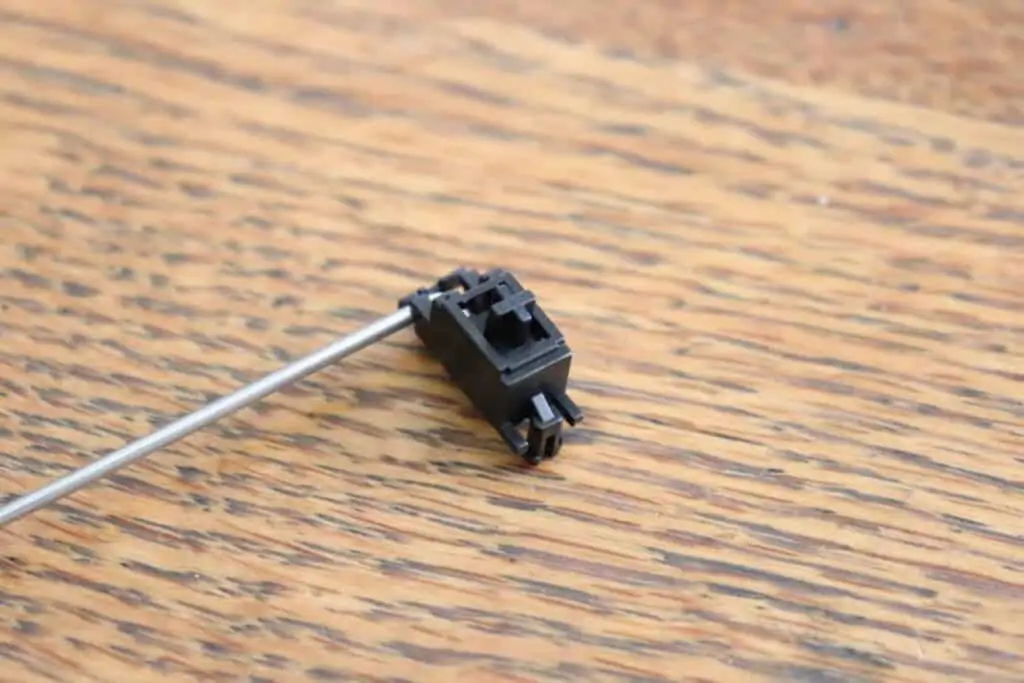
Cherry stabilizers are made up of three main components, the stabilizer bar, insert, and housing. These three components work together to keep the larger keys stable and reduce rattle.
Each key will have one stabilizer bar, two inserts, and two housings. The stabilizer bar keeps both sides of the key from tilting when typing. The stabilizer bars come in several different sizes based on which key it is for, but we’ll get into that later.
Different Mounting Styles for Cherry Stabilizers
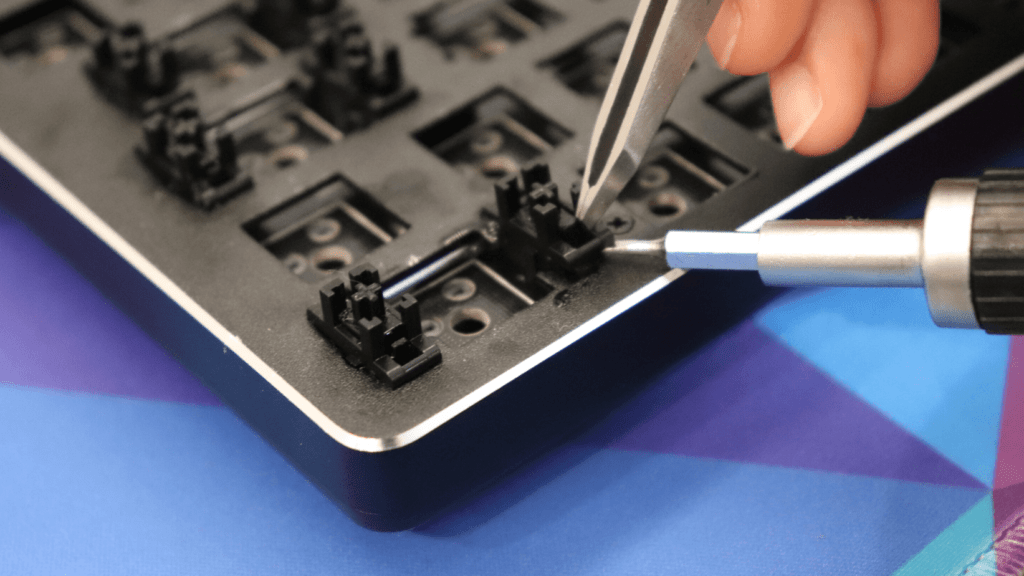
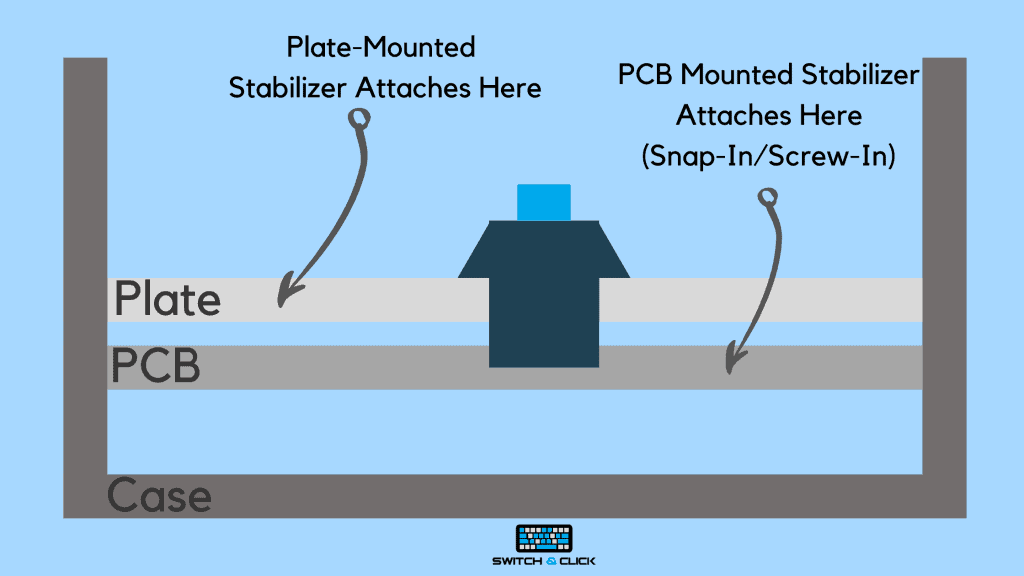
There are three different mounting styles for Cherry style stabilizers, they can attach differently and are compatible on certain keyboards. Plate-mounted stabilizers attach to the metal plate, while the other two attaches to the PCB (printed circuit board).
Shown below is a side view of a keyboard with a metal plate and PCB. Read more about PCB vs plate-mount.
Plate-Mounted Stabilizers
Plate-mounted stabilizers are the most common mounting style and are typically found on almost all pre-built mechanical keyboards. These stabilizers attach to the metal plate inside the keyboard instead of directly to the printed circuit board (PCB).
Plate-mounted stabilizers are considered the least effective mounting style as they tend to rattle more and vibrate with the aluminum plate when typing. It’s possible to improve these stabilizers by modding them which we’ll get into later.
The stabilizers attach by clipping/snapping into the metal plate. This style of connection is not the most secure and adds to the overall amount of shaking and rattling.
You can remove these stabilizers by first removing the switch, then pressing on a small plastic tab on the stabilizer, while simultaneously lifting up on the stabilizer.
Screw-In Stabilizers
Screw-in stabilizers mount directly into the PCB and are attached with screws. This mounting style is considered the best because the stabilizers are much more secure and will vibrate less.
In addition, the screw-in stabilizers remain in place when taking off the key caps, unlike the snap-in style which tend to dislodge.
The PCB also tends to vibrate less than the metal plate, which makes it a better mounting location for the stabilizer.
Screw-in stabilizers are typically only found on custom-made keyboards and not on pre-built keyboards, which makes them less common, but highly sought after.
We highly recommend the screw-in stabilizer type if you plan on building a keyboard.
Snap-In Stabilizers
Snap-in stabilizers are another PCB mounted stabilizer type. They are better than plate-mounted, but not quite as effective as screw-in stabilizers.
Since snap-in stabilizers mount to the PCB, they tend to vibrate less than plate-mounted, which makes them a better option. The only downside is they are much less common than plate-mounted, and they are typically only found on custom keyboards.
Screw-in stabilizers are usually a better option than snap-in as they vibrate less and are more secure. The only situation where we would recommend this stabilizer type is if you can’t find a keyboard with screw-in stabilizers.
As mentioned before, snap-in stabilizers can pop out the PCB when trying to remove the keycaps, where screw-in stabilizers do not have this problem.
Different Brands that Make Cherry Style Stabilizers
There are a few main companies that manufacture Cherry stabilizers and they typically come in a variety of different colors and materials.
Durock Stabilizers
Durock stabilizers are interesting because the stabilizer housing insert come in a nice translucent purple with a gold-plated stabilizer bar, if you’re feeling a little fancy. Perfect for building a keyboard with each component adding to the overall aesthetic.
These stabilizers are actually quite affordable considering how unique they look, which makes them an excellent option. We find them to be smoother than the standard GMK stabilizers.
Durock stabilizers only come in the screw-in style, so you can really only use them on a custom keyboard. All of the three sizes are available for purchase (2u, 6.25u, and 7u).
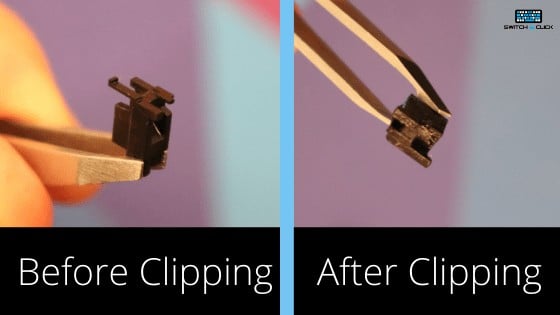
Durock stabilizers come pre-clipped, which mean the little feet on the bottom of the stabilizer housing are removed to make them more stable and improve the typing experience. Many people will do this manually to GMK stabilizers if they mod them.
We also recommend ordering these off of Prevail Key Co.
GMK
GMK is mainly known for their high-end keycaps, but they also produce genuine Cherry style stabilizers. This means they actually hold the tooling to make the “proper” Cherry stabilizers. If you have a keyboard with Cherry stabilizers, most likely they were produced by GMK.
GMK makes very plain and normal looking stabilizers, with a black stabilizer housing and insert, along with a grey metal stabilizer bar. You can get GMK stabilizers in all three mounting styles: plate-mounted, screw-in, and snap-in.
We typically order GMK stabilizers off of NovelKeys as they have them stock-in more often than other stores.
ZealPC
The most expensive stabilizers on the list ($30). Coming with a gold-plated stabilizer bar and clear housing, the ZealPC stabilizers have a design that can work with almost any colored keyboard (unlike the purple Durock stabilizers).
The stabilizers are pre-clipped which makes them rest on the PCB in a more stable fashion and improve the typing experience.
The ZealPC stabilizers are offered only in the screw-mount style, with a custom nut design to prevent stripping the threads.
It’s hard to recommend these stabilizers due to the super high price, when the Durock stabilizers are available with many of the same features at a fraction of the cost.
You can find these stabilizers on the ZealPC website.
Everglide
Everglide stabilizers come with a gold-plated stabilizer bar and clear housing, very similar to the ZealPC stabilizers. They are also pre-clipped, come in the screw-in style, and are a decent price.
These stabilizers come in all three sizes, or you can buy them as a package to save money depending on what size keyboard you have.
You can find them on the kprepublic website.
How to Improve Cherry Stabilizers
If you are willing to put a little extra work in, your Cherry stabilizers can benefit from some custom modifications, the most common being band aid, clip, and lube.
The band aid modification includes applying band-aids where the stabilizer insert hits the PCB to dampen the sound and create a much nicer acoustic.
Clipping the stabilizer feet makes the key feel more stable and less rickety. Many stabilizers come with the feet already clipped.
Lubricating the stabilizers reduces the friction when typing and makes them feel smoother and more consistent.
After these modifications, the stabilizers will feel much better and the difference will be night and day. I recommend everyone with the time and patience to try this mod out.
We have a couple guides on our site to walk you through these mods. Depending on if you have soldering equipment or not, there are few different methods:
How to Band-Aid Mod, Clip, and Lube Stabilizers
How to Lube Stabilizers without Desoldering
Click test before and after modification
Conclusion
There is a lot of tribal knowledge in the mechanical keyboard community about stabilizers that everyone assumes you know already, so we hope this post laid out the information for you in a clear and easy-to-read format.
There is a lot of small complexities to sort through when picking out a stabilizer for you next mechanical keyboard. There are many stabilizer sizes, types, manufacturers, and mounting styles, not to mention all of the modifications.
For your first mechanical keyboard build, we highly recommend picking out a keyboard that supports screw-in Cherry stabilizers and going with the Durock or Everglide variations depending on which colorway/price works best for you. These two stabilizers offer the best bang-for-your-buck and offer a smooth, stable typing experience.
If you have a pre-built mechanical keyboard, you’ll usually be stuck with plate-mounted stabilizers (even if it’s hot-swappable). Screw-in and snap-in stabilizers are typically reserved for custom mechanical keyboards.
We also recommend taking the time to mod your stabilizers to improve them even more. A little bit of lubricant and band-aids goes a long way.
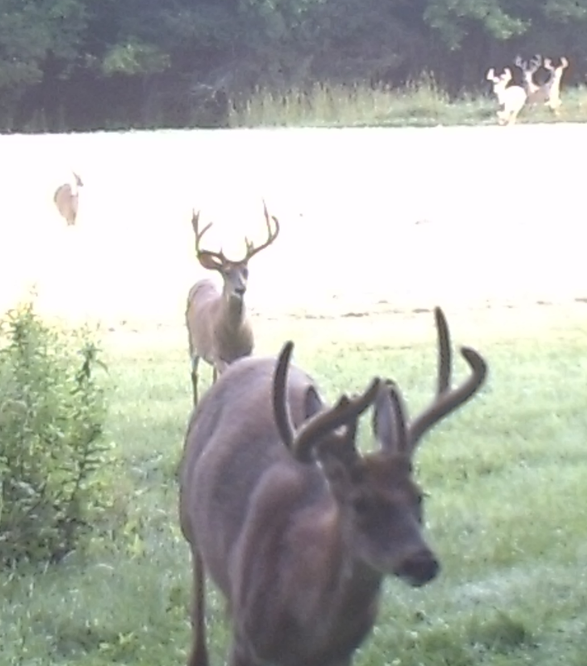
A reader recently sent us a question about buck behavior along with some photos. He is located in Venango County. For context, this area of Pennsylvania has a “3-up” antler point restriction not including the brow tine (formerly 4-point area).
Here’s the email:
To My Favorite PSU Deer Squad,
I have a few questions regarding these bucks I have captured [on camera] this summer. Since we all know male deer form “bachelor” groups in the summer, is there any reason behind this, or are boys just being boys?
Spotting one night, I witnessed eleven, yes, eleven bucks together, I think in one group, in one field.
My next question is, are these bucks I have captured on my trail cam this summer going to stick around, or once they start separating will they disperse? There are obviously many, many others but here is just a sample.
Thanks for your research and info, I love it, and have gotten everybody I know who hunts to subscribe and they agree. Thanks Guys!
Let’s start with the first question, “Why bachelor groups?”
Ecologists have characterized this behavior as “sexual segregation.” The human equivalent to sexual segregation is basically gender-distinct bathrooms. Male and female deer separate themselves spatially for some reason.
There have been a number of reasons or hypotheses proposed:
Altruistic behavior by males to leave superior range (less predation and better food resources) to reduce competition with females and offspring,
Predator avoidance by males,
Minimize sexually motivated aggression when breeding is not possible,
Males move to open habitats to minimize damage to antlers during their growth period and to maintain male-dominance hierarchies,
Optimizing foraging resources by males and selection of the best habitat for raising young by females.
Hypotheses 1, 4, and 5 suggest that deer change their use of space over time. Unfortunately, that doesn’t really fit our observations of white-tailed deer in Pennsylvania. The core home ranges of the majority of bucks (and does) we have monitored don’t change over the course of a year.
But, of course, there are always exceptions! But for a theory to be useful, it can’t just apply to exceptions.
Because we don’t see a change in space use over the seasons or across years, hypothesis #2 (predator avoidance) doesn’t seem to make much sense either – unless they avoid predation by traveling as a group (safety in numbers).
For hypothesis #3 (minimize sexual aggression) to apply, bucks and does would have to separate for 10-11 months of the year. This study (and others) has plenty of examples of overlap in home range among males and females throughout the year. However, they could use the same space, just at different points in time (temporal separation).
As you can see, this behavior gets really complicated to explain. The real problem for scientists is how can we experiment to test these hypotheses? It’s difficult! We have mostly relied on observational work, perhaps in unique situations – like the Isle of Rum Red Deer Project.
But this is a blog, so reading a whole treatise on deer behavior and how social theory could explain bachelor groups really isn’t what you came here for, so let me just share some thoughts that might make sense.
Males do tend to hang together in the summer, but there is no strict sexual segregation. It’s more like sexual aggregation. I have seen a group of male deer on one side of a field and a group of does and fawns on the other. While males tend to enjoy each other’s company in the summer months, they are not separated from other deer. They just can’t be bothered with “women and children” so to speak.
It is possible that bachelor groups could help inform individual deer about the mate competition that is about to begin in late October. Ever watch The Bachelorette? Me neither, but I think the premise is the same. Twenty-five men size each other up and likely weigh the odds of them being the chosen one. Bucks could be doing the same thing.
Since Pennsylvania implemented antler point restrictions, more yearling males disperse in the fall. And most of that fall dispersal occurs before the peak of the rut. Our theory is that yearlings disperse in the fall if they find that mate competition is just too fierce. They’re better off rolling the dice and dispersing to an area where there is potentially less breeding competition.
That brings us to the second question, “Are these bucks I have captured on my trail cam this summer going to stick around, or once they start separating will they disperse?”
If any of those bucks you are watching right now are yearlings, more than half of them will hit the road this fall (mid-September through early November). The adult bucks, however, won’t be going anywhere. Very, very rarely does a buck have a different home range during the breeding season. Even those with a bachelor pad.
However, it will seem like they all disappeared!
First, these bachelor groups are going to break up.
Second, during the rut, the home ranges of these bucks will increase by 2-5 times. You read that correctly. If a buck has a home range right now on the order of a square mile, come late October he’ll be traveling an area of 2-5 square miles.
Good luck seeing him at the right place and at the right time! But that’s why they call it hunting, right?
-Duane Diefenbach
If you would like to receive email alerts of new blog posts, subscribe here.
We often get asked questions about silencers, such as how to buy a silencer or how to clean a silencer, that experienced users deem simple but are important questions for new gun and silencer owners. Thanks to misrepresentation in the media and politics about silencers, muzzle brakes, flash hiders, suppressor accessories, and even the simple act of barrel threading, it’s only logical that there is some confusion out there.
So, we are going to look at the various things you can screw onto the end of your rifle or pistol’s muzzle, what they do and how they work. If you already know this, great! Share this post to a new gun owner, or even an anti-gunner who has been left behind through media propaganda. And if you don’t know, read on!
There is no difference between a silencer and a suppressor, and the terms are 100 percent interchangeable. Whether someone uses the term “suppressor” or “silencer,” they’re referencing the exact same thing. So why the different names, you might ask? Well, we must go back to the very beginning, with the invention of the Maxim Silencer. Invented by Hiram Percy Maxim, son of the famous machine gun inventor, the Maxim Silencer was patented in 1909 and was the first successful silencer on the market.
Now, truth in advertising laws were lax to nonexistent back then and breathtaking claims were the order of the day. Maxim advertised that his crude device made of stamped sheet metal baffles stacked inside a steel tube would render a firearm silent. This is pretty much impossible, even today unless you use a highly engineered device with carefully crafted subsonic ammo or low powered rimfire ammo.
In other words, a silencer isn’t exactly a “silencer.” It’s more like a muffler (which Maxim went on to develop for cars) or a device for suppressing sound. You know, a suppressor.
However, the name “silencer” stuck. Later on, shooters and manufacturers promoted the more accurate “suppressor” to reflect the reality of these devices.
Shop Silencers
Silencer vs. Suppressor – Does It Matter What You Call Them?
Probably not. After all, we are Silencer Central, and we sell the famous BANISH Suppressor, which shows how interchangeable the terms really are. But because the term “silencer” is so heavily ingrained in modern usage, it is as viable a term as “suppressor.” The difference between a silencer and a suppressor? Absolutely none.
Perhaps the only real problem now is that with two competing popular terms, folks can get confused — and that’s understandable. After all, the two really do sound like similar but different devices. But rest assured, there’s no difference and you can call a silencer a suppressor, or a suppressor a silencer. It’s completely up to you.
Now that we’ve cleared up the gun suppressor vs silencer question, let’s look at another area of confusion…
Shop Suppressors
Flash Suppressor vs Silencer
If suppressors are silencers, then are flash suppressors also silencers? Well, no they aren’t. While both devices are designed to suppress aspects of muzzle gas, they do two radically different things.
What is a Flash Hider?
A sound suppressor works only on slowing down and cooling gas to reduce the sound of gunfire. A flash suppressor (or flash hider) works to reduce the visibility of flaming gas. While it’s true that a sound suppressor also reduces (or eliminates) muzzle flash, it’s a side effect of the gas containment. A flash suppressor, on the other hand, offers no sound reduction.
Flash suppressors are intended for the benefit of the person shooting the gun and reduce or almost eliminate the visual flame from a barrel under low light conditions. This makes it easier to see and is invaluable for self-defense situations and when hunting in low light conditions.
How Does a Flash Hider Work?
There are various sorts of flash suppressors on the market today that work in a number of different ways. Some are little more than cones or cans that contain and disperse the flaming gasses at the muzzle long enough for them to burn off or cool down. Others redirect the gas and flame in order to drive it away from the shooter’s field of vision.
Many flash suppressors are combined with muzzle brakes, which also redirect gas energy to reduce recoil. It only makes sense to combine the two products in that fashion, but not all flash suppressors are muzzle brakes, and not all muzzle brakes are flash suppressors. Confused? Don’t worry, we have a full article covering muzzle brakes vs. flash suppressors.
Why Are Flash Suppressors Regulated in Some States?
That’s a good question. The simple answer is fear and moral panic. Some people believe the purpose of a flash suppressor is to hide the gun and make it stealthier in use. Other people think that anything that makes a gun easier, more ergonomic or more comfortable to shoot somehow means the gun will magically kill people and be used in a crime. These misconceptions are often deliberately promoted by media and anti-gun crusaders, and sometimes reshape how the general public understands guns.
States like California which have an aversion to civil rights are busy making sure law-abiding citizens can’t reduce a bit of visual flash on the end of their self-defense pistol, hunting rifle or sporting carbine. This is simply because they think a bit of metal with notches cut in it or a metal cone turns a rifle into an assault rifle of some sort. There is no rational reason to regulate these very common devices, save for the desire to attack our gun rights and shared freedom.
Silencers vs. Suppressors vs. Flash Suppressors
Gun silencers and suppressors are two terms the same thing with each name born out of a different era in American history and marketing. They can be and are used interchangeably without affecting the meaning.
However, flash suppressors and sound suppressors are radically different devices doing different things, although a sound suppressor combines both functions due to the nature of how it operates. Hopefully, this clears up some confusion on seemingly identical and sometimes conflicting sounding terms.
Get Started
Want to learn more about silencers? Visit our products page and look over our line of suppressors.
Feel free to give us a call at 888.781.8778 or email [email protected] to learn which one is best for you and how to buy it.
The use of the slingshot is not only intended for children. With the right attributes (power, construction materials, etc.), this tool can become a perfect weapon to practice hunting with a slingshot or slingshot hunting. In this case, how to choose your hunting slingshot? We will find out now in this article.
You can have a hunting slingshot by making it yourself. This approach does not require much DIY skill. But the easiest way would be to buy one. Moreover, you can find a wide range of choices on the market according to your needs.
According to legislation
According to current legislation on weapons in France, a hunting slingshot is classified into two categories according to its power. Between 2 and 20 joules, it is considered a category D-2-H weapon (free acquisition and possession for adults). For more than 20 joules, it is categorized as a category C-4 weapon (acquisition and possession subject to declaration).
Rustic slingshot
It is a traditional and artisanal manufacture. At the base, the slingshot or the sling was formed of a handle with two branches in Y form, on which were attached elastic bands joined to a flexible band, often in leather. To fire, the projectile (stone or metal ball) is placed on this flexible band by pinching two fingers. Then, the rubber band must be stretched by moving the arm that holds the handle away and the shot is fired after the pressure of the fingers is released on the projectile.
It is a simple manufacture, but generally not very effective.
Modern slingshot,
The modern slingshot is industrially made. Its handle is often made of metal frame or polycarbonate, its grip is designed to be ergonomic and its tubular or flat latex elastic is made to maximize: performance and durability.
For a more comfortable and optimized hunting slingshot, it is also possible to add
An ergonomic handle: finger shape, non-slip grip, pistol shape, etc. ;
An armrest: by leaning on the forearm, you can relieve your wrists (when tightening the elastic) and optimize your comfort by leaning on the forearm. On the other hand, opinions are not unanimous regarding shooting accuracy.
A stabilizer: adding one or more weights stabilizes the slingshot and limits shaking.
A sight: the addition of a sighting device ensures better shooting accuracy. For example, an optical or laser sighting system allows you to shoot accurately at more than 40 meters.
Varieties of slingshots according to its ammunition
The type of ammunition or projectile used to fire slingshots is numerous. Depending on your slingshot model and your hunting needs, you can choose from the following variety of ammunition.
Steel projectiles
These are metal balls with a diameter ranging from 0.68 mm to 0.44 mm. This type of projectile is extremely dangerous and does the most damage on impact. They have better stopping power and are particularly effective for hunting.
Glass projectiles
Glass ammunition is like a rubber-coated bullet. They can bounce more than steel, so be careful when using them at home.
Copper bullets
Some professional hunters like to use copper ball ammunition in their slingshots. However, these bullets are more expensive than steel and glass bullets. In addition, they tend to deform on impact, requiring experience to shoot them accurately.
Tungsten carbide projectiles
This is a hardened ammunition that is lighter than steel balls for the same strength. However, these bullets are expensive.
DIY bullets
You have a free choice on the type of projectile to use, from hex nuts and pebbles to plastic or wood. Just make sure you choose DIY ammunition that won’t quickly damage the slingshot’s rear firing block.
Choosing the right rubber band for your slingshot
The energy expended to propel the hunting slingshot projectile comes from the rubber band. A good slingshot rubber band provides above-average speed and shooting power. For example, professional hunters and slingshot users can hit targets up to 400 feet away using a professional setup.
You can distinguish between two types of slingshot rubber bands:
Tubular models: these are the most commonly used in hunting slingshot design. They are known to be strong and durable.
Flat models: this type of rubber band is characterized by its flexibility and ease of use. They are usually used for introductory slingshots or for defensive slingshots.
The material of your hunting slingshot
In order to have a sturdy, high-performance hunting slingshot, you must be careful to identify the material from which it was or should be made. For this, you will have the choice between metal, wood or plastic.
To know that:
Metal is known for its lightness and strength, especially against wood. That’s why a metal sling is ideal for hunting and survival.
Wood is the most common material for making traditional slingshots. It is an easy material to carve in order to make an aesthetic and authentic slingshot. Slingshots made from this material are often used for practice.
Plastic stands out for its affordable price, its unmatched lightness. Nowadays, you can find durable and efficient slingshots capable of shooting, for example, slingshot balls at high powers and speeds. Only, it is not at the level of metal and wooden models.
Conclusion
There are so many models of hunting slingshots to choose from, whether they are rustic and traditional or more modern. In order to find the right model, it is important to know your needs. This goes for finding the type of slingshot and the type of ammunition that is right for you.
Are you planning to use your weapon for practice or to hunt a particular game? It needs to have sufficient power. This power is based on the choice of rubber band. Between flat and tubular rubber bands, you will have a variety of choices depending on the model of slingshot at your disposal.
For the choice of ammunition, it must match the model of slingshot, as well as your hunting needs. For this, there is a wide variety of ammunition on the market (steel, glass, copper, tungsten carbide, etc.).
If you can’t choose the right model among the many ranges that exist on the market, we suggest you to see our selection of hunting slings.
Comments: Pros: Decent action, nice paint job, cast well, Con: Floats, had to add 3 suspend dots.
From: Aaron: 4/10/22
Comments: I’m ordering more. I catch bluefish, spanish mackeral, ladyfish, and flounder on the 3 3/4 inch 1/2 oz model. Can’t wait to try it on speckled trout and red drum soon. I prefer single saltwater hooks so I change out the trebles with singles. Works better for me. Great hard bait with great action. Fish slam it.From: Unknown: 9/30/20
Comments: Very nice action and durability. I’ve caught 2 dozen fish or so on one of these bad boys and the finish and hooks still hold up. Highly recommended.From: Unknown: 3/14/20
Comments: Excellent action, it will hunt side to side with the right twitch cadence. Mine had a VERY slow sink but changing hooks to a smaller size would make this lure simply hover indefinitely in the right water temperature.
From: Unknown – 1/4/19
Comments: Picked up some of the larger models in all the colors, tried them out in the salt. they swam great, but float. I know items are more buoyant in salt water, so I picked up some lead dots and plan to adjust them accordingly. if I can get these to suspend, im sure ill nail the Calico bass, as these lures have a great finish
From: Unknown 8/29/17
Comments: Threw this off a dock just to test it. Had a real good darting action and suspended pretty good. It did have a very slow rise but I was using 14lb mono and the water was upper 80s. The lure looked well built and hooks seemed to be good.
From: Ruff: Missouri 7/26/17
Comments: I was using the 5.5″ in Black scale and it worked great!! I caught a 5.62 lbs Largemouth on it. The Hooks don’t need to be changed, they are 9/10, 9/10 because when I was unhooking that bass one of them bent, but it was easy to fix.
From: Elliot 5/8/17
Comments: I’ve been throwing the 5.5″ in Silver Prism and Silver Back for the past few months. It is a certified big fish bait. Stuck numerous fish ranging from 4-7lbs. My hat is off to Baker Lures. Fit and finish on this jerkbait is excellent. High quality paint and components. Hooks are beefy and nasty sharp. This bait is a steal for the price. Pick a few up, you won’t be sorry!
From: Jake H.: Wentzville, Missouri 4/5/17
Comments: I use the baker jerk baits all the time for small & large mouth bass. They are awesome baits, suspend perfectly and catch tons of bass. I start using them once water is below 60 degrees.
From: Jim: PA 11/25/15
Comments: Baker lures is one of my favorite jerk baits now. I caught bass all day with the coral opal ice color and the black scale color. They are built with very quality products and the main thing is you can afford to throw these guys in places where you wouldn’t the 28 dollar megabass lures. Another great thing about the Baker lures is they do what they say they will. You had better get you some before the price goes up and the word gets around about how great they catch fish.
From: William: Hohenwald, TN 5/17/14
Comments: These jerkbaits are a winner. Of the many “suspending” jerkbaits that I own, the Baker is one of the very few that actually hangs in place, neither rising nor sinking.From: MA
Comments: i used the baker jerkbaits this spring! They worked really good for smallmouth bass. Water temp was 43-53 degrees. I caught them on 5 different colors in clear water. i was impressed.From: PA
"Air Rifle Scope vs Rifle Scope: Unveiling the Ultimate Precision Optics. Discover the essential differences and benefits of these two optical devices, empowering shooters...
")
")
")
")
")


 Nikon P-Rimfire Scope
  Shop NowClick to read my review Vortex Crossfire II Rimfire Scope