Learn the steps to make your own venison snack sticks at home on a Traeger grill with this step-by-step tutorial.
This post contains affiliate links for The Bearded Butchers, Amazon, and Traeger, but all opinions and thoughts are my own. As an Amazon Associate, I earn from qualifying purchases.
For many of us living in Wisconsin, deer hunting is a big deal! It’s a chance for hunters to go out into the woods and provide meat for their family for a relatively low cost. This year, our family was lucky enough to have three deer to process, giving us a chance to enjoy some hearty and delicious meals like venison stew. But one of our favorite and most practical ways of processing our venison is in the form of venison snack sticks. This year, we decided to make them ourselves (we’ve made sausage at home before, but not snack sticks), and we were really pleased with how smooth and simple the process went. We hope that you can benefit from this post and can start making your own snack sticks at home too!
Tools Needed to Make Venison Snack Sticks on a Traeger Grill
Ingredients for Venison Snack Sticks
Steps to Making Venison Snack Sticks on a Traeger Grill
Mix Venison and Pork Pieces
Grind Meat
Add Seasonings
Grind Meat Again
Stuff Casings
Smoke the Snack Sticks
Cool Snack Sticks
Cut and Package Snack Sticks
Store Snack Sticks
Video of Steps
Get Your Supplies at The Bearded Butchers
Save and share this post!
More meat recipes
Want to read more about growing, raising, and cooking your own food?
Tools Needed to Make Venison Snack Sticks on a Traeger Grill
Meat Grinder: We used this meat grinder from Amazon for our small batch processing.
Sausage Stuffer and Stuffing Horn: We wanted to invest in a sausage stuffer that was going to last us our lifetime, so we got the MEAT! 15 lb. vertical sausage stuffer for our needs. For stuffing the snack sticks, we purchased the 10 mm size stuffing horn.
Traeger Grill (or Smoker): The Traeger will be used to cook your snack sticks slowly to a safe-to-eat temperature.
Snack Stick Casings: You can get these in a kit (like we did) from the Bearded Butchers, or order them separately.
Sharp Knife: These knives are really sharp, which is exactly what you want when you’re at that final stage of cutting the snack sticks. This is also a great knife for cutting the venison too!
Large Container: You’ll need a food-grade container to hold the ground meat as it is grinding and for mixing in seasonings.
Meat Thermometer: You’ll use a meat thermometer to continuously check the cooking progress of your snack sticks and to help you know when they’ve finished cooking.
Wooden Cutting Board
Ingredients for Venison Snack Sticks
20 pounds venison:Best harvested from a big buck with a fun story to tell! But not necessary, of course. You’ll want to cut your venison into smaller sized chunks so that it can easily fit through the grinder.
5 pounds pork: You can use pork trimmings or pork fat. Venison is a very lean meat, so adding pork fat helps to add flavor and hold the meat together. Again, make sure that this is cut into small sized pieces to fit through your grinder.
Seasonings and Cure: We used a Cajun snack stick bundle from the Bearded Butchers that we really enjoyed. They have a lot of great seasonings over at the Bearded Butchers to check out and try!
Steps to Making Venison Snack Sticks on a Traeger Grill
Mix Venison and Pork Pieces
In a large tub, combine your venison and pork together so that the meats are mixed equally and are combined nicely for the grinding process, which comes next.
Grind Meat
Grind your venison and pork mixture into a large container. During this first grind of meat, you’ll want to use a coarse grinding plate so that the meat can go through the grinder easily.
Add Seasonings
After your meat has been ground once, mix in the seasonings and cure. You can also buy a smoke flavoring packet to mix in, and you’ll want to do that now during this stage if you are choosing to use that. Make sure that the seasoning covers all of the meat equally. We used our hands to manually mix it in, but you can purchase a meat mixer to do this job if you’d rather.
Grind Meat Again
After seasonings have been well mixed into the meat, grind the meat once again using a finer cutting plate. This is the final grinding stage and prepares the meat to go into the casings.
Stuff Casings
Fill your sausage stuffer, and then slowly push the meat into the casings. Don’t overfill or underfill your casings; simply let it come out of the stuffing horn to fill the entire casing evenly.
Smoke the Snack Sticks
Take your rope of snack sticks and place them on the trays of the Traeger grill without them overlapping. You can use both upper and lower grates of your grill for this smoking process. You will cook the snack sticks slowly, changing temperature as you go. You should cook your snack sticks at these temperatures during these times in the cooking process:
Hours One and Two: Smoke at 165 degrees
Hour Three: Raise the temperature to 175 degrees
Hour Four: Raise the temperature again to 200 degrees. *Your finished snack sticks should reach an internal temperature of 155-160 degrees.
Cool Snack Sticks
Once your snack sticks have reached the 155-160 degree mark, you should remove the snack sticks from the grill and place back into your clean container (be sure you don’t place it back into a container that had raw meat in it as this can potentially cause bacteria to be spread). Mist the snack sticks with cold water to stop the cooking process, then drain. Place the snack sticks in the refrigerator until cooled down completely.
Cut and Package Snack Sticks
The final step is to cut your snack sticks into pieces that will fit into your packaging. We vacuum sealed our snack sticks in quart bags, which allows for about an 8 inch snack stick and fits about 10-12 per package. In total, we got about 200 eight inch snack sticks from this process.
Store Snack Sticks
Store your snack sticks in the freezer until you are ready to use them.
Video of Steps
Watch this short video to get an overview of what each step looks like.
Get Your Supplies at The Bearded Butchers
My husband Dan has been a huge fan of The Bearded Butchers for a long time. To purchase some the great products we used to make our snack sticks, head on over to The Bearded Butcher’s website and shop their store.
The Bearded Butchers often offer great discounts upon arrival to their site, so please check them out!
Save and share this post!
More meat recipes
Smoked Venison Summer Sausage on a Traeger Grill
Want to read more about growing, raising, and cooking your own food?
Check out these posts!
FOODS TO MAKE FROM SCRATCH INSTEAD OF BUYING FROM THE STORE
SIMPLE HOMEMADE APPLESAUCE FROM SCRATCH
FALL FORAGING IN WISCONSIN
CANNING FOR BEGINNERS: WHAT YOU NEED TO KNOW BEFORE STARTING HOME PRESERVATION
SUSTAINABLE WAYS TO SPEND LESS ON GROCERIES THAT ANYONE CAN DO
THIS IS WHAT AND HOW MUCH TO PLANT FOR A SELF-SUFFICIENT GARDEN THIS YEAR
TOP 5 TIPS SO YOU CAN COOK FROM SCRATCH WITHOUT A MEAL PLAN
RAISING CORNISH CROSS CHICKENS FOR MEAT: THE ULTIMATE MEAT BIRD
There are two species of seaworms that are popular among striper fishermen, the bloodworm and the sandworm. Both are dug from mud tidal flats in Maine, but they can be found throughout the Northeast.
Seaworms
The worms are similar in their appearance and effectiveness, yet there is a strong regional preference for bloodworms in southern New Jersey, while fishermen to the north prefer sandworms. Bloodworms hold the hook a bit better than sandworms, but both are relatively fragile.
In southern New Jersey, fishermen use them in rivers and back bays for spring stripers. In northern New Jersey and throughout New York, shore fishermen use sandworms in the surf and in the bays, while boat fishermen use them to sweeten trolling rigs.
A worm tipped at theend of a tube-and-worm rig is the secretto its success.
For fishing these baits from shore, fishermen have the most luck using a two-hook rig like the Pompano Rig. Tied with short leaders and small baitholder or circle hooks, this rig is best fished on back-bay mud flats or sand beaches.
Years ago, slow-trolling sandworms on a worm harness from a small boat was the preferred tactic for catching early-season stripers in Long Island Sound. Though this technique has fallen out of favor with modern anglers, it’s no less effective today, and will account for big numbers of spring stripers.
The bizarre-looking tube-and-worm rig is a proven tactic for big stripers throughout the season. Tipping the tube with a piece of sandworm is the secret to the rig’s success as the scent of the worm seals the deal for stripers following the rig.
Keep Them Fresh
If you have leftover seaworms, place them on a bed of damp seaweed and put them in your refrigerator. They should keep for a week or so.
CLAMS
Though stripers can’t crack the shell of a full-size surf clam, when a storm does the cracking for them, they don’t hesitate to slurp down the gooey entrails. Clams are a very popular bait in New Jersey and on Long Island.
Clams are best used when fresh, bought in the shell at your local tackle shop. In the absence of fresh, salted clams are the next best, with frozen being a last resort.
Surf fishermen use clams along sandy beaches and inside mudbottom bays, especially early and late in the season. Boat fishermen anchor around back-bay structure and ladle out clam bellies to start a chum slick and bring the stripers right to the boat.
Bathe Them in Brine
At the end of your trip, if you won’t be getting out again soon, you can save your clam baits for a future outing by adding them to a kosher salt brine and placing them in the freezer. Be careful not to oversalt the clams or they will become rock-hard and useless as striper bait.
BUNKER
When it comes to Atlantic menhaden, freshness is key when chunking them as bait.
Live or cut into chunks, bunker share the title of the best big-bass bait with eels.
Since dead bunker are easy to procure from bait shops, chunking is the most popular method for using this bait. Surf fishermen usually switch over from clams to bunker late in the springtime when larger stripers move in from southern waters. Boat fishermen chunk bunker throughout the season, anchoring up and doling out small pieces of baitfish while sending back a larger chunk or the head on a hook.
Live bunker are usually fished weightless with a large hook worked through the nose. In deeper waters, or areas with current, fishermen will rig the bunker on a three-way rig with a sinker to help it drop into the strike zone. Surf fishermen can use live bunker by employing a technique known as the “snag and drop,” whereby they cast a weighted treble hook into a school of bunker, snag a bait with long sweeps of the rod, and allow the bait to swim.
Both shore and boat fisherman use weighted treble hooks to snag fresh bunker.
The weighted treble, and mortal wound, causes the struggling bunker to sink below the school where opportunistic stripers make a quick meal of it. Some fishermen frown upon this technique as it can lead to stripers being deep-hooked with a treble hook, but if fishermen set the hook at the first strike, the chances of a gut-hooked fish will be reduced dramatically.
Catch Your Own
Bunker are easily caught since they give their presence away by flipping on the surface. Boat fishermen can quickly acquire a day’s worth of bait by tossing a large, heavily weighted cast net over a school of bunker inside a bay or harbor. On the ocean, both shore and boat fishermen use weighted treble hooks cast into the school and snag the large baitfish.
Cutting a Bunker for Chunking
Head A fine piece of bait when looking to weed out skates, dogfish, bluefish and smaller stripers in favor of large fish. Large stripers are accustomed to cleaning up the bunker heads left behind by marauding bluefish schools, and will rarely pass up this bait. Hook the head through the meat on the bunker’s “shoulder,” not through the nose or lips as you would with a live bunker. This allows the hook to tear through the softer flesh when you set the hook, allowing for a better set.
Prime Ribs The next two cuts of bunker include the ribcage and viscera, and leave a potent scent trail the water. These are the best part of the bunker to use as bait when schoolies, skates and dogfish aren’t a nuisance.
Round The last chunk of bunker is all meat. Some fishermen will use it as bait, especially for blues and smaller bass, but many prefer to cut this section into smaller pieces to toss over the side as chum.
Tail Cut the tail off and toss it over. It has little value as bait or chum, and left on, will cause the final cut of bunker to spin while on the hook.
MACKEREL
Mackerel are one of the most popular live baits for striped bass north of Cape Cod. Fished weightless on a live-lining rig or under a float, fishermen use mackerel around rocky structure and shorelines. Slow-trolling with live mackerel is another popular technique for tempting large stripers. Dead mackerel are a great bait when chunked and fished on the bottom. Many bait and tackle shops will have frozen mackerel on hand throughout the season, making it a great backup bait when fresh pogies aren’t available.
Catch Your Own
If you want live macks, it’s on you to catch them. North of Cape Cod, mackerel can be found in large schools over inshore structure and in deep areas with some current. To catch them, drop a mackerel tree or Sabiki rig with a small diamond jig as the weight. You can draw them in and keep them around your boat by using chum.
PORGY
You can find plenty of porgies where thereis bottom structure such as reefs.
The porgy is a favorite bait for fishermen seeking trophy stripers off eastern Long Island and in Long Island Sound. Summer stripers will hunt schools of porgies around reefs and other bottom structure, making them an effective bait to match the hatch.
Catch Your Own
Since no bait and tackle shops sell live porgies, you’ll have to catch them on your own before your trip. Usually, catching porgies with pieces of clam or squid is no problem; however, finding a perfect baitsize porgy that meets the minimum size limit (9 inches NJ; 10 inches NY), but is no more than 12 or so inches long can be difficult. Fortunately, the payoff when you find them is quick.
Porgies congregate over shallow structure such as a mussel bed or reef. Anchor over this structure and send out a chum pot filled with frozen clam chum. Lower a clam-baited high-low rig to the bottom, and the action should be immediate. Toss the bait-size porgy in the livewell, and when you have enough, head for the striper grounds.
Since fishermen target structure while fishing with scup, a three-way rig or fishfinder rig with enough weight to get the bait to the bottom is best. Once the rig hits bottom, take a few cranks of the reel handle so the live scup drifts past the structure just a few feet above it.
EELS
From the Cape May Rips to Montauk, eels are the go-to live bait for stripers because they are readily available at most tackle shops, are easy to keep alive, and big stripers can’t help but attack them.
Surfcasters fish eels without weight, casting and retrieving them slowly, almost like a living lure. In shallow waters, boat fishermen employ this same technique, casting the eels toward shoreline structure and retrieving them back to the boat. In deeper waters, boaters fish the eels on threeway rigs, lowering the eel to the bottom as they drift over structure.
3 Bucket Eel System
No Tank, No Problem!
Three Bucket Eel System With a few tools from the garage and three 5-gallon buckets picked up at your local hardware store, you can easily build one of these systems that will keep your eels alive and fresh for days. Drill holes into the bottoms of the top two buckets and leave the bottom one as-is. Then, as the diagram on the right shows, ice in the top, and eels in the middle. The melting ice will drip onto the eels, keeping them wet and cool, but the drain holes in the eel bucket prevent them from sitting in the ice water and suffocating.
Designers have tried to make use of human nature by combining a circular front sight with a circular rear aperture sight.
It becomes easy for most hunters to fit a circle within a bigger circle.
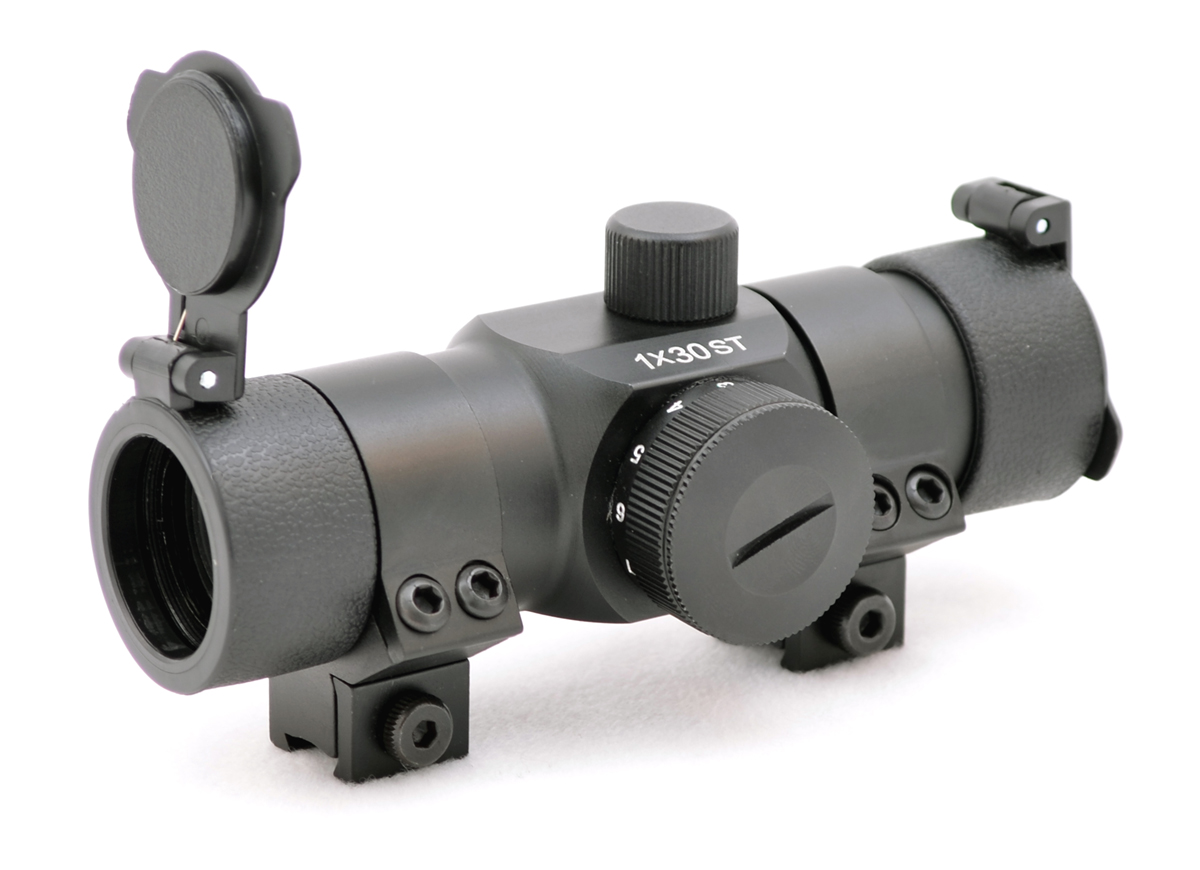
3. Optic sights
These can also be referred to as telescopic sights or simply, ‘tele’.
They are also more popularly known as scopes.
The name tells you its operation closely resembles that of a real telescope.
As such, it consists of two lenses, the front, and the rear.
The front lens, also known as the objective lens, allows light into the scope.
The rear lens, also known as the ocular lens, is the one into which the shooter looks.
Conventionally, both the front and rear ends of the scope are widened to house the lenses.
The two lenses are connected through a narrowed cylinder referred to as the tube of the scope.
Scope tubes are mostly designed to be 25 mm or 30 mm in diameter.
The 1-inch tube dominated the market for decades until manufacturers saw the need for a larger tube to accommodate bigger lenses which are better.
Some have even gone a step further and made scopes with a 34 mm scope tube – e.g. the Discovery HD 3-18X50 FFP SS.
The scope tube houses reticles.
Perhaps a more familiar term is the crosshairs.
Again, there are quite a variety of reticles to choose from.
It all depends on how you are wired.
a. Fine crosshair
This must be the simplest of all, in that it comprises two thin lines intersecting at the center of the field of view.
With this, you can view a larger part of the target without obstruction.
The only downside is that the thin crosshairs may be difficult to view when the target is somewhat dark.
However, they work well in high contrast backgrounds – think of bright targets like a yellow metal plate or a bright green soda can.
To solve the problem of sighting against dark backgrounds, some manufacturers illuminate the reticles with battery power to bright colors such as red, green, or blue.
You can then comfortably switch to the color you see best against the current background.
b. Duplex crosshair
Considering the disadvantages of the fine crosshairs, designers thought of thickening the hairs along the periphery of the field of view and leaving the hairs thin around the intersection.
Small dots are added to the thin hairs towards the intersection, simply to boost visibility against dark backgrounds.
Ted’s HoldOver shows you how to use the mil-dot reticle to determine the distance to your target here:
d. Target dot
This is a modification of the fine crosshairs with a dot added at the center.
The center dot is meant to rest at the center of the target.
This improves the fine crosshairs but it may not prove useful where the target is very small, as the dot is likely to cover the entire target.
c. Circle
Instead of the center dot described above, this comprises a full circle around the intersection of the crosshairs.
This is meant to improve visibility but has the unexpected effect of cluttering the target.
Pros of optic sights
Perfect for long-range hunting
Perfect for tiny targets
Comes in fixed and variable varieties
Hundreds of options to choose from
Easy to use
Cons of optic sights
Can prove difficult to use if the target keeps moving
Adjustment settings change quickly with every turn of the several knobs
Other variations
From the basic optic sights with front and rear lens and reticles, designers have added a whole battalion of features to scopes to enhance the hunter’s experience.
Let us look at some of these.
Lasers
These basically project a beam with the aim to assist in rangefinding.
A rangefinder calculates the exact distance between you and the target and additionally presents a crystal-clear image of the target
So that you are not left guessing what you are aiming at.
It enables you to pull the trigger with a high degree of surety.
Pros
Great for situations where you are likely to be jerked out of the shooting position
Gives you a perfect aim at the target in the shortest time possible
Cons
Makes new shooters poor at aiming
Visibility problems arise when the sun shines too brightly
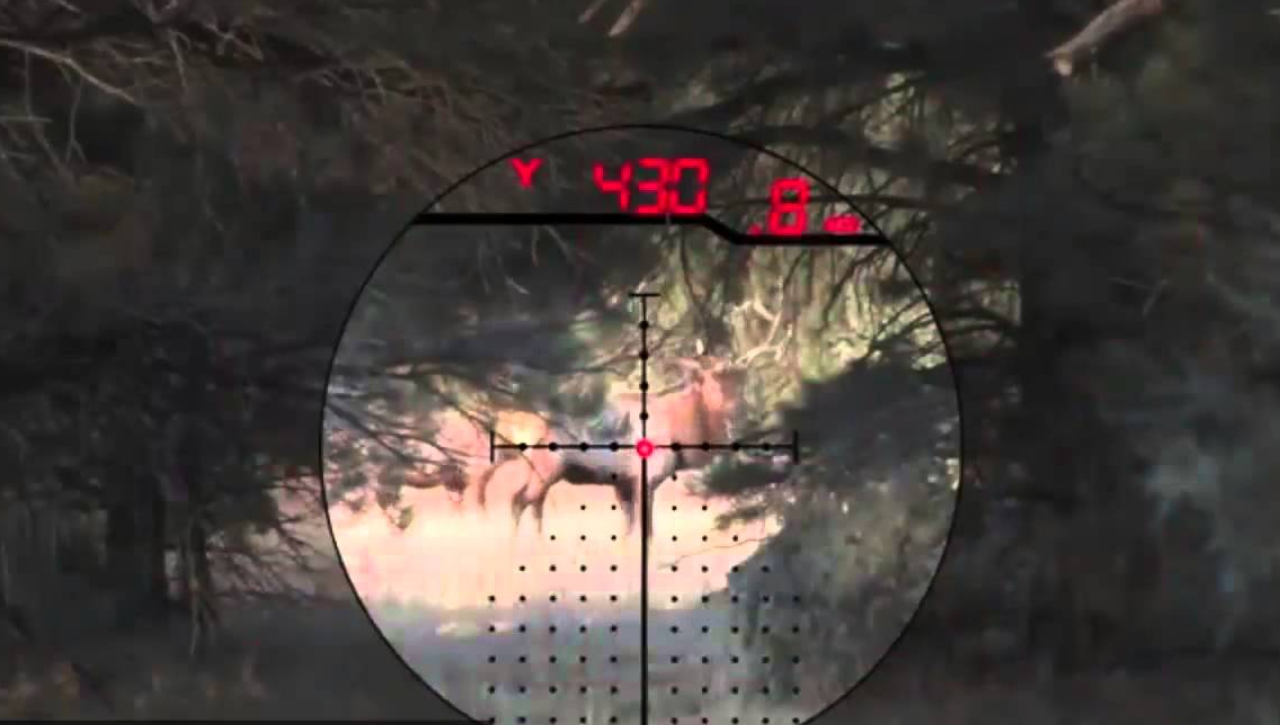
Red dot sight
A red dot sight likewise allows the hunter to view a holographic sight picture of the target within the optic.
It becomes quite easy to place the red dot right on the target.
Depending on the model, you are able to enlarge the target up to sixteen times, or even eighty times for more advanced scopes.
All this does is provide a clearer picture of the target – you see the stomach, head, shoulders, legs, back, etc.
You then narrow down to the specific part you are interested in and pull the trigger with higher chance of hitting the intended part.
To adjust the magnification power, you simply need to rotate the power ring to the desired magnification level.
You will mostly find the power ring at the rear end of the scope near your eye.
Additionally, most scopes with magnification ability come with the ocular focus ring.
This is used to ensure the reticle is in focus, however far or near the target is.
And now to the two variations of scopes in regards to magnification ability:
Variable scopes – This is what we just discussed. You can alter the magnification power to a value of your choice, basically by rotating an adjustment knob.
Fixed scopes – These do not allow you to change the magnification. For this reason, you better use them for targets that are not too far away – preferably for plinking and target shooting practice. If used for hunting, ensure that the prey is at close range.
As much as they seem limited, fixed scopes have the one advantage of requiring no adjustment once they are mounted.
Pros of Red Dot sights
Can be used for varying light conditions
The prey can’t view the red dot and so will never know it’s being aimed at.
Cons of red dot sights
With hundreds of brands and models to choose from, you feel confused right away
Can prove a bit pricey if you fancy more advanced features
Fiber optic sights
The crosshairs for this sight are made of an optical fiber that is transparent and flexible, usually of a diameter next to that of human hair.
The optical fiber allows light to pass through it, thus enhancing the visibility of the target.
It is interesting how optical fibers interact with light.
They’re usually made from an inner core and outer covering.
Both the inner and outer components have a low refractive index, implying that they do not bend light.
However, the outer covering has high reflectivity, so it reflects light along its entire length.
Even in conditions of poor light, the optical fiber is able to pick up the little light and transmit it along the full length of the cable.
This makes it ideal for foresight.
You can place the well-lit fiber on the target without much problem.
As such, they find great use in low-light settings.
Better still, they come in two main colors – red and green.
Which one strikes a chord with you? Go for it!
In case your eyes are not that good, consider purchasing a fiber-optic sight with a bigger circumference.
At least you won’t strain a lot.
Here is a list of some popular air rifles that come bundled with fiber optic sights:
Great for beginner shooters who are just starting out
Very useful in poor light conditions
Budget-friendly
Have easy-to-change rods
Cons
Some are fragile – you can easily break the glass tubes
Fiber optic rods may be affected by a number of cleaning solutions – with some like acetone bleaching the rod
Understanding scope models
You can get easily confused by the numerous numerical numbers you see on different scope models.
Take the example of the CenterPoint 6-20X50 AO Rifle Scope.
The numbers 6-20 mean that you can magnify the target 6-20 times, while the number 50 points to the size of the objective lens in mm.
The larger the objective lens, the larger the objective bell.
You need this information before you make the purchase so that you can ensure the scope will fit onto the mounting rails of your air rifle.
In addition to that, the bigger the lens, the stronger the magnification.
Go for the largest objective lens if you intend to go hunting at dusk or dawn.
Lastly, AO means Adjustable Objective, implying that the adjustment feature for parallax is fitted onto the objective bell of the scope.
You will also find some scopes with the suffix AOE – lightly meaning Around the Objective End.
Other terms you may come across in scopes include:
IR – Illuminated reticle
SF – Side Focus – the turret for adjustment of parallax is mounted on one side of the scope tube.
HD – High Definition
MOA – Minute of angle – refers to the accuracy of groupings at a particular range. MOA is actually 1/60th of a degree. 1 MOA implies groupings of 1” at 100 yards.
SWAT – Special weapons and tactics
Air rifle scopes vs firearm scopes
It would seem an incredible hack to simply mount your old firearm scope onto your new air rifle.
Don’t! Air rifle scopes are specially designed to counteract the unique vibration and double recoil of airguns.
As a matter of fact, spring-powered airguns require especially rated air rifles that can withstand the sometimes high recoil.
Springers are known to easily damage other scopes.
Frequently Asked Questions
1. What is a 6 o’clock sight picture?
There are quite a number of sight pictures that shooters use to improve their shooting accuracy.
This is especially so if you are working with open sights.
Sight pictures are obtained by aligning the rear and front sights in a specific relationship with the target.
The best one is that which allows you to have the smallest groupings.
Some of the popular sight pictures are elaborated below:
Center hold – this involves placing the front sight directly in the center of the target.
6 O’clock – this involves placing the front sight at the lower part of the aiming black.
Sub 6 – this favors those shooters who experience difficulties with the 6 O’clock hold by including a small white line between the front sight and the aiming black.
Frame hold – this involves placing the front sight at the center of the rear sight. In case there is no distinct aiming point, the front sight can be adjusted to the 6 or 12 O’clock position. This works quite well in low-light settings.
2. Why should you aim with your dominant eye?
Think of it this way – you are either left-handed or right-handed.
If left-handed, your dominant hand is the left one, with which you easily handle many tasks.
The opposite is true for right-handed persons.
This concept also applies to the eyes.
FYI, One of your eyes is stronger than the other.
In most cases, right-handed persons have the right eye as the dominant one
But there are instances where the dominant eye can be the opposite of the dominant hand.
To know your dominant eye, Hunter-Ed proposes the 5 steps below:
Use your four fingers and the thumb to create a triangular opening.
Extend the arms away from your eyes.
Try looking at a far object through the opening with both eyes open.
Gradually pull the arms towards your eyes, ensuring your focus on the object does not waver.
The opening will naturally land on your dominant eye.
You may also try closing one eye at a time.
The dominant eye tends to remain focused on the object while the other eye sees the back of your hands.
To keep your shooting as accurate as possible, always use the dominant eye.
I am right-handed and my right eye is dominant. What about you?
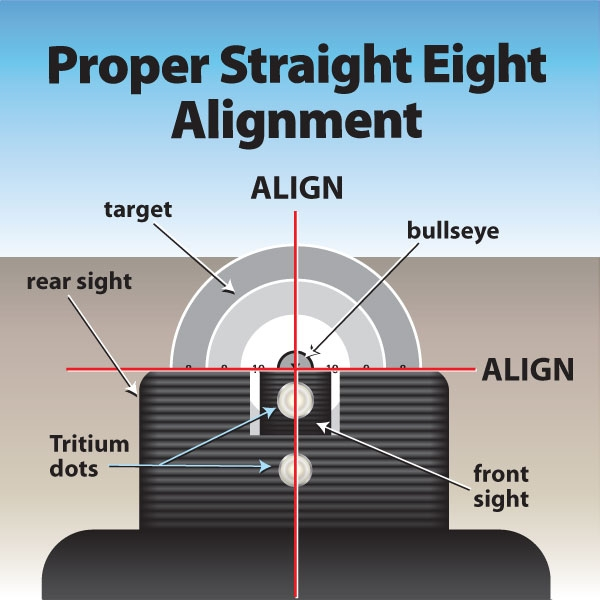
3. What is proper sight alignment?
Sight alignment is basically the link between the front and rear sights.
You ideally peep through the rear sight with the intention of seeing the front sight right at the center.
On the other hand, the sight picture refers to the link between the aligned sights and the aiming bull on the target, which may be in the form of a post or bead.
Before I sign off, I’ll add yet another term for your keeps – eye relief. This refers to the distance between your eye and the rear sight.
You should master keeping a relatively constant distance between your eye and the sight.
You don’t want to bump the sight with your eye or place it very far away.
As a rule of thumb, aim at a minimum of 2 inches, and don’t go beyond 5 inches.
When we think of ivory, we think of an elephant’s tusks, or the teeth of a walrus, a whale or a hippo. But few people realize elk in North America are actually carrying around a remnant from their prehistoric ancestors, which you can find in their teeth. However, these “ivories” can be easy to miss if you don’t know where to look. Today, we’ll discuss what exactly they are, and why they’re worthwhile to hold onto.
Hundreds of thousands of years ago, the ancestors of what we now call elk are believed to have had full-fledged tusks, similar to the Asian Muntjac deer, which still has upper canine tusks. Although it’s likely the ancestors of elk used their tusks to fight in the same way Muntjac deer do today, evolution produced the antlers we admire today, making the tusks virtually useless. Even though they’ve completely disappeared, there is still a pair of ivories hidden in the upper jaw.
Depending on where you are, you may hear people refer to them as “eye teeth,” “whistlers,” or “buglers,” but each is referring to the same thing. And, just like any other tooth, they’ll slowly wear down and stain over time as the elk continues to age.
This question has been asked for thousands of years, as Native Americans once used elk ivories as a form of currency. Today, they still carry a certain value, particularly among jewelers and craft enthusiasts, but it’s difficult to put a dollar amount on them. Considering a pair of elk ivory earrings could go for $30-$40 on eBay right now, it’s safe to say they aren’t a commodity. However, even as common as elk are in North America, few people even know these ivories exist, so there is still a rarity element that creates a certain level of demand.
Some states regulate which parts of an animal you can and can’t sell, though, so make sure to check your local game regulations before you start wheeling and dealing. Considering the lack of monetary value, many hunters try to turn the ivories from a harvested elk into a memento by which they can remember their hunt.
How to remove elk ivories
Here is the tricky part. Many hunters down their elk in extremely remote areas of the North American wilderness. After all, the best elk hunting is often in the hardest-to-reach spots. Your first and only thought may be packing your animal out, which does unfortunately make it easy to forget about those two special, hidden teeth. And, most hunters will tell you that getting them out certainly isn’t easy, as it will take a lot of labor and patience with a knife to dig them out. You have to be careful not to damage them, too, meaning you should avoid using a pair of pliers to pull them.
Hushin, one of the more popular hunting YouTube channels, demonstrated a fairly easy and efficient way to extract them in the video above. You’ll see Eric Chesser uses a block and a hammer to get the job done despite the head being fairly dried out, which should have made it even more difficult.
Eric says an old hunter taught him the trick. It seems like there is almost always a better way to do things found by an old timer, isn’t there? He simply uses a hammer and block of wood to quickly pop the ivories out of the jaw. We’d recommend using this technique if you have a block and hammer handy. It might be a good idea to throw these items in the back of your truck before your first elk hunt of the year.
Why you should keep your elk ivories
Even if it appears that elk ivories don’t have a lot of monetary value right now, that doesn’t mean it will always be true. If you’re the kind of lucky hunter who gets to bag an elk every year, put those elk teeth away and save them for a rainy day. Who knows what they’ll be worth in the future?
If you’re good with crafts, this is a good chance to make a gift for someone special that comes from the heart. Maybe your significant other “tolerates” your hunting obsession. A handmade elk ivory pendant or piece of jewelry would be a good way to say thank you.
You could also use them to form lasting memories. Did your child just shoot his or her first elk? Make them a pendant to wear around their neck. You could even make matching ones, one for you and one for them. They’re sure to hold a lot of sentimental value as your child grows older.
But perhaps the best reason to hang onto elk ivory is to simply utilize as much of the animal as you can. As hunters, we owe it to the animal to let very little go to waste. Even if you can’t see a use for the ivory right now, hang onto them. You just may find the perfect use in the future.
For more outdoor content from Travis Smola, be sure to follow him on Twitter and check out his Geocaching and Outdoors with Travis YouTube channels.
READ MORE: EVERYTHING THERE IS TO FIGURE OUT ABOUT COLORADO ELK HUNTING
Given the ever-increasing proximity of neighbors due to suburban sprawl and the boost in sales of .22 caliber sound suppressors for range and field use, it’s little wonder why subsonic .22 Long Rifle (LR) loads have grown by leaps and bounds in recent years. In fact, MidwayUSA currently lists more subsonic .22 LR options than supersonic on its website. There are several reasons for this shift: Beyond maintaining positive relationships with nearby residents, subsonic .22 LR loads also don’t frighten livestock or game, and their use helps preserve one’s hearing—especially when coupled with a quality suppressor, and they’re often more accurate than their supersonic brethren, too.
To qualify as “subsonic,” the projectile mustn’t break the speed of sound, and that rate varies greatly. Depending on the temperature, humidity, air pressure and elevation, it’s reported to range between 1087 fps and 1129 fps. For extra “cushion,” I opt for loads with velocities at (or less than) 1050 fps. At such speeds, the ammunition doesn’t produce the associated “crack” of supersonic ammo across a host of climates and locations.
Within the realm of subsonic .22 LR ammunition, there exists a multitude of configurations, and not all are well-suited for hunting small game. Outside of a restrained marksman who can consistently make head shots on squirrel-size game, lead, round-nose subsonic loads should be relegated to range work. Even lethal hits will often result in a lost animal. This is particularly true of squirrels, which will quickly scurry into a nest or hole in a tree.
To counteract the loss of energy and terminal performance due to lower velocities, you need a bullet that maximizes the wound channel(s). The most lethal bullet designs for use at subsonic velocities will be a traditional hollow-point or specialized, segmenting hollow-point. I’ve experienced good results with both designs.
Beyond terminal performance, the loads must function flawlessly in the rifle, too. Due to their low velocities—and, at times, low bullet weights—cycling can be particularly problematic for semi-automatic rifles. Such is not the case with bolt-, pump- and lever-action rifles.
For this article, I selected six current, subsonic .22 LR loads suitable for small-game hunting and subjected them to a barrage of tests to evaluate relative sound, accuracy (five-consecutive, five-shot groups at 50 yards), functioning, velocity and terminal performance (in modeling clay at 25 yards). The rifle employed was a Ruger 10/22 fitted with a 16 ½-inch Tactical Solutions barrel with a YHM Mite suppressor, topped with a Weaver Grand Slam 4-16x44mm riflescope. In addition to the particulars of each load and the test results, I also identified the advantages and drawbacks, if any. Please keep in mind that these results are from a single rifle, and each rifle has different preferences. Nevertheless, hopefully this will ease your decision-making process.
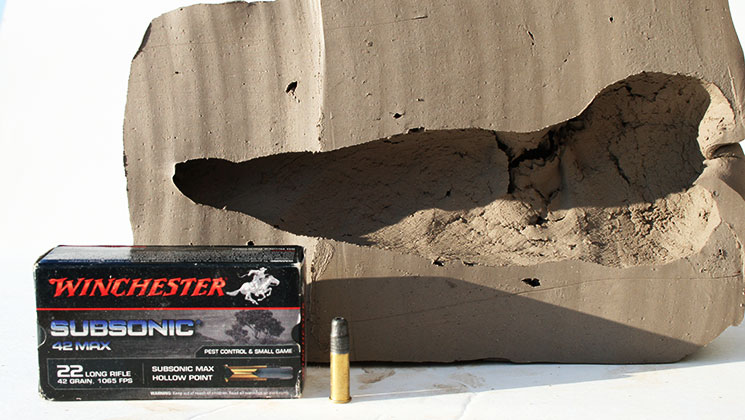
1. Winchester Subsonic 42 Max• Particulars: Manufactured in Australia, Winchester’s Subsonic 42 Max features—unsurprisingly—a cavernous, truncated-nose, hollow-point, 42-grain lead bullet propelled to 1065 fps. That equates to 106 ft.-lbs. of energy. MSRP: $5.39 per 50-rnd box; midwayusa.com.
• Test: Across a Competition Electronics ProChrono Digital Chronograph at five feet, Subsonic 42 Max loads averaged 1001 fps, and were fairly loud. I ranked them as the third loudest. Concerning accuracy, the Aussie loading was disappointing; for five consecutive, five-shot groups at 50 yards, the average was 1.63 inches—the largest of the batch. That being said, functioning in the semi-automatic test rifle was flawless, and the bullets delivered devastating terminal ballistics in the clay. Beyond a large cavity, the bullet traversed the full length of the clay block.
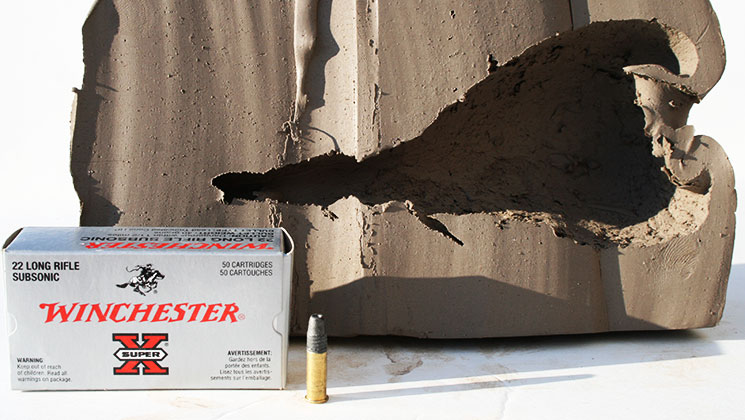
• Particulars: Available on a somewhat inconsistent basis, Winchester‘s Super-X 22 Long Rifle Subsonic load features a 40-grain lead, truncated-cone, hollow-point bullet propelled to 1065 fps. Also manufactured in Australia, the bullet has five less ft.-lbs. of energy than the abovementioned load. MSRP: $4.99 per 50-rnd. box; midwayusa.com.
• Test: Posting an average velocity of 1042 fps, Winchester’s Super-X 22 Long Rifle Subsonic load was the fastest of the bunch, and it was the loudest, too. Moreover, it produced the second largest groups; for 25 shots, the mean was an unremarkable 1.53 inches. There was one failure to eject. As for terminal performance, the 40-grain bullet created a massive wound channel and traveled nearly the length of the block of clay.
• Particulars: A true premium-grade .22 LR load, Subsonic Hollow is manufactured by ELEY in England and features a 38-grain lead, hollow-point bullet propelled to 1040 fps. Energy is 96 ft.-lbs. MSRP: $9.29 per 50-rnd. box; midwayusa.com.
• Test: With a mean velocity of 993 fps, ELEY’s Subsonic Hollow was third fastest, but second loudest. In addition to delivering flawless functioning, the load also proved to be the most accurate; in fact, five, five-shot groups averaged 0.89-inch. In a match-grade rifle, it’d be scary accurate. Despite a great showing in the accuracy department, its terminal performance was somewhat lacking. Although ample to deliver a quick, fatal blow to small varmints and game, larger species might travel a bit further before succumbing.
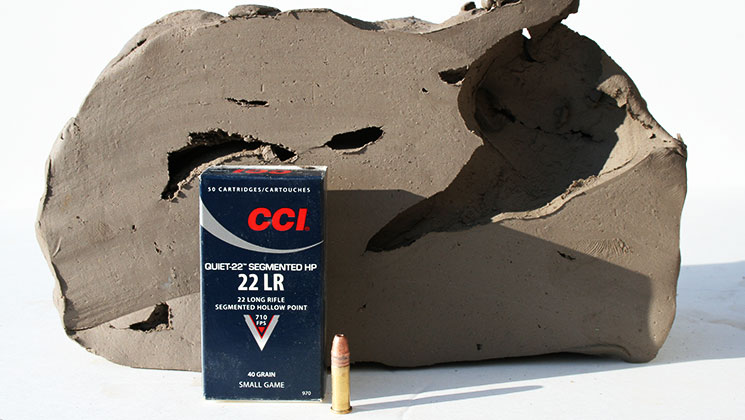
• Particulars: Propelled to a modest 710 fps, what the CCI Quiet-22 copper-plated 40-grain segmented hollow-point bullet lacks in energy—45 ft.-lbs.—it makes up for in terminal performance. During penetration, the projectile breaks into three pieces to increase damage to vital organs and structures. MSRP: $5.93 per 50 rnd. box; midwayusa.com.
•Test: From the 16 ½-inch barrel of the 10/22, Quiet-22 Subsonic HP ammunition averaged a modest 664 fps—little wonder why it didn’t cycle in the semi-automatic rifle. Nonetheless, it was incredibly quiet—the least report of any tested—and acceptably accurate. For 25 shots, it had a mean of 1.30 inches. Concerning terminal performance, the Segmented HP created a large initial cavity before splitting into three pieces, each of which penetrated deeply. It’s a devastating design, and the sound it produces when striking is equally eye opening.
• Advantages: Remarkable terminal performance, reduced risk of ricochet and over penetration, copper-plated, good accuracy
• Drawbacks: Won’t cycle most semi-automatic actions
5. CCI Suppressor 22 LR
• Particulars: Designed for flawless functioning in semi-automatic rifles, CCI’s Suppressor 22 LR propels a non-plated, 45-grain lead hollow-point bullet to 970 fps. Energy is 94 ft.-lbs. MSRP: $5.12 per 50-rnd. box; midwayusa.com.
• Test: Despite propelling the heaviest bullet in the test, CCI’s Suppressor 22 LR load still averaged 931 fps, and its perceived report was the second quietest. As for accuracy, it was the only real competitor for the ELEY Hollow load; its mean was a respectable 1.17 inches. The 10/22 cycled without issue when loaded with Suppressor 22 LR. Moreover, the heavy bullet created a sizable cavity in the clay before exiting. This load has a lot going for it.
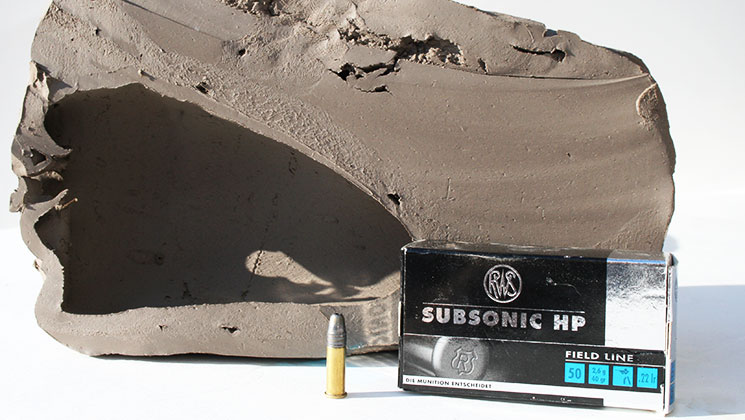
• Particulars: Manufactured in Germany, RWS’ Subsonic HP load has a traditional-style 40-grain lead hollow-point bullet travelling 1033 fps, for 95 ft.-lbs. of energy. MSRP: $6.99 per 50-rnd. box; midwayusa.com.
• Test: With an average velocity of 977 fps, RWS Subsonic HP was middle-ground, and so too was its report. Accuracy wise, the round had a mean of 1.25 inches—not too bad. Cycling, however, was unreliable. While lacking in functioning, it was extraordinary with regards to terminal performance; in fact, this round produced the largest wound channel of all tested. Quarry won’t travel far (if not stopped outright).
•Drawbacks: costly, wax coating easily gets on hands, unreliable functioning in semi-automatic rifles
If you’re not using subsonic loads, you’re really missing out. Go ahead and give some of these loads a try when hunting small game, and if you’re like me, you’re likely to stick with them.
What’s the most diverse group of guns in use by the world’s military forces?
It’s not rifles, or machine guns, or submachine guns, or even shotguns. Most successful long-gun fall into just a few different designs.
When you see oddball service rifles, you often see them plagued by issues of all kinds I.E. the INSAS, the FAMAS, the SA-80, and even the G36 have all had their problems.
And yes, we know the M16 had issues also.
The most diverse group of military weapons are handguns, aka sidearms. Even within certain countries, pistols can be diversely issued depending on the unit and mission.
Sometimes pistols are such a second thought they are a mishmash of different guns.
For example, see Israel at the near end of this list. Another challenge is how countries outside of Western Europe equip their military forces. In the Western World, there is a big move towards standardization that’s not present with other countries.
U.S. Army new M17
Several countries also don’t put out a press release when they purchase or adopt a new handgun, making it difficult to verify the information.
To be entirely fair, sidearms are just a step above bayonets on the necessity of military equipment priorities. Most countries issue them in small numbers to officers and specialists.
I put my best foot forward to come up with a comprehensive list of the sidearms from around the world. It was a little harder than I initially thought, but the research was still fascinating and fun.
With all this in mind, I’ve tried my hardest to verify the issuance of every firearm on this list. I set my parameters to general issue sidearms.
Some Special ops teams may use something different than the standard forces, and trying to catalog these weapons along with general sidearms would take several articles.
For example, the United States military alone issues the Beretta M9, the M17/18, the MEU/SOC 1911, the SIG P226, the M11A1, the P229R, the Glock 34, Glock 17, Glock 19, Glock 22, and many more we’ve likely never seen. It’s much more reasonable to focus on the general issue sidearms of these military forces.
Since several military forces have adopted the same gun, we’ll group those together to simplify things.
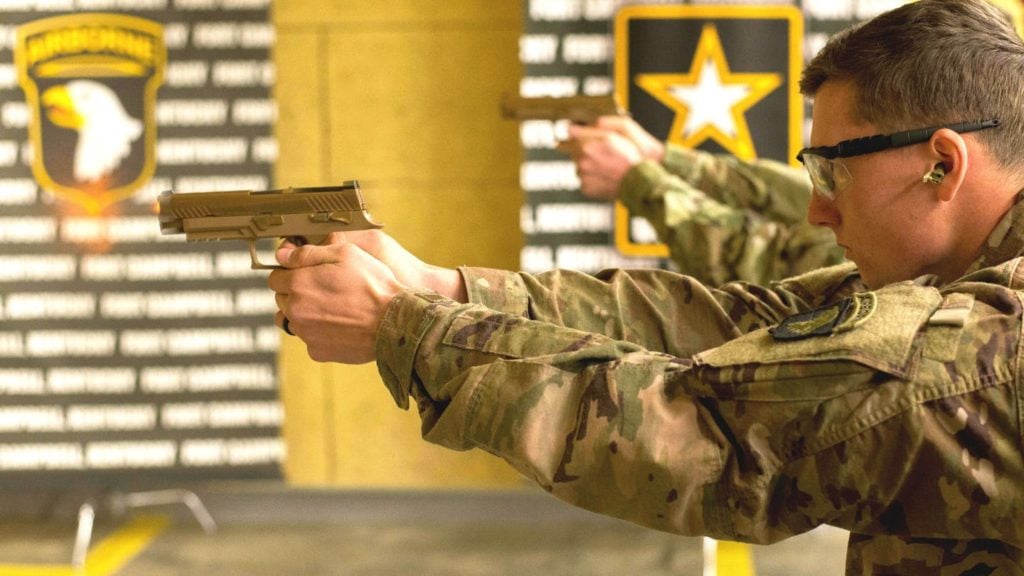
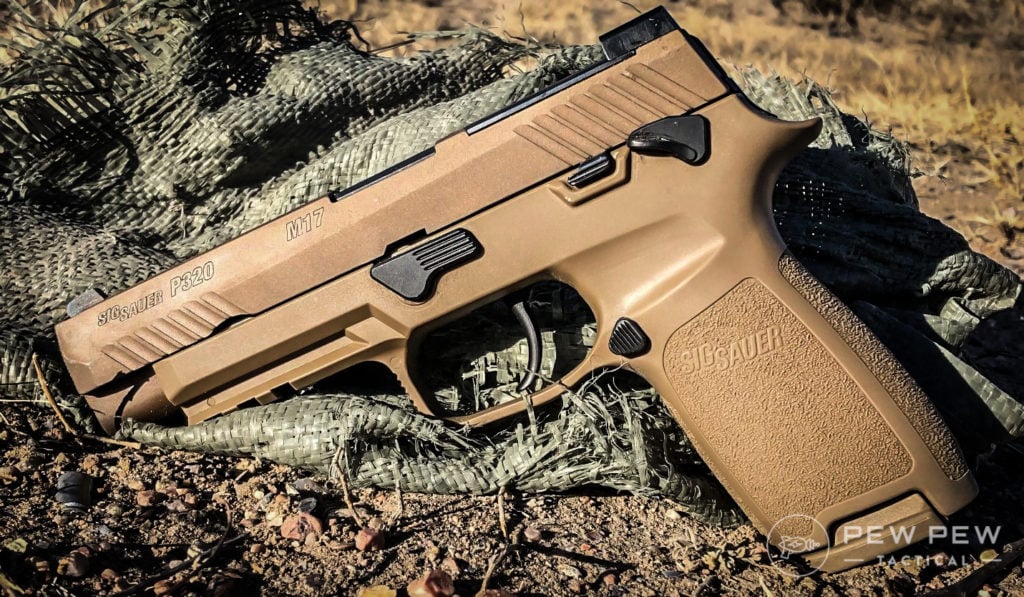
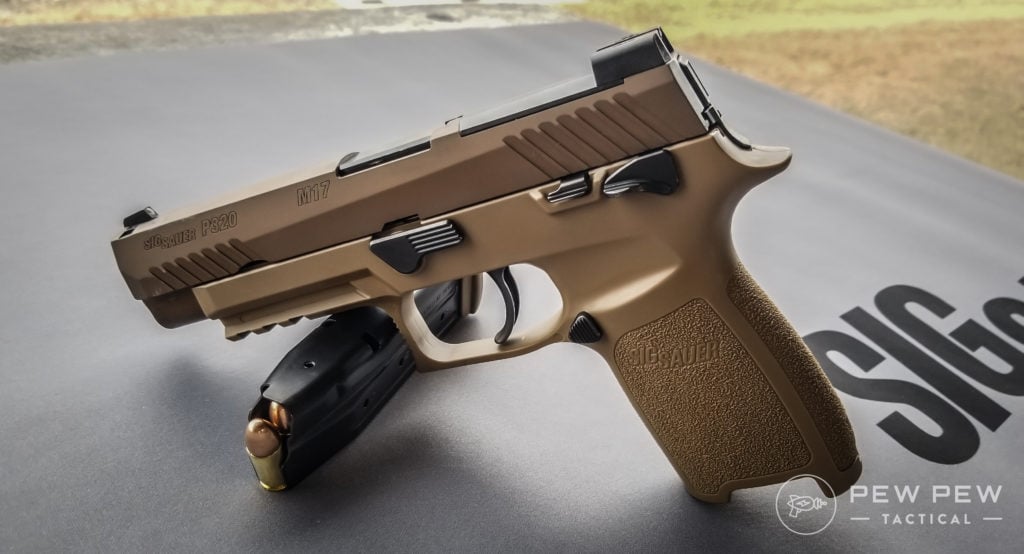
I was lucky enough to be at SHOT Show when it was announced that the SIG P320 would be adopted for military service with the U.S. Army. Needless to say, the folks at the SIG booth were quite excited.
Sig Sauer, SHOT 2018, colorized
The P320, designated the M17 and M18, was adopted in 9mm in full size (M17) and compact (M18) variants. The M17/18 series are quite advanced for military sidearms and feature red dot optics compatibility. Although red dots have not been issued as far as I know.
P320-M17
Like the P320 the ability exists to move the serialized fire control group to different grip modules. The military is quite strict with serial numbers and if the military allows the issued troop to choose a grip module they could get a gun that fits them. One size fits all is rarely a good idea.
Of course, the U.S. Military is nanny like and included a manual safety. In reality, more training would be more beneficial than a manual safety, but who am I to judge big army.
The M17 has since been adopted by the Air Force, the Navy, and the Marines. The M17 is currently being issued to combat arms units first in the U.S. Army. The Army plans to replace every M9 within ten years with an M17/18.
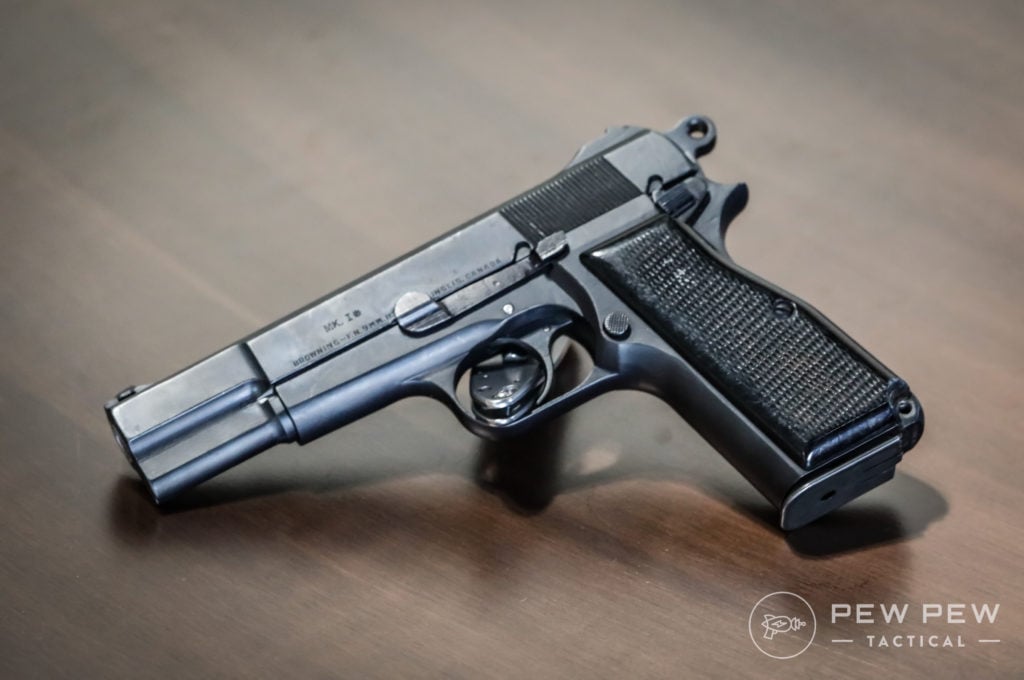
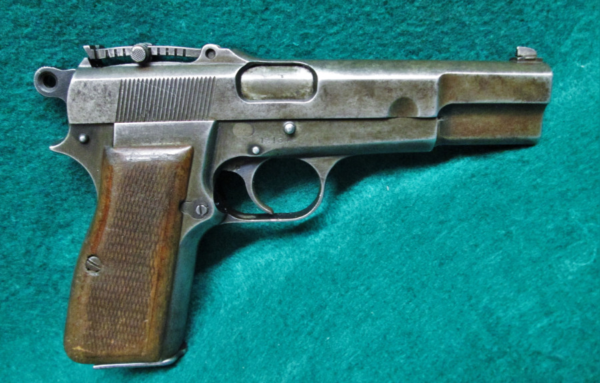
2. Commonwealth Club – The Browning Hi-Power
Canada, Australia, Bahrain, India, Thailand
The Browning Hi-Power is the European 1911.
FN Browning Hi-Power
What I mean by that is its popularity and longevity in military service. The Hi-Power has been used by just about everybody and in only the last few years have more modern designs replaced it.
Original World War II Era Browning Hi-Power
The Hi-Power was one of the first high capacity 9mms that entered regular service. It’s a single action only weapon with a manual safety and a 13 round magazine. The Hi-Power is a beautiful gun that is robust and reliable.
It’s close to 100 years old and is still seeing war.
It’s one of the few guns to see action on both sides of WW2 in service with numerous Allied Forces, including the British, and in the hands of Germans. The Hi-Power is an excellent firearm and was a final fitting design for John Browning.
Its legacy of service across the world is nearly unmatched. Much like the sun never sets on the British empire, the sun doesn’t set on the Hi-Power. While it’s been produced mostly in Europe, the gun is also widely built in South American factories as well.
Modern Browning Hi-Power Mark III with World War II Era Hi-Power
It’s been heavily used in Europe, the Middle East, Asia, and South America. From imported goods to domestic production copies, the Hi-Power is a legend in small arms design.
It’s currently the issued sidearm of Commonwealth countries like Canada and Australia, and as far out as India and Thailand.
Canadian Hi-Power
3. 20+ Nations – The Glock 17, 19, and 34.
The United Kingdom, Sweden, Austria, Finland, Malaysia, Mexico (Navy), Montenegro, The Netherlands, New Zealand, Norway, Poland, Portugal, Romania, Switzerland, Yemen, Venezuela, Uruguay, India, and many more.
It would seemingly be easier to make a list of countries the Glock 9mm series doesn’t serve in. The weapon seems to be everywhere in the world.
Glock 19
Why not? The 9mm Glocks are the flagship of their handguns, and the only difference between the 17, 19, and 34 is barrel and grip length.
Glock 9mm pistols are legendary for their rugged and reliable design. These superbly simple guns work, and keep working. On top of that, Glock has logistics nailed with supplies and spare parts out the yin yang.
UK Glock 17
Generation wise it appears that Gen 3 and Gen 4 models are the most popular variants in the military market. The Glock series also seems to be the most popular choice in countries where Spec Ops have more leeway in choosing a handgun.
The Glock series of firearms are popular the world over for a good reason. They are accurate, easy to use, highly reliable, lightweight, and cheap. The price Glock sells their guns to Police Forces is criminally low, and I imagine the price for military forces is even smaller.
Penny pinchers often give a big say when it comes to new guns, and price always matters. Glock makes their weapons affordable while being high quality. As far as military sidearms go the Glock 17 will likely remain the most popular choice for some time to come.
If you want to get your own Glock, you should take a look at some of these articles:
Best Glock (All Sizes & Calibers)
Best 9mm Glock
Best Glock Upgrades
4. Germany, Ireland, Greece, and Spain – The HK U.S.P.
I love the HK U.S.P. It’s one of my favorite DA/SA guns, and that’s saying a lot. The U.S.P., or universal self-loading pistol, is Heckler and Koch’s premier handgun design.
Germans with their HK USP
It’s a fascinating gun and while 9mm is the chosen NATO cartridge the USP was one of the first guns built around the 40 S&W. The gun was also chambered in 357 SIG, and later 45 A.C.P.
HK45 USP with mounted light
The U.S.P. stood apart from other polymer-frame guns of the time due to its mechanical recoil reduction system. This system is implemented with a heavy captive coil spring around the guide rod that reduced the force of the slide slinging rearward.
This buffers recoil by up to 30% according to H.K. The U.S.P. came to be because of the Offensive Handgun Weapon System, where it was tested alongside prototypes of the Mk 23 Mod 0. From the very beginning the gun was always meant to be a service pistol.
As a service weapon, it has been adopted by at least four countries as the general issue sidearm. In several more countries, it serves as a pistol for Special Operations units. Plus the U.S.P. C. is Jack Bauer’s gun of choice.
5. The French – M.A.C. Mle 50 and PAMAS G1
I’m not picking on the French, but any look into their current small arms will find them lacking. Their military is often ignored and their weapons are often quite old. There are two current service pistols in use, and neither is a new design.
French army MAC50
First we have the ancient, but domestically designed M.A.C. Mle 50 and then the PAMAS G1. The PAMAS G1 is a licensed clone of the Beretta 92F and is built in France.
The 30-year-old G1 was supposed to replace the MAC Mle 50, but it seems the process has been moving along very slowly. They are looking to now replace both pistols as of March 2019.
The M.A.C. Mle 50 is a product of its time, and as a gun designed in 1950, that means it’s a single stack 9mm with nine rounds and a single-action design. It uses the Browning system like a Hi-Power and has an integral barrel feed ramp.
The M.A.C. 50 is a stout little gun that’s known for its durability, clearly, since it’s been around for nearly 70 years now.
The PAMAS G1 is a clone of the Beretta 92F made in France. There are a few differences between the PAMAS G1 and Beretta 92F. The G1 has a decocking lever only, and apparently, the French steel is more brittle.
Since it’s a 92F, it lacks the enlarged hammer axis pin that prevents the slide from accidentally leaving the gun and hitting the operator in the face. However, there is some speculation this was initially caused by +P+ ammo.
PAMAS G1
The French will likely adopt a Glock pistol, but until then, the M.A.C. and PAMAS are chugging along. The PAMAS is certainly a step up from the MAC, but both are likely well past their service life.
6. South Korea – The Daewoo K5
South Korea has a robust and well established domestic arms production history. Rather than just relying on the U.S., the Daewoo brand has produced most of South Korea’s military firearms.
The Daewoo K5 is an innovative and exciting firearm design that has served the Koreans since 1989.
Daewoo K5
The Daewoo K5 is a DA/SA pistol with a hammer, made on metal frame and is chambered in 9mm. The Daewoo K5 holds 15 rounds of 9mm, and in 1989 was quite high tech. It’s slightly dated now, but still an excellent combat pistol.
The K5 features an unusual trigger mechanism, sometimes called Triple action or Double action +. It’s quite similar to the P99, except with an actual hammer-fired handgun. The K5’s hammer can be decoked, while still maintaining mainspring compression.
The DP51 is the export version of the K5
The end result is a trigger pull with the length of a double-action trigger, but the weight of a single-action design. In the states, the Lionheart imported pistol had the same innovative feature. The K5 is a fascinating gun, and in 1989 showed a lot of innovative thought from Daewoo and South Korea.
Daewoo is an interesting company. They make everything from TVs to Cars, and handguns and assault rifles. If you need a slow, fuel-efficient car and a machine gun, call Daewoo.
7. China – Type 92
The Type 92, aka the QSZ-92, is China’s primary service sidearm. This recoil-operated, locked-breech pistol has a rotating barrel locking system like the Beretta PX4 series. This rotating barrel setup is supposed to improve reliability and decrease recoil.
Chinese Type 92
This is an interesting little gun, and it was ahead of its time.
The Type 92 was designed in 1994 and featured a detachable steel frame that holds the fire control group. This sits in the plastic grip and acts very much like a SIG P320’s FCU. The frame can be removed and moved into different sized frames and grip designs.
Whether or not this was ever done remains to be seen. The gun is also chambered in the very odd 5.8x21mm round. This was China’s variant of the 5.7 and was designed to defeat soft armor.
Popular Pistol Calibers
It holds 20 rounds of the 5.8×21 round in a double-stack magazine and has a combination safety/decocker. It’s a DA/SA design and is issued lightly among Chinese forces.
9mm variants also exist for export… for reasons.
I’m betting the 5.8 round handles a lot like the 5.7, and it’s a shame we can’t find out for ourselves.
8. Russia – Makarov, and MP-443
Russian is a weird country for small arms.
Admittedly they are much more focused on their rifles than their handguns. That’s why the Makarov pistol is still around and kicking in use by their military forces. This Great Value brand Walther PP has been serving since 1951.
Rusian Makarov RT
It’s a blowback-operated design that’s very compact for a service pistol. When your handgun is more or less used for executing traitors and subjugating people, I guess size doesn’t matter. The Makarov had a capacity of 8 rounds of what is essentially a +P .380 ACP round.
The most impressive thing about the Makarov is the fact it’s made of only 27 parts. This was perfect for the Soviet Union at the time. It is cheap and easy to produce, and had very few failure points.
The Makarov pistol has been around for so long because the former Soviet Union produced millions of them, and they are robust little pistols.
The MP 443 Grach, aka the PYa, is a more modern Russian service pistol that aims to replace the Makarov. The MP 443 is a modern 9mm Parabellum pistol with a 17 or 18 round magazine capacity. The MP 443 is slowly making its way into the hands of Russian forces, and the gun has been in mass production for eight years now.
Russian MP443
The MP 443 is pretty standard as far as pistols go. It’s a DA/SA design that does allow the user to swap the slide stop lever and manual safety to the right and left sides of the gun. The MP 443 uses a Colt-Browning design and doesn’t do anything revolutionary.
So it’s a lot unlike bored Russians in that sense.
It is an all-steel gun, and while this adds to the gun’s weight, it is quite robust and durable. It needs to be to use the Russian armor piercing 9mm 7N21 armor-piercing round. This s a +P+ style round apparently and is a hard hitter
Russian 7N21 AP 9mm
The MP 443 is another gun we will likely never see, but I doubt it does anything an old SW 3rd gen doesn’t do.
9. Belgium – FN Five-Seven
The Belgium FN Five-Seven pistol is an interesting firearm. It fires the 5.7x28mm round and was developed to share ammunition with the FN P90 PDW. The round it fires is similar to a rifle round in design and shape.
Five-SeveN with Ammo and Mag 2
While the ammunition is long, it’s thin, and this allows the Five-Seven to hold 20 rounds in a flush-fitting magazine. The Five-Seven offers soft armor penetration and very low recoil on top of a flat shooting cartridge that can reach out to 100 yards.
This is a very easy shooting gun, and I can see why a military would adopt it. Plus it’s lightweight, reliable, and is unlike most handguns when it comes to armor and barrier penetration. The gun and the ammo is quite pricey though.
The gun is Belgium designed and is currently replacing the Browning Hi-Power with the Belgium Army. The Five-Seven also serves the Air Force, Special Forces Group, and Federal Police forces. The Five-Seven is an unconventional choice but is an effective weapon.
And of course, it is the firearm of Ivan Chesnokov fame.
We literally cannot think about the FN Five-seveN without thinking of Ivan Chesnokov.
10. Czech Republic – C.Z. 75 Phantom
The Czech Republic has a long history of private firearms ownership and is one of the few European countries to have a strong firearm’s civil rights. C.Z. is also one of my favorite personal gun makers.
Czech soldier with CZ 75 Phantom
The C.Z. 75 has been used extensively by their military for quite some time, and still serves in reserve units.
The C.Z. 75 Phantom is now the primary service pistol. This gun is similar in design to the classic C.Z. 75 but features a polymer frame, Picatinny rail, and a decocker only design. It also uses a larger 19 round magazine, but can also work with classic C.Z. 75 mags.
Lots of CZ 75 mags
The C.Z. 75 Phantom is a robust and accurate weapon. The ergonomics are simply incredible, and C.Z. isn’t afraid to sell the gun in the States, so yay for us. The Phantom is a service pistol with the handling of a competition gun.
It has an excellent trigger, a low bore axis, and is well proven. The Phantom is an excellent gun, and it was a great choice by the Army of the Czech Republic.
11. South Africa – Vektor Z88 and SP1
South Africa has an exciting history of arms design and has both cloned and created their weapons. Their service handguns are a mixture of both. The Z88 was a domestically produced clone of the Beretta 92.
Vektor SP1
They couldn’t license it or receive handgun imports due to the arms embargo on South Africa at the time. Beretta also couldn’t sue because South African’s couldn’t come to court to defend themselves.
The Z88 was a direct clone of the Beretta 92 and, as such, is a DA/SA gun with a decoking safety and a 15 round magazine. The Z88 was a very well done clone and helped modernize the South African military. It still serves today in a limited role.
Z88 and SP1, Forgotten Weapons
After the sanctions were lifted, Beretta was in a place where they could file lawsuits, so South Africa wisely changed the design and came up with the Vektor SP1. This gun utilized the same basic Beretta design with some changes. The safety was moved to the frame, the barrel was no longer exposed, and a 40 S&W variant was created.
The SP1 is a metal frame pistol, and it still utilizes Beretta magazines. It currently serves the South African National Defence Force and the Police Service. It admittedly looks very cool and while limited numbers were imported to the States I’ve never seen one in person.
The SP1 is reportedly a well made combat handgun, and since the weapon is based on a Beretta 92 it’s got a solid platform to start on. South Africa apparently likes the weapon enough that they’ve yet to start shopping for a new sidearm, even without an arms embargo.
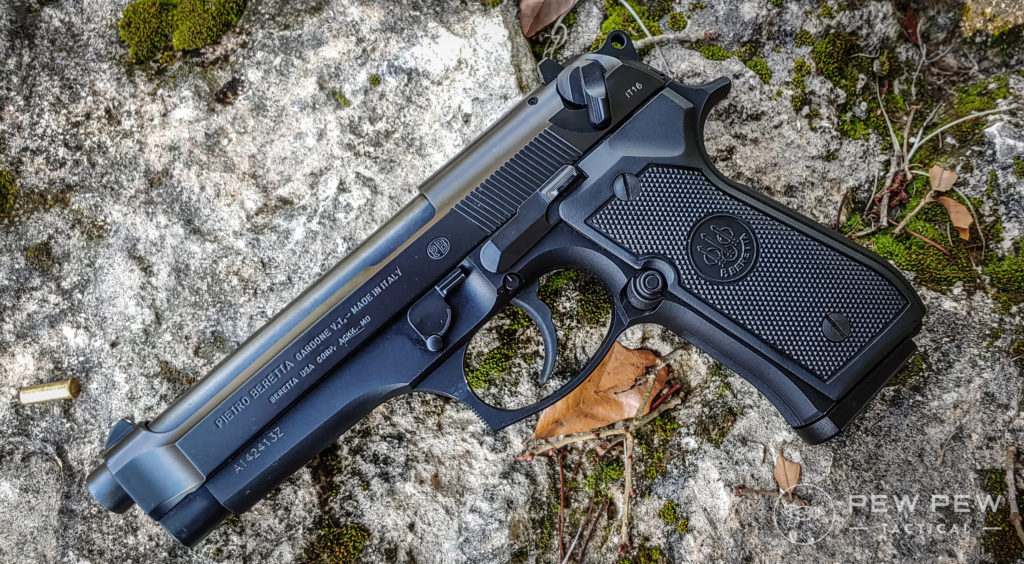
12. Italy – Beretta 92FS
Beretta, the world’s oldest still-operating arms company, is an Italian firm. Are we at all surprised that the Italians are using one of Beretta’s most legendary handguns?
The 92FS has served several countries as a military and police sidearm, including our own, for more than 30 years.
Beretta 92FS
The Italian military uses the Beretta 92FS. This DA/SA design features one of the best stock factory triggers on the market. The 92FS has a combination safety and decocker and excellent ergonomics outside of the safety.
The 92FS in it’s M9 form was the gun I used and it’s an excellent weapon. The 92FS is robust, reliable, and well-proven. The direct feed system and open slide design greatly increase the gun’s reliability.
Beretta’s and the U.S. Army’s numerous testing has shown that the weapon is extremely reliable and can take a ton of abuse before it cracks.
The all-metal frame pistol has very low recoil and handles like a dream. It’s perfect for both new recruits and expert shots. The 92FS is Italy’s standard service pistol, and there doesn’t seem to be a rush to swap it out.
13. Brazil – Taurus PT-92
The PT-92 is the Brazillian copy of the Beretta 92, made by Brazillian firm Taurus. It’s not an identical copy of the Beretta. Taurus makes these guns on original Beretta machinery left behind after Beretta’s military contract expired in Brazil.
PT 92
The Taurus PT-92’s most significant and most noticeable change from the Italian Stallion was the use of a frame-mounted combination safety and decocker. Other than that, the PT-92 handles almost identically to the Beretta 92.
This includes the DA/A design, the direct feed design, and the double-stack magazine. The PT-92 has been serving the Brazillian military for decades now without much issue. The teething problems the Taurus guns sometimes have are seemingly not present in the P.T. 92’s design.
14. Israel… A Little Bit of Everything
Tracking down one service pistol for the Israeli army isn’t easy. It seems like they keep a bit of everything around.
The domestically produced Jericho pistol is in the inventory, as well as the SIG P226 and 228, the Hi-Power, the Glock 17 and 19 models, and more.
Sig Sauer 226
Researching this article has shown me that service pistols in the Israeli Army are highly uncommon. The Special Forces and Intelligence agencies all seem to have their particular pistol.
I mean, does the Uzi pistol count as a pistol?
Sure, this was the full-sized Uzi. But it was still his CCW!
The one common thread between Israeli pistols is that they are all quality options. They are well made, proven guns with a long history of service and success.
Conclusion
Service pistols are such a diverse subject to cover, guns that include both past and present designs. The current field of Service pistols around the world is massive, and I was left exhausted after researching and writing this article.
Service pistols are a fascinating subject to research, and I’m surprised to see such exciting diversity. I can’t possibly have conquered them all, so I ask you fine folks in the comments, which ones have I missed? Want more…check out Police Sidearms: From Past to Present.
Available Montana Bison Hunts – Search HF Aventures
Montana has two bison migration hunts. Unit 385-20 is on the northern border of Yellowstone National Park near the town of Gardiner, and unit 395-20 is located on the western side of the park near the town of West Yellowstone. Season dates for these hunts will be November 15, 2024-February 15, 2024, and 40 tags will again be issued for each hunt. Keep in mind that there will be a lot of Native American tribes from across several of the western states that have traditional hunting rights and will be hunting if bison are coming out of the park.
Go on More Hunts with Better Information, Join Huntin’ Fool Today!
The other bison hunt is unit 385-21, and it is only valid in the Absaroka Beartooth portion of unit 385. Season dates will be September 15-November 14. The bison population is very small, and with a hunt quota of only five, it is not available to nonresidents. This is a very remote wilderness backcountry hunt that is loaded with grizzlies. Pack animals are a must if you harvest on this hunt. Only two of the hunters reported harvesting in 2022.
Montana’s non-resident bison hunts allow hunters the chance to harvest a bison as they migrate out of Yellowstone National Park. With a combination of mild weather and a lack of good snowfall, the herd will stay safely within the confines of the park’s boundaries for the entire hunting season. This had been the case since the 2017-2018 hunting season, and only 15 total bison were harvested between the 2018 and 2021 seasons by the 320 migration permit holders. With cold weather and heavy snow, the herd of almost 6,000 animals will move into the hunting districts along the northwestern boundary of the park in search of lower elevation and better access to forage. When this happens, hunters will have good success on their hunts. Rolling the dice on 2022-2024’s weather paid off for successful bison applicants as strong winter conditions beginning in early November set the stage in driving hundreds of migratory bison out of the park. In total, state hunters killed 73 bison between the two migration hunts. In district 385-20, 34 of the 40 tags issued in the draw were filled. Another 20 hunt roster tags were later activated on that hunt and 14 of those were also filled. In district 395-20, 25 of 40 tags were filled. Another 782 bison had been harvested by tribal hunters through the first week of March 2024.
There is no point system for Montana bison, so your odds are the same as all other applicants. These can be extremely frustrating hunts most years, but if you want to hunt Boone and Crockett eligible bison, Montana is one of only a handful of states that offers the opportunity to do so.
Our Memberships Include The Most Accurate Draw Odds Available, Join Now!
Self-Guided Montana Bison Hunts
Over the last 20+ years, we’ve collected hunting research and data, so join Huntin’ Fool today and access the best research tools for hunting bison in Montana, including 3D Maps, Draw Odds, Consultations, and much more. Go on more hunts with better information!
Private Land, Semi-Guided, and Guided Bison Hunts in Montana
Search our database for Montana Bison opportunities.
Consult with Hunters Who Have Hunted in Your Unit, Join Now!
Montana Bison Application Deadline
The Montana Bison application deadline is May 1, 2024.
Our magazine, which is available in print and online, has everything in one location – application info, draw details and odds, fees, hunter requirements, point structure, age restrictions, youth information, weapon restrictions, other tag opportunities, hunt planning, and much more. If you would like access to all of our research, join today!
2022 MONTANA NON-RESIDENT FEES Up-Front Fees Base Hunting License $15 Conservation License $10 Bonus Point (optional/per species) $20 Bison Application Fee $50 Post Draw License Fees (if successful) Bison Permit $1,250 Bow and Arrow License (required for all archery hunts) $10 *Fees do not include the additional 2.5% convenience fee.
MT Bison Hunting Articles from Huntin’ Fool Magazine
Knowing when and how to hunt over scrapes is a pivotal part of being a successful whitetail deer hunter. These markings are utilized by bucks in a way that acts as a calling card for deer in a specific area and they can be extremely productive for hunters who know how to use them.
There is an element of mystery associated with scrapes as hunters can’t always tell what type of buck created the marking without the aid of a trail camera. Nevertheless, hunting scrapes at the right time can be the ticket to bagging a mature buck when all other methods of approaching the deer prove to be fruitless.
In this article, we’ll cover how bucks utilize scrapes in relation to the specific time of year, as well as certain times of the day during deer season. I hope to provide some insight as to the best ways to approach hunting over a scrape, and also give hunters an idea of when to lay off and stay away from them as well.
Scrapes are one of the most talked-about aspects of whitetail deer hunting. While there is plenty of great information that can be found online regarding scrapes, there are a lot of instances where misinformation is spread and sometimes advocated by what most hunters would deem to be reputable outdoorsmen and women in the hunting industry.
Seeing a fresh scrape is certain to inspire a sense of excitement in hunters of all skill levels as it is a sure sign that a buck has been in the area—and that he is likely to return on a semi-regular basis to check the scrape again at some point. So this begs the question, when is the best time to hunt over a scrape?
Hunters should start seeing more signs of buck activity in the form of scrapes on their given hunting location around early to mid-October throughout much of the United States. While bucks are known to make scrapes at virtually any time of the year, this kind of activity will increase when the bucks’ testosterone levels are increasing just before the rut goes into full effect.
This is a time when bucks are becoming more active and preparing to draw a line in the sand, so to speak, when it comes to their own personal territory. Bucks will start to create these kinds of markers as they instinctively know that the rut is set to kick off in a matter of a few weeks, depending on where you’re located throughout the country.
Determine the Freshness of the Scrape First
One of the key aspects to focus on when it comes to scrapes and how you should approach them is freshness. If you come across a scrape in your hunting land, take your time and look it over thoroughly to determine whether or not it is a fresh scrape, or if it has been made more than a few weeks ago. Focusing your efforts on hunting over an old scrape will likely turn out to be a huge waste of time as bucks may be on the move in your area and turning most of their attention towards their female companions instead of scrapes.
Be sure to look at the overhanging branches above the scrape to see if they have recently been chewed or twisted. Most skilled hunters are able to tell when a small tree branch was worked by a buck and make a fairly accurate assessment as to when the buck chewed on the ends of the branch or used its antlers to twist and break the ends.
It’s also important that you closely inspect the ground where the buck has pawed at the scrape and pay attention to whether there are any leaves and other debris that have fallen into the scrape area since the buck made the marking. A fresh scrape will have very few if any leaves in the scrape and an old one will have a decent amount of debris in the area.
When to Start Looking for Scrapes?
The most important question any hunter can ask pertaining to scrapes is likely going to be “when is the best time of year to hunt over scrapes?”
However, it can be just as important to understand when you should start looking for scrapes on your hunting land. If you are able to find scrapes or scrape lines early shortly after they’ve been created by bucks in your area, you can usually work to stay one step ahead of the buck you’re after.
You should start looking for scrapes on the property you are hunting in early October. Once you find the first scrape or scrape line, you should work to connect the dots and try to make an assessment as to where the buck is headed and what two points of interest the scrape is made to connect.
In most cases, scrapes are made in areas very close to where a buck is either feeding or bedding. If you are very familiar with the specific area you’re hunting, you should try to look for areas where bucks might bed down in thickets and other sections that offer good amounts of cover and a higher vantage point than the land surrounding the bedding area.
In addition to finding and pinpointing the particular bedding area in your neck of the woods, it’s also important to try and search out the various food sources nearby. If you can locate the bedding areas and determine which food supplies a buck is likely to be using in early to mid-October, you’re very likely to find scrapes along the trails or edges of thick cover and hardwoods.
Best Time of Year to Hunt Over Scrapes
According to most experienced whitetail deer hunters, hunting over scrapes is an excellent strategy just before the rut starts to kick in. For most of the United States, bucks will start to engage in behavior that is consistent with their usual rutting patterns around the beginning of October or toward the end of the month.
When it comes to hunting over scrapes, freshness is the most important aspect of the entire conversation. If you find a fresh scrape in early October or near the middle of the month, the best time to hunt over this particular buck sign is sooner rather than later. A buck that takes the time to create a scrape is likely to come back and check it within a few days, or sooner in some cases.
It’s a mistake to think that you can simply make a note of this scrape and hunt over it once the rut is truly beginning. Bucks typically make scrapes just a few weeks before they will begin to chase after does as a means to tell other bucks in the area “this is my turf.” Once they begin to go into estrus, bucks will mostly lose interest in scrapes as they will focus most of their efforts on finding these does that are in heat and mating with them.
Bucks will, however, come back and check these scrapes if they are in the area. Most hunters swear by the process of creating their own mock-scrapes in order to draw the attention of bucks. There is little scientific evidence to back up the idea that mock-scrapes are just as productive as naturally occurring scrapes.
Most hunters will have the most success hunting over scrapes in the month before the peak of the rut in their particular area.
Best Time of Day to Hunt Over Scrapes
Most scrapes are going to be worked by bucks under the cover of darkness. Obviously, hunters can’t legally hunt during this time, so the next course of action is to catch an unsuspecting buck at or near a freshly-made scrape in the early morning hours. If you plan to hunt over a particular scrape or a scrape line, it’s best to do so in the early morning.
Be sure to get into your stand well before daylight in order to avoid disturbing any bucks as they make their way along the trail where the scrape is located. It is very likely that the buck has spent the night roaming around the general area, checking scrapes, and feeding on various food sources.
The time for hunting over scrapes successfully is actually a shorter window than most hunters realize. Bucks will make scrapes in the early portion of the hunting season, but they will quickly turn most of their focus toward chasing after does in estrus once the rut kicks in full force.
Buck Behavior Around Scrapes
The subject of buck behavior around scrapes is one that could be discussed in an article of its own as there are many different points to consider. Bucks will react in a variety of ways to other deer visiting their scrapes and many mature bucks are known to make use of scrapes more heavily than younger bucks.
Bucks will begin to make scrapes more aggressively once their testosterone levels increase as the rut comes closer. Scrapes will begin to appear more frequently in October and you can expect other bucks to leave their scent in an already-made scrape in most cases. Some hunters can draw bucks in and keep their attention for a few days through the use of a mock scrape and the right combination of buck urine or doe estrus.
What is a Scrape Line?
A scrape line is one of the biggest signs that bucks are living in a specific area and that they’re also frequently using a certain lane of travel back and forth from their bedding area to their chosen food source. Bucks will create scrapes along the way from their bedding area to a particular food source in intervals of about 20 to 50 yards in most cases.
Bucks will usually create a scrape line sometime around early to mid-October and will continue to use and check these scrapes up until the rut kicks into high gear toward the middle of November.
How to Hunt a Scrape Line
If you plan to hunt over a scrape line, it’s best to do so during the morning hours as most bucks will work their scrapes during the night and move toward their bedding area shortly after the sunrise. In some cases, mature bucks will actually show up during the mid-morning hours to check their scrapes during late October or early November.
It’s best to hunt over a scrape line in the few short weeks just before the rut begins in your specific area. For much of the United States, the rut fully begins in the middle of November, so it’s best to hunt over scrapes and scrape lines in the month before the rut kicks off.
Conclusion
There is a lot of information related to scrapes that can be found online and wildlife biologists are still working to understand the subtle nuances of just how whitetail bucks utilize scrapes in a way to communicate their presence with one another. Regardless of your level of understanding when it comes to scrapes and when to hunt over them, the information in this article should help you get off to a productive start as it relates to scrape hunting in the next season.
Thank you for reading my article! I hope you enjoyed it, and if you have any questions or feedback, please send me an email at [email protected]. If you want to learn more about me or Omega Outdoors, visit my About Page. Otherwise, I hope you have a great day, and check out some of my other articles while you’re here!
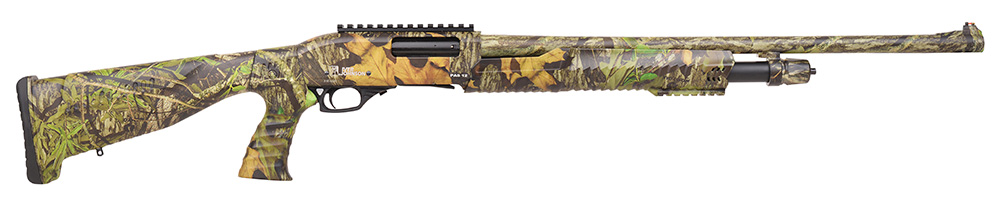
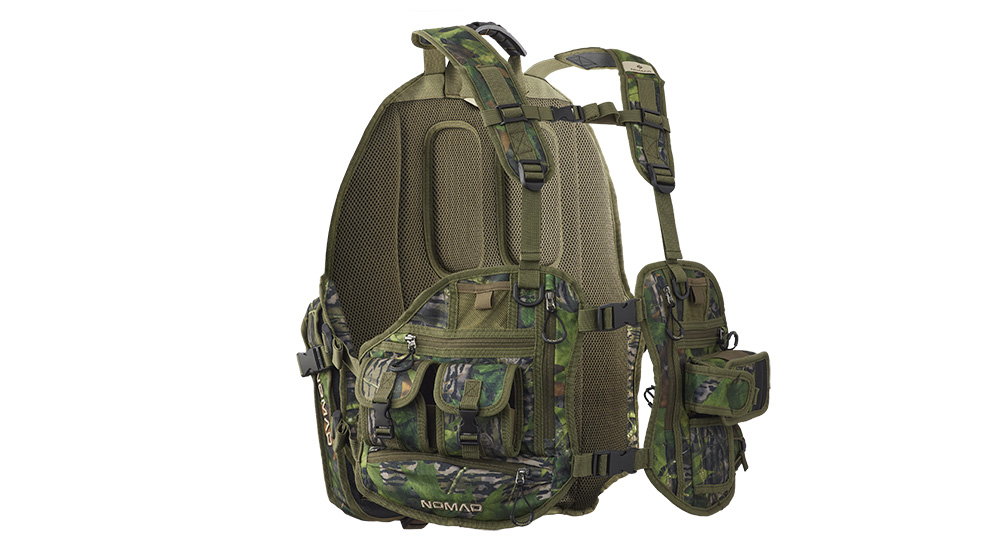
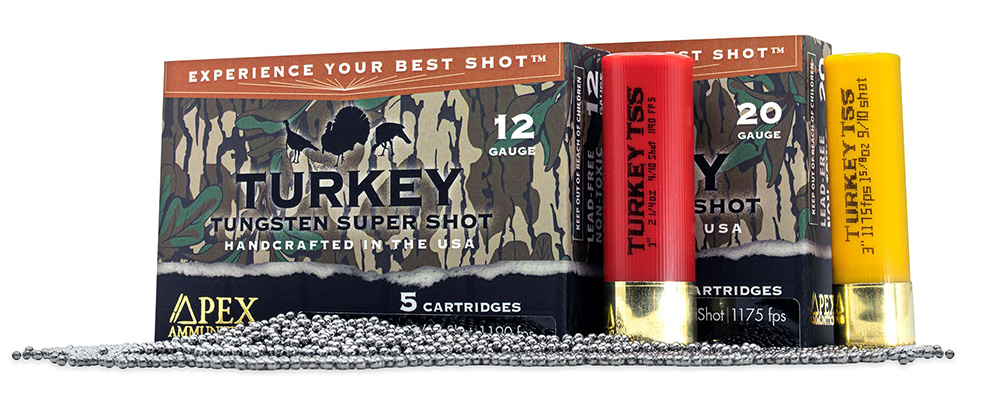
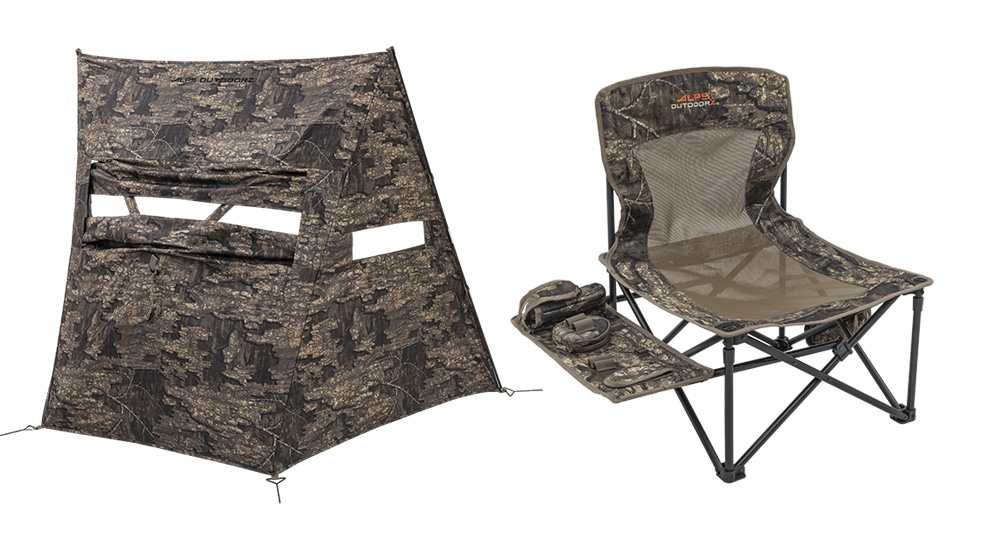
Be prepared when you enter the turkey woods this spring with this year’s must-have gear.
Mossberg International SA-28 Tactical Turkey ShotgunNow that modern loads can turn sub-gauge shotguns into true turkey killers, it’s time to get a modern sub-gauge shotgun. The International SA-28 Tactical Turkey is a small-framed semi-auto gas gun with a 2¾-inch chamber designed specifically with that in mind. At only 39 inches long, this 6-pound featherweight sports a straight stock and a contoured pistol grip, providing a short but maneuverable 12.75-inch LOP. Highly visible fiber-optic ghost-ring sights come standard on the 22-inch, vent-rib barrel, as does the top-mounted Picatinny rail should you choose to add an optic. Decked out in Mossy Oak Greenleaf camo, this bad boy ships ready-to-hunt with an extended turkey choke. Also available in 20-gauge. MSRP: $902; mossberg.com.
Primos Turkey CallsWhen turkey season comes calling, Primos has what you need to call back with confidence. Three new calls for spring include The Owl Call, The Crow Call and a new aluminum Rare Breed pot call. The Owl and Crow locator calls are both made of hardwood and are designed with built-in back pressure to allow for a wide range of sounds sure to elicit a gobble from any toms in earshot. The Rare Breed pot call is now available with a water-resistant, no-conditioning-required aluminum striking surface that’ll produce wind-cutting high-pitch notes right out of the box, ringin’ the ears of lonely toms near and far. MSRP: $54.99 Owl, $45.99 Crow, $49.99 Rare Breed; primos.com.
Hevi-Shot Turkey LoadsHevi-Shot has jumped on the proverbial TSS bandwagon this year with something a bit different in its new Hevi-18 TSS Turkey shells. Not only have they loaded premium 18 g/cc density No. 7 and No. 9 TSS into their 3½- and 3-inch 12-, 20-, .410 and 28-gauge loads, but they’ve also launched a reduced-recoil 2¾-inch load of Hevi-18 for your 12- and 20-gauge guns. Now available in a 3-inch 28-gauge load, Hevi-Shot’s Magnum Blend is a bit more economical but just as deadly with a blend of 12 g/cc density No. 5, No. 6 and No. 7 tungsten shot packed into each hull. MSRP: $45.99-$103.99 Hevi-18, $38.99-$60.99 Magnum Blend; hevishot.com.
Mojo Scoot-N-Shoot Max Turkey DecoyIf you were a fan of the original Mojo Shoot-N-Scoot “reaping” decoy, then the upgraded Shoot-N-Scoot Max should tickle your tail feathers. Built to take advantage of the aggressive nature of breeding gobblers, sometimes resulting in charging birds at uncomfortably close ranges, the new Max version sports the ability to attach either the included artificial wings and tail fan to get a turkey’s attention, or the real thing. Fan includes a mesh viewing window and wings sport orange for safety. Check local laws surrounding turkey “reaping” before you hit the field. MSRP: $79.99; mojooutdoors.com.
Iver Johnson Pump Turkey ShotgunLooking for a solid turkey gun that’ll tackle turkeys nationwide but won’t put you in the hole? This 12-gauge pump gun from Iver Johnson is all that and more. While the PAS12MO could use a better name, it sports a Mossy Oak Obsession camo finish, twin action bars for dependable cycling, a 3-inch chamber, a Pic rail for mounting optics and, perhaps best of all, the push-button ability to remove the buttstock and convert to a pistol-grip shotgun with a 24-inch barrel. How cool is that? MSRP: $386; iverjohnsonarms.com.
Nomad Bull Lounger Turkey VestBe you a run-and-gun gobble chaser or a sit-and-wait ambush hunter, the Bull Lounger adapts to your style of hunting. A lightweight, adjustable and removable aluminum frame provides a solid back rest just about anywhere a turkey may demand you set up, and the thick foam seat means you’ll be able to sit comfortably to wait him out. Pockets galore adorn this pack, 23 in total, starting with a huge game pouch at the rear, water bottle pockets, a Thermacell pocket and various call pockets and zippered compartments out front for your shells, gloves, cellphone, sandwich and everything else you can possibly think of. Available in Mossy Oak Bottomland and Shadow Leaf. MSRP: $250; nomadoutdoor.com.
APEX Mossy Oak Greenleaf Turkey TSS BlendApex Ammunition has partnered with Mossy Oak to release a special offering to turkey hunters this year: a duplex load consisting of No. 9 and No. 10 TSS pellets. Engineered for massive payloads and tight patterns, the Mossy Oak Greenleaf Turkey TSS Blend is available in 3-inch 12-gauge 2¼-ounce loads and 3-inch 20-gauge 1⅝-ounce loads throwing an incredible 1,096 and 774 ultra-dense 18 g/cc density TSS pellets. Shells are handloaded to tight tolerances and use a super-tough, tungsten-grade wad to deliver tight patterns and protect your barrel. MSRP: $49.99-$62.99; apexammunition.com.
ALPS OutdoorZ High Ridge Chair and Dash Panel BlindIf you’re going to be sittin’ for a spell waiting on a strutter, you might as well do it in a chair designed for the task. The low-profile High Ridge Chair from ALPS unfolds into a comfy low-lounger with a call table attached conveniently to the side. Built-in pockets keep calls organized and within easy reach, and a dedicated pocket holds your Thermacell in the perfect spot. Used with or without a chair, the Dash Panel Blind is a lightweight and quick-deploying ground blind for hiding up to two hunters. Three-sided design provides more than full-frontal concealment and sports mesh viewing windows on the side panels and a large adjustable Silent-Trac shooting window out front. Includes ground stakes and a carry bag. MSRP: $79.99 chair; $139.99 blind; alpsoutdoorz.com.
Introducing the High Velocity Air Rifle: Unlocking Precision and Power. Experience unrivaled accuracy and impressive speed with our cutting-edge air rifle. Engineered to deliver maximum performance, this advanced firearm pushes boundaries, propelling pellets at incredible velocities. Perfect for target practice or small game hunting, it guarantees unmatched precision and an exceptional shooting experience. Elevate your shooting skills with the high velocity air rifle – a true game-changer in the world of firearms.
high velocity air rifle
A high velocity air rifle is a type of air gun that propels pellets or bullets at a significantly higher speed compared to traditional air rifles. These rifles are designed for various purposes, such as hunting, target shooting, or pest control. With their increased velocity, they offer improved accuracy and greater range, making them popular among enthusiasts and professionals alike.
One of the key advantages of a high velocity air rifle is its ability to deliver exceptional power while still being relatively quiet and recoil-free. This makes it an ideal choice for hunters who want to minimize noise and disturbance in their surroundings. Additionally, the high velocity allows for a flatter trajectory, meaning the bullet or pellet maintains its path over longer distances, improving accuracy and reducing the need for frequent adjustments.
When choosing a high velocity air rifle, it’s important to consider factors such as caliber size, power source (spring or gas), and overall build quality. Different calibers offer varying levels of power and versatility, catering to different shooting needs. It’s also crucial to ensure that the chosen rifle complies with local regulations and safety guidelines to ensure responsible use.
In conclusion, high velocity air rifles offer a powerful and accurate alternative to traditional firearms. With their advanced technology and precision, these rifles provide an effective means for target shooting and pest control. Additionally, their quiet operation and affordability make them a popular choice among enthusiasts. Whether for recreational purposes or practical use, high velocity air rifles are a reliable option worth considering.
"Understanding the Legalities: Felon Ownership of Air Rifles in Tennessee"
can a felon own an air rifle in tennessee?
In the state of Tennessee, the ownership...
")
")
")
")
")


 Though stripers can’t crack the shell of a full-size surf clam, when a storm does the cracking for them, they don’t hesitate to slurp down the gooey entrails. Clams are a very popular bait in New Jersey and on Long Island.


 Mackerel are one of the most popular live baits for striped bass north of Cape Cod. Fished weightless on a live-lining rig or under a float, fishermen use mackerel around rocky structure and shorelines. Slow-trolling with live mackerel is another popular technique for tempting large stripers. Dead mackerel are a great bait when chunked and fished on the bottom. Many bait and tackle shops will have frozen mackerel on hand throughout the season, making it a great backup bait when fresh pogies aren’t available.