")
")
")
")
")


Benjamin Marauder is a brand that mixes superiority with affordability when it comes to air rifles.
Since 2009, Benjamin Marauder has been gifting shooting enthusiasts
With a wide range of rifles that combine accuracy, accessibility, quietness and class.
Whether you’re a hobbyist, a serious shooter or a pest controller, you can rely on this air rifle.
The Marauder is one of the best PCP air rifles you can buy right now!
The Benjamin Marauder’s affordable price has made it a popular choice with multitudes of shooter.
If you’re thinking about buying an air rifle for hunting or for pest control, we’re here to make your task easier.

Table of Contents
- Benjamin Marauder – Guntype
- Stock
- Sight
- Velocity, accuracy and power
- Trigger
- Cocking and loading
- Loudness
- Shooting Ability
- Maintenance
- Accessories
- Pros and Cons
- Price
- Durability
- Specifications
- Customer review
- How Benjamin Marauder compared to other guns?
- Benjamin Marauder vs Armada
- Benjamin Marauder vs Hatsan (AT 44, AT 44S-10, BT65)
- Benjamin Marauder vs Diana Outlaw
- Benjamin Marauder vs Gamo Urban
- Benjamin Marauder vs Gamo Coyote
- Benjamin Marauder vs Umarex Gauntlet
- Benjamin Marauder vs Field and Target version of itself
- Benjamin Marauder vs Benjamin Fortitude
- Conclusion
Benjamin Marauder – Guntype
Benjamin Marauder is a PCP pellet gun.
PCP (Pre-charged pneumatic) air rifles use highly-pressurized air in the chamber to discharge the pellet.
The pressurized air is compressed up to 2000-3000 psi by using scuba tanks or hand pumps.
When the air reaches the desired pressure, the gun is ready to use.
(For more on the 5 types of air rifles you need to know before buying, see this post.)
The Benjamin Marauder air rifle’s reservoir is filled via hand pump, tank, compressor, or other accessories that we are going to discuss in detail later.
The air pressure inside the reservoir increases due to the blockage that the valve creates.
When you pull the trigger, a little gap is created through which the pressurized air escapes, launching the projectile.
Benjamin Marauder is one of the best PCP air rifles you can buy right now
You must understand that the air pressure and the performance are not always proportionate.
With too much air pressure your rifle will stop working at all
This is why we will discuss in detail the best air pressure range for this model along with the Benjamin Marauder .25 cal.
The basic feature that I would like you to understand is that this is a multi-shot gun — once you pull the trigger you can fire up to ten shots.
This particular model has auto-indexing which looks after the accuracy for the succession of shots.
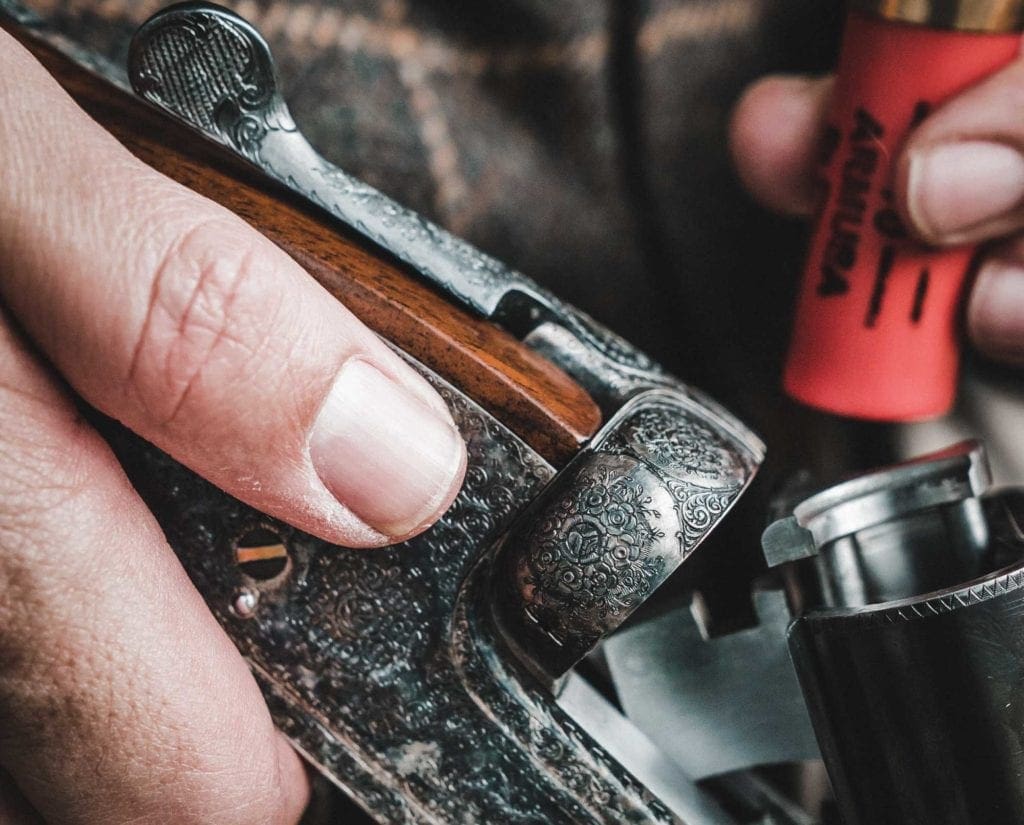
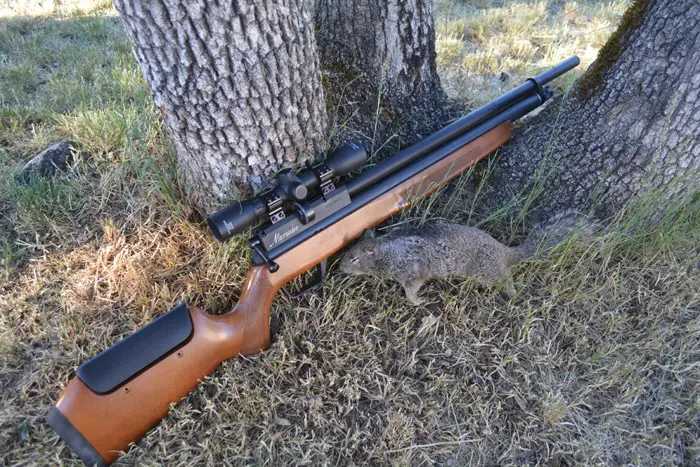
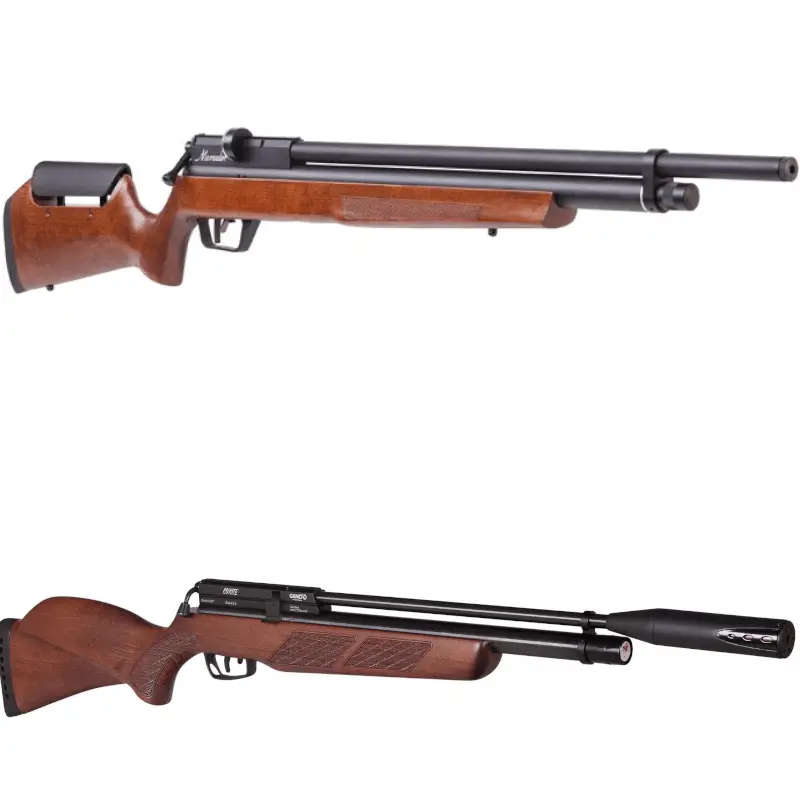
The Benjamin Marauder wood stock rifle comes with a barrel that is fully shrouded,
And as a result, they are really quiet, making it absolutely suitable for pest control or safeguarding the lawn.
(For more on things you should know about air rifle barrels before buying, see this post.)
As with most PCP guns, the marauder is perfectly suited for pest control.
However, with higher caliber ammunition and the right accessories, you can use it for medium to big games like boar, deer, etc.
(For more on the best air rifle for deer hunting, see this post)
The barrel comes choked for better accuracy and range as it shapes the shot spread initially.
This means that you can hit your target repeatedly, and the points of impact are more condensed than that of an unchoked barrel.
This dramatically increases the chance of killing your game.
The caliber ranges from .177 to .22 and .25 (with Crosman barrel or Lothar Walther Match Barrel)
Accuracy, velocity, and air pressure vary with caliber.
(For more on how to choose the right air gun caliber for your game, see this post.)
a marauder is an expert in pest control. furthermore, with higher caliber and proper accessories, you can use it for medium and big games like boars, deers, etc.
A PCP gun has numerous advantages over spring-piston guns, accuracy chief among them.
Secondly, the Benjamin Marauder doesn’t need to be cocked again and again, as you can charge it once for multiple shots.
Stock
There are two types of stock available: wood and synthetic.
Let’s deal with the wooden one here.
The black powder finish is worth the comment.
The stock also comes in a black synthetic version.
The metal parts have bluing, which is intended to protect them from rust.
It may lack the beautiful mirror finished look of an air rifle, but this stock gives it a very realistic appearance.
Let’s be honest, a Marauder is not just made to be looked at.
It is for SHOOTING with serious power!
The wooden stock gives you an authentic look but it could be harder to use in extreme weather conditions,
While the synthetic stock would do just fine and remains lighter in weight.
The synthetic one may lack the authentic touch but it is more easily carried.
(For more on the in-depth comparison between synthetic and wood stock, see this post.)
Coming to the most important and impressive feature, this stock is ambidextrous.
Both right and left-handed gunners can use it with ease. For left-handed shooters, the bolt has to be reversed.
The stock has padding for better resting.
The Marauder stock is heavy but the weight just feels better and more realistic while shooting, although some might find the weight too much.
Fear not, we have a solution for that too: Just attach a sling to alleviate some of the burdens.
Sight
Sighting is one of the most important features of any gun.
Being able to control the sights effectively makes all the difference for the performance.
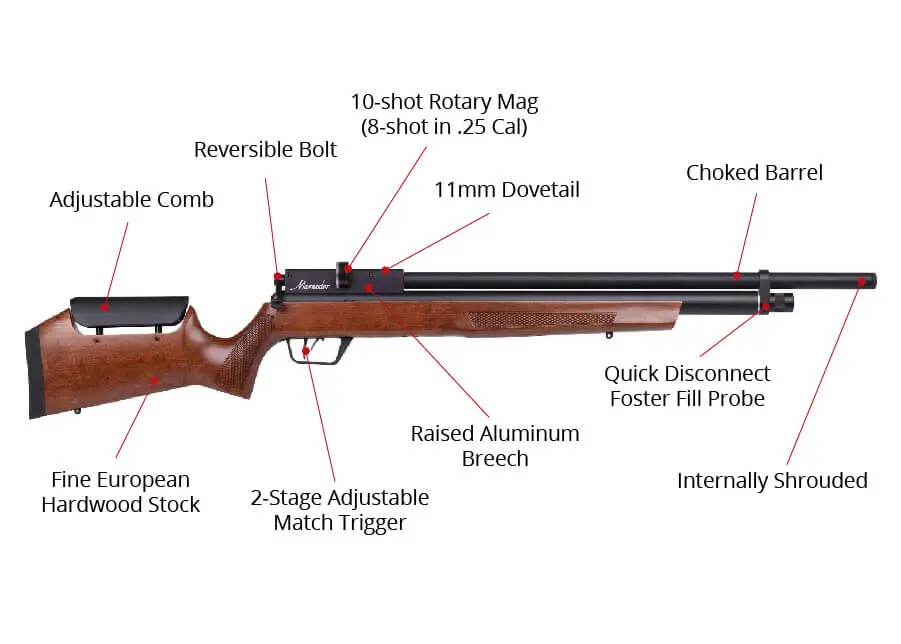
The Benjamin Marauder wood stock has an 11mm dovetail rail which we can see across the receiver top.
This model does not offer you an iron open sight
So you are free to choose your favorite optic for your mission depending on factors like the scope, price, range, etc.
It would be wise to have an adapter handy or an extra set of airgun rings available.
We can see a Picatinny rail on the vision and target version.
You can choose the best one suitable for you from the options available in the market like a Hawke sidewinder 30 SF Mil-Dot Reticle scope.
Besides, a Center point-4 16*40 AO scope is included in the Marauder premium package.
Velocity, accuracy and power
The key point for the most effective velocity or accuracy and the optimum use of power is tuning.
You can use the factory setting if you are not an expert yet.
I would personally advise you to go with the preset tuning,
But there is huge scope for improved performance with the Marauder models if they are tuned with the right technical knowledge.

It would not be right if I didn’t mention that there’s a lot of in-built tuning potential with this gun.
Easy adjustments can be made for valve output or hammer spring tension.

A word to the wise though: do not change the factory settings without complete understanding.
You will end up in a lot of trouble regarding muzzle velocity or high air pressure.

Here I will make you a table for a better understanding of the velocity, energy, and accuracy.
The gun has been tested for different pellets, and the results range from 23.38ft/lbs to 33.43ft/lbs in case of average muzzle energy.
The velocity of the muzzle also varied from 1041.83 FPS to 843.85 FPS.
| Weight | Pellets | First shot muzzle velocity | Fifth shot muzzle velocity | Tenth shot muzzle velocity | Average muzzle velocity | Average muzzle energy | Accuracy |
| 9.70 grain | Gamo Raptor Platinum | 1057.94 FPS | 1037.09 FPS | 1030.82 FPS | 1041.83 FPS | 23.38 FT/LBS | GOOD |
| 10.03 grain | H&N field target trophy green | 1038.43 FPS | 1032.58 FPS | 1007.23 FPS | 1024.70 FPS | 25.00 FT/LBS | POOR(vertical stringing) |
| 11.90 grain | RWS hobby | 994.08 FPS | 980.63 FPS | 963.31 FPS | 980.30 FPS | 25.40 FT/LBS | GOOD |
| 14.30 grain | Crossman premier HP | 950.15 FPS | 939.31 FPS | 922.70 FPS | 935.83 FPS | 27.81 FT/LBS | GOOD |
| 14.35grain | JSB Jumbo Exact | 953.59 FPS | 941.58 FPS | 929.36 FPS | 941.61 FPS | 28.26FT/LBS | BEST OF THE TESTED |
| 14.66 grain | H&N field target trophy | 954.80 FPS | 950.37 FPS | 927.51 FPS | 941.99 FPS | 28.89 FT/LBS | GOOD |
| 21.14 grain | H&N barracuda match | 848.93 FPS | 846.38 FPS | 836.84 FPS | 843.85 FPS | 33.43 FT/LBS | GOOD |
Nothing can match the Marauder for accuracy in this price range.
That is one trait I can vouch for any day.
The rifle is accurate over both long and short distances.
The range varies from caliber to caliber.
.177 is fit for paper targets whereas .22 is all set to kill some rabbits or squirrels.
From up to 30 yards of distance .22 does its magic smoothly.
(For more on the differences between .177 & .22 and which jobs they do best, see this post.)
In the case of .25, you can try from 50 to 100 yards distance.
.25 is suitable for hunting predators and sometimes, if properly set, it can be used for animals as large as coyotes.
Want example? Ian Harford and Steve Wild from Team Wild TV used Benjamin Marauder wood stock for hog hunting here:
Trigger
We mentioned the trigger earlier, but here, I am going to help you understand how that helps you in the shooting.
This is a two-stage trigger resulting in a very crisp function and positive let-off.
It makes all the difference, and you will understand how pleasant it is once you start shooting.
The two-stage trigger offers you two basic advantages over single pull conventional triggers.
The first one is safety.
Safety is very important in the case of air guns or rifles and in this model, the safety is attached just in front of the trigger with direct contact.
The trigger pull weight is around 3lbs, which is pretty reasonable.
Two-stage triggers are much safer because of their requirement of heavier trigger pull.
There is less of a chance of an accidental shot.
The second benefit of such a trigger is the accuracy.
You take the first pull, then if not targeted properly, you can pause and correct it with minimal effort and then take the second pull.
It is way easier and thus results in higher accuracy.
Now, if you are not happy with the manufacturer’s adjustments on the trigger, you can always change it.
Crossman has a very detailed manual that contains all the necessary information about changing any kind of setting.
You can change the first and second stage settings along with the pull weight and the position of the trigger blade.
However, my advice to you is to do it very slowly, just one or two steps at a time,
And then make use of the changes to understand your actions on the trigger and its reaction on the whole system.
It is of grave importance to keep checking the safety of the trigger — accidental discharges are the last thing you want while enjoying a fun shoot.
Cocking and loading
Let us start with the bolt.
The opening act has a cock and because of that, the opening action is justifiably light.
You can load the pellets easily while following the three classic steps.
Pull back the bolt handle first, then snap the magazine in and conclude with pushing forward the bolt.
For an easier loading process, the aluminum breech is elevated.
You can cock the rifle and leave it aside until you are ready to shoot.
This does not affect the shooting at all.
The bolt is reversible, and it may take some time for adjustment but it’s not an issue to worry about.
About the magazine, you should be careful while filling it with pellets because it’s quite small.
You may end up losing more pellets while loading than actually shooting.
Loudness
If you see one thing in any Benjamin Marauder review more than most, it would be the noiselessness.
It’s famous for this feature, thanks to its fully shrouded barrel.
The internal shroud is called the De-pinger because it changes the sharp ping of the gun into a dull thud.
People claim that it’s so quiet that they’ve killed squirrels without disturbing any other nearby animals.
Shooting Ability
The Benjamin Marauder comes with a 10 shot clip which is very convenient to load.
Though single shot trays are also available, I could not think of any valid reason or appropriate situation where you might need one.
The Marauder offers you a very useful feature in that it shows how many pellets are remaining in the clip.
The absence of double feed protection as seen on most firearms should also be noted carefully as it plays a great role in jamming the rifle.
There could be a number of consequences if you load them without care.
First of all, there is nothing to alarm you about the fault.
Now that it is done, it could be a double shot that would surprise you leading to accidents or unintended events.
Another thing that can also happen is that your system could be jammed, and it would take a lot to get it back to normal again.
The ambidextrous feature makes it not only user-friendly but also suitable for a wide range of accessories.
The Marauder has a wide fan base, and they know how to respect it while making shooting easier for everyone.
You can adjust the stock comb height for setting up cheek weld,
Which is a big plus considering it can be customized according to your physical needs, and the features of your scopes or mounts.
We can always use a good cheek weld, which instantly results in higher accuracy.
You can also use a rifle rest or stand if you are planning a long session.
Maintenance
The Marauder is not a high-maintenance gun.
Clean the pellets after using a few hundred with any air rifle lube.
This will prevent lead building up in the barrels, and your shooting experience will not fall below standard.
Have micro fibers handy to clean the overall outer parts.
It removes the smudges and any kind of fingerprints making the air rifle new and shiny.
Accessories
First and foremost, you need a hand pump or tank to fill the tank.
Being a PCP rifle, it works on the pneumatic principle, which uses compressed air for shooting.
This model needs 2000-3000 psi pressure to work.
The actual amount may vary by a small amount, and you will get the closest value for your rifle following the instructions on the owner’s manual.
Keep the pressure accurate for effective shots.
Once the pressure gets low, you cannot operate the rifle.
Then, the velocity and accuracy fall and it won’t be triggered.

215cc (size of the air reservoir) is a considerable amount of air, and it could get tiresome to use a hand pump though many shooters prefer to use it.
In that case, a compressor or scuba tank, or carbon-fiber bottle makes the process easier and faster.
There are numerous compressors available in the market.
In fact, the marauder also can be bought with a tank,
But if you are looking for something better, you can go for:
- Air venturi Carbon Fiber Tank 4500 psi,
- Benjamin traveler 4500 psi compressor,
- Air Venturi Nomad II 4500 PSI Portable Compressor , etc.
If you are interested in hand pumps, you can go with Air Venture g6 or g7 hand pump or Hill MK4 hand pump.
Another must need accessory is a sight for this air rifle which I have already mentioned in the section dedicated to it.
Another must-have accessory is a sight for this air rifle, which I mentioned above.
Pros and Cons
| Pros | Cons |
|---|---|
|
|
Price
The Benjamin Marauder comes at an unbeatable price.
PCP Air guns cost from as little as 300 dollars to several thousand dollars,
And this model can be bought for around 450-550 dollars, depending upon the barrel and accessories.
Affordability meets quality with this model.
There are better air rifles in the market, but when we are talking about this price range, finding something better would be very difficult.
Anything better than this will cost you 3 to 4 times its price.
Durability
Known for its performance and durability, I do not need to mention these features specifically.
It will go for years unless you neglect it.
It requires very little hassle, as I mentioned above.
With a little care, your marauder will keep you company for years.
Marauder is the model in which affordability meets the standards. Anything better than this will cost you 3 to 4 times of its price
Specifications
Here I am charting out the entire specifications once more so you can see it all together.
- 10 shots repeater rifle with an auto indexing features.
- Air pressure range from 2000-3000 psi.
- The muzzle velocity can be adjusted with different pellets and so is the muzzle energy. The accuracy depends on the pellets.
- There is an internal shroud present in the gun that makes it very quiet, turning the ping into a thud.
- Choked barrel ensures better accuracy and repetitive hit on the target.
- The two-stage trigger is made of metal, which is robust and smart looking.
- In case of circular magazines, they made the process easier with the raised breech made of aluminum.
- Original model comes with dovetail ring of 11 mm.
- The stock is made of hardwood. The forearm and grip are checkered and you can adjust the comb.
- Reversible bolt is present in this air rifle, which can be switched from left to right making it ambidextrous and suitable for both right and left hand shooters.
- In-built manometer to keep track of the pressure inside the reservoir.
- The size of the air reservoir is 215cc.
- Benjamin Marauder wood stock gen 1 rifle weighs around 8.2 lbs without scope. The heavy weight helps in improving accuracy.
- At the end of the reservoir, there is a quick disconnect male foster fitting which is used with a quick disconnect female fitting for filling up the tank from a pump or air tank.
- Swivel studs for sling along with one magazine is provided.
- The valve has been increased from the previous model which gives more shots. In case of the .177/.22 caliber the number of shots is almost 32 whereas it is 16 in case of the .25 caliber.
Another feature that varies with caliber is the noise. The loudness of the rifle increases with an increase in caliber.
Customer review
Customers are very satisfied with Benjamin Marauder wood stock air rifle gen 1 and delighted after shooting with it.
They emphasize accuracy, durability, quietness, and a smart look.
There have been few complaints about this air rifle and the brand names live up to the expectations.
Critics are also happy with the products, and different air rifle selling sites have detailed customer reviews which are absolutely positive.
At the end of the day, all I can say is that the Benjamin Marauder is the name you trust for accuracy and durability.
It will last for long years and serve you well.
At this price, it is hard to find a better air rifle that has this degree of performance with all these high-end features and quietness.
How Benjamin Marauder compared to other guns?
Benjamin Marauder vs Armada
| Specifications | Benjamin Marauder | Benjamin Armada |
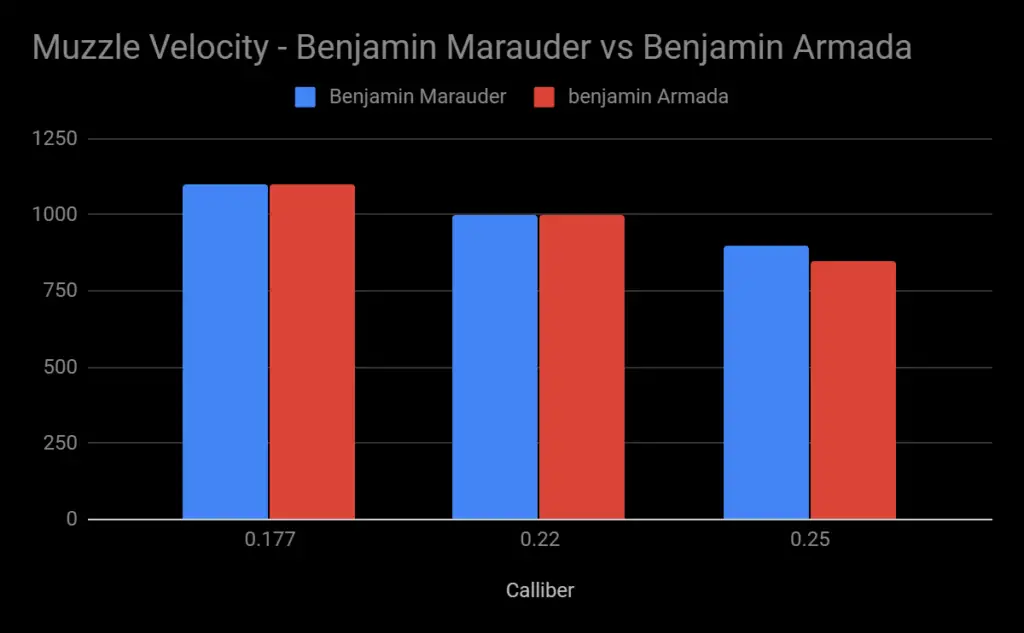
| Max velocity | 1100 fps | 1000 fps |
| Loudness | 2-low-medium | 2-low-medium |
| Barrel Length | 20.0” | 20.0” |
| Overall Length | 42.8” | 42.8” |
| Shot capacity | 10 | 10 |
| Barrel | Rifled | Rifled |
| Front sight | None | None |
| Rear Sight | None | None |
| Scopeable | 11mm dovetail | Weaver/Picatinny |
| Buttplate | Soft rubber recoil pad | Plastic |
| Trigger Pull | 1.5 lbs | 1.5 lbs |
| Action | Bolt action | Bolt action |
| Safety | Manual | Manual |
| Powerplant | Pre-charged pneumatic | Pre-charged pneumatic |
| Function | Repeater | Repeater |
| Max shots per fill | 32 | 30 |
| Weight | 7.3 lbs | 7.3 lbs |
| Cylinder size | 215 cc | 215 cc |
| Shrouded | Yes | Yes |
| Stock | Synthetic | Synthetic |
| Grip | Ambidextrous | Ambidextrous |
| Color | Black | Black |
As is evident above, the Benjamin Armada is very similar to the Benjamin Marauder PCP air rifle.
Perhaps the most striking difference is the tactic-cool stuff the Armada has been upgraded with.
The Benjamin Armada has a fancier stock than the Benjamin Marauder.
In this sense, the Armada is largely seen as a cosmetic upgrade of the Marauder.
The rest of the functions are pretty much the same.
If you’re onto aesthetics, do not hesitate to purchase Benjamin Armada.
Below is a comparison of the maximum muzzle velocities for the different models of Benjamin Marauder and Benjamin Armada:
Rick Eutsler (Air Gun Web) did a match-up between Benjamin Marauder and Armada here:
Benjamin Marauder vs Hatsan (AT 44, AT 44S-10, BT65)

| Specifications | Benjamin Marauder | Hatsan AT44-10 Long QE | Hatsan AT44S-10 Tact QE PCP | Hatsan BT65 SB Elite QE |
| Caliber | .177 | .25 | .22 | .22 |
| Max velocity | 1100 fps | 970 | 970 fps | 1180 fps |
| Loudness | 2-low-medium | 2-low-medium | 2-low-medium | 4-medium-high |
| Barrel Length | 20.0” | 22.8” | 19.4” | 23.0” |
| Overall Length | 42.8” | 48.9 | 45.0” | 48.8” |
| Shot capacity | 10 | 9 | 10 | 10 |
| Barrel | Rifled | Rifled | Rifled | Rifled |
| Scopeable | 11mm dovetail | Weaver and 11 mm dovetails | Weaver and 11 mm dovetails | Weaver and 11 mm dovetails |
| Buttplate | Soft rubber recoil pad | Adjustable | Rubber | Rubber, Adjustable |
| Action | Bolt action | Sidelever | Sidelever | Bolt action |
| Safety | Manual | Automatic | Automatic | Dual – manual and automatic |
| Powerplant | Pre-charged pneumatic | Pre-charged pneumatic | Pre-charged pneumatic | Pre-charged pneumatic |
| Function | Repeater | Repeater | Repeater | Repeater |
| Max shots per fill | 32 | 35 | 10 | 40 |
| Weight | 7.3 lbs | 8.6 lbs | 9.5 lbs | 9.75 lbs |
| Cylinder size | 215 cc | 230 cc | 180 cc | 255 cc |
| Stock | Synthetic | Synthetic | Synthetic | Synthetic |
| Grip | Ambidextrous | Ambidextrous | Ambidextrous | Right |
| Color | Black | Black | Black | Black |
The table above compares and contrasts Benjamin Marauder to the three models of Hatsan.
The Hatsan BT65 SB is the longest of the four PCP air rifles.
All the three Hatsan models are heavier than the Benjamin Marauder
The Hatsan AT44S-10 has a notably small size cylinder (180 cc) that can yield only 10 shots per fill.
Benjamin Marauder has a 215 cc cylinder that yields 32 shots per fill.
Benjamin Marauder and Hatsan BT65 use bolt action while Hatsan AT44 and Hatsan AT44S10 use side lever action.
People have different preferences when it comes to choosing between bolt action and side lever action.
The majority prefer side lever actions, because of their smoothness and the ease of cocking the gun.
Bolts can sometimes move out of position when stalking game, however.
Below is a comparison of the maximum muzzle velocities for the different models of Benjamin Marauder and Hatsan AT44:

The Legendary Jim Chapman (American Air gun Hunter) did a head-to-head review between Benjamin Marauder and Hatsan BT65 here:
Benjamin Marauder vs Diana Outlaw

| Specifications | Benjamin Marauder | Diana Outlaw |
| Caliber | .177 | .177 |
| Max velocity | 1100 fps | 1000 fps |
| Overall Length | 42.8” | 41” |
| Shot capacity | 10 | 13 |
| Front sight | None | Scope 3-9×40 |
| Rear Sight | None | None |
| Scopeable | 11mm dovetail | 11 mm dovetail optics rail |
| Buttplate | Soft rubber recoil pad | Soft Rubber |
| Action | Bolt action | Side lever |
| Safety | Manual | Manual |
| Powerplant | Pre-charged pneumatic | Pre-charged pneumatic |
| Max shots per fill | 32 | 13 |
| Weight | 7.3 lbs | 6.6 lbs |
| Cylinder size | 215 cc | 210 cc |
| Shrouded | Yes | Yes |
| Stock | Synthetic | Walnut-stained German beech |
| Grip | Ambidextrous | Ambidextrous |
| Color | Black | Brown stock, Black barrel |
In terms of weight, Diana Outlaw is lighter than Benjamin Marauder by about 0.7 lbs.
Diana Outlaw offers you fewer shots per fill (13) than Benjamin Marauder (32).
This is despite the fact that Diana Outlaw has a cylinder with slightly less capacity than that of Benjamin Marauder – 210 vs 215 cc.
For the .177 caliber, Benjamin Marauder exhibits a higher muzzle velocity (1100 fps) than Diana Outlaw (1000 fps).
While Benjamin Marauder operates on a bolt action, Diana Outlaw operates on Side lever action.
Below is a comparison of the maximum muzzle velocities for the different models of Benjamin Marauder and Diana Outlaw:

Benjamin Marauder vs Gamo Urban

| Specifications | Benjamin Marauder | Gamo Urban |
| Caliber | .177 | .22 |
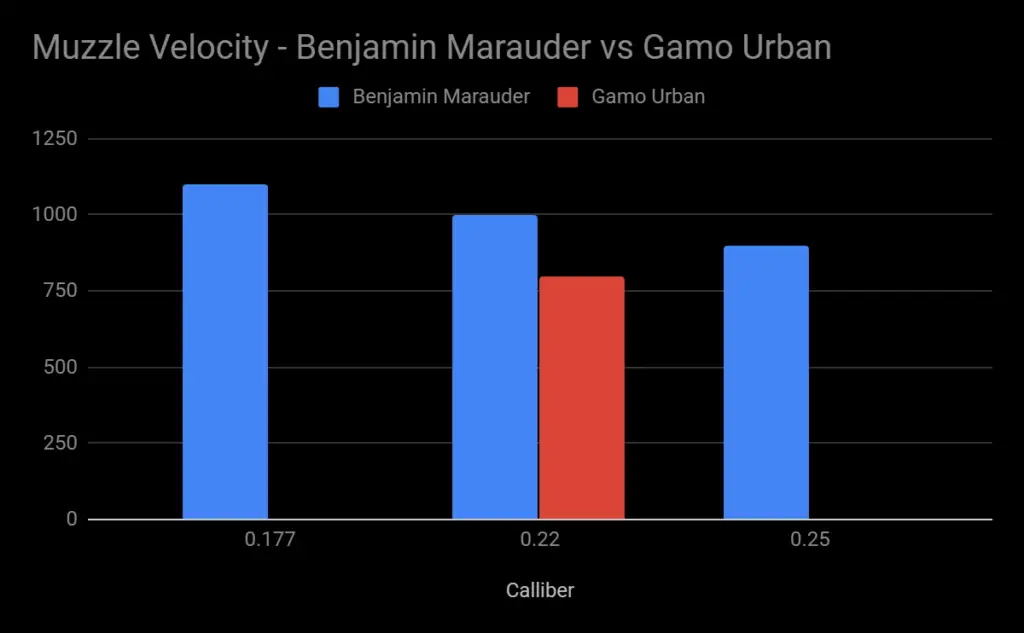
| Max velocity | 1100 fps | 800 fps |
| Loudness | 2-low-medium | 3-medium |
| Overall Length | 42.8” | 42.0” |
| Shot capacity | 10 | 10 |
| Barrel | Rifled | Rifled |
| Front sight | None | None |
| Rear Sight | None | None |
| Scopeable | 11mm dovetail | 11 mm dovetail |
| Buttplate | Soft rubber recoil pad | Soft rubber recoil pad |
| Trigger Pull | 1.5 lbs | 3.0 lbs |
| Action | Bolt action | Bolt action |
| Safety | Manual | Manual |
| Powerplant | Pre-charged pneumatic | Pre-charged pneumatic |
| Function | Repeater | Repeater |
| Max shots per fill | 32 | 30 |
| Weight | 7.3 lbs | 6.7 lbs |
| Cylinder size | 215 cc | 105 cc |
| Stock | Synthetic | Synthetic |
| Grip | Ambidextrous | Ambidextrous |
| Color | Black | Black |
The trigger pull for the Gamo Urban (3.5 lbs) is double that of the Benjamin Marauder (1.5 lbs).
This tells you that you can have better control of the trigger when using the Gamo Urban.
Lighter triggers can still work but are not the preference of more experienced shooters.
Another significant difference is the cylinder size of the guns,
Where the Benjamin Marauder comes with a 215 cc cylinder while the Gamo Urban comes with a 105 cc cylinder.
The larger the cylinder the more shots per fill you expect.
The 0.6 lbs difference in weight between the two air rifles may not be that noticeable.
Below is a comparison of the maximum muzzle velocities for the different models of Benjamin Marauder and Gamo Urban:
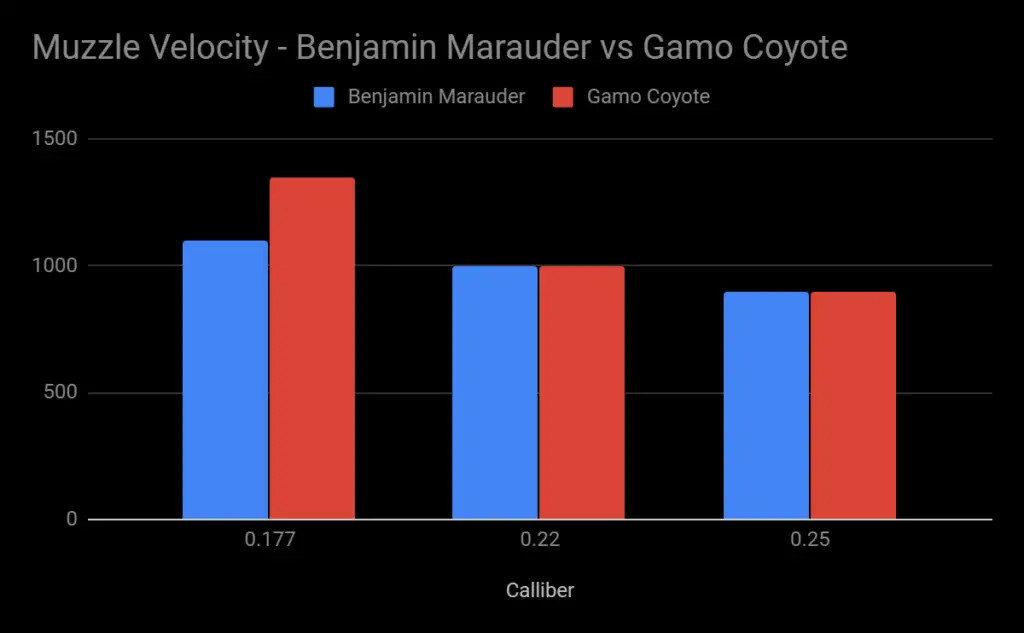
Benjamin Marauder vs Gamo Coyote
| Specifications | Benjamin Marauder | Gamo Coyote |
| Caliber | .177 | .22 |
| Max velocity | 1100 fps | 1000 fps |
| Loudness | 2-low-medium | 3-medium |
| Barrel Length | 20.0” | 24.5” |
| Overall Length | 42.8” | 42.9” |
| Shot capacity | 10 | 10 |
| Barrel | Rifled | Rifled |
| Front sight | None | None |
| Rear Sight | None | None |
| Scopeable | 11mm dovetail | 11 mm dovetail |
| Buttplate | Soft rubber recoil pad | Ventilated rubber |
| Action | Bolt action | Bolt Action |
| Safety | Manual | Manual |
| Powerplant | Pre-charged pneumatic | Pre-charged pneumatic |
| Function | Repeater | Repeater |
| Max shots per fill | 32 | 25 |
| Cylinder size | 215 cc | 153 cc |
| Shrouded | Yes | Yes |
| Stock | Synthetic | Beech |
| Grip | Ambidextrous | Ambidextrous |
| Color | Black | Brown |
With the Gamo Coyote, you expect about 25 shots per every fill of the 153cc cylinder.
On the other hand, the 215cc cylinder of the Benjamin marauder yields about 32 shots per fill.
Below is a comparison of the maximum muzzle velocities for the different models of Benjamin Marauder and Gamo Coyote:
Keep in mind that you can use Benjamin Marauder for coyotes like Chip Hunnicutt (Marketing Manager at Crosman Corporation) did:
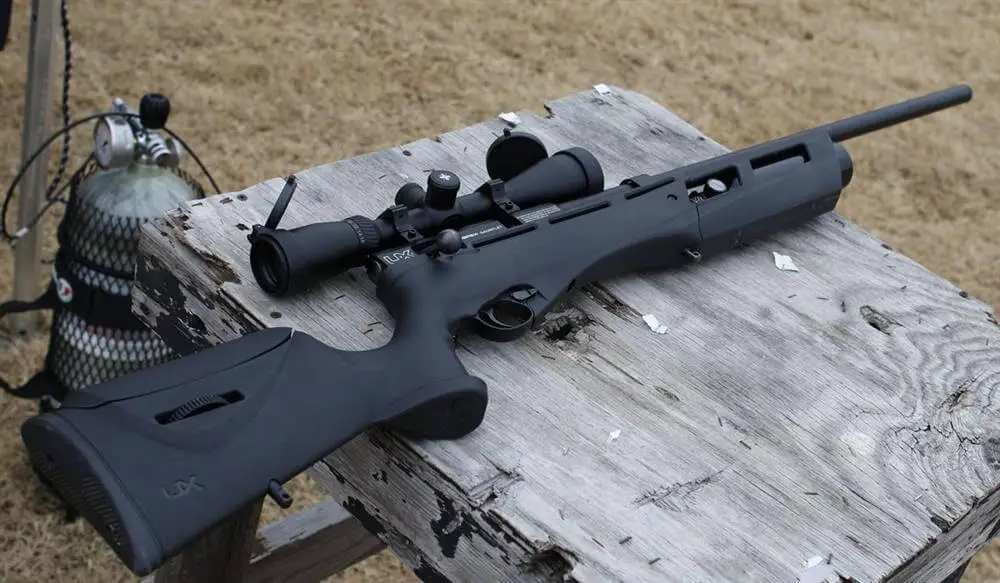
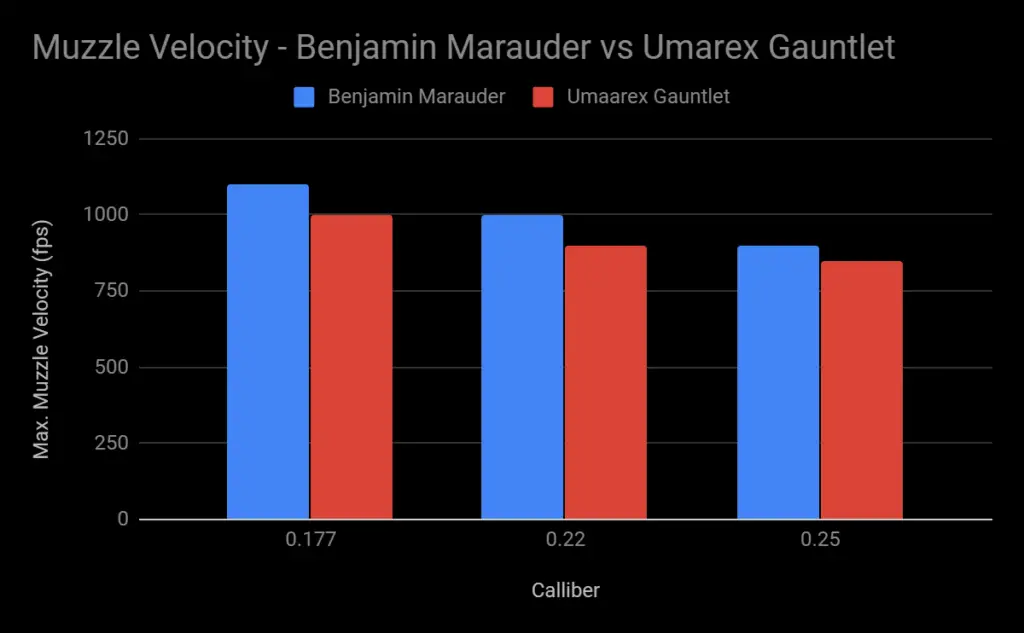
Benjamin Marauder vs Umarex Gauntlet
| Specifications | Benjamin Marauder | Umarex Gauntlet |
| Caliber | .177 | .177 |
| Max velocity | 1100 fps | 1000 fps |
| Loudness | 2-low-medium | 3-medium |
| Barrel Length | 20.0” | 23.5” |
| Overall Length | 42.8” | 46.0” |
| Shot capacity | 10 | 10 |
| Barrel | Rifled | Rifled |
| Front sight | None | None |
| Rear Sight | None | None |
| Scopeable | 11mm dovetail | 11 mm dovetail |
| Buttplate | Soft rubber recoil pad | Rubber |
| Trigger Pull | 1.5 lbs | 2.9 lbs |
| Action | Bolt action | Bolt action |
| Safety | Manual | Manual |
| Powerplant | Pre-charged pneumatic | Pre-charged pneumatic |
| Function | Repeater | Repeater |
| Max shots per fill | 32 | 70 |
| Weight | 7.3 lbs | 8.5 lbs |
| Cylinder size | 215 cc | 213 cc |
| Shrouded | Yes | Yes |
| Stock | Synthetic | Synthetic |
| Grip | Ambidextrous | Ambidextrous |
| Color | Black | Black |
The Umarex Gauntlet is slightly longer than the Benjamin Marauder, by about 4 inches.
For this reason, the Umarex Gauntlet is also heavier than Benjamin Marauder by about 1.2 lbs.
Let this guide your choice as you know how strong you are.
Other than that, the Umarex Gauntlet gives you a clean 70 shots per fill.
This lets you shoot and shoot and shoot before you think of refilling the gun again.
The 30 shots per fill for the Benjamin Marauder are however not that bad, bearing in mind other guns offer you only 8 shots per fill.
Below is a comparison of the maximum muzzle velocities for the different models of Benjamin Marauder and Umarex Gauntlet:
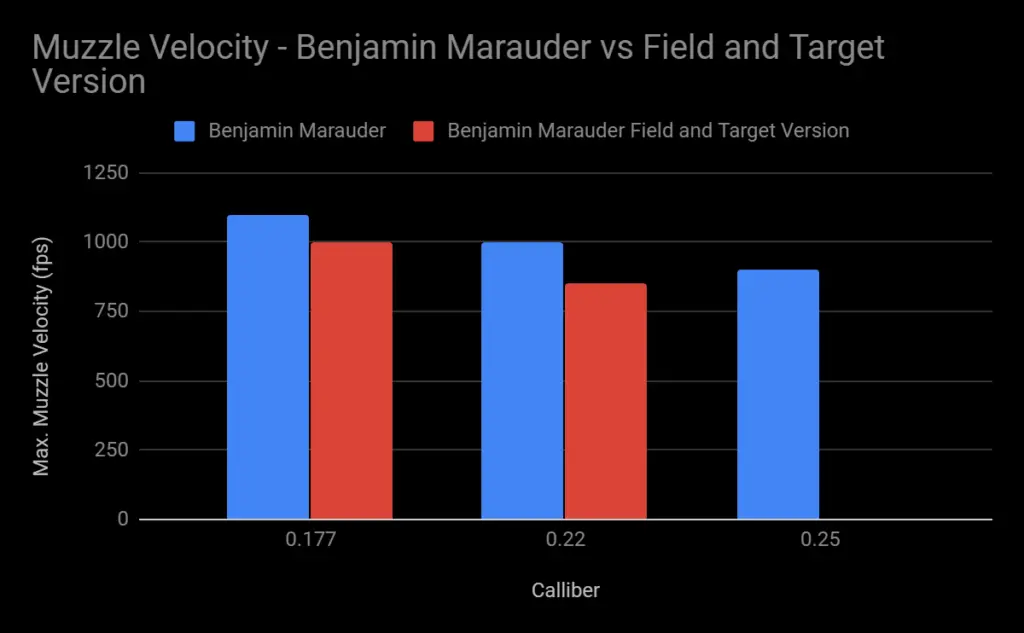
Benjamin Marauder vs Field and Target version of itself
| Specifications | Benjamin Marauder | Benjamin Marauder Field and Target Rifle |
| Caliber | .177 | .177 |
| Max velocity | 1100 fps | 1000 fps |
| Loudness | 2-low-medium | 2-low-medium |
| Barrel Length | 20.0” | 20.0” |
| Overall Length | 42.8” | 43.0” |
| Shot capacity | 10 | 10 |
| Barrel | Rifled | Rifled |
| Front sight | None | None |
| Rear Sight | None | None |
| Scopeable | 11mm dovetail | Weaver/Picatinny |
| Buttplate | Soft rubber recoil pad | Soft rubber recoil pad |
| Action | Bolt action | Bolt-action |
| Safety | Manual | Manual |
| Powerplant | Pre-charged pneumatic | Pre-charged pneumatic |
| Function | Repeater | Repeater |
| Max shots per fill | 32 | 80 |
| Cylinder size | 215 cc | 215 cc |
| Shrouded | Yes | Yes |
| Stock | Synthetic | Hardwood |
| Grip | Ambidextrous | Ambidextrous |
| Color | Black | Brown |
You will certainly fall for the Hardwood stock of the Benjamin Marauder Field and Target Rifle.
The hardwood stocks give you the confidence and pride of outdoor hunting more than synthetic stock will ever do.
But on the other hand, synthetics can be more durable given the effect of weather on wood.
Again, the Field and Target Version stays true to its name
By giving you an incredible 80 shots per each fill of the air cylinder, compared to the 32 shots per fill for the basic Benjamin Marauder.
Below is a comparison of the maximum muzzle velocities for the different models of Benjamin Marauder and Benjamin Marauder Field and Target Version:
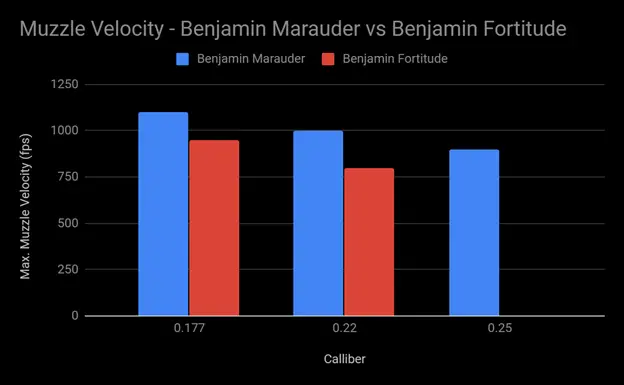
Benjamin Marauder vs Benjamin Fortitude
| Specifications | Benjamin Marauder | Benjamin Fortitude |
| Caliber | .177 | .177 |
| Max velocity | 1100 fps | 950 fps |
| Loudness | 2-low-medium | 2-low-medium |
| Barrel Length | 20.0” | 23.31” |
| Overall Length | 42.8” | 42.6” |
| Shot capacity | 10 | 10 |
| Barrel | Rifled | Rifled |
| Front sight | None | None |
| Rear Sight | None | None |
| Scopeable | 11mm dovetail | 11 mm dovetail |
| Buttplate | Soft rubber recoil pad | Plastic |
| Action | Bolt action | Bolt action |
| Safety | Manual | Manual |
| Powerplant | Pre-charged pneumatic | Pre-charged pneumatic |
| Function | Repeater | Repeater |
| Max shots per fill | 32 | 60 |
| Weight | 7.3 lbs | 5.3 lbs |
| Cylinder size | 215 cc | 135 cc |
| Shrouded | Yes | Yes |
| Stock | Synthetic | Synthetic |
| Grip | Ambidextrous | Ambidextrous |
| Color | Black | Black |
The Benjamin Fortitude is way lighter than the Benjamin Marauder by a whole 2lbs.
Go for the Fortitude if you are young or of small stature.
The 60 shots per fill for the Fortitude is also something to wow you.
See below the performance comparison.
Below is a comparison of the maximum muzzle velocities for the different models of Benjamin Marauder and Benjamin Fortitude:
Conclusion

Benjamin marauder is very unlikely to disappoint you when it comes to performance.
The quietness with perfect accuracy and adjustable features makes it a shark in the sea of air rifles.

The price which is around $500, is unbeatable and the acceptance among the hunters shows clearly that it has earned the name rightfully.
If you are into synthetic, check out Benjamin Marauder Synthetic Stock (Gen 2) review here


![Barrel Break-In: What Is It & How To Do It Right [Guide]](https://www.pewpewtactical.com/wp-content/uploads/2021/12/8.-Remington-Factory-Ammo-1024x578.jpg)
![Barrel Break-In: What Is It & How To Do It Right [Guide]](https://www.pewpewtactical.com/wp-content/uploads/2018/04/Winchester-32-Piece-Cleaning-Kit-1024x683.jpg)
![Barrel Break-In: What Is It & How To Do It Right [Guide]](https://www.pewpewtactical.com/wp-content/uploads/2021/11/4.-Crimson-Trace-RAD-Max-Range-Shooting-1024x575.jpg)