Home Blog Page 164

Duck Hunting Slang – The Language of a Duck Hunter

0

Duck Hunting isn’t just something you do; it tends to become a part of who you are. Duck hunters have their own culture and unique language.

I’ll never forget hunting with some buddies, it was my first time hunting with this group, and I was a new hunter. A group of Scaup came in, and the season for them wasn’t open yet (California early season). I pulled my gun up and waited for my friend to give me the call to shoot them, but he never did. I asked him why we didn’t shoot at those ducks, and he said – They’re blueys. I didn’t know what that meant, so I asked him what type of duck that was, and he explained to me that they call Scaup – blueys.

That’s when I realized I had much more to learn than I had thought. The different names for ducks that day didn’t stop, and my eyes had been opened that these guys were speaking a different language – Duck Slang.

The slang between duck hunters can vary between regions and areas you hunt, but there is definitely a common thread that goes through most areas.

Whether you are a new duck hunter just starting out on this addiction we call waterfowl hunting or an experienced duck hunter who uses many of these words regularly (especially during season) – get ready to learn some Duck Hunting Slang.

Types of Ducks & Geese

Duck Hunters have slang terms for many different types of ducks and geese, and it often varies based on your location. Some terms transcend a majority of the duck hunter dialects. Duck Hunting Lingo like:

  • Drake Mallard: Park Duck, Green Bean, Green Head, Greenie.
  • Northern Shoveler: Spoonie, Hollywood, Smiling Mallard, Boot Lip
  • American Wigeon: Cotton Top
  • Northern Pintail: Sprig, Chocolate Top
  • Gadwall: Gray Duck
  • Wood Duck: Woodie
  • Bufflehead: Buffie
  • Common Merganser: Lawn Dart
  • Hooded Merganser: Hoodie
  • Canadian Goose: Honker
  • Snow Goose: Sky Carp
  • Specklebelly (White-fronted) Goose: Speck, Tar Belly
  • Scaup: Bluey, Bluebill
  • Hen Mallard: Suzy
  • American Coot: – Trash Duck
  • Sea Gull: – Portuguese Snow Goose, Steven

It’s truly amazing to think about how we use so many different slang terms to label the different types of waterfowl.

Duck Hunting Lingo

It’s not just the different types of ducks that have nicknames. There are countless made-up names for various elements of duck hunting that you should know about. Check out a small list below:

  • Sky Buster: Someone who shoots at ducks that are too high.
  • Honey Hole: The perfect place to hunt ducks. Always successful.
  • Refuge Rat: Someone who hunts a public refuge religiously
  • Pass Shooting: Shooting at ducks as they pass, rather than while they are landing.
  • Cupped up: When ducks lock their wings and begin to lower in elevation.
  • Spot Burner: The guy on the internet or in person who shares someone else’s honey hole.
  • Flock Shooting: Shooting at a flock of ducks instead of focusing on a single duck.
  • Water Swat: Shooting a duck that is on the water.
  • Spinner/Mojo: A Spinning wing decoy.
  • Deek: A decoy
  • Spread: The entirety of a hunter’s decoys as they are set out.
  • The X: Where the birds want to be
  • Cut Em: The saying someone uses to signal other hunters it’s time to shoot
  • Bling: Band

Duck Hunters definitely have their own language, and it even seems like there are different dialects to their lingo. If you have a word or phrase that isn’t on the list – go ahead and share it with us, we’d love to hear it!

Spider Rigging For Crappie

0
Spider Rigging For Crappie
Morrow’s Crank-Pushing

Spider Rigging For Crappie

Spider rigging for crappie looks simple enough — a bunch of fishing rods weaving a web of lines from bow to stern. A closer look at the boats of crappie pros reveals that their spider rigs are intricate systems based on exact rod positioning and specialized rod-holder designs. The pros set up their spider rigs differently depending on the situation, whether it’s fishing deep brushpiles, open-water structure, shallow vegetation, or for pushing crankbaits.

The most essential pieces of equipment for spider-rigging are the rods and holders. “The key is to make sure the rods are all the same,” says Barry Morrow, a guide on Oklahoma’s Lake Eufaula. “All the rods should be the same length, power, and action, and they should be adjusted to the same height in the rod holders, so that you are able to decipher the motion of the rod tips to detect bites. If you are using different types of rods they’re all bowed differently and respond differently to strikes, making it more difficult to interpret rod-tip and line movement.”

Preferences on rod-holder design vary among the pros, but there’s one that top anglers all agree on: Rod holders need to be stable. “When I mount a set of rod racks, I want those things not to move,” says Alabama guide Brad Whitehead. Beyond that, top spider-riggers have developed individualized setups to suit the situations they fish.

Whitehead’s Deep Brush

Probing deep brush

For spider-rigging over brushpiles on Wilson and Pickwick lakes, Whitehead prefers 12-foot rods at the bow. He places 10-foot rods across the stern for his clients because the shorter rods are easier for them to handle. Rods are spread evenly across the bow and stern for uniform coverage and easy access to the poles. “I’m a fanatic on keeping 11„2 feet between each rod,” says Whitehead, who also keeps each rod tip about 8 to 10 inches above the water.

He usually sets his baits at different depths, varying about 1 to 2 feet. “I want my shallowest rods to my right and left, but the deepest rods are always the two in the middle,” he says. His poles are rigged with B’n’M Capps and Coleman Minnow Rigs (with a 1-ounce weight).

Whitehead’s choice of rod holder is a four-pole Hi-Tek Stuff mount. He positions two of the mounts about 3 feet apart on the bow and stern. “Position rod racks so when you are sitting, you don’t hit your knees on the rod handles,” he says. “Make sure they’re far enough away, but not too far to where you have to bend to get the rods. You want to be able to sit up straight when you grab rods.”

Capps’ Pads

Pad fishing

Six-time national champions Ronnie Capps and Steve Coleman are renowned for their spider-rigging tactics in the lily pad stems at Reelfoot Lake. The key to their setup is a customized pole-holder system with independent mounts rather than a rack that holds multiple rods. “The rod holders cradle the poles so you have no trouble getting your hand between the forks of the holder and the rod butt. And when you grab a pole out of the holder it’s a quick reaction,” says Capps. “You’re able to get your hand in there with no problem.

“The reason for the independent holders is because I want my poles to be ultra still. With a T-bar type mount, on the other hand, if you grab one pole from a set of four, you disturb the other three rods and you can’t detect a bite. With independent holders, you can detect bites well. I also think fish bite better when a pole isn’t moving much.

Capps is constantly moving his poles off the pad stems to prevent hang-ups. He says the individually mounted holders are critical in this situation because getting hung up on one pole doesn’t disturb the others.

The Tennessee pro also prefers a rod holder with a Y-fork cradle rather than a U-shaped cradle, for better hook-sets. “If you see a bite and the line is scooting to the left, you want to set the hook to the right. But with some of the U-shaped holders there is only one way to get that pole out — straight up,” Capps says.

The depth and cover Capps fishes determines how far apart he positions 8 poles across the front of the boat. “If I’m fishing shallow and directly into spots that I expect fish to be in, I bunch poles tight,” he says. “If I’m trying to cover more area on a shallow flat, I set them farther apart.”

For pushing a single 1/16-ounce jig on 6-pound line in the lily pads, Capps uses 16-foot B’n’M jig poles (model BGJP163). “I get more bites having my baits farther from me with 16-foot poles than I do with 14-footers,” he says, also noting that 16-footers allow him to cover a wider swath of water. Extra length also keeps his jigs farther from the boat, away from trolling motor noise that could spook shallow fish.

Huckabee’s Suspenders

Riprap and breakline trolling

Oklahoma guide and tournament competitor Todd Huckabee prefers single-pole fishing whenever possible. But there are certain conditions when he resorts to spider-rigging, such as during the postspawn on his home waters of Lake Eufaula when crappies pull off the bank and suspend 2 to 6 feet deep over riprap and breaklines in the depth range of 10 to 15 feet.

Four-rod Perotti-Bilt rod holders are Huckabee’s choices for spider-rigging. “They are simple and sturdy,” he says. “When a fish hammers one pole, the other three don’t shake — you can tell which pole got the bite.” He mounts his rod holders on each side of the boat’s bow, positioning the rods about 2 feet off the floor. “I want rods set where I can reach over and set the hook quickly, without having to bend over too far,” he says.

His choices for spider-rigging poles are 11-footers with plenty of backbone. “When I get bit I can pull the fish up with that pole in between all the other poles.” he says. Huckabee sometimes varies his presentation between minnow rigs and tandem-jig rigs, but most of the time he spider-rigs with two jigs of varying colors.

Morrow’s Crank-Pushing

Pushing crankbaits

Pushing crankbaits in front of his boat has become an effective spider-rigging trick for Barry Morrow. The tournament competitor and guide rigs each 11-foot pole with a 2- to 3-ounce egg weight, glass bead, and swivel, followed by a Lindy Shadling crankbait on a 3-foot leader. When he fishes tournaments with a partner, Morrow pushes crankbaits with 8 rods, starting with 2 pointing straight out the nose of the boat and the other 6 spread about 2 feet apart on the port and starboard sides.

Morrow also uses 4-pole Perotti-Bilt holders that allow him to easily adjust the rod positions. “I like to have a rod rack that is adjustable vertically as well as horizontally,” he says. Wind and wave action usually dictate how high he positions his rods over the water. He says the lower the better, preferring to keep rod tips about 3 inches above the water.

The next time you see a spider-rigging setup, you might be able to decode their fishing situation. Or someone might be studying your boat, trying to unravel the crappie-catching web you’re weaving.

The Different Types of Barrel Contours and What You’re Left With

0

A barrel is essentiallya steel cylinder with the bore drilled out. It’s as simple as that. For typical handguns (with their short barrels), there isn’t that much more to it. But with rifles, for which the barrel is often the largest and heaviest component, the overall shape of the barrel can take many different forms. This is generally referred to as barrel contours or profiles.

As a baseline, consider a barrel with no exterior material removed, known as a bull barrel. Here, the outer diameter is constant along its length. Naturally, as a perfect cylinder, this is the heaviest profile, though the diameter can vary from large to small (typically referred to as heavy, medium and light).

At the cost of weight, bull barrels do provide some benefits. With all that steel and surface area, they take longer to heat up. This helps maintain accuracy under sustained fire and prolonging their useful life.

Their rigidity also helps prevent deflection, whether from a sling or pressure on the handguard (if not free floated) or from the addition of a suppressor. While it can be unpleasant to carry the damn thing and potentially awkwardly front-heavy, a heavier barrel equals a heavier weapon. A heavier weapon is generally steadier while shooting and helps mitigate recoil impulse.

Of course, you could also simply select a shorter barrel. This reduces weight and can actually increase stiffness of the barrel, potentially helping with accuracy but at the cost of a loss of muzzle velocity. And if you plan to shoot longer distances, you’ll appreciate a higher velocity.

Tapering

Metal can be removed in various ways from this perfect cylinder, thus also lightening the barrel. It can be tapered, where the diameter at the breech end is greater than at the muzzle — with everything from a linear taper to various other profiles, limited only by the manufacturer’s imagination. It doesn’t make much sense for barrels to be tapered in the other direction, since pressures are greatest in the chamber and decrease as the bullet travels down the bore. Not to mention that it would make the rifle imbalanced all together.

Yet, there are lots of AR-15 barrels that have profiles mimicking military configurations, such as the ubiquitous M4 profiles that have thinner diameters under the handguards and thicker in front of the gas block, along with a cutout to mount an M203 grenade launcher.

Eric Kincel, Director of R&D for Bravo Company USA, Inc., explains, “The original AR-15 and early M16 barrel profiles were never like that. But with the adoption of the M16A2, the mass at the front of the barrel was added for one reason and one reason only — the barrels were bending when soldiers were prying crates open with the muzzle end of the barrel. Seriously.”

Tapering is a time-worn method of reducing the weight and improving a rifle’s balance and handling. While less weight is always a bonus when carrying a rifle, there are tradeoffs in heat dissipation and barrel rigidity. It’s a delicate balance to maintain. This is why matching barrel contours and treatments to your rifle’s intended use is key.

Fluting and Other Treatments

Material can also be removed in other ways, leaving the overall diameter constant but relieving metal in other patterns. With advancements in machining tools, more and more complex patterns are possible. Everything from fluting, which is longitudinal grooves (either straight, spiral or radial), to other geometric patterns (such as dimples, hexagonal honeycombs, etc.) are possible.

These sort of treatments are intended to shave some weight. They also maintain greater outer diameter and provide quicker cooling of the barrel during sustained fire, since more surface area of the barrel is exposed. And since beauty is in the eye of the beholder, they can look pretty damn cool as well, while still serving as an attractive host for your suppressor.

Let’s look at two identical barrels. If you flute one of them, the fluted one will not be as stiff as the non-fluted barrel. In theory, you can increase a barrel’s diameter enough to offset what you lose in stiffness from adding fluting. However, the simple rule is that no fluting means a stiffer barrel.

For complete rifles (or complete uppers), manufacturers tend to offer barrel contours that match the intended purpose of the weapon — from hunting rifles with relatively lightweight tapered barrels to target rifles meant for a benchrest with bull barrels to general-purpose ARs with medium-weight barrel contours.

Barrel makers are churning out custom, semi-custom and prepackaged offerings with a wide variety of profiles and contours. For those spec’ing out a build, whether bolt gun, gas gun or otherwise, virtually anything you desire can be done … with judicious application of cash or credit.

We’ve never had so many options as we do right now. So as always, choose what best matches your intended use, and enjoy!

Barrel Contours: Tale of the Tape

To demonstrate a variety of options, we obtained four identical standard 16-inch mid-length gas system barrels with government profiles (and 0.750-inch gas block) from Bravo Company USA. We sent three of them to Adco Firearms to be dimpled, fluted and turned down to a lightweight contour.

Dimpling is harder to apply, hence the price premium. It also results in less weight loss. So we dare say one would need to really like the aesthetics to make this choice.

It’s not uncommon to see a fluted process, and this provides a nice balance of characteristics.

The lightweight contour removes the most material, winning the “Biggest Loser” competition here with its anorexic pencil profile.

The pricing listed in the chart in the gallery above encompasses Adco’s gunsmithing fees plus parkerizing (shipping not included). Note that the stripped standard barrel retails for $310. Dave O’Malley with Adco suggests fluting or dimpling for those who want to use a suppressor or crank out high rates of fire. But he advises that “none of these services are ‘needed’ and fall into the ‘want’ category.”

Nevertheless, he’s more than happy to turn “end users’ ideas into reality.”

This article is from the summer 2015 issue of Ballistic Magazine. Grab a subscription to Ballistic Magazine at OutdoorGroupStore.com.

Keep Reading

7 Things To Look for When Buying Your First Scope for Your Air Rifle

0

It’s exciting to buy your very first air rifle. However, once you go out there and start hitting targets that are further away from where you are, you’d realize that it’s not enough – you need to get the best air rifle scope!

Unfortunately, choosing the best one isn’t easy. With so many options, you can easily feel overwhelmed and confused. In the end, you may even pick the wrong scope and that’s just a waste of money.

To help make the process easier, here are seven things to look for when choosing a rifle scope:

1. The Right Type of Scope

For you to find the perfect air scope rifle, you need to focus on picking the right one not just for your gun but for your needs too. In general, there are two main types you can choose from: variable and fix.

A fixed air rifle scope is set to just one magnification. Because of that, you can’t make any adjustments.

Most scopes under this type have low magnification. Usually, they’re at 4×32.

Although fixed air rifle scopes don’t have great magnification levels, they have a large field of view. This makes them highly recommended for close-range shooting.

A variable air rifle scope, on the other hand, lets you adjust the magnification range. This allows you to get a larger field of view when you’re target shooting and zoom far enough to hit targets in the distance. 

2. Magnification

When you’re considering magnification, you have to understand how much your target can be magnified when you compare it with how it looks without your scope. 

Consider this:

If your scope has 3x magnification, it means that it’ll let you see targets as though they are four times closer.

If you are using your rifle to hunt a target that’s about 100 yards away from you, the scope can make it appear as if it’s only 25 yards away.

3. Reticle

This feature allows you to aim at your targets with your scope. It’s also a big help when it comes to estimating the wind.

Some scopes have the standard crosshair which offers one of the best accuracies. They are highly recommended for target shooters. Other scopes have the mil-dot which is good if you’re hunting in dark environments.

4. Lenses

When it comes to picking lenses, there are two things you need to think about. 

  • The diameter of the objective lens affects the amount of light that’s allowed in.
  • The bigger the lens in diameter, the heavier the overall weight of the scope gets.

Another thing you have to consider when picking scopes is the coating of the lens. Since glass has this ability to reflect light, you’d want coated lenses.

Also, make sure that it’s a high-quality coating so you can enjoy less glare and better light transmission.

5. Construction

Obviously, when looking for the best air rifle scope, you’d want something that can keep up with you.

Scopes vary in the diameter of their main tubes. You can get one from 25mm to 34 mm, depending on the brand you’re considering.

When you buy a scope with a bigger tube, you’ll have more space for its interior compartments. And because of that, you’ll get a better adjustment range as well. This is a big factor you need to consider when you’re doing long-distance targeting.

6. Eye-relief

The last thing you want to happen is to get yourself injured while firing your gun. While hunting and target shooting are exciting activities, getting a bruised eye isn’t.

To avoid that, consider investing in an air scope with higher-eye relief. The standard is around four inches while scopes of lesser quality can give you around 3 to 3.5 inches.

7. Turrets and Adjustments

When you’re hunting, you want everything to be all set. The last thing you’d want is to have turrets that fail halfway through your activity.

Turrets’ primary function is adjusting windage and elevation. The first one refers to the horizontal adjustment while the latter refers to the vertical adjustment of your scope.

Usually, these knobs are located on the right and top parts of your scope. You’ll find non-tactical models advertising turrets at 1/4” or 1/8”.

In Conclusion

The factors mentioned above can help make the process of picking the best air rifle scope easier and less stressful for you. However, ultimately, the best one will still depend on what you are planning on using your scope for.

If you’re shooting just within 100 yards, you can go with a scope with a magnification of 1x to 4x. If you’re aiming for something at more than 200 yards, it’s a good idea to go for a scope with 9x magnification.

For the other factors, consider picking based on what you need and what fits your air rifle. 

6 Most Common Reasons You’re Getting Backlash With Your Baitcasting Reel

0

You might think that with today’s fishing reels, backlash would be a thing of the past, but that’s just not the case. Unless you are flipping or pitching your bait with your casting reel, you may as well come to the understanding that it is going to backlash on you once in a while, especially if you’re new to using one. Backlash is basically the result of the spool on your casting reel turning faster than line can leave it. The lure flies through the air, but not at the same rate as the line leaves the spool. A baitcaster is meant to give the user more ability to send long-distance casts into heavy cover with a greater amount of control, retrieve ratio, and hook setting power. Unfortunately, it can be a little tricky to avoid backlashes, and even trickier to master.

It’s one of those issues that can cause so many to abandon a baitcasting reel for a more-simple spinning reel, limiting the versatility at their disposal. It’s time to demystify the venerable baitcaster so that you can begin to use one with impunity and avoid the backlashes that take up time and energy when all you want to do is fish. Here are a couple of obvious reasons why this happens and one or two that are less likely, so you can be on the lookout before they occur.

Improper Spool Tension and Brake System Adjustment

The spool tension and brake system on most baitcasting reels have become so sophisticated that the fine tune adjustments can really make a difference. Anglers typically start by cranking down the spool tension knob to the point that when you engage the reel (push down the thumb bar as if you were about to cast), the spool won’t move.

As you adjust it back so that the spool will allow the weight of the lure to slowly pull line off of the reel as you hold the rod upright, you’re loosening the tension but increasing the chance of a backlash. If you go to the other side of the reel and adjust the brake, you’ll also be changing backlash likelihood. Try to make a series of practice casts, short and easy at first, then make small adjustments that will get your reel casting the way that you want. Without working your way through these adjustments, you might have things set so improperly that a backlash is inevitable.

Thumb Control

backlash

Once anglers realize they need to slow and control the spool with their thumb that is left on the reel once you have made your cast. If you let your lure or bait hit the water without any frictional force from your thumb, you are likely getting closer to a backlash. Even veteran fishermen sometimes forget how much thumb control matters when using a baitcasting reel, and it’s a skill that needs refreshing when you start fishing each new season.

Line Size

backlash

Many of us use a baitcaster so we can increase the line size and change up the line material to fish in some extreme conditions. Placing a jig in the slop where it’s likely to get crushed by a big largemouth is one thing, but the resulting mess of weeds and sticks can be murder on light line. The same goes for fishing around stumps and other tangles that can really fray fishing line. The best part is that casting reels work well with heavier lines and aren’t as prone to backlash when you use them. Granted, you’ll be using heavier baits along with it. Lighter lines can be used on baitcasting reels, but with caution; lighter lines can come screaming off of a baitcaster, especially on long casts which increase your odds of a backlash.

Wind

practice casting in your yard

Anytime that we cast into the wind while fishing we take a chance of getting a backlash (sometimes a bad one) on a casting reel. This is not to say that you mustn’t cast into the wind ever with a baitcaster, just that you are going to have to consider the consequences. This is especially true when using spinnerbaits and buzzbaits that catch the wind due to their wide blades and design profiles. This is where your reaction time and thumb control really comes into to play. You may have to recognize that a particular cast is going to go bad, and you will need to abort it quickly by stopping the spool.

Rod Length

This one is a bit uncommon, but it is said that the length of the casting rod that you’re using can have an effect on its ability to use the casting reel effectively. The most common rods are in the six foot to seven-foot range. Sure, there are casting rods that are plenty longer and still good for long casting, but some are made more for seasoned baitcasting fishermen and some are more for the surf fishing crowd. Shorter rods are easier to handle for the novice and can have the affect of greater control when starting out.

Trial and Error

6 Most Common Reasons You’re Getting Backlash With Your Baitcasting Reel

If you’re just learning to use a baitcaster, then you will want to keep an eye out for these things. Truth be told, it will take some time and experience, and you’ll certainly work your way through plenty of bird’s nests cause by backlash. It’s not unlike a good quarterback who sometimes throws an interception; even seasoned anglers get a backlash now and again. If you’re using a heavy lure and light line, then it’s going to scream off of the reel when you launch that beautiful cast. Even if you have everything set to the best of your ability, you’re going to have to recognize when things are going south and try to nip it in the bud before the worst happens.

There are many good reasons to use a baitcasting system when fishing, so it’s just a matter of practicing and working hard to avoid the dreadful backlash. The better you get, the less it will happen, and the more time you’ll have to spend actually fishing instead of untangling knots.

Please check out my book “The Hunter’s Way” from HarperCollins. Be sure to follow my webpage, or on Facebook and YouTube.

READ MORE: WHY FLY FISHING, CONVENTIONAL FISHING BOTH HAVE SUCH A DEVOTED FOLLOWING

Bringing Back Mr. Bob — Tips on re-establishing quail

0
Good habitat protects quail from aerial predators, such as hawks.

This Anson County preserve owner has ideas for establishing quail habitat and restoring bird populations.

Anyone who loves quail hunting — or longs for the days when bobwhites were widespread in North Carolina — is restricted mostly to preserve hunting, if they want a chance to pursue these fast-flying game birds.

A few state game lands contain quail, but they’re exceptions.

Most preserve hunters aren’t interested in the glory days of quail hunting, nor the land management necessary to have property that produces huntable numbers of quail. Instead, they pay to walk behind well-trained bird dogs and a professional handler to see points, flush quail and experience the rush that comes from a covey rise.

For the vast majority of hunters, these birds nearly have disappeared at the family farms, untended fields and woodlot edges that once harbored tens of thousands of quail across the Southeast — and North Carolina is in that category.

Potential problems for quail have been speculated about for years. They include conversion of pastures to fescue, diseases, bad weather and increasing numbers of natural enemies. The problem is doubly perplexing because of success stories of other species, particularly deer and wild turkeys. Whitetails and turkeys have survived and thrived at the same habitats where bobwhite numbers have plummeted.

So why are preserves the main places to find quail today in North Carolina — with the exception of some large private farms and a few game lands?

The answer is clear — lack of habitat.

The South once was dominated by small farms. Farmers rotated crops but allowed some fields to remain unplowed. Natural vegetation growing in untended fields provided excellent food and cover for quail. Field-edge vegetation also was prevalent, creating nesting, roosting and feeding sites for quail.

But after farm machinery became more mechanized after World War II, most farmers plowed their fields annually, eradicated brushy field borders and cleaned out ditches, removing undergrowth such as honeysuckle and briars.

In North Carolina, that left pine forests and open hardwoods — neither suitable for quail survival — and that’s not to mention the conversion of former agricultural land to housing developments, more roads and urban/suburban sprawl.

With their habitat disappearing, quail became scarce. About the only places now with quality quail habitat are found at hunting preserves, managed specifically to provide food and cover by hunting-preserve operators who expend a tremendous amount of capital and work in order to create properties with suitable landscapes for bobwhites.

Once quail hunting could be enjoyed by nearly everyone with a decent pointer or setter, from the poorest kid living on with his family in a share-cropper’s cabin to Piedmont farmers and sons to the richest men in the country.

Habitat was key then, and it remains so today.

Don McKenzie, director of the National Bobwhite Conservation Initiative wrote in the Fall 20112 issue of the N.C. Wildlife Resources Commission’s Upland Gazette, that lack of habitat was the major problem causing quail to disappear.

“Habitat degradation at landscape scales is the root of the range-wide quail and grassland bird problem,” he wrote. “Regardless of whether you are in North Carolina or any other southeastern state, look around and ask yourself ‘Where is the quail habitat?’

“It should be quickly obvious that the proper question is not ‘Where have all the quail gone?’ Instead, the question should be, ‘How are quail managing to hang on at all in such hostile landscapes?’”

The answer is what people such as 35-year-old Jason Kiker, who operates Buchanan Shoals Sportsman’s Preserve, know and have acted upon to benefit quail and hunters. He uses innovative techniques for rearing and protecting the birds.

Kiker manages 5,300 acres in southern Anson County. The Pee Dee River flows adjacent to some of the preserve’s property, marked mostly by pines with scattered hardwood forests and a few fields.

A 2000 N.C. State University forestry-management graduate, Kiker intensively manages Buchanan Shoals for small and big game, including quail.

“My dad (Paul Kiker) actually started the club,” he said. “He ran the operation for a couple of years.”

Before Kiker took over the full-time operation of Buchanan Shoals, he was a forestry management specialist handling about 250,000 acres of timber.

“We do lots of things for quail,” he said. “One of the main things we do is controlled burns in the pines. We burn all the quail areas, 1,000 acres each year, to control hardwood (sprouts) and upland hardwood (forests). We do the burns each two to three years on a rotating basis.

“We also apply herbicides to control hardwood sprouts. This helps seeds in the ground to grow and provide food and cover.”

The result is classic quail-hunting habitat resembling the pine plantations of South Carolina and Georgia.

“If we manage everything right, there’s no need for quail food plots,” Kiker said. “We have some food plots, but they’re mainly for turkeys and deer. We also plant 120 acres for doves and have six impoundments of 150 acres for wood ducks and mallards.”

Buchanan Shoals is host to a few “wild” quail, so Kiker employs what are known as “surrogators” to raise quail in a natural setting where they eventually will be turned loose to fend for themselves — and can be hunted.

“We have nine areas on the property where we use surrogators,” he said.

A surrogator is a box-like device that includes a propane burner to provide warmth at night when the chicks are small balls of fluff. It also contains a 50-gallon water tank with pipes that run just above the chicks’ heads and nipples they quickly learn to peck to obtain water. Pans inside surrogators are replenished daily with food for the rapidly-growing quail.

“We put them in the surrogators when they’re only two or three days old,” Kiker said.

Quail chicks quickly learn to eat and peck for water. At one point, Kiker sprays half-grown birds with a fine mist to stimulate their skin’s oil glands. This process waterproofs the birds’ feathers and insulates them from sicknesses caused by cold or wet weather.

After five weeks, they’re ready to be set free in the wild.

Some studies have shown quail reared in surrogators don’t survive long, but Kiker said he has learned how to increase his birds’ survival time. Some eventually survive to form native coveys and rear young.

“It just takes a lot of work and being attentive to the chicks and the surrogators,” he said.

He also uses “call” birds that pull the quail back to the safety of the surrogator where they can roost at night and not be worried about attacks from predators.

“I set up (surrogators) for other people who want to have quail on their land,” Kiker said. “Wildlife management plays a big role in having pen-raised birds survive.”

Kiker figures some of his raised birds have lived for months, a long time for quail raised in pens and released into natural habitat.

One of his keys for quail survival is to place surrogators in heavy cover near good habitat.

“We also feed them the same thing (cracked corn) in the pens as we do after they’re released,” Kiker said. “We scatter corn for them in the areas where we hunt because the quail have learned to eat this particular food and won’t find it in nature.”

Kiker said with the survival rates of most quail raised in surrogators at less than 1 percent he “expects we get 85- to 90-percent survival.” And that’s over a period of several months.

That’s usually not the case, he said, for people who buy a surrogator, watch a DVD provided by the company and try to follow its directions.

“I know people who have used surrogators and gotten only a 10-percent survival rate — or less,” he said. “You can’t just watch the DVD and expect you’ll have a good crop of adult quail that’ll live more than a few days. There’s a lot of stuff they don’t tell you about on the DVD I’ve learned through experience.

“You have to check on the birds a lot. There’s a lot of baby sitting you have to do with young quail.”

The final step, after the birds have grown to adult size in five or six weeks, is to release them in a suitable area.

“You can’t take a pen-raised bird and turn it loose into a bad habitat and expect it to live more than a few days,” Kiker said. “It needs to come out (of a surrogator) and have food and cover nearby.”

Good habitat protects quail from aerial predators, such as hawks, and food should be available. Released quail obtain water from puddles, dew on grasses and leaves or after rains.

Another problem is predators and controlling them is no small expense. Kiker concentrates on reducing foxes, coyotes, raccoons and opossums, all eaters of quail eggs. Because quail nest on the ground, their eggs are on the menu of nearly every wild critter.

“We use a lot of fur-bearing predator control after deer season,” he said. “That’s when we have a licensed trapper take coyotes, foxes and bobcats. The fur-bearing predators are the ones we believe cause our quail the most problems.”

Kiker scatters cracked corn for released birds during hunting season.

“We put out feed and hunt them the next day or two because food concentrates the birds,” he said. “It’s like ringing a dinner bell, especially for hawks. So we hunt immediately after scattering feed.”

During the spring when quail nest and lay eggs, a hired trapper uses HavaHeart wire-cage traps to ensnare raccoons and opossums.

“It’s a 2 1/2-foot-long box, a live trap,” Kiker said. “We want to keep raccoons and opossums from breaking up nests. We trap them as much for turkeys as we do for quail because they’ll eat turkey eggs, too.

“We don’t use leg-hold traps because of the possibility of catching hunting dogs.”

Anyone who wants to have huntable quail numbers should consider Kiker’s approach — controlled burns and herbicides to stimulate ground vegetation, rearing quail in surrogators, keeping a close eye on growing quail chicks, allowing natural cover to grow and controlling predators.

What Is The Difference Between A 17 HMR And A 17 WSM?

0

What are the requirements of a good cartridge? Being easy to use, good speed, good trajectory, etc. are common features. In these terms, people choose cartridges for themselves. People find it difficult to find what is the difference between a 17 HMR and a 17 WSM?

Both these cartridges are great to use. But you’re here to know the differences between them, and you’re about to purchase one of them. Right? Besides, your rifle will come with respect to the cartridge you choose. And you should also pick a perfect scope for 17 WSM to have a good experience.

What is the difference between a 17 HMR and a 17 WSM?

You are reading this article as you need to find what is the difference between a 17 HMR and a 17 WSM? Consumers had a great experience using both these cartridges.

But you cannot blindly select one of these. You have to filter one of them out based on some parameters. Believe it or not, the following specifications will help you to make a proper decision.

Speed:

In the case of a cartridge, speed is one of the requirements that consumers demand. If the cartridge cannot get enough velocity, then it is useless. Passionate rifle users like to have fast bullets in their rifles.

The speed of 17 HMR is greater with respect to 17 WSM. It is light in weight. As a result, it travels faster than the other. It is suitable to hunt birds or other animals at close range.If needed, you can use affordable thermal imaging scopes for WSM with its rifle.

The speed of 17 WSM is less than 17 HMR. It is heavier. So, it travels with less speed. However, it can make a hole in thick objects. Thick objects cannot be penetrated with thin bullets. So, this bullet is suitable for people who will use it to penetrate thick objects.

Cost:

Cost plays an important role while choosing cartridges. If your potential cartridge use is high, then you should go for the cheapest cartridge available.

The 17 WSM is more expensive between 17 HMR and 17 WSM. The 17HMR costs 20 cents only, whereas 17 WSM costs 30 cents. So, the cost difference is negligible for these cartridges. But you are not buying only one cartridge; you will buy hundreds or thousands of cartridges. However, this little amount can have a great effect in the long run.

The cost of the HMR might even get chipper in time. IT is completely the opposite case for the 17 WSM. 17 WSM will get out of the market sooner or later. As more and more cartridges are coming into the market, the public is losing interest in buying 17 WSM. The production rate has reduced, as well. So, the cartridge and the rifle both might get out of the market as well. As the quantity gets decreased, the seller might take advantage of it. People who have 17 WSM rifles have to buy 17 WSM cartridges, as it will not be available anymore, the seller will sell the product for a higher price.

Field Performance:

The core fact of cartridges is field performance. The choice of cartridge changes based on this parameter. Based on this parameter, other parameters are subjected to change.

Based on the distance of the target, your choice of cartridges will change. A lot of factors come along with an increase in distance.

In terms of a distant shot, time plays an important role. As time increases, the trajectory goes downward. The cartridge has to keep the trajectory for longer distances. If the trajectory decreases, the probability of the cartridge to miss the target will increase.

The wind may have other impacts as well—for example, wind deflection. When a bullet leaves the rifle, it starts flying with velocity in one direction. The wind is flying in another direction. As a result, the bullet might get deflected from the target.

The 17 WSM is the better cartridge to have a better field performance at a greater distance. Both these cartridges can work with the wind. Though, the WSM works better than the other in terms of long-distance.

17 HMR is great for a short distance. It is fun to work with. It has got a better speed than the other. It creates less noise than the 17 WSM. These are needed to hit the target at a short distance.

However, none of these cartridges should be used for self-defense, where many other cartridges are available. 17 HMR and 17 WSM both should be avoided in this term.

Availability:

Availability is a factor that many people do not consider. It creates different types of problem letters.

The 17 HMR cartridge is available. You may go to any ammunition store and find 17 HMR. The rifle of 17 HRM is also available everywhere. As the rifle is available, it is relatively easy to find separate parts if needed to fix the rifle.

The 17 WSM cartridge is not available everywhere. And it’ll be a hassle to find out either. You would find it difficult to find separate parts of the rifle if needed. The cartridge is a special kind. You can’t use this cartridge in any rifle, either. You need to have the 17 WSM rifle to use this cartridge.

In terms of availability, 17 HMR should be your choice.

Final Words

You are looking to find a cartridge that suits you. Go through the parameters given above before making your final decision. And you’ll be able to make a list of what is the difference between a 17 HMR and a 17 WSM? You should be economical while buying cartridges. So, 17 HMR is obviously a better choice for you.

If you need to hit a target at 450 meters distance under strong wind, buying 17 HMR is useless. The 17 HMR will fly up to 150-250 meters and then drop on the ground. You will need 17 WSM to do the job under such conditions. So, all these factors should be considered to get the best cartridge.

Safely Bypass PTO Switch on Lawn Mower: Tips and Tricks

0

Learn how to bypass a PTO (Power Take-Off) switch on your lawn mower effortlessly with our step-by-step guide. Increase your control over the mower’s blades and eliminate unnecessary restrictions, allowing for a smoother mowing experience. Discover the simple yet effective methods to ensure uninterrupted operation while maintaining utmost safety.

The Importance of Not Bypassing a PTO Switch on a Lawn Mower: Safety First

The Importance of Not Bypassing a PTO Switch on a Lawn Mower: Safety First

Why is the PTO switch important?

The Power Take Off (PTO) switch on a lawn mower serves as a crucial safety feature. Its primary function is to prevent the blades from turning when the operator dismounts the mower. This ensures that there are no accidental injuries caused by the blades while the operator is not in control of the machine. By bypassing this switch, you are putting yourself at risk of serious injury or even death.

The risks of bypassing the PTO switch

Bypassing the PTO switch on a lawn mower can have severe consequences. When you bypass this safety feature, you eliminate the protection it provides and increase the chances of accidents occurring. If someone were to accidentally engage the blades while standing near or working on the mower, they could be seriously injured by the rotating blades. Additionally, if you bypass the PTO switch and forget to disengage it before stepping off or away from the mower, it can lead to dangerous situations where others may come into contact with the running blades unknowingly.

It is important to remember that manufacturers include safety features like the PTO switch for a reason – to protect operators and those around them from harm. Therefore, it is always recommended to consult your manufacturer’s manual or seek professional help if you encounter any issues with your PTO switch rather than attempting to bypass it yourself.

Alternative solutions

If you are facing problems with your PTO switch, there are alternative solutions available that do not compromise safety. Consulting your manufacturer’s manual or contacting a professional for repair or replacement is always advised. They will have expert knowledge and experience in dealing with such issues and can ensure that your lawn mower operates safely.

Remember, safety should always be prioritized when operating machinery, and bypassing safety features like the PTO switch is never a recommended solution. It is better to address any issues with the switch through proper channels to ensure the well-being of both the operator and others in the vicinity.

Troubleshooting a Faulty PTO Switch on Your Lawn Mower: Expert Advice

Troubleshooting a Faulty PTO Switch on Your Lawn Mower: Expert Advice

1. Understanding the Importance of the PTO Switch

The Power Take Off (PTO) switch on a lawn mower is a crucial safety feature that should not be bypassed. It is designed to prevent the blades from turning when the operator dismounts the mower, reducing the risk of serious injury or even death. By bypassing this feature, you are compromising your safety and potentially endangering yourself and others. It is always recommended to consult the manufacturer’s manual or seek professional help if you encounter any issues with your PTO switch.

2. Proper Troubleshooting Steps

If you are experiencing problems with your PTO switch, it is important to follow proper troubleshooting steps before considering any workarounds or replacements. Start by checking for any loose connections or damaged wires around the switch. Clean any debris or dirt that may be obstructing its functionality. If these basic checks do not resolve the issue, consult your mower’s operation manual or contact a professional for further guidance.

3. Replacing a Faulty PTO Switch

If it is determined that your PTO switch needs replacement, it is essential to ensure that you choose a suitable replacement part. Look for original factory parts if available, but if not, make sure that any alternative switch can handle the required amperage of your mower. Engaging in trial and error with different switches can lead to further complications and potential damage to your equipment.

Remember, prioritizing safety should always be paramount when dealing with lawn mower components like the PTO switch. It is strongly advised against attempting to fool or bypass this safety feature as it can have severe consequences. Seek professional help whenever necessary and follow proper troubleshooting procedures outlined by manufacturers for optimal results and long-term reliability.

Exploring Alternative Solutions to Bypassing a PTO Switch on Your Lawn Mower

1. Consulting the manufacturer’s manual or contacting a professional

If you are having trouble with the PTO switch on your lawn mower, it is always best to consult the manufacturer’s manual or contact a professional for repair or replacement. They have the expertise and knowledge to properly diagnose and fix any issues with the switch. This ensures that your lawn mower remains safe and in good working condition.

2. Understanding the safety implications

It is important to recognize that bypassing a PTO switch can lead to serious injury or even death. The purpose of this safety feature is to prevent the blades from turning when the operator dismounts the mower. By bypassing this feature, you are compromising your own safety as well as those around you. It is crucial to prioritize safety and follow proper procedures when operating any machinery.

3. Exploring alternative troubleshooting methods

If you are unable to consult a professional or find a suitable replacement switch, there are some alternative troubleshooting methods you can try. One option is to locate the safety switch on your mower and attempt to fool it using duct tape. By closing the switch, you can make the mower think that it is still on the seat or that the pedal is pushed in.

However, it is important to note that not all mowers will allow for this type of manipulation, especially newer models with CPUs (central processing units). In such cases, attempting to bypass the switch may not be possible or advisable.

Another alternative method is using jumper wires to wire around the switch. By connecting the two leads together, you can engage the power take off (PTO) function as a way of testing if the switch itself is faulty. However, this should only be done as a temporary solution until a proper replacement switch can be obtained.

It is crucial to remember that bypassing the PTO switch should only be done as a last resort and with extreme caution. The best course of action is to always replace a faulty switch with a new one, ensuring that it can handle the amperage required for your mower’s operation. This guarantees both the safety and optimal functionality of your lawn mower.

Testing and Replacing a Defective PTO Switch on Your Lawn Mower: Step-by-Step Guide

Testing and Replacing a Defective PTO Switch on Your Lawn Mower: Step-by-Step Guide

Step 1: Safety First

Before attempting to test or replace a defective PTO switch on your lawn mower, it is important to prioritize safety. Make sure the mower is turned off and the engine is cool. Disconnect the spark plug wire to prevent accidental starting. Wear protective gloves and eyewear throughout the process.

Step 2: Locate the PTO Switch

Refer to your lawn mower’s manual or online resources to identify the location of the PTO switch. It is typically located near the operator’s seat or on the control panel. Take note of any specific instructions provided by the manufacturer regarding accessing and handling the switch.

Step 3: Testing with Jumper Wires

To test if the PTO switch is defective, you can use jumper wires to bypass it temporarily. Carefully connect two jumper wires between the terminals or wires connected to the PTO switch. This should engage the power take off. If it works, it indicates a faulty switch that needs replacement.

Step 4: Choosing a Replacement Switch

If your PTO switch is indeed defective, it is important to choose a suitable replacement. Look for an original factory part if available, but ensure that any alternative switch you choose can handle the amperage required by your mower.

Step 5: Removing and Installing New Switch

Follow the manufacturer’s instructions or refer to your lawn mower’s manual for guidance on removing and installing a new PTO switch. Typically, this involves disconnecting any electrical connections, removing mounting screws, replacing with a new switch, and reattaching all connections securely.

Step 6: Testing After Replacement

After installing the new PTO switch, reconnect the spark plug wire and turn on the mower. Test if the power take off engages and disengages properly. If everything functions as expected, you have successfully replaced the defective PTO switch.

Remember, bypassing or tampering with a PTO switch is not recommended due to safety concerns. It is always best to consult the manufacturer’s manual or seek professional assistance for any repairs or replacements on your lawn mower.

Understanding the Risks of Bypassing a PTO Switch on Your Lawn Mower

Understanding the Risks of Bypassing a PTO Switch on Your Lawn Mower

Bypassing a PTO (Power Take Off) switch on a lawn mower can have serious consequences and should be avoided. The PTO switch is designed as a safety feature to prevent the blades from turning when the operator dismounts the mower. By bypassing this switch, you are removing an important safety mechanism that could lead to injury or even death.

The PTO switch works by detecting whether the operator is still on the seat or if the pedal is pushed in. If you bypass the switch, you are essentially fooling the mower into thinking that it is still on the seat or that the pedal is engaged. While this may seem like a quick fix, it can be extremely dangerous.

One way to bypass the switch is by using duct tape to close the circuit and make the mower think that it is still on the seat or that the pedal is pushed in. However, this method is not recommended as it can easily fail and put you at risk of injury. It is always best to consult your manufacturer’s manual or contact a professional for repair or replacement of the PTO switch.

In conclusion, bypassing a PTO switch on your lawn mower should not be attempted as it poses significant risks to your safety. It is important to understand and respect these safety features in order to prevent accidents and ensure proper functioning of your equipment. Always consult professionals for any issues with your lawn mower’s PTO switch and follow manufacturer guidelines for repairs or replacements.

Finding the Right Replacement for a Faulty PTO Switch on Your Lawn Mower

Finding the Right Replacement for a Faulty PTO Switch on Your Lawn Mower

If you are experiencing issues with the PTO switch on your lawn mower, it is important to find the right replacement in order to ensure proper functioning and safety. Here are some steps to help you find the correct replacement:

1. Consult the Manufacturer’s Manual

The first step is to consult the manufacturer’s manual that came with your lawn mower. This manual will provide detailed information about the specific model of your mower and may include instructions on how to replace or repair the PTO switch. It may also provide recommendations for compatible replacement switches.

2. Contact a Professional

If you are unsure about how to proceed or if you are unable to find the necessary information in the manual, it is best to contact a professional for assistance. They will have experience working with different lawn mower models and can guide you through the process of finding and installing a suitable replacement switch.

3. Research Online

Another option is to research online for information about your specific lawn mower model and its compatible replacement parts. Many manufacturers have websites where you can search for parts by entering your mower’s model number. Additionally, there are numerous forums and communities dedicated to lawn mower enthusiasts who may be able to offer advice or recommendations based on their own experiences.

Once you have obtained a suitable replacement switch, it is important to follow proper installation procedures outlined in the manufacturer’s manual or seek professional assistance if needed. Remember, bypassing or tampering with safety features can lead to serious injury or even death, so it is crucial to prioritize safety when dealing with any electrical components on your lawn mower.

In conclusion, finding the right replacement for a faulty PTO switch on your lawn mower requires careful research and consideration. Consulting the manufacturer’s manual, contacting a professional, and conducting online research are all viable options to help you locate a compatible replacement switch. Prioritize safety and follow proper installation procedures to ensure the continued safe operation of your lawn mower.

In conclusion, bypassing a PTO switch on a lawn mower can be done by following a simple process. However, it is important to note that tampering with the safety feature may lead to potential accidents or damage to the machine. Therefore, it is advised to consult a professional or manufacturer for guidance before attempting any modifications.

Crosman Vantage Review – The Cheapest Nitro Piston Gun Available

0

Don’t let the mediocre look of the product images fool you about this rifle.

This gun could be the one of the best value guns you can find on the market.

Read more to find out why.

Crosman Vantage – Guntype

This airgun is powered by Nitro Piston Technology. Read more about nitro piston technology here to see how it can make your gun sport more exciting.

Crosman Vantage NP has a caliber (the internal diameter of the bore) of .177 ( 4.5 millimeters). It is a single-shot, break-barrel gun with a rifled barrel. For more on how to choose the right air gun caliber for your game, see this post.

Stock

The stock is made of handsome, brown hardwood so it can endure impact, stress, and collision in daily life.

Moreover, hardwood can be refinished easily at any time so it has a very long lifespan.

Plus, the stock is ambidextrous so you can use this gun with ease whether you are a lefty or a righty.

Ammo

Crosman Vantage NP uses .177 pellets as its only source of ammunition.

Since the .177 is the standard caliber accepted by all global 10 meters shooting organizations,

.177 air guns are generally more accurate than other types of air rifles due to the given extra attention for it.

Besides, .177 is the easiest-to-find pellet in the store today and often costs less money than .22 or .25 pellets so it’s very cost-effective if you shoot a lot.

For more on the differences between .177 & .22 and which jobs they do best, see this post.

Cocking and Loading

Cocking the gun:

First, put the gun ON SAFE, hold the gun by your side, then firmly tap the muzzle end to expose the breech.

Let the gun rest on your upper thigh and grasp the muzzle end.

Continue to pull the barrel down to its limitation to perform cocking action

Loading the pellet:

With the breech open after cocking, put the pellet (with the pellet’s nose lying forward) into the breech.

Then pull the barrel up to its original position until it locks and you are ready to fire

Sight

Crosman Vantage NP comes with a traditional open sight which is elevated to satisfy the pickiest shooters:

The front sight is a fiber-optic sight that uses optical fiber for the dot so that it’s brighter than the dark surrounding.

The rear sight is fiber optic sight, too, and it is fully adjustable for windage and for elevation.

Fiber optic sight gives you a huge advantage in low-light conditions and it provides faster target acquisition in normal circumstances.

Velocity, Power and Accuracy

This air rifle boasts a velocity of up to 1200 FPS, which makes this rifle belong to the magnum class of air guns.

Since the speed of sound is about 1100 FPS (vary with altitude and temperature),

You can hear the loud crack if you use a lightweight projectile when shooting due to the super-fast pellet breaking the sound barrier.

Chrony tests give us the following results:

This nitro piston rifle delivers 930 FPS and 15.18 FPE with Crosman Premier Hollow Point pellet 7.9 grains.

Although it’s not near the stated number of manufacturers, it still gives you more than enough knockdown power to take care of birds, starlings, squirrels, etc.

For Crosman Vantage NP, various shooting tests have been conducted by different shooters with positive results.

The common shooting groups are:

  • 1-2” at 30 yards,
  • dime size at 40 feet,
  • 1” at 30 yards,
  • less than 1” at 25 yards,
  • 3/4″ at 20 yards,
  • 1/2″ to 1 1/2″ at 35 feet
  • and 1.5” at 50 feet.

As you can see, this gun is a tack driver up to 30 yards .

Shooting range and intended use

The effective shooting range of this gas piston rifle is up to 30 yards. You can use this gun for target shooting, plinking, small game hunting, and pest control.

Maintenance

Crosman Vantage NP requires little maintenance:

Just remember to oil your gun with Crosman RMCOIL Chamber Oil to keep it as good as new .

Noise

Remember the claims of Crosman that Nitro Piston reduces 70% less noise?

Well, it’s true in this case.

The Crosman Vantage received lots of praise for its quietness, some shooters said that this gun’s even quiet like Benjamin Titan or Crosman Nitro Venom.

Specification

  • Caliber: 0.177”
  • Velocity: 1200 FPS
  • Loudness: 3 – Medium
  • Overall Length: 45”
  • Shot Capacity: 1
  • Barrel: Rifled
  • Front Sight: Fiber Optic
  • Rear Sight: Fiber Optic, fully adjustable for windage and elevation
  • Scopeable: 11mm dovetail
  • Trigger: Two-stage adjustable
  • Buttplate: Rubber
  • Suggested for: Plinking/Target shooting/Pest control/Small game hunting
  • Action: Break barrel
  • Safety: Manual
  • Powerplant: Gas-piston
  • Function: Single-shot
  • Body Type: Rifle
  • Weight: 7.1 lbs

Customer Reviews

There are lots of customer reviews about this gun.

In positive reviews, people love this gun because it’s quiet, accurate, has great fit and finish, is easy to cock, and has enough power to get the job done.

They also think that although the scope is not top-of-the-line, it appears to be adequate.

There are few negative reviews about this nitro piston rifle, mostly concerned with defective products that they get but that’s a predictable risk when you are buying online

Pros and Cons

ProsCons
  • Quiet
  • Magnificent Nitro piston technology
  • Excellent craftsmanship
  • Outstanding accurate
  • Awesome power
  • Adequate scope
  • Imported from another country

Price

The price for Crosman Vantage is only about 90 dollars.

It’s the best choice for the money and is a steal at this price.

In fact, this is the cheapest Nitro Piston gun available in the market.

Conclusion

The Crosman Vantage is an unsurpassed air rifle for the money.

It’s like you buy a tuned gun, not only much smoother and much quieter, but it’s also more powerful.

If you are looking for a decent, break barrel gun, with the added scope and proven nitro piston technology, this is a good deal to go for.

12 Gauge vs 20 Gauge: The Shotgun Shootout

0

12 gauge vs 20 gaugeThe versatility of a shotgun cannot be matched by many other types of firearms. You can select from a wide variety of gauges, barrel lengths, chokes, shot sizes, and more. This allows a shooter to utilize a shotgun for a multitude of purposes like hunting, home defense, and sporting clays.

However, all the different varieties and purposes can be overwhelming to new shotgun owners. Instead of covering every potential shotgun variation, it’s best to focus on the biggest question new shooters have, “Which gauge works best for me?”

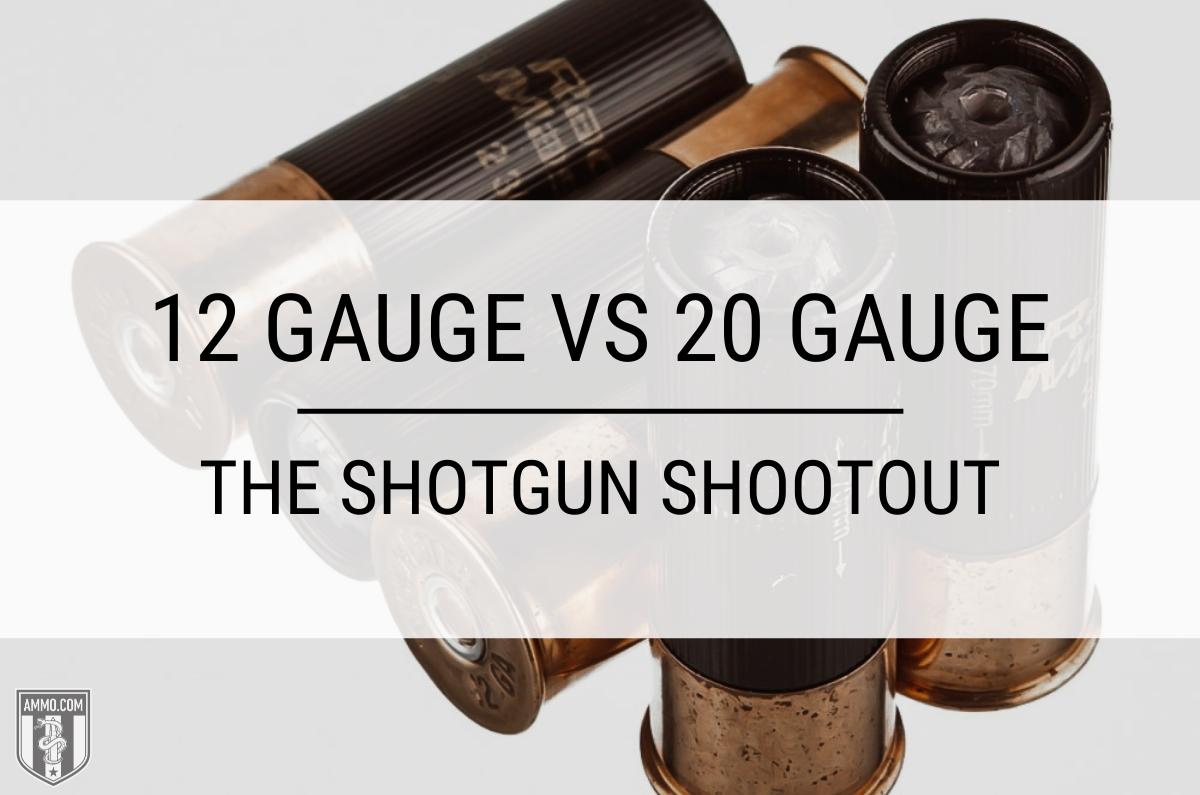
Most prospective shotgun owners will narrow their choices down to two options: 12 vs 20 gauge.

The 12-gauge shotgun is the most effective one-gun solution for hunting, target shooting, and home defense. However, that doesn’t mean that the 12-gauge is the best choice for every situation.

In this article we will analyze the advantages and disadvantages of the two most popular shotgun options, 12 and 20-gauge.

What’s the Difference Between 12 Gauge vs 20 Gauge?

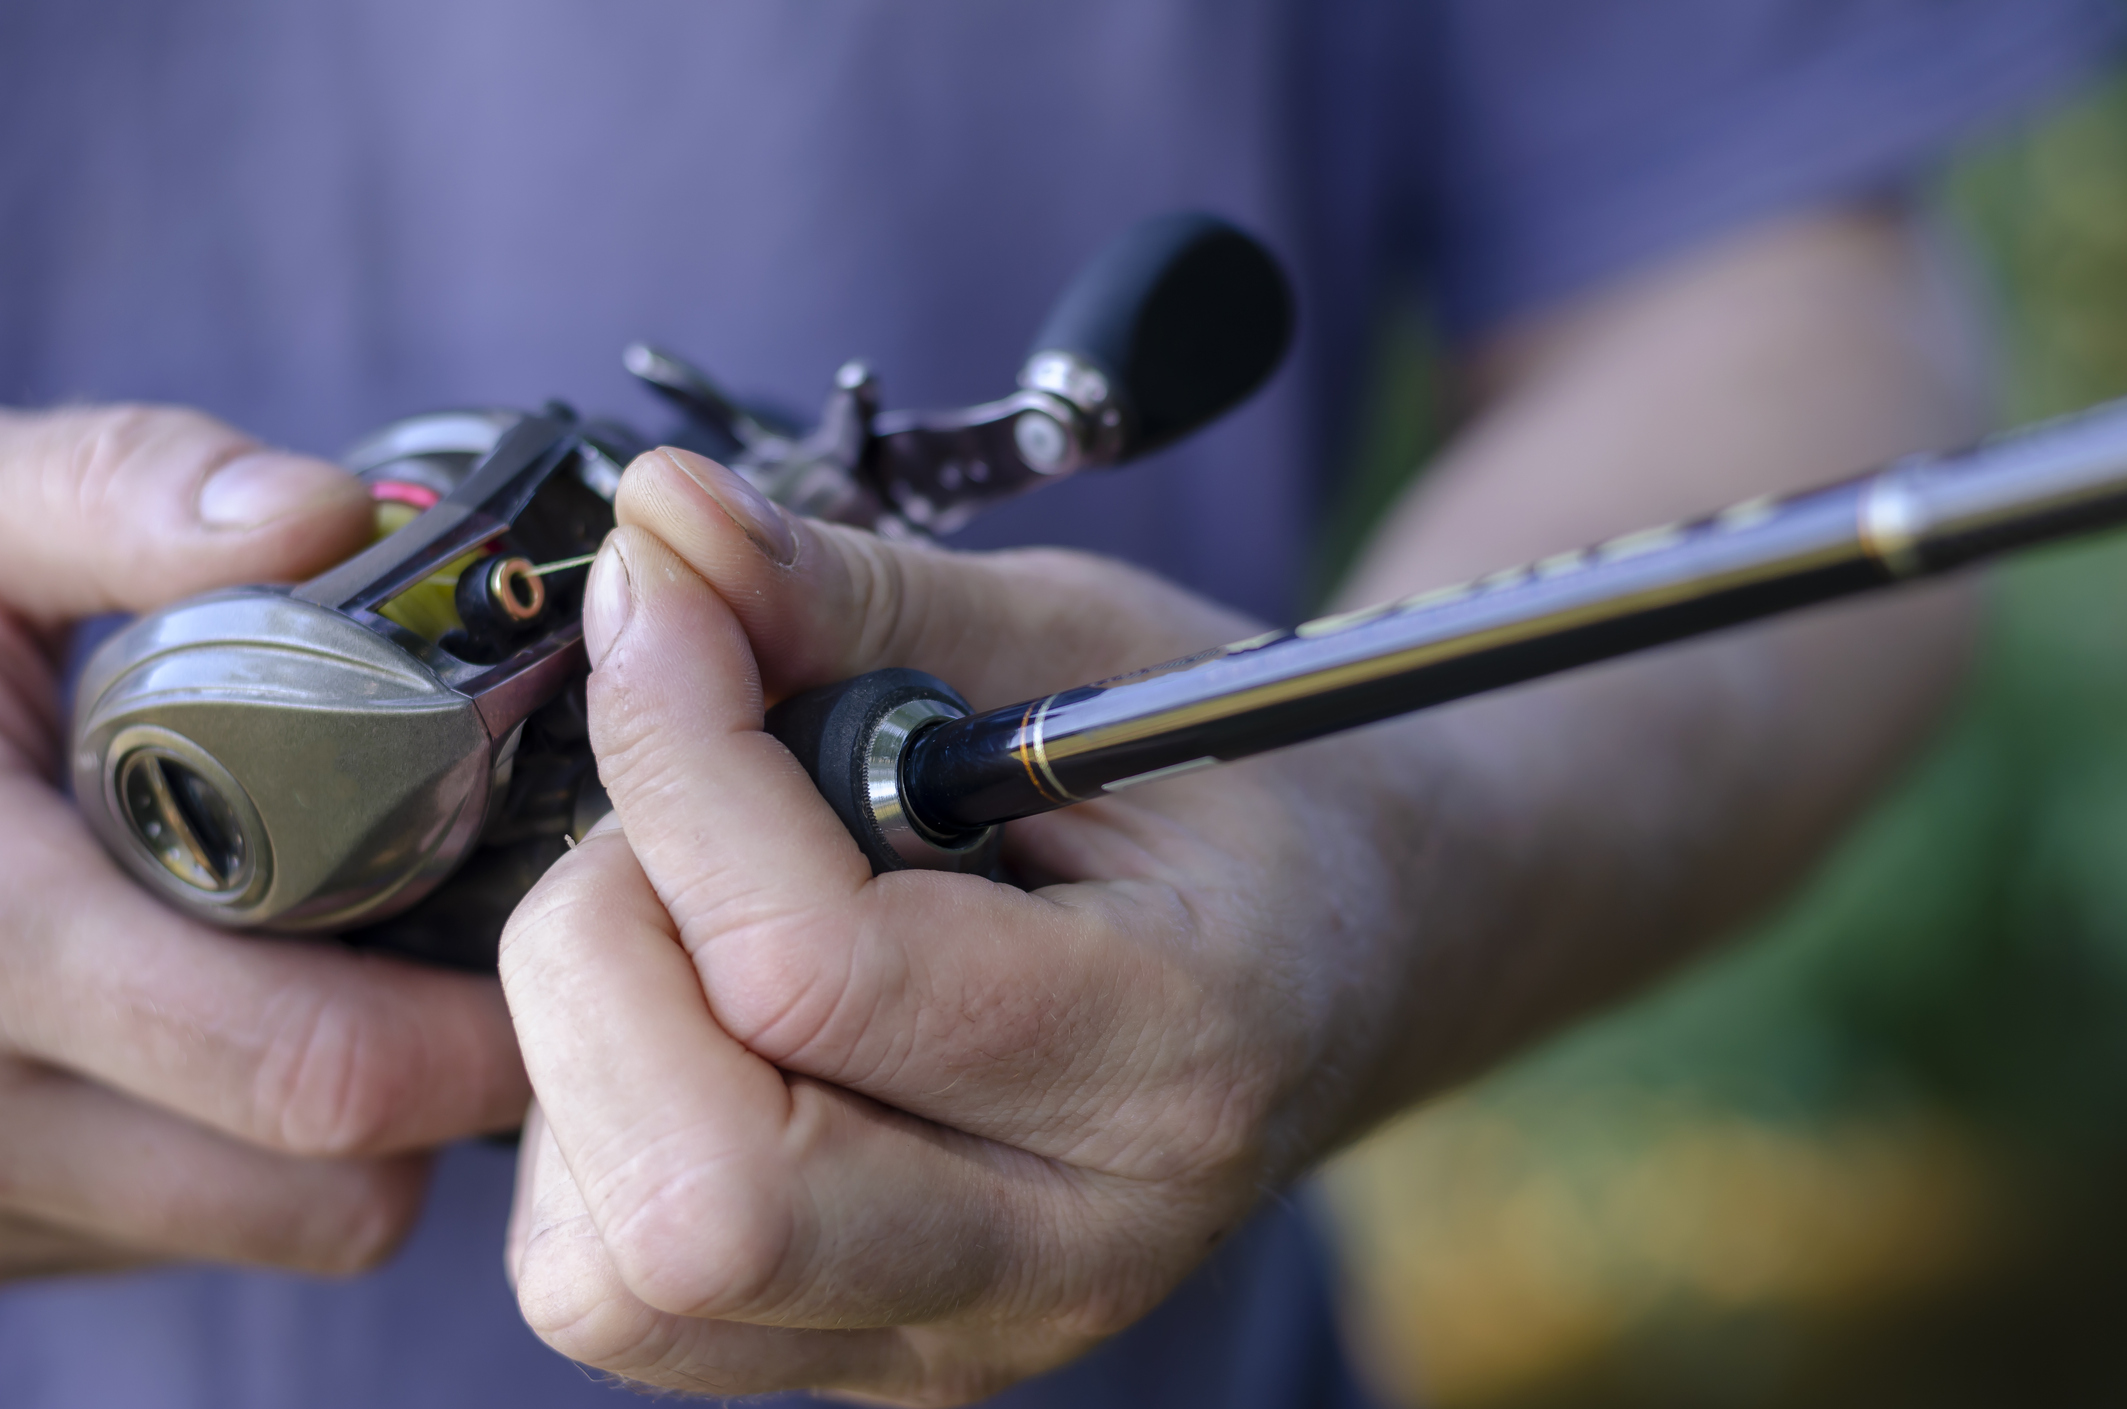
The difference between 12 and 20-gauge shotguns is their bore diameter. A 12 gauge has a bore diameter of 0.729” compared to 0.615” for 20 gauge. This means that a 12 gauge can fire larger payloads of buckshot at higher muzzle velocity at the cost of higher felt recoil.

12 Gauge vs 20 Gauge: Understanding Shotgun Gauges

If you’re familiar with shotguns, you’ll know that a lower gauge means a bigger caliber. However, if you’re new to shotguns or firearms in general, this can be a confusing concept to grasp.

Handgun and rifle calibers are defined by their internal bore diameter. A 40-caliber handgun has 0.40 inch diameter bore. This means the bigger the number, the bigger the bullet the gun can fire. However, shotgun gauges are determined by a more archaic system.

Gauge is determined by the number of lead balls with the same diameter as the barrel would add up to one pound.

For a 12-gauge shotgun with a bore diameter of 0.729” it would require twelve lead balls to equal one pound. Likewise, for 20 gauge guns, it requires 20 lead balls with a 0.615 inch diameter to equal one pound.

A Special Note On 20-Gauge Shells: Yellow is the New Black

If you’re new to shotguns you might not be aware that all 20-gauge shotgun shells are required to be colored yellow, regardless of payload.

This is to endure that a shooter does not mistakenly load a 20-gauge shell into a 12-gauge shotgun. If this were to happen, it’s possible that a 12-gauge shell loaded behind could cause the 20-gauge shell to fire inside the magazine causing catastrophic damage to the firearm and potentially the shooter.

For this reason, it has been mandated that all 20-guage shells are colored yellow to make them easily distinguishable from 12-guage shells.

Recoil

12 Gauge vs 20 Gauge recoil comparison chart

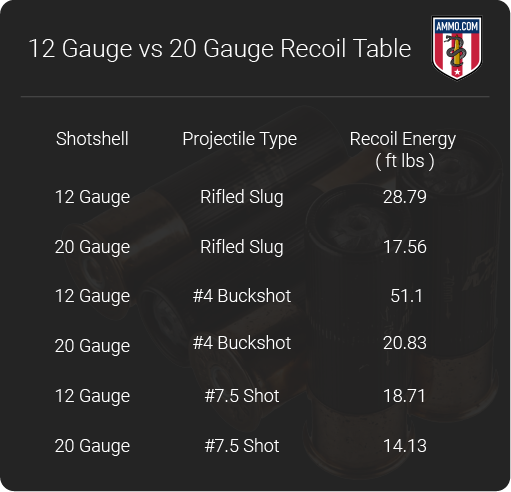
When it comes to felt recoil, 20-gauge shells win by a country mile. As 12 gauge shells pack a heavier payload of projectiles and powder they will always have more recoil than comparative 20 gauge ammo. This chart compares the felt recoil experienced by the shooter for three popular 12 and 20 gauge Winchester SXP hunting loads.

Less recoil gives a 20-gauge shotgun two distinct advantages.

The first advantage is the comfort factor to the shooter. Although felt recoil will be different between shooters, the low recoil impulse that the 20-gauge shells impart on its user’s shoulder often results in increased accuracy. Less recoil means that it is less likely for a shooter to develop a flinch or raise their head off the stock just prior to firing.

The second advantage is speed of follow-up shots. Regardless of whether you need to line up two quick shots on a pheasant you just kicked up or if you need to perform a mag dump in a self-defense situation, the lighter recoil of the 20 gauge makes this an easier task.

Accuracy/Pattern Density

To understand pattern density, it’s important to understand how a shotgun ammunition works.

A shotgun shell, or shotshell, is a plastic hull with a primer at the bottom. Inside the hull is a powder charge and on top of that is a plastic cup known as a “wad” to hold the projectiles known as “shot” which are essentially just round steel or lead balls.

Shot sizes will vary depending on what you’re planning on using the shotgun shell for. For self-defense you would want to use something larger like #00 buckshot (pronounced “double aught”), or if you’re hunting something smaller, like grouse or pheasant, a smaller option like #8 birdshot would be ideal.

One common misconception is that once the wad and buckshot leave the shotgun barrel, it behaves like a swarm of bees and scatters quickly. However, what happens is that the shot leaves the barrel in a column and begins to disperse.

There are numerous factors that affect how the projectiles disperse, such as minor imperfections on the surface of the shot, muzzle velocity, and stringing.

Stringing is a process where the shot at the top of the wad is deformed less during firing, while shot at the bottom of the wad endures the added pressure and weight of all the shot above it causing it to deform. This means that the buckshot at the top of the column will reach the target faster (because it’s more aerodynamic) than the shot at the bottom of the column.

The width of dispersion of shot when it reaches the target is referred to as pattern density. If the patter density is too wide, it’s possible to miss a smaller bird like a quail, at range. Conversely, if the pattern density is too tight it will be harder for shooters to score hits.

One other factor that can affect pattern density is the type of choke used in the shotgun barrel. A choke typically screws into the barrel and acts like a forcing cone, making the lead or steel shot a more compact column as they exit the barrel. Chokes will create a tighter pattern density but should not be used with slugs.

As the 12 gauge has a wider bore diameter, it can fit more shot into a wad. This means that it will have a higher pattern density than 20 gauge shot.

Stopping Power

The 12 gauge shotgun has been well known for its stopping power due to its effectiveness in trench warfare during WWI and in the jungles of the Pacific theatre during WWII. Furthermore, the 12 gauge Remington 870 pump-action shotgun is a favorite of law enforcement and can be found in squad cars across the United States.

There’s no denying that a 12 gauge load packs a huge punch, but how much? In the table below we compare three popular loads for both 12 gauge and 20-gauge shells.

Let’s compare the rifled slugs for the purpose of this explanation.

12 Gauge vs 20 Gauge ballistics table

Even though both slugs exit the barrel with the same muzzle velocity of 1600 FPS, the 12 gauge load has a muzzle energy of 2488 foot-pounds while the 20 gauge load clocks in at 1865 foot-pounds (that’s a 33% difference!)

Although the disparity will vary between different loadings, 12 gauge shotgun ammunition will generally always have more stopping power than a comparative 20 gauge load.

Hunting

When it comes to getting into the woods for some hunting, you’ll find plenty of 12 and 20-gauge shotgun shooters in their tree stands or deer blinds in the fall.

Both shotgun gauges are extremely popular for hunting all types of game animals from upland bird, waterfowl, turkey, and even whitetail deer.

Proponents of the 20-gauge shotgun will cite its recoil advantage over the 12 gauge and suggest that it is more than sufficient for all sizes of game. On the other hand, 12-gauge aficionados will bring up the shotshell’s hard-hitting terminal ballistics and extended range that the 12 gauge offers.

Although 20-gauge loads can be effective for turkey hunting, waterfowl, and deer, the major issue is that you need to be at close range. As the 20 gauge shotshell has a lower muzzle velocity compared to the 12 gauge, the 20 will lose velocity faster and how a shorter effective range.

Therefore, the majority of hunters will grab their 12-gauge shotgun when they plan to hunt larger game animals like duck, goose, turkey, and deer. The extended range and stopping power more than make up for the additional felt recoil in most cases.

However, for small game or bird hunting, the 20-gauge is usually the best option. With its low recoil, it allows manufactures to produce a lighter gun that is quick and maneuverable. This makes it easier for hunters to quickly bring their gun to bear on a grouse or pheasant they kicked up. Furthermore, the lower recoil of the 20-gauge allows for extremely quick and accurate follow-up shots.

Just make sure you have adequately prepared your ammo. Don’t forget to check out our Fiocchi 20 Gauge ammo page for more options.

There’s absolutely no reason why you can’t bring your 12-gauge shotgun bird hunting as they are extremely effective. Although, if given the choice, most game hunters will opt for the lighter gun, and that’s most often a 20-gauge.

If you can only purchase one shotgun, then the 12-gauge is the best option as it does it all.

However, if you have the financial capability to purchase both, a 20-gauge shotgun is an excellent choice for small game while you can still employ your 12-gauge medium to large game hunting.

Self-Defense/Home Defense

When it comes to home defense, it’s hard to be a shotgun. Although some shooters contest that a handgun is the better choice, it simply does not compare to the sheer power that a shotgun offers.

For home defense, it is inadvisable to use rifled slugs as they will typically over penetrate and could hit an innocent bystander in the home or apartment next door. Buckshot is what you want loaded in your self-defense shotgun.

There is some scholarly debate amongst ballisticians as to which buckshot is the best option for home defense. Many swear by #00 buckshot as it is considered the gold standard for self-defense, however other state that #1 or #2 buckshot is more than sufficient for any home defense situation.

If you’re unfamiliar with buckshot designations, here is a chart explaining the difference.

12 Gauge vs 20 Gauge buck shot

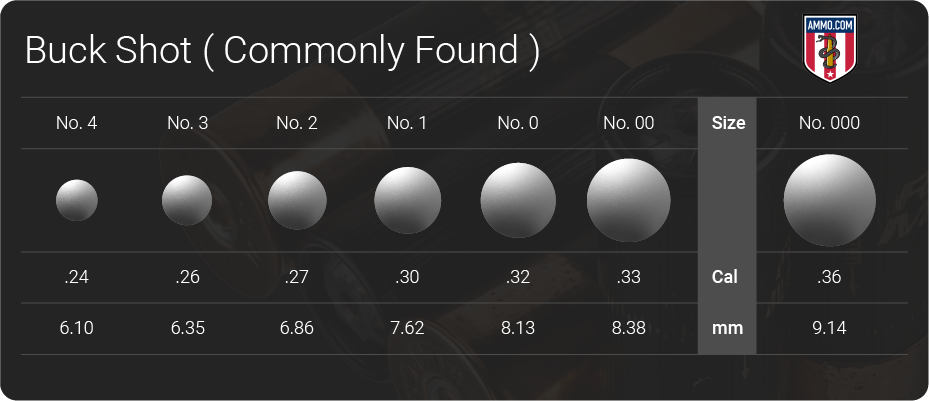
As you can see, the difference between #00 buckshot vs #1 buckshot is 0.03” in projectile diameter. This debate has been beaten to death on the Internet, however the bottom line is that any would-be home invader will likely not be able to tell the difference.

But that brings us to which shotgun would be better for home defense? 12 vs 20 gauge?

Many shooters like the feel of a 12-gauge shotgun for home defense. It’s what the military and police use and for some people, that’s all they need to know. Others like the lower recoil of 20-gauge shells and feel they are more accurate with this ammo.

For close range engagements like those in a home, it won’t make much difference which shotgun you choose. Both will be more than effective in defending your life and the lives of your friends and/or family members.

Just make sure to load up with a quality buckshot (NOT birdshot or slugs) and you should be more than adequately prepared to take on any threat that enters your home and threatens your life.

Ammo and Rifle Cost/Availability

The beautiful thing about shotguns is their versatility. You have so many options, from a single shot, pump action, and even a semi-auto, the world is your oyster when it comes to shotguns.

Furthermore, entry level pump action models are typically inexpensive compared to most centerfire rifles and handguns. You can easily pick up a Remington 870 or Mossberg 500 for around $300 new in box at the time of writing.

Check out our stock of Remington 12 Gauge Ammunition for more options.

However, this does not mean that all shotguns are so affordable. If you’re looking to get into sporting clays, skeet, or trap shooting, most competition-ready shotguns will command several thousand dollars.

Although a 20-gauge shotgun typically requires less materials to produce, there is very little difference in price between 12 and 20-gauge shotguns.

As for variety, you will not lack for options for either gauge. However, there are going to be more options for the 12-gauge as it is the most popular gauge in North America due to its versatility.

The same is true for ammo cost. Although the 20-gauge shells are smaller and require less material for construction, there is very little difference in cost between 12 vs 20 gauge.

Since we are in the subject of the ammo cost, don’t forget to check out our Remington 20 Gauge Slugs page.

Just like for rifle variety, you will find more options when you are purchasing 12-gauge shells as they are the most popular. There are still plenty of options for 20-gauge ammunition, just less than 12 gauge.

Buying in bulk is always smart, make sure to check out our stock of bulk 12 gauge ammo.

Reloading

Reloading shotgun shells is something that many reloaders enjoy doing. However, as shotshells are relatively inexpensive, most reloaders do not bother reloading used hulls.

The cost savings for reloading shotgun shells is so low that only high-volume shooters ever worry about doing it, as it is usually cheaper just to buy new factory shotgun ammo. However, if you love the idea of optimizing your shotgun ammo, there’s nothing stopping you for loading your own shotshells.

Please note that shotshell reloading requires a specialized press that cannot be used for centerfire rifle and handgun reloading.

A Brief History of The Shotgun Shell

In their infancy, most firearms could fire a single projectile or multiple as they all had a smooth bore. Early firearms like those used by the settlers of the New World needed this versatility to survive by hunting small birds to deer with the same gun.

However, with the introducing of rifling during the mid-16th Century, rifles and shotguns became two separate entities with different purposes.

At this time, shotguns were mostly used for bird hunting but also saw use in law enforcement and protection details.

Did you ever “call shotgun” as a kid when getting into a car? This phrase dates back to the Wild West when the person sitting next to a stagecoach driver would carry a shotgun to protect the cargo or passengers from outlaws.

The first shotgun shell was introduced by the French gunsmith, Casimir Lefaucheux, in 1836. Most early shotgun shells were made entirely of brass as paper cartridges were unreliable and couldn’t be reloaded.

It wasn’t until 1960 when Remington introduced the plastic shotgun hull that is used today.

Final Shots: 12 Gauge vs 20 Gauge

There’s no denying that the 12 gauge is the “jack of all trades” option in the shotgun world. There plenty of target load options for sporting clays, trap, and skeet, heavy slugs for deer, and a variety of birdshot for turkey, waterfowl, and upland birds.

Not only is the 12 gauge a potent option for all forms of hunting, it is an extremely effective home defense option when loaded with quality buckshot shotshells.

However, just because the 12-gauge can do it all, that doesn’t mean that it’s always the best option.

The 20-gauge shotgun has proven itself to be a capable upland bird gun as it is fast, maneuverable, easy to carry, and packs enough punch to fell pheasants, grouse, and doves without issue. At close range, it can also be utilized for turkey, deer, and self-defense with proper loads. And it can do all of these things with approximately 33% less recoil than a 12 gauge.

Which shotgun gauge is best for you depends on your personal needs as a shooter. If you are recoil sensitive and only plan to hunt upland birds then the 20-gauge shotgun will be everything you need it to be.

The ideal choice would be to own both, however if you are on a budget then the 12-gauge shotgun is the best option as it does everything you could possibly want at a very reasonable price point.

Best Air Rifle Deals

Popular Posts

Dry Firing Air Rifles: What You Need to Know

0
"Master the art of precision shooting with dry firing air rifles. Enhance your aiming skills, trigger control, and muscle memory without using ammunition. Discover...

How Does an Air Rifle Work?

0
Discover the inner workings of an air rifle with our comprehensive guide! From the mechanics behind its powerful shots to the intricate process of...

How to choose the right Air Gun Caliber for your game?

0
A story is told of three Native American hunters. Two are smart, the other somewhat ignorant. On the first day of the hunting season, one of...