Home Blog Page 163

The Best Kayaks for Beginners in 2022

0

Kayaking has been a part of the human story for thousands of years. Developed by Inuit people for fishing and transportation, kayaking is now an increasingly popular mode of recreation. Similar to canoeing, kayaking offers an active way to get out on the water and intimately enjoy the outdoors.

The growing interest in recreational kayaking is a direct result of the activity’s many benefits and widespread appeal. Kayaking offers a satisfying combination of physical exercise and the grace-filled sensation of being in sync with the stillness and flow of water.

On a clear and windless morning, the experience of slicing quietly across the surface of the water as you repeatedly dip and retract your paddle is simply glorious.

For beginner paddlers interested in purchasing a kayak of their own and advancing their skills, the kayak market can seem complicated. Although kayaking requires various pieces of gear (a paddle and a personal flotation device), a reliable entry-level kayak is the most important item that a beginner will need.

There are many different types and styles of kayaks, each designed for a specific purpose and to best suit a specific kind of paddler. Some categories beginners should be aware of include sit-in kayaks, sit-on-top kayaks, inflatable kayaks, tandem kayaks, and folding kayaks.

Because there are several categories, we’ve chosen the best kayaks in each category to help find the best kayak for you. Be sure to read our buyers guide and our comparison chart to better inform your decision. Scroll through to view our picks for the best beginner kayak, or jump to a category below:

  • Best Sit-On-Top Kayak
  • Best Sit-In Kayak
  • Best Budget Kayak
  • Best Tandem Kayak
  • Best Pedal Kayak
  • Best Inflatable Kayak
  • Best Folding Kayak
  • Best Kayak for Kids

Our how-to guide at the end of the list also provides answers to frequently asked questions and all the information you’ll need to select the best kayak for your adventures.

The Best Kayaks for Beginners in 2022

Best Sit-On-Top Kayak: Wilderness Systems Tarpon 105

wilderness systems tarpon 105

The Tarpon 105 kayak from Wilderness Systems ($1,119) is our pick for the best kayak in the sit-on-top category. As a recreational kayak, the Tarpon 105 offers impressive versatility and can perform well when used for various activities such as fishing, camping, exploring, bird-watching, and even surfing waves.

For those looking to own a single kayak that is both beginner-friendly and adaptable, the Wilderness Systems Tarpon 105 is a wise choice. The newest version of the tried-and-true Tarpon is the Tarpon 105. This updated model builds on the success of previous Tarpon iterations and comes with more features than ever before.

Thanks to Wilderness Systems’ careful attention to detail and function-forward mindset, it’s fully stocked the Tarpon 105 with various features for on-the-water support — no matter what your favorite kayak-based activity is. In flatwater or flowing creeks and rivers, this kayak is sporty, stable, and downright fun.

For fishing purposes, the Tarpon 105 is compatible with fishing pole holders, GPS units, and fishfinder screens. Relative to similar boats, the Tarpon 105 is very stable and can maneuver easily through tight coves and sharp bends.

At 10.5 feet long, the Tarpon 105 is shorter and stubbier than many sit-on-top kayaks. Because of its shape, this boat is not especially fast, nor does it glide through the water outstandingly well.

Simply put, the Tarpon 105 was built for stable cruising and not for speedy racing. For a similar option that is also longer and faster, check out the Tarpon 120.

The 105’s flat hull allows the boat to turn quickly and easily. While paddling, the entire boat changes direction smoothly and with minimal effort.

For long kayaking sessions, the Tarpon 105 is built with Wilderness Systems’ exceptionally comfortable Phase 3 AirPro seating system. The thoughtfully contoured backrest is ergonomic and supportive — crucial traits for a long day on the water.

The Tarpon 105’s impressively long list of well-considered features includes large waterproof storage wells, a magnetic water bottle strap system, a built-in paddle holder, rigid carry handles, and a dog-friendly deck so you can bring your pup on board.

Paddlers who wish to prioritize stability and comfort over speed would do well with the Tarpon 105. Its shorter length gives the Tarpon a boost in portability, and at 55 pounds, it can be carried around without too much trouble.

Although a bit on the more expensive side at around $1,079, the Tarpon 105’s feature-packed, durable design makes it a good-value buy. A versatile kayak that doesn’t sacrifice fun or comfort, the Tarpon 105 is our choice for the best sit-on-top kayak.

Weight: 55 lbs.

Length: 10’6″

Pros:

  • Comfortable seat
  • Easy to climb in and out of, even while out on the water
  • Makes smooth turns, impressively maneuverable
  • Useful for lots of activities
  • Packed with thoughtful features

Cons:

  • Glides slowly
  • More expensive than other options

Check Price at REICheck Price at Backcountry

Best Sit-In Kayak: Old Town Manitou Sport

old town manitou sport

The Old Town Manitou Sport sit-in kayak ($850) is an excellent do-it-all kayak for beginners and seasoned paddlers alike. Originally designed by Necky Kayaks, which is now part of the Old Town brand, the Manitou Sport is a simple craft that offers stability and maneuverability above all else.

Except for technical whitewater, the Manitou Sport performs well on most water bodies including lakes, rivers, creeks, and bays. A 26.5-inch hull makes this kayak incredibly stable. Its 10’11” length offers a functional balance between smooth tracking and nimble maneuverability.

On open water, the Manitou Sport can handle plenty of speed. It also responds well to sharp turns in tight areas thanks to its extended keel. It’s difficult to find a kayak that shines in so many areas of performance.

Although this boat doesn’t quite offer enough storage space for overnight trips, there is plenty of room for a day trip’s worth of gear. Bow and stern deck rigging lets you secure equipment to the top of the boat, and a dry storage area provides reliable waterproofing.

Adjustable foot pedals and a comfortable seating system make it easy to sit in the boat for hours without becoming stiff or sore.

Overall, the Old Town Manitou Sport is easy to love. Its large cockpit is effortless to climb in and out of, and toggle handles allow comfortable two-person carrying of the kayak from the car to the water and back again.

At $850, this kayak is an excellent value, especially because it comes with a Carlisle Magic Mystic paddle. Old Town built the Manitou Sport to maximize recreational fun on the water, and it delivers with style.

Weight: 44 lbs.

Length: 10’11”

Pros:

  • Durable and lightweight
  • Comes with a paddle
  • Good balance of graceful tracking and responsive maneuverability
  • High-volume bow cuts through choppy water with ease
  • Comfortable cockpit and seat
  • Good value

Cons:

  • Not ideal for open ocean or whitewater
  • Not very practical for fishing

Check Price at REI

Best Budget: Intex Challenger K1

intex challenger k1

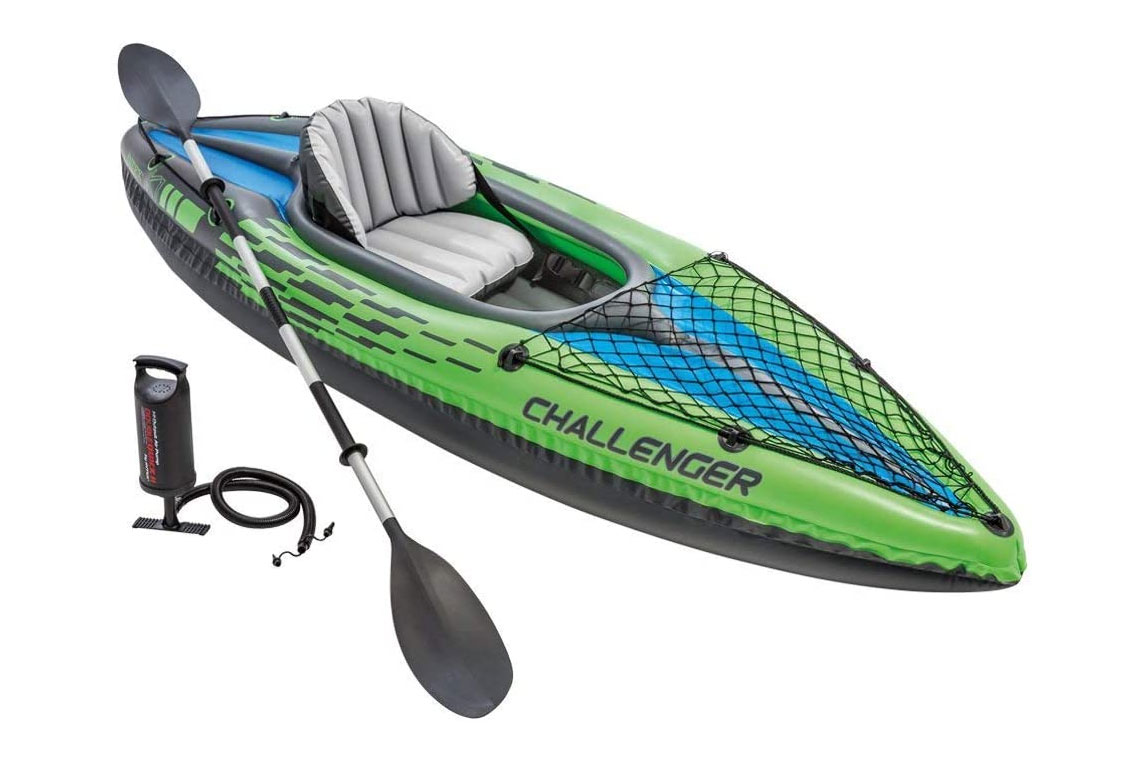
The Intex Challenger K1 inflatable kayak (on sale for $95) is our pick for the best budget kayak available in 2022. With a normal price tag of $170, this boat is far cheaper than other options on this list. For the money, it’s an excellent value that is more than capable of providing many hours of on-the-water fun.

For a cheap kayak, the Challenger K1 handles impressively well on the water. In general, the entire boat rides low, which makes it quite stable and less vulnerable to being pushed around by the wind.

A long skeg helps the K1 track decently well in a straight line. At 9 feet long and 2.5 feet wide, the K1 has a short, stubby profile that turns and steers well.

One downside of the craft’s low profile is the resulting high likelihood of taking on water. The K1 does not have a scupper hole, so to drain any excess water, you’ll have to paddle to shore and flip the entire thing upside down.

The inflatable seat is decently comfortable, and we like that it is both removable and adjustable. On the boat’s upper deck, a cargo net provides a small amount of gear storage. There is not enough space for camping gear, but the net can easily handle a water bottle, a small tackle box, and some snacks.

Intex claims that the K1 is made from venture-resistant vinyl. However, users should take care to keep the boat away from sharp objects — in use and in storage.

Two separate air chambers are quick to inflate. But because there are only two chambers, it’s important to wear a personal flotation device when using this kayak. If one of the chambers pops, the remaining chamber will not provide much buoyancy in an emergency.

The K1 comes with an 84-inch aluminum oar, a repair patch, a carrying duffel, and an inflation pump. To set up the boat, simply inflate both chambers until the included gauge tells you that the boat is good to go.

When your paddling session is over, dry the boat with a towel and fold it back into its carrying duffel. When packed down, the boat and all of its components can be easily stored in a closet or garage.

All things considered, the Intex K1 challenger is a good purchase for paddlers in need of an affordable vessel and who are more concerned about fun than performance. This is not the kayak that will best suit advanced paddlers with racing or expeditionary aspirations. For a day of summer fun, though, the K1 is a wonderful and portable addition to your kit.

Weight: 23.9 lbs.

Length: 9′

Pros:

  • Affordable
  • Packs down into an included duffel bag
  • Comes with a paddle and pump
  • Tracks and steers well
  • Removable and adjustable seat

Cons:

  • No drain plug
  • Not the most durable
  • Included pump inflates slowly

Check Price at AmazonCheck Price at Walmart

Best Tandem Kayak: Advanced Elements Advanced Frame Convertible

advanced elements advanced frame convertible

The Advanced Elements Convertible Tandem Kayak ($980) is a high-performance inflatable kayak that can be paddled by either one or two people. Although a bit on the more expensive side for an inflatable kayak, the Advanced Elements is comfortable, durable, and thoroughly packed with practical features.

Depending on how you set up the seats, this kayak can be either a tandem or a single kayak. Its 550-pound capacity is plenty to accommodate two paddlers plus additional gear.

Tiedown points, bungees, and integrated pockets offer adequate storage for quite a lot of gear. This kayak could feasibly be used for overnight expeditions — especially when configured for a single paddler.

When paddling the Advanced Elements Convertible Tandem, it’s easy to forget that you’re in an inflatable vessel. Impressively, this boat handles more like a rigid-sided kayak. Plus, it offers supreme durability with three outer layers of ripstop material.

At 15 feet long, the relatively narrow 32-inch hull provides excellent tracking without giving up too much stability. Multiple tracking fins and a small skeg contribute to a smooth, straight, and speedy ride.

In tandem mode, this kayak has ample space for both paddlers to move freely without getting in each other’s way. High seatbacks offer sufficient back support and remain comfortable throughout a full day on the water.

The low-lying seats keep your center of gravity close to the water while paddling. This configuration reduces wind resistance and keeps the boat from feeling tippy.

Inflating and setting up the AE Convertible tandem takes some getting used to. A thorough set of instructions is included, but you will still need to practice a few times before setting it up feels efficient.

Six air chambers can be pumped up, although only three of these are important for structural integrity. Each chamber has specific pressure requirements.

Be sure to be careful when inflating because it can be easy to over or underfill. The kayak does not come with paddles or a pump.

Overall, this is a hefty inflatable tandem that in many ways feels more like a solid plastic boat than an inflatable one. Its bulk may be a downside for some users — it’s difficult to pack into its duffel and carry on your own.

However, on the performance side, this kayak shines and offers tracking and speed that most other inflatable tandems cannot. It’s not cheap, but because it’s built to last, it’s our pick for the best tandem kayak of 2022.

Weight: 52 lbs.

Length: 15′

Pros:

  • Durable
  • Capacity of 550 lbs.
  • Can be used as a single boat or a tandem
  • Tracks well
  • Handles speed with ease
  • Ample storage space

Cons:

  • Heavy
  • More expensive than other options
  • Setup is difficult, especially with just one person

Check Price at REICheck Price at L.L.Bean

Best Pedal Kayak: Hobie Mirage Passport 10.5 R

hobie mirage passport 10.5 R kayak

Hobie has been making kayaks for over 20 years. This model ($1,799) is one of its newer ones, released in 2022. We loved the previous version of this kayak, and the updated model maintains the tried-and-true design while adding a new rotomolded hull construction.

Pedal kayaks have lots of pros. Generally, they are equipped with a few more accessory features and have more room for gear storage. And, of course, they allow you to paddle hands free. Fishing, bird-watching, photography, you name it — there are lots of great applications here.

The Hobie Mirage Passport 10.5 R offers great tracking in the water, whether the weight on board is 150 or 200 pounds. The Mirage Glide technology refers to the fins, pedal, and rudder components.

This kayak has a stowable rudder with steering control located by your left hand next to the seat. The Hobie is a bit wider than standard kayaks to accommodate the seat and steering control, although it only measures 34 inches across.

You may have noticed the aluminum frame seat. Pro: It’s way more comfortable than standard kayak seats. Con: It adds some weight.

If you are doing overnight paddles, or even day touring for hours on end, a comfortable seat is worth it. Even with the extra weight of this kayak, it’s balanced well and feels really streamlined moving through the water.

The Passport 10.5 R has kick-up fins that automatically recess. How cool is that? Whether you are paddling in shallow waters or encountering logs or obstacles, the kick-up fins will automatically recess upon impact to protect both you and your equipment.

Other features on this kayak include an 8-inch twist-and-seal hatch for storing gear, as well as two cargo storage areas with bungee straps on the bow and stern. If you are using this kayak for fishing or touring, storage is important.

There’s plenty of space on this boat to store rods, a tackle kit, dry bags, a small cooler, camera equipment, or anything else you may want to bring along.

Pedal/fishing kayaks can run up to $5,000. This Hobie cat model is a great-quality kayak at a great price, especially if you’re looking to pedal. This kayak comes with a two-piece aluminum paddle.

Weight: 65 lbs. (fitted hull weight), 75 lbs. (fully rigged weight)

Length: 10’5″

Pros:

  • Very comfortable seat
  • Waterproof gear storage with hatch
  • Rod mounts and accessories to personalize your kayak
  • Kick-up/retractable fins
  • Good price
  • High-tech rotomolded construction

Cons:

  • Lots of individual components
  • Heavier than most other kayaks on this list

Check Price at Hobie

Best Inflatable Kayak: Kokopelli Moki-Lite

kokopelli moki-lite

Made for touring across flat water, the Kokopelli Moki-Lite inflatable kayak ($699) is portable, easy to set up, and impressively lightweight. This watercraft is ideal for paddlers who are looking for a simple and high-quality boat for recreational paddling.

Compared to other inflatable kayaks, we appreciate how easily the Moki-Lite transitions from fully deflated to water-ready. In less than 10 minutes, this kayak’s floor and side tubes can be filled with air and launched onto the water. When you’re done paddling, the boat deflates and folds into its roomy river bag for easy transport.

The 1,000-denier reinforced PVC drop-stitch floor is fully rigid when pumped up and is abrasion-resistant. Additionally, the EVA seat is low-profile and relatively comfortable to sit in.

A removable 9-inch tracking fin helps the Moki-Lite track smoothly. The entire kayak is just 10 feet long, and this short length results in high-performance maneuverability.

The kayak comes with a four-piece alpine lake paddle, carry bag, Nano Barrel pump, tracking fin, and repair kit. For a streamlined and sporty-looking inflatable kayak, it doesn’t get much better than the Kokopelli Moki-Lite.

Weight: 17 lbs., 3.2 oz.

Length: 10′

Pros:

  • Lightweight
  • High-quality 1,000D outer material
  • Good tracking with 9″ fin attached
  • Easy to set up and pack down

Cons:

  • Not a lot of cargo space

Check Price at KokopelliCheck Price at Amazon

Best Folding Kayak: Oru Inlet

oru inlet

For those living in tight quarters, folding kayaks offer all of the benefits of owning your own watercraft without the need for a large storage space. Whether you live in a van or a studio apartment, the Oru Inlet folding kayak ($999) is a brilliant tool that can go with you anywhere.

Compared to the often-convoluted process of inflating a kayak, the Inlet’s origami-like folding assembly is as simple as snapping a few clips and slipping into the cockpit. Oru claims that the Inlet can be set up in 3 minutes, a bold statement that has been verified by several owners and testers.

When it’s all folded up, the Oru Inlet can be slung over a single shoulder for effortless carrying. After all, it weighs only 20 pounds.

While the folds in the kayak do create weaknesses in the 5mm double-layered polypropylene exterior, the Inlet has been manufacturer-rated for 20,000 fold cycles. The hull’s 30-inch width provides enough stability for beginner paddlers to feel comfortable, and also makes it ideal for fishing.

At $999, the Inlet is cheaper than other offerings from Oru, although it’s still expensive compared to many kayaks on this list. The ideal user is someone who enjoys mellow on-the-water excursions and really wants to prioritize easy storage and compact gear.

The cockpit is large enough to store a small dry bag or a bit of fishing gear. However, there probably isn’t enough room for overnight gear, and there is no waterproof cargo area.

Although this is certainly a niche kayak, it easily earns its place on this list of best beginner kayaks. With the Oru Inlet, the entire user experience is defined by simplicity.

It’s simple to set up, simple to paddle, and efficient enough for regular use. With the Oru Inlet, limited gear storage space will no longer keep you from getting out to paddle.

Weight: 20 lbs.

Length: 10′

Pros:

  • Super light
  • Easy to set up and fold down
  • When folded up, the kayak can be carried with a simple shoulder strap
  • Padded seat
  • Open cockpit is simple to enter and exit
  • Beginner-friendly

Cons:

  • Maximum weight capacity of 275 lbs.
  • Expensive
  • Does not track especially well

Check Price at AmazonCheck Price at Oru Kayak

Best Kayak for Kids: Perception Hi Five

perception hi five

Part stand-up paddleboard and part kayak, the Hi Five watercraft from Perception ($299) is all about fun on the water, which makes it our pick for the best kayak for kids.

The Hi Five is sized to perfectly suit kids up to 120 pounds. At just 6 feet long and 2 feet wide, this small kayak fits easily into most hatchbacks and roof racks.

Its unique design integrates the seat and other features into one continuous piece of polyethylene plastic that weighs just 24 pounds. Because the entire boat is one solid piece, there are very few ways a user can break or damage the Hi Five.

People with kids will know that the ability to withstand rough handling is an asset of any piece of kids’ gear, and the Hi Five is fully up to the task.

On the Hi Five’s stern, a flat swim-up deck allows for swimmers to easily climb aboard. Other clever features include a paddle rest, a large standing surface, and ergonomic grab handles. All of these features come in handy during blissful hours of family time on the water.

Additionally, the Hi Five is specifically designed to keep working as kids grow, making it a good long-term investment that can stay with you for many years.

For maximum safety, the Hi Five is super stable. It comes with a hitch-and-tether system so mom or dad can tow the boat when the smallest paddler in the family gets tired.

For $300 with a kid-size paddle included, the Hi Five can offer many years of joy and paddling progression. From rivers to creeks to small backyard ponds, the Perception Hi Five is a standout kids’ kayak.

Weight: 21 lbs.

Length: 6′

Pros:

  • Good value
  • Entire watercraft is one durable piece of molded plastic
  • Progression-focused
  • Lightweight and easy to transport

Cons:

  • Not the most comfortable seat

Check Price at Amazon

Beginner Kayak Comparison Chart

Wilderness Systems Tarpon 105Old Town Manitou SportIntex Challenger K1Advanced Elements Advanced Frame ConvertibleHobie Mirage Passport 10.5 R Kokopelli Moki-LiteOru InletPerception Hi Five

Why You Should Trust Us

We compiled this list of kayaks with beginner paddlers in mind. The GearJunkie team has plentiful paddling experience, are we’re also keenly familiar with the kayak market. The boats on this list are user-friendly, approachable, and progression-focused.

Not all beginners will need the same kind of kayak, so we carefully considered dozens of boats and highlighted the best options in several categories. In every category, our recommended kayak had to beat out several other models to earn its place.

To identify our top picks, we considered overall value, usability, build quality, durability, and much more. We examined materials, studied brands, and compared pricetags down to the last detail.

As new kayaks hit the market, we’ll be sure to test them in consideration for this list. At any given time, our roundup will include the best of the best.

Beginners’ Buyers Guide for Kayaks: How to Choose

Before you purchase a beginner-level kayak, you first need to determine what type of kayaking you want to do. There are lots of well-made and high-quality kayak brands, and most brands offer options for a wide range of paddling pursuits. Once you know what kind of attributes you are looking for in a kayak, it will become much easier to choose.

If you want a kayak for mellow cruising on a backyard pond or small lake, you do not want to purchase a sea kayak that is made for slicing through big waves. Similarly, if you need a kayak that will be easy to transport, you don’t want to purchase something bulky and heavy.

There are a few key things to consider when deciding what your kayaking needs really are. There are many unique categories of kayaks, and each category has its own strengths and drawbacks.

In this buyer’s guide, we will provide information about many of these categories, including sit-on kayaks, sit-in kayaks, tandem kayaks, recreational kayaks, day touring kayaks, inflatable kayaks, folding kayaks, pedal-powered kayaks, and whitewater kayaks.

Once you have identified which category best fits your needs and plans, other important considerations to keep in mind include material, weight, capacity, durability, and price. Purchasing the right kayak can feel confusing, but with the use of this in-depth guide, we hope you’ll be able to identify the right kayak to buy.

Types of Kayaks

Sit-on-Top Kayaks

Sit-on-top kayaks do not have an internal, hollowed-out cockpit that you have to climb into. Instead, this style of kayak allows you to sit right on top of the boat, where your legs will be exposed to the open air.

Sit-on-top kayaks tend to be easier to get on and off of than sit-in kayaks. Also, sit-on-top kayaks tend to feel more stable than sit-ins, especially for new paddlers who are getting used to the water.

Sit-on-top kayaks are good for warm weather because the user is likely to get wet. This style of kayak is also better for users who plan to paddle with a dog on board.

best sit-on-top kayak for beginners
(Photo/Amazon)

Sit-In Kayaks

Sit-in kayaks have an internal cockpit that you have to climb into to paddle. When paddling a sit-in kayak, you will have a low center of gravity and the rotation of your hips will be more involved in steering the boat.

Some sit-in kayaks that are built for whitewater paddling utilize spray skirts that cover the cockpit to prevent water from getting inside. Sit-in kayak users will experience less wind resistance than sit-on-top kayakers.

Tandem Kayaks

Tandem kayaks are paddled by two people at once. To allow this, these boats are usually longer than single-user boats and include two seats instead of one.

Tandem boats can be inflatable or made of solid material. The process of learning how to paddle in sync with your partner can be a fun and tricky challenge.

best tandem kayak for beginners
(Photo/REI)

Recreational Kayaks

When a kayak is labeled “recreational,” that means it’s built to prioritize fun over high-end performance. Recreational kayaks will not be the fastest or lightest boats on the market, but they will include practical features that maximize comfort and allow you to enjoy your paddling experience.

Day Touring Kayaks

Day touring kayaks are meant for single-day excursions. These boats lack adequate storage space for overnight trips or expeditions. Often, day touring kayaks are simple and user-friendly vessels built for a quick session on the water.

Inflatable Kayaks

Inflatable kayaks are filled with air like a balloon and can be deflated when not in use. For users who do not have enough storage space to keep a rigid plastic kayak at home, an inflatable kayak can be a fantastic solution.

Inflatable kayaks typically have multiple compartments that must all be pumped full of air before use. This list includes both single-user and tandem inflatable kayaks that we recommend.

Folding Kayaks

In recent years, many folding lightweight kayaks have entered the market. These boats aim to maximize portability for kayakers who don’t have a lot of available storage space in their lives.

Folding kayaks require some practice to assemble and set up properly. Although folding kayaks tend not to be as durable on the water as solid plastic kayaks, they tend to be more lightweight than any other category of kayaks.

Pedal Kayaks

Pedal-powered kayaks do not require a paddle to move about the water. Instead, these kayaks are operated using your legs, either by pushing or rotating the pedals to generate thrust. This style of kayak is excellent for fishing because the foot pedals leave your hands free to cast out and tend to your fishing rod.

Whitewater Kayaks

Whitewater kayaks are made to maneuver through fast-flowing water. Whitewater kayaks are almost always sit-in kayaks, with a short length and minimal storage space. Most whitewater kayaks utilize a spray skirt to keep water out of the cockpit.

Kayak Features

Material vs. Weight

Most kayaks on market these days are made of solid plastic, inflatable abrasion-resistant PVC, thin foldable plastic, or fiberglass. Different materials work well for different functions.

Solid plastic boats tend to be the most durable. Inflatable PVC and foldable plastic are lighter and easier to pack down and store in a small space.

If you plan on paddling with a dog on board, it may be wise to steer clear of inflatable kayaks that can be punctured. Solid plastic kayaks tend to be heavier than inflatable and foldable kayaks. (And obviously, tandem kayaks are heavier than single kayaks.)

If you plan to kayak alone and need to load and unload your kayak from your car on your own, it is wise to purchase a lighter kayak that you can easily carry. Or, get a kayak dolly. Kayaks on this list vary widely by weight, so be sure to check the kayak’s weight before purchasing.

best tandem kayak for beginners
(Photo/REI)

Capacity

The majority of brands measure kayak capacity by weight. Before you purchase a kayak, make sure that the boat will be able to accommodate the total weight of the anticipated user (plus the weight of any gear). It’s good to stay on the conservative side of a boat’s capacity limit to ensure that it will perform safely and as intended.

Durability

Kayaks are built to be durable, but not all boats are created equal. Inflatable watercraft tend to be less durable than solid plastic ones because they are vulnerable to punctures.

To maximize the longevity of your kayak’s life, be careful not to drag it along jagged rocks during loading and unloading. When storing your kayak, be sure to keep it out of the full sun and away from potentially harmful objects and substances. And of course, always follow PSI recommendations to prevent overinflation.

Price

It’s wise to decide on a specific budget before you begin the actual shopping process. Kayaks vary in price a lot, and high-end options can be very expensive.

Still, it’s very possible to find a fairly priced kayak that offers excellent value for the money. If you are considering buying a kayak for yourself and your partner, you’ll also want to weigh the options of buying two kayaks versus buying a tandem.

FAQ

What is the best type of kayak for beginners?

We recommend all of the kayaks on this list to beginner paddlers. Ultimately, the best kayak will be the one that meets your individual needs and helps you progress as a paddler. Depending on your lifestyle, storage space, preferred paddling location, and other factors, some kayaks will suit you better than others.

What size kayak is best for beginners?

There are kayaks of all shapes and sizes on the market. The size and shape of kayaks vary depending on their intended function. Beginner kayaks tend to be between 9 and 12 feet long and 2 to 3 feet wide.

Long, thin kayaks are built for going fast in a straight line and cutting through choppy water and waves. Short, stubby kayaks are made to be nimble and easy to turn in fast-moving streams and whitewater. Many of the kayaks on this list are midsize to provide a good balance between smooth tracking and maneuverability.

Most kayaks — regardless of their size or shape — can accommodate paddlers of various heights and weights. Before purchasing a kayak, check to make sure it can accommodate a paddler of your size.

Which is better: sit-on-top kayaks or sit-in kayaks?

Neither kayak style is strictly better — they simply have different strengths and weaknesses.

A sit-on-top kayak is easier to climb in and out of, especially while out on the water. Sit-on-top kayaks also tend to be better for kayaking with a dog on board. Overall, sit-on-top kayaks tend to be more comfortable for long paddling sessions, as they allow the user to stretch their legs and move around.

Sit-in kayaks keep the paddler’s center of gravity low, which decreases wind residence and creates superior maneuverability. In colder or rainy weather, sit-in kayaks allow the user to stay fairly dry, especially with the use of a spray skirt.

What size kayak should I get for my height?

Most kayaks are made to accommodate people of a wide range of heights. Many recreational kayaks for beginners are around 10 feet long and will be suitable in size for most adults up to 6 feet tall. For those taller than 6 feet, a recreational kayak around 12 feet long will likely be a better fit.

It can be helpful to test a kayak’s size by sitting in it before purchasing. Make sure there’s enough legroom and your hips fit comfortably in the seat and cockpit. Many kayaks have multiple or adjustable footrests to accommodate paddlers with shorter or longer legs.

best budget kayak for beginners
(Photo/Amazon)

What length paddle do I need?

Having a properly sized paddle can make all the difference. When deciding on the length of your paddle, you must consider both your own height and the width of your kayak. Generally, the wider the kayak is, the longer paddle you’ll need to ensure that the sides of the boat won’t get in the way of the paddle blades entering the water.

Most of the beginner kayaks on this list are between 24 and 32 inches wide. So, here is a basic guideline for how to size kayak paddles for kayaks that are between 24 and 32 inches wide.

Paddlers under 5’5” should use a paddle that’s about 220 cm in length. Folks between 5’5” and 5’11” should use a paddle that’s about 240 cm in length. Paddlers over 5’11” should use a paddle that’s around 250 cm in length.

Adjustable paddles are a good idea for those who will not be able to test out their paddles before purchase. Adjustable paddles are also great as they divide into pieces for storage and travel.

Have a favorite kayak? Let us know in the comments, and we’ll check it out for future updates to this article.

The Ultimate Showdown: The Best Caliber for Elk Hunting

0

So you’re heading out on your big elk hunt and considering which caliber to use. Whether you’re a beginner or an experienced hunter, choosing the right one for the job is essential. After all, your success depends on it! To help make this decision easier, we’ve compiled a comprehensive guide outlining some of our favorite — and the best — calibers for elk hunting.

How we determined the best caliber for elk hunting.

There’s not a single rifle cartridge that can be called the “best” for elk hunting. The perfect rifle cartridge for the hunt depends on various factors, including the terrain, the type of game hunting, and personal preference. However, after much research and discussion, we’ve identified a few top categories that stand out from the crowd regarding elk hunting.

  • Best caliber overall. This one is a bit of an all-rounder caliber and can be used in various hunting scenarios. We wanted to find an elk cartridge that could cover everything, so we focused on several calibers widely accepted and proven to work well in different scenarios.
  • Best caliber for long-range elk hunting. Long-range shooting is a popular way of taking down game from a distance. We had to consider bullet drop, wind drift, and the effective range of the cartridge.
  • Best caliber for brush hunting. Brush hunting requires staying essentially relatively close to your prey while stalking them. As such, recoil becomes an important factor when selecting a cartridge. We prioritized calibers offering minimal recoil and fast follow-up shots.
  • Best lightweight caliber. One of the most important things to consider when elk hunting is weight. You’ll carry your rifle for extended periods, and a light caliber can make all the difference in how much you enjoy the hunt. We looked at calibers that offered good power without the extra bulk.
  • Best caliber for take-down power. If you’re hunting elk, especially in the western states with large herds, you want a caliber that will pack enough punch to take down a big bull. We looked at calibers with proven knockdown power and deep penetration capabilities.

Now that we’ve established what we were looking for in these categories let’s discuss why finding an elk cartridge that is perfect for you is crucial.

The importance of finding the right caliber for your elk hunt.

For elk hunting, accuracy and consistency are king. You need a cartridge to do the job without being overly powerful or cumbersome. An elk cartridge that is too slow will leave you with meat damage, while one that’s too fast can cause excessive recoil and shoot through the animal instead of stopping it in its tracks.

The right caliber for you depends on the type of terrain and game you’re hunting, your budget and preferences, and your shooting skills.

Range.

One of the most critical aspects of elk hunting is the range you will shoot. If you’re hunting in an open field, a long-range cartridge like the .308 Winchester or 6.5 Creedmoor might be your best bet. Not only is the bullet weight important, but you’ll also need to consider an optic for your elk rifle.

Environment.

Another important factor to consider is the environment in which you’ll be hunting. A light caliber might be best if you’re hunting in dense brush or woods since you won’t have to lug around a heavy rifle all day. If you hunt in open country, a heavier caliber will give you more power at longer ranges.

Take-down power.

When it comes to elk hunting, take-down power is key. The right cartridge should offer enough energy to penetrate the animal deeply and cause an instant kill. Bullet construction is also important here; some cartridges are designed with controlled expansion to penetrate deeper without damaging too much meat (this is called a controlled expansion bullet).

Weight.

Finally, you’ll want to consider the overall weight of your rifle. If you carry a gun all day, you’ll want something lightweight but still packs enough punch to finish the job. If you’re patiently waiting in a stand or a blind, a heavier rifle might not be an issue.

Breaking down the best elk cartridge.

With all that out, let’s get into our top picks for the best elk cartridges. We think you’ll find something that fits your hunting needs here.

Best caliber overall — .338 Winchester Magnum.

For the best overall elk cartridge, we selected the .338 Winchester Magnum. This powerful magnum packs a serious punch and can take down large game at long distances. It offers great accuracy and consistency, making it an excellent choice for hunting in open fields and brush. Plus, with its recoil-taming features, the .338 Win Mag is still relatively easy to shoot accurately.

What we love the most about the .338 Winchester Magnum is its versatility. This big-game cartridge is suitable for elk and moose, giving you plenty of options for hunting large game. Whether you’re taking down the biggest bull elk you’ve ever seen or even going deer hunting, the .338 Winchester Magnum is up to the task.

Best caliber for long-range elk hunting — .300 Winchester Magnum.

Easily one of the most popular cartridges for long-range elk hunting, the .300 Winchester Magnum is an ideal choice. This classic magnum cartridge offers power and great accuracy at extended ranges. It’s also relatively easy to control in various shooting positions, making it a top pick for experienced hunters who want to take their shots from a distance.

Its ability to handle strong winds sets the 300 Win Mag apart from other long-range cartridges. It’s high ballistic coefficient and flat trajectory make it an excellent option for hunting in windy conditions. And with its controlled expansion bullets, you can expect deep penetration and minimal meat damage.

Best caliber for brush hunting — .30-06 Springfield.

Sometimes, elk hunting in the brush can be a challenge. You need a powerful cartridge to take down your prey but still lightweight and easy to maneuver in tight quarters. That’s where the .30-06 Springfield comes in. This classic deer and elk cartridge is an excellent choice for brush hunting due to its moderate power and low recoil. Plus, with its flat trajectory and controlled expansion bullets, you can expect good accuracy and deep penetration in tight spots.

Our favorite thing about the .30-06 Springfield is its affordability. The factory ammo offers great performance at a reasonable price, and it’s also widely available and easy to find in most gun shops.

Best lightweight caliber — .270 Winchester.

The .270 Winchester is a great choice for hunters who need a lightweight cartridge with plenty of power. This classic deer and elk cartridge offers moderate recoil and excellent accuracy at extended ranges. It’s also quite versatile, as it can be used for various game animals, including elk and deer.

The thing we love the most about the .270 Winchester is its recoil. Compared to other elk rifles, a rifle chambered in .270 Winchester has mild recoil. Hunters of all experience levels can accurately shoot their target with manageable recoil. And with its excellent accuracy, you can be sure to take down your elk in one shot.

Best caliber for take-down power — 7mm Remington Magnum.

Finally, we have the 7mm Remington Magnum. This popular elk cartridge is known for its unmatched take-down power and flat trajectory, making it an excellent choice for long-range hunting. It has superior ballistics and offers excellent accuracy, allowing you to take down your target precisely.

With the high muzzle velocity of the 7mm Rem Mag, this wouldn’t be a good choice for close-range hunting. But if you’re looking for a cartridge that can easily take down a big bull elk at extended ranges, then the 7mm rem mag is your best bet.

Pro tips for finding the perfect elk hunting rifle.

Finding good elk cartridges is only half the battle; you must also find the perfect elk hunting rifle. Here are some pro tips for finding the right setup:

  • Understand Your Hunting Environment: The terrain and environment where you’ll be hunting can significantly impact the type of rifle you need. For instance, a lighter, more maneuverable rifle might be your best bet if you’re hunting in dense forests with shorter sight lines. On the other hand, if you’re hunting in open spaces where longer shots are expected, a heavier, more stable rifle that’s accurate at long distances would be ideal.
  • Consider the Caliber: As discussed earlier; some calibers are better suited for elk hunting than others. Powerful rounds like the .338 Win Mag, .270 Winchester, and .300 Winchester Magnum are all good choices. Consider what you feel comfortable shooting and what will effectively take down an elk.
  • Choose the Right Action: Bolt action rifles are popular among elk hunters because they’re reliable, accurate, and can handle powerful rounds. However, lever action and semi-automatic rifles can also be suitable, especially if you anticipate needing quick follow-up shots.
  • Check the Weight: Remember that you’ll likely carry your rifle for a long while hunting. Balance the need for a powerful, stable gun with the practicality of hauling it around all day. Lightweight rifles are easier to carry but might have more recoil.
  • Look for Quality Optics: A good scope can make a huge difference in successful elk hunting. Look for optics with clear, bright images and a good magnification range. A quality scope can help you make accurate shots at various distances.

Our hunting experts have bought countless rifles over the years and agree that following these tips can help you pick the perfect elk hunting rifle. You’ll be ready to hit the woods and bag your next big bull with the right setup.

FAQs for elk hunting Calibers.

To round off our comprehensive guide to elk hunting calibers, here are some frequently asked questions—

What is the best caliber for elk hunting?

The best elk hunting calibers depend on your hunting style and environment, but some of the most popular options include .300 Winchester Magnum, .30-06 Springfield, .270 Winchester, and 7mm Remington Magnum. These are all great choices for taking down an elk at extended ranges.

What is the most accurate caliber for elk hunting?

The .300 Winchester Magnum is widely considered one of the most accurate cartridges for elk hunting due to its flat trajectory and high ballistic coefficient. It’s also a powerful round that can effectively take down large game animals.

How far can you accurately shoot an elk?

The effective range for taking down an elk will vary depending on the caliber, shooter experience, and environmental conditions. As a general rule of thumb, most elk hunters should have no problem making accurate shots out to 500 yards with the right rifle and optics. Of course, it’s always best to practice shooting at various distances to develop good shooting habits and accuracy.

Is a .308 big enough for elk?

A .308 Winchester is generally considered big enough for elk hunting. The rule of thumb for the minimum amount of kinetic energy needed to kill a mature elk is 1500 ft-lbs, which a .308 can deliver. However, it’s important to consider shot placement and the hunter’s ability to shoot accurately.

Is 6.5 Creedmoor or 308 better for elk?

The debate between 6.5 Creedmoor and .308 Winchester for elk hunting is a topic of much discussion among hunters. Both bullet weights have strengths and weaknesses, and their choice largely depends on your needs and circumstances. The 6.5 Creedmoor has a slightly flatter trajectory, less wind drift, and less recoil than the .308 Winchester, making it easier to shoot accurately, particularly at longer ranges. However, it’s worth noting that some hunters consider the 6.5 Creedmoor too light for elk, with most suggesting a minimum of 1,500 ft-lbs of energy for a clean kill. On the other hand, the .308 Winchester is known for its superior frontal surface area and wound channel creation, which can lead to more effective kills. Its ammunition is also more widely available and typically cheaper, making it a more economical choice for many hunters.

What is the preferred rifle shot for elk?

The preferred shot on an elk is a broadside shot. This shot placement affords the best chance of striking the animal’s vital organs while still allowing for maximum penetration. Ideally, you should aim for the highest point of the shoulder to ensure a clean kill.

Can you shoot a bedded elk?

Yes, you can shoot a bedded elk, but it is important to ensure an ethical shot. This means considering the wind direction, background noise, and the animal’s position. If you doubt whether your shot will be ethical, it’s best to wait until the elk stands before taking the shot.

What is the best follow-up shot for elk?

The best follow-up shot for an elk depends on the initial hit placement and the circumstances of your hunt. If you’ve made a clean kill, there’s no need to take additional shots. However, if you haven’t achieved a clean kill with your initial shot, you’ll want to take another shot as soon as possible. A quick follow-up shot can help ensure the animal is taken down humanely and quickly.

Finding the right caliber.

The quest for the perfect elk hunting rifle and caliber is a personal journey heavily influenced by your unique hunting style, environment, and comfort level.

Whether it’s the .338 Win Mag with its sheer stopping power, the .30-06 Springfield’s brush hunting prowess, the .270 Winchester’s light recoil, or the 7mm Remington Magnum’s exceptional take-down ability, each caliber offers unique advantages.

Remember, a critical part of your success in the field is not just the rifle and its caliber but also understanding your hunting environment, the rifle’s action type, weight, and optics quality. And never underestimate the power of trying before buying.

Armed with these insights, you’re on your way to finding the perfect partner for your next elk-hunting adventure.

Twenty-Gauge Super Slugs

0

Until recently conventional wisdom held that using a 20-gauge shotgun for deer hunting was a bad idea. The 20 gauge was something ladies and kids used only for its reduced recoil, and the Foster-style slug was the only option. The 20-gauge Foster slug has a ballistic coefficient of around .060, which is about as low as a conical lead projectile can get. Even though it leaves the shotgun with more than 1,600 ft.-lbs. of energy, by the time the slug passes the 100-yard mark it is down to about 625 ft.-lbs. And it drops like a brick—not exactly the performance of deer-hunting legends.

Things have changed, though, and it could be argued that there are some very good reasons to use a 20-gauge slug gun for deer hunting. I put that theory to the test at Graystone Castle in Texas with my friend Joe Coogan and the rest of the “Benelli On Assignment” television crew. When I had a good, 100-yard broadside shot at a buck with tall, almost straight-up antlers, I eased the Benelli M2 shotgun into position. I sent a 5/8-ounce piece of technology through its ribs. If you saw the show, you might remember that you can actually see the slug flying though the air and hitting the deer. It is pretty dramatic footage.

The Federal 20-gauge shotshell was loaded with the Barnes Tipped Expander slug. Federal lists the muzzle velocity at an impressive 1,900 fps from a 30-inch test barrel. From my Benelli’s shorter, 24-inch barrel, it comes surprisingly close with 1,809 fps at the muzzle. That means the slug hit that buck with 1,337 ft.-lbs. of energy, which is more than some 20-gauge Foster slugs have at the muzzle, and it’s about double the energy the Foster carries at 100 yards The buck simply toppled over.

Although the old Foster slugs often struggled for “minute of backstop” accuracy past 50 yards, when I was sighting in, this Benelli M2, which had a rifled barrel, was shooting groups with the Federal ammunition that had some of the rifle guys looking twice. In fact, this setup has the accuracy and external ballistic performance to make it a 200-yard deer gun. Sighted 2 inches high at 100 yards, it strikes 9 inches low at 200 yards and still has 1,000 ft.-lbs. of energy. That kind of performance was unheard of from a 20-gauge slug just a few short years ago. It has all trickled down from the big dog, the 12 gauge, and has completely changed the rules about shooting 20-gauge slug guns for deer.

Many of the newest slugs use polymer tips for higher ballistic coefficients. They are streamlined, lighter in weight, have a higher velocity than the 20-gauge slugs of old and, as a result, mean that the “Twenty-Bore” is no longer a deer hunting compromise. Today’s 20-gauge slug is an efficient and powerful deer hunting tool. Let’s take a look at a few of the recent innovations in 20-gauge slug ammunition from the big-name companies.

I tested the four slugs for terminal performance in both water and Perma-Gel at close range. The slugs impacted with nearly their full muzzle velocity. Both of those testing mediums are a little tougher than the standard ballistic gelatin, yet somewhat softer than big game with its bones and other variables. Expanded diameter was measured twice, 90 degrees to each other, and then averaged.

How Weather Affects Fishing: All You Need to Know

0

Reading Time: 8 minutes

We’ve all been there. You get ready for a perfect day of fishing, pick your best lures and your favorite rod, only to sit out on the boat watching your line idle without a single bite. “What did I do wrong?” you ask yourself. A painful question pretty much every single angler has asked at some point. Well, we’ve got some good news and bad news for you: It wasn’t really your fault. But in a way, it was. Why did you strike out? The answer, more often than not, lies in how the weather affects fishing. And today, you’re going to learn all there is to know about it.

An angler fly fishing in a river while it

To understand exactly how the weather affects fish, we’ll first take a look at the individual weather factors that influence the way fish behave. We’ll then explore how these factors make fish tick (or tock). Last but not least, we’ll talk about the best weather conditions for fishing, as well as what you can do to make the most out of your outing.

By the time you’ve read this article, you’ll not only have a few geeky facts to tell your friends, you’ll also know some tricks to help you round the day off with a full cooler.

The weather can affect fishing in a number of ways. A few naturally-occurring elements are key influencers on the way fish behave. These are:

  • Water temperature
  • Wind
  • Barometric pressure

Water Temperature

Most fish species are cold-blooded, and can’t regulate their body temperature. This means that they’re forced to adjust their metabolisms to the temperature of the water around them. In colder waters, fish tend to slow down, and generally need less food to support themselves. In warmer waters, they are much more active, and as a result, need significantly more food to survive.

A school of fish underwater.

But that’s not the only way water temperatures affect fish. In order to breathe, fish rely on their gills to extract dissolved oxygen from the water. It so happens that the amount of dissolved oxygen in the water depends almost exclusively on the surrounding temperature. As a rule of thumb, colder waters have more dissolved oxygen, and warmer waters have less.

So, what’s the big deal? Simply put, each fish species has a minimum water temperature under which it won’t feed, and a maximum water temperature over which it can’t breathe. As a fisherman, you obviously don’t need to know the exact numbers. However, knowing why and when water temperatures change can make all the difference when trying to catch fish.

How does the weather influence water temperatures?

Water temperature can change in a number of ways. There are slow, seasonal changes, which are mainly influenced by the amount of sunlight a body of water receives over an extended period of time. These changes don’t have a tremendous impact on water temperature in the short term.

Even if you’re fishing a small pond, a passing cloud won’t realistically change the temperature by a significant amount. What can drastically change the water temperature, however, is rainfall.

Angler fishing a pond during bad weather.

When it rains, fresh water pours into a body of water, changing its temperature. This change can happen quickly, especially if we’re talking about a small body of water. In addition, rainfall changes the turbidity (clarity) of the water, as well as the salinity of saltwater. Lastly, rain can often shoot large quantities of nutrients into the water. When all these changes occur at the same time, they can significantly change the way resident fish behave.

Wind

In North America, winds generally blow in a northeast direction. This happens for two reasons: first, the Earth’s rotation, and second, the jet stream. During the summer, the jet stream shifts to the north, pulling warm gusts of low-pressure air from the southwest with it. This is why we have those warm summer winds. During fall and winter, the jet stream shifts to the south, bringing cold fronts and high-pressure air masses from the north.

A map showing movements of high pressure air and low pressure air.

When masses of cold and warm air mix, storms start to brew. But more on this in a bit.

Winds can influence water bodies and their residents in several ways. The most obvious one, of course, is by making waves. As winds blows along the surface of the water, it creates friction. The stronger the wind blows, the greater the friction, and the greater the waves.

Waves can increase the turbidity of the water, pulling currents and nutrients along with them. All of these factors influence the way fish will behave. Last but not least, winds cause changes in barometric pressure.

Barometric Pressure

If there’s one thing that can bring about a feeding frenzy in fish, it’s a change in barometric pressure. Sudden weather changes produce rapid shifts in barometric pressure, and this is precisely why these are the best moments to wet your line.

What is barometric pressure?

Barometric pressure, or atmospheric pressure, is the force exerted by the Earth’s atmosphere on a given area. Think of it as “the weight of the air.” Barometric pressure is measured in several ways: inches of mercury (in-Hg), millibars (mb), or pounds per square inch (psi). In the US, we mostly use inches Hg. At sea level, barometric pressure of 29.92 inches is “normal.” Anything above that is considered high, and anything below that, low.

Again, you don’t need to focus on absolute numbers, because fish aren’t paying much attention either. What you should make note of is that just as the atmosphere pushes down on Earth’s surface, it does the same to its many bodies of water. These waters, in turn, push on the fish that live there.

Why does barometric pressure affect fish?

To survive in water, fish had to develop a series of physical adaptations. When it comes barometric pressure and fish behavior, two of these adaptations are key. These are the lateral line and the swim bladder.

The lateral line is an organ fish use to navigate and sense the presence of predators or food. It senses the tiniest of reverberations in the water, and as such, it is very sensitive to pressure changes.

The swim bladder, on the other hand, is an organ similar to the stomach, which can inflate with air and allows the fish to achieve buoyancy. As the air pressure changes, so does the pressure on a fish’s swim bladder. It’s something like a natural barometer.

A picture of the anatomy of a fish, highlighting its swim bladder.

Fish species like Trout, Grouper, Snapper, and Tarpon have larger swim bladders, and are more sensitive to changes in air pressure. On the other hand, species with smaller bladders like Mahi Mahi, Barracuda, Wahoo, and Kingfish are much less affected. And then there are species like Sharks and various types of Tuna that don’t have this organ at all.

Barometric Pressure and Fishing

Alright, air pressure affects fish, we understand. But exactly when and how does this happen? It’s a well-known fact that rising barometric pressure means improving weather and clear skies. Conversely, dropping barometric pressure means that a storm or a cold front is on its way.

Fishing before and after a Storm

As a storm approaches, a mass of warm, low-pressure air gathers above a mass of cold, high-pressure air. When the two air masses meet, they start creating condensation in the form of clouds. During this time, a noticeable, steady drop in air pressure occurs. The pressure continues to drop until the very end of the storm.

Depending on the scale of the storm, this can happen very quickly, or over an extended period of time. For you, the latter is a much better option, as it gives you more time to fish while the pressure is dropping.

What follows the storm is typically a cold front, bringing winds, and a mass of cold, high-pressure air. The cold front often clears the skies, and more importantly, brings about a rapid rise in air pressure. In most cases, this means that fishing is a no-go.

Once the air pressure reaches a high point, it finally stabilizes. There’s no set rule on how long this can take, as it usually depends on the storm that just passed. Fish are mostly inactive after the atmospheric pressure levels out. However, around 72 hours into this period of steady barometric pressure, the fish start coming out again.

Interestingly, fish seem to be much keener on biting than before the weather change started. Some anglers speculate that this is because there was no fishing for several days, and fish have “forgotten” about the hooks and lures they normally avoid. A more realistic cause for the increased bite, however, seems to be that the fish haven’t fed in a while.

Fishing Tactics for Changing Weather

All of the weather factors we mentioned are very closely connected, meaning that one doesn’t change without the other. To make the perfect fishing tactic, you’re going to need to be mindful of them all.

Timing

Summarizing what we talked about above, fish react to changes in barometric pressure in the following way:

  • Rapid drops in pressure: changes of more than 0.18 inches Hg in 3 hours, the bite is great
  • Rapid rise in pressure: the fish retreat, the bite is non-existent
  • Stable pressure: after 3 days of pressure not changing by more than 0.3 inches Hg, the bite is good again

Nowadays, there are plenty of barometer-equipped fishing apps which you can use to track and plan your outings.

Temperature and Turbidity

In colder weather, fish are sluggish, so your lure/bait presentation should be slow-moving as well. Of course, the contrary is true for warmer conditions.

As we mentioned, wind and rainfall can make waters more turbid than normal. Turbidity can drastically limit visibility underwater, and in turn, change the way fish behave. For the most part, fish are sight hunters. When they can’t see, they’ll rely more on their lateral line to find prey. This is where fast action lures can come in handy. The flutter these lures make is the perfect attention-grabber in such situations.

Still, if you’re fishing cold waters, the fish might not be as easily lured to move (no pun intended). In these situations, you’ll need to rely on brightly colored lures to get them to bite. Reds, yellows, and greens can all produce results. In muddy waters, however, red-colored lures tend to lose their visibility. If this is the case, your best bet is to stick to bright yellow and green presentations.

If the seas are rough, chances are that fish have retreated to deeper waters. If you’re determined to fish in these conditions, make sure you’ve chosen the right kind of boat.

Enjoy Responsibly

Fishing ahead of an upcoming storm can produce incredible results. There are countless stories of fishermen cashing in on the feeding frenzy while other anglers are stuck on the highway trying to get home.

Still, as much as it would be cool to be the star of “Twister 2.0,” no fish is worth losing your head over. Read the weather and fishing reports carefully, and give yourself a time cushion to leave the area in case you get held up.

Get things right, however, and you could be looking at catching the fish of a lifetime! So there you have it. That covers everything you need to know about how weather affects fishing.

If you need more information on how to go about fishing for the first time, visit our Fishing Tips for Beginners blog.

What are your tactics for fishing in bad weather? Did you ever fish ahead of a coming storm? Are there some weather-related fishing tips we forgot to mention? Let us know in the comments below.

Fishing Hook Sizes – How to Choose the Right Fishing Hook

0

How Fishing Hook Sizes Work

You can save a lot of money buying hooks online, but do not get burned buying the wrong size hook. Here is a useful diagram I made to help show how fishing hook sizes work.

Fishing Hook Sizes Diagram

Fishing Hook Size (#) and Aught (/)

A hook’s measurement is defined on a spectrum by “Sizes” and “Aughts”. “Sizes” are smaller while “Aughts” are larger, with 1/0 (Pronounced One – Aught) being the middle or median of the scale. On the smaller end of the spectrum you would have a Size 10, on the larger end of the spectrum you would have a 10/0 (Pronounced Ten-Aught) with 1/0 generally in the middle.”Sizes” are the inverse of “Aughts”, as “Size” gets larger the hooks are smaller, as “Aught” gets larger the hooks are larger. Example: A Size 6 hook is 10 times smaller than a 6/0 hook. You would fish for Panfish with a Size 6, you would fish for Sturgeon with a 6/0.

The Baitholder Hook is the best hook to get started fishing

The Baitholder is a very versatile hook that allows you to start fishing the basics. Use this hook for worms, insects, and grocery store concoctions. The baitholder hook is great for using natural bait because it has 2 barbs on the shank that keep the bait from falling off the hook.

Pair a #4 Baitholder hook with a 1″ cut of worm. This is a basic freshwater rig effective for Sunfish, Crappie and Perch.

Alternatives to worms include 3-4 kernels of corn, a slice of hotdog, or a balled piece of bread. You may want to go down a size to #6 for pesky panfish, but this will be more challenging to bait and remove from the fish for those just starting out. Use the Larger #2 with a full Nightcrawler for Walleye, and move up to a larger 1/0 with a full Nightcrawler on a Texas Rig or Carolina Rig for Bass.

baitholder fishing hook sizes worm

Common Baitholder Hook Sizes & 1″ Cut of Nightcrawler on a #4 Baitholder Hook

Octopus Hook for Live Minnows & Leeches

Best for Live Minnows and Leeches, the short shank with a wide gap on an Octopus hook is great for hooking large fish. Use a smaller #6 or #4 for 1-2″ minnows and small leeches to target Perch and Crappie. Use the medium size #4 & #2 on larger 3-4″ minnows and jumbo leeches for Walleye. Lastly, the 1/0 is great with larger 4-6″ minnows used to target Pike and Bass. Red is a popular color for Octopus Hooks as it signals to your presentation at deeper depths.

Aberdeen Hooks for Insects & Removal

Thin, long wire shanks make these hooks great for fragile bait, removing swallowed hooks, and freeing up your line in a snag. Aberdeen hooks will bend, but that’s great because it serves their purpose. The thin wire makes this hook an ideal design for bottom fishing cats. When you are snagged the hook will bend and twist for an easier release. Use the smaller #4 for insects like crickets and grasshoppers to target Trout and Panfish. The light wire keeps these fragile baits in tact, and the long shank lets you easily remove the hook. Use the #2 & 1/0 with a ball of Nightcrawlers for Catfish.

Fishing Hook Kit Bass Hooks Octopus Circle Worm

Popular hooks can be found with the sizes above in our Fishing Hooks Kit.

Wide Gap Hooks

The less common Wide Gap hooks are used with large Minnows or Cut-Bait. Think of them as a narrower version of the Circle Hook. The Wide Gap allows you to target big Cats and Largemouth Bass, while keeping a tighter profile for Live Bait presentations or covering your hook shank more thoroughly with Cutbait. 2/0 is a popular size for both techniques.

Treble Hook for Dough Bait & Lure Replacement

Treble hooks are often associated with Lures such as Crankbaits, Spoons, and Spinners. However, Treble Hooks are also effective for Dough Baits and Nuggets as the 3 prongs secure your soluble bait longer than a single barbed hook.

For targeting Catfish, we recommend using a Size 4 Treble Hook to pair with your Dough Bait.

For Trout, a Size 12 Treble Hook is a small, precise medium for securing Trout Nuggets.

Most of the common lures, in popular sizes have #6 Treble Hooks attached. It is a good idea to keep a a few of these on hand for rusty or dull hooks that need replacement.

Worm Hooks for Soft Plastic Baits

Worm hooks pair with soft plastic worms are a popular staple among Bass fishermen. These artificial models are typically 4-8″ in length, while profile depends on the style of lure. The most popular hook is an EWG Worm Hook, and the most common sizes range in 2/0-4/0. Use a 3/0 EWG Worm Hook for the majority of soft plastic Bass baits. Round Bend Worm Hooks are also a popular option and are often used in more finesse situations rigged with slender plastic worms. Use a 1/0 Round Bend hook for Worms 6 to 7 inches and a 2/0 for worms 8-10 inches.

Hook Pairings for Soft Plastics

EWG Worm Hooks are often paired with thicker diameter soft plastics such as Stick Worms, Soft Jerkbaits, Beaver Baits, and Creature Baits. However, EWG Hooks are common to use with every style. Round Bend Worm Hooks are used to target Bass with slender profile soft baits. Often paired with Finesse Worms and Ribbon Worms which are longer and narrow for a concealed presentation.

texas rig ewg worm hook lizard tailored tackle

3/0 EWG Worm Hook with a 6″ Creature Bait (Texas Rig)

bass fishing hook plastic worm tailored tackle

1/0 Round Worm Hook with a 6″ Ribbon Tail Worm

Circle Hooks

Popular among saltwater anglers and great for conservation efforts. However, these are less common in Freshwater, as they facilitate “Cut-Bait” most effectively. Use a 5/0 Circle Hooks when targeting Catfish with Cut pieces of Shad or Carp.

circle hook size diagram tailored tackle

Final Note on Hook Size

Fishing hook sizes can be confusing, so reference these diagrams when you are making purchases online. Hooks in the Size # range get smaller as the numbers get larger. Hooks in the Aught / range get bigger as the numbers get larger.

Top 10 Best Rated Work Boots For Standing Long Hours On Hard Concrete Surfaces

0

Welcome to our best work boots for standing and working on concrete floors review for 2022 (updated for 2024).

To bring you this article we’ve researched 68 websites looked at 22 work boots brands and models, read 100s of reviews and customer feedback for a total amount of 41 hours.

We’ve done all of this in order to bring you the best information about working on concrete surfaces and the best boots and features to look out for when shopping in this sector.

Alright, let’s go into it…

Compare these 10 comfortable concrete work boots

Here’s a quick comparison table if you’re curious about which work boots we’ve included in our round-up.

Reviews of the best concrete work boots for walking and standing all day

Alright, let’s jump into some detailed reviews of each one of these concrete work boots we’ve included in today’s round-up.

We’ll start with the one that our editor picked for you …

1. Thorogood Wedge Sole

These are the best work boots for people who want a short, six-inch pair of work boots for walking on concrete.

These boots are also made in the USA, so if supporting American jobs and families is important to you, then this is the pair of American-made work boots in this roundup.

They also feature a wedge sole. Wedge sole work boots are work boots that have a larger surface area at the bottom than heel or arch boots.

The advantage of this when working on concrete is that far more of the work boot is in contact with the ground at any one point while you are walking around.

This reduces the potential shock to your feet when you are walking around. This makes it our #1 choice for walking around on concrete, as well as the best US-made work boot.

If you are a fan of this brand then why not go and check out this great Thorogood work boots reviews round up article where you’ll find a lot more models similar to this one!?

2. Wolverine Overpass

Wolverine has been in the work boot business for decades, and they have over 200 products in their range.

So for us to say this is the best Wolverine product for concrete work in their extensive range is quite the compliment.

Weighing just 1.75 pounds per boot, your feet will feel much lighter in these boots than other brands, preventing you from exhausting yourself on the concrete surfaces.

Don’t think the lightweight means these boots are less safe. The boots meet all the requisite safety standards that you would expect from other boots in the sector.

And for working on concrete, this work boot contains an Ortholite cushioned footbed which delivers a combination of temperature regulation and comfort.

Perfect for absorbing shocks when you are working on concrete.

Plus, the flexible, athletic Contour Welt construction moves with you by bending and flexing at essential points, preventing the build-up of long-term pains and sprains.

And the slip-resistant soles also mean you won’t have to worry too much about falling over whilst on the worksite, even if you’re working in an environment with a lot of oil or slippery liquids.

So no need to worry about falling on that hard concrete floor. Check out this page if you’re still wondering if Wolverine work boots are any good. We went deep into researching this brand!

  • Read My Full Review Of The Wolverine Overpass Work Boots

3. Ariat Rebar Flex

The ARIAT Men’s Rebar Flex 6″ H2o is the best composite toe work boot if you are in the construction trade and you need to work on concrete

This work boot features superb lightweight flexibility and supportive cushioning, with a 4LR footbed that keeps your feet cushioned and cool.

This makes them an ideal choice for outdoor construction workers worried about sweaty feet giving them a condition such as an athlete’s foot.

Made from waterproof leather combined with rugged mesh panels, these boots are highly durable and will protect your feet from the elements in harsh weather conditions, always assuring dry comfort.

So they are perfect for outdoor construction workers who work long days on concrete.

4. Skechers

The synthetic sole in these Skechers work boots makes it the ideal work boot for providing your feet with support and comfort whilst working on hard concrete surfaces.

And what’s even better is they are made from 100% leather, allowing your feet to breathe easily with those soft leather uppers.

People who have bought these boots have been delighted by how the memory foam insoles keep your feet ventilated with every step, allowing them to keep cool during every step.

Here’s a wider selection of great work boots to keep your feet dry and ventilated on summer days.

5. Heritage Classic

Red Wing is an excellent manufacturer of workboots who make all of their products in the USA and also run an in-house repair shop.

This means you can send your boots to them for repair for less than the cost of buying a new one, saving money, supporting cobblers, and preventing materials waste.

So if avoiding waste, shopping sustainably, and supporting American families is important to you, then Red Wing boots are the ones to buy.

The durability of the Red Wing work boots is great for most jobs that require you to stand or walk on concrete surfaces a lot.

Working on concrete does lead to work boots deteriorating more quickly- since the hard surface causes the boots to absorb a lot of shocks.

But people who bought this work boot have been delighted with how long it lasts.

Plus, for comfort, the full-grain leather that the upper boot is made from wicks away water, keeping your feet dry in treacherous conditions.

Nonetheless, the breathable membranes wick away internal moisture, keeping the inside of your boots cool and dry on a hot summer day.

6. Danner Bull Run

Danner has an extensive range of hundreds of products, from work boots to hiking and much much more.

However the Bull Run 6” work boot is the best of the best from within their range.

The boot contains a wedge sole, ensuring your weight is evenly distributed across your feet when you are working on concrete floors- reducing the risks of knee, feet, and ankle pains.

And the uppers are also made from durable, oiled full-grain upper leather for maximum comfort and durability.

Finally, it features a steel shank. This will minimize your risk of injury on the job by protecting your feet from punctures and giving them adequate support as you walk around.

Find out here if Danner’s work boots are worth the money and other cool details about the brand.

Also, we’ve put together a list of some of the best soft toe work boots here (in case you want to see what other alternatives to this Danner work boot model you can find out there)

Anyway, here’s some good and bad things about this boot…

7. Irish Setter

If you want to look like John Wayne on the worksite, the Irish Setter work boots are the most comfortable western work boots for concrete.

The heat-resistant outsole will keep your feet cool even as the concrete becomes baked in the hot outdoor sun.

It also possesses heat and electric resistant outsole that can withstand external temperatures of 475 degrees Fahrenheit and 18,000-volt shocks respectively.

Further, the 12-inch shaft measuring from the arch gives you the maximal support you need to take on the working day.

Finally, it features groundbreaking RPM technology, a breakthrough material that significantly reduces the weight of the boot, without compromising on the essential features of a work boot that keep you safe.

Want more models? Check out our top 10 best pull on work boots that you can compare with this Irish Setter boot…

8. Timberland PRO

The best pair of leather work boots from Timberland for concrete workers that we have to recommend for you is the Timberland PRO Drivetrain work boot.

These boots are simply amazing, from tough toe materials to breathability, it has it all.

This boot uses the toughest material there is, TPU, for the toe overlay, complimenting the composite toe cap for a lightweight but still very protective experience.

The outsole of the boot also uses polyurethane, which is a variant of TPU, one of the tougher materials companies are using to toughen up the soles of their boots.

The Timberland Pro Drivetrain contains an antimicrobial moisture-wicking lining, that prevents odors from lingering in the boot, keeping the feet of the users nice and fresh. It is an extremely breathable design.

And users simply love the fact that it barely weighs anything, with so many of them comparing wearing these boots to wearing basketball or tennis shoes.

The lightweight makes it ideal for walking on concrete, reducing the pressure on your feet and knees as you are walking around.

9. Merrell Men’s Moab 2

The Merrell Men’s Moab 2 Mid Waterproof Hiking Boot is the right boot for the job if you are working in hot weather.

It contains lightweight, breathable mesh uppers with abrasion-resistant synthetic overlays. These breathable mesh uppers provide increased ventilation and comfort.

It also features an abrasion-resistant synthetic overlay that helps protect your work boots against the wear and tear of a modern worksite.

As well as keeping your feet cool in hot weather, these work boots are also waterproof, and so they are ideal for outdoor workers in rainy cities.

Another awesome aspect of this product is the contoured footbeds that cradle your feet to keep them comfortable all day long.

The Merrell air cushion in the heel absorbs shock while providing stability on uneven terrain.

10. Carhartt

If you’re working on cold concrete surfaces, then this work boot is ideal for you.

Carhartt boots are specially designed for you to work in hard winter conditions. They pride themselves on the highest standards of design and componentry to ensure that you’re able to do your work safely no matter the conditions in comfort and style.

Safety for Carhartt is a top priority. Their composite (non-metallic) toe cap will protect you from dropped objects of up to 125 joules (or the equivalent of 22.7kg dropped from 56cm).

Their toe protection also extends to electrical shocks, offering protection against incidental shocks of up to 18,000 joules under dry conditions.

This makes these boots suitable for electricians and engineers as well as bricklayers and other construction professionals.

But it’s not just your toes that the Carhartt Men’s 10″ Waterproof Insulated PAC Composite Toe Boot is designed to keep you safe.

The TPU heel guard with Achilles flex joint will offer support to your arched feet, allowing you to work confidently without needing to worry about collapsed arches and other forms of long-term feet condition that might develop.

And the insulative LiteFire membrane keeps your feet dry and protects them from extreme weather conditions like rain or snow whilst also promoting airflow.

So your feet will remain warm and dry, avoiding both frostbite and athlete’s foot.

Overall, we strongly recommend that if you are working on concrete during periods of extreme cold, you invest in this pair of boots.

You will feel warm, dry, comfortable, and safe no matter the weather if you have these work boots on. Here’s our best winter work boots page in case you want to see more models for the cold season.

This section of the article will tell you about the dangers for workers on working on concrete for lengthy periods of time, as well as what features to look out for in a pair of work boots for a comfortable, pain-free experience.

The dangers of working on concrete floors for long hours

Working on concrete for long hours can be very dangerous. Concrete is a tough, unforgiving surface that will cause pain and discomfort if you are not careful when working it.

This is why we’re going to look at some of the dangers of working on concrete for too long.

1. Trips and Falls

One of the worst things about working on concrete for long hours is the risk of falling down and hurting yourself.

Concrete, unlike grass or carpeted floors, is unforgiving.

This means a fall onto concrete from any height can result in serious injury or death.

This is particularly dangerous for professionals in construction; who according to the Occupational Safety and Health Administration face twice as many deaths per capita as any other private sector occupation.

But even for workers in warehouses or other professions not involving high altitudes, slipping onto the surface can be a painful experience.

2. Feet Pain

Plantar Fasciitis is a condition that leads to pain at the point where your heel bone connects with the arch.

It can come as a result of working too much on concrete surfaces as they are inflexible, leading to unnatural pronation. Discover here if work boots can cause you plantar fasciitis.

3. Knee pain

Without rest, the knee joints can become excessively strained as a result of being over-worked

This can lead to the knees feeling stuck or tight.

In extreme instances, this can even lead to osteoarthritis.

4. Back pain

Working on concrete for long hours can lead to permanent spinal damage.

This is because concrete is a hard material, and when you’re constantly using your back muscles to work on it, it can become strained or overworked.

As a result, the discs between your vertebrae start to bulge out from their normal position due to the pressure put on them- causing lower back pain.

What you could do to avoid health problems whilst standing or walking on concrete for long hours

Walking and standing on concrete for a long period of time is, unfortunately just a fact of life for many workers, whether on construction sites, in warehouses, or people delivering the post.

There are three main things you can do to avoid health problems from this

Firstly, before starting work and during break times, it is worth doing some stretching exercises with your feet, such as ankle rolls, calf stretches, and touching your toes. This will keep your feet and legs flexible and supple for the long day of work ahead.

Losing weight can also be helpful. This will reduce the load on your knees and feet when you are standing or walking all day.

Finally, buying supportive work boots with features that will ease the strain on your feet and knees is the best thing you can do to avoid health problems. These features will be mentioned just below…

Features to look for in a good work boot for standing all day on concrete

If you’re a worker who spends long periods of time on concrete work surfaces, then buying a good pair of work boots is essential for preventing pains and long-term conditions.

This section of the buyer’s guide will inform you as to what to look out for in a work boot for standing all day on concrete, as well as some additional products you can purchase.

1. Comfort

Comfort is absolutely crucial when you are purchasing work boots and additional products. There are things you should look out for when it comes to comfort, both in the work boot and as an additional product.

2. Shock absorbing footbeds

Shock-absorbing footbeds or ‘insoles’ are great additional products.

They will provide your feet with cushioning and support, and also prevent unhealthy pronation (how feet roll to absorb shock when walking).

One particularly effective product is Dr. Scholl’s Massaging Gel Insoles, which are clinically proven to relieve pain by workers.

They provide excellent cushioning, so it’s almost like you are walking on pillows.

3. Cushioned midsoles

As well as inserts, a good midsole is crucial to having a comfortable work boot.

The midsole is the bit of the work boot between the outsole on the bottom and the upper.

Making sure the midsole is well-cushioned will allow for ample shock absorption, flex support and will support good pronation.

4. Slip resistant outsoles

Hopefully, the concrete work surface you are working on is even, however, there may occasionally be spills, or if you are working outdoors and it starts to rain, then you can slip and seriously hurt yourself.

To prevent this, the outsole, the part of the shoe that comes into direct contact with the ground, needs to be made from a non-slip material.

Soft rubber will be able to grab hold of a slippery concrete surface whereas boots with a harder, stiffer outsole would not be able to.

5. Wedge soles

People often find wedge sole work boots, of which there are a couple in this roundup, most comfortable for working on concrete surfaces.

By spreading the surface area in contact with the ground more broadly, and having a wider area in play, distributes the force of the impact more than a typical boot sole.

So workers in construction, factories, warehouses, or garages find wedge soles more comfortable than boots with an arch.

6. Material

Leather is the best material for working on concrete as it is resistant to water and dust, making it ideal for concrete workers who work in construction or development.

Leather boots in general have a good combination of grip, stability, comfort, and durability, making them ideal for workers on concrete surfaces.

7. Brand

The benefit of a good brand of work boots is that they signify trust and innovation.

These brands will invest millions into research and development so as to make more effective products.

You can also find out more information more easily than for small independent manufacturers, such as the manufacturing process and how other customers found wearing the work boots.

Brands are often able to give great deals on warranties and returns owing to the volume of trade that they do.

The downside to brands is they may cost more. (But you’ll look more fashionable :D) Also, make sure these brands really do have the cutting-edge features they promise before paying out the extra $$.

Benefits of wearing a good work boot whilst working on concrete floors

The benefits of a good pair of work boots for people who work or move on concrete surfaces are comfort, the prevention of developing feet pains, and good support/ traction for the avoidance of more serious injuries.

Concrete Work Boots Q&A

Have questions about buying work boots for concrete you are too afraid to ask your supervisor?

Have no fear, this section of the article will address some of the most common queries users have had about concrete, comfort, and work boots.

Do all work boots for concrete have steel toe?

No, many of the work boots in this roundup have a soft toe or a synthetic toe.

What is the most durable work boot outsole for concrete?

For concrete surfaces, dense molded rubber is the most durable outsole material available.

A nice thick rubber will absorb the shock from walking on concrete to a much greater extent than other materials.

And it will also last longer due to the dense rubber being more durable than synthetic outsoles.

Why do your Feet hurt after Walking on Concrete?

The lack of flexibility of concrete floors, compared to say grass or carpets, creates muscle wear as a result of the shock being felt in the bones. Across the tendons, these shocks will result in pains, aches, and sores.

Your ankle also can feel pain as the ankle is a collection of bones. Think of it like shaking pebbles together in a rigid plastic bag.

Since many shoes encourage us to walk with our heels, this can exacerbate the problem.

Final Verdict On The Best Work Boots For Concrete

In our opinion, the best work boots for concrete are the Thorogood Maxwear.

This work boot contains the best in supportive technology, pain reduction, and cushioning.

Ensuring you can get a good day’s work done without having to worry about long-term feet pain, or tripping and falling over on the concrete.

Those are common dangers of working on concrete, and if you are spending long hours on the hard surface, you need to make sure that you are protecting yourself with a high-quality pair of work boots.

Wedge soles are good, but high-quality tread can also make all the difference.

As can a good internal cushion in the work boot, a steel shank, and a breathable leather design.

Team Members Working On This Page

What is BaddieHub?

0

Step into the world of BaddieHub, the digital playground where confidence reigns and self-expression thrives. This rising star in social media isn’t just another platform—it’s a movement, a community, and a creative powerhouse all rolled into one stylish package.

Understanding BaddieHub: More Than Just a Platform

BaddieHub is a specialized online platform and digital community centered around the “baddie” aesthetic and lifestyle. The term “baddie” originated in social media culture, describing individuals—predominantly women—who exude confidence, embrace bold fashion choices, and display a distinctive sense of style characterized by attention-grabbing makeup, trendy outfits, and an unapologetic approach to self-presentation.

Unlike broader social networks, BaddieHub creates a dedicated ecosystem where this specific aesthetic is celebrated, supported, and cultivated. It serves multiple functions simultaneously:

  • Content Repository: A curated collection of fashion inspiration, beauty tutorials, lifestyle guidance, and wellness advice tailored to the baddie aesthetic
  • Social Network: A community space where like-minded individuals connect, share experiences, and build relationships
  • Creator Platform: A stage for content creators to showcase their work, build audiences, and potentially monetize their digital presence
  • Educational Resource: A learning environment where beginners can access mentorship, tutorials, and practical advice

This multifaceted approach positions BaddieHub as more than just another social media platform—it’s a comprehensive digital habitat for a specific cultural movement.

The Evolution of Baddie Culture

To understand BaddieHub’s significance, it’s essential to recognize the cultural phenomenon it’s built upon. The “baddie” aesthetic emerged organically through platforms like Instagram and TikTok, characterized by:

  • Bold makeup techniques with strong contouring, dramatic eyeliner, and defined eyebrows
  • Fashion choices that blend streetwear, luxury brands, and trend-forward styles
  • A distinctive photography style emphasizing carefully curated images with particular poses and settings
  • An emphasis on confidence and self-assurance as essential components of the look

What began as a hashtag and visual trend has evolved into a recognized subculture with its own codes, influencers, and community practices. BaddieHub represents the institutionalization of this aesthetic movement, providing it with a dedicated home beyond the constraints of general-purpose social platforms.

Content Offerings: The Heart of BaddieHub

At its core, BaddieHub provides access to diverse content aligned with the baddie aesthetic:

Fashion and Style

The platform showcases the latest fashion trends, outfit inspirations, and styling tips that embody the baddie look. From streetwear combinations to elevated casual ensembles, users can explore various interpretations of the aesthetic tailored to different occasions, body types, and personal preferences.

Beauty and Makeup

Makeup plays a central role in the baddie aesthetic, and BaddieHub offers comprehensive tutorials, product recommendations, and technique demonstrations. Content ranges from everyday glam to special occasion looks, with particular emphasis on signature elements like perfect winged eyeliner, flawless foundation, sculpted contours, and bold lip choices.

Lifestyle Content

Beyond fashion and beauty, BaddieHub encompasses broader lifestyle elements including:

  • Home decor and personal space styling
  • Travel destinations and experiences
  • Wellness routines and self-care practices
  • Fitness regimens and body confidence approaches

Community Interaction

What distinguishes BaddieHub from mere content repositories is its emphasis on community engagement. Users can:

  • Comment on and discuss content
  • Share their own interpretations and creations
  • Participate in challenges and themed events
  • Join specialized groups based on specific interests within the broader aesthetic

User Experience and Interface

BaddieHub’s design philosophy appears centered on creating an intuitive, visually appealing experience that aligns with the aesthetic sensibilities of its user base:

  • Visual Priority: The platform likely emphasizes high-quality images and videos, with layouts designed to showcase visual content effectively
  • Intuitive Navigation: Easy-to-use menus and search functions help users discover content relevant to their specific interests
  • Mobile Optimization: A responsive design and dedicated mobile app ensure on-the-go access to the platform
  • Interactive Elements: Features that encourage engagement, such as reaction buttons, comment sections, and sharing capabilities

The user journey through BaddieHub appears designed to be both educational and inspirational, guiding users from casual browsing to active participation and potentially to content creation.

Creator Ecosystem: Nurturing Digital Expression

One of BaddieHub’s most distinctive features is its focus on supporting content creators at all stages of their journey:

For Aspiring Creators

BaddieHub offers resources specifically designed for beginners:

  • Mentorship programs connecting novices with experienced creators
  • Educational content on content creation techniques and strategies
  • Guidelines for building an audience and developing a personal brand
  • Support for transitioning from hobbyist to professional creator

For Established Creators

More experienced users benefit from:

  • Expanded reach through a targeted, interested audience
  • Potential monetization opportunities through subscriptions or premium content
  • Networking with other creators for collaborations and knowledge sharing
  • Tools for audience engagement and content distribution

Monetization Framework

While specific details vary, BaddieHub appears to offer multiple avenues for creator monetization:

  • Subscription-based models for exclusive content
  • Tipping or direct support mechanisms
  • Possible advertising revenue sharing
  • Branded partnership opportunities

This holistic approach to creator support distinguishes BaddieHub from platforms that either focus solely on content consumption or provide creator tools without the supportive community context.

The Business Model: Balancing Community and Commerce

Based on available information, BaddieHub likely operates on a multi-faceted business model:

  • Freemium Structure: Basic access to content and community features available for free, with premium features or exclusive content behind paywalls
  • Creator Revenue Sharing: Taking a percentage of transactions between creators and their audiences
  • Advertising Integration: Targeted advertising relevant to the platform’s demographic
  • Possible Subscription Tiers: Different levels of access and features based on monthly subscription fees

This diversified approach allows BaddieHub to generate revenue while maintaining accessibility for casual users and providing income opportunities for active creators.

Cultural Significance and Positioning

BaddieHub’s existence reflects several significant trends in contemporary digital culture:

Niche Community Formation

As mainstream social platforms grow increasingly broad and algorithmic, there’s a countervailing trend toward specialized spaces catering to specific interests and aesthetics. BaddieHub exemplifies this movement toward digital communities united by shared visual and lifestyle preferences.

The Creator Economy

BaddieHub operates within the broader “creator economy”—a paradigm shift where individual content creators can build sustainable careers through direct audience relationships. By providing both the tools and the audience, BaddieHub facilitates this economic model specifically for creators within the baddie aesthetic.

Representation and Inclusivity

While centered on a specific aesthetic, BaddieHub appears to emphasize diversity and inclusivity within that framework, showcasing various interpretations of the baddie look across different body types, skin tones, and backgrounds. This positions it as part of a broader movement challenging traditional beauty standards while establishing new visual codes.

Digital Identity Construction

The platform reflects contemporary approaches to identity formation through digital self-presentation, where aesthetic choices become significant markers of personal and social identity. BaddieHub provides both the templates and the stage for this identity work.

Challenges and Considerations

Despite its appealing features, BaddieHub navigates several challenges common to digital platforms:

Content Moderation

Ensuring appropriate content while fostering creative expression requires sophisticated moderation approaches. BaddieHub likely implements both automated systems and human review to maintain community standards.

Beauty Standards and Ethical Considerations

Any platform centered on aesthetic presentation must contend with questions about beauty standards and potential impacts on user self-image. BaddieHub appears to approach this by emphasizing confidence and authenticity alongside specific visual styles.

Privacy and Data Security

As with all digital platforms, BaddieHub must address concerns about user data protection, privacy policies, and information security, particularly if financial transactions occur on the platform.

Sustainability and Evolution

To remain relevant, BaddieHub must evolve with changing aesthetic trends while maintaining its core identity and community connections. This requires continuous innovation in features, content approaches, and community engagement strategies.

The BaddieHub Experience: From Consumer to Creator

The typical user journey on BaddieHub might progress through several phases:

  1. Discovery: Finding the platform through social media mentions, influencer recommendations, or direct searches for baddie-related content
  2. Consumption: Browsing available content for inspiration and education
  3. Participation: Engaging with the community through comments, likes, and shares
  4. Creation: Beginning to contribute original content, starting with simple posts and potentially developing more sophisticated offerings
  5. Monetization: For some users, transitioning to creating premium content and building a dedicated audience

This progressive engagement model creates multiple entry points and pathways through the platform, accommodating various levels of interest and commitment.

Beyond the Platform: BaddieHub’s Broader Reach

BaddieHub extends its presence beyond its primary platform through:

  • Social Media Integration: Connections with established platforms like Facebook for additional community engagement
  • BaddieHub TV: A specialized content channel focusing on video presentations of baddie-related content
  • Mobile Applications: Dedicated apps providing optimized mobile experiences
  • Rewards Programs: Points systems and perks encouraging continued engagement and platform loyalty

These extensions create a broader ecosystem around the core platform, increasing accessibility and deepening user engagement.

Conclusion: BaddieHub as a Digital Cultural Phenomenon

BaddieHub represents more than just another social media platform—it exemplifies the evolution of digital spaces toward more specialized, community-focused environments where specific aesthetics and interests can flourish. By combining content delivery, community building, and creator support within a unified ecosystem, it creates a distinctive value proposition for both casual enthusiasts and serious creators within the baddie aesthetic.

As digital culture continues to fragment into more specialized communities, platforms like BaddieHub demonstrate how online spaces can foster deeper connections around shared visual and lifestyle preferences. Whether it’s providing inspiration for a casual follower of the aesthetic or offering economic opportunities for dedicated creators, BaddieHub illustrates the potential of niche digital platforms to create meaningful cultural spaces in an increasingly diverse online landscape.

For users seeking a digital environment that celebrates confidence, bold style choices, and authentic self-expression through the baddie aesthetic, BaddieHub offers a comprehensive ecosystem that goes beyond mere image sharing to create a true community of shared interests, aspirations, and creative expressions.

.300 Win Mag vs 30-06: The Quintessential Long Range Big Game Calibers

0

300 win mag vs 30-06As you take your seat next to the crackling campfire at elk camp, you look up as the sparks flutter into the night sky. The evening is brisk, and you are looking forward to the hot coffee that is starting to boil in the blue enamel kettle on the fire.

Your hunting buddies soon join you after a long day of stalking and regale their tales of the events that transpired. Near misses, huge bull elk sightings, and jokes about who are the worst shooters in the group pass the time as you soak in the atmosphere and scent of the forest that surrounds you.

As the evening progresses, the discussion turns towards which hunting cartridge is ideal for big game hunting in North America.

When it comes to long-distance big game hunting, the 30-06 Springfield and 300 Winchester Magnum are ever-present in the discussion around the campfire or internet hunting forums.

Many claim that the high muzzle velocity, flatter trajectory, and longer effective range make the 300 Win Mag the obvious choice. However, some contest that the 30-06 is more than sufficient for any large game, and the added recoil and hunting rifle weight of the 300 Win Mag are not needed.

But which of these 30-caliber cartridges is ideal for your next hunt?

The Difference Between .30-06 vs .300 Win Mag: Two 30-Caliber Giants

The 30-06 Springfield and the .300 Win Mag are two extremely capable long-range shooting cartridges that will serve you well when the moment arises. Both hunting cartridges fire the 30 caliber bullets accurately and it’s unlikely that we will be able to determine a winner per se.

The 300 Winchester Magnum was designed as a long-distance magnum cartridge to fire heavier bullets with extreme precision at a high effective range like that of the 6.5 Creedmoor.

The 30-06 Springfield was designed as a military cartridge that found amazing success in the realm of big game hunting. With its spectacular terminal ballistics, the 30-06 has claimed every large game animal on the North American continent and has been the hunting rifle chambering of choice for no less than 3 generations.

Each hunting cartridge has its advantages and disadvantages, and you need to be aware of these when choosing the caliber of your next target shooting or hunting rifle.

Cartridge Specs

Both the 300 Win Mag and the 30-06 fire the same diameter bullet, 0.308”. This means that they can typically fire the same 30 caliber bullets, so it makes reloading simpler for both calibers.

300 win magv s 30-06 dimension chart

The first striking difference that you’ll see when comparing the .300 Win Mag and the 30-06 is the difference in case length. The 300 Win Mag is a full 0.12” longer than the 30-06 and you can easily see this when comparing them side by side. However, once loaded, both the 30-06 ammo and the .300 Win Mag will have the same overall case length.

The overall design of the 300 Win Mag also lends itself to increased case capacity. The .300 Win Mag has over 35% more case capacity than the 30-06, allowing for larger powder charges and higher velocity that lends itself to long-range shooting.

As far as pressure, the .300 Win Mag is capable of handling over 3,000 psi more pressure than the 30-06. But all of that increased case capacity and powder charge come at a price, recoil, and barrel life.

Recoil

There’s no denying that the recoil plays a key part in accuracy, and neither the .300 Win Mag nor the 30-06 is a slouch when it comes to recoil.

Recoil also plays a part in follow-up shots, as you can get your sights back on target faster with a lower recoiling rifle.

As I’m sure you have guessed, the 300 Win Mag has higher felt recoil than the 30-06. Assuming a 7 lb rifle for both calibers, the .300 Win Mag has approximately 35 ft-lbs of recoil, while the 30-06 is slapping your shoulder with 23 ft-lbs. That’s a good 12 ft-lbs less recoil for the 30-06, and that’s not nothing.

However, there is another factor that we need to consider, and that’s rifle weight. Often a .300 Win Mag will garner a larger rifle. Although this might be uncomfortable to backpack through the woods all day, a heavier rifle will reduce the felt recoil a shooter has to endure as the rifle soaks up some of the recoil itself.

With a rifle weighing 9 lbs, the felt recoil for .300 Win Mag will come down to about 27 ft-lbs of shoulder punishment.

300 win mag vs 30-06

Although this is a lot more manageable, you still must carry a 9-pound rifle through the woods all day, and that can wear on your endurance as well. In the end, it’s a trade-off, a heavier rifle recoils less but is more uncomfortable to carry while a lighter rifle will recoil more but be more comfortable to carry through the woods.

Many hunters will just say you need to “man up” because shooting the more powerful .300 Win Mag is worth it. But is it?

When shooting at longer ranges, consistency is key. Although the flat shooting trajectory of the 300 Win Mag is more favorable for long-range shots, the added recoil can add a level of difficulty focusing on the fundamentals of shooting, particularly a clean trigger squeeze.

For younger shooters, there is no question, the 30-06 with less recoil is the obvious choice. For more seasoned hunters and shooters, you need to be honest with yourself about your marksmanship skills and ability to handle the recoil.

Because a little trigger jerk at 400 yards will send that 220 gr Hornady ELD-X under the belly of that trophy mule deer. Or worse, you wound the poor animal with a shot that misses all the vitals entirely.

The simple truth is that it is easier to be more accurate with a 30-06 as it has less recoil, and you can practice with it more.

Barrel Life

This is another category that favors the 30-06 Springfield as the .300 Win Mag is notoriously hard on barrels. This is due to the larger powder charge that the cavernous case capacity of the 300 Win Mag allows.

Sure, you can send those 30 caliber bullets screaming out of the barrel at ridiculously high velocity, decidedly higher velocity than the 30-06. But those magnum powder charges are going to accelerate your barrel wear, especially in the throat where the rifling begins.

Traditional wisdom states that a 30-06 barrel is good for 3,000 to 4,000 rounds while the .300 Win Mag barrel will maintain peak accuracy for 2,500 to 3,000 rounds.

For most hunters, it is unlikely that they will ever wear out a 300 Winchester Magnum barrel.

However, for long-range shooting competitors, it is not uncommon to go through a lot of rounds in a practice session. These shooters demand the pinnacle of accuracy from their handloads and barrels, therefore barrel life is much more important for competitive shooters as opposed to hunters.

Accuracy

Accuracy is a tricky category to empirically analyze as there are factors that cannot be calculated. The rifle system being used, barrel life, consistency of ammo, the skill of the shooter, and environmental conditions all play a part in accuracy.

All things being equal, both the .300 Win Mag and the 30-06 are extremely accurate within their effective ranges and sub-MOA accuracy is achievable with match-grade ammo, proper optics, and proper execution of the fundamentals of marksmanship.

As the .300 Win Mag has a flatter trajectory, this gives it a slight edge in accuracy over the 30-06 as a shooter will need to make fewer adjustments to account for bullet drop.

300 win mag vs 30-06

Furthermore, the Army selected the 300 Win Mag as its ammo for their new Enhanced Sniper Rifle in 2010 (though the 6.5 Creedmoor is turning some heads at USSOCOM).

Effective range also plays a part in accuracy, as once a bullet goes subsonic, accuracy goes out the window.

The .300 Win Mag is rated out to a maximum effective range of 1,300 yards while the 30-06 starts going subsonic right around the 1,000-yard marker. Under 800 yards, with all things being equal, I doubt many shooters could detect any differences in accuracy. Over 800 yards it will become more apparent as the 30-06 starts to hemorrhage fps quickly and the 300 Win Mag is still trucking along.

For shots over 800 yards, the 300 Win Mag will be the better option. However, for shots within ethical hunting ranges and below 800 yards, accuracy should be equal for these two hunting cartridges.

Trajectory

Trajectory is how we quantify a bullet’s flight path to its target measured in inches of bullet drop.

For the purpose of discussion, we will look at the 180 grain bullet that both cartridges fire.

Short-range trajectory for the 300 Win Mag and 30-06 are fairly close, at -18” and -27” respectively. Nine inches is not insignificant, but the difference between these two cartridges really shows when you hit the 1000-yard line.

At 1,000 yards, the 30-06 has dropped on average -397” while the 300 Win Mag has only dropped -295”. That’s 8.5 feet difference between the two cartridges.

This is one of the main reasons that the 30-06 is not used in long-range target shooting competitions and the 300 Win Mag is often seen on the 1,000-yard firing line.

The .300 Win Mag was specifically designed to be a high velocity, flat shooting round similar to the 6.5 Creedmoor and it excels at this role. There’s no denying that for longer ranges, the .300 Win Mag is the superior choice.

Effective Range

This is another category where the .300 Win Mag runs away with the victory.

As mentioned earlier, the 300 Winchester Magnum can maintain supersonic bullet speeds out to 1,300 yards, with some match grade loads reaching out to 1,400 and even 1,500 yards.

The 30-06 Springfield will start to go subsonic right around the 1,000-yard line and accuracy will drop off significantly.

The .300 Win Mag has cornered the market in terms of effective range.

Ballistic Coefficient

When I start talking about ballistic coefficient (BC) to my shooting buddies, I often get a “deer in headlights” look.

In short, the ballistic coefficient for a given bullet is a measure of how well it resists wind and air resistance. It’s a numeric representation of how aerodynamic a bullet is, a high BC is preferred and means the bullet will buck the wind easier.

300 win mag vs 30-06

The way a bullet’s ballistic coefficient is calculated is a bit complicated, so we won’t cover that today as I don’t want your eyes to glaze over!

Generally, a heavier bullet will have a higher BC.

As the 300 Win Mag and the 30-06 Springfield fire the same bullet diameter, there is not a lot of difference in ballistic coefficients between the two cartridges.

The .300 Win Mag does pull away a little when you start to factor in the heavier 190+ grain loadings, but it is not a significant difference.

If we look at this in a hunting context, I doubt that any hunters will be able to detect a difference in wind drift under 300 yards, which is where the majority of shots will occur.

Therefore, there is not a major difference between these two rounds in terms of ballistic coefficient as most offerings stick between the 0.45-0.5 range, which is an exceptional BC.

There are a few 30 caliber bullets that break the 0.6 BC, which would be ideal for long-range target shooting for the 300 Win Mag. Those bullets would be the Nosler Trophy Grade AccuBond Long Range 190 gr (0.64 BC) and the Barnes Precision Match OTM 220 gr (0.611 BC).

Sectional Density

Sectional Density (SD) is the measure of how well a bullet penetrates a target. This is extremely important when hunting big game, as you need a bullet that can punch through thick hide, bone, and sinew.

Sectional density is calculated by comparing the bullet weight and the bullet diameter, the higher the number the more effective it will be at penetrating a target. The higher the SD the deeper the bullet will penetrate the target.

300 win mag vs 30-06

Just like for ballistic coefficient, there is not much difference between the 30-06 and the .300 Win Mag as they fire the same .308” diameter projectiles, with a slight advantage for the heavier 300 Win Mag loadings.

Another small advantage is the higher velocity that the 300 Win Mag can achieve with its higher case capacity. This added velocity over the 30-06 Springfield will allow the .300 Win Mag to penetrate just a bit deeper.

However, both the 30-06 Springfield and the 300 Winchester Magnum will give you devastating penetration that will punch through the toughest bone and sinew on any large game that dares to end up in front of your crosshairs.

The average sectional density for .300 Win Mag is approximately 0.284 vs 0.26 for the 30-06.

Hunting

Now we come to the big question, is the 300 Win Mag or 30-06 better for hunting?

And I’m going to go out on a limb here and state that the 30-06 Springfield is the ideal hunting round between the two.

Now, before all my 300 Win Mag shooters get up in arms, let me present my case.

The biggest selling point on the .300 Win Mag that I read constantly in hunting forums online is that has a flatter trajectory and longer effective range. And those are both true.

On those same forums, I see hunters justifying their purchase that they “might need to shoot out to 1,000 yards at some point…”

I have a question, have any of those forum posters actually practiced 1,000-yard shots?

I’m not talking about using reduced-sized targets to simulate 1,000 yards at 100 yards, I’m talking about an actual 1,000-yard shot.

The calculations and skills that are required to make a shot this long require years of practice and specialized training.

There are a ridiculous number of factors to consider in taking a shot this long: changes in wind direction along the flight path, bullet drop, relative humidity, temperature, the Coriolis Effect, bullet travel time, the curvature of the Earth, even the type of powder you used in your handloads.

300 win mag vs 30-06

Oh, and you actually need a shooting range that can accommodate 1,000-yard shots. In my home state of Indiana, there is exactly ONE range that allows shooters to go out to this distance and they have extremely stringent marksmanship requirements that you must meet before you can even set foot on the 1,000-yard range.

If these forum posters think they can pull off even an 800-yard shot without practicing, well I say, “Good luck to you sir!” Because you’re going to need it!

The simple fact is this, most hunters do not have the equipment, skills, time, or money to develop the ability to shoot this far. And you know what? That’s OK!

If you are an ethical hunter (which if you have read this far, I know you are), you should not even be considering taking a shot on any game animal at those distances because the probability that you wound the animal is significantly higher (if you hit them at all).

An ethical hunter will try to close the distance to a range they are comfortable taking the shot or passing on the animal altogether. Therefore, the internet group reasoning for purchasing a 300 Win Mag because of its ability to shoot out to 1,000 yards is null and void in terms of hunting.

In my experience, ethical hunting shot distances are 500 yards or less with 300 yards being the average maximum distance most hunters are comfortable with. Shot placement is always the most important thing to ethically harvesting an animal, and the closer you are the better your shot placement will be.

Bearing that in mind, what advantage does the 300 Win Mag offer over the 30-06 Springfield at 300-500 yards? The answer is not much.

Both hunting cartridges will have more than enough muzzle energy to take down a bull elk (1,000+ ft-lbs) at these distances, which means they are more than enough for Whitetail and Mule Deer as well.

Therefore, it makes logical sense that the better option is the cartridge that has less recoil (better shot placement), allows for faster follow-up shots, and is generally less expensive.

Hence my reasoning for selecting the 30-06 Springfield as the superior choice for hunting medium to large game animals across North America.

Neither cartridge is recommended for varmint hunting as they are simply too much bullet for the job. For something like this, I’d recommend using the cheaper and softer shooting 223 Rem or perhaps a 22-250.

For deer to black bear, the 30-06 loaded with quality hunting ammo like a Nosler Partition will serve you well.

300 win mag vs 30-06

Ammo Price and Availability

In terms of ammo availability and price, without question, the 30-06 is the superior choice.

As the 30-06 has been in service for well over 100 years now, the amount of work that has been done on the cartridge is extensive. Advancements in bullet technology and powders have come a long way to make the 30-06 an effective large game slaying cartridge.

Virtually every ammo manufacturer has an offering in 30-06, but the same cannot be said for .300 Win Mag.

The 300 Winchester Magnum was not released until 1963, and although it has gained a lot of popularity, not as many ammo options are available for this caliber.

You still have plenty to choose from, but overall, there are fewer options for .300 Win Mag.

As for price, cheap full metal jacket (FMJ) ammo can be had for about $1.50/round for 30-06 compared to $2/round for 300 Win Mag.

That might not sound like a huge difference, but when you start looking at premium hunting ammo from Hornady, Nosler, Barnes, Norma, or Federal, the price jumps up significantly. Premium hunting ammo for 30-06 will run you anywhere between $2-3/round. In contrast, you should expect to pay no less than $3 and up per round for the likes of Federal Premium 300 Win Mag ammo, Hornady Superformance, or Barnes VOR-TX.

With 30-06, you can practice with your hunting rifle more which means you will be better prepared when hunting season comes around.

Rifle Price and Availability

Rifles for both the 30-06 and 300 Win Mag are not in short supply.

Every major rifle manufacturer will have an offering in both cartridges.

Some popular bolt action rifle options are:

  • Remington 700
  • Savage 110
  • Browning A-Bolt
  • Ruger American
  • Winchester Model 70
  • Tikka T3

And although you will not lack options in either caliber, there will simply be more in 30-06 as it has been a military caliber. There are many surplus options for 30-06, like the 1903 Springfield and M1 Garand, that are simply not available for 300 Win Mag.

It was only within the last 12 years that the 300 Win Mag was adopted as a military round, and as such there are no surplus rifles available. And when there are more rifle options available, this means that the price will be lower.

In general, a rifle chambered in 30-06 will be a little cheaper than one chambered in .300 Win Mag.

300 win mag vs 30-06

Reloading

As the .300 Win Mag and the 30-06 shoot the same .308” diameter bullet, it is nothing short of a reloader’s dream as you can stock up on one bullet type for both calibers.

Furthermore, if you want to shoot long-range (and have the location to do so), handloading is the best way to tighten up your groups and squeeze every fps of muzzle velocity out of either cartridge (Warning: never load over the maximum charge listed in your reloading manual!)

The widespread success of the 30-06 (and 308 Winchester) means that you have a wide variety of different bullet weights, bullet profiles, and powders to choose from to create your ideal reload.

Reloading for both the 30-06 and .300 Win Mag is a breeze and you should not worry about any lack of components or reloading dies as these are both extremely popular cartridges for handloading.

.300 Win Mag vs .30-06: Ballistics

Below are the ballistics tables for both .300 Win Mag and .30-06 Springfield comparing multiple popular loadings for each cartridge. Here you can see how each cartridge stacks up against the other, and the differences in the ballistics are impressive.

The 300 Win Mag has a clear advantage over the 30-06 in terms of muzzle velocity and muzzle energy as we have alluded to earlier in the article.

When looking at the lighter bullet options for the .300 Win Mag, you’ll note that the 150 grain 300 Win Mag has a higher muzzle velocity than the 55 grain .223 Rem! (3,400 fps vs 3,200 fps, respectively)

Generally, the 30-06 Springfield is going to be about 800 fps slower at the muzzle than the 300 Win Mag. The same can also be said for muzzle energy as the .300 Win Mag will have about 500+ more ft-lbs of energy at the muzzle compared to the 30-06. There’s no denying that the 300 Win Mag is a high velocity, hard-hitting round!

.300 Win Magnum Ballistics

Note: This information comes from the manufacturer and is for informational purposes only. The actual ballistics obtained with your firearm can vary considerably from the advertised ballistics. Also, ballistics can vary from lot to lot with the same brand and type load.

.30-06 Springfield Ballistics

Note: This information comes from the manufacturer and is for informational purposes only. The actual ballistics obtained with your firearm can vary considerably from the advertised ballistics. Also, ballistics can vary from lot to lot with the same brand and type load.

300 Win Mag: Joining the Magnum Lineage – Go Big or Stay Home

Let’s call a spade a spade my fellow shooters, here in North America we like our Magnum cartridges!

From Dirty Harry and his .44 Magnum Smith and Wesson handgun to big game hunters in the forests of Northern Canada, many shooters like that extra stopping power that magnum cartridges bring to the table.

And the 300 Winchester Magnum steps into the Magnum Lineage like any other magnum cartridge on the market…with a deafening BANG!

Before the 300 Winchester Magnum exploded onto the shooting scene in 1963, there were several other 30-caliber options that we would classify as Magnum ammo by today’s standards.

The most prominent of these was the 300 H&H Magnum that had been on the market since 1925. However, the 300 H&H Magnum could not fit into a standard action Mauser or Springfield receiver and required a custom Magnum action, which severely handicapped its acceptance in the shooting community.

The next attempt at a magnum rifle cartridge was attempted by Roy Weatherby with the 270 Weatherby Magnum in 1943 and the 300 Weatherby Magnum in 1944.

300 Win Mag: Genesis of the Quintessential Big Game Hunting Cartridge

In 1958, Winchester figured they should probably get in on the magnum craze and introduced 3 new cartridges to their line: the 264 Winchester Magnum, the 338 Winchester Magnum, and the 458 Winchester Magnum.

Notice any glaring omission from that list? There’s no 30-caliber option!

Wildcatters (hand loaders who take it upon themselves to develop new cartridges) quickly jumped on this glaring hole in the Winchester line and developed the 30-338 Winchester. Norma Precision also took the opportunity to get in on the action and developed the 308 Norma Magnum in 1960.

It was at this point that Winchester figured that maybe they might do well by introducing a 30-caliber magnum rifle cartridge offering. And in 1963, Winchester introduced the 300 Win Mag in its long-action Winchester Model 70 bolt action rifle.

Remington quickly followed suit, introducing a 300 Win Mag offering in its popular Rem 700 bolt action rife. Since then, the 300 Winchester Magnum has quickly become one of the most successful magnum rifle cartridges on the market today.

The 300 Winchester Magnum was developed from the belted 375 H&H Magnum cartridge and sports a whopping case capacity of 91.5 gr of water and a max pressure of 64,000 psi based on SAAMI specifications.

This voluminous case capacity allows the 300 Win Mag to pack in the powder and push the .308” diameter bullet to its limits.

At the muzzle, a 150 grain bullet is screaming downrange at about 3300 fps with a back-breaking 3600 ft-lbs of energy. That is some serious power! Standard loadings for the 300 Win Mag range between bullet weights of 165 and 220 gr.

Many shooters believe that the belt around the case head is required to contain the “case-splitting” pressure that the 300 Win Mag must exude. However, this is a common misconception.

Based on the case design, the belted cartridge is superfluous. However, Winchester retained the design as a marketing strategy to link the cartridge to its heavy-hitting predecessor, the 375 H&H Magnum.

The strategy was wildly successful as the 300 Winchester Magnum has become one of the most popular magnum cartridges on the market, surpassing the 300 WSM, 7mm Rem Mag, and 270 Weatherby Magnum in popularity.

A Brief History of the 30-06 Springfield: America’s Beloved Rifle Cartridge

America’s love affair with 30 caliber rifle rounds began back in the Wild West with the introduction of the 30-30 Winchester. Later, the U.S. Army developed the 30-40 Krag to be its smokeless powder replacement for the .45-70 Government.

Around 1901, the U.S. Military started developing a new cartridge to replace the 30-40 Krag. The American Expeditionary Forces were very familiar with the effectiveness of the 7mm Mauser cartridge, suffering staggering losses at the hands of the 1893 Mauser at the Battle of Santiago during the Spanish-American War.

It was clear that the 30-40 Krag was an inferior design compared to the Spanish Mausers and the military did not want to fall behind with advancements in bolt action rifle and cartridge technology.

At the time, heavier bullet weights were thought to be the superior ballistic choice. Therefore, the initial design submitted in 1903 used the same 220-grain round-nose bullets fired by the 30-40 Krag.

300 win mag vs 30-06

The 30-03 Springfield was patterned after the famous 7x57mm Mauser cartridge, sharing identical case head dimensions.

However, it didn’t take long for the American generals to take note that multiple European nations were favoring higher velocity, Spitzer (pointed) projectiles in their new bolt action rifles.

Not wanting to get left behind, the U.S. Military was quick to adopt a similar design. In 1906, the new cartridge that fired a 150-grain Spitzer flat-based bullet was submitted and accepted. The original design for 30-06 Springfield achieved a muzzle velocity of 2,700 fps, packed 2,429 ft-lbs of muzzle energy, and a maximum pressure of 60,200 psi (SAAMI specs).

And thus the 30-06 Springfield was born. The “30” designates the bullet caliber and the “06” (pronounced: aught six) designates the year of its adoption.

Although the 30-06 initially gained popularity with the Army’s new bolt action rifle, the 1903 Springfield (which looked surprisingly similar to a Mauser…coincidence I’m sure), it truly became World Famous with the introduction of the semi-auto M1 Garand during World War II.

The 30-06 Springfield was the ammo carried by our soldiers who fought in the trenches on the Western Front in World War I, stormed the beaches of Normandy in WWII, assaulted the 38th Parallel in Korea, and saw limited use in the jungles of Vietnam.

Not only has the 30-06 seen massive success on the battlefield, but it has also seen immense commercial success in the civilian market. Big game hunters loved the amazing terminal ballistics and long-range that the 30-06 offered while having a recoil impulse that is not punishing to the shoulder.

Since its introduction to the civilian market, the 30-06 has been the de facto hunting cartridge that all other hunting caliber cartridges are measured against. The most popular loadings for 30-06 range between 150 and 180 gr bullet weights with the 180 grain bullet being the most popular with big game hunters. However, specialty ammo can go as low as 110-grain bullets and as high as 220 grain projectiles.

The 30-06 Springfield is incredibly versatile, allowing hunters to customize their loads depending on the game animals they are stalking. Lighter bullet weights like the 150 and 165 gr Nosler Partition or Accubond can be utilized for whitetail or mule deer, while you should have good luck with the 200 gr Barnes TSX when you have a vital shot lined up on that trophy elk in your crosshairs.

The 30-06 is truly a rifle cartridge of American legend and has survived the test of time, as it is still one of the most popular hunting rounds in the world over 100 years later. But does the 300 Winchester Magnum simply outclass the tried and true 30-06? Let’s compare these two spectacular long-range cartridges.

Final Thoughts on .300 Win Mag vs .30-06 Springfield

The .300 Win Mag was developed to be an incredibly accurate long-range rifle cartridge capable of shooting past 1,000 yards. And it does this extremely well.

The 30-06 Springfield was battle-tested on the beaches of Normandy and has proven to be a capable hunting cartridge in the forests across North America.

On paper, the 300 Win Mag has superior ballistics in terms of muzzle velocity, muzzle energy, trajectory, effective range, and ballistic coefficient. However, all these benefits are at the cost of punishing recoil and reduced barrel life.

But with all these advantages, should you go out and sell the Remington 700 or Browning A-Bolt chambered in 30-06 that you inherited from your grandfather and get a 300 Win Mag? Absolutely not!

The 30-06 is a versatile hunting cartridge that has withstood the test of time, claiming every large game animal from the Great Plains to the Rocky Mountains. Less recoil and faster follow-up shots allow the 30-06 to be just as potent as the 300 Win Mag within 500 yards and you should never feel under-gunned when you bring your 30-06 into the woods.

But if you can take the recoil and you take comfort in knowing you are bringing a high velocity, flat shooting cartridge to bear on that Whitetail in your sights, the 300 Win Mag won’t let you down so long as your shot placement is on point.

Hunting season is fast approaching, it’s time to get out to the range and practice with your favorite bolt action rifle and get ready. Your trophy deer or elk is waiting for you, show him what a 30-06 or a .300 Win Mag can do!

How to get started with bird hunting

0
Photo by John Holyoke

Loving the outdoors, wanting to put some food on the table and maybe spending some quality time with friends. These are just some of the reasons people get started with bird hunting.

Upland birds are game birds that including quail, pheasant, grouse, woodcock, prairie chicken or partridge.

Learn from those who know

For first time bird hunters, getting started is as easy as finding a local class covering hunting safety and regulations.

“I always encourage anyone looking to start bird hunting to not pass go,” said Wes Siler, Montana-based outdoorsman, adventure traveler and author of Outside Magazine’s column IndefinitelyWild. “Enroll in a hunters’ education course where you will get the best information on all the hunting basics and safety.”

Many states, Siler said, require successful completion of a hunter safety course before issuing a hunting license. The laws and seasons associated with upland bird hunting vary state to state. Always check with your state’s fish and game commission to know the latest in laws and what is in season.

“Typically this is a one-day class taught by volunteers [and] is equivalent to the drivers ed course you took in high school,” Siler wrote in a recent column. “Even if you’re already familiar with firearms and the outdoors, hunter’s ed is a fantastic refresher in all the nitty-gritty details of remaining legal and safe in the field.

In some states, the course is required to obtain a hunting licence, but even where it’s not mandatory it’s recommended to take one. The course will also answer a number of beginner questions including what are the best types of guns to use and what kind of ammunition works best for specific game birds.

Getting out into the field

Hunter education course certificate and hunting license in hand, it’s time to get out into the field.

“The nice thing about bird hunting is you can find groups of people to hunt with,” Silas said. “Either an informal hunting party of friends or a paid guide can take you out and you can start to put what you learned in [hunter’s ed] into practice.”

Unlike guided big game hunts for animals like deer, bear, moose or elk which Silas said can cost in the thousands of dollars, a guided bird hunt will usually run around $100.

“Having a guide or someone with real experience with you helps you get out for an authentic and fun hunting experience,” Siler said. “A guided bird hunt is really the easiest possible entry point into the sport of hunting.”

What equipment and gear do I need to get started with bird hunting?

BDN File Photo

As for what to bring on the first hunts? Siler, who’s been hunting since he was a young boy, recommends the basics — a shotgun, ammunition and patience.

“If the weather is good, all you need to wear are jeans, a t-shirt and tennis shoes,” he said.

Silas is a fan of the 12-gauge shotgun for bird hunting that has been outfitted with a “choke-tube.” A choke tube is a tapered attachment for the front of a shotgun barrel, it can be set to shoot the shot from a shell in a narrow to wide, scattered path.

By mixing and matching the type of shot used in individuals shells and the set-path for that shot Siler said you can custom-configure the shotgun to specific birds and terrain, making it a very versatile weapon.

“You can open the choke tube up for a wider spread of shot if your target is close in,” he said. “Or you can set it so the shot’s path is narrow and goes a greater distance.”

John Holyoke, longtime Maine outdoorsman, staff writer and writer of the outdoors column Out There for The Bangor Daily News,and Julie Harris, fellow columnist at the Bangor Daily News with It’s a Bird Dog’s Life, both hunt with .20-gauge shotguns. They recommend wearing at least a blaze orange hat or vest so you are visible in the woods.

Siler agrees wearing either a hat or vest that has blaze orange on it, making you visible to other hunters who are in your group or in the area, is a very good idea.

Harris likes to also wear a vest with pockets into which she can place a whistle, ammunition, a compass and anything else she may need for a day in the woods. Vests can also have a larger pocket in the back to place dressed out birds from a successful hunt.

“I always make sure to have good rubber boots,” she said. “The terrain can get mucky at times.”

Go where the birds are

If bird hunting is the best entry point to hunting, as far as Siler is concerned, grouse are the gateway birds.

“Let’s face it, grouse are pretty stupid,” he said with a laugh. “Their defense when frightened is to stand still and freeze, which makes them a good target for hunting.”

To successfully start hunting upland birds, you first need to find them. And once you understand bird habitat, you are well on your way to spotting the game.

According to Holyoke, successful bird hunters know that upland birds prefer to hang around in good cover made up of scrubby brush and new growth associated with old pastures that are going back to trees.

“These are called ‘successive forestland,’” Holyoke said. “It’s the kind of spot that provides everything the [upland] birds need in terms of habitat.”

When a cover area grows up to the point it no longer meets the needs of the birds, Holyoke said the birds move on to a new spot, so where birds congregate changes over time.

“These covers age-out over time and even more than a favorite fishing spot, the location of active cover area is closely guarded by bird hunters.”

Walking through forestland that has been cut within five or so years, or on old pasture is a good way to come across bird cover and the birds themselves.

Because the birds will likely see you before you spot them, they may not freeze in place. They may attempt to quickly fly away, meaning you have “flushed” it from the cover.

Some hunters, Holyoke said, will only shoot at a bird if it is flying, or “on the wing.” Other hunters, he said, will fire at a bird that is walking or just sitting on the ground.

A bird hunter’s best friend has four paws and a great nose

Photo by Linda Coan O’Kresik

The single best piece of equipment a bird hunter can have is a good dog, Siler said. For someone starting out, that is often not possible given the time and expense associated with obtaining and training a good bird dog.

“I hunt with friends who have bird dogs,” Siler said, adding his three large rescue dogs love to go on hunts but are far more interested in catching game for themselves. “It’s one reason that when you start out, it’s a good idea to contract with a guide, especially if he or she hunts with dogs.”

Some bird hunters hunt with dogs, who can help locate birds, flush them out and retrieve them. But not all dogs do the same work.

There are “flushing dogs” like the cocker spaniel Holyoke uses, who flush the birds out of cover and into the open.

Then there are the “pointing dogs” like the Brittney Spaniels used by Harris. Her dogs sneak up on the birds, stand still and use their nose and one leg to point out the hidden bird.

Harris said the first step in deciding what kind of dog you want along on a hunt is deciding what you want that dog to do.

Then she said it really comes down to breed preference, Harris said. Though she did add the smaller dogs like the Cocker Spaniels tend to make better indoor pets for those who want their hunting dogs to be part of the family inside and out.

“After you choose what kind of dog you want, make sure you do your homework and research breeders,” she said. “Most have websites and many can be seen and talked to at hunting events and sports shows.”

A bird in the pot

Maybe the best part of bird hunting, after the thrill of the hunt itself, is feasting on the day’s bounty, Siler said.

As far as dressing out those birds — cleaning them after they are shot — Holyoke recommends turning to the internet and checking out the myriad of online videos devoted to that subject.

Then, it’s time to get cooking.

In Maine, Holyoke said, it’s common to simply saute the breast of a grouse or woodcock in butter with a bit of garlic. Others like to parboil and cook the breast meat in a batch of baked beans. Soups and stews are also popular.

Regardless of cooking methods, newcomers to hunting and eating game birds will notice a difference in flavor.

Siler recommends checking the internet for recipes on cooking wild birds.

Over the years, Siler has filled coolers with cheap champagne and brined the birds in it overnight, smoked entire birds, deep fried whole birds in peanut oil and roasted breasts. He’s even prepared a pheasant-au-vin.

“Judging by the amount of people who have tried their first game meat at my house and then asked how they could get started, I’ve done a pretty good job,” he said of his culinary and hunting skills, and adding he tells them, “Becoming a hunters is easier and more fun than you think.”

It’s homesteading skills month on Hello Homestead! Every weekday this month, we’ll be highlighting a skill for living a self-sufficient life. Make sure you LIKE our page on Facebook, FOLLOW on Twitter, FOLLOW us on Instagram and/or sign up for our newsletter so you don’t miss a single one!

Master the Artillery Hold Technique

0

Introducing the Artillery Hold Air Rifle: Master Precision with Perfect Balance. Unleash your shooting potential with our revolutionary air rifle designed for ultimate accuracy. Discover the art of perfect balance and control as you effortlessly hit your targets every time. Elevate your shooting experience and dominate the field with the Artillery Hold Air Rifle.

artillery hold

artillery hold air rifle

The artillery hold is a shooting technique commonly used with air rifles to improve accuracy and consistency. It involves holding the rifle loosely, allowing it to recoil freely in a controlled manner. This technique is particularly effective with spring piston air rifles, which have a unique recoil pattern compared to other firearms.

The key to the artillery hold is finding the right balance between grip and relaxation. The shooter should maintain a firm grip on the stock with their dominant hand, while allowing their non-dominant hand to lightly rest on the forend or support handguard. The goal is to minimize any interference that could disrupt the natural movement of the rifle during firing.

By adopting the artillery hold, shooters can mitigate the effects of spring vibration and recoil, which can negatively impact accuracy. This shooting technique helps dampen excessive movement and allows for more consistent shot placement. It requires practice and experimentation to find the optimal grip and position for each individual shooter, but once mastered, it can significantly improve shooting performance with an air rifle.

In conclusion, the artillery hold technique is essential for mastering accuracy with an air rifle. By maintaining a loose grip and allowing the firearm to recoil naturally, shooters can significantly improve their aim and consistency. Practicing this method consistently can make a noticeable difference in overall shooting performance, making it a valuable skill for any air rifle enthusiast.

Best Air Rifle Deals

Popular Posts

How to make a break barrel air rifle more powerful

0
"Unleash the Power: Mastering Break Barrel Air Rifles for Maximum Performance. Discover expert tips and techniques to enhance the power and precision of your...

Air Rifle Scope vs. Rifle Scope – Which One Fits Your Shooting Needs?

0
"Air Rifle Scope vs Rifle Scope: Unveiling the Ultimate Precision Optics. Discover the essential differences and benefits of these two optical devices, empowering shooters...

What Is a Break Barrel Air Rifle?

0
A break barrel air rifle is a type of air rifle that uses a break action to load and unload pellets. It is one...