When I hiked the Pacific Crest Trail in 2019, I wanted a sun shirt for the heat. I’d heard bamboo has a lot of the same properties as wool but doesn’t get as hot. Wool was my go-to choice for long-distance adventures for its anti-stink and warm-when-wet insulating properties, but I wanted something cooler. So I got to researching.
I typed “bamboo sun hoodie” into Google and ended up on Free Fly Apparel’s website. I had never heard of this fishing brand, and they definitely were not marketing to hikers. The anglers all over the site looked cool in more ways than one, but were they secretly overheating under that full-coverage hood?
I decided to give this unknown-to-me brand a shot. I bought the Bamboo Lightweight Hoodie, put it on, and started my PCT thru-hike. And after 2 months of wearing this shirt in conditions ranging from 100 degrees under the blazing desert sun to late-season snowstorms, I was sold. The lightweight sun hoodie had become my favorite trail top. Right up until I lost it.
In short: The Bamboo Lightweight Hoodie from Free Fly Apparel is a must-have for hot summertime pursuits in the sun. Like wool, it doesn’t stink as polyester shirts do, but it keeps you cooler than wool. Plus, it’s buttery-soft, so you’ll be happy to wear it for days on end. Nothing I’ve found hits the sweet spot between comfort and durability like this shirt.
Unfortunately, after weeks of endless rain and snow, I picked up a thin polyester shirt in hopes of staying drier. That was a mistake. The sun came out one glorious afternoon, and I changed into that new dry shirt.
That ill-fated afternoon, I forgot my Free Fly Hoodie on the side of a mountain along the PCT. I suspect if I hadn’t lost the shirt, it would’ve lasted the entire 2,650-mile thru-hike.
I recently got another Free Fly Bamboo Lightweight Hoodie. Between that first hoodie and now, 4 years later, I’ve abused the crap out of countless other sun shirts. I should’ve bought a replacement Bamboo Lightweight Hoodie much sooner.
One Shirt Every Day, for 2 Months
(Photo/Sam Schild)
I legitimately wore this sun hoodie every day for 2 months. I washed it occasionally, about once a week, but only when I could conveniently access laundry. Really, I never felt like this hoodie needed to be washed, unlike most polyester shirts I’ve worn since (or my socks, which were always the reason for doing laundry).
Much like wool, bamboo has natural antibacterial properties. If the smell is any indicator, this fabric doesn’t seem to let microorganisms proliferate. Thanks to an antimicrobial agent called “bamboo kun,” bacteria have a hard time sticking to bamboo fabric. I didn’t perform any scientific testing on the freshness of this shirt. But, I definitely monitored whether or not it smelled bad — and it didn’t.
You may have been able to find me in a laundromat somewhere in California, wearing only raingear, sniffing the armpits as I loaded the Bamboo Lightweight Hoodie into a washing machine.
Bamboo Fabric: Cooler Than Wool and Fresher Than Polyester
(Photo/Sam Schild)
This sun hoodie’s fabric is the reason I could wear it every day for so long. It’s made of a knit material that’s 70% viscose from bamboo and 30% polyester. The bamboo makes this material incredibly soft and keeps you cool while staying fresh longer.
This shirt kept me the coolest in hot, sunny conditions of any hooded sun shirt I’ve worn. An ultrathin polyester shirt also does a pretty good job of protecting from the sun without building up heat, but I find bamboo does a better job.
Beyond its temperature-regulating properties, this fabric is just plain comfortable. It feels downright luxurious, nothing like the slippery feeling of synthetic fabrics. This fabric is buttery soft, and quite a joy to put on every day (or never take off).
Sun Protection on Par With the Best
(Photo/Sam Schild)
Every shirt that claims to be a sun hoodie must protect you from the sun, but the Free Fly Bamboo Hoodie does this better than most. It has an awesome hood that overlaps under your chin to cover your entire neck. This hood fits so well that I use it to keep my hat from blowing off my head in windy conditions.
I hiked tons of long, hot stretches of the PCT with the hood pulled over my head and hands covered up to my fingers (yes, it has thumbholes). Even with temperatures in the triple digits, I never felt like I needed to roll up my sleeves or take off the hood to cool off. And when I did roll up the sleeves and remove the hood, I didn’t feel any cooler. This fabric breathes that well.
Trail-Tested Durability
(Photo/Sam Schild)
After 2 months of wearing it daily, the Bamboo Lightweight Hoodie showed no signs of wear. I’d rely on this as my only shirt for months, without hesitation. (And I did.)
Polyester is definitely the most durable material for a sun shirt. It’s more abrasion-resistant and doesn’t degrade in the sun like natural fibers. However, I’ve never been able to wear a polyester shirt for months at a time because it gets that old polyester smell, and the stink doesn’t even go away when you wash it.
I’ve also beaten the crap out of wool sun shirts in the past, and they all developed holes on the shoulders and back after about 2 months of wearing them with a pack. I expect this would happen eventually with bamboo as well, but in my experience, it doesn’t seem to happen as fast as with wool.
Free Fly Bamboo Lightweight Hoodie: Final Thoughts
(Photo/Sam Schild)
Bamboo fabric isn’t a panacea. It’s definitely cooler than wool and less stinky than polyester. It also dries faster than cotton, and still insulates when wet, unlike cotton.
But, bamboo fabric doesn’t seem to keep you as warm when wet as wool does. If I expect to be hiking in cold rain, sleet, or snow, I’m still going to reach for a wool hoodie. But for hot and exposed under the blazing sun, it’s hard to beat bamboo.
And 4 years after buying my first Bamboo Lightweight Hoodie from Free Fly Apparel, they’re still the best game in town for bamboo. This time, I’m not going to take it off.
By Valentine’s Day you’ve probably felt the pain: the agony of having coyotes shun your calls. It’s not out of the ordinary for coyote-calling success to dwindle as the days begin to grow longer with spring’s approach. Educated coyotes are top misery makers, and many of the less wary are MIA due to a date with fur-shed destiny. Dr. Phil consultation won’t help this pain, but tweaking your coyote strategy could assist you in landing one more fawn-eater in your truck bed. Here are late-winter tactics from four experts to help you close out the season.
Play Love SongsNineteen-year coyote-hunting veteran and Mossy Oak pro-staffer Heath Wood has hunted coyotes across the Great Plains, but he spends most of his time pursuing Show Me State ’yotes. He understands the tests late-season coyotes pose, but also knows coyotes have a weakness during this period: love.
“One of my favorite calling techniques for late season is adding estrus whimpers, whines and female howls,” says Wood. “I start off the setup with three to four subtle howls on a diaphragm call or an open-reed howler. After the howls I wait four to five minutes then continue with some type of distress sound. I add coyote vocals to the end of the sequence, usually doing this on the last stand of the day after the distress sounds have played for around 30 minutes.”
Wood believes this strategy delivers because instead of giving coyotes just one reason to visit his calls, he piques their interest in everything important to a coyote. However, he stresses it’s the ending vocals, female whimpers and submissive howls that play a major role in late-season success.
Feed Them CrowSteve Criner, host of “Dog Soldier TV” on the Sportsman Channel, realizes late-season coyotes pose a threat to his production schedule. When he hits a wall with other calls, Criner immediately switches to a standby he’s used for years: crows. Crows, magpies, jays and other scavengers of the air provide coyotes with information about kill sites, and they instill coyote confidence through their keen observations from above.
“Like most coyote hunters I hunt ranches that are beat up and shot up by me or other hunters,” admits Criner. “To call in educated coyotes I rely on crow mobs for late-season success.” Criner starts his set with a long, drawn-out, subtle howl. After watching for a few minutes, he introduces the sounds of a crow and hawk quarreling. A few minutes later he adds more crows fighting with a single hawk. As this all heats up he augments the disturbance with one more ingredient: the sound of a rabbit in distress. To mix the sounds he utilizes an electronic caller along with mouth calls.
“You usually call in crows, and they see everything, so you need to be well camouflaged to prevent them from sounding an alarm. If you create a crow mob you’ve created what I call the Dog Soldier smoke signal. It’s a confidence visual that coyotes run to as their territoriality, curiosity and hunger impulses kick in. It creates the perfect situation,” asserts Criner.
Mock the TalkLevi Johnson has 30 years of coyote hunting experience, including decoy-dog adventures that provide content for his popular online video series, “Doggin’ with Levi.” He hunts coyotes the entire year and understands the trials late in the fur season. To make wary coyotes show themselves, Johnson prefers to challenge them—or as he puts it, “irritate the living heck out of them.”
It’s easy to find a challenge howl recording on most electronic callers these days, but Johnson goes beyond that sound. In fact, he often shies from a true challenge howl since it can be too threatening to young or subordinate coyotes. He prefers to return the same message a coyote sends to him.
“I don’t use a lot of challenge howls, but I use a lot of lone howling,” shares Johnson. “During the breeding season and even later I make the howl long and draw it out. When I get a coyote to challenge or howl back I immediately respond with the same howling. I talk the same talk he’s talking to me. It’s the same as two adults talking and one mocking the other by repeating everything. It’s irritating and makes coyotes come in to look.”
In addition to repeating every sound a coyote yips back, Johnson sets up to make a coyote look for his calls. He places his FoxPro caller some distance away from his position and upwind, plus he hides it in brush tall enough to cloak a coyote. If a coyote arrives on scene and can’t see the responding “coyote” in the brush, the irritated canine is forced to come closer for a look.
Stage a FightPredator Quest pro-staff manager Matt Piippo specializes in coyote vocalizations, and few hunters can match the canine realism he produces with a mouth diaphragm. He refers to late-season coyotes as “fool me twice” coyotes and realizes they’ve heard it all. For him a new sound is in order, and his go-to is the ruckus of quarreling coyotes.
“I kick off 90 percent of my stands with a female howl. In the late season I make it pathetic to send a message of a female asking if anyone is out there,” explains Piippo. “If there isn’t a response I answer it with a more aggressive howl and then wrap it with a yip howl.”
All along, Piippo ramps up the aggressiveness of the message. A response from a distant coyote prompts him to possibly send a challenge howl back. Nevertheless, in the middle of his theatrics he initiates the growls of a fight, complete with coyote distress cries.
“These sounds tell coyotes within earshot that a fight has started in their territory,” he notes. “It could be over boundaries or it could be about breeding, but the fighting sounds are central to fooling coyotes late in the season. Stay on stand for up to an hour and be prepared for a coyote to show up anytime.”
Hot Times to HowlBrian R. Mitchell conducted a two-year coyote vocalization study at the Dye Creek Preserve in California for his doctorate degree. During the study Mitchell discovered coyotes have individual voices identified through spectrogram deciphering. He also noted that howls recorded from real coyotes and then played back made radio-collared subjects approach from at least a kilometer away.
“Approaches were most common when playbacks were within the responding animal’s home range, during the first half of the year, and at or before sunrise,” Mitchell documented. “Territorial coyotes were twice as likely to respond as transients.” His study also noted that barks didn’t send the same, attractive information. As you can see from your own canine pal, barks oftentimes send an alarm message. Mitchell included human imitations of coyotes in his study. When compared to recordings of real coyotes, human calls “generated similar levels of approach responses.” This is great news for hunters who don’t rely on electronic callers.
Last March I had a free weekend to give the coyotes one more chance to ride in my truck. Instead of carrying on a lengthy message I simply howled several times and shut up to watch. Forty-five minutes later a coyote walked leisurely out of a brushy draw with a suspicious, yet brave approach. The slap of my Hornady V-Max signaled a successful ending to my coyote season with nothing more than a howl for attraction.
When it comes to spotting scopes, often manufacturers either do it well or they don’t. Many of our top brands that are hunters’ go-to companies had some disappointing hits and misses – mostly misses – in this price range.
Because of this, when putting together the line-up for the $300-500 price range, it was tough to come up with the top three. So, you’ll have to forgive us if we throw in an option that slightly bends the rules – it’s just going to have to do.
We took into account the grade quality of the glass, any special coatings, and ability to see groupings clearly in the 200-400 yard range. Let’s take a look at what we came up with.
The 6 Best Spotting Scopes Under $500
1. Leupold SX-2 Alpine 20-60×80 – Best Overall
The SX-2 Alpine spotting scope is capable of providing clear and sharp resolution throughout all hours of the day and across its entire magnification range. It has a drawback or two, but it’s easily one of the best spotting scopes for its price point.
Pros:
HD Optics
Oversized eyepiece
Rugged construction
Fog/waterproof
Lifetime guarantee
Cons:
ED glass confusion
The SX-2 Alpine has Leupold’s Advanced Optical System with HD quality. Leupold lacks mentioning any ED elements, but the glass was made with calcium-fluoride (much like ED glass, right?) that helps to reduce the dispersion of lightwaves at the objective lens. So yes, while there will be some chromatic aberration, it might only be visible on the higher powers and in difficult light conditions that most spotting scopes struggle with too.
Helping to keep you longer behind the eyepiece by reducing fatigue and compensating for less-than-perfect eye alignment is the oversized 59.94mm eyepiece and the 19-18mm of eye relief. All-day glassing, big game hunts, and long-range spotting of groupings are tasks the Alpine HD is well suited to.
Build quality is covered with an impressively balanced speed-to-precision helical focus, fogproof and waterproof body, and it’s been tested to perform in extreme climate conditions from -40 to 160-degrees Fahrenheit.
If the name is any indication, you may have to put in for a hunting unit where you can test it to its limit. High mountain hunts for black bears, whitetails, mules, elk, and bighorn sheep are more productive when you have glass that can keep up with the harsh alpine conditions.
2. Athlon Argos HD 20-60×85 – Best Value
The Argos HD mustn’t be compared to more expensive scopes as it’s one of the cheapest in this price range. To get a colossal 85mm spotter for under $400, it’s a budget buy with value.
Pros:
85mm aperture
Advanced FMC coatings
Helical focus
Fog/waterproof
Extendable sunshade
Cons:
Optical quality vs marketing
It may be harsh to be so blunt about the optical quality of the Argos HD, but the marketing implies that it has a couple things that it, in fact, lacks. It does not have ED glass or additional elements that can be confirmed to provide high-definition optics. Athlon says the scope has “phase coated Porro prisms” but Porro prisms are inherently unaffected by beam splitting that occurs in roof prisms.
The gist of it is, Porro prisms are great at maintaining contrast and resolution and will perform better than roof prisms that lack PC coatings. As such, the Argos does well for its price point with or without the supposed PC coatings. It struggles with light loss past 40x and off-axis sharpness as do all spotting scopes at comparable price points.
Looking past the marketing gumbo, it has laudable resolution in lowlight conditions. It’s adequate for hunting, range use, wildlife observation, and amateur lunar observation.
The adjustable features of the spotter, i.e., magnification ring, multi-position eyecup, and extendable sunshade offer smooth responsiveness. The focus knob is touchy at max power, so for instant gratification for birdwatching when seconds count, the Argos might not work for you. For focusing in long-range in the field or the shooting range, you have time to be light-handed here.
For the average range shooter, causal outdoorsman, and spot and stalk hunter, the Argos offers big specs with better-than-average performance for its price point. Now that’s value.
3. Vortex Diamondback HD 20-60×85 – Best for Hunting
Overall, the Vortex Diamondback HD isn’t perfect, but for the money, it offers a lot more than the old series. The VIP warranty can’t be beat, so there’s no fear in taking it into wild country for the hunt. The bottom line is that it performs, it’s under $500, and it’s highly recommended.
Pros:
ArmorTek coating
Dual focus
Long eye relief
Argon gas
Arca-Swiss compatible
Cons:
Chromatic aberration
The Diamondback HD spotting scopes have an HD Optical System, but Vortex did not disclose any ED elements. It suffers from color fringing and can be distracting for birdwatching and lunar observation/digiscoping.
The optics will not hold a candle to the Viper HD let alone the Razor HD. But as the entry-level spotting scope line, the glass quality is more than acceptably functional for wildlife observation, range use out to 1000 yards, and Western deer hunting.
The Diamondback HD is rubber armored, waterproof, and has been purged with Argon gas that is usually seen in the high-end range. It has long eye relief of 20.3-18.3mm, has an adjustable eyecup and sunshade, and a rotating tripod ring.
A new feature is the dual focus for course and fine adjustments with the helical focus collar. It’s compatible with Arca-Swiss tripods without needing additional plates and can be mounted to standard ¼-20 tripods.
The HD models gained weight and the objective got larger. This model weighs 60.9oz, and it’s not a bad thing. The extra weight will help to stabilize the setup especially when you’re in the high mountains and big country where windy conditions are the norm.
The glass isn’t perfect and that’s okay. You can always spend more to get better, but for this price point, the Diamondback HD is a performer.
4. Vanguard Endeavor HD 82 Scope
Remember how we said we were going to bend the rules a little bit? This is where we show you how. The Endeavor is just above the $500 mark, but when it’s on sale, you can get it within this price range. We had to do a little tweaking because we only want to offer you the most reliable and high-performing spotting scopes there are. There’s no point in recommending a dud.
The Endeavor has a beast of an objective lens that can provide ultimate brightness and light collection. To take maximum advantage of the 82 mm lens, it’s been made with extra-low dispersion glass elements, been fully multi-coated, and has BaK4 prism glass. There’s more yet to spill about the Vanguard Endeavor, so keep your eyes peeled for the full review!
5. Visionking 30-90X100SS Spotting Scope
This spotting scope is huge, so it’s no joke to assume this thing will be the king of faraway vision. With extreme, high magnification and a huge 100 mm aperture, no distance will be out of your reach.
Pros:
Price
Extreme high magnification
Huge aperture
Dual focus
Weatherproof
Cons:
Heavy
If you think you can have these spotting scope specs without some serious poundage, you’re kidding yourself. With almost 6 pounds to tote and set up, this is a beast of an optic that you want to use with a quality tripod that can support its weight.
So, what’s the point of such extreme specs? To see more of course! The 100 mm aperture will allow in as much ambient light as possible throughout different times of the day whether it’s bird and wildlife watching or star gazing. With such high magnification, you’ll want to make use of the 2-speed dual focus dials to get the sharpest and clearest image possible.
The BaK4 prism glass is fully multi-coated, but there’s no mention of any phase/prism coatings or extra-low dispersion glass elements. The lack of these additional glass features is surprising for such a high powered scope, and it may mean clarity might not be the best as it reaches max magnification.
Even for a generic, off-brand spotter, it still covered its bases when it comes to durability. It has RainGuard HD water-repellent lens coating (sound familiar? Bushnell tech?), it’s O-ring sealed, nitrogen-purged, and 100% waterproof.
If you’re the type of spotter that likes to get set up and stay stationary, the Visionking scope will work for you. A tripod is included in the buy so you won’t have to immediately fork out for one.
6. Kowa TSN-601 Angled 60mm Spotting Scope
Kowa, a prestigious Japanese brand known worldwide for their quality optics, and we have a spotting scope that just barely fits this price range. Owning a Kowa for 500 bucks just might be the best bargain deal of the day.
Pros:
Price
Interchangeable eyepiece system
Made in Japan
Weatherproof
10-year warranty
Cons:
Scope body only
Typically, you won’t see spotting scopes sold by eyepiece and scope body separately until you’re spending over two grand. This is indicative of premium quality to ensure you’re purchasing the most appropriate eyepiece system for your spotting application. Want variety? You can buy and use an eyepiece with a different power range.
With the interchangeable eyepiece system, you also have access to see if Kowa compatible digiscoping accessories can work for photography, recording, and capturing rare once-in-a-lifetime moments that you won’t ever be able to duplicate.
Still, if you’re spending only 500 buckaroos on the scope body, you’ve got to wonder how much it costs to get the eyepiece. Expect to add at least a few hundred bucks to your budget.
The Kowa spotter is made in Japan, and they’re usually an excellent source of glass and quality when it comes to optics. When you buy this scope from an authorized dealership, you’ll get their lifetime warranty on it.
It’s nitrogen-purged and O-ring sealed for both fog and waterproof protection. It’s made with polycarbonate materials to keep weight to a minimum without compromising build quality.
What more is there to say? You’re getting a Kowa for 500 bucks!
What to Look for in a Spotting Scope in This Price Range
Spotting scopes in this price range should have a few premium perks thrown in – we’re talking about $500, it’s got to be worth it. However, you’ve got to be brand-specific to ensure you’re getting the best of what you can afford.
If you’re going with a high-powered and heavy scope, you’re going to want to add additional costs for quality, strong, and solid tripods and mounting systems. Just keep that in mind when you plan on spending every penny. Here’s what else you need to look for.
Glass & Coatings
Overall, we should start to see some ED (Extra-low Dispersion) enter the market. Some spotting scopes might have “HD quality” but it doesn’t guarantee ED elements. When it comes to coatings, we should see FMC and extra lens coating formulas to enhance light transmission and protect the lens.
On average, there will be a lot of 20-60×80 configurations at this price point. Considering the glass quality, this is a good configuration to stay within since more magnification will demand more performance from the glass.
Though most spotting scopes under $500 will have the eyepiece included with the scope, you may see some interchangeable eyepiece scopes available. Though rare to see it at this price point, it can happen.
Eye relief will tell you how comfortable the eyepiece will be to use and if you can keep your glasses on or not. I would say that 15 mm is the minimal amount of acceptable eye relief if you wear glasses, but it’s better to have at least 19-20 mm on the long side as it does get shorter at max power.
The field of view can indicate what applications the spotting scope could be good for. Though high magnification narrows the FOV, it can provide close-ups of the target that is good for long-range seeing. On the other hand, a wide FOV is good for watching moving targets while hunting or bird watching.
In general, weight and size can be a limiting factor of a spotting scope. They are obviously larger than binoculars, but they offer high and variable magnification with a huge objective lens. Compact scopes would be best for hiking, some hunting, and for fast glassing.
Full-size scopes are excellent performers when tripod-mounted for bird watching, wildlife observation, and amateur astronomy like lunar observation.
You should also consider overall weight, that is, combined weight with a tripod and any counterweights if needed.
Overall, you should expect good glass and solid performance out of a $500 spotting scope. They should be fog and waterproof at this point and come with a warranty that you can rely on in case the unexpected happens.
If you have the chance to shop in person, put your scope through the ringer to really see if it’ll work for you. If one promising purchase ends up being a dud, it’s one purchase too many.
Buying online eliminates the chance to give the spotting scope a test run before you buy, but that’s where counting on our expertise comes into play. If the masses are impressed, you just might be too. Since we’ve put ’em all through the ringer for you, you can rest assured that your money is well placed. It’s called buying confidence – you’re welcome!
Further Reading
Zeiss Victory Harpia Spotting Scope Review – 85mm Angled with Dual Speed Focus System
Zeiss Dialyt 18-45x65mm Spotting Scope Review (A True Hunters Tool)
Zeiss Conquest Gavia 85 T Spotting Scope Review (Ideal for Birders)
Vortex Viper HD 20-60×85 Angled Spotting Scope Review (Helical Focus)
Vortex Viper HD 15-45×65 Spotting Scope Review (Straight)
The number one question people ask us at outdoor shows and in the field is “how do you set up your decoys” or “why did you set your goose decoys up this way”. In fact I’d say it’s the number one reason people who book a guided goose or duck hunt with Maxxed Out Guides want to learn about while they’re in the field.
Unfortunately there isn’t one easy answer. Some hunters may say they set up there spread one particular way every time. You’ll hear hunters talk about and X, C, J spread which means their decoys are set to loosely resemble one of those letters. I strongly recommend not following that line of thinking. There are many times driving around that I’ll see decoy spreads that make a definitive, C, J or X in the field.
This causes two problems for you. First birds don’t naturally sit in fields in formations that resemble letters. Second birds see these unnatural looking spreads up and down the flyway. So not only are they unnatural geese get trained and accustomed to seeing them. This is typically not a combination for success.
However from my experience there is no one decoy spread that each and every day in the field. Some days you need more decoys. Some days you need fewer. There are days where your blinds will need to be at the front of your decoy spread and there are some days where they will need to be at the back.
There are many variables to this equation but the main variable, as it is with any hunt, is the weather. Birds simply look for different things in different weather conditions. The only thing that can tell you how to react to weather is experience and time in the field.
Are there days that a ‘letter shaped” spread will kill geese? Absolutely! However what you typically find on those types of days is most any style spread will kill birds.
So while there isn’t one “go to” spread there are a few things that can help you as you learn how to set your decoys.
First is the kill hole. You always want to try and manipulate the birds to attempt land or finish where you want them. Usually the kill hole is a spot in front of everyone that will create safe shooting lanes and opportunity for everyone to shoot. Typically we like to set up with the wind at our backs so the birds are finishing straight at us. However things like where the roost is in relation to the field, sun, wind and avaialble cover to hide your layout blinds doesn’t always make that possible. Hunting a strong cross wind is one of the more challenging scenarios you’ll run into when establishing the kill hole and is something that comes with experience. Either way though we typically like to give the birds lot of space so they have plenty of area to finish as they come into the spread. Sometimes you have to adjust things as the birds are finishing differently than you anticipated they would.
The second is never have your hide (where you put your layouts) dictated by your decoys. Your decoys should always be dictated by your hide. It does not matter how many decoys you have or realistic they are, if birds see your hide as they approach you are in for a long day in the field, because remember, these birds did not wake up this morning and head out to feed with the intention of giving you a good hunt. They want to live and if they see things out of the ordinary…they’re gone! So once you find your field and see what type of wind and sun your going to be dealing with the next day, your first priority should be to determine where the best place for your hide is, based on the information you have.
Once you have an idea of where your hide is, then you can start to strategize on how to set our decoys and where to position the kill hole.
Lastly, while I can’t give one shape that always works, look at your decoys when you’ve set them all. Remember these are wild animals your hunting. Does your spread look natural? Does it have a definitive edge (it shouldn’t)? Don’t be afraid to put smaller groups just outside of the main mass of decoys. You’ll frequently see a main mass of birds in a field and then smaller groups sprinkled around it. Create some randomness to your spread and don’t be afraid to try something new.
The tune of Mrs. McCottontail was singing out of the X24. My thumb positioned on the volume buttons, ramping the volume of the rabbit cries up and down. My attention was on the grown up fence row that led into a nasty thicket full of briars and treetops. Suddenly a group of birds were frantically communicating with each other straight down the fence row. I thought to myself, “Surely that means a bobcat is on its way.”
All of a sudden a bobcat magically appeared no more that 50 yards in front of me. The bobcat’s eyes were fixated on the call -flipping his tail as he stalked toward the sound. My rifle was already positioned in the direction of the X24. As the cat crossed in front of my gun barrel, I lip squeaked to stop him, settled the crosshairs on his shoulder, and squeezed the trigger. Pew! Thwap!!! There laid a bobcat just feet from the call. I walked up to the cat and was in awe – just like I am of every bobcat that I’ve been blessed to put my hands on.
After several years of calling bobcats in Kentucky, I’ve found that thorough scouting, smart stand selection, and solid calling techniques all work together to increase your odds of tagging bobcats.
Scouting is an important tool to take advantage of for bobcat success. It’s pretty tough to call up a bobcat in a place that doesn’t have them.
First things first, you have to find them. You’ll rarely see a bobcat out in the wide open. Bobcats seem to love the thick stuff. Lots of times the thicker the better. Recently logged areas that have treetops scattered throughout and have grown up in thick briars can be hot spots for cats. Brushy creek bottoms, thick drainages, and even grown up fields can be places that bobcats love to hang out in and hunt.
Get out there and start looking for sign such as tracks & droppings. Probably the easiest way to find tracks is by walking travel corridors after a snow. Looking for tracks in mud and sand along creeks and pond banks can also pay off.
Take advantage of trail cameras. Trail cameras are an excellent scouting method for finding bobcats. Not only will they let you know if you have a cat to hunt, but they can also help you pattern a cat and let you know when you need to be in the area calling.
One thing I’ve learned over the years is if you call a bobcat in an area, there’s a good chance you’ll find success in that area year after year. I have a few stand locations that I can count on to produce a bobcat, year in and year out. There’s actually a couple of locations that I don’t dare call unless bobcat season is in because there’s that good of a chance that a cat will stroll in.
STAND SELECTION
Stand selection is crucial for success. An ideal stand will have you set up tight on thick cover, but be in an area open enough for you to see. Setting up in woods or in thickets can be effective, but you take the chance of a bobcat coming into the call and sneaking back off without you ever seeing it. Plus, there’s a good chance you could spook a bobcat walking in if you push too far into their area.
I personally like to find open areas such as a small field that is adjacent to where I have bobcats scouted. If possible I’ll set up 50-75 yards away from the thick cover and place the FOXPRO out half the distance from me to the edge of cover. A bobcat isn’t likely to cover a tremendous amount of open ground. So you’ll need to set up close enough that a bobcat will feel comfortable to come to your call.
When it comes to wind direction for bobcats, you’ll find that opinions differ. I’ll give you mine – Always Hunt The Wind! I have seen bobcats circle to the downwind side of my FOXPRO on more than one occasion. I have also seen a bobcat enter my scent cone, get nervous, and run off without the opportunity to fire a shot. I have also called numerous coyotes (which never get a pass) while making bobcat stands. It doesn’t matter if I’m calling for bobcats, coyotes, or fox – I’m always hunting the wind.
SOUNDS & SOUND SEQUENCES
I definitely have favorite sounds that I like to use on bobcat stands. In my experiences of calling bobcats, I’ve become a big fan of cottontail distress sounds. That being said, I’ve called cats in on jackrabbit, snowshoe hare, and various bird sounds. I’ve actually had success calling in bobcats on over a dozen different FOXPRO sound files.
A general bobcat sequence that I like to run starts out light and builds in intensity throughout the sequence. I’ll usually run 3-4 different prey distress sound files resulting in a 15-25 minute stand depending on the location (most of the bobcats I call in show up under 8 minutes). For instance, I’ll start out with a sound such as “Bay Bee Cottontail.” I’ll run that sound for 4-6 minutes. If a cat doesn’t show, I’ll pause for 20-40 seconds and then go into an adult cottontail sound such as “Mrs. McCottontail.” Again, I’ll run that sound for 4-6 minutes. If a cat still doesn’t show I’ll pause for 20-40 seconds again and then go into a snowshoe hare sound such as “Snowshoe Hare HP.” If a bobcat still doesn’t show I’ll finish with a few minutes of a jackrabbit sound such as “Lightning Jack.” As you can see, I like to start out light and increase with intensity with each successive sound. I’ve learned over the years that if a bobcat doesn’t show on a sound played, they’ll usually show up rather quickly after the next sound starts up. It’s almost as if they are afraid they lost their chance to claim the rabbit and then charge in when another sound starts back up.
Over the last 2 years I’ve fallen in love with the new FOXPRO sound file “Mrs. McCottontail.” I’m starting to think that it might be the best bobcat calling sound file ever recorded. After watching 8 different bobcats show up while that sound was playing, I’ve henceforth started leading off with “Mrs. McCottontail.” I’ve recently tagged 2 bobcats that each came to the call in under 5 minutes to that sound.
CLOSING
It’s an amazing sight to witness a bobcat come to the call. Sometimes they sneak in, stalking your call. At times they will come running in just like a coyote. Other times one will show up out of nowhere just sitting there scanning the area. No matter how they come to the call you need to be ready to capitalize on the opportunity. I wish you the best of luck on your next bobcat stand.
Explore dove hunting tactics, gear, seasons, and more in this complete guide to dove hunting
If you are new to wingshooting, then dove hunting is the perfect introduction for first-timers wanting to get into bird hunting. It lays the basic foundation for all the other upland disciplines. It’s a laid-back and enjoyable experience for beginners, and it’s a social hunting event. The action can go from zero to sixty in nothing flat.
Depending on where you live in the United States, the seasons and species for dove hunting fill up all 365 days a year offering a wide variety of situations and experiences to help fill the gaps of other bird hunting pursuits. From the iconic mourning dove, to the year round season of the invasive Eurasian collared dove the fun and food can be never-ending. To other less known species like the white-winged dove.
Dove hunting is as simplistic as you are going to get. The basic premise for dove hunting includes carrying a shotgun from a vehicle to a field, sit (bucket) or stand, wait for passing or decoying doves to fly close, and shoot. That, in a nutshell, is Dove Hunting 101. Just like in any type of hunting, there are those that go “all out” when dove hunting, but it is not necessary to do so. So, how do you get started?
Dove season dates and licenses
September 1st is the day that signals hunting season has begun! For a first-time dove hunter, the first thing at the top of the list should be to check season dates. Some states have an early and a late dove season. Being familiar with regulations is very important. Checking the state game and fish websites or visiting the local office should provide all the information needed. Most sites will also provide photos for proper dove identification.
Besides purchasing a regular hunting license, dove hunters are required by law to participate in the Harvest Information Program (HIP). This may require buying an additional permit or “stamp” if hunting migratory birds— dove, coot, rail, snipe, sandhill crane, waterfowl, and woodcock. Typically, the cost is only a couple of dollars. When the stamp is purchased, hunters will be asked to indicate which birds were hunted the previous year. At the end of the hunting season, HIP stamp purchasers will be randomly surveyed by the U.S. Fish and Wildlife Service. Responding to the survey provides important information for setting and justifying future migratory game bird seasons.
Choosing a shotgun for doves
Is there such a thing as a perfect shotgun for hunting doves? Maybe, but the truth is nearly any shotgun will work. If each hunter could draw up their ideal shotgun for dove hunting, you would get hundreds of different opinions, each one valid. Beginners shouldn’t allow themselves to get sucked into the “shotgun vortex” that defines what gun to use for dove hunting.
For the beginner, any shotgun that’s available will work. Most shotguns will be in the 12- or 20-gauge range. Whether owned or borrowed, these gauges will be the norm in most dove fields. Yes, once in the field, an array of shotguns will echo their presence—from hand-me down wooden pumps to slick black and camouflaged semi-autos, to single-shots and doubles, to over/unders and side-by-sides. Gauges will read like a ruler: 12-, 16-, 20- and 28-gauges and .410 caliber. All are great choices but the 28 and .410 are going to be carried by those with years of experience shooting grey rockets with little toy-like cartridges.
New dove hunters should be aware that repeating shotguns, which include both pump action and semi-automatic, have tubular magazines. These types of shotguns MUST be limited to holding only three shotshells (“plugged”) while dove hunting. Federal regulations require that when hunting migratory birds, the tubular magazine must have a plug inserted so that the total holding capacity of the shotgun does not exceed three shot-shells (one in the chamber, two in the magazine).
Beginners shouldn’t allow choosing a shotgun to be difficult. Use what you have or what you can get your hands on. As with learning anything new, ask a hunting mentor for assistance and advice.
READ: Choosing a Shotgun for Dove Hunting
Choosing ammunition and chokes for dove
If choosing a shotgun for dove hunting is confusing, then staring at all the variety of shotshells will send a new dove hunter into a frenzied panic. Take a deep breath and step back. Novice dove hunters will see an array of colorful cardboard ammo boxes adorned with artwork and photos of flying doves and with alluring words such as “dove” and “small” Game Loads.
READ: What Chokes and Shot Size to Use for Dove Hunting
Regardless of the temptation, beginners should stick to the most popular of the smaller shot sizes: 7, 7-1/2, or 8s. This range of shot is best suited for both early and late season doves. It doesn’t take a whole lot of pellets to bring down a dove, and smaller shot sizes offer more pellets down range. Because doves are fast flyers and tricky to hit, open shotgun chokes such as Improved Cylinder or Modified are recommended to allow the pellets to spread out and create a larger, more open pattern.
Dove hunters should pay attention to area rules and regulations pertaining to the type of shot allowed. While lead is still the most popular, shooters should check their respective state regulations. Many areas managed by the state require steel or other non-toxic shot (tungsten or bismuth) when dove hunting on public accessed lands.
READ: Why I Stopped Shooting Lead at Doves
Shooting skills are a factor for each dove hunter. Shooters should bring along more ammunition than they think they’ll need as September speedsters can prove even the most skilled wingshooter wrong.
Dove hunting clothing
Let’s be real: a pair of jeans (earth tones if possible) and a camo shirt will work. I know I may get some flack for saying that, but truth be told, khaki or brown pants paired with a green shirt or whatever camouflaged pattern of the day is can be worn effectively on a dove hunt. Dove hunters should find some type of camo or earth tone bird vest or wingshooters belt to carry the basic essentials such as ammo, doves, and water. Dove hunters should locate a good place to conceal themselves and wait until it’s time to pull the trigger. Enough said.
Where to dove hunt
Dove hunting is as simple as finding a location where doves are congregating and feeding. Harvested wheat stubble or corn silage fields, ponds with exposed banks and weed cover, and harvested sunflower fields are all excellent locations to target. Refer to state websites again and check for state-managed dove fields on publicly-accessible lands.
Read: How to Identify Mourning Dove Habitat
Basic dove hunting methods
Pass-shooting (shooting birds as they fly over) is probably the most common method of hunting doves. If hunting in the morning, dove hunters should set up no later than sunrise. Evening shooters will be most successful right before dusk. Both beginners and experienced dove hunters must resist the temptation to fire off rounds until doves cross into range. This means knowing the effective range of your choke. For most, that’s forty yards or less.
The other method is to use dove decoys to draw them in close for possible shots. Motion dove decoys are best, as movement lures doves in. Adding a few stationary decoys will add to the overall effectiveness.
READ: Duping Doves with Decoys – The Three D’s
For those that cannot sit still you can explore the idea of walking up doves while hunting.
Eating dove is delicious
For beginning dove hunters, whether it’s a small pile or a limit of grey birds, cooking up doves is the culmination of a successful hunt. The easiest way to savor those tasty doves is also the traditional way—wrap ’em up in bacon with a slice of jalapeño. As any dove hunter knows, there’s no greater mouth-watering delicacy!
To find our more about dove hunting on Project Upland check out the category: Dove Hunting
SUBSCRIBE to the AUDIO VERSION brought to us by: ESP – Digital Hearing Protectionfor FREE : Google | Apple | Spotify
Why I Stopped Shooting Lead at Doves
What Chokes and Shot Size to Use for Dove Hunting
Hunting Eurasian Collared-Dove in the Summers of the United States
Pheasants flushed from cover outside corn can often be taken by hunters standing just inside the edge of the cornfield.
If a rooster pheasant were one of Batman’s archenemies, he’d be the Joker. The common denominator of both bird and Bad Guy? Neither of them plays fair, especially Mister Ringneck.
So how do you pin down such a slippery character? Well, for starters, you find out where he lives. Where he spends his time. And why he’s there. Next, you research his weaknesses — those habits than make him less than perfectly elusive. And finally, you develop tactics to exploit those weaknesses, using his shortcomings to your advantage.
Pheasants flushed from cover outside corn can often be taken by hunters standing just inside the edge of the cornfield.
It’s October, so let’s look closely at two of the ringneck’s preferred early season haunts — corn and cattails — and how best to attack this pair of perennial favorites.
CORN
In many areas where corn is planted as a large-scale crop, 95 percent or more of it will still be standing come the first week of October. And standing corn offers, at best, terrible hunting conditions.
Why? First, modern agricultural practices ensure little to no row-to-row cover in today’s 21st Century cornfields. No foxtail. No goldenrod. No reed canary grass. Just dirt sidewalks devoid of any weeds. Yields are maximized, but that doesn’t do much for pheasants and pheasant hunters.
Roosters do love standing corn, mainly for the overhead protection it provides; but again, overhead protection does little for the human predator. Second, standing corn is almost impossible for one or two hunters to work effectively. It’s noisy, and because it’s “clean” of weedy plants it allows pheasants to see us long before we see them.
Meanwhile, it can be difficult for hunting dogs and hunters to keep track of each other in standing corn. And finally, and with little exception, few farmers are going to grant permission to six guys asking to bulldoze through his corn. It’s simple economics there.
That’s the bad news about pheasants, October, and standing corn. The good news is corn is still an asset to the pheasant hunter; however, his approach to the crop needs to focus not on the crop itself, but whatever might be around it — that is, the more “huntable” cover immediately adjacent to it.
Even the largest cornfield has an edge, and as simple as it sounds, that’s where you want to focus your efforts. This will be a bit more challenging than merely walking through knee-high brome grass with standing corn off your left shoulder, and tagging a three-bird limit of roosters. Successfully hunting the edges along standing corn requires some strategy. And that means both tactics designed for you and, if you have one, your bird dog.
Gunning roosters along standing corn involves first understanding two variables — where, and when. Typically, pheasants won’t roost or spend the night in modern cornfields for the simple fact there’s no cover there. They will roost in adjoining cover, and will typically, as morning progresses, migrate toward the edge between corn and cover. Here, they have everything they need — the corn’s nearby overhead cover, bare dirt with grit, the ability to see predators, access to seeds and insects, and some 360-degree protection in the adjacent heavy grass.
What this means to the pheasant hunter is a return to the concept of strategy. If you hunt with a dog — ours were Labrador retrievers, both pointing and non-pointers — absolute control and obedience is paramount now. Pheasants are notoriously skittish; a dog that doesn’t stay extremely close, one that doesn’t obey non-verbal direction (i.e., low-volume whistle commands), won’t necessarily flush birds wild, but will send birds scurrying into the protection of the standing corn, where they will be almost impossible to roust.
The key here is to let the dogs hunt — let them to do their job — but keep them close and always under control.
Second, be quiet. Stealth certainly does play a role in successfully hunting standing corn. Quiet means no shouted commands to the dog. No yelling “Over here! Over here! Seeing anything!!??” back and forth to your hunting partner or partners.
No slamming car doors, shotgun actions, or thinking you can silently slip down to the end of the field between cornrows three and four. Pheasants, like the majority of wild game birds, can hear extremely well. And once they hear you, it’s off to the races — and they run faster than you can.
Finally, keep your numbers small and have a plan. Unless you’re in a group of 15 guns or more — which, granted, can at times be effective, albeit quite the logistical undertaking — a pair of hunters is plenty to work corn edges.
As for a plan, we’ll assume two guns here. Typically, rousted roosters will try to fly toward cover that is heavier than where they were originally flushed. Knowing this, one gun walks quietly at the edge of the standing corn; the second, and the one with the well-mannered and close-working dog, exacts a slow zigzag pattern parallel to and perhaps 30 to 50 yards off the shoulder of the first.
Ideally, birds that don’t go straight away from the man/dog team will make a beeline for the standing corn, and that’s where the silent solo gun waits. One-man pushes can also be tried. Ideally, the man/dog duo works into the wind toward a corner of the standing corn where an earlier quietly positioned hunter stands.
One last trick to try while hunting standing corn. Everywhere Daylight Savings Time takes effect in late October, dusk comes earlier in the day. And approaching dark means time for birds to come out of the corn where they’ve spent the day and head for overnight cover.
As close to the end of legal shooting time as possible watch for cockbirds that fly out of the corn, and mark their landing accurately. A quick but quiet approach just might put you into position for a flush and shot.
CATTAILS
Cattails are another phenomenal pheasant cover; however, like standing corn, they’re not without their challenges. One of the most significant is the water commonly associated with cattails. Pheasants don’t like to be wet. And second, cattails are tough enough to hunt when dry; add the water element, and cattails become almost impossible to work efficiently.
That said, pheasants love cattails for the protection they provide, so to ignore the cover is to ignore a good number of birds.
But how to hunt this impenetrable mass of vegetation? You could wait until the water freezes. This makes the cover much more accessible to both hunter and hunted; however, this is in many places a late-season tactic.
In the early season cattails still present a couple of different strategic options. Hunting the edges, as one does with standing corn, is one; the other is to search out those sections of marsh that are still dry following summer’s heat. As mentioned, pheasants dearly love these thick hideouts, and will pull out all the stops when it comes to self-preservation — running and burrowing into the mats, either before or after taking flight.
Cattails lend themselves perfectly to big, strong dogs. Our Labs liked nothing more than rooting roosters out of right-of-way stands of cattails. Still, such dogs need to be controlled and close-working — qualities which are often not a problem, thanks to the twisted web of broad-leafed marsh vegetation.
October, November, or January. Standing corn or cattail marsh. The calendar or the cover mean little to ringneck pheasants, who practice the art of evasion 365 days each year, and who will use either type of cover to full advantage. A quiet, stealthy, and well-thought plan of attack, however, can swing the odds a bit more in the hunter’s favor once opening day rolls ’round.
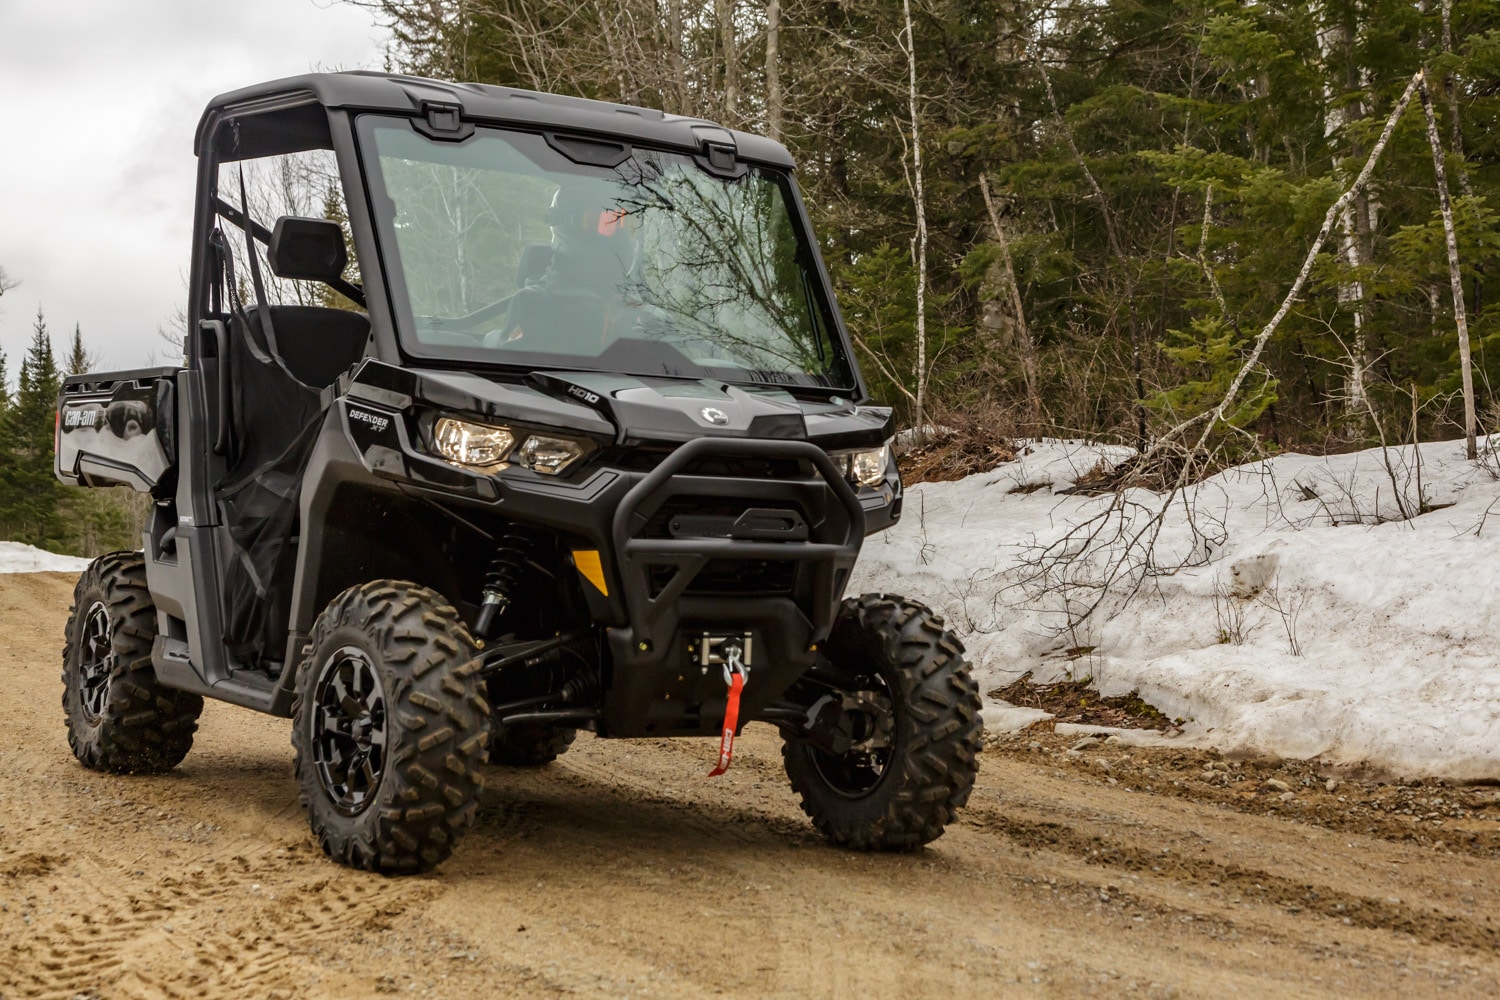
The Planet Quad team reports on the Can-Am Defender XT HD10 2022 – Test Ride a vehicle that needs no introduction. Introduced in 2016, this big workhorse side-by-side from BRP has made it into the top 3 in this market segment. The 2022 iteration brings its share of changes and most importantly, an engine overhaul. We take a look at it in detail with you!
First, we’ll discuss the engine that powers the 2022 Can-Am Defender. You can choose one of 3 different engines depending on what you want to use it for.
The new HD7: A 650cc Rotax single-cylinder engine producing 52 horsepower and 41 lb*ft. It replaces the HD5 with 37% more power while reducing noise and vibration.
The new HD9: A 976cc Rotax V-twin producing 65 horsepower and 59 lb*ft. The HD9 replaces the HD8 with an increased displacement that offers 30% more power than its predecessor.
Last but not least, the HD10 is at the top of the list for its performance. A 976cc Rotax V-twin producing 82 horsepower and 69 lb*ft. Already present in previous models, it has been revised to offer better performance and reduce vibrations.
With this trio of engines, we have an excellent choice of engines that will fit your needs. Moreover, Rotax engines are known to offer; performance, reliability as well as an excellent smoothness of ride.
HD10: The engine of choice!
If you choose the HD10 as our test model, you will have more than enough power. With the HD10, you get a lot of power and torque right from the low rpm range. Moreover, we notice that Can-Am has put a lot of effort into reducing the noise level in the cabin up to medium rpm. When the throttle is fully depressed, you can hear the roar and have fun pushing the vehicle to its limits.
The HD10 is the team’s favorite engine, as it allows us to work hard without flinching and is a perfect match for the rigid chassis that this utility vehicle offers. On the other hand, you’ll still be able to exploit those sporty abilities even though that’s not the Defender’s primary vocation. The result is a versatile vehicle that’s always ready to get the job done and that can put a big smile on your face when you push the throttle more aggressively in a series of curves.
CVT Transmission
To efficiently transmit this power to the terrain, Can-Am opted for continuously variable transmissions (CVT). For the HD7 engine, we get the Pdrive with different transmission ratios: high and low speeds, park, neutral and reverse… the classic H-L-P-N-R found on almost all vehicles of this type with a few exceptions. We also get a standard engine brake that will be very useful for its vocation as a work vehicle.
On the HD9 and HD10 engines, the PRO-TORQ transmission with Quick Response System (QRS) technology is standard for even more precise and faster clutches. In addition, high-flow ventilation and electronic belt protection have been integrated to improve performance and, above all, belt life.
Can-Am has also included a button to select the driving mode. There are 3 different modes; ECO™, ECO™ Off and Work. These modes will act directly on the response of the accelerator pedal and on the injection mapping. One will be able to obtain a driving that favors a reduced fuel consumption or more aggressive and also a last one to favor clutches at very low speeds for work. The different modes are effectively felt and it is adapted to take full advantage of the versatility of the Can-Am Defender XT HD10 2022.
Driveability
On the dashboard there is also the driveability selection. In this way, you can ensure that the grass on your property is protected as much as possible with the rear differential “unlocked” so that the rear wheels can turn more freely in corners without trying to tear up the grass. Then there is the possibility of using 2 or 4 wheel drive as is standard on other models on the market.
In addition, we can count on a front differential with the Visco-Lok QE automatic locking system when engaged in 4-wheel drive mode. This way, when one of the front wheels starts to lose traction (skid), the differential locks in a fraction of a second and allows maximum traction.
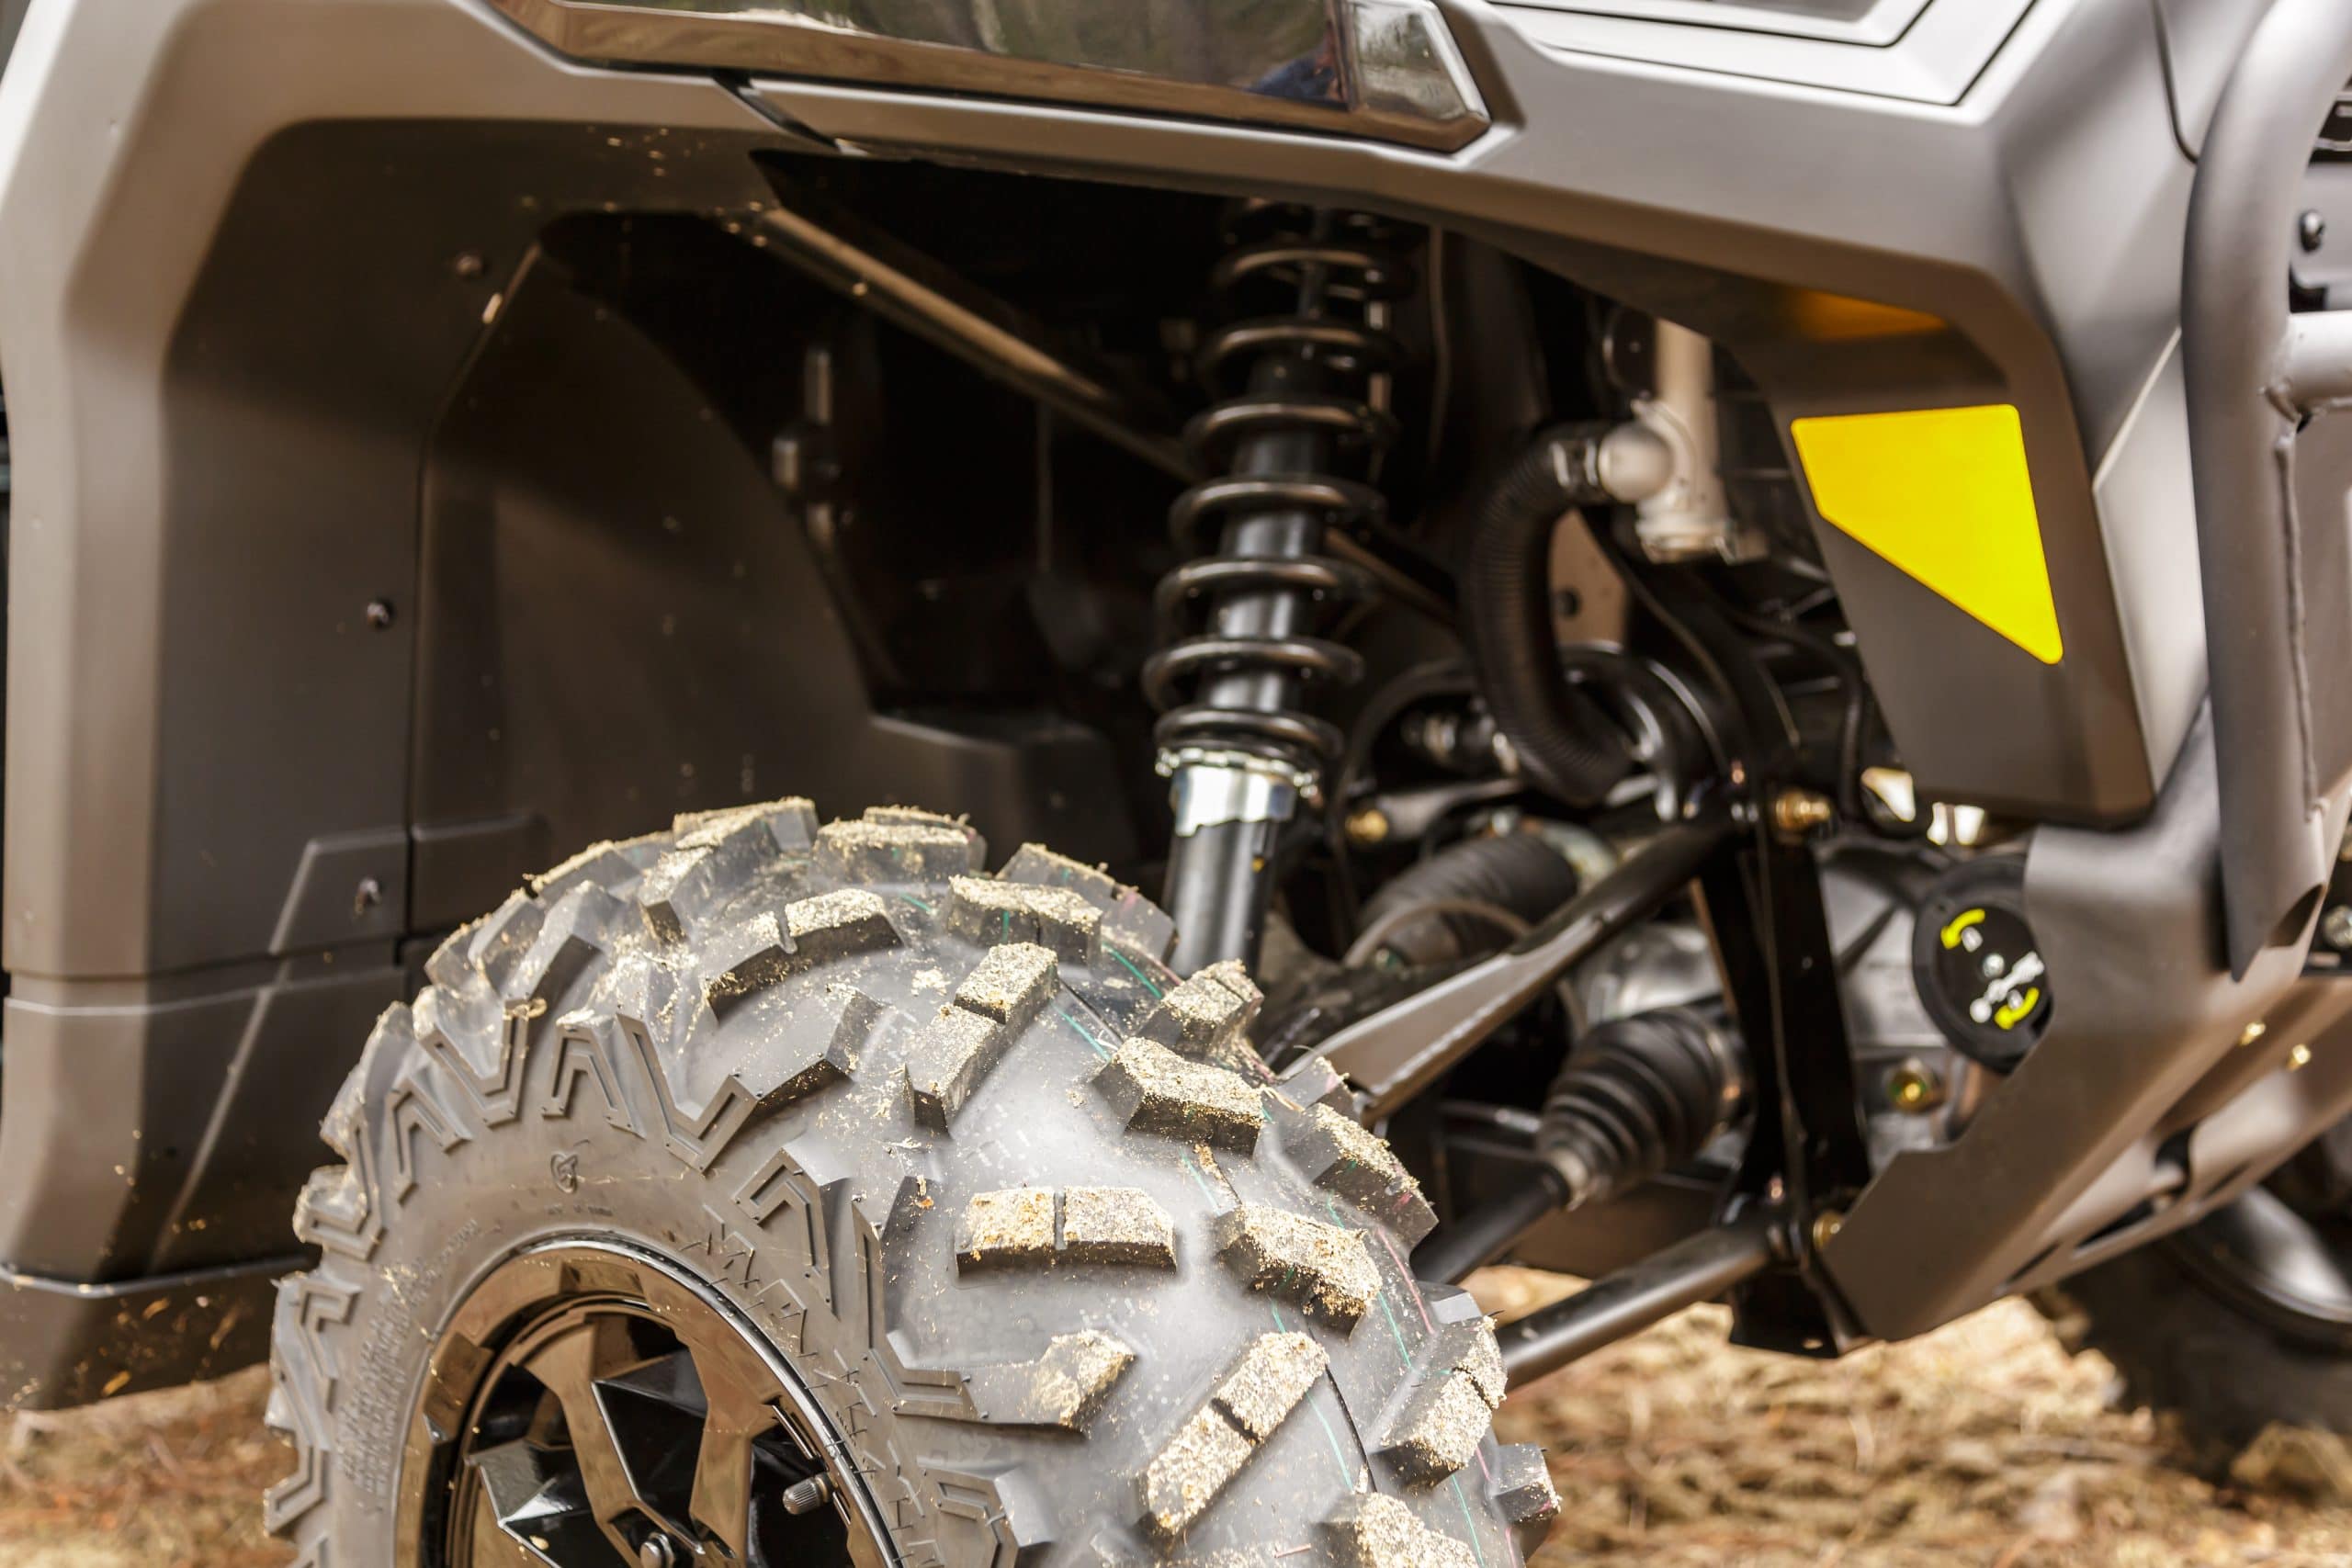
Suspension
On the suspension side, we find twin-tube gas shocks as well as double-arched triangular arms. This gives us a generous 27.9 cm (11 in.) of travel, which is excellent for this market category. In addition, the arched arms allow for a wider clearance under the vehicle to limit the risk of catching stumps, for example.
Moving to the rear, we find the same type of twin-tube gas shocks as well as arched arms. Once again, the 27.9 cm (11 in.) of travel is more than enough for thi type of vehicle and will provide the confidence to navigate through any terrain.
With these suspension geometries and the arched arms, ground clearance is an impressive 33cm (13″). Can-Am has selected a suspension that is firm enough to handle the hard work you’ll be putting your Defender through. However, you won’t be outdone if you decide to push it more in gear or use it for trails. Comfort is still one of its strong points!
Interior and other features
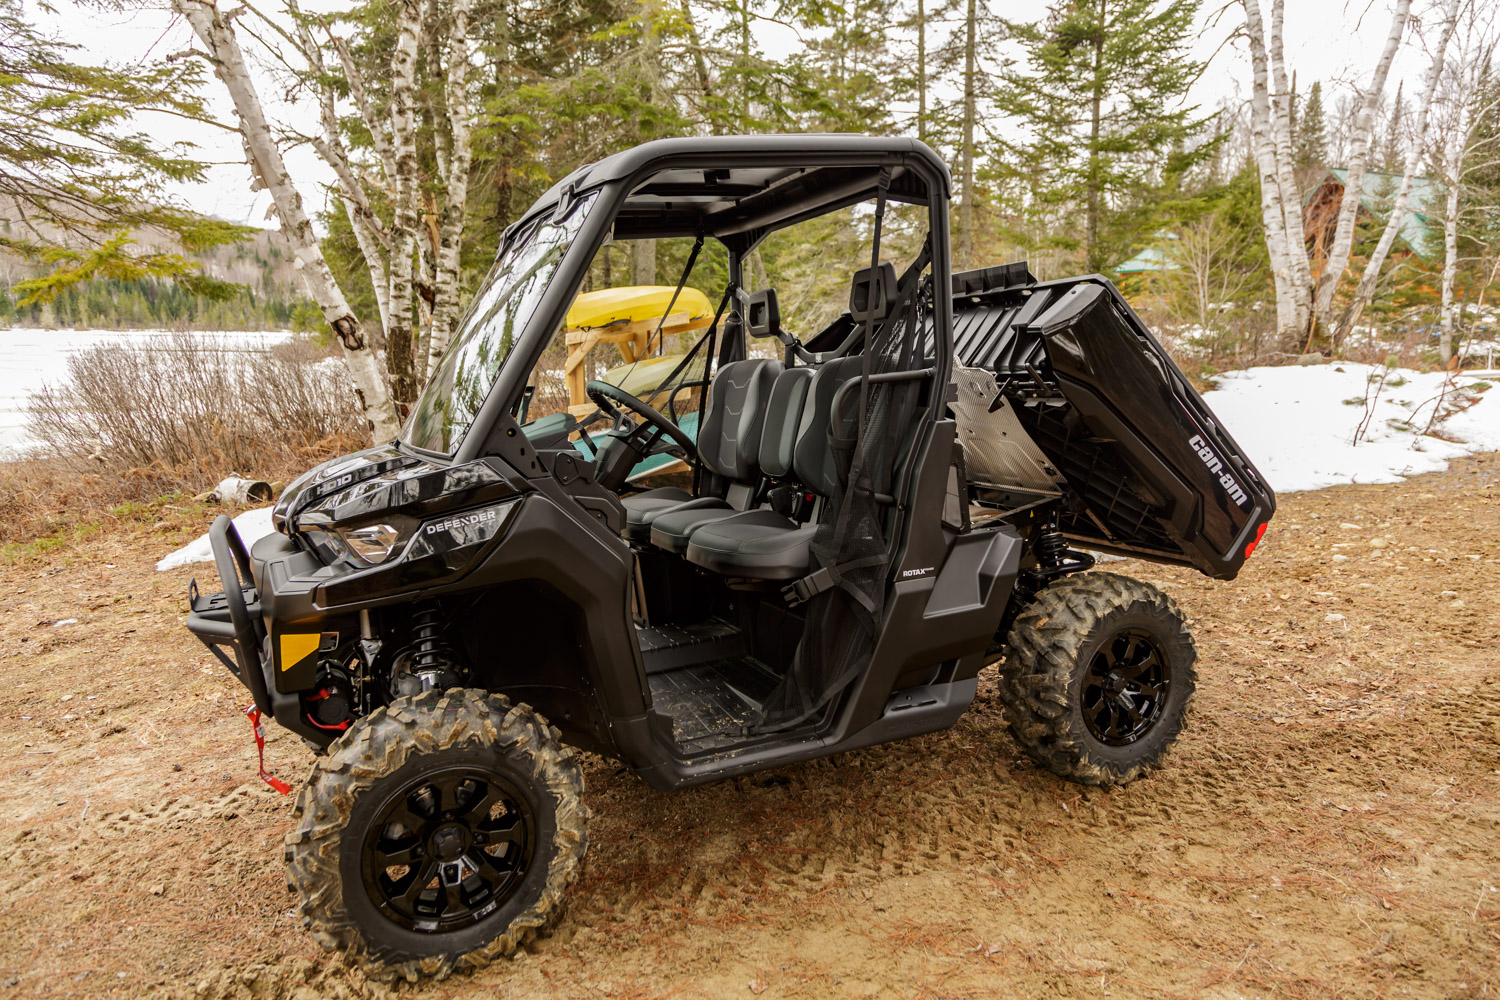
When you step inside the Can-Am Defender XT HD10 2022, you find yourself surrounded by a very spacious cabin that can accommodate up to 3 passengers comfortably. The Versa Pro seats are very practical, as they allow you to stand up and use the storage boxes under them. Or to bring your dog with you without having to worry about it damaging the seats.
Many storage compartments are integrated (16.2 gallons total) and well thought out, such as the glove compartment that turns into a transportable tool box by lifting the handle that locks it in place. In all respects, the finish is exemplary and the Defenders are a credit to what we know of Can-Am vehicles.
Our test model, the XT version, comes with several standard features. Thus, we are entitled to a 4500lb winch, a front bumper and an aluminum protection plate under the vehicle. You can see on the pictures that our test model comes equipped with other accessories like a retractable windshield and rock sliders. One of the good points of choosing the Can-Am Defender is certainly to have access to a mountain of accessories to configure your vehicle to your image and to make sure that it will be functional for the various applications for which you will use it.
Defender Capabilities
When you have a work vehicle, you expect to put it to the test and it was designed to take it! With the best towing capacity in the industry at 2500lbs, you’ll be able to tow anything you can think of. Plus, the cargo bed can accommodate things up to 1000 lbs. It’s easy to tip with the handles on each side and its air shock that controls the movement smoothly. It is even possible to add an electric servo to raise and lower it. This is everything you need to make the Defender your best work partner.
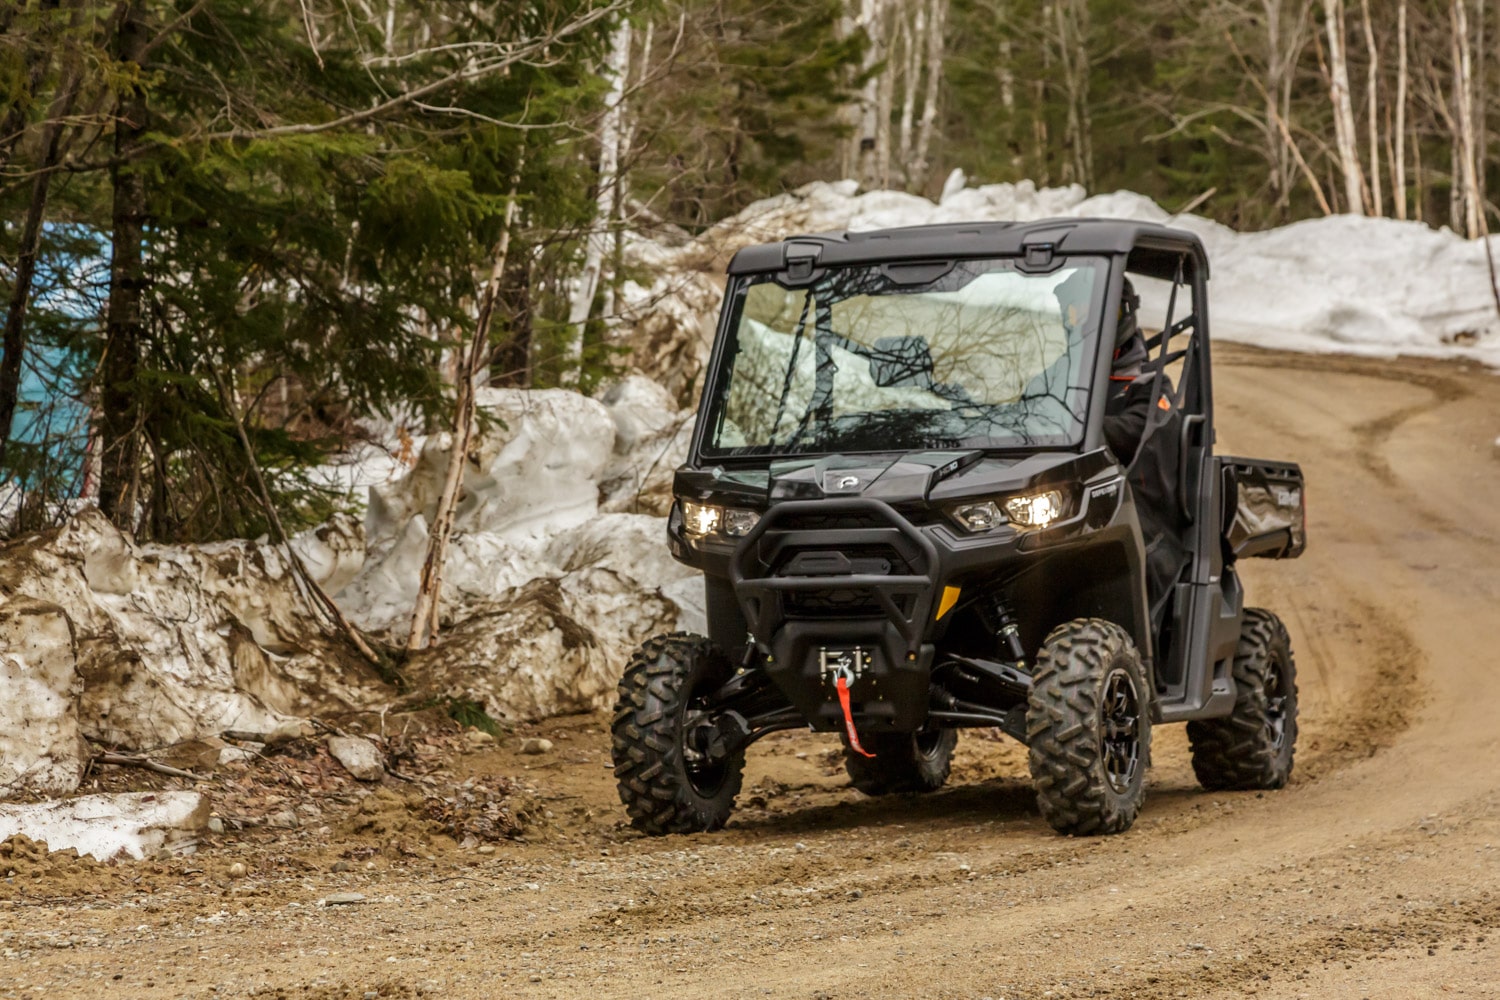
Driving impressions of the Can-Am Defender XT HD10 2022
During the test drive, we were able to test the Defender in many different situations. On the trails, the engine provides more than enough power to get us through the curves and put a smile on our faces. The suspension does a great job and the ride is quite precise. However, when you increase the pace, you’ll notice that he power steering is too much present and you’ll notice a certain “blur” in the driving.
When you put the Defender to work, you will appreciate its engine braking system, which means that you hardly use the brakes. This makes for a smoother ride when going downhill and when towing, for example. The turning circle is also noteworthy because it is very tight. It is therefore easy to drive around the yard or when doing work in the woods without having to go back and forth several times.
In summary, the HD10 engine is really powerful, quiet and economical. The suspension is well calibrated for the vehicle and its utility vocation. The interior is comfortable and well designed. It really has everything to be a real “work horse”!
The positive points:
3 choices of engines to adapt to the different possible uses
Very powerful HD10 engine, generous torque and relatively quiet
Suspensions are quite firm, but well calibrated for utility and sometimes more ”sporty” use.
Attention to detail and assembly quality worthy of mention.
Points to improve:
Very generous dimensions that can become a disadvantage on narrow trails. Especially in the extended wheelbase and MAX versions (6 seats)
The power steering intervenes too much at higher speeds and we lose some driving precision.
With the asking price of the XT version, it would be interesting to have doors and not only nets.
Conclusion
These many hours behind the wheel of the Can-Am Defender XT HD10 2022 allowed us to appreciate it at its full potential. It’s a pleasure to drive when you’re out on the trails. When we put it to work, where it is fully at ease, we are confident that it will accomplish all the tasks we ask of it!
If you would like more information on Can-Am models, visit the website or your nearest dealer.
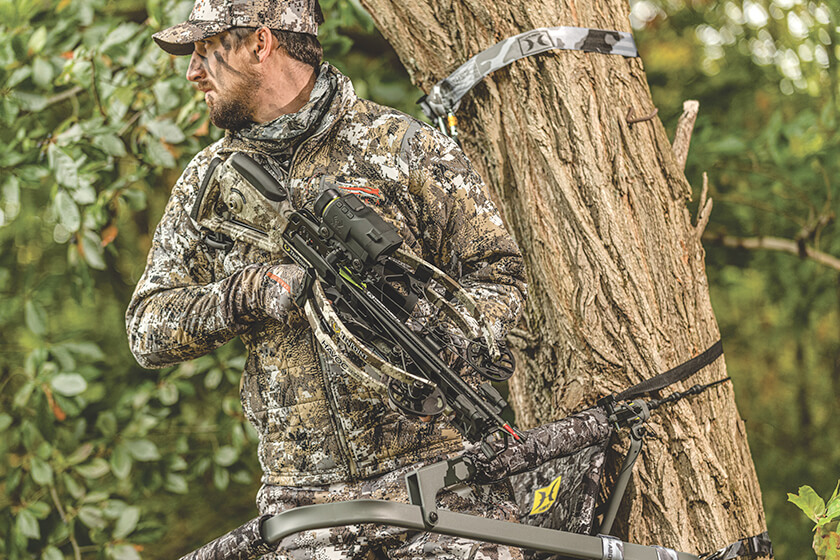
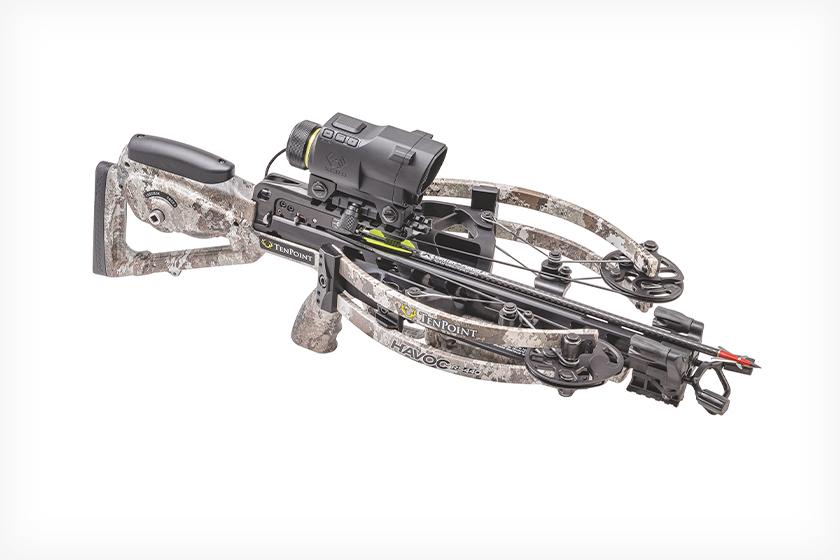
The TenPoint Havoc RS440 Xero, which comes with the Garmin Xero X1i laser-rangefinding scope, has an axle-to-axle measurement of just 7 1/2 inches when cocked. (Photo courtesy of TenPoint)
Timing is often critical to getting a shot while bowhunting. Whether hunting with a crossbow or a compound, preparing to shoot typically takes longer than when hunting with firearm.
With a compound, it also requires more movement. These are challenges that bowhunters readily accept and that bow manufacturers seek to help them overcome.
Being able to deftly maneuver a bow is key to capitalizing on a shot opportunity. No matter if the hunt occurs in a treestand or a ground blind, or even in the form of spot-and-stalk, crossbows with narrow widths and compounds with short axle-to-axle lengths shine in tight quarters.
They are easier to carry off the beaten path and guide around brush, branches and vegetation without hang-ups. New technology allows manufacturers to build easy-handling bows that are not only fast, but also accurate and comfortable to shoot.
Here are seven new models that are among the most compact on the market. They might buy you those extra few moments you need to make a shot.
Ravin promises the R500E will deliver 500 fps with the 400-grain arrows that come with the bow. Unprecedented speed is exciting, but the cocking system is just as impressive. The battery-powered Ravin Electric Drive System allows shooters to cock and decock the crossbow with just a push of a button. This cocking system is detachable and includes a charger, and the R500E can still be cocked manually with Ravin’s VersaDrive System. The R500E has an axle-to-axle spec of just 3.6 inches when cocked. While the overall width of the crossbow is certainly wider than the axle-to-axle figure, it’s still ultra-narrow. The R500E’s 28-inch length also contributes to the compact nature of this crossbow.
Axle-to-Axle, Cocked: 3.6″
Axle-to-Axle, Uncocked: 7.6″
Power Stroke: 15″
Length: 28″
Weight: 9.9 lbs
Speed: 500 fps
MSRP: $3,349
ravincrossbows.com
Wicked Ridge NXT 400
Wicked Ridge NXT 400
At just six inches wide axle-to-axle when cocked, the NXT 400 is Wicked Ridge’s narrowest crossbow ever. Its XR6 Cams and Vector-Quad cable technology uses four cables instead of two to power 200-pound limbs. The result is a speed of up to 400 fps with 400-grain arrows. Without the foot stirrup, the NXT 400 is 33 inches long and weighs less than 7 1/2 pounds. The NXT 400 package includes an ACUdraw cocking device, TenPoint 3X Pro-View scope, three-arrow quiver, and three Pro Elite 400 carbon arrows with practice points.
Axle-to-Axle, Cocked: 6″
Axle-to-Axle, Uncocked: 11.3″
Power Stroke: 15 1/2″
Length: 33″
Weight: 7.4 lbs
Speed: 400 fps
MSRP: $1,099.99
wickedridgecrossbows.com
TenPoint Havoc RS440 Xero
TenPoint Havoc RS440 Xero
The TenPoint Havoc RS440 Xero is a top-quality crossbow, but it’s what’s on top of the Havoc that sets it apart. This crossbow ships with the Garmin Xero X1i rangefinding scope. Press a button, and the scope determines the distance to the target then automatically provides an illuminated aiming point based on the range (see “Gear: How It Works,” page 100). The Havoc RS440 includes TenPoint’s ACUslide System, which makes cocking and decocking quiet, safe and nearly effortless. Easy to handle, the Havoc measures less than 27 inches long without the foot stirrup and 28 3/4 inches with the stirrup. The two-stage S1 trigger is silky smooth, and pull weight is a smidge under 3 pounds. The Havoc RS440 is also available with a more conventional EVO-X scope that features a holdover reticle.
Axle-to-Axle, Cocked: 7 1/2″
Axle-to-Axle, Uncocked: 12.3″
Power Stroke: 13 1/2″
Length: 26 1/2″
Weight: 7 1/2 lbs
Speed: 440 fps
MSRP: $3,649.99
tenpointcrossbows.com
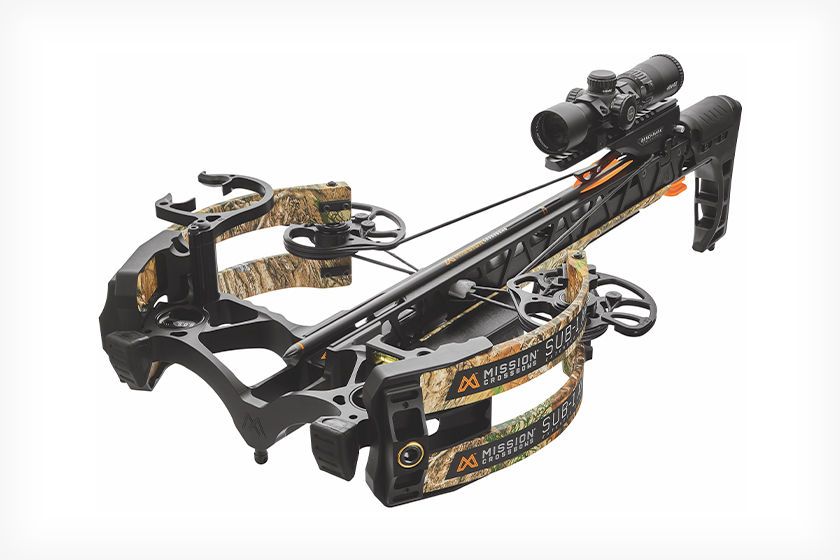
Mission Sub-1 XR
Mission Sub-1 XR
When cocked, the Mission Sub-1 XR measures 9.1 inches axle-to-axle and 13 inches at its widest point. It produces arrow speeds of up to 410 fps. The Sub-1 XR is easy to cock without a cranking device, but a silent Mission RSD Crank is an optional add-on. A speed-compensating Hawke scope is included in the package, along with a quiver and soft case. (The Sub-1 XR can also be purchased without the scope, quiver and arrows for $200 less.) This crossbow is incredibly accurate, thanks in part to a match-grade trigger that breaks crisply at about 3 pounds of pull weight. And if the hunt doesn’t end with a shot, the Sub-1 XR can be decocked easily. It is arguably the safest and easiest crossbow to decock without a crank system.
Axle-to-Axle, Cocked: 9.1″
Axle-to-Axle, Uncocked: 12 1/2″
Power Stroke: 14 5/8″
Length: 30 1/2″
Weight: 7.6 lbs
Speed: 410 fps
MSRP: $1,899
missioncrossbows.com
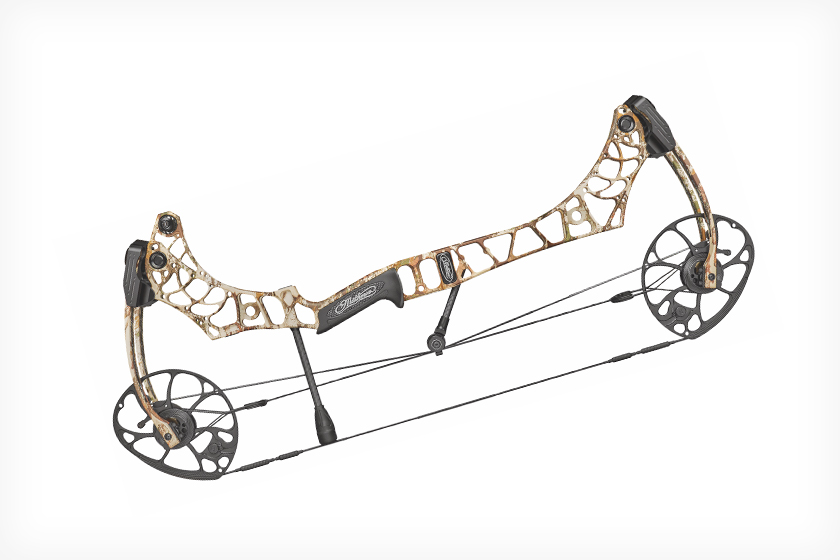
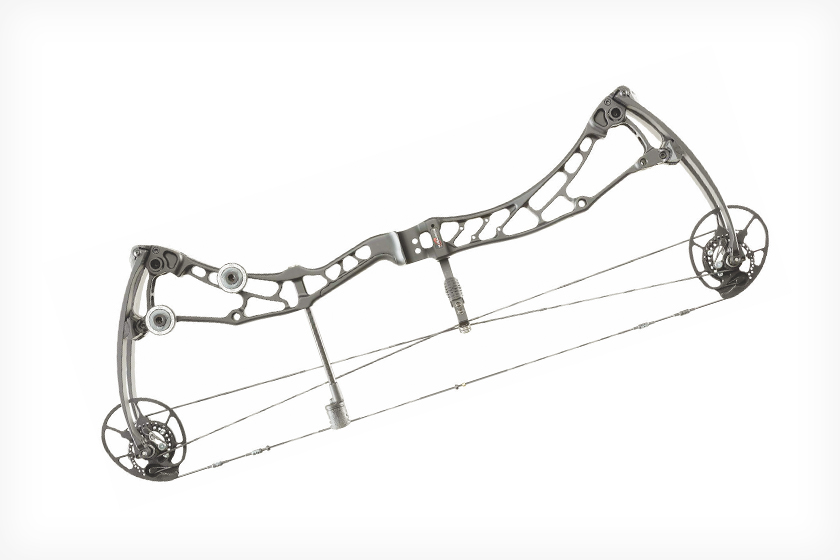
Mathews V3 27
Mathews V3 27
It’s not often you find a pair of flagship bows, especially with different axle-to-axle lengths, that mirror each other in almost every way. Mathews’ V3 27 and 31 models, however, are the exception to this rule. Both have a brace height of 6 inches and an IBO speed rating of 342 fps. The main difference is the length between the axles. The V3 27 is the company’s most compact bow to date. It, like the V3 31, makes use of Mathews’ Crosscentric cam to permit easy draw-length and draw-weight changes, the new Nano 740 damping system, and redesigned limbs and limb cups to reduce weight.
Axle-to-Axle: 27″
Brace Height: 6″
Let-Off: 80, 85%
Draw Weight: 60, 65, 70, 75 lbs
Draw Length: 25 to 29.5″
Weight: 4.29 lbs
Speed: 342 fps
MSRP: $1,199
mathewsinc.com
Hoyt Carbon RX-5
Hoyt Carbon RX-5
Hoyt heralds its latest carbon incarnation, the RX-5, as its best carbon model to date. The bow is fitted with an all-new HBX Cam that promises smoothness and speed, plus redesigned Limb Shox to minimize vibration and noise. Measuring 30 inches between the axles and having a 6 1/4-inch brace height, the RX-5 can hit speeds up to 342 fps. Other notable features of this 4.4-pound compound include the Integrate Rest Mount, which puts QAD’s Integrate MX drop-away in line with the riser, and a lower stabilizer position. The bow is also offered in an Ultra model with a 34-inch axle-to-axle length and 7-inch brace height.
Axle-to-Axle: 30″
Brace Height: 6 1/4″
Let-Off: 80, 85%
Draw Weight: 30 to 80 lbs
Draw Length: 25 to 30″
Weight: 4.4 lbs
Speed: 342 fps
MSRP: $1,699
hoyt.com
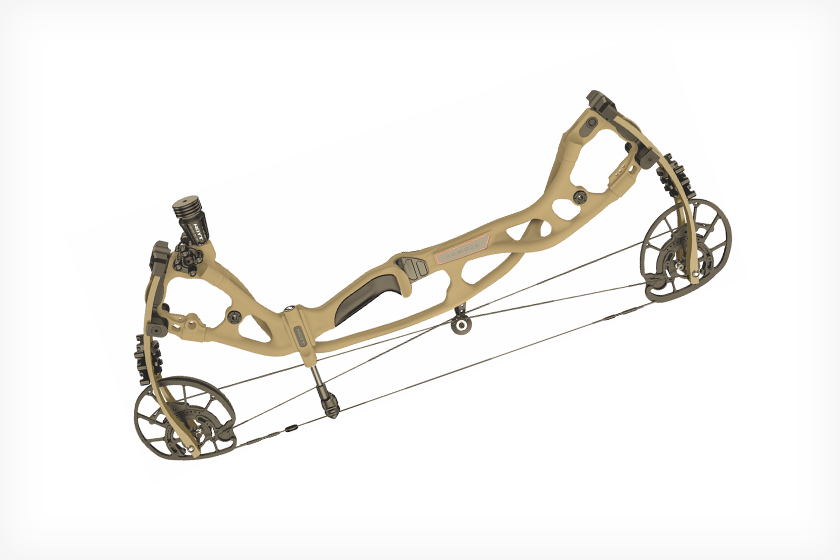
Bowtech Solution SD
Bowtech Solution SD
Optimized for bowhunters with draw lengths of 23 1/2 to 28 1/2 inches, the new Solution SD offers speed and performance in a short-draw compound. Bowtech reports arrow speeds up to 323 fps, and the company builds the Solution SD with its DeadLock Cam System. The Deadlock cams can be moved left or right on the axles by just turning a screw for easy tuning to achieve perfect arrow flight. Deadlock cable containment reduces torque, and Orbit dampeners can be strategically placed on the riser to offset accessory weight while minimizing vibration.
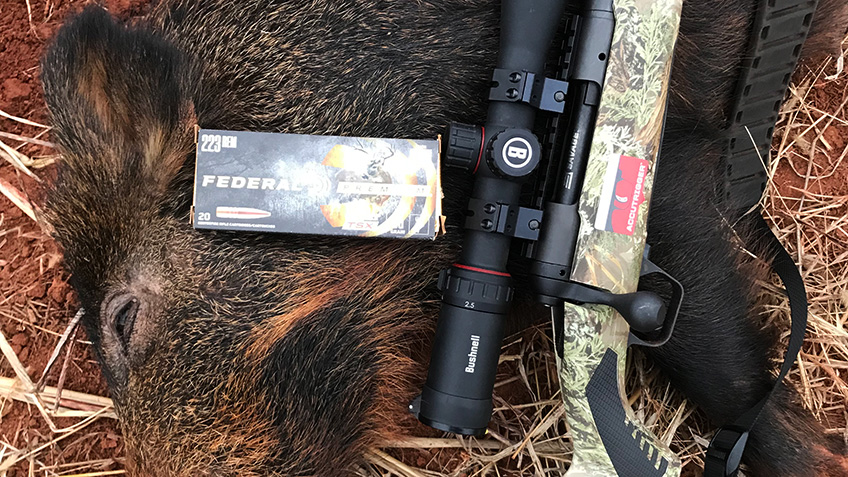
Calling coyotes in the state of Oklahoma, a pair of dogs winded us and cut diagonally across the ravine. The duo stopped to look back at 200 yards, and I squeezed the trigger on my Savage 110 Predator. The yote disappeared into the grass and rolled down the hill.
I was happy with the accuracy and knockdown power of the Federal Premium Barnes TSX ammo. I had used it in the past, but since being discontinued in 2013, I forgot how deadly the bullet was on game.
The diminutive .223 barked again late in the evening when we ran across a sounder of hogs in the dry bed of a wetland. The tall grass provided brief glimpses of the swine, as they sauntered in and out of view like apparitions. My hunting partner and I lined up on the two largest pigs, which didn’t have a clue we were perched on a hill 230 yards away. Our elevated position allowed us to see into the grass where the pigs had been rooting. When the two mature hogs turned broadside at the same time, we squeezed the triggers. The hog I had in my scope dropped like a bag of concrete. It was dead on impact.
A hog is a stout critter and often requires serious knockdown power from a larger caliber rifle, but the .223 Rem. did just fine with the performance of the Barnes TSX. We repeated our performance the next evening when a large sounder of hogs appeared below us, wandering a creek bottom just before sunset. We knocked down three pigs and caused the rest to scramble in a matter of seconds.
Solid copper bullets are nothing new. Federal loads several varieties of copper bullets, including Trophy Copper and Power-Shok Copper. I’ve used them on everything from bears to elk and love the terminal performance the bullets provide.
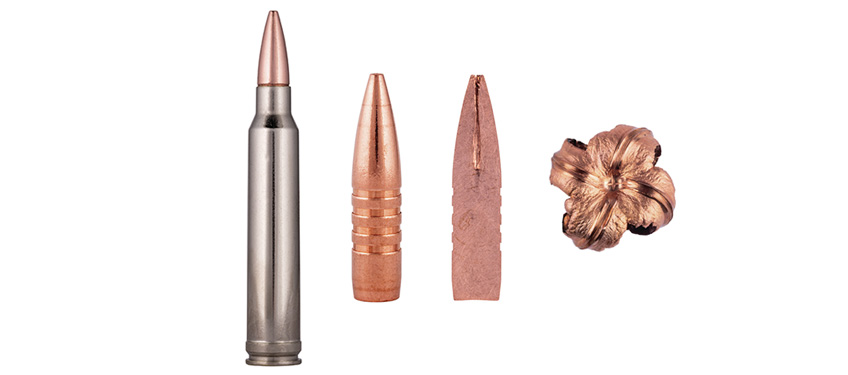
The name says it all, as the TSX stands for Triple-Shock X. The TSX was introduced in 2003 and is Barnes’ most popular hunting bullet. Barnes claims, “The TSX has gained worldwide recognition as one of the deadliest, most dependable bullets you can buy. Try these all-copper bullets and realize the added benefits of improved accuracy, reduced barrel fouling and increased velocity.”
Instead of trying to describe why hunters should consider the TSX bullet, I asked Barnes engineers what makes the Triple-Shock X so popular, and its engineers said, “The Barnes TSX, TTSX and LRX bullets are all a monolithic design. They are manufactured using a solid copper slug. They are a controlled expansion projectile. This gives high weight retention due to the fact that there is not a core and jacket to separate. They have a cavity formed into the nose which allows rapid expansion upon impact when fluid enters the cavity. The ‘TSX’ grooves cut into the shank reduce bearing surface [pressure] and fouling. The grooves also increase accuracy. Proprietary design, tooling and manufacturing processes allow us to produce accurate and consistent projectiles. They are very popular among hunters because of their excellent terminal performance and accuracy. Being a controlled expansion bullet, we are able to ‘optimize’ the function window for a given cartridge and velocity range. This aids in superior terminal performance.”
From elk and moose to coyotes and hogs, the Barnes TSX works. The bullet stays intact to deliver maximum energy at any range. The consistent expansion of the bullet is what hunters will appreciate.
Federal Brings Back Fan FavoritesThe notion of using top-quality components to build superior cartridges started 42 years ago when Federal produced its Premium line of centerfire rifle ammunition. The Sierra MatchKing bullet was one of the first, grabbing the attention of hunters looking for optimal performance. No other company considered using another company’s bullets, but Barnes, Nosler, Sierra and Berger are but a few of the premium-class bullets loaded by Federal over the years to create a market demand for better performance. Does anyone remember the introduction of Trophy Bonded Bear Claw or Nosler Partition?
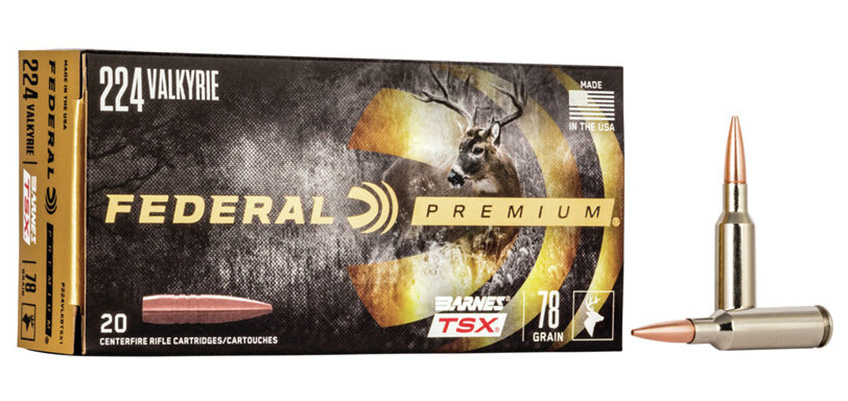
Over the years, there have been many variations of premium ammunition produced. Some were popular but discontinued in an attempt to bring something new to the market and keep up with demands like specialty cartridges for dangerous game, or long-range hunters. It has been over six years since Federal used the Barnes TSX bullet in its Premium line, but in 2019 it was brought back by popular demand. The offerings in the line from 2013 will be back in virtually the same form as before.
The good news is that powders and components like nickel-plated cases have seen advancements since the Barnes TSX was discontinued, so hunters will benefit from the short hiatus. The Federal Premium Barnes TSX loads will be very close to the same velocities and accuracy specifications as before, and will also be available in 6.5 Creedmoor and .224 Valkyrie, which have gained popularity in the short time Federal didn’t load the Barnes TSX.
The all-copper hollow point projectiles, known for tight groups at long range, and consistent downrange expansion are available in 17 loads from .223 Rem. to .300 Win. Mag. and have an MSRP of $33.95 to $52.95.
The senior communications manager from Federal said, “Anyone can load the Barnes TSX bullets, but it’s the premium components that set our cartridges above the rest.”
A short 42 years ago Federal made an effort to have its ammunition stand out, and continues to do so today. Look for new packaging as part of the marketing to separate Premium ammunition from others to make it emerge on the shelf and in the field.
"Understanding the Legalities: Felon Ownership of Air Rifles in Tennessee"
can a felon own an air rifle in tennessee?
In the state of Tennessee, the ownership...
Wyatt Earp has said:
Fast is fine, but accuracy is everything
And I just thought how many airgunners are obsessed with muzzle velocity and muzzle energy,...
"Master the art of precision shooting with dry firing air rifles. Enhance your aiming skills, trigger control, and muscle memory without using ammunition. Discover...
")
")
")
")
")