The Ten Commandments of Firearm Safety
The Ten Commandments of Firearm Safety are stated variously by different organizations and are often presented in different order, but the meaning is consistent and universal, including in Africa. If these rules are followed, a firearm-involved accident is highly unlikely.
- Treat every firearm as if it’s loaded.
- Control the direction of your firearm’s muzzle.
- Be sure of your target and what’s beyond your target.
- Be sure that the barrel and action are clear of obstructions and that only the proper size ammunition is used.
- It is not uncommon for termites and other insects to discover that a rifle barrel is an ideal place to build a nest. Take a look through your barrel every day!
- Unload firearms when not in use.
- Never point a firearm at anything you do not intend to shoot.
- Never climb a fence or tree or jump a ditch or log with a loaded firearm.
- Never shoot a bullet at a flat, hard surface or water.
- Store firearms and ammunition separately.
- Avoid alcoholic beverages and drugs before and during shooting.
These commandments rely upon basic common sense. Implied throughout is the reliance on control of the direction the barrel is pointed—and the lack of reliance on the firearm’s mechanical safety. These rules don’t change in Africa. Most professional hunters (PHs) will attest that the most dangerous creature in the African bush is an excited visitor with a firearm!
Four Basic Safety Rules
The International Hunter Education Association (IHEA) reduces the Ten Commandments of Firearm Safety to four basic safety rules. They can be remembered by using the acronym ACTT and the statement “ACTT responsibly around firearms.” ACTT stands for:
- Assume every firearm is loaded. Consider any firearm that you have not just unloaded to be still loaded, and treat it accordingly.
- Control the muzzle —point guns in a safe direction. Decide what the safest muzzle direction is, and keep your firearm pointed in that direction. Never point a firearm at yourself or others.
- Trigger finger —keep your finger off the trigger until ready to fire. The natural instinct when picking up a firearm is to put your finger in the trigger guard. Don’t! This could cause an accidental discharge if the firearm is loaded.
- Target—be sure of your target and beyond. Never point your firearm at something you do not intend to shoot. Make sure you positively identify what you are shooting at and what lies in front of it and beyond it. Do not use telescopic sights as a substitute for binoculars when identifying persons, animals, or objects.
Universal Drills
Basic firearms safety applies no matter where you are, and is often accomplished by certain basic and universal rituals or drills.
- Checking the chamber. Whenever passing a firearm to another person or getting into a vehicle, the normal etiquette or protocol is to check the chamber to make sure it is empty—likewise when receiving a firearm from another person.
- Negotiating an obstacle. Whether crossing a fence, boulder, log, or stream, or entering a stand or blind, it is almost unavoidable that the firearm’s muzzle can be temporarily out of control and a 100% safe direction cannot be guaranteed. There are two ways to handle the situation.
- The buddy system. Two buddies (or you and your PH) take turns holding the firearms and negotiating the obstacle.
- Unload the firearm! The standard procedure for crossing a fence is to unload the firearm and lay it down at the base of the fence with the muzzle pointing in a safe direction. Cross the fence, and retrieve the firearm. While this is the “school solution” for all obstacles, many will be negotiated simply and quickly by slinging the rifle. The point is that the muzzle is temporarily out of control, especially in the case of a slip or fall, so the chamber should first be unloaded.
- Getting into a vehicle. Customs and laws vary. In some areas, it is specifically illegal to have an uncased firearm in a vehicle. Required or not, it is always a good idea to put a firearm in a soft case while in a vehicle—not only to reduce wear and tear, but also to reduce the chance of a scope changing zero. However, whether a case is used or not, when a firearm is in a vehicle (including a boat or aircraft) or in a saddle scabbard on a horse or ATV, the muzzle is temporarily out of control, so the chamber must be clear. The drill for getting into a vehicle or any similar situation is thus simple: Clear the chamber and check it!
Introduction to the African Elephant
Two Varieties of African Elephants
Most authorities maintain there are two varieties of African elephants: the bush elephant found across most of sub-Saharan Africa and the forest elephant of the forest zone. Today, these are often described as two separate species: Loxodonta africana (the bush elephant) and Loxodonta cyclotis (the forest elephant).
- The primary difference is size. Forest elephants are much smaller, with mature males averaging eight feet at the shoulder, while bush elephant bulls range from 10 to 13 feet or more. Weighing up to 15,000 pounds, the bush elephant is the largest land animal on Earth. But the size difference between the bush and forest elephants is significant enough that the Asian elephant, though smaller than the African bush elephant, is actually larger than the forest elephant.
- Based primarily on size, the two African elephant types have long been recognized and considered subspecies. Separate species classification, though recent and not agreed upon, is based on differences in size as well as appearance. For example, bush elephants typically have four toenails on the front feet and three on the rear, while forest elephants typically have five toenails on the front feet and four on the rear.
Common Behaviors
The African elephant is a browsing animal that must have prodigious amounts of both vegetation and water. A large elephant may consume 900 pounds of foliage daily. Elephants are thus highly destructive feeders and, when overpopulated, quickly devastate their habitat. Elephants will normally water daily and must water every other day. With their huge food intake requirements, they may travel many miles daily between good browse and water sources.
Elephants have extremely keen hearing and an uncanny sense of smell. Their eyesight is not on par with their other senses. But it’s unclear if they really can’t see particularly well or if they simply place greater reliance on their two stronger senses.
Elephants are social animals with a generally matriarchal society. The primary unit is customarily about 10 females, mostly related, led by an older female. Depending on available food and water, family groups may congregate into much larger herds, sometimes into the hundreds, but such gatherings are temporary.
Cows and Bulls
Although elephants are very slow breeders, normal population increase will be about 5% per year. Cows (females) can reproduce at about 10 to 12 years old, with single calves born after a 22-month gestational period. Although sexually mature earlier, bulls (males) are usually neither big enough nor strong enough to compete for mating rights until their mid-20s. By this time, bulls are nearly twice as heavy as females of the same age, but elephants continue to grow slowly throughout their lives until they reach old age.
As young bulls reach puberty, they are ejected from the family group. Cows may come into estrus at any time of the year, at which time bulls will join the group for breeding—with bulls fighting viciously for mating rights.
Cows are exceptionally good and protective mothers and are generally far more aggressive than bulls. However, breeding bulls experience an exaggerated level of testosterone, accompanied by facial gland and penis secretions (the former can be seen while the latter is found in tracks). The increased testosterone causes extreme aggression, a state called musth. Cows with young are always extremely dangerous to approach, but a bull in musth is probably the most dangerous.
Teeth and Tusks
Life expectancy depends primarily on tooth wear. Elephants have four molars, with new molars growing and moving forward replace the front pair as they wear. An elephant will replace its molars four to six times, but when the last set wears out, slow starvation is certain. Average life expectancy in the wild is about 50 years. But in areas with softer soil (such as montane and forest environments), elephants can live to 70 and more.
The tusks are actually incisors that continue to grow throughout an elephant’s life. Although tuskless African elephants occur in both sexes, both males and females typically grow tusks, with cow ivory much smaller and thinner than bull ivory. In the old days, it was said that an elephant may grow a pound of ivory per year, but this is not true. A bull in his 30s—in his prime—may grow several pounds of ivory per year, with growth slowing as he begins to age. To a degree, tusk size is somewhat dependent on body size, but genetics and minerals are probably much more important. While the trunk is the primary instrument in stripping leaves, elephants use their tusks for digging, for breaking branches, and for fighting. So, it isn’t unusual for an elephant to break one or both tusks during its long life.
Threats to African Elephant
Primary threats to the elephant are the illegal ivory trade and loss of habitat to human expansion. In the 1970s and 1980s, commercial poaching reached a peak, and elephant populations fell precipitously in much of Africa. In 1989, the international body Convention on International Trade in Endangered Species (CITES) enacted a near-worldwide ban on ivory trade that blocked many markets and allowed significant recovery for 20 years.
Unfortunately, since 2009, a new wave of poaching has swept much of Africa. Total numbers continent-wide are uncertain and hotly disputed, but it must be accepted that the African elephant is again in crisis. That said, Africa is a big continent. There are several countries, primarily in southern Africa, where elephants have been protected and are being managed well.
Management
Since 1990, CITES has allowed exemptions for sport-hunted ivory for personal use, by quota, from countries that have demonstrated that limited hunting is beneficial to their elephant population. Namibia and South Africa have limited habitat for elephants, with current populations of a few ten thousand each at or near carrying capacity. Zimbabwe is estimated to have a minimum of 70,000 elephants, far above carrying capacity. These countries continue elephant hunting as part of their management, as do Cameroon, Mozambique, Tanzania, and Zambia, all with approval of CITES.
Africa’s largest elephant population is in Botswana, which has 250,000 by recent (2015) survey. Although this number is considered far above the carrying capacity, Botswana does not currently allow elephant hunting.
For American hunters, the U.S. Fish and Wildlife Service does not precisely echo CITES in allowing importation of legally sport-hunted ivory. In 2017, import permits were being issued for Namibia and South Africa, with a moratorium on ivory importation from Tanzania and Zimbabwe (permitting for Zimbabwe ivory appears likely to resume in the near future).
Despite increasing pressure from illegal poaching, African countries that continue to hunt elephants consider regulated hunting an important tool because (1) placing value on elephants—through direct fees and local employment—deters poaching; (2) license and permit fees fund anti-poaching efforts; (3) legal safaris in the field deter illegal activities; and (4) with elephants being highly intelligent animals, legal hunting acts as a deterrent against human/elephant conflict (crop-raiding). In areas where elephants are overpopulated, the management imperative for hunting is as strong as for any species in the world.
Equipment for African Elephant Hunting
Legal Requirements
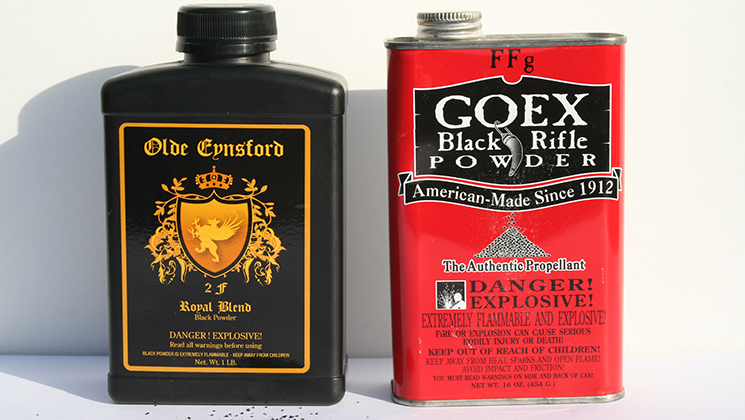
Many African countries have minimum caliber requirements for dangerous game, and hey, if they do, the elephant is always considered dangerous game. Both the legal minimum and common sense say that a .375 is the minimum caliber for elephant. Now, in many countries, this is not stated as .375. It’s stated as the European equivalent, the 9.3mm or .366 caliber, which is very, very minimal for elephant.
Use of handguns and archery tackle is much more restrictive, specifically illegal in many areas but allowed in some. Now whether you prefer the European 9.3mm or the more common .375, or larger and more powerful cartridge, or a big handgun or archery tackle, keep in mind that whether enacted into law or not, minimum standards exist because of conventional wisdom developed over time and based on experience, which is both good and bad.
An elephant bull can be 10 times larger than the average buffalo. So, a .375 is a good sound, sensible minimum. And if the law allows and you choose to deviate from that and use a handgun or archery tackle or black powder, make sure it’s legal in the area where you’re hunting and discuss it with your PH.
Cartridges for Elephant Hunting
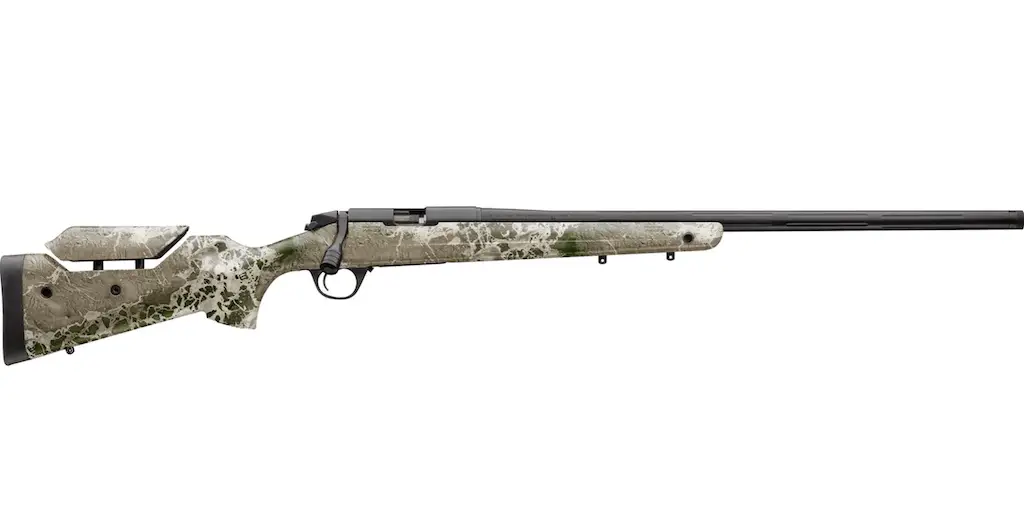
The .375 H&H, introduced clear back in 1912, is probably the baseline for hunting elephant. It’s going to be within the legal minimum in all countries, and it’s a cartridge of relatively low recoil that most people can learn to handle. But keep in mind with elephants, shot placement is always more important than raw power. Now faster .375s are going to give you a little bit more penetration and certainly deliver more energy. But keep in mind that as you go up the velocity scale, and with the .375s, recoil goes up.
Now the 9.3s are the European equivalent. Cartridges like the .370 Sako Magnum, also called 9.3x66mm, and the old 9.3x64mm Brenneke, are essentially the equal of the .375. If a 9.3 is legal where you’re hunting, you’re going to do just fine with them.
Low recoil options are actually relatively limited. The old 9.3x62mm and 9.3x74R in double rifles is very, very minimally adequate for elephant. It may be legal in areas where 9.3s are allowed, but you’re pushing the limit. And that’s really as low as you should ever consider going for elephant hunting today.
The several .416s and cartridges like the .450/.400, and .404 Jeffery are extremely effective on elephant. In fact, with higher velocity, many of them will actually penetrate better than the big bores. They’re going to be a lot more effective than the .375 for elephant. But you have to keep in mind that they’re not as versatile for other game and they do produce more recoil.
The true big bores are the traditional choices for hunting elephant. Now with their higher velocity, the .40s may penetrate better, but the big bores are going to deliver a heavier blow. Obviously, as you increase in power, then recoil goes up. So, it’s really important to not use more gun than you can handle comfortably, but there is no such thing as too much gun for elephant. Your professional hunter will almost certainly be armed with a big bore to back you up, if necessary.
Rifles for Elephant Hunting
The bolt action is by far the most common choice for visiting hunters. And there’s bolt actions and suitable calibers at a wide variety of price ranges. This is certainly the least expensive option, and it’s going to be effective. However, if you choose a bolt action, you have to make absolutely certain that all aspects of feeding and functioning are totally reliable. And in your practice sessions, make sure that you practice working that bolt so that you can get off follow-up shots quickly, if you need to.
The double rifle is the preference of many professional hunters because of the instantaneous availability of that second shot, and hey, that applies to visiting hunters as well. Elephant hunting is probably the only situation where the double rifle really is superior to the bolt action simply because of that instantaneous and reliable second shot.
The drawbacks to the double rifle are greatly increased cost and reduced versatility. But in this most specialized of all hunts, versatility shouldn’t be a major consideration. Several modern single shots are chambered for cartridges that are absolutely adequate for elephant. But a single shot isn’t recommended simply because of the frequent requirement for a quick backup shot.
Now as a visiting hunter, you’re not going to be hunting alone, so if you choose a single shot, that’s fine. Your professional hunter is going to be there, but he may well have to back you up simply because no human being can load a single shot fast enough when things go wrong with elephant.
No other action types, whether slide action, semi-auto or lever action, have been factory chambered for cartridges adequate for elephant. Custom work is possible, but you don’t see these in elephant hunting very often.
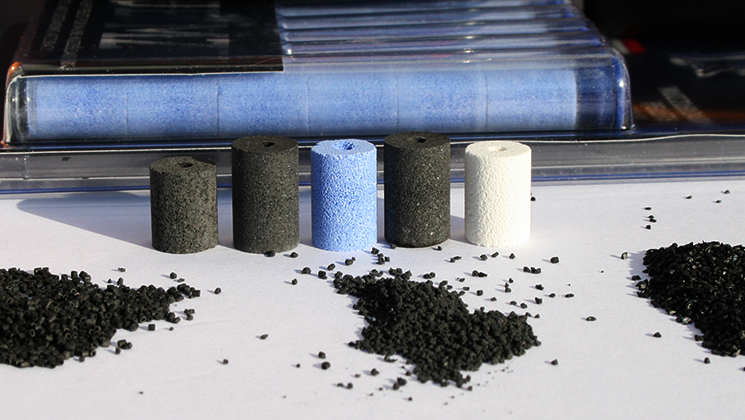
Bullets for Elephant Hunting
Hey, this is easy, solids only. Non-expanding or solid bullets are designed for deepest penetration on the largest game. And these are the bullets you absolutely have to use. Elephant hunting is purely a game of shot placement and then penetration of the bullet.
The professional hunter and Craig Boddington crouch beside an elephant skull.
Professional Hunter: Craig, there’s no way that any form of soft point, even a premium soft, would enter the brain. It’s just so much bone to travel through that a soft point would slow down and not make the brain.
The two primary choices today are the homogeneous-alloy or all-copper bullet—the solid, solid—and then the traditional jacketed bullet that has a lead core but it’s jacketed with a coating of mild steel, what we call steel-jacketed solids. Both are extremely good. There really aren’t any bad solids on the market today; it’s obviously a very small market. And these are bullets that you trust your life to, and really, all the solids on the market today are very good.
You should use the one that gives you the most confidence. The only limitation is that the homogeneous-alloy bullets have a slightly different pressure curve, may not be a good idea to use them in older double rifles with thin barrel walls. But again, just a matter of confidence. There aren’t any bad solids, but for elephant hunting, you’ve got to choose a solid.
Legal Requirements
Most African countries (but not all) have established legal minimums for “dangerous game,” which always includes elephant. If in doubt, ask your professional hunter (PH)! Although we often state that the .375 is the legal minimum, this is not always true.
In several countries, the actual minimum is the European equivalent, which is 9.3mm (.366-inch). Some countries do not have established legal minimum standards, and in some countries, the rules vary. Zimbabwe, uniquely, has a minimum energy standard, which includes the 9.3x62mm Mauser. But this rule is only applicable on government land and not on private land.
Use of handguns and archery tackle is more restrictive, specifically illegal in many areas but allowed in some. Whether you prefer the European 9.3mm, the more common .375, a larger and more powerful cartridge, a big handgun, or an archery tackle—keep in mind that, whether enacted into law or not, minimum standards exist because of conventional wisdom developed over time and based on experience—both good and bad.
An elephant bull can be 10 times larger than the average buffalo! Regardless of law or convention, a .375-caliber rifle is the recommended minimum for elephant. If you wish to deviate from this and local law allows it, discuss this with your PH, and make certain that he or she is willing and confident to conduct a hunt under such circumstances.
Cartridges for Elephant Hunting
9.3s and .375s. The baseline for elephant hunting is probably the .375 H&H, introduced in 1912. The .375 H&H is adequate for elephant under most conditions and has the advantage of fairly moderate recoil that most shooters can learn to handle. In any discussion of hunting elephant, shot placement is far more important than raw power.
Faster .375s, such as the .375 Weatherby Magnum and Remington Ultra Mag, deliver more energy, but they also deliver more recoil. The .375 Ruger, though slightly faster than the .375 H&H, is a more compact cartridge, chambered in several excellent but inexpensive rifles.
9.3mms, such as the .370 Sako Magnum and 9.3×64, are essentially ballistically identical to the .375 H&H, but they may not be legal if the stated minimum is .375 caliber. Lower-recoil options are few. Even in areas where 9.3s are legal, the 9.3x62mm Mauser and 9.3x74R (for double rifles) should be considered very marginal, especially for hunting larger-bodied bulls.
.40s and .416s. The several .416s and cartridges such as the .450/.400 for double rifles and the .404 Jeffery are much more effective on elephant than the .375s. Shot placement remains critical, but the .375 and equivalent should be considered a bare-bones minimum, with the .40-caliber cartridges as far better choices. Their disadvantages are that they are not as versatile for other game and that they produce more recoil. But they are very good choices for elephant.
Big bores (.450 and larger). The true big bores are the most traditional choices and are effective on elephant. Because of higher velocity, the .40-caliber cartridges penetrate at least as well, but the big bores deliver a heavier blow. Recoil tends to increase along with caliber, so it’s important to avoid using larger calibers than you are comfortable shooting. But there is no such thing as “too much gun” on elephant. The largest calibers are highly specialized, but so is elephant hunting! Your PH will almost certainly be armed with a big bore.
Rifles for Elephant Hunting
Bolt actions. A bolt-action rifle is by far the most common choice for the visiting hunter. There are numerous options in various price ranges chambered to suitable cartridges. But if a bolt action is chosen, its user must make certain all aspects of feeding and functioning are totally reliable. In practice sessions, he or she should concentrate on learning to work the bolt quickly for follow-up shots.
Double rifles. The double-barreled rifle is often the PH’s choice because of the instantaneous availability of a second shot. In elephant hunting, this applies to the visiting hunter as well: Elephant hunting is one of very few situations where the double rifle is clearly superior to the bolt action—purely because of that instant availability of a second shot. The double rifle’s drawbacks are higher cost and reduced versatility, but in this most specialized of all hunts, versatility should not be a consideration.
Single shots. Several modern single shots are chambered in suitable cartridges for elephant. Because of the frequent requirement for a fast second shot, single shots are not recommended for elephant hunting. But they can be used with the understanding that the visiting hunter will not be alone and may have to rely on the PH for necessary backup.
Other action types. No other action types (slide action, semi-automatic, lever action) have been factory chambered for cartridges adequate for elephant, although custom work is possible.
Bullets for Elephant Hunting
Solids only! Non-expanding solid bullets are designed for the deepest penetration on the largest game. Only high-quality non-expanding bullets are suitable for elephant. Choices usually fall between homogeneous copper alloy bullets and traditional lead-core bullets jacketed with mild steel overlain with copper (steel-jacketed solids). Both bullet types are effective.
Because of their highly specialized and relatively limited use, there are no “bad” solids in production today. However, homogeneous-alloy solids have a different pressure curve, so they are not recommended for older double rifles with thin barrel walls. Because of distance and size of target, extreme accuracy is not a requirement. The primary criterion in the choice is the bullet that gives you the most confidence.
Scopes and Sights for Elephant Hunting
Optical or open?Elephant hunting is one of the few situations in the entire hunting world where iron sights are superior to telescopic sights. Here are reasons why iron sights are superior: Ranges are very close and the target is very large, but proper shot placement within that large target remains essential. The use of a magnifying sight runs the risk of seeing nothing but a wall of gray at very close range. Also, telescopic sights tend to create tunnel vision. The greatest danger in elephant hunting may not be from the target elephant but from unseen elephants nearby, so peripheral vision is important.
Ideal iron sights for elephant.Either aperture or traditional open sights may be used, but it’s important that they be extremely sturdy. Do not assume that iron sights are automatically stronger than optical sights. Also, if iron sights are chosen, do not assume that you can simply pick up the rifle and use them well enough. Practice is required!
Ideal scopes for elephant.Because of familiarity with scopes or visual acuity, scopes can be used if there are issues that preclude use of iron sights. But in elephant hunting, magnification is dangerous and too much magnification can be deadly. Low-range variables with a low setting of 1X (meaning no magnification) are ideal, and a low setting of 2X is probably the maximum that should be considered. Lighted reticles greatly speed aiming and assist in shot placement.
Optical options.Traditional open sights (notch or V rear, bead or blade front) require the eye to focus in three focal planes: rear sight, front sight, and target. This becomes increasingly difficult as range increases and greater precision is required. Also, open sights become more difficult for most people as middle age approaches and the eye becomes less flexible. The aperture, or peep, sight is an iron sight, but it is actually an optical sight in that the eye naturally centers the front sight in the aperture or circular opening of the rear sight. Thus, aperture sights require the eye to focus in just two focal planes: front sight and target. Most shooters can effectively use aperture sights for some time after open sights are completely “fuzzed out.” A disadvantage is that, in low light, all iron sights—open and aperture—quickly become hard to see. But an aperture sight is a valid option on an elephant rifle.
- Another extremely sound option is the reflex or red-dot sight. This is a non-magnifying sight that projects or reflects a red dot as the aiming point. Actual dots may be yellow, green, or blue. But on elephant, a red dot is probably the most visible. The reflex sight, like a scope, allows the eye to operate in one focal plane. As with a scope reticle, the eye simply superimposes the dot on the aiming point. All iron sights and reflex sights encourage shooting with both eyes open, thus maintaining the peripheral vision that can be critical in elephant hunting.
Scope mounts.While any mechanical device can fail, the scope mount is probably the weakest link. Recoil is the great enemy to both scopes and mounts, so strong and rugged mounts must be chosen and must be assembled properly in accordance with the manufacturer’s directions. Modern detachable mounts are adequately strong. But even if iron sights are present on the rifle, make sure you have another option in case there is scope failure or a need to go into extremely thick cover. That said, it has been proven that low-powered scopes and reflex sights are faster to use than any iron sights, even at very close range. In elephant hunting, shooting distances are usually very close. This is a situation where a hunter might consider removing a scope in favor of iron sights before concluding a stalk but only if the alternate sights are properly zeroed and he or she is completely familiar with them.
Quality.Both rifles and scopes take serious beatings in Africa, constantly bouncing over rough roads. Scopes should be rugged, and the best way to ensure that is to use one of the many high-quality brands and to avoid the most inexpensive scopes.
Protection.Dust is a major issue in Africa. Bring a scope cover or lens caps. Leave it on your scope in the vehicle, and remove it when you commence a stalk. Using a soft gun case in vehicles will also save wear and tear on the scope as well as the rifle.
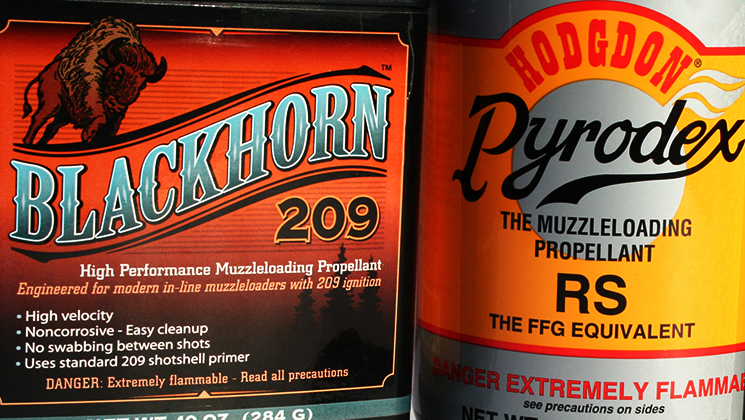
Handguns, Muzzleloaders, and Archery Tackle
Handguns, muzzleloaders, and archery tackle are legal in some areas. Elephants have been taken by the most imaginable alternative methods. Equipment requirements for these methods of take are highly specialized. (Remember that an elephant may be 10 times the size of a buffalo bull!) If alternative methods are desired, this must be discussed with and cleared by your outfitter and/or PH, preferably a person who has previous experience with the type of method you wish to use.
Hunting success is never assured, but the choice of alternative methods of take renders success more difficult. This is not a problem for dedicated handgun, muzzleloader, and archery hunters, but it must be understood. Also, the PH is morally and legally responsible for the safety of the entire party. If the PH deems it essential to shoot in order to prevent the escape of a wounded animal and avoid a dangerous follow-up, then that’s a judgment call he or she must be allowed to make. Obviously, when equipment of marginal power and penetration are used, it is more likely that the PH will be required to fire backup shots.
The Professional Hunter’s Greatest Concern
While we all think about Africa’s dangerous animals and snakes, most professional hunters (PHs) and guides worldwide worry most about strangers with firearms. Statistically, nearly as many PHs and trackers are injured by accidental gunshot wounds as by dangerous animals.
Range Day
One of the first events on any safari or guided hunt is to go “check zero.” Some PHs are astute “gun guys,” but many are not. Either way, they will endeavor to get you as close to the animals they hunt as circumstances (terrain, vegetation, etc.) allow. Long-range shooting on elephants is out of the question, but the shot may be standing unsupported at close range or on shooting sticks at very medium range. PHs have a vested interest in making certain your firearms have survived the journey and are reasonably in zero, but they probably don’t care as much as you do that your zero is “perfect.” At the ranges elephants are taken, an inch or two off at 100 yards makes very little difference. Zero does need to be checked, but the purpose of that range day is actually threefold. The PH and his or her team—including the trackers—want not only to ensure that the rifle hasn’t shifted during travel but also to evaluate your shooting ability and your gun handling safety.
Every day is “qual day.” In the U.S. military, an oft-used saying is “every day is qualification or ‘qual’ day.” Range day is like qualification day, and it’s not an exam you cram for. Basic gun handling safety must be practiced all the time, and it matters to your safari. The way you shoot and handle your firearm on range day has much to do with the way your PH and his or her team will conduct the safari—how they will try to set up your shots, what shots they will recommend (or in fact allow) you to take, and how much time they will have to devote to watching your gun handling when they should instead be focused on finding game and orchestrating stalks. Safe gun handling starts at home on your range, but it continues on range day and must be constant throughout.
Shooting Off of Sticks
In African hunting, three-legged shooting sticks are almost universal. There are several reasons for this.
- They get you up off the ground. Low vegetation often precludes shooting positions commonly used elsewhere (such as prone, sitting, and kneeling) because the animal is often obscured.
- Even when a low position is possible, everything in Africa has thorns, and biting ants are a common pest in many areas. Shooting standing off sticks solves the problem.
- Sticks are ideal in the African situation. The lead tracker often carries them. During a deliberate stalk, the PH usually takes the sticks and the lead. But if an animal is suddenly spotted or encountered within shooting range, the lead tracker will customarily set up the sticks and fade to one side. The PH comes up to the other side to evaluate the animal. Your job as the hunter is to step forward, avoiding sudden movements, get the rifle on the sticks, and be prepared to shoot if the PH gives the go-ahead.
Shooting Sticks Technique
Shooting sticks require practice! It takes a bit of work to become comfortable and familiar with shooting sticks. The two primary secrets are:
- Learn the right height for you!Usually, it’s about the level of the top shirt button, so you can lean slightly forward into the sticks.
- Placement of your supporting hand.Never rest the barrel directly on the junction of the sticks (or anything else). The ideal is to grasp both the fore-end of your rifle and the sticks, tying them together. Not everyone has large enough hands to do this, so you have to find what works for you. This is another exam you can’t cram for! Don’t let range day be the first time you’ve ever used sticks. Make your own or get a commercial set, and practice with it on your own range. Then you can not only demonstrate your ability but also show your PH and your trackers exactly how you like the sticks set up.
Practice does make perfect! Sticks are not a perfect solution; slight horizontal wobble is almost unavoidable. However, with practice, most shooters can become adequately steady for perhaps 150-yard shots, certainly covering almost all shots at elephants.
Steady and Steadier
With shots at elephants, the target is large and the range is close. The shot must be placed well, but speed is generally more important than precision. Practice on your range until you can consistently hit a pie plate-sized target off sticks at 50 yards and unsupported standing at 25 yards. That should prepare you for most shots at elephants.
Loaded or Unloaded?
As in all things, listen to your PH, and follow his or her directions! Typically, the rifle will be carried with cartridges in the magazine but with the chamber unloaded until the PH directs. The PH will walk ahead of you, and in areas where dangerous game might be present, his or her rifle will usually be fully loaded and ready. Yours doesn’t need to be until you are “action imminent.” There is very little imminent danger while tracking elephant. So, there is usually no reason for the chamber to be loaded until an actual stalk begins.
The basic rule is that the chamber should not be loaded unless you can absolutely control the direction of the muzzle. This means that if you are carrying the rifle slung over your shoulder, the chamber should be clear. In areas where dangerous game is present, most PHs don’t use rifle slings; they carry their rifles in their hands, and the rifles are always ready.
Most sport hunters do use slings, and that’s fine. But a fully loaded rifle should not be slung because it is impossible to control the muzzle in the case of a slip or fall, and many mechanical safeties can be brushed off by clothing while a rifle is slung. If in doubt, never hesitate to ask your PH if you should chamber a round.
Mechanical Safeties
The safety on your rifle is not a substitute for safe gun handling but serves as a backup for momentary lapses. Even if you are carrying your rifle at “port arms” ready, you may briefly lose control of the muzzle direction if you slip or stumble. But when glassing and tracking, whether carrying the rifle casually or slung, the muzzle is not under tight control, so the chamber should be clear.
Whether loaded or unloaded, the muzzle must be pointed in a safe direction. When the chamber is loaded, check the mechanical safety constantly to make sure it is engaged. African hunting is especially problematic for gun handling safety because it is normal for you, your PH, and your trackers to walk single file, and you as the hunter will be well back in the line. No matter how you carry your rifle and how often you check your safety, focus on keeping the muzzle in a safe direction: UP, DOWN, or SIDEWAYS.
The “African Carry”
As so often seen in photos and on television, it is very common in Africa to carry the rifle with the action balanced over one shoulder, butt to the rear, muzzle forward and grasped and controlled by one hand. This is not in itself unsafe, as the hand controls the direction of the muzzle.
In order to understand the “African carry,” it’s useful to know where it comes from. In the old days when trackers also commonly served as “gunbearers,” the normal situation was for the gunbearer to walk ahead—rifle balanced on one shoulder, muzzle forward, butt to the rear. When game was encountered, the hunter needed only to reach forward, grasp the pistolgrip, and take the rifle, quickly and efficiently.
Today, almost all African hunters—professional and amateur—carry their own rifles. The “African carry” persists because few PHs use slings, and the muzzle-forward carry is very comfortable (especially with heavy double rifles, with flat action bottoms and broad muzzles to grasp). The obvious problem is the muzzle points forward. Thus, when walking in line, it is almost inevitable that the person carrying rifle will “sweep” the person walking ahead. If the rifle is unloaded, this is merely unsafe and a display of terrible manners. If the rifle is loaded, the “African carry” is potentially deadly. It is not recommended, but it is a very comfortable way to carry a rifle, especially on long, hot tracking hunts. If employed, it is essential to concentrate constantly on muzzle control. Keep the barrel offset well to the side and away from the people walking ahead.
Evaluating the Elephant
Listen to your PH. Hey, that’s the first and cardinal rule in all African hunting, and it’s equally important with elephant hunting. Hey, it’s your animal, but you must never shoot until the PH gives the go-ahead, and you have to be absolutely certain that you and your professional hunter are looking at the same animal.
Professional Hunter: Hit him.
A hunter fires her rifle at an elephant.
Professional Hunter: Again.
The professional hunter and hunter fire follow-up shots at the elephant.
Judging Elephants
This is your PH’s job, not yours.
The professional hunter and Craig Boddington discuss an elephant they have just observed.
Professional Hunter: Brilliant.
Craig Boddington:
Professional Hunter: Beautiful elephant.
Craig Boddington:
Professional Hunter: The guy’s better than the one yesterday.
Craig Boddington: Yes.
Professional Hunter: He’s in the middle 60s.
Craig Boddington:Yes.
Professional Hunter: You can see how thick he is.
Craig Boddington: Oh, it’s beautiful.
Professional Hunter: That elephant will probably have about 29 to 30 inches in his head. He’s got a monster head.
Craig Boddington: Huge.
Professional Hunter: Absolutely monster head.
Craig Boddington: Yeah.
With experience, PHs can become pretty good at it, but judging the weight of ivory is probably the most difficult and frustrating trophy judgment in the world. This is because a major portion of the tusk is concealed within the skull, and the actual weight depends a lot on the size of the nerve.
Hunters discuss an elephant near a waterhole.
Hunter 1: Oh, lovely, thick ivory.
Hunter 2: Oh, he’s beautiful.
Hunter 1: What a great elephant.
Hunter 2: That is a great elephant.
Some elephants have larger nerve cavities than others. Your PH will do the best job possible of calling the ivory, but the ultimate decision is up to you.
The professional hunter and Craig Boddington each hold up an elephant tusk.
Professional Hunter: Generally, what you look at is the girth of the ivory at the lip, OK? And let’s say, for instance, this ivory is 15 inches at the lip. We then take an assessment of what is actually showing, and in this case, there might be 3 feet of ivory showing. So, you multiply the 3 by the 15, that will give you 45 pounds. Now, that would be if the ivory was solid. We then have the nerve. And the nerve can vary as much as from 5 to 10% of weight lost to the nerve, depending on the age of the elephant.
This elephant is a sort of middle-aged elephant, and you would probably be looking at 7%, maybe 8%, even up to 10%. So, if you take that 45 pounds, less 10%, it would come to around about 40 pounds, 41, 42 pounds, which is exactly what this elephant is.
Craig Boddington That’s exactly what he is.
Professional Hunter: And that’s pretty much how we assess the weight of tusk in the elephant.
With elephant hunting today, there may be specific requirements. In some cases, there are legal minimums, which may be expressed as either tusk length or weight. And in some areas, there are legal maximums enforced to protect genetics for large tusks. Today, with elephant hunting an important management tool in overpopulated areas, there are also trophy hunts in reverse, where tuskless elephants, non-trophy bulls, and even females may be targeted.
Regardless of what type of elephant you’re looking for or have on license, the actual hunt’s much the same because you and your PH are going to have to get very close to make sure the chosen animal meets the requirements.
Trophy Quality
One of the best and most current references is Safari Club International’s record book, available online at scirecordbook.org. With elephants, its primary value is its currency, showing where record-class elephants are being taken today. With elephants, it’s extremely important to research the area you plan to hunt and establish reasonable goals. Monster tuskers can appear almost anywhere, but at the cost of an elephant safari today, it may be foolish to pass a bull that’s average and acceptable for the area and continue looking for an animal that may not exist. Once again, listen to your PH.
Craig Boddington fires his rifle at an elephant.
Professional Hunter: Look at that.
Craig Boddington: Oh, that’s beautiful.
Professional Hunter: He’s 20 inches at the lip.
Craig Boddington: Oh my god. That’s beautiful. Fantastic.
Professional Hunter: He’s absolutely beautiful.
Craig Boddington: Fantastic.
Hunters: Whoa. Whoa.
Professional Hunter: Now, that other tusk is just—
Craig Boddington: The other tusk is unbelievable, absolutely. It’s heavier than I thought, heavier than you thought.
Professional Hunter: That left tusk is going to hit 70.
Measuring
Although the record books are excellent references, try to avoid record book fever. Elephants are measured and enter the record book based on tusk weight. However, your professional hunter is generally going to evaluate the elephant based on tusk length, meaning the length of the exposed tusk at the lip, understanding that a whole lot of that tusk lies buried deep in the skull.
Once you’ve taken your elephant, if possible, you should get accurate tusk weights before you leave camp, but at a minimum, take measurements. Measure the total length of the tusk. Measure from the lip to the tip, and then get the circumference at the widest point. You should record those just for future reference.
Listen to Your Professional Hunter
Listening to your professional hunter (PH) is the first and most cardinal rule of African hunting, and it is even more important with all dangerous game. It is essential that you never shoot until your PH gives the go-ahead. But even when he or she does, it’s still your shot and your animal. So, don’t take a shot unless you are comfortable, steady, confident, and certain that you and your PH are looking at the same animal.
Judging Elephants
This is your PH’s job, not yours. With experience, PHs can become pretty good at it, but judging the weight of ivory is probably the most difficult and frustrating trophy judgment in the world. This is because a major portion of the tusk is concealed within the skull and the actual weight depends a lot on the size of the nerve; some elephants have larger nerve cavities than others. Your PH will do the best job possible of “calling the ivory,” but ultimate decision is up to you.
With elephant hunting today, there may be specific requirements. In some cases, there are legal minimums (which may be expressed as either tusk length or weight). And in some areas, there are legal maximums that are enforced to protect genetics for large tusks. Today, with elephant hunting being an important management tool in overpopulated areas, there are “trophy hunts in reverse.” These hunts may target tuskless elephants, non-trophy bulls, and even females. Regardless of what type of elephant you are looking for or have “on license,” the actual hunt is much the same—because you and your PH are going to have to get very close to make sure the chosen animal meets the requirements.
Trophy Quality
One of the best and most complete references is Safari Club International’s record book, available online (www.scirecordbook.org). With elephants, the primary value is its currency, showing where “record class” elephants are being taken today. With elephants, it is extremely important to research the area you plan to hunt and to establish reasonable goals. Monster tuskers can appear almost anywhere. But at the cost of an elephant safari today, it may be foolish to pass a bull that is average and acceptable for the area and to continue looking for an animal that may not exist. Listen to your PH!
Measuring
Although record books are excellent references, try to avoid “record book fever.” Elephant trophies go into the record books based on tusk weight. However, most PHs judge ivory by estimating the length of the tusk showing beyond the lip and the circumference of the tusk. If possible, you should get accurate tusk weights before you leave camp. But for future reference, it’s a good idea to take measurements: outside the lip, total length, and circumference at the lip.
In the Group
Lone elephant bulls are frequently encountered, but bachelor groups of three to six are probably most common. When hunting bulls, most PHs avoid cow herds because of the danger. But since elephants may breed throughout the year, a mature bull could be found in a herd at any time. When hunting cow elephants, it is necessary to penetrate the herds to make sure a chosen animal doesn’t have a calf at heel.
It is essential to be absolutely certain you are focusing on the same animal as your PH. Shooting the wrong elephant has been done, and it is a horrible mistake! The first and cardinal rule applies: Listen to your PH. It is essential that you never shoot until your PH gives the go-ahead. But even when he or she does, it’s still your shot and your elephant. So, don’t take the shot unless you are comfortable, steady, confident, and certain you and your PH are looking at the same animal.
Stages of Elephant Hunting—Locating Elephants and the Approach
Most elephant hunts have four phases: locating elephants, the approach, selecting the animal, and taking the shot.
Locating Elephants: Tracking
Elephants are usually located by tracking or glassing. Tracking elephants is one of the most traditional and interesting of all African hunts. And it’s pure magic to watch the African trackers do their work.
Despite their great weight, elephants are actually more difficult to track than buffalo because their feet have pads rather than hooves. So, elephant tracking is advanced tracking that only the most skilled trackers can do well. It starts with a search for fresh tracks, which can mean days of covering ground, usually done by a combination of driving and walking. Fresh tracks will often be found crossing a road or track. And water sources are often critical.
It may take a short time on the track, but by examining tracks, dung, and signs of feeding, African trackers can determine the age of tracks. This is critical information, but it depends on the time of day. Early in the morning, it’s perfectly acceptable to follow tracks made during the night, even 12 hours earlier.
A hunter investigates an elephant track.
Craig Boddington: An elephant hunt always starts with finding a good track. We’ve got a good one here. He’s worn in the back. It’s fresh. It’s from this morning. It’s about 7 o’clock right now, just the perfect time to find an elephant track.
Ivan is going to measure it. But we don’t really need to measure this track. We know that this is an older bull because he’s worn. And this is one we’re going to follow.
Elephants can cover many miles in a day, but usually, alternately feed and rest during the night. In the early morning, they’ll usually start to move toward heavy cover, where they’ll rest through the heat of the day. Knowledge of the area is, thus, important to evaluating the feasibility of following tracks, but an elephant will go where it goes. So, one never knows at the outset where and how far a track might lead.
Age of a track is, thus, extremely critical in evaluating whether or not to follow, but so is the track itself. Since mature bulls are nearly twice the size of cows, it’s very easy to determine bull tracks. Size of elephants vary regionally. So, you’re looking for a large track for the area you’re hunting. There are also indicators of age that fine soil will offer, such as depth of corrugations and sole wear.
The professional hunter points at an elephant track.
Professional Hunter: You see no smoothness on the track.
Craig Boddington: No, none whatsoever.
Professional Hunter: None whatsoever. And if you look here, if you look at the big calluses, you can see there’s no smoothness.
Craig Boddington: No smoothness. None whatsoever.
Professional Hunter: So, the baby skin is disappearing. And it’s getting more mature. And then the calluses get even bigger and bigger and bigger. And it just shows you the size of the body. And if you follow a track like that, probably you will end up with mature bull. So, the moment there’s any smoothness, you just walk away from it. It’s going to take you for a long walk.
None of these indicators say anything about size of tusks. The only way to determine size of tusks is track up the elephant and take a look.
Locating Elephants: Glassing
In more open or hilly country, elephants are often spotted simply by glassing. This is common in Namibia. It’s common in Botswana. It’s also common in hilly country in Zimbabwe.
If elephants are spotted at a distance then, you may have to circle the wind, where you may be able to make a direct approach. But the approach begins once elephants are spotted.
The Approach
The elephant hunt really starts almost at the end of the track. This may mean the sign is very fresh. Experienced PHs and trackers develop almost a sixth sense as to when elephants are near. Because of timing and the elephant’s habit of seeking thick cover at midday, auditory clues are actually the most likely—a stick breaking as elephants feed, a trumpet from a paranoid cow, the soft belly rumbling of undisturbed elephants, or the much softer swishing sound of the great ears fanning.
Following tracks is fairly straightforward. Although if the wind is unfavorable, experienced trackers will often deliberately leave the tracks and try to circle the wind. But now, with elephants nearby, it’s absolutely essential to get the wind right.
Most trackers carry ash bags, cloth sacks filled with fine ash, that when shaken will show wind direction. This is usually the time to load the chamber of your rifle. Don’t hesitate to ask your PH if you should load up. But make sure your safety is engaged, and pay close attention to keeping your muzzle in a safe direction.
From this point, movement will be much slower and has to be as quiet as possible. Depending on the cover, you may be able to walk upright or you may need to crouch. Crawling or butt scooting is possible, but rare with elephants.
Follow your PH’s lead, and concentrate on stepping as quietly as possible.
How to Hunt African Elephant
Most elephant hunts have four phases: locating elephants, the approach, selecting the elephant, and taking the shot. Depending on the circumstances, elephants are generally located by tracking or glassing.
Hunting Techniques for Locating Elephant
Tracking
Tracking elephants is one of the most traditional and interesting of all African hunts, and it is pure magic to watch African trackers to their work. Despite their great weight, elephants are actually more difficult to track than buffalo because their feet have pads rather than hooves. So, elephant tracking is advanced tracking that only the most skilled trackers can do well.
It starts with a search for fresh tracks, which can mean days of covering ground, usually done by a combination of driving and walking. Fresh tracks will often be found crossing a road or track, and water sources are often critical. It may take a short time on the track. But by examining tracks, dung, and signs of feeding, African trackers can determine the age of tracks. This is critical information.
Successful tracking depends on the time of day. Early in the morning, it is perfectly acceptable to follow tracks made during the night, even 12 hours earlier. Elephants can cover many miles in a day, but they usually alternately feed and rest during the night. In the early morning, they will usually start to move toward heavy cover, where they will rest through the heat of the day. Knowledge of the area is thus important to evaluating the feasibility of following tracks. But an elephant will go where it goes, so one never knows at the outset where and how far a track might lead.
Age of a track is thus extremely critical in evaluating whether or not to follow, but so is the track itself. Because mature bulls are nearly twice the size of cows, it is very easy to determine bull tracks. Size of elephants vary regionally, so you’re looking for a large track for the area you are hunting. There are also indicators of age that fine soil will offer, such as depth of corrugations and sole wear. None of these indicators say anything about size of tusks. The only way to determine that is to track up the elephant and get a close look!
Glassing
In more open or hilly country, elephants are sometimes located by glassing. This is common in both Botswana and Caprivi, where elephants are extremely plentiful and the bush conditions allow it, and in hilly country in Zimbabwe and elsewhere. Depending on wind, you might circle to intercept or make a direct approach once elephants are located.
The Approach
The elephant hunt really starts almost at the end of the track. This may mean the sign is very fresh. Experienced PHs and trackers develop almost a sixth sense as to when elephants are near. Because of timing and the elephants’ habit of seeking thick cover at midday, auditory clues are the signs you will most likely encounter: a stick breaking as elephants feed, a trumpet from a paranoid cow, the soft belly rumbling of undisturbed elephants, or the much softer swishing sound of the great ears fanning.
Following tracks is fairly straightforward. Although if the wind is unfavorable, experienced trackers will often deliberately leave the tracks and try to circle the wind. But now, with elephants nearby, it is absolutely essential to get the wind right. Most trackers carry ash bags—cloth sacks filled with fine ash—that will show wind direction when shaken. This is usually the time to load the chamber of your rifle. Don’t hesitate to ask your PH if you should “load up.” But make sure your safety is engaged, and pay close attention to keeping your muzzle in a safe direction.
From this point, movement will be much slower and must be as quiet as possible. Depending on the cover, you may be able to walk upright, or you may need to crouch. Crawling or butt-scooting is possible but rare with elephants. Follow your PH’s lead, and concentrate on stepping as quietly as possible.
Stages of Elephant Hunting—Selecting the Elephant
Selecting the Elephant
This is probably the most exciting phase of any elephant hunt. At this point, you’re probably very close. Perhaps closer than you ever expected to be from a wild elephant. But you’ll be shocked at how well elephants blend into cover and how little cover it takes for an elephant to hide almost completely. Whether you’re looking for a worthy bull or a tuskless cow, you must now find out.
Often, you have to go very close then retreat and circle back to look at all the individuals in a group. This phase often happens at midday when African winds are swirling and unstable. So, the trackers are paying close attention to the wind while the PH studies the herd.
Hunters observe an elephant that is very close to them.
Professional Hunter: Yeah, he’s very inquisitive. It’s fine, no problem.
Hunter: Way too smart.
Professional Hunter: He’s not actually feeding there. He’s looking at us. He’s pretending to eat. That’s something that he put in his mouth is called crotalaria. They don’t normally eat that. This is called displacement behavior, where what he’s doing is he’s pretending that he wanted to eat that, but actually he’s checking us out. See how wide open his eyes are? If he was feeding, his eyes would be half shut. And he’s just listening to us talking. If I talk in a proper voice, he’ll probably flare up a little bit. He might come in a step or two, but then he’ll back off.
There we go. That’s fine. He’s going to back off. Now, watch. Back off, big guy. Back off. Back off. No, no, don’t worry. Back off. Back off, big guy. Back off. Back off. Back off. Back off.
The elephant leaves. The hunters laugh in relief.
Professional Hunter: That’s fun stuff, isn’t it?
Not every group or herd will contain a suitable animal. But if you get into a group of elephants and you manage to see each and every one and determine that there’s nothing in there you’re looking for, hey, you’ve won on that day.
The professional hunter and Craig Boddington discuss an elephant they have just observed.
Professional Hunter: Nice elephant.
Craig Boddington: Beautiful.
Professional Hunter: Anywhere else probably.
Craig Boddington: Anywhere else.
Professional Hunter: The champagne cork would have been gone.
Craig Boddington: We’re not anywhere else.
Professional Hunter: No, that’s true.
Craig Boddington: This is the kind of bull we’re seeing. What a fantastic experience.
The Final Stalk
Depending on the range, you may be in a shooting position while you’re evaluating the elephants. But even a small group of four or five bachelor bulls is likely to be spread out whether resting or feeding. Even if you see an acceptable bull, most PHs will want to look at the entire group, making sure there isn’t a monster being overlooked.
So often you’ll have to do some creeping and sneaking to get into position. You’re excited and a little bit scared. This is the time when firearms safety habits become critical. Your chamber will certainly be loaded by now, but check it one last time. Check the power ring on your scope too. Depending on the terrain, you may want some magnification or not, but make sure it’s where you want it.
As you’re creeping and sneaking, check your safety repeatedly. Keep your fingers away from the trigger guard, concentrate on keeping your muzzle in a safe direction, and follow your PH’s lead. If a final approach is needed, it will usually be just you and the PH. The tracker is staying back to reduce noise and movement.
Follow your PH’s lead, and be very, very careful where you step. The PH will probably carry the shooting sticks. And if circumstances dictate, he might be able to set them up. But as we’ve discussed earlier with elephants, be prepared for that standing unsupported shot and expect it to be very close.
Selecting the Elephant
This is perhaps the most exciting phase of any elephant hunt! At this point, you are probably very close—perhaps closer than you ever expected to be from a wild elephant. But you will be shocked at how well elephants blend into cover and how little cover it takes for an elephant to hide almost completely!
Whether you’re looking for a worthy bull or a tuskless cow, you must now find out. Often, you have to go very close, then retreat, and circle back to look at all the individuals in a group. This phase often happens at midday, when African winds are often swirling and unstable. So, the trackers are paying close attention to the wind while the PH studies the herd. Not every group or herd will contain a suitable animal. But if you actually manage to see, evaluate, and eliminate all the animals in the group, then on that day, you’ve won.
Stand Up and Shoot
Your PH’s default method will almost always be to set up the shooting sticks, but this requires both time and motion. There are many situations with elephants when your stalk carries you so close that the extra movement necessary to set up the sticks is almost certain to spook the animal.
With elephant hunting—perhaps more so than any other African hunting—it is essential that you can make an accurate shot from an unsupported standing position. This is another exam that cannot be crammed for. Practice shooting standing on your range. Again, pie-plate accuracy at just 25 yards is good enough. Shot placement is critical on elephant, but beyond 25 yards is actually a long shot on elephant. If such a shot is necessary, there should be time to set up sticks. For the close-range encounter, practice so that you can raise the rifle, snicking the safety as you raise it, find the sight picture quickly, and hit the pie plate.
Closing on Elephant
In the final moments of a stalk—and any time a hunter is in proximity to elephants, even if inadvertently—the rifle will almost always be fully loaded (cartridge in the chamber and safety on). This is not only to be ready but also to avoid the metallic noise of working the action in proximity to game. Again, muzzle control is essential, with the mechanical safety as only a backup system.
- Crawling. Depending on terrain and vegetation, a lot or a little creeping and crawling is often required to get into a final shooting position. The biggest safety challenge comes when crawling is required. And this is potentially one of the most dangerous situations because many mechanical safeties can be brushed into firing position by grass and twigs. The trigger can also be snagged. Natural excitement doesn’t make it better! It is essential to focus on the muzzle, step by step, and ensure it is pointed in a safe direction. The muzzle can be offset to one side, or if you are in the rear of the line, the muzzle can be reversed.
- Butt scooting. An alternative to crawling on hands and knees is to sit flat with legs forward, knees bent, and feet flat on the ground. The rifle is laid across the lap with the muzzle to either side in a safe direction and with arms straight and hands to the rear. Using legs and arms, you scoot forward a foot and then repeat. Although slow and uncomfortable, butt scooting is safer from a muzzle control standpoint. If any significant distance must be covered, it is also less strenuous than hands-and-knees and creates much less wear and tear on hands, knees, and rifle.
Although techniques for crawling and scooting are important to know, their use is rare in elephant hunting because the elephant’s eyesight are a third and distant line of defense. Approaches must be made with the wind in favor and in absolute silence, so walking slowly, one step at a time, is most common when closing on elephants. Also, if the wind changes the hunter must be ready to move quickly!
Toughness of African Elephant
Elephants are so huge that “toughness” is a silly subject. No shoulder-fired rifle has enough power to impress an elephant. They can be killed readily but only by bullet penetration into brain, spine, heart, and lungs. Some of our really modern expanding bullets are actually tough enough to provide adequate penetration on some shots. But only non-expanding solid bullets designed specifically for penetration can provide reliable penetration on all potential shots. That said, with elephants, we are asking for a great deal of penetration—often through massive bone. No caliber or bullet is going to work every single time, so with elephants, it is extremely important to keep in mind what might happen next and be prepared for fast follow-up shots.
Shot Placement
Hey. Elephants are so huge that toughness is a silly subject. No shoulder-fired rifle has enough power to really impress an elephant. It’s all about shot placement.
They can be killed readily but only by bullet penetration to the brain, spine, heart, and lungs. Some of our really modern expanding bullets are actually tough enough to provide adequate penetration on some shots, but only non-expanding solid bullets designed specifically for penetration can provide reliable penetration on all potential shots.
That said, with elephants, we’re asking for a great deal of penetration, often through massive bone. No caliber of bullet is going to work every single time. So, with elephants, it’s extremely important to keep in mind what might happen next and be prepared for fast follow-up shots.
Neck and Spine Shots
Though either will at least immobilize an elephant instantly, neither is recommended for an initial shot. The target is too small and the risks of a non-fatal wounding shot much too high.
Frontal Brain Shot
By the time most hunters go on an elephant safari, they’ve read too many old books and watched too many DVDs, and they want to make that frontal brain shot. It is not recommended. The skull is huge, the brain is small, and it’s easy to make a mistake. The biggest challenge with the frontal brain shot is the brain lies well back in the skull, so its relative position changes with distance and head angle.
A professional hunter and Craig Boddington crouch beside an elephant skull.
Professional Hunter: Bearing in mind the brain is about the size of an American football and is totally surrounded and protected by this huge, bulky bone.
Craig Boddington: It sits a whole lot lower in the skull than a lot of people believe.
Generally speaking, at moderate distance, maybe 15 yards, and in a resting attitude, directly between the eyes is about right. Very close in the final instant of a charge, the elephant will drop its head, so center of the forehead is more correct.
When the elephant is threatening, he raises his head. Or when he’s very close, the uphill angle now requires shooting well below the eyes and requiring even more penetration.
The professional hunter and Craig Boddington crouch beside the elephant skull.
Craig Boddington: And that means you’re going to have to penetrate this much bone to reach that brain.
Professional Hunter: Exactly. As the elephant gets closer to you and his head goes down, your point of entry of your shot becomes higher and higher, and less and less bone to go through. The other major problem you have with a frontal with the elephant is that your elephant’s ivory sockets end up right above the eye. And depending on the size of the bull, you’ve got anything from 22 to 26 inches of ivory in the head. Any slight side shot, undoubtedly, the hunter ends up hitting the ivory and damaging the ivory.
It’s not true that a near miss to the brain will always stun an elephant—sometimes. But don’t count on it.
The professional hunter and Craig Boddington crouch beside the elephant skull.
Craig Boddington: This is where you have that honeycomb bone that they talk about that just soaks up the shock, right?
Professional Hunter: If someone puts a shot through the honeycomb, Craig, undoubtedly, the elephant will walk away. It’s not going to go down.
The most likely result of a failed brain shot is that, absent rapid follow-up shot, that elephant will never be seen again. However, despite the most careful maneuvering to get into position, the elephant ultimately decides what shot angle is offered. If an elephant senses something amiss, it will often confront the threat, which means a frontal brain shot will be offered. Avoid it if you can, but study it hard.
The brain lies at the center of the broomstick. So, while external aiming point changes with head attitude and distance, aiming to break that broomstick is always the right shooting solution. If the frontal brain shot is successful, the back legs usually collapse first, and the elephant is down so fast that he literally falls out from under the recoil of the rifle.
If the brain shot fails, things happen just as fast. But you should instantly recognize that you’ve flubbed, and you have to shoot again immediately and more accurately. By the time you’ve recovered from recoil, it will be too late to try a frontal brain again, but the elephant will normally turn away. So, in very rapid succession—fractions of seconds—you’ll be offered first the side brain shot, and then the shoulder shot, and then, as a last resort, a going-away shot to either hip or spine.
Side Brain Shot
Although still not recommended for first-time elephant hunters, the side brain shot is much easier to visualize than the frontal brain, and it’s just as deadly. Unlike with the frontal brain, from the side, the relative position to the brain doesn’t change with head angle and changes only slightly with distance.
A professional hunter, a hunter, and Craig Boddington stand beside a downed elephant.
Professional Hunter: I’ve got Kofi actually pointing out the earhole there. And as the head pivots up, there’s no movement.
Craig Boddington: No, that doesn’t move.
Professional Hunter: Do you see that?
Craig Boddington: That stays the same.
Professional Hunter: It really is the pivot point.
Craig Boddington: The frontal shot changes radically, and the side shot doesn’t change at all.
Professional Hunter: Absolutely.
Craig Boddington: Wow.
Viewed from the side, the elephant’s earhole is very visible. Perfect shot placement for the side brain shot with a broadside presentation is simply one hand’s breadth, three or four inches, in front of the earhole. At a very slight quartering-away angle, the earhole was the aiming point. At a very slight quarter-to angle, shoot slightly in front of the earhole.
As with the frontal brain, things happen quickly. And you’ll know instantly if your shot failed or was successful. But with a failed brain shot, things happen even faster. There will only be a split second for a follow-up shoulder shot, and then a split second later, the only opportunity is the going-away spine or hip shot.
Shoulder/Heart Shot
This is the shot preferred by most professional hunters and the shot that’s recommended for first-time elephant hunters. The target is huge, the aiming point is clear, and if properly executed, the result is certain. The shoulder/heart shot is not as dramatic as the brain shot. An elephant so hit can be expected to run 50 to possibly 200 yards. But losing an elephant to even a marginal chest cavity shot is extremely unlikely.
The elephant has a very prominent crease behind the shoulder that looks very much like an upside-down V. Find that crease, and come up to the top. The crease will end about one-third up from the brisket. Perfect. Broadside, the top of the V is a perfect lung shot. Quartering slightly away, the top of the V is a top of heart shot. For the perfect shoulder/heart shot, however, with a broadside presentation, find the top of the upside-down V. Then, depending on how the elephant is standing, move about 6 to 10 inches left or right toward the center of the shoulder.
A hit slightly higher back will still be solidly in the lungs, but it’s important to stay below the horizontal halfway point. Such a hit should be quickly fatal. But the elephant is going to run, and you can’t be certain of either shot placement or bullet performance, so follow up that first shot if you possibly can.
Shot Placement: Neck and Spine, Frontal Brain
Neck and spine shots. Though either placement will at least immobilize an elephant instantly, neither is recommended for an initial shot. The target is too small, and the risks of a non-fatal wounding shot are too high.
Frontal brain shot. By the time hunters go on an elephant safari, most have read too much of the old stuff and watched too many videos. The front brain shot is often the shot they dream of making, but it is not recommended for first-time elephant hunters! The skull is huge, the brain is small, and it’s easy to make a mistake. It is not true that a near-miss to the brain will always stun an elephant. Sometimes, it will, but don’t count on it. The most likely result of a failed brain shot is that, absent rapid follow-up shots, the elephant will never be seen again. This shot should be avoided if possible. However, despite the most careful maneuvering to get into position, the elephant ultimately decides what shot angle is offered. If an elephant senses something amiss, it will often confront the threat, which means a frontal brain shot will be offered. Avoid it if you can, but study it.
- Head angle. The biggest challenge with the frontal brain shot is that the brain lies well back in the skull, so its relative position changes with distance and head angle. Generally speaking, at moderate distance (15 yards) and in a resting attitude, directly between the eyes is close. When very close in the final instant of a charge, the elephant will drop its head, so the center of forehead is more correct. When threatening or when very close, the uphill angle requires shooting well below the eyes and even more penetration.
- Break the broomstick! The most visual and most easily remembered rule on the frontal brain shot is to visualize a broomstick horizontally through the elephant’s skull from earhole to earhole. The brain lies at the center of the broomstick, So, while the external aiming point changes with head attitude and distance, aiming to “break the broomstick” is always the right shooting solution.
- What next? If the frontal brain shot is successful, the back legs normally collapse first, and the elephant is down so quickly that it essentially falls out from under the rifle. If the brain shot fails, things happen just as fast. But you should recognize instantly that you’ve flubbed it, and you must shoot again immediately and more accurately. By the time you have recovered from recoil, it will be too late to try a frontal brain again. The elephant will normally turn away, so in very rapid succession (fractions of seconds), you will be offered first the side brain shot, then the shoulder shot, and, then as a last resort, a going-away shot to either hip or spine.
Shot Placement: Side Brain, Shoulder/Heart
Side brain shot. Although still not recommended for first-time elephant hunters, the side brain shot is much easier to visualize than the frontal brain shot—and equally deadly. With the side brain shot, the relative position of the brain doesn’t change with the head angle unlike with the frontal brain shot. And it changes only slightly with distance.
- Viewed from the side, the elephant’s earhole is very visible. Perfect shot placement for the side brain shot with a broadside presentation is simply one hand’s breadth—3 or 4 inches—in front of the earhole.
- At a very slight quartering-away angle, the earhole is the aiming point. At a very slight quartering-to angle, shoot slightly in front of the earhole.
- As with the frontal brain shot, things happen quickly, and you will know instantly if your shot failed or was successful. But with a failed side brain shot things happen even faster. There will be only a split second for a follow-up shoulder shot, and then a split second later the only opportunity is the going-away spine or hip shot.
Shoulder/heart shot. This is the shot preferred by most African PHs and most recommended for beginning elephant hunters. The target is huge, the aiming point is clear, and if properly executed, the result is certain. The shoulder/heart shot is not as dramatic as the brain shot. An elephant that is hit can be expected to run 50 to possibly 200 yards, but losing an elephant to even a very marginal chest-cavity shot is extremely unlikely.
- Find the V. The elephant has a very prominent crease behind the shoulder that looks very much like an upside-down V. Find that crease, and come up to the top. The crease will end about one-third up from the brisket—perfect! Broadside, the top of the V is a perfect lung shot. Quartering slightly away, the top of the V is a top of heart shot. For the perfect shoulder/heart shot, however, with a broadside presentation, find the top of the upside-down V. Then depending on how the elephant is standing, move about 6 to 10 inches left or right toward the center of the shoulder.
- A hit slightly high or back will still be solidly in the lungs, but it’s important to stay below the horizontal halfway point.
- Such a hit should be quickly fatal, but the elephant is going to run. You cannot be certain of either shot placement or bullet performance, so follow up that first shot if you possibly can!
Shot Angles
Obviously, just like any other animal, elephants don’t always stand perfectly broadside. But because elephants are so much larger than anything else, only very slight quartering angles can be accepted for body shots, and angles make brain shots more difficult. The broadside presentation is rarely perfect, but most PHs will work very hard to maneuver you into an acceptable shooting position and presentation. And you must not shoot until your PH says, “Take him.”
Going-Away Shots
On unwounded elephant, of course, never. However, to prevent the escape of a wounded animal, the going-away shot is not an uncommon option. Like most animals, upon receiving a bullet, an elephant is most likely to turn away to escape, opening up two opportunities for follow-up shots.
Spine Shot
A central Texas heart shot is unlikely to penetrate to the vitals of an elephant, so it’s essential to break heavy bone. Unlike most animals, on an elephant, the spine is very visible as a prominent ridge above the tail. This is not a large aiming point, but a hit on that ridge will immobilize your elephant.
Hip Shot
Although harder to visualize, the hip shot is much preferred by experienced elephant hunters for stopping wounded elephants. As an elephant goes away, the pumping action of the massive hip joint is actually visible at just about the level of the anus. Aside from the obvious danger of following the elephant, the elephant’s able to cover vast amounts of ground. So, potential loss of the wounded elephant is probably higher than with any other animal. Never shoot unless you’re certain, but once the initial shot is fired, follow up your shot if you possibly can. If the first shot wasn’t fatal, additional shots can’t worsen the situation.
Shot Angles
Obviously game animals don’t always stand perfectly broadside. But because elephants are so much larger than anything else, only very slight quartering angles can be accepted for body shots, and angles make brain shots more difficult. The broadside presentation is rarely perfect, but most PHs will work very hard to maneuver you into an acceptable shooting position and presentation. You must not shoot until your PH says, “Take him!”
- Going-away shots. On unwounded elephant, of course, never! However, to prevent the escape of a wounded animal, the going-away shot is not an uncommon option. Like most animals, upon receiving a bullet, an elephant is most likely to turn away to escape—opening up two opportunities for follow-up shots.
- Spine shot. A central “Texas heart shot” is unlikely to penetrate to the vitals of an elephant, so it’s essential to break heavy bone. Unlike most animals, the spine on the elephant is very visible as a prominent ridge above the tail. This is not a large aiming point, but a hit on that ridge will immobilize your elephant.
- Hip shot. Although harder to visualize, the hip shot is much preferred by experienced elephant hunters for stopping wounded elephants. As an elephant goes away, the pumping action of the massive hip joint is actually visible, at about the level of the anus.
Aside from the obvious danger of following a wounded elephant, the elephant is able to cover vast amounts of ground. So, potential loss of a wounded elephant is probably higher than than with any other animal. Never shoot unless you are certain, but once the initial shot is fired, follow up your shot if you possibly can. If the first shot wasn’t fatal, additional shots cannot worsen the situation!
After the Shot
Adrenaline is surging, and that’s good. But that’s not the time to throw away safety. After firing a shot, immediately make ready to shoot again. With elephant hunting, a backup or insurance shot is almost always fired no matter what happens after the first shot. Sometimes, you will remain in position and observe or listen for a time. Other times, you will rush forward, depending entirely on your PH’s judgment at that moment. After the shot or shots, you should reload your chamber and be ready. But before you move forward to check your elephant or look for sign, be certain you engage your safety, and maintain full control of your rifle with both hands. Before you move is the right time to top up your magazine, especially if you have fired more than one shot.
Approach a downed elephant with extreme caution, and do not rush ahead of your PH and trackers. Approach with your PH. Ideally, approach so that a final insurance shot may be fired from a safe position—either into the brain or heart, depending on how the elephant is lying. With elephants, it is the lack of reaction to that insurance shot that verifies the animal’s death. Once it is certain the animal is deceased, unload your chamber.
Follow-Up Shots and Backup Shots
Follow-up shots. On the range, practice firing additional shots from sticks and while standing unsupported. If a brain shot is not successful, things happen very fast. And elephants almost never go down immediately even to perfectly placed heart/lung shots. So, with elephants, additional follow-up shots can be extremely important. If the first shot didn’t go right, follow-up shots, in this unique case, can actually be more important than the first shot.
- Practice working your action or using the second barrel of your double without changing position or losing your sight picture. Speed is of the essence! Things happen fast after the first shot is fired. But with elephants, there will usually be a brief opportunity for a follow-up shot, provided you have trained yourself adequately. Especially with failed brain shots—which are common—it is extremely unlikely that elephant will ever be seen again, so quick follow-up shots are of critical importance. As with all situations, it remains essential to be absolutely certain you are aiming at the same elephant!
Backup shots. These shots are commonly thought of as being fired by your PH at your elephant. Most competent PHs prefer not to fire, following the ethic that it is your animal and your long-awaited adventure. Some, usually with limited experience, are too anxious to assist.
- The subject of backup shots must be discussed with your PH at the start of your safari. If you insist on a brain shot, then it is highly recommended that you ask your PH to be prepared to fire immediately after you do. The result of a failed brain shot, as one famous PH said, is that the elephant will “ramp the horizon, never to be seen again.” The shoulder/heart shot, though not as immediate, is far more certain, and its use may preclude the necessity for the PH to fire.
- Ultimately, the PH is responsible for the entire party’s safety, including yours. It is the PH’s responsibility to recover wounded game if at all possible, and this is clearly essential with wounded dangerous game. It is recommended that the PH be allowed to use his or her judgment as to whether or not to fire. The necessity for the PH to fire is greatly mitigated by accurate initial shot placement and by follow-up shots when they can safely be made.
Following Up on Elephant
Absent a well-executed brain shot, it’s very unlikely for an elephant to fall within sight. However, the animal is huge. It’ll be heard crashing away for some time and may roar in pain and fright. In open cover, some PHs will immediately dash forward, trying to keep the elephant in sight. But it’s more common to wait a bit and listen.
If the shot is well placed, the elephant will go down very quickly, usually well within earshot. Either way, before moving, top up your rifle. Follow your PH’s lead. But be sure to engage your safety and keep your rifle muzzle in a safe direction. And be ready.
Your professional hunter and, perhaps, the trackers have observed the hit or hits, and they have a reasonable idea of the situation. But hey, some hits are better than they look and some are worse. Unless it’s believed that the shots weren’t well placed, the initial follow-up is generally conducted with the hope and often belief that the elephant is down.
With elephants, however, this is usually readily apparent. Blood spray from the trunk will indicate a proper heart-lung hit, and the elephant will quickly be found. The spoor will also reveal a poorer hit and a worse situation. Your professional hunter is in charge and he’s done this before. Place yourself where he tells you, and proceed carefully.
The professional hunter signals the group to stop.
Craig Boddington: There’s still movement?
The professional hunter and Craig Boddington walk slowly forward.
Rifle fully loaded, on safe, controlled by both hands, muzzle in a safe direction. When the elephant is spotted, whether down or standing, shoot again at your PH’s direction.
Craig Boddington fires his rifle at the elephant.
Professional Hunter: He’s going away.
The elephant is shown lying down.
Another hunter fires his rifle at an elephant in a herd. The elephant collapses. The other elephants run away as hunters shout at them. The elephant gets up.
Hunter: He’s getting back up. Hit him again.
The hunters fire multiple follow-up shots at the elephant.
Depending on cover and spoor, after you follow it for maybe 200 yards, the assumption has to be made that you’re following a wounded elephant. This is a dangerous situation, and the outcome is now uncertain. The spoor has to be followed as long as it is possible for the trackers to hold the track or until the elephant’s crossed a totally unbreachable boundary such as an international border. Wounded elephants have been recovered after several days on the track.
In the case of a wounded elephant, the PH is absolutely in charge. And one of the things he worries about most is an inexperienced hunter with a rifle in his hands. Some PHs prefer to follow up alone with their trackers. Others will invite the hunter to participate based on their evaluation of his or her coolness and safe gun handling. If invited, walk as the PH directs, usually to the side rather than the rear and concentrate. This is serious stuff.
Pay attention to where the PH and trackers are at all times. Keep your rifle on safe, and monitor your muzzle direction. This is a good time to load up again with solids. In the case of a charge, the frontal brain shot is usually the only shot that’s presented, and it’s the only shot that’s going to stop the elephant.
An elephant charges forward. Two hunters fire multiple shots at the elephant. The elephant collapses.
It hasn’t changed. Imagine the broomstick running from earhole to earhole, and shoot to break that broomstick.
Following Up on Elephant
Absent a well-executed brain shot, it is extremely unlikely for an elephant to succumb within sight. The animal is huge, so it will be heard crashing away for some time and may roar in pain and fright. In open cover, some PHs will immediately dash forward, trying to keep the elephant in sight. But it’s more common to wait a bit and listen. If the shot is well placed, the elephant will go down very quickly, usually well within earshot. Either way, before moving, top up your rifle. Follow your PH’s lead. But be sure to engage your safety, and keep your rifle muzzle in a safe direction. And be ready!
- Your PH and, perhaps, the trackers have observed the hit or hits. Based on experience, they will have a reasonable idea of the situation. But some hits are better than they look, and others are worse. Unless it’s believed that the shot or shots weren’t well placed, the initial follow-up is generally conducted with the hope (and often belief) that the elephant is down. With elephants, however, this is usually readily apparent. Blood spray from the trunk will indicate a proper heart/lung hit, and the elephant will quickly be found. The spoor will also quickly reveal a poorer hit and a worse situation. Your PH is in charge, and he or she has done this before. Place yourself where the PH tells you and proceed carefully—rifle fully loaded, on safe, controlled by both hands, muzzle in a safe direction. When the elephant is spotted, whether down or standing, shoot again on your PH’s instruction and place your shot as well as you can.
- Depending on cover and spoor, after you’ve followed for 200 yards, the assumption must be made that you are following a wounded elephant. This is a dangerous situation, and the outcome is now uncertain. The spoor must be followed as long as it is possible for the trackers to hold the track or until the elephant has crossed a totally unbreachable boundary, such as an international border. Elephants have been recovered after several days on the track.
- In the case of a wounded elephant, the PH is absolutely in charge, and one of the things he or she worries about most is an inexperienced hunter with a rifle following behind. Some PHs prefer to follow up alone with their trackers. Others will invite the hunter to participate based on evaluation of his or her coolness and safe gun handling. If invited, walk as the PH directs—usually to the side rather than the rear—and concentrate. This is serious stuff. Pay attention to where the PH and trackers are at all times, keep your rifle on safe, and monitor your muzzle direction. This is a good time to load up with solids!
- In the case of a charge, the frontal brain is usually the only shot—and almost always the only shot that will stop the elephant. The shot placement hasn’t changed; you must shoot to “break the broomstick” running from earhole to earhole.
Researching Africa
Anticipation is part of the fun of any safari, but smart preparation will make any safari more successful.
For further study:
- African literature. These works are unusually rich. Since the African elephant has long been the stuff of legends, there are a number of great books specifically on elephant hunting, both old and current. While Africa has certainly changed, elephant hunting hasn’t changed much, so there is value to this reading. Just be aware that today’s trophy quality is not what it was 50 years ago, so do not allow your reading and study to instill unrealistic expectations.
- Films and videos. Beware of unnecessarily sensationalized media. With elephants, mock charges are common, but serious charges are rare, especially with straight shooting and careful hunting. However, there are great films, television shows, and videos (both amateur and professional) on elephant hunting. The most important thing to learn is to visualize proper shot placement, and moving pictures are excellent for this. They are also valuable for ivory judgment.
Conditioning
Elephant hunting is not marathon running or sheep hunting, but an elephant hunt with typical tracking can be one of the most physically demanding hunts in Africa. The best exercise for walking is walking. Tracking is conducted at a slow, steady pace. But it isn’t unusual to be on tracks for several hours, and at the end of the hunt, the vehicle may be several hours away.
Practice
Shooting accurately is a key to the success of any hunt. The more practice time you can manage in the months and weeks before the hunt is to the good. There is no formula, but if an unfamiliar heavy rifle is acquired for an elephant hunt, a minimum of 50 (better 100) shots should be fired through it prior to the hunt, both to build familiarity and to ensure absolute reliability. Because of recoil, this cannot be done in one or two sittings. You can use a .22 to practice shooting off sticks and while standing. Shooting the elephant rifle should be limited to 5 to 10 shots per range session to avoid acquiring a recoil-induced flinch.
- Shooting sticks. Make or acquire a set of shooting sticks and practice with them, working your bolt through a full magazine or using both barrels of your double.
- Speed. The great complaint of African professional hunters (PHs) about their hunters’ shooting is not raw accuracy but speed in acquiring targets and getting their shots off. Rather than just practicing shooting off sticks, practice starting a few feet behind them with rifle down and safety on. Work on getting into position, acquiring the target, and getting an accurate shot off quickly.
- Offhand or standing. Practice shooting unsupported at closer ranges. In the field, this is to be avoided. But in close encounters with elephants, there is often no other option, so spend a lot of range time shooting offhand.
- Reloading. Practice working your action rapidly with as little movement off the target as possible, firing two or three shots rather than just one.
- Use a .22. While there is no substitute for shooting the rifle or the rifles you intend to use on safari and becoming absolutely familiar and confident, shooting off sticks and shooting offhand can be practiced very effectively with a .22 rimfire—cheaper ammo, no recoil, less noise. Training with an accurate airgun is equally effective.
Medical Considerations
Always consult your doctor before planning any distant hunt, or beginning a training regimen for any hunt. That said, medical preparations for safaris are minimal.
- Inoculations. The Centers of Disease Control and Prevention (CDC) maintains a listing of required and recommended inoculations by country. Again, consult with your doctor before taking any medications, but “required” and “recommended” mean just that. You can expect to be required to show proof of a required inoculation in order to gain entry to a country, while recommended inoculations are at your discretion. It’s important to check the current listings, but typically, there are no required inoculations for Namibia, South Africa, or Zimbabwe. Countries to the north often require a current yellow fever vaccination.
- Malaria prophylaxis. Except for South Africa, most elephant hunting areas have potential for malaria-carrying mosquitoes. Numerous malaria preventives are available—all by prescription—so discuss the best option with your doctor.
- Medical evacuation membership. African hunting is generally safe, but in the case of an accident or sudden illness, medical evacuation from a foreign country can be catastrophically expensive. Several firms offer medical evacuation memberships that will cover these expenses if evacuation is necessary. This coverage is a good idea any time you are away from home, so annual membership is ideal for people who travel regularly. If this is not the case, short-term membership is available to cover the period of your safari.
- First-aid training. If you aren’t trained, get basic first-aid training. Your PH will do everything possible to prevent you from being injured. You should be prepared to help your PH if there’s a serious accident.
Paperwork
Temporary firearms importation and visa requirements vary with countries (and visa requirements vary depending on your country of origin). Both are subject to change. Discuss these requirements with your outfitter well ahead of your safari, and be clear as to what actions are required and who (you or your outfitter) is supposed to do them.
Airline Reservations and Requirements
Airline Reservations and Requirements Traveling with firearms is increasingly difficult. Some carriers no longer carry firearms, and many carriers require advance notice. Some interim destinations require special permits to transit with firearms. The simplest and safest solution is usually to use a “firearms and hunting-savvy” travel agent to help sort through the labyrinth, but if you book your travel yourself, speak to an airline representative and make sure all requirements are fully understood.
Clothing
With current baggage restrictions, it’s advisable to pack light. This is generally possible on an African safari because weather is usually mild and, unlike hunting camps in many areas, laundry is done on a more or less daily basis.
- Camouflage is becoming more common in Africa, and restrictions against wearing it have generally been lifted. Whether camouflage or solid, neutral green is the preferred color. You should have at maximum three changes of clothing.
- Fabric chosen should be quiet to avoid scratching noises in brush and should be rugged enough to withstand vigorous handwashing. Cotton is always a good choice.
- Whether you wear short or long trousers or sleeves is a personal choice. Most PHs wear shorts. Shorts are quieter in brush and cooler during the heat of the day but mean more exposure to the sun and (probably) more scratches from thorns.
- Do not underestimate how cold it can be during the African winter (June to August), which corresponds with the peak safari season in southern Africa. In addition to layered outerwear for cold mornings and rapidly cooling evenings, bring a warm watch cap or balaclava and gloves.
- Rain is extremely unlikely between June and October, but it is not impossible. Light rain gear can also double as an extra layer.
Additional Equipment
Optics
Binoculars are mandatory, likewise good sunglasses.
Firearms Accessories
Cleaning kit. Africa is hard on firearms. Dust is the major issue, but once in a while, insects nest in gun barrels (overnight). Bring minimal cleaning gear: oil, solvent, patches, and a jointed cleaning rod.
Rifle sling, scope caps, soft gun case, belt ammunition pouch, hearing protection. Especially if the decision is made to bring just one rifle, consider bringing a spare riflescope set in rings, along with necessary tools to switch in case a scope fails or is damaged in a fall.
Ammunition. Required amounts vary depending on length of safari and size of bag, but running low isn’t fun, and running out is a problem. Think about two to three cartridges for each animal you plan to hunt along with spares for zeroing and checking zero periodically. If a specific rifle is brought primarily for elephant, then 30 rounds is plenty, mixed between expanding and solids. Weigh your total ammunition, and make sure you don’t exceed the international 5-kilogram or 11-pound baggage limit for ammunition.
Packing Tips
Firearms and Ammunition
Firearms must be packed separately in sturdy locked cases. Make sure your hinges are secure and the hasps allow the case to be securely locked. Always declare firearms and ammunition when you approach any ticket counter.
In the United States, up to 5 kilograms or 11 pounds of ammunition in original factory containers can be in checked baggage, separate from firearms. In Europe and South Africa, the same weight limit applies, but ammunition must be checked separately in its own locked case (wood, metal, or plastic). The simplest approach is to get a small, sturdy ammunition case and pack it in your duffel bag with locks inside but not locked when you leave the United States. In this fashion, you are ready to comply if required during a plane change or stopover.
Carry-On Bag
While baggage handling is generally reliable, delays and lost bags do occur everywhere in the world. Pack your carry-on bag as if it were the only bag you will receive! You can usually borrow a rifle and ammo and purchase basic clothing articles, so mandatory in the carry-on are binoculars, camera, extra prescription glasses, all prescription medications for the full period of your hunt, one change of clothing, and anything else you simply cannot live without for 10 days or 2 weeks.
Checked Bags
Luggage must be rugged and waterproof, but soft duffel bags are better than hard-sided luggage because they are easier to fit into vehicles and smaller final transport to camp.
")
")
")
")
")