Home Blog Page 11

Muzzle Brake vs. Compensator: Which is right for your rifle?

0

Most rifle barrels in the past several years have come threaded from the factory so the shooter can add a muzzle device such as a muzzle brake or a compensator. This has recently extended to bolt-action and lever-action rifles more commonly found in the hunting as opposed to the tactical arena. Some come equipped with thread protectors and many come with a muzzle device.

Although the included muzzle device is typically a flash suppressor, some jurisdictions cling to antiquated and ill-informed laws that regard these devices as an “evil feature,” whereas a muzzle brake or compensator is perfectly legal.

We’ll go over the nitty-gritty of muzzle brakes and compensators, but if you’re looking for a quick reference, take a look at this chart for the two major differences between the two:

MUZZLE BRAKECOMPENSATOR Deflects blast to the sidesDeflects blast down Primarily used to reduce felt recoilPrimarily used to reduce muzzle flip

WHAT IS A MUZZLE BRAKE?

A muzzle brake is a device which threads onto the end of a firearm’s barrel. Although construction varies, the primary identifying characteristic is a series of cuts that direct the burning gasses and muzzle blast of a fired round away from the shooter and most often toward the side or 180 degrees from the muzzle itself.

Muzzle Brake vs. Compensator: Which is right for your rifle?

WHAT DOES A MUZZLE BRAKE DO?

As most of the felt recoil from a firearm originates at the muzzle, this effort is primarily done to reduce recoil. Secondary benefits of muzzle brakes are byproducts of this as the reduction in felt recoil can aid the shooter with regard to accuracy and allow for faster follow up shots.

Some muzzle brakes, when used in conjunction with a suppressor, can act as a sacrificial blast baffle. This is not the same as a sound baffle, which decreases the sound signature of the firearm, but rather that the brake takes the brunt of the muzzle blast and fired gasses as opposed to the baffles in the suppressor itself. This tends to prolong the life of the suppressor.

The drawback to most muzzle brakes is that they can change the direction of the sound of the fired round. In some cases, the shooter may find the report of the weapon to be louder but most of the time it is the other shooters in close proximity that will find the shots fired to be louder. This is typically a result of the other parties feeling the shockwave generated as opposed to the sound itself.

Originally, muzzle brakes were meant for use on calibers that generated a lot of felt recoil and they were commonly found on belted magnum rifle cartridges intended for big game or dangerous game hunting or bolt-action pistols chambered in 308 Winchester and 30-06 Springfield for use in handgun hunting. However, this is not always the case and they have been used successfully on rifles where a muzzle brake would have been uncommon even a decade ago.

Competitive long range shooters tend to favor muzzle brakes, as the redirected gas and flash allow them to maintain a better sight picture. Three gun shooters like muzzle brakes as they can allow for faster follow-up shots and a reduced recoil impulse.

WHAT IS A COMPENSATOR?

A compensator is a type of muzzle device that works in a different way than a muzzle brake. A compensator’s primary role is to reduce “muzzle flip” or “muzzle climb.” While some manufacturers claim that they aid in recoil reduction, this is not entirely true, as most compensators operate on a different principle.

WHAT DOES A COMPENSATOR DO?

Most compensators divert gasses and muzzle blast in a downward fashion to keep the firearm from rising during the firing sequence.

One of the earliest compensator designs was the Cutts Compensator found on the Thompson submachine gun. The 45 ACP round, while fired on full auto, would cause the muzzle to rise due to recoil and the Cutts Compensator helped keep the guns on target.

The same principle carried over to competitive pistol shooting in the late 1970s. The ports on a compensator are carefully angled and machined to force the pistol downward. This allowed competitive pistol shooters to fire rapidly and accurately, scoring multiple hits on the same target.

Eventually, the compensator made its way back to rifles, primarily semi automatic modern sporting rifles (MSR), as the virtue of decreased muzzle rise was seen as an asset on the competitive shooting circuit.

LINEAR COMPENSATORS

One type of compensator that caught the attention of shooters was the linear compensator, which directed the noise and expanding gasses forward and away from the shooter. While it did not suppress the sound in any way like a silencer, this redirection of sound reduced concussion and the perceived decibel level, making for a more pleasant shooting experience.

A MUZZLE BRAKE VS. A COMPENSATOR FOR USE WITH A SUPPRESSOR

When it comes to using a suppressor for your firearm, the muzzle brake and the compensator are typically trumped. A silencer acts like the ultimate muzzle brake or compensator because it contains the burning gasses and muzzle blast within the body of the can. Most suppressors reduce felt recoil, muzzle climb, and most importantly noise and concussion.

The use of a muzzle brake or a compensator plays more of a role when the suppressor is not mounted and the weapon is being fired unsuppressed. If the shooter is more concerned about recoil control, the muzzle brake may be the way to go. If recoil is not a factor but controlling muzzle rise or flip is an issue, then something like a linear compensator could be the answer.

However, there is another factor to consider when shooting a suppressor and using a muzzle device where a muzzle brake may be the clear winner.

POINT OF AIM CONSIDERATIONS

Every time a suppressor is removed and reattached, the point of aim can change. In a similar manner, most muzzle brakes and compensators will not always line up or index correctly when they are moved and reattached. The ports need to be timed in position with the barrel and the shooter may need to use shims in order to properly obtain alignment, as well as torque the device to the barrel properly.

The best of both worlds is using a muzzle device as the mounting system. As we mentioned earlier, a muzzle brake mount is usually ideal for this role.

Most muzzle brakes are built with an expansion chamber that aids in their function of reducing felt recoil. In a number of instances, a properly made muzzle brake with this feature will absorb the brunt of the burning gasses behind the projectile as the bullet leaves the crown of the barrel.

Rather than hit the baffle head-on, much of this is absorbed by the muzzle brake now acting as the mount for the silencer. This prolongs the life of the suppressor and most shooters would rather replace a muzzle brake out of pocket than have to deal with the hassles of sending a suppressor back to the manufacturer for service and repair.

Another benefit with the muzzle brake mounting system is that the mount should allow the silencer to index correctly to the barrel repeatedly. This helps maintain the rifle’s point of impact so that the shooter does not have to re-zero the rifle every time the suppressor is attached. Some shooters do not need to worry about this, as they leave their silencer mounted all the time, but it can be an issue if you need to remove the silencer for transport or storage or if you move the suppressor from one host to another.

Which leads to the next benefit. A proper suppressor mounting system in the form of a quick detach or QD muzzle brake mount as opposed to a direct thread allows the shooter to have more versatility with a suppressor or silencer.

Muzzle Brake vs. Compensator: Which is right for your rifle?

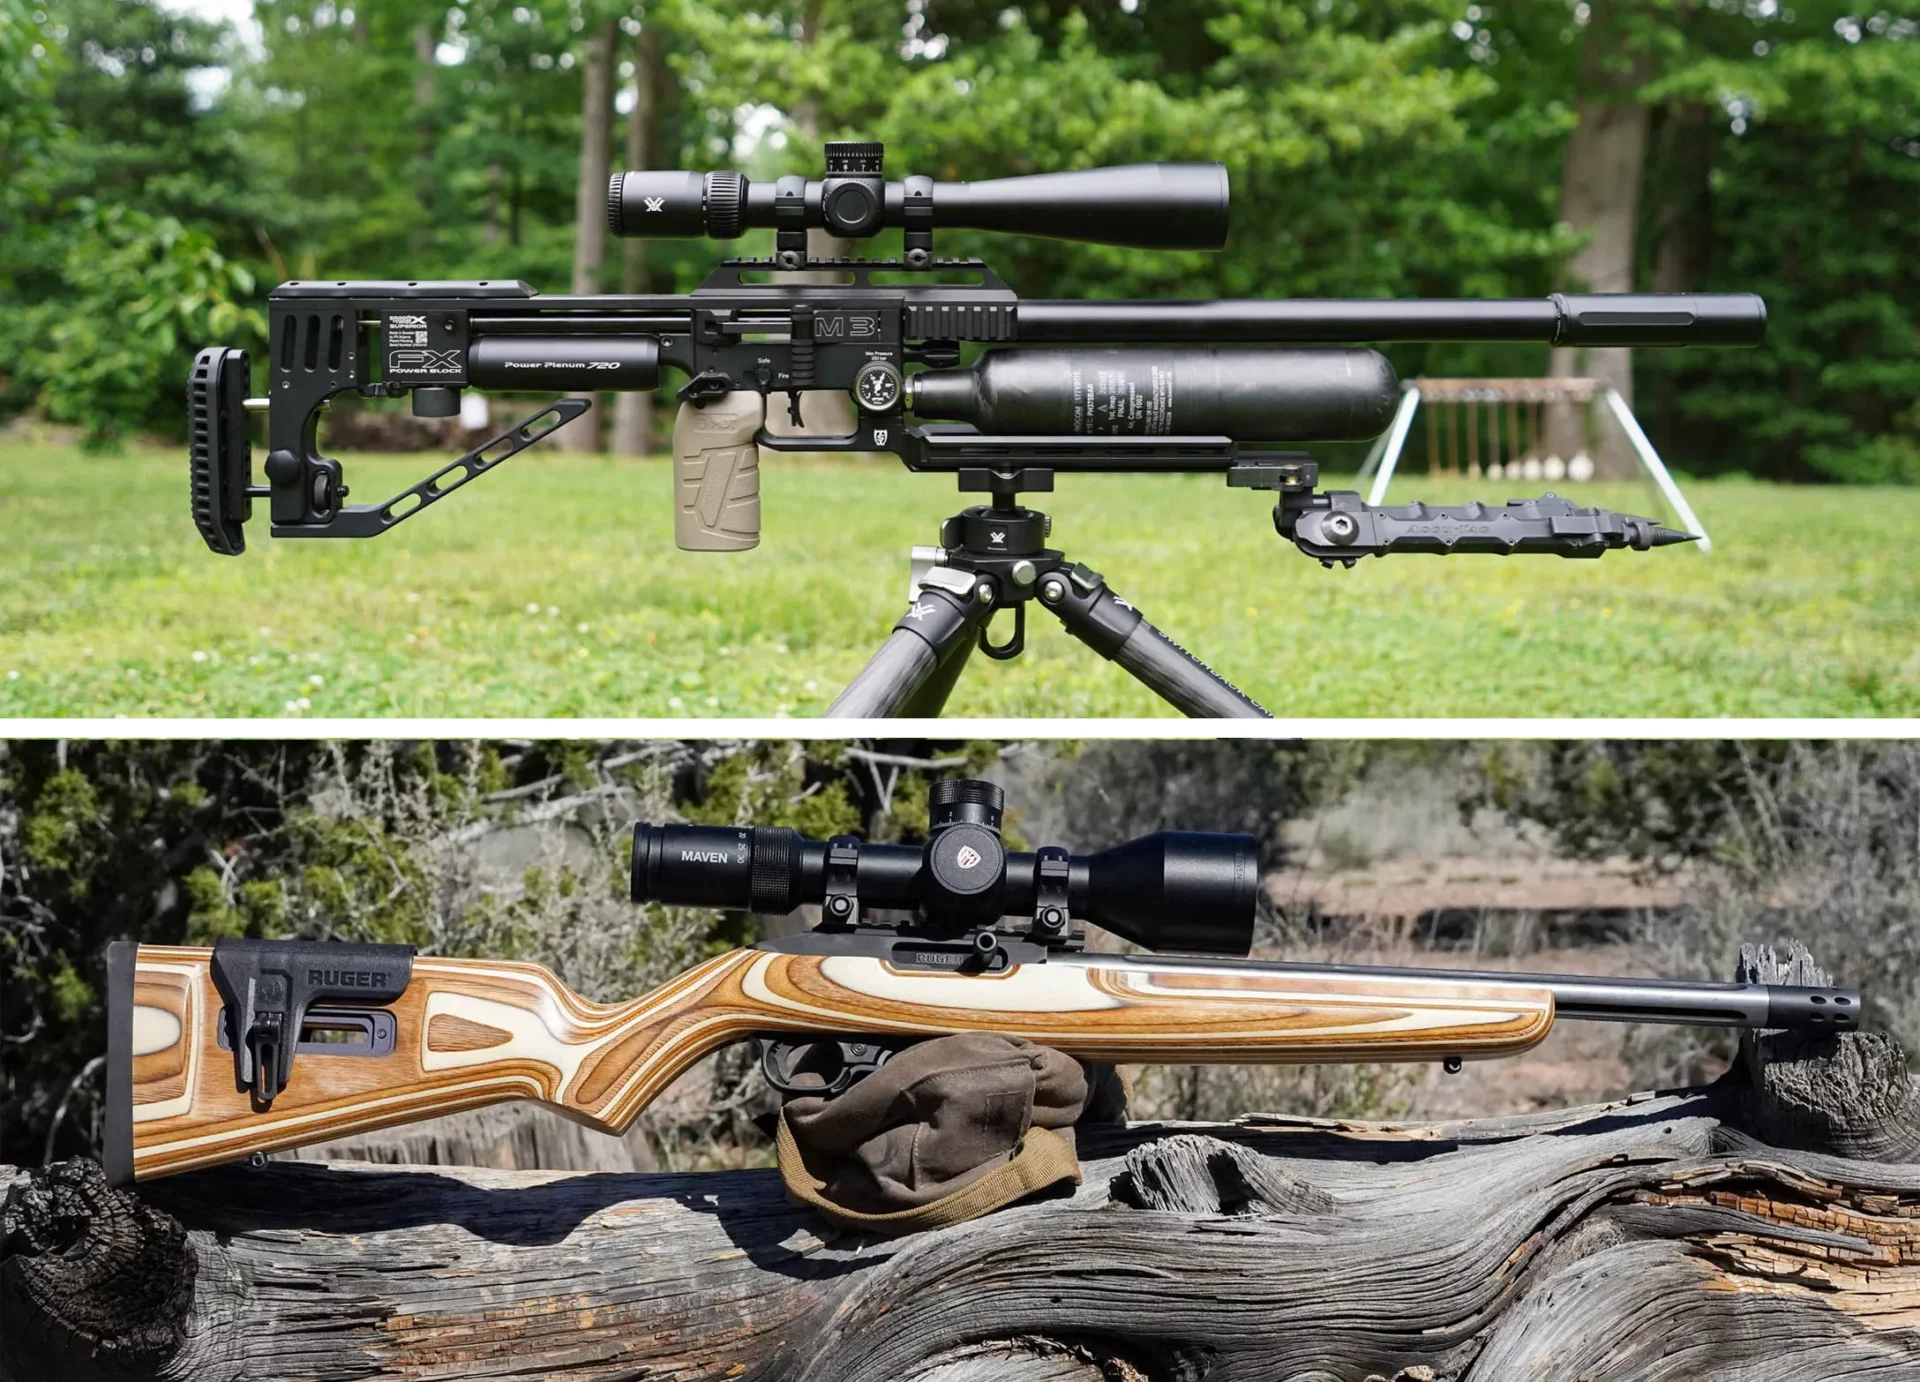
When direct thread silencers were the only option, shooters were limited in moving their suppressor from one host to another. The barrel threads had to be the same pattern as the female threads of the suppressor and that could prevent mounting a .30 caliber can with a thread pitch of 5/8 x 24” onto a .22 caliber barrel with a thread pattern of ½ x 28”. The muzzle brake mounting system changed this because now the shooter just needed to obtain an additional mount as opposed to going without a suppressor for a different host or having the rifle barrel threaded or recut to match the thread pattern of the silencer.

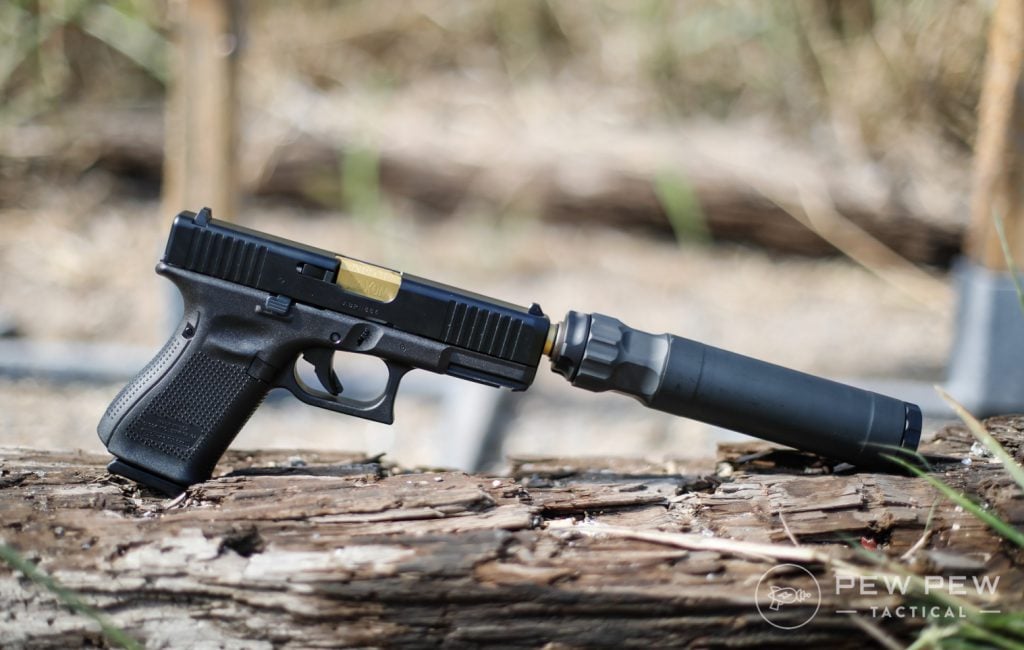
Our BANISH 30 GOLD is a quick detach 30 cal suppressor that comes with two muzzle brakes (1/2×28 and 5/8×24).

Thus, the shooter could mount the BANISH 30 GOLD on a rifle chambered in 300 Winchester Magnum, fire it and in less than a minute run the same BANISH 30 GOLD on a 10.5” AR-15 or any other rifle equipped with a BANISH 30 GOLD muzzle brake.

These reasons are what makes the muzzle brake a better choice, in our opinion, for shooting suppressed.

SHOOT SUPPRESSED TODAY!

If you’re ready to experience the benefits of shooting suppressed, then there’s no better time to start the buying process than right now!

At Silencer Central, we are passionate about compliance, knowledge, and community education in firearm sound suppression. With more than 15 years’ experience in the industry, we are the nation’s largest silencer dealer. We’re also the only one licensed in all 42 suppressor-legal states that can sell, process, and ship your new suppressor directly to your front door.

Like all things in life, there’s always something more to learn. Hopefully, the information in this article helped answer a lot of your questions about muzzle brakes, compensators, and silencers. Of course, it’s also possible that it brought some new questions to mind that you hadn’t thought of before. Or, we might have overlooked your question altogether. Whatever the case, we’re here to answer any and all of your questions and to help you buy your first suppressor.

SHOP SILENCERS

The Best Fishing Knots Of All Time [Ranked Strongest To Weakest]

0

It’s fishing knot time!

Do you want to know something that might shock you about fishing knots?

After testing hundreds of fishing knots over the past couple of years, I’ve learned one very important lesson…

The “100% fishing knot” is a myth.

Why?

Physics.

Yes, simple physics is the reason why. Pretty much all knots will create a weak point on the line given that it creates a point on the line where a max load is hitting it from more than just one direction.

And although there are some instances where the main line (or leader) will break before the knot fails, there is no single knot that can always do that with all types of lines.

So step #1 in using the strongest possible knots for your fishing needs is to understand that there is no such thing as a “100% knot”…

And if you hear someone say that their knot is 100% without any exclusions, then they likely have never tested it out in a controlled test with multiple lines, so I be wary of their recommendation.

Here’s the hard truth…

Your favorite fishing knot is weak, and so is mine

This is simply due to the fact the contorting line and creating hard turns that get put under tension will always create a weak point in the line making it the weakest point in the system (assuming that the main line is not compromised).

Note: This weak point is almost always at the first hard turn in the top section of the knot coming from the main line, so it most often leaves a clean break which looks like the mainline simply snapped when an angler examines the line after a break-off.

Now that we’re past the first hurdle (acceptance), step #2 is to actually test our knots to make sure that you don’t lose the fish of a lifetime due using a knot that isn’t the absolute best for each connection in your line system.

To help save you time in testing knots, I’ll be displaying results from my continued testing on this page.

Best of all, the individual fishing knots will be ranked based on their strength & performance results for the following knot connection categories:

Knot Category Groupings

Feel free to use the links below to skip down to the knot connection that you’re most interested in. Otherwise, you can simply scroll down to see all of the knots.

  • Best Knots For Braid
    • Braid to Leader Knots
    • Loop Knots (Line Doubling Knots)
    • Doubled Line to Leader Knots
    • Braid to Swivel/Lure/Hook Knots
  • Best Knots for Monofilament & Fluorocarbon
    • Mono to Mono Knots
    • Mono to Hook (Overview)
      • Mono to Hook/Lure Knots (Loop)
      • Mono to Hook/Lure Knots (Snug)

And if you don’t see your favorite knot listed, just leave a comment on the bottom of this post (click here) and I’ll add it to my list of fishing knots to evaluate.

So let’s get started…

Definition of Bad, Good, & Great Fishing Knots

best fishing knots

Before going on the knot strength results, it is essential that we first all understand the different categories of knots in terms of their strength:

  • Bad Knot: unravels/slips when under heavy tension
  • Good Knot: does not unravel or slip (it breaks before unraveling)
  • Great Knot: does not unravel/slip and has a higher breaking point than “Good knots”

How To Determine A Bad Knot

A bad knot is very easy to see because it leaves behind the telltale sign of trouble… the curly tag end.

Yes, the curly tag end that you may have seen after a break-off means that the knot used was either a bad knot, or there was a poor job in tying a good/great knot.

So if you ever see the curly end after a break-off, do not tie the same knot the same way because it’ll likely happen again.

How To Determine A Good Knot vs. A Great Knot

The difference between a Good knot and a Great knot requires the act of intentionally breaking them under a controlled test to see how much tension they can hold before the break occurs.

This is the missing link that most anglers overlook because it requires time and effort.

I am the perfect example of this because I was even fishing tournaments with money and pride at stake and never even bothered to actually test my personal knots.

And when I finally did test my knots, I was shocked at the results… the very first test I did revealed that I was getting 30% less strength than I otherwise would have had I been simply using a different knot for my line to leader connection (replacing the Double-Uni knot with the FG knot… both shown below).

So I highly recommend testing out your knots. And if you’d like a shortcut, this page shows the results from my testing below to help guide you to the best knots from my many tests done so far.

And I’ll continually update this “best fishing knot” post as more and more knots are tested so that you can have the latest and greatest data.

So if you want to save time while maximizing your line strength, this post is for you.

What Are The Best Fishing Knots?

There are many different types of lines which in many cases have completely different textures, sizes, and friction coefficients.

So we’ll be evaluating knots based on the type of line used within these general line categories:

  • Braid
  • Monofilament/Fluorocarbon
  • Wire (Coming soon)
  • Flyline (Coming soon)

And to truly evaluate a fishing knot, it is essential to focus each test on a specific type of connection because a knot that is very good for line-to-line connections is often not good at all for line-to-lure connections (and visa-Aversa).

So we’ll break out the rankings shown below into the following connections types for each line category:

  • Line-to-Line Knots
  • Line-to-Hook/Lure Knots [Snug]
  • Line-to-Hook/Lure Knots [Loop]

Let’s get started!

Best Fishing Knots for Braided Line

braided fishing line

Braided line has quickly become an extremely popular choice for inshore anglers because it allows for longer casts and better feel of lures given that its strength to diameter ratio is so much higher than mono/fluoro lines.

Plus, it has very little stretch which enables the angler to feel even the lightest of taps on the other end of the line.

But braid requires much for friction within the knot compared to monofilament so it almost always requires a different knot than the traditional knots used on mono.

Best Braid to Leader Knots

To kick things off, we’ll start with the most important of all connections for most saltwater anglers who use a lighter main line to connect to a stronger leader.

This setup is becoming very common because it allows for the overall system to have optimal casting performance (due to the lighter line in the reel) while having a stronger leader line at the business end to hold up to the sharp teeth and/or rough mouths of the target species.

Fluorocarbon is the most commonly used monofilament leader these days since it’s known for being less visible in the water while also being more resistant to abrasions, so this analysis is focused on connecting a braided line to a fluorocarbon leader.

Here are the top 5 ranking knots based on the knot tests I’ve done so far:

  1. PR Bobbin Knot [requires tools]
    • Pro: This is an extremely strong knot when tied correctly
    • Con: Requires tools to tie and takes a long time (extremely tough to do while on the water)
  2. FG Knot*
    • Pro: Thinnest knot I’ve ever seen while also having the highest breaking strength.
    • Con: Requires a strong cinch before cutting the tags so that it fully locks into place.
      • Note: Only use this knot if tying a braided line to a stronger mono/fluoro leader.
  3. 6 Turn Surgeon’s Knot
    • Pro: Very quick to tie while having a shocking strong breaking point and can be tied using lines of any size
    • Con: Bulkier and slightly weaker than the FG knot
  4. Doubled-Over Double Uni Knot
    • Pro: Easy knot to tie and it can be used for all connections
    • Con: Up to 30% weaker than the FG knot in my tests
  5. Crazy Alberto Knot
    • Pro: Nice low profile knot with a strong breaking point
    • Con: Up to 30% weaker than the FG knot in my tests
  6. Improved Albright
    • Pro: Nice low profile knot with a strong breaking point
    • Con: Weaker than the FG knot and the Crazy Alberto
  7. GT Knot
    • Pro: The viral version is easy to tie
    • Con: This knot isn’t nearly as strong as it’s touted for lighter lines

Click here to see the first contest I hosted for this connection.

Note: If your favorite knot isn’t included, leave a comment below and I’ll test it out and add it to the list.

Best Doubled Braid-to-Leader Knots

Many anglers like to double the braid by forming a loop at the end of the braid and then tying a line-to-line knot to connect the doubled braid to the leader.

In many instances, this does increase the overall line strength for anglers who are using a lighter braid relative to the leader.

However, the FG knot tied on a single line has proven to outperform the doubled knot connections in most of my testing. The only combination that consistently beats the single line FG knot is the use of the FG knot to connect a doubled line formed by the Bimini Twist to the leader.

Line Doubling Knots [Braid]

  1. Bimini Twist
    • Pro: Extremely strong doubling knot
    • Con: It often requires more twists (30+) with braid so that it won’t slip
  2. Spider Hitch
    • Pro: Faster to tie than the Bimini Twist
    • Con: Not as strong as the Bimini Twist
  3. Surgeon Loop (6-turn)
    • Pro: Extremely fast to tie
    • Con: Not quite as strong as the Bimini Twist

Doubled Line To Leader Knots [Braid to Fluoro]

  1. FG Knot
    • Pro: Thinnest knot I’ve ever seen while also having the highest breaking strength.
    • Con: Requires a very strong cinch before cutting the tags so that it fully locks into place.
      • Note: Only use this knot if tying a braided line to a stronger mono/fluoro leader.
  2. No-Name Knot (aka- Bristol Knot)
    • Pro: Quick and easy knot to tie
    • Con: Not as strong as the FG knot
  3. Yucatan Knot
    • Pro: Quick and easy to tie (very similar to Bristol knot)
    • Con: Not as strong as the FG knot

Note: If your favorite knot isn’t included, leave a comment below and I’ll test it out and add it to the list.

Best Braid-to-Swivel/Lure/Hook Knots

This next category is focused for anglers who use braided line and like to use swivels.

But it could also be useful if you like to use connect your braided line directly to your terminal tackle (although I do not recommend tying directly to your lure or hook using braid because fish can see it so much better than mono/fluoro… instead, use a ~20 to 30 inch leader in between your braid and lure/hook).

  1. Braid Uni Knot
    • Pro: Great knot that is very strong and easy to tie
    • Con: Although an easy knot to tie, some are faster
  2. San Diego Jam Knot
    • Pro: Strong knot that is easy and quick to tie
    • Con: Not quite as strong as the Modified Uni Knot
  3. Palomar Knot
    • Pro: Very fast and easy to tie
    • Con: Not as strong with braid as it is with mono
  4. Orvis Knot
    • Pro: Quick and easy to tie
    • Con: Not as strong with braid as it is with mono
  5. Improved Cinch Knot
    • Pro: Quick and easy to tie
    • Con: This knot doesn’t perform well with braid (prone to slippage)
  6. Clinch Knot
    • Pro: Quick and easy to tie
    • Con: This knot doesn’t perform well with braid (prone to slippage)

Click here to see results from a contest I hosted for this connection.

Note: If your favorite knot isn’t included, leave a comment below and I’ll test it out and add it to the list.

Best Fishing Knots for Monofilament/Fluorocarbon Line

best fishing knots for mono line

Monofilament line is used by almost all anglers in some capacity, so I’ve done many tests with knots using mono line.

For tests that I’ve done for my personal use, I focused on Fluorocarbon line, which is a specific type of mono.

Many anglers use Fluorocarbon for their leader material since it’s known to be stronger the less visible than traditional monofilament line.

Here’s what I’ve tested so far:

Best Mono-to-Mono Knots

Here are the top mono-to-mono knots that I have tested:

  1. Blood Knot*
    • Pro: Easy to tie with lines of similar size
    • Con: Not as effective with lines of different diameters
  2. Double Uni Knot
    • Pro: Easy knot to tie and it can be used for all connections
    • Con: Not as fast or strong as the Surgeon’s knot
  3. 3 Turn Surgeon’s Knot
    • Pro: Extremely easy and fast knot to tie with very strong holding strength
    • Con: Need to tie this before tying on a lure or hook
  4. SS Knot
    • Pro: Versatile knot connection with an impressive breaking strength
    • Con: Not quite as fast or strong as the Surgeon’s knot
  5. Albright Special
    • Pro: Easy knot to tie that looks very nice once completed
    • Con: Not as fast or strong as the Surgeon’s knot

Click here to see results from a contest I hosted for this connection.

Note: If your favorite knot isn’t included, leave a comment below and I’ll test it out and add it to the list.

Best Line-to-Hook Knots [Mono/Fluoro]

Now that we covered the very important line-to-line connection, let’s dig in to the best fishing knots for connecting our hooks and lures to the end of the line.

For this category, we’ll split it up into two sections to cover the two core different types of connections:

  1. Loop Knot – Leaves a loop so that the lure/hook has more range of motion in the water (less strength compared to snug)
  2. Snug Knot – Line hugs around hook/lure eye forming a strong connection (less range of motion)

Note: I’ve specifically focused on fluorocarbon line since it’s the most popular for saltwater anglers… if you want me to test these with standard mono, just let me know and I’ll add it to this post.

Best Loop Knot to Lure/Hook

When fishing with artificial lures, using a loop knot is an advantage because it allows the lure to have more motion in the water which most often leads to more strikes.

But the downside is that loop knots are not as strong as snug knots, so that needs to be taken into account when selecting your leader line size and when setting drag.

Here are my favorites:

  1. Rapala Loop Knot
    • Pro: The strongest loop knot I’ve tested so far
    • Con: Takes a bit longer to tie than many others and leaves a tag end facing up which can snag weeds/debris
  2. Non-Slip Loop Knot (aka. Kreh Loop)*
    • Pro: Very quick and easy to tie and has a tag end that points down towards the lure (more weedless)
    • Con: Just a tad weaker than the Rapala knot
  3. Figure 8 Loop Knot
    • Pro: Tested to be very strong (very close to Rapala Loop Knot
    • Con: Takes longer to tie than the Non-Slip Loop knot and does not have a weedless tag end
  4. Perfection Loop Knot
    • Pro: Strong loop knot that is quick to tie
    • Con: Tougher to tie since this knot requires the hook/lure to pass through a loop
  5. Canoe Man Loop Knot
    • Pro: Extremely fast loop knot to tie
    • Con: Strength test was great with traditional mono, but it didn’t perform nearly as well with fluorocarbon

Click here to see the first contest I did with this important connection.

Note: If your favorite knot isn’t included, leave a comment below and I’ll test it out and add it to the list.

Best “Snug” Knot to Lure/Hook

When going for maximum strength when having action in the water is not as important, then the snug knot is the way to go because a good snug knot will be a significant amount stronger than a good loop knot.

Here’s my ranking of the Snug knots that I’ve tested so far:

  1. Palomar Knot
    • Pro: Very strong knot that is easy to tie when using bare hooks
    • Con: Can become cumbersome when using larger lures because it requires the lure pass through a loop
  2. Clinch Knot
    • Pro: Quick and easy knot to tie
    • Con: Not as fast and easy as the Orvis Knot nor as strong as the Palomar Knot
  3. Uni Knot
    • Pro: Good knot that is fairly quick to tie and can be used for almost any connection
    • Con: Not quite as strong as the Palomar knot nor the Clinch knot
  4. Orvis Knot*
    • Pro: Very quick and easy knot to tie that is very strong
    • Con: Not quite as strong as the knots listed above
  5. Double Davy Knot
    • Pro: Very quick and easy to tie (just 1 more twist vs. the Davie Knot)
    • Con: Not quite as strong as the Orvis knot which is just as easy to tie
  6. Davy Knot
    • Pro: Very quick and easy to tie
    • Con: Not quite as strong as the Orvis knot which is just as easy to tie

Click here to see the first contest I did with this important connection.

Note: If your favorite knot isn’t included, leave a comment below and I’ll test it out and add it to the list.

More test data getting added soon, so be sure to bookmark this page!

Conclusion

best fishing knots

Of the many factors that determine if you land the fish of a lifetime that you hook, the one that we have 100% control over is the quality of the knots that we use.

So it’s essential for us to select the absolute best fishing knot for each connection to get the most overall line strength.

You have certainly heard the saying, “A chain is only as strong as its weakest link…” Well, a rod, reel, and an angler are only as strong as the knot between them and the fish.

Make it count.

There isn’t (and never will be) one fishing knot that can do everything with all line types and connection needs, so make sure to be mindful of the knot options you have for each connection need you have.

This post will continually grow over time as knot suggestions come in, so leave a comment below letting us know of any other knots you’d like us to add to this analysis.

Note: The * symbols next to the knots listed above are the ones that I personally use for each of the respective connections.

The tests have been done using 10 to 20 lb PowerPro braid tied to 20 to 30 lb Ande monofilament and Seaguar fluorocarbon.

Related Posts:

1. How To Tie The Perfect Leader Assembly For Inshore Fishing

2. What Is The Proper Drag Tension To Use For A Fishing Reel?

3. How To Get A Hooked Fish Out Of Structure Without Breaking Off

4. The Best Online Fishing Club…

P.S. – If you think your angler friends or fishing networks would enjoy seeing this, please Tag them or Share this with them. You Rock! Pa-POW!

Pan-Seared Rockfish

0

This delicious pan-seared rockfish is made with fish seared in butter and oil, and then served with a lemon and caper pan sauce.

pan-seared rockfish on a plate

This year has had its ups and downs, but for us there has been one constant.

We’ve had a freezer full of amazing seafood.

Since we knew we’d be home (not traveling) for quite some time, we signed up for monthly seafood deliveries from a CSF (community supported fishery).

And guys, it’s made the year a little bit easier.

If you’re looking for a CSF to join, I can highly recommend the one we joined, Sitka Salmon Shares.

One of our monthly fish deliveries included black rockfish (or black bass). We immediately made blackened rockfish tacos (yum!), but next I wanted to try a recipe where I could taste the rockfish more clearly.

This pan-seared rockfish is based on one of my all-time favorite fish recipes, Julia Child’s fish meunière (fish in butter sauce), and is served with an easy lemon caper sauce.

Looking for more white fish recipes? Try these: pan-seared lingcod, baked lingcod with tomato caper sauce, broiled cod, broiled halibut, pan-seared halibut, pan-seared hake, and halibut tacos.

What Does Rockfish Taste Like?

It depends on the type of rockfish you’re buying!

The black rockfish I used was a mild, flaky fish.

In the past, I’ve purchased Pacific rockfish at Aldi that had a somewhat stronger flavor profile. It was still quite tasty.

Can I Make This Pan-Seared Rockfish Gluten-Free?

Yes, absolutely!

Before pan-searing the rockfish, you’ll dust the fish with flour. All-purpose gluten-free flour, such as Cup 4 Cup, will work perfectly.

Can I Skip the Flour?

Yes, you can.

The sear on the fish will be slightly less golden.

How to Make Pan-Seared Rockfish

Start by patting the fish dry and lightly dusting it with flour. Season the fish with salt and set aside.

Next, heat butter and olive oil in a heavy pan. I like to use this Lodge 12″ carbon steel skillet.

Place the fish into the pan, and avoid trying to move the fish. Don’t touch it yet.

Add Fish to the Hot Pan

After about three minutes, use a metal spatula to test the fish. Ideally, use a fish spatula.

I use this Wusthof fish spatula, but have also heard good things about this OXO fish spatula.

Try to slide the spatula under the fish.

If the rockfish releases easily from the pan, flip it. If it doesn’t, try again in a few seconds.

It will release when the bottom of the fish is done cooking.

After you flip the fish, top each fillet with a little more butter.

Flip Rockfish + Top with Butter

Cook the rockfish for another couple minutes, and then remove it from the pan.

How to Make the Pan-Sauce

To make the sauce, add lemon juice and capers to the hot pan.

Use a wooden spoon to stir, scraping up any bits of fish stuck to the pan. Stir in some fresh herbs, and it’s ready!

Add Lemon Juice, Capers, + Herbs to Pan

Top the pan-seared rockfish with the lemon caper pan-sauce and a few more fresh herbs.

I like to serve this rockfish along with French mashed potatoes and a haricot vert salad.

pan-seared rockfish on a plate

9 dog breeds with the strongest bite force

0

While all dogs have the potential to nip and bite, some breeds have stronger bites than others due to their powerful jaws, large teeth and fearless character.

When researching dog breeds, it’s important to remember the factors that contribute to biting incidents, such as anti-social behaviour by irresponsible owners who train their dogs to be aggressive. Many dogs have been bred specifically for their intelligence and strength, while others may simply be the result of poor ownership.

To help us understand more about the dogs who bite, Norfolk-based animal behaviourist and trainer, Sarah-Jane White, has measured the strength of dogs by looking at the pounds per square inch (PSI) for each breed.

Take a look at the full list of dog breeds below…

1. German Shepherd

“The German Shepherd is a breed that is well-known for its strength and intelligence,” says Sarah-Jane White. “With a bite force of 238-291 PSI, this breed is often used for law enforcement, military and protection. German Shepherds are also popular as family pets due to their loyalty and obedience. They are the eighth most popular dog in the UK.”

2. American Bulldog

“The Bulldog is a strong breed of dog that has a very powerful bite,” explains Sarah-Jane. “With a bite force of 305 PSI, this dog is not to be trifled with! Often used as a guard dog or for protection, the American Bulldog is a breed that you want on your side. They are energetic and require a lot of exercise, but make great family pets.”

3. Rottweiler

“The Rottweiler is a powerful breed of dog that is known for its strength and intelligence. With a bite force of 328 PSI, this breed can definitely hold its own against other animals. Often used as a guard dog, the Rottweiler is a breed that you don’t want to mess with! They make really lovable companions with the right training.”

4. American Pit Bull Terrier

“The American Pit Bull Terrier is a breed that is known for its strength and determination. With a bite force of 240-330 PSI, this breed can definitely bring down larger prey,” Sarah-Jane explains.

“Pitbull terriers are legal in the United States. But in Canada, pit bulls are banned in many towns and cities. Puerto Rico had a two-decade ban in place until 2018, when it was once again made legal to own, sell and import the breed. They are banned in the UK.”

5. Mastiff

“The Mastiff is another large breed of dog that is known for its strength and power. With a bite force of 556 PSI, this breed can easily overpower other animals. This is more than three times the bite force of an average dog.”

6. Cane Corso

Sarah-Jane continue: “The Cane Corso is a breed that is known for its power and strength. With a bite force of 650 PSI, this breed can take down prey much larger than itself.”

7. Turkish Kangal

“The Kangal Shepherd is a Turkish breed of dog that is known for its large size and impressive strength. With a bite force of 743 PSI, this breed is the undisputed king of the canine world when it comes to raw power. Typically used to protect against wolves, bears, and jackals in its native Turkey due to its intimidating size and capabilities as an effective guardian.

“While all of these breeds are incredibly strong, the Kangal takes the top spot as the dog with the strongest bite in the world. With a force that is more than three times that of an average dog, this breed can take down prey much larger than itself. So, if you are looking for a dog that is not only powerful but also fearless, the Kangal is the breed for you!”

8. Dutch Shepherd

According to Petkeen, Dutch Shepherds are often used by law enforcement in different countries and nearly went extinct in World War Two. While the breed is still rare, their usefulness and powerful bite of 224 PSI has kept them around.

9. Tosa Inu

This large-sized breed, currently banned in the UK under the Dangerous Dogs Act, is known for its protection and powerful nature. Originating from Japan, they have a bite force of 556 PSI and have been sadly bred to fight completely silently.

How to Process a Deer at Home: The Ultimate Guide

0

Many hunters each season harvest a deer and pay a processing facility to butcher the animal. One of the comments we saw a lot when we made our video on butchering a deer at home was the amount of meat that many processors waste. That’s exactly why we wanted to put this guide together.

There is a special relationship you will find knowing that you harvested your venison, dressed, skinned, and butchered the meat, and made a meal that your friends and family will talk about for years. You can butcher a deer at home and know that you wasted nothing, plus you’ll save money. Once you know the best way to butcher a deer, you can do it quickly, often finishing the major steps in less than half an hour.

Skinning Your Deer the Right Way

A properly harvested deer begins with good shot placement and field dressing the animal quickly. We have put together guides for you to properly field dress a deer in print and on our Youtube channel.

For this process, we are going to use the Outdoor Edge RazorMax. This knife has interchangeable blades, so you can quickly switch from a 5” boning knife to a 3.5” drop point. You can purchase our favorite knives right from our website.

Begin skinning your deer by making a cut down the back of the hind legs. Be careful not to cut the Achilles tendon, as you will hang the deer from that at a later stage. After you have made the incision, you can start to pull the skin down the leg, like removing a sock. Keep the meat as clean as possible. Disposable gloves are a good idea, and you should change them when they are contaminated.

As you pull the skin down, you will find a joint. You can make an incision with your knife around and into the joint and snap the lower leg off. Continue pulling the hide down and rolling it so that the hair does not touch the meat and expose the tendon. Do this for both back legs.

You can go to the front and do the same thing as with the back legs. Simply find the joint, make an incision, and snap the lower leg off. Now you are ready to finish skinning your deer.

Hanging Your Deer

The easiest way to skin a deer is by hanging it. We are lucky to have an overhead hoist in our butcher shop. If you don’t have access to a hoist, there are a number of ways to hang a deer. You can use a chain fall and gambrel from the rafters in your garage. You can even use a sturdy tree. Placing a waterproof tarp underneath will help with cleanup.

If hanging a deer to skin is not possible, it can be done on the ground, but it is much more difficult and you should plan on making sure your carcass stays clean. Use tarps.

You will fit the gambrel through the tendons of the back legs and lift the carcass up to about chest level. This will give you good leverage to push the hide down. You’ll hardly use your knife as you skin the haunches. You can finish your cut through the groin and pull the skin back to the haunches.

When you start to work along the front of the legs, be careful not to cut the flap meat. You will find a membrane that holds the flap, and you want to make sure not to cut into it. You want the flap meat to stay on the carcass, because it will make pulling the hide off much easier.

At this point, you can pull the hide down and cut through the tail. Continue to grasp the hide and push down with your hand or fist. Be careful to avoid contaminating your deer. Change your gloves regularly. When you have gotten down to the chest area, you should raise your deer up again if possible.

Finishing the Skinning Process

The hide will be more difficult to remove in the neck, particularly with a buck. If you’re not cutting the cape for a shoulder mount, you can cut the hide down the throat to the jaw. This will make it easier to pull the hide off. Use your knife to cut through the spine at the base of the skull. Cut through the esophagus and pull the hide off the rest of the way.

Pull the esophagus through. Now you will have an opening through the neck. Your carcass should be pretty clean without any hair on it. You can rinse the cavity out to get rid of any blood. If your deer was gut shot, you should not rinse it. All you are doing is spreading contamination around. You will need to cut the contaminated parts out and discard them.

Skinning an animal is a skill that takes practice to get good at doing. When you first start out skinning, it will take you a long time to do the job, and that’s fine. You should be patient and be careful to make sure you remove the hide cleanly without damaging your meat.

A few tips that can help a lot:

Start with a Sharp Knife

This may seem obvious, but you wouldn’t believe how many times we have seen mangled, hacked up deer because someone tried to use a dull knife. You should become skilled at sharpening a knife and you should have a basic knife sharpener with you on your hunt. Regularly ensuring the blade of your hunting knife is kept sharp will speed up your skinning process. Even the best knife in the world will not hold an edge forever. One of the reasons we recommend the Outdoor Edge RazorMax is the quick-change blades. This way, you don’t have to stop halfway through the process to sharpen a blade.

Use Correct Knife Technique

A sharp knife makes it easy to cut, but you still must be cautious about the way you use your knife. Always be aware of where your hands, or a helper’s hands are when working with a knife. It’s unbelievably easy to accidentally cut someone or yourself when skinning. Make short, precise cuts away from yourself. Keep your knife handle clean. A non-slip handle is very beneficial.

Wear Gloves

Gloves will significantly help your cleanup process, but most importantly, they help prevent spreading contaminants around while you are skinning and butchering. It is particularly important to prevent spreading hair around on the meat. Changing your gloves periodically while skinning will help to keep the hair on the hide and off your dinner.

Use the Buddy System

Skinning any large animal is a chore to do by yourself. Once you have plenty of experience, it won’t be as difficult, but an extra set of hands and eyeballs can really come in handy for balancing the carcass while skinning and butchering.

With these tips and our guide, you should be able to start skinning like the professionals. Practice makes perfect, so keep at it. Offer to help others who are skinning, just so you have the opportunity to see and experience the process. The more you do it, the easier it becomes. For a visual breakdown of the process, make sure you check out or video below.

Next, we will show you how we butcher a deer so that you can learn to do it at home, save money on processing charges, and get the cuts of venison you really want. Later, we’ll show you some of our favorite ways to prepare venison and share some family favorite recipes and techniques.

So you field dressed and skinned your deer, but what’s next? In this article, we’re going to explain the process and techniques we use at home to butcher a deer and prepare the meat for final cuts. A lot of the information here can also be found on our Youtube channel if you would like to see the process we use.

It’s key to make sure your deer is completely clean and free of hair and dirt before butchering. Cleanliness is essential. You do not want to accidentally ruin your venison because of carelessness.

Butcher a Deer

We are going to go through and show you how to break the carcass down into the different muscle groups, then we will come back and show you how to further process those parts. We are using the Outdoor Edge Butcher’s Knife Kit. It comes with all of the essential tools you need. We’re going to use the bone saw, the boning knife, and a larger butcher blade that is similar to a Bowie knife. This is a great set of tools to pick up, we highly recommend them for your at home butchering. Let’s get started!

Tenderloins or Fish Tenders

The first thing you will do is reach inside the carcass and find the tenderloins. We call them fish tenders because, well, they are about the size of a fish fillet. Once you get them started, they pull out easily. A lot of people miss these or cut into them when field dressing their deer, which is really a waste of one of the best parts.

Rear Quartering

We are going to use the Outdoor Edge bone saw to quickly remove the hind quarters. This just makes the next steps easier. First, trim the flap meat, then cut through above the hip joints.

Switching back to the boning knife, you will use some downward pressure to separate the hip joints and slice the haunch off. You can use the edge of the table as you cut to get leverage. This will help separate the joint. Set the rear haunches aside for now. Later, we will break those down into the sirloin, top, bottom, and eye of round roasts and tell you how to make some jerky.

Front Quartering

Most of the time as you are butchering an animal, you will see visual cues where to cut. As you work along the front legs, you will find a membrane between the muscles. Just follow that with your knife, and the shoulder will come apart easily. Use short strokes with your knife and apply pressure with your other hand. The muscle groups will usually come apart. Set the shoulders aside. Later, we will clean these up and describe how to cut a venison flat iron steak.

Ribs and Backstrap

Use your knife and make an incision down the spine. Cut along the carcass to the rib, and work the knife back toward your first cut. Like filleting a fish, if you make these cuts right, your backstrap will come right off. The backstrap is one of the most prized parts of a deer. You will make these cuts on both sides to remove the backstraps. Later, we will tell you how to finish processing these and make them into chops.

This is where the heavier bladed butcher knife comes in handy. You will need to cut through the sternum to separate the ribs. There is a piece of cartilage that makes cutting easier. You can also use the bone saw to quickly hack through the sternum.

Use the heavier knife and a sawing motion to cut the ribs from the spine and remove them. These are great on the smoker as is, but if they are too big, you can cut the bottom portion off. Find the cartilage and cut through it to remove. You can process that part later to add to ground venison. Now, you have St. Louis style ribs.

Use the bone saw to remove the remainder of the ribs. An extra set of hands comes in very handy on this step. A pro tip is to use your knife to cut through the muscle to the bone before starting to cut with the saw. This way, you are not wasting energy cutting muscle with the saw.

Waste Not, Want Not

Carefully go over the remaining spine and neck portion to remove any usable bits of muscle. These can be ground up with other trimmings and make amazing sausage. Most of the bones can be boiled down and used to make stock. Venison bone stock makes out-of-this-world gravy, and is an excellent natural immune system booster. The only bones you should not use are the skull, brain, and spinal cord. Some animals can carry diseases that may be transferable to humans and can withstand industrial heat sanitation temperatures. It’s just not safe to use these parts.

Many people have very strong opinions on using deer fat, and there are some serious things you should consider before embarking on rendering your fat.

Probably the most important thing to consider is the diet of the animal you harvested. Deer feeding on grasses, grains, or acorns are likely to have fat similar to that of grass-fed beef and will be pleasant. Deer eating scrub brush and such should be avoided. These deer are likely to have little fat, and what they do have will not taste good.

Fat you find inside the carcass and surrounding the liver is called suet. This is used to make tallow for candles and can be saved, but is usually discarded when field dressing a deer. If you want to embark on a candle-making adventure, or if you know someone who is interested in buying suet to make tallow, you can save these parts.

If you do render deer fat for cooking, remember a little goes a long way. Too much, and it will coat your mouth in an unpleasant way. Deer fat does not keep and will go rancid within three to four months even in the freezer.

Getting Ready for the Next Step

Your deer has been broken down into the major groups now, so it is time to move on to the types of cuts you can get from your deer. We have videos on our Youtube channel that show the best way how to skin and butcher the deer you have harvested.

In Part Three, we will discuss how to get the best cuts and share with you some of our favorite ways to make venison at home using The Bearded Butcher Blend spices and seasonings.

Once you have finished the basic butchering steps outlined in part two of this guide to butchering at home, it is time to process your quarters into proper cuts of meat.

As we go along here, we will explain the different cuts and give you some tips about the way we like to prepare and season venison using our Bearded Butcher Blend Spices. We are going to continue using the Outdoor Edge Butchering Kit. The knives in this set are excellent for making great cuts of venison at home.

Back to the Venison Backstrap

The first thing you want to do when trimming your backstrap is to find the seam in the muscle. You can open this up by hand, and then give it just a little help with the knife to expose the edge. Trim the long edge off and save it for trimmings.

Next, find the thick spinal sinew that runs all the way down the backstrap and cut that out. This is often used to make traditional bowstrings. Now, we need to remove the silver skin.

Use the fish fillet method by starting at the thick end of the backstrap and cutting down to, but not through the silver skin. Then carefully press the knife away from you while gently pulling the edge of the silver skin and the silver skin will come off. If some parts are missed, you can flip the backstrap over and angle your knife blade against the skin and gently cut away from yourself. This way, you can catch the skin and lift it off without destroying the backstrap.

With the silver skin and sinews removed, you can cut the backstrap into 1 ¼” slices for chops. These are some of the most desirable cuts of venison.

Dressing up a Deer Backstrap

A way to cut and prepare a backstrap that is sure to impress is to butterfly the backstrap. To do this, you will cut the backstrap into thirds. Using the thickest portions, place your hand on top of the backstrap and use your knife to cut as close to the table as possible without cutting through the backstrap. Using your other hand, gently unroll the backstrap as you cut. You can continue to cut and unroll the backstrap until you have one uniform, thin layer.

You can season this with Bearded Butchers Spices. The Original is a personal favorite on a backstrap like this. Next, you will layer whatever filling you would like. Feta cheese, spinach, and onions is a good choice. So is cream cheese and jalapenos for a creamy spicy kick. All you have to do is roll the butterflied backstrap up and tie it off. Smoker, grill, or the oven, this is a great way to make a backstrap.

Breaking Down the Deer Hind Quarter

Next, we are going to separate the hind quarters. These parts can be used for many great dishes. The major portions are the round steaks. These are the ideal cuts for jerky. We are also going to detail how to get a great sirloin roast from a hind quarter.

Get started by applying a little downward force with your knife at the knee joint. When you are in the right spot, you will cut the shank off cleanly. Alternatively, you can use the bone saw to cut through the joint, but be sure to start with your knife. Bone saws don’t work well on muscle.

Using your boning knife, follow the femur bone down until it is separated from the meat. Cut around the bone and lift it out of the muscle. Now you will have a 100 percent boneless piece of venison.

There are four muscle groups we are going to deal with in the haunch. The first is the round point. The round point, also called a sirloin when it is properly dressed, has a membrane that holds it in place. You can start working it free by hand and use your knife sparingly to trim it out. This is the best piece to make roast venison, but you can also cut it up into cubes for stew meat. If you remove the connective tissue, you can also slice this into jerky.

From here, you are going to separate the other three muscle groups. These muscles will pull apart pretty easy when you find the seam in the membrane. This will take experience to learn to do quickly. A trick is

PCP vs Gas Piston: Which One is Better?

0

The perfect airgun is a difficult pick when you are new to gun-hunting.

There are a lot of things to keep in mind, starting from technicalities to their functionality.

Once you have decided on what your budget is going to be, there is also the problem of the power source for the rifle that needs to be taken care of. 

Buyers usually have the most problems regarding this aspect.

Before, the gas piston gun is among the favorite. However, recently PCPs or Pre-Charged Pneumatics have started becoming more popular than their rival rifle. 

So which one is the better option?

Luckily, this article will explain how you need to go about gun buying, the pros, and cons of both types, and some things you need to consider before becoming a rifle owner. 

What is a Gas Piston and How Does it Work?

The gas piston is a more advanced version of its earliest gun ancestor, the spring-piston gun.

It is more sophisticated than the latter with its autoloading technology and gas-operating system. 

The gas piston is powered by a gas-filled cylinder present in the chamber of the gun from where the gas goes off through a tiny hole present at the top of the barrel.

Here is exactly how the gas piston works:

  1. Upon cocking the gun, the gas cylinder gets more compressed by the pressurized air in the gas cylinder. 
  1. Since the air inside is compressed at very high tension and pressure, upon releasing the trigger, the pellet is forced out of the gun through pressurized air. 

This mechanism is faster as compared to its older version and has proved beneficial due to its automated reloading. 

What are PCPs and How Do They Work?

Pre-Charged Pneumatics or PCP air rifles use compressed air stored in built-in air tanks as the propellant to fire pellets. This may sound similar to what a gas piston works like, so to understand the mechanics of PCPs, here is exactly how their firing procedure works:

  1. The air inside the PCP air tanks is compressed to about 2700-3000 pounds per square inch using a hand pump, or other pumping devices, such as air compressors or carbon fiber tanks. When filled to the correct pressure, it is ready to fire. 
  1. The trigger is directly connected to a valve from which a small amount of air is released upon squeezing it. 
  1. Air pressure pushes the pellet out through the barrel and then out of the gun. 
  1. With each shot, pressure is reduced along with the amount of air in the tank which needs to be refilled after it has completely been exhausted. 
  1. Since PCP works with air pressure, it does not fire accurate shots when low on air pressure as it needs to be recharged to get optimum firing capability. 

This may vary according to different companies and models, but a good, average PCPs can shoot somewhere up to 30 – 400 shots before you will need to recharge it. 

PCP vs Gas Piston (Main Differences) 

The main difference between a PCP vs a gas piston air rifle is the advancement in its structure. 

While gas pistons are almost the same as their spring gun relatives, the only difference is that instead of a spring, there is a gas-filled cylinder. Alternatively, PCP has compressed gas already stored within the cylinder which does not require frequent reloading.

Power

Though both the guns work on the same air compressing system, it is no doubt that when it comes to PCP vs gas piston air guns, then PCP is more powerful in comparison. 

A gas piston can offer around 1000 ft/s velocity. This means that for .22 caliber pellets, the velocity will be near 850 ft/s.

You will certainly be able to get pre-charged pneumatics in small calibers, but they come into their own in larger sizes as well. From .30 up to .50, these PCP rifles are available from several manufacturers with energies above 200 ft-lbs.

(For more on the best PCP air rifle on the market, see this post)

Accuracy

There is a certain belief that there is no recoil when a PCP is shot. However, the recoil is present when you shoot from a PCP. But, the impact is certainly lesser than that of a gas piston. This greatly affects the accuracy of the guns.

Upon firing, you must allow the gas piston to complete the recoil phase and come to rest in the original position it was in before. This is the only way it will be truly accurate. You have to make sure that your grip is gentle as well as the same for every shot that is taken. Once mastered, gas pistons can be extremely accurate. 

Meanwhile, when using a PCP, recoil is minimal and the shooter has the freedom to choose different sorts of holds without being worried about the pellet misfiring as long as their head and eye position remain constant throughout. 

Noise Level

In the noise department, the PCP vs gas piston pellet gun is sort of useless as both are noise-friendly guns – in the sense, they do not make much noise. 

Gas piston guns often come with a ‘Sound Suppression Technology” which is built in to dampen the noise from the gun. A fluted shroud is used to keep the gas chambers enclosed which keeps the sound from escaping, reducing noise significantly. 

PCP air guns, being the advanced predecessor of guns, are also built to be quiet compared to other rifles. Since it produces very little recoil, the sound is also at a minimum. 

Upkeep Cost

Being newer gun models, it is certain that PCP guns cost more than gas pistons. The starting price range of a decent one will begin from $400. 

You also need to keep in mind the additional expenditure that will follow for your PCP gun’s maintenance.

Refilling the air cylinders can get quite heavy on the pockets as prices start at $200 and go upwards. Getting a stirrup pump that starts at 100$ is a more economical option that can save you the extra expense of refills with the only downside being that it is a laborious job. 

Gas pistons on the other hand are much cheaper and you can get one of the better ones with even the upper limit being just $200. Little to no maintenance is required apart from the usual cleaning and loading, but it can be expensive to get it fixed. 

(For more on the best air rifles on the market, see this post)

PCP Vs Gas Piston – Which One Is Better for Pest Control?

Gas pistons have a recoil and grip system. Not being very different from spring air guns, they need control to shoot accurately. The noise-suppressing system is a great advantage for pest control which requires stealth and silence. 

It is obvious that PCP guns, being soundless and with no grip and position requirements, are the more comfortable options out of the two. But, they are unnecessarily high maintenance for a rifle just there for normal pest control. 

Considering that both PCP guns and gas pistons are good picks for those who want to avoid noise and not scare off pests, the debate on which one is great for killing little critters comes down to just the prices. 

Personally, if your gun is just for pest control and safety, gas pistons that are low maintenance and cheap are the right option. 

(For more on the best air rifles for pest control, see this post)

PCP vs Gas Piston – Which One Is Better for the Hunting Game?

Both PCP guns and gas pistons are equally good for hunting. With both of them making minimum sound and movement, which one is better depends on the type of hunting you are doing. 

If it is just pest control or small hunting games, where things are not as serious, a gas piston will be a good option. It fits under the budget and works almost as well as a PCP. 

However, if the hunt is serious, or if the situation is about saving time and energy, a PCP gun will be more advantageous as it loads quicker, is silent, as well as far more accurate. 

(For more on the best air rifle for hunting medium games, see this post)

Conclusion

Gun enthusiasts, just like fans of any other machinery, will tend to prefer the newer models that are built lighter and more efficiently. However, guns are also instruments with their little tweaks and treasures. So, to find one that suits you, whether an older or newer model, is completely up to what is best built for you.

You can choose a gas piston over a PCP gun if:

  • You are a beginner at guns and hunting and want something that is at the same price as a traditional spring gun but also has some features of a PCP. 
  • Your budget is not very high and money is a priority.  
  • Your main use of the gun is going to be simple hunting games, pest control, and the occasional shooting. 
  • You need a gun that can be kept around the house without any risk of high maintenance. 

A pre-charged pneumatic gun would be the correct option for you if:

  • You have quality as your priority and do not have many limitations to your budget. 
  • You want to go for professional hunting which may require a lot of time and energy. 
  • You do not want to deal with the hassle of a steady grip and recoil while shooting. 
  • You are experienced with guns and will have no problems maintaining them.

10 Best Glock 19 Holsters: Concealed & OWB

0

Ever dream about carrying your Glock with you everywhere?

We get it…your Glock 19 is the go-to concealed carry weapon for many.

Glock 19 Gen 5, Stock

It’s also the standard sidearm for tons of law enforcement agencies and military organizations around the world.

But if you want to carry your Glock with you, you need a holster.

The Glock 19’s popularity means there’s a huge market of compatible holsters for you to choose from.

Unfortunately, all those options can make it difficult to figure out what’s a good holster at a good price that fits your individual needs.

Fortunately, you’ve got us!

In this guide, we’ll tell you what features any holster needs to have, give you the rundown on the various holster types out there, and finally, give you recommendations for holsters in each category.

THE QUICK LIST

Choosing a Good Holster

Your holster’s most basic job is to hold your firearm when you’re not using it. But it also needs to protect your firearm — both from being dropped and from bumps and scrapes.

It also prevents accidental discharge and allows you to quickly draw your firearm when the situation calls for it…whether that’s in competition or a defensive situation.

So how do you make sure that a holster can do all that?

Comfort

Don’t underestimate how important comfort is.

It may seem secondary compared to the other qualities we’ll discuss, but if you’re not comfortable in your holster, you probably won’t wear it.

Comfortable Ariel

If you don’t wear your holster, you’ll still be in the position of needing to buy a holster for your Glock 19, plus you’ll have wasted money on a useless holster that just sits around taking up space.

And, if your home is anything like mine, you don’t need any more useless stuff sitting around taking up space.

So, like anything else you wear, try on a potential holster before you buy it, if at all possible. If you can’t try it on, at least make sure you can return it in case you don’t like it.

When trying on a holster, imitate the normal motions you go through during the day.

Make sure the holster doesn’t twist or rub. A little bit of rubbing may seem like it’s not a big deal, but over time it can lead to irritation, bruises, and blisters.

If your holster isn’t comfortable on your skin, you’ll need to wear a barrier between your holster and your skin or opt for a different holster entirely.

Concealed Cary Gear Women
A lightweight tank or undershirt between the gun and you can help reduce irritation.

Rubbing from holsters made of hard materials will lead to more irritation, and an undershirt may not be enough to prevent it.

You also want to make sure that your holster won’t slip or shift.

Protection

Holsters constructed from durable and protective materials shield your Glock 19 against bumps and abrasion.

Most holsters are made of leather, nylon, or a polymer like Kydex, which all offer plenty of protection.

Retention

Retention just means that your holster won’t allow your gun to fall out of it.

The go-to litmus test for retention is simply turning the holster upside down. If your gun stays firmly in place, you’ve got plenty of retention.

Holosun 507C X2 Primary Arms Vulcan Safariland Holster Draw

Yes, I know most of you probably won’t be doing cartwheels or headstands in your holster, but what if you’re in an altercation and get knocked down?

The last thing you want is for your gun to slip out of your holster so your assailant can grab it before you recover.

Even outside of a defensive situation, you don’t want your gun to fall out while doing normal daily activities, like running, getting in and out of a vehicle, or using the bathroom.

4. Exercise Concealed Carry
Definitely don’t want your gun falling out in the gym.

Holsters use an active retention system, a passive retention system, or both at once.

An active retention system means that the user has to take steps to engage and disengage the retention system.

Common examples of active retention are thumb breaks or straps that the user must release before they can pull their weapon from the holster.

A passive retention system means the scabbard of the holster (the part that actually holds the gun) fits snugly around the gun and is molded to the shape of the gun.

This increases surface area contact, which combines to keep the gun firmly in place using friction.

Tenicor Velo Holster with G19

Typically, passive retention holsters use screws that allow you to adjust how tightly the scabbard fits around the gun, allowing the user to adjust the level of friction and, by extension, the level of retention.

Just remember that while retention is absolutely important, you also need to be able to draw your firearm quickly.

Passive systems typically allow quicker access. But there’s a wide range of active retention holsters available as well.

Concealment

This is exactly what it sounds like…how visible is the holster when you wear it?

It’s difficult to talk about concealability briefly since holster type, shape, and material -in addition to the wearer’s build and clothing choices — all impact that.

You’ll also want to try a variety of different holster types to get an idea of what’s most easily concealed on your unique body type and under the clothes that you like to wear.

If you only plan on carrying openly, you may not need to worry about concealability.

OWB Holster Bravo concealment Blazer
An OWB holster

Still, it’s nice to know that you already have a concealable holster should you ever decide that you want to carry concealed after all.

On the other hand, I don’t want to rob you of an excuse to buy another holster. You do you.

Trigger Coverage

This is another factor that’s pretty self-explanatory — your holster needs to cover your Glock 19’s trigger to stop the accidental discharge.

Not all holsters do this, but there’s no reason to risk it.

Positive Grip

This simply means that you should be able to draw your gun with one hand with a ready-to-shoot combat grip regardless of position and even in close quarters.

Glock G43X Concealed Draw

The holster needs to make this efficient, but you can’t expect it to carry the full burden here. You also need to consistently drill to make sure that you can do this reliably.

Holster Types

Now you know what you need from a holster, so let’s move on to holster types.

Outside the Waistband

Once again, we have something that is exactly what it sounds like.

Outside the waistband (OWB), holsters attach to your waistband or belt and are carried on the outside of it.

PHLster Floodlight OWB
An OWB sits on the outside of the pants.

This is a very visible style, so it’s usually what people think of when they think of a holster, but it’s actually not a particularly popular holster, precisely because it’s so visible.

Their positioning makes them difficult to hide under clothing because they either peek out from under them or print (show a visible bulge).

On the other hand, OWB holsters tend to be quite comfortable and position your firearm where it can be quickly and easily accessed.

OWB Holster Bravo concealment Blazer

Inside the Waistband

And inside the waistband (IWB), holsters are similar, but they sit — you guessed it; inside of your waistband.

They’re probably the most popular holster type for concealed carry since they are easily hidden under clothing.

Womens Concealed Carry IWB
IWB

The cost is that they can be uncomfortable (though an undershirt goes a long way in helping this), and establishing a positive grip is more difficult.

Shoulder

If you’ve seen just about any movie about spies or law enforcement, then you’ve almost certainly seen a shoulder holster.

They’re actually a popular choice among plainclothes law enforcement in real life, too — but not so much among civilians.

AlienGear Shapeshift Holster

They’re easily concealed under a jacket, but that obviously means that you have to keep your jacket on as long as you want to keep your firearm concealed.

They also conceal well under loose shirts, but this makes it more difficult to access your gun, especially if your shirt is tucked in.

Brownells Daily Defense Shoulder Holster

Ankle

While ankle holsters aren’t usually the first choice for concealed carry since they can be uncomfortable, they can be used for backup guns.

Womens Concealed Ankle Holster

With an ankle holster, you’re trading quick and convenient access for deep concealment. Also, remember that running and drawing from this holster is impossible. You will have to stop to get to your gun, which could be problematic depending on the situation.

Nevertheless, if you love a good backup gun or have no other option, this can work in a pinch.

Women-Specific Holsters

Now, women can wear any of the holster types we’ve discussed, but unless indicated otherwise, the vast majority of holsters are designed with men’s bodies in mind.

That means they may not be as comfortable on functional when worn by a woman.

Womens CCW Dress

You may not have encountered any problems with non-women-specific holsters, but if you do, you can find holsters of all of the above types that are actually designed for women.

There are also holster types that are generally women-specific, like thigh holsters, carry purses, and purse holsters.

For a more comprehensive look at women’s concealed carry, check out our Guide to Carrying for Women or Best Concealed Carry Gear for Women.

Best Glock 19 Holsters

You asked for it, and we listened — here’s a rundown of some of the best holsters for your Glock 19. We’ve rounded up a few of each type, so you’ll have plenty of options to choose from.

Best OWB Holsters

1. Fobus Tactical GLT19

The Fobus Tactical GLT19 offers a low profile for an OWB holster. So, it’s a great option if you want to practice concealed carry but aren’t a fan of IWB holsters.

It’s made of Kydex to offer complete protection and trigger coverage with a paddle-style back to keep the holster in place.

The GLT19 brings a blended retention system with a safety strap and fits Glock 19s with laser sights as well.

2. Gould & Goodrich B803 Three Slot Pancake Holster

For a more classic look, go with the G&G B803 Three Slot Pancake Holster.

It’s made of genuine, vegetable-dyed leather but is also molded to more securely fit your Glock.

The B803 is available in both left and right-handed versions and can be positioned straight or canted.

Best IWB Holsters

3. Rounded Gear IWB Kydex Holster

It’s no secret that Rounded Gear (formerly Concealment Express) holsters are popular here at Pew Pew Tactical.

This one, in particular, is lightweight, comfortable, and secure, both in how it attaches to your waistband and in how it retains your gun.

The durable Kydex provides excellent protection.

It’s great for a variety of carry positions but does especially well for appendix carry.

Check out Eric’s more complete review of Concealment Express holsters for more info, pics, and videos of them in action.

4. Tenicor Holsters

If you know you want to carry appendix carry and require the most thought-out holster…check out Tenicor’s Velo.

They shaped the Kydex into something more anatomically pleasing. And it really does feel better.

Plus, the size for their light-bearing Sagax Lux model isn’t too much larger.

Their standard T1 clip is also SUPER retentive — takes longer to put on, but it’s not coming off unless you want it to. Other more standard options are available too.

And, of course…it’s super fast on the draw.

The only downside is the price compared to other pure Kydex. But if you carry for a living and want something super comfortable in the appendix…

5. Crossbreed SuperTuck

Crossbreed’s SuperTuck is another Kydex IWB holster, but this one is a “hybrid” with a soft leather backing for improved comfort.

It can be comfortably worn with a tucked or untucked shirt and is supposed to be positioned toward the rear of your draw side.

Another one of our favorites.

Plus, the belt clips are powder-coated to protect your belt and allow for adjustable cant and ride height.

6. Alien Gear Cloak Tuck 3.5

As the name might tell you, the Cloak Tuck 3.5 is a holster with a lot of iteration and development behind it.

We have a complete hands-on review of the 3.0 version, and we liked it a LOT.

The 3.5 version is even better, with improved retention options and better connections to the belt.

Plus, all of the awesome things we loved in the 3.0, such as a cooling neoprene backing, hardshell holster front, and high backing to prevent the handgun from digging into your side, and it’s available for a HUGE range of guns — not JUST the Glock 19.

A great starter (or ender) into the IWB world.

7. Hidden Hybrid Holsters

Our current favorite hybrid holster uses Amish leather, which makes it super comfy.

Especially when paired with the suede backer.

They have plenty of options for the G19, such as a single clip (for appendix carry) to a double-clip if you want more comfort in the 4-5 o’clock arena. Or you just want a laser/light.

Check out our full review of Hidden Hybrid, where we’ll cover everything you might need to know.

Our Editor’s pick for the comfiest hybrid G19 holster we’ve tried so far.

What’s your take on Hidden Hybrid Holsters? Rate them below.

Best Shoulder Holsters

8. Galco Gunleather Classic Lite Shoulder Holster

The Classic Lite Shoulder Holster is exactly what you imagine when you think of a shoulder holster.

It’s made of soft leather for a classic look and comfortable fit and is available for either left or right-handed draw.

A mag holster and gear loop are on the side opposite your gun holster to add utility and keep the holster balanced.

A snap closure keeps your gun securely in place.

Best Ankle Holsters

9. Uncle Mike’s Nylon Ankle Holster

This is probably one of the most widely recommended ankle holsters.

It’s comfortable, with an adjustable velcro wrap that allows it to fit on a variety of leg sizes, while a breathable elastic calf garter keeps the holster securely in place.

A velcro closure retention strap keeps your gun secure.

The holster is also padded to make it more comfortable. All that said, carrying a G19 on your ankle will take a special effort as this gun isn’t really made for deep concealment.

We recommend a smaller Glock (like the G43 or G26) to make this one work.

Honorable Mentions

10. PHLster IWB & OWB

We couldn’t end this list without talking about PHLster holsters. This company is a smaller shop but one that is dedicated to high-quality, solid holsters that conceal really well.

PHLster Floodlight IWB CZ P09

We personally have tired out their Floodlight IWB and OWB models as well as the newer Enigma system, and we can’t brag enough.

Yes, these are a little pricier than some models, but they are well worth the money!

Final Thoughts

You can’t go wrong with any of these holsters. But, to find the one that works best for you, try on and handle a variety.

Suppressed Glock 19 with Faxon Barrel and Banish 45
Suppressed Glock 19 (you probably can’t carry this…but it’s too cool now to show)

Whichever holster or holster you go with, you’ll also need to be sure to drill to get yourself familiar with the holster. Also, continue to practice as long as you continue to use the holster to keep up your muscle memory.

Include drills that practice both drawing and holstering your Glock 19 and, if applicable, your spare magazine or magazines.

Glock G43X Concealed Draw
Remember to practice!

Our go-to affordable Kydex option is Concealment Express.

While our current favorite comfortable option is Hidden Hybrid.

So what holster did you choose to carry your Glock 19? Do you use one on our list, or have another favorite? Check out our master list of Best Concealed Carry Holsters.

Best Air Rifle Brands – Who Makes the Best Pellet Gun?

0

In Jeff Bezos’ own words:

“A brand for a company is like a reputation for a person. You earn reputation by trying to do hard things well.”

And we can all agree that setting up Amazon was not a mean feat.

Nor was Google, Apple, Microsoft, Samsung, Coca-Cola, Disney, Walmart, Toyota, and Huawei.

You realize that no air rifle brand made it to this list of the top ten most popular brands in the world.

But that’s understandable – because we airgunners exist in our own world.

And in our circles, we also have visionary and purpose-driven men and women who have toiled for decades to set up the best air rifle brands. 

You’ve certainly heard of:

WinchesterSapien ArmsRapid Air Weapons
Western JusticeSenecaRWS
WeihrauchSheridanRuger
WaltherSIG SauerRemington
VortekSpringfield ArmoryAir Venturi
UTGSRCMantis
TSDStoeger ArmsLegends
Tech ForceSwiss ArmsLeapers
KWAHawke Sport opticsFN Herstal
Kral ArmsHatsanFirepower
Hoppe’sHammerliFeinwerkbau FWB
HellraiserGletcherEvanix
Heckler & KochGamoDiana
DaisyColtBlack Ops
CybergunBSABrowning
BerettaBenjaminBeeman
BarraAtamanAnschutz
AvantiASGAirForce International
AirForceFX AirgunsAir Arms
UmarexCrosmanNTC

It sure feels like a complex crossword puzzle for now.

But here, we’ll shortlist the top air rifle brands from the long list above.  

Best air rifle brands

1. Air Arms

Located in Diplocks Way Hailsham, East Sussex, England, Air Arms daily upholds its commitment to excellence.

All this began in 1983 when the company founder, Bob Nichols, joined forces with equally visionary guys like Colin King and Bill Sanders .

From then, it has been milestone upon milestone as technology advances and customer demands also grow .

The company is now known as a top producer of hunting and competition air rifles across the world. 

(For more on the best spring air rifles, see this post)

Top airguns by Air Arms include:

2. Crosman

Who doesn’t know Benjamin Marauder? 

Well, its conception must have begun nearly 100 years ago

When the Crosman Brothers set out to produce pellets and airguns after one William McLean requested them to do so .

In the years that followed, the duly formed Crosman Rifle Company would move on to revolutionize the airgun industry through ingenious innovations – including the revered nitro piston technology.

Some of the top products by this New York-based air rifle company include:

3. Weihrauch

Call it Weihrauch & Weihrauch Sport GmbH & Co. KG if you like.

Germans really love guns – as well as airguns.

As of now, about 15,822,000 firearms are in Civilian possession.  

Note that in Germany, any air rifle with more than 5 FPE is counted as a firearm.

And you can be sure that Weihrauch plays a big part in supplying Germans with firearms.

The company is currently headquartered in Mellrichstadt, Germany.

Their large team of experienced airgun experts works tirelessly to ensure the production of sports, hunting, and hobby airguns with excellent performance and long service life. 

Some of these include:

4. Air venturi

This is a US-based importer and distributor of top airgun brands.

They mainly work in places like the world-renowned Pyramyd Air Gun Mall – in that they distribute airguns, ammo, and other air rifle accessories from:

  • International companies like Air Arms, Kral, Haendler & Natermann, Feinwerkbau, Evanix, Diana, Beeman, and Ataman
  • And local companies like Winchester, Webley, Walther, Smith & Wesson, Hawke, Daisy, AirForce, and Browning.

On top of that, they manufacture wonderful air rifles such as:

  • Seneca line of air rifles
  • Air Venturi Avenger (read its review here)
  • Air Venturi TR5 Multi-Shot Target Air Rifle
  • Cowboy Action Diamond Gong Airgun Target
  • The Medusa Airgun Target
  • Air Venturi 4500psi Electric Air Compressor
  • Air Venturi Carbon Fiber Tank 4500 psi
  • John Wayne Lil Duke BB Repeater
  • Dueling Tree Target
  • Crazy Eights Target
  • Air Bolt
  • John Wayne 1911 CO2 BB Pistol / Duke Colt Peacemaker Series
  • V10 Competition Target Pistol

Though started in 2010 – meaning just over 10 years in operation now – they have worked closely with the more experienced air rifle brands to ensure that all American air gun shooters get the products they long for. 

5. Seneca

Seneca is a line of air rifles produced by Air Venturi – the airgun company we just discussed above. 

Mention ‘Seneca’, and the greenest airgunners will complete the phrase with ‘Dragon Claw’.

That’s how popular the Seneca Dragon Claw has become.

Otherwise, what do you expect with a beast that spits a fiery 230 FPE knockdown power in its .50 caliber?

Other popular Seneca air rifles include:

  • Seneca recluse Dual Tank .357 cal
  • Seneca Sumatra
  • Seneca Big Bore 909 Light Hunter .45 cal
  • Seneca Wing Shot MKII
  • Seneca Eagle Claw
  • Seneca Aspen .25 cal
  • Seneca Double Shot

Seneca pellets have also mesmerized hunters, shooters, and hobbyists alike.

(For more on the best .50 air rifles, see this post)

6. FX Airguns

Lo and behold! An air rifle brand from Sweden – presumably the best country in the world.

And so you expect their airguns to be that amazing. 

FX Airguns is the brainchild of Fredrik Axelsson, who set out in 1999 to design and manufacture the best airgun in the world.

20 years later, the company now boasts of recognizable brands like:

  • The Crown MKII GRS Green Mountain Laminate
  • The FX Maverick Sniper
  • FX Wildcat MKIII
  • FX Dreamline Classic
  • FX Biathlon II
  • FX Bobcat
  • FX Boss
  • FX Royale 500

7. Evanix 

Over to South Korea now.

And before bewilderment overtakes you, let’s be sure you are not confusing it with Kim Jong-un’s North Korea.

The current president here is Moon Jae-in.

Evanix is so far the only Asian manufacturer of air rifles on our list. That deserves a thumb-up!

Perhaps you are most familiar with their Evanix Rainstorm II .357 PCP Air Rifle that delivers a crazy 155 FPE enough to knock down the toughest of animals.

The company also became famous for top-of-the-range air rifles like:

  • Evanix Air Speed
  • Evanix Hunting Master AR-K6
  • Evanix Air Max
  • Evanix Sniper X2
  • Evanix Rex
  • Evanix Windy City
  • Evanix Blizzard S10 

8. Umarex

When you buy an air rifle, there is always that inner desire for it to operate like well-known firearms. 

Umarex read your mind way before – and that’s exactly what they do.

They ensure they are licensed to build replicas of these firearms to avoid any legal tussles. 

Having done this since 1972, be confident that these top products of theirs are worth your time and money:

  • Umarex NXG APX Air Rifle Combo
  • Umarex Synergis, Multi-shot Gas-piston Rifle Combo
  • Umarex Gauntlet PCP Air Rifle
  • Umarex Fusion 2 CO2 Rifle
  • Umarex Octane

An interesting rat-hunting video here using the Umarex Gauntlet .22 Caliber Airguns

Umarex is also the force behind the following air rifle brands:

  • Beretta
  • Browning
  • Colt
  • Heckler & Koch
  • Ruger
  • Smith & Wesson
  • IWI  

9. Gamo Precision Airguns

Gamo produced its first airgun in 1961. It’s now over 60 years since their journey started.

During this period, they have come up with patented technologies like:

  • 10X Quick-Shot Gen2
  • 10X Quick-Shot Gen 1
  • Gamo Whisper sound suppression technology
  • Whisper Fusion
  • Whisper Maxxim
  • IGT Mach 1 – Inert Gas Technology
  • CAT – Custom Action Trigger
  • RRR – Recoil Reducing Rail

It’s no wonder they rightly claim to be the largest producer of air rifles and associated accessories in Europe.

(For more on the quietest air rifle on the market, see this post)

Here are some of their most popular air rifles:

  • Gamo Whisper Fusion Gen2
  • Gamo Coyote PCP Air Rifle
  • Gamo Black Cat 1400
  • Gamo G-Magnum 1250
  • Gamo Hunter 1250 Grizzly Pro
  • Gamo Whisper Silent Cat

What is the best PCP air rifle brand?

1. AirForce Airguns

Airforce Airguns sets itself as the king of PCPs through the production of world-renowned models like:

With now, over 20 years in the Industry, the Tennessee-based company lives its vow of being the world’s number-one producer of the most powerful PCP air rifles.

You really need an AirForce airgun if your aim is big game hunting.

As they say, serious air gun sport starts with AirForce.   

2. Hatsan Arms Company

Heading over to Izmir, Turkey, you find the Hatsan Arms Company tucked away in the western end of Anatolia.

Some of its patented technologies that have set new standards in the air gun world include:

  • Quattro trigger
  • Shock absorber system – popularly abbreviated as SaS
  • TruGlo Fiber Optics
  • Quiet Energy
  • XRS Recoil Reduction System
  • Triopad Butt System for reduced recoil effects
  • Vortex gas piston
  • Escort semi-auto technologies

Various combinations of the above hi-tech systems have birthed popular air rifles like:

Their 45 years of hard work have been surely worth it.

(For more on the best PCP air rifle on the market, see this post)

3. Daystate Air Rifle

Daystate is a pioneering manufacturer that was the very first to develop pre-charged pneumatic air rifles and had models that date back to the 70s. Their first was an early pest control model called the Air Ranger. In 1980, they were commissioned by the firm Rentokil to produce a rifle for the same purpose. This rifle, the Huntsman, was such a good design, and so popular, that it is still in production today.

Since then they have had a reputation for innovating with original ideas in the airgun field. Today, they are based in Eccleshall, Staffordshire, and produce world-beating guns for a variety of uses including sport, pest control, and competition.

Models like the Daystate Air Ranger, AirWolfHuntsmanPulsar, and Daystate Wolverine are some of the most prized among airgun enthusiasts, professionals, and sportspeople.

Their rifles have been recommended by a variety of airgun journalists, including Terry Doe, editor of Airgun World, hunting author and journalist Mat Manning, and Nigel Allen of Airgun Magazine.

(For more on the best .22 air rifle on the market, see this post)

What is the best break barrel air rifle brand?

1. Beeman

And now, over to Germany where quality is the order of the day.

Beeman Precision Airguns has lived to the dream of supplying quality products capable of performing above and beyond user expectations.

Ordering these Beeman break barrel air rifles will never disappoint:

  • Beeman R7
  • Beeman R9
  • Beeman Gas Ram Dual Caliber Air Rifle

2. Diana

This is yet another world leader in the production of break barrel air rifles from Germany.

2021 is its 131st year of operation.

Who dares dispute such experience?

You’ll surely be confident with their top break barrel air rifles like:

(For more on the best break barrel air rifle that hits like a champ, see this post)

What is the best CO2 air rifle brand?

1. Hammerli

Since 2006, Hammerli’s Partnership with Walther of Umarex has led to the production of even more world-class air rifles, thanks to their experience that dates back to the Middle Ages.

Their Hammerli 850 Air Magnum .22 CO2 rifle tops their product list. Airgunners worldwide respect it as the most powerful CO2 air rifle.  

(See this post for more)  

2. SIG Sauer

With its headquarters in Newington, New Hampshire, the over 2000 workers at Sig Sauer have seen to the production of powerful CO2 air rifles like:

  • SIG Sauer MCX Pellet Rifle
  • SIG Sauer MCX CO2 Rifle
  • SIG Sauer MPX CO2 Pellet Rifle

Their bullpup design has especially captivated the hearts of millions of shooters worldwide. 

3. Best scope brand for an air rifle?

1. Leapers UTG

With over 29 years of innovation, the Michigan-based Leapers UTG leads the air rifle scope industry.

They offer such a large variety of scopes and nearly all the models have gained huge popularity worldwide.

Some of the best include:

  • UTG 30mm SWAT 3-12×44 AO Rifle Scope
  • UTG AccuShot SWAT 4-16×44 AO Rifle Scope
  • UTG Bug Buster Compact CQB 3-9×32 AO Rifle Scope 

2. Hawke Sport Company

Hawke has worked really hard for the last 40 years to cement its presence in over 60 countries worldwide.

With a clear mission to manufacture the finest precision optics, they have come up with marvels such as:

  • Hawke Vantage 4-12×50 AO Rifle Scope
  • Hawke Sport Optics Airmax 4-12×40 AO Rifle Scope
  • Hawke Airmax 30 SF 6-24×50 AO Rifle Scope

Conclusion

The manufacture of air rifles and the associated accessories has come a long way and has a long way to go. 

From humble beginnings, where even the term hi-tech had not been uttered through human lips, the pioneering companies set out to produce air rifles

That helps the world population in hunting, pest elimination, and sports. 

And as technology has kept advancing, companies have kept improving air rifles to the best quality possible.

We can now sit back and enjoy the hundreds of models from these reputable air rifle brands. 

(For more on the best air rifles for pest control, see this post)

How Big Are Grizzly Bear Claws And Paws? Their Sizes And Sharpness.

0

By Elizabeth Dandy. Updated: November 2024.

Grizzly-Bear-Claws-And-Paws

Provided by TruthAboutAnimals (Photo: iStock by Getty Images).

Grizzly bear paws are large, long and powerful. And you may be wondering how big are grizzly bear claws? You may have thought of those massive paws when you saw the extreme strength that was used to kill a moose.

Also known as the grizzly bear paw or just the grizzly bear claws, there isn’t a lot of information on how big they actually are. Being strong by nature, one would assume they are pretty damn big.

Grizzly Bear claws are part of this species’s equipment for survival and hunting. They are incredibly large and powerful, which is what makes them such a feared predator.

Having a set of grizzly bear claws like this would be a bit of a bummer for people who have things that need to stay intact, but it sure would make mincemeat out of something fragile!

Let’s start to find out how big are grizzly bear paws, what the claws look like, their sizes and sharpness.

Table of Contents.

Do Grizzly Bears Have Paws?

The answer is yes, but not in the way you might think.

What Are Paws?

Paws are thought to have evolved from fins, which are found on fish and amphibians. All four-legged animals have some kind of paw, though they may look different depending on the species.

For example, dogs have paws with five digits while bears have four-toed paws. The front paw on a bear has two large claws that are used for digging and catching prey, while their back paws have three smaller claws that help them climb trees and rocks.

The Anatomy of The Grizzly Bear Paw.

A grizzly bear’s paw anatomy includes:

Ankle bone or tarsus: This is made up of two bones (the tibia and fibula) that connect your ankle to your foot bones (metatarsals). It allows for flexion and extension of your leg so you can walk or run quickly.

For example, when you bend your knee or push off with your toes as you run, it’s due to the action of these two bones working together as one unit.

Metacarpal bones: These are located at the front part of each paw and correspond to our finger bones;

Do Grizzly Bears Have Claws?

Grizzly bears have large, strong claws that they use to catch and kill prey. They also use their claws to dig into the snow to find food.

Grizzly bears are considered omnivores, which means that they eat both plants and animals. Grizzly bear claws are used for digging through snow in search of prey like elk or bison. They also use their claws to attack other animals for food.

The grizzly bear’s large paws allow it to easily walk on snow, ice, and rocky terrain. The grizzly’s front paws are larger than its rear paws by about 25%.

Their front paws measure from 7 inches long to 8 inches long (17 cm). The rear paws measure from 5 inches long to 6 inches long (12 cm).

Facts About The Grizzly Bear Paw

Grizzly Bear Feet Facts: The grizzly bear has a double pad between each toe on both front and hind feet.

This pad helps protect against injury while walking through snow or over rocky terrain where sharp objects could easily puncture their pads without such protection.

The grizzly bear’s claws are long and curved like those of a dog or cat, but much larger than those of any other mammal in North America except for the tiger seal (which has no claws).

The paws of a grizzly bear are extremely large, powerful and can have five digits. The front two digits are thumb-like while the rest are more like fingers.

The paw pads are thick, tough and covered in small scales that protect them from abrasion and injury. A grizzly’s claws are sharp and curved and they can be up to three inches long.

The claws help with climbing trees, digging food out of the ground and defending themselves against predators.

The Paw Size of The Grizzly Bear.

The grizzly bear paw size is about 10 inches long and 6 inches wide. The claws are 2 inches in length. The paws are used for digging and grooming as well as walking, climbing and swimming.

The long claws are used to tear apart meat, while the short ones are used for climbing trees and digging food out of the ground.

The grizzly bear is the largest member of the bear family. They can reach up to 7 feet tall when standing on their hind legs, but they usually stand at just 5 feet tall when walking around on all fours!

They weigh between 400 and 700 pounds, although some have weighed as much as 1,500 pounds!

A grizzly bear’s diet consists mainly of plants such as berries, roots and grasses. They also eat fish, deer, elk and carrion (dead animals).

The grizzly bear is an omnivore which means it eats both plants and meat.

Measuring The Strength of Grizzly Bear Swipe.

A grizzly bear swipe is a lot stronger than it looks. The paw swipe is one of the strongest animal movements ever tested, according to a new study published in the Journal of Experimental Biology.

The researchers found that when a bear swipes down from an upright position, its paw exerts about 2,300 pounds per square inch (psi) of force on the ground, or about 1,000 psi more than the bite of an alligator (which tops out at about 1,000 psi).

That’s about 10 times more force than what scientists previously thought bears could generate using their paws. That’s not just impressive for an animal, it’s impressive for any species.

“It was amazing to see how much energy these animals can produce with their paws,” said lead researcher Michael Sawaya, who studies biomechanics at Stanford University in California. “We’ve seen this kind of power before in other mammals like primates but never in carnivores like bears.”

How to Identify Grizzly Bear Paw Prints

When you’re out in the wilderness and come across fresh bear tracks, it can be difficult to distinguish between the tracks of a black bear and grizzly bear.

While black bears are often found in the same regions as grizzlies, the latter tends to travel more widely and is more aggressive. The best way to tell them apart is by looking at their paw prints.

Grizzlies have larger, broader feet with claws that are longer than those of black bears. The front pad on a grizzly’s foot is wider than the rear pad, while in black bears it’s about equal in size. Their claws also tend to be longer and more curved than those of black bears.

Another difference between grizzlies and black bears is how they walk.

Grizzlies tend to walk flat-footed with little or no arch or heel strike, while black bears tend to walk with an arched foot with an exaggerated heel strike due to their smaller size and shorter claws compared to grizzlies.

Grizzly Bear Claw Facts

Grizzly bear claws can reach up to 8 inches in length. They are curved and sharp, and are used for tearing into prey.

The claws also play an important role in the grizzly bear’s defense. They can be used to swipe at an attacker, or to grab onto objects and pull them closer.

Claws are also helpful when the grizzly is digging for food or shelter. They can dig through tough soil quickly and easily.

Grizzly bears use their claws for a variety of activities, including hunting, climbing, and swimming.

How Sharp Are Grizzly Bears Claws?

Grizzly bears are omnivores, which means that their diet can consist of both meat and plants. However, grizzlies are mostly carnivorous, meaning that they eat mostly meat. Their diet consists of fish, ungulates (deer), small mammals such as rodents, insects, and fruits and vegetables.

Their claws help them capture their prey. Grizzly bear claws can grow to be up to 4 inches long. They are curved and sharp, which helps the grizzlies catch their prey. The claws also help the bears climb trees.

Grizzly Bear Paw vs. Polar Bear Paw Size

Grizzly bears and polar bears are two of the largest land-based predators on Earth, but they’re still different in many ways. Their paws are no exception: grizzly bears have much larger paws than their polar cousins.

The average grizzly bear paw is about 15 inches long and 10 inches wide, while the average polar bear paw is only about 13 inches long and 6 inches wide.

That’s a difference of almost an inch in length and more than 2 inches in width! However, these measurements vary greatly depending on species and subspecies—some grizzlies have even been reported to grow as large as 20 inches across!

But why do grizzlies have such big paws? It’s all about weight distribution.

Grizzlies can weigh up to 1,500 pounds (680 kilograms), which makes it extremely difficult for them to walk on snow without sinking into it unless they’re using their claws for traction (which isn’t always possible).

By contrast, polar bears weigh half as much as grizzlies do and live primarily on ice instead of snow, so they don’t need such large feet.

Conclusion:

If you are planning on ever seeing a Grizzly Bear then I would expect that you would have some basic knowledge about them.

One of the first things that many people want to know is how big Grizzly Bear claws and paws really are. Once you have that figured out then you will be able to better plan for living in the same area as these magnificent creatures.

See what others are doing.

Alaska Trout and Grayling Fishing Techniques

0

Alaska’s waters offer plenty of opportunity to hook into grayling, lake trout, rainbow trout, and dolly vardens. Depending on when and where you anticipate fishing and for which species, the methods can vary substantially. We’ve compiled some of the basics to get you started in the right direction.

Grayling

This species is often found north of Anchorage, and is abundant in interior Alaska. An aggressive biter, this fish can be found in most interior waters, and are easily caught in lakes and small streams. While these fish never grow very large (20” is huge), they are a blast to catch and very tasty. Grayling can be found in both clear and murky waters, but can become spooky in bright light. Avoid letting your shadow fall on the waters where you fish.

Flies in size 12-16 (black ant, foam beetle, elk-hair caddis, mosquito, gnat, black wooly bugger, prince nymph and a variety of other natural colored flies, both wet and dry). Get a variety pack of split shot.

Small lures size 0-1 (Mepps Black Fury, Vibrax chrome, bright colors for dark days, dark colors for bright days)

Lake Trout

You guessed it, lake trout are found in lakes and are the largest trout here in Alaska. They move based on water temperature, being inshore when the water is cold, and moving to deeper water as the summer progresses. Your best bet to find these giants of the deep is in interior Alaska, with many great opportunities in the Glenallen area and along the Denali highway.

The general rule is that these fish like to eat other fish, so this is how you target them. Use lures/spinners that have fish patterns, or are blue/chrome. Fishing herring (as bait) on the bottom of a lake can also entice these monsters to bite. For flies, try patterns which resemble smolt or leeches (chrome/blue or dark colors).

Rainbow/Dolly Varden

This is by far the two most widespread species in Alaska, and can be found in lakes, rivers, and streams. Different tackle is used based on location and season, and I’ll cover that here.

Lakes – For spinning gear, try small lures size 0-2 (bright colors for dark days, dark colors for bright days). A bobber with bait also works. Use size 8-12 hooks, a bobber just big enough to see, and single eggs (balls o fire, etc) or popcorn shrimp as bait.

For flies, I’ve had my best luck using dark wooly buggers, twitched through the water like leeches. I would also try (black ant, foam beetle, elk-hair caddis, mosquito, gnat, black wooly bugger, prince nymph and a variety of other natural colored flies, both wet and dry). I always keep a couple obnoxious colors because sometimes, the only way to catch them is to tick them off.

Streams/Rivers – If there are no salmon in the water, then use dark flies (black/purple wooly buggers, prince nymphs, etc). Let these flow with the current, twitching them to give them some life. Aim for overhanging branches and in “slow water” (behind bends, big rocks, fallen trees: anything that creates a hole; a slow patch of water).

If there are salmon in the water, you’re best bet is to use beads (to mimic salmon eggs). Pick a variety of colors, keeping in mind that salmon eggs come out bright deep red, and fade into a creamy pink color over time. You will want to change the color of your bead based on how long the eggs have been sitting in water (sometimes, you don’t know until you try). Bead size also makes a different. Fish the beads behind salmon, being careful not to hook the salmon. Keep the bead flowing at the same pace of the current.

Here is a loose guide on bead size (based on which salmon are in the water). In general, its okay to have beads too small, but not too large.

  • Kings – 10mm
  • Silvers/Reds/Chum – 6-8 mm
  • Pinks – 6 mm

If there are salmon carcasses in the water, you will use flesh flies. Just like beads, these start out bright red, and fade into a dirty white as the flesh ages. These are tied just like normal flies, and fished very similar to beads. Feel free to adjust weight amount if you see flesh flowing faster/slower than current. See the attached diagram.

Best Air Rifle Deals

Popular Posts

Gas vs Spring Piston: Which One is Better?

0
Today, you can find 5 different types of air rifles available in the industry. They are: spring pistons, gas pistons, PCP air rifles, variable...

Master Small Game Hunting with an Air Rifle: Tips and Techniques

0
"Experience the thrill of small game hunting with an air rifle! Embark on a captivating journey as you test your accuracy and precision in...

Can you dry fire a gamo air rifle?

0
Unveiling the truth behind dry firing a Gamo air rifle, this intriguing headline delves into the possibility of safely practicing without ammunition. Join us...