While preparing for another survivalist challenge, I thought to myself – what does it take to become a successful survivalist, what mindset should any of us possess? After some extensive research, I compiled a list of characteristics and qualities that many survival-minded folks have in common.
So, what are the necessary survival qualities? Here is the short list:
Adaptability – you need to survive in any environment.
Self-control – cooler heads prevail.
Resourcefulness – taking advantage of your surroundings.
The ability to learn – absorbing new methods and knowledge.
Motivation – the strong desire to survive.
But is this the complete list? And how do we acquire and learn these qualities? Let’s explore the mindset of a survivor even further.
Survival Qualities and Traits – The Comprehensive List
1. Adaptability
This skill is probably inherited by each and every one of us after millions of years of evolution. It is the survival of the fittest, after all. The better you adapt to new circumstances and environments, the higher are your chances to survive. You need to be flexible, you need to be capable of changing your plans accordingly to unexpected scenarios. Situations and surroundings might change for the worse and they won’t care about what you planned so far. Keep your ears pricked; keep your mind open and alert; keep your body ready to do things differently.
2. Self-control
A true survivalist should be able to control his emotions. That does not mean that he or she is a cold-hearted slab of stone. What it actually means is that you always remain calm in the face of any unforeseeable danger or situation. You can be aware of your natural emotional reactions, you may experience agitation, anger, fear, and so on. Yet you will not let those feelings cloud your rational decision-making processes. It’s a tough quality to master, but it’s very rewarding. Whatever difficulty comes your way, you will not panic. Instead, you will assess it with a cool, concentrated mind and act accordingly.
3. Resourcefulness
Once you adapt and calmly judge the situation, this trait will become handy and even crucial to your prolonged survival. How do you overcome this challenge? How do you use the environment to your advantage? Where is the shelter, food, water? How can you use the gear you’ve prepared in this situation? Can you make fire? Can you filter the water? Can you find north? As a resourceful person, you can bend the situation to your needs, you can use your surroundings to your benefit.
4. The Ability to Learn
Learning is the key to preparedness. Survivalists are smart and capable of educating themselves. This quality goes hand in hand with the flexibility and open-mindedness that I’ve mentioned earlier. Just like you adapt to a new situation, your mind needs to be open and flexible for a new information. A survivalist is always willing to absorb new knowledge and to incorporate it with previously accumulated facts and methods. There are countless ways for you to learn something new that will make you even more prepared. There are books, videos, blogs (such as this one), you can even look for mentors and experienced teachers.
If you are eager to learn, I would honestly recommend “SAS Survival Handbook: The Ultimate Guide to Surviving Anywhere”, which you can get on Amazon. It has every possible aspect of survival knowledge and technology, and the latest edition covers such new topics as terrorism and urban survival. The books teaches you about being prepared, making camp, finding food, first aid, disaster survival, and so much more.
5. Motivation
Motivation is the driving force behind your will to survive. It should be constantly with you: when you’re learning, when you’re managing to keep your emotions in check, when you’re adapting to new challenges and resourcefully taking advantage of the environment. Whatever comes your way, you need to have the inner desire to survive, whether alone or with your loved ones. Motivation keeps you going, keeps you afloat. It makes you focused on your goals, on the things that must be done in order to survive under every possible condition.
Here are a few more words about survivalist’s motivation:
Aren’t There More Useful Qualities and Traits Than Just These Five?
Of course there are more! While the aforementioned survival traits stood out during my research, here are additional characteristics you should hone as well.
Realism
A survivalist is neither a complete pessimist, nor a blind optimist. He sees things realistically, without tainting them with any subjective colors and filters. He recognizes the needs and the means to fulfill those needs. He realizes the gravity of any situation, estimates the danger and thinks about the ways he can cope with the situation. He does not tend to see the situation as hopeless, nor does he think that everything will turn out just fine and dandy. The reality is a complex thing, it never just positive or negative, and the survivor sees it for what it is. A good self-control will help your realism.
Stubbornness
This might seem like a trait that negates the suggested flexibility and adaptability, but stubbornness actually completes them. It basically means adopting the “never give up” attitude. You stubbornly pledge to survive, you stick to your goals no matter what, and proceed using the tools mentioned earlier (self-control, resourcefulness, etc.) as well as physical skills you’ve learnt. This is not about being dense and ignoring everything as you plow forward. This is about being persistent and resilient, about believing in what you can do and encouraging yourself to overcome any hardship.
Healthy Well-Being
Without sounding too poetic, your body is the vessel for your mind. You need to have a healthy attitude towards your physical well-being. Now, I don’t intend to preach what you should eat and how much you need to exercise. But your body is what will execute the orders sent by your will and your desires. Your body is you; take care of it. Take care of yourself, stay fit, train, improve your stamina. A healthy spirit can only thrive within a healthy body.
Our greatest happiness does not depend on the condition of life in which chance has placed us, but is always the result of a good conscience, good health, occupation, and freedom in all just pursuits.
– Thomas Jefferson
How Can I Learn and Improve These Abilities?
These qualities are not set in stone. You can improve and refine them. The key is open-mindedness as well as a will to change. Learn from your mistakes, always challenge what you know and what you believe in. Understand what every quality means, how it applies to you, and what you can do to master it.
For instance, self-control. Recall all situations in which your emotions got the best of you. What could you do to react better? How are you going to react in a similar situation in the future? Try yourself in a real situation. What do you feel when confronting the same people or circumstances? Can you let go of that emotion, if it gets in your way?
As far as the traits like adaptability and resourcefulness go, you can develop them all the time. Join various survival challenges and try yourself in different environments. Calmly estimate your successes and failures, but do not judge yourself harshly. It’s a learning process, you will do better next time.
The same goes for motivation and stubbornness. Always stick to your missions and goals, no matter what obstacles you might encounter along the way. Look at yourself objectively, notice the weaker spots in your determination. Think what causes them and what you need to solve to become a better survivor.
Always nourish your learning ability. Look for new information and challenge old preconceptions. The books and the Internet are rich with knowledge on survival and preparedness. Of course, not every information out there is legit, use your common sense, take any new knowledge with a grain of salt. Learning does not mean just mindlessly taking the new data in, you need to be smart about it. Incorporate new information wisely, trust your instincts and truly become a smart survivalist.
For a really trustworthy well of information and skills, you should check “100 Deadly Skills: Survival Edition: The SEAL Operative’s Guide to Surviving in the Wild and Being Prepared for Any Disaster”, a book with hundreds of positive reviews on Amazon. This impressive list of one hundred skills functions as a perfect guide and ensures your survival in the wild, in any climate and terrain. The book, compiled by actual special forces personnel, prepares you for any crisis, so that you stay safe in any calamity or hostile environment.
In addition to this book, I have compiled a list of recommended survival books that you can trust.
Becoming a Better Survivalist: A Tool to Measure Your Progress
Now that you see what it takes to have a great survival mindset, here is a simple tool you can use. It’s a table that lists all the necessary qualities. You can print it as many times as you would like. Then assess yourself, mark how you rate yourself for every trait, on a scale from 1 to 10. Work on those mental skills, strive to become better, and once in a while (let’s say, every two weeks) rate yourself again. Compare with the previous results, observe your progress, and recognize weaker points that you still need to improve.
Related Questions
What makes someone a survivor? A characteristic survivor possesses the skills and qualities mentioned in this post. In a nutshell, a survivor can cope with anything, can find stability within him/herself, no matter what circumstances they are facing at the moment.
Why are survival skills needed? Simply put, they are the deciding factor between life and death. If you are motivated to survive, you will need to master many useful survival skills, such as adapting to anything, starting a fire, making a shelter, using the right tools, and so on.
Have you ever wanted to go on an iguana hunt? Florida is the perfect place to do it! With its warm climate and abundance of iguanas, the Sunshine State is a mecca for iguana hunting. In this ultimate guide, we’ll show you how to plan and execute a successful Iguana hunt in Florida. We’ll cover everything from equipment and supplies, to where to find the best hunting spots. So whether you’re a beginner or a seasoned pro, this guide will help you have a successful and enjoyable hunt. Let’s get started!
Yes, iguana hunting is legal in Florida. Green iguanas are an exotic reptile species that, other than Florida’s anti-cruelty law, is not safeguarded in the state. On private properties where landowner permission has been granted, this species can be kindly euthanized year-round without a permit or hunting license on 25 designated public lands throughout South Florida.
Are Green Iguanas an Invasive Specie to Florida?
Yes, green iguanas are an invasive specie in Florida. They were first introduced to the state as pets, but they have since become naturalized and now pose a threat to native wildlife. The green iguana is disruptive to local ecosystems and studies show that their population size has increased exponentially over the last decade. They are capable of destroying vegetation and may even spread disease. Therefore, the green iguana is considered a pest species in Florida and their population is actively managed.
Why are Green Iguanas Invasive to Florida?
Green iguanas have been found to out-compete native wildlife, including birds and small mammals, for food. They also eat plants that are important to the local ecosystem, such as fruit trees and sea grape bushes. Additionally, green iguanas can carry salmonella bacteria which they can spread through their droppings. Studies have even shown green iguanas to be implicated in the transmission of other diseases, including chytridiomycosis. All of these factors have led to green iguanas being labeled as an invasive species in Florida and actively managed by state wildlife authorities.
Where are Green Iguanas Native to?
Green iguanas are native to Central and South America. They are most commonly found in tropical forests, but have been known to inhabit other habitats such as grasslands, marshes, rainforests and coastal areas. They can be found from Mexico down to northern Argentina. In recent years green iguanas have been introduced to parts of the US, including Florida and Hawaii. As an invasive species, green iguanas can be found in many areas where they are not native.
Did Green Iguanas come from a Cuban Cargo Ships in the 1960s?
There is a popular theory that green iguanas were introduced to Florida from Cuban cargo ships in the 1960s. However, the truth is that green iguanas have been present in the US for much longer than that. As early as 1910, green iguanas had been imported into the US and kept as pets. It is possible that green iguanas have been released into the wild due to their popularity as pets, and it is likely that they were first introduced to Florida in this way. Regardless of how green iguanas got to Florida, they are now firmly established in the state and actively managed by wildlife authorities.
Are iguanas aggressive?
Green iguanas can be very aggressive when they feel threatened. If a green iguana feels cornered, it may strike out with its powerful tail or bite. Bites from green iguanas can draw blood and even cause severe lacerations in some cases. Therefore, green iguanas should be approached with caution and given plenty of space. In general, green iguanas are not dangerous to humans, but they should still be respected and given the space they need.
How painful is an iguana bite?
Iguanas have sharp teeth and strong jaws that can deliver a bite that is both painful and dangerous. The pain of an iguana bite can range from mild to severe, depending on how deep the bite penetrates the skin. In some cases, green iguanas may even cause lacerations or puncture wounds due to their sharp teeth. Additionally, green iguanas may carry salmonella bacteria which can cause illness if ingested through an open wound. Therefore, it is important to seek medical attention right away after being bitten by a green iguana.
What is the biggest iguana in Florida?
The green iguana is the largest iguana species found in Florida, reaching lengths of up to 6 feet. This makes green iguanas one of the biggest lizards found in the state and they can be a scary sight when encountered in the wild. In order to protect against green iguanas and their potential damage to local ecosystems, they are actively managed by wildlife authorities in Florida.
Is it beneficial to join an iguana hunting Florida Safari with an Expert?
Absolutely! Joining a Florida Safari with an expert provides safe and productive hunting experience. The experts are knowledgeable about the local environment, have in-depth knowledge of iguanas and can teach safe handling techniques. With their guidance, you will be able to hunt green iguanas safely while learning more about this fascinating species as well as its importance to the local ecosystem. It is also important to remember that green iguanas are an invasive species and it is beneficial to help reduce their populations when possible. An expert guide will ensure that your hunting experience is safe, educational and beneficial for both yourself and the environment!
What kind of gun is used to hunt iguanas?
The most common weapon used to hunt green iguanas is an airgun or pellet gun. Airguns are becoming increasingly popular for hunting small game and reptiles, due to their accuracy and low levels of noise. Pellet guns are similar to airguns but fire smaller pellets at higher velocities than airguns, making them even more accurate and effective. It is important to remember that airguns and pellet guns should only be used in accordance with local laws and regulations. Additionally, airguns are not recommended for use near populated areas due to the potential for injury or property damage. When hunting green iguanas, it is important to make sure you have the proper safety equipment and airgun or pellet gun. With the right knowledge and equipment, hunting green iguanas can be a safe and enjoyable experience!
Can you shoot iguanas in Florida with a pellet gun?
Yes, pellet guns can be used to hunt iguanas in Florida. However, it is important to remember that pellet guns should only be used in accordance with state and local laws and regulations. Additionally, pellet guns are not recommended for use near populated areas due to the potential for injury or property damage. It is also important to make sure you have the proper safety equipment and pellet gun before going hunting. When used safely, pellet guns can be an effective tool for hunting green iguanas to help reduce their population in Florida.
Can you shoot iguanas in Florida with an air gun?
Yes, air guns can be used to hunt iguanas in Florida. However, it is important to remember that air guns should only be used in accordance with state and local laws and regulations. Additionally, air guns are not recommended for use near populated areas due to the potential for injury or property damage. It is also important to make sure you have the proper safety equipment and air gun before going hunting. When used safely, air guns can be an effective tool for hunting green iguanas.
What is the Most Popular location to go iguana hunting Florida?
The most popular destination to go iguana hunting in Florida is near Davie. Davie is one of the best locations in Florida to hunt the Green Iguana. This area is home to large populations of iguanas and provides plenty of opportunities for safe, successful hunts. With its diverse habitats, including mangroves and wetland environments, south Florida is the perfect place to hunt green iguanas. The experts found in this region are knowledgeable about the environment and can provide advice and guidance on how to safely handle your prey once it has been captured. Whether you’re a novice or an experienced hunter, south Florida offers a unique opportunity to learn more about these fascinating creatures while helping protect ecosystems against their invasions.
How far is Iguana Hunting near Orlando?
Iguana hunting near Orlando is approximately 80 miles away. Davie, Florida is the most popular destination for iguana hunting in the area and is only an hour and twenty minutes from Orlando when driving. Davie offers a diverse landscape with mangrove swamps, wetlands, and other areas that provide plenty of opportunities to successfully hunt green iguanas. Davie is also home to trained experts who are knowledgeable about the environment and can provide advice and guidance on how to handle your prey once it has been captured. If you’re looking for a unique hunting experience, Davie is the perfect place to go!
How far is Iguana Hunting near Fort Myers, Florida
Davie, Florida is the most popular destination for iguana hunting in the area and is only an hour and forty-five minutes from Fort Myers when driving. Davie offers a diverse landscape with mangrove swamps, wetlands, and other areas that provide plenty of opportunities to successfully hunt green iguanas.
How far is Iguana Hunting near Tampa
Davie, Florida is the most popular destination for iguana hunting in the area and is only about one hour and fifty minutes from Tampa when driving. Davie offers a diverse landscape with mangrove swamps, wetlands, and other areas that provide plenty of opportunities to successfully hunt green iguanas.
How Many Iguanas can you get in one Hunt?
The number of iguanas you can get in one hunt will vary based on the size of your hunting party, as well as the skill level of each member. Generally speaking, its not uncommon to bring back an average of 10 iguanas harvested by a single group in one outing. However, this range can fluctuate depending on the weather, season, and other factors.
Can you eat the Iguana Meat?
After your hunt, its a great idea to toss your game into an iced cooler if you are planning to cook the iguana meat. Thats right! Iguana meat is delicious and can be used in a variety of dishes. The most popular way to cook iguana meat is by grilling or roasting the whole animal. You can also use iguana tail meat to make delicious tacos, burritos, stews, soups and more. However, it is important to note that wild-caught iguanas should never be eaten raw due to the risk of salmonella contamination. Additionally, when handling iguanas for consumption, always wear protective gloves and thoroughly wash your hands with soap before cooking the meat. Finally, remember to discard any leftovers promptly after consuming as they may still contain harmful bacteria. With these precautions taken into consideration, you can enjoy delicious iguana
What is iguana meat called?
Iguana meat is sometimes referred to as chicken of the trees. This nickname alludes to the fact that iguana meat provides a similar texture and flavor profile to chicken, but with an exotic twist! Additionally, it is an excellent source of protein and other nutrients like iron and vitamin B12, making it a great addition to any diet. So next time you’re looking for something new, why not give iguana meat a try? You won’t be disappointed!
What part of the iguana do you eat?
The tail of the iguana is the most commonly eaten part. The tail meat can be cooked in a variety of ways such as grilling, roasting, or boiling. Additionally, you can also use the tail for soup, tacos, burritos, stews and more.
What does iguana taste like?
Iguana meat has a light and mild chicken-like flavor with a slightly gamey taste. It is also firm and chewy, similar to chicken thighs or wings. The mildness of the flavor allows it to take on an array of spices, making for delicious dishes such as fajitas or tacos.
What is the best recipe with Iguana meat?
One of the most popular recipes for iguana is Iguana Fajitas. This delicious dish combines grilled iguana tail with bell peppers, onions, garlic, tomatoes and spices to make a flavorful and unique fajita filling. For an even more exotic twist, try adding some diced mango or pineapple to the mix! To make this dish, simply marinate the iguana in some lime juice, garlic powder, and chili powder for at least an hour before grilling. Once cooked, combine the tail with sautéed vegetables and serve over toasted tortillas. Enjoy!
Alternatively, try making a traditional Iguana Soup by combining diced iguana tail with potatoes, tomatoes, onions, bell peppers and garlic in a broth of your choice. Simmer the ingredients until they are cooked through and then garnish with fresh cilantro or diced avocado before serving. Enjoy! Regardless of which recipe you choose, iguana meat is sure to be a hit at your next dinner party!
Is there any iguana hunting Florida outfitters?
Yes! Rockon Recreation Rentals is a 5 star-rated iguana hunting outfitter based in Florida. Their expert guides will help you plan your hunt and provide you with the necessary equipment to ensure a successful outing. Additionally, Rockon Recreation Rentals is dedicated to responsible harvesting practices which protect local wildlife populations. So if you are looking for an adventurous experience that won’t break the bank, rockon recreation rentals should be your first choice! Whether you are planning on eating the iguana meat or simply going for the experience of hunting, rockon recreation rentals has got you covered.
Beware of outfitters with low or no ratings, as several have popped up as people lost their jobs in the pandemic, and have little to no experience. Feel confident booking with a company like Rockon Recreation Rentals who has hosted hundreds of successful hunts with 5 star reviews from Google that you can rely on.
How much does it cost to hunt iguanas in Florida?
Typically, a half-day hunt with Rockon Recreation Rentals will cost around $500 – $600 depending on the size of the group. A two-person party would be in the $500 range, while adding a third person to the party is just $100 more. This includes all necessary equipment, guidance from experienced guides, and access to exclusive hunting sites across Florida.
Have a larger group? No worries, we can accommodate two parties of up to three people each party for a full party of six to enjoy in on all the fun.
With rates like these, you can be sure that you’re getting the best experience at an affordable price! So if you’re looking for a unique outdoor adventure that won’t break the bank, iguana hunting in Florida with Rockon Recreation Rentals is definitely worth considering!
Where can I book iguana hunting near me?
If you’re looking for a top-notch iguana hunting experience near you, Rockon Recreation Rentals is the perfect choice! They offer half-day and full-day hunts. If you think Florida Iguana Hunting might be your next big adventure, you should book one today! Booking your hunt with Rockon Recreation Rentals is easy – all you need to do is visit their website and fill out the online form with your personal details. Once done, they will be in touch within 24 hours to confirm your booking and provide further information about the hunt.
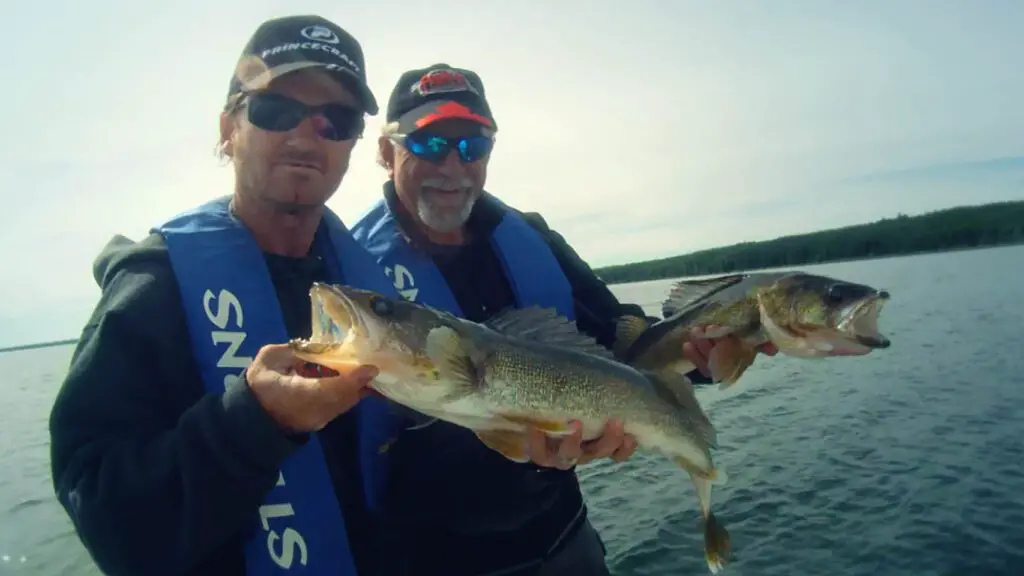
Ever since the sushi fad first touched down in Canada, we have been avid consumers. Starting hesitantly, as most did, with California Rolls and eventually working our way up to plates full of Sashimi, sushi has become a staple of our diet and has become the same for millions of people across North America.
Being avid anglers, however, eating this much fish caught by other people seemed somewhat wrong. Lake caught walleye and pike had always been more enticing to us than haddock or cod and our choice of salmon has always favoured lake-bound Kokannee over farmed Atlantics.
So, to combine our favourite hobby with one of our favourites foods, we decided to give our favourite freshwater quarry the full sushi treatment – taking a freshly caught walleye from a pristine northern Ontario lake, filleting it on the front of the boat, and eating walleye sashimi right on the water as we fished.
All was perfect in the world of Fish’n Canada… that was until we told a local biologist about our experiment.
After a full lecture about metre-long worms, small yellow grubs, and other parasites, we were just happy to have made it home alive.
Fast-forward 20 years, the fear instilled in us by that biologist has all but worn out and we are ready to tackle the subject once more and, with a little help from our friends, answer the question of “can you eat freshwater fish raw?” once and for all.
Gord Pyzer is known as “the Doc” not just because he has put doctorate-level hours into fishing, but because he has over 30 years of experience as a senior manager with Ontario’s Ministry of Natural Resources.
This made him the perfect man to run our raw fish questions by as he would know exactly what kind of potential parasites our favourite fish were holding and what kind of damage they would do if they were consumed by humans.
What kind of parasites do freshwater fish carry?
Yellow Grub
Yellow Grubs nestled into a Bluegill (Photo courtesy Craig Banner, Oregon Department of Fish and Wildlife)
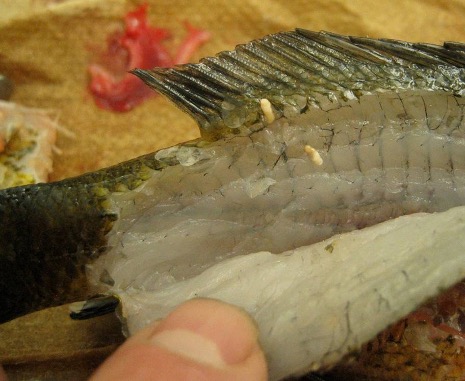
Yellow Grubs are perhaps the most common parasite we see in our fresh water fish, often found nestled into the tails and flesh of panfish such as Perch and Bluegill. These unsightly grubs (actually parasitic flukes) make their way into the water via fish-eating birds, where they then mature inside aquatic snails before venturing out in their mature form to find their host fish.
Thankfully, these grubs are harmless to humans and, even if eaten live and raw, would only add a bit more protein to your diet.
Black Grub
A Northern Pike infected with Back Spot Disease
Black Grubs, more commonly called Black Spots, are very similar to Yellow Grubs in every way except the markings they leave on the fish.
Like the Yellow Grubs, these parasitic flukes enter the water through fish-eating birds, mature inside of snails, and then find their target fish.
Once the worm enters its final host, the fish responds by forming a hard cyst made from a black pigment to trap the worm, creating small black spots throughout the fish’s body and temporarily pausing the spread of the parasite. These cysts remain closed until the fish is eaten, typically by birds, where the cycle starts over again.
Thankfully (again), this parasite is not transmittable to humans but will add a bit of crunch to your fillets if they are not picked out.
Broad Fish Tapeworm
If you found the last two parasites gross, you may want to stop reading.
Known formally as Diphyllobothrium latum, the broad fish tapeworm is the largest tapeworm that can infect humans and is present in many of our freshwater fish. “Large”, in fact, may be a bit of an understatement as these behemoths have been measured in humans at over 30 feet in length.
In our recent podcast episode, Gord gets into a story about a friend of his experiencing this first hand after consuming some undercooked Lake Trout.
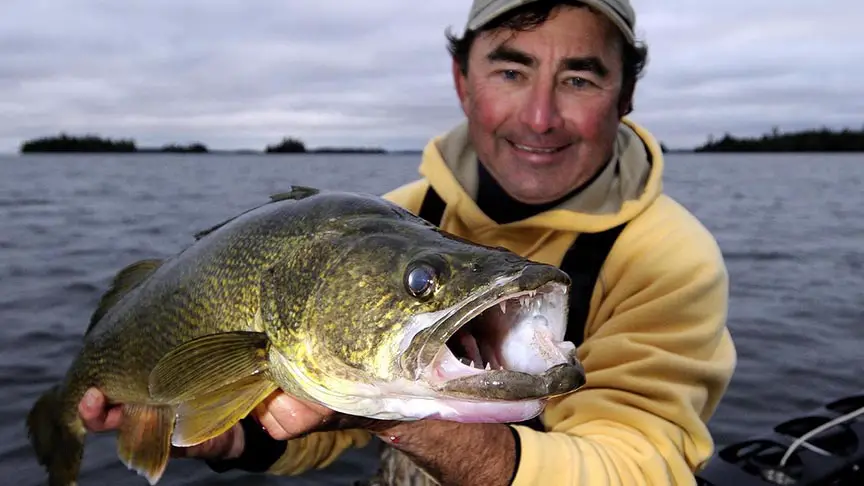
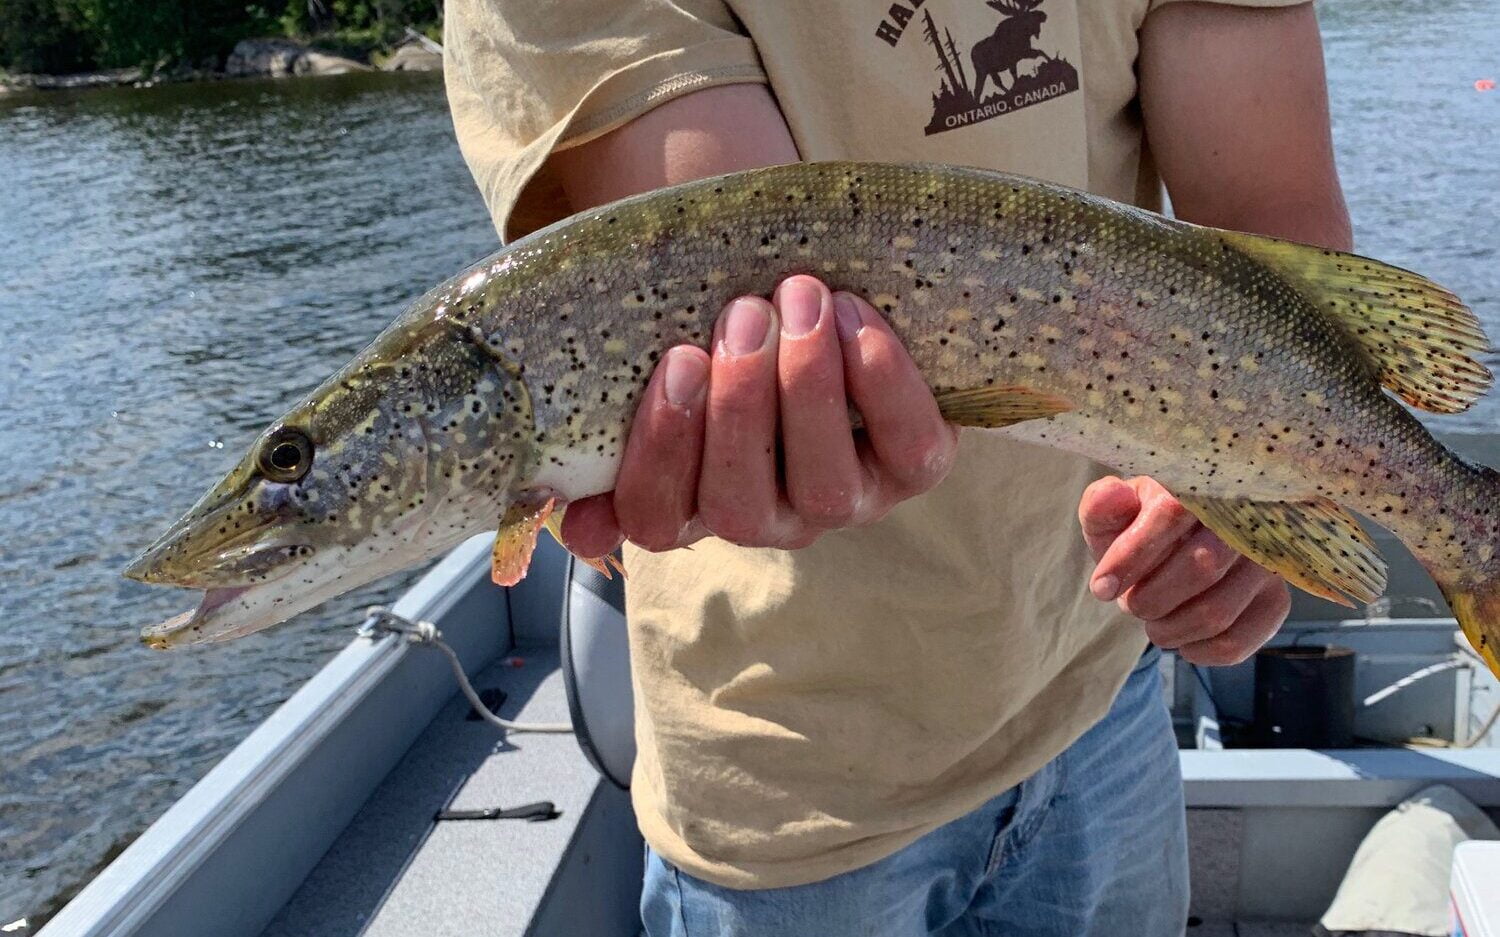
Since these parasites like cold water, Lake Trout are one of the more frequent hosts of these worms, however, they are also very prominent in Whitefish, Northern Pike, Walleye, and Smallmouth Bass.
Fortunately, for those cooking their fish, these worms will not survive the frying, baking, or smoking process and, if you have eaten a lot of trout, you have likely consumed them without noticing. For us sushi eaters, however, contracting these worms is a real possibility.
Gord’s Reccomendation:
Gord says that the decision to eat raw fish ultimately comes down to your perception of risk vs. reward. As he says in the podcast, “is eating that piece of raw fish really worth a 25-foot tapeworm?”
From Gord’s perspective, the answer to this question is obvious and he would much rather fry up his fresh-caught walleye than take the chance and consume it raw. As Gord says, “there are no medals for self-inflicted wounds.”
The Chef’s Perspective
Chef Antonio Meleca
After getting scared to death by Gord’s tapeworm stories, we wanted a more positive take on eating raw freshwater fish.
Chef Antonio Meleca is not only a chef to the stars and host of Fish’n Canada’s Fish du Jour series on YouTube, but is also an avid angler who frequently consumes his catches raw
In fact, Antonio has blended his hobby and his work on several occasions, including once with Kit Harington of Game of Thrones fame, where he prepared Smallmouth sushi and sashimi, caught by the actor right on the shores of Lake Nipissing (listen here).
So how did Kit and Antonio survive the process tapeworm-free?
How do you prepare freshwater sushi?
Antonio says that anytime he prepares freshwater sushi, he uses the same process he would for tuna or salmon. This starts with the gutting process, which should start as soon as possible after the fish is caught. When filleting, Antonio says he is then always keeping a close eye on the flesh for grubs or worms. In most of our non-bottom-dwelling freshwater fish, these parasites are not microscopic and can be easily spotted or felt.
Next, the fish has to be frozen for at least 48 hours below -18 C. In the sushi world, this is called IQF (Individually Quick Frozen) and is the time and temperature necessary to kill any harmful parasite that could be living in the meat. Unfortunately, most household freezers cannot reach these temperatures so some local connections to those with commercial-grade freezers may have to be made.
After the freezing process has been completed, the fish can be prepared any way you like. On the day with Kit Harington, sashimi and ceviche were the preference. However, Antonio has also used raw Smallmouth and Walleye for rolls which are sweetened with brown sugar and soya sauce.
Antonio’s Reccomendation:
Antonio says that freezing fish at the IQF standard -18C for two days makes it perfectly safe for consumption and, when done correctly, can make excellent tasting sushi of your favourite freshwater fish. Antonio does emphasize, however, that household freezers DO NOT reach these temperatures and, as a disclaimer, he cannot recommend making sushi at home without the proper equipment.
The Food Safety Perspective
To break the tie, we wanted to interview someone who could give us the food safety perspective of eating freshwater fish raw.
That man was Ken Cashin, a food safety consultant at Innovative Quality Solutions on Prince Edward Island.
In our interview with Ken, he echoed much of what both Gord and Antonio had said by stating that when eating any raw food, whether it be trout, salmon, beef or oysters, there is always a risk.
However, some fish provide a far greater risk than others. With oysters, for example, which act in the ocean as filters for known toxins, people rarely think twice about consuming them raw despite the massive health risks that can result from improper handling.
With something like a raw freshwater trout or walleye, on the other hand, the risks of serious illness are far lower yet many people wouldn’t dream of consuming it raw.
Ken’s Reccomendation
Like Gord, Ken says eating raw fish is all about weighing risks and deciding how much you really want that sushi. Like Antonio, Ken also reiterates that all risks can be avoided through proper handling and freezing. “The process is simple,” said Ken, “freeze the product, kill the worm.”
The Verdict
So can you eat freshwater fish raw?
The quick answer is yes.. with a caveat.
As both Antonio and Ken pointed out, the parasites found in our freshwater fish cannot survive the IQF freezing process carried out on traditional sushi, meaning all you have to do to make your fish safe to eat raw is to freeze it at -18 C for at least two days.
This, however, is much easier said than done as most household freezers cannot reach these temperatures.
For those looking to skip this process, the decision to eat raw freshwater fish ultimately comes down to your own calculation of risk vs. reward and whether you think your eyes are keen enough to spot the tapeworms that are patiently waiting to grow to record sizes in their next host.
Let us know in the comments below whether freshwater sushi will be added to your next shore lunch menu.
For the full interviews with all three of our guests, check out the podcast on Apple Podcast, Spotify, Google Play, or wherever else you get your podcasts.
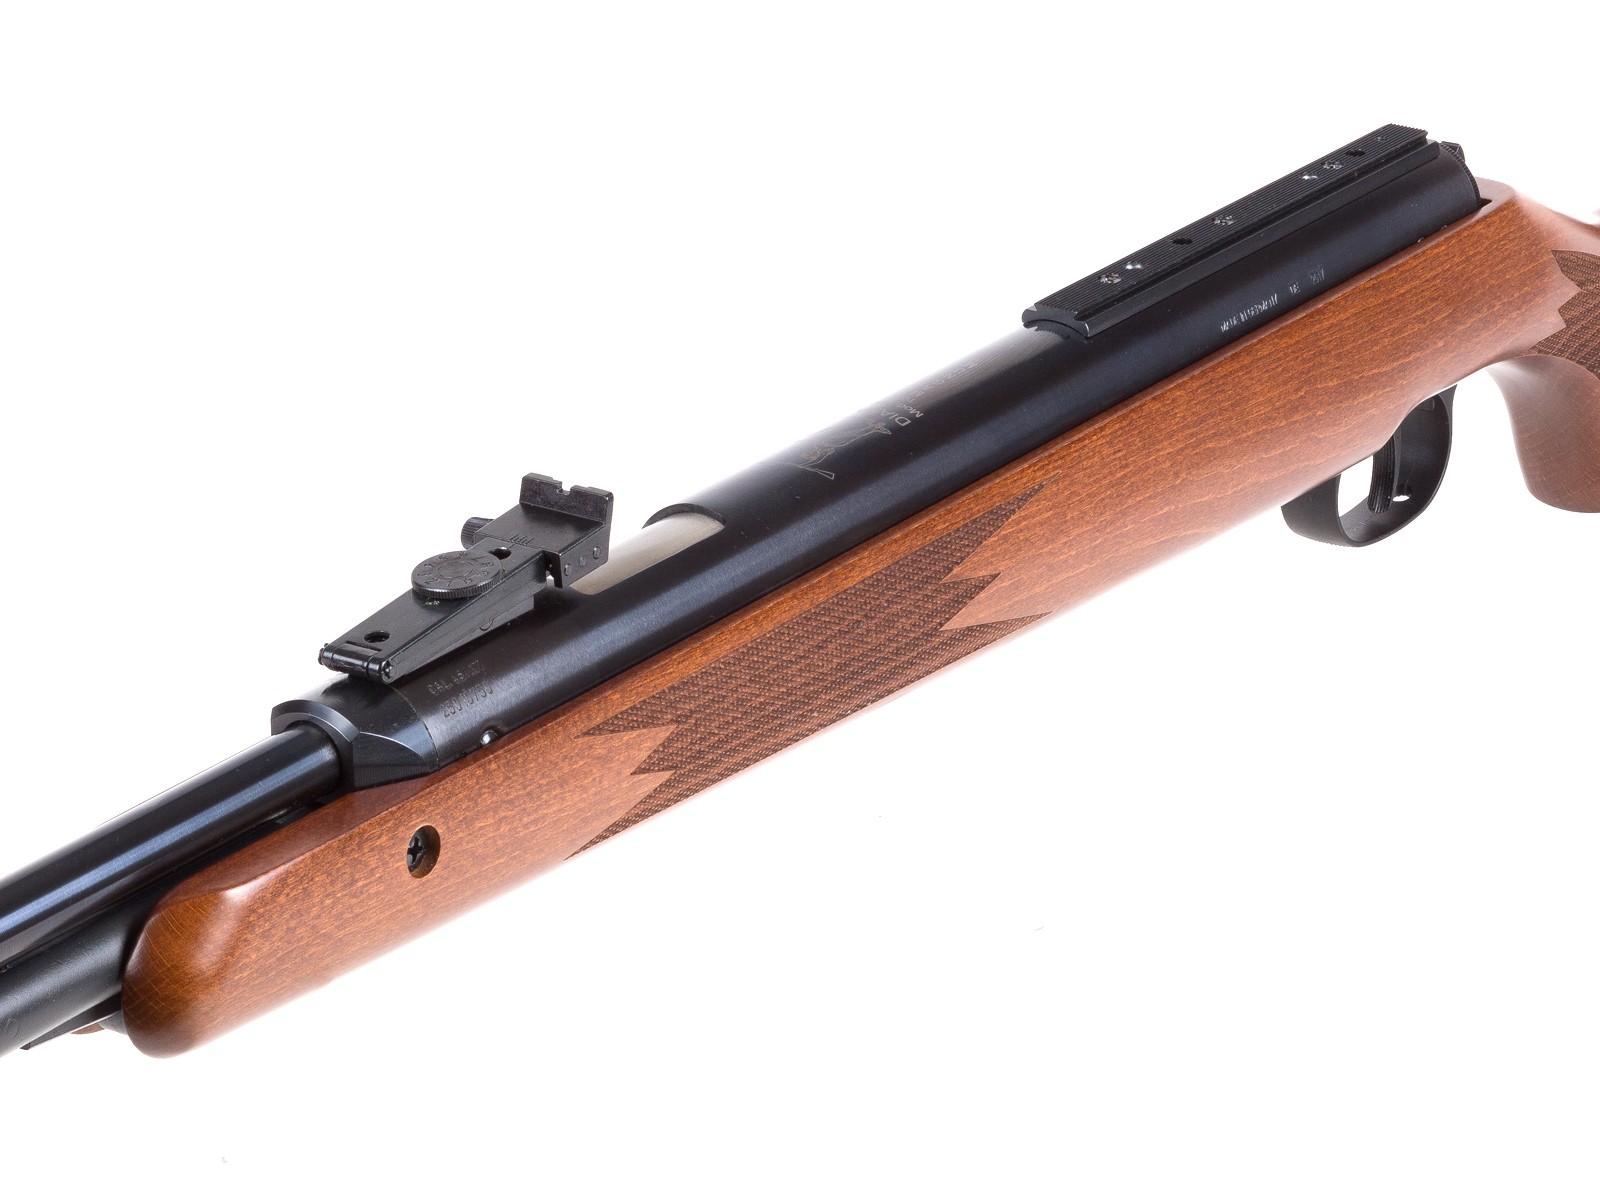
The Diana 460 Magnum stands as a testament to German engineering in the world of high-powered spring-piston air rifles. This detailed review explores every aspect of this formidable underlever air rifle, from its power delivery to real-world accuracy testing, helping you make an informed decision about this premium offering from RWS Diana.
The 460 Magnum immediately impresses with its substantial presence. At 8 pounds, 6 ounces, this is unmistakably a full-sized adult air rifle. The German manufacturing heritage shows in every aspect of its construction, from the beautifully executed bluing on the metal parts to the precisely fitted hardwood stock. Currently, Diana 460 Magnum one of the best spring air rifles for the money.
Stock Features
The beech wood stock deserves special mention for its thoughtful design elements:
A right-hand Monte Carlo configuration with raised cheekpiece
Practical checkering patterns on both the forearm and pistol grip
Ventilated rubber buttplate for recoil absorption
Traditional sporter styling that balances aesthetics with functionality
Cocking Mechanism
The underlever design is a defining feature of the 460 Magnum. While the measured 47-pound cocking effort (higher than the advertised 36 pounds) might seem daunting, the underlever mechanism provides superior mechanical advantage compared to break-barrel designs. This makes the cocking sequence more manageable, though it’s still a substantial workout during extended shooting sessions.
Performance
Velocity and Power Testing
Chrony tests:
Calibers
Pellets
FPS
FPE
.22
Crosman Premier Hollow Point Pellets 14.3 Gr
890
25.16
.22
JSB Diabolo Exact Jumbo Heavy 18.13 gr
775
24.19
.22
JSB Diabolo Exact Jumbo 15.89 Gr
749
19.8
.22
Gamo Raptor 9.9 Gr
911
18.25
.22
H&N Sniper Light 14 gr
825
21.16
.22
RWS Superdome 14.5 Gr
815
21.39
.22
Beeman FTS Copper Plated 14.72 gr
905
26.78
.22
RWS Hobby 11.9 gr
897
21.27
.22
RWS Superpoint 14.5 Gr
820
21.65
.22
RWS Super H Point 14.2 Gr
801
20.24
.22
JSB Diabolo Exact Jumbo 15.89 Gr
777
21.31
.22
Beeman Kodiak 21.14 Gr
585
16.07
One of the most impressive aspects of the 460 Magnum is its exceptional velocity consistency. The extreme spread of just 4 FPS with both RWS Super H-Points and JSB Exact domes is remarkable for a spring-piston airgun, matching or exceeding the consistency of many regulated PCP rifles. This consistency translates directly to better accuracy potential and more predictable performance in the field. Moreover, the Diana 460 Magnum is one of the best air rifles for pest control.
The Diana 460 Magnum represents a high-end offering in the spring-piston air rifle market. It delivers impressive power, exceptional consistency, and excellent accuracy potential when properly handled. The build quality and engineering reflect its German heritage, justifying its position in the premium segment.
For shooters willing to master its technique requirements and manage its physical demands, the 460 Magnum offers a compelling package that can serve equally well for hunting or precision shooting. The rifle’s consistency and accuracy potential are particular highlights, matching or exceeding many more expensive PCP rifles in these aspects.
While the cocking effort and weight might deter some shooters, these are reasonable trade-offs for the power and performance delivered. The rifle’s independence from external power sources and its all-weather capability make it a practical choice for serious airgunners.
The 460 Magnum stands as a testament to Diana’s engineering prowess, offering a compelling blend of power, accuracy, and consistency for the serious airgunner. While it demands respect and proper technique to achieve its full potential, it rewards the dedicated shooter with exceptional performance and reliability.
What is the difference between a deer, elk, and moose?
Many people are not sure, especially since they all look similar.
They are all classified under the cervid family, but there are some distinct differences between them.
When you are out hunting, it is important to be able to identify the difference between deer, elk, and moose.
This will help you determine what animal you are hunting and what type of weapon you should use.
In this blog post, we will discuss the key differences between these animals. We will also provide photos so that you can better familiarize yourself with them.
After reading this blog post, you will be able to accurately identify deer, elk, and moose when you see them in the wild.
Elk are larger than deer and can weigh up to 1000 pounds.
They have a long body and short legs, which makes them appear lanky.
Elk also have large antlers, but they are not as large as the antlers on a male moose.
Both male and female elk have antlers, but the antlers on a male elk are much larger.
Male elk also have a large neck and chest, which makes them look heavier than they actually are.
They can range from 4 feet to 6 feet at the shoulder.
Elk also have antlers, but they are shorter and thinner than those of a deer.
Male elk also have a large neck and chest, but their body is not as bulky as a moose.
They are averaging between 710-730 pounds.
Where you’ll find elk: Look for them in open areas such as meadows, valleys, and mountainsides. They are most active at dawn and dusk.
What they eat: Elk are herbivores and their diet consists of grasses, leaves, and twigs. They will also eat fruits and nuts when they are available.
Moose:
Moose are the largest of the three animals and can range from 6.5 feet to 7.5 feet at the shoulder.
They are weighing in at 840-1500 pounds on average.
Moose also have antlers, but they are longer and wider than those of a deer or elk.
In addition to their antlers, moose have a large hump on their back near their shoulders.
This hump is where they store fat for the winter months.
Male moose also have a large neck and chest, which makes them look even larger than they actually are.
Where you’ll find moose: Look for them in wet areas such as lakes, marshes, and swamps. They are most active at dawn and dusk.
What they eat: Moose are herbivores and their diet consists of aquatic plants, grasses, and leaves. They will also eat twigs, berries, and bark when they are available.
This video gives you a good idea of the size difference between Elk and Deer:
Tracks:
Deer:
The deer has small, delicate hooves that leave a dainty print.
The front prints are almost heart-shaped, while the back prints are more oval.
You will often see pairs of deer tracks together because they walk single file. Deer tracks typically measure between 1 and 3 inches long.
Deer can be found in open areas such as meadows, woods, and fields. Elk are typically found in open areas such as meadows and valleys. Moose are usually found in wet areas such as lakes, swamps, and marshes.
How are killer whales and Greenland sharks predators of moose?
Killer whales and Greenland sharks are both predators of moose. They hunt them for their meat. Killer whales will attack a moose from below and drag it underwater where they will drown it. Greenland sharks will eat a moose alive, starting with its head. It’s because moose frequently swim between the islands off the northwest coast of America.
Are moose and elk endangered?
No, moose and elk are not endangered. In fact, they are doing quite well. The population of moose has been increasing in recent years, and the population of elk is stable.
Conclusion
Now that you know the difference between deer, elk, and moose, you can be sure to identify them correctly when you see them in the wild.
Remember, deer are the smallest of the three animals and have the smallest antlers.
Elk are the second largest animal and have antlers that can span up to 6 feet wide.
Moose are the largest animal and have antlers that can span up to 8 feet wide. If you ever have any questions about these animals, be sure to ask a ranger or other expert. Thanks for reading!
The Glock 43X is the reverse stretch of Glock pistols. Glock took the wildly successful Glock 43 pistol and stretched the grip to accommodate a newer 10 round magazine. The Glock 43X became a very popular concealed carry pistol and opened up a new market for Glock slimline pistols. We will explore its various features in this Glock 43x MOS review.
The Glock 43X has recently gotten a welcome addition in the form of a MOS model. The new Glock 43X MOS is hitting shelves now and will likely be a huge hit.
MOS stands for Modular Optics System. This pistol bears the name MOS, but the MOS system on these guns is much different from the standard MOS system.
The standard system comes with a multitude of plates to accommodate tons of red dot optics.
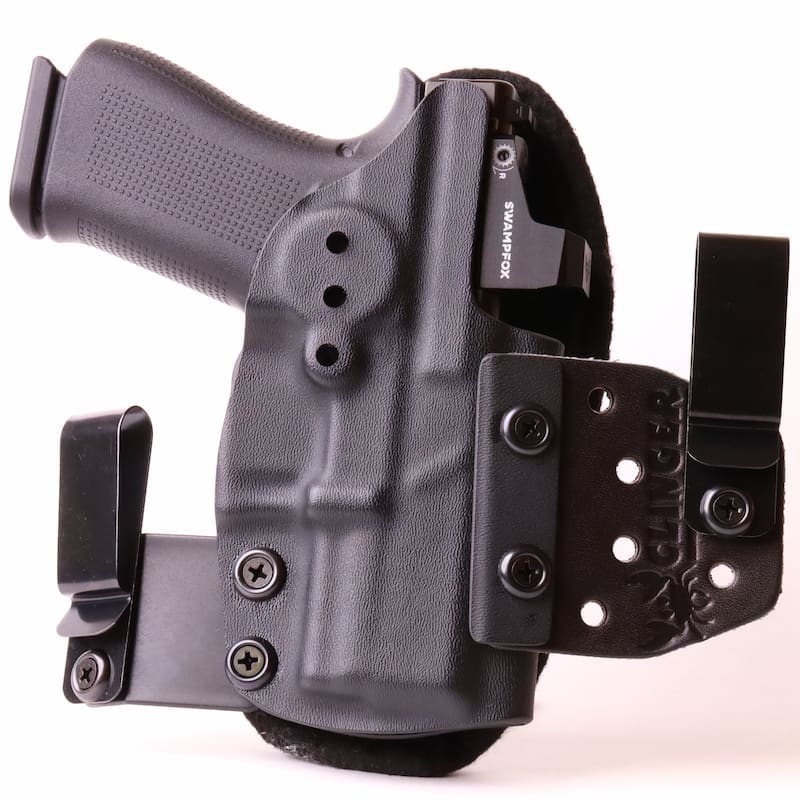
The Glock 43X is a superbly small handgun, so it can’t accommodate bigger red dot sights. This MOS system is cut for the Shield RMSc pistol red dot.
This is one of the smallest pistol red dots on the market, and the footprint of the optic is quickly becoming popular.
This opens it up for the Shield RMSc, SIG ROMEO Zero, SwampFox Sentinel, and Holosun 507k, and a few newer models hitting the market hard and fast.
That’s not the only change Glock made to the 43X series pistol though so let’s dive in and check out the Glock 43X MOS and how Glock made a micro fighting pistol a bit more capable.
While these new small optics have yet to prove themselves, they are becoming increasingly popular. Especially when you pair it with a great Glock 43X MOS holster.
A big change Glock made to the Glock 43X MOS was changing the slide color from stainless steel to a traditional black nDLC finish. The guns came out in a black finish prior to the MOS series, but the MOS series will be exclusively nDLC.
This diamond-like coating is ultra-strong and proven to be durable on the vast majority of Glock pistols. The hardness level is extreme, and it doubled from the older tenifer finish.
I can’t lie, I like the stainless steel coating, and I think it makes the plain Jane, Spartan Glocks stand out a little, but I understand the change.
Stainless looks good, but the black is less reflective and will create fewer reflections on the lens of your red dot optic. The black finish gives the gun a more discrete look and allows it to disappear a bit better under a cover garment.
Silver does tend to stand out a bit more than most.
The frame is the traditional Glock black polymer frame. It’s a bit blocky and plain, but looks professional and is molded precisely. The Glock frame isn’t fancy but is perfectly suitable and well made.
You won’t see issues with the frame’s molding marks or texture.
The appearance of the Glock 43X demands a black optic to keep the black on black theme going. Luckily, black is the most common color in the tactical optics world. It’ll also match your shoes.
Specs
The Glock 43X MOS is a superbly thin and lightweight handgun designed with concealed carry in mind. The G43X MOS has an ultra-short barrel, and this makes OWB carry possible and makes the 43X MOS easy to carry IWB and AIWB (Appendix Inside the Waistband).
The overall length is 6.5 inches long, and the overall height is 5.04 inches, including the magazine.
The overall width is a slightly chunky 1.10 inches, and the slide is .87 inches wide. The gun weighs 23.07 ounces fully loaded. The gun isn’t the thinnest option, but it’s still exceptionally easy to conceal.
The gun is remarkably balanced, and those of us who want something small and light to carry but still want a full grip will love the Glock G43X MOS.
As you add an optic, the gun’s height and overall weight will change, but not significantly. The modern micro red dot is a super small and lightweight design that barely adds bulk to your firearm. The G43X MOS is one of the smallest optics-enhanced guns on the market.
The gun comes with ten-round magazines, and it cannot take magazines made for the G43. This cuts off a lot of extended magazines made for the G43. However, a company called Shield Arms makes a 15 round magazine that fits flush with the G43X MOS and Glock 48.
This adds five rounds of flavor to your Glock series pistol. I have no personal experience with these magazines, so I cannot speak to their reliability, but they do seem to be well-loved by Glock 43X MOS and Glock 48 owners.
Ergonomics
The Glock 43X MOS offers a much better grip than the original G43. The longer grip fills the hand better and allows the gun to fit the 10 round single stack magazine with ease. Another major improvement is the slight beavertail that provides some protection for my hand.
Me and Glocks sometimes don’t get along because I’m a victim of constant slide bite from the Glock series. The Glock G43X MOS is different and provides a nice little overhang that allows me to have a nice high grip and keeps my hand from getting bit.
The Glock 43X MOS is a very simple gun. Glock has a reputation for making guns as simple as possible, and admittedly simple is good in a pistol designed for combat. The 43X MOS features three safety devices, but not a single one is a manual safety.
The only thing close to that is the trigger safety, which will not allow the trigger to fall without a complete and purposeful press. This keeps things quite simple and allows a shooter to have a gun they can instantly engage with without much thought behind it.
The G43X’s hand-filling design does help with recoil and control. The grip allows you to comfortably control and handle the gun.
It’s much more comfortable for rapid-fire training and long days at the range than the standard 43. This is a must-have for an optics-enhanced gun.
A real grip ensures you can hold the dot steady and take full advantage of all the benefits a red dot has to offer you.
The G43X MOS isn’t perfect ergonomically.
One of the issues with the gun is the slide lock. With a good, thumbs forward grip, the slide lock will be pinned down and fail to engage when the gun is empty.
This might be a problem associated with my sausage-like fingers, but it’s one that plagues every Glock I’ve ever shot, including the G43X (non-MOS version).
That’s the life of dudes with 2XL sized hands.
Features
Red Dot Cut Out
The star of the show is clearly the gun’s ability to utilize an optic. An optic on a handgun might seem silly to some, but they’ve been proven by reputable trainers around the industry to be a drastic improvement on your handgun’s potential.
A dot equipped handgun is faster, more precise, and allows a shooter to hit targets at further distances with ease. On the G43X MOS, the optic makes a ton of sense.
Small guns typically have a short sight radius, and the presence of a dot completely erases the sight radius issue. This allows a small gun to be as precise as a large gun. Although learning to use the red dot takes some extra practice. It’s well worth the investment in the end.
The red dot cut cuts in the slide aren’t the only big change.
Picatinny Rail
Glock also added a small Picatinny rail on its new G43X MOS model. This small Picatinny rail allows users to attach any number of devices. This includes lasers, small lights like the Olight Mini Valkyrie, or even training devices like the MantisX.
The Picatinny rail is a nice touch, and as red dots and lights become more mandatory on guns, more companies will embrace small rails on their carry guns.
The G43X MOS also comes with most of the updates Glock made for the Gen 5 guns. This includes a high visibility follower in the magazine, a smooth finger groove-less design, front serrations, and a reversible magazine release.
The front serrations are an important touch and allow you to easily manipulate the slide when the gun is wearing a red dot. They’ve been on the gun since the original G43X and are more important on the MOS system.
Front serrations ensure you can manipulate the weapon without gripping the optic. You can grab the optic to manipulate the slide but you’re likely to smudge oil from your skin on the glass when you do so. A smudge-free optic works much better.
The below image shows a big thumbprint on the Swampfox Optic.
Shooting Characteristics
The Glock 43X is a weirdo, and the MOS model is also still a weirdo. The short slide combined with the compact-sized grip makes the gun interesting, to say the least.
The Glock 43X MOS fills the hand nicely, and the beavertail extension allows for a nice high grip on the gun. This allows you to maximize control over the gun and keep it on target, even when firing rapidly.
The original 43 used to bite the hell out of my hand, and I hated it. I would start flinching just a bit between each and every shot. That is long-gone with the Glock 43X MOS.
The iron sights are like all Glock iron sights, and they are made from plastic and kind of suck. Toss on a red dot and replace the sights with suppressor height sights for co-witnessing asap.
The recoil is minimal, especially with 115-grain loads. You’ll feel a bit more snap with self-defense loaded +P loads. This snap is notable, but not uncontrollable or even painful.
It has some jump and kick to it, but it’s not like a 357 from a snub-nosed by any means.
The gun cycles just about anything you could put through it. The G43X is built to the same standards as all Glocks, and a big part of that is reliability.
You can say a lot about Glock pistols, but you can’t say they aren’t reliable.
They eat everything without complaint and just keep on going even with poor maintenance.
You can say the trigger is average at best, the grip is blockish, and the magazine release needs to be bigger. All are very true, and the Glock 43X MOS carries all the issues the regular G43X has.
The good news is these problems are very small in the grand scheme of things.
Concealment
As a gun designed for concealed carry, size matters, and the Glock 43X MOS is not necessarily a big gun, but it’s not the smallest either.
The G43 is admittedly easier to conceal just by design. However, the G43X MOS is far from difficult to conceal. However, the addition of an optic will make it a slightly bigger gun height-wise.
The G43X’s light weight makes it a comfortable gun to carry, and it won’t sag or pull at your waist.
It’s a gun that’s easy to forget you’re even carrying. The G43X MOS disappears easily under a T-shirt. The shorter barrel design allows it to be comfortably carried OWB, and that’s my preferred method of carry.
The shorter barrel means you won’t have to wear a tall shirt to make it disappear.
The gun is also quite comfortable for appendix carry and traditional IWB. IWB is typically an easy way to carry almost any gun, but AIWB can be trickier with long guns.
I haven’t mastered AIWB with a full-sized gun just yet, but a nice short gun like the G43X MOS is the perfect AIWB companion.
All in a Day’s Work
The Glock 43X MOS is a helluva upgrade to the G43X. The presence of a rail and optic allows the gun to step into the territory of full-sized guns. The extra presence of an optic and light makes the guns all the more capable, and Glock made some wise choices with the Glock 43X MOS.
The Glock 43X MOS is a very capable, but also easy to conceal weapon. With the right holster and belt combo, you’ll be able to pack the G43X, spare magazines, and a good attitude due to your comfortably concealed weapon.
Check out the Glock 43X MOS and take a peek at the Glock 43X MOS holsters.
Let us know below if the G43X MOS is for you, or are you a G48 MOS kinda person?
Please comment to let us know if you liked our Glock 43x MOS review. Also Checkout our Taurus G3c Review
Most people will have a few bags of frozen chicken in their freezer. It can be easy to forget about one or two bags only to discover them too late – when they’re freezer burnt.
Freezer burn has a very distinctive taste, but it’s hard to describe. Off, weird, old, musty, and ‘like the freezer’ are some of my attempts.
So, how do you get rid of the taste of frozen chicken? To get rid of frozen chicken taste, marinate or brine the chicken and cut off any visible bits of freezer burn. You can also opt to use the chicken in a dish where its flavor will be overpowered, such as a curry, enchiladas, or something spicy.
The freezer taste that clings to your chicken is not a seasoning anyone would choose. A simple frying, grilling, or baking won’t be enough to shake it off.
Sadly you can’t get rid of the taste of freezer-burn completely, but you can improve it to the point where it’s barely noticeable.
Here are a few ways to go about making your frozen chicken disaster edible.
Word of warning: you may see varying success depending on how badly your chicken has suffered in the freezer.
But the way I see it is that the only thing you have to lose is time.
You either throw the meat out straight away or try and save it. If you save it great. If not you can throw it away, but at least you tried.
Cut off any freezer burnt bits
The most important thing to do is to cut off any obvious bits of freezer burn. Cut them off before you cook the chicken.
This will get rid of the worst tasting bits, but it won’t completely solve the problem. Freezer burn affects the whole piece of meat and not just the visible bits. The rest of the chicken probably won’t taste great either, but that’s where the next tactics come into play.
Marinate or brine the meat
Marinating meats is a classic way to flavor them, and it’s even more important when you’re dealing with freezer burnt chicken.
A good, strong marinade will help mask the frozen taste, and adding something acidic to the marinade will help to tenderize the meat.
Acids break down some of the proteins and fats in the meat, making it more tender. Balsamic vinegar is a good option. It’s acidic and adds a slightly sweet flavor to the chicken.
Put a small but concentrated amount of your chosen marinade into a ziploc bag and add the frozen chicken. As the chicken defrosts, the juice from the chicken will mix with the marinade and dilute it. Shaking the bag a few times as the chicken is thawing will help to ensure even coverage.
Brining meat is similar to marinating.
Make a saltwater solution and let the chicken sit in it as it thaws. The primary goal of brining is to tenderize the meat, the flavor comes second.
The salt solution will replace some of the lost moisture in the chicken and help bring it back to life. You can also add some herbs and spices to the brine mix such as sage, black pepper, or garlic. This will help to give the chicken a subtle flavor.
Grind or shred the chicken and put in a sauce
One of the best things you can do to disguise badly frozen chicken is to use it in a dish where the texture or taste of the actual chicken doesn’t matter too much.
Grinding or shredding the meat means you no longer need to worry about the texture of the meat because you’re changing it anyway.
Grind the chicken up with a meat grinder (link to amazon) to make meatballs or burgers and add whatever additional flavors you like to mask the ‘frozen’ taste. Thai chicken meatballs are super tasty and a little different from the usual Italian recipes you’ll find. You need lots of garlic, chili, ginger, and kaffir lime (if you can get hold of it).
Just like ground meat, shredded meat can be easily flavored. You can slow cook it in a crockpot with lots of sauce to mask any off-tastes. Add bbq sauce to make an alternative to pulled pork, or use salsa and black beans to make a delicious burrito filling. You’re basically turning the chicken into a sauce delivery vehicle.
Related: How To Reheat Frozen Shredded Chicken
If you want something cold, you can poach and then shred the meat to make a chicken salad.
Use it to make a stock or soup
If the frozen chicken taste is really offending you, then use it to make soup or stock. That way, you can still make use of the chicken without actually eating it.
Don’t worry. The chicken won’t leave a frozen taste in your stock. It will taste just like regular chicken stock.
Thaw the chicken and simmer it in water along with some vegetables. Once it’s done you can strain the chicken and either get rid of it or shred it and put it back into the soup.
This technique works best if your chicken is on the bone. The bones tend to add a lot of nutrients and extra flavor. However, it will also work fine with boneless chicken.
Make a curry / stew
Curries and stews tend to be very strongly flavored. The sauce is the star of the dish, and the chicken is more of a filler. As a filler, the chicken’s flavor gets lost and you can forget about the fact it doesn’t taste perfect.
Any recipe will do so just pick your favorite curry or stew and get cooking.
If you’re pressed for time a quick alternative to curry is to slather hot sauce on your chicken. This may not mask the texture but it will definitely hide any bad tastes.
Return it (if store bought)
If you bought the chicken pre-frozen from a store then the likelihood is you can return it.
Most food stores will accept returns if you’re not happy with the quality of the food. Simply state you found the taste and texture of the chicken unacceptable.
Of course you wont be able to return the chicken if you bought it fresh and froze it yourself.
What causes frozen chicken to taste bad and how to prevent it from happening again?
It’s no secret that freezing foods can affect their quality, but it’s not always clear why. There are two factors at play with chicken: the chicken’s texture altering and freezer burn.
Texture changes
As the chicken freezes, ice crystals form inside it. The sharp edges of these ice crystals rupture the chicken’s cell walls, causing the muscle fibers to weaken and break down. This noticeably alters the chicken’s texture and means the meat can no longer hold in moisture effectively. As the chicken thaws, lots of moisture will be lost leading to a dry piece of chicken.
You can’t prevent these ice crystals from forming as it’s part of the freezing process. But you can minimize how many form and how big they are. The quicker you freeze the meat, the less time the ice crystals have to form.
Chill the meat in your fridge first so it’s as cold as possible before going into the freezer. Then flash freeze the meat uncovered for a few hours. Uncovered meat will freeze faster than covered meat. Once the meat has frozen solid, make sure to cover it before leaving it for longer-term storage. Effective wrapping of the meat will help to prevent freezer burn.
Freezer burn
Freezer burn is the next issue and can affect both the taste and texture of frozen chicken.
Freezer burn occurs when the chicken is exposed to cold air. The cold air draws moisture out of the surface of the meat, leaving it severely dehydrated. Freezer burn isn’t unsafe to eat, but it doesn’t taste very nice.
It’s easy to see freezer burn on chicken because the meat changes color. The meat will turn white and look visibly tougher.
Luckily, freezer burn is completely preventable. You may have fallen victim to it this time, but you don’t have to again. Prevention is key to avoiding frozen chicken taste.
To prevent freezer burn, you need to prevent any air exposure. One way to do this is to wrap each individual bit of chicken in a double layer of plastic wrap or tin foil and then put it in an airtight container.
Related: How To Break Apart Frozen Chicken
Alternatively, if you have a vacuum sealer at home you can use this. Vacuum sealers are great because you can be sure no air will be in contact with your meat. I recommend the Greyon food saver (amazon link). There is a slight upfront cost involved, but it will save you money in the future because you’ll never need to throw out ruined frozen food again.
In this Leupold VX 3 HD review, we are going to dive into the details of this 4.5-14×40 Leupold VX 3 HD rifle scope. Leupold’s new scope that is just a step below their extremely popular VX 5 HD, is a bit more affordable, but still big on performance. Featuring Leupold’s HD glass and a wide range of magnification offerings, the Leupold VX 3 HD rifle scope is the perfect scope for the hunter who doesn’t need ultra long range capabilities, but wants a scope that will perform well on a hunt.
Love optics? We certainly do here at Backwoods Pursuit, so make sure to check out our other optics reviews, as well as our massive 19 Spotting Scope Review where we lined up 19 of the best spotting scopes on the market and tested them side by side!
Looking for a binoculars? Check out ourMASSIVE 26 BINOCULAR REVIEW where we put 26 of the best binoculars side by side!
In this Leupold VX 3 HD review we are going to look at how this rifle scope stacks up as a hunting scope. It’s not a long range optic, so if that is what you are looking for, there are better options. However, if you are looking for a great rifle scope that has the ability to take longer shots, the 14x magnification with the CDS-ZL locking turret can reach out there as far as most of us are comfortable shooting at game. The CDS stands for “Custom Dial System” and the ZL means “Zero Lock”, which we’ll go over below.
In preparation for the hunting season, many trips to the range were made to get this scope dialed in and to practice plenty to make sure both it, and myself were ready when the time came to make the shot.
What’s In the Box: Leupold VX 3 HD Review
The Leupold VX 3 HD rifle scope comes with all the tools needed to set your zero stop. You also get an integrated throw lever that is very user friendly and not overly large or bulky like some. Unfortunately, it doesn’t come with a Leupold Sun Shade, the Leupold Flip Back Lens Cover Kit, or the handy Leupold Neoprene Scope Cover.
All of the Leupold accessories are top notch and extremely well-built. They are, however, on the expensive side and if you pick them all up, it adds up quick. This is was bit of a disappointment as the only accessory that comes with the scope is the rubber lens cover, but if you like having a sun shade, flip up caps, or neoprene cover, you’ll have to drop an additional few hundred bucks to get the whole setup.
Leupold VX 3 HD Specs
The Leupold VX 3HD rifle scope is a fantastic rifle scope that’s purposefully built for the hunter who needs a solid, super lightweight scope that also gives you enough magnification to reach out a little ways if needed. It features some pretty impressive specs:
WordPress Tables Plugin
Eye Relief: Leupold VX 3 HD Review
The Leupold VX 3 HD 4.5-14×40 gives you a nice 3.6-4.4 inches of eye relief, keeping your face plenty far away from the scope to avoid getting a nice half moon decoration on the top of your nose/eye. I found that, consistent with the specs, you do lose a little eye relief moving to the top end of the zoom range, but the 3.6 inches of eye relief when at 14x is more than enough.
I tested the Leupold VX 3 HD along side others like the Bushnell Forge 4.5-27×50 as well as the Athlon Cronus 4.5-29×50, the Tract Toric UHD 4-20×50, the Sig Tango4 6-24×50 and the Zeiss Conquest V4 6-24×50 rifle scopes, and the Leupold VX 3 HD hung in there, even among some of those more expensive ones. Now obviously this VX 3 HD is a very different scope than most of the ones just mentioned given its design, size and purpose, but it still impressed when compared to the others.
Turrets & Side Focus: Leupold VX 3 HD Review
Between field testing and range time testing for this Leupold VX 3 HD review, I found the turrets to be perfect for the hunter who wants to keep things simple, but also wants to be able to dial in for the occasional longer range shot when needed and have the ability to set the side parallax with the side focus knob. The elevation turret locks nicely in place and only moves using a spring loaded push button when it’s time to dial it in. The side focus knob works very well and is nice and smooth without too much resistance, however, I do wish it had some yardage reference points.
The turrets are crisp and give you nice audible clicks so there’s no mistaking how many MOAs you have moved it. You get only one rotation out of the dial, but that gives you 15 MOAs, and for most of us, that’s more than enough. 15 MOAs still gets you a long ways out there with most modern hunting rifles.
The windage turret on the Leupold VX 3 HD is capped, but if you remove the cap, you have a nice, easily adjustable knob in the event you want to calibrate for wind. Of course, if you remove the cap and make your adjustment manually you’d need a few extra seconds for that. If you select the Windplex reticle like we tested here, you can make your windage adjustments using the reticle if needed.
The Leupold VX 3 HD gives you an easy to read side parallax adjustment that moves freely enough to not be overly difficult to adjust, but not too freely to accidentally move on you. Side parallax is usually a feature reserved for your long range scopes, but it’s great that Leupuold made this VX 3 HD model with it, given that you have up to 15 MOAs of adjustment with the CDS-ZL dial when you want to make a longer shot. Having that side parallax adjustment makes a big difference once you start stretching the range out.
The Leupold VX 3 HD gives you an amazing 75 minutes of windage and 75 minutes of elevation adjustment. Impressive that you get that much adjustment in this scope!
Zero Lock & CDS-ZL Dial: Leupold VX 3 HD Review
The Leupold VX 3 HD rifle scope gives you a unique Zero Stop feature that locks into place with a spring loaded button. To move the turret from “zero,” you simply push the button and dial to whatever MOA you need. To bring it back to zero, turn the knob and the button will pop back into its locking position when you reach zero. Pretty slick setup that is pretty fool proof and easy to use. While it’s possible to accidentally push the button and move the turret from zero, it’s very unlikely. Make sure to double check your zero before your shot, though, as that’s always a good idea.
To set your zero on the Leupold VX 3 HD, you’ll need to remove the cap via the small allen screws. Once the cap is removed, you have access to zero your rifle at whatever distance you like, then reinstall the cap and you are set. Make sure to bring the tool to pull the turret cap off with you to the range when zeroing your rifle or you may not be able to make the needed adjustment.
Image quality: Leupold VX 3 HD Review
A good Leupold VX 3 HD review wouldn’t be complete without testing the optical performance throughout the zoom range of the scope. While testing, I found that the Leupold VX 3 HD provides outstanding optical performance, particularly for a rifle scope in its price range. One of the things that really stood out is the impressive field of view and substantial eye relief you get. There is almost no “dreaded donut,” or black ring around the image like so many scopes have. With the Leupold VX 3 HD, you don’t feel like you are looking through a tunnel at all, which is a welcomed feature for such a small and lightweight scope.
Optically, you get a brilliant image that will not disappoint. It’s not quite as top notch as the VX5 HD or VX6 HD as you would expect, but still extremely good. As with most scopes, you do lose a little image clarity at the top end of the zoom range, but not much. The image you get at 14x is still sharp and clear, particularly if you take the time to use the side focus/parallax adjustment and make sure your eyepiece is focused properly.
4.5-14x40mm Magnification & Functionality
With the Leupold VX 3 HD rifle scope you get a perfect zoom range of 4.5x up to 14x, which is really all that’s neccesary for most practical hunting situations. Again, if you are into long range shooting, there are better scopes out there than the VX3 HD to fit that need, but for a hunting scope, this thing is ideal.
The zoom mechanism is super smooth and you get a throw lever included which is really convenient. The throw lever is nice and compact as well, unlike most other throw levers on the market that are much more bulky. The amount of resistance on the zoom mechanism is just about perfect for a hunting scope, but I did find that I preferred leaving the throw lever on there rather than removing it.
The loss in eye relief is noticeable as you move to the 14x magnification and requires you to “suck in” to the scope a bit, but you still have plenty of eye relief when at max zoom.
2nd Focal Plane & Subtensions
The Leupold VX 3 HD is a second focal plane scope. Now, backing up a bit, a second focal plane scope is one where the reticle size remains the same throughout the zoom range (unlike a first focal plane scope which gets larger as you zoom the scope in). The challenge with a second focal plane scope like the Leupold VX3 HD can be that your subtensions change depending on the magnification you are using. As with most scopes, the hash marks noted above are set for when you are at max zoom -14x in this case. This design makes sense in that, if you are holding for wind, you are likely to be at max zoom anyway.
As you can see above, the subtensions are nicely set with windage hash marks to help you hold for wind if you choose to do so. Even the width of the reticle can be used as a reference point, which can be very useful if you don’t have time to dial in the distance. There are no elevation subtensions, however, so you’ll want to utilize the CDS-ZL dial for elevation adjustments if you are wanting to stretch out the distance.
How The Leupold VX3 HD Ranked
Leupold VX 3 HD Review: Conclusion
After taking the Leupold VX 3 HD rifle scope through the paces, I came away really liking this rifle scope. It’s an ideal setup for a hunting scope, particularly if you are someone who likes to play a little bit at longer ranges, and/or at least want the ability to do so and dial in your reticle for those longer shots.
The WindPlex reticle is very functional, but it’s certainly not for everyone either. Some will love it and others might prefer a standard duplex. Personally, I didn’t find the WindPlex reticle too busy or distracting at all. Some of your long range scope reticles can get very busy, and it can simply be too much for a hunting scope. You get a TON of bang for your buck with this scope in image quality, build quality, fantastic zero stop, and great eye relief.
One downside, as mentioned above, is how expensive the accessories are for this scope and that most of the time, you have to buy them separately which is a bummer. If you are someone who likes to have a sun shade, caps and/or a neoprene cover, you’ll have to drop some additional cash to add those pieces to your scope.
At the end of the day, though, you’d be hard pressed to find a better rifle scope around the $750 price point than the Leupold VX 3 HD. It gives you fantastic optical performance with everything you need as a hunter and nothing that you don’t. This lightweight rifle scope features a solid locking zero stop design, non-bulky turrets, a CDS-ZL elevation turret that is compatible with a customizable turret from Leupold, and even a side focus knob. It hits all the marks for a great hunting scope!
Subscribe to Backwoods Pursuit to get Your FREE Backcountry Gear Worksheet!!!
Dial in your gear list, calculate your pack weight, and lighten up your pack with this handy tool!
In this article, weâll look at two rifle cartridges: the .300 Winchester Magnum and .300 Winchester Short Magnum. Although their names are similar, theyâre both different, with some interesting performance characteristics. We’ll delve into an extensive data set in this in-depth comparison.
The .300 Magnum cartridge family from Gun Digest
The similarities in their names can confuse those not familiar with these cartridges. You can use both for the same shooting and hunting purposes. However, these two cartridges are not interchangeable. Here, we’ll highlight the differences and the similarities between the .300 Win Mag vs .300 WSM. We are not looking to crown one cartridge as superior to the other. Instead, we want to present an unbiased view of these two cartridges. We’ll do this so that you can have a better basis for deciding which one better suits your shooting needs.
First, we’ll take a look at some ballistics. Afterward, we’ll dive into the performance characteristics of these cartridges. Then, we’ll also try to tie everything back together at the end of the article. Finally, we’ll discuss which purposes are best suited for each of these cartridges.
Test.300 Win Mag.300 WSM Average Recoil (ft.lb)27.625.43 Average Supersonic Flight Limit (Yards)27742799.3 Average Short Range Bullet Drop at 100 yards00 Average Ballistic Coefficient0.4860.483 Average Long Range Bullet Drop at 100 yards1.551.39 Average Supersonic Flight Limit (Yards)12551286 Average Kinetic Energy (fl. lb) at 100 yards3029.83114 Average Sectional Density0.2840.273 Average Bullet Momentum (lb. f/s) at 100 yards71.270.3
A Brief History
.300 Winchester Magnum
The .300 Win Mag takes a 30-cal bullet as does the .300 WSM. Winchester produced this cartridge in 1963. When compared to other popular hunting cartridges, it’s relatively new. Although, it’s older than the .300 WSM. This cartridge is also one of the most famous magnum cartridges worldwide when it comes to factory loads. In addition, it was the first cartridge designed in the magnum category. Similar to the popular 7mm Remington Magnum which was released a year earlier. Nevertheless, the .300 WM seemed to come out at the right time.
You can pack the .300 Win Mag with large amounts of powder giving it a huge advantage in velocity. Additionally, the cartridge can also take a variety of bullet weights. Most weights are within the 150-200 grain range despite the variety of lighter and heavier rounds available.
This round is popular for long-range shooters, including big game hunters and competitive shooters. In addition, snipers in special forces and military circles also use this cartridge. That said, the majority of its use is in the hunting world. Now, itâs all about matching the ammo style with the hunting situation when it comes to effectiveness.
.300 Winchester Short Magnum
Winchester introduced the .300 Winchester Short Magnum (WSM) to the public in 2001. It created a huge buzz in the hunting and shooting world. Winchester designed the magnum to provide power and speed while using lighter rifles.
The .300 WSM offered shooters the power of the popular .300 WM while using a lighter short-action rifle. Short magnums, which have a wider powder column, burn more uniformly and cleanly. In theory, this should provide more accuracy, though the significance of this can be argued and is not the subject of debate in this particular article.
The .300 WSM is one of the more popular short magnum cartridges that have come out in the last two decades. You can use it for both big game hunting as well as benchrest target shooting. Its bullet weighs from 125 to 200 grains. Although, most would agree that the 150-180 gr bullets often work the best with the cartridge.
Specs
.300 Win Mag.300 WSM Parent Casing.375 H&H Magnum- Bullet Diameter0.308â0.308â Neck Diameter0.339â0.344â Base Diameter0.532â0.555â Case Length2.62â2.1â Overall Length3.34â2.86â Case Capacity93.8gr80gr Max Pressure (SAAMI)64,000psi65,000psi
Just by looking at the bullet and casing specs of these two cartridges, we can begin drawing some inferences about how these two cartridges will perform. It also gives us something to look back on when we see the numbers and help us make more sense of them.
Both of these cartridges take a 30 cal bullet (.308â) but thatâs about where the similarities between these two cartridges end. The WSM has a bit wider neck and wider base than the .300 WM. On the other hand, the .300 WM has a half-inch more in its case length and overall length. The increase in length of the .300 WM over the .300 WSM is greater than the increased wideness of the case of the .300 WSM. The difference in how low the bullet sits in the casing is negligible and results in the .300 Win Mag being able to hold a greater amount of powder through the case capacity does not represent how much powder is loaded into each cartridge. The .300 Win Mag also has a lower max pressure though only slightly.
Keep this information in mind as we start to look at the actual data comparing these two rounds. To make these comparisons, we selected ten rounds for comparison with five for each cartridge. There are obviously more options out there but ten felt like a nice round number that wouldnât make things too cluttered. We also tried our best in selecting a sample that contained some different styles of bullet and bullet weights. The ten rounds we have graphed for this article are listed below.
Ammunition for Testing
If you already use one of these cartridge types, you might be wondering why we are not using your favorite, and undoubtedly the best, round in this comparison. Itâs no sleight, and we have not made the statement that these are the best available rounds available. If it works for you, that should be all that matters.
Since this is a small sample size, we compiled the numbers for 15 extra rounds for each cartridge. This gives us a total of 40 rounds. At the end of several performances and ballistic sections, we created a table that includes the averages for those forty rounds. By doing this, we can present you with more information. We also hope that it can help it with your decisions, or help you learn more about a particular cartridge you like.
The Samples
All the selected rounds are factory loads and are widely available. In addition, factory loads tend to err on the side of caution when loading the casings with powder. We also want to note that all of the data here is computer-generated. We sourced the majority of the data from the manufacturer. For unavailable data, we relied on ballistic calculators from trusted sources. Additionally, we used ballistic calculators and kept as many variables the same between rounds of the same cartridge. We also made sure to clear our variables.
When it comes to this type of data, there is no concern with comparing cartridges, but you should be aware that these numbers can change when being fired from your rifle. Each rifle tends to have its own small differences in its profile, and this means some small differences in the ballistic output. As far as comparing the two cartridges go, computer-generated data has its advantages in that these small differences are negated as well as a lot of environmental factors.
So, with all of that out of the way, letâs jump into our comparisons.
Recoil
Looking at the recoil of the .300 Win Mag vs .300 WSM is important for understanding certain situations that you might favor one over the other. It is probably a bigger factor in selecting between one over the other for younger or inexperienced shooters. Itâs still something to think about even if you do have a lot of experience. Recoil can influence shots, especially ones where you might not have much time to prep the shot, and it also influences your ability to make follow up shots.
We are looking at the energy that is generated when firing these rounds. Donât confuse that with the âkickâ that you feel when shooting. While this energy does translate to felt recoil, it is actually quantifiable. Felt recoil takes a lot of other factors into account that are difficult to put numbers with.
Recoil Data
We used a ballistic calculator to generate the recoil energy generated from firing these ten rounds (Graph 1).
Because propellant loads used by the manufacturer are not available, we went conservative with the loads using Nosler load data and kept the charge the same for each round within a cartridge.
We should also note that we used the same gun weight for all ten rounds. In reality, most rifles chambered for the .300 WSM are often a little lighter with them having a short action. And by lighter, itâs usually around half a pound to a pound difference in weight. Lighter rifles often mean a little extra recoil energy that is generated so the numbers might be a little higher for the .300 WSM rounds.
Looking at the graph, the first thing you’ll notice is that all ten rounds generate a significant amount of recoil with over 24ft. lbs of energy. The .300 Win Mag rounds generate over 26ft. lbs of energy with several in the 29-32ft. lb range. Meanwhile, the .300 WSM rounds are not too far off staying in the range of 24 to 26ft. lb range.
In general, anything over 20ft. lb of recoil is enough to impact shot placement, although that is pretty relative to who is handling the rifle. For inexperienced shooters, both of these cartridges are going to be felt when shooting and can easily cause flinching.
Below we have listed the average recoil energy from all forty rounds we have compiled.
Average Recoil (ft.lb)
.300 Win Mag.300 WSM 27.625.43
Once we add the extra rounds into the equation, we still see the general trend for the .300 WM with higher recoil energy than the .300 WSM rounds. The gap between the two is not as wide with the extra rounds. We can only see a little over two ft. lb of difference between the averages.
Both rounds produce a significant amount of recoil energy. In addition, you might see that shrink difference more if the .300 WSM rounds were to be simulated through a slightly lighter rifle.
Ballistics
When comparing two cartridges, the ballistics of each is always an important topic. Knowing how the round performs lets you understand if it will fit the situation at hand. In this section, we will look at velocity, trajectory, and ballistic coefficients of the .300 Win Mag vs 30-06. We do this to acquire the information necessary and draw some conclusions on which cartridge is best used.
Both of these are .30 caliber rounds. It would be easy to assume that a lot of their ballistic performances are similar. Remember that there are some distinct differences between the two cartridges. So it is important to take a close look at as many ballistic categories as we can.
In addition, it is important to note that though we are looking at these categories individually, that is only giving you part of the picture. All of these categories, including those outside of ballistics, go hand in hand and influence each other. We will attempt to bring all of this together when we get to the application section.
Velocity
Velocity is an important property of bullets for several reasons. For one, the faster a bullet is traveling, the less effect wind drift and gravity are going to have on the flight path. This is very important for long-range shots, which these cartridges are often used for. Once a bullet falls to a certain velocity, outside factors can greatly decrease the accuracy.
Velocity is also vital when it comes to stopping power. Most bullets designed for hunting expand on impact to create a more damaging wound. Hunting bullets also give optimal transfer of force to the surrounding tissue. These bullets need a proper amount of speed to get the correct terminal ballistics.
So whether you are hunting or bench rest shooting, velocity is an important characteristic to understand when choosing between two different cartridges. It influences just about every performance spec that is often discussed when looking at different cartridges.
We have compiled the velocity data for all ten rounds from the muzzle out to 500 yards and graphed them here (Graph 2).
Bullet Velocity Data
There are several conclusions we can draw from looking at this data.
First, these rounds have high velocities, both cartridges averaging nearly 3,000fps. At a distance of 500 yards, all rounds are supersonic with velocities above 2,000 ft.s. From the muzzle out to 200 yards, the .300 WMS has a slight advantage with a difference less than 100fps. Lastly, from the 300 to 500 yards, the .300 Win Mag has a slight advantage, but again, it is less than 100fps. At any range, both perform similarly.
The rounds for each cartridge are not grouping together. All of the ten rounds are interspersed in the graph. Upon looking at the muzzle velocities, three rounds outperform the others. Two of them from .300 WSM rounds and one .300 Win Mag round.
Below are the averages for all forty rounds we compiled for this article. Even with the increase in sample size, the general trend remains the same in regards to how close these two cartridges are to bullet velocity. One aspect that changed by adding the extra rounds is that the .300 WSM seems to keep its slight advantage over the .300 WM rounds out past the 200-yard mark.
Again, with the averages within 100 fps of each other, there’s a lot of overlap in performance between individual factory loads of these two cartridges. Both have potential for long-range shooting applications. For hunters, these rounds remain above supersonic speeds, looking from the velocity data above.
When bullets fall below supersonic speeds, the flight becomes less stable. Furthermore, the bullets become more susceptible to environmental factors. Understanding this allows you to take the necessary steps when calculating shot placement.
Average Supersonic Flight Limit (Yards)
.300 Winchester Magnum.300 Winchester Short Magnum 12551286
Both of these cartridges remain in supersonic flight out past the 1200 yard mark. While the .300 WSM has a slightly longer supersonic flight than the .300 WM, on average, it is only by thirty yards. If you look at the individual rounds (data not shown), you will see that the rounds from each cartridge mix thoroughly. If you want a round that remains supersonic, both the .300 WM and the .300 WSM have many viable options.
Ballistic Coefficient (BC)
The BC is important when you are looking at two cartridges designed to take larger game. It’s also essential for long-range shooting where the wind becomes more prominent. This is mostly the case when looking at the .300 WM and .300 WSM cartridges.
In the simplest of terms, the ballistic coefficient is a number that is derived from an equation taking into account a variety of bullet flight specs. The higher the ballistic coefficient, the less prone to wind resistance and drag the bullet is. In theory, a bullet with a better ballistic coefficient should be more accurate since it should be easier to stay on target after being fired.
If youâre never going to be taking shots out past 200 yards, the differences in the ballistic coefficients we are about to look at are negligible, but if youâre planning on getting any range on your shots, this should be an interesting section for you.
We have compiled each of the ten roundâs BC and graphed them here (Graph 3).
In this graph, the rounds from each cartridge have high ballistic coefficients while some have excellent ones. If we look at the averages, the .300 Win Mag rounds have a slightly higher BC at .553 while the .300 WSM has an average of .520. Like any category when dealing with cartridges, we are not going to be shooting the averages. If we look at individual rounds, the .300 WSM has two rounds at .45 and below while the .300 Win Mag only has one that falls below .5. Both cartridges have options with .6+ BCs which are going to be intriguing for the long-range guys.
And this is only five rounds for each cartridge. We are not under the impression that all rounds available are going to fall within this range. Generally, for factory loads, they are going to hover around these numbers. However, if you need a high BC, there are rounds of both cartridges available out there.
To get a little better idea of how the two compare, letâs look at the averages for our larger sample set.
Average Ballistic Coefficient
.300 Winchester Magnum.300 Winchester Short Magnum 0.4860.483
One of the noticeable differences is that the BCs for both cartridges drop significantly compared to the smaller sample set. Still, for average ballistic coefficients, both have pretty respectable numbers. The difference here is nowhere close to say that one cartridge has an advantage over the other. Both have very high BCs and both have rounds on the lower end of the scale.
Trajectory
Trajectory is one of the most discussed ballistic properties when it comes to discussing the performance between different rounds as well as between two different cartridges. When we talk about trajectory, we are only referring to elevation and how much a bullet will drop as it moves downrange. A bulletâs flight path has a characteristic arc with the bullet dropping in elevation over time. A lot goes into a bulletâs trajectory including bullet specs as well as environmental characteristics. The velocity and BC both affect the trajectory of the bullet as does gravity and wind resistance.
Most hunters/marksmen want a flat shooting round. And by flat we mean there is a less pronounced drop in elevation over time. This flatter trajectory makes it easier to adjust for shots over longer ranges and gives you more room for error when trying to quickly judge a targets range.
When getting into trajectory with ten different rounds, all with different powder charges and bullet weights it can get pretty cluttered in the discussion. Because of that, we wanted to step back and take a broad look at two rounds, one from each cartridge, that are very similar. They are the same manufacturer, the same bullet design, the same bullet weight, and very similar BCs.
If we take a look (Graph 4) itâs difficult to tell if there are even two separate lines. Based on this, we can begin to see that the differences between these two cartridges, when just looking at the skeletal design, is not the determining factor for which cartridge is going to show a more pronounced bullet drop. The bullet design and weight, as well as the powder charge, are what will determine each rounds trajectory. And there are some differences in the cartridge specs as well as the types and weights of bullets more often used for each cartridge.
Both of these rounds show close to 45 inches of bullet drop at 500 yards. It is not too bad for factory loads that are more suited for hunting rather than extreme range shooting. Letâs take a look at our ten rounds and see how they compare.
Short Range Trajectory
Most folks won’t think of the .300 WM or WSM for short-range trajectory. However, you are likely to take shots within 300 yards, especially when it comes to hunting. Because of this, we wanted to take a look at the trajectories of these rounds with the rifle zeroed in at 100 yards (Graph 5).
Short Range Trajectory Data
From this set of rounds, there’s no visible pattern regarding rounds from each cartridge grouping together. We also donât think we would, even if we had twenty rounds from each cartridge. At the 200-yard mark, there is 0.14-inch difference between the two averages. The .300 Win Mag having the slight advantage. The flattest .300 WM mag round has a bullet drop of 2.2â³ while the flattest .300 WSM round has a bullet drop of 2.6â.
At the 300-yard mark, we still see the rounds interspersed. However, we do see an increase in the difference between the averages of the two cartridges. The .300 WM has a bullet drop of 9.9 inches while the .300 WSM has an average bullet drop of 11.06â³, still, less than two inches. That change in the difference is mostly due to the .300 WM Trophy’s bonded ammo from Federal which only has a bullet drop of 6.6â, which is several inches better than any of the other Win Mag and WSM rounds. It can skew the data a bit but donât make the mistake of thinking that there are not other .300 WSM rounds out there that can give the same performance.
If we look at the rest of the rounds at the 300-yard mark, there is no difference in trajectory between these two cartridges. There are flatter and steeper rounds for each. Additionally, the steepest is only a little over 12â³ at 300 yards. This is more than manageable with todayâs rifle optics and a little hard-earned experience.
Again, even with more cartridges in play, we see the same trend pop up between these two cartridges. We have also added in a 400 yard marker for further comparison.
From this standpoint of just looking at computer generated data, there is nothing really to discuss between these two cartridges are short range when looking at trajectory. The averages show the .300 Win Mag has around half an inch less of altitude loss at the 300 yard mark but when you look at all of the individual rounds, their distribution make all of them seem like the same cartridge type.
If you go out to the 400 yard mark, the .300 WSM rounds have an average of 0.7 inches of bullet loss. From this data, either of these cartridges are going to provide options for flat shooting rounds and probably isnât the category you will need to focus on until you start trying to decide which round you are actually going to cycle through your rifle.
Long Range Trajectory
Most people might be more interested in how these two compare at longer ranges. So, we gathered the long range data and presented it here (Graph 6).
Long Range Trajectory Data
We measure the bullet drop (inches) out to 700 yards with the rifle zeroed in at 200 yards.
Before getting into the specifics, if we just look at the graph, several points of discussion come up. The first is that all ten of these rounds group together very tightly out to 500 yards. At the 600 and 700 yards, we start to see gaps form between the two rounds, but like the short range trajectory data, there doesnât seem to be any pattern in how the rounds from each cartridge group together. All of the rounds also show less than 110 inches of bullet drop at 100 yards which is pretty impressive for factory loads, with the majority of them designed for hunting purposes.
There is never more than an inch of difference between the averages of the two cartridges at any point over the bulletâs range. If you look individually, there are better performing rounds for both cartridges. The two flattest shooting rounds are a .300 WM and a .300 WSM round while the two steepest rounds are also a .300 WM and .300 WSM round.
And again, you might look at the numbers on the graph and realize you have seen other trajectory data with much flatter trajectories but remember we are only looking at factory loads. Both of these cartridges can be hand loaded to give better performance specs.
In the table below, we have listed the averages of the forty rounds we compiled and their long-range trajectory numbers. We also have a 1,000 yard mark for further comparison.
Here again, we do not see any significant difference in bullet drop between these two cartridges at the same yard markers that we looked at above. Interestingly, we do see a little more separation between these two cartridges at the 1,000 yard range. It is still less than 10 inches and when you look at the individual rounds, there are a number of .300 WM mag rounds that show trajectory perform as well or better than the top performing .300 WSM rounds.
Several rounds of the .300 WM have 190+ bullet weights category than the .300 WSM rounds. Those heavy rounds at 1,000+ yards appear to bring the average down a good bit at this range. And that is usually a tradeoff you get with heavier rounds. The physics just donât allow them to stay flat while still being manageable in other categories.
For hunting purposes, which both of these cartridges are used for, all the ballistic data is important, but if they canât bring down big and thick hided game, it isnât going to matter if the bullet gets there. So with that, letâs take a look at the stopping power of these cartridges.
Stopping Power
In this section, we will examine our ten rounds and look at the kinetic energy they carry along a flight path from the muzzle to 500 yards for our .300 Win Mag vs .300 WSM comparison. We will also examine the sectional densities for each round we have selected to represent both cartridges to determine the amount of potential penetration. Both of these cartridges were designed to be able to reach out at far distances and be able to still carry enough kinetic energy and punching power to kill the target on impact and large targets at that.
While both of these cartridges are used at the bench, they are also popular big game hunting cartridges which require a lot of stopping power. This section is probably going to carry more weight for hunters rather than just competition shooters, but itâs never a bad thing to know as much about a cartridge as you can.
There is a lot of debate out there as to how we can accurately estimate the stopping power of a round. Some argue that kinetic energy is the most important, some argue for momentum, and some argue that neither give you useful information. We are in the party that all of this points of comparison play a role in stopping power. While we will look at each separate from the others, they should all be taken into account when determining which cartridge would be more advantageous in a certain situation.
Now, there are more factors that go into a bullets ability to drop animals cleanly, such as the bullet design and its ability to cause serious wounds based on how the bullet expands when it reaches the target. We canât quantify this in our .300 Win Mag vs .300 WSM comparison. Because of that, we will strictly focus on energy that the bullet carries and will be transferred to the target and the potential amount of penetration you will get on the target.
Kinetic Energy
All bullets, once fired, carry kinetic energy that is generated by the force of the gunpowder being ignited and the weight of the bullet which is basic physics you learned in school. On impact, this kinetic energy is transferred to the target where it causes damage to surrounding tissue and organs.
As a general rule, you want at a minimum of 1,000 ft.lb force when trying to take down larger game, and probably more in the 1,500+ range when talking about bear, elk, and moose which these cartridges are often used for. We do think that the amount of energy a bullet is carrying is important to know and understand when using these rounds for hunting purposes, but we also know that those guidelines are arbitrary. Shot placement is equally if not more important than the amount of energy that the bullet is carrying.
This sub-category is going to cater more towards those looking for a hunting cartridge, but if youâre going to buy a rifle chambered for one of these cartridges, then there is no harm in understanding as much as you can about each.
And given that we are dealing with two cartridges that are known for their incredible knockdown power, this is an important section if your choice is coming down to these two cartridges.
We compiled the energy data from the manufacturers of these ten rounds and graphed them below (Graph 7).
Kinetic Energy Data
As we have seen with most of the other categories, there is a lot of similarity between these two cartridges. Though, we do see a little bit more of a distinction between the averages of the two cartridges.
Looking only at the averages, the .300 WM hold around a 50-100ft.lb advantage over the .300 WSM from the muzzle out to 500 yards. And while there are better performing rounds than others, there are options in both the .300 Win Mag and .300 WSM that will give you incredible bullet energy through 500 yards.
From the muzzle, all of these rounds show bullet energy levels greater than 3,400ft.lb with two of the Win Mag rounds showing greater than 3,700ft.lb of energy. With these two cartridges, we are more interested in the energy once we get out to the 100-300 yard range and beyond.
At these ranges, all ten rounds still carry more than 3,000ft.lb of kinetic energy, and all of them maintain this energy fairly well as they move to 200 yards where they all still have well over 2,500ft.lb of energy. From the muzzle out to 200 yards, all of the rounds group pretty tightly together but we do see the two .300 Win Mag rounds show slightly higher energy than the other eight rounds. From 300 to 500 yards, the difference shrinks between those two rounds and the other eight.
At 300 yards, all these rounds still have well above 2,000 ft. lbs. Several rounds, including both .300 Win Mag and .300 WSM, still, carrying more than 2,500ft. lb.
At 400 and 500 yards, we start to see the rounds begin to separate from each other. All of them still carry a tremendous amount of energy at these extreme ranges when it comes to hunting though with all of the rounds bringing more than 1,500ft.lb with two rounds still carrying over 2,000ft.lb, one .300 Win Mag and one .300 WSM.
While the differences between the two cartridges are the same amount, the slight advantage in kinetic energy has flipped from the .300 WM to the .300 WSM rounds at the muzzle and 100 yards. And this is one of the reasons why we wanted to include the numbers for a larger data set in the event that something like this would happen.
Again, there is not really a significant difference and the rounds from each cartridge are interspersed pretty evenly if we were to graph them. And with the formula for kinetic energy and what we know of the velocity between these rounds from the muzzle to 100 yards, we would expect there to be a slight increase in KE for the .300 WSM rounds at these markers.
Penetration (Sectional Density)
When hunting larger game, you often need your round to be able to penetrate through thick skin and tissue to reach vital organs. One way to determine the amount of penetration two cartridges will have is to compare the sectional density (SD) of the bullets used.
The SD is derived from a calculation using the bulletâs diameter and weight. A bullet with a higher sectional density should have greater penetration than a bullet with a lower SD. The sectional density alone does not indicate penetration. The velocity as well as the design of the bullet factor in as well. Higher velocities increase penetration as does highly bonded bullets that will not fragment on impact.
Deeper penetration is not always an indicator of a better cartridge. In addition, it all depends on what youâre shooting at. We’ll discuss this more once we get to the applications of these cartridges.
We are not stating here that penetration depends solely on the sectional density of the bullet. Penetration is a factor for stopping power. The sectional density is only a piece of the larger picture when it comes to penetration.
We calculated the sectional density numbers for the ten rounds and listed them in graph form below (Graph 8).
From these numbers, we donât see huge differences between the two cartridge types. Both cartridges have several rounds in the .25 to .3 range. Although, the .300 Win Mag has a slightly higher sectional density on average. While both cartridges use .308â bullets, the .300 Win Mag usually is loaded with heavier bullets than the .300 WSM.
In the table below, you will find the sectional density data from the larger data set.
Average Sectional Density
.300 Winchester Magnum.300 Winchester Short Magnum 0.2840.273
From this data, the .300 Win Mag still has a slightly higher sectional density than the .300 WSM rounds. Like most sections we have looked at, there is a lot of overlap in the rounds of both cartridges. In this case, with both of them having the same diameter, itâs just a case of which has heavier bullets.
Again, sectional density is only a part of a much larger equation that goes into stopping power. The momentum of the bullet is another indicator of penetration. It goes hand in hand with the sectional density and is the topic of the next section.
Penetration (Momentum)
Momentum simply describes the ability of an object in motion to stay in motion. The more momentum a bullet has, the more it is going to take to stop the bullet. For hunting large game, you want more momentum to push through thicker hide and bones, which are denser and provide more resistance. For home defense, you donât need the same amount of momentum. Of course, bullet design, sectional density, and expansion also influence a round’s penetration.
Sectional density plays a role in momentum as more momentum is conserved when the projectile, a bullet in our case, is striking a smaller area. With a smaller area providing resistance, more momentum is conserved, and the projectile can drive further into the target.
We have calculated the bullet momentum by using the bulletâs mass and velocity for each round and graphed them below (Graph 9).
Again, like most of the other categories, there is a lot of overlap between the two cartridge types, at least with the rounds we have selected. Both of these cartridges have rounds that leave the muzzle in the 70-80lb/f.s range with the .300 Win Mag rounds having a slight advantage when looking at the averages. The .300 Win Mag rounds have an average of 80.0lb/f.s while the .300 Win Mag has an average of 77.12lb/f.s. The difference between the two averages remains just about constant as the rounds move downrange to the 500-yard mark where the averages for the WM and WSM are 58.2lb/f.s and 22.3lb/f.s respectively.
And again, while the averages give a slight advantage to the .300 Win Mag, there are several .300 WSM rounds that provide just as much or more bullet momentum than several of the .300 Win Mag rounds.
In the table below, we have listed the average bullet momentum numbers over a 500-yard range for the forty compiled rounds.
When we look at the full data set, we see that the .300 Win Mag rounds still have a slight advantage over the .300 WSM, though the difference between the averages has tightened. Is this difference significant in the relation of cartridge to cartridge comparison? Most likely not, but like every other category has gone, there is some variation between individual round. Not just .300 WM to .300 WSM round, but between rounds of the same cartridge type.
Accuracy
Anytime you bring up two cartridge types, the argument for accuracy eventually rears its ugly and opinionated head.
Photo by Karolina Grabowska from Pexels
There is no doubt, that accuracy is incredibly important. Whatâs the point of using a round if it canât be put on target? The issue that we think never gets discussed is that the cartridge itself is only part of the equation when it comes to accuracy. Perhaps more important is how well the ammo cycles through your weapon, which it is the case that some ammo seems to work better with certain rifles than others. And you can never minimize the impact the person holding the rifle has on accuracy.
While measuring MOA is a great way of comparing rounds for each person individually, itâs difficult for us to compare cartridges that way for several reasons. The first is that those numbers can change from day to day based on the environmental factors and even the person doing the shooting. And as we mentioned earlier, the rifle being used might give different results than what you are using.
And we are not discounting that method of determining accuracy. We just donât think itâs the best method for looking at two cartridges with a broad view and being able to present you with data that remains consistent.
We can look back at some of the other ballistic characteristics we have already examined. That performance can give us some indication of how difficult it might be to place the bullet in the vitals or the bullseye. And of course, this is not taking into account the rifle or the user.
Accuracy and Velocity
We didnât see any huge difference in velocity from the averages of the cartridges out of the muzzle. Velocity, when paired with the correct barrel twist can make the bullet more stable. So your rifle is going to be a major factor in the velocity of these rounds being a pro or con. Still, a lot of people like high velocity and feel that their rounds perform better with a little extra speed. While the averages were slightly in favor for the .300 Win Mag (around 50 more fps), there were individual rounds, for both the .300 WM and .300 WSM that outperformed the other rounds in muzzle velocity.
When we look at the trajectory, we still did not see a lot of difference between these two cartridges. In fact, when we look at the averages of these rounds we see that there was less was never more than an inch difference in bullet drop in the short or long range trajectory data. With that, in this set of ten rounds, the flattest round was a .300 Win Mag round, but we also saw a .300 Win Mag round that was the steepest in bullet drop. Both of these cartridges showed pretty impressive trajectories for factory loads with an average of 6.64â³, 19.2â³, and 100.9â³ at the 300, 400, and 700-yard mark.
Other Factors Affecting Accuracy
Besides trajectory, the bullets ability to resist drag and wind resistance is also a factor in helping accuracy. We looked at the ballistic coefficients for all of these rounds and saw that the .300 Win Mag had a slight increase in their average BCs over the .300 WSM. With that, there were several .300 WSM rounds with BCs from .5 to over .6. So, we donât think one cartridge has an advantage over the other. .300 Win Mag rounds are often a bit heavier than the more popular .300 WSM rounds. This is mainly due to feeding issues with the shorter actions of .300 WSM chambered rifles. If there is no issue with the rifle, there are several 190+ grain weight WSM cartridges out there that give higher BCâs than the 185grain and lighter rounds.
Finally, we did see some differences in the recoil energy that is generated between these two cartridges. Both produce enough recoil to influence a shot, especially when you have been shooting for several hours where fatigue can set in and especially if a less experienced marksmen is holding the rifle.
There was a trend for more recoil energy with the .300 Win Mag rounds, and we also have to take into account the difference in rifle weights between these two cartridges. Rifles chambered for the .300 WSM are lighter than rifles chambered for the .300 Win Mag and this reduction in weight often means a bit meaner kick. Itâs still relative though, and might not make much of a difference to a lot of you reading this. So while both cartridges have a good amount of recoil, itâs still not something that is going to make you miss a lot of shots once you have put some time in with handling the rifle and the round.
Barrel Length
And one final issue that we want to bring up is the barrel length. We mentioned that the .300 WSM is often used in shorter, lighter rifles. Some of this reduced weight often comes from using a shorter barrel, and there are a lot of arguments out there for longer barrels increasing the accuracy of the round. Now, itâs not directly correlated such as an extra inch of barrel gives you a certain amount of tighter groupings, but the physics behind a longer barrel and the impact it has on a bulletâs velocity and stability when leaving the barrel implies that accuracy would be positively affected. Itâs nothing we can look at with these ten rounds under our criteria, but itâs something we thought you would like to take into consideration and research a little more on your own.
Price & Availability
The ongoing ammo shortage is affecting the .300 as well. While you can find both the .300 Win Mag and the .300 WSM can in major retail stores, there are usually more options for the .300 Win Mag. It is an older round with a much larger following. In addition, the WSM and the manufacturers know this. Itâs not that you canât get what you want of the .300 WSM, but you might have to shop around more for it.
As far as price goes, it depends on the individual round. If you were to take the price of every round for each cartridge and average it, the .300 Win Mag might be a couple dollars more expensive. However, most folks are more concerned with the performance of the round. If it gives you the performance, a few extra dollars per box is not going to be an issue. Both of these cartridges are a bit more expensive than other centerfire cartridges. However, they also bring a lot more to the table regarding stopping power and ballistics.
AmmunitionPrice (20 Rounds) .300 Win Mag Federal Vital-Shok Trophy Bonded 180gr$50 300 Win Mag Federal MatchKing BTHP Gold Medal 190gr$50 .300 Win Mag Nosler Trophy Grade AccuBond Long Range 190gr$55.20 .300 Win Mag Barnes Precision Match OTM 220gr$43.80 .300 Win Mag Hornady Superformance SST 180gr$42.47 .300 WSM Winchester Expedition Big Game 180gr$35.82 .300 WSM Federal Vital-Shok Trophy Bonded Tip 165gr$57.99 .300 WSM Federal Edge TLR 200gr$44 .300 WSM Hornady ELD-X Precision Hunter 200gr$57.99 .300 WSM Barnes VOR-TX TTSX Boat Tail 165gr$46
Applications
Just from looking at these factory rounds, there is no difference in velocity when looking at the averages. The .300 Win Mag rounds do have around an extra 40-50fps at each range marker. How much this extra velocity aids in accuracy isnât something we can adequately determine in this article. Some people like a little extra velocity out of the muzzle, especially long-range shooters, and there are .300 WM and .300 WSM rounds that give you that.
These high-velocity rounds also means a little extra kick. For most people, this recoil is manageable especially given the extra stopping power and trajectory you get from it. Both hunters and target shooters use these two cartridges for long range shots. For factory loads, both of these cartridges bring pretty impressive trajectories. They are not as flat shooting as hand loads, but for those looking to get into one of these cartridges and then move on to handloading, they are going to do well on the range. Both also have round options with very high ballistic coefficients which is always beneficial when you start dealing with higher wind speeds and 500+ yard shots
These characteristics are also advantageous to hunting large game where shots greater than 300 yards are common. Both of these cartridges carry well over 2,000ft.lb of energy at 300 yards with several from both cartridges carrying over 2,500ft.lb. If we take it out to the 400-yard mark, we are still talking about an average right at the 2,000ft.lb mark which exceeds the general limit you need for big North American game. While bullet energy isnât everything you need for stopping power, it is still an important part, and these numbers should make you feel more comfortable when taking a shot.
Big Game Hunting
When it comes to hunting big game, there is one advantage for the .300 Win Mag, and that is the bullet size. These heavier bullets provide more penetration and stopping power that is always appreciated when taking down large game. And as we mentioned before, there are .300 WSM rounds that use the 200-grain bullets, but we have come across a lot of problems that people have when feeding these large bullets through short action rifles.
If your particular rifle can handle them, then itâs not an issue at all. While we saw slight increases in the averages for SD and bullet momentum for the .300 WM, the .300 WSM were not far off at all and there are rounds that provide high performance in both categories. As far as being able to get deep penetration, both of these cartridges are well suited for the job, based on the data presented here.
Best Rounds
Top Hunting Round
The .300 Win Mag Nosler Trophy Grade, AccuBond Long Range 190gr round, stands out to us from a hunting perspective. For large and even dangerous game this is an excellent round. The Accubond bullet design gives you deep penetration on large game with controlled expansion to provide a lot of damage. Even at 500 yards this round still carries 2,016ft.lbs of energy, so range and stopping power is not an issue even for larger game. It has an incredibly flat trajectory out to 300 yards and is even manageable at the 400-yard range when the adrenaline is pumping with a ballistic coefficient of 0.64. For a large game hunting round, this one has all the characteristics you look for.
For big game hunting, the Hornady 200gr Precision Hunter is a great choice. Outside of the bullet design, which is going to provide controlled expansion to deliver penetration as well as deliver the huge amount of kinetic energy this bullet carries, it also carries a ton of momentum. With all of these factors, you are going to get the needed penetration for large and tough game. On top of that, this round has an incredibly flat trajectory at 300 and even 500 yards and a BC of .597 which will make things a bit easier when dealing with less than ideal wind conditions in the field.
Looking for the best budget hunting rifles, check out our guide.
Top Range Round
For the .300 Win Mag, the Hornady Superformance SST 180gr stands out to us as an excellent round to bring to the range. This round offers a decent ballistic coefficient though not as high as some of the others, but it is also one of the least expensive .300 WM we have examined. Even so, it offers the highest velocities and the flattest trajectory than any other round with less than 100 inches of bullet drop at 700 yards which is very impressive for a factory load.
If you are on the range, we like the .300 WSM Barnes VOR-TX TTSX 165gr round. It holds off on the recoil energy just slightly compared to the other rounds but still provides one of the flattest trajectories compared to the other .300 WSM rounds that we have discussed and used in our average tables. This round is also top of the list when it comes to muzzle velocity. It doesnât have the highest BC compared to the other rounds, but it is still fairly high, and users seem to be very happy with its performance at long ranges.
Conclusion
After looking at the data for this sample of rounds from the .300 Win Mag and .300 WSM, we have seen that there is not much difference when looking at the cartridges. You get changes in performance from the individual rounds, but itâs tough for us to say which cartridge gives you more of a certain ballistic or other performance component.
The biggest difference between these two cartridges is not the ballistics, but in the rifle platforms they can be used. Itâs always good to look into the similarities and differences of two cartridges, but at times, your decision really should be made based on other factors. That just happens to be the case when looking at the .300 Win Mag vs .300 WSM.
What it all comes down to between these cartridges from a ballistic/performance standpoint is personal preference, in our opinion. For long range shooting or chasing a bull moose, both of these cartridges, when shot with confidence and skill, are going to put meat in the freezer.
Ammunition List
AmmunitionPrice (20 Rounds) .300 Win Mag Federal Vital-Shok Trophy Bonded 180gr$50 300 Win Mag Federal MatchKing BTHP Gold Medal 190gr$50 .300 Win Mag Nosler Trophy Grade AccuBond Long Range 190gr$55.20 .300 Win Mag Barnes Precision Match OTM 220gr$43.80 .300 Win Mag Hornady Superformance SST 180gr$42.47 .300 WSM Winchester Expedition Big Game 180gr$35.82 .300 WSM Federal Vital-Shok Trophy Bonded Tip 165gr$57.99 .300 WSM Federal Edge TLR 200gr$44 .300 WSM Hornady ELD-X Precision Hunter 200gr$57.99 .300 WSM Barnes VOR-TX TTSX Boat Tail 165gr$46
More .300 articles:
.300 Winchester Magnum: A Brief Guide
.300 Win Mag vs .308 Win â Cartridge Comparison
.300 Win Mag vs .30-06 Sprg â Cartridge Comparison
.300 Blackout vs .308 Win â Cartridge Comparison
Best Concealed Carry Insurance
Beginner Firearm Safety, From Safe Storage to Safe Shooting
Venison usually refers to deer meat but it can also include any wild game meat such as elk, carabao, and antelope. Canning venison is a great way to preserve the fall harvest and fill your shelves with shelf stable foods for quick meals.
It will also free up freezer space and help prepare you for power outages.
Neither my husband nor I grew up in a hunting family, fishing yes, hunting no. However, when we moved to this area we met many people who hunt and over the years we have become a family who eats wild game. Each fall you’ll find me canning venison as it’s my favorite way to preserve venison (and beef).
I’ve had a love/hate relationship with venison since the first time I ate it at a friend’s house. There have been times I had it and it was wonderful and at times hardly edible. There are a lot of variables such as the age of the deer and how it was butchered that will determine how “gamey” the meat is. We (as in I) do not like the “gamey” taste although I know many people who do.
Canning venison seems to remove the gamey flavor and once you add onions and garlic it really makes for a nice quick main dish.
In full disclosure, I have to say that I was a bit worried about eating canned venison the first time. The finished product doesn’t look very appealing (in the jar). However, when I opened the jar my daughter said “That smells good!” and you know what? It did.
I put it in a skillet, simmered it for 15 minutes and added some flour to make a gravy. The meat was very tender and tasty. I’ve been canning venison (and lots of other meats) ever since.
Contrary to what some sites say, you do have to use a pressure canner to can meat. It is a low-acid food which is not safe to can in a water bath canner.
Also, you cannot put the flour in the jar to make the gravy ahead of time – the flour can coat the jar and mess up the process.
If you’re worried about the meat tasting strong or gamey, you can add a little tomato juice or sauce to the jars before canning. This will mellow the flavor of strong-flavored wild meats.
Canning venison is just like canning any other meat and you can use these same directions for canning wild game, such as elk or moose, and beef or chicken. The process is the same.
Even though venison doesn’t have much fat, remove any excess fat and any silver skin, which is the connective tissue. It can seem tedious but it really does go quickly and will make for a better end product.
Each quart jar will hold about 1 1/2 pounds of cubed venison or beef. That should help you figure out how many jars you need.
It’s recommended that salt be added to the canned meat, it’s just for flavor not for safety so it can be omitted if you want to. Also, you don’t have to use canning salt, any pure salt is just fine.
You can also add any dry spices such as black pepper, garlic or onion powder to the jars without compromising the safety.
Here are some tips for using a pressure canner. Pressure canning is super easy, just follow the directions that came with your canner. This is the pressure canner I have and I really like it. I like that it doesn’t have a gasket I have to worry about and that I can can 7 quarts or 18-19 pints in one batch.
I also like to use Tattle reusable lids for our canned venison. I try to use them for any canning that I do for our family as it really cuts down on the cost of canning. If you’re using metal disposable lids, make sure to use new lids as they are for single use only.
I like to keep track of all my home preserved food with these worksheets. You can get a copy emailed to you by filling out the form below.
Raw pack vs hot pack for canned venison
There are two ways to can venison (or beef) and both result in super tender meat. You can either raw pack or hot pack the venison.
Sometimes I choose to raw pack the meat simply because it’s faster, but I do think I get a better end product for storing when I hot pack the venison. Sometimes when I raw pack venison there isn’t enough natural meat juices to cover the meat.
You don’t need to add water or broth when you raw pack venison as the meat will make it’s own juice during the canning process.
Just know that it might not make enough juice to fully cover the meat in the jars, and it’s totally fine. The meat is still safe, but the meat not covered will darken over time.
Canning venison with the hot pack method means that you precook the meat in a small amount of fat before you put in the jars. Then you pour the drippings, broth, or hot water over the meat. This helps you know that there will be enough liquid to cover the meat in the finished product but it takes a little longer.
When you serve the meat you need to heat it up, some resources recommend boiling home canned meat and vegetables for 10 minutes before serving but that is no longer the recommendation from the National Center for Home Food Preservation. But it’s probably not very tasty straight out of the can, so go ahead and heat it up.
How to can venison with the raw pack method
Wash canning jars and lids in hot soapy water.
Put the pressure canner on the stove and add water according to the manufacturer directions.
Turn the heat to medium high to heat the water – you want it hot but not boiling (about 140F)
Put the clean canning jars in the pressure canner to keep them hot while you prepare the venison.
Cut the raw venison into cubes, remove any excess fat and muscle tissue (silver skin)
One by one, remove the jars from the canner and fill each jar with the raw meat and leave a 1-inch headspace. You’ll want to firmly pack the meat down.
Add onion and garlic to each jar if desired, if you add onion and garlic you might need to remove some meat so you still have a 1-inch headspace.
Add 1/2 teaspoon of salt per pint and 1 teaspoon of salt per quart, if desired.
Wipe jar rims with a clean damp cloth.
Top the jars with lids and screw bands on. I really like to use canning reusable lids on these because I don’t normally give these as gifts.
Place filled jars into the pressure canner (prepared per manufacturer guidelines).
Lock the lid
Turn up the heat to medium-high
Once it’s boiling and you hear steam coming from the vent, let the steam vent from canner for 7 minutes, then put weight on the vent,
Continue heating until you reach 10 pounds pressure (adjusting for altitude if necessary)
Process pint jars at 10 pounds of pressure for 75 minute, and quart jars for 90 minutes
After processing time is finished, turn off heat and let pressure go all the way to zero psi
Once the canner is completely depressurized, remove lid.
Let the jars cool in the canner for about 10 minutes.
Remove jars with a jar lifter and put them on a towel on the counter to cool overnight.
Once they’re cool, remove bands, wipe jars, and store in a cool, dry place.
How to can venison with the hot pack method
Wash canning jars and lids in hot soapy water. The jars will need to stay hot while you prepare the meat.
Turn the heat to medium high to heat the water – you want it hot but not boiling (about 140F)
Put the clean jars in the pressure canner to keep them hot while you prepare the venison.
Cut the raw venison into cubes, remove any excess fat and muscle tissue (silver skin)
Brown raw meat in a small amount of oil. No need to cook it all the way through, just until it’s at the rare stage and releasing it’s juices.
One by one, remove the hot jars from the canner and add the partially cooked venison to each jar.
Add onion and garlic to each jar if desired.
Add 1/2 tsp salt per pint and 1 tsp salt per quart if desired.
Fill each jar with the hot venison and leave a 1-inch headspace.
Pour the drippings over the meat leaving a 1-inch headspace.
Use a bubble remover or silicone spatula to get air bubbles out of the jar by sliding the bubble remover between the jar and the meat and gently pressing the meat towards the opposite side of the jar.
Add hot water, broth or tomato juice to the jar to cover the meat.
Wipe the rims of the jars with a clean damp cloth.
Top jars with lids and screw the bands on. I really like to use canning reusable lids on these because I don’t normally give these as gifts.
Place filled jars into water in pressure canner (prepared per manufacturer guidelines).
Lock the lid
Turn up the heat to medium-high
Once it’s boiling and you hear steam coming from the vent, let the steam vent from canner for 7 minutes, then put weight on vent
Continue heating until you reach 10 pounds pressure (adjusting for higher elevations if necessary)
Process pint jars for 75 minute, and quart jars for 90 minutes
After processing time is finished, turn off heat and let pressure go all the way to zero psi
Once the canner is completely depressurized, remove lid.
Let the jars cool in the canner for about 10 minutes.
Remove jars with a jar lifter and put them on a towel on the counter to cool overnight.
Once they’re cool, remove bands, wipe jars, and store properly.
Adjusting Pressure for Altitude:
If you live 1000 feet or more above sea level you’ll need to use a pressure higher than 10psi for canning meats. Use the graph below which is from the National Center for Home Food Preservation.
How to cook canned venison
Home-canned- venison is wonderful even if it doesn’t look so tasty in the jar. There are three ways I like to use canned venison.
Our favorite way is to put it in a skillet and add flour to make a gravy. I just put a bit of water in the empty mason jar and add a heaping tablespoon of flour. I mix is up to get rid of clumps. Then slowly pour it into the hot meat and stir. If it needs to be thicker I add more flour, if it’s too thick I add a bit of water. I add salt and pepper. If I want something more like Mexican carne guisada, I add cumin and a bit of chili powder. I serve it over mashed potatoes, using canned potatoes when I’m short on time.
Sometimes, we’ll cook the meat and let the juices evaporate then add bar b que sauce for bar b que sandwiches.
Lastly, I’ll sometimes use canned venison and other home canned vegetables to make a quick stew.
More Venison Recipes
Venison can be used as an alternative in any recipe that calls for red meat, although the flavor may be a little different since wild game meat is leaner than beef and most other red meats.
If you have a freezer full of venison and don’t want to can it all, there are plenty of other ways to prepare it. We love making venison jerky with some of our deer meat.
Here are 50 recipes to make delicious venison burgers, steaks, stews, chili and much more!
Do you can venison or other meats? If so, share your ideas in the comments.
"Master the art of precision shooting with dry firing air rifles. Enhance your aiming skills, trigger control, and muscle memory without using ammunition. Discover...
")
")
")
")
")


 If you are eager to learn, I would honestly recommend “SAS Survival Handbook: The Ultimate Guide to Surviving Anywhere”, which you can get on Amazon. It has every possible aspect of survival knowledge and technology, and the latest edition covers such new topics as terrorism and urban survival. The books teaches you about being prepared, making camp, finding food, first aid, disaster survival, and so much more.