What Is A Shotgun Choke?
A choke is simply a tapered constriction of the gun barrel’s bore at the muzzle end. The exit end of the choke is smaller by some dimension than the actual bore of the barrel. This difference is the amount of constriction. For example if the bore of the barrel is .730 and the exit dia of the choke is .710 you have a constriction of .020. The amount of constriction for a given degree of choke will also vary between manufacturers. As a general rule for standard chokes the total range will be between .000 and .045 thousandths of an inch under bore diameter. In the case of special purpose turkey chokes it can be as much as .100 or 1/10th of an inch. The length of the choke can vary as well. Most, but not all chokes will have an overall length of between 1.5 and 4 inches. Note that many fixed choke barrels marked skeet will actually be .000 or cylinder.
They can be grouped in 3 general types:
1- Fixed chokes- They are made as an integral part of the barrel and cannot be readily changed except by a gunsmith and any alteration is considered permanent.
2- Interchangeable chokes- These can be of the “screw on” style which is externally attached or the “screw in” which is recessed into the barrel. To change the degree of constriction you simply remove and replace with a choke of a different diameter.
3- Adjustable chokes- This style of choke is adjustable throughout the entire range by turning a sleeve, which collapses or allows a collet to expand thus changing the exit diameter. A popular choke of this type is the Polychoke.
The internal design of chokes can also be broken down into three main groups:
1- Conical Parallel- This style has a cone that blends into a parallel section which helps to stabilize the shot charge as it leaves the choke.
2- Straight Conical- This has a cone only. Where the cone stops is the point where the shot exits the choke.
3- Wad Retarding-They do not have the constriction in the same manner as either of the above designs but instead use bumps or projections to alter the shot pattern.
The most common design in use is the conical parallel. All Trulock Chokes are of this design.
Shotgun Bore Diameter and Pattern Performance
I am often asked the above question by people who are interested in purchasing a new shotgun. They reason that if a specific bore size inherently gives better, that is more even patterns, then it makes sense to purchase a shotgun with that bore diameter.
Shotguns that were made in the U.S.A. were for many years, all of the same nominal bore diameter (.730 plus or minus the tolerance of the individual manufacturer) as the U.S. standard for 12 ga was .7299. With the rise in popularity of foreign shotguns such as Beretta we were introduced to smaller bores running in the nominal .721/.725 diameter. Stan Baker to the best of my knowledge was the first to do extensive experiments with backbored barrels (the process of enlarging an existing bore diameter) taking the 12 ga bore up to a nominal 10 ga diameter of .775. Some time back Browning added a new choke design to their line which they named Invector Plus to differentiate it from their original design called Invector. The new chokes and the barrels were based on a nominal .740 bore diameter. I believe that Browning was the first company to offer a factory barrel with a bore diameter that was significantly larger than standard. Currently most of the major shotgun manufacturers offer at least some models with bores larger than their “standard” bores. Some have gone totally to a new larger bore. The results of this are that today’s shooter has a very wide range of bore diameters to choose from.
Pulling from my memory I can recall the following nominal 12 ga. bore sizes. These may not be exact numbers as each manufacturer has plus and minus tolerances. Some of the below numbers have been rounded when converting from metric measurements and some for my convenience.
.725
.730
.733
.735
.740
.745
.774
Now that you have all of the background information, you can get my answer.
I have always been able to obtain the pattern that I was looking for within reason (no 100% patterns at 80 yards) with all of the above bores by patterning with different chokes and or shells. I have had shotguns on occasion that took quite a bit of work to obtain the pattern I wanted but this has never been limited to a certain bore size as they were always a random mix.
Shotgun Patterns
Patterns are normally expressed as a percentage such as 50%, 60%, 70% ect. This is the commonly accepted method comparing pattern density. In a 50% pattern ½ of all the pellets contained in the shell will strike inside of a circle of 30 inches in diameter. To find the percentage of any given load divide the number of hits inside the circle by the total number of pellets contained in the shell. You can obtain the approximate number of pellets any given load will have from a shotgun shell reloading book or you can open a couple of shells and actually count the pellets. Normally all pattern testing is done at a distance of 40 yards with the exception of cylinder and skeet 1 chokes in all gauges and all chokes for the .410 bore which are normally measured at 25 yards. Industry pattern percentages for chokes were developed using the preceding distances. If you want to compare any given choke to the industry figures you should do your pattern testing at the same distance.
The purpose for this is to allow you to select a choke that will throw a pattern that is as large as possible without having the pellets so far apart that the target can move through the shot string without receiving multiple hits. For shooting both game and clay targets you want a pattern that is perfectly even in pellet distribution over the 30-inch circle. Having said that, and after looking at thousands of patterns over a span of 25 years I could count on my fingers the number that I would call “even” and if these were measured close enough they would not have qualified. In this instance “very close” is excellent. Two exceptions to the preceding would be buckshot and turkey patterns. With both of these you are looking for a tight center cluster of pellets.
One thing to remember –The only thing that is consistent about shotguns is that very few things are consistent. Identical guns with the same degree of choke and using the same shell may not pattern the same. The same load between various brands of shells can pattern differently. Patterns will change when changing from hard to soft shot. Patterns can change when anything in the shell changes such as different wads, powders or primers. What I am trying to get across is that when you change anything such as brands, shot size, or components you will need to check the pattern as it could have changed, sometimes by an extreme amount.
Once you find a choke/shell combination that gives you the pattern you want it should remain reasonably consistent as long as nothing is changed. I am satisfied as long as the percentage stays within a 5% plus or minus deviation.
The below chart shows the relationship between the degree of choke, the percentage and constriction based on lead shot. Keep in mind that the percentages are a guide only. What you actually want is a pattern that is dense enough to insure multiple hits on your target at the distance you normally shoot.
Lead Shot Choke Chart
Constriction Percent Cylinder .000 40 at 40 yds- 70 at 25 yds Skeet 1 .005 45 at 40 yds- 75 at 25 yds Imp Cyl .010 50 at 40 yds Skeet 2 (lite mod) .015 55 at 40 yds Modified .020 60 at 40 yds Imp Mod .025 65 at 40 yds Full .030 70 at 40 yds Extra Full .040 73 at 40 yds Turkey .045 Plus 75 PLUS at 40 yds
Keep in mind that this chart should be used as a starting point only. Select the choke and pattern it. Change chokes or loads as needed to get the pattern you want. If you do not pattern your gun please feel free to accept this chart as being infallible.
What Choke Should I Use
The most frequently asked question we get is “What choke do you suggest”?
Use a choke that will give you 70 or so percent patterns at the distance you plan to shoot.
If you look back at the “lead shot choke chart” it is obvious that open chokes at long distances will have a much more open pattern than tighter chokes. I will not argue the point that you can certainly break/kill targets at 40 yards with a skeet choke but the odds are certainly not in your favor. Try your best to estimate the distance that you would normally encounter for a specific shooting condition and select a choke that gives you an evenly spaced 70% pattern with your choice of shell. Rarely, will your estimate be “on the money” so test pattern this combination at distances both closer and farther from your established base line. If the shooting distances change then change your choke to match them.
When I first started dove shooting many years ago, I noticed there were always one or two men at every shoot that almost never missed a bird. After long observation I realized that the one thing that each had in common was that they picked their shots instead of blasting at every bird in the field. They were simply shooting those birds that were within range of whatever gun/choke/shell combination they were using. In my opinion shooting range equals 70% pattern density.
While there are other variables, for all practical purposes chokes will have the biggest effect on pattern density. I look at density from two different ways. The first is the pattern percentage. This is simply a figure telling you how many pellets out of the total number of pellets that were fired at the target hit inside a thirty-inch circle. Example: 250 pellets were in the shell and 200 landed inside the circle. Divide 200 by 250 = 80%. Percentage is percentage and it does not matter what size of shot is used.
The second way is pellet spacing. Common sense tells us that a 1-¼ oz. load of #8 shot will have many more pellets than a 1-¼ oz. load of #4 shot. If both loads pattern at 70% you will have more # 8 shot in the target than you would have with 4’s. The pellets must be close enough that the target cannot slip through. While I generally think that the 70% rule is sufficient, some of the larger pellets may not give enough density. Pattern and make sure.
How To Pattern
I like to use paper that measures 4 feet square. Paper this size may be hard to find locally. If it is not available try taping several sheets of butcher paper or newsprint together. Bruce Buck the “technoid” of “Shotgun Report” suggested using red resin flooring paper. This is available at any home supply store and shows the pellet holes perfectly when viewed from the back. He noted it is available only in 36-inch wide rolls but it cuts and tapes easily. If you use small paper and your gun does not shoot to the point of aim, part of your pattern could be off of the target. You would probably confuse this with a bad pattern. Mark the target center for use as an aiming point. I strongly suggest that you use a padded shooting bench when patterning. At this point you are not checking the gun for fit and a bench rest helps to remove some of the variables. Note that if your head/eye is not located in the same place on the stock between bench rest and offhand shooting your point of impact will be different. From the correct distance, shoot at the center of the target. I would do this a minimum of 5 times on different targets with each shell or choke that is being tested. You will need to draw a 30-inch circle around the most dense portion of the pattern on each target. If you intend to do much of this get a 30-inch diameter piece of thin Lexan [Plexiglas]. You can easily move this around on the paper to find where to draw the circle. Count the pellets inside of the circle. Divide this number by the total number of shot contained in the shell and you will have your percentage. Take the percentage from each target, add them and divide by the total number of shots fired for each shell or choke. This will give you the overall average for that test. Sounds like a royal pain doesn’t it? It is, but there are no short cuts if you really want to know what your shotgun is doing.
After you have finished look carefully at each pattern for holes that are big enough to let your intended target slip through. You want a dense enough pattern to ensure multiple hits.
Point of Impact
We are asked on occasion about chokes that do not center the pattern exactly on the aiming point. Most shooters want a shotgun that centers the pattern exactly with the point of aim. Most shotguns are manufactured in theory to do this. The problem arises between theory and fact. It is not unusual to find shotguns that shoot high or low and to the right or left or a combination of these. Shotguns that pattern ½ above and ½ below the point of aim have what is commonly known as a 50/50 pattern. One that shoots ¾ of the pattern over and ¼ under the point of aim has a 75/25 pattern and so on. Certain guns are designed to give patterns other than 50/50. WE WILL ASSUME that you know if your gun was designed to give a pattern other than 50/50.
Some of the common reasons for off center patterns are listed below.
1-Defective choke tube
2-Bent barrel
3-Choke/barrel alignment
4-Loose barrel
5-Poor gun fit
6-FLINCH
This could also result from a combination of any of the above.
To check your gun for point of aim we suggest the following
1- Shoot from a padded rest.
2- Make sure to get perfect bead alignment if your gun has a center bead, if it doesn’t get the rib perfectly flat, with the bead visible.
3- Use the same load as you will use in the field or on the range.
4- Squeeze the trigger. This is easier said than done as most shotgun trigger assemblies give anything but a good pull.
5- Use targets with a center aiming point.
Shoot several targets, change chokes and repeat.
I would suggest you do this with several different chokes. If you are using aftermarket chokes also test some of the factory tubes that came with the gun.
1- If all of the chokes shoot to the same spot or at least very close to the same, your problem is not with the chokes.
2- If your point of impact changes with each choke you test your problem is not the chokes.
3- If one choke shoots to a different point of aim and the others do not. I would say that choke is defective and a call to the manufacturer would be in order.
One other thing you should be aware of is the “point of convergence” [POC]. This problem will be found only on side-by-side or over/under shotguns. Both barrels should shoot to the same spot. Again what works in theory seldom works in practice. Generally with O/Us the top barrel will shoot high. When testing for proper POC you will find it somewhat easier if you use tight chokes. If the POC is close, be happy, many are not. If you cannot live with the error I suggest you talk to the manufacturer.
Steel Shot/Waterfowl Chokes
Much has changed over the years with steel loadings. The quality and consistency of the shells has been greatly improved. However, the fact that steel shot exerts much more stress on choke tubes has not changed. The problem is that steel shot is much harder than lead. It will transmit much more energy to the choke when it strikes the conical portion and if the tube is not of sufficient strength it will cause it to deform. This is known as “choke creep”
Over a period of time choke creep can lock a choke in the barrel so that it is next to impossible to remove. Most Trulock Chokes are rated for use with steel shot from cylinder bore through improved modified with the exception of the Tru-Choke S.D. which are not recommended for any shot other than lead. In addition our Super Waterfowl Choke was designed especially for steel and all other environmentally friendly shot.
It is strongly suggested that you use our Extended Precision Hunter style choke for steel shot as they normally give a superior pattern over the flush style chokes.
Close Range -approximately out to 30 yards – Skt 1= pattern percentage of about 55% Medium range- approximately out to 35 yards-Skt 2 [light mod] =pattern percentage of 65%
Medium range- approximately out to 35 yards-Skt 2 [light mod] =pattern percentage of 65%
Long Range-35yards and further- Improved Modified =pattern percentage of 75%
Extreme Range= Super Waterfowl series=pattern percentage of 80% plus
The above suggestions normally work well with number (4, 3, 2 ect.) size steel shot. If you are using letter size (BB, BBB ect.) steel you may find your best results using cylinder (close range) improved cylinder (mid range) and modified for long range.
If you are switching from standard velocity steel to fast steel and you notice a decrease in pattern performance try backing off of choke constriction by .005 from whatever size you presently use.
These suggestions should be used as a starting point and should not be taken as a substitute for patterning your shotgun.
The recommendations below are for Trulock Chokes only.
Tungsten Iron- Use the same choke constrictions as you would for steel shot.
Tungsten Shot such as Hevi-Shot, Hevi 13, Winchester Extended Range and Federal Heavyweight.
For waterfowl and upland bird hunting we suggest you use two sizes smaller shot than you would with steel. We find that these alloys can be used in chokes with much more constriction than you can use with steel shot and they retain velocity much better. This, in my opinion makes them the ultimate choice for long range shooting. For normal patterns using # 6 thru # 2 size shot we like a skt 1 for close range, a skt 2 (light mod) for mid range and improved modified for long range. For shots on the long side of 40 yds try the extra full constriction or one of our Super Waterfowl chokes.
This type of shot can be used in our turkey chokes and normally deliver excellent patterns.
Bismuth – Use the same chokes you would use with lead shot.
All current production Trulock Chokes are marked on the body if rated for steel or tungsten or both.
Turkey Chokes
We make a wide assortment of chokes that fall under this heading. No one choke works well in all guns with all loads but one thing has to be consistent, the shot shell. You will have to shoot premium factory loads or assemble your hand loads with the best components available in order to get good dense patterns at long range. While this basically holds true for all shotgunning it is especially so when hunting turkeys. You have a very small kill zone even when the bird is at close range and it is imperative that you know exactly what your shotgun and shell is capable of doing. In testing different shells we have found several that work very well.
1- Hevi Shot
2- Federal Premium Mag Shok Heavyweight
3- Winchester Supreme Elite Xtended Range Hi-Density- No longer loaded but some existing stock may be on dealer’s shelves.
4-Winchester Long Beard™ XR™ Scroll down for more information
As a rule we found that the shells with “heavier than lead” pellets shot tighter patterns than those using lead but this may not be the case with your gun.
To get a dense pattern with a tight center you will need the Precision Hunter style choke. Our three most popular chokes have exit diameters of .670, .665 and .660. Although some shotguns like a .680 generally one of the above ends up working better. We also make a.650 and .640 but these are better suited to card shooting and not live bird hunting as they like smaller # 8 shot better. The smallest exit diameter does not always give the tightest pattern. We find that the smaller the exit diameter the more erratic the patterns. Normally one particular load will pattern considerably better than the rest. Let me repeat that you will be wasting your time to shoot a cheaply made or promotional type shell. We have patterned the above listed shells with our chokes and make the following suggestions.
Suggested turkey chokes and shot size
.690 first choice for .774 bore guns- #5/6 lead, #6 “heavier than lead”
.670 first choice for .740 bore guns- #5/6 lead, #6 “heavier than lead”
.665 first choice for .730 bore guns- #5/6 lead, #6 “heavier than lead”
.660 first choice for .725 bore guns- #5/6 lead, #6 “heavier than lead”
We have NOT had a chance to test Remington’s replacement for Hevi Shot but will do so and post the results.
Please note that a choke of a given exit diameter is usually going to give a different pattern when used in guns of different bore diameters.
Take a Beretta at .723 a Remington at .727 a Browning I.P. at .740 and using a .660 in all three guns normally gives three different patterns. Just because a .660 worked very well in your Remington does assume it will work great in your Browning.
Special Turkey Chokes for Specific Shells
Trulock Fed # 7 turkey chokes
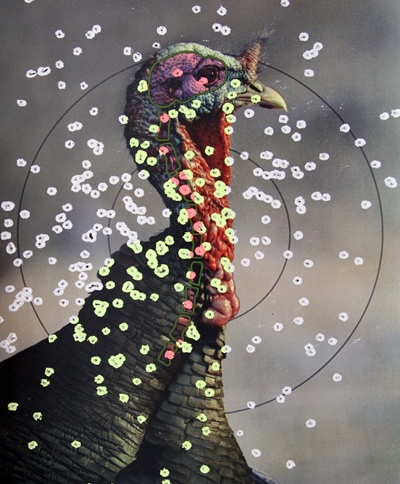
After testing the Federal Heavyweight turkey # 7 we were so impressed we designed a series of turkey chokes especially for this shell. It gave very good results as per the below pattern. The folks at federal tell me that the # 7 tungsten pellet has the same killing power at 40 yards as a # 5 lead pellet.
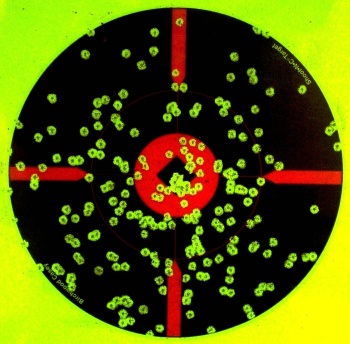
Federal #7 turkey load fired through Trulock Fed #7 choke at 40 yards.
Winchester Long Beard™ XR™ turkey chokes
These shells use lead shot that are encased in a special solid buffer that fractures upon firing. I don’t have a clue what the buffer is but I can tell you that patterns fired using this type of shell are amazing.
We developed a line of turkey chokes for this shell that is shot size specific. We make chokes specific to the #4, #5 and #6 shot sizes.
Combine the Longbeard XR™ turkey load with Trulock’s new LongBeard XR choke tubes to maximize the shell’s performance. With this remarkable combo, you can expect 10% greater penetration over standard lead loads beyond 50 yards and twice the number of pellets in a 10″ circle out to 60 yds.
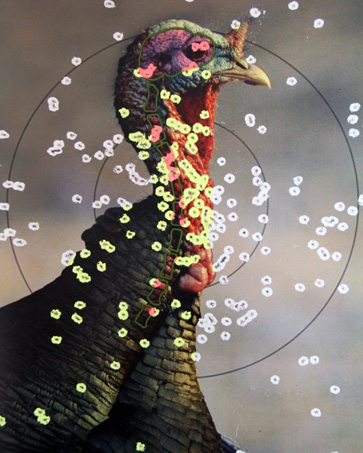
#5 Shot #6 Shot
Chokes for Buckshot
As with Turkey chokes you will be trying to get a very dense, tight pattern but since you have such a small number of pellets you cannot afford to have as many fliers. However, the rule about using premium shells does not change. Hard, plated pellets with a buffer will normally shoot tighter patterns with fewer fliers than those loads made with soft lead and no buffer. I would suggest the Precision Hunter style choke [extended] with a constriction of .030. This would be our full choke. Some gun/load combinations will work better with a constriction of .040 (extra full). One of these two constrictions will normally give you a very dense pattern.
The only sure way to know for sure which choke your gun likes the best is to test pattern and see.
Do not use turkey chokes for “00” buckshot. They have too much constriction and will decrease not increase the density of the pattern.
The constrictions suggested were based on the use of 00 size pellets.
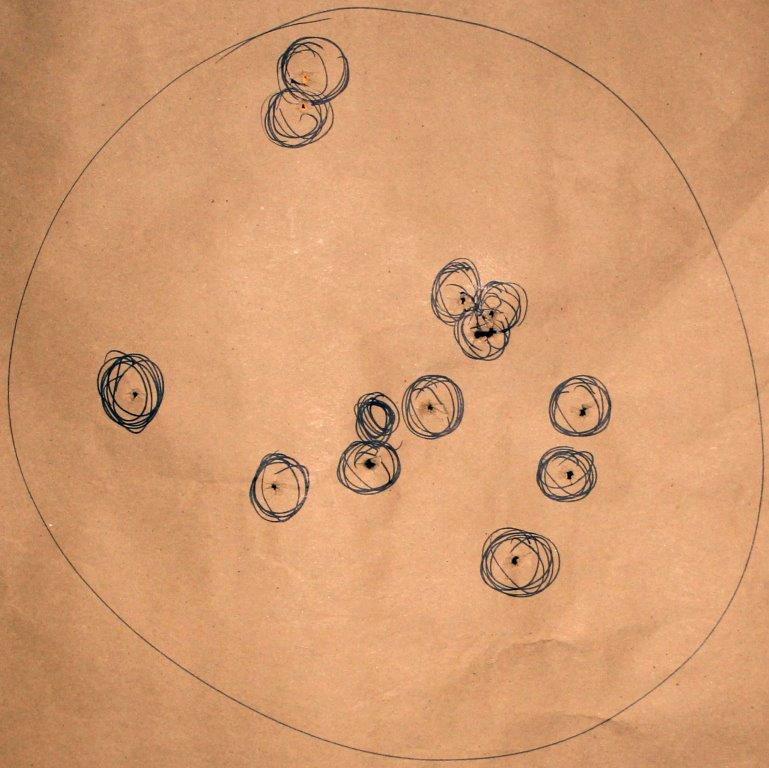
We have patterned Hevi Shot’s 9-pellet buckshot load.
We consistently got 6 of the 9 pellets in a 10-inch diameter circle at 40 yards using an extended full and ex full choke.
00 and 000 Buckshot Choke Tubes For Big Game
Deerstroyer™ Choke Tubes
At the 2015 SHOT Show we introduced our Deerstroyer™ style of choke tubes especially for 00 and 000 buckshot sizes. All of these are made in a 4 inch overall length. For 2016 we have redesigned this choke internally for improved pattern performance. All of the Deerstroyer™ chokes have a nominal .030 constriction based on average bore size for each specific model.
Boar Blaster™ Choke Tubes
The Boar Blaster™ style of choke has a totally new internal design consisting of 5 steps with 6 parallel sections. This design has been tested with numerous loads of 9 and 15 pellet 00 and various 000 shells and has shown an increase in pattern density over conventional conical parallel choke designs with every load we have tested. Made from high strength stainless steel with a black oxide finish and knurled head.
Predator/Varmint Chokes
Our suggestions on chokes are as follows.
Mossberg 835’s and similar .774 bore shotguns .710 exit diameter
Browning Invector Plus and similar .740 bore shotguns .680 exit diameter
Remington and similar .730 bore shotguns .670 exit diameter
Beretta Optima Plus and similar.733 bore shotguns .683 exit diameter
Benelli Crio Plus, Mobil style and similar .725 bore shotguns .665 exit diameter
We suggest the below loads
Hevi-Shot Dead Coyote (T Pellets)
Win Xtended Range HD Coyote (B Pellets)
Number 4 buckshot
In any given shotgun you may find one load patterns tighter than another. You will have to pattern your gun to find the best load.
Predator™ Choke Tubes
At the 2015 SHOT Show we introduced our Predator™ style of choke tubes especially for # 4 buckshot and the large pellet predator tungsten loads. All of these are made in a 4 inch overall length with a longer (3 inch) than normal conical section for less pellet deformation. All of these chokes have a nominal .050 to .060 constriction based on average bore size for each specific model.
Choke Cleaning
Ideally chokes should be cleaned each time the gun is used. Plastic fouling and powder residue will build up in screw in chokes much faster than in fixed choke guns. Powder fouling will also work between the choke and the choke counter bore in the barrel. Remove the choke and clean with a toothbrush using some sort of solvent. We use and suggest Choke Shine as a cleaner. Simply, drop the choke into the solution for a short time and it will come out with the fouling dissolved. Clean the inside of the barrel with a cleaner/lubricant such as Clenzoil making sure the threads do not have any residue, lightly wipe the choke with oil and reassemble.
Remember that rust can occur in the barrel and freeze a choke in place even if the choke is made from stainless steel. Waterfowl hunters should pay particular attention to keeping the choke and barrel clean.
Choke Tightness
Although this seems like a no brainer we believe that there is a proper way to install a choke tube. When changing a choke in the field or at the range, wipe the choke with a clean rag to keep any abrasive from being ground into the threaded area of the choke/barrel. Finger tighten and then use a wrench that properly fits the tube to finish tightening using a moderate amount of pressure. This will help keep the choke from loosening up when in use. When a choke is not properly seated the possibility of the shot charge striking the edge of the choke greatly increases. If this happens a bulged barrel and a ruined choke are almost guaranteed. Most chokes will loosen and back out to some degree if they are left finger tight. A perfectly clean, dry choke installed in a clean, dry barrel and moderately tightened with a wrench should not work loose. Having said that, most shooters are better off to make sure that there is a light coating of oil on the choke before installing as this will help prevent rust in the barrel. All chokes should be checked on a regular basis for tightness.
Prior to doing anything with a choke, be sure the gun is unloaded and the muzzle pointed in a safe direction.
Frozen Chokes
We have pulled frozen chokes in our shop of almost every brand. Normally by the time we get the barrel one or more people have attempted to remove the choke. Did you ever wonder where the saying “Fixed Guns Repaired” came from? This is a problem that can be prevented 99% of the time by simply cleaning the choke/barrel on a regular basis. The number one problem is RUST in the threaded area of the choke/barrel. If you keep this from forming, you generally will not experience any problems. The second problem is choke creep [expansion]. This fortunately is much less of a problem than rust. This is caused normally by using large steel shot in tight chokes [full or tighter]. Follow the manufacturer’s suggestions when using steel shot and the odds are very much in your favor that you will have no problems. If choke creep happens you will notice the choke becoming harder to remove and install and if you continue shooting it will eventually lock itself in the barrel.
If you find yourself with a frozen choke my first suggestion is to take it to a competent gunsmith. Make sure the smith has some experience in this line of work.
The information below is not intended to be all inclusive instructions. If you are not responsible for your own actions do not attempt to use any of the suggestions.
Unload the gun, remove the barrel from the action and soak the muzzle in a can of penetrating oil for several days. Make sure the container has a sufficient amount of oil to completely cover the barrel as deep as the choke is recessed. Use a proper fitting choke wrench and try to work the choke back and forth in small increments. If this does not work try letting it soak several more days. Heat applied to the choke area can be of help. Never get the barrel so hot that you cannot touch it with your hand for several seconds. Do not use a hammer of any kind to try and “tap” it. Soaking and low heat will get most frozen chokes out. Take your time, we have seen a number of barrels ruined because of impatience.
Choke Storage
We suggest that you keep your chokes in a padded case especially designed for them. There are a number of quality cases on the market for under $10.99. The purpose is to keep them from hitting each other or any hard object that could cause burrs or deformation. Chokes are particularly susceptible to denting in the skirt area. We have seen this occur on numerous occasions when chokes stored in plain boxes were dropped. We also urge you to clean all of the chokes that have used when you clean your gun. Alloy steel chokes need a light coat of oil prior to storage and stainless steel keeps its rust resistant properties best when it is free from all contamination.
British Shotgun Choke Tube Constrictions
Choke constrictions in Britain are normally marked using a different method that what we are accustomed to seeing here in the United States. In some cases the same name is used in both countries with an entirely different meaning as to the amount of constriction in the choke.
The below chart gives a comparison between the choke name and the amount of constriction.
Constriction Constriction British US Trulock MM Inches Marking Marking Marking .00 .000 Cylinder Cylinder Cylinder .13 .005 Imp Cyl Skeet Skeet 1 .25 .010 1/4 Imp Cyl Imp Cyl .50 .020 1/2 Modified Modified .75 .030 3/4 Lite Full Full 1.00 .035 Full Full
We have tried to give you a very basic course on chokes and their use. If we can be of any service to you please call us. We will be glad to help with any questions or problems you may have. This will be a constantly evolving paper. If you would like to see any subject discussed concerning chokes or related please let us know.
")
")
")
")
")


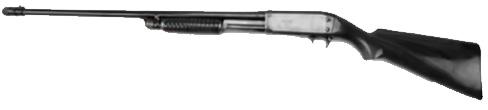 The Remington Model 17 pump shotgun was a forerunner to the Model 870.
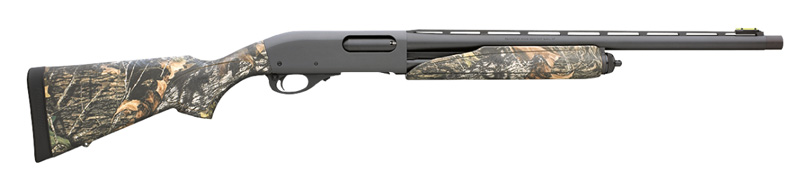


:quality(70)/cloudfront-us-east-1.images.arcpublishing.com/adn/JZX4EU6DJNESDBJH2M55PFG6VU.jpg)