Home Blog Page 61

Shark vs. Crocodile: Who Wins in a Fight?

0

Here’s whether a shark or a crocodile wins in a fight:

A great white shark may take more than one hit and a lot of biting to beat a crocodile, but eventually, the great white shark will win.

Sharks species smaller than a great white easily lose to crocodiles.

The shark is always the prey when crocodiles and small sharks fight in shallow waters.

If you want to learn all about who wins in a fight between a shark and a crocodile, then you’re in the right place.

Keep reading!

Who Wins in a Fight Between a Shark and a Crocodile?

The only place where the great white shark and the saltwater crocodile can meet is the open water.

This is the natural habitat of the great white shark and gives them a maneuvering advantage over the slower saltwater Croc.

It would take multiple hits and a lot of biting to beat the crocodile, but eventually, the shark would probably win.

If it’s any other species of sharks smaller than the great white, the crocodile would easily take the win home.

Fights between crocodiles and small sharks sometimes happen in shallow waters, and in this case, the shark is always the prey.

It’s a bit different with great whites since they are rare and can only be found in deep waters.

Great white shark with the sun rays.

Sharks can swim with 25 mph (40 km/h) speed in long bursts, while crocodiles can get to 18 mph (29 km/h) but get easily tired.

That’s where the main advantage for the great white shark over the saltwater crocodile lies.

Who Has a Stronger Bite: A Shark or a Crocodile?

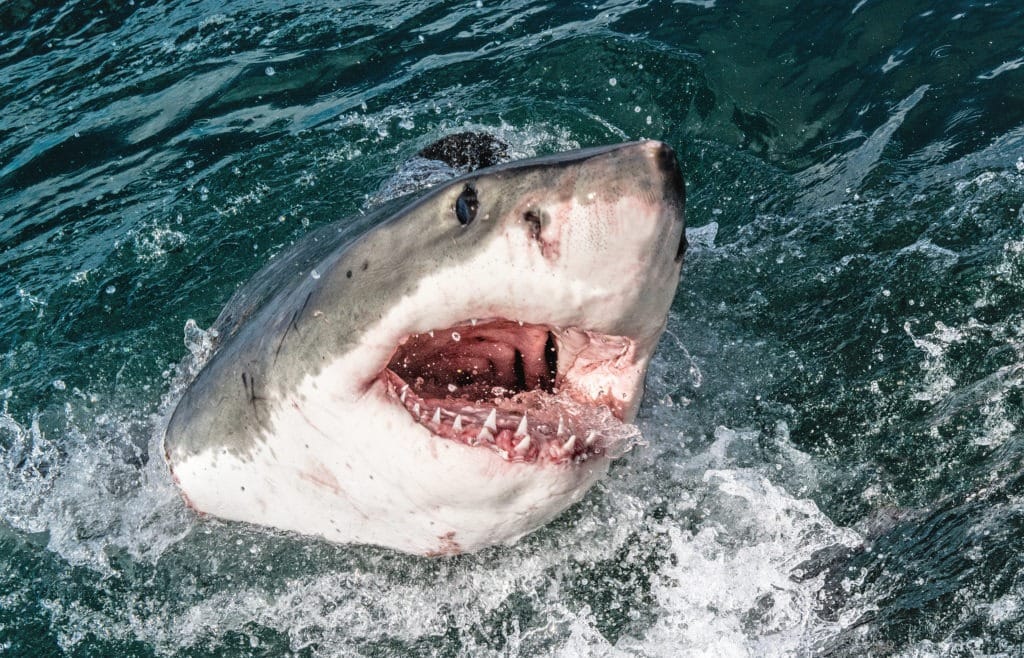
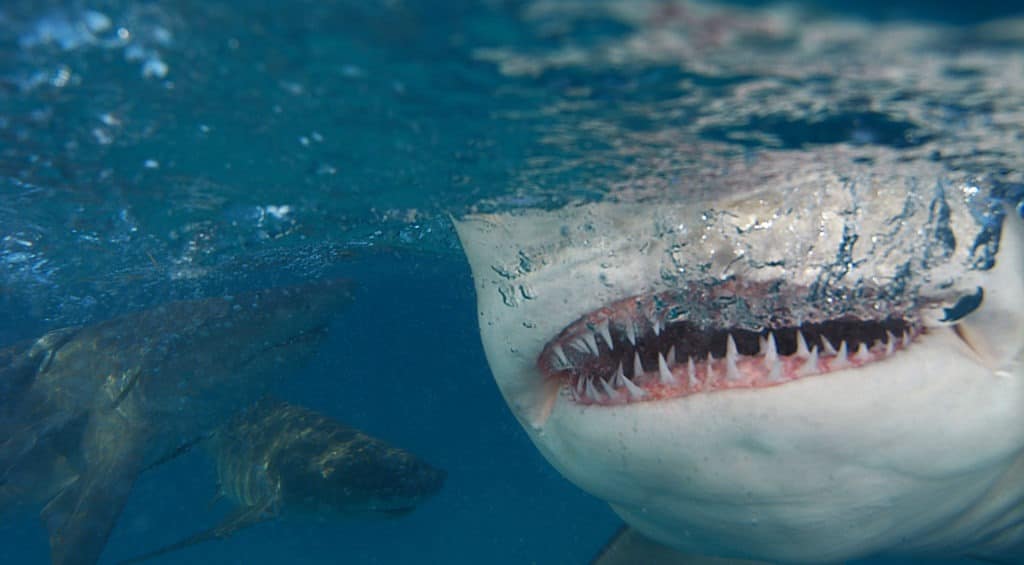
The great white shark does have a huge jaw, but as a result of its diet, it doesn’t have the strongest bite amongst all shark species.

It’s a lot easier to bite through a seal (great white prey) than through the shells of a turtle (tiger shark prey).

The world’s most ferocious jaws, belonging to the saltwater crocodile, can snap with a force of 4000 lbs (2 tons).

The White Shark has a bite force of only 2200 lbs (1.1 tons).

It’s not a joke when this shark bites you but compared to the crocodile, they seem toothless.

The jaw size of the shark is wide enough to bite any part of a crocodile, but it lacks the force and proper teeth to do serious damage.

Great white shark with open mouth.

Although a crocodile can bite-crush almost anything, his mouth is simply not big enough for a great white shark.

Different Types of Teeth

Since they feed on different types of animals, it’s no surprise that sharks and crocodiles have different teeth shapes.

Crocs hunt prey that is larger and with stronger skin and bones, so they need teeth rigid enough to devour their victims.

White sharks don’t need to crunch the bones of the things they hunt and go for biting rather than squeezing with huge pressure.

A shark’s teeth look like a saw, and they are a few rows of spare ones behind each front tooth.

It’s not rare for sharks to lose and replace teeth during a struggle.

Who Will Participate in a Shark vs. Crocodile Fight?

The family Crocodylidae or True Crocodiles numbers 14 animal species.

As part of the order Crocodilia, the family has caimans, alligators, and caimans as their closest cousins.

A group of baby crocodiles.

The largest of them all is the one who is going to be picked for the Shark vs. Crocodile fight.

The saltwater crocodile is the largest living reptile, and this ancient being is also the one causing most human deaths compared to others of its family.

There are more than 1000 shark and ray species, and new ones are discovered each year.

If we want to pick the contender for this epic fight we will probably go with the biggest shark of them all, correct?

Well, not quite!

The whale shark is the biggest fish in the world but doesn’t participate in fights.

Its megamouth serves as a filter feeder to swallow anything coming its way (possibly a crocodile even).

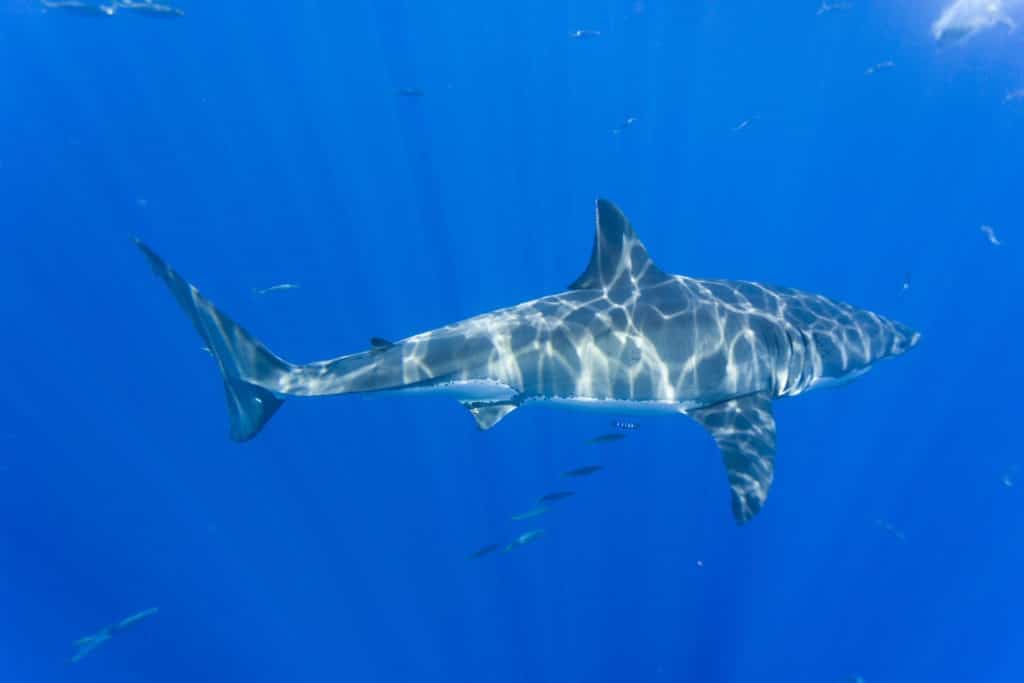
The real shark fighter and the one with the most recorded attacks on humans is the great white shark.

It’s the 6th largest shark species, and the only one coming near its ferocity, strength, and size is the tiger shark (4th largest).

Characteristics of the Great White Shark

Legendary for being one of the fiercest predators, the great white shark caused admiration and fear in people for many years.

Great white shark "smiling".

This cartilaginous fish is probably causing more harm in people’s imagination than in real life.

While humans fear the great white shark expressly and consider it a man-eating predator, this powerful and efficient hunter never had a preference for people.

Attacks happen when the shark is confused or just wants to taste the moving object.

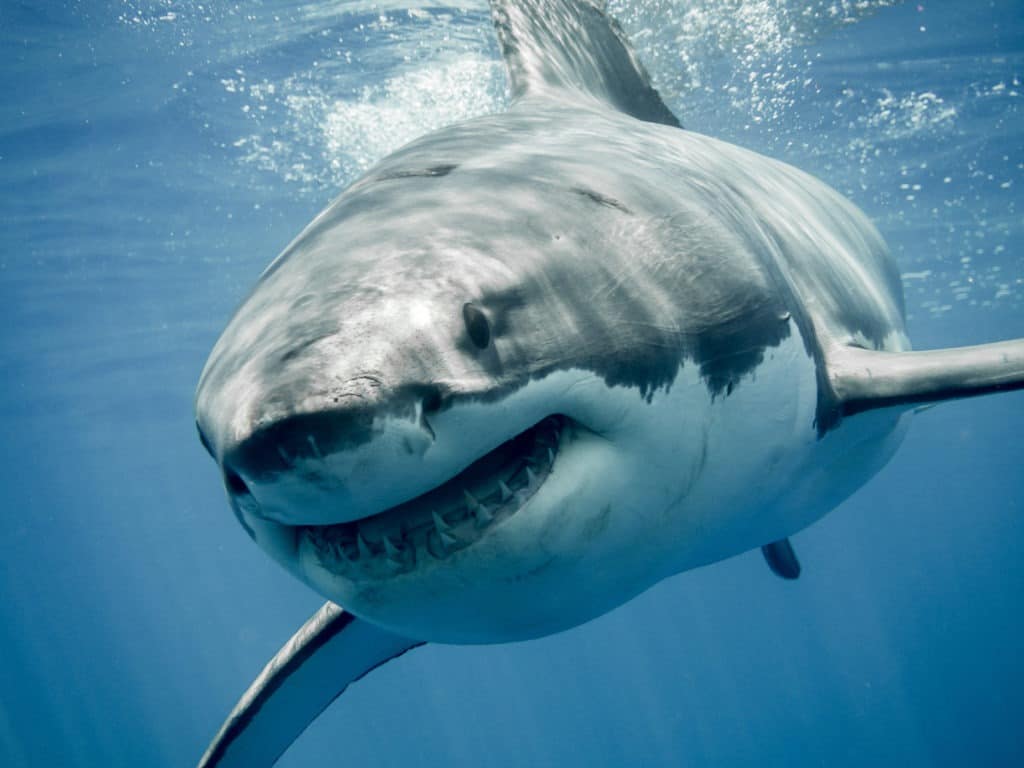
When a great white shark wants to attack, the opening of its mouth can be 3 to 4 ft (1-1.2 m) wide.

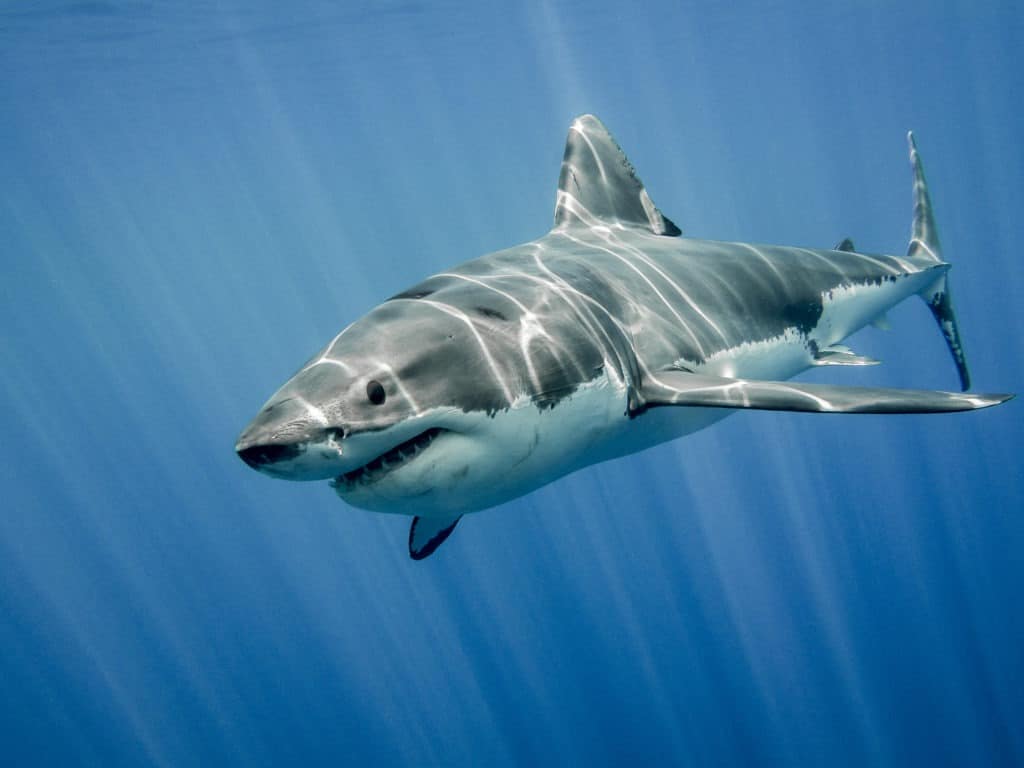
The top of the great white shark is darker in blue of gray variations, while the lower area of the body is white.

Such discoloration is a hunting advantage because prey doesn’t notice the shark’s figure, and to them, it looks like the bottom of the ocean.

White Shark Body Strength

A great white shark has a fusiform and robust body. That means it’s shaped like a spindle and big and strong at the same time.

Adult sharks can be 13-22 ft (4-6.7 m) long with an average length of 19 ft (5.8 m).

Their weight can be somewhere between 6600 and 7500 lbs (3000-3400 kg).

Great white shark in the deep blue waters.

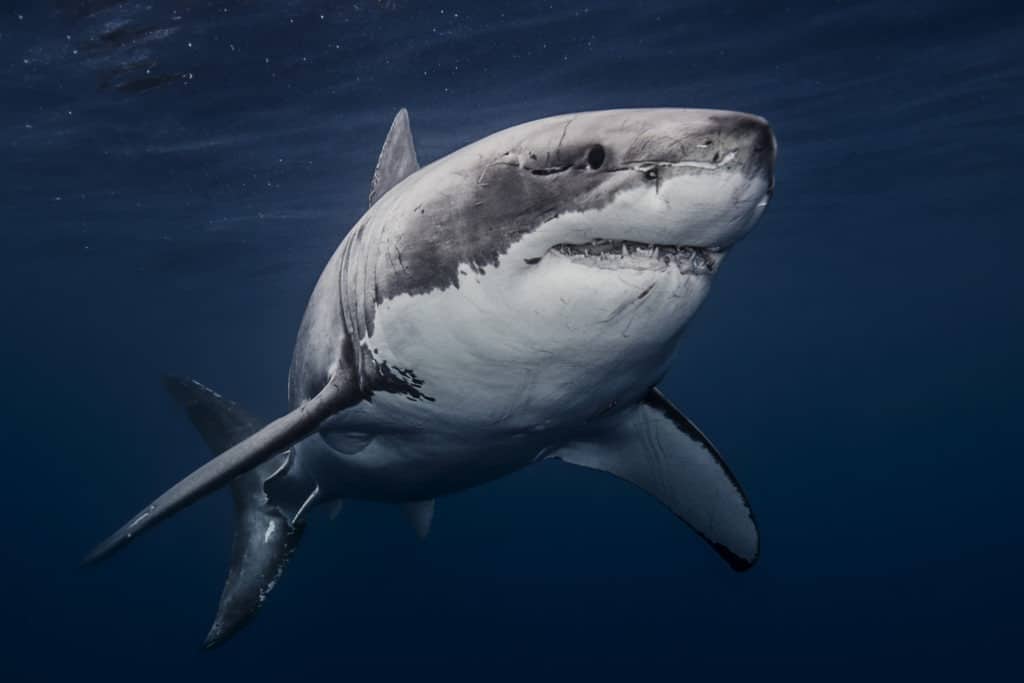
The adult male great white sharks are approximately 6.5 ft (2 m) smaller than their representative females.

Strong pectoral fins and a triangle-shaped back fin are placed behind its narrow and pointed snout.

There is a smaller fin near the tail which ends with long lower and upper lobes.

Whiteys have delicate skin that cannot withstand huge penetrating forces, which puts them in an inferior position compared to crocodiles.

Characteristics of the saltwater crocodile

The saltwater crocodile is believed to be the animal that is most likely to eat a human being of all other animals in the world.

At the back of their mouths, saltwater crocodiles have valves that seal off the cavity from the throat.

This way, they can open their mouth while under the water.

However, it’s not possible to eat the prey beneath the water surface because they will need to swallow and allow their throats to open and fill with liquid.

When a crocodile catches something underwater, it has to take it to land and eat it or raise itself with its head above the water and swallow.

Adult individuals can be 16-23 ft (4.8-7 meters) in length and weigh between 880-1540 lbs (400-700 kg).

Crocodiles in a crocodile farm.

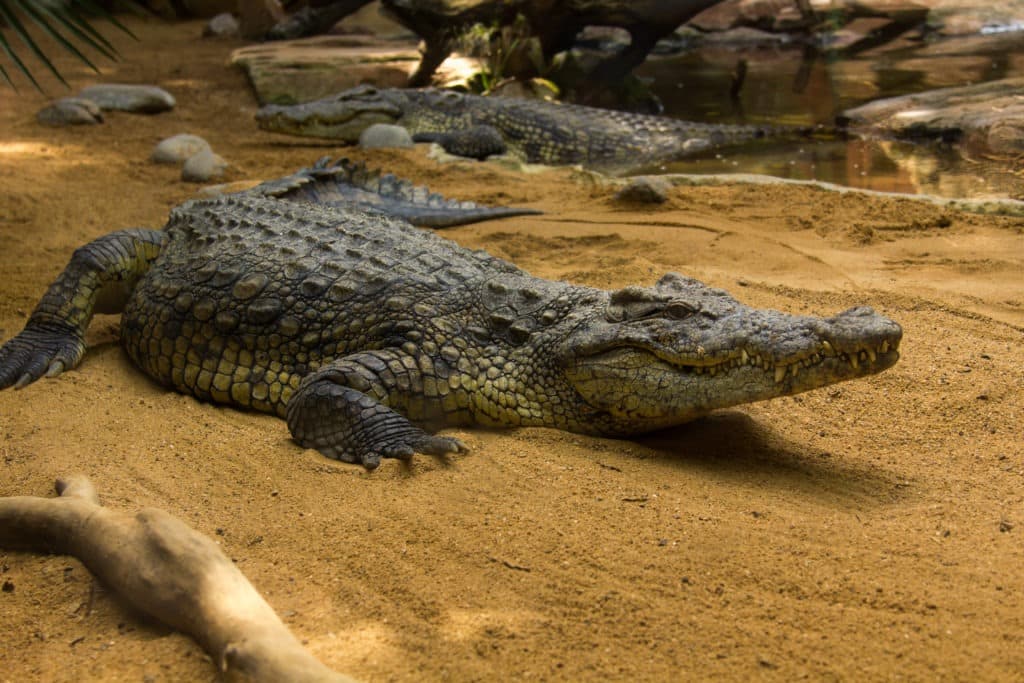
The male crocodiles are much larger than the females.

Their enormous heads and broad, heavy bodies are grey to brown so that they can blend in their muddy habitats.

Having short and strong limbs, their biggest attributes are their long and strong jaws.

A croc’s skin appears as some sort of prehistoric armor. It’s not easy to penetrate through it at all.

Where Can You Find Sharks?

You can find sharks in a lot of places in the world. They inhabit tropical waters nears the coasts and even temperate and cold areas.

In the Americas, there are sharks from Alaska to Mexico in the Pacific Ocean and from Newfoundland to Mexico in the Atlantic Ocean.

Outside of America, sharks dwell in the waters of Japan, the Mediterranean Sea, Oceania, and South Africa.

White Shark Behavior

Generally, the great white shark swims and hunts solitarily. From time to time, they can reunite with others. The groups can consist of a couple of sharks or even groups of 5-6.

Females mostly take the lead in the groups because of the existing hierarchical dominance.

Large 5-meter female great white shark.

Larger sharks dominate over the smaller ones, and when the group accepts newcomers, the fresh ones are subdued by the old leadership for some time.

The animal is equally active day and night. In an attempt to get familiar with the surroundings or look for prey, great sharks can sometimes jump out of the water.

While not being aggressive towards others of their species, an occasional warning bite might happen.

Where Can You Find Crocodiles?

Saltwater crocs can be commonly found in and around river mouths, mangrove swamps, and coastal marshes.

They inhabit the tropical regions of Australia, Africa, South America, North America, and Africa.

When crocodiles feel capable of swimming a lot, they can travel upstream.

Seasonal floods make it possible for crocodiles to get to places that are otherwise hard to reach.

It’s not unusual for them to live in the open ocean for short periods as they are quite capable of that.

Cuban crocodile swimming along the sea grass.

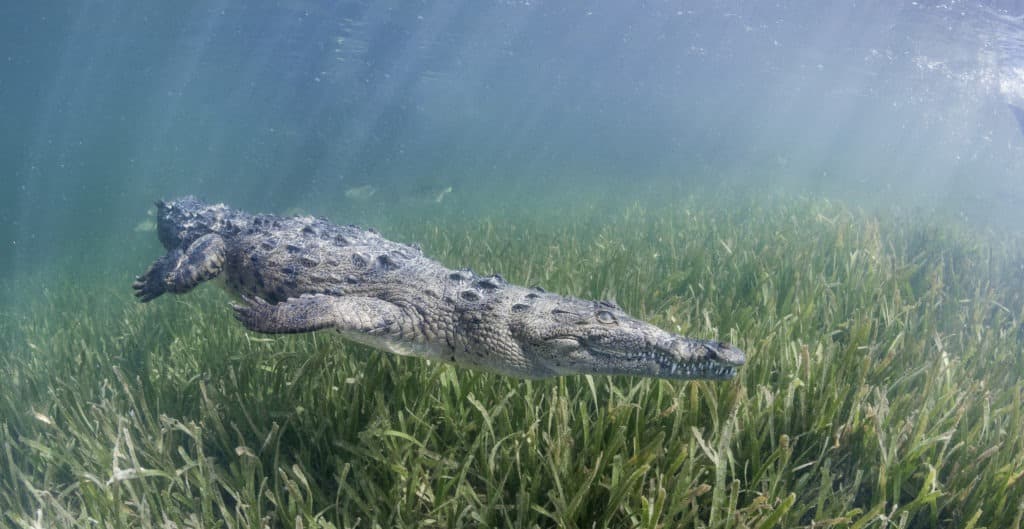
Exploring is an exciting activity that can make them cross large water expanses.

Saltwater Crocodile Behavior

The saltwater crocodile is thought of as one of the most sophisticated and intelligent reptiles on the planet.

They live in groups and communicate with each other by crocodile-barking, hissing, chirping, and growling.

Saltwater crocodiles invest a great deal of their time thermoregulating to maintain their body temperatures.

For example, when it’s too hot, they go inside the water, stick their eyes and nostrils out and just wait until they are cool.

Do Crocodiles and Sharks Meet in Nature?

Crocodiles and sharks can occasionally meet in the water and have close encounters; most of the time, the situation would end with the shark fleeing the scene or getting eaten.

It’s mostly smaller shark species since large ones don’t dwell in shallow water.

Brutus the Giant Crocodile

Brutus is an 80-year-old crocodile living in Adelaide River in Northern Australia.

He some kind of celebrity because his front right leg is missing, and there are even boat tours that take you to him.

Photographers have caught him a few times with a bull shark in his mouth freshly caught from the river.

But you know what’s even more interesting?

Close-up shot of a shark

It is sharks that took his front leg in the first place.

Comparison of Great White Shark and Saltwater Crocodile Attributes

The great white sharkSaltwater crocodile

Beretta M9A1 vs M9A3: Side by Side Comparison

0

Very few firearms have been a top choice for military, police, and civilian shooters alike for over half a century like the Beretta M9 series.

Two of the updates of the M9 design, the M9A1, and the M9A3, are still some of the more compelling full-size handguns on the market today. But, what are the differences between these two guns, and which is the best option for you?

While both of these pistols are truly world-class designs and come from the same general blueprint, there might well be some differences between the two that make one better than the other for your purposes.

The Beretta M9A1 vs M9A3 are very similar in terms of specs and overall design. The M9A3 has a higher capacity and is a bit more customizable, with a threaded barrel, longer rail, and removable front sight. The M9A1, on the other hand, has a three-dot sight and a slightly shorter barrel.

In this article, we’ll compare each of these gun models head to head, getting into specifics of size, ergonomics, optics, controls, and more.

Products Mentioned In This Article

Beretta M9A1

Beretta M9A1 Handgun Photography

For a lot of folks fighting in the Global war on terror, their first encounter with a pistol was a Beretta M9A1. According to Beretta’s website, the M9A1 was designed specifically to meet Marine Corps requirements that were cognizant of not only Desert Storm in 1990-91 but the then-ongoing conflicts in Iraq and Afghanistan.

The main thing that folks transitioning from the M9 to the A1 variant would be likely to notice is the inclusion of a Picatinny rail on the underside of the pistol’s frame. This allows users to attach lights and lasers, greatly enhancing the operational capabilities of the weapon. From there, the changes are more subtle.

The front and back straps, as well as the grips, of the A1 model are more aggressive than its older counterpart to make it easier to grip while sweating or wearing gloves. Additionally, the M9A1 came with magazines with a specially designed coating to resist the sand that is so common in Iraq.

Basically, you can think of the M9A1 as a slightly refreshed and face-lifted model of the M9, with both some cosmetic and performance improvements to make it a more effective weapon for troops in the field.

If you’re looking for a Kydex or hybrid Beretta M9A1 holster, check out our selection of IWB and OWB holsters here.

Beretta M9A3

Beretta M9A3 Firearm Photography

If the A1 model was a refreshed version of the M9, the A3 variant is something like what folks in the car community might call a restomod: a redesign and retrofitting that keeps the original design philosophy in mind, but that stretches performance to its limits.

The A1 model was adopted into military service in 2006. With about another decade of learning in the field, arguably the best research and development on the planet, Beretta came out with the A3 in 2015.

The M9A3 adds even more Picatinny rail to give users more options for installing lights and lasers, in addition to larger, 17-round magazines. The grip was also thinned out, with the option to add a more traditional, thicker grip. Finally, the magazine geometry was changed to make it easier to reload by feel.

In effect, the M9A3’s list of changes represents a fine-tuning of the M9A1 into one of the most compelling military pistols that are in current or recent use.

If you’re looking for a Kydex or hybrid M9A3 holster, check out our selection of IWB and OWB holsters here.

Beretta M9A1 vs M9A3: Specs

Beretta M9A1 vs M9A3: Size & Capacity

With most of these comparisons, we’re going to be splitting hairs, since both the A1 and A3 are iterations of the M9 design. There are, however, some meaningful differences when it comes to size and capacity.

As you can see in the chart above, the two pistols are very similar in size, with an inch here and an ounce there being added and subtracted in the various dimensions of the two designs.

Importantly, the M9A3’s standard magazine capacity is 17 rounds, two more than the older design. Those two rounds in effectively the same sized pistol lead us to lean a little bit in the direction of the M9A3 in this category.

A Beretta M9A3 gun laying down along side its magazine - Size and Capacity

Beretta M9A1 vs M9A3: Ergonomics

Frame

The major difference in the frames between these two firearms is that the M9A3 has a slightly more vertical hand position than the M9A1. For folks picking up both of them for the first time on the same day, the A3 might feel a little more natural to point and shoot. If, on the other hand, people spent many range days with the A1, then the older model will likely feel more like home.

The difference in frame geometry is also somewhat offset given that the A3 can be used with a thicker grip that is the same size as that of the A1 as well as its standard, very slightly thinner grip profile.

Slide & Barrel

Here is where things get a little bit different: while the slide on the two guns is extremely similar, the two major upgrades on the A3 model give it the edge here.

First, the A3’s slide can be switched between models with or without a decocker. While this is a niche feature, it’s one that some folks will deeply appreciate, considering you can have a new slide shipped to your door.

Second, the A3’s barrel comes threaded from the factory, making the A3 a better choice for people who might be thinking about suppressing their M9s.

Generally, the A1 and A3 shoot very similarly in terms of their slide and barrel, but the ability to more easily suppress the A3 with the included threaded barrel might sway some folks. Oh, also, the M9A3 comes in Flat Dark Earth in case you want your M9 in a color other than black.

Close up image of the Beretta M9A3 from the back of the handgun

Beretta M9A1 vs M9A3: Sights & Optics

This might be the category in which these firearms differ most from each other, and where a lot of users might make their choice between them a little clearer.

The M9A1 comes with white three-dot sights that are relatively easy to use in the daytime, and reasonably well at night.

The rear sights are adjustable on the A1 model, meaning you can drift them left to right to zero the pistol, or replace them entirely with a mode of your choice from the aftermarket. But, and this is important, the front sights are integral and are not coming off without a grinder.So, if you like a white dot front sight, good. If not, then you might like the A3.

The A3 model was designed so both the rear and front sights are removable. This opens users up to a lot more options, including raised sights for use with suppressors, making the threaded barrel that much more useful.

You can attach a light or laser on the bottom of the frame of both the A1 and the A3. The A3 does have a longer Picatinny rail in addition to being able to swap out the front sight, which the A1 cannot do.

Beretta M9A1 vs M9A3: Controls

Safety

In their stock configurations, both the M9A1 and M9A3 have a combination decocker and safety, which makes it possible for these guns to be carried with the hammer down on a live chamber safely.

Here the edge goes to the M9A3 since it is possible to buy a slide that only has a decocker. Many folks consider the additional manual safety to be redundant and unnecessary. There are ways to do the same thing to an A1, but it’s a lot more involved than simply popping on a new slide like you can with the A3.

Trigger

The trigger on these two firearms is identical for the purposes of most shooters: it’s a double/single-action trigger that takes some getting used to.

With DA/SA triggers, the first pull is a heavy one that cocks the hammer and then fires a round, while subsequent shots are lighter and shorter. This means that the shooter will have to get used to two different trigger pulls to shoot either of these handguns well.

Close up imagery of the Beretta M9A1 gun laying on a flat surface

Which is Right For Me?

Because the A1 and A3 models of the M9 are so similar to each other, the choice here will be a mostly personal one depending on your preference.

If you’d like to get the most modern version of the M9, with the ability to easily use a suppressor and upgraded sights along with larger lights and lasers, then the M9A3 is for you.

The Beretta M9A3’s accuracy might be a little bit better than its older predecessor with some upgraded sights, better grips, and more optics options on the bottom of the frame. And if the accuracy doesn’t help, then you get two more rounds to hit the target.

With that said, one thing to seriously consider is the possibility of getting an awesome deal. Since the M9A1 is no longer in production, you can often buy them for less, and they make great concealed-carry guns. The Beretta M9A1 specs are certainly nothing to scoff at, and it’s an excellent defensive tool.

Summary

Both Beretta M9A1 and the Beretta M9A3 handguns - Side to side - which one is better?

The variations between the Beretta M9A1 vs M9A3 are very small. The two pistols are very similar in size, with the main differences being in their sights and slides.

Overall, both of these make an excellent choice of full-size handgun, and either one would serve you well: if you want the most modern version go for the A3 model, but an A1 at a deep discount in the local gun store would be an almost ideal gun for people who plan to shoot a lot and want good quality for the money.

If you’re looking for a new IWB, OWB, or pocket carry holster, visit our Holsters by Gun Model page for Kydex holsters that are custom-made for your weapon of choice.

Interested in items beyond holsters? Check out our Resources Page for links to recommended products like lights, lasers, first aid, maintenance, and more, and browse our selection of belts, apparel, and accessories at our website, vedderholsters.com.

To stay up-to-date on all the latest Vedder Holsters content and offerings, check out our blog and follow us on Facebook, Instagram, and Twitter. And be sure to visit our sister company, GeoGrit, for all of your American-made minimalist wallet needs.

I Tried Marinating Venison In Buttermilk – Here’s What Happened

0
venison soaked in buttermilk in a cast iron pan

You hear people talking about soaking venison in buttermilk. But why? Does it work? I tried it and here’s what happened.

For YEARS people have been telling me to soak venison in milk or buttermilk before cooking it. Any time I put a post out on social media about why deer meat might taste *gamey* someone always comments “soak in milk overnight. Works every time.” Honestly, I never really got the hype.

Prefer watching a video over reading an article? Here’s the full experiment I did on YouTube!

After all this time, I decided to do a controlled study. I took venison chops from the same animal and cooked them the exact same way: salted, seared in a cast iron pan, basted in garlic, thyme and butter, rested for 10 minutes, finished with flakey salt, pepper, and a squeeze of lemon. My variable was soaking 3 of the chops in buttermilk overnight prior to cooking.

Here’s what happened:

venison soaking in buttermilk
deer chops on a white plate

Why soak venison in buttermilk? What does it do?

People have been soaking venison and other proteins in milk or buttermilk for years. The claim is that the acidic or low ph level helps to break down the tissue to tenderize the meat while also ridding the meat of a powerfully “gamey” or wild/iron-like flavor.

I ultimately choose to work with buttermilk because it has a lower ph level than milk.

Why I was skeptical

I was mainly skeptical because of the marriage of flavor between venison and milk/buttermilk. It’s just not an inherently great pairing. My initial thought was “yes, I’m sure the acid in buttermilk can help tenderize the meat but wouldn’t you be better off using a marinade with flavors that complement venison? Like citrus or red wine.”. I’m in love with my All-Purpose Marinade (and still am after this experiment) so my thoughts were to stick with something like that instead of using a dairy product.

The thought of getting all of the buttermilk off of the meat before cooking also seemed daunting. One of my biggest tips for working with any protein is drying your meat with a paper towel as best you can before cooking to get a great sear. So, this worried me, too. But, forth I went to the kitchen.

venison soaked in buttermilk on a cutting board after cooking

How to soak venison in buttermilk

To soak venison in buttermilk all you need to do is grab a zip-top bag or bowl with a lid and totally submerge the meat in the buttermilk. I marinated overnight, but 4 hours or so should do the trick.

Next, once the meat is marinated, remove it from the buttermilk and PAT IT DRY. You’re going to use up a few paper towels (or kitchen towels if you’re OK with that). BUT DO NOT RINSE THE MEAT. Just be very diligent and pat the meat dry with a towel. It will be fine and actually didn’t hinder the searing process or leave a weird taste behind at all. (are you starting to get the sense that this worked well for me?!)

Next, heat a cast iron pan or grill over medium-high heat. I prefer the cast iron method so I’ll talk about that here.

While your pan heats, salt the meat generously and pat it dry AGAIN with a towel. When the pan is hot, add some sort of high heat tolerant cooking fat (duck fat, avocado oil, etc) and add the meat to the pan.

Cooking time will vary depending on the size of your chops. But, when you have a nice sear on one side (anywhere from 2-5 minutes) flip the meat. Then, add about 1-2 tablespoons of butter, smashed garlic cloves and fresh thyme to the pan. Tilt the pan to the side and baste the meat by spooning the butter and aromatics over the chops.

Once the internal temperature reaches about 115-125F, remove the meat from the pan. If you’re grilling just flip and grill on each side for 2-5 mins. You do NOT want to cook venison over medium-rare. I like rare plus. Trust me and get used to cooking it this way.

Let it rest for at least 10 minutes before slicing against the grain.

Season with some fresh cracked pepper, flakey salt (or regular salt – just a pinch) and a little squeeze of lemon. You’re done! That’s all there is to it.

venison chops resting on a cutting board

Here’s how soaking deer meat in buttermilk works

The ph level in buttermilk helps to break down the tissue to tenderize the meat and aid in moisture retention resulting in potentially more tender and juicy meat. The protein found in dairy, casein, also binds to the meat potentially helping to rid the animal of a powerfully “gamey” or wild/iron-like flavor.

Does soaking venison in buttermilk work?

In short – YES! Here’s what I noticed after comparing plain venison and buttermilk soaked venison cooked in the same fashion:

  1. The meat was more tender and retained more liquid making it plumper and juicer. The buttermilk soaked meat actually looked different than the control on the inside. It was visibly juicer (check out the video to see).
  2. The flavor of the buttermilk marinated meat was more mild. I actually prefer the control group (plain, unmarianted) because the taste was fresher and a bit more *wild*, if you will. However, the animial I was working with was extremely palatable and perfectly cooked (if I do say so myself).
  3. The meat did not taste poor due to being soaked in dairy! I managed to get off all of the buttermilk just by patting dry and there was not a residual flavor left behind.

So…Should you soak deer meat in milk or buttermilk?

Here’s my conclusion. Soaking in buttermilk can help if one of the following circumstances is true for you:

  • You don’t like the taste of deer meat because you’re not used to eating it and you have a bunch of chops and steaks to use up and you like beef steak.
  • You harvested an older buck or buck in peak rut and the flavor is strong. Or really if you have an animal that just tastes really negatively different to you (maybe it’s diet, lifestyle) from past deer you’ve consumed.
  • Something went awry with your kill and you potentially didn’t execute swiftly enough.
  • You’re cooking for a group of people who are intimidated by the flavor of deer meat.
  • Something went amis during the field dressing or processing process (and the meat is still safe to eat).
  • You just want to switch things up because you’ve got SO MUCH deer meat on hand.
venison soaked in buttermilk in a cast iron pan

All in all, I’m pleasantly surprised by the results of this study. Will I always soak my meat in buttermilk? Nah. Will I do it again? Probably! I was impressed by the tender texture it resulted in most of all.

Thanks for humoring me and encouraging me to write this post! What should I test next? In the meantime, grab a copy of my cookbook, Venison Every Day, for more recipe ideas!

Other recipes you may find helpful:

  • Ground Venison Tacos
  • Venison Lasagna
  • Venison Chili
  • Venison Burgers
  • Venison Enchiladas
  • Venison Pasta Bake

Print

Mathews V3X Review

0

“So, I guess here it is, we’ll just announce the 2022 flagship right now. The all-new 2022 (******) from Mathews!” This is how we ended the 2021 Mathews V3 review. There’s no crystal ball, no palm reading, or tarot cards. For a few years I wondered just how Mathews could keep improving? Over the last few years though, they have made it easy to predict the future. Not the specifics, just the fact that they aren’t sitting back waiting. Year after year, they are innovating, proving, and advancing technology. This year’s flagship, the V3X, is no different.

The V3X stage is set on the Proving Ground, which you can watch here.

Mathews V3X Review

Like the 2021 V3, this year’s V3X has many of the tried and true features. The Integrate MX dovetail rest mount, Center Guard cable system, Switch Weight modules, and CrossCentric Cams are a few of the more prominent things to carry over. More info here.

New for the V3X, and visibly hard to miss, is the Bridge-Lock Sight technology. This allows dovetail sights to be mounted directly through the riser. This eliminates the external mounting bracket, creating a cleaner look, improved balance, less hand shock, and a more compact profile. This feature is compatible with all dovetail sight brands that I have tried, and don’t fear-the V3X is still compatible with all external sight mounts as well.

Mathews LowPro Quivers

In conjunction with the Bridge-Lock, next in line are the new LowPro quivers. These are designed around the geometry of the V3X. Moving the sight to the center of the riser allowed the engineers to bring the fixed and detachable versions over 50% closer to the riser. These are more precise and fit tighter, helping keep the streamlined balance position that Mathews is creating. Like previous models, the LowPro series is available in both one and two-piece versions. More information can be found here.

Mathews Stay Afield System

One of the biggest fears of backcountry hunters, and those who travel across the U.S and the World, is having a mishap during the hunt. Losing a peep or needing to fix strings and cables on the fly isn’t a worry anymore. With specially modified cams and this bow-specific set of cables, the Stay Afield System is the new lightweight bow kit that will save more than one hunt this fall. At less than ½ ounce, this is a must-have. You can learn more about the system here.

29″ and 33″ ATA Options

Like the V3, the V3X is available in two lengths. 29” and 33’’, so slightly longer than the V3 was. It is available in draw weights of 5lb increments, and draw lengths of ½-inch increments.

Mathews V3X Setup and Testing

Similar to last year I received the review bow in late October, while I was out on other hunts. Like a kid at Christmas, it’s always exciting to see what Mathews put together. It didn’t take long to get the box ripped open, and begin setup.

The setup was fast and super simple. I was able to slide in my HHA Tetra Max dovetail bar and lock it into the Bridge-Lock-such a simply ingenious system. Within another 15-20 minutes, I was able to get the rest, loop, and peep sight all tied in. It was time to fling a few arrows to get sighted in and feel this bow’s shot sequence for the first time.

Like normal, I measure and eye everything close, then go to 5 yards and shoot one arrow. Then I make adjustments, and then another arrow at 10 yards. I make that set of adjustments and shoot another at 20 yards. At this point, I am pretty dialed. I’ll then shoot three arrows at distances out to 50. When comfortable, I’ll dial 60 yards and shoot that until I’m confident enough to pick my sight tape.

On this particular day, I didn’t have a lot of time, but I was able to get 20 arrows in, and was comfortably hitting 4” circles at 50 yards, with broadheads. So slightly over an hour after unboxing, I was headed to the tree stand. I was particularly excited. This was only my second sit in Wisconsin, I had a brand-new rig, and I would only have one more sit after this one before the rifle season opened.

The Real Test

That sit was uneventful, and the following morning I had commitments that kept me out of the tree until 2:00 that afternoon. It wasn’t much after 2:00, though, when I could see a doe feeding my direction through the oak trees. Within 20 minutes she was at about 30 yards and I started preparing for the shot. Over the years I have come up with a very specific shot sequence, it’s become second nature; automatic if you will. Anytime anything in that equation changes, things aren’t as fast, and become less automatic.

With a new rig in my hand, I was now drawn and working through each step of the process when I heard the crunching of leaves behind and below the doe. In seconds, I could see the flash of brown and shine of antler as this buck worked his way up towards us. Within seconds he spotted the doe, grunted, and began trotting towards her. She bolted away from us and then made a loop around. This path had her coming directly under me. I drew again, and as he took a shortcut, it put him on a line 24 yards in front of me-and wide open. With two loudmouth grunts, he came to a stop and I was able to get through the process, sending an Iron Will Solid through both shoulders. He only went 25-yards.

That Was Fun, Now Back to the Bow

Being new, and not totally second nature, I took a little more time with the shot process. When the shot broke, three things came to mind immediately. Wow, that was quiet, literally almost silence, other than the arrow smashing through the buck. I felt no hand shock, barely any bow movement, and lastly, it hammered him!!

Specs from the website:
  • Brace Height 6.5” (6” on the 29” ata)
  • IBO Rating up to 336 FPS
  • Axle to axle available in 29”and 33”
  • Draw Weight available in 60/65/70/75
  • Let-Off 80 or 85%
  • Weights of 4.67# and 4.47# for 33” and 29” respectively
  • MSRP $1299

Once again I used the Mathews Bow Builder for custom strings, cables, and accessories. I chose the new Granite finish, which I really like. I use an HHA Tetra Max dovetail with this, a two-piece low-profile quiver, and outfit it with a Jakt Gear bow and wrist sling.

Conclusion

My final thoughts on this bow are incredible. As I alluded to in the hunt recap, it is unbelievably quiet, and the bow movement upon shot release is almost nonexistent. It’s honestly hard for me to believe. It’s got a solid back wall, the balance is tight, and it is the nicest bow I’ve ever shot. Start building yours here.

I do have to be very careful when I’m at the back wall, it seems ready to take off at any point if I relax at all. More time with it will be the only way to see how it works out.

The only other thing to watch is the LoPro quivers. They will mount and fit with a sight that is mounted externally, but you will lose a couple of the arrow slots, as the arrows would hit the sight mount if mounted externally.

I’ll reiterate, how amazingly quiet this bow is. I can see this being a big advantage in certain situations like jumpy whitetails, western antelope, and longer-distance shooting at some animals. Less noise should hopefully keep those edgy animals from jumping the string so much.

I’ve shot almost every Mathews built since the early 1990s. It’s an amazing company (and just an hour from my house.) Just like about anyone else, I have the ability to shoot a bow from any bow manufacturer that I like-and I do every year from many companies to stay in the loop and formulate honest opinions. And I still keep coming back to Mathews. I’m looking forward to getting my hands on a 29” version to see how it shoots…and even more looking forward to seeing what the 2024 Mathews will bring to the table…stay tuned.

Comment on this review or ask Les questions here.

More archery content available here.

Unlock the Power: Exploring the 22 Air Rifle Velocity for Superior Shooting Performance

0

“Unleash the Power: Exploring the Impressive Velocity of 22 Air Rifles”

22 air rifle velocity

22 air rifle velocity

When it comes to 22 air rifles, one of the crucial factors that shooters consider is the velocity of the projectile. The velocity refers to the speed at which the pellet or bullet travels after being fired from the rifle. For many shooters, a higher velocity is desirable as it can improve accuracy and increase the effectiveness of their shots.

22 air rifles are known for their versatility and power, making them popular among hunters and target shooters alike. The velocity of these rifles can vary depending on several factors such as the type of ammunition used, barrel length, and overall design of the rifle. Generally, 22 air rifles have velocities ranging from 600 to 1000 feet per second (fps), with some models even reaching speeds beyond that range.

It is important to note that while a higher velocity can provide advantages in terms of accuracy and impact, it also comes with certain considerations. High-velocity shots may be louder and produce more recoil compared to lower-velocity options. Additionally, factors like wind resistance and bullet drop become more significant at higher velocities. Therefore, shooters need to find a balance between speed and other factors to optimize their shooting experience with a 22 air rifle.

In conclusion, the velocity of a.22 air rifle plays a crucial role in determining its effectiveness and accuracy. Higher velocities result in greater energy transfer, increased range, and improved penetration. However, it is essential to consider factors such as safety, local regulations, and the purpose of use when selecting an appropriate velocity for your air rifle.
https://www.youtube.com/watch?v=cyTZGOMSMUk&pp=ygUVMjIgYWlyIHJpZmxlIHZlbG9jaXR5

Best Saddles for Hunting? – 2024 Guide

0

The world of hunting has witnessed an unparalleled revolution since the first introduction of hunting saddles in the 1960s. With an ever-increasing demand for reliable, comfortable, and adjustable hunting gear, the saddle market has transformed and adapted to offer some of the most versatile solutions for contemporary hunters. At the heart of this evolution, Trophyline® has carved a niche for itself, setting the gold standard in hunting saddles and creating a legacy that outshines many.

Trophyline’s® primary objective, since its inception, has always been to design a quality product that ensures the hunter remains both mobile and safe during the pursuit of their game. This commitment is reflected in the impressive range of saddles they’ve developed over the years, with a particular emphasis on the needs of hunters, Comfort, Adjustability, Customization, Mobility, Weight, Dependability, and above all, Safety. Let’s dive into the factors you should consider when finding the best saddle in 2024:

Video: Deciding on a new saddle or an upgrade to your current saddle hunting setup? Robert from Trophyline ® walks you through a a detailed guide on what saddle might be best for you.

Comfort-This factor is slightly subjective and also obvious. Can you sit in your saddle all day? Is it comfortable? Does it support you in all the right places and eliminate things like hip pinch?

Adjustability/Customization-You want to be able to streamline the saddle to your individual figure. Can you adjust it to fit your body? Are the Pouches and attachment points easy to reach? Are there enough places to attach your needed accessories?

Mobility- Can you wear your saddle when walking in miles deep? Is it cumbersome? Loud? Or too bulky to get into your hunting zone stealthily and comfortably?

Weight –At the end of the day you’re either wearing or packing a saddle in, and if it seems too heavy or bulky you won’t take it. Weight is one of the largest contributing factors for a lot of people diving into saddle hunting, so it is in the list of considerations. Too heavy? Too Light? Goldilocks zone?

Dependability-What materials are used to build the saddle and how were they tested? This is the actual physical construction of the saddle. Will it break, rip or come apart? Or was it all built to stay together.

Safety-Safety factors are the features built into the saddle, separate linemans loops, bridge loops, leg straps, fully adjustable belts. These are the things that keep you safe in the tree and should be looked at when considering your safety in a saddle.

Saddle Hunting – It’s a System Not Just a Saddle

Today, saddle hunting is no longer just about having a simple piece of gear. It’s about creating an integrated system that molds to your specific hunting style and scenario, providing an unparalleled level of adjustability and customization. A saddle is the pivot point around which your hunting experience revolves, and Trophyline® understands this better than anyone.

Whether you are walking through the woods or packing your saddle in your backpack, mobility plays a critical role. With the relaunch and introduction of the renowned Ambush saddle (which is no longer available), Trophyline® redefined the standards of mobility and safety. The Ambush saddle was a leap forward in design and technology, merging comfort and convenience seamlessly, thus simplifying the hunt and making it more efficient.

Continuing our commitment to innovation, Trophyline® has launched new additions to our saddle range, such as the Covert Lite 2.0, the Covert Pro 2.0 , and the Venatic. Each of these models has been designed keeping in mind the varying demands of hunters, from the beginner to the veteran. All three models have been rigorously third-party tested, ensuring they uphold the highest standards of safety and quality that Trophyline is synonymous with.

Spinner Fishing for Trout: Tips and Techniques

0

If you’re new to trout fishing and want to get started using artificial baits, there is no better lure to begin with than the humble spinner. The spinner was conceived by French engineer Andre Meulnart on the trout rivers of the French Alps and later adopted and mass produced in the U.S. by Todd Sheldon.

The spinner has become a timeless lure with a reputation to match. Whether you call it a Roostertail, Panther Martin, or MEPPs, the spinner is cheap, easy to use, and practical. I doubt there is an angler alive today that has not had a spinner in their tackle boxes at some point, and there is good reason for it. The spinner remains one of the single most effective fishing lures ever created. From the tackle you use, the size of the lure, and the type of retrieve you perform, the spinner is a highly versatile and nuanced lure that can help you land that trophy trout you’ve been after for years.

Why are Spinners so effective for trout?

Trout, like all fish species, have a specialized organ called the lateral line that runs the length of their bodies. This organ has evolved to pick up vibrations in the water column that indicate danger or potential prey. Trout have also developed incredible monocular and binocular color vision making them adept hunters regardless of water quality and light conditions. The spinner stimulates these extraordinary senses and often elicits a strike even if the trout isn’t hungry. The flash of the blade through the water mimics a floundering baitfish or insect, while the blade’s spinning vibration reinforces the deception that the lure is, indeed, a prey item. Together these two aspects make the spinner lure nearly irresistible to an aggressive trout and at least worth a closer inspection by more wary specimens.

Brown Trout caught on a spinner on the Nantahala River, NC.

Brown Trout caught on a spinner on the Nantahala River, NC.

What Tackle to Pair and Rig with Spinners

A good rule of thumb when fishing for trout, especially in smaller creeks and streams, is to use the most lightweight tackle you can feasibly get away with. My go-to spinner set up for trout is typically a 3000-size spinning reel with 8-12lb braided line, 3-4ft fluorocarbon leader paired with a 6-8ft light action fishing rod with a soft tip. If you have not guessed by now, the name of the game is lightweight tackle; you can use a baitcaster, but unless the lure is at least 1/8oz, I wouldn’t advise it unless you love fixing backlash.

Table 1: A general guide to the sizes of line lure based on the conditions. Color is entirely up to the angler. Rod type for all data below is a 7ft light-medium action rod with a soft tip.

Reel size(Spinning)Mainline(Braid)Leaderline(Floro)Spinner SizeWaterConditionsTrout Expected1000-30008-12lbn4-6lbn1/32 oz; 1/16 oz; 1/8 oz1-5ft, light currentSmall to Medium size Rainbow, Brook, and Brown Trout1000-300010-12lb6-8lb1/4 oz; 1/4 oz1-10ft, light to heavy currentMedium to Large size Rainbow, Brook, and Brown Trout3000+10-12lb6-8lb1/4 oz; 1/4 oz1-10ft, light to heavy currentMedium to Large size Rainbow, Brook, and Brown Trout3000+12+lb8-12lb3/4 oz; 1 oz1-10ft, light to heavy currentMedium to Large size Rainbow, Brook, and Brown Trout

Tackle

1. Spinning reel: size 1000-3000

1000 to 3000 sizes of spinning reels are typically compact, light, and more than capable of handling large trout even in fast current. The reel brand is entirely up to the angler, and I would advise avoiding plastic-bodied reels with plastic handles. Remember, in the world of retail fishing, if it feels cheap, it probably is cheap. Typically higher-quality gear will have aluminum, steel, or carbon-fiber reel handles and bodies. My current favorite reel to use with spinners is a Daiwa Legalis 3000 LT.

Daiva Legalis 3000

Daiwa Legalis 3000LT
2. Spinning Rod: 5-8ft Light to Light-Medium action

Longer rods will allow longer casts and more maneuverability around rocks and boulders, while a shorter rod can be used for quicker, more precise casting. Because I like to fish rivers with dense shoreline cover, I typically choose shorter, more maneuverable rods that won’t get hung up in trees and limbs.

3. Line: 8-12lb braid with a 4-6lb fluorocarbon leader

The light braid will give you substantially more casting distance without sacrificing line strength. The fluorocarbon leader is nearly invisible in the water and will not spook away wary trout.

flourocarbon fishing line

Any fluorocarbon line will work. Try not to go above 8lb test.
4. Lure Size and Weight: 1/32 to 1 oz

Lure weight and size depend entirely on depth, wind conditions, size of fish targeted, fish species, and the type of water being fished. A solid middle ground for all types of water is a 1/8 oz spinner. Remember that lure size does matter when attempting to target larger fish regardless of what people tell you. Animals can determine whether a prey item is worth their time for the energy they expend to retrieve it. Although you can find cases of small fishing hitting big lures and vice versa, typically, larger lures will entice larger fish. This is why Muskie spinners are nearly the size of your hand, while trout spinners can be smaller than your pinky fingernail.

Color of Spinner, Do Trout Care?

The color of the spinner’s body isn’t as important as you might think, regardless of what the trout fanatics and gurus tell you. Spinners are primarily causing reactionary strikes with trout due to the combination of flash and vibration. Therefore, when changing lures, it’s more prudent to change the blade style and color instead of the lure’s body color. Changing the blade color, alters the flash color and vibration that the spinner is expending into the water, which might be more enticing to that lethargic 20in brown your trying not to “accidentally” snag in the face after your 100th cast at it.

Typically I use darker colors during clear days and brighter colors on overcast days. Regardless of this guideline, however, I have been mistaken before. So take this advice with a pinch of salt. Tip: My favorite color and size when exploring a new creek or river is a 1/16oz Rooster-tail with a bronze blade.

1/16 oz Brown Trout Roostertail with a Bronze Blade

1/16 oz Brown Trout Roostertail with a Bronze Blade

How to Rig a Spinner for Trout Fishing

As the name implies, spinners spin. Unfortunately, this sometimes causes the line to spin as well. We use a fluorocarbon leader attached to the braid with a swivel to prevent this. The swivel will allow the leader line to spin while preventing the mainline from turning. Although this isn’t required, it will help avoid tangles and loops forming in your mainline, which can be a real pain in the neck.

When spinner fishing for you trout, you can use a standard spinner rig setup. Tie the mainline (braid) to the fluorocarbon leader using a barrel swivel. Attached the mainline and fluorocarbon leader to the swivel using an improved clinch knot or palomar knot. Allow for 1′ to 2′ of leader line between the swivel and your spinner bait.

trout spinner rig

Spinner rig setup for spinner fishing for trout

Tip: To remove twists from the line remove all tackle from the terminal end of the line and free-spool out as much line as possible into the current or behind a boat. This will naturally allow the line to untwist itself.

How and Where to use a Spinner for Trout

Retrieval Rate

Your retrieval rate is an important aspect you must be aware of when spinner fishing for trout. All spinners have a minimum retrieval rate that will allow the spinner to rotate freely like a boat propeller and not just flop around in the water. To use a spinner the most effectively, you want to maintain the slowest retrieval that your spinner will allow as you propel it through the water.

All brands, blade sizes, shapes, and weights of spinners are different, and finding the optimal retrieval rate for each one is imperative. To get an idea of your spinners’ optimal retrieval rate, drag the lure a few feet in front of you until you see the blade engage and rotate like a small propeller. If it isn’t rotating, you can bend the blade’s edge using a pair of pliers or flatten it with a hammer or rock.

How to Fish a River with a Spinner for Trout

In a river, trout are typically in feeding lanes with their heads pointed into the current as they wait for wounded baitfish or insects to pass by them. These feeding lanes generally are found on drop-offs into deeper water or on the edge of eddies created by rocks or fallen timber. Rarely will they pursue a meal into the current to waste precious energy, highlighting the importance of proper positioning when you make your cast.

Always throw your spinner at roughly a 45-degree angle up-current to allow it to swing through areas where you believe fish might be. Since we know the general direction in a river that trout will face, it’s also prudent to walk upriver instead of downriver when bank fishing. This way, you walk up behind fish instead of in their line of sight. You’ll find you spook less fish and catch more this way.

How to Fish a Lake with a Spinner for Trout

In lakes, trout are much more susceptible to atmospheric changes than in rivers. During the hottest and coldest months of the year, you will typically find them in deeper water and difficult to target by the shore. During the Spring and Fall, trout will hunt along the shorelines, looking for insects, amphibians, and small fish that stray too far into the open. These are the optimal times to throw spinners for trout in a lake. Keep the spinner just a few feet above the bottom, maintaining a continuous retrieval casting toward the structure or the bank. Try to fish drop-offs, structures, and vegetation where the trout’s natural prey may be hiding.

Final Note: Brown vs. Rainbow Trout

Typically, when fishing for trout in the U.S., you will find yourself in waters stocked with Brown or Rainbow trout. Both species of fish have variable habits that, once known, can help you identify areas where you are more likely to catch either species. Brown trout love the dense cover of fallen logs and shorelines with overhangs where they can ambush small animals, fish, and insects as they fall into the water.

Although you can find rainbows exhibiting similar behavior until they reach a particular size class, I tend to find rainbows in deeper, calmer water. Brown trout are also more aggressive and prefer hunting smaller trout and fish, while rainbows, especially hatchery fish, prefer bugs, nymphs, and larvae. I know…I know, you have caught giant brown trout on size 20 nymphs and swear by it. However, from my experience, larger spinners with wider blades tend to catch more brown trout than rainbows.

Till next time, good luck and tight lines.

An Overview of Fleshing Knives

0

The fleshing knife is a key component to most fur sheds. If you’re fleshing muskrats, mink, marten and weasels, you can simply use a butter knife, or a small pelt scraper. But if you’ve got any amount of meat and fat to clean off a pelt, you need a fleshing knife.

Fleshing knives come in a variety of shapes and sizes, and a wide range of price points. The very low end, entry level fleshing knives cost around $15-25. Why so cheap? They’re simply a piece of mild steel with a handle on each end. Unlike the better knives, they’re only one sided, meaning you can do a lot of pushing, but little to no cutting unless you sharpen the convex side on your own. They also typically come unsharpened, and don’t sharpen very easily. They can get the job done, and are great for fleshing a few pelts a season, but they require a whole lot of work and will wear a guy out pretty quick trying to do much fleshing. A number of different companies make these knives, some with brand names and some without. Aside from a lack of ergonomics, the entry level fleshing knives don’t have the quality steel that will take a sharp edge and hold it. Sure, you can sharpen them, but they’ll go dull pretty quick, and won’t cut or push nearly as well. Still, if you need a fleshing knife in a pinch, or you only flesh the occasional pelt, one of these will save you a few bucks.

There’s a quick jump, both in price and quality, between the low end and high end fleshing knives – without much in between. Instead of paying less than $30, you’ll be well north of $60 for a good knife. And in my opinion, it’s well worth the added investment. I remember my disbelief when I tried my first good quality knife, a Necker 600, after spending years trying to flesh beavers with the low end knives. It was incredible. One side for pushing, and a razor edge on the other for cutting the tough spots. The high quality steel blade didn’t dull a bit, even after fleshing 20 beavers. In addition to steel quality, the ergonomic shape was easier on the hands and arms, and the knife had a level of flex to it that made for smooth strokes and less tiring. I swore I’d never go back to an entry level knife. If you can afford it, get a Necker, or equivalent fleshing knife like the Wiebe Elite or the Au Sable Superior.

In addition to the low and high end standard knives, there are a number of other styles that some folks prefer. Sheffield and Green English are a bit different style of knife, with a much wider double-edged blade. They come factory sharpened, and lots of folks like them. The Green English is available at a similar price point to the Necker, and the Sheffield is kind of the high end of the high end product – hand crafted in England with the best quality steel.

A relative newcomer to the market, the Caribou fleshing knife has had some really great reviews recently as well. The big time beaver trappers I know who have used it say it has a thinner, more flexible blade than the Necker, and they really like the precision it affords. Check it out!

Unless you’re a skilled clean skinner or one of those guys who fleshes beaver pelts with a small knife over his knee, you need a fleshing knife in the fur shed. It’s as important as the beam, and you certainly get what you pay for. The low end knives are a dime a dozen, and will get you by in a pinch, but a good fleshing knife that’s comfortable and high performing is worth every penny you spend on it. It’s an item that will last for many years, and pays for itself with every pelt you put up.

6.8 Western: What the .270 WSM Should Have Been

0

If you ask the average American rifle shooter if the world needs another hot new hunting cartridge, it’d be tough to find many to agree right off the bat. But if you laid these specs in front of that same average shooter, they might change their tune: a long, heavy-for-the-caliber bullet with a high ballistic coefficient that produces less felt recoil than a 7mm Rem Mag that can be run in a light, short-action rifle action. Yeah, that’s definitely attractive — and that’s the new 6.8 Western cartridge.

It was engineered as a collaboration between Browning and Winchester, and released to the public in 2021 with hunters as the target demographic.

“The 6.8 Western is the cartridge we turn to for accuracy testing,” said Browning’s director of marketing and communications, Rafe Nielsen, on the Backcountry Hunting Podcast.

Many shooters may ask why two powerhouse companies would introduce a new cartridge in an already saturated market. Do the engineers at Winchester and Browning know something we don’t?

GOOD GEAR – Survive the Day With BRCC’s Endurance Roast

Going From Good to Great

The cartridge’s designers lowered the shoulder of the .270 WSM, removing roughly 10% of the case’s powder capacity. Lowering the shoulder allowed long, higher ballistic coefficient bullets to seat in the case without encroaching into the powder space.

Fast-twist barrels of 1:7.5” and 1:8” help stabilize the long, heavy .277-caliber projectiles weighing from 162 to 175 grains.

The heaviest bullet you can expect to find in a .270 WSM is 150 grains. With heavier bullets and a higher BC, the 6.8 Western can simply reach out farther with greater accuracy.

READ NEXT – 338 Norma Magnum: Cheat Code for Snipers and Machine Guns

6.8 Western vs. 7mm Rem Mag

According to the BH Podcast, the 6.8 Western, for the most part, nips on the heels of the 7mm Remington Magnum in several categories — again, with a lighter kick.

When both cartridges shoot the same 165-grain bullet weights, the velocity for the 6.8 Western is roughly 2,900 fps, and the 7mm Rem Mag moves at about 3,000 fps. The BC of those bullets is more than 0.600 on the G1 scale, which translates into a projectile that can buck the wind and retain energy at long ranges.

However, the 6.8 Western produces about 15% less felt recoil than a 7mm Remington Magnum. It offers a cartridge capable of taking all of North America’s big-game species — minus the really big bears — in a short-action platform with manageable recoil.

With those features, the 6.8 Western is predictably an excellent deer hunting cartridge that’s capable of making long shots across bean fields on whitetails or steep canyon shots on mountain muleys. It’s especially well-suited for hunting the Great Plains, where shots are routinely at around the 400-yard mark.

GOOD GEAR – Embody the Ethos of the Quiet Professional With BRCC’s Silencer Smooth Roast

6.8 Western vs. .270 Winchester

The 6.8 Western and a .270 Winchester fire the same-diameter bullet, but their parent cases differ quite a bit. The .270 Winchester was born from necking down the .30-06 Springfield case to hold a .277-inch projectile.

The 6.8 Western was created from the .270 Winchester Short Magnum case by lowering the shoulder and reducing the case’s powder capacity, which allows a longer, heavier, high BC bullet more room to fit into the case.

A 140-grain bullet fired from a .270 produces 1,401 foot pounds of energy at 500 yards, while the 6.8 Western’s 170-grain bullet hits with 1,736 foot pounds The cartridges also have almost identical trajectories, but the 6.8 lands with a larger wallop.

READ NEXT – Iron Will Releases New Wide Single-Bevel Broadheads

How It Stacks Up Against the 6.5 PRC

Should you get a 6.8 Western if you have a 6.5 PRC? That largely depends on whether you are a target shooter or a big-game hunter.

The 6.5 PRC allows shooters to hit vital-size targets on large bovines out to 800 yards. However, the 6.5 PRC’s 140- to 153-grain bullets do not carry the same downrange penetration capabilities and energy transfer as the heavy-for-caliber 163-, 165-, 170-, or 175-grain projectiles from the 6.8 Western.

If hitting steel at extended distances or shooting whitetails and pronghorn in open country is what you are asking the 6.5 PRC to do, then sticking with that cartridge is fine. However, if you’re after larger game, like elk, large black bears, or moose, the 6.8 Western will drive heavier bullets at difficult angles deep into the vitals.

Those heavier bullets will retain more energy at longer ranges. Pair that extra power with the larger frontal diameter of the 6.8 PRC, and the cartridge delivers far more thump on target.

Both cartridges also have the charge sitting close to the primer, which allows for efficient ignition within the case, consistent pressures within the chamber, and velocities that stay the same from shot to shot.

GOOD GEAR – Fuel Your Next PR With BRCC’s Fit Fuel Blend

6.8 Western Rifles

There are currently 23 rifle offerings from Winchester chambered for the 6.8 Western. Nine are in the “rifleman’s rifle,” the controlled-feed Model 70. There are also 14 options in Winchester’s budget-friendly XPR line.

Browning’s 6.8 Western lineup includes 18 X-Bolt rifles, including the Western Hunter LR. There are 13 X-Bolt models in 6.8 featuring Browning’s own Hawg Muzzle Brake, advertised to reduce felt recoil by up to 76%, depending on caliber. Not only is this easier on your shoulder, but it also reduces muzzle rise, so a shooter can easily spot hits or get back on target for follow-up shots on game.

For models that don’t wear a brake, recoil sits between the levels of a .270 Winchester and a 7mm Remington Magnum. It is pretty comparable to a .30-06 firing a 180-grain bullet, which comes out to about 20 foot pounds of felt energy in an 8-pound rifle.

Some smaller gun shops, such as the Texas company Hill Country Rifl, have decided not to build guns for the new caliber because some ammunition doesn’t seem to shoot well out of their rifles.

“The Browning ammunition made our accuracy standards of a three-shot half-inch group at 100 yards,” Matt Bettersworth of Hill Country Rifles told Free Range American, “but the Winchester ammunition did not meet our standards. And this was from the same gun.”

Winchester Model 70 Extreme HunterPrice: $1,869.99

Often dubbed “The Rifleman’s Rifle,” Winchester’s Model 70 bolt-action is incredibly accurate for a factory-fresh rifle. This version is built for dead-on accuracy in the roughest hunting environments on Earth.

It features a tough Bell and Carlson synthetic stock that resists moisture like there’s no tomorrow and a free-floating sporter-weight barrel with a tungsten Cerakote finish.

Winchester XPRPrice: $609.99

The Winchester XPR is proof that you don’t have to dump a wad of cash to get a great rifle chambered in 6.8 Western. The company took the proven concepts of the Model 70 and combined them with super-efficient manufacturing processes to come up with a reliable and affordable option for the everyday hunter.

Featuring an advanced polymer stock with a matte black finish, a nickel teflon-coated bolt body, and a rugged Perma-Cote finish on the barrel and receiver, this rifle is made to stand up to harsh conditions and rough environments.

The Future of the 6.8 Western

Predicting the fate of a cartridge is hard. Like the .30-06 Springfield, some survive because of the confidence of troops carrying them in battle and later into the deer woods. Sometimes the cartridge is paired with a rifle platform that flat-out works, such as the 7mm Rem Mag and the Remington Model 700. Some cartridges never make it far beyond the basements they were born in.

If hunters and shooters take notice of the 6.8 Western’s ability to shoot high BC bullets capable of ringing long-range steel or taking game up to the size of a moose, then it should stick around. An inherently accurate cartridge that recoils less than a 7mm Remington Magnum chambered in compact, lightweight, proven rifle platforms should find a place in any rifleman’s arsenal.

READ NEXT – S&W Drops Performance Center Version of 10MM M&P M2.0 Pistol

What’s the Best Rimfire Cartridge Right Now? .22 WMR Versus .17 WSM:

0

.22 WMR

I won’t go as far as to belittle the, uh, little .17 Winchester Super Magnum. It’s a unique cartridge that does what no rimfire has done before. It’s the fastest rimfire ever designed and actually performs spectacularly – for a rimfire.

What I will do is ask, why? The great charm about rimfires is that they’re versatile and inexpensive to shoot. The .17 WSM, superb distance performer that it is, is neither. While it’s capable of perforating a prairie dog farther away than “common” rounds, such as the .22 Magnum, most savvy shooters have transitioned to centerfires when distances stretch that far. And up close the .17 WSM is actually going too fast: Squirrels and cottontails suffering a body shot from it leave the hunter with little but fluff.

By stew-pot decree, any rimfire not well suited for small-game hunting is, well, not really a rimfire. It’s an outcast. What some folks charitably term a “niche” cartridge.

Contrast that with the .22 Magnum. While it’s not as aerodynamic as its .17-caliber sibling, it hits authoritatively within the rimfire’s realm – inside of 150 yards or so. For small-game hunting, full-metal-jacket projectiles minimize meat damage; likewise valuable pelts about to be separated from their host furbearer. Butchers effectively use a .22 Mag pellet between the eyes on even the biggest steer.

Government trappers prefer it for killing troublesome mountain lions – cats die in the tree instead of being knocked out, hurt and fighting mad, into their pack of valuable dogs.

And, finally, even homeowners have viable ammunition choices engineered specifically for self-defense to choose from. If that’s not versatility, what is? – Joeseph von Benedikt

.17 WSM

Hunters need just two rimfire cartridges for small game: a .22 LR if they want to eat it and a .17 Winchester Super Magnum (WSM) if they wish to kill it. The .22 Winchester Magnum Rimfire (WMR) splits the difference between the two, crushing them both in all the categories that don’t matter.

The .22 WMR fires a projectile too fast for use on tablefare, such as squirrel or rabbits. What’s more, the bullets are ballistically inefficient at longer range. See for yourself. With only a 5 mph breeze, Hornady’s .22 WMR 30-grain V-MAX drifts 6.9 inches and strikes with 94 ft.-lbs. of energy at 150 yards. At that same range, Winchester’s .17 WSM 20-grain load drifts only 2 inches and carries an impressive 230 ft.-lbs. of energy. At 200 yards, where the .22 WMR is running on fumes, the .17 WSM is still scooting right along and carries twice the energy of the .17 HMR, itself a long-range rimfire.

What about bullet weight and penetration, two attributes the .22 WMR does possess? They simply don’t matter on game that can fit inside your mother’s purse. What about coyotes? Skip both and use a centerfire.

However, if you must use a rimfire on predators, opt for the 25-grain .17 WSM load. Using its superior velocity, the .17 can and will knock down any coyote within 150 yards as long as you hit your mark. You’ll be surprised at the long-range killing power of this little thumper, and you’ll save a few bucks in the process.

Speed kills, and the .17 WSM slaughters the .22 WMR in velocity, trajectory, wind drift, and retained energy. Its rimfire lethality is far superior to anything stamped “.22 WMR.” – D. Faubion

Best Air Rifle Deals

Popular Posts

Air Rifle Scope vs. Rifle Scope – Which One Fits Your Shooting Needs?

0
"Air Rifle Scope vs Rifle Scope: Unveiling the Ultimate Precision Optics. Discover the essential differences and benefits of these two optical devices, empowering shooters...

Can a 22 air rifle kill a deer?

0
"Debate over whether a 22 air rifle can effectively take down a deer has sparked curiosity among hunting enthusiasts. With its lower muzzle velocity...

Air gun 101: Everything you need to know about air rifle accuracy

0
Wyatt Earp has said: Fast is fine, but accuracy is everything And I just thought how many airgunners are obsessed with muzzle velocity and muzzle energy,...

Can you dry fire a gamo air rifle?

0
Unveiling the truth behind dry firing a Gamo air rifle, this intriguing headline delves into the possibility of safely practicing without ammunition. Join us...

Best Air Rifle Brands – Who Makes the Best Pellet Gun?

0
In Jeff Bezos’ own words: "A brand for a company is like a reputation for a person. You earn reputation by trying to do hard...