Home Blog Page 55

Do Squirrels Carry Rabies? (Myth Busted)

0

There is a lot of misinformation out there about rabies. Some people believe that any wild animal can carry the virus, while others think that it’s only bats and raccoons that are at risk. So, what do you need to know about rabies and squirrels? Are they a danger to humans? Can they spread the disease? In this blog post, we’ll answer all your questions and set the record straight. Keep reading to learn more.

What is Rabies and How is it Transmitted?

Rabies is a viral disease that affects the nervous system and can be fatal. It’s usually transmitted through the bite of an infected animal, but it can also be spread if saliva from an infected animal gets into an open wound or the eyes, nose, or mouth. The virus then travels to the brain, where it causes inflammation and eventually death.

Do Squirrels Carry Rabies?

The short answer is no, squirrels do not carry rabies. Small rodents (like squirrels, hamsters, guinea pigs, gerbils, chipmunks, rats, and mice) and lagomorphs (including rabbits and hares) are almost never found to be infected with rabies and have not been known to transmit rabies to humans.

There are several reasons why squirrels are not a major risk for spreading rabies. Squirrels are small in size and have rapid metabolism. For example, if a rabid animal bites a squirrel, then the squirrel will die within a few hours. That’s why small rodents like squirrels, rats, and mice are unlikely to get infected by each other and spread the rabies infection. The rabies virus kills these small rodents within a few hours of being bitten before transmitting to other animals.

What animals carry rabies?

In the United States, bats, raccoons, skunks, and foxes are the most common animals that carry rabies. Squirrels are much less likely to be infected with the virus. In fact, there have been only two documented cases of squirrel-to-human rabies transmission in the United States, both of which occurred in 2003.

So, while it is technically possible for a squirrel to carry rabies, it’s extremely rare. If you are bitten by a squirrel, the chances of contracting the disease are very low.

Signs and Symptoms of Rabies in Squirrels

If a squirrel does happen to contract rabies, there are several signs and symptoms that you might see. These include:

-Paralysis of the hind legs

-Inability to eat or drink

-Excessive salivation or drooling

-Aggressive behavior

-Foaming at the mouth

-Incoordination

– Neurological problems

If you see a squirrel exhibiting any of these symptoms, it’s important to contact your local animal control or wildlife agency immediately. They will be able to safely remove the animal and test it for rabies. Do not attempt to capture the animal yourself.

Can You Get Rabies from Touching a Squirrel?

No, you cannot get rabies from touching a squirrel. The virus can only be transmitted through a bite or contact with saliva or other bodily fluids from an infected animal. So, even if a squirrel has rabies, you won’t contract the disease simply by petting it or touching its fur.

However, it’s still important to use caution when approaching any wild animal. Squirrels are wild animals and they can carry other diseases (like typhus and leptospirosis) that can be transmitted to humans. They can also carry fleas and ticks that can transmit these diseases to your pets. So, it’s always best to err on the side of caution and avoid contact with wild animals whenever possible.

Treatment for a Squirrel Bite

If you are bitten by a squirrel, the first thing you should do is wash the wound with soap and water for at least 5 minutes. Then, seek medical attention immediately. Your doctor will assess the risk of infection and determine if you need to receive any vaccinations or other treatment.

Can Squirrels Give Rabies to Dogs?

No, squirrels cannot give rabies to dogs. The virus can only be transmitted through a bite or contact with saliva or other bodily fluids from an infected animal. So, even if a squirrel has rabies, your dog won’t contract the disease simply by being in contact with it.

However, it’s still important to use caution when your dog is around wild animals. Squirrels are wild animals and they can carry other diseases (like typhus and leptospirosis) that can be transmitted to dogs. They can also carry fleas and ticks that can transmit these diseases to your pet. So, it’s always best to err on the side of caution and avoid contact with wild animals whenever possible.

Squirrels May Carry Other Diseases

While squirrels are not known to carry rabies, they can carry other diseases that can be transmitted to humans. These include:

-Typhus: Typhus is a bacterial disease that can be transmitted to humans through contact with infected fleas or lice. Symptoms of typhus include fever, headache, and rash. If left untreated, typhus can lead to serious complications or even death.

-Leptospirosis: Leptospirosis is a bacterial disease that can be transmitted to humans through contact with contaminated water or soil. Symptoms of leptospirosis include fever, headache, and muscle pain. If left untreated, leptospirosis can lead to kidney damage or failure.

(Do Squirrels Eat Meat? See this post for more)

FAQs

How soon after being bitten should I seek medical attention?

If you’ve been bitten by any animal, it’s important to clean the wound and seek medical attention as soon as possible. Even if the animal does not appear to be sick, it’s always better to err on the side of caution. If you can’t get to a doctor right away, call your local animal control or police department and they can help you decide what to do.

Can I get rabies from a petting zoo?

No, you cannot get rabies from petting animals at a petting zoo. The animals in these types of zoos are typically vaccinated against the virus and are closely monitored for any signs of illness. However, it’s still important to wash your hands after petting any animal, as there may be other diseases that they can transmit.

Should I be worried about contracting rabies if I live in an area with a lot of squirrels?

No, you don’t need to worry about contracting rabies from squirrels if you live in an area where they are common. As we mentioned before, squirrels are very unlikely to be infected with the virus. Even if they were infected, they would likely die within a few hours due to their small size and rapid metabolism. So, the chances of a squirrel spreading the rabies virus to humans are very low.

Conclusion

To sum up, there is always a small chance that any animal could be infected with rabies, but it’s very unlikely in the case of squirrels. So, if you see one acting strangely, there’s no need to panic. Just keep your distance and call your local animal control or wildlife agency for advice. (See this post for more)

Best .300 Win Mag Ammo For Hunting Elk, Deer & Other Big Game

0

Many people use the flat shooting and hard hitting .300 Win Mag for hunting elk, deer and many other species of big game with excellent results. Here are a few great brands of .300 Win Mag ammo that will probably serve you very well next time you’re afield.

The .300 Winchester Magnum cartridge exploded onto the scene in the 1960s and quickly surpassed older .30 caliber magnum rifle cartridges like the .300 Weatherby Magnum and .308 Norma Magnum in popularity. It has also displayed a lot of staying power and remains a favorite among hunters all over the world to this day. For that reason, just about every big manufacturer like Barnes, Black Hills, Federal Premium, Fiocchi, Hornady, Norma, Prvi Partizan (PPU), Sellier & Bellot, Sig Sauer, Remington, and Winchester produces several different variants of .300 Win Mag ammo for hunting elk, deer, moose, bear, and many other big game animals.

Known for being really accurate, having a flat trajectory, and for retaining lots of kinetic energy at extended range, versatility is the name of the game with the .300 Win Mag and it’s well suited for hunting a wide range of big game at short, medium, and even long range. However, different situations (like deer or pronghorn at long range vs moose at short range) necessitate the use of different kinds of .300 Win Mag ammo for best results.

While they are very accurate and are certainly capable of killing big game animals, I don’t recommend using bullets designed for target shooting like the Hornady ELD Match and Sierra MatchKing hollow point boat tail (HPBT) for hunting because they usually aren’t designed for optimum terminal performance on big game animals. The same goes for open tip match (OTM) or boat tail hollow point (BTHP) bullets.

Instead, it’s best to stick with .300 Winchester Magnum ammo specifically designed for hunting that uses soft point, jacketed hollow point, or similar bullets.

Fortunately, the .300 Winchester Magnum is one of the most popular hunting cartridges in North America and there are a wide variety of .300 Win Mag factory loads specifically designed for just about every conceivable big game hunting situation. So, regardless of whether you’re using a bolt action Winchester Model 70, a Remington Model 700, a Ruger Hawkeye, a Savage 110, a Mauser M18, a Weatherby Vanguard, or some other hunting rifle, there is pretty much guaranteed to be something for everyone on the list below of the best .300 Win Mag ammunition for hunting.

In today’s post, I’m going to show you the best .300 Win Mag ammo for hunting elk, deer, feral hogs, black bear, and all sorts of other big game and go over the pros and cons of each individual load.

Note: some of the links below are affiliate links. This means I will earn a small commission (at no extra cost to you) if you make a purchase of rifle, handgun, rimfire, or shotgun ammunition through those links. This helps support the blog and allows me to continue to create free content that’s useful to hunters like yourself. Thanks for your support.

Federal Premium Terminal Ascent

picture of best 300 win mag ammo terminal ascent

Federal’s Terminal Ascent line is an excellent option of .300 Win Mag hunting ammo for hunters looking for really good extended range performance on medium and large game. This ammunition uses the new Terminal Ascent Bullet, which is also extremely aerodynamic and accurate. It has a very high BC (higher than the 200gr Hornady ELD-X) and is also much more robustly constructed.

With those things in mind, I personally tend to lean more towards the Terminal Ascent over the ELD-X for hunting bigger game like elk with the .300 Win Mag. This ammo is another great option for hunters going after game out west like mule deer or pronghorn who need excellent .300 Win Mag ammo for a long range hunting situation.

Don’t misunderstand me though: it will also work great on all manner of game at shorter ranges too. I’ve had a number of clients in Africa use this 300 Win Mag ammo with outstanding results on plains game ranging in size from impala (about the size of deer) all the way up to zebra, gemsbok, and kudu (about the size of elk) at ranges from 50-200 yards.

If this ammunition shoots accurately in your rifle, this is one of my to recommended loads (right there with the Nosler Partition) for hunters who need good .300 Win Mag ammo for elk or moose hunting. Terminal Ascent ammo has better long range performance than the Nosler Partition, so this is definitely the stuff you should use if a shot past 250 yards is likely on an upcoming elk hunt.

  • Bullet Type: Terminal Ascent
  • Bullet Weight: 200 grains
  • Ballistic Coefficient (G1): .608
  • Muzzle Velocity: 2,810 feet per second

GET TERMINAL ASCENT 300 WIN MAG AMMO HERE

Also Available at: Cabela’s, Lucky Gunner, Optics Planet, and Sportsman’s Warehouse

Barnes VOR-TX

picture of best 300 win mag ammo for hunting barnes

If you’re a hunter who loves Barnes bullets, then you’re in luck because Barnes produces some great .300 Win Mag ammo as part of their VOR-TX line. Featuring their legendary copper Tipped Triple Shock X (TTSX) bullet, this ammunition is designed for rapid expansion, high weight retention, and deep penetration. Available using 150 grain, 165 grain, or 180 grain .30 caliber bullets, Barnes offers three outstanding choices for hunters regardless of what they’re after.

The 180 grain load is quite possibly the best .300 Win Mag ammo for elk, bear, and moose hunting. The 165 grain load will also work for larger game like elk, but it’s perfect for bigger deer and bear. That high velocity 150 grain load is great .300 Win Mag ammo for deer and pronghorn hunting, especially for hunters who want a couple hundred extra fps and a really flat trajectory to minimize their holdover for a longer shot. All that being said, there’s certainly a lot of overlap on the acceptable hunting uses for those three bullet weights as well.

All three loads are also 100% copper, which makes them an ideal choice of .300 Win Mag hunting ammunition for use in states like California that that don’t permit the use of lead bullets.

Though I’ve since switched over to Federal Premium Trophy Copper ammo (next on this list), the Barnes VOR-TX line is still great ammunition and was my personal favorite .300 Win Mag ammo for a long time. I used that 165 grain load with a lot of success on both deer and pronghorn over the past few years and this ammo is also a favorite among many North America, New Zealand, and Africa hunting outfitters.

  • Bullet Type: TTSX Boat Tail
  • Bullet Weight: 150 grains, 165 grains, or 180 grains
  • Ballistic Coefficient (G1): .420 (150 gr), .442 (165 gr), .484 (180 gr)
  • Muzzle Velocity: 3,285 feet per second, 3,120 feet per second, or 2,960 feet per second

GET BARNES 300 WIN MAG AMMO HERE

Also Available at: Cabela’s, Lucky Gunner, Optics Planet, & Sportsman’s Warehouse

Hornady Outfitter

picture of best 300 win mag ammo hornady outfitter

Hornady recently introduced their new Outfitter line of ammunition. Though it will also work quite well on a whitetail deer hunt in the back 40, the company markets this .300 Win Mag ammo for use on guided hunts in really tough environments like a moose hunt in Canada or a kudu hunt in South Africa.

This ammunition is loaded with an extremely tough 180 grain CX bullet that’s designed for controlled expansion, high weight retention, and deep penetration on large, heavy boned animals like elk, bear, and moose. This ammunition also uses nickel-plated case for reliable feeding and corrosion resistance under the most demanding conditions

With all those things in mind, it’s easy to see why Hornady advertises their Outfitter .300 Win Mag ammo for use on a big hunt that’s the culmination of years of saving and planning. After all, when the chips are down on the hunt of a lifetime, the absolute last thing you need is for your ammo to fail at the moment of truth.

The CX bullet used in Hornady Outfitter ammunition is lead free, which makes this ammo another good choice for use in states like California. Note: the CX bullet replaced the older GMX bullet from Hornady and is a tiny bit more aerodynamic, but retains the great terminal performance of the GMX.

  • Bullet Type: CX
  • Bullet Weight: 180 grains
  • Ballistic Coefficient (G1): .469
  • Muzzle Velocity: 2,960 feet per second

GET HORNADY OUTFITTER 300 WIN MAG AMMO HERE

Also Available at: Cabela’s, Lucky Gunner, & MidwayUSA

Hornady Precision Hunter

picture of best 300 win mag ammo for hunting

The .300 Winchester Magnum is an excellent long range cartridge and Hornady’s Precision Hunter line contains an outstanding .300 Win Mag ammo option for hunters looking to squeeze every bit of long range performance out of the cartridge. Loaded with the extremely aerodynamic Extremely Low Drag eXpanding (ELD-X) bullet, this ammo is perfect for western hunters going after game like elk, mule deer, or pronghorn who need the very best .300 Win Mag ammo for a long range hunting situation.

Hornady advertises that the ELD-X bullet has the best-in-class ballistic coefficients over their entire trajectory and that their Precision Hunter ammunition also offers match grade accuracy (usually sub-MOA).

Though the ELD-X does not have a bonded core like the Hornady InterBond, the ELD-X does feature a thicker jacket and an InterLock ring to help control expansion, increase weight retention, and minimize the chances of core-jacket separation. For this reason, the ELD-X is still devastating on deer and pronghorn sized game, but it’s also a much better choice than their SST bullet used in the Hornady Superformance line for use on larger game.

Add it up and you have some .300 Winchester Magnum ammunition that’s capable of delivering great terminal performance on a wide range of big game for shots at 400+ yards.

  • Bullet Type: Hornady Extremely Low Drag eXpanding
  • Bullet Weight: 200 grains
  • Ballistic Coefficient (G1): .597
  • Muzzle Velocity: 2,850 feet per second

GET PRECISION HUNTER 300 WIN MAG AMMO HERE

Also Available at: Brownells

Remington Core Lokt

picture of best 300 win mag ammo for hunting remington

If you’re a “meat and potatoes” kind of hunter who wants some reasonably priced and dependable 300 Win Mag ammo for hunting deer, elk, feral hogs, and black bear, then the Remington’s 180 grain Core Lokt soft point will probably work really well for you (it’s also available as a 150 grain soft point load which is good for deer hunting).

It’s not the latest and greatest stuff by any means, but this .300 Win Mag ammunition has been around for a long time and countless hunters have successfully used Core Lokt ammo to take just about every species of big game in North America. The same goes for hunts overseas in places like New Zealand or Africa: one of those bullets through the vitals of a red stag, kudu, eland, or wildebeest will make for a very short tracking job.

Finally, this ammunition is very reasonably priced and has one of the lowest costs per round out of all the .300 Win Mag ammo on this list.

  • Bullet Type: Core-Lokt Pointed Soft Point (PSP)
  • Bullet Weight: 180 grains
  • Ballistic Coefficient (G1): .383
  • Muzzle Velocity: 2,960 feet per second

GET CORE LOKT 300 WIN MAG AMMO HERE

Also Available at: Brownells, Cabela’s, Lucky Gunner, & MidwayUSA

Nosler Trophy Grade

picture of best 300 win mag ammo for hunting nosler

The Nosler Trophy Grade line of ammo will very likely fit the bill for those looking for some seriously heavy hitting .300 Win Mag ammo for elk, moose, or bear hunting. Loaded with a 180 grain or a 200 grain Nosler Partition bullet, this load is perfect for hunting really big game where it’s really important to use a heavy, well constructed bullet. With that in mind, this is also perfect .300 Win Mag ammunition for an African safari for really large or tough game like kudu, blue wildebeest, or eland.

This ammunition is not limited to use on bigger and tougher animals either and will also work extremely well on game like deer. Indeed, a heavier 180gr or 200gr bullet like those used in this loading will also probably cause less meat damage on deer-sized game than lighter and faster 150gr and 165gr bullets.

Though it doesn’t have the flattest trajectory out there, this load retains energy very well, so this is still excellent .300 Win Mag ammo for hunting at a reasonable range. The Nosler Partition is a very old bullet design, but it remains one of the best hunting bullets around and has a proven track record over the course of many decades and won’t let you down at the moment of truth. Nosler also produces a similar load in their Trophy Grade line featuring the newer Nosler Accubond bullet.

  • Bullet Type: Nosler Partition
  • Bullet Weight: 180 grains or 200 grains
  • Ballistic Coefficient (G1): .361 (180gr) or .481 (200gr)
  • Muzzle Velocity: 2,950 feet per second (180gr) or 2,750 feet per second (200gr)

GET NOSLER PARTITION 300 WIN MAG AMMO HERE

Also Available at: Brownells and Lucky Gunner

Federal Premium Trophy Copper

picture of best 300 win mag ammo federal

Hunters in search of a high quality alternative to Barnes bullets should definitely check out Federal Premium’s new Trophy Copper line of ammunition. Like the Barnes TTSX, the Trophy Copper provides a devastating mix of high weight retention, rapid, yet controlled controlled expansion (to approximately twice the original diameter), and deep straight-line penetration. This ammunition is available using either a 165 grain or 180 grain .30 caliber bullet and the whole line has been endorsed by the MeatEater crew.

The 180 grain load is an outstanding choice of .300 Win Mag ammo for elk, moose, or bear hunting while the the lighter 165 grain load is perfect for deer, pronghorn, and bear. Both of those loads use a slightly more aerodynamic bullet than the comparable factory loads in the Barnes VOR-TX line. Especially with regards to the 180 grain Trophy Copper, the result is some .300 Win Mag ammo with a flatter trajectory, more retained energy at long range, and more resistance to wind drift than comparable Barnes ammo.

Federal Premium Trophy Copper ammunition is also a tiny bit more accurate in my rifle. While Barnes VOR-TX ammo is great and has served me well for many years, the improved accuracy combined with the slightly better ballistics of the Federal ammunition were enough for me to make the switch from Barnes to Federal Premium in 2020.

With those things in mind (and after seeing the performance of this ammo in the field), the Federal Premium Trophy Copper line is my new personal favorite .300 Win Mag ammo for all my hunting. I could not have asked for better performance on elk than what I received using that 180 grain load. Regardless of whether you’re hunting deer, elk, and bear in North America or one of the big species of African antelope, this ammo will serve you well and get the job done if you do your part as a shooter.

Both Federal Premium Trophy Copper loads are also lead free, which makes them an ideal choice of .300 Win Mag hunting ammunition for use in states like California that that don’t permit the use of lead bullets.

  • Bullet Type: Trophy Copper
  • Bullet Weight: 165 grains or 180 grains
  • Ballistic Coefficient (G1): .503 (165 gr) or .523 (180 gr)
  • Muzzle Velocity: 3,050 feet per second or 2,960 feet per second

GET TROPHY COPPER 300 WIN MAG AMMO HERE

Also Available at: Sportsman’s Warehouse and Optics Planet

Winchester Deer Season XP

picture of best 300 win mag ammo for hunting winchester

Winchester’s Deer Season XP line of ammunition is a really good choice choice if you’re planning on taking your .300 Win Mag deer hunting. The Extreme Point bullet this rifle ammo uses is similar to Winchester’s Power Point bullet (same goes for the Ballistic Tip and Ballistic Silvertip), but the Extreme Point has a large diameter polymer tip that’s specifically designed to produce a gigantic wound channel along with massive impact trauma. This normally results in a very short tracking job and a very easy to follow blood trail. Even so, it’s designed specifically to compete with popular whitetail deer hunting ammo like the Federal Fusion, Federal Power-Shok, Hornady American Whitetail, Remington Core-Lokt, and Winchester Super-X in terms of accuracy and reliability.

The Winchester Deer Season XP line is also competitively priced and has one of the lowest costs per round out of all the .300 Win Mag ammo on this list.

So, not only is this some very reasonably priced .300 Win Mag ammo, but it also has a very good reputation for producing a giant wound channel and minimizing the distance deer run after being hit. In fact, this Winchester ammo is one of my top recommended brands of 300 Win Mag ammo for whitetail deer hunting. That being said, I would NOT recommend using it for bigger game like elk or moose.

Finally, Winchester does manufacture a lead-free version of their Deer Season XP ammo loaded with their Copper Impact bullet in 300 Win Mag for use with hunters who are prefer (or are required to) use lead-free ammunition.

  • Bullet Type: Extreme Point
  • Bullet Weight: 150 grains
  • Ballistic Coefficient (G1): .392
  • Muzzle Velocity: 3,260 feet per second

GET DEER SEASON XP 300 WIN MAG AMMO HERE

GET COPPER IMPACT 300 WIN MAG AMMO HERE

Also Available At: Brownell’s, Cabela’s and Lucky Gunner

Federal Fusion

picture of best 300 win mag ammo federal fusion

It’s far from the latest and greatest stuff, but this Federal Fusion loading with either a 150gr or a 180gr bullet is really good 300 Win Mag ammo for deer hunting. In addition to being very effective, this ammunition is also somewhat reasonably priced and has been one of the easier to find 300 Win Mag ammo options during the past few years.

Additionally, Fusion bullets have a bonded lead core to help with weight retention. Combined with a skived tip to help initiate expansion, Federal Fusion 300 Win Mag ammo delivers a really good balance of controlled expansion, high weight retention, and deep penetration. Federal Fusion ammunition also has a good reputation for accuracy.

While I think Fusion 300 Win Mag ammo is better for elk hunting than some of the other loads out there, this is ideal ammo for feral hog and deer hunting. You could also include game like pronghorn and maybe black bear in there as well.

It will definitely work on bigger like elk or moose in a pinch, but I do not recommend using Federal Fusion 300 Win Mag ammo for hunting really big game like that unless you can’t find anything better. Instead, use one of the other loads I recommend later in this article like the Barnes TTSX, Federal Terminal Ascent, or Nosler Partition.

Like I said though, this is outstanding on deer sized game though and it’s to go wrong with Federal Fusion 300 Win Mag ammo for deer hunting.

  • Bullet Type: Fusion Soft Point
  • Bullet Weight: 150 grains or 180 grains
  • Ballistic Coefficient (G1): .410 (150gr) or .485 (180gr)
  • Muzzle Velocity: 3,200 (150gr) or 2,960 feet per second (180gr)

GET FEDERAL FUSION 300 WIN MAG AMMO HERE

Also Available at: Natchez Shooter Supplies and Optics Planet

NEXT: BEST 6.5 CREEDMOOR AMMO FOR HUNTING ELK, DEER, & OTHER BIG GAME

NEXT: 223 REM vs 5.56 NATO: WHICH SHOULD YOU USE IN YOUR AR-15 CARBINE?

NEXT: 6.8 SPC vs 6.5 GRENDEL: WHAT YOU NEED TO KNOW

NEXT: 101 BEST GIFTS FOR HUNTERS

Enjoy this article about the best .300 Win Mag ammo for hunting? Please share it with your friends on Facebook and Twitter.

Make sure you follow The Big Game Hunting Blog on Facebook, Instagram, Twitter, and YouTube.

Giant Lake Simcoe burbot could dethrone long-held Ontario record from north

0

An Orillia, Ont. angler says he has caught what could be an Ontario record burbot.

On Jan. 25, Sebastien Roy says he was ice fishing on Lake Simcoe with a buddy, looking for some whitefish.

Roy, 32, said the spot they had planned on fishing was open water, so they had to make an adjustment.

“It’s kind of luck as we ended up fishing a spot we usually wouldn’t fish,” he said.

Roy said his first fish on the ice was a burbot — a form of freshwater cod. “It was a really small one, ” he said. “But it was my first burbot ever.” Roy continued to jig a small Vibrato spoon just off the bottom. Twenty minutes after he had caught his first fish, another one hit.

This fish was much heavier, and pulled Roy’s jigging rod over in a tight arc. When it got near the ice hole, Roy said he knew he had something special.

“It’s really clear, Lake Simcoe,” Roy said. “And the minute I looked down the hole I knew it was a record. It was one of the biggest fish I’ve ever seen swimming around.”

Roy said he called his partner, Steve, over and and they pulled the burbot from the hole together.

“Oh my God bro, that’s a giant,” said his partner.

They measured the fish as nearly .99 metres (39 inches) long, with a 48 cm (19 inch) girth. Roy borrowed a scale from some other anglers on the ice and the scale read 18.3 pounds.

A check of the Ontario burbot records via smartphone revealed the fish he had landed was a potential Ontario record.

Roy, who prefers to release his fish, also learned he had to keep the fish to qualify for a provincial record.

Back on land, the anglers looked for a place to weigh the fish. Two scales were tried, but Roy finally weighed the fish on a certified scale at Zehrs market, in Orillia.

“The guy at Zehrs was amazing,” said Roy. “He let us weigh. In kilo’s it weighed 8.145, so times 2.2 gives you pounds, so it was 17.9 on a certified scale. And we got all this on video.”

Roy said he initially had to store the fish in a toboggan full of snow, as it was too big for the freezer.

“My girlfriend wouldn’t like it if I left it in the freezer,” said Roy. “It’s a big fish.”

He said he has filled out the proper forms and plans to enter his giant fish for record book consideration.

Roy said he had read about the giant burbot caught by 18-year-old Landan Brochu, of Thunder Bay, on March 5, 2016.

  • Ontario teen lands record-breaking freshwater cod

Brochu’s fish weighed 16.8 pounds and measured .94 metres (37 inches) long and was 55.9 cm (22 inches) around. It is also the pending Ontario record.

Alesha Howran, of the Ontario Federation of Anglers and Hunters (OFAH)/Ontario Record Fish Registry said Brochu’s fish will be announced as the new record in March 2017, barring any other burbot from 2016 being entered.

However, she said if Roy’s burbot meets all the proper requirements, it may be announced as a new Ontario burbot record in March 2018.

The present Ontario record burbot weighed 15.8 pounds and was caught by Ernie Arpin, on March 14, 2003. That fish measured .93 metres (36.5 inches) long by 53 cm (21 inches) around.

If Roy’s trophy burbot makes it through the OFAH/Ontario Record Fish Registry requirements, it will be the first time in recent memory a fish from southern Ontario will have that title.

Both Arpin and Brochu’s fish were caught in the same northwestern Ontario reservoir, located just north of the town of Nipigon.

The burbot is the only gadiform freshwater fish and is closely related to the marine common ling and the cusk fish.

Once considered a nuisance by many anglers, burbot have become something of a phenomenon in recent years.

Although Ontario has a growing reputation as a home to giant burbot, the king of them all came from another Canadian province.

The International Game Fish Association records the world-record burbot as being caught in Lake Diefenbaker, Saskatchewan.

That fish was caught by Sean Konrad on March 27, 2010. Konrad’s world record burbot weighed a whopping 25 lb 2 oz (11.4 kg).

Fish records are typically measures in pounds. One pound equals .45 kilograms.

The Best 22LR Scopes for Target Shooting in 2024

0

Today I’m going to show you the best 22LR scope for target shooting.

In fact:

I’ve hand-tested 18 scopes alone for this review.

The best part?

I’ve sorted the scopes by use. So whether you’re on a budget or need the best 22LR optic, you’ll find it here.

Let’s dive in!

The 4 Best 22LR Scope for Target Shooting

If you’re pressed on time, here’s a quick list of the best 22LR scopes:

  1. Leupold VX-Freedom Rimfire: Best Overall 22LR Scope
  2. Vortex Crossfire II 2-7×32 Rimfire: Best Close-to-Medium Range Scope
  3. Bushnell Drop Zone-22 2-7×32: Best Short-range Varmint Hunting
  4. Athlon Argos BTR 6-24×50: Best Short-to-Long Range 22LR Scope

1. Leupold VX-Freedom Rimfire: Best Overall 22LR Scope

The Leupold VX-Freedom Rimfire is the best overall 22LR scope.

I’ve used it for hunting, target shooting, night time hunting and more.

What makes it so versatile?

Keep reading and I’ll show you…

Glass Clarity & Reticle

Here’s the thing:

When a scope is positioned at a low price point like the Leupold Freedom Rimfire, it usually equates to reduced quality.

But that’s wasn’t the case here.

In fact, the glass on this scope is just as crisp and clear as the glass used on more expensive Leupold sights.

Leupold VX Freedom Rimfire front glass

It’s also great in low light conditions, making the visibility problems I usually face with early morning shooting nonexistent.

Leupold VX Freedom Rimfire reticle

But what about the reticle?

It’s a standard duplex reticle set in the second focal plane.

This allows you to have a strong and easy to see reticle at all magnifications.

Eye Relief & Eye Box

It has a whopping 4.1” of eye relief!

That’s more than any other scope on this list.

Leupold VX Freedom Rimfire rear glass

The best part?

You can shoot with both eyes open, and accurately hit your target without worrying about getting a black eye 🙂

Durability & Weight

The VX-Freedom Rimfire is well built.

It’s crafted with lightweight aluminum that is O-ring sealed and nitrogen purged.

Leupold VX Freedom Rimfire sideview

In other words:

It’s completely shockproof, waterproof and fogproof.

In the dead of winter, with snow actively falling, I didn’t have a single temperature or fog related problem.

Elevation & Windage Knobs

The dials worked correctly, and are set at ¼ MOA with audible clicks to ensure precision.

Leupold VX Freedom Rimfire windage and elevation

However, the knobs feel cheap. The plastic used on the knobs is soft and feels like something you find in a dollar store.

Leupold VX Freedom Rimfire firedot button

Don’t get me wrong:

The knobs work fine and do exactly what they are supposed to do. I just wish Leupold used a higher quality plastic or even aluminum for the knob.

That being said, they are accurate, easy to use and track true. It’s also easy to zero, and holds zero even with strong recoil or accidental drops.

Magnification & Parallax

The 1.5-4x magnification is perfect for hunting and target shooting.

Leupold VX Freedom Rimfire magnification

In fact, I’ve used it up to 200 yards without a problem. Further than that would require more magnification. I’d recommend checking out myVortex Viper HST 4-16×44 Review.

Although parallax is fixed, I experienced no blurriness or fuzziness when shooting within 100 yards.

Leupold VX-Freedom Rimfire Review: Is It Worth It?

If you’re looking for the best overall 22 LR scope that will work in almost any situation, then the Leupold VX-Freedom Rimfire is for you.

Here’s why. It’s:

  • Affordable
  • Clear glass
  • Lightweight
  • Works well in low light
  • Short-to-medium range magnification

In short:

The Leupold VX-Freedom Rimfire Riflescope is budget friendly and easy to use scope. Plus, it’s backed by Leupold’s lifetime guarantee.

You break it, they’ll fix it…free of charge.

2. Vortex Crossfire II 2-7×32 Rimfire: Best Close-to-Medium Range Scope

Looking for the best close-to-medium range scope for target shooting? Then get a Vortex Crossfire II 2-7×32.

Not only is it affordable, but the scope’s features is built with quality.

Like what?

Keep reading to find out…

Glass Clarity & Reticle

Glass clarity is always one of the defining features on a Vortex optic and the Crossfire II 2-7x is no exception.

This scope has a fully multi-coated lens that provides a stunningly bright and clear view of your target.

Vortex Crossfire II glass clarity

The lens also has an anti-reflective coating. This reduces light absorption to minimize any glare that could appear in your sight,

What’s better is the V-plex reticle.

Vortex Crossfire II reticle

It’s a popular hunting reticle that can be used for about any hunting applications. That’s why I recommended it in my 4 best scopes for Ruger 10/22 guide.

However, it’s wire constructed. Although it’s not bad, it can break and occasionally lose their position.

This reticle is a second focal plane (SFP) which lets you increase or decrease magnification without changing the size of the reticle.

So the reticle gets to do its job without obstructing your view of the target.

Eye Relief & Eye Box

One sure sign of a quality optic is the eye relief.

A good scope should allow you to have a comfortable distance between your eye and the eyepiece while still being able to clearly see the full field of view.

The Crossfire II really delivers in this area. It offers a very forgiving 3.9 inches of eye relief at the lowest magnification and 4.7 inches at the highest magnification.

Vortex Crossfire II eyebox

The eye box (range of positioning behind the eyepiece) is also really generous. This allows for faster target acquisition and is a big reason why this optic can be recommended for both tactical use as well as for hunting.

Durability & Weight

The Vortex reputation is built on the company’s resolve to make a product that endures.

Crossfire II displays all the signs of the vortex standards

Vortex Crossfire II optic

Like other Vortex products, the Crossfire II has been designed to surpass the standards of similarly-priced riflescopes.

The hard-anodized tube is made from aircraft-grade aluminum which protects it against scratches and dings.

The design is also shockproof, ensuring that the components aren’t easily jumbled by the movement of your gun. Not to mention movements that come with normal use, such as, having it packed up with the rest of your gear in the back of your truck, or even accidentally knocking it over or dropping it.

The scope is O-ring sealed and nitrogen purged, making it both waterproof and fog proof.

If for some reason any of these features fail or your scope is damaged in any way, Vortex covers it with its VIP lifetime warranty.

The company will either repair or replace your Crossfire II, no matter what the problem is or how long you’ve had it.

To top it all off, this heavy-duty scope weighs just 14.3oz. — a comfortable addition to most rifles.

Elevation & Windage Knobs

The turrets on the Crossfire II are medium height and finger adjustable.

Vortex Crossfire II windage and elevation

The knobs have a sturdy feel to them and can be easily manipulated, even with a gloved hand. Both turrets are capped to protect your settings and can be reset back to zero after sighting in.

Windage and elevation can both be adjusted to 60 MOA with each click measuring ¼ MOA.

Magnification & Parallax

With a magnification of 2-7x, this is a scope meant for close to medium-range shooting.

Vortex Crossfire II magnification

The parallax adjustment is fixed up to 100yds which is a good fit for this level of magnification.

Vortex Optics Crossfire II 2-7×32 Review: Is It Worth It?

With a price tag of only $129, you are getting a great scope with quality features that many people pay twice as much for.

Not only that, but when you take into account the lifetime warranty, it’s almost a no brainer.

In short:

If you’re looking for a solid tactical scope that excels in hunting, then I’d recommend the Crossfire II.

3. Bushnell Drop Zone-22 2-7×32: Best Short-range Varmint Hunting

Want to do short-range varmint hunting?

Or rimfire tactical matches?

Then take a look at the Bushnell Drop Zone-22 2-7×32. It’s literally designed for the .22 LR round.

The best part?

It’s super affordable. Let’s take a closer look…

Glass Clarity & Reticle

The glass is surprisingly good.

In fact, I didn’t notice any tunnel vision from the bezel like I do with other similarly-priced optics.

But what’s even better is the Drop Zone-22 BDC reticle.

Bushnell Drop Zone-22 glass clarity

It’s specifically engineered for 38-40 grain, .22 LR high-velocity loads, with a 50-yard zero.

What that means is it specifically measures the .22 LR’s trajectory, giving you completely accurate bullet drop estimates.

This is perfect if you do short-range varmint hunting or rimfire tactical matches.

Eye Relief & Eye Box

The 3.6” of eye relief is very forgiving — even at full magnification.

Bushnell Drop Zone-22 front scope

Also, the eye box is generous. I didn’t experience any eye fatigue.

Durability & Weight

The Drop Zone-22 is built like a tank.

Bushnell Drop Zone-22 side view

It’s O-ring sealed, argon purged and crafted from durable aluminum. Which means, the scope is waterproof, fogproof and shockproof.

However, it comes at a hefty cost:

Heavy weight.

At about 19.5 ounces in weight, the Drop-Zone 22 is one of the heaviest scope in its class.

Elevation & Windage Knobs

The exposed target turrets are reliable.

They produce positive, crisp clicks. No tools are required. And the ¼ MOA is very precise.

Bushnell Drop Zone-22 windage and elevation

However, the dials are a bit stiff to turn…at first. With usage, it’ll loosen up.

Moving on, zeroing was easy. After 7 rounds, I was zeroed in. It also held zero like a champ. 82 rounds and a few hikes later, I still haven’t lost zero.

Magnification & Parallax

Just like the turrets, the power ring is also rather stiff.

The solution?

Use a throw-over lever. This makes turning the knob a breeze.

No products found.

The scope is also equipped with an adjustable side parallax knob. This is gold…considering the price of the optic.

It can adjust as low as 10 yards to infinity. A plus if you’re plinking, engaging close targets or rimfire shooting.

Bushnell Drop Zone-22 magnification

In short:

The 2-7x magnification and parallax adjustment is clean and precise.

Bushnell Optics Drop Zone-22 Review: Is It Worth It?

If you’re looking for a budget-friendly 22LR scope, then get a Bushnell Drop Zone-22.

Here’s why. It’s got:

  • Durable
  • Clear glass
  • Long eye relief
  • 22LR BDC reticle
  • Side parallax adjustment

It’s literally designed for small game hunting, plinking and rimfire shooting.

The best part?

It’s backed by Bushnell’s lifetime warranty. So if ANYTHING happens to the scope, they’ll fix er’ up for free.

4. Athlon Argos BTR 6-24×50: Best Short-to-Long Range 22LR Scope

The Athlon Argos BTR 6-24×50 is the best short-to-long range scope for your 22lr rifle.

In fact:

The Argos BTR packs in many of the features of top-dollar scopes, but for a fraction of the cost. Like what? Keep reading to find out…

Glass Clarity & Reticle

The glass on the Argos BTR is very high quality, which means the image you see through your scope is clear and crisp. In fact, the Argos BTR excels in low-light conditions.

I’ve found that it’s the perfect scope for dusk and dawn hunts. This is because the BTR is made with a fully multi-coated lens which provides fantastic light transmission.

I’ve noticed that when I zoom in to 18-24x, I get a little bit of blurriness. That said, for under $400, you really can’t beat the image clarity of the BTR.

Now let’s take a look at the reticle.

I was expecting a pretty basic reticle from this scope, especially considering the price. However, the BTR uses an illuminated, etched APMR MIL reticle. It’s anything but basic!

Here’s a look at the APMR MIL reticle:

I really like the illuminated reticle, especially when I’m shooting in low-light conditions. There are 11 brightness settings which means that I can find the perfect illumination level every time.

I do wish that the BTR had an auto-shutoff feature to help save on battery life, but I tend to keep an extra Lithium battery in my bag just in case.

Also, since the reticle is etched into the glass, you don’t need to turn on the illumination at all if you don’t want to. The etched reticle is also much more durable than a wired crosshair, so you don’t have to worry about your wires getting knocked off center.

One of the best things about the Argos BTR is that it is a first focal plane riflescope, which means that the reticle grows as you zoom in on your target. No more calculations for holdover or windage when you change your magnification.

I love that the MIL reticle works at all ranges, and this feature usually only comes in scopes that cost over $1000.

Eye Relief & Eye Box

The eye relief on the BTR is a nice, comfy 3.3 inches. This is perfect for low-to-zero recoil calibers like 22lr.

The eye box is also nice and generous, although I’ve noticed it does shrink a little as you zoom in to max.

Durability

The Argos BTR is incredibly durable. The tube is made from heat-treated, aircraft grade aluminum and is sealed with O-rings.

As if that’s not enough, the whole tube is made from a single piece of metal, which makes it stronger and more waterproof than multi-piece scope tubes. The BTR is also argon-purged and uses an etched reticle.

All of these features mean that the scope is able to handle any kind of conditions and take any kind of punishment that I might throw at it.

Elevation & Windage Knobs

Here’s the scope’s biggest con…

The turrets move very easily, with almost no resistance…which can lead to over adjusting.

However, I spent about ten minutes re-greasing the turret caps. When I was done, the turrets felt much less mushy and the clicks were a lot louder.

If you’ve never regreased turrets before, here’s a quick video showing you how to do it:

Zeroing was a very easy process. I was able to zero the scope in less than ten rounds once I was hitting paper.

And I’ve put hundreds of rounds through my 22lr since, and the zero has held true.

In my experience, these turrets have proved to be very reliable.

Parallax & Magnification

The parallax adjustment knob works very well. It’s easy to turn and accurate. This makes for easy adjustments in the field.

The 6-24x magnification is probably my favorite thing about this scope. Whether I want to shoot something ten yards out or plink a target at 1000 yards, the BTR is my go-to.

The scope image is very clear up until about 20x. After that it gets a little bit blurry, so you may want to invest in a higher-end scope if you want to do a lot of extreme distance shooting.

That said, I’ve found that the Argos BTR still functions well at 1000 yards, especially when you consider the price.

Mounting & Rings

The Argos BTR doesn’t come with any rings or a mount, so I’d suggest getting a set of High Scope Rings that fit your 22lr.

The scope does come with a set of lens covers, which is nice. It also includes a battery for the illuminated reticle.

I went ahead and bought a 50mm Athlon Sunshade to use for my daytime shooting.

It helps a lot with glare and reflections.

Is the Athlon Argos BTR 6-24×50 Worth It?

If you need an all-range scope for your 22lr, you can’t go wrong with the Argos BTR.

Here’s why. It has:

  • First focal plane
  • 6-24x magnification
  • Excellent in low-light
  • Reliable, hand-adjustable turrets
  • Illuminated, etched BTR MIL reticle
  • Fully multi-coated glass for clear, crisp image

And all of this comes in a package that costs a fraction of what other competing scopes cost.

If all of that wasn’t enough, the BTR comes with Athlon’s Gold Medal lifetime warranty, so you know you’re covered if anything happens to your riflescope.

If you want all these features in a low-cost riflescope, then the Argos BTR 6-24×50 is for you.

Looking for a riflescope for your AR? Here’s our list of the 7 Best AR-15 Scopes and Optics.

Now It’s Your Turn

I hope you enjoyed my best 22LR scope for target shooting guide.

So as a recap:

If you’re looking for the best overall .22LR target shooting scope, then get the Leupold VX-Freedom Rimfire.

What about the best close-to-medium range optic? The Crossfire II 2-7×32 is for you.

If you’re into short-range varmint hunting, then opt-in for the Bushnell Drop Zone-22.

Or if you’re looking for the best short-to-long range scope, then get the Athlon Argos BTR 6-24×50.

Whichever .22LR scope you choose, you’re bound to hit a reliable, yet effective optic. I’ve spent hundreds of rounds through each one with no failure.

Now I want to turn it over to you:

Which rifle scope will you pick for your .22LR?

Let me know by leaving a quick comment down below.

9 Best Group 27 Deep Cycle Battery 2024 – For Terrestrial and Marine Vehicles

0

We have discussed a lot of different types of batteries on our blog. We have talked about batteries based on performance, functionality, weather, usage and a lot of other factors.

In this article, we are going to discuss the different batteries available for you if you need a car battery, specifically the best group 27 deep cycle battery. Different cars with different designs require different size batteries.

Now, if you know about batteries, you must also know that the design of batteries also affects their performance. As it turns out, Group 27 is one of the most popular battery groups and is very common in vehicles, both terrestrial and marine.

Group 27 batteries offer a great size-to-performance ratio. They are mostly used in vehicles requiring high power such as Jeep Wrangler. Group 27 batteries are also seen in other domains such as scooters and other appliances. It greatly depends on what the type of battery is.

In this article, we’ll be mostly looking at deep-cycle batteries. It is very important, however, to figure out beforehand what kind of battery fits your requirement. Getting the wrong battery can be a real hassle and can often cause problems in the long run.

Luckily, we have discussed at the end of this article how you can find the best deep-cycle battery for you. But before that, let us have a quick look at the different products available in the market for you to choose from.

Best Group 27 Deep Cycle Batteries – Our Top Picks

How to find the Best Group 27 deep-cycle battery?

Best Group 27 Deep Cycle Battery

Choosing a good battery can be really tricky but in this section, we are going to talk about a few points you can keep in mind while buying a new deep-cycle battery.

Since you have already identified the size of the battery you want, a lot of the work is already done. Keep these points in mind when you buy a deep-cycle battery.

Capacity

Needless to say, one of the most important features of deep-cycle batteries is their capacity. 100Ah batteries are widely used but that doesn’t mean that a 100Ah battery would be the best choice for you too.

As the capacity increases, the price also increases and you should try to figure out your exact power consumption to get a good idea of the exact battery capacity you need. It will help you save some money and also improve your overall performance.

Battery Type

We have looked at a few different battery types in this article. Flooded, AGM, Li-Ion and Gel are some of the most common battery types available in the market. Each has its own advantage and disadvantage.

Before you buy a battery, make sure you read about the different battery types available in the market and see which one’s the best for you.

Price and Warranty

Last but not the least, you should always make sure that you get reliable batteries. Getting a reasonably priced battery with a good warranty is a safer option than buying cheap batteries with no warranty.

There are a lot of budget options when it comes to batteries but make sure the battery you are buying has a decent quality.

Batteries with warranties are always a good deal as it makes sure your investment is safe in case something goes wrong.

Here is a helpful video on how to choose the right car battery:

FAQs

Conclusion

In this article, we discussed the best Group 27 deep-cycle batteries available in the market. Towards the end, we also talked in brief about some things you should look out for while buying yourself a deep-cycle battery. We hope you found the article helpful.

What Are The Best Lures For Lake Trout Fishing? (Detailed Guide)

0

UPDATED 03 NOVEMBER 2024

by Robert Ceran

This article may contain affiliate links. If you make a purchase after clicking on a link we may earn a small commission at no extra cost to you.

Are you looking for the best lures to use for catching a laker or two, but aren’t sure which ones are best for your fishing tactic?

My team and I tested the most popular lake trout lures on the market, and evaluated them based on their ability to catch lake trout with vertical jigging, trolling, ice fishing, or casting from shore.

Based on our testing, here is our pick of the best lake trout lures in 2024:

  • Best overall: Kodiak Tackle Tube Jig
  • Best bucktail jig: Last Cast Tackle Bucktail Jig
  • Best jigging spoon: Acme Kastmaster Spoon
  • Best trolling spoon: Hagen Muskie Spoon
  • Best trolling crankbait: Rapala Shad Rap
  • Best diving plug: Luhr Jensen Rattling Kwikfish
  • Best for ice fishing: Mission Tackle Lake Trout Tube

What is the best lure for lake trout?

LureImagePriceRecommended size Acme Kastmaser Spoon1 to 1.5 oz Thundermist Jigging Spoon1.75 oz Last Cast Tackle Bucktail Jig1 to 2 oz Kodiak Tackle 6” Tube Jig1.5 oz Mission Tackle Lake Trout Tube0.75 oz Keitech Easy Shiner Soft Paddle Swimbait5 to 8″ Sanhu Shad Swimbait Paddle Tail9″ Big Hammer Jig Head With 4/0 Hook1 oz Last Cast Tackle White Shad Jig Head2 oz Hagen Muskie Spoon1.25 oz Rapala Shad RapSize 07 to 09 Luhr Jensen Rattling KwikfishSize K15 to K16 Truscend Soft Swimbait0.75 oz Acme Kastmaster with BuckTail Teaser0.75 oz

The table above shows a summary of the best lake trout lures that we tested, which fall into three main categories:

  • Jigging lures
  • Trolling lures
  • Lures for casting from shore

Jigging lures play a pivotal role in fishing for lake trout, and are among the very best lake trout lures, since you can use them all year long, both during open water and ice fishing season.

Many anglers assume that the only time you can catch lake trout with jigging lures is while ice fishing in the winter, but this is far from true.

Vertical jigging is also one of the best ways to catch lake trout from a boat during the open water season, and together with trolling, it is among the very best techniques for hunting lake trout.

During the summer, most lake trout are caught with lures fished from boats (especially during the peak of summer, when they retreat into colder water that’s over 60 feet deep).

But during spring and fall, you also have a chance of catching lake trout by casting lures from shore, and we’ll cover those as well.

Now let’s take a closer look at each of these types of lures, and cover the best lake trout lures for all techniques, so you can decide which ones are a good fit for you.

Best lake trout lures for jigging

When it comes to lake trout jigging, our testing revealed that the best types of lures to use for lake trout are jigging spoons, tube jigs, hair jigs, and jig heads rigged for lake trout with oversized plastic swimbaits.

One thing to keep in mind with each of these lure types is that our testing showed that it’s best to use larger lure sizes than you would for other kinds of fish, since lake trout tend to feed on very large bait fish, and the best lures for fishing for lake trout need to be able to match the size of their forage in order to grab their attention.

Here are the best lake trout lures for jigging:

Acme Kastmaster Spoon (1 to 1 1/2 oz)

When it comes to jigging spoons, the Kastmaster is hard to beat, and has been catching lake trout reliably for many years.

And while the Acme Kastmaster is also often used for targeting smaller trout species, our tests showed that it’s important to upsize to a bigger spoon size when jigging for lake trout, as you need to be able to get your spoon down into deep water where the lake trout are holding. That’s why we recommend the 1 oz to 1 1/2 oz size for fishing for lake trout.

Thundermist Jigging Spoon (1 ¾ oz)

The Thundermist jigging spoon has a very simple design, but when we tested it, it got the job done. Again, it’s best to choose the larger sizes for lake trout jigging, as that will allow you to get it down into the strike zone fast enough, and with 1 ¾ oz this is one of the largest lures in this review.

Last Cast Tackle Bucktail Jig (1 to 2 oz)

This is a classic jig lure that has been around for many decades, but when we put it to the test we found that it still works as a highly reliable lake trout jig, especially when tipped with a piece of cut bait, such as a slice of sucker.

A great thing about the Bucktail Jig is that it comes in large sizes all the way up to 6 oz, which is ideal for lake trout. The most effective color is white.

Kodiak Tackle 6” Tube Jig (1 1/2 oz)

Our testing revealed that tube jigs are among the very best lake trout lures, and can outperform all other lures on many days. Again, you should aim to use the larger sizes, with the smallest sizes starting around 1/2 oz and going up from there. My favorite size is the 1 1/2 oz jig head rigged with a 6” tube jig.

Mission Tackle Lake Trout Tube (3/4 oz)

While slightly smaller than the previous lure, this white tube jig for lake trout comes with the added advantage that it glows in the dark if you shine light onto it before use.

When we tested it, we found that this can be one of the very best lures for fishing for lake trout in low light conditions, such as during ice fishing, or on early mornings, late evenings, or on overcast days. Another great thing about this lure is that it comes pre-rigged with a stinger hook.

Keitech Easy Shiner Soft Paddle Swimbait (5”)

Now let’s switch gears and take a look at lake trout swimbaits, which our testing showed can be a secret weapon for catching lake trout, especially when it comes to targeting trophy size fish.

With 5 inches, the Keitech Easy Shiner is still on the small side, but a good option to start with if you don’t know what size bait fish the lake trout are keyed in on.

Sanhu Shad Swimbait Paddle Tail (9”)

With a length of 9 inches, this soft plastic lure starts to approach muskie size dimensions, but our testing showed that this is exactly what you need when lake trout are hunting big forage, such as fully grown herring, ciscoes, or shad.

Jig heads to use with soft plastic swimbaits

In order to fish oversized swimbait lures that are 5 to 10 inches long, it’s necessary to use extra large jig heads that are in the 1 to 2 oz weight range (or even bigger).

Big Hammer Jig Head With 4/0 Hook (1 oz)

Last Cast Tackle White Shad Jig Head (2 oz)

When using large swimbaits over 5 inches, you may also want to rig a stinger hook to avoid short strikes.

Best lake trout lures for trolling

There can be no doubt that spoons are by far the most effective lures for lake trout trolling, though you can also put plenty of fish in the boat with crankbaits and flatfish lures.

Here is a selection of the best lake trout lures for trolling:

Hagen Muskie Spoon (1 1/4 oz)

These spoons were originally designed for pike and muskie fishing, but when we put them to the test, we found that they also work like gangbusters for trolling lake trout.

Our favorite color is the red and white design (resembling the original Daredevle), as well as the red diamonds on a yellow background, which seem to catch more lake trout than the other colors.

The best lake trout spoons have a strong side to side wobbling action, which creates a lot of vibrations and flashes in the water.

During spring time you can troll them with a 3 way trolling rig for lake trout, while in summer it’s better to use leadcore or a downrigger to get your spoon deep enough.

Rapala Shad Rap (Size 07 to 09)

This classic crankbait comes with a large diving shovel that gives it a strong wobbling action when trolled.

Also, since it’s set to dive deep, we discovered that you can troll the Shad Rap without downrigger during spring time, when lake trout are often active in more shallow water.

During the summer you can either use leadcore or downriggers to get it down deep enough.

Luhr Jensen Rattling Kwikfish (Size K15 to K16)

This diving plug was specifically designed for salmon and lake trout, and during our testing we found that it has a slow side to side wobbling action that lake trout seem to find irresistible.

And once again, don’t be shy to use the largest Kwikfish lures, as most novice anglers tend to underestimate the bait size for these voracious predators. You can choose from a wide variety of colors, and with or without a rattle.

The Kwikfish (or the very similar Flatfish lure) is ideal for trolling with a downrigger, and it can also be combined with a flasher or dodger rigged as an attractor about 1 or 2 feet in front of the plug.

Best lures for lake trout from shore

While targeting lake trout from shore is not as effective as fishing from a boat, you can catch lake trout in shallow water from shore during early spring, when the water is still cold.

When casting lures from shore, you can fish them just like you would for pike or bass, and great options to use are large spoons, crankbaits, and swimbaits.

Here are the best lake trout lures to use from shore:

Truscend Soft Swimbait (3/4 oz)

This lure can be either fished vertically, by jigging it from a boat, or it can be cast out from shore and retrieved like a regular paddle tail swimbait lure. It comes with a 3/4 oz jig head, and our tests showed that this is great for achieving maximum casting distance, and for fishing it close to the bottom, both of which are ideal for fishing for lake trout from shore.

Acme Kastmaster with BuckTail Teaser (3/4 oz)

The Acme Kastmaster spoon works equally well for vertical jigging and for casting from shore, and when you’re fishing it from shore you can experiment with slightly smaller sizes than when you’re fishing for deep lake trout. During our testing, we found that gold can be a better choice of color on overcast days, while silver tends to work better on bright days.

Best lake trout lures for ice fishing

Based on our testing, the best types of ice fishing lures for lake trout are:

  • Tube jigs
  • Jigging spoons
  • Bucktail jigs

Since ice fishing by definition consists of vertical fishing, you can use the same jigging lures that you would use for vertical jigging during the summer. Also, it’s always good to use a flasher sonar or an ice fishing fish finder, since that will allow you to key in on the right depth at which lake trout are holding.

In addition, try to use your sonar to get a feel for how the lake trout respond to your lure presentation. Sometimes you can trigger a strike from lake trout by pulling your jigging lure away from a lake trout that is checking it out, which may then pursue it all the way to the surface and bite just before it reaches the ice hole.

Best lake trout lures for spring

Spring is a great time to catch lake trout, since they can be found in more shallow waters than throughout most of the rest of the year.

The reason for this is simple: lake trout need very cold water in order to thrive, and during spring time, the water is still cold in the shallow parts of the lake, whereas later in summer the shallows become too hot for lake trout.

Lake trout feed very actively in spring, so this is a great time to target lake trout with lures that produce a lot of flash and vibrations in the water, including spoons, jigging spoons and Rapala crankbaits.

You can either cast these from shore or from a boat, or troll them around gravel beds and sand flats.

Best lake trout lures for summer

Due to the fact that lake trout have a strict requirement for cold water around 53 degrees, they retreat to deeper water layers in the summer.

You can find lake trout either close to the bottom, or suspended in the water column at their ideal temperature range.

Lake trout feed on schools of pelagic baitfish species found in deep water zones during the summer (including ciscoes, bloaters, and smelt).

Based on our testing, we found that the best lake trout lures in the summer are either jigging lures that are fished at depths of 60 to 80 feet or more, or trolling lures presented at a similar depth range with the help of a downrigger.

Using a fish finder to locate lake trout and presenting your lure at the right depth is absolutely essential at this time of the year. Otherwise you’ll be fishing for lake trout blindly.

Best lake trout lures for fall

During fall lake trout once again push into more shallow areas of a lake, where the trout can be found from late September until December.

During early fall they feed very actively, in order to build strength for their spawn, and this is a great time to catch lake trout in shallow zones between 20 and 30 feet deep.

The best lake trout lures to use at this time of the year are large spoons, swimbaits and crankbaits that you can either cast from a boat, or troll without a downrigger in order to present them in relatively shallow water that’s less than 30 feet deep.

Final remarks

This concludes our article on the best lake trout lures, and hopefully some of these lures will help you catch more lake trout.

Lake trout are among the biggest freshwater fish you can target in North America, and fishing for lake trout is one of the most exciting experiences you can have as an angler.

I was many years into my journey as an angler before I finally decided it was time to start fishing for lake trout.

But after landing my first laker in Lake Superior (a beautifully marked 12 pound fish that I remember as if it was yesterday), I’ve been hooked on lake trout fishing ever since.

Many anglers never try fishing for lake trout because they assume they’re hard to catch, but that isn’t actually true.

The hardest part is locating lake trout, which admittedly can be a little challenging (especially in big lakes).

But nowadays finding lake trout has become much easier, due to the amazing advances in sonar technology.

Once you’ve found the lake trout, you just need to present them with the best lake trout lures, and you’ll find that fishing for lake trout becomes pretty straightforward.

Tight lines and see you on the water!

Methods and gear used for testing

We tested all of the lures covered in this article with one of the following 3 setups: a jigging rod and reel setup, a trolling rod and reel setup, or an ice fishing setup. For the jigging setup we used a 7′ Ugly Stik Elite spinning rod paired with a Pflueger President 3000 spinning reel and spooled with 20 lb test Power Pro braid. For the trolling setup we used a 9′ Okuma Classic GLT trolling rod paired with an Okuma Convector line counter reel, and spooled with 40 lb test Power Pro braid. Finally, for the jigging setup we used a 38″ Medium Heavy 13 Fishing Widow Maker paired with a Pflueger President 3000 spooled with 18 lb test Berkeley Trilene Fluorocarbon.

21 Homemade Deer Feeder Plans You Can Make On A Small Budget

0

If you enjoy watching wildlife, a homemade deer feeder will bring the wildlife closer to you to observe it with best practices. Fill the feeder with treats and you will be able to watch deer, turkey, and other animals feed and interact with one another.

A homemade deer feeder like one of our 21 listed below will attract a lot of attention and get many visitors. Deer are creatures of habit and will return over and over again to a food source.

These homemade deer feeder ideas that we have gathered for you will show you how to build a feeder on a small budget. You will be enabling the deer to eat healthier diets so they can reproduce and you will get the enjoyment of watching these majestic creatures.

1- PVC Homemade Deer Feeder

One 10-feet piece of PVC pipe can make two homemade deer feeders such as this one by Hub Pages. Use the PVC pipe that is 6-inches in diameter and you will create a large sized deer feeder that holds lots of corn. You won’t have to refill it often and the deer won’t get spooked by your presence or human scent.

What I like about this feeder, it is a budget friendly building project and these free plan will show you how to build this PVC feeder step by step. A pictorial guide and written instructions are included in this building manual that is in PDF format.

If you have PVC pipe leftover from another project the cost of this DIY project will be very good for a small budget.

PVC Pipe Deer Feeder, Image via: homemade deer feeders

2- Covered Deer Feeder

This covered deer feeder is easy to build and it will keep the feed dry until all of it has been eaten.

This is one of the best Deer feeder plans that we just love. The larger size and stand alone design makes this wild game feeder ideal for attracting various forms of wildlife. The wide bottom tray allows you to put corn, grain, salt lick, and hay in it at the same time. The more variety of food that is offered, the more variety of wildlife will show up to eat.

A covered homemade deer feeder by My Outdoor Plans like this one will keep the wildlife food protected from the weather so nothing will be wasted. You can fill the feeder with lots of treats and not have to worry about re-stocking it for several days. The deer and other wildlife will appreciate the covering that keeps their head dry while they eat.

These free plans provide step by step instructions so you can easily build one of these DIY deer feeders.

Covered Deer Feeder, Image via: myoutdoorplans

3- PVC Deer Feeder

Here is a budget friendly deer feeder that requires no carpentry skills to build. This homemade deer feeder is made from PVC pipe and attached to a tree with wire. It’s simple design, cheap to make, and deer will love it.

Make this homemade deer feeder using 2 inch diameter pvc pipe, hacksaw or PVC cutter, metal wire, rope, or string, two 2 inch pvc pipe caps, and pvc glue. This is a very simple DIY project that will only take a few minutes to build and cost less than $10. These free plans will show you how to make a cheap homemade deer feeder by Instructables so you can enjoy watching deer in their natural habitat.

You can create several of these if you have a large piece of property so you can get a good view of deer from different locations. These DIY deer feeders would also make a good gift for family and friends that live in a wooded area.

PVC Deer Feeder, Image via: instructables

4- Homemade Wooden Box Deer Feeder

This deer feeder plan, unlike previous ones we have discussed, will show you how to build a basic wooden box structure that has a storage bin on top. The storage bin is filled with food and as the deer eat from the bottom, fresh food drops down from the top. The removable lid on top makes filling the bin easy.

A salt lick or mineral block can be placed in the deer feeder such as this one by feltmagnet instead of corn or grain. All types of wildlife will be attracted to this wooden feeder box and for birds you may need a diy bird feeder. If you have some scrap lumber on hand the cost to build this will be almost nothing.

You can make this homemade deer feeder using the following parts cutting list Part A (sides): 18″ long by 8½” wide (quantity of two needed), Part B (back): 18″ long by 7½” wide, Part C (slanted front): 17″ long by 7½” wide,Part D (bottom): 7¾ long by 7½” wide,Part E (lid): 10″ long by 10½ ” wide,Part F (tray front): 9″ long by 2½ ” wide.

Wooden Box With Bin, Image via: feltmagnet

5- Barrel Deer Feeder

This barrel deer feeder is so easy and inexpensive to build and will attract a lot of attention from wildlife.

A plastic 55-gallon barrel and a few pieces of lumber can be used to create a long-lasting DIY deer feeder such as this one on YouTube. This video will take you through the building process so you can make one for your landscape.

The roof will keep most of the rain water out of the feeding trough, but drill a few holes in the bottom so rain water can drain through and not cause the grain to ruin. You can also place a trail camera on the side so you can capture up-close videos or pictures of the deer as they eat.

6- Five Gallon Bucker Feeder

A five gallon bucket can easily be transformed into a hanging deer feeder with this unique idea.

These plastic buckets are cheap and can be bought at any building supply center. A wooden dowel, piece of rope, and screw are the other component needed for this DIY project.

This homemade deer feeder by fivegallonideas can be made in 15-minutes. Fill it with corn or other grain, hang it up from a sturdy tree limb and the deer will arrive shortly afterward to feed. You don’t have to have carpentry skills or a big budget, just a bucket and a rope.

There are a few other designs that can be used to create a feeder with a five gallon bucket, but this is the simplest and cheapest. You may also like to make a DIY squirrel feeder to enjoy watching the habits of squirrels when you are close to them.

Five Gallon Bucker Feeder, Image via: fivegallonideas

7- Down Spout Deer Feeder And Food Recipe

An inexpensive down spout used for a home guttering system makes an ideal and cheap deer feeder by wikihow.

Place the large end of the spout at the top and add gutter connections to the bottom to create a narrow end so the grain won’t pour out. Attach the down spout to a tree with wire or screws and fill it with one of the recipes included with these free plans.

Corn, oats, and molasses make a tasty and wholesome treat for deer. Stale bread, honey, and molasses will also make an irresistible treat for deer. Making this feeder is cheap and the homemade recipes for deer food make keeping the feeder full inexpensive and easy too.

Down Spout Deer Feeder, Image via: wikihow.com

8- PVC Pipe Feeder

Simple and affordable to make, this DIY deer feeder by realtree is made from PVC pipe and will last for years.

These free plans include a video and written instructions so the build will go smoothly even if you have never built anything before. No cutting is required but you might need to use a drill.

Spray paint the finished deer feeder with camo paint and it will blend in with the surrounding landscape. The large PVC pipe won’t need to be re-filled daily so you can rest and enjoy watching the deer eat with minimal work or expense.

PVC Pipe Feeder, Image via: realtree

9- Hanging Deer Feeder

These free plans will show you how to recycle a five gallon bucket and a tin can into a new hanging deer feeder By diyjoy

The five gallon bucket holds the corn or grain and the tin can hangs from the bottom to catch the attention of the passing deer. When the deer come by to investigate and nudge the tin can, some of the feed inside the bucket will drop out.

When the deer discover they get free food each time they nudge the tin can they will come around often and stay a long time.

Recycle a five gallon bucket into Hanging DIY Feeder, Image via: diyjoy

10- Covered Deer Trough

It gets tough for deer and other wildlife to find enough food to survive during the winter and a deer feeder like this will help keep them well fed.

These free detailed plans will show you how to build a covered deer trough by myoutdoorplans that will help nourish the deer during the cold winter months. The large trough holds plenty of food so it will only need refilling every 5-6 days.

If you have basic carpentry skills and a small budget, download this PDF file that contains all the building plans. You can build this covered trough in one weekend and it will last for years.

Covered Deer Trough, Image via: myoutdoorplans.com

11- Gravity Feeder

Learn how to build a homemade deer feeder on youtube that uses gravity to keep the corn flowing downward.

A 55 gallon barrel, either plastic or metal, is used for this DIY project. The barrel is placed up on metal legs so the deer can go under the barrel feeder to get to the corn. A salt lick can be placed under it to provide an extra treat for the deer and other wildlife. A mineral block will also help keep the deer healthy.

12- Homemade Barrel Feeder

Here’s another idea for creating a DIY deer feeder on youtube with a 55-gallon barrel. This detailed YouTube video will show you how to recycle a metal 55-gallon barrel into a functional deer feeder. This is a great idea for a small budget project and it will provide plenty of corn for the deer.

The digital feeder kit that is attached to the bottom is affordable and available at hunting supply centers. It will release the corn as needed so it won’t be wasted when wildlife is not near the feeder.

If you have a metal barrel and some metal poles, the cost for building this barrel feeder will be very low. Plus you’ll be doing a good deed by recycling metal and feeding the wildlife.

13- Plastic Barrel Feeder

Learn how to build a gravity deer feeder in this YouTube video using a plastic barrel. The barrel feeder costs less than $20 to build and is great for a small budget.

The barrel feeder has a PVC pipe feeder on the bottom so the deer can easily access the corn or grain inside that is inside the barrel. The barrel can be suspended from a tree or it can be placed on wooden legs to get it off the ground.

The 55 gallon plastic barrel holds plenty of corn or grain to keep the deer well fed for several days. The cheap building costs leaves more money for you to spend on corn to put into the feeder.

Remember to put a few drainage holes in the bottom of the plastic barrel feeder to allow rain water to escape. Paint the plastic barrel camo so it will blend in with the surrounding landscape.

Gravity Feeder

Building a gravity feeder has never been easier! Get all the free instructions you will need for building a DIY deer feeder for your hunting land.

A PVC deer feeder in this YouTube video that works with gravity to keep the feed flowing will attract the deer and keep them coming back for more food. Build this gravity deer feeder on a small budget since the components are very inexpensive. A length of PVC pipe, a cap for the top, and an elbow joint are basically all that you will need to build this DIY deer feeder.

Many DIY enthusiasts will have these PVC pipe components on hand so building this efficient homemade deer feeder will be almost free.

This deer feeder is ideal for hunters who want to keep the deer in the area well fed without spending a lot of money on batteries. Even if you are not a deer hunter but just enjoy feeding and watching wildlife, this gravity feeder will be ideal.

Barrel Corn Feeder

Use a 55 gallon plastic barrel to create a corn feeder for deer. This homemade deer feeder on youtube will hold plenty of corn so you won’t have to return often to refill it.

If humans are in the area too often it will spook the deer and they will find another feeding location. Building a large barrel corn feeder like the one shown in this YouTube video will allow you to stay away from the feeding area so the deer won’t be spooked by the human scent.

This YouTube video will show you how to build a deer feeder using a plastic barrel and PVC pipe.

Automatic Deer Feeder

Making an automatic deer feeder like this one on youtube video will enable you to keep food in the selected area at all times. The deer will return again and again to feed because they know food will always be there for them.

This is ideal for hunters and wild life watchers. You can count on deer being in the area because they can count on food being there. Build it and fill it with corn and the deer will come.

This instructional YouTube video will provide the automatic deer feeder plans so you can get started building one this weekend. It is a budget friendly DIY project that won’t cost much to build. A 55 gallon plastic barrel and some left over lumber are the main components of this building project.

Covered Deer Feeder

Building this homemade deer feeder for your landscape will give you an incredible view of wild life from your back porch. Make this covered trough feeder to be the focal point of your backyard. It’s easy to build with lumber, plywood, and shingles.

This DIY deer feeder by howtospecialist is a covered trough that will attract deer and keep the food dry during rain or snow. The way the feeding trough is designed will give you a great view of the deer as they feed.

These detailed instructions will show you how to make a deer feeder that attracts deer, look good in your yard, be easy to fill and refill with corn, and keep the corn dry. This feeder is made from wood so you can paint it to match your house or paint it in camouflage colors to blend in with the surrounding landscape.

Covered Deer Feeder, Image via: howtospecialist

Wooden Deer Trough

Watch how to build a wooden deer trough on this YouTube video. Use leftover wood and build it to fit perfectly on your hunting land or to use it to make a deer blind. The covered trough is made from wood and will protect the food inside the trough while attracting the deer to come and eat.

This homemade deer feeder can be built on a small budget, especially if you have some leftover wood on hand from previous DIY projects. This covered feeder is sturdy and built to last for years. Coat the wood with a clear coat of water seal and that will help the wooden deer feeder last even longer.

More Deer

Bring more deer on your hunting land fast with this cheap and easy to build deer feeder.

Transform an ordinary 55 gallon plastic barrel into an efficient homemade deer feeder in just a few minutes in this youtube video. You may want to make several of these for your hunting land.

A 55 gallon barrel with a lid makes an ideal storage unit for deer corn. When you cut a few holes near the bottom to allow the corn to come out as needed the barrel becomes a cheap deer feeder.

This YouTube video will also show you how to paint the barrel in camouflage colors so it will bend in with the landscape.

Automatic Bucket Deer Feeder

If a 55 gallon barrel feeder is too big for your hunting land, how about a 5 gallon bucket deer feeder? Learn how to build a deer feeder in this YouTube video with a 5 gallon bucket and make it automatic.

This feeder is cheap and easy to build and will keep the deer coming back daily for more food. Ideal for a back yard view point or for placing in several prime locations around hunting land. The budget friendly cost and easy build will enable you to build many of these automatic bucket feeders. Suspending the deer feeder from a tree branch will also keep the raccoons and possums out of the corn.

PVC Pipe Deer Feeder

This is cheap, easy, and fast to build! PVC pipe makes a long lasting deer feeder that can hold a lot of corn and stand up to the weather conditions.

Take a length of 6 inch PVC pipe and easily transform it into a gravity diy deer feeder such as in this youtube video. The cheap cost will enable you to build several of these homemade deer feeders and place them around your hunting land. Leave the PVC pipe white or paint camo or green to blend in with the landscape.

Watch this detailed YouTube video to learn how to build a deer feeder using PVC pipe. One like this can be built in minutes and enjoyed for years.

Conlusion

So these are the ideas we have gathered around the internet to make it convenient for you to make your own custom design deer feeder. Now you have a lot of options to try starting from pvc pipe, bucket, hanging feeder and a 55 gallon drum. These feeders are made using one thing sure that is less wastage of feed and easy to refill. Hope you like the article!

“; n.innerHTML = “window._taboola = window._taboola || [];_taboola.push({mode:’thumbnails-rr’, container:’taboola-below-article-thumbnails’, placement:’below-article’, target_type: ‘mix’});”; insertAfter(t, e); insertAfter(n, t) }injectWidgetByMarker(‘tbmarker’);

What is the 9mm Pistol Effective Range?

0

Introduction

If you define the effective range as the distance a shooter can deliver a hit to a man-sized target, then the maximum effective range for a 9mm round fired from a handgun is about 1800 meters. If it sounds absurd, it is because the assumption is ridiculous.

However, the estimate takes into account match grade ammo when fired from a perfectly maintained weapon and by a skilled marksman in a stable shooting position. The target is motionless and at a known distance in the perfect environmental conditions.

The basic answer to this question varies based on the gun and the shooter abilities. The safe estimate for both target and combat shooting is, however, between 25 and 50 meters. And this estimate is for the average effective range for an average shooter using average equipment on an average day. Significantly less because there are just so many factors to account for.

From experience, a reasonably skilled shooter with a 9mm handgun may be able to hit a man-sized target out to a hundred yards on a practice range. Sometimes 200 yards and that is if the gods of luck smile. In the real world, in cases of life and death situations, or self-defense shootings, it is quite common for shooters to miss their targets seven out of ten times within a few yards distance.

=> Check latest 9mm ammo prices

What is a Pistol For?

To expand on this question we must understand the purpose of having a pistol and its primary use. You have to ask yourself, what is the use of a handgun? A pistol was never intended to be a battle weapon. In combat situations, it plays the role of the sword in the bygone eras and it is used as a last resort. Compared to a rifle, the handgun is a prosecuting firearm at close quarter combat.

Rarely are handguns used in hunting and the 9mm is not a hunting cartridge. But for the most part, a handgun’s primary purpose is a personal defense weapon. Personal defense does not include a range beyond 25 yards. Throughout history, most personal defense situations are between 10 yards or closer. I see a scenario where one tries to explain to a jury an assailant more than 30-40 feet away puts you at risk of causing you grievous bodily harm or death.

If it was in the defense of others, 25 yards is still far enough away, and I estimate it to be the limit of the average shooter to get a sure hit. However, the consequences of missing could still be tragic and all individual shooters with a 9mm handgun must know the effective range of the cartridge. It is also imperative that one knows their overall effective range.

What Affects the Effective Range of a 9mm Handgun

The effective range of a 9mm handgun has two interwoven components. That is the distance the cartridge can kill with a lethal hit and the likelihood of an average person making a lethal hit at a given range.

Range

If you consider the range, a 9mm has a potential killing power out to several hundred yards. As a practical matter, an average shooter can consistently make a hit within less than 30 yards. If you also use a scope with your handgun then the effective range and accuracy increase tremendously.

Barrel length

Shooting at long range is challenging as the pistol is the most difficult to master as the bullets are very slow and this makes them arc a lot at long range. But if the pistol barrel becomes longer, that distance increases. If the sight radius of a pistol is elongated, the sighting becomes easier and accuracy increases.

We need to differentiate between lethality and effectiveness. Bullets can be lethal at any distance as long as it still has its stopping power. But at very long distances, a human-size target is smaller than the front sight post, and this reduces accuracy. At this point, you will just be lobbying rounds and hoping to hit something.

For the average shooter, trying to get a hit rate at 100 meters with a handgun is world-class shooting.

Action

The effective range also depends on the gun that fires the round. A bolt action rifle does not use propelling gas to operate or reload mechanism. Both semi-auto and automatic rifles use some propellant gas to reload. The gas comes from a hole in the last piece of the barrel.

Most pistols are designed to reload immediately and if there are lots of propelling gas escaping the wrong way the shot power is compromised. Therefore, the amount of propelling gas ultimately affects the effective range of a handgun.

For example, a Glock 17 has an effective range of 25meters. The range is only for the pistol though and not the bullet. If the same bullet from a pistol is fired from a pistol caliber carbine a shooter can be very accurate at those distances and slightly higher.

Stock/Design

If you buy the .22 Long Rifle rimfire round you must have seen the warning it embodies on the box.

“Dangerous Within One Mile.”

Most handguns like the 9mm are chambered and tuned for reliability and not so much pinpoint accuracy. The sights are designed to withstand abuse and allow a shooter to have a rapid visual acquisition. It means that most pistols are for short-range use.

The delivery system is what limits the range, and for most service pistols, to hit fifty yards under street conditions is a difficult and long shot to take and make a hit.

What is the Lethal Range of a 9mm?

There is no definitive answer for this as well. But if you ask me, I will place it at 50 yards give or take. And that is a pretty lucky shot if the circumstances are favorable.

The variables include the 9mm ammo brand and power, the rifling in the barrel, the accuracy of the pistol, and its constructive impact on the bullet’s trajectory. Also, you must factor the external conditions that include density and moisture among others.

Now, a lethal range certainly means a handgun capable of inflicting deadly or serious damage to a person or animal. Also, consider that there is no limit for any safe and out of bounds area. I mean that fluke shots are still lethal although the target is far away and the shot unintended.

Other factors that make a shot lethal include, point of entry, impact angle, and area of entry. There are a whole lot of things that could make a shot lethal or not. Sometimes at close range, a bullet may pass through flesh missing vital organs and therefore inflicting only flesh wounds instead of fatality.

Therefore, despite all the arguments of the lethal range, the first rule of gun handling is to ensure that firearms are always pointed downwards. Always practice safe use to ensure your safety and the safety of others around you.

How Far Does a 9mm Bullet Travel?

There are some variables that we must consider before we give a blanket answer. First, is based on the type of 9mm round. Some ammo is loaded at a higher pressure and will leave the gun faster than others. Other bullet shapes will cause less drag than others.

Also, the type of firearm will determine the velocity of a bullet. Longer barrels allow the bullet to reach higher initial velocities than a short barrel handgun

Understanding Velocity

If you already know the velocity at which the bullet will fall, then all we need to do is calculate how fast it travels when it leaves the barrel. For example, a standard 115-grain bullet leaves the 4.5-inch barrel of a typical handgun at about 1100 feet per second.

When calculating velocity, it is essential to know that all guns fire bullets at a small upward angle. The reason is that the sights are “zeroed” at some distance. For handguns, the distance is about 25 yards

Understanding Drag

When you fire a bullet it travels through a medium. In this case it is air. The bullet slows down because of the friction caused by the medium. It is what we refer to as drag. Drag varies with the ballistic coefficient of the bullet as this is determined by the shape of the bullet. A 9mm handgun bullet, having a round, as opposed to a spire nose will not have a very good ballistic coefficient.

9mm versus .40 Smith & Wesson

There are three key things to consider when picking the best self-defense caliber.

Cost

Everywhere you go, wisdom dictates that shot placement is more important than the caliber you use to shoot. It does not mean that calibers do not have an impact on a shooter’s outcome. Small rounds may not penetrate bones or breastplate when hunting.

Caliber does matter. However, the emphasis on shot placement is to remind you that when you miss it is the same as shooting a zero caliber bullet. Therefore, shot placement is not necessarily king but rather it is the proficiency of the firearm you will use. It is why the cost of the ammo matters.

For example, if a 9mm costs about 14 cents a round. And a.40 S&W costs about 19 cents a round.

There is only a 5 cent difference. Eventually, it all adds up though. Suppose you use 1000 rounds that means you pay about $80 more for your ammunition when shooting with the .40 S&W.

Regardless of your budget, if you shoot the 9mm you will get more training for your money, and therefore become more proficient with your gun. In effect, you will have a better-shot placement.

Recoil

The .40 S&W is essentially just a short 10mm round, therefore it features a higher breach pressure than the 9mm. Because it is a heavy round, the .40 S&W has more felt recoil.

High-pressure rounds that produce a recoil impulse can be uncomfortable for some shooters and also more challenging to shoot with one hand.

If a shooter spends time and resources training to shoot with the same handgun, chambered in 9mm, in the end, they become faster and more precise. There is less recoil energy to absorb and control in a 9mm round.

Magazine Capacity

I cannot see a situation where having more rounds is not better. Take the context of self-defense, reloading can be impossible. To reduce the chances of having to reload, the magazine capacity should be high.

Provided you are comparing two guns of the same size, the 9mm will always have a higher magazine capacity than .40 S&W. Therefore, a 9mm handgun enables you to perform better than .40 S&W.

However, the .40 S&W is also a perfectly viable self-defense round. Though it takes more training, it is a darling to many shooters.

Conclusion

But, if you want to shoot a lot and also want to be a better shot for less money, you should consider using a 9mm handgun for both home and personal defense. It is a sure way to save money and time without compromising defensive performance.

338 Win Mag vs 338 Lapua: Loaded for Bear

0

338 win mag vs 338 lapuaWith an effective range of over half a mile, the 338 Lapua Magnum and 338 Winchester Magnum are two centerfire rifle cartridges that excel at long range shooting.

The 338 Lapua Mag is the rifle cartridge of choice for military snipers as it was developed to punch through body armor at 1,000 yards and bridges the gap between the 300 Win Mag and the 50 BMG.

The 338 Win Mag was part of the belted-magnum cartridge craze in the late 50’s and early 60’s and has been the go-to ammo of choice for dangerous game hunters across North America.

Capable of ethically harvesting any thin-skinned game animal on the planet, it is the preferred cartridge in Alaksa to protect yourself against belligerent grizzly bears or other large game. But which of these two magnum cartridges is the best option for your new medium bore bolt-action rifle?

For most non-competitive shooters, the 338 Win Mag will be more than enough cartridge to suit your needs while the 338 Lapua is most at home on the firing line for 1,000+ yard shooting competitions.

In this article, we will examine the advantages and disadvantages of the 338 Lapua and 338 Win Mag to help you understand which will work best for your needs.

What’s the Difference Between 338 Lapua and 338 Win Mag?

The 338 Lapua and 338 Win Mag are two centerfire magnum rifle cartridges that fire the same 0.338” diameter bullets. Although both rifle cartridges fire the same caliber bullets, this is where the similarities between the two ends.

One major difference between the two is the design of the cartridge case. The 338 Win Mag utilizes a belted-magnum design that became popular during the magnum era of the late 1950’s and was marketed for big game hunters while the 338 Lapua uses a non-belted case and was designed specifically for military use.

The 338 Win Mag was also designed to fit into a long action like a 30-06 Springfield, while the 338 Lapua requires a magnum action as it is a longer, beefier round.

Both 338 magnum cartridges excel at long range accuracy and precision, you will not find the 338 Win Mag on the firing line of a 1,000-yard competition that is dominated by 6.5 Creedmoor, 300 Win Mag, and 338 Lapua.

But why is that?

The reason is because the 338 Win Mag is primarily a sporting cartridge while the 338 Lapua is long range precision cartridge. Each have their own roles that they fill admirably and understanding the difference is critical to making the right choice for your next rifle.

In the following sections, we will break down the differences between these 338-caliber magnums so that you can more clearly understand the advantages and disadvantages of each.

Cartridge Specs

When evaluating two big game hunting cartridges, it’s a good idea to analyze the cartridge specs to gain more knowledge of each.

The first, and most obvious, similarity is that both the 338 Lapua Magnum and 338 Winchester Magnum fire the same 0.338” diameter projectiles. However, this is where the similarities end.

338 Win Mag vs 338 Lapua dimension chart

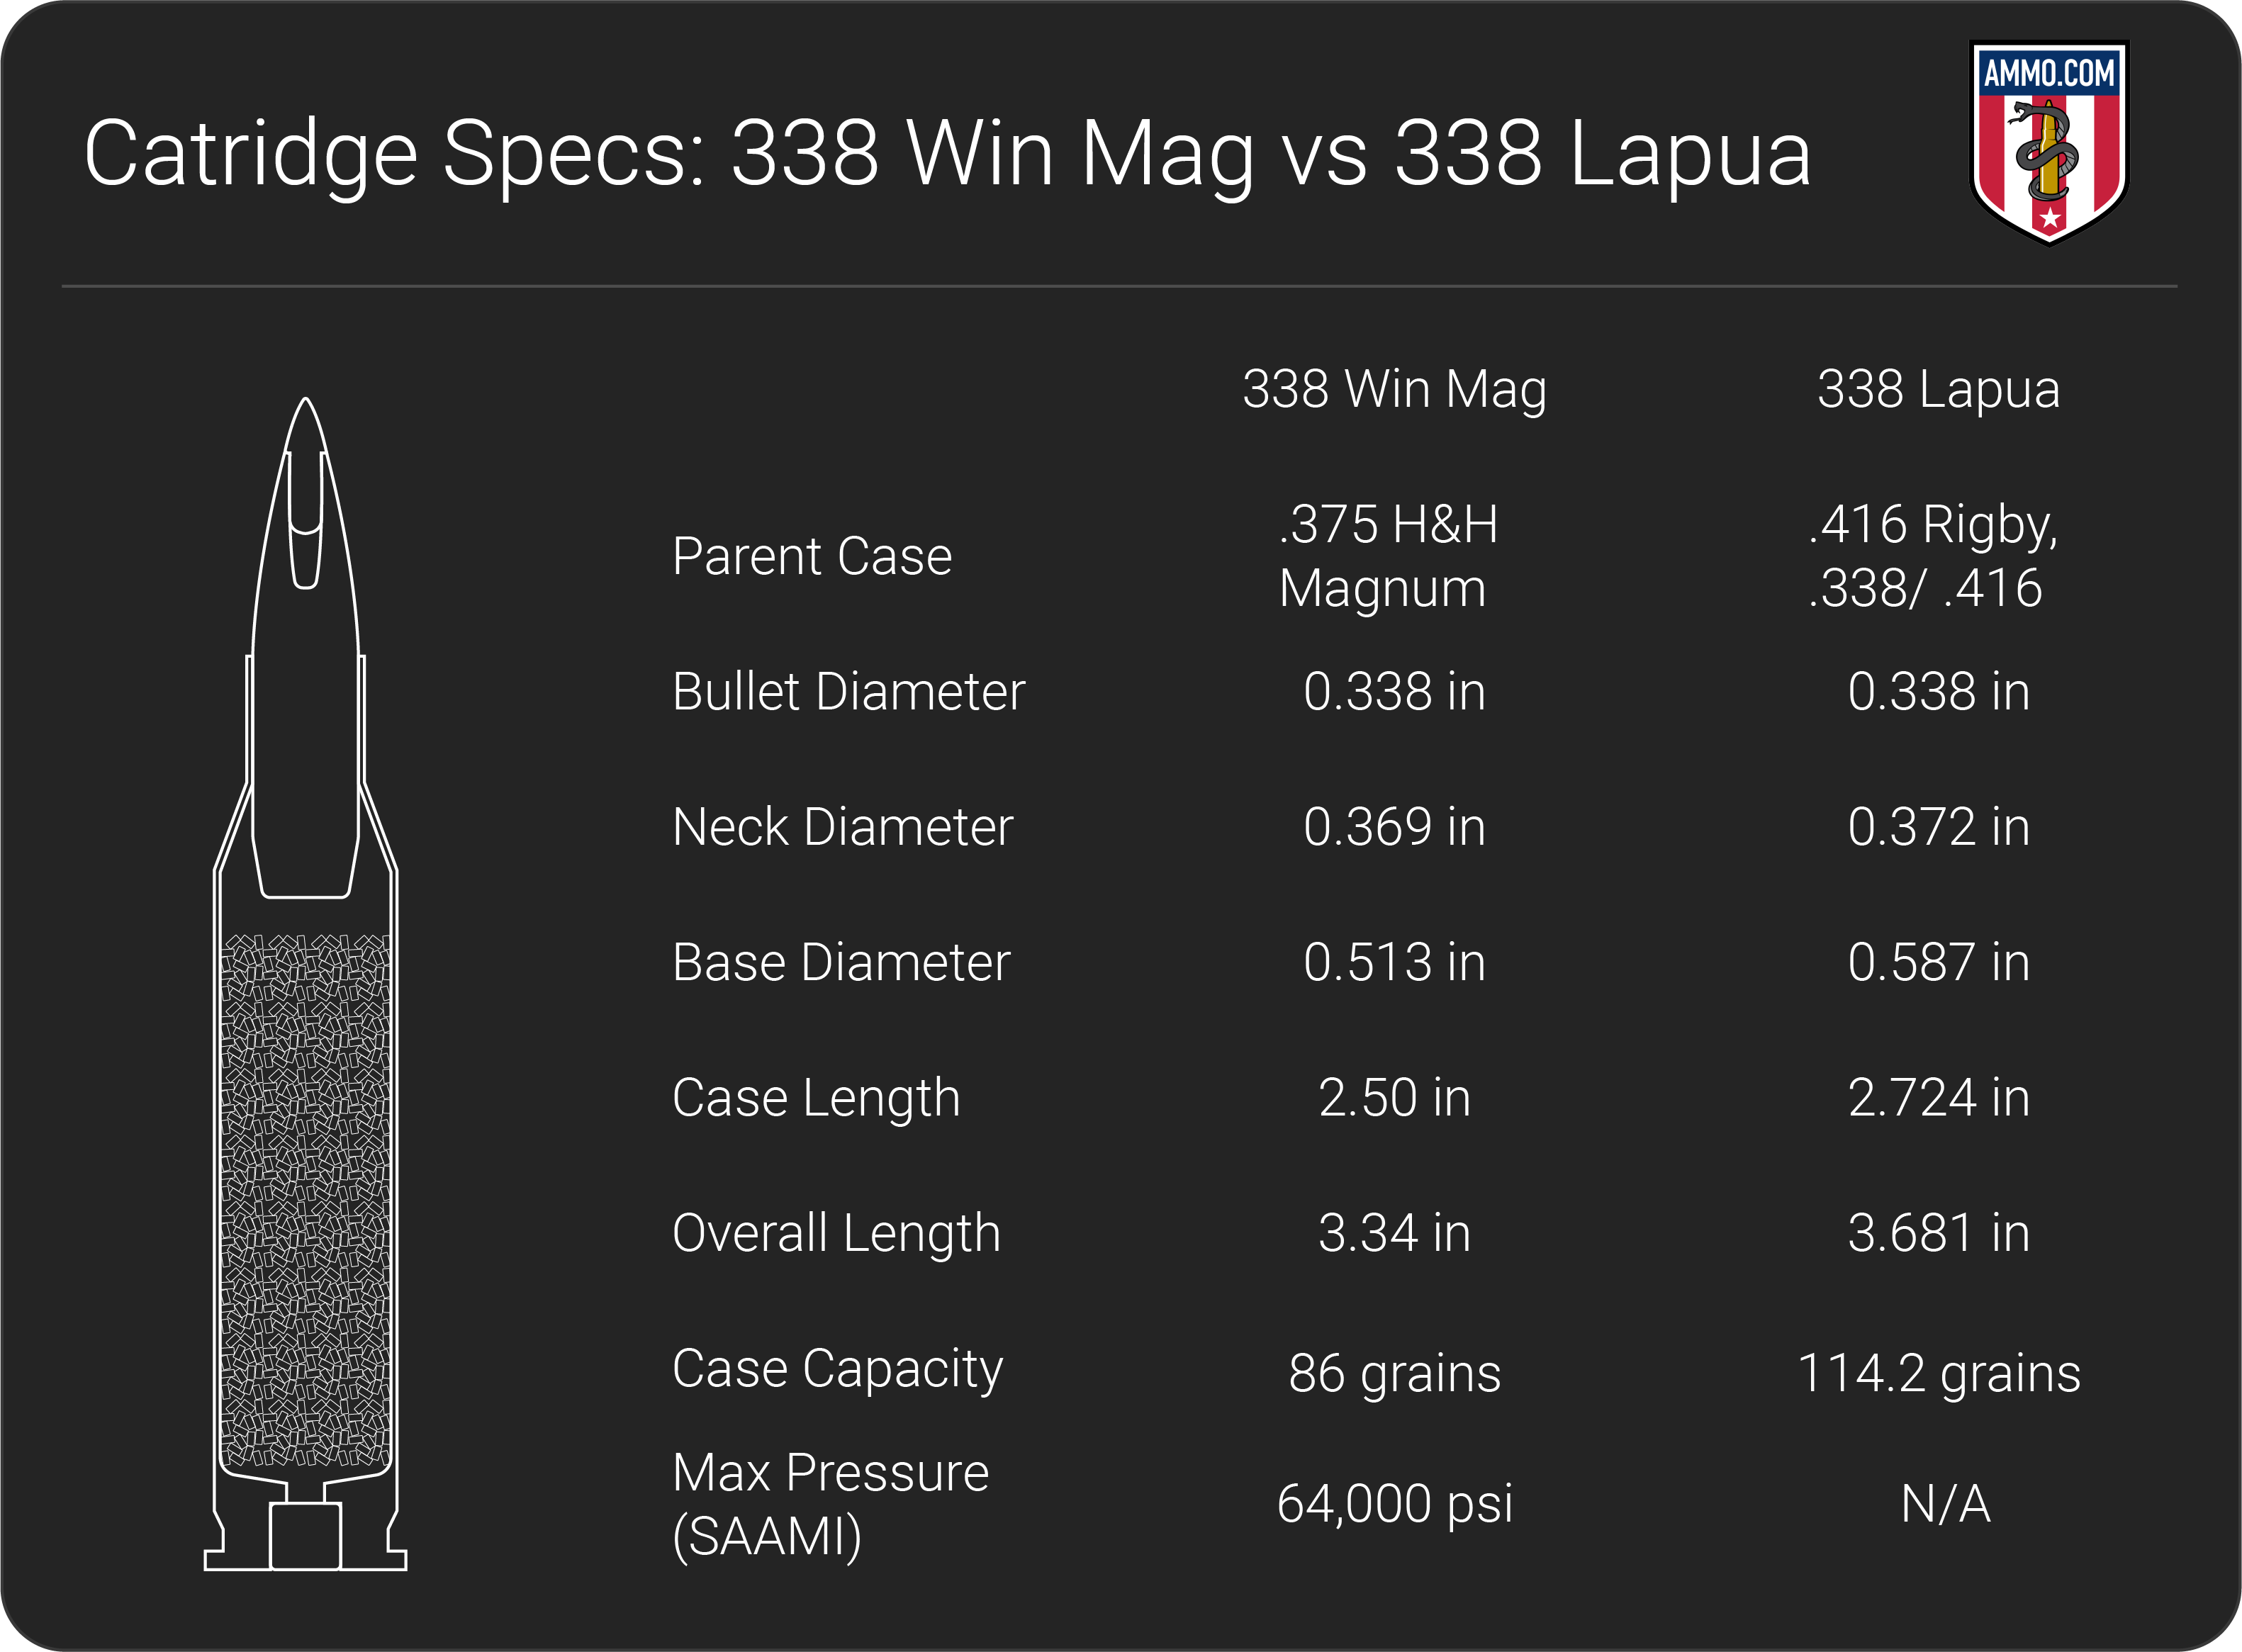
One major difference is the case length of both rifle cartridges. The 338 Lapua Magnum has a case length of 2.724” and overall length of 3.681” compared to 2.50” and 3.34”, respectively, for the 338 Win Mag. This difference in case length directly affects case capacity.

The 338 Lapua is well-known for having a cavernous cartridge case. With a case capacity of 114.2 gr, the 338 Lapua can hold over 30% more powder than the 338 Win Mag at 86 gr. This added powder capacity is what allows the 338 Lapua to fire heavier bullets with a higher ballistic coefficient than the 338 Win Mag.

Another difference is the type of rifle action that both cartridges are fired from. With its longer overall length, the 338 Lapua sits firmly in a heavier and stronger magnum action, while the 338 Win Mag is short enough to fit into a long action rifle like the 30-06 Springfield and 300 Win Mag.

At the time of writing, SAAMI has not proofed the 338 Lapua and does not have an established max pressure for the round. To complicate matters, Lapua and the CIP have been somewhat ambivalent about the max pressure for the cartridge.

There is some scholarly debate as to the max pressure for the 338 Lapua, but the lower limits (and therefore safer) suggest 420 MPa (60,916 PSI). The max pressure for 338 Winchester Magnum is 64,000 PSI.

The 338 Lapua is an overall larger case and can fire heavier bullets, and although those projectiles perform extremely well at long distance shooting, there is a price to be paid for this enhanced downrange performance.

The additional case capacity afforded to the 338 Lapua has a negative effect on felt recoil and barrel life when compared to the 338 Win Mag.

Recoil

Recoil is the energy directed towards the shooter when a cartridge is fired from a firearm. For experienced hunters or marksmen, recoil will be a non-issue. However, for less experienced shooters or those who are recoil sensitive, less felt recoil will be preferred.

Lower recoil will also allow shooters to get their sights back on target quicker for follow-up shots. In contrast, heavy recoil can cause shooters to flinch before they pull the trigger, and during long shooting sessions shoulder fatigue can become an issue.

Both magnum cartridges are well known for having stout recoil. The 338 Lapua has so much felt recoil that most manufacturers install a muzzle brake at the factory to help reduce the amount of pounding the shooter’s shoulder receives.

The 338 Win Mag is no slouch when it comes to recoil either. However, this is exacerbated by the fact that most rifles chambered in 338 Win Mag are lighter to make them easier to carry on long hunts.

For this recoil comparison, we will use the Savage 110 Brush Hunter (7.4 lbs) as our 338 Win Mag rifle and the Barrett MRAD (14.5 lbs) for our 338 Lapua Magnum. This comparison will not include the added weight of a scope or bipod as this adds too many variables to the equation.

For a 225 grain Nosler Accubond traveling at 2700 fps, the 300 Win Mag shooter will experience 38 ft-lbs of recoil energy. Now for the 338 Lapua we will consider the 250 grain Nosler Accubond traveling at 2850 fps, which will slap the shoulder at 32 ft-lbs for force.

Now you might look at this and say that the 338 Lapua has lower recoil but note that the rifle is virtually twice as heavy. If we fire the same 338 Win Mag round out of the Barrett the felt recoil would be 20 ft-lbs.

This showcases the extremely different roles that each round serves and the rifles that are used to fit that role.

Barrel Life

Magnum cartridges are notorious for being tough on barrels. Although all that case capacity is great for achieving ridiculous muzzle energy and velocity, it is also will erode the rifling at the chamber throat considerably faster.

Take for example the 300 Remington Ultra Mag (300 RUM) that is reported to burn out a barrel at or below 1000 rounds.

There is a lot of controversy surrounding barrel life and how many rounds a particular barrel can endure before downrange accuracy begins to suffer. One of the major factors that affects this is the powder charge.

If you’re reloading close to max pressure for either round, your barrel will have a shorter lifespan than someone loading milder powder charges.

This is critically important for precision rifle shooters who often engage in extra long range shooting competitions that require the utmost pinnacle of accuracy. These shooters will maintain meticulous records to determine when their barrel is “shot out”, as they will typically see changes in point of impact or their groups opening up when shooting long distance.

For hunters, it’s less likely that you will ever shoot enough to wear out a barrel for either cartridge.

Although it’s difficult to name a specific round count that barrel is good for, the 338 Lapua Mag will generally burn out a barrel faster than the 338 Win Mag as the Lapua round has 30% more case capacity.

Trajectory

Trajectory is how we quantify a bullet’s flight path as it travels downrange measured in inches of bullet drop.

Obviously, a flatter shooting cartridge is preferred for shooting longer ranges, as a shooter will require fewer adjustments to their optics to compensate for bullet drop. Having a flatter trajectory also means that a cartridge will be more forgiving of ranging mistakes.

For this comparison, we will consider the Hornady 250 gr Match 338 Lapua ammo traveling at 2900 fps and Hornady 230 gr ELD-X Precision Hunter ammo screaming out of the muzzle at 2810 fps for 338 Win Mag.

As the 338 Lapua has a higher muzzle velocity, it will reach the intended target faster and thereby be affected by gravity less than the 338 Win Mag.

At 500 yards, both projectiles have almost identical trajectories with the 338 Lapua only being slightly better at -40” of bullet drop compared to -43” for the Winchester Magnum.

However, the 1,000-yard line is what separates the marksmen from the plinkers, coincidentally this is where the 338 Lapua starts to pull away from the 338 Win Mag. At 1,000 yards, the 338 Lapua has experienced -211” of bullet drop compared to -231” for the 338 Win Mag.

Although both the 338 Lapua and the 338 Win Mag have excellent for long range shooting, the 338 Lapua has the flatter trajectory overall.

Ballistic Coefficient

Ballistic coefficient (BC) is a measure of how well a bullet resists wind drift and air resistance. Put another way, it’s a numeric representation of how aerodynamic a bullet is. A high BC is preferred as this means the bullet will buck the wind easier.

Generally, heavier bullets will have a higher BC as it takes more force to disrupt the flight of a heavier bullet than a lighter one. Ballistic coefficient varies from bullet to bullet based on design, weight, and other factors that are beyond the scope of this article.

Since the 338 Lapua can fire heavier projectiles than the 338 Win Mag, the Lapua round will generally have a higher BC.

For example, a 300 grain Nosler Custom Competition 338 Lapua round will have a BC of 0.8 compared to a 225 gr Nosler Expansion Tip for 338 Win Mag with a BC of 0.611.

Although ballistic coefficient will vary between bullets, in general the 338 Lapua will have a higher SD than 338 Win Mag.

Sectional Density

Sectional Density (SD) is the measure of how well a bullet penetrates a target. This is extremely important when hunting big game, as you need a bullet that can punch through thick hide, bone, and sinew.

Sectional density is calculated by comparing the bullet weight and the bullet diameter. The higher the SD the deeper the bullet will penetrate into the target. This is a simplified view of penetration as there are other factors to consider, such as bullet expansion and velocity.

Let’s look at the Hornady Precision Hunter line for an apples-to-apples comparison.

The 270 gr ELD-X for 338 Lapua has a SD of 0.338 while the 230 gr ELD-X for 338 Win Mag has a SD of 0.288.

As the 338 Lapua typically has a higher muzzle velocity than the 338 Winchester Magnum, it will often have the higher SD.

Hunting

Determining the superior round for hunting has been debated ad nauseum in online forums, around campfires, and at gun store counters. There are clear merits to both the 338 Lapua and Winchester Magnum in terms of hunting efficacy.

However, the 338 Win Mag is the better choice in terms of hunting large game. I know a lot of Lapua fans are lighting their torches and sharpening the pitchforks but let me explain why.

The first reason is rifle design.

Generally, 338 Win Mag rifles are lighter and easier to carry into deep brush. This is why so many Alaskan guides carry them as a deterrent to dangerous game, it’s a light-weight rifle that packs a massive punch.

Would a 338 Lapua be good against bears? Absolutely. But carrying a rifle weighting 12+ lbs is a lot more difficult than carrying one that is 7 lbs. Rifles for 338 Lapua were intentionally built heavier to handle the massive strain the cartridge puts on the rifle action and to reduce felt recoil.

All that weight might be perfectly fine for long distance shooting from a bench, but it’s not so helpful when you’re carrying it miles on end. In this situation, having a lighter and maneuverable rifle is preferred to having one that is bulkier, longer, and harder to carry.

The second reason is cost.

Many big game hunters will scoff at the concept of cost, stating that ammo expenditures are minimal when only going through a few boxes a year. And I’d agree with that.

However, if I told you that you could get identical performance for a lower cost, I’m guessing most of my readers would take that deal. I know I would!

When comparing the same brand of ammo, the 338 Win Mag will almost always be the lower cost option.

And let’s not forget the rifle cost as well. Your regular run of the mill bolt action rifle from Savage, Weatherby, Sako, or Ruger for 338 Win Mag will typically cost you under $1,000. But you should expect to spend no less than $2,000 for a rifle chambered in 338 Lapua.

The third and final reason, is terminal ballistics.

Fans of the 338 Lapua will be at the ready to tell me that the 338 has better terminal ballistics than the Win Mag, and they are correct in this.

But will that big game animal be able to tell the difference? I highly doubt it.

The 338 Lapua is simply more than you need for large game across North American.

Now if you fancy flying across the pond to take on The Big 5 in Africa, then the 338 Lapua would be the better option. For those extra-large dangerous game animals, you’ll want as much stopping power as you can get and the 338 Lapua can deliver that for you.

For North America, 338 Win Mag is more than enough. For the dangerous game of Africa, 338 Lapua is a suitable choice (though most will use 375 H&H Magnum, 416 Rem Mag, or 458 Lott).

Ammo and Rifle Availability/Cost

As mentioned previously in the Hunting section, the 338 Win Mag is the better option when it comes to cost for both rifles and ammo.

Ammo for the 338 Win Mag runs around $4-6/round depending on the manufacturer and grade. Match ammo and premium hunting ammo will typically garner a higher price than bulk practice ammo.

For 338 Lapua, you should expect to generally pay around $5/round for the cheap stuff and upwards of $10/round for hunting and match grade ammo.

In terms of availability, as the 338 Lapua is a military round, it is a bit more plentiful than 338 Win Mag. However, all of the major manufacturers like Hornady, Federal, Remington, and Nosler make ammo for both calibers.

Although ammo might be a bit easier to find for 338 Lapua, there are considerably more varieties and affordable rifle options for 338 Win Mag since it is a hunting round. Weatherby, Remington, Savage, Ruger, and Sako all make bolt-action rifles for 338 Win Mag that can be had for under $1,000.

Good luck finding a 338 Lapua rifle for less than $2000 out the door!

As the 338 Lapua is a more powerful round, it required reinforcement in the action to handle the pressures and recoil that the cartridge can produce. This requires more material and therefore increases cost. Furthermore, most Lapua rifles are accurized by a gunsmith as the round is designed to be shot at long range. This also drives up the price.

There are fewer manufactures who offer rifles in 338 Lapua but that number is growing. The major players in terms of 338 Lapua rifles would be Barrett, Accuracy International, GA Precision, Ruger, and Savage.

Reloading

Reloading is one way to reduce the overall cost per round of your ammo. Furthermore, reloading allows you to tailor your ammo to your individual rifle, allowing you to achieve sub-MOA results without eating the cost that match grade ammo commands.

Both of these 338 rifle cartridges will devour powder, so make sure that you’re ordering in bulk to ensure you get the best price.

Although the 338 Lapua and 338 Win Mag fire the same caliber bullets, there isn’t as much overlap in the grain weights that they use when compared to other cartridges like the 308 Winchester and 300 Win Mag. The 338 Lapua typically fires bullets between 250 and 300 grains while 338 Win Mag can fire between 200 and 275 grains, with 225 grain bullets being the most popular.

Ballistics: 338 Win Mag vs 338 Lapua

Our team here at Ammo.com has spent countless hours scouring the Internet to bring you extremely comprehensive ballistics tables for both calibers. These tables will compare bullet weight to muzzle velocity, muzzle energy, and trajectory.

338 Win Mag Ballistics

338 Lapua Ballistics

A Brief History of 338 Winchester Magnum

The 338 Winchester Magnum was introduced in 1958 by the Winchester Repeating Arms company.

The 338 Win Mag is a belted magnum cartridge that draws its heritage from the 375 H&H Magnum round that was also used in the development of the 264 and 458 Winchester Magnum cartridges released in the same year.

The introduction of the 338 Win Mag sparked the “Magnum Era” in terms of cartridge design, and the other bullet manufacturers were not about to let Winchester go unchallenged. Weatherby was quick to introduce the 340 Weatherby Magnum as a direct competitor to the 338 Win Mag, but it was Remington’s release of the 7mm Rem Mag that made the biggest splash and prompted the development of the 300 Win Mag in 1962.

Although the 338 Win Mag was marketed to big game hunters as a medium bore cartridge capable of taking on grizzlies, it was not immediately a commercial success. However, as time passed it has become the top choice for Alaskan hunting guides working in bear country.

Capable of pushing a 225-grain bullet at 2,800 fps with 3,918 ft-lbs of energy, the 338 Win Mag is a heavy hitting cartridge capable of taking down any game animal on the planet.

A Brief History of 338 Lapua Magnum: The 50 BMG Lite

Development of the 338 Lapua Mag began in 1983 by US-based company, Research Armament Industries (RAI). Their goal was to create a cartridge that bridged the gap between the 300 Winchester Magnum and the 50 BMG.

The design specification required that the cartridge be able to penetrate 5 layers of military-grade body armor at 1000 meters and fire a 0.338” diameter bullet for its ideal sectional density and ballistic coefficient. The targeted muzzle velocity to meet these goals was 3,000 fps.

Initial designs for the 338 Lapua Magnum utilized the 416 Rigby as a parent case, simply necking it down to accept a 250 grain Hornady A-MAX bullet. Sadly, the 416 Rigby case was not strong enough to withstand the pressures needed to achieve RAI’s ballistic goals.

By 1984, RAI was under pressure from the military to finish their work and in desperation they reached out to the Finnish ammo company, Lapua, for assistance. Straddled with debt, RAI had to drop out of the program, and this left the fate of the new cartridge in the hands of the engineers at Lapua.

The ballistics team at Lapua joined forces with Sako and Accuracy International to work on redesigning the 416/338 case so that it could handle 60,000 psi of pressure.

The final case design was an extremely pressure resistant that was able to achieve velocities just short of the initial 3,000 fps goal. The decision was also made to depart from Hornady bullets, utilizing a new bullet design instead, the LockBase B408 FMJ.

The finalized 338 Lapua Magnum cartridge submitted and accepted by the CIP (the European version of SAAMI) in 1989 and became a NATO cartridge shortly thereafter.

NATO standard 338 Lapua Mag ammo fires a 250-grain bullet with a muzzle velocity of 3000 fps and muzzle energy of 4892 ft-lbs.

Precision rifle shooters who like to air it out to 1000 yards or more will appreciate the 338’s ability to easily remain supersonic past 1400 yards and maintain MOA levels of accuracy. While the 338 Lapua has a trajectory that would make any 6.5 Creedmoor or 300 Win Mag shooter green with.

The 338 Lapua Mag is a powerhouse of a round and will be competing with the 50 BMG for years to come.

Final Shots: 338 Lapua vs 338 Win Mag

The 338 Lapua and 338 Win Mag are both extremely hard-hitting rifle cartridges that have an insane effective range of over half a mile. They have proven themselves countless times in the woods, the battlefield, and on the firing line at precision rifle competitions.

The 338 Lapua is a round specifically designed with military snipers in mind. It has an incredibly flat trajectory and cut its teeth in the deserts of the Afghanistan during Operation Enduring Freedom. Although the Lapua has seen most of its action overseas, it is becoming more popular on the civilian market for long range shooting competitors who want to reach out past 1,000 yards.

The 338 Winchester Magnum has proven itself against big game animals for over half a century and is still going strong. It’s the favored cartridge of Alaskan hunting guides for its persuasive power against disgruntled grizzly bears and angry bull moose. Bolt-action rifles for 338 Win Mag are light and maneuverable, making them ideal for long stalks or in a tree stand.

Although the 338 Lapua has superior external ballistics, most civilian shooters will be well served by the 338 Win Mag due to its lower overall cost and an effective range well outside ethical hunting distances. This is not to say that you shouldn’t get a 338 Lapua if you can afford it or if it’s something that you’ve always wanted. The Second Amendment ensures this right, and you should use it every chance you get.

# How to Tan a Squirrel Hide: A Beginner\’s Guide

0

As an avid air rifle enthusiast and hunting expert, I’ve had my fair share of experiences with small game hunting, including squirrels. One of the most rewarding aspects of hunting is utilizing every part of the animal, and tanning the hide is a fantastic way to honor the animal and create a lasting memento. In this guide, I’ll share my expertise on how to tan a squirrel hide, perfect for those planning their October hunts.

The Art of Hide Tanning: A Time-Honored Tradition

Before we dive into the specifics of squirrel hide tanning, let’s take a moment to appreciate this ancestral skill. Hide tanning has been practiced for thousands of years, allowing our ancestors to create durable, waterproof materials for clothing, shelter, and tools. Today, it remains a relevant and rewarding hobby for hunters and crafters alike.

As the chief instructor at the NRA education and training department and the main content creator for Air Gun Maniac, I’ve seen a growing interest in traditional skills like hide tanning among our community. It’s a great way to connect with nature and our hunting heritage.

Preparing for Your Squirrel Hunt

Before we get into the tanning process, let’s briefly touch on the hunt itself. When hunting squirrels with an air rifle, accuracy is key. I recommend using a .22 caliber air rifle for clean, humane kills. Remember to check your local hunting regulations and obtain the necessary permits before heading out.

Step-by-Step Guide to Tanning a Squirrel Hide

1. Skinning the Squirrel

The tanning process begins immediately after the hunt. Carefully skin the squirrel, taking care not to puncture the hide. A sharp knife and steady hand are essential here.

2. Cleaning the Hide

Once skinned, scrape off any remaining flesh or fat from the hide. This step is crucial for a successful tan.

3. Salting the Hide

Now, let’s address the method you mentioned:

I’ve seen on places dry, let sit in 5 cups salt to 1 gallon of water, then stretch.

This is a good starting point, but let me expand on it. Create a brine solution using 5 cups of non-iodized salt per gallon of water. Submerge the hide in this solution for 24 hours. This helps preserve the hide and remove any remaining blood.

4. Rinsing and Drying

After brining, rinse the hide thoroughly in clean water. Gently squeeze out excess water, but don’t wring it.

5. Stretching the Hide

While the hide is still damp, stretch it fur-side down on a wooden frame or board. Use small nails or tacks around the edges to keep it taut.

6. Applying the Tanning Solution

Here’s where we diverge from the simple salt method. For a more durable result, I recommend using a commercial tanning solution or a mixture of:

  • 1 part brain (yes, the squirrel’s brain works perfectly)
  • 1 part water
  • 1 teaspoon of salt

Apply this mixture generously to the flesh side of the hide.

7. Working the Hide

This is the most labor-intensive part. As the hide dries, work it with your hands to keep it soft and pliable. This process, known as “breaking” the hide, can take several hours spread over a few days.

8. Smoking the Hide (Optional)

For added durability and a traditional finish, you can smoke the hide over a small fire of punk wood or sage.

Tips for Success

  • Patience is key. Rushing the process can lead to a stiff or poorly preserved hide.
  • Keep your tools clean to prevent contamination of the hide.
  • If you’re new to tanning, practice on a few hides before attempting to create a final product.

Conclusion

Tanning a squirrel hide is a rewarding process that connects us to our hunting heritage. It’s a perfect way to utilize every part of the animal and create a lasting memento of your hunt. As you prepare for your October squirrel hunting trip, remember that the journey doesn’t end with the shot – it continues with the preservation of the hide.

I encourage you to try this method and share your experiences with our community at Air Gun Maniac. Whether you’re a seasoned hunter or just starting out, there’s always something new to learn in the world of hunting and outdoor skills.

Happy hunting, and happy tanning!

Best Air Rifle Deals

Popular Posts

How Do Break Barrel Air Rifles Work?

0
A break barrel air rifle is a type of airgun where the barrel breaks open at a hinge point just above the breech. This...

Dry Firing Air Rifles: What You Need to Know

0
"Master the art of precision shooting with dry firing air rifles. Enhance your aiming skills, trigger control, and muscle memory without using ammunition. Discover...

Can a 22 air rifle kill a deer?

0
"Debate over whether a 22 air rifle can effectively take down a deer has sparked curiosity among hunting enthusiasts. With its lower muzzle velocity...