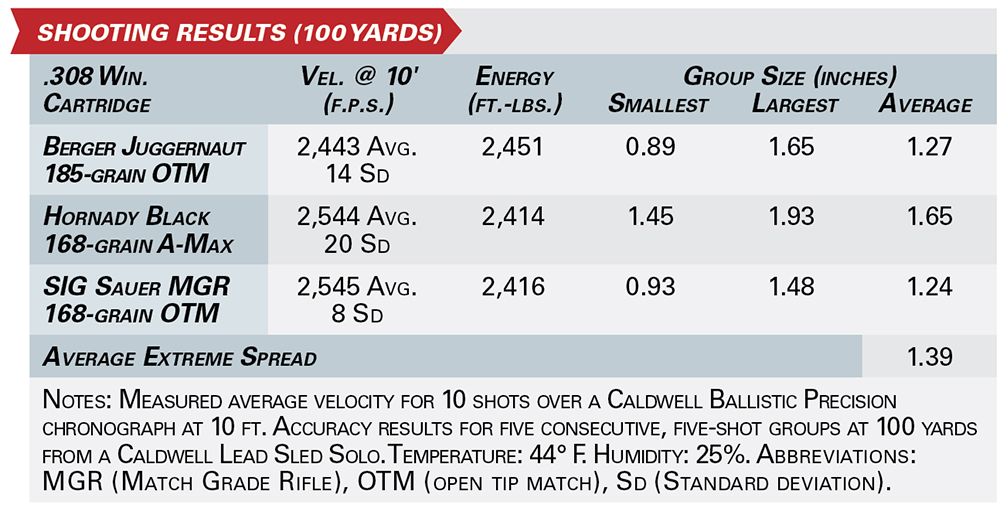
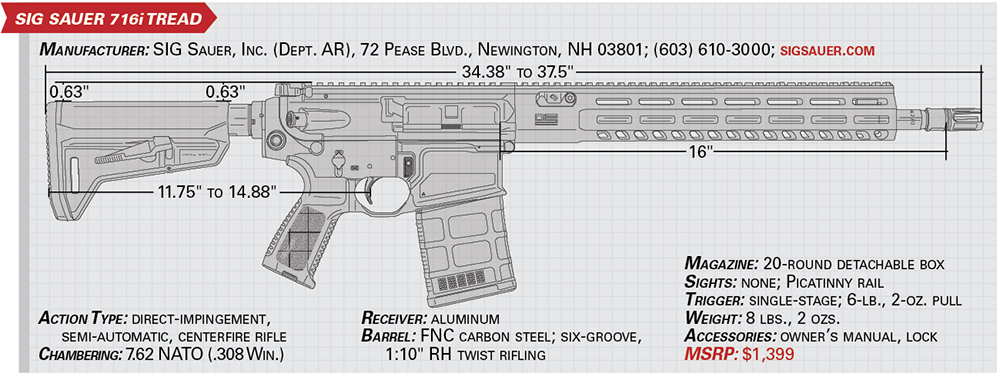
Home Blog Page 53

Here’s Every State That Offers Sandhill Crane Hunting

0

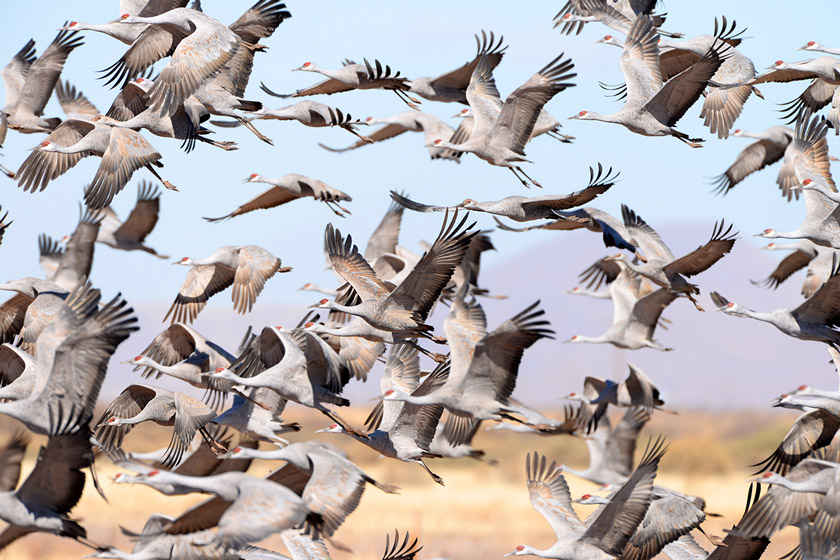
Sandhill crane hunting is more popular than ever, with hunters drawn to the challenge and reward of “The Rib Eye of the Sky.” In North America, there are six subspecies of sandhill cranes. Three are non-migratory, staying in one area year-round. The other three are migratory and travel from Northern Canada to Mexico. Seventeen U.S. states are sandhill crane hunting states. Still, federal regulations set the stage for anyone who wants to pursue them. There are some requirements and a critical program with which to register. After that, it’s up to you to decide where you want to go hunting.

Federal Laws for Sandhill Crane Hunting

Sandhill crane hunting is subject to most federal waterfowl regulations. These rules include using shotguns to take with a maximum capacity of three shells and only using a nontoxic shot. The federal government also prohibits using live decoys, hunting from vehicles, or using bait to draw in sandhill cranes.

All sandhill crane hunters must register in the Harvest Information Program (HIP) for migratory game birds. You can do this through the state’s wildlife department you plan to hunt in. Although it is a federal program, some states require you to register with them.

Suppose you have been duck or goose hunting before. In that case, you know about the Federal Migratory Bird Hunting and Conservation Stamp, commonly referred to as the Federal Duck Stamp. Some state regulations do not require the Duck Stamp for sandhill cranes.

In contrast, others explicitly say it is necessary. Defer to the state wildlife department you plan to hunt in to make sure. Now that the countrywide rules have been made clear, it’s time to list the states that allow sandhill crane hunting within their borders.

Alabama

If you’re looking for sandhill cranes in Alabama, you better go north into the Tennessee River Valley or the Weiss Reservoir on the Coosa River. Alabama offers sandhill crane hunting for Alabama residents in the northern part of the state through an annual draw. The season bag limit is three.

Licenses Required:

  • Alabama hunting license
  • Annual State Duck Stamp or Lifetime Duck Stamp
  • Alabama Sandhill Crane permit
  • Sandhill Crane Identification certification

Alaska

Most sandhill cranes in Alaska migrate through the Copper River Delta or the Tanana Valley near Delta Junction-Georgia Lake. As many as 50,000 cranes fly through this Alaskan funnel daily, many from Siberia. Sandhill cranes are subject to fall/winter hunting season dates based on the specific Alaskan Unit you are hunting in. All units have a daily bag limit of two.

Licenses Required:

  • Alaskan hunting license

Arizona

Sandhill cranes go way back in Arizonan history. People still find ancient petroglyphs of these birds etched into stones along the Gila River. Arizona offers sandhill crane hunting in select areas through an annual draw. The Grand Canyon State issued a total of 580 tags for the 2021-22 season, with a season bag limit of three.

Licenses Required:

  • Arizona Migratory Bird Stamp
  • Arizona Sandhill Crane permit

Colorado

Colorado offers an open sandhill crane hunting season. Sandhills are the only species of crane found in the Rocky Mountain State. Before the first hunting trip of the season, hunters must call 1-877-COLOHIP or register at ColoHIP.com and obtain permit numbers. All areas east of the Continental Divide except North Park and the San Luis Valley are available for sandhill crane hunting from Oct. 1 – Nov. 27, 2022, with a daily bag limit of three.

Licenses Required:

  • Colorado Small Game license
  • Colorado Sandhill Crane permit

Idaho

Idaho’s vast plains and valleys are a significant stop along the sandhill crane migratory route. The state holds sandhill crane hunting seasons in the eastern part through an annual draw. In 2021, the state of Idaho issued 610 sandhill crane tags with seasons running throughout September. The daily and season limit is two cranes.

Licenses Required:

  • Idaho hunting license
  • Idaho Sandhill Crane tag

Kansas

Sandhill crane hunting is available in the central and western Kansas zones during the fall and winter months. The daily bag limit for sandhill cranes in Kansas is three. The Kansas crane hunting season dates have the same start and duration from year to year.

The Western Zone Season begins on the third Saturday in October and continues for 58 days, including the opening day. The Central Zone Season will commence on the Wednesday after the first Saturday in November and shall continue for 58 days, including the opening day.

Licenses Required:

  • Kansas Sandhill Crane permit

Kentucky

There is an annual draw for Kentucky sandhill crane permits, with applications opening and closing in September. The season runs through December and January with a daily bag limit of two.

Licenses Required:

  • Kentucky hunting license
  • Kentucky Sandhill Crane permit

Minnesota

Sandhill cranes used to thrive in the Great Lakes region until humans settled down there. There are two separate populations in Minnesota today. Minnesota offers an open sandhill crane hunting season in the northwest portion of the state. The sandhill crane season runs from Sept. 18 – Oct. 24, with a daily bag limit of two.

Licenses Required:

  • Minnesota small game license
  • Minnesota Sandhill Crane permit

Montana

Montana has sandhill crane hunting in select areas through permits issued in an annual draw. The Montana season runs from Sept. 1 – Oct. 30, with a bag limit of either one or two depending on the specific area the permit is issued for.

Licenses Required:

  • MT Migratory License
  • Conservation License
  • Base Hunting License

New Mexico

New Mexico offers Free Regular Season Eastern Sandhill Crane permits and a Draw-Season Sandhill Crane permit. In 2021, New Mexico issued 540 Draw-Season sandhill crane permits. The daily bag limit is three.

License Requirements:

  • Harvest Information Program (HIP) registration
  • Game Hunting License or Game Hunting & Fishing License
  • Sandhill Crane Permit

North Dakota

North Dakota has an open sandhill crane hunting season beginning in September 2022. The daily bag limit for Unit 1 is three, and the daily bag limit for Unit 2 is two.

Resident License Requirements:

  • Harvest Information Program (HIP) registration
  • Fishing, Hunting, and Furbearer Certificate
  • Small Game License
  • General Game and Habitat License or Combination License
  • Sandhill Crane Permit

Nonresident License Requirements:

  • Fishing, Hunting, and Furbearer Certificate
  • General Game and Habitat License
  • Valid Nonresident Small Game License or Valid Nonresident Waterfowl License
  • Sandhill Crane Permit

Oklahoma

sandhill crane hunting states

Western Oklahomans know the call of a sandhill crane. The state is a thoroughfare on their migratory pattern. Sandhill crane hunting is available in the state of Oklahoma. Contact your local Oklahoma Department of Wildlife Conservation office for specific season dates and limits.

License Requirements:

  • Valid Oklahoma Hunting License
  • Federal Sandhill Crane Permit

South Dakota

South Dakota offers an open sandhill crane hunting season from Sept. 24 – Nov. 20, 2022. The daily bag limit is three.

Licenses Required:

  • Residents: Combination or Small Game hunting license
  • Nonresidents: Nonresident Small Game or Nonresident Waterfowl license.
  • South Dakota Migratory Bird Certification.

Tennessee

Tennessee offers sandhill crane hunting in select areas through an annual draw.

Licenses Required:

  • Tennessee Sandhill Crane Tag
  • Sandhill Crane Identification Test

Texas

192 of 254 Texas counties have sandhill crane seasons from October through January. Texas requires a “Federal Sandhill Crane Hunting Permit,” but this appears to be a state requirement and is only available through the Texas Parks and Wildlife.

Licenses Required:

  • Valid Texas Hunting license
  • Texas Migratory Game Bird Stamp Endorsement
  • Federal Sandhill Crane Hunting Permit

Utah

Utah offers sandhill crane hunting in select areas through an annual draw. If you don’t plan on hunting for grouse or cranes this year, Utah has a yearly preference point application that will improve your chances of winning a draw if you decide to apply the following year.

Licenses Required:

  • Utah combination hunting license or Utah small game license
  • Utah Sandhill Crane permit

Wyoming

Wyoming offers an open season for lesser sandhill cranes and a permit quota season for greater sandhill cranes. The daily bag limit for the general sandhill crane permit is three, and the season bag limit for the quota sandhill crane permit is one.

Licenses Required:

  • Residents: resident game bird or game bird/small game hunting license
  • Non Residents: nonresident game bird/small game hunting license
  • Hunter Safety Certificate
  • Wyoming Conservation Stamp
  • Wyoming Sandhill Crane permit

Regulations change annually, so check with the local wildlife department before the season starts to get up-to-date information on rules and permits. Participating in a sandhill crane hunt is both a challenging and rewarding experience, but luckily, there are many options regarding where to do it.

This article was originally published on May 17, 2022.

READ MORE: ALL THE UPLAND GAME BIRDS YOU CAN HUNT IN AMERICA

Review: SIG Sauer 716i Tread

0

It’s a common practice for firearm manufacturers to create an item with mass appeal first, and then follow up with line extensions. Such is the case with SIG Sauer’s wildly successful Tread series, which debuted in 2018. And while 5.56 NATO-chambered AR-15-type firearms have the broadest appeal, there’s a segment of the AR community that desires—or needs—the upscaled performance delivered by the larger 7.62 NATO round. As such, for 2020, the company added the .30-cal. 716i to the Tread lineup.

Like its .223-cal. counterparts, the 716i is a semi-automatic rifle that operates using direct gas impingement. Paired with the carbine-length gas system is an H2 buffer. The combination results in reliable functioning, minimal muzzle rise and tolerable recoil.

Immediately catching the eye are cutouts in the 716i’s bolt carrier. Circumventing the rear are six, evenly spaced recesses measuring 1″ by 1/4″. Not only will these nooks reduce weight, but they could capture debris, too.

Larger cutouts are found on the front right and the front left. The latter is 3″ in length and 7/16″ wide, saving meaningful weight. Still, according to an AWS Postal Scale, the BCG weighs right at one pound, and it’s a major contributor to the carbine’s 8-lb., 2-oz. overall weight. Other features of the carrier group include a staked bolt key, eight-lug bolt (with an M16-style extractor) and dual, plunger-type ejectors. The latter launched spent cases well to the right and rear of the shooter in a relatively small radius, making cleanup of the valuable brass fast and easy.Sig Sauer 716i Tread

During testing, the direct-impingement SIG 716i Tread’s dual, plunger-type ejectors (l.) launched empty cases into a nice, neat little pile to the right and rear of the shooter. Bilateral controls include (r.) 90-degree safety levers and magazine-release buttons.

Chambered in 7.62 NATO (.308 Win.), the 716i features a compact, 16″ ferritic nitrocarburizing (FNC) steel barrel with 1:10″-twist rifling. This twist rate will adequately stabilize all but the very heaviest, most streamlined bullets. As for the barrel’s abbreviated length, while a boon for maneuverability and portability, shooters should expect velocities to fall short of published numbers, which are typically generated with 24″ barrels. The hearty tube’s muzzle is threaded in the common 5/8×24 TPI pattern, and it ends with a three-prong flash hider.

There are several other noteworthy features of the aluminum alloy upper receiver. First, there’s the practical ejection port cover, shell deflector and forward assist—essentials for self-defense and hunting. Affixed to the front of the receiver is a 15″ free-floating handguard, also crafted from aluminum. Since the 716i is devoid of sights, the 22½” of uninterrupted Picatinny rail atop the upper provides space for attaching an optic. The CNC-machined handguard has cutouts to facilitate cooling and improve aesthetics, as well as five sets of seven M-Lok mounting points for adding accessories.

Like the upper receiver, the lower is made from aluminum, and there is minimal play between the sections thanks to a rubber tensioning insert and quality machining. The magazine well is beveled to facilitate faster changes of the AR-10-style magazines; one black Magpul PMAG 20 LR/SR Gen M3 magazine accompanies the rifle. There are bilateral attachment points on the lower for a single-point sling.

To the rear of the lower is a polymer pistol grip with ribs on the frontstrap and backstrap to increase purchase. This is enhanced by aggressive texturing on the sides. At the bottom there’s a removable cap, which grants access to storage space for spare batteries, ammunition, tools, etc. In an effort to cater to all shooters, the 716i’s fire controls include bilateral magazine-release buttons and two-position safeties, however, there is only a left-side bolt catch.

The carbine has a polished, hard-coated, single-stage trigger. According to a Lyman Digital Trigger Pull Gauge, the test rifle’s trigger broke at an average of 6 lbs., 2 ozs. Despite its relatively heavy pull weight, creep and overtravel were virtually nonexistent, and the reset was quite short.

Rounding out the 716i’s attributes is a six-position, telescoping Magpul SL-K buttstock. In its extended position, the overall length of the rifle is 371/2″, and the length of pull is 147⁄8″. When collapsed, those numbers are 343⁄8″ and 113/4, respectively. Given that range, the carbine can fit most shooters, even with changes in apparel and/or protective gear.

sig sauer 716i tread shooting results

To test the 716i, we topped our sample with a Leupold VX-3i 4.5-14X 40 mm scope and assembled a variety of .308 Win. loads to evaluate accuracy and proper functioning. The rifle fared very well: SIG’s 168-grain open-tip match load grouped best, producing a five-shot, five-group average of 1.24″ at 100 yards, contributing to an excellent three-load average extreme spread of only 1.39″. Still, there’s little doubt to the evaluators that accuracy could be further improved through a lighter trigger pull and/or experimentation with a range of bullet weights and types. During all testing, there were no failures to feed, fire, extract or eject.

In the process of firing nearly 200 rounds, recoil wasn’t an issue, and that’s not due to the hard rubber pad on the buttstock; instead, it’s the result of a well-balanced operating system and the gun’s heft, which is its foremost complaint in reviews by actual owners. In actuality, a lightweight .308 Win. quickly becomes unpleasant to shoot, and we think SIG got it just right. Given its impressive performance relative to its reasonable price, those shooters interested in stepping up to an AR-10 will find the SIG Sauer 716i Tread to be a top choice for doing so.

sig sauer 716i tread specs

Where is the serial number located on Sheridan Blue Streak rifles?

0

Looking to find the location of Sheridan air rifle serial numbers? Look no further! Our comprehensive guide will provide you with all the information you need. Discover where to locate the serial numbers on your Sheridan air rifle and unlock valuable insights about its history and authenticity.

sheridan air rifle serial numbers location

sheridan air rifle serial numbers location

When it comes to Sheridan air rifles, locating the serial numbers can be essential for various reasons. The serial number of a Sheridan air rifle provides valuable information about its age, model, and manufacturing details. By knowing where to find the serial number, collectors and enthusiasts can better understand the history and value of their rifles.

The location of the serial numbers on Sheridan air rifles can vary depending on the model and production year. However, most vintage Sheridan rifles have their serial numbers engraved or stamped on the receiver or frame of the gun. This is typically found on either side of the receiver near the breech or above the trigger guard. Newer models may have their serial numbers located in similar areas or on other parts of the gun, such as under the barrel or inside the stock.

If you are unable to locate the serial number on your Sheridan air rifle, it is recommended to consult the manufacturer’s documentation or contact customer support for assistance. Having accurate information about your rifle’s serial number not only adds value to your collection but also helps with identifying spare parts, determining authenticity, and ensuring compliance with local regulations.

In conclusion, locating the serial numbers of Sheridan air rifles is vital for various reasons such as authentication, tracking ownership history, and ensuring legal compliance. By carefully examining the receiver or barrel, enthusiasts and collectors can easily find these unique identifiers. Remember to exercise caution while handling firearms and consult experts when necessary.

Top 10 Landowners in Missouri: Who Owns the Most Land in the Show-Me State?

0

Missouri is a state with diverse landscapes, rich history, and abundant natural resources. It has over 44 million acres of land, of which about 60% is privately owned. But who are the largest landowners in Missouri, and what do they do with their land? In this article, we will reveal the top 10 landowners in Missouri and explore their backgrounds, interests, and impacts on the state.

Top 10 Landowners in Missouri

1. The State of Missouri

The largest landowner in Missouri is the state itself, which owns over 3 million acres of land. This includes state parks, conservation areas, historic sites, and other public lands. The state manages these lands for various purposes, such as recreation, education, wildlife protection, and natural resource conservation. Some of the most popular state-owned attractions in Missouri are the Gateway Arch National Park in St. Louis, the Mark Twain State Park in Florida, and the Katy Trail State Park that spans across the state.

2. The United States Government

The second-largest landowner in Missouri is the federal government, which owns over 1.4 million acres of land. This includes national forests, wildlife refuges, military bases, and other federal properties. The federal government administers these lands through various agencies, such as the U.S. Forest Service, the U.S. Fish and Wildlife Service, the U.S. Army Corps of Engineers, and the National Park Service. Some of the most notable federal lands in Missouri are the Ozark National Scenic Riverways, the Mark Twain National Forest, and the Fort Leonard Wood Military Reservation.

3. Missouri Department of Conservation

The third-largest landowner in Missouri is the Missouri Department of Conservation (MDC), which owns over 460,000 acres of land. The MDC is a state agency that was established in 1937 to restore and manage the state’s fish, forest, and wildlife resources. The MDC owns and operates conservation areas, nature centers, shooting ranges, fish hatcheries, and other facilities that provide opportunities for outdoor recreation, education, research, and wildlife management. Some of the most visited MDC properties are the Busch Wildlife Area in St. Charles County, the Runge Nature Center in Jefferson City, and the Shepherd of the Hills Fish Hatchery in Branson.

4. The Ted Turner Reserves

The fourth-largest landowner in Missouri is Ted Turner, a media mogul and philanthropist who owns over 149,000 acres of land in the state. Turner is the founder of CNN, TNT, TBS, and other cable networks. He is also a passionate environmentalist and conservationist who owns more than 2 million acres of land across the U.S., making him the second-largest individual landowner in the country. Turner’s properties in Missouri are part of his Ted Turner Reserves, a collection of luxury eco-tourism destinations that offer guests access to his private ranches and wildlife reserves. Some of his ranches in Missouri are the Bar K Ranch near West Plains, the Flying S Ranch near Salem, and the Osage Hills Ranch near Rolla.

5. The Ozark National Scenic Riverways

The fifth-largest landowner in Missouri is the National Park Service (NPS), which owns over 80,000 acres of land in the state2. The NPS is a federal agency that manages national parks and other natural and cultural heritage sites across the U.S. The NPS’s largest property in Missouri is the Ozark National Scenic Riverways (ONSR), which was established in 1964 as America’s first national park to protect a river system. The ONSR encompasses over 134 miles of the Current and Jacks Fork Rivers in southern Missouri, along with their surrounding forests, caves, springs, and historic sites. The ONSR attracts over one million visitors annually who enjoy activities such as canoeing, camping, fishing, hiking

6. The Weyerhaeuser Company

The sixth-largest landowner in Missouri is the Weyerhaeuser Company, a timber and forest products company that owns over 75,000 acres of land in the state. Weyerhaeuser is one of the world’s largest private owners of timberlands, with more than 24 million acres of land in the U.S. and Canada. Weyerhaeuser’s lands in Missouri are mainly located in the southeast region of the state, where it operates several mills and plants that produce lumber, plywood, oriented strand board, and other wood products. Weyerhaeuser also manages its lands for wildlife habitat, recreation, and conservation.

7. The Pioneer Forest

The seventh-largest landowner in Missouri is the Pioneer Forest, a privately owned forest that covers over 65,000 acres of land in the state. The Pioneer Forest is owned by the L-A-D Foundation, a non-profit organization that was founded in 1962 by Leo Drey, a businessman and conservationist who is considered to be the father of sustainable forestry in Missouri. The Pioneer Forest is managed according to the principles of natural forest management, which aim to preserve the ecological integrity, diversity, and productivity of the forest. The Pioneer Forest is open to the public for hiking, hunting, fishing, and other low-impact activities.

8. The Bass Pro Shops

The eighth-largest landowner in Missouri is Johnny Morris, the founder and CEO of Bass Pro Shops, a retail chain that specializes in outdoor gear and equipment. Morris owns over 50,000 acres of land in Missouri, most of which are part of his Big Cedar Lodge resort near Branson. Big Cedar Lodge is a premier destination for outdoor enthusiasts, offering a variety of accommodations, amenities, and attractions, such as golf courses, spas, museums, restaurants, and wildlife parks. Morris also owns Dogwood Canyon Nature Park, a 10,000-acre preserve that features trails, waterfalls, caves, and wildlife.

9. The University of Missouri

The ninth-largest landowner in Missouri is the University of Missouri (MU), which owns over 40,000 acres of land in the state. MU is a public research university that was founded in 1839 as the first public institution of higher education west of the Mississippi River. MU’s lands include its four campuses in Columbia, Kansas City, Rolla, and St. Louis, as well as its research farms, forests

10. The Missouri Botanical Garden

The tenth-largest landowner in Missouri is the Missouri Botanical Garden (MBG), which owns over 30,000 acres of land in the state. The MBG is a botanical research and education institution that was founded in 1859 by Henry Shaw, a wealthy businessman and philanthropist. The MBG’s main campus in St. Louis is one of the oldest and most beautiful botanical gardens in the world, featuring a variety of gardens, conservatories, and collections of plants from around the globe. The MBG also owns and manages several other properties in Missouri, such as the Shaw Nature Reserve in Gray Summit, the Sophia M. Sachs Butterfly House in Chesterfield, and the Commerce Bank Center for Science Education in St. Louis.

Conclusion

Missouri is a state with many large and influential landowners, who own and manage millions of acres of land for various purposes. Some of these landowners are public entities, such as the state and federal governments, the MDC, and the MU. Some are private individuals or organizations, such as Ted Turner, Johnny Morris, the L-A-D Foundation, and the MBG. Some are corporations or businesses, such as Weyerhaeuser and Bass Pro Shops. All of these landowners have a significant impact on the economy, environment, culture, and history of Missouri.

Most Asked Questions and Answers

Here are some of the most asked questions and answers about the top 10 landowners in Missouri:

Q: Who is the largest individual landowner in Missouri?

A: The largest individual landowner in Missouri is Ted Turner, who owns over 149,000 acres of land in the state.

Q: Who is the largest private landowner in Missouri?

A: The largest private landowner in Missouri is Weyerhaeuser, a timber and forest products company that owns over 75,000 acres of land in the state.

Q: Who is the largest public landowner in Missouri?

A: The largest public landowner in Missouri is the state itself, which owns over 3 million acres of land.

Q: How much land does Missouri have?

A: Missouri has over 44 million acres of land, of which about 60% is privately owned.

Q: How much land does the federal government own in Missouri?

A: The federal government owns over 1.4 million acres of land in Missouri.

Q: How much land does the state government own in Missouri?

A: The state government owns over 3 million acres of land in Missouri.

Q: How much land does the MDC own in Missouri?

A: The MDC owns over 460,000 acres of land in Missouri.

Q: How much land does Ted Turner own in Missouri?

A: Ted Turner owns over 149,000 acres of land in Missouri.

Q: How much land does Johnny Morris own in Missouri?

A: Johnny Morris owns over 50,000 acres of land in Missouri.

Q: How much land does the MBG own in Missouri?

A: The MBG owns over 30,000 acres of land in Missouri.

AR-15 Cleaning and Maintenance [Ultimate Guide]

0

So you just bought a new AR-15 and took it to the range.

You ripped through a few boxes of ammo and now you’re home and you need to know….how do I clean this thing?

Maybe you’ve pulled the pins and separated the upper and the lower and you have no idea what to do from there.

It looks intimidating, right?

Feeling a bit overwhelmed?

No need for that, cleaning the AR-15 is pretty easy!

I’m going to show you just how easy it is to tear your rifle apart, clean it in depth, and put it all back together without fear of damaging anything or leaving any parts out.

Now…with a quick video too!

If that helped, please subscribe to our YouTube channel since we’re adding new videos every week!

Step One: Get the Tools to Clean Your AR-15

If you already have other guns, and you’re cleaning them like you should be (you are cleaning your guns regularly right?) then you most likely already have just about everything you need to clean an AR-15, except for some AR-specific things like a bore brush for your particular caliber.

If you don’t already have cleaning supplies, or if you want to build a complete AR-15 cleaning kit that you can carry to the range or competitions, you have two options: build a kit, or buy one.

Which one is better?

That’s going to be a decision you have to make for yourself.

If you just want a kit that works, or maybe you don’t shoot your AR a lot and aren’t worried about maximizing your cleaning efficiency, then just buying a pre-made kit is perfectly fine.

But, if you are a high volume shooter and you need to clean your rifle frequently, or you’re like me and just enjoy the Zen-like process of cleaning your guns, you’ll probably want to build the perfect kit to meet your needs.

Let’s look at the pros and cons of these two approaches.

Buying a Pre-Made Gun Cleaning Kit

First, if you want to order a kit that will have just about everything you need, there’s no shame in that. Not everyone has the time or energy to build a kit from scratch, and there are several good options out there. The downsides of buying a totally pre-made kit are you can only reliably find universal cleaning kits that are going to include a bunch of extra brushes and bore snakes that you won’t necessarily need.

All Gun Cleaning Kits

Think of the pre-made kit like an off-the-rack suit. Sure it’ll work, but its never going to be as nice, or as personalized as a bespoke option.

Basically, off-the-rack is fine, but you wouldn’t want to wear it to your wedding or wear it every day.

The same goes for these pre-made kits…you wouldn’t want to rely on them for something important, say, if you’re a competition shooter, and you’ll want a more personalized option if you’re going to be using it a lot.

That being said, these kits are perfectly fine for most folks, and they’ll be good if you have other guns or other AR-15 calibers, or are looking at acquiring some in the future. Our favorite is the GuardTech.

With these kits or any kit, you buy/build, you’ll want to make sure that they include the correct size bore snakes and brushes, as well as the other tools that work with your AR-15. Make sure you match the caliber to your gun, or you’re going to have to buy another…and you’ll feel a bit silly in the process.

Check out all our favorites in Best Gun Cleaning Kits.

Building Your Own AR-15 Cleaning Kit

Because cleaning a gun is a process that can vary so much from person to person, it’s best that you build a kit that meets your own needs. You can always pick up several different pre-made kits and combine them into one giant “frankenkit”.

If you’re going to build your own kit, I recommend buying a nice case such as this Plano 3-Tray Tackle Box with Dual Top Access, but anything from a cardboard box on up will do.

Next, you’ll want a cleaning mat to keep your parts visible and to keep everything organized. A white sheet or tablecloth will do, but I like this Gun Cleaning Mat because it also includes a handy parts list, making it perfect for a beginner.

From there, you’ll want to buy the brushes and bore snakes/rods for your particular AR caliber. I’ve included some links to .223/5.56 caliber ones below since these are the most common flavors of AR on the market, but you’ll need ones that match your particular caliber.

Here are some kits that include more or less everything you need:

  • Gunmaster 223/5.56 AR Rifle Cleaning Kit ($12) – This is the one in my case up top.
  • Real Avid Gun Boss – AR/.223/5.56 Compact Rod-Type Cleaning System Kit ($30)
  • Otis Modern Sporting Rifle & AR Cleaning System ($43)

With these kits, you should have the brushes, bore snakes/rods, punches, and other various and sundry things you will need, other than your consumable cleaning supplies such as solvent, lubes, and cleaning patches.

The only other things you may find useful (especially if you want to get into some light gunsmithing) is a better punch set like this Ultimate Arms Roll Pin Punch Set ($29.99) and an AR-15 Vise Block ($49.99) that fits into the mag well of the rifle so you can secure it in a bench vise without scratching the finish on your gun.

Best AR-15 Cleaning Solvents and Lubricant

  • Hoppe’s No. 9 Gun Bore Cleaner ($7.46)
  • Hoppe’s No. 9 Lubricating Oil ($6.99)
  • CLP Oil, Solvent, and Lube Combination ($33)
  • Ballistol Multi-Purpose Aerosol Can Lubricant Cleaner Protectant ($10) (We love this one so much, we wrote a Ballistol Review)

Step 2: Prep the Area and Clear the Firearm

First, lay out your cleaning mat and throw on some gloves. Some of these chemicals are toxic and you want them in the gun, not on your skin or in your body.

Next, round up all the ammo for your gun, and move it off the table. Seriously. Get it out of the room, if possible. This eliminates the possibility of a round finding its way into the chamber at any point.

Next, clear and render safe your firearm. (That’s fancy talk for making sure the gun can’t go pew, pew pew, or pew pew pew for any reason.)

Here’s the full procedure

  1. Point the rifle in a SAFE direction.
  2. Remove the magazine.
  3. Place the weapon on safe (don’t worry if you can’t because the hammer isn’t pulled back).
  4. Lock the bolt to the rear.
  5. Visually inspect the chamber and remove any ammunition that may not have been ejected.
  6. Release the bolt.
  7. Place the weapon on safe.

Step 2: Separate the Upper Receiver from the Lower Receiver.

Push the take-down pins out and pull the two halves apart. Some pins can be pushed out with your finger, others may require the use of a punch. Be careful whatever you use so you don’t scratch your finish. I recommend a nylon punch from one of the kits above for general use.

Step 3: Remove the Charging Handle and Bolt Carrier Group

Step 4: Disassemble the Bolt Carrier Group

First, push the bolt to the rear (pictured above) and remove the firing pin retaining pin using your pick. Remove the firing pin and set it aside. Rotate the cam pin ninety degrees and remove it. Now the bolt should slide right out!

Step 5: Disassemble the Bolt

Once you have the bolt out of the bolt carrier group, use a punch and your mallet to remove the extractor pin, and then remove the extractor and set it aside.

Step 6: Remove the Buffer and Buffer Spring from the Buffer Tube

Using a calloused finger, or a punch, press down on the buffer retainer. Remove the buffer and spring from the tube. Remember the retainer is under pressure, so try not to push down on it too far and slip once the pieces are out.

Otherwise, you’ll spend the next few hours looking for it after it springs off to the other end of the room.

Step 7: Clean the Chamber and Barrel

Everyone has their method for this, but there are a few things you need to remember.

The most important thing is that you clean the chamber and barrel from rear to front. You want to make sure the debris comes out the front of the barrel, and that any brush you use on a rod is inserted from the rear – go with the bullet.

This helps keep the rifling intact. The movies are wrong; you don’t clean from the muzzle to the chamber!

This area takes some creativity to clean up, but with time you’ll find what works for you. This is a good place to drop a little bit of that Bore Cleaner you picked up.

Step 8: Clean the Bolt Carrier Group

This is easier than the chamber and barrel.

Give everything a good scrub. Look for carbon buildup, especially at the rear of the firing pin.

Clean the extractor well, attention to detail is key. I make sure my rags are all plain white and cleaned after every use with bleach.

Set one aside as an “inspection” rag so you can easily find missed carbon.

When you’re finished, reassemble the bolt carrier group in the exact opposite order of disassembly. Make sure your bolt is fully to the front so it can be reinserted in the upper. A flick of the wrist helps this along.

Step 9: Clean the Buffer Assembly

This part is easy. Get a rag with a little lube on it and wipe it all down.

Unless you took your rifle to a really cool obstacle course, you probably won’t need to get back in the tube itself. Wipe down the spring and buffer and you’re all set.

During this step, if you have a collapsible stock it’s not a bad idea to remove it and wipe down the outside of the buffer. It’s an option if you have been in a messy environment, but not needed for range trips.

Step 10: Clean the Charging Handle and Upper Receiver

Just like the buffer assembly, a lightly oiled rag is all you should really need here.

You’ll find what works best for you, but once reassembled the charging handle should move effortlessly within the upper receiver.

Step 11: Clean the Fire Control Group (FCG) and Lower Receiver

This takes a brush, oil, and patience.

It generally doesn’t get too fouled up. Pay attention to your FCG and make sure there are no cracks on the hammer or anywhere on the lower receiver.

Step 12: Reassemble your Rifle

Work backward from the takedown, just like the bolt carrier group. After the fifth time, you do this it will become second nature! It should look something like this when you’re done.

Step 13: Lubricate your Rifle

There are more details to this, but I’m going to keep it simple for right now. All the pieces of your bolt carrier group and your charging handle should receive a light coat of lubricant. It should have a nice sheen to it.

Your FCG, mag release button, bolt catch button, safety selector should all get a drop or two of lubricant. Fiddle with them a touch to work it in there. Bottom line, anything that moves needs to have a bit of lubricant on it.

Step 14: Perform a Function Check

You put all your ammo away at the beginning of this whole deal (right?) so there should be no way a round is anywhere near the chamber but do a safety check just in case.

Then:

  1. Point the weapon in a safe direction.
  2. Pull the bolt to the rear and release it forward.
  3. Place the rifle on safe. Squeeze the trigger. If the hammer doesn’t drop, you passed that step.
  4. Place the rifle on fire and pull the trigger. The hammer should fall. If it does, then you’re all finished with the hard part.

Step 16: Clean Your Magazine

This is an often overlooked step. It doesn’t need to be cleaned after every trip to the range. Just pay attention to it during loading.

Does it bind up? Can you hear dirt rattling around in there? Is it hard to load?

Cleaning the magazine is just like cleaning the buffer assembly. Use a pick or whatever you have handy to remove the base plate.

Remove the spring and follower. Wipe it all down and clean it up. Reassemble in the reverse of disassembly.

These are pretty straightforward. If you’ve invested in anti-tilt followers for your GI magazines, this is a great time to install them.

Step 17: Maintenance

Just like the break-in procedure, every rifle has its own maintenance schedule. Consult the manufacturer for more. A general rule of thumb is to give your rifle a thorough inspection every thousand rounds. Once you hit the five thousand round mark, it is a good idea to move to inspections every five hundred rounds.

The most common failures occur in the various springs (specifically the extractor spring), and in the O-Rings on the bolt carrier group. If failures begin, start there!

Keeping a clean and properly lubricated rifle will naturally reduce the risk of failure and extend the life of your rifle. During each cleaning, inspect all parts of cracks, burrs and general wear and tear that may bring your rifle out of spec.

Some Final Thing to Consider When Cleaning an AR-15

Do you shoot corrosive ammo? Check out our handy guide for more information and proper cleaning instructions.

Take your time. You want to be as thorough as possible. Really get inside the bolt carrier with every rag and cleaner you possibly can.

When inserting the firing pin retaining pin, remember the big hole is where it goes in. If you put it in the small hole on the other side, you’re going to have a bad day.

Anything that moves on your rifle should get at least one drop of lubricant whenever you clean. Just like an engine, that oil is important! I cannot stress this enough.

That about does it for this one folks, if you have any questions or want to tell us about your own cleaning procedures, drop us a line in the comments below! Want to see what can happen when you DON’T clean your AR…check out 8 Most Common AR-15 Failures.

Top 3 Best Chokes for Benelli Super Black Eagle 2

0

The Benelli Super Black Eagle 2 is a popular shotgun for hunting both ducks and geese, and with the right choke tube, it can deliver consistent patterns with non-toxic shot. The SBE II’s versatility allows it to function in even the most challenging environments, but it needs the right choke tube to function effectively.

The Patternmaster Code Black and Carlson’s Cremator are two of the best choke tubes for the Super Black Eagle 2. They can deliver results of over 80% pellets inside a 30-inch circle at over 40 yards with the right ammo. Their ported design helps reduce recoil and muzzle jump, making follow up shots quicker and more accurate.

In this guide, we’ll discuss in more detail why you should consider these chokes, the features behind them, and what to expect at certain hunting distances. And remember, always pattern your shotgun to see how it performs with the ammo you plan on hunting with so adjustments can be made prior to using it in the field.

best-choke-benelli-SBE-2

Best Chokes for the Benelli Super Black Eagle 2

These are the three choke tubes you should consider that can provide more consistent and dense patterns downrange. The SBE II is compatible with the Crio Plus choke system.

1) Carlson’s Cremator Non-Ported Choke

The Carlson’s Cremator choke tube is an excellent choice for hunters who need a versatile choke that can perform well with a variety of shotshell loads. This choke tube uses a unique design that consists of multiple tapers, which work together to provide a consistent shot pattern. This makes the Cremator ideal for hunting situations where you need to be able to adjust your shooting style quickly and accurately.

The Benelli Super Black Eagle 2 works especially well with the Carlson’s Cremator. This choke produces dense patterns between 30 and 40 yards with steel shot for hunting over decoys. The Cremator can put 80% of pellets inside a 30-inch circle at 40 yards with the right ammo. It has a diameter of 0.697″ which is close to an improved modified. This is the BUDGET pick.

2) Patternmaster Code Black Choke

The Patternmaster Code Black is a top-of-the-line choke tube that provides unmatched performance in long-range hunting situations. This choke tube uses a specialized constriction design that helps to control the spread of shot at longer distances. This makes it an ideal choice for waterfowl hunters who need to take shots at moving targets from a distance.

The Patternmaster Code Black choke tube fits the Benelli Super Black Eagle 2 perfectly. This all-around choke is great for field hunts, ponds, lakes, and rivers where the range of shots varies, and you’ll be able to handle it all without having to change chokes mid hunt. The internal rings help halt the wad from the shot column in a controlled manner to reduce pellet disruption during wad separation while giving better patterns downrange. Expect it to pattern closer to a full choke. This is the TOP pick for MAX range.

3) Carlson’s Cremator Ported Mid Range

Carlson’s ported version of the Cremator choke series is another good option for the Super Black Eagle 2 in that it can help reduce recoil and muzzle jump, while the internal stud design works to reduce pellet deformation. This mid-range choke tube is perfect for decoying birds in tight or for quick passing shots at medium range.

Consider the ported Cremator choke if you want a slight reduction in muzzle jump and getting on targets faster for follow up shots due to directing some of the gases and pressure outwards. However, ported chokes can be louder and may throw more gun powder residue outwards, so keep that in mind.

Why you should choose the Cremator for the Benelli SBE 2

  • Made from high-quality stainless steel
  • Specifically designed to provide superior performance
  • Features a unique design that allows for tighter shot patterns and improved accuracy
  • Unique wad tapering system as the shot exits the barrel
  • Less fouling and improved consistency
  • Black oxide finish that provides superior durability and corrosion resistance
  • Improved accuracy and performance

What is the best Benelli Super Black Eagle 2 choke for steel shot?

The Benelli Super Black Eagle 2 shotgun works well with a wide variety of choke tubes and shot types. This is true with steel shot used mostly for waterfowl. Steel shot loads can all be fired through certain models of the Super Black Eagle 2 which it is specifically designed for.

The best Benelli Super Black Eagle 2 choke tube for steel shot is the Patternmaster Code Black choke. It provides dense patterns with short shot strings that are capable of hitting fast moving birds. It works especially well over decoys out to ranges of 50 yards.

Other great options for choke tubes that work well for the Super Black Eagle 2 are the Carlson’s Cremator series of chokes. These choke tubes are highly customizable as they are available in long range and mid-range options depending on the hunting situation.

Are Benelli factory chokes good enough?

Often overlooked are the factory choke tubes that are included with the Benelli Super Black Eagle 2 when bought new. The choke system is installed on most Super Black Eagle 2 shotguns and can be customized with interchangeable choke tubes built for it.

Factory Benelli chokes tubes can be good enough, but it depends on the application it’s being used for (e.g. timber hunting vs pass shooting) and the shotshell loads. These factors will determine if the factory choke you have is capable of performing for any given hunting situation.

Once you’ve determined that the factory choke size and constriction is right, then patterning the Super Black Eagle 2 with the loads you intend to hunt with will let you know if it’s good enough to use in the field. If patterning can’t be done, then an aftermarket choke tube like the Patternmaster will most likely perform better right out of the box.

Is the Benelli Super Black Eagle 2 modified choke the most versatile choke size?

Yes, the modified choke tube is the most versatile choke tube for the Benelli Super Black Eagle 2 and its choke system. It may not be the best performer at all ranges, but over a wide range it can’t be beat.

This includes close decoy shooting, birds skirting the edges of the decoys, and that occasional long pass shot. A modified may be too tight of a choke for timber hunting since shots are under 30 yards. A light modified, improved cylinder, or skeet choke may be a better option.

Regardless, if you’re in a field hunting situation where the shots on birds will be at varying ranges from 20 yards to 50 yards, the modified is a good choice for versatility.

best-choke-benelli-super-black-eagle-2

How It Compares

When it comes to choosing the right choke tube for the Benelli Super Black Eagle 2, Carlson’s Cremator stands out from its competitors. The Carlson’s Cremator is engineered with a unique design that provides consistent and even shot patterns, resulting in better accuracy and a higher precision. Unlike its competitors, the Cremator is built with Triple Shot Technology, which ensures that the shot is evenly distributed, reducing the chances of having holes or gaps in your pattern. Additionally, the Cremator’s longer parallel section helps to reduce recoil, which in turn leads to more controlled shots and better follow ups. Overall, the Carlson’s Cremator is a top performer, delivering outstanding results that set it apart from the competition.

Bottom Line

Several factory choke tubes come with the Super Black Eagle 2, but they aren’t always the best. After market premium choke tubes are available to provide enhanced features and better patterning results that translate to better success in the field.

The Patternmaster Code Black and Carlson’s Cremator are two of the best choke tubes to consider using when hunting with the SBE II. These ported chokes are extended for easy removal in the field and are designed to produce more consistent and dense patterns between 30 and 50 yards.

As always, you should pattern your shotgun to see what ammo and choke combinations work the best out of it. One shotgun may not perform like another. Test it out and develop a system that will work well throughout the hunting season and give you the best chance of success when birds are hovering over your decoys.

Related

  • Benelli Choke Tube Chart – Comparision Guide
  • Best Chokes for the Benelli Super Black Eagle
  • Are Benelli and Stoeger choke tubes compatible?
  • What does BER/BEN mean on a choke tube?

Latest Posts

  • Best Waterfowl Choke Tubes for Duck Hunting Success
  • Choke Tube Diameter and Constriction Table
  • 7.5 vs 8 shot: The 3 Key Differences to Know

Last update on 2024-11-05 / Affiliate links / Product Images from Amazon Product Advertising API

Kansas Deer Season 2024-2024: A Hunter’s Guide to Kansas Deer Hunting!

0

In Kansas, deer hunting is a well-liked tradition. Kansas Deer Season 2024-2024 has plenty of opportunity for hunters to capture deer across multiple seasons and with various sorts of equipment. To help you have a great season, this guide includes important information about Kansas deer hunting dates, laws, licensing requirements, bag restrictions, and more.

Kansas Deer Hunting Season Dates

From early September through January, Kansas offers specialized deer seasons for a variety of hunting equipment. The suggested dates for Kansas’s deer seasons in 2024 and 2024 are as follows:

KS Deer SeasonDatesDescription Youth and Disability SeasonSeptember 2 – September 10, 2024Early season for youth under 18 and hunters with disabilities to deer hunt with a permit. Muzzleloader SeasonSeptember 11 – September 24, 2024Deer may be taken with muzzleloader or archery equipment during this period. Archery SeasonSeptember 11 – December 31, 2024Bowhunting for deer is open for the longest duration of any season. Pre-Rut Firearm Whitetail Antlerless-OnlyOctober 7 – October 9, 2024Brief firearm season for harvesting antlerless deer. Regular Firearm SeasonNovember 29 – December 10, 2024General firearm deer hunting season in Kansas. Extended Firearm Whitetail Antlerless-Only – 1st SegmentJanuary 1 – January 7, 2024 (Units 6, 8, 9, 10, 17)Additional antlerless deer harvest after the regular season in specific units. Extended Firearm Whitetail Antlerless-Only – 2nd SegmentJanuary 1 – January 14, 2024 (Units 1, 2, 3, 4, 5, 7, 11, 14, 16)Additional antlerless deer harvest after the regular season in specific units. Extended Firearm Whitetail Antlerless-Only – 3rd SegmentJanuary 1 – January 21, 2024 (Units 10A, 12, 13, 15, 19)Additional antlerless deer harvest after the regular season in specific units. Extended Archery Whitetail Antlerless-OnlyJanuary 22 – January 31, 2024 (Unit 19 only)Extra whitetail does can be taken in Unit 19 with archery gear. Fort Riley Military Base SeasonCheck specific datesSeparate deer season for permit holders at Fort Riley military base. Fort Leavenworth Military Base SeasonCheck specific datesSeparate deer season for permit holders at Fort Leavenworth military base.

Kansas Deer Hunting Regulations

Regulations governing license, hunter education, corpse tagging, and general hunting guidelines apply to deer hunting in Kansas. Here are several important rules:

  • Both local and nonresident hunters need the appropriate licenses. There are special, reduced licenses available.
  • Anyone born after July 1, 1957, must possess a Hunter education certification.
  • Private lands need written authorization. Public road hunting is governed by unique restrictions.
  • Game regulations include issues including gifting or selling meat, using a car or drone, or making an electronic call.
  • It is necessary to properly tag deer corpses and keep the tag on them until the meat is prepared.
  • To avoid wasting game, hunters must make an attempt to recover fallen deer.
  • Seasonal requirements dictate the sort of equipment to be utilized.
  • During the seasons for muzzleloaders and firearms, orange attire is needed.
  • Officers have the right to examine licenses, tools, and harvested game.

For complete information on permitted deer hunting in Kansas, always refer to the summary of the Kansas Department of Wildlife and Parks rules.

Kansas Deer Bag Limits

Depending on the kind of permission you have, you may harvest a certain number of deer:

Permit TypeDeer Bag LimitDescription Resident Firearm (either species/sex)One deer of any kindResident hunters using a firearm may harvest one deer of any kind. Nonresident FirearmOne antlered and one antlerless whitetail deerNonresident hunters using a firearm may harvest one antlered and one antlerless whitetail deer. MuzzleloaderOne deer of any kindHunters with a muzzleloader permit can harvest one deer of any kind. ArcheryOne deer of any kindArchery permit holders may harvest one deer of any kind. Antlerless (any type)One antlerless deer of any speciesPermit holders can harvest one antlerless deer of any species. Property Owner/MaintainerOne deer of any kindPermit allows hunting one deer of any kind on properly owned or maintained property. Antlerless (does or fawns without antler protrusions)Check unit limitsOnly does or fawns without antler protrusions are eligible for antlerless licenses. Be sure to check the unit limits specified on your permit.

Note that only does or fawns lacking antler protrusions are eligible for antlerless licenses. Check the unit limits on your permit as well.

Kansas Deer Hunting Licenses

In order to lawfully shoot deer in Kansas, you must have the appropriate hunting license in addition to the necessary season permits:

  • Kansas citizens must have a resident hunting license in order to hunt small game and waterfowl statewide, unless they are excluded.
  • For non-residents 16 years of age and older without exceptions, a hunting license is necessary. more restrictions than resident licenses.
  • For people ages 16 and above who have not yet finished hunter instruction, an apprentice hunting license is available.
  • License at a lower cost for Kansas citizens 15 years of age or younger.
  • Senior persons, handicapped veterans, and active military members may be eligible for special licenses.
  • Licenses: In addition to a regular hunting license, the proper deer licenses must be acquired.

Annual Hunting License

Residents: Unless exempted by Kansas law, all resident hunters between the ages of 16 and 74 must possess a resident hunting license.

Nonresidents: No matter their age, nonresident hunters must get a nonresident hunting license.

Fee: The data given does not specifically specify the costs associated with hunting permits for residents and non-residents.

Preference Points

Resident: A resident hunter who chooses not to participate in the current season may pay $12.50 for a preference point that will be used in a future drawing for a firearm-either-species, either-sex deer permit.

Non-resident: A non-resident hunter who wishes to forego the current season may buy a preference point that will be used in a future drawing for a white-tailed deer ticket.

Mule Deer Stamp Fee

Price: $152.50 (plus the above-mentioned nonresident white-tailed deer permit price).

An application for the Mule Deer Stamp must be submitted by a nonresident during the April application period. The applicant’s White-tailed Deer Archery or Muzzleloader Permit becomes an Either-species/Either-sex Archery or Muzzleloader Permit if it is pulled. There is no preference point system for this Mule Deer Stamp draw. If unsuccessful, the hunter will be given the permit for the successful draw unit for white-tailed deer taken with an arrow or muzzleloader.

Where to Hunt Deer in Kansas

Deer hunting is permitted on a lot of public property in Kansas:

Walk-in Hunting Access areas: The WIHA program is active on more than a million acres of private property. need a permission.

Wildlife Management Areas: Nearly 400 WMAs, ranging in size from 40 to over 10,000 acres, are designated as wildlife management areas.

State Parks: Some state parks allow limited deer shooting, although there are limits.

Federal areas: When the season is right, hunting is permitted on federal lands such as national wildlife refuges, Army Corps lakes, and national forests.

Particularly for non-resident hunters, public areas provide good possibilities for deer hunting. Make careful to investigate several regions to identify those with thriving deer populations.

Field Dressing and Processing Deer

It’s crucial to field dress harvested deer properly:

  • Use latex gloves and handle brain and spinal tissue as little as possible.
  • Covering meat and washing your equipment in vinegar water will keep them clean.
  • Quickly calm down the deer and steer clear of dragging in mud or debris.
  • Before your hunt, understand the right field dressing methods by watching video lessons.

Many hunters do their own venison processing. Some people butcher deer at meat processors. Treat all meat with hygiene. Deer meat may be used in a variety of dishes by grinding it or creating jerky out of it.

Apply for Your Kansas Deer Permit

Applications start in April! Most deer licenses in Kansas must be applied for by both citizens and non-residents.

  • The application deadline for muzzleloader and weapon licenses is June 9, 2024.
  • Applications for whitetail firearms from non-residents cost $25.
  • After the draw, unused permits could be distributed on a first-come, first-served basis.
  • Through October 1, 2024, archery licenses may be acquired over the counter.
  • If the quota allows, antlerless permits are limitless after the draw.
  • Create an account and submit your deer permit applications online at https://www.kshuntfishcamp.com. So that you don’t miss out, mark your calendar.

Your Kansas deer hunt will be successful if you do your homework and are aware of the rules, hunting seasons, and permit requirements. For a successful deer season in 2024-2024, use this information. For complete information and legal requirements, contact the Kansas Department of Wildlife and Parks.

Happy hunting!

Frequently Asked Questions

How to Preserve a Dead Bird? – A Step-by-Step Guide

0

how to preserve a dead bird

There are several reasons people learn how to preserve a dead bird. It is often because they can’t bear to part with theirs or want to keep a dead bird to study.

Whatever the reason for preserving a bird is, it is crucial to do it right the first time. There is no room for trial and error here because, most times, you only have one specimen and one chance to do it.

This article will discuss some of the best ways to preserve a bird and why people do it. Read on.

How to Preserve a Dead Bird

store-feathers

It is hard to witness the death of a bird, even more so to decide what to do next. Fortunately, you have the option to preserve the bird and keep them in shape close to how they were before.

Is it hard to preserve birds? The answer is no. Luckily, it is easy to do the preservation process on your own. In addition, you can find most of the items and tools you need around your home.

Here are two ways you can proceed with bird preservation.

Bird Preservation With Borax

preserve-turkey-feet

Things To Prepare:

preserve-dead-bird-wings

Step 1: Wear your safety gear and prep the bird

Slip on your gloves and goggles. Collect the bird and remove any debris or dirt from it.

Step 2: Coat the bird inside the bag with borax

Coat the inside of the garbage bag with a bit of Borax. Put the bird in and sprinkle enough Borax to coat the bird. Adjust the amount according to the size of the bird.

Step 3: Place the bird in the shoebox and rub more borax

Transfer the bird to the shoebox. Check for any part without Borax and rub them with the powder.

Step 4: Let it dry and dust the Borax off the bird

Once the bird is thoroughly covered in borax, leave it to dry for a month. After four weeks, use a paintbrush to remove the powder. It is then ready for display.

Bird Preservation With Salt and Bleach

remove-feathers-from-a-dead-bird

Things To Prepare:

preserve-feathers-from-a-dead-bird

Step 1: Suit up for safety and clean the bird

Wear your mask and gloves before removing the dirt from the bird. Carefully sand its feet and legs.

Step 2: Create a water and bleach mixture for the bird

Change your gloves. Mix a part of bleach with two parts of water. Place the bird in the container and add the mixture, making sure that it covers the whole bird.

Step 3: Let it soak, then add the salt mixture

Leave the bird with the mixture for a whole day. Once finished, remove the bird and clean the container. Concoct another mixture with half a gallon of water and 2 cups of salt. Return the bird to the container and add the liquid to preserve it.

Step 4: Soak again before air drying

Let the bird soak again for another 24 hours. Next, remove the bird and air dry. Make sure it dries thoroughly before displaying it.

FAQs

preserve-bird-feet

The Benefits Of Preserving Dead Bird

Why do people preserve dead birds? It is because one wants to save a dead bird of paradise they found and keep their beauty for a long time. Pet owners also preserve their beloved birds to remember them.

Preserving birds can be traced back several centuries ago. In the days of Charles Darwin, preservation was done to keep the specimen in a state where the following generations could admire and study them. This way, people can get to know rare and endangered avians.

Other Types Of Bird Preservation Methods And How To Choose One

We shared with you two bird preservation methods: using borax and using salt. Aside from these, there are other ways to preserve a dead bird for display. You can try:

Deciding which one works best for you will depend on several factors. Getting rid of the bird’s internal organ and stuffing its body with cotton balls or straw, a method called taxidermy, is the perfect technique for lifelike results.

On the other hand, the freeze-drying methods are what most pet owners go for because of their realistic outcomes. However, freezing a dead bird requires patience, as it is a long process that takes approximately seven months.

To those who cannot afford the waiting, skinning the bird is faster as it takes only a few days. The only downside is, you cannot preserve dead bird bones or the whole bird, but only its skin or hide.

Another procedure used for taxidermy is embalming. This is a widely used approach to preserving the bird and is one of the top choices alongside taxidermy and freeze-drying. Embalming takes less time, but it demands focus and attention.

Egyptians used this last method and worked perfectly in preserving your bird. It can keep a bird in excellent condition even after decades or even a hundred years.

The Cost To Preserve Dead Bird

If you want to reach out to a professional taxidermist to preserve your pet bird, the service will cost you $500 to $2,000.

The number varies depending on the size of the bird, if you want fast service, and other factors. For a small bird, you can expect to spend $500 as a starting point. It is always best to ask for the pricing before anything else.

How to preserve feathers from a dead bird?

You can preserve dead bird wings in four steps!

How to preserve bird feet?

If you want to preserve turkey feet, follow Borax’s bird preservation tutorial. Other methods you can try are:

Remove feathers from a dead bird before proceeding with preserving its feet.

Conclusion

We hope that with this article; you learned how to preserve a dead bird and understand its importance. Now, you have an option other than burying a dead bird.

Whether you want to preserve a dead songbird or your favorite pet, come back to this and refer to it as your guide. If you know someone interested in learning how to preserve a deceased bird, share this with them.

Have you done bird preservation before? How was your experience? How did it turn out? We want to hear about it, so comment below for us to read!

It’s common to come across a dead bird on the ground, but have you ever wondered what it could mean? please take a look at this article and see now 7 steps to dispose of a dead bird.

8 Tips for a Successful Deer Drive

0

Thank you for returning to read my latest article. In this article I would like to talk about the lost art of the “deer drive”.

There are many people out there that discount this age old practice due to belief that it is unethical and unsportsmanlike to hunt deer or any big game in such a matter.

I think I have only seen it shown on TV hunting shows maybe once or twice ever, and I watch a lot of hunting shows.

Now to a person that did not grow up learning this style of hunting, I can see how this is true. Some people may not know how to accurately shoot at a running deer or lack the confidence to do so.

If a deer drive is not properly planned out with your hunting party, it can be very dangerous as well. But, if done safely, and properly, it is a very effective way to harvest deer.

I grew up and have lived my entire life in the state of Wisconsin. In the Midwest, the deer drive is a long standing deer camp tradition. It is however, in my opinion, being phased out by most people, preferring to emulate what they learn from watching TV and reading magazines, where such a thing is generally frowned upon. In the Midwest region of the country, until the past couple decades; deer hunting was a way to put food on the table. Hunters were not going out to specifically to harvest a trophy whitetail, although they all dreamed of doing so. Normally people would sit their stands the first day or so, but if no luck was to be had, well we made our own luck. We needed food in our freezer, and if that meant bumping that giant out of the area in hopes to put a tag on a doe for meat, well then so be it.

In my opinion, things have definitely changed.

Tip #1 Safety, Safety, Safety

Did I forget to mention safety? It is true that this can be a very dangerous tactic to use while trying to harvest deer. Always make sure everyone knows where they can and cannot safely shoot. Many hunters have paid with their lives shooting into areas where they are not supposed to during a deer drive. If there is no safe direction for walkers to shoot due to position of the standers, then the walkers should not carry their guns on the drive, to avoid temptation to shoot at a deer that may jump out of its hiding spot.

This was made clear to me on my first deer drive. I still remember like it was yesterday, my first ever deer drive. It was Thanksgiving Day in 1986. I had sat opening weekend seeing only a few deer. From what I can remember, no one had put a tag on a deer as of yet. After the Thanksgiving morning hunt we met at the trucks for lunch and started planning a drive. I was nervous, hoping I did would not screw up. Since I was using a 20 gauge shotgun, younger, and full of youthful energy, I was chosen to be one of the walkers. My father and older brothers, who had longer shooting rifles, were to be the standers. My other brother Tony was also chosen as a walker, because he also carried a shotgun. We chose to drive out a corn field that sat on the east end of the property. I was told sternly to follow the rules to ensure the utmost safety of everyone participating. My father and two other brothers would set up in the corners of the corn to catch deer that broke out of hiding. They were not allowed to shoot into the corn at all, for obvious reasons; my brother and I were in it! Tony and I were not allowed to shoot anywhere but straight down the rows of corn, this way we would not run the risk of shooting the standers stationed in the corners of the field.

We gave our predetermined signals to the standers that we were starting to walk into the field. Everyone was in place and ready for what was to come. As I took my first step into the rows, I grew ever more nervous. I was 12 years old and all of about 4 feet 8 inches tall. The corn we were walking into was over 7 feet tall! I could not see anything farther than 5 feet in front of me. All I knew was I had to walk straight through the corn and follow the rows so everyone knew where to expect me to be. I did not make it through the field 30 yards when I heard my brother Tony bellow “DEER!” and I heard shots start ringing out from his shotgun, or at least I thought it was him as I really could not see anything. I could hear corn stalks crashing all around me, and shots began to ring out from every perceivable direction. I pulled my gun up and knelt down in the middle of the corn, half expecting to get run over by a deer at any point in time. To say I was freaking out would be an understatement! For what seemed like 10 minutes, but was in reality probably only 30 seconds, the commotion subsided. My brother Tony started to yell my name to check to make sure I was safe. I did not immediately answer his calls because I was still in defense mode ready for a deer to plow through and run me over. After a few calls I finally answered him, “Ya!” They all started asking where I was. I could not answer them, as I was slightly disoriented, and my heart and brain was going at a million miles per hour. The only thing I could think of to do was put my blaze orange hat on the end of my barrel and raise it above the stalks of corn so they had a chance to see just where I was. They told me to make my way out. I gladly followed that piece of advice and walked until I reached the outskirts of the corn, leaving my hat on my gun barrel pointed above the corn the entire way, almost like a flag of surrender. As I reached the end of the corn I noticed my family standing around a doe that lay on the ground in front of them. They had taken, to the best of my childhood recollection, 3 does during that short drive. In a matter of a minute or so, my family had the much needed venison to sustain us through until the following deer season.

Tip #2 The Set-up

8 Tips for a Successful Deer Drive 1
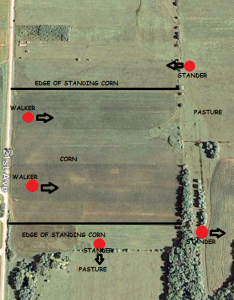
The position of the standers is paramount to the success of your drive. Standers should be set up to block all escape routes of the deer you are trying to move. I will use my hunting property to give you an example of this. The lay out of this land is simple. On the East side of the property is a large ridge with open mature hardwoods. The ridge only rises up about 10-15 feet in elevation. The West side of the land is a cow pasture that covers about 10 acres or so and runs adjacent to the road. The North end is a corn field, and the south end is a swampy area that the deer use as bedding and butts up to public land. The swampy area extends through the middle of the property essentially cutting it in half. This finger of swamp running between the hardwoods to the east and the pasture to the west makes for a perfect travel and escape route for the deer. Our walkers start by coming in on the public land to the south and push through the swamp towards the corn in the north. The deer normally follow the swamp on their way to the corn, essentially making it a pinch point. They do not like escaping through open territory, preferring to stay in cover as long as possible. We put one stander on the ridge to the east to catch any deer that shoot out the side, one in the pasture for the same reason, and then 1 or 2 along the corn to block off any way of escape. If there are any deer bedded down in the swamp, they are sure to bust out in the direction of one of the standers. The walkers in this scenario do not have much opportunity for shots due to the thickness of the cover, which is also why the deer love to hide here. If your standers have all escape routes blocked, success is assured. If there are any gaps or escape routes not covered, it is guaranteed the deer will find the weakness and exploit it.

Tip #3 Play the Wind

8 Tips for a Successful Deer Drive 2The wind is always a primary concern when it comes to hunting whitetails. The whitetail’s best defense is its sense of smell. While playing the wind during a deer drive, there are different factors to consider than just sitting in your stand. You should line up your walkers to walk with the wind, and your standers should be upwind of the drive. This allows the deer to smell the walkers. Letting the deer smell you may be something that goes against all you have been taught about hunting deer. The main purpose of letting the deer smell the walkers is to make them move before being jumped. If the deer sense your presence before you jump it they will move off towards the standers much sooner. If the deer do not know the walkers are coming towards them, you run the risk of jumping them at close range. If you startle the deer they are more likely to run full speed away. A deer at full speed is far harder to hit for the standers than one that is try to creep away. When they are moving away slower they are more likely to stop to look back at the danger, giving the shooter a chance to get a clean shot. A startled deer will not stop running until it knows it is safe. There are so many variables in taking a shot on a whitetail that is running for its life. You have to be able to hit something the size of a paper plate that is running at 30+ mph, and is bounding up and down, and zigzagging left and right. It almost seems impossible when you think about it. I have taken several deer while running, but have missed more. It is difficult to make an accurate shot at that target, and there is no way to practice for such a scenario. I have yet to see a rifle range that has moving targets that move as randomly as a running deer. There are some ranges that have a running deer moving target, but it is mainly a target that moves at a slower more predictable speed, and they move in straight lines. To make this shot requires either great skill or great luck, most of the time luck. With this in mind, I agree with most that say it is unethical for the majority of people to attempt this shot. The practice I have with this shot is the fact that I have made many of them. With deer drives firmly infused into my blood, I know what to expect when attempting a running shot. Opening day 6 years ago, I was sitting in my traditional rifle stand overlooking a corn field. Late in the morning a 7 point buck came out of the woods at full run across the cow pasture I was hunting over, headed for the corn. I knew if it hit the corn field it was going to be impossible to take it. I settled my rifle on a tree branch in front of me and started to track the deer through the iron sights of my Marlin 336 .35 Remington. This model gun is usually only good for shots under 200 yards; and that is in ideal shot conditions, but I knew my gun well. 8 Tips for a Successful Deer Drive 4
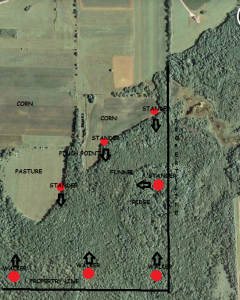
I knew the closest that deer was going to get was about 175 yards away and with it at a full run, most people would not even think of attempting it. As it got closer and closer to the corn I knew it was now or never. I concentrated on my aim, let out a deep breath, and touched off a round. The deer folded up where it was at. I would be foolish to think that a shot like that was all skill. I know for a fact that there was a lot of luck involved. If the deer would have varied any on its path to the corn, I would have missed badly, or worse, wounded the deer so it would suffer. I am confident in taking a running shot, but it is not for everyone. 99% of all shot opportunities on deer during a drive will be moving deer, anything you can do to make the deer take a slower retreat; will greatly improve your odds of success.

Tip #4 Make Noise

Make noise you say? Well that is another tip that goes against the grain of traditional thinking when it comes to whitetail hunting. There are multiple reasons for walkers to make noise while on a drive. First is for safety reasons. If the walkers are making noise, then the standers can more easily pinpoint the location of the walkers, insuring that the standers know not to fire at your location. It also gives them an educated guess as to how much farther the walkers have to go before the drive is complete. It also aids in letting the deer know the walkers are coming, giving them ample opportunity to move before being startled and jumped from their bed. Once again, a deer creeping away slowly in an attempt to be undetected is easier to shoot than a running deer. This tactic is especially effective when driving through corn fields. Deer tend to hang tight in corn and will not jump until the last second and can hide rather well between the rows. I have developed a fun and entertaining cadence when making noise through the corn. I like to talk a lot and loudly and I also try to smack corn stalks on my way through. I want them to move before I get to them.

Tip #5 Be Prepared

As a stander, never in any circumstances, relax while you are waiting for the walkers. Always have your weapon in hand and pay close attention to your surroundings. The action can happen at any time and from any direction. It can be all over in a matter of seconds. I have seen deer pushed from drives while the walkers are still hundreds of yards away, and I also have had deer come out after the drivers have passed by. As discussed before, the deer will more than likely be on the run when you see it. If you get nice and comfy and lean your weapon up against a tree next to you, it will take longer for you to set up a shot. If you have your gun already in your hand when the deer comes through, you can quickly pull up and take your shot. If you have to pick your gun up first, your opportunity might pass you by before you have a chance. Never get caught unprepared on a drive.

Even walkers on the drive need to pay close attention. If you are a walker that is allowed to shoot on the drive, your window of opportunity will be even shorter. Instead of moving towards you like the standers, the deer is moving away from you, and quickly! You may only have a second or two to try and pull off an ethical shot. If you do not have a shot, or are not carrying a weapon, you can try to signal the standers that you have a deer on its feet if you see a deer jump and start moving away.

8 Tips for a Successful Deer Drive 3A few years ago, I was a walker on a short drive at our hunting property. I was equipped with a two-way radio to communicate with the standers, and I was the only walker. I made it about a quarter of the way through my drive when I jumped 2 does and a mature 9 point buck out of a thicket. Because I paid attention to my surroundings and never relaxed during my walk I was able to see the deer and tell the standers what was coming at them. My dad was ready with his gun up and into position already by the time that buck crested the ridge line in front of him. It was the biggest buck of his life, and undoubtedly noticing what was going on in front of me greatly helped in the success of that drive.

Tip #6 Lower Your Standards

While everyone would like to sit back and wait on that mature buck, it is very hard to age a deer while it is moving quickly through the woods. You may only have a couple of brief seconds to react and shoot at any given deer. You will never have the opportunity to study the deer and determine age. If you only want to shoot a buck that is 4 ½ years old or older, then deer drives may not be for you. While a small buck is fairly easy to judge while running quickly through the woods, you probably will not be able to tell the difference between 2 ½ year old and a 4 ½ year old. A running deer will appear more stretched out than a deer just standing there in a relaxed state, so you will not see if that deer has a large chest and pot belly as compared to a younger sleeker deer. And forget about trying to count points or judging score. If you try to judge the age and score of a deer before shooting, the deer will more than likely pass you by before you can figure it out.

Button bucks are another reason you may want to lower your expectations. If you are on a drive that permits you to take a doe, you run the risk of shooting buck fawns. While it is fairly easy to tell a fawn doe from a mature deer, it is not that easy with button bucks, especially in the north. By the time deer season rolls around in November, button bucks are normally the size of the adult does. Their body frame is larger than doe fawns, and can really fool you when on a full run. Even if the button buck is running next to a couple mature does, it does not look much smaller and can easily be thought to be a doe. If you do happen to shoot a buck fawn, do not get down on yourself about it. Take it from me, a professional chef, those fawns taste delicious! As I have always said, “Nothing tastes better than a baby vegetarian”.

Tip #7 Choose Your Weapons

The choice of weapons for your individual position in a deer drive is a critical factor. If you are a walker that is permitted to shoot, never carry a weapon with a scope. There are a couple reasons for this. As I mentioned before in this article, your window of opportunity will normally be shorter than that of a stander. To get a proper sight picture through your scope, it will take longer, running the possibility of missing your window. If you have a bead sight or iron sights on your gun you can more quickly acquire your target, improving your odds. I like to choose a shotgun for my weapon when I am a walker. My shots are usually close range and in dense cover. A high powered rifle bullet does not move through brush as easily as a shotgun slug. If I use a rifle, I use one without a scope and usually choose a slower moving bullet that will bust through brush without being deflected as much as a fast moving bullet. My rifle of choice is usually a lever action such as a 30-30 or my favorite, a .35 rem. Round nose bullets bust brush more easily than a pointed bullet, without as much deflection.

Walking through heavy brush where deer like to hide when pressured, can easily knock your scope off of zero, causing other headaches while deer hunting. If you knock off your zero, you will never know it, and this may cause you to miss your target or worse, wound the deer and cause it suffering.

Standers should be positioned in such a way that their gun matches the shot opportunities. If a stander has a short range rifle, then that shooter should be set up for short range shots. You do not want to set up a person with a short range rifle in a spot where his shot opportunities may be further than his guns effective range. If you have a spot in the drive where the stander has the chance to shoot out a couple hundred yards or so, you will want a long, flat shooting gun. On that same note, if the shot scenario will be something within 50 yards, you may want a shooter with a short range gun such as a shotgun or 30-30, rather than a 30-06 or 7mm-08. The cartridge you fire should always be considered when planning out your drive.

Tip #8 Driving Public Land

This is perhaps the most dangerous of situations. Public land is just that; public! Anyone, at any point in time, may wander onto the property. If you pull up to an empty parcel of land and decide you want to do a drive on it, make sure all safety rules are in place. You could all split up to your respective positions, and then another hunter could pull up, unaware of what is taking place. This puts both drivers and the other hunter in serious danger. If you believe the land is empty, but it suddenly is not, you may be shooting at a person you do not know is there. Alternatively, he might not know that there is a person walking towards him and take a shot at a deer you pushed, and put you or your standers in danger. If you choose to drive public lands, set up either a stander or walker where they can see if anyone else has entered the property, such as close to a road. This way if someone does enter the property, he can communicate to others and adjust your plan accordingly. A two-way radio helps in this so you can easily and instantly tell others, and everyone in your party is aware of what is going on.

I hope you find this article helpful when planning your next outing. While some may think this is an unethical or unsporting way of hunting, it is without doubt, an effective way to harvest deer. My party does several drives per year and has it down to a science, but the only thing we can predict, is the unpredictability of the whitetail deer.

If you follow some of these basic tactics; it will greatly increase your chances to put backstraps on the dinner table.

I would like to thank you all for taking the time to read this article. Good luck to all those venturing into the woods this fall and happy hunting!

Poaching in Michigan: Crimes, Penalties & Defense

0

Poaching in Michigan is a serious offense in Michigan with serious penalties if convicted.

Did you know Michigan has elk? Most people think of these animals as belonging in the Western states or Canada. However, Michigan is home to a population of these beautiful, wild creatures. Michigan is also home to many avid hunters.

Unlike deer, who run rampant throughout the state and suffer from overpopulation, elk are more protected by the law. You could get in big trouble for hunting them without a special license.

Elk hunting licenses are only available by drawing, and there are a limited number available each year. If you don’t get a special permit, that’s it. You will have to try again next year.

Illegal hunting is called poaching, and poaching could cost you your ability to hunt in this state – potentially for the rest of your life.

Elk Poaching in Michigan

Two Michigan men were charged for poaching a cow elk in Wolverine, Michigan in 1998. It was through the DNR poaching hotline that DNR officers investigated Jakob Gagnon and Logan Turbin.

An anonymous tip about the pair led to a search warrant, which led to investigators finding elk meat and cocaine in Gagnon’s residence.

Turbin was charged with assisting Gagnon in processing the elk and illegal possession of elk meat.

Gagnon initially fled the state after authorities searched his home, but turned himself in to law enforcement. He was arraigned August 28, 2020 for taking an elk without a license, possession of stolen property, and cocaine possession.

Penalties for Poaching in Michigan

While Gagnon’s poaching crime was a misdemeanor, his actions attracted law enforcement who went on to find evidence to charge him with a felony crime.

That’s just one way in which breaking hunting laws can backfire on you.

New Deer Hunting Regulations in Michigan

It’s also good to be aware of some of the new bag limits on deer hunting as we get closer to deer hunting season. A mistake or a crime of opportunity could result in a massive fine.

In 2014, Public Act 175 of 2013 went into effect, making it more expensive to break the hunting laws. Rather than a flat $1,000 restitution fee, the fine increases with the number of points on the deer’s antlers, to discourage hunters from taking more trophy bucks than they are legally allowed to bag.

According to Natural Resources and Environmental Protection Act (Excerpt) Act of 1994:

A Michigan hunter was fined $15,000 for bagging an 18-point buck in 2015. It was his third of the season. Apparently, it was a “crime of opportunity.” He had the right to hunt, and the buck just walked in front of him.

Michigan Poaching Defense Attorney

Poaching may not be one of the top crimes leading to jail time or felonies on your record. However, if it doesn’t lead to those things, it can undoubtedly bleed your wallet dry.

For a hunter, losing your license potentially for 15 years isn’t worth the bagging that one animal. Don’t assume no one will tip-off investigators either.

If you’re facing jail time or hefty fines related to poaching in Michigan, call my office and get us working for you.

Call now

Best Air Rifle Deals

Popular Posts

How Does an Air Rifle Work?

0
Discover the inner workings of an air rifle with our comprehensive guide! From the mechanics behind its powerful shots to the intricate process of...

Can a Felon Legally Possess an Air Rifle in Tennessee?

0
"Understanding the Legalities: Felon Ownership of Air Rifles in Tennessee" can a felon own an air rifle in tennessee? In the state of Tennessee, the ownership...

PCP vs CO2 Guns: Which One is Better?

0
The most talked-about debate between hunters and gun enthusiasts is what the best power source of a gun is.  The five main sources of power...