Home Blog Page 193

Trout Fishing Rigs (9 Setups You Need To Know)

0

UPDATED 08 SEPTEMBER 2024

by Robert Ceran

Using the right fishing rig is essential for catching trout successfully, and knowing which rig to use for what conditions can make the difference between catching your limit or getting skunked.

There’s a perfect trout rig for almost every situation, and that’s why it’s so important to master rigging for trout, as this will allow you to choose exactly the right fishing rig for your purposes.

In this article I’ll cover the 9 best trout rigs, and will discuss what each of them is ideally suited for.

The best trout rigs (setup & fishing guide)

How to rig for trout

In order to rig for trout, you need to choose one of three basic types of rigs:

  • Rigs that present your bait suspended underneath a bobber or float
  • Rigs that present your bait close to the bottom with a weight
  • Rigs that enable you to cast and actively retrieve an artificial lure

While these three types of fishing rigs cover almost all trout fishing applications, they come in a variety of different shapes and forms, each of which is best suited for slightly different trout fishing setups.

So if you’re a beginner, chances are that you’re confused about all the different options of rigging for trout.

However, the great thing is that you can get started with just two or three of the most versatile trout fishing rigs, and then add more specialized rigs once you know what kind or rig works best for your pond, lake or stream.

Now let’s look at each of the most important trout rigs in more detail, to help you choose the best rig for your purposes.

And in case you’re also looking for the best bait to use with your trout fishing rigs, check out our article on what is the best bait for trout?

Trout fishing rigs with bobbers

Bobber rigs are among the most effective trout fishing set ups, and work especially well when fishing in shallow ponds and streams, as well as in shallow bays of bigger lakes, or basically in any situation where trout are active close to the water surface.

Now let’s look at the two main types of bobber rigging for trout.

Trout rig with fixed bobber

Fixed bobber rig for trout

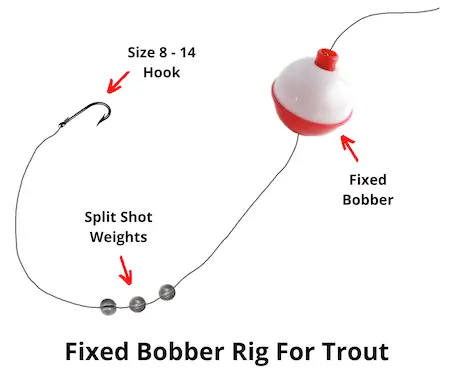
This is one of the simplest trout rigs, and consists of a fixed bobber attached to the line, as well as a hook and sinker to weigh down the baited hook in the water.

The depth at which the bait is presented depends on the distance between the hook and the bobber.

How to tie it: Attach the bobber to the line, and then tie the end of the line to the hook. The most common type of bobber used for this fishing rig is a round red and white bobber, but you may want to choose a pencil shaped bobber instead, which offers less resistance when a trout takes the bait.

If you’re not sure how to rig a fishing line for trout, take a look at our article on what fishing line should you use for trout?

When to use it: This is a great fishing rig to use in shallow ponds and streams, as well as any situations where trout are feeding close to the surface. It’s very easy to set up and a lot of fun to fish with, which makes it an excellent choice for beginners who want to try trout fishing in a stocked pond.

But keep in mind that the maximum depth you can fish this rig corresponds to the length of your rod, since you can’t cast the fishing rig effectively if you set the bobber higher than that.

How to use it: The best way to use this fishing rig is to cast it out with a baited hook and wait for a trout to bite, which is indicated by the bobber being pulled down underwater.

When you see this, set the hook immediately, so the trout doesn’t have a chance to spit out the hook when it feels resistance on the line. This is the best setup for trout fishing in streams and rivers, where you can use it to drift your bait into the best locations that hold trout.

Slip bobber rig

Slip bobber rig

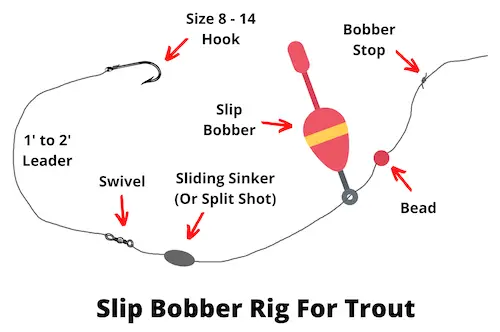
This is another commonly used trout rig, and should be part of every trout angler’s arsenal of fishing tools.

Using a slip bobber rig (aka sliding float rig) makes the fishing rig more compact and easier to cast with than a fixed bobber rig.

How to tie it: Tie a bobber stop on to your main line, and then thread the line through your bobber and tie the line to the hook. The best hook size depends on your bait, but generally lies somewhere between size 8 and 14.

If you’re unsure about choosing the right hook size for different trout line setups, take a look at our article on the best size hook for trout.

Attach a split shot or two to the line between the bobber and the hook. This stops the bobber from sliding down onto the hook and it also weighs down your bait, helping to present it at the right depth to the trout .

Keep in mind that some baits (like powerbait) float in the water, and you may need to add extra split shots to make the baited hook sink down to the desired depth.

When to use it: The slip bobber rig is the best choice when trout are feeding in midwater, and if you can’t reach them with either a fixed bobber rig or with a bottom fishing rig.

The great thing is that you can fish practically any depth with this fishing rig, as you just need to move the bobber stop up the line to whatever depth you want to set the bobber.

How to use it: Estimate the depth of the water you’ll be fishing in, and set the bobber stop to that depth. Then bait your hook and cast out your fishing rig to the desired spot and wait for a fish to grab the bait.

Bottom fishing rigs

Bottom fishing rigs are often the best choice when trout are found in deeper water, as they tend to feed close to the bottom most of the time. There are several options available to you in this rig category, so now let’s look at the most important ones.

Slip sinker rig

Slip sinker rig

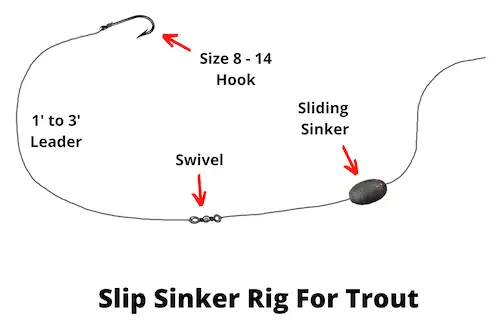
This is the simplest bottom fishing rig around, and is the one most often taught to novice trout anglers. This rig has been in use for more than a century, and continues to perform well in many situations where trout hold close to the bottom.

How to tie it: Thread a 1/8 or 1/4 oz sliding sinker (either a bullet or egg sinker) onto your main line, and then tie the line to a barrel swivel. Attach a leader to the other end of the swivel, and tie your hook to the leader. Choose the type and size of hook depending on the type of bait you want to use.

When to use it: This rig is most commonly used in lakes where trout hold in water deeper than 5 or 10 feet. It’s a great rig to use from shore, since you can cast it relatively far, and cover a lot of water with it.

It’s important to use this fishing rig with floating bait, since you don’t want your baited hook lying on the bottom where trout won’t notice it. You can use it with either powerbait (which is designed to float), or worms injected with air to make them float.

How to use it: This is the most common bait rig used for trout fishing setups, and is usually fished passively. Most anglers cast it out to a promising fishing spot and then wait for a bite. If you do this, make sure to check your rig regularly to see if the bait is still on the hook, and also test different fishing spots.

Carolina rig

Carolina rig

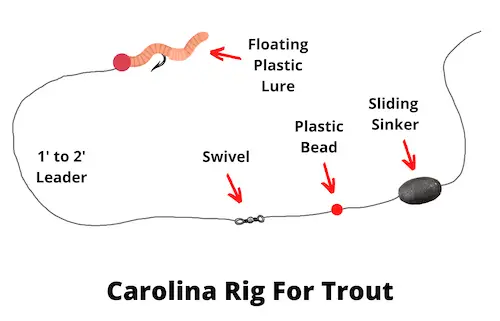
This rig is very similar to the slip sinker rig, but unlike the slip sinker setup it is often fished actively with artificial lures instead of passively with bait, which is why we list the two options separately.

How to tie it: Start by threading your main line through a 1/8 to 1/4 oz sliding sinker. Next, thread the line through a plastic bead, and then tie it to a swivel or snap swivel. The bead stops the weight from banging into the swivel during retrieval, which protects the knot on the swivel from being damaged while fishing, and this is more important if you want to fish it actively.

When to use it: You can use this option anywhere where trout are feeding close to the bottom. It’s a great option to use when fishing in lakes, reservoirs and ponds, but you can also use it in rivers.

How to use it: While you can also use this fishing rig with a baited hook and fish it passively until a trout comes by and bites, the strength of the Carolina trout fishing rig lies in fishing it actively with a floating lure.

You can use a floating jig head with plastic lures such as trout magnets or power worms. After casting out, let your rig sink to the bottom, and then slowly retrieve it with a jigging movement.

Split shot rig

Split shot rig

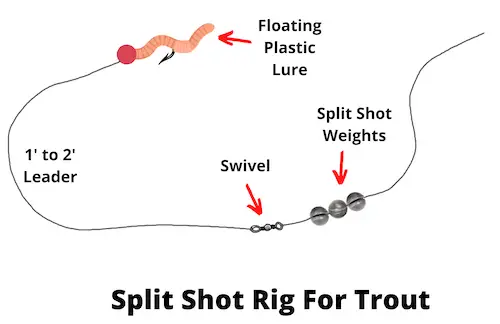
This is basically a finesse version of the Carolina rig, and instead of a sliding sinker it uses one or more split shots attached to the line. Since trout can be finicky at times (especially when fishing in heavily fished waters), it’s always great to have some finesse techniques up your sleeve.

How to tie it: Tie your main line to a swivel or snap swivel, and then add one or two split shots to the line right above the swivel. Next, tie a 1 to 2 foot long fluorocarbon leader to the swivel, and then tie your hook to the other end of the leader.

Next, thread a soft plastic lure onto the hook, and your trout fishing line setup is good to go.

In most cases you’ll want to use a floating lure on this rig, which will result in presenting your lure right in the strike zone every time the split shots sink to the bottom.

When to use it: This rig is a great option if you notice that the trout are finicky. This is most often the case in heavily fished waters, and especially in clear water it can be advantageous to use a finesse rig that’s harder for the fish to spot. It’s also a great trout fishing set up for small creeks.

How to use it: Cast the rig out and let it sink to the bottom. Then slowly retrieve it with jigging movements of your rod tip. The main disadvantage of the split shot rig is that it can’t be cast as far as the Carolina rig, since it comes with less weight on the line. Because of this, it’s better to use it when fishing in smaller lakes, rivers and streams.

Drop shot rig

Drop shot rig

This is another great trout fishing rig setup for bottom fishing, and one of it’s key advantages is that it allows you to place your lure in the strike zone and keep it there for a long time. Similar to the two previous rigs, it’s most often used with soft plastic lures.

How to tie it: Start by tying your main line to a 4 or 5 foot fluorocarbon leader with a double uni knot, and then tie the end of your trout leader to a 1/8 to 1/4 drop shot weight.

Next, take a bait hook and place it facing upwards, and form a loop with the leader line about 1 foot above the drop shot weight.

Pass the loop through the eye of the hook from below, and then tie an overhand knot with the loop. Finally, pass the hook through the loop, wet the line, pull tight, and you’re ready to start fishing.

When to use it: While the drop shot rig was originally developed for vertical fishing in deep water from a boat, most bass anglers can tell you that this rig works equally well for fishing from shore, and can even be fished in very shallow water. It’s a great trout fishing setup for beginners fishing in lakes and rivers.

How to use it: Cast the rig out and slowly retrieve it by hopping the weight along the bottom, while jigging the lure up and down. If you figure out where the strike zone is, you can keep the drop shot fishing rig there, and simply wiggle the lure in place without moving the weight. That way you can keep your lure right in front of the fish for a long time, without having to retrieve it and cast again.

Lure rigs

While all of the fishing rigs discussed above can be used as trout fishing setups with either natural bait or artificial lures, some options for rigging for trout are only intended to be used with lures. Let’s take a look at the most important rigs of this type that you should know.

Spinner rig

Spinner rig

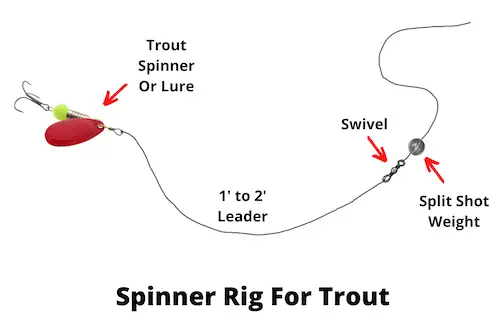
The spinner rig is the most commonly used lure fishing rigs for trout. It is most often used with spinners (such as a rooster tail or panther martin), but it can also be used when fishing with any other artificial lure designed for casting and retrieving.

How to tie it: Tie your main line to a swivel or snap swivel, and add one or two split shot weights just above the swivel. Next, tie a 2 to 4 foot fluorocarbon leader to the other eye of the swivel, and then tie your lure to the other end of the leader.

Depending on the size and weight of your lure, adjust the number of split shots to achieve the right depth during retrieval. The swivel prevents line twist of your main line, but if you’re using a lure that doesn’t generate twist, you can also tie the main line directly to the leader.

When to use it: This is one of the most versatile trout set ups, and can be used in almost any setting, from small streams to deep lakes. In most cases you should try to fish this rig in the middle of the water column, but can also go deeper than that if the trout are holding close to the bottom.

How to use it: Simply cast out the fishing rig and start retrieving. Depending on how deep you want to fish it, you can adjust your retrieve speed, and you can also experiment with letting the rig sink to the bottom before you start reeling it in. However, if you’re trout fishing over weed beds, make sure to keep your lure above the weeds.

If you’re interested in fishing with trout spinners, check out our complete guide to trout fishing with spinners.

Trout fishing rig setup with bobber and jig

Trout rig with bobber and jig

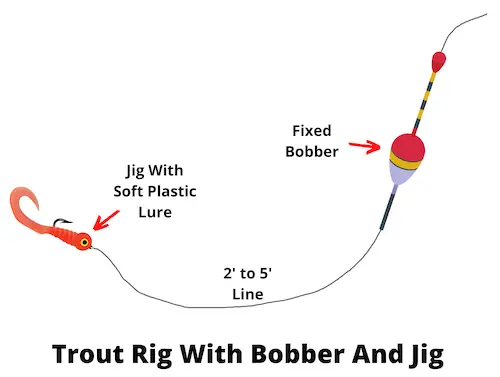
This is a great rainbow trout rig to use if you’re fishing over weeds, as you can fish it slowly without getting the jig snagged in the weeds.

How to tie it: Depending on the depth of the water, you can use either a fixed bobber or a slip bobber.

So start by setting up one of the two bobber rigs (as described above), and instead of tying a bait hook to the end of the line, tie a 1/16 or 1/8 oz jig head to the line. Next, you can bait the jig head with any of a wide variety of plastic lures, and you’re ready to start fishing.

When to use it: This is a great trout fishing setup for beginners when fishing over weed beds, and when want to keep your lure just above the weeds. You can achieve this by setting exactly the right depth with your bobber.

This trout rig setup is also great for drift fishing in streams and rivers, and again you should adjust the setting of your bobber to present the lure just above the bottom.

How to use it: If you’re trout fishing in a lake, cast out the fishing rig and let the jig sink as far as it can (at which point the bobber stands up straight). Then lift your rod tip to retrieve the fishing rig about 4 to 5 feet, and then pause to let the jig sink down again.

What this trout fishing setup achieves is that your jig will be slowly pulled up and then allowed to sink again. In the case of a plastic worm, this results in the worm wiggling through the water, which is highly attractive to most trout.

See also: How to rig when trolling for trout

Ned rig

Ned rig

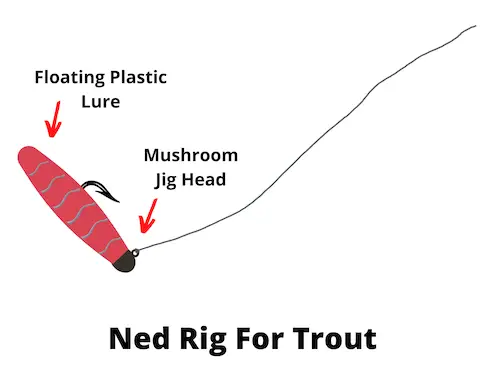
The ned rig is most familiar to bass anglers, but few people know that it also works really well for catching trout. The key feature of the ned rig that makes it so effective when fishing for trout is that it is usually fished with a floating plastic tail, which is ideal for catching trout.

How to tie it: This is the simplest fishing rig to tie in this collection. If you’re using fluorocarbon as your main line, you can tie that directly to the mushroom jig head of the ned rig and you’re ready to start fishing. If you’re using braided line as your main line, it’s best to use a 2 to 4 foot fluorocarbon leader, since that’s much less visible in the water.

When to use it: You can use this rig whenever trout are feeding close to the bottom, and it works equally well in lakes, rivers, and streams. The only situation when you shouldn’t use this rig is if you’re fishing in a lake with a lot of vegetation on the bottom, which is likely to get your ned rig snagged.

How to use it: Cast it out and let it sink to the bottom, then retrieve it for 3 or 4 feet with a jigging motion, and let it settle on the the bottom again. Repeat this until you get a bite.

What are the best trout rigs?

The 3 best trout rigs are:

  • Slip bobber rig
  • Slip sinker rig
  • Spinner rig

Between them, these three setups cover all the three main types of rigging for trout, and if you can set each of them up and fish them effectively, you’re off to a great start.

The slip sinker rig is perfect for presenting a bait close to the bottom, which is the best depth to target trout in most situations.

The slip bobber rig, on the other hand, can be used to present a bait suspended underneath a bobber, which is great when fishing for trout that are active higher in the water column.

And the spinner rig is a great basic setup for active trout fishing with lures, which is an ideal way to cover a lot of water in search of hungry trout.

If you’re currently looking for a new trout rod, check out our article on what is the best rod for trout fishing?

What are the best trout bait rigs?

The 3 best trout bait rigs are:

  • Slip sinker rig
  • Slip bobber rig
  • Fixed bobber rig

Each of these fishing rigs is well suited for baiting your hook with natural baits like worms, maggots, minnows, corn, salmon eggs, or scented baits like powerbait.

In addition, all of them can be used for fishing passively, by casting out your fishing rig and then waiting for a trout to pass by and take the bait.

Trout worm rigs

The best rigging for trout to use with worms is either the slip sinker rig, or the slip bobber rig. The former rig is the ideal choice if you know that trout are feeding close to the bottom, and the latter rig is better if trout are feeding higher in the water column.

When using a slip sinker with a worm as bait, it’s important to make sure that your baited hook floats in the water, as trout will not eat it if it’s lying directly on the bottom. Traditionally, this has been done by injecting air into the worm with a worm syringe (which you can get in most tackle shops).

More recently, many anglers are fishing with floating jig heads baited with worms to make their bait presentation float in the water, and another great trick is to put a small marshmallow on the tip of your hook, which also makes it buoyant.

Finally, no matter which trout worm rig you use, it’s usually best not to use a whole nightcrawler on your hook, as this is too big to fit into the mouth of a trout. Instead, cut off a 1 or 2 inch piece of the worm, and thread it onto the hook.

The best hook type to use for this rig is a baitkeeper hook, which prevents the worm from sliding down the shank of the hook.

Minnow rigs

The best trout rig to use with minnows is either the slip bobber rig, or the fixed bobber rig. Your hook size should be between size 8 and 12 (depending on the size of the minnow). The best way to hook a minnow for trout is through the upper lip.

Small fish form a large part of the diet of many trout species, which is why they can be such a good bait.

Bobber rigs are great for fishing with live minnows, since you can easily spot a trout bite when the bobber goes down, and this allows you to delay your hook set long enough to give the trout a little extra time to get the minnow fully inside its mouth.

Which one of the two bobber fishing rigs you choose depends on the depth of the water you want to fish in, and on the depth at which trout are active.

When fishing with live minnows as trout bait, it’s important to weigh them down with split shots, so they stay at the right depth.

Salmon egg rig

The best trout rig setup to use with salmon eggs is one of the following:

  • Slip bobber rig
  • Fixed bobber rig
  • Drop shot rig

Your hook size should be between size 8 and 14, and if you use a larger hook, you can thread several salmon eggs onto your trout hook. No matter which fishing rig you choose, you need to cast very gently in order to avoid ripping the eggs off the hook during the casting process.

If you’re trout fishing in a lake or pond, the best choice is a bobber rig, as that allows you to present the salmon eggs suspended in the water. But if you’re trout fishing in a stream or river, you can use a bobber rig to drift the salmon eggs with the current.

Alternatively, you can also use a split shot rig to drift the salmon eggs right on top of the bottom of the stream. The latter approach is better for getting it right in front of the trout, but it’s harder to detect bites with this style of fishing.

Egg rigs also work very well for steelhead fishing, and it that’s something you’re into, check out our article on how do you rig for steelhead bank fishing?

Final remarks

This concludes our article on rigging for trout, and hopefully we’ve helped you find exactly the right rig for your fishing technique.

Different trout rigs are ideally suited for different trout fishing tactics – bait fishing, lure fishing, trout fishing from shore, trout fishing from a boat, as well as fishing in diverse bodies of water, ranging from small streams to big lakes.

Now that you understand the basics of what each of these fishing rigs is designed for, this should help you to choose the best trout setups to help you to catch more fish in your local trout fishery.

How long do bow strings last?

0

Whether you’re new to archery or a seasoned pro of the sport, you’ll likely be aware that your bow string being in good condition is crucial to being able to fire off a shot properly. If you don’t have a lot of experience in bow and string maintenance, you might find yourself wondering how long your bow string is likely to last before you need to replace it.

In short, the longevity of your bow string will depend on a number of factors, including the kinds of wear and tear that you subject it to, as well as how you look after it. Read on for our comprehensive look at how long bow strings last, and how to keep them in better shape, for longer.

Also don’t forget to check our roundup of the best recurve bow strings and the best bow string waxes.

A common ballpark figure for the lifespan of your average bow string is anywhere from three to five years. However, in reality, this can vary pretty widely, depending on how often you shoot your bow and how well you maintain the bow string itself.

There’s no major difference to the longevity of bow strings for compound vs. recurve bows. Generally, the main factors that determine how long your bow string lasts is the amount of use that it gets, as well as the draw weight a given bow has. A higher draw weight means the bow string is exposed to more force, which, in turn, causes it to wear out faster.

Another question worth asking is how often or how frequently you should generally replace your bow strings. Even if your bow string isn’t completely falling to pieces, that doesn’t mean you can still use it safely.

There’s no real consensus as to how often you need to replace bow strings. Most bow manufacturers recommend that you replace your bow string every year if it’s on a target bow, or every second year for a hunting bow. However, some manufacturers recommend that you replace your bow strings every two to three years, depending on the type of bow you’re shooting with.

Ultimately, the more often you shoot your bow, the more frequently you’ll need to restring it. And, it’s crucial that you don’t keep shooting with a bow that has a string in dire need of replacing. Worn out strings can cause serious injury if they snap when shot, for example.

Even if you wouldn’t expect to need to replace your bow string just yet, it’s wise to keep an eye on the kind of condition it’s in. We’d generally recommend that you inspect your bow string before each use. Depending on the poundage and wear and tear you subject your bow to, you may need to replace it sooner than anticipated.

One sign you might like to keep an eye out for is fraying of the string. Keep in mind that dryness of the bow string can also occur, and you can usually remedy this by waxing the string. However, if the bow string or serving is actually starting to fray, you’ll likely need to replace the string, or at the very least get it repaired.

Subtle changes in the tuning or performance of your bow may also be a sign that you need a new bow string. As bow strings stretch with use, they can feel less responsive and their timing can start to feel ‘off.’ If you notice this happening to your bow, then your best bet will generally be to get it inspected by a bow technician.

So, we’ve established the importance of properly maintaining your bow string if you want to extend its longevity. But, if you don’t have a lot of experience in bow maintenance, you might be wondering how to best take care of your bow string.

Easily the most important aspect of bow maintenance when it comes to your bow string will be waxing it regularly. The main purpose of waxing your bow string is to stop it from drying out. Waxing the bow string should also provide some form of protection from the elements in the case of harsh wind or sunlight, for example.

It’s also important that you store your bow in an environment with a stable climate. If you were to keep your bow in a room without much insulation, your bow would likely be subject to fluctuating temperatures. These changes in the temperature of the environment can disturb the tension in the bow string. You’ll want to be careful not to expose your bow to intense heat in particular.

If you shoot with recurves or longbows, then another great way to extend your bow string’s lifespan is by unstringing your bow when it’s not in use. This limits the amount of tension that your bow string is subject to and can help to dramatically extend its lifespan.

Given how important the bow string is in archery, it’s only natural that so many new archers worry about the implications of replacing and maintaining their bow strings. However, with proper maintenance, you should expect your bow string to last at least three years or so, though certain manufacturers will recommend that you replace the bow string before then.

Can You Refreeze Venison After It’s Thawed Out?

0

Hunting season can mean a generous amount of deer meat to process and enjoy. But if you are like me, you set out a pack of venison to cook, and then life gets in the way…

Can you refreeze that venison after it’s thawed out?

The Deer hunting community seems to have this rumor floating around…” you cant refreeze deer meat!”

But that’s just not true…

You can refreeze thawed venison without safety concerns, provided you make sure it has been kept cool and dry, such as in the refrigerator. After that, the only real issue with re-freezing is that you may notice a distinct drop in taste and tenderness from moisture loss.

If you are looking into making the most out of your venison, keep on reading.

In the rest of this article, I’ll get into the details of how protein-rich and flavorful venison meat is processed and stored and how refreezing them could impact quality.

Table of Contents

  • Can You Refreeze Defrosted Venison?
    • What Is Venison?
  • What Happens When You Refreeze Defrosted Venison?
  • How To Transport and Process Freshly Hunted Venison
  • How Do You Store Venison?
  • Do You Need To Freeze Venison?
  • How Should You Thaw Venison?

Can You Refreeze Defrosted Venison?

According to the US Department of Agriculture, you can still refreeze thawed meat, although you must handle it correctly before being refrozen. This includes keeping venison thawed in the refrigerator for a maximum of four days or at room temperature for no more than two hours.

Thawed meat also cannot be left out of the fridge at a temperature above 90 °F (32.22 °C) for more than an hour.

Be mindful, however, that these standards are the essential elements of safely storing and preparing meat products for future consumption. Safety, though, does not necessarily guarantee quality.

Unfortunately, the taste and quality of venison can deteriorate when refrozen, so this is something you will also have to consider.

It’s also important to fully understand the meat you’re working with, as it has slightly different properties to beef and pork.

What Is Venison?

Venison is any portion of deer meat that is edible. Generally, venison includes all the deer’s internal organs, such as the heart, kidneys, liver, intestines, and of course the main cuts of red meat. It takes its name from the Latin word venatus, which literally means “to hunt.”

Composition-wise, it resembles that of beef and can also be prepared into similar cut-types such as chops, cutlets, tenderloins, and ribs.

In the United States, Canada, and other countries like Australia, deer hunting is extremely popular. Hunters help regulate populations, and in turn, provide funding through license sales that help fund conservation efforts.

Whitetail deer is the most popular big game mammal in the United States, and millions of ethical hunters harvest and process their own venison for the dinner table.

Me included!

What Happens When You Refreeze Defrosted Venison?

We’ve already established that refreezing defrosted venison a second time is generally safe, given that you observe certain safety caveats.

Many are curious, though, about the specific trade-offs when you refreeze venison and why it is usually discouraged.

While refreezing venison is safe, it can come with quality tradeoffs. In a mini-experiment, tasters compared two types of cooked venison meats, with the first thawed once and the second twice. They found the twice-frozen venison meat either less tender or less flavorful.

Still, it depends on the overall food preparation and handling, as one of the tasters reported that they did not notice any difference between the two types of meat’s overall flavor.

How To Transport and Process Freshly Hunted Venison

Freshly hunted venison needs to be processed correctly to avoid contamination and possible poisoning. Licensed venison processors adhere to safety standards to produce safe, retail-quality deer meat.

Upon transporting deer carcasses from hunting to initial processing, handlers must ensure that environmental elements or fecal matter do not contaminate the raw meat.

During transport, pack ice cubes into the deer’s cavity to keep its insides cold. Ice must be contained in a sealed pouch as once it melts, excess water inside the cavity may lead to spoilage. Carcasses must also be processed immediately and placed away from sunlight to maintain their freshness.

Especially when the ambient air is above 40 °F (4.44°C), hunters must refrigerate venison as soon as possible, ideally within three to four hours.

If you bring your venison carcass to a meat processor, they could refuse to handle it if they find apparent signs of meat mishandling. The measure is necessary to keep you and the rest of your family safe by consuming only fresh venison, so it is best not to argue with them.

How Do You Store Venison?

You should store venison below 4 °F (-15.56°C). Raw, uncooked venison also cannot stay in the refrigerator for more than four days. However, if you plan to cook it after a more extended period, there is always the freezing option.

Just make sure to portion your venison into meal-sized cuts to prevent you from thawing excessive amounts when you decide to cook it.

Also, ensure that the packaging you’re using to store your venison in before freezing is not permeable to the air.

Freezer burns often occur when meats are frozen in the presence of oxygen, resulting in the deterioration of meat quality, color, and taste.

To prevent freezer burns, wrap your raw venison portions in butcher paper. I recommend using Reynolds Freezer Paper Plastic from Amazon.com. This packaging has a wax-lining on the side the meat touches preventing oxygen from penetrating the meat during storage.

You can also invest in a vacuum sealer like the FoodSaver FM2100-000 Vacuum Sealer Machine System and buy rolls of vacuum-sealer bags like the Vacuum Sealer Bags Heavy Duty.

All you have to do is put your raw venison portions into the bags and let your vacuum sealer do the work. The sealer sucks the air out of the bag, ensuring that your venison is in an oxygen-free environment for the entire freezing time.

See Also: Can You Eat Venison Rare?

Do You Need To Freeze Venison?

You do need to freeze venison if you don’t plan on eating it right away to prevent bacteria and parasites from ruining it. At low enough temperatures, the activity of these organisms can completely halt due to the slow movement of molecules inside the meat.

The US Food Safety and Inspection Service recommend freezing all kinds of meats, including venison, to 0 °F (-18 °C) to keep them safe for consumption indefinitely.

However, prolonged freezing time may affect the quality of meat. Fortunately, the quality of frozen raw venison will remain more or less the same for 8 to 12 months as long as it is prepared and packed correctly.

How Should You Thaw Venison?

To thaw venison, you can either let it thaw in the fridge, immerse the whole package in cold water, put it in a microwave, or skip the separate thawing part and cook it immediately. The most important thing to note is that It is not safe to thaw venison at room temperature.

It will likely take one to two days to thaw venison in a fridge, and if you store them in large chunks, each pound of venison could take an additional five hours of thawing time.

If you need the thawed venison a little faster, you can opt for the cold water thawing. Place the venison in a leak-free container, usually a plastic pouch, and completely immerse in cold water.

While the last step can be much faster, you will also have to be physically present to change the cold water once every half an hour and check for possible water leakage into the meat as this could lead to spoilage.

See Also: Why Does Eating Venison Give Me Gas?

  • How to Clean a Deer Skull Found in the Woods (EASY STEPS)
  • 3 Easy Ways to Whiten Deer Antlers (Skulls)
  • How to Preserve a Coyote Tail (Easy Method)
  • How Dangerous is Public Land Hunting?
  • How Much Do Coyote Pelts Sell For?
  • Are Creeks Considered Public Land? Well…It Depends.
  • Are State Forests Public Land?
  • Can You Use Climbing Spikes on Public Land?
  • Is it Legal to Pick Flowers on Public Land?

What is your effective bowhunting range?

0

What is your effective bowhunting range

With hunting season in full swing and with more hunts around the corner, the archery ranges have been busier than ever. Folks are getting ready for upcoming hunts and some are possibly even trying to rectify some mishaps that might have recently happened in the field. All of us have been there a time or two. We’ve put in the range time ahead of season, scouted our tails off and continued to grind our way into the depths of our hunt all to arrive at that moment. That moment that we are all striving for. We get a great animal in front of us and hit them with our rangefinder. The reading is within our effective shooting distance back at the range, so we let it rip. Unfortunately, that’s all the ripping that takes place and our arrow sails harmlessly over the animal’s back.

“They were within my effective range! What happened?”

Hunting happened and your effective range might not be what you think it is.

So, what is your effective range?

Effective bowhunting ranges

Before we dive into the meat and potatoes here, let’s look at effective range as a whole. What is it? Personally, I would define it as a distance in which the shooter can effectively place three arrows within a paper plate or kill zone of an animal. At which point distance wise they fail to do that, that point would be past their effective shooting range. That distance is going to vary from shooter to shooter, but the principle remains the same. One hunter’s effective range might be 40 yards, while another’s might be 80 yards. Experience, dedication to their craft and overall skill level seems to be what separates people here. No matter the case, it’s important that we are honest with ourselves here when we’re at the range. Take note of where you really start to see inconsistencies. That’s at the range, though. This tale doesn’t end at the range.

Your effective range in the field…

I am a firm believer that your effective range at the range is likely not your effective range in the field. Things are just different and there is no way for us to replicate the feeling of a live animal in front of us. This is the part that we get to practice the least out of this whole equation that is bowhunting. We don’t get to practice having the adrenaline rush that comes from a close encounter. There aren’t scenarios at the range where you are at full draw waiting for the right angle, all the while melting with anticipation.

Shop article bar

At the end of that cycle, there is picking a spot and executing a good shot. The first few times I was ever at full draw on an animal, I remember actually aiming at the animal as a whole, not picking a spot—a common mistake among new bowhunters. We know these things before getting into the field, but, when we get there and are put in that situation, it’s almost as if you forget. For that reason, I think we need to eat some humble pie before heading in the field.

Practice makes perfect

It is good practice, in my opinion, to subtract a bit off of what you determine your effective range is at the range. Let’s say 10 to 20 yards. So, if your effective range at the range is 80 yards, I’d say whittle that down to 60 yards during your hunt. There are just so many variables that have an effect on our shooting out there. The weather, a target that moves, the size of the animal, our own desires, poor shooting conditions, etc. Of course, this distance might increase through the years as you grow more comfortable with bowhunting and acquire more in the field practice. However, ice running through the veins is not a common trait. I’d also be pretty sad if, one day, bowhunting encounters don’t excite me as they do today. It’s why we do it.

Practicing for game day

Practicing for game day

While we can’t replicate exactly what it is to be at full draw in the red zone of a big buck, I do think there are some things that we can do to practice for game day. Instead of standing with perfect archery form, try sitting or kneeling for your shot. You could try sitting with your legs out to the side, in front of you or even crossed. What about shooting with one foot up on a rock while the other is planted on the ground? Each of these things throw off our balance, which is a highly likely scenario in a hunting situation. Try shooting at your maximum effective shooting distance in some of these positions. You might be surprised. While you’re at it, try holding at full draw for 30 seconds to a minute and then shoot at your maximum effective distance. Actually, before you do that, sprint to the target and back or do 20 burpees to elevate your heart rate a bit. Oh! And when you shoot, don’t aim at a bullseye. Pick a spot and aim at a random place on the target. 3D targets are great for this. In the end, my money is on that effective shooting distance not being exactly what you thought it was.

Closing thoughts

Long range bowhunting

In no way, shape or form am I knocking long-range bowhunting with this piece. I’ve said it before and I’ll say it again: If you can do it, you can do it. Getting to that point, though, doesn’t come without a little reflection. These are merely thoughts on some possible healthy reevaluations that we can look at. As hard as bowhunting is, we don’t get opportunities out the wazoo for filling tags. Each animal that we are so fortunate to bring home is one that doubtfully came from little to no work. It takes dedication to be consistently successful with a bow and, along the way, it pays for us to truly know what we are and are not capable of. Knowing this is going to provide us with a better experience overall and the quickest death possible for the game we pursue. We are predators and it is on us to be good ones.

goHUNT's INSIDER Research Tools

Best Fish Finders for Small Boats (2024 Buyer’s Guide)

0

I’ve been fly fishing in southern Virginia for more than 15 years and ever since I first started trolling with my dad from our small 50hp boat when I was 12, I’ve fished with a fish finder.

Picking out the best fish finder for small boats will not only help you find fish more effectively from smaller vessels but also locate and save key areas where fish could be hanging out in the future.

So, it will help you catch fish now, and you can also mark key spots on the river or lake. That way you can always come back and try those spots.

Quick Answer: Best Fish Finders For Small Boats

  • 1. Humminbird Helix 5 Series
  • 2. Humminbird Helix 7
  • 3. Lowrance Hook 2 GPS
  • 4. Joywee Phiradar
  • 5. Lucky Portable Fish Finder

If you’re looking to find fish and locate habitat, then check out the article below. I’m going to go over some of the best small boat fish finders.

We also have a “Best Fish Finders Overall” article if you’re looking for all types of fish finders.

Check Out Our Video

What is a Fish Finder?

A fish finder is able to tell you several pieces of information that will be critical for helping you find and catch fish. It’s possible to fish without one, but it can make a world of difference.

Fish finders can tell you the depth of the water and the temperature, along with where the structure, bait fish, and game fish you’re after are. Plus, some different models also have GPS.

Types of Fish Finders

There are several different types of fish finders. Each has its own pros and cons, so you should do careful research before you purchase one, as it may not work well for your style.

So, below I’ll go over a few different kinds to help you figure out which one will work best for you. Check them out and then see which one you can best utilize.

Mountable

These are great because they come with a bracket that’s fixed onto the boat. However, the actual unit can be taken on and off. So, the next morning, it can easily be mounted back on.

This is great for travel or if you have your boat parked outside. You can now take off your electronics and keep them safe inside your house or your truck.

Fixed

If you have a boat that you know will be safe and secure, then a fixed fish finder will be fine. These are great because it’s just one less thing you have to worry about taking on and off the boat at the end of the day.

These are also great if you’ll be fishing in choppy conditions. Since it’s fixed onto the boat, it has a low likelihood of falling off from waves crashing and bouncing off the boat.

Portable

Portable fish finders are great for when you have a smaller boat or a kayak. These can be easily installed before getting to the lake, or right at the water’s edge.

The portability factor makes it easy to transfer to and from your boat and reduces weight. This is great when you’re fishing from a kayak or float tube that may have a weight limit.

Handheld

These are similar to portable fish finders. They can be very easy to travel with and can also be lighter, making them great for use on smaller boats that have a weight limit.

Typically, these aren’t as nice as some of the bigger units that you mount. However, I think you’ll find that these will capture all the information you need and help you catch more fish.

Castable

These are great for shore anglers. Since you’re not actually in the water, you can cast out the transmitter and see the depth, water temperature, and even if there are any fish below the transmitter.

You can also use this when fishing out on boats too. They’re typically not as efficient as some of the handheld models out there, but are a great option for a cheaper model.

When to Use a Fish Finder

You can use a fish finder whenever you want to. Since you can now utilize castable fish finders, anyone can go out to their favorite water and have some sort of idea of what the bottom of the lake looks like.

The only time you may not need one is when you’re floating a shallow or clear river. Typically the water depth will change rapidly, and the only thing you may need to know is the water temperature.

Do You Really Need a Fish Finder?

If you want to go fishing, then you don’t actually need a fish finder. You can find success without one by looking for lay downs and other structure that your naked eye is able to find.

However, it will make a world of difference if you use a fish finder. It can help you locate bait fish, humps, drop-offs, sunken structure, and even schools of game fish.

5 Best Fish Finders for Small Boats

Below, I’ll go over five different products. These are the best fish finders for smaller boats. Kayaks, jon boats, paddleboards, and all other small vessels will be able to utilize the products below.

Check them out and see which one will work the best for your fishing style. Each has its own pros and cons, so take a close look and figure out which one will be the best for you.

1. Humminbird Helix 5 Series

  • Pros: Has sonar and comes with a transducer, great value
  • Cons: Smaller screen, not as bright, older model

The Humminbird Helix 5 is a great overall fish finder. It can be mounted onto smaller boats and even comes with its own transducer. Setting it up is a breeze.

It has side imaging, down imaging, speed, and GPS. It comes with sonar, water temperature, and a depth indicator, meaning this isn’t just a barebones unit. But, it has everything you need to locate fish.

It comes in at a solid price point, so a beginner angler can purchase this and learn how to use a fish finder properly without having to spend too much on a unit.

Product Specifications

  • 5 inch color display
  • Dual beam sonar
  • 4000 watts power output
  • Comes with a transducer
  • Broadband CHIRP
  • Easy use and set up

VIEW ON AMAZON

2. Humminbird Helix 7

  • Pros: GPS and down imaging
  • Cons: No SD card with loaded maps

If you’re looking to take the next step in purchasing a fish finder, then the Humminbird Helix 7 is a great option. It won’t break the bank but it has a solid price point, especially considering what it can do.

With down imaging, this unit can tell you exactly what’s beneath your boat. It’s ideal for fishing in deep lakes, rivers, or in salt water. You can easily tell the water temperature and the depth as well.

The device can give you coverage up to 125 feet, which is more than enough for most anglers out there. If you plan on taking this into really deep salt water, then maybe another unit would be better.

Product Specifications

  • 7 inch screen
  • Mega down imaging
  • 125 feet depth
  • Low Q CHIRP transducer
  • Dual spectrum CHIRP
  • Two display modes
  • Includes transducer and mounting hardware

VIEW ON AMAZON

3. Lowrance Hook 2 GPS

  • Pros: Comes equipped with GPS and wide sonar coverage
  • Cons: Can have issues with consistent depth readings

If you’re looking for a unit that has GPS capabilities, then this is the one for you. A GPS unit on your boat is great for when you’re fishing big water that may be new to you. This allows you to traverse the lake without getting lost.

The Lowrance Hook 2 is also very easy to use, which makes it ideal for someone who may be new to the world of fish finders. You can easily mount it, set it up, and learn to use it out on the water.

It gives you traditional CHIRP sonar, so you can tell if there is any structure below you. It also tells you the water temperature, depth, and if there are any schools of fish beneath your boat.

Product Specifications

  • Auto tuning sonar
  • Easy to use menu options
  • Wide sonar coverage
  • Easy setup
  • Mount on transom, hull, or trolling motor
  • GPS
  • Transducer included in the package

VIEW ON AMAZON

4. Joywee Phiradar

  • Pros: Small and compact size, accurate depth readings
  • Cons: Can be a pain to install and set up to a battery

If you’re looking for a great fish finder that can be used on a kayak, then this is the one for you. The Joywee Phiradar is small enough that it won’t add too much extra weight, which is important when kayak fishing.

Installation can be a bit of a pain, but once you have it set up and ready to go, then it’s fine. You can easily paddle around the lake on your kayak utilizing the great work this fish finder does.

It’s extremely accurate and outworks the price, making this another great deal. It’s perfect for someone who doesn’t want to drop a crazy amount of money on a fish finder.

Product Specifications

  • 3.5 inch screen
  • Depth reading from 1.8 to 900 feet
  • Auto zoom tracking
  • Bottom contour and temp readings
  • Multi-language settings
  • Big or small fish indicator
  • Dual beam sonar frequency

VIEW ON AMAZON

5. Lucky Portable Fish Finder

  • Pros: Small and easy to use and transport
  • Cons: Slow readings and no bells and whistles

For the price, the Lucky Portable Fish Finder is pretty incredible. Don’t expect too much, though, as this is a very barebones fish finder. It will tell you depth, water temp, and fish location. It seems the fish location can be slow sometimes, though.

This can be taken out in just about any type of watercraft you can think of and be utilized. So, if you don’t want to pull the trigger on something crazy expensive, then this is the one for you.

Ideally, this is best suited for a kayak. Since it’s so small and lightweight, it won’t take up much extra space in the boat. It’ll deliver all the essential information you need to catch more fish, but nothing more.

Product Specifications

  • Portable
  • Streamlined shape
  • Real-time water depth
  • Background light
  • Fish detector
  • 328 feet max depth
  • Extremely easy to use

VIEW ON AMAZON

Features of a Good Fish Finder (Particularly Those For Smaller Vessels)

Below, I’ll go over some of the best features of fish finder for small boats. Each has its own pros and cons, so think about what you want and then apply it to the list below.

GPS Integrated

Having GPS on your fish finder can be the ultimate game changer. Most of these have waypoint settings that will allow you to plot exactly where fish have been hanging out or where you think they will be.

It’s also great if you plan on fishing large waterways for the first time. This way you can easily plot your way back to shore or the boat ramp without getting lost.

Cone Angle

The cone angle is the sound generated by the transducer that works its way towards the bottom. The sound wave looks similar to an upside-down ice cream cone.

Some fish finders have a wider cone than others. The wider cone will allow you to see more of the bottom, thus allowing you to see more drop-offs, bait fish, or anything you may want to key in on.

Side Scan vs Down Scan

Side-scan gives you an image of what is on the sides of your boat. It shoots out an image a number of feet and allows you to see a lay down or brush pile that may be off to the side.

Down scan allows you to see directly beneath your boat. This is ideal when fishing in deep water, such as lakes or oceans. It’s especially effective if you plan on jigging beneath your boat.

Mounting Type

The mount type for your fish finder should depend on what type of boat you want to use. A small vessel would do well with one that can be removed or something that’s handheld.

Larger ships do well with fixed units. These are usually locked up and can’t be taken off without power tools and either lifting the boat out of the water or getting in the water to take them off.

Vessel Specific Fish Finders

If you have a small boat, then something that can be easily taken on and off would be great. Also, something small and lightweight would be best because smaller boats can’t handle as much weight.

Larger boats can handle much more weight, so 12 inch screens and large electronics won’t weigh down the boat. These are best when you’re using a larger ship.

Transducer

A good fish finder will have an even better transducer. The transducer will send and receive signals, and it acts as the heart of the echo sound system.

It changes electrical pulses into sound waves and then back again, so that the machine can accurately read what’s beneath the boat.

Display

The display of the fish finder depends on the size as well as the backlight. Some are made to be used in all different lighting conditions, from midnight darkness to the brightest of conditions in the middle of the day.

The size of the screen is also important. The bigger it is, the easier you’ll be able to spot different fish attractors or baitfish on the screen. You’ll need to find a screen that’s large enough to see but not too big to weigh down a smaller boat.

Frequency

Ultrasound frequency usually ranges from 15 kHz to 200 kHz. The majority of fish finders out there usually only have a range of 50 kHz to 200 kHz.

Some expensive or commercial fishing vessels may have a fish finder with a frequency that’s much higher. This isn’t needed for a recreational angler.

Some of My Favorite Fish Finder Brands

If you’d like to know who makes great small boat fish finders, then check out the section below. I cover several different brands that should meet your needs.

Take a close look at each brand before purchase, though. Each has its own pros and cons, and it could hinder your style of fishing if you purchase the incorrect one.

Humminbird

If you want to make the most out of your time on the water, then it’s hard to go wrong with a Humminbird. They have all of the high tech features needed to enhance your fishing experience.

It doesn’t matter what type of water or what type of boat you have. Humminbird makes a fish finder that will help you catch more fish.

Lowrance

One of the best-known names in the world of fishing electronics, Lowrance is regarded as one of the best companies out there in terms of producing high-quality fish finders.

It doesn’t matter the size, color, frequency, or cone angle. Lowrance creates a fish finder that will work perfectly for the style of fishing you plan on doing.

Joywee

Joywee is not a household name the way that Lowrance or Humminbird is. However, they make great fish finders that can be utilized by both professionals and amateurs.

Look to them if you want something that works well but won’t cost an arm and a leg to get. These are great for smaller vessels.

Lucky Fish Finders

Lucky fish finders are in the same vein as Joywee. This a newer company that makes great fish finders. They may not be well known, but they sure do work well.

Most of these are smaller and cheaper, making them ideal for anglers who may be new to the fish finder game and don’t want to spend too much. These are ideal for the angler who uses kayaks, canoes, or float tubes.

Review This Post

Conclusion

Fish finders are a great way to get you out on the water and improve your chances of catching fish. There’s only so much your naked eye can see, and there’s so much beneath the surface.

The items above are a great start, but feel free to use them as a jumping-off point to help find the right fish finder for you and your way of fishing.

If you want more success on the water, then you need to be using a fish finder. It doesn’t matter by who or how big. As long as you have one, then you’ll catch more fish than you did before.

The 6 Best Walkie-Talkies You Can Buy Today

0

We all love our mobile phones, but we appreciate their limitations. While your phone could serve you well in the city, it might prove inadequate when you go to the wild, where mobile coverage is limited. In addition, most mobile phones cannot withstand the adversities of the elements — rain, ice, snow, and scorching sun could destroy your delicate mobile device.

When you have to operate in areas with inclement weather, the best way to keep in touch with family and friends is by using a walkie-talkie. Walkie-talkies are known for their hardiness. While some of these gadgets have limited features, others are created to stand up to the most adverse weather conditions — you’ll find walkie-talkies that operate perfectly in rainy and snowy conditions.

Some walkie-talkies have outstanding battery life and a great range. Moreover, with your handheld radio, you can talk to groups of people simultaneously. This is a matter not to be trivialized, as you can imagine what would happen if you went for a mountain adventure and then lost contact with a colleague — your walkie-talkie could be the only way to find out where the lost colleague is.

Today’s market is awash with thousands of different walkie-talkie brands and when you go shopping, you might be overwhelmed by the diverse choices. To help you make the best purchase decision, we have compiled the following list of the 6 best walkie-talkies you can buy today.

  • Best Overall: Motorola Talkabout T800
  • Best for Winter Activities: Backcountry Access BC Link 2.0
  • Best Walkie-Talkies for Hunting: Midland X-talker T10
  • Best Budget Option: Motorola T600
  • Best Range: DEWALT DXFRS800
  • Best-Looking Walkie-Talkie: Cobra ACXT645

Best Overall: Motorola Talkabout T800

When you go hiking or camping in remote areas with no cell phone coverage, the Motorola Talkabout T800 could be your best companion. The radio boasts a range of up to 35 miles and, depending on the terrain, this gadget will keep you connected when your cell phone fails.

Communication using the Motorola Talkabout T800 is clear and interference-free as the radio has 22 channels and 121 privacy codes. Its built-in flashlight makes it ideal for nighttime activities.

Moreover, the T800 is designed to be waterproof and dustproof, with an IPX4 rating, which means that it can withstand splashing water from any direction. The radio will come in handy during emergencies as it enables you to ask for emergency assistance using its emergency alert button.

The Motorola Talkabout T800 operates on FRS and GMRS frequencies and has a maximum power output of 2 watts. It also comes with a rechargeable battery that provides up to 10 hours of continuous use. Courtesy of its in-built Bluetooth feature, you can pair it with a smartphone, enabling you to communicate with your team even when they are out of range.

For a radio with a host of great features, the Motorola Talkabout T800 is also competitively priced. The price, together with its long battery life, high durability, and emergency features makes the Motorola Talkabout T800 the best overall walkie-talkie you can buy today.

Check out the Motorola Talkabout T800 on Amazon.

Best for Winter Activities: Backcountry Access BC Link 2.0

For lovers of backcountry skiing, the aptly named Backcountry Access BC Link 2.0 is the two-way radio to go for. With a six-mile range and operating on FRS and GMRS frequencies, the Backcountry Access BC Link 2.0 ensures clear and strong communication even in remote areas.

One of the most notable features of the BC Link 2.0 is its Smart Mic, which is equipped with push-to-talk functionality and allows users to control the radio without having to remove it from their packs. The device also has a large LCD display making it easy to read and navigate through the menu options.

Made for the harsh outdoors, the BC Link 2.0 has a waterproof rating of IP56 and its rugged construction means that it can handle drops and impacts without breaking down. It has a rechargeable lithium-ion battery that provides up to 12 hours of continuous use to help you stay connected through long trips.

For its durable construction and user-friendliness, the Backcountry Access BC Link 2.0 is one of the best walkie-talkies that you can buy today.

Check out the Backcountry Access BC Link 2.0 on Amazon.

Best Walkie-Talkies for Hunting: Midland X-talker T10

When you’re going hunting and are not certain about how the weather will behave, bringing the Midland X-talker T10 with you would be a great idea as the radio is designed to alert you about adverse weather conditions in your location.

It’s not surprising then that this radio is beloved by hunters and other outdoor enthusiasts who operate in areas of unpredictable weather. The X-talker T10 has 22 channels which allow users to communicate with others who are using the same channel.

Additionally, the radio has 38 privacy codes, which help to prevent interference from other radio users. Boasting a range of up to 20 miles, this radio is ideal for use in remote areas.

Its backlit display helps you operate optimally in low-light conditions, and its 26-hour battery life means that you can continue with your activities for a long time away from a power source. A reasonably priced product, the Midland X-talker T10 is also highly portable as it weighs a mere 3.9 ounces and stands 5.5 inches tall.

Check out the Midland X-talker T10 on Amazon.

Best Budget Option: Motorola T600

When you require a high-performing two-way radio at an affordable price, you can’t go wrong with the Motorola T600. Meant for outdoor enthusiasts, this is a durable and waterproof gadget that you could take with you for hiking, camping, or on construction sites.

The Motorola T600 has a range that can reach up to 35 miles, depending on the terrain and weather conditions. This makes it ideal for use in remote areas where cellular reception is not available. The radio comes with NOAA weather alerts, allowing users to stay updated on severe weather conditions in their area.

A highly durable product, the Motorola T600 is IP67 rated, meaning that it is waterproof and dustproof, making it ideal for use in all kinds of weather conditions. In addition, it has a built-in flashlight for use in emergencies.

The T600 also offers a number of other useful features, such as 22 channels, 121 privacy codes, and a keypad lock. The radio is compatible with other FRS/GMRS radios, making it easy to communicate with other users who may have different types of radios.

Priced at $98.99 on Amazon, the Motorola T600 is a budget product because it has features that you would normally expect to find in pricier radios. This makes it one of the best walkie-talkies you can buy today.

Check out the Motorola T600 on Amazon.

Best Range: DEWALT DXFRS800

One of the most outstanding features of the DEWALT DXFRS800 is its range. At about 300,000 square feet, this is one two-way radio that has an astounding range and, conditions allowing, would be ideal for large-scale projects.

The use of the DEWALT DXFRS800 ensures secure transmission thanks to its 22 preset channels and 121 privacy codes. The radio also features a bright backlit display and a keypad lock to prevent accidental button presses.

This walkie-talkie is a durable product that will withstand harsh conditions. It has an IP67 rating for water and dust resistance. It is also designed to meet MIL-STD 810 standards for shock resistance. This means that it can withstand drops and impacts without getting damaged.

The radio also comes with a belt clip and a rechargeable battery that can provide up to 18 hours of talk time. While it’s pricier than other two-way radios on the market, its long battery life, durability, and range make the DEWALT DXFRS800 a worthy investment.

Check out the DEWALT DXFRS800 on Amazon.

Best-Looking Walkie-Talkie: Cobra ACXT645

With Bluetooth connectivity, the Cobra ACXT645 is a two-way radio that can be connected to smartphones. This way, the walkie-talkies ease communication in remote areas. The radio has a GPS tracking mechanism to assist users who might be in distress. It’s, therefore, a great companion for outdoor activities in the wild.

It has a range of up to 35 miles, making it easy to communicate with others even in remote areas. The radio has 22 channels, including 10 NOAA weather channels that provide real-time weather information.

The radio’s weather alert function ensures that you are always aware of any severe weather conditions in your area. This is essential for outdoor activities. To help you continue activities in low-light conditions, the radio has a built-in LED flashlight.

The radio has a rugged and durable design and a water-resistant exterior to ward off light rain. Thanks to its in-built VOX feature, you can use the radio hands-free. This feature is particularly useful when you are engaged in activities that require your hands, like rock climbing.

In terms of battery life, the Cobra ACXT645 has a rechargeable battery that lasts for up to 12 hours. It also has a battery saver mode, which helps to conserve battery life when the radio is not in use.

The radio comes with a micro-USB charging cable that allows you to charge the battery easily. At 5.1 ounces and available in Black and Orange, this radio is both portable and quite good-looking.

Check out the Cobra ACXT645 on Amazon.

How to Pick the Best Walkie-Talkies: Step by Step

Given the vast diversity of features in the walkie-talkies available on the market today, there are some considerations to take into account to acquire a gadget that will serve you well. The most crucial factors to consider include:

Range

When you’re out hiking with friends, you need a handheld radio that covers a wide enough range to make sure that you stay in touch. While the figures advertised on some products tend to be rather huge (over twenty miles, for example), the reality on the ground is quite different.

Owing to obstructions from rocks, vegetation, and even weather changes, the range of your walkie-talkie could be highly limited. One sure way to increase the range of your gadget is to opt for a walkie-talkie with a long antenna.

While some of the gadgets with long antennas might have limited power, this might be the trade-off you could be forced to consider if the range is important for your activities.

Battery Life

When you’re engaging in activities that take you away from a power source, you want to have a walkie-talkie with substantial battery life. A gadget with a good battery might cost you a lot upfront but, in the long term, it saves you money since you will spend less on batteries.

While good battery life is important, if you end up with a walkie-talkie with limited battery life, you should consider investing in an alternative powering solution, such as a power bank or a solar panel, that you could take with you when you spend substantial time away from a power source.

Waterproofing

When you engage in activities in the wilderness, there is a very high chance that your walkie-talkie will be exposed to some form of a water hazard. For this reason, you want a gadget that’s fully waterproofed.

Waterproofing is a critical measure of a walkie-talkie’s durability and failure to obtain a gadget that meets this requirement might mean that you’ll need to replace your walkie-talkie sooner than you expected.

The best way to find out whether a walkie-talkie will meet the required durability requirements is by looking at its IP rating. Ideally, you should opt for a radio with a high IP rating.

Portability

While your walkie-talkie performs the critical function of keeping you in touch with colleagues and the outside world, its usefulness will be determined to a considerable degree by its portability. When a walkie-talkie is too heavy, moving around with it could prove inconvenient and tiring and it helps to invest in a lightweight gadget.

Sound Quality

There are organizations that use walkie-talkies to enable communication between groups of workers in different locations. Should that be the case, you want to ensure that the communication between the groups is perfectly clear by investing in gadgets with high sound quality.

And while your walkie-talkies could have been serving you well in the past, should you notice that they have lost their clarity, it might be time to conduct some maintenance. If your radios are not cleaned regularly, the speakers and microphones could be stuck with dust and debris, and cleaning them could improve communication.

What to Know Before Buying the Best Walkie-Talkies

Your walkie-talkie is an important investment that could serve you well for many years. For some organizations, normal operations might be greatly hampered without the use of these gadgets and this will adversely affect the organization’s bottom line.

Given the crucial role that these gadgets play, it’s important to realize that the walkie-talkies you buy will need regular maintenance if you want them to remain in tip-top condition for a long time. Neglected and abused, walkie-talkies break down prematurely, and depending on the number of gadgets you have, replacement costs could be crippling.

Before parting with your money for a walkie-talkie, it’s also important to note that there are countless brands on the market and that some have better reputations than others.

While products from the big brand names might look expensive, these are products that have been tried, tested, and trusted for generations and you’re therefore safer with products from companies such as Motorola, DeWalt, and the others we have reviewed above.

Using the Best Walkie-Talkies: What It’s Like

While the walkie-talkie is a crucial gadget, your experience with it will ultimately depend on how well you use it and how much routine maintenance you give it. Should you experience poor reception from your gadget, before seeking help from a technician, you first need to confirm that you’re positioning your walkie-talkie properly.

Are you, for instance, holding your gadget upright? When you try to communicate with a walkie-talkie that’s lying on a flat surface, you limit the radio’s signal; hence, the poor reception.

Damaged or improperly attached antennas could also distort communication. Should your troubleshooting efforts identify a broken antenna, replacing this critical part of the radio might be the only option. In many situations, walkie-talkies are life-saving gadgets.

When you’re out in the wild and can’t physically locate a colleague, this precious gadget could be your only hope. In some workplaces, people work alone. For the management to be confident that these workers are safe, they rely on walkie-talkies.

Two-way radios have advanced safety features that enable the lone worker to send emergency messages. Moreover, in an emergency, GPS tracking can be used to locate a missing person.

The image featured at the top of this post is ©Kabardins photo/Shutterstock.com.

Benjamin Titan GP Review

0

This rifle may be branded as either Crosman #C8M22NP or Benjamin #BW8M22NP.

This is the same air rifle made by the same manufacturer.

Crosman has changed this model name to Benjamin but no changes have been made in terms of the quality or construction of the gun.

Gun type

The Benjamin Titan GP is a gas ram gun, powered by nitro piston technology.

A nitro piston gun (or gas piston gun) works the same as the spring gun but it has a gas-filled cylinder instead of a coiled spring.

The air in the cylinder is already compressed and you apply more pressure to it when you cock the gun.

The pressurized air is kept under tension until you pull the trigger.

When you fire, the pellet is propelled down the barrel with the force from compressed air.

Nitro-piston rifles are lighter and last longer than spring guns.

Besides, it has less recoil and is easier to cock.

Furthermore, it can be left cocked for days without spring fatigue.

Read more about nitro piston technology in this post to see how it can make your gun sport more exciting.

This rifle is available in both .177 and .22 caliber.

While .177 is popular and a perfect choice for target shooting, .22 is the king of hunting and is the go-to caliber for hunters and pest eliminators.

Also remember that accuracy holds true for both calibers: .177 is no more accurate than .22 and vice versa.

Besides, this gun is a single-shot break barrel gun so you can only shoot one shot at a time.

After the first shot, you have to break the barrel to manually reload the pellet.

Single-shot guns make you a disciplined shooter: you have to make your first shot count

Since you have only one chance to hit the animal or it will run away while you are still busy reloading.

The barrel is a rifled steel barrel.

A rifled barrel has helical grooves inside that make the bullet spin.

Spin stabilizes pellets, improves accuracy, and enhances shooting range.

Furthermore, the gun has a muzzle brake at the tip of the barrel. Muzzle brake gives you lots of advantages:

First, it protects the barrel tube itself from scratches and guards the critical crown areas against damage

In case the rifle is dropped or banged against hard objects.

Second, it serves as a convenient cocking handle because you have more added leverage when used on a break-barrel gun.

Third, it adds muzzle steadiness in shooting, partially eliminating muzzle wobble when firing, hence improving accuracy.

Fourth, it ensures all sounds coming from the barrel go forward.

And finally, it makes your gun more aesthetically pleasing by adding tactical construction other than a plain barrel tube.

Stock

Benjamin Titan GP has an eye-catching wooden stock so it can endure impact, stress, and collisions in daily life.

Moreover, hardwood can be easily refinished at any time so it has a very long lifespan.

Plus, the stock is ambidextrous so you can use this gun with ease whether you are a lefty or righty.

This rifle has a ventilated rubber butt-pad which is thicker and softer than normal so it absorbs more recoil in the shooting.

Besides, the stock is a dual-comb stock: it has dual raised cheekpieces on both the left and the right sides of the stock.

A dual-comb is extremely useful if you are a left-handed shooter.

Moreover, it has a thumbhole that provides a more relaxed grip on your wrist by resting the stock on your wrist as opposed to holding the stock up with your hands.

As you know, air rifles, and especially spring pistons, are considered hold sensitive,

So the ability to really grasp and pin the rear of the stock into your shoulder,

While having a nice, wide, flat, beaver tail style stock to rest your hands on for the artillery hold adds a much better accuracy.

Ammo

A Benjamin Titan GP uses .177 and .22 corresponding to 2 types of calibers.

As you can see from different e-commercial sites, .177 pellets are cheap, easy to find, and very popular among target shooters.

On the other hand, .22 pellets have more stability in their trajectory than .177 pellets so you can shoot it under windy conditions.

Besides, .22 hits the target with serious authority and often gets the job done in one clean shot,

So you can take it to the field or deal with annoying critters in your backyard.

Cocking and Loading

Cocking the gun:

First, put the gun ON SAFE, hold the gun by your side, then firmly tap the muzzle end to open the breech.

Let the gun rest on your upper thigh and grasp the muzzle end.

Continue to pull the barrel down to its limitation to perform cocking action

Loading the pellet:

With the breech open after cocking, put the pellet (with the pellet’s nose lying forward) into the breech.

Then pull the barrel up to its original position until it locks and you are ready to fire.

Benjamin Titan GP Sight

The Titan GP doesn’t have a traditional open sight.

No front sight, no rear sight.

Instead of an iron sight, you have a 4×32 Center point scope for more precision in the shooting.

32 is the diameter of the front lens, measured in millimeters.

4 is the magnification power of the scope.

It means that the scope magnifies the picture 4 times bigger than reality.

This scope is pretty decent for target shooting and plinking but you can upgrade to a more able scope for hunting or pest control.

Velocity, Accuracy and Power

In .177 caliber, the Titan GP delivers up to 1200 FPS with alloy pellets.

In .22, this break barrel rifle gives you 950 FPS with alloy and 800FPS with lead.

This is a high-end velocity compared to other air guns on the market so it’s a rifle you can use for both short and long-range shooting.

Chrony tests give us the results as follows: 

In .177:

.177 PelletFPSFPE
Kodiak Match 10.65 grains6008.52 
RWS Meisterkugeln 8.2 gr79011.37 
Crosman Premiere Hollow Point1014 18.04 
Crosman Premiere 10.5 gr89318.6 

In .22:

.22 PelletFPSFPE
RWS Hobby 11.9 gr711.59 13.38 
Crosman Premiere 14.3 gr663.4713.98
Gamo PBA Raptor 9.9 gr832.515.24 
Crosman Premiere Ultra Magnum 14.3 gr732.317.03 
Crosman Premiere Hollow Point 14.3 gr729.916.92 
RWS Meisterkugeln 14.3 gr75017.87 
Crosman Premiere Hollow Point 14.3 gr720 16.46 
Accupell 14.3 gr78019.32 
RWS Superdome 14.5 gr75318.26 
Crosman Premiere Hollow Point 14.3 gr67914.64 
Gamo Raptor 9.8 gr970 20.48 
Benjamin round nose 14.3 gr95729.09 

As you can see, the numbers in .177 fluctuate sharply

But we can expect a more stable velocity in .22, with most non-lead pellets traveling at 700-800 FPS.

Now we’re done with velocity, let’s take a look at the accuracy of this gun.

The common shooting groups are:

  • ½” at 25 yards, 1/2″ at 20 yards,
  • 1/4″ at 60 feet,
  • 1.25” at 30 yards,
  • 1/4″ at 20 yards,
  • 1” at 20 yards,
  • 1/4″ at 25 yards,
  • 1/4″ at 35 yards,
  • 1.5” at 35 yards,
  • 1/2″ to 3/4″ at 20 yards,
  • dime size at 25 yards,
  • 1/4″ at 15 yards,
  • 0.75” at 25 yards with JSB exact diabolo heavy, 
  • 3/4″ at 30 yards,
  • 0.5” at 20 yards,
  • dime size at 22 yards,
  • 3/4″ at 25 yards with Diabolo Dome 18.13 gr, 
  • 1/4″ at 50 yards,
  • 3/8” at 25 yards,
  • 1/4″ at 25 yards,
  • 3/4″ at 20 yards,
  • nickel size at 20 yards with Diabolo Exact 8.44 gr,
  • Quarter size at 20 yards with Premiere Ultra Magnum 10.5 gr, 
  • 1.25” at 30 yards with Copper head wad cutter, 
  • 1/4″ at 30 yards with Crosman Pointed, 
  • Dime size at 45 yards,
  • 1/4″ at 45 yards,
  • 3/4″ at 30 yards,
  • 1-2” at 30 yards,
  • 1/4″ at 30 yards,
  • 3/8” at 50 yards,
  • dime size at 40 yards,
  • 1” at 25-30 yards,
  • 3/4″ at 50 yards,
  • 1/4″ at 25 yards,
  • 2.5” at 66 yards,
  • penny size at 20 yards with RWS Meisterkugeln, 
  • 1” at 30 yards ,
  • 2” at 60 yards,
  • 3/8”-1/2” at 50 yards,
  • 7/8” at 67 feet,
  • 1/2″ at 25 yards with Crosman , 
  • 1” at 25 yards,
  • nickel size at 15 yards with 16 gr predator polymag,
  • penny size at 30 yards,
  • dime size at 20 yards with 14.3 gr Crosman Premiere, 
  • penny size at 20 yards,
  • 3/4″ at 30 yards. 

Furthermore, this gun can:

hit a paint can at 75 feet,

kill a starling at 55 yards,

shot down a rabbit at 65 yards with CPHP, 

hit 2”x3” cardboard at 240 feet,

hit tin can at 100 feet,

hit a tack at 20 yards (what!),

shoot crow at 40-50 yards on top of a tree,

take down squirrels at 20 yards in 1 clean shot using 14.3 gr CPHP, 

kill sparrows at 24 yards,

kill squirrels at 20 yards,

hit rats at 20 yards,

penetrate through a 1” plywood board at 20 yards,

kill a Texas 6-point buck (California 3-point) in a single shot,

kill crows at 40-50 yards,

kill Arizona squirrels at 60 yards,

take down a jackrabbit at 37 yards,

fully penetrate a gallon jug of water at 10 meters with 14.3 gr CPHP, 

blast a pellet through a 3/4″ piece of plywood at 25 yards,

out the pellet all the way through 5/8” plywood,

go through 3/4″ target backing at 35 yards,

pass through 3/4″ soft pine at 20 yards,

go through both sides of a water-filled anti-freeze jug at 50-55 yards with 14.3 gr CPHP, 

kill squirrels at 35 yards,

go through 3/4″ pine at 15 yards,

kill crows at 50 yards,

kill tree rat at 20 yards,

kill prairie dog at 67 yards,

kill Arizona squirrel at 60 yards,

kill bird at 30-40 yards,

shoot through 1” plywood at 40 yards with Hollowpoint, and blow through off a back of 3/4″ pine board. 

In summary, this gun is damn accurate and hits like a tank with a shooting range up to 50 yards.

Shooting range and intended use

The effective shooting range of Titan GP is up to 60 yards.

You can use this gun for target shooting, plinking, small game hunting, and pest control

Maintenance

No special attention is required for this gun.

Just put a few drops of Crosman RMCOIL every 500 shots to keep this gun shooting like new.

Noise

The audible test gives us a surprising result: this gun is really a quiet gun with only 86 DB of noise.

While the other break barrel rifles tend to have a sound of 100 DB or over, this gun is much quieter

And you can use it on your property without bothering your neighbors.

Benjamin Titan GP Specifications

  • Caliber: .177/.22
  • Velocity: 1200 FPS with .177/ 950 FPS with .22
  • Loudness: 3- medium
  • Barrel Length: 15”
  • Overall Length: 43.5 “
  • Shot Capacity: 1
  • Cocking Effort: 31 lbs
  • Barrel: Rifled
  • Front Sight: None
  • Rear Sight: None
  • Scopeable: 11mm dovetail
  • Trigger: 2-stage adjustable
  • Buttplate: ventilated rubber
  • Suggested for: Small game hunting/plinking
  • Trigger pull: 4.5 lbs
  • Action: Break barrel
  • Safety: manual
  • Powerplant: gas-piston
  • Function: single-shot
  • Body Type: Rifle
  • Weight: 6.75 lbs (without the scope and mounts)

Customer Reviews

If you sift through Amazon or Pyramyd Air, you will find lots of positive reviews on this gun.

People love its huge power, deadly accuracy, and quietness.

The only problem that I found in the negative reviews is the trigger.

Many buyers complain about the horrible trigger with its long, heavy second stage.

There are a few possible solutions for this issue:

First, you can manage it for yourself with some adjusting of the second stage, or you can order a special trigger like GRT-III.

Or you can fix the trigger like in this Youtube video – put a couple of washers onto the trigger sear pin and your trigger will be light and crisp.

This modification only costs you 10 minutes and a few cents.

Pros

  • Proven Nitro piston technology
  • Handy-dandy muzzle brake
  • Good-looking wood stock
  • Convenient thumbhole design
  • Decent scope
  • Extremely quiet
  • High-end velocity
  • Remarkable power
  • Amazing accuracy

Cons

  • Long, heavy trigger but it can be fixed in several ways as I said in this review.

Benjamin Titan GP Price

The price for Titan GP is about 120 dollars.

It’s a great price for the gun that gives you hard-hitting power, smooth cocking, low noise level, and fantastic accuracy.

Conclusion

For me, the GP in the name of this gun means  “Great Punch”.

It has nice features that satisfy the pickiest shooters.

Add this rifle to your inventory and you’ll be glad that you did.

Unlocking the Mystery: Are Deer Nocturnal?

0

“Unraveling the Mystery: Shedding Light on Deer’s Nocturnal Habits”

1. Understanding Deer Behavior: Are They Nocturnal or Diurnal?

1. Understanding Deer Behavior: Are They Nocturnal or Diurnal?

Deer behavior is a fascinating subject for hunters and wildlife enthusiasts alike. One of the most common questions asked about deer is whether they are nocturnal or diurnal animals. The truth is that deer can exhibit both diurnal and nocturnal behavior, depending on various factors such as food availability, predation risk, and human disturbance.

Nocturnal Behavior:

During certain times of the year, especially during hunting season or in areas with high human activity, deer may become more active at night and display predominantly nocturnal behavior. This shift in behavior is often triggered by the increased presence of humans in their habitat, which makes them more cautious and wary during daylight hours.

Nocturnal deer tend to feed, travel, and engage in other activities under the cover of darkness when they feel safer from potential threats. They have excellent night vision and rely on their acute senses to detect any signs of danger while foraging for food or moving through their territory.

However, it’s important to note that not all deer become completely nocturnal. Some individuals may still be active during dawn or dusk hours, which are known as crepuscular periods.

Diurnal Behavior:

In areas with less human disturbance and lower predation risk, deer are more likely to display diurnal behavior patterns. This means that they are active primarily during daylight hours, particularly around sunrise and sunset.

During these times, known as the “golden hours,” deer are often seen grazing in open fields or meadows where they can easily spot predators approaching from a distance. They use their keen eyesight and hearing abilities to stay alert while feeding on grasses, leaves, fruits, and other vegetation.

It’s worth mentioning that even though deer may be diurnal in certain areas or seasons, they still possess some level of nocturnal behavior. They may take short naps or rest during the day, especially in shaded areas or dense vegetation, to conserve energy and avoid overheating.

Understanding the factors that influence deer behavior and their activity patterns can greatly enhance your chances of spotting and hunting them. By studying their habits, scouting their movement times, and adapting your hunting strategies accordingly, you can increase your success in targeting both diurnal and nocturnal deer.

2. Unveiling the Mystery: When are Deer Most Active?

2. Unveiling the Mystery: When are Deer Most Active?

Deer, particularly white-tailed deer, are known for their crepuscular behavior, which means they are most active during dawn and dusk. During these times, the lighting conditions provide them with an advantage as they have adapted to low-light environments. This allows them to navigate their surroundings more effectively while minimizing their exposure to potential predators.

Factors Influencing Deer Activity

Several factors influence deer activity patterns throughout the day. One of the primary factors is food availability. Deer are herbivores and spend a significant amount of time foraging for food. They tend to be most active during periods when their preferred food sources are abundant and easily accessible.

Another factor that affects deer activity is weather conditions. Extreme temperatures or inclement weather can limit their movement and force them to seek shelter during the day. Additionally, hunting pressure can also influence deer behavior, causing them to become more nocturnal in areas with high human activity.

Deer Movement Times Explained

Understanding deer movement times is crucial for hunters and wildlife enthusiasts alike. As mentioned earlier, deer are most active during dawn and dusk, which are commonly referred to as the “golden hours.” During these periods, visibility is reduced due to low light conditions, making it easier for deer to move undetected.

In the morning, deer typically start moving around 30 minutes before sunrise as they search for food after a night of rest. This early morning activity continues until a few hours after sunrise when they find a suitable spot to bed down and rest during the day.

In the evening, deer become active again around two hours before sunset as they prepare for another night of feeding. They continue moving until it becomes too dark for them to see effectively.

Tactics for Hunting Nocturnal Bucks

Hunting nocturnal bucks can be challenging, but there are tactics that can increase your chances of success. One approach is to scout the area during the day to identify bedding areas and travel routes. This allows you to understand their movement patterns and plan your hunting strategy accordingly.

Another tactic is to hunt near food sources such as crop fields or oak stands, which are known to attract deer during their feeding times. Setting up trail cameras can also provide valuable insights into deer activity, helping you determine the best times to be in the field.

In conclusion, deer are primarily crepuscular animals, meaning they are most active during dawn and dusk. Understanding their activity patterns and adapting your hunting strategies accordingly can greatly improve your chances of encountering and successfully harvesting these elusive creatures.

3. Cracking the Code: Decoding Deer Sleep Patterns and Habits

3. Cracking the Code: Decoding Deer Sleep Patterns and Habits

Deer sleep patterns and habits have long been a topic of interest for hunters and wildlife enthusiasts alike. Understanding when and where deer sleep can provide valuable insights into their behavior and movement patterns.

Sleep Behavior

Deer are known to be crepuscular animals, meaning they are most active during dawn and dusk. However, their sleep behavior is quite different from diurnal or nocturnal animals. Deer do not have a typical sleep-wake cycle like humans or many other mammals. Instead, they engage in short periods of rest throughout the day and night.

During these resting periods, deer enter a state called “alert rest.” This means that while they may appear to be sleeping, they are actually still alert to potential dangers in their surroundings. They keep their senses sharp and can quickly respond to any perceived threats.

Patterns and Habitats

When it comes to choosing sleep locations, deer exhibit certain preferences. They often seek out areas with dense cover, such as thickets or brushy areas, which provide protection from predators and harsh weather conditions. Additionally, deer tend to select spots with good visibility so that they can detect approaching danger.

Deer also show a preference for sleeping near food sources. This allows them to conserve energy by minimizing the distance traveled between feeding and resting areas. In agricultural areas, deer may even sleep in crop fields or orchards if they provide sufficient cover.

Understanding these patterns can help hunters identify potential bedding areas where deer are likely to rest during the day or night. By scouting these locations during hunting season, hunters can increase their chances of encountering deer in their preferred habitats.

Overall, cracking the code of deer sleep patterns and habits requires careful observation and knowledge of their behavior. By understanding when and where deer rest, hunters can develop effective strategies to approach and hunt these elusive creatures.

4. Deer Movement Explained: Nocturnal, Diurnal, or Crepuscular?

Deer movement patterns can vary depending on the species and their environment. Some deer are primarily nocturnal, meaning they are most active during the night, while others may be diurnal, being most active during daylight hours. However, many deer exhibit a behavior known as crepuscular activity, which means they are most active during dawn and dusk.

Nocturnal Behavior

Nocturnal deer are adapted to low-light conditions and have excellent night vision. They tend to feed, move, and engage in other activities primarily at night when there is less human activity and potential predators are less active. This behavior allows them to avoid disturbances and seek food sources without interference.

In order to hunt nocturnal bucks successfully, hunters often employ specific tactics such as setting up trail cameras near feeding areas or using artificial light sources to locate them at night.

Diurnal Behavior

On the other hand, some deer species exhibit diurnal behavior and are more active during daylight hours. These deer may be seen grazing in open fields or meadows during the early morning or late afternoon when the sun is not too intense. They rest or seek shelter in shaded areas during the hottest parts of the day.

When hunting diurnal deer, it is important for hunters to scout out their feeding areas and travel routes during daylight hours in order to plan their hunting strategies accordingly.

Crepuscular Behavior

Crepuscular animals like deer are most active during twilight periods – dawn and dusk. This behavior allows them to take advantage of both low-light conditions and relative safety from predators that may be more active at night. During these times, deer will often emerge from cover to feed on grasses, leaves, fruits, or other available food sources.

Hunters who want to target crepuscular deer should focus their scouting efforts on areas where deer are likely to feed or travel during these specific times of day. This may involve setting up tree stands or ground blinds near known feeding areas or along well-used trails.

In conclusion, the movement patterns of deer can vary depending on their species and environmental factors. While some deer are primarily nocturnal or diurnal, many exhibit crepuscular behavior, being most active during dawn and dusk. Understanding these patterns and adapting hunting strategies accordingly can greatly increase the chances of a successful hunt.

5. Strategies to Spot and Hunt Nocturnal Bucks

5. Strategies to Spot and Hunt Nocturnal Bucks

Hunting nocturnal bucks can be a challenging task, as they are most active during the cover of darkness. However, with the right strategies and techniques, you can increase your chances of spotting and hunting these elusive creatures.

1. Scout During the Day

Although bucks may be more active at night, it doesn’t mean they disappear completely during the day. By scouting their feeding areas, bedding sites, and travel routes during daylight hours, you can gather valuable information about their patterns and habits. Look for fresh tracks, rubs on trees, or droppings that indicate recent deer activity.

2. Utilize Trail Cameras

Trail cameras are an excellent tool for monitoring deer movement in areas where you suspect the presence of nocturnal bucks. Set up trail cameras near food sources or along well-used trails to capture images or videos of deer activity during the night. This will help you determine the best times to plan your hunts.

3. Focus on Food Sources

Nocturnal bucks often visit food sources under the cover of darkness when they feel safer from human disturbance. Identify key food sources such as agricultural fields, orchards, or mast-producing trees in your hunting area. Set up tree stands or ground blinds near these locations to increase your chances of encountering a buck during its feeding time.

4. Use Calling Techniques

Calling techniques can be effective in luring out bucks during their nocturnal activities. Experiment with different calls such as grunt calls or rattling antlers to imitate sounds that attract male deer during their rutting season. Practice proper calling techniques and learn to mimic realistic deer vocalizations to entice a curious buck into range.

5. Hunt Transition Areas

Transition areas between bedding and feeding areas are prime spots to intercept nocturnal bucks during their movement. Look for funnels, pinch points, or narrow corridors where deer are likely to travel between these two locations. Set up your hunting position in a concealed spot along these transition areas, ensuring you have a clear shooting lane.

By implementing these strategies and adapting your hunting tactics to the nocturnal behavior of bucks, you can increase your chances of spotting and successfully harvesting these elusive creatures. Remember to always follow local hunting regulations and practice ethical hunting practices for a responsible and rewarding hunting experience.

6. Unlocking the Secrets: What Causes Deer to Become Nocturnal?

6. Unlocking the Secrets: What Causes Deer to Become Nocturnal?

Deer are primarily crepuscular animals, meaning they are most active during dawn and dusk. However, there are certain factors that can cause deer to become more nocturnal in their behavior. One of the main reasons is human disturbance. When deer feel threatened or disturbed by human presence, they tend to adjust their activity patterns to avoid encounters.

Factors Contributing to Nocturnal Behavior:

1. Hunting Pressure: Intense hunting pressure can push deer into becoming more nocturnal. As they learn to associate daytime with potential danger, they start adapting their behavior to feed and move during the cover of darkness when hunters are less active.

2. Human Encroachment: Urbanization and increased human activity in natural habitats can lead to disturbances that make deer more wary and cautious during daylight hours. They may retreat to quieter areas or adapt their habits to avoid human contact.

3. Predation Risk: The presence of predators such as coyotes or wolves can also influence deer behavior, making them more cautious and inclined towards nocturnal activities as a survival strategy.

4. Temperature and Weather: In warmer climates, deer may become more active at night when temperatures are cooler, allowing them to conserve energy during the heat of the day. Similarly, extreme weather conditions like heavy rain or snowfall may prompt deer to alter their movement patterns.

5. Food Availability: If food sources become scarce during daylight hours due to competition or depletion, deer may resort to foraging at night when there is less competition and greater availability of food resources.

It is important for hunters and wildlife enthusiasts alike to understand these factors that contribute to deer becoming nocturnal. By recognizing these triggers, it becomes possible to adjust hunting strategies or manage habitats in a way that minimizes disturbance and encourages healthier deer populations with balanced activity patterns throughout the day.

In conclusion, deer are primarily crepuscular animals, meaning they are most active during dawn and dusk. While they may exhibit nocturnal behavior in areas with high human activity or predation risk, their natural instinct is to avoid nighttime movement. Understanding their activity patterns is crucial for effective management and conservation efforts.

Frog Gigging 101: How to Gig for Frogs in the Water | Grim Workshop – Grimworkshop

0

Frog Gigging 101: How to Gig a Frog

Frog gigging, also known as frog hunting, is a popular activity in parts of the United States, particularly the South and Midwest. Gigging frogs typically involves using a large spear, or gig, to impale frogs in bodies of water and then pulling them out of the water to be cooked and eaten. If you’re new to this pastime, or if you have always wanted to learn how to gig for frogs in the water yourself, then here’s everything you need to know about this fun summer activity!

What is Frog Gigging?

The techniques and equipment involved with frog gigging are relatively straightforward, but to successfully gig a frog, is not. The spear has a small barb with a small barb near it’s tip like a fishing hooks barb; when you gig a frog, it will stay on your spear without slipping off due to the barbs. The barbs of a frog gigging spear help keep your catch secure as you pull them out of underwater hiding spots or through thick vegetation. In general once you have some experience and have successfully learned to gig a frog it’s very easy to gather large amounts of frogs through gigging. Though typically you’ll want a partner to help you as it’s much harder to do solo (We’ll explain why below).

Step 1: Set up your Frog Gig

A frog gigging spear is a long-bladed spear tip traditionally used by hunters who wanted to catch frogs from the shore of a lake or river. A traditional frog gigging spear is thin, with three pronged spear points with small barbs on the end. You can purchase a ready to go spears to gig a frog, or even make one yourself from pretty basic materials. With that said, there are plenty of variations—some frog gigging spears have 3 prongs with barbs on all three ends, some have 2 or 4 prongs on them. Once you’ve got your frog gig grab a partner, and a couple headlamps. If you’d like more information on making your own frog gigging spear, click the link HERE or grab your own Frog Gigging Spear Card HERE

Step 2: Find Some Water to Gig a Frog in!

If you’re looking to gig a frog in the water, the first step is finding some water. Once you do you can confirm their presence by listening to the frogs as they croak; they often call near the water. (Croaking generally gets louder as their proximity to the water increases.) After locating a group of frogs, shine your light out over the water, you can see their eyes glow to confirm their presence. Once that’s done it’s time to go get your equipment together and go gig a frog!

Step 3: Blind the Frogs

You’re now equipped with the perfect frog gigging spear, a partner and an area to hunt. The only thing left to do is shine them, then gig a frog. It’s crucial that you blind the frogs while they are sitting on the bank or in their mud holes, or even in the water so your light needs to be as bright as you can get. You don’t want them to be able to escape, but if you shine it right into their eyes, they won’t be able to see your partner approach (from behind is best) just don’t get between them and the light or they will quickly hop away.

Step 4: How to Spear a Frog

Step up slowly behind the frog. This is a critical part of making sure you take your frog out cleanly and quickly. When ready, aim at the base frog’s head, directly behind his eyes, and thrust, congratulations, you’ve just learned how to gig a frog! Put your frogs into a dedicated frog gigging bag (like a burlap potato sack that’s been wet with cool water) and transfer them to an iced cooler as soon as you can to keep the meat as fresh as possible.

Step 5: Dinner Time!

now that you’ve got a few frogs, it’s time to eat! There’s a lot of resources online that include recipes for cooking frog legs, as well as other edible parts of frogs, so I won’t go into that for now since there’s plenty of information out there.

To purchase your own Gig click HERE

For more information on how to make a Frog Gig click HERE

Before Going Frog Gigging Check your Local Laws

before you go frog gigging check your local laws to determine any special requirements or limits you may have.

Types of Frogs: Only certain types of frogs can be hunted depending on the State. Some States allow more but, as a general rule, most states allow hunting:

American Bullfrogs

Green Frogs

Pig Frogs

Leopard Frogs

Your specific State Wildlife Department is the best place to get up-to-date information and resources for hunting, fishing, and land-use regulations

5 Best Battery-Powered Backpack Sprayers (2024 Guide)

0

Backpack sprayers are absolute cheat codes in the lawn care game. Long gone are the days of walking around cranking the pump lever all over your yard. Or even worse, the little sprayers that you carry and set down and repeatedly pump then get maybe 1-2 seconds of spray.

The new backpack sprayers keep a consistent amount of pressure inside and make your life way easier. I think the first time I used a backpack sprayer I was caught off guard with how quickly I was able to complete the job.

Battery powered backpack sprayers are the tool of the future, available now.

They aren’t all made the same and have some unique features and benefits.

So let’s break them down.

  1. Ryobi 40V Cordless Backpack Sprayer
  2. Ryobi ONE+ Cordless Backpack Sprayer
  3. Milwaukee M18 FUEL Backpack Sprayer (4 Gallon)
  4. Spraymate Lil Squirt Sprayer
  5. Dewalt Battery Powered Chemical Sprayer

Why we review lawn tools

The reason we started this website in the first place was because we had so much trouble trying to find reasonable, understandable, honest reviews for lawn equipment. And it’s not cheap! After hours and hours of research, trying products and returning them, and messing up our yards – we started this site.

review lawn tools
We take tool testing seriously.

As people who had to learn the hard way, we want you to know exactly what you are signing up for before you purchase a piece of equipment. That’s why we are committed to providing honest, easy-to-understand reviews that mean something.

What to look for in a battery powered backpack sprayer

Again, these aren’t all made the same. With one of these backpack sprayers, you want to make sure to have the below features.

  • Comfort
    • It sounds silly, but if you are going to be personally hauling a bunch of chemicals on your back, you’ve got to make sure it is comfortable. Honestly, with how easy these things are to use, the main differentiator is what the experience feels like. Look for padded shoulder straps and an otherwise lightweight tool.
  • Battery run-time
    • There’s not really a point to a battery-powered sprayer if the battery dies and you can’t finish the job. Regardless of how long your job takes, you want to make sure to get one with a decent battery life. That helps you if you take the battery off and use it on another tool.
  • A see-through tank
    • This one sounds even sillier, but some of these battery-powered backpack sprayers have dark tanks. You can’t see how much fluid is in it. Not a huge deal but also a minor inconvenience that is so easy to avoid. Grab one where you can see the fluid.

Those are the main things I look for. Of course there are other important things like different nozzles and a strainer to make sure you don’t get a clogged line, but those should come standard.

5 Best Battery-Powered Backpack Sprayers: Ranked

Okay! Finally after careful consideration we have put this list together. We’ve gotten our hands on a few of these but also tried to get some more variety in new products. So let’s get to the bottom of it once and for all.

5. Dewalt Battery Powered Backpack Sprayer

The Dewalt Lithium-Ion Battery-Powered Backpack Sprayer is sure to be a rugged, long-lasting tool. Not only does it come with Dewalt’s trusted brand reputation, but it’s a part of their 20V battery series.

Dewalt’s 20V Battery series is compatible with TONS of Dewalt tools.

What I love about the Dewalt Battery-Powered Backpack Sprayer

  • Part of the 20V battery series
  • Padded straps with two wrap-around straps
  • 10 different flow settings
  • Several nozzles for different spray patterns

What I don’t love about the Dewalt backpack sprayer

This breaks rule number one! It doesn’t have a see-through tank. So you have NO idea how much fluid is left in there outside of the weight differential.

The other thing I don’t love about this backpack sprayer is the price! It comes in at a steep $300 and can be purchased online from Home Depot.

4. Spraymate Lil Squirt Portable Backpack Sprayer

Candidly, we have not used this little guy but thought it was so cool that it needed to make this list.

It isn’t really a backpack sprayer, but more like a satchel sprayer. It comes with a nice little strap that you can hang over your shoulder and waltz around your lawn to get the job done.

At just about $100, this thing is the most cost-effective way to get the job done with a battery powered sprayer.

So where is the battery?

Great question. Looking at this, you would have no idea. But it is actually built into the handle of the Lil Squirt sprayer. It plugs into the wall and has a nice little charger that you plug in directly. It makes the product super intuitive and easy to use without having to pull out a separate battery.

Otherwise, this sprayer has a nice six foot hose, a quick-connect extension wand, and is super lightweight.

If you are a more casual backpack sprayer user, then this is a really good cost-effective alternative to the others here.

You can grab this one at Home Depot or get its big brother, a fully built out backpack sprayer with four gallons on Amazon.

3. Milwaukee M18 4 Gallon Backpack Sprayer

Milwaukee rocks. In fact, we’ve gotten our hands on a few of their pieces of lawn equipment. Like their new blowers and even their M18 lawn mower.

They simply don’t miss.

So when I saw their backpack sprayer I knew it would make the top five.

What we love about the Milwaukee M18 Backpack Sprayer

  • The M18 battery line is incredible and can service TONS of tools
  • It can absolutely LAUNCH spray – like over 20 feet away if you desire
  • The shoulder straps are supremely comfortable
  • The battery placement is well-designed

What we didn’t love

  • We didn’t have this problem, but from others have heard that the tank can leak
  • It’s a bit pricey.
milwaukee m18 backpack sprayer battery
Now that is pretty cool!

All in all this is a great backpack sprayer and perfect for those of us that already own M18 batteries, this thing is sweet. If you already own the batteries you can save a ton of money by purchasing the tool-only version on Amazon or getting it off of Home Depot, wherever you prefer.

2. Ryobi ONE+ 18V Cordless Backpack Sprayer

The Ryobi ONE+ 18V Cordless backpack sprayer is pretty slick. We loved using it and even filmed a long YouTube video that highlights all the different features and benefits.

backpack sprayer ryobi
Very nice!

It is a huge timesaver, just like the other battery-powered backpack sprayers, but is also really reliable. Ryobi products are super common as well, so chances are you already have one of their ONE+ 18V batteries to pop right onto this backpack sprayer.

Ryobi 18V Chemical Sprayer
Very nice!

What we love about the Ryobi 18V backpack sprayer

  • Super easy, ergonomically designed trigger that fits your whole hand
  • Battery interchangeability with all the other Ryobi 18V tools
  • You can use the tank 11 times on the same charge
  • Incredibly comfortable – way better than my Jansport backpack
  • Easy to use pressure control valve on the side
  • See-through 4 gallon tank so you know when you’re getting low
backpack sprayer handle
Extremely easy to use.

Frankly, there wasn’t much to dislike about this backpack sprayer. It comes in at a great price WITH battery and charger on Amazon or at Home Depot for a great price.

1. RYOBI 40V Cordless Backpack Sprayer

Okay guys, we have a confession. This one is basically IDENTICAL to the 18V ONE+ battery backpack sprayer above. And we like it for all the same reasons.

But the 40V series from Ryobi is just much more popular than the 18V series. If you already own a Ryobi tool, you can get this thing for an insane price from a number of places. We found the best price for the tool-only version on Home Depot’s site and it’s even cheaper than the 18V series.

Best Air Rifle Deals

Popular Posts

What can you kill with a 177 air rifle?

0
"Unleash Your Precision: Discover the Power of a .177 Air Rifle to Take Down Targets with Accuracy. Explore the Versatility and Potential of this...

Guide to find Best Scope for Break Barrel Air Rifles

0
"Unlock the Perfect Shot: Discover the Best Scope for Break Barrel Air Rifles. Enhance your shooting experience with precision and accuracy, as we delve...

Best Air Rifle Brands – Who Makes the Best Pellet Gun?

0
In Jeff Bezos’ own words: "A brand for a company is like a reputation for a person. You earn reputation by trying to do hard...