Home Blog Page 146

How To Preserve A Deer Tail – 6 Easy & Simple Steps!

0

Are you in need of tips on how to preserve a deer tail for your next project?

If you are looking to use it as a lure or any craft project, then our step by step guide will help you out. Discover this easy DIY guide to clean and preserve that precious deer tail. Beginning from the carcass and up to the slab, we’ll teach you everything you need to know.

Let’s get started!

How To Preserve A Deer Tail

Just a heads up – the tips on how to preserve a deer tail that you are about to read is focused more on the simple preservation of this material.

It does not involve tanning; instead, this is the step that you will start with before you tan the deer tail. By preserving the tail, you can get the fur perfectly set. Hence, you can prevent bugs from developing into the material.

Another reason why you would want to learn how to preserve a deer tail is to keep the material intact. Otherwise, it is most likely to get torn over time.

Are you all set to preserve that deer tail? Let’s get started with these tips:

1. Remove the tail.

Naturally you want to first remove the tail off the deer. Cut the tail off depending on the length that you prefer. Some folks snip it at the base of the deer’s buttocks but you can decide on how long you exactly want it to be.

For this step, you will need a pair of utility knife, pliers or razor. Be sure to get the bone out of the tail, or that hard portion. You can do this by slicing it right down the middle.

2. Start the cut.

Next step, you will now have to make your cut. With the tail no longer intact the bum of your deer, lay it flatly on a clean surface.

Keep the bottom portion up with the hairs separated. Then, cut precisely right along the entire length of the tail or over the bone.

You will want to make sure that the hair is parted while you cut to the top. This will help to prevent losing much of the fur or causing some damage to the tail’s overall appearance.

Once you have opened the tail, pick the bone out using your pliers. You need to be very careful with cutting the fat right from the bone’s base portion.

As you hold the hide down, gently pull the tail right off. In some cases, cutting the fat that sticks to the bone may be necessary. Do this as gently and as firmly as possible until the bone is completely out.

3. Clean the hide.

At this point, you are now ready to wash and clean the hide. You only need to use some dish soap diluted in warm water.

Fill up a basin with warm water and mild detergent. Next, submerge the tail carefully and rinse off blood or dirt that may be stuck in it.

Rub it gently with soap but be careful not to tear any piece. When you are done soaping it, you need to rinse it with lukewarm water until there is no more soap left on it.

4. Dry the tail thoroughly.

After you have cleaned the tail, it’s now time to dry it all off.

Lay it on a wax paper and grab your hair dryer to gently dry out the hair and skin. Be sure that it is completely dry.

You may also use some paper towels to further dry it. Sometimes, there’s some moisture left on the skin after using a hair dryer, so paper towels or some dry cloth would come in handy.

In case some fat remains intact, simply scrape this portion off with a serrated knife. But be very gentle and careful since you would not want to cut the skin.

6. Add borax to the tail.

You may be wondering why you need to use borax to the tail. Well, for the simple reason of protecting it from bacteria that might develop on the skin.

Since borax is antibacterial, it helps to apply it on the tail to fully preserve and protect it from damage.

With the tail laying flat and cut open, coat the inner portion with a thin layer of your borax. You may apply as much as necessary, which will coat the flesh that’s fully exposed.

But if you are preparing the deer tail for tanning, you may want to use non-iodized salt instead of borax. Apply a thick layer of non-iodized salt on the flesh until it is fully coated. Let it dry ad add a bit more salt as needed for this salt curing process.

An additional tip when preparing the material for tanning is by making sure all membrane and fat are removed. When you leave even the slightest hint of fat on the skin, this will give the tan an odd color while reducing pliability.

Let the tail coated with borax sit for a few days in a dry and cool place. You need to be certain that the skin is absolutely dry before you use it for your desired purpose.

Alternate Technique On How To Preserve A Deer Tail

Perhaps it doesn’t really matter as much without you if the tail is flexible or pliable. In this case, you may go for the dehydrator technique.

A food dehydrator is just what you need to really dry the material out. But at the same time, it will completely dry the flesh out, which may not be ideal for some people.

You can simply leave the tail in a food dehydrator for a few days. This will completely dry the material, yet you will no longer be able to reform it to the way you want without causing the hide to break.

What To Do With Preserved Deer Tail

what to do with preserved deer tail

Now that you have completed the process of preserving deer tail, you may be curious to find out what exactly you can do with it.

Well, if you are an angler, you can certainly use the deer tail on jigs. This is a fine material that is strong and durable, which is perfect for jigs to use on fishing.

But if you are not into angling, you can also use the hair of deer as a paintbrush. You will love the durability and steadiness of the tail and the brush works for your ceramic glaze.

And lastly, you can make small purses or dice bags for the tail. Just put the parts together and add a smooth lining or just leave it as is – leathery and all.

No matter what you decide to do with your preserved deer tail, it is sure to be a great project to work on with amazing results!

Final Thoughts

Preserving deer tail may initially seem to be a complex and intimidating process.

But by checking out our quick guide on how to preserve a deer tail, now you understand that it is actually quite simple and basic.

With only a few tools and some know-hows that we have just shared with you, the entire process should go as seamlessly as possible.

We hope this post has been helpful, and now, you are ready to start preserving deer tail for your next DIY project!

The .450 Bushmaster – A Big Bore, Big Game, Big Fun Blaster!

0

Remember your excitement when you got your first AR-15? If you’re like me, it was memorable! Now imagine something even more so – getting something BIGGER! Yes, it’s just a matter of time before you’ll get the itch to join the “BIG BORE” club. Typically characterized by calibers .44 greater, big bore ARs are a ton of fun to shoot, usually better for hunting and good for the ego! One of these “BIG BORE” bad boys is the 450 Bushmaster, a formidable beast with the ability to provide a one-shot kill at 250 yards. Feel the itch yet? I did, and that .450 Bushmaster became my first entry into the Big Bore Club.

.450 Bushmaster

The 450 Bushmaster DNA goes back to the legendary Col. Jeff Cooper and his disdain for the .223 caliber AR-15 platform. Cooper was convinced of the need to go bigger. He envisioned a cartridge for big game hunting out to 250 yards. That idea inspired Tim LeGendre of LeMag Firearms, LLC to develop the “.45 Professional Cartridge” which would utilize .452 projectiles.

Later, LeGendre licensed the .45 Professional to Bushmaster Firearms International. Bushmaster teamed up with Hornady Ammunition to produce it. Hornady wanted to modify the original concept to incorporate its 250 grain Super Shock Tip (SST) bullet. This forced a compromise to shorten the cartridge case and the Bushmaster 450 was born.

Hornady 450 Bushmaster

I’ve used Hornady ammo for years in most of my traditional hunting rifles, so the decision for me was simple. The .452” 250 grain FTX features Hornady’s Flex Tip technology is a solid choice. It provides great velocity and devastating energy out to 300 yards. It has a ballistic coefficient .210 and 2200 feet per second muzzle velocity. These FTX bullets (this one is built for the .45 Colt) are designed to have a much higher BC than normal flat-nosed bullets standard in those types of cartridges. The FTX bullets are somewhat soft and offer very good expansion, but are not the best bullets for the toughest game. In North America they are suitable for anything but brown or polar bears, and perhaps bison.

Zeroed at around 175 yards, this load is easily a 200 yard load without worrying much about hold overs.

Remington also jumped into the mix and now provides several options for the .450 Bushmaster. For reloading, the 275 grain Barnes XPB has a .215 ballistic coefficient. Designed for the increased muzzle velocity and long barrels available on .460 S&W hunting pistols, this Barnes solid projectile is a game-changer for the .450 Bushmaster. This is the load I would choose if I were using the .450 BM in bear country. Trajectory is basically identical to the Hornady 250 grain FTX load at practical ranges, so the same zero could be used for both in most cases. Zeroed around 175 yards, you would be in the kill zone out to 200 yards without holding under or over.

Also useful to reloaders is the Remington 260 grain Core Lokt Ultra Bonded bullet with its .144 ballistic coefficient. Core Lokt bullets have a strong reputation for being consistent performers. They may not be the flashiest new technology, but they have been working reliably for generations. They perform well at modest velocities, and it is hard to go wrong with a Core Lokt in any caliber.

This is a good tree-stand cartridge, and should roll up a pig nicely. Within reasonable ranges it will be fine for black bear, elk, or moose. It does not have quite as flat a trajectory as some of the others, but this is not a long-range cartridge anyway. Even if velocities are low for reliable expansion at longer ranges, a .45 caliber bullet doesn’t usually need much expansion.

For loaded ammo, Remington makes their 260 grain Premier Accutip. It certainly looks cool, but I can’t find the ballistic coefficient specs for this bullet anywhere. With a muzzle velocity of 2180 feet per second, Remington says it is the most accurate .45 caliber bullet ever made. It looks like this bullet performs on game about the same as the Hornady FTX bullet does, so it should be fine for anything up to moose or black bear. Like Remington’s Golden Sabre loads, this one has a brass jacket that is cut for expansion.

My introduction to Big Bore ARs was more luck than general curiosity. A few years ago, the Indiana Department of Natural Resources added three very popular hunting cartridges to its deer hunting approved list. The 450 Bushmaster, .458 SOCOM and .50 Beowulf made their way into regulation. I’d imagine every Hoosier with an AR started salivating at the opportunity of using his or her AR to hunt deer.

It took me several months of research to decide on which big bore caliber upper to purchase. At first, I was set on the .458 SOCOM, but at the time, ammo availability and pricing held me back from going that route. The 450’s strong following, ammo availability and pricing won me over and the rest is history.

I ordered the 450 Bushmaster upper from Rock River Arms since it works with my standard mil-spec 5.56/.223 receiver. No modification of the lower receiver was necessary and it comes with a 5 round Bushmaster magazine with a 450 follower. I had an extra EOTech XPS Holographic Sight available, so my upper setup was done within minutes.

The Hornady 250 grain bullet I used provides a flat trajectory out to 150 yards. With a fifty yard zero the the drop is only 1.7″ at 150 yards. With a 175 yard zero, it stays just inside the kill zone from 2.7″ high at 100 to 2.5″ low at 200 yards. This is an excellent setup for deer hunters who use tree climbers and shoot within a limited range. There is no need to memorize hold overs. Just point and shoot!

After months of waiting it was time to get some trigger time with the 450. The ballistics tables will only tell me so much and I was really curious how a “big bore” rifle would shoot. Admittedly, the ammo itself is visually intimidating and the stories I’d heard of this beast had me a little apprehensive.

450 Bushmaster AR15

My range day with the 450 was very different from what I’d expected. The anticipated bang and shock was nothing close to what I’d imagined. Much of the felt recoil was mitigated by the factory installed Izzy Muzzle Brake. My zero session at 50 yards was fun and effortless. I followed up with another half a dozen shots at 100 yards just for good measure. The “big bore” weapon system’s setup and Hornady accuracy gave me a strong sense of satisfaction and confidence. The real test was in November, deer hunting in Indiana. Here’s where the performance really showed >>>

Editor’s note: Special THANKS to Dylan Saunders for his assistance with this story.

Read more on .450 Bushmaster >>>

Best Glocks of 2024: Top Calibers & Sizes

0

Glocks…one of the most popular, recognizable, and divisive brands in the firearms world.

Glock G17 and G19 Gen 4
Glock G19, left, and G17, right.

Even if you take a step out of the gun community, most people know about Glock. From movies to rap lyrics, the brand seemingly exists everywhere.

But within the gun world, Glocks are one of those guns that foster a conversation.

Glock Rap
Glocks pop up everywhere

Whether you love Glocks or love to hate them, we’re going to take a look at some of the best models the Austrian company has to offer.

From concealed carry 9mm variants all the way to full-auto (oh yeah, they have one of those too), we’ll tell you which Glocks are worth your time, money, or are just plain fun.

Let’s get to it!

THE QUICK LIST

History Time!

We would be remiss if we didn’t at least touch on the history of Glock. Since it is a powerhouse brand, we feel we kinda owe it to you to explain how they got to where they are.

Glock began in the early 1960s, helmed by Gaston Glock.

Gaston Glock
Gaston Glock

At the time, pistols weren’t really on his mind. Instead, the company manufactured wood, steel, and plastic.

Fast forward to the groovy era of the 1970s, marking Glock’s entry to the world of weaponry — specifically, knives, grenades, and machine-gun belt links.

1970s
The 70s were groovy, baby.

It didn’t take long for the wheels to start turning and by the 1980s, the Glock 17 emerged.

While it wasn’t the first polymer pistol to land on shelves (that honor belongs to HK VP70), it was the first one to be a big hit.

All Tested Glock Triggers
The G17.

Before you know it, law enforcement was arming up with the plastic fantastic and its stellar 17-round magazine.

So, why has Glock maintained its stature?

Well, like it or not, the pistols are affordable and reliable. Two things that make both government agencies and civilians fall in love.

Glock Models Chart
Aftermarket, anyone?

Since Glock’s emergence into the firearms community, the brand has continued to release new models based on the tried-and-true design.

Whether that’s upgrading generations or producing new models in different calibers (I’m looking at you G44), Glock isn’t going anywhere anytime soon.

Glock G17 Gen 4
Glock models…you got some options.

Best Glocks in All Calibers

With history behind, let’s get to what you really came for…the best Glock pistols.

Though 9mm is classic Glock, we’re going to cover all sorts of calibers in the company’s inventory.

1. Glock 17 (9mm)

Ok, so we had to kick this list off with the OG, the one that started it all…the Glock G17.

A full-size, 9mm model, the G17 is available in all multiple generations.

Glock G17 Gen 4
Glock G17 Gen 4 with a Crimson Trace light.

(Don’t know the difference between a Gen. 3 and a Gen. 5, head over to our Glock Generations article to get the low-down.)

Featuring a barrel length of 4.49-inches, the G17 measures 8.03-inches in total length. It weighs in at 32.28-ounces loaded with a standard 17-round magazine.

Glock G19 Gen 4
The gold standard of Glocks

The G17 is the gold standard for most law enforcement and its reliability has made it a winner in the civilian market.

From carry to home defense, the G17’s larger style makes it a perfect pistol for self-defense and personal protection.

If full-size isn’t your thing, however, then you might consider moving to Glock’s midsize 9mm…

2. Glock 19 (9mm)

The Glock 19 is remarkably similar to the G17, but on a slightly smaller scale.

Still chambered in 9mm, the G19 measures 7.28-inches in total length. It sports a 4.02-inch barrel and weighs 30.16-ounces loaded.

Glock G19 Gen 4
Glock G19, Gen 4

This midsize model is versatile and easily transitions from the range to concealed carry with its double-stack design.

Again, it’s seen wide use in the law enforcement realm and, like most Glock products, is renowned for its ease of use and reliability.

G43 Banana
Love a midsize? The G19 is for you!

Not to mention, the 9mm chambering means that, in non-ammo shortage scenarios, you should be able to easily train with it alongside its standard 15-round magazine.

The G19 also benefits from a wealth of aftermarket support so you can switch sights, triggers, and slides if you so choose.

Interested in learning even more, especially about the Gen 5 G19, then head over to our full review.

If you still need something smaller to conceal, maybe in hotter summer months, then let’s take a look at a single stack.

What do you think of the Glock 19? Rate it below.

3. Glock 43/43X (9mm)

Coming in with a subcompact style, the Glock 43 and newer 43X reduce the size of the platform with a single-stack design.

Glock G43X
G43 and a…banana???

The 6-round capacity on the G43 brings with it a slimmer profile but still with a 9mm chambering.

Offering a 3.41-inch barrel and 6.26-inch overall length, the G43 weighs 20.64-ounces loaded.

Meanwhile, the G43X brings an ever-so-slightly larger build.

The G43X measures 6.50-inches overall but still uses that 3.41-inch barrel. Loaded, it weighs more than the standard G43 at 23.7-ounces.

.45 acp glock 30
Glock G43X

You also get more rounds with the G43X — it features a 10-round capacity.

If you want a slim CCW pistol but have to have that sweet, sweet 9mm, the G43 and G43X are right up your alley.

For a more in-depth look at the G43, check our review here or just watch the video below.

If you prefer a little different oomph, however, you can knock it up to .45 ACP.

4. Glock 30SF (.45 ACP)

Some people love their .45 ACP and who are we to tell you you’re wrong. If .45 ACP is what you want, then the G30 SF is the Glock pistol for it.

Based on the G30 design, the G30 SF brings a subcompact appearance with a 10-round capacity.

.45acp glock 30s vs 30sf
The Glock 30 is just the right size for a lot of folks.

How does Glock accomplish this? With a shortened frame and reduced grip dimensions, of course.

With a barrel length measuring 3.78-inches and an overall length of 6.97-inches, the SF weighs 33.69-ounces loaded.

Glock G21
The Glock 30SF (right) vs the Glock 30S (left)

The choice of many plain-clothed street cops and security personnel, the G30 SF fits naturally into a concealed carry or defensive setup.

Like all Glocks, it’s easy to operate and maintain.

Though the G30 SF makes for flawless concealed carry in .45 ACP, what about a full-size for home-defense or just fun at the range…

5. Glock 21 (.45 ACP)

Continuing the .45 ACP vibe, the G21 is the full-size package.

With a barrel length of 4.61-inches and a total length sitting at 8.07-inches, the G21 weighs 38.80-ounces loaded.

What do you get from the G21 that you don’t see with the G30 SF? More rounds!

Glock 23, Gen 4
Glock G21

The G21 boasts a standard capacity of 13-rounds.

We always think more is better, especially when at the range or during a defensive situation.

Which, is where this pistol excels.

It could easily tuck into a nightstand safe or tossed into a range bag.

If .45 ACP isn’t your cup of tea, though, Glock does offer a handful of .40 S&W models

6. Glock 23 (.40 S&W)

The G23 comes chambered in .40 S&W with a magazine capacity of 13-rounds (though you can certainly spring for an aftermarket mag with up to 22-rounds).

Sporting a 4.02-inch barrel and total length of 7.28-inches, it weighs 34.36-ounces loaded.

Glock G23

It’s available in Gen. 4 or Gen. 5, but if you go for a Gen. 5 you’ll get the bonus of an nDLC finish, Glock Marksman barrel, and flared magwell.

Oh, and lefties will appreciate that ambidextrous slide stop lever too!

Using a compact build, the G23 is a nice middle area between full-size and subcompact.

Glock 20 and lots of ammo
Glock G23 (Photo: Glock)

And if you happen to love red dots and optics as much as we do, there’s even a MOS model that supports red dots.

If you love the .40-caliber, then you can’t get better than the G23.

Of course, while we’re talking alternative rounds, we might as well mention that Glock also has 10mm offerings

7. Glock 20 (10mm)

There’s something cool about shooting 10mm. Whether you’re doing it on the hunt or at the range, it’s a fun round!

Luckily Glock has a few 10mm offerings up its sleeve, but our favorite is the G20.

Glock 20 Target and Ammo
G20 with a Trijicon optic.

With a capacity sitting at 15-rounds, the G20 is a full-size model with 8.07-inches in total length to its name.

The barrel measures 4.61-inches and total loaded weight is 39.86-ounces.

While the G20 only comes in the Gen. 4 variant, but Glock does offer an SF, or short frame, model.

Glock G42
From a distance of 25 yards, shooting from the bench, with the SRO mounted to the gun the G20 nailed this group with Barnes 10mm 155-grain TAC-XP HP.

You still get that 15-round capacity with the SF and most of the measurements are on par with the G20.

But the SF downsizes the receiver’s circumference at the rear for a little more ease when shooting.

Interested in a deep dive into this 10mm bad boy? Check out our full review here!

Of course, if 10mm is just a bit much in your book, you can move in the opposite direction to a Glock in .380 ACP.

8. Glock 42 (.380 ACP)

The G42 comes chambered in .380 ACP which means there’s little to no recoil while shooting.

This subcompact offers a barrel length of 3.25-inches with an overall length measuring 5.94-inches. Weight rests at 15.87-ounces loaded.

Glock G42
Glock G42

Glock’s G42 is an ultra-compact pistol designed for concealed carry. This is your summer gun!

The trade-off for such a small handgun, though, is capacity. In the case of the G42, that means 6 rounds. Probably want to stock up on the spare mags…

Glock 44 at the Range
Glock G42

It keeps to Glock’s easy-to-shoot-and-maintain platform and brings that durability you’ve come to expect from the Glock brand.

If .380 ACP is still too much, you can always go with a cartridge most of us probably started on…a .22 LR.

9. Glock 44 (.22 LR)

Ok, so I know the G44 is controversial. I’m sorry to all the fanbois who wanted a Glock PCC but instead got a .22 LR. Don’t throw hate at me.

The G44 burst onto the scene with a .22 LR chambering. According to the company, they wanted to introduce a gun specifically for first-time gun owners and those that put in a lot of training reps at the range.

Glock G48 MOS
Glock 44

Mimicking the size of the G19, the G44 comes with a 4.02-inch barrel and an overall length of 7.28-inches. Loaded with its standard 10 rounds, it weighs 16.40-ounces.

While you most likely won’t be packing this in your IWB holster, the G44’s strength comes from the fact that you can easily plink with it.

Glock 18C with Fun Switch

Normally, .22 LR ammo is cheap and easy to find, making this gun a perfect training companion.

Not to mention, .22 LR has virtually no recoil so first-timers will find this comfortable and less intimidating to shoot.

To see the G44 in action, peep our video below or you can read our full review here!

10. G48 MOS (9mm)

A newer Glock model, the G48 series takes a slim approach and looks to shave down on size.

Chambered in 9mm, it measures pretty close to the G19 but adopts Glock’s Slimline build to reduce its width.

Where the regular, ole G19 offers a 1.26-inch width, the G48 MOS measures 1.10-inches.

Glock G32
Glock G48 MOS (Photo: Glock)

The G48 brings a 4.17-inch barrel to the table with an overall length of 7.28-inches. It tips scales at 24.97-ounces loaded. And, it comes with a standard capacity of 10 rounds.

The MOS designator means that it uses Glock’s Modular Optic System. If you love red dots, this is a great pistol to toss an optic on — especially for concealed carry.

For more info on the G48 (and G43X) walk on over to our full review here.

Honorable Mentions

We couldn’t do an ultimate Glock list and leave off the very cool full-auto (yeah, you read that right) Glock 18.

The G18 is a BAMF 9mm full-auto Glock that most of us could just dream of owning. But for the lucky few, it’s a rad model that is peak Glock.

Glock G43X and G48
Glock 18C with fun switch

Also worth mentioning, if you’re a fan of .357 calibers and were a little bummed to not see the cartridges mentioned…well, let me put you on the G31 and G32.

Both are .357 SIG models! So, go get your fix!

Best Glocks of 2024: Top Calibers & Sizes
Glock G32

Conclusion

Glock pistols set the standard for polymer, striker-fired pistols. With a range of calibers from .22 LR all the way to 10mm, you’re guaranteed to find a model that fits your needs.

Best Glocks of 2024: Top Calibers & Sizes
Glock G43X and G48

What is your favorite Glock? Did it make our list? Let us know in the comments below. If you’ve already got a Glock but want to snazz it up, check out some of our other articles on how to Gucci your Gat: Best Glock Upgrades, Best Glock Sights, and Best Glock Triggers.

What can you hunt with a .22 air rifle?

0
what-can-you-hunt-with-a-22-rifle

Are you looking for a new hunting rifle? If so, you may be wondering if a .22 air rifle is a good option. In this blog post, we’ll discuss the pros and cons of using a .22 air rifle for hunting, and we’ll give you some tips on how to choose the right one for you. So keep reading to learn more!

What can you hunt with a .22 air rifle?

You can hunt small games and varmint with .22 air guns, it’s not recommended to use .22 for hunting big games.

Animals you can hunt with .22 include:

  • Squirrels
  • Rabbits
  • Grouse
  • Raccoons
  • Coyote
  • Groundhogs
  • Chipmunks
  • Foxes
  • Chipmunks
  • Gophers
  • Rats
  • Skunks
  • Possums

(Do Raccoons Eat Cats? See this post for more)

ARE .22 CALIBER AIR RIFLES POPULAR?

.22 caliber air rifles are popular because they offer a lot of benefits for hunters. They are lightweight and easy to carry, which makes them perfect for long hunting trips. Additionally, they are very accurate and can take down small games with ease. If you’re looking for a reliable and affordable hunting rifle, a .22 caliber air rifle is a great option.

TIPS FOR CHOOSING THE RIGHT .22 AIR RIFLE FOR YOU

When choosing a .22 air rifle, it is important to consider:

– Your budget

– The weight of the gun

– The length of the barrel

– The type of action (semi-automatic or bolt-action)

– The power source (spring-powered, gas piston, CO2, multi-pump, or PCP)

(For more on 5 types of air rifles you need to know before buying, see this post.)

FAQs

CAN YOU BIRD HUNT WITH A .22?

Yes, you can bird hunt with a .22 air rifle. These rifles are accurate and powerful, making them perfect for taking down small game. Just be sure to use the proper ammunition for your gun.

WHAT IS THE BEST .22 AIR RIFLE FOR HUNTING?

The best .22 air rifle for hunting depends on your needs and preferences. If you’re looking for a lightweight and easy-to-carry gun, a break-barrel rifle might be the best option. If you’re looking for a more powerful gun, a gas piston or a PCP rifle would be a better choice.

(For more on the best .22 air rifle on the market, see this post)

WILL A .22 KILL A COYOTE?

Yes, a .22 air rifle can do the trick, as long as the shot is placed to where vital organs are going to be terminally damaged. A head, heart, or lung shot with a .22 will take down a coyote in no time.

(For more on the best PCP air rifle on the market, see this post)

CAN YOU KILL A HOG WITH A .22?

Yes, watch the video below for more details:

HOW FAR CAN A .22 AIR RIFLE SHOOT?

The maximum range of a .22 air rifle depends on the gun and the ammunition being used. Break-barrel rifles can typically shoot up to 100 yards, while gas piston and PCP rifles can shoot up to 150 yards.

CAN YOU KILL A DEER WITH A .22?

No, we do not recommend using a .22 air rifle for deer hunting. These rifles are not powerful enough to take down a deer humanely.

CAN YOU MOUNT A SIGHT ON A .22?

Yes, you can mount a sight on a .22 air rifle. This will help you to be more accurate when taking down small games. Just be sure to choose a sight that is compatible with your gun.

Conclusion

As we have discussed, the .22 air rifle is a perfect choice for small games and rabbit-sized animals. They are lightweight, accurate, and easy to carry which makes them perfect for long hunting trips. If you are a beginner, we highly recommend you choose this type of air rifle.

12 Gauge vs 20 Gauge: The Shotgun Shootout

0

12 gauge vs 20 gauge
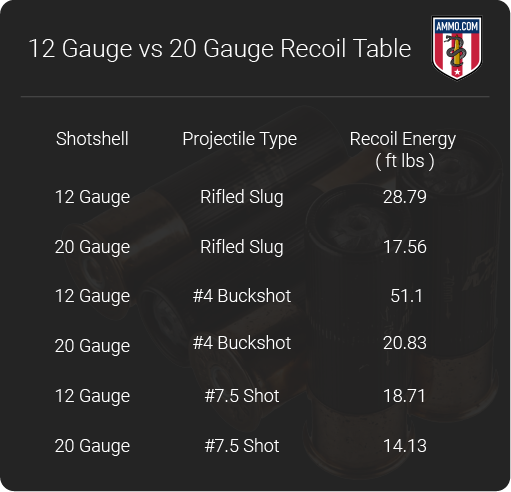
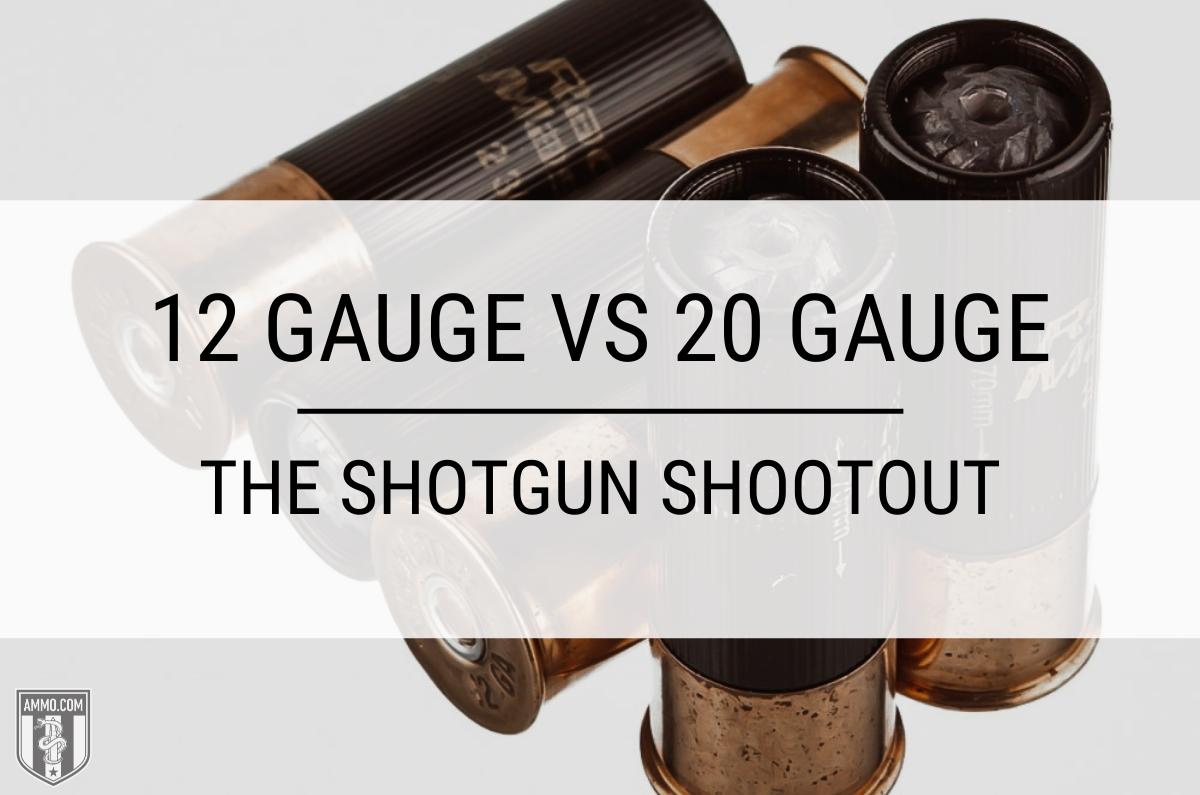
The versatility of a shotgun cannot be matched by many other types of firearms. You can select from a wide variety of gauges, barrel lengths, chokes, shot sizes, and more. This allows a shooter to utilize a shotgun for a multitude of purposes like hunting, home defense, and sporting clays.

However, all the different varieties and purposes can be overwhelming to new shotgun owners. Instead of covering every potential shotgun variation, it’s best to focus on the biggest question new shooters have, “Which gauge works best for me?”

Most prospective shotgun owners will narrow their choices down to two options: 12 vs 20 gauge.

The 12-gauge shotgun is the most effective one-gun solution for hunting, target shooting, and home defense. However, that doesn’t mean that the 12-gauge is the best choice for every situation.

In this article we will analyze the advantages and disadvantages of the two most popular shotgun options, 12 and 20-gauge.

What’s the Difference Between 12 Gauge vs 20 Gauge?

The difference between 12 and 20-gauge shotguns is their bore diameter. A 12 gauge has a bore diameter of 0.729” compared to 0.615” for 20 gauge. This means that a 12 gauge can fire larger payloads of buckshot at higher muzzle velocity at the cost of higher felt recoil.

12 Gauge vs 20 Gauge: Understanding Shotgun Gauges

If you’re familiar with shotguns, you’ll know that a lower gauge means a bigger caliber. However, if you’re new to shotguns or firearms in general, this can be a confusing concept to grasp.

Handgun and rifle calibers are defined by their internal bore diameter. A 40-caliber handgun has 0.40 inch diameter bore. This means the bigger the number, the bigger the bullet the gun can fire. However, shotgun gauges are determined by a more archaic system.

Gauge is determined by the number of lead balls with the same diameter as the barrel would add up to one pound.

For a 12-gauge shotgun with a bore diameter of 0.729” it would require twelve lead balls to equal one pound. Likewise, for 20 gauge guns, it requires 20 lead balls with a 0.615 inch diameter to equal one pound.

A Special Note On 20-Gauge Shells: Yellow is the New Black

If you’re new to shotguns you might not be aware that all 20-gauge shotgun shells are required to be colored yellow, regardless of payload.

This is to endure that a shooter does not mistakenly load a 20-gauge shell into a 12-gauge shotgun. If this were to happen, it’s possible that a 12-gauge shell loaded behind could cause the 20-gauge shell to fire inside the magazine causing catastrophic damage to the firearm and potentially the shooter.

For this reason, it has been mandated that all 20-guage shells are colored yellow to make them easily distinguishable from 12-guage shells.

Recoil

12 Gauge vs 20 Gauge recoil comparison chart

When it comes to felt recoil, 20-gauge shells win by a country mile. As 12 gauge shells pack a heavier payload of projectiles and powder they will always have more recoil than comparative 20 gauge ammo. This chart compares the felt recoil experienced by the shooter for three popular 12 and 20 gauge Winchester SXP hunting loads.

Less recoil gives a 20-gauge shotgun two distinct advantages.

The first advantage is the comfort factor to the shooter. Although felt recoil will be different between shooters, the low recoil impulse that the 20-gauge shells impart on its user’s shoulder often results in increased accuracy. Less recoil means that it is less likely for a shooter to develop a flinch or raise their head off the stock just prior to firing.

The second advantage is speed of follow-up shots. Regardless of whether you need to line up two quick shots on a pheasant you just kicked up or if you need to perform a mag dump in a self-defense situation, the lighter recoil of the 20 gauge makes this an easier task.

Accuracy/Pattern Density

To understand pattern density, it’s important to understand how a shotgun ammunition works.

A shotgun shell, or shotshell, is a plastic hull with a primer at the bottom. Inside the hull is a powder charge and on top of that is a plastic cup known as a “wad” to hold the projectiles known as “shot” which are essentially just round steel or lead balls.

Shot sizes will vary depending on what you’re planning on using the shotgun shell for. For self-defense you would want to use something larger like #00 buckshot (pronounced “double aught”), or if you’re hunting something smaller, like grouse or pheasant, a smaller option like #8 birdshot would be ideal.

One common misconception is that once the wad and buckshot leave the shotgun barrel, it behaves like a swarm of bees and scatters quickly. However, what happens is that the shot leaves the barrel in a column and begins to disperse.

There are numerous factors that affect how the projectiles disperse, such as minor imperfections on the surface of the shot, muzzle velocity, and stringing.

Stringing is a process where the shot at the top of the wad is deformed less during firing, while shot at the bottom of the wad endures the added pressure and weight of all the shot above it causing it to deform. This means that the buckshot at the top of the column will reach the target faster (because it’s more aerodynamic) than the shot at the bottom of the column.

The width of dispersion of shot when it reaches the target is referred to as pattern density. If the patter density is too wide, it’s possible to miss a smaller bird like a quail, at range. Conversely, if the pattern density is too tight it will be harder for shooters to score hits.

One other factor that can affect pattern density is the type of choke used in the shotgun barrel. A choke typically screws into the barrel and acts like a forcing cone, making the lead or steel shot a more compact column as they exit the barrel. Chokes will create a tighter pattern density but should not be used with slugs.

As the 12 gauge has a wider bore diameter, it can fit more shot into a wad. This means that it will have a higher pattern density than 20 gauge shot.

Stopping Power

The 12 gauge shotgun has been well known for its stopping power due to its effectiveness in trench warfare during WWI and in the jungles of the Pacific theatre during WWII. Furthermore, the 12 gauge Remington 870 pump-action shotgun is a favorite of law enforcement and can be found in squad cars across the United States.

There’s no denying that a 12 gauge load packs a huge punch, but how much? In the table below we compare three popular loads for both 12 gauge and 20-gauge shells.

Let’s compare the rifled slugs for the purpose of this explanation.

12 Gauge vs 20 Gauge ballistics table

Even though both slugs exit the barrel with the same muzzle velocity of 1600 FPS, the 12 gauge load has a muzzle energy of 2488 foot-pounds while the 20 gauge load clocks in at 1865 foot-pounds (that’s a 33% difference!)

Although the disparity will vary between different loadings, 12 gauge shotgun ammunition will generally always have more stopping power than a comparative 20 gauge load.

Hunting

When it comes to getting into the woods for some hunting, you’ll find plenty of 12 and 20-gauge shotgun shooters in their tree stands or deer blinds in the fall.

Both shotgun gauges are extremely popular for hunting all types of game animals from upland bird, waterfowl, turkey, and even whitetail deer.

Proponents of the 20-gauge shotgun will cite its recoil advantage over the 12 gauge and suggest that it is more than sufficient for all sizes of game. On the other hand, 12-gauge aficionados will bring up the shotshell’s hard-hitting terminal ballistics and extended range that the 12 gauge offers.

Although 20-gauge loads can be effective for turkey hunting, waterfowl, and deer, the major issue is that you need to be at close range. As the 20 gauge shotshell has a lower muzzle velocity compared to the 12 gauge, the 20 will lose velocity faster and how a shorter effective range.

Therefore, the majority of hunters will grab their 12-gauge shotgun when they plan to hunt larger game animals like duck, goose, turkey, and deer. The extended range and stopping power more than make up for the additional felt recoil in most cases.

However, for small game or bird hunting, the 20-gauge is usually the best option. With its low recoil, it allows manufactures to produce a lighter gun that is quick and maneuverable. This makes it easier for hunters to quickly bring their gun to bear on a grouse or pheasant they kicked up. Furthermore, the lower recoil of the 20-gauge allows for extremely quick and accurate follow-up shots.

Just make sure you have adequately prepared your ammo. Don’t forget to check out our Fiocchi 20 Gauge ammo page for more options.

There’s absolutely no reason why you can’t bring your 12-gauge shotgun bird hunting as they are extremely effective. Although, if given the choice, most game hunters will opt for the lighter gun, and that’s most often a 20-gauge.

If you can only purchase one shotgun, then the 12-gauge is the best option as it does it all.

However, if you have the financial capability to purchase both, a 20-gauge shotgun is an excellent choice for small game while you can still employ your 12-gauge medium to large game hunting.

Self-Defense/Home Defense

When it comes to home defense, it’s hard to be a shotgun. Although some shooters contest that a handgun is the better choice, it simply does not compare to the sheer power that a shotgun offers.

For home defense, it is inadvisable to use rifled slugs as they will typically over penetrate and could hit an innocent bystander in the home or apartment next door. Buckshot is what you want loaded in your self-defense shotgun.

There is some scholarly debate amongst ballisticians as to which buckshot is the best option for home defense. Many swear by #00 buckshot as it is considered the gold standard for self-defense, however other state that #1 or #2 buckshot is more than sufficient for any home defense situation.

If you’re unfamiliar with buckshot designations, here is a chart explaining the difference.

12 Gauge vs 20 Gauge buck shot

As you can see, the difference between #00 buckshot vs #1 buckshot is 0.03” in projectile diameter. This debate has been beaten to death on the Internet, however the bottom line is that any would-be home invader will likely not be able to tell the difference.

But that brings us to which shotgun would be better for home defense? 12 vs 20 gauge?

Many shooters like the feel of a 12-gauge shotgun for home defense. It’s what the military and police use and for some people, that’s all they need to know. Others like the lower recoil of 20-gauge shells and feel they are more accurate with this ammo.

For close range engagements like those in a home, it won’t make much difference which shotgun you choose. Both will be more than effective in defending your life and the lives of your friends and/or family members.

Just make sure to load up with a quality buckshot (NOT birdshot or slugs) and you should be more than adequately prepared to take on any threat that enters your home and threatens your life.

Ammo and Rifle Cost/Availability

The beautiful thing about shotguns is their versatility. You have so many options, from a single shot, pump action, and even a semi-auto, the world is your oyster when it comes to shotguns.

Furthermore, entry level pump action models are typically inexpensive compared to most centerfire rifles and handguns. You can easily pick up a Remington 870 or Mossberg 500 for around $300 new in box at the time of writing.

Check out our stock of Remington 12 Gauge Ammunition for more options.

However, this does not mean that all shotguns are so affordable. If you’re looking to get into sporting clays, skeet, or trap shooting, most competition-ready shotguns will command several thousand dollars.

Although a 20-gauge shotgun typically requires less materials to produce, there is very little difference in price between 12 and 20-gauge shotguns.

As for variety, you will not lack for options for either gauge. However, there are going to be more options for the 12-gauge as it is the most popular gauge in North America due to its versatility.

The same is true for ammo cost. Although the 20-gauge shells are smaller and require less material for construction, there is very little difference in cost between 12 vs 20 gauge.

Since we are in the subject of the ammo cost, don’t forget to check out our Remington 20 Gauge Slugs page.

Just like for rifle variety, you will find more options when you are purchasing 12-gauge shells as they are the most popular. There are still plenty of options for 20-gauge ammunition, just less than 12 gauge.

Buying in bulk is always smart, make sure to check out our stock of bulk 12 gauge ammo.

Reloading

Reloading shotgun shells is something that many reloaders enjoy doing. However, as shotshells are relatively inexpensive, most reloaders do not bother reloading used hulls.

The cost savings for reloading shotgun shells is so low that only high-volume shooters ever worry about doing it, as it is usually cheaper just to buy new factory shotgun ammo. However, if you love the idea of optimizing your shotgun ammo, there’s nothing stopping you for loading your own shotshells.

Please note that shotshell reloading requires a specialized press that cannot be used for centerfire rifle and handgun reloading.

A Brief History of The Shotgun Shell

In their infancy, most firearms could fire a single projectile or multiple as they all had a smooth bore. Early firearms like those used by the settlers of the New World needed this versatility to survive by hunting small birds to deer with the same gun.

However, with the introducing of rifling during the mid-16th Century, rifles and shotguns became two separate entities with different purposes.

At this time, shotguns were mostly used for bird hunting but also saw use in law enforcement and protection details.

Did you ever “call shotgun” as a kid when getting into a car? This phrase dates back to the Wild West when the person sitting next to a stagecoach driver would carry a shotgun to protect the cargo or passengers from outlaws.

The first shotgun shell was introduced by the French gunsmith, Casimir Lefaucheux, in 1836. Most early shotgun shells were made entirely of brass as paper cartridges were unreliable and couldn’t be reloaded.

It wasn’t until 1960 when Remington introduced the plastic shotgun hull that is used today.

Final Shots: 12 Gauge vs 20 Gauge

There’s no denying that the 12 gauge is the “jack of all trades” option in the shotgun world. There plenty of target load options for sporting clays, trap, and skeet, heavy slugs for deer, and a variety of birdshot for turkey, waterfowl, and upland birds.

Not only is the 12 gauge a potent option for all forms of hunting, it is an extremely effective home defense option when loaded with quality buckshot shotshells.

However, just because the 12-gauge can do it all, that doesn’t mean that it’s always the best option.

The 20-gauge shotgun has proven itself to be a capable upland bird gun as it is fast, maneuverable, easy to carry, and packs enough punch to fell pheasants, grouse, and doves without issue. At close range, it can also be utilized for turkey, deer, and self-defense with proper loads. And it can do all of these things with approximately 33% less recoil than a 12 gauge.

Which shotgun gauge is best for you depends on your personal needs as a shooter. If you are recoil sensitive and only plan to hunt upland birds then the 20-gauge shotgun will be everything you need it to be.

The ideal choice would be to own both, however if you are on a budget then the 12-gauge shotgun is the best option as it does everything you could possibly want at a very reasonable price point.

Turkey Sounds & What The Mean

0

Knowing what basic turkey talk sounds like and being able to mimic these sounds will make the difference between a fan bobbing over your shoulder and tag soup.

by Scott Haugen

As I write these words, spring turkey season is only a few days away. Where I live in the Pacific Northwest, it’s believed to be our most harsh spring conditions since the early 1980s. I’m scouting for turkeys daily, and what I see is far different from last season.

Many hens and juvenile birds are still in large family flocks. Several toms are in bachelor flocks of the same age class, and their strutting and gobbling have been very subdued. We’re supposed to have freezing temperatures and snow the next few days, which may further delay turkey courtship and breeding activity.

Knowing this, I plan on hunting on opening day in some extensive stands of Douglas fir timber. We’ve had constant rain for days, and this is where many of the turkeys have been seeking shelter. The hens spend a lot of time preening, and because they’re in family flocks, the birds are vocal when there’s a break in the weather.

On opening day, I plan to emulate what I hear from turkeys, such as soft hen yelps with more kee-kees than I usually use this time of year. I’ll also use deeper-sounding tom yelps, which I’ve detected on my Stealth Cam trails cam video clips lately. For my decoy setup, I’ll use a new Preening Hen from Dave Smith Decoys and possibly an Upright Hen if birds hang out in big numbers and the rain continues to fall.

I’ve been fortunate to hunt turkeys in many places around our great country, and I base much of my calling on what the birds do at the time and place I’m hunting.

One season began in Florida in 80-degree temperatures, and I also hunted on a 16-degree day with snow in Washington state a few days later. Knowing what sounds turkeys make, and more importantly, what they mean, has dramatically impacted my nearly 40 years of turkey hunting.

While turkeys are vocal all year long, here are some sounds to tune into this spring.

Hen Yelp

The hen makes the most commonly heard sound in the turkey woods, called a hen yelp or plain yelp. Toms and jakes also yelp, but it’s louder, raspier, and usually more drawn-out than that of hens.

The hen yelp is an introductory call and the most straightforward sound. I’d say 80 percent of the toms I’ve called in — and seen called in — have come to a hen yelp. These sounds are usually delivered in a series of one-note tunes and occur when turkeys are within sight of one another. It sends the message that everyone is safe and lets one another know where they are.

Yelps can range from three to seven notes, even up to nine or ten as hens get more excited. The pitch and volume remain constant, with three to four notes created per second and each burst lasting up to .10 seconds. The sequence is simple and resembles a chirp, chirp, chirp, or a yup, yup, yup sound.

Yelps are easily made with box calls, slates, diaphragms, and push-pull calls. The yelp is a good call to bring birds in close, whether you can see them or not. Should birds appear edgy, plain yelps can help calm them. Yelps will also bring in hens, and toms will likely follow them.

The Cluck

The cluck is one of the most basic sounds in the turkey woods, but it still carries a strong meaning. The one to three-note sequence goes like tuck…tuck,…tuck. Its purpose is to get another bird’s attention or reassure an approaching tom that a hen is waiting. It’s a pleasing, attention-grabbing, simple, yet powerful sound when bringing in a tom.

Clucks are made up of one to three single, staccato notes, usually separated by two to three seconds. A cluck’s sharp, crisp sounds are mainly used when an approaching tom hangs up in sight of your setup.

Often, hens are called in with clucks, and I think this is because when turkeys cluck, they like hearing others respond in the same way; it’s their way of saying, “I’m here, and all is safe.” This is true with hen yelps, too. Clucks are not as intense or abrupt as putts, which is an alarm call.

When birds feed, clucks are often made in conjunction with purrs. Clucks and purrs send a message that all is safe and the birds are content, especially in a flock situation. Clucks and purrs, together, sound something like tuck, tuck, errrrr…..tuck, errrrr…tuck, tuck, tuck, errrrr, tuck. Using the cluck and purr together is natural and convincing if looking to pull in wary toms or hens. They’re also good, calm sounds to stop a tom for a shot.

The Purr

As with the cluck, purrs can easily be made on slates, box calls, and push-pull calls. Purrs are tougher to make with diaphragm calls but are worth mastering when you find yourself in the open and need to call hands-free to bring a tom in closer or stop him for a shot.

Purrs are relaxing, almost bubbly sounding, reassurance calls. They send the simple message that birds feel safe. When a flock of birds spreads out, feeding in early spring, purrs can continually be heard. Purrs are soft sounds that roll in a smooth, calming fashion, thus, are not very loud. The purr is a single, drawn-out note that sounds like, errrr. This is a great call to offer when toms are close, especially if they seem nervous.

Kee-Kee

The kee-kee is a call commonly associated with fall turkey hunting. But I’ve had great success with it early in the spring when conditions are cold and wet, and birds are in large flocks. The purpose of the kee-kee is to reassemble broken flocks, and the sound is largely made by young birds who’ve lost track of the congregation and are looking to reassemble with adult birds. Adult birds, primarily hens, also make variations of these sounds, and this is what toms will often respond to.

The kee-kee is usually made up of three relatively coarse and somewhat unevenly spaced kee, kee, kee sounds that, in total, last just over a second. The key to making this call work is sticking to the magic three-note sequence, not extending it. As birds mature, the kee-kee sounds become slightly raspier, which is what you’ll hear in early spring.

The Cutt

Cutts are a series of loud, insistent, fast-paced, single-note sounds turkeys use to announce their presence, often hoping to hear another turkey’s response. It says, “If you hear me and are ready to breed or simply socialize, come find me.”

Cutts are easy sounds on a box or slate call, but diaphragm users may find it challenging due to the complex, stop-start, and rapid pace. Cutts are made in fast bursts of two or three notes, usually followed a second or so later with more of the same. The sequence sounds something like; tut…tut….tut, tut, tut, tut…tut…tut…tut…tut. tut. tut, tut, tut. The sequence varies widely, so if offering these sounds, don’t feel like they have to be exact.

Many hunters like using cutts to locate toms by getting them to shock gobble early in the morning. I use cutts any time of day, all season long, because they are natural turkey sounds used to announce their presence and because they are loud and carry well in the big terrain of the West where I do much of my hunting.

There are other sounds turkeys, and turkey hunters make, many more. But the ones we’ve looked at here are the basics hunters should be able to recognize in the woods and create on their own at any moment.

This turkey season, listen closely to the birds in your area. Know that their sounds — especially in the early season — can vary daily, even hour to hour on those stormy days with momentary sunlight breaks. Being equipped with the right calls, and making the right sounds at the right time, can make a big difference when bringing in a boss tom.

Leupold VX 3 HD Review 4.5-14×40 | Perfect Hunting Scope

0

In this Leupold VX 3 HD review, we are going to dive into the details of this 4.5-14×40 Leupold VX 3 HD rifle scope. Leupold’s new scope that is just a step below their extremely popular VX 5 HD, is a bit more affordable, but still big on performance. Featuring Leupold’s HD glass and a wide range of magnification offerings, the Leupold VX 3 HD rifle scope is the perfect scope for the hunter who doesn’t need ultra long range capabilities, but wants a scope that will perform well on a hunt.

Love optics? We certainly do here at Backwoods Pursuit, so make sure to check out our other optics reviews, as well as our massive 19 Spotting Scope Review where we lined up 19 of the best spotting scopes on the market and tested them side by side!

Looking for a binoculars? Check out ourMASSIVE 26 BINOCULAR REVIEW where we put 26 of the best binoculars side by side!

In this Leupold VX 3 HD review we are going to look at how this rifle scope stacks up as a hunting scope. It’s not a long range optic, so if that is what you are looking for, there are better options. However, if you are looking for a great rifle scope that has the ability to take longer shots, the 14x magnification with the CDS-ZL locking turret can reach out there as far as most of us are comfortable shooting at game. The CDS stands for “Custom Dial System” and the ZL means “Zero Lock”, which we’ll go over below.

The Testing: Leupold VX 3 HD Review

In preparation for the hunting season, many trips to the range were made to get this scope dialed in and to practice plenty to make sure both it, and myself were ready when the time came to make the shot.

What’s In the Box: Leupold VX 3 HD Review

The Leupold VX 3 HD rifle scope comes with all the tools needed to set your zero stop. You also get an integrated throw lever that is very user friendly and not overly large or bulky like some. Unfortunately, it doesn’t come with a Leupold Sun Shade, the Leupold Flip Back Lens Cover Kit, or the handy Leupold Neoprene Scope Cover.

All of the Leupold accessories are top notch and extremely well-built. They are, however, on the expensive side and if you pick them all up, it adds up quick. This is was bit of a disappointment as the only accessory that comes with the scope is the rubber lens cover, but if you like having a sun shade, flip up caps, or neoprene cover, you’ll have to drop an additional few hundred bucks to get the whole setup.

Leupold VX 3 HD Specs

The Leupold VX 3HD rifle scope is a fantastic rifle scope that’s purposefully built for the hunter who needs a solid, super lightweight scope that also gives you enough magnification to reach out a little ways if needed. It features some pretty impressive specs:

WordPress Tables Plugin

Eye Relief: Leupold VX 3 HD Review

The Leupold VX 3 HD 4.5-14×40 gives you a nice 3.6-4.4 inches of eye relief, keeping your face plenty far away from the scope to avoid getting a nice half moon decoration on the top of your nose/eye. I found that, consistent with the specs, you do lose a little eye relief moving to the top end of the zoom range, but the 3.6 inches of eye relief when at 14x is more than enough.

I tested the Leupold VX 3 HD along side others like the Bushnell Forge 4.5-27×50 as well as the Athlon Cronus 4.5-29×50, the Tract Toric UHD 4-20×50, the Sig Tango4 6-24×50 and the Zeiss Conquest V4 6-24×50 rifle scopes, and the Leupold VX 3 HD hung in there, even among some of those more expensive ones. Now obviously this VX 3 HD is a very different scope than most of the ones just mentioned given its design, size and purpose, but it still impressed when compared to the others.

Turrets & Side Focus: Leupold VX 3 HD Review

Between field testing and range time testing for this Leupold VX 3 HD review, I found the turrets to be perfect for the hunter who wants to keep things simple, but also wants to be able to dial in for the occasional longer range shot when needed and have the ability to set the side parallax with the side focus knob. The elevation turret locks nicely in place and only moves using a spring loaded push button when it’s time to dial it in. The side focus knob works very well and is nice and smooth without too much resistance, however, I do wish it had some yardage reference points.

The turrets are crisp and give you nice audible clicks so there’s no mistaking how many MOAs you have moved it. You get only one rotation out of the dial, but that gives you 15 MOAs, and for most of us, that’s more than enough. 15 MOAs still gets you a long ways out there with most modern hunting rifles.

The windage turret on the Leupold VX 3 HD is capped, but if you remove the cap, you have a nice, easily adjustable knob in the event you want to calibrate for wind. Of course, if you remove the cap and make your adjustment manually you’d need a few extra seconds for that. If you select the Windplex reticle like we tested here, you can make your windage adjustments using the reticle if needed.

The Leupold VX 3 HD gives you an easy to read side parallax adjustment that moves freely enough to not be overly difficult to adjust, but not too freely to accidentally move on you. Side parallax is usually a feature reserved for your long range scopes, but it’s great that Leupuold made this VX 3 HD model with it, given that you have up to 15 MOAs of adjustment with the CDS-ZL dial when you want to make a longer shot. Having that side parallax adjustment makes a big difference once you start stretching the range out.

The Leupold VX 3 HD gives you an amazing 75 minutes of windage and 75 minutes of elevation adjustment. Impressive that you get that much adjustment in this scope!

Zero Lock & CDS-ZL Dial: Leupold VX 3 HD Review

The Leupold VX 3 HD rifle scope gives you a unique Zero Stop feature that locks into place with a spring loaded button. To move the turret from “zero,” you simply push the button and dial to whatever MOA you need. To bring it back to zero, turn the knob and the button will pop back into its locking position when you reach zero. Pretty slick setup that is pretty fool proof and easy to use. While it’s possible to accidentally push the button and move the turret from zero, it’s very unlikely. Make sure to double check your zero before your shot, though, as that’s always a good idea.

To set your zero on the Leupold VX 3 HD, you’ll need to remove the cap via the small allen screws. Once the cap is removed, you have access to zero your rifle at whatever distance you like, then reinstall the cap and you are set. Make sure to bring the tool to pull the turret cap off with you to the range when zeroing your rifle or you may not be able to make the needed adjustment.

Image quality: Leupold VX 3 HD Review

A good Leupold VX 3 HD review wouldn’t be complete without testing the optical performance throughout the zoom range of the scope. While testing, I found that the Leupold VX 3 HD provides outstanding optical performance, particularly for a rifle scope in its price range. One of the things that really stood out is the impressive field of view and substantial eye relief you get. There is almost no “dreaded donut,” or black ring around the image like so many scopes have. With the Leupold VX 3 HD, you don’t feel like you are looking through a tunnel at all, which is a welcomed feature for such a small and lightweight scope.

Optically, you get a brilliant image that will not disappoint. It’s not quite as top notch as the VX5 HD or VX6 HD as you would expect, but still extremely good. As with most scopes, you do lose a little image clarity at the top end of the zoom range, but not much. The image you get at 14x is still sharp and clear, particularly if you take the time to use the side focus/parallax adjustment and make sure your eyepiece is focused properly.

4.5-14x40mm Magnification & Functionality

With the Leupold VX 3 HD rifle scope you get a perfect zoom range of 4.5x up to 14x, which is really all that’s neccesary for most practical hunting situations. Again, if you are into long range shooting, there are better scopes out there than the VX3 HD to fit that need, but for a hunting scope, this thing is ideal.

The zoom mechanism is super smooth and you get a throw lever included which is really convenient. The throw lever is nice and compact as well, unlike most other throw levers on the market that are much more bulky. The amount of resistance on the zoom mechanism is just about perfect for a hunting scope, but I did find that I preferred leaving the throw lever on there rather than removing it.

The loss in eye relief is noticeable as you move to the 14x magnification and requires you to “suck in” to the scope a bit, but you still have plenty of eye relief when at max zoom.

2nd Focal Plane & Subtensions

The Leupold VX 3 HD is a second focal plane scope. Now, backing up a bit, a second focal plane scope is one where the reticle size remains the same throughout the zoom range (unlike a first focal plane scope which gets larger as you zoom the scope in). The challenge with a second focal plane scope like the Leupold VX3 HD can be that your subtensions change depending on the magnification you are using. As with most scopes, the hash marks noted above are set for when you are at max zoom -14x in this case. This design makes sense in that, if you are holding for wind, you are likely to be at max zoom anyway.

As you can see above, the subtensions are nicely set with windage hash marks to help you hold for wind if you choose to do so. Even the width of the reticle can be used as a reference point, which can be very useful if you don’t have time to dial in the distance. There are no elevation subtensions, however, so you’ll want to utilize the CDS-ZL dial for elevation adjustments if you are wanting to stretch out the distance.

How The Leupold VX3 HD Ranked

Leupold VX 3 HD Review: Conclusion

After taking the Leupold VX 3 HD rifle scope through the paces, I came away really liking this rifle scope. It’s an ideal setup for a hunting scope, particularly if you are someone who likes to play a little bit at longer ranges, and/or at least want the ability to do so and dial in your reticle for those longer shots.

The WindPlex reticle is very functional, but it’s certainly not for everyone either. Some will love it and others might prefer a standard duplex. Personally, I didn’t find the WindPlex reticle too busy or distracting at all. Some of your long range scope reticles can get very busy, and it can simply be too much for a hunting scope. You get a TON of bang for your buck with this scope in image quality, build quality, fantastic zero stop, and great eye relief.

One downside, as mentioned above, is how expensive the accessories are for this scope and that most of the time, you have to buy them separately which is a bummer. If you are someone who likes to have a sun shade, caps and/or a neoprene cover, you’ll have to drop some additional cash to add those pieces to your scope.

At the end of the day, though, you’d be hard pressed to find a better rifle scope around the $750 price point than the Leupold VX 3 HD. It gives you fantastic optical performance with everything you need as a hunter and nothing that you don’t. This lightweight rifle scope features a solid locking zero stop design, non-bulky turrets, a CDS-ZL elevation turret that is compatible with a customizable turret from Leupold, and even a side focus knob. It hits all the marks for a great hunting scope!

Subscribe to Backwoods Pursuit to get Your FREE Backcountry Gear Worksheet!!!

Dial in your gear list, calculate your pack weight, and lighten up your pack with this handy tool!

Leave this field empty if you’re human:

How to Spool a Spinning Reel

0

This is true even with Lew’s superior spinning rods and reels and Strike King’s premium Tour Grade fishing lines.

String the reel wrong and you’ll be plagued with line twist, short casts and poor sensitivity. Do it right and you’ll get the superior performance you expect from every Lew’s reel.

SHOP FISHING LINE

Fluorocarbon and Monofilament Lines

Spinning reels perform at their best with fluorocarbon and monofilament lines no heavier than 8-pound test. A heavier line doesn’t flow through the guides as smoothly, which reduces casting distance and efficiency.

First run the fishing line from its spool through the first guide above the reel. Then open the reel’s bail and tie the line to its spool with an Arbor knot. After tying the knot, close the bail and you are set to begin winding.

The Flat Spool Method

Lay the line’s spool on whichever side allows the line to come off of it counterclockwise. If the line comes off clockwise it will twist. As you wind the reel, run the line through your fingers below the guide and apply firm pressure.

Stop after 15 cranks or so and release the line in your fingers. If the line is limp and without twist, continue winding. If the line twists around itself, the wrong side of the spool is facing up. Flip the spool over and resume cranking. Double check the line for twist after another 15 cranks.

The Upright Spool Method

Another option is to set the line spool in some type of holder so that it sits upright on edge, or use the Strike King Sidewinder tool that comes in every package of Tour Grade Line. The line should come off the top of the spool and straight through the guide. Here again, apply finger pressure to the line as you wind.

Tour Grade Spool Thumbnail

When to Stop Winding

The reel is full when the line comes to within about 1/8-inch of the spool’s outer edge. Stopping short of this will reduce casting distance and the reel’s speed. If you fill the reel to the very edge of the spool, bird’s nests are inevitable.

Spooling Braided Line

Because braided line has no memory, it will not twist if you lay the spool flat on either side or use the upright spool method. However, braided line is so slick that it will slip on the reel’s spool regardless of the knot you use. You must first attach a length of monofilament or fluorocarbon to the reel’s spool and knot it to the braid.

Braid is so much thinner at the same diameter than monofilament or fluorocarbon that it takes up less room on the spool. Consider backing the spool with a less expensive monofilament so you don’t use more braid than you need.

The advantages of braided line are so numerous that top pros, including Oklahoma’s Andrew Upshaw, use it almost exclusively.

“Since braided line doesn’t stretch, it is super sensitive and delivers much better hook sets,” Upshaw said. “I love Strike King’s Tour Grade yellow braid because I can see it so well.”

A gossamer braid never becomes springy, so it allows for longer casts, especially with light finesse lures. You can also use a stronger line if you wish. Many pros opt for 15-pound braid.

Once you’ve got your spinning reel spooled up and have taken it fishing a few times, make sure you know how to clean and maintain it!

SHOP SPINNING REELS

Watch How Mark Zona Does It

The Best Fishing Knots Of All Time [Ranked Strongest To Weakest]

0

It’s fishing knot time!

Do you want to know something that might shock you about fishing knots?

After testing hundreds of fishing knots over the past couple of years, I’ve learned one very important lesson…

The “100% fishing knot” is a myth.

Why?

Physics.

Yes, simple physics is the reason why. Pretty much all knots will create a weak point on the line given that it creates a point on the line where a max load is hitting it from more than just one direction.

And although there are some instances where the main line (or leader) will break before the knot fails, there is no single knot that can always do that with all types of lines.

So step #1 in using the strongest possible knots for your fishing needs is to understand that there is no such thing as a “100% knot”…

And if you hear someone say that their knot is 100% without any exclusions, then they likely have never tested it out in a controlled test with multiple lines, so I be wary of their recommendation.

Here’s the hard truth…

Your favorite fishing knot is weak, and so is mine

This is simply due to the fact the contorting line and creating hard turns that get put under tension will always create a weak point in the line making it the weakest point in the system (assuming that the main line is not compromised).

Note: This weak point is almost always at the first hard turn in the top section of the knot coming from the main line, so it most often leaves a clean break which looks like the mainline simply snapped when an angler examines the line after a break-off.

Now that we’re past the first hurdle (acceptance), step #2 is to actually test our knots to make sure that you don’t lose the fish of a lifetime due using a knot that isn’t the absolute best for each connection in your line system.

To help save you time in testing knots, I’ll be displaying results from my continued testing on this page.

Best of all, the individual fishing knots will be ranked based on their strength & performance results for the following knot connection categories:

Knot Category Groupings

Feel free to use the links below to skip down to the knot connection that you’re most interested in. Otherwise, you can simply scroll down to see all of the knots.

  • Best Knots For Braid
    • Braid to Leader Knots
    • Loop Knots (Line Doubling Knots)
    • Doubled Line to Leader Knots
    • Braid to Swivel/Lure/Hook Knots
  • Best Knots for Monofilament & Fluorocarbon
    • Mono to Mono Knots
    • Mono to Hook (Overview)
      • Mono to Hook/Lure Knots (Loop)
      • Mono to Hook/Lure Knots (Snug)

And if you don’t see your favorite knot listed, just leave a comment on the bottom of this post (click here) and I’ll add it to my list of fishing knots to evaluate.

So let’s get started…

Definition of Bad, Good, & Great Fishing Knots

best fishing knots

Before going on the knot strength results, it is essential that we first all understand the different categories of knots in terms of their strength:

  • Bad Knot: unravels/slips when under heavy tension
  • Good Knot: does not unravel or slip (it breaks before unraveling)
  • Great Knot: does not unravel/slip and has a higher breaking point than “Good knots”

How To Determine A Bad Knot

A bad knot is very easy to see because it leaves behind the telltale sign of trouble… the curly tag end.

Yes, the curly tag end that you may have seen after a break-off means that the knot used was either a bad knot, or there was a poor job in tying a good/great knot.

So if you ever see the curly end after a break-off, do not tie the same knot the same way because it’ll likely happen again.

How To Determine A Good Knot vs. A Great Knot

The difference between a Good knot and a Great knot requires the act of intentionally breaking them under a controlled test to see how much tension they can hold before the break occurs.

This is the missing link that most anglers overlook because it requires time and effort.

I am the perfect example of this because I was even fishing tournaments with money and pride at stake and never even bothered to actually test my personal knots.

And when I finally did test my knots, I was shocked at the results… the very first test I did revealed that I was getting 30% less strength than I otherwise would have had I been simply using a different knot for my line to leader connection (replacing the Double-Uni knot with the FG knot… both shown below).

So I highly recommend testing out your knots. And if you’d like a shortcut, this page shows the results from my testing below to help guide you to the best knots from my many tests done so far.

And I’ll continually update this “best fishing knot” post as more and more knots are tested so that you can have the latest and greatest data.

So if you want to save time while maximizing your line strength, this post is for you.

What Are The Best Fishing Knots?

There are many different types of lines which in many cases have completely different textures, sizes, and friction coefficients.

So we’ll be evaluating knots based on the type of line used within these general line categories:

  • Braid
  • Monofilament/Fluorocarbon
  • Wire (Coming soon)
  • Flyline (Coming soon)

And to truly evaluate a fishing knot, it is essential to focus each test on a specific type of connection because a knot that is very good for line-to-line connections is often not good at all for line-to-lure connections (and visa-Aversa).

So we’ll break out the rankings shown below into the following connections types for each line category:

  • Line-to-Line Knots
  • Line-to-Hook/Lure Knots [Snug]
  • Line-to-Hook/Lure Knots [Loop]

Let’s get started!

Best Fishing Knots for Braided Line

braided fishing line

Braided line has quickly become an extremely popular choice for inshore anglers because it allows for longer casts and better feel of lures given that its strength to diameter ratio is so much higher than mono/fluoro lines.

Plus, it has very little stretch which enables the angler to feel even the lightest of taps on the other end of the line.

But braid requires much for friction within the knot compared to monofilament so it almost always requires a different knot than the traditional knots used on mono.

Best Braid to Leader Knots

To kick things off, we’ll start with the most important of all connections for most saltwater anglers who use a lighter main line to connect to a stronger leader.

This setup is becoming very common because it allows for the overall system to have optimal casting performance (due to the lighter line in the reel) while having a stronger leader line at the business end to hold up to the sharp teeth and/or rough mouths of the target species.

Fluorocarbon is the most commonly used monofilament leader these days since it’s known for being less visible in the water while also being more resistant to abrasions, so this analysis is focused on connecting a braided line to a fluorocarbon leader.

Here are the top 5 ranking knots based on the knot tests I’ve done so far:

  1. PR Bobbin Knot [requires tools]
    • Pro: This is an extremely strong knot when tied correctly
    • Con: Requires tools to tie and takes a long time (extremely tough to do while on the water)
  2. FG Knot*
    • Pro: Thinnest knot I’ve ever seen while also having the highest breaking strength.
    • Con: Requires a strong cinch before cutting the tags so that it fully locks into place.
      • Note: Only use this knot if tying a braided line to a stronger mono/fluoro leader.
  3. 6 Turn Surgeon’s Knot
    • Pro: Very quick to tie while having a shocking strong breaking point and can be tied using lines of any size
    • Con: Bulkier and slightly weaker than the FG knot
  4. Doubled-Over Double Uni Knot
    • Pro: Easy knot to tie and it can be used for all connections
    • Con: Up to 30% weaker than the FG knot in my tests
  5. Crazy Alberto Knot
    • Pro: Nice low profile knot with a strong breaking point
    • Con: Up to 30% weaker than the FG knot in my tests
  6. Improved Albright
    • Pro: Nice low profile knot with a strong breaking point
    • Con: Weaker than the FG knot and the Crazy Alberto
  7. GT Knot
    • Pro: The viral version is easy to tie
    • Con: This knot isn’t nearly as strong as it’s touted for lighter lines

Click here to see the first contest I hosted for this connection.

Note: If your favorite knot isn’t included, leave a comment below and I’ll test it out and add it to the list.

Best Doubled Braid-to-Leader Knots

Many anglers like to double the braid by forming a loop at the end of the braid and then tying a line-to-line knot to connect the doubled braid to the leader.

In many instances, this does increase the overall line strength for anglers who are using a lighter braid relative to the leader.

However, the FG knot tied on a single line has proven to outperform the doubled knot connections in most of my testing. The only combination that consistently beats the single line FG knot is the use of the FG knot to connect a doubled line formed by the Bimini Twist to the leader.

Line Doubling Knots [Braid]

  1. Bimini Twist
    • Pro: Extremely strong doubling knot
    • Con: It often requires more twists (30+) with braid so that it won’t slip
  2. Spider Hitch
    • Pro: Faster to tie than the Bimini Twist
    • Con: Not as strong as the Bimini Twist
  3. Surgeon Loop (6-turn)
    • Pro: Extremely fast to tie
    • Con: Not quite as strong as the Bimini Twist

Doubled Line To Leader Knots [Braid to Fluoro]

  1. FG Knot
    • Pro: Thinnest knot I’ve ever seen while also having the highest breaking strength.
    • Con: Requires a very strong cinch before cutting the tags so that it fully locks into place.
      • Note: Only use this knot if tying a braided line to a stronger mono/fluoro leader.
  2. No-Name Knot (aka- Bristol Knot)
    • Pro: Quick and easy knot to tie
    • Con: Not as strong as the FG knot
  3. Yucatan Knot
    • Pro: Quick and easy to tie (very similar to Bristol knot)
    • Con: Not as strong as the FG knot

Note: If your favorite knot isn’t included, leave a comment below and I’ll test it out and add it to the list.

Best Braid-to-Swivel/Lure/Hook Knots

This next category is focused for anglers who use braided line and like to use swivels.

But it could also be useful if you like to use connect your braided line directly to your terminal tackle (although I do not recommend tying directly to your lure or hook using braid because fish can see it so much better than mono/fluoro… instead, use a ~20 to 30 inch leader in between your braid and lure/hook).

  1. Braid Uni Knot
    • Pro: Great knot that is very strong and easy to tie
    • Con: Although an easy knot to tie, some are faster
  2. San Diego Jam Knot
    • Pro: Strong knot that is easy and quick to tie
    • Con: Not quite as strong as the Modified Uni Knot
  3. Palomar Knot
    • Pro: Very fast and easy to tie
    • Con: Not as strong with braid as it is with mono
  4. Orvis Knot
    • Pro: Quick and easy to tie
    • Con: Not as strong with braid as it is with mono
  5. Improved Cinch Knot
    • Pro: Quick and easy to tie
    • Con: This knot doesn’t perform well with braid (prone to slippage)
  6. Clinch Knot
    • Pro: Quick and easy to tie
    • Con: This knot doesn’t perform well with braid (prone to slippage)

Click here to see results from a contest I hosted for this connection.

Note: If your favorite knot isn’t included, leave a comment below and I’ll test it out and add it to the list.

Best Fishing Knots for Monofilament/Fluorocarbon Line

best fishing knots for mono line

Monofilament line is used by almost all anglers in some capacity, so I’ve done many tests with knots using mono line.

For tests that I’ve done for my personal use, I focused on Fluorocarbon line, which is a specific type of mono.

Many anglers use Fluorocarbon for their leader material since it’s known to be stronger the less visible than traditional monofilament line.

Here’s what I’ve tested so far:

Best Mono-to-Mono Knots

Here are the top mono-to-mono knots that I have tested:

  1. Blood Knot*
    • Pro: Easy to tie with lines of similar size
    • Con: Not as effective with lines of different diameters
  2. Double Uni Knot
    • Pro: Easy knot to tie and it can be used for all connections
    • Con: Not as fast or strong as the Surgeon’s knot
  3. 3 Turn Surgeon’s Knot
    • Pro: Extremely easy and fast knot to tie with very strong holding strength
    • Con: Need to tie this before tying on a lure or hook
  4. SS Knot
    • Pro: Versatile knot connection with an impressive breaking strength
    • Con: Not quite as fast or strong as the Surgeon’s knot
  5. Albright Special
    • Pro: Easy knot to tie that looks very nice once completed
    • Con: Not as fast or strong as the Surgeon’s knot

Click here to see results from a contest I hosted for this connection.

Note: If your favorite knot isn’t included, leave a comment below and I’ll test it out and add it to the list.

Best Line-to-Hook Knots [Mono/Fluoro]

Now that we covered the very important line-to-line connection, let’s dig in to the best fishing knots for connecting our hooks and lures to the end of the line.

For this category, we’ll split it up into two sections to cover the two core different types of connections:

  1. Loop Knot – Leaves a loop so that the lure/hook has more range of motion in the water (less strength compared to snug)
  2. Snug Knot – Line hugs around hook/lure eye forming a strong connection (less range of motion)

Note: I’ve specifically focused on fluorocarbon line since it’s the most popular for saltwater anglers… if you want me to test these with standard mono, just let me know and I’ll add it to this post.

Best Loop Knot to Lure/Hook

When fishing with artificial lures, using a loop knot is an advantage because it allows the lure to have more motion in the water which most often leads to more strikes.

But the downside is that loop knots are not as strong as snug knots, so that needs to be taken into account when selecting your leader line size and when setting drag.

Here are my favorites:

  1. Rapala Loop Knot
    • Pro: The strongest loop knot I’ve tested so far
    • Con: Takes a bit longer to tie than many others and leaves a tag end facing up which can snag weeds/debris
  2. Non-Slip Loop Knot (aka. Kreh Loop)*
    • Pro: Very quick and easy to tie and has a tag end that points down towards the lure (more weedless)
    • Con: Just a tad weaker than the Rapala knot
  3. Figure 8 Loop Knot
    • Pro: Tested to be very strong (very close to Rapala Loop Knot
    • Con: Takes longer to tie than the Non-Slip Loop knot and does not have a weedless tag end
  4. Perfection Loop Knot
    • Pro: Strong loop knot that is quick to tie
    • Con: Tougher to tie since this knot requires the hook/lure to pass through a loop
  5. Canoe Man Loop Knot
    • Pro: Extremely fast loop knot to tie
    • Con: Strength test was great with traditional mono, but it didn’t perform nearly as well with fluorocarbon

Click here to see the first contest I did with this important connection.

Note: If your favorite knot isn’t included, leave a comment below and I’ll test it out and add it to the list.

Best “Snug” Knot to Lure/Hook

When going for maximum strength when having action in the water is not as important, then the snug knot is the way to go because a good snug knot will be a significant amount stronger than a good loop knot.

Here’s my ranking of the Snug knots that I’ve tested so far:

  1. Palomar Knot
    • Pro: Very strong knot that is easy to tie when using bare hooks
    • Con: Can become cumbersome when using larger lures because it requires the lure pass through a loop
  2. Clinch Knot
    • Pro: Quick and easy knot to tie
    • Con: Not as fast and easy as the Orvis Knot nor as strong as the Palomar Knot
  3. Uni Knot
    • Pro: Good knot that is fairly quick to tie and can be used for almost any connection
    • Con: Not quite as strong as the Palomar knot nor the Clinch knot
  4. Orvis Knot*
    • Pro: Very quick and easy knot to tie that is very strong
    • Con: Not quite as strong as the knots listed above
  5. Double Davy Knot
    • Pro: Very quick and easy to tie (just 1 more twist vs. the Davie Knot)
    • Con: Not quite as strong as the Orvis knot which is just as easy to tie
  6. Davy Knot
    • Pro: Very quick and easy to tie
    • Con: Not quite as strong as the Orvis knot which is just as easy to tie

Click here to see the first contest I did with this important connection.

Note: If your favorite knot isn’t included, leave a comment below and I’ll test it out and add it to the list.

More test data getting added soon, so be sure to bookmark this page!

Conclusion

best fishing knots

Of the many factors that determine if you land the fish of a lifetime that you hook, the one that we have 100% control over is the quality of the knots that we use.

So it’s essential for us to select the absolute best fishing knot for each connection to get the most overall line strength.

You have certainly heard the saying, “A chain is only as strong as its weakest link…” Well, a rod, reel, and an angler are only as strong as the knot between them and the fish.

Make it count.

There isn’t (and never will be) one fishing knot that can do everything with all line types and connection needs, so make sure to be mindful of the knot options you have for each connection need you have.

This post will continually grow over time as knot suggestions come in, so leave a comment below letting us know of any other knots you’d like us to add to this analysis.

Note: The * symbols next to the knots listed above are the ones that I personally use for each of the respective connections.

The tests have been done using 10 to 20 lb PowerPro braid tied to 20 to 30 lb Ande monofilament and Seaguar fluorocarbon.

Related Posts:

1. How To Tie The Perfect Leader Assembly For Inshore Fishing

2. What Is The Proper Drag Tension To Use For A Fishing Reel?

3. How To Get A Hooked Fish Out Of Structure Without Breaking Off

4. The Best Online Fishing Club…

P.S. – If you think your angler friends or fishing networks would enjoy seeing this, please Tag them or Share this with them. You Rock! Pa-POW!

Diana RWS 34 – T06 Trigger Review

0

Here we go, the most popular air rifle sold by RWS – the Diana RWS 34.

This gun has had a decades-long great reputation, and air gunners all over the world simply love it when they witness its awesomeness with their own eyes.

Although RWS 34 doesn’t have some of the fancy features of modern guns in the market today, it still stays on top of the best-seller lists in air rifle stores in the USA.

Fun fact: A few years ago, the New York State Field Championship (target distance 55 yards), was won with an RWS 34.

And we are talking about shooting against more powerful and expensive air rifles that cost thousands of dollars, yet the RWS 34 still manages to beat them all!

Diana RWS 34 – Guntype

This is a spring-piston gun.

Read more about spring-piston guns’ pros and cons, and how spring-powered guns compare to other types of air guns in this post.

(For more on the in-depth comparison between gas and spring piston, see this post.)

Diana RWS 34 is a break barrel gun. In order to cock it, you need to slap the barrel downward while holding the gun upward, insert the pellet and swing it into its original position.

It may sound complicated at first but when you get used to it, it will become second nature.

Besides, break barrel guns give you unlimited shooting capacity.

You can shoot tens of thousands of rounds without worrying about running out of power like CO2 or PCP air rifle.

In addition, this is a single-shot action gun i.e. you can only shoot once at a time.

Single-shot action gives you control over the type of pellet you shoot and, in fact, it makes you a better shooter as you get used to having to make your first shot count.

The barrel has 2 types of caliber (the internal diameter of the bore, measured in inches):.177 (4.5 millimeters) and .22 (5.5 millimeters).

Both calibers are ideal for plinking paper targets and spinners.

The .22 cal should be your choice for small game hunting and pest control.

=> For more on the differences between .177 & .22 and which jobs they do best, see this post.

Furthermore, the barrel is rifled with helical grooves inside so it makes the bullet spin before it exits the barrel

(For more on things you should know about air rifle barrels before buying, see this post.)

Check Price on PyramydAir

Stock

diana rws 34 stock

The stock is made of handsome beech wood.

Beech stock gives you lots of advantages:

First, beech stock is heavier, denser, and harder than other types of hardwood so it has good impact resistance.

Second, it has a beautiful wooden texture.

When looking at the beech stock, you will notice that its texture is uniform and gorgeous.

Meanwhile, the hue is soft and smooth and it looks great too.

For more on the in-depth comparison between synthetic and wood stock, see this post: https://airgunmaniac.com/synthetic-vs-wood-stock/

The stock is ambidextrous so you will have no problem shooting it whether you are a lefty or righty.

Moreover, this rifle has a Monte Carlo stock with a raised comb and low heel.

Monte Carlo stock has lots of advantages including improved accuracy ( the shooter’s eyes are lined up more naturally with the sight), some recoil absorption, and therefore faster follow-up shots .

Sight

diana rws 34 sight

If you are a fan of traditional open sight, you’re going to love the RWS 34.

The front sight is Trugglo fiber optic.

Moreover, the rear sight is fiber optic, too.

It is fully adjustable for windage (allowing you to adjust the sight left and right) and for elevation (allowing you to adjust t up and down).

You don’t need a scope when a useful fiber optic sight is already there!

(For more on how many types of air gun sights are out there and which one is suitable for you, see this post.)

Trigger

diana rws  34 trigger

The real jewel of the RWS 34 is the redesigned trigger, now named TO6.

The TO6 is so smooth and exceptionally light.

With a trigger pull of only 1 lb 3.6 oz, it is the best trigger you can find.

The trigger alone is worth all the money spent.

It’s very light travel, nice clean break, and light pull, and is adjustable, too.

In other words, the evolution of the T06 trigger is the icing on the cake.

It’s hard to improve upon perfection and I don’t see where any changes would be necessary.

Velocity, accuracy and power

The maximum velocity of this gun is 1000 FPS in .177 cal and 800 FPS in .22.

These are high-end velocities compared to other air guns on the market.

The Chrony Test gives us the results as follows:

In .177 caliber:

.177 PelletFPS
8.8 grains pellet880
Crosman Premiere 10.5 gr domed and Benjamin 10.5 gr HP790
Crosman Premiere pointed1016
JSB Exact RS917
H&N Field Target Trophy886
H&N Baracuda787
Gamo PBA Raptor1010
Beeman Crow-Magnum730

In .22 cal:

.22 PelletFPSFPE
11.9 gr RWS Hobbies724 13.86
RWS Superdome 14.5 gr68515.14
RWS Super H-point 14.2 gr67814.49
 15 gr pellet680 15.41 
Crosman Premiere 14.3 gr65413.58
RWS Superdome 14.5 gr65913.99
JSB Exact heavy 18.13 gr55712.49

As you can see, the actual numbers meet the advertised velocities and are quite consistent among different pellets.

(For more on the in-depth comparison between .22 and .25 caliber, see this post.)

diana rws 34 scope

How about accuracy and power? To answer this question, let’s look at the shooting tests.

The common shooting groups are: 

  • 0.185” at 10 yards with RWS Super H-point, 
  • 0.556” at 20 yards with RWS Super-H Point, 
  • Dime size at 20 yards, 
  • 0.247” at 10 yards with RWS Super H-point 14.2 gr, 
  • 0.26” at 10 yards with RWS Super H –point 14.2 gr, 
  • 0.615” at 20 yards with RWS Super H-point 14.2 gr, 
  • 0.556” at 20 yards with RWS Super H-point 14.2 gr, 
  • dime size at 25 yards, 
  • 1” at 45 meters, 
  • dime size at 25 yards, 
  • 1/4″ at 40 feet, 
  • 1-2” at 100 feet, 
  • 3” at 35 yards, 
  • 1” at 20 yards, 
  • 2” at 50 yards with RWS Superdomed, 
  • nickel size at 50 yards, 
  • dime to quarter size at 20 yards,  
  • 1/4” at 10 yards, 
  • half-dollar group at 30 yards, 
  • 1 1/2” at 20 yards, 
  • ickel size at 50 yards, 
  • less than 1/4″ at 40 feet, 
  • 1/4” at 20 yards with JSB Diabolo 13.43 gr, 
  • 1/4″ at 20 yards with RWS Super dome 14.5 gr.
  • 1” at 50 feet, 
  • nickel size at 10 meters, 
  • 1/4″ at 15 yards, 
  • same hole at 30 yards, 
  • 1.5” at 35 yards, 
  • 1” at 50 yards and 1.5” at 72 yards with JSB Heavy, 
  • 1/4″ at 60 feet with H&N FTT, 
  • dime group at 25 yards, 
  • dime size at 20 meters, 
  • bull’s eye at 40 yards, 
  • dime size at 20 yards, 
  • 5/8” at 20 yards. 

Moreover, this gun can:

  • go over 12cm in depth into the raw meat at a distance of 6 meters with H&N Baracuda .177
  • blow a Coke can up at 20 meters with H&N Baracuda
  • kill birds at 30 yards
  • kill squirrels at 50 yards
  • punch a Meisterkulgen pellet through both sides of a metal coffee can at 10 yards
  • shoot soft drink cans at 70 yards
  • kill prairie dogs at 25-40 yards
  • put a nice size dimple on a solid brass padlock
  • nail a squirrel at 35 yards with JSB Exact 7.8 gr dome
  • and punch through 0.5” ply board with RWS Superdome. 

Bottom line: this gun is extremely accurate and hits with serious authority so it has more than enough power to deal with common pests like squirrels, possums, skunks, etc.

Loudness

This rifle is very quiet.

It has hundreds of customer reviews without a single complaint about noise,

So you can shoot this gun on your property without bothering the neighbors or bring it to the hunting field for a stealthy hunt.

Shooting Ability

The effective shooting range of RWS 34 is up to 50 yards .

It can be used for target shooting, small game hunting, and pest control.

Warranty

As of this date, the Diana RWS has a lifetime warranty.

Specifications

  • Caliber: .22/.177
  • Velocity: 800 FPS with .22, 1000 FPS with .177
  • Loudness: 3- Medium
  • Barrel Length: 19.5”
  • Overall Length: 45.0”
  • Shot Capacity: 1
  • Cocking Effort: 33lbs
  • Barrel: Rifled
  • Front Sight: Fiber Optic
  • Rear Sight: Adjustable for windage and elevation
  • Scopeable: 11mm dovetail
  • Trigger: Two-stage adjustable
  • Buttplate: plastic
  • Suggested for: Small game hunting/Plinking
  • Trigger Pull: 33 lbs
  • Action: Break barrel
  • Safety: Automatic
  • Powerplant: Spring-piston
  • Function: Single-shot
  • Body Type: Rifle
  • Weight: 7.5 lbs
  • Length of Pull: 13.75″

Customer review

There are bunches of positive reviews on the Diana RWS 34.

They love its accuracy, power, and fantastic design.

Besides, shooters really emphasize the solid construction of this gun.

It’s excellently fitted and finished and better than most air guns.

For example, one shooter comments that you cannot feel any joint between the buttplate and the stock – evidence that lots of care are taken during the sanding process.

The bluing on this rifle is dark and even, and the overall metal finish is perfect as well.

The aesthetic design makes this gun look very slender, smooth, and beautiful.

That’s not all, many people tell interesting stories about how Diana RWS stands the tests of time.

Those owners have had Diana for 20,30 years and it holds on to its original velocity over the Chrony test after a few decades.

One shooter’s story is about how his friend has used the RWS to shoot squirrels and bats for 15 years

And it continues to do amazingly well under the extreme African climate.

Do you think the lifetime warranty is just for fun?

Nope, one customer somehow managed to bend the barrel into a C shape after 15 years of use

And Diana not only replaced the damaged barrel but also performed the overall checkup and returned it for free!

Pros and Cons

ProsCons
  • Beautiful Beech stock
  • Ergonomic Monte Carlo design
  • Amazing fiber optic sight
  • Awesome trigger
  • Consistent velocities with different kinds of pellets
  • Breath-taking power
  • Remarkable accuracy
  • QuietGuaranteed lifetime warranty
  • Stands the test of time
  • Excellent customer service from manufacturer
  • It would be nice if RWS added a hunting scope on it for badly-sighted shooters.

Price

The RWS 34 has a price of about 200 dollars.

It is a reasonable price for a gun that has an attractive design, is hard-hitting, extremely accurate, and can last for decades.

If you are not an air gun collector and just want a one-size-fits-all rifle that gets the job done, this is an excellent choice for the money.

Check Price on PyramydAir

Conclusion

Diana RWS 34 is one of the best air rifles in the market.

RWS is known for standing behind their air gun, their warranty is always viewed as the best in the business, and their well-made rifle sells like hotcakes.

RWS could cheapen up this $200 gun with a lawyer trigger, plastic adjustable rear sight, and crappier wooden finish but they didn’t.

It has an awesome trigger, luxurious fiber optic sight that breeds confidence, and great construction with a beautiful finish.

This is a gun you enjoy bragging about to other shooting pals!

Best Air Rifle Deals

Popular Posts

Can a 22 air rifle kill a deer?

0
"Debate over whether a 22 air rifle can effectively take down a deer has sparked curiosity among hunting enthusiasts. With its lower muzzle velocity...

Air Rifle Scope vs. Rifle Scope – Which One Fits Your Shooting Needs?

0
"Air Rifle Scope vs Rifle Scope: Unveiling the Ultimate Precision Optics. Discover the essential differences and benefits of these two optical devices, empowering shooters...

Air Rifle vs BB Gun: Understanding the Key Differences and Choosing the Best Option

0
"Air Rifle vs BB Gun: Unveiling the Key Differences and Choosing the Perfect Weapon for Your Shooting Needs. Delve into this comprehensive guide to...

Air Gun 101: What You Should Know about Air Rifle Barrels Before Buying

0
Have you ever heard the phrase: “Imitation is the sincerest form of flattery”? The Chinese must have been very sincere in emulating this proverb. I...

Can a Felon Legally Possess an Air Rifle in Tennessee?

0
"Understanding the Legalities: Felon Ownership of Air Rifles in Tennessee" can a felon own an air rifle in tennessee? In the state of Tennessee, the ownership...