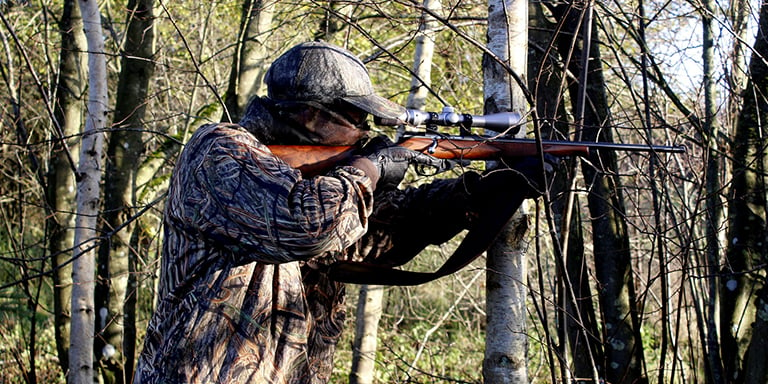
Are you looking for a new hunting rifle? If so, you may be wondering if a .22 air rifle is a good option. In this blog post, we’ll discuss the pros and cons of using a .22 air rifle for hunting, and we’ll give you some tips on how to choose the right one for you. So keep reading to learn more!
.22 caliber air rifles are popular because they offer a lot of benefits for hunters. They are lightweight and easy to carry, which makes them perfect for long hunting trips. Additionally, they are very accurate and can take down small games with ease. If you’re looking for a reliable and affordable hunting rifle, a .22 caliber air rifle is a great option.
TIPS FOR CHOOSING THE RIGHT .22 AIR RIFLE FOR YOU
When choosing a .22 air rifle, it is important to consider:
– Your budget
– The weight of the gun
– The length of the barrel
– The type of action (semi-automatic or bolt-action)
– The power source (spring-powered, gas piston, CO2, multi-pump, or PCP)
Yes, you can bird hunt with a .22 air rifle. These rifles are accurate and powerful, making them perfect for taking down small game. Just be sure to use the proper ammunition for your gun.
WHAT IS THE BEST .22 AIR RIFLE FOR HUNTING?
The best .22 air rifle for hunting depends on your needs and preferences. If you’re looking for a lightweight and easy-to-carry gun, a break-barrel rifle might be the best option. If you’re looking for a more powerful gun, a gas piston or a PCP rifle would be a better choice.
Yes, a .22 air rifle can do the trick, as long as the shot is placed to where vital organs are going to be terminally damaged. A head, heart, or lung shot with a .22 will take down a coyote in no time.
The maximum range of a .22 air rifle depends on the gun and the ammunition being used. Break-barrel rifles can typically shoot up to 100 yards, while gas piston and PCP rifles can shoot up to 150 yards.
CAN YOU KILL A DEER WITH A .22?
No, we do not recommend using a .22 air rifle for deer hunting. These rifles are not powerful enough to take down a deer humanely.
CAN YOU MOUNT A SIGHT ON A .22?
Yes, you can mount a sight on a .22 air rifle. This will help you to be more accurate when taking down small games. Just be sure to choose a sight that is compatible with your gun.
Conclusion
As we have discussed, the .22 air rifle is a perfect choice for small games and rabbit-sized animals. They are lightweight, accurate, and easy to carry which makes them perfect for long hunting trips. If you are a beginner, we highly recommend you choose this type of air rifle.
As Thanksgiving is just around the corner, I and my friends decided to go on a Turkey hunt. Laced with all the basic gear, we devised a hunting plan, however, one question that bugged us was that Can Turkeys smell? Can they trace a hunter with their sense of smell? After thorough research, I got some answers which are worth sharing this Thanksgiving.
Turkey belongs to the genus Meleagris and has two extant species the Wild turkey and Ocellated turkey. Over the years, Turkey has become a staple of Thanksgiving feast and Christmas dinner for its delicious and lean meat.
So, back to our quest, can turkey smell? Let’s elaborate on the subject to give you a better understanding.
Turkeys have a poor sense of smell which often works in the hunter’s favor. Many people fret about the fact that Turkey’s sense of smell might ruin an otherwise perfect hunt.
So when tracking down a gobbler in the hunt, it is highly likely that poor Turkey is not going to sense danger. Though, Turkey has a poor sense of smell it will outsmart the hunter in many other ways.
Turkey’s Sense of Smell
According to Journals of uchicago Unlike dogs and some other animals, wild Turkeys possess a poor sense of smell. The sense of smell is associated with the olfactory lobes, located in the forepart of the brain. Turkey has a poor sense of smell because of the under-developed olfactory lobes.
Unlike Turkey, Canine has an extremely sharp sense of smell because of the highly developed olfactory lobes. Vultures, condors, and griffons are considered exceptions as they are bestowed with a sharp sense of smell.
Do Turkeys Lack a Sense of Smell?
This saying is always linked with Turkey’s sense of smell ” If they could smell you, you’d never kill them.”
Turkeys do not lack a sense of smell but it is almost non-existent. Because of small under-developed olfactory lobes, many scientists believe their sense of smell to be equivalent to lacking.
Can Turkeys Smell Food Items?
Yes, They can. Even though the Turkeys have a poor sense of smell, but they can discern food items.
They are capable of sensing food items through smell. Turkeys lose the bet when it comes to taste and smell. Turkeys do not have a well-developed sense of taste and smell they mostly rely on their incredible vision and hearing.
Can Turkeys Locate food Using the Olfactory Gland?
Even though it is said that Turkeys have a poor sense of smell and taste, which leads to another question of how do they select only certain types of seeds, fruit, and suet from the feed?
That can be explained by the fact that they do have a sense of smell and taste even if it’s poor, the Olfactory glands are sufficient enough to help them distinguish their favorite food items. Some wild turkeys eat ticks by smelling.
How the development of Olfactory lobes affect Turkey’s sense of smell?
Turkeys are not blessed with a sharp sense of smell. Turkeys do not have a developed sense of smell as the brain region that controls olfaction is smaller in size. Smaller olfactory lobes are the reason Turkeys have little to no sense of smell.
Do Turkeys Have Nostrils?
Yes, they have well-developed see-through nostrils but that does not mean it helps in magically improving Turkey’s sense of smell. Turkey’s sense of odor is not heightened or weakened by the presence of nostrils or their size rather it is controlled by the brain.
Turkeys sniff
Turkeys can sniff but that does not mean they are going to smell far off things. Turkeys’ poor sense of odor comes in the way every time they try to sniff or smell something.
Does Scent Control help in hunting wild Turkeys?
No, there is no need to apply scent control when hunting a wild Turkey. They are not going to smell a hunter’s presence anyway thanks to their poor sense of smell. However, to not lure other wild animals when hunting in a forest, a hunter might want the help of scent control.
Does lust scent work for Turkeys?
No, lust scent would not be able to draw Turkey closer to the hunter. They would not be able to smell the scent in the first place let alone come closer.
Do Turkeys have Highly developed five senses?
Turkey does not even book a spot in the Top 10 when it comes to their sense of smell and taste. However, Turkey’s daylight vision is amazing, it is often said that they can see through a knothole. The sense of hearing and touch is also stronger in Turkeys.
Frequently Asked Questions
In brief, before going on a Turkey hunt, the hunter needs a better understanding of Turkey’s senses to devise a clever strategy to track down the gobbler. Turkeys do not have a well-developed sense of smell because of the relatively smaller size of the olfactory lobes. So, they are not going to smell out a hunter tracking them, however, they may outsmart him with their incredible vision and hearing.
Logger boots are more than just footwear—they’re your companions in the great outdoors. From shielding your feet against falling debris to ensuring they’re firmly grounded on rough and uneven terrain, these boots provide the ultimate protection for your feet. In this article, you’ll find the best logger boots on the market that offer unmatched protection and style.
Logging workers have some of the highest injury and fatality rates of any occupation. This high risk of injuries makes it essential for loggers to wear boots that offer maximum protection.
For this reason, logger boots generally have reinforced steel toe caps that offer protection against falling objects, such as branches or logs. These protect your feet from any potential impact and crushing injuries.
Additionally, logger boots make logging work less strenuous by providing comfort through good arch support, cushioning, and even moisture-wicking materials. These features reduce foot fatigue when worn for extended periods.
Comfort, longevity, and protection make a logger boot absolutely essential for anyone working in harsh conditions.
The Best Logger Boots
Best Overall Logger Boots: Georgia Men’s G7313 Logger Boot
Best Low-Heel Logger Boots: Georgia Men’s Low-Heel Logger Boot
Best Waterproof Logger Boots: Carhartt Men’s 8″ Logger Boot
Best Logger Boots for Winter: Chippewa Men’s 9″ Logger Boot
Best Steel-Toe Logger Boots: Irish Setter Men’s Mesabi Logger Boots
Best Composite Toe Logger Boots: Timberland PRO Men’s Rip Saw Logger Boot
Best Logger Boots On A Budget: AdTec Men’s 9” Super Logger Boots
Best Women’s Logger Boots: Chippewa Women’s 8″ Boots
Best Slip-On Logger Boots: ARIAT Men’s Powerline Pull-on Boots
Best Logger Boots Made in the USA: Thorogood Men’s Logger Series 9” Work Boots
Best Logger Boots for Spring: WOLVERINE Men’s DuraShocks Waterproof Boots
Best Overall Logger Boots – Georgia Men’s G7313 Logger Boot
Available at:
The Georgia G7313 logger boot is the brand’s most popular shoe and is my pick for the best logger shoe overall.
These steel-toe logging boots have one of the best waterproof designs I’ve seen. Built with the Georgia Waterproof System, they repel 100% of the water that tries to get inside. You could wade through ankle-deep water in these and still have completely dry feet.
Features
Georgia® Waterproof System
Abrasion-resistant rubber outsole
Goodyear® welt construction
Full-grain leather
Steel shank
Pros
Highly waterproof
Fashionable look
Excellent traction
Stable boot structure
Maximum impact protection
Fits true to size
Cons
Take longer to break in
What People Are Saying
A buyer raved about their spectacular traction on all surfaces and commended the waterproof design of the boots.
Another user stated that “I had tried on boots from various manufacturers, and these were the best boots I had owned.“
Best Low-Heel Logger Boots – Georgia Men’s Low-Heel Logger Boots
Available at:
My top pick for a low-heeled logger is the Georgia low-heeled boot. The boot makes up for the short heel with an oil and slip-resistant outsole that enhances traction and grip in uneven, slippery terrains.
The boot features a composite safety toe to protect your feet from any injury. It’s equipped with a waterproof system that protects moisture from seeming into your boots.
Features
1″ heel
Georgia® Waterproof System
Tempered steel shank
Oil and slip-resistant rubber lug outsole
Heel-stabilizing Counter Lock
Ergo-Fit safety toe
AMP LT insole with memory foam
Pros
Versatile and fashionable
Highly waterproof
Anti-slip outsoles offer great traction
Very comfortable
Composite Toe Cap offers protection
Cons
Not well insulated
Can wear out quicker due to lower heel
What People Are Saying
A user commended the boot’s comfort, quality, and durability.
Another buyer commented, “I was highly impressed with the traction offered by this boot. It allowed me to easily hike over extremely steep slopes without falling.
Best Waterproof Logger Boots – Carhartt Men’s 8″ Logger Boot
Available at:
My top pick for waterproof logger boots is the Carhartt Men’s 8” Logger. This boot features the Storm Defender waterproof membrane that keeps your feet dry while ensuring breathability.
This logger boot also has great traction due to its oil and slip-resistant outsoles. The 3M Thinsulate insulation inside the shoe also offers warmth and comfort.
Features
Carstrong® durable reinforced fabric
Storm Defender® waterproof breathable membrane
Composite toe protection
Carhartt Heel Stabiliser
Goodyear welt-constructed rubber outsole
Electric protection
Pros
Highly Waterproof
Insulated for cold weather
High traction with slip and oil-resistant outsoles
Great ankle support
Extremely comfortable
Cons
Tight toe-box
Take up to a week to break in
What People Are Saying
One customer commended the boots’ waterproof features and said, “The inside stayed dry even when I went into really deep water.”
Another buyer commented, “These boots exceeded my expectations and provided great ankle support at a reasonable price.”
Best Logger Boot for Winter – Chippewa Men’s 9″ Steel-Toe Logger Boots
Available at:
These Chippewa Loggers are one of the best logging boots you’ll get out there. With 400 grams of Thinsulate insulation, this shoe is truly the top choice for keeping your feet warm in the winter. They are also completely waterproof.
The brand’s Chip-a-Tex waterproof membrane prevents any water or snow from getting inside your boot while ensuring breathability.
Features
Chip-A-Tex® waterproof membrane system
Steel toe
Texon® insoles for cushioning
400 grams of 3M Thinsulate™ Ultra
Steel Shank
Goodyear® welt construction
Vibram® rubber outsole
Pros
Superior insulating system
Highly waterproof
Great traction
High protection against injuries
Extremely durable
Cons
Slightly heavy due to the added insulation
Runs narrow at the toe
What People Are Saying
“One user stated, “I will only buy Chippewa boots from now on.”
Another reviewer tested these out during the brutal winter conditions in Cleveland, Ohio. They reported, “These shoes are the most comfortable ones I’ve tried in my entire life.”
These Irish Setter boots are as safe as they are marketed to be. High-quality steel cap toes offer great protection against heavy falling objects so your toes are always safe.
These boots also have other features that make them a great investment for logging. They come equipped with an UltraDry waterproofing system that stops water from getting inside the shoe.
Features
Steel Toe for protection
UltraDry™ Waterproofing system
Electrical protection
Aggressive lug pattern
Oil and slip resistant
Heat-Resistant Outersole
Pros
Highly protective safety steel toes
Waterproof
Aggressive lugs on outsoles give great traction
Durable and Reliable
Cons
Take longer to break in
May have to size up
What People Are Saying
A logger who worked five days a week for 11 hours in a lumber yard commented, “I found these shoes to be worth every penny.”
Another happy customer commented, “After struggling for years to find boots that fit right, I finally found these Irish Setter boots and couldn’t be happier.”
Best Composite Toe Logger Boots – Timberland PRO Men’s Rip Saw Composite-Toe Logger Boot
Available at:
These Timberland loggers come with a composite safety toe that meets ASTM standards and offers good protection against any heavy falling objects.
The boot also has a puncture-resistant plate that prevents any sharp objects from stabbing in from below.
Features
Composite Safety Toe
Ever-Guard Leather for abrasion resistance
Puncture-resistant plate
Waterproof leather and lining
Timberland PRO exclusive Independent Suspension Network
Anti-Fatigue Technology Comfort System
Vibram® Outsoles
Pros
Composite safety toe caps
Slip-resistant outsoles for enhanced traction
Abrasion-resistant uppers
Good waterproofing system
Supportive and flexible
Cons
Laces wear out very fast and are short
They run slightly large
What People Are Saying
One user commented, “The boot is excellent for all weather conditions and is very good for tree work.”
Another buyer bought them for working on steep hills. “These boots provided spectacular ankle support and comfort.”
Best Logger Boots On A Budget – AdTec Men’s 9” Super Logger Boots
Available at:
Here’s my top pick for the best low-cost logger boot – The AdTec Super Logger. It has all the safety features necessary to protect you from falling objects and tough external conditions.
This boot protects your feet from potential hazards with high-quality steel toe caps, a sturdy build, and a waterproof membrane.
Features
Crazy Horse Leather
Goodyear Welt Construction
BROAD Steel Toe
Waterproof Membrane
One Piece Logger Sole
Pros
Affordable
No compromise on safety and durability
Minimal break-in period
Good ankle support
Cons
Heels may wear out faster than more expensive boots
Insoles are very thin and uncomfortable
What People Are Saying
One user stated, “The boot was great for the price and offered good support all the way around.”
Another buyer reported, “I consider them to be among the best boots.”
Best Women’s Logger Boots – Chippewa Women’s Tinsley 8″ Steel Toe Boots
Available at:
These logger boots are perfect for women that are on their feet all day doing strenuous work. This boot features the Chippewa waterproof Chip-A-Tex technology that keeps the boots dry.
They also come with 400 grams of Thinsulate to keep you warm in all conditions.
Features
Waterproof with Chip-A-Tex Technology
400-gram, 3M Thinsulate Ultra insulation
Steel toe meeting ASTM F2413-11 standard
400-gram, 3M Thinsulate Ultra insulation
Texon insole
Vibram Tacoma yellow plug logger outsole
Slip and oil-resistant outsole
ASTM electrical hazard rated
Pros
Waterproof
Insulated
Excellent protection against impacts and compression hazards
Comfortable and supportive fit
Great traction from slip-resistant outsoles
Cons
Long break-in time
Heavy
What People Are Saying
One buyer felt these boots provided the perfect combination of waterproofing, insulation, and steel toe protection.
Another logger who wore them while cutting down trees and digging ditches commented, “The soles gripped rugged terrain like glue. I was pleased with the ankle support of these boots.”
Best Slip-On Logger Boots – ARIAT Men’s Powerline Pull-On Boots
Available at:
The ARIAT powerline loggers are a great choice if you’re looking for work boots you can easily slip on and off.
The boots have a stylish, comfortable design that makes them easy to wear and have high traction, support, and protection.
Features
DRYShield™ waterproof construction
Oil and slip-resistant Vibram® rubber sole
Outdoor traction lugs with debris-releasing tread
External heel protector
Goodyear leather welt construction
Tempered steel shank
Composite safety toe
Pros
Highly waterproof
Comfortable
Easy to put on
Good traction
Extremely stable and comfortable
Cons
Very wide uppers make it hard to pull pants down over them
What People Are Saying
One user commented that “the boots perform well and fit comfortably. The composite toe prevented my toes from freezing”
Another buyer raved about the insulation of the boots and their durability.”
Best Logger Boots Made in the USA – Thorogood Men’s Logger Series 9” Waterproof Steel Toe Work Boots
Available at:
The Thorogood Logger Series 9” Waterproof Boot is a top-notch option for those seeking a logger boot made in the USA.
These boots are constructed with high-quality materials, ensuring durability and performance on the job.
Features:
Premium full-grain leather
American made
Vibram® heel outsole
Steel toe
Aztec lining and ultimate shock absorption
Vibram midsole
Goodyear storm welt construction
Thorogood “job-fitted” design
Pros
Made in the USA, guaranteeing quality craftsmanship
Excellent durability and longevity
Comfortable fit
Good arch support.
Waterproof
Cons
Runs larger than expected
Long break-in time
What People Are Saying
One buyer commented on the quality of the boots, stating that “the boots are top-notch!”
Another happy customer said “the craftsmanship of these boots is outstanding.”
Best Logger Boots for Spring – WOLVERINE Men’s DuraShocks® Waterproof Boots
Available at:
Finding the right logger boots for spring can be difficult. You want boots that can keep you warm in the chilly spring mornings but don’t have your feet sweating in the hotter mid-day.
After a lot of deliberation, my best pick for logger boots for spring is the Wolverine DuraShocks Steel-Toe boot.
These boots have the right amount of insulation that keeps your feet from sweating but doesn’t freeze your toes off in the morning
Features
Wolverine DuraShocks® for shock-absorption
200-gram Thinsulate™ insulation which is perfect for spring
Long-lasting Dri-lex® sweat-wicking lining
Removable double-density footbed for cushioning and stability
Fiberglass shank
Pros
The right balance of warmth and breathability
Good arch support
Excellent durability
Highly comfortable
Waterproof
Cons
Run slightly small
What People Are Saying
One buyer commented on how great the shoes were, and another one really liked their style.
Key Features of a Logger Boot
1. Reinforced Safety Toes
Reinforced toes or safety toe caps are necessary to meet shoe standards and protect the loggers using them.
Logger boots will either have a toe cap made of steel, composite material, or alloy, which protect against injuries.
2. Kiltie
Kilties are pieces of fringed leather sticking out from the bottom of the laces. Kilties are essential for protecting the leather boot from dirt and debris and increasing durability.
3. Raised Heels
Most logger boots have a 2-to-3-inch heel that keeps the foot elevated and provides arch support to the wearer. The heel also makes climbing easier and increases stability.
4. Steel Shanks
A shank is a material inserted between a boot’s insole and outsole to enhance structural integrity and provide arch support and stability.
In logger boots, shanks are most commonly made of steel to provide extra durability and support to the boot and protection for your feet.
5. Deep Lugs
Deep, multidirectional lugs provide the necessary grip and traction on uneven terrains such as mud, dirt, or snow.
How to Choose High-Quality Logger Boots
Here are the key aspects you must consider while choosing logger boots.
1. Waterproof
Logger boots should be waterproof to keep your feet dry and protected, especially if you work in wet and muddy conditions.
2. Durable
Your boots must withstand long hours in challenging terrains immediately without extreme wear and tear.
3. Comfort
When choosing a boot, look for boots with cushioned insoles and ample arch support to minimize fatigue and provide all-day comfort.
4. Warmth
Insulated logger boots are the right way to go if you work in cold environments. Warm logger boots generally have 400g to 600g of Thinsulate material.
5. Breathable
Choose logger boots with breathable materials or moisture-wicking linings to prevent excessive sweating and maintain foot hygiene.
6. Performance to Weight Ratio
Logger boots should offer a balance between performance and weight. Even though extra weight can mean extra protection and warmth, you don’t want to lug around 4kg of boots all day.
FAQs
What’s the best way to tie/lace logger boots?
Logger boots are typically tied the way normal boots are, in the regular criss-cross pattern. However, if you want greater support around your ankles and don’t want the additional hassle of tying your laces up every couple of minutes, you can try other techniques like the heel locking lacing, the 2-1-3 method, and the ladder lacing method.
How long do logger boots last?
Logger boots typically last from about 6 months to a year. However, if they are taken care of properly and don’t go through extreme conditions daily, they can last well over two to three years.
Do logger boots hurt your knees?
Logger boots aren’t supposed to hurt your knees. The boots are designed to prevent fatigue and overuse of your feet, knees, and legs. However, lack of shock absorption and a poor fit in some boots may lead to knee pain for the wearer.
What’s the best value-for-money brand of logger boots made in the USA?
The best value-for-money brand of logger boots made in the USA is Chippewa. Their boots use the highest quality materials and are proven to be extremely durable, comfortable, and long-lasting.
The Bottom Line
Buying the right logger boots doesn’t have to be difficult. Our carefully handpicked selection of the best logger boots should simplify the process and help you choose the right ones for your job.
These exceptional options are designed to meet the rigorous demands of logging work. So pick your favorite logger boot, and step into a world of comfort, durability, and protection. Your feet will thank you!
Squirrels are charming in the park. In your attic? Not so much.
I’ve spent years managing property, running air rifle drills, and dealing with wildlife up close. One morning I pulled down my attic hatch and found a gray squirrel staring back at me from a nest built out of my own insulation. Expensive lesson. Don’t make the same mistake.
Squirrels can damage furniture, chew through wires, cause disease, and have even been known to start house fires. They’re rodents — their teeth never stop growing, so they never stop chewing. What starts as a bit of scratching above the ceiling can escalate into torn insulation, chewed wiring, and a full-blown infestation.
The key is catching it early. Here are the 7 signs to watch for.
Before we get into the signs, a quick reality check. A squirrel problem isn’t just a nuisance — it’s a liability:
They chew electrical wiring, which is a leading cause of attic fires
They destroy insulation, driving up your heating and cooling bills
Their droppings carry disease
They breed twice a year — a small problem becomes a colony fast
Read the signs early and you save yourself thousands in remediation costs.
Sign #1: Strange Noises at Dawn
This is almost always the first red flag — and the one most homeowners dismiss for too long.
If you’re hearing scratching, rustling, or rapid scurrying in the attic or between walls, there’s a good chance a squirrel has moved in. Many homeowners describe it as someone running across the ceiling.
Timing tells you a lot:
Loud at dawn, fading by mid-morning → gray or fox squirrel
Noise at night → likely a flying squirrel, since they are nocturnal
Chewing sounds mixed with thumping → squirrels gnawing beams or dropping food caches
What to do: Don’t wait. Get up in the attic during daylight and look for the other signs below.
Sign #2: Roofline, Soffit, or Vent Damage
You can spot this one from outside — if you know what you’re looking for.
Squirrels only need a tiny gap to slip in — often around soffits, shingles, and vent openings. They’ll gnaw at plastic or aluminum vent covers to get access to the attic, especially during breeding seasons in early spring and late summer.
What to look for:
Jagged chew marks around roof edges and soffits
Cracked or broken vent covers
Small holes where the fascia meets the soffit
Gnawed wiring or piping where it enters the attic
Get a good pair of binoculars and do a slow walk around your entire roofline. Pay special attention to corners and transition points where materials meet — that’s where gaps form.
What to do: Photograph every damaged spot. Don’t seal anything yet — if squirrels are still inside, blocking the exit makes everything worse.
This is where a nuisance becomes a genuine safety hazard.
Squirrels constantly gnaw to wear down their teeth, and wiring insulation is often the unfortunate victim. This damage can lead to exposed wires, flickering lights, or even house fires. If your electrician can’t explain why a particular circuit is acting up — and you’re hearing noises above the ceiling — it may not be a coincidence.
Warning signs:
Flickering lights or tripping breakers with no clear cause
Scorch marks or burning smell near the attic access
Chewed wood structures alongside damaged wiring
I’ve personally seen attic fires attributed to rodent-chewed wiring. Don’t gamble on this one.
What to do: If you suspect squirrel activity near your electrical system, call an electrician before you do anything else. This is not a DIY-first situation.
Sign #4: Droppings and Persistent Odors
Droppings are one of the most concrete confirmations of an active infestation.
Squirrel droppings resemble rat feces, though slightly more rounded and often found in clusters. You’ll find them concentrated in corners, along beams, and near nesting areas.
Key odor clues:
A strong, musky smell emanating from accumulated urine — often mistaken for plumbing issues or mold
A sour, persistent smell that builds over time signals a dead squirrel trapped inside a wall or the attic
Don’t try to remove droppings yourself — squirrel droppings can carry diseases. Ask an expert.
What to do: Wear gloves and a mask if you must inspect. In most cases, contaminated insulation needs full replacement. This is a job for a professional.
Sign #5: Nesting Materials and Insulation Damage
If squirrels have been in your attic for any length of time, they’ve been actively building a home inside yours.
Squirrels tear apart insulation, cardboard, and even bits of fabric to create warm dens for their young. If you notice insulation or wood chips scattered around, or shredded debris tucked into corners, you’re likely looking at squirrel nesting behaviour.
What a squirrel nest looks like:
A ball of dry leaves, twigs, and shredded material in a corner or along a beam
Piles of loose insulation gathered in isolated corners
Fabric or paper scraps woven into a dense clump
Beyond the mess, there’s a real financial cost. Damage to insulation leads to increased heating and cooling costs due to reduced effectiveness.
What to do: If you find a nest, check carefully for juvenile squirrels before touching anything. Disturbing a nest with young inside during breeding season requires careful handling and, in many cases, professional help.
Sign #6: Yard Damage and Outdoor Destruction
Squirrel problems don’t always start inside. Often, the yard is the first place you notice something is off.
Squirrels can tear up landscaping when scavenging for food — leaving small divots in the yard, chewed bark on young trees, eaten garden plants, and damaged bird feeders.
Common outdoor damage signs:
Teeth marks on decking, fencing, and patio furniture
Bark stripped from young trees
Scattered garbage near bins (often blamed on raccoons, but squirrels are frequent culprits too)
Constant squirrel fighting and chasing — a sign the population is too large to support individual survival needs
I had squirrels wipe out an entire row of tomato plants overnight and demolish a bird feeder station I’d spent a weekend building. What looked like isolated incidents was actually the start of a population establishing territory. The yard damage was the first warning shot I ignored.
What to do: Persistent yard damage combined with roofline activity means squirrels are already scoping your home’s exterior for entry points. Time to act.
Sign #7: Repeated Squirrel Activity Near Your Roof or Chimney
Sometimes the most obvious sign gets overlooked — you’re literally watching squirrels hang around your house and not connecting the dots.
If you’re regularly spotting squirrels running along power lines, leaping from trees onto your roof, or hanging out near your chimney, you might be hosting more than you think. One squirrel might just be passing through. Two or more loitering near the same access point repeatedly is a sign of established activity — and possibly a growing family inside.
Squirrels running along utility lines or on the roof can lead to squirrels entering your attic or chimney space.
Squirrels are methodical. They’ll test the same weak point on your roofline every morning until they find a way through. If you’re seeing repeated visits to the same spot, that spot is already on their shortlist.
What to do: Walk your perimeter in the early morning when activity peaks. Note exactly where you see repeated visits — those are your priority exclusion points.
Quick Bonus: The Flour Track Test
Here’s a field trick worth knowing. Put flour on a piece of cardboard and place it near an area where you suspect squirrel activity. Squirrel rear paws have 5 long toes and are larger than the front paws, which only have 4 toes. Tracks look similar to the outline of a human hand skeleton. Cheap, easy, and surprisingly effective for confirming activity in a specific spot.
What to Do If You Have All the Signs
Here’s the short version of your action plan:
Don’t seal entry points first — confirm squirrels are out before closing any gaps
Use steel mesh or hardware cloth — squirrels chew through plastic and foam
Live trapping works well for individual animals; always check local regulations before relocating
Deterrents (motion sprinklers, predator scent) reduce pressure on specific zones like gardens
Air rifle control is effective and quiet in rural/semi-rural areas where legally permitted — a .177 or .22 caliber PCP/spring/gas piston air rifle handles pest management cleanly at close to medium range
The seven signs — ceiling noises, roofline damage, chewed wiring, droppings and odors, nesting materials, yard destruction, and repeated rooftop activity — are your early warning system. Catch two or three together and you’ve got a problem that needs addressing now, not next month.
The earlier you act, the cheaper and simpler the fix. Ignore it, and you’re looking at insulation replacement, electrical inspection, structural repairs, and a bill that’ll make you wish you’d grabbed the binoculars six months earlier.
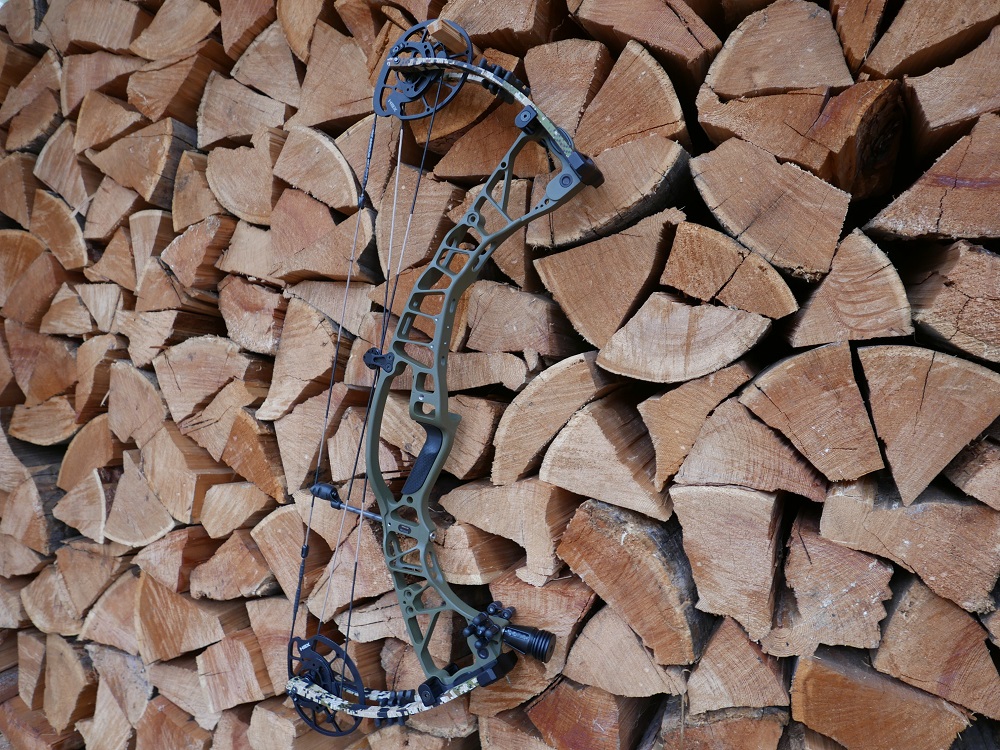
My personal history with Hoyt stretches back to the mid-’90s when machined aluminum risers, fast flight cables, and aggressive dual cams were cutting edge. The first Hoyt I owned was long between the axles with recurved split limbs and a very short riser. That particular bow was used to kill my first spot & stalk spring black bear and a solo mountain goat, both very memorable hunts.
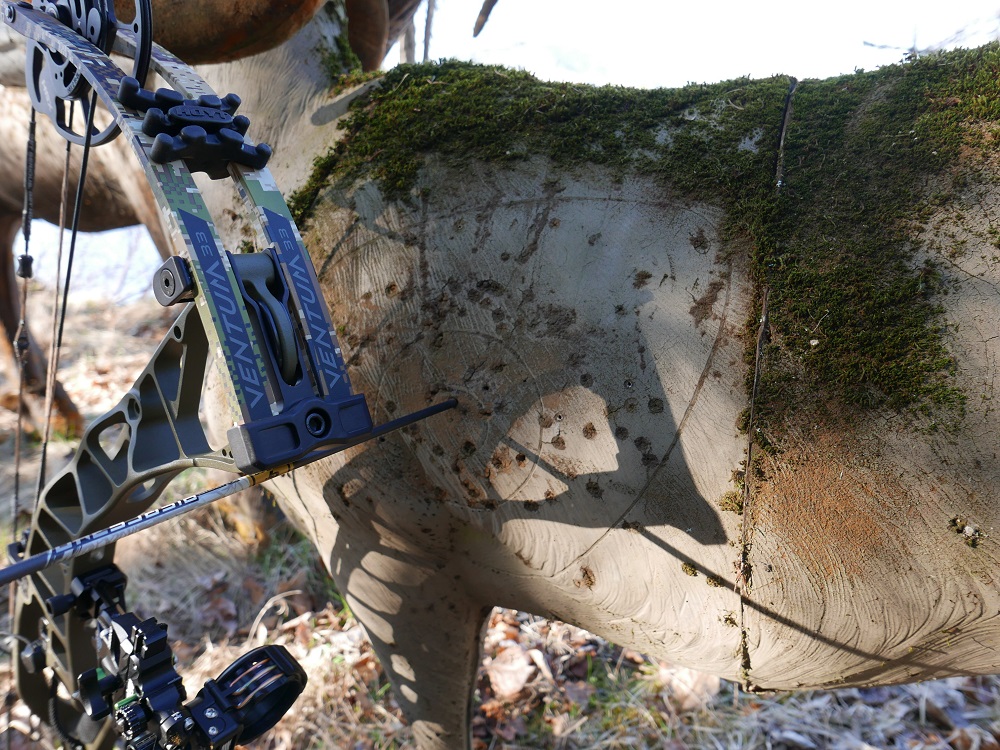
Hoyt Ventum 33
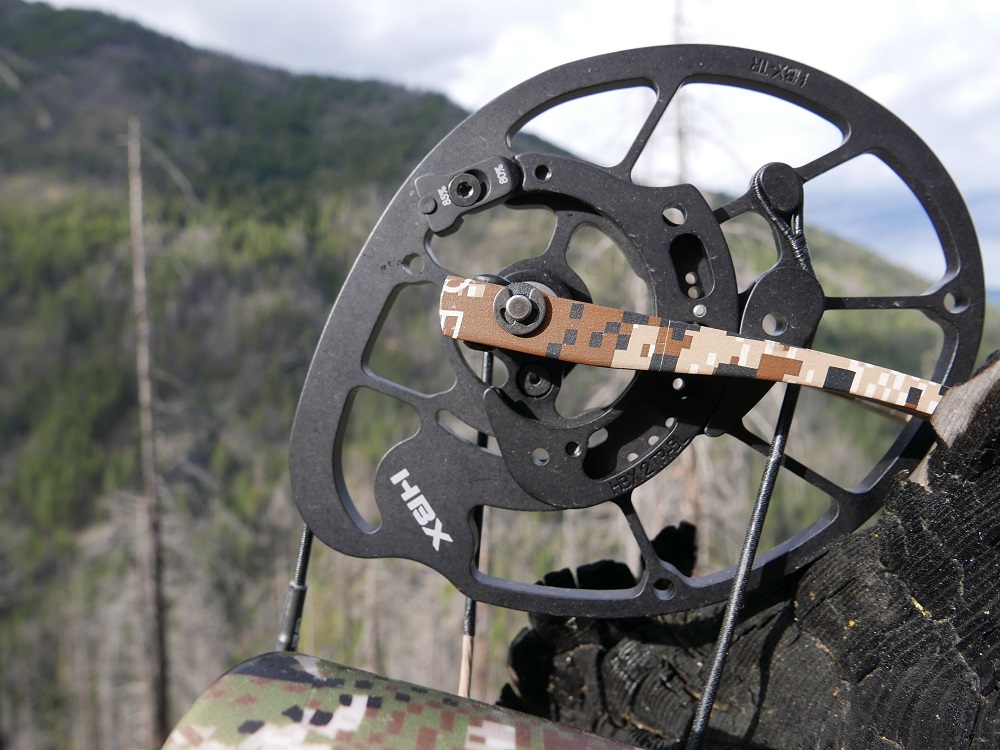
Fast forward to 2021; with a fondness of Hoyt etched in my memory, the new models were released. Of all the new models I was most eager to test the 33-inch Ventum. New for this year is the HBX cam which is a major departure from Hoyt’s Cam & a Half eccentrics of the past. The new cam system is a three-track binary eccentric which uses two different modules to cover the spectrum of draw lengths. The tuning of these cams is completely different utilizing shim spacers on the axel vs. a split yoke to achieve level nock travel.
Specs and Set-up
The Hoyt Ventum 33 is the longer brother to the Ventum 30 with a 33.125” axle-to-axle length and a 6.375” brace height.
It is available in draw lengths of 26-31 inches and draw weights of 30-80 pounds.
The draw weight of my test Ventum 33 is 70 pounds and the draw length is 27″ (module 2 position “I”).
The color is Wilderness Green paired with Optifade Subalpine. The string and cables are factory with a Tru Peep installed and a short d-loop tied 1/16 of an inch nock high.
The factory cam spacers were left in the baseline position while the initial break-in shots settled the strings. Switching between the 80 and 85 percent let-off, I came to prefer the 85 percent setting due to the slightly longer valley it provides.
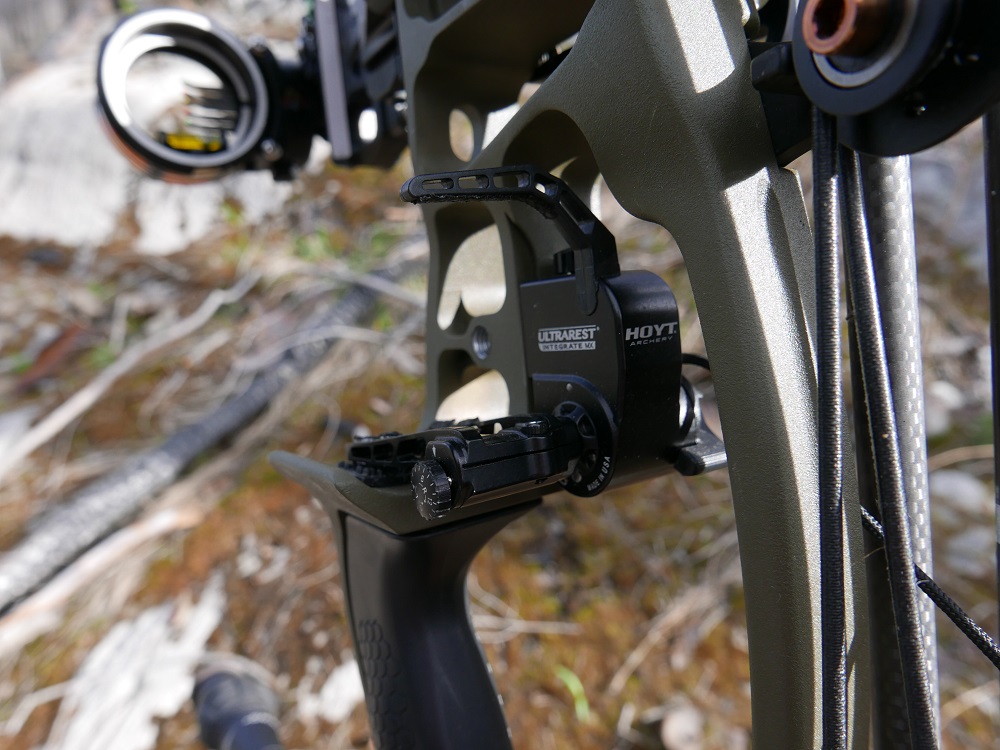
A QAD Integrate MX rest was mounted to the rear dovetail mount and centered at 11/16 of an inch from the riser. I utilized the picatinny mount that comes with the bow and attached an Axcel Accu-Hunter 5-pin sight. This allows mounting a Tight Spot quiver closer to the riser which balances well with an overall lower profile.
It’s a sharp-looking bow that comes in at 5.3 pounds with all the factory dampers and the included 2″ Short Stop stabilizer. Fully rigged with a 10” Shrewd stabilizer and a quiver full of arrows, it weighs 7.8 pounds.
Tuning and Performance
After the initial settling of the strings, the bow paper tuned to a perfect bullet hole within a few shots. I then proceeded to bare shaft tune at close range and worked out to longer yardage. I ended up moving the rest 1/32 of an inch outward: Both fletched and bare shafts were easily grouping at 60 yards.
To note, I’ve read where others on the Rokslide forum needed to move spacers around to achieve proper tune at center shot, but I had no such need. There is a tuning chart provided on Hoyt’s website here that shows different spacer configurations based on arrow flight feedback.
I had zero issues tuning and setting it up and it has not moved at all from the initial tune. There was no need to shim anything and had perfect holes in paper and the same result with bare shaft tuning. I’m still using the factory stings and they haven’t budged. I’ll be ordering a second set to shoot and tune and use the factory as a backup.
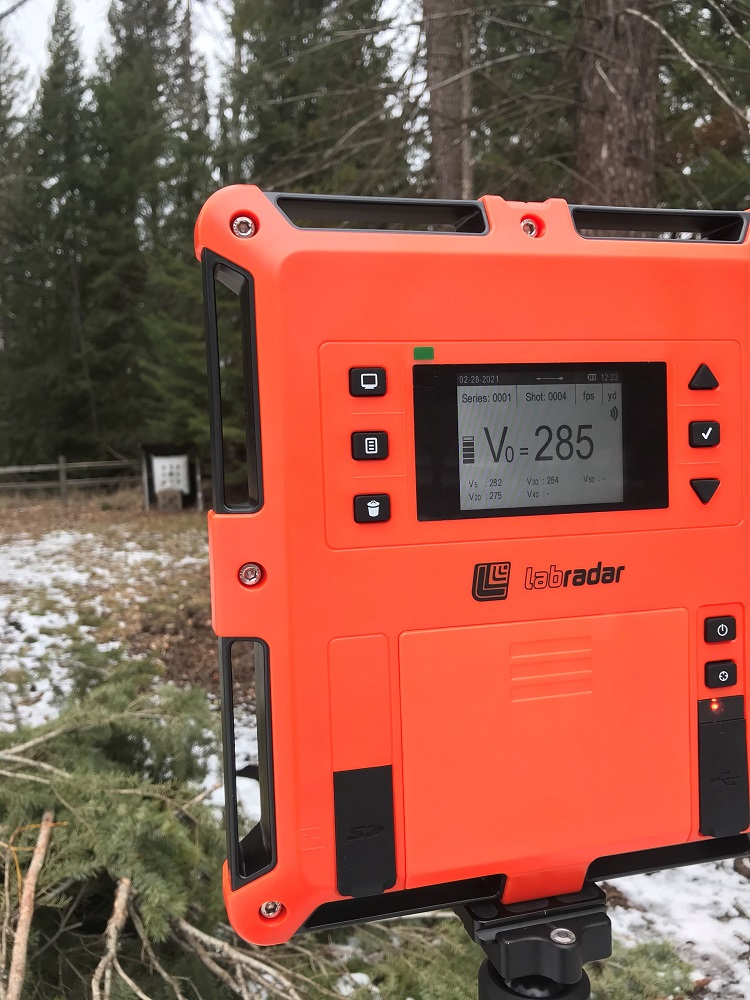
Hoyt Ventum 33 Speeds
I measured arrow speeds after the initial tune and was pleased with the results of my test arrows. Throughout this review (6 months) there has not been any change in speed nor a change in cam synchronization. The strings and cables have not seen any serving separation or premature wear on any of the contact points of the bow. The bow has been extremely accurate and forgiving. The extra heft seems to mute out fine movements of the bow arm and allows for a steady hold at full draw.
HBX Cam vs. ZT Pro Cam & a Half
My previous Hoyt hunting setup was an RX-3 Ultra with the ZT Pro cams set at 27 inches and 70-pound draw weight. Comparing the two, the new HBX cams seem to roll over smoother in the draw cycle due to the shape and size of the eccentric. Yet there seems to be less valley in the HBX but subsequently more speed. My test bow was 10 feet per second faster than the RX-3 and considerably quieter. The back wall is firm with the hefty mass of the bow. It’s rock-steady, and there is very little vibration at the shot.
Integrated Components
The QAD rests I’ve used in the past have not been integrated like this UltraRest version made for Hoyt. After 6 months of use, my thoughts are positive. It is really easy to install and it locks down solid. It has not moved or failed after many trips through the mountains this spring.
Picatinny Axcel Sight
The Axcel sight in the picatinny configuration was also able to withstand the rigors of mountain hunting. When the mounting option was first announced, I was curious to see how it would function in the real world. The sight is super simple to secure to the picatinny mount and has not moved or loosened. The side-to-side balance shift is really subtle but the shift forward has been noticeable. I added a little extra weight to my back bar to compensate. The Tight Spot can now be mounted closer to the riser. Which I prefer as it changes the center of gravity in a positive direction. Overall, the picatinny rail sight and the integrated rest make for a very clean and balanced setup.
Final Thoughts
The Hoyt Ventum 33 is a solid choice for a western hunting bow. The speed is zippy even with my short draw length and is incredibly quiet. At the shot, hand shock is non-existent due to a combination of the smooth cams and added vibration reduction components. The bow is on the heavy side when compared side-to-side with my RX-3. But, the extra heft aids in stability at full draw and follow-through after the shot. Its heavier weight hasn’t been noticeable in the field. While packing it in some rough country this spring I’ve not felt encumbered by it.
The integrated components don’t amount to much weight savings but do change how the weight is distributed on the bow. I really like having the different options and will definitely keep the sight and rest mounted on their integrated rails for the upcoming fall season.
Overall the Hoyt Ventum 33 is an accurate and well-balanced bow that suits my style of western big game hunting. A shorter version is available for those who prefer something in the 30” axle length. Check them out at your nearest Hoyt dealer to see what you prefer and learn more here.
Comment on this review or ask Josh questions here.
Check out Tony’s review of the Hoyt Carbon RX-5 here.
My favorite skincare ingredient is animal fat. Yeah, us homesteaders are an odd bunch…
As homesteaders, we brave the elements to pursue our passion and at times those conditions can be a bit unforgiving on our bodies.
We care for animals in the dead of winter and tend our gardens under the scorching summer sun. In time, these things can take a toll on the body, and they can leave us with dry skin and cracked, callused hardworking hands.
The good news is that these minor skin irritations caused by tough homesteading conditions and weather can be fixed with a little self-care and animal fat (that’s right I said animal fat). Rendered animal fat (especially tallow) has been used for generations in different household items including skincare products.
So let’s take a deep dive into the DIY world so you can learn how to use tallow to create your own body butter to help with that cracked dry skin that the homesteading life has left you with (which I firmly believe is a small price to pay while pursuing our homesteading passions).
What is Tallow?
Tallow is most commonly rendered beef fat, but it can also be made from other ruminant animals. Tallow can also be made from goat fat, sheep fat, and even deer fat.
Rendering animal fat is a natural process that causes the oils to melt away from the tissue when heated. Tallow is the liquid oil left behind; as it cools it becomes solid and appears as a hard oil block.
If you are interested in rendering your own fat rather than buying the finished product, you can learn How to Render Tallow right here.
Using Tallow Throughout History
Our ancestors traditionally let nothing go to waste, including animal fat that was rendered into tallow. Throughout history, tallow has been used for cooking and also for making many household products. As time went on, tallow and other animal fats were deemed bad for cooking, and so they disappeared from both our kitchen and our other household items.
Learn more about the history of animal fats in my Old-Fashioned on Purpose podcast episode here.
Tallow was used for:
Cooking Oil
Candles ( Learn How to Make Tallow Candles)
Soap (my Tallow Soap Recipe is simple and a great DIY project)
Skincare Products
Using tallow to create these natural DIY products is another step you can take toward self-sustainability and independence. Plus, it’s both fun to make your own household products and empowering to learn how to use all the parts of an animal so that there’s no waste.
Cooling Soft Tallow
Using Tallow for Skincare
Tallow is animal fat that has been used in cooking for generations, but perhaps it came as a surprise to you to learn that it can also be used as a skincare product.
Allow me to assure you here that you are not moisturizing with cooking oil and you won’t smell like beef fat if you use natural tallow skincare products. Tallow is a great moisturizer that naturally rebuilds your skin with many extra benefits.
Tallow Skincare Product Benefits:
Does not clog your pores
Is a natural moisturizer
Rich in vitamins and omegas
Has a similar molecular makeup to skin cells
Is completely natural
Has a long shelf life
If you are interested in learning more about using animal fat for skincare, you will love listening to this episode from The Old Fashioned on Purpose Podcast: How to Opt-Out of Toxic Mainstream Skincare.
By the way, if you are not interested in making your own tallow body butter, you can always buy some tallow balm from my friend Emily’s store (see podcast episode link above to listen to me and Emily talk about skincare). Check out Toups & Co. Organics Tallow Balms here.
One skincare product that can easily be made in your kitchen is tallow body butter. Tallow body butter a simple DIY project that takes a few ingredients and very little time.
How to Make Tallow Body Butter
Ingredients Needed to Make Tallow Body Butter:
16 oz of Tallow – Grass-Fed Sourced or Bought Tallow is fine or you can render your fat (learn how to render tallow here)
4 Tbsp.Extra Virgin Olive Oil (other liquid oils will also work; avocado oil is also a great choice) Note: It must be liquid oil that does not harden at cool temps.
Extras:
Essential Oil (Optional) Adding essential oil isn’t necessary but it can help make your tallow body butter smell nice. Start with just a few drops of essential oils and add a few more drops at a time until you like the scent. Make sure you are using a good-quality essential oil company. I personally prefer using doTERRA essential oils.
Arrowroot Powder (Optional) – Tallow body butter can sometimes feel slightly greasy, and adding arrowroot powder can help reduce the greasy texture and the skin absorb the butter. Add the arrowroot powder 1 tsp at a time until you like the texture.
Equipment Needed to Make Tallow Body Butter:
Sauce Pan
Medium Mixing Bowl
Wooden Spoon
Hand-Held Mixer (any mixer will work, but a hand-held one is best)
Glass Jar(s)
Liquid Tallow and Olive Oil
Making Tallow Body Butter Instructions:
Step 1: If you are using stored or bought tallow, you will need to heat it in a saucepan until it is all in liquid form. Stir the tallow as you heat to help melt down large clumps. Once in liquid form, pour it into your mixing bowl.
If you are using freshly rendered tallow that is already in liquid form, pour it through a fine-mesh sieve (it helps remove any random bits) into your mixing bowl.
Step 2: Allow the liquid tallow to cool to room temperature, but not to the point it has started to harden again. Once cool, add your olive oil (or other liquid oil).
Step 3: Stir with a wooden spoon to combine the tallow and oil mixture. After a few stirs, place the mixture into the refrigerator until solid.
Step 4: Remove the solid tallow mixture from the fridge, and let it warm up a bit at room temperature; this will make it easier to whip.
Step 5: Using your hand-held mixer, whip the tallow and oil mixture until it appears fluffy. It will resemble whipped cake frosting.
NOTE: This is when you can add the (optional) arrowroot powder, which helps reduce the possible greasy feeling/texture of your tallow balm. If you’re adding it, add the arrowroot powder 1 tsp. at a time. After adding 1 tsp. of it, whip the mixture again until the powder is fully incorporated and then test the texture of the product on your skin. Add up to another 1 tsp. of powder if so desired, and make sure you whip the mixture again until everything is fully mixed.
NOTE: This is also when you can add the (optional) essential oils. Start with just a few drops of your favorite essential oils, then whip it until fully incorporated, and then test the scent of your tallow body butter to see if it needs more.
Step 6: Scoop the tallow body butter into glass jars for storage. You can store your body butter for up to 5-6 months in a dark, cool place. Be sure to label your jars.
When you are ready to try your tallow body butter out, keep in mind that a little goes a long way.
Nourish Your Skin with Tallow Body Butter
Taking care of yourself is just as important as taking care of your animals and garden. Homesteading is hard work and it can be hard on one’s body. Remember a little self-care can go a long way and you can use all-natural homemade products to help.
Do you have any other self-care tips or DIY natural products recommendations for the hardworking homesteader?
Also, don’t forget to check out Emily Toup’s skincare products! Toups & Co. Organics: http://toupsandco.com/ Make sure you check out her Tallow Balms section! I love her products SO much.
With striped bass and bluefish crashing bait in the surf line, a large glide bait is a great way to cull out a cow bass.
Put glide baits to use when you find that next big fall blitz of bass and blues.
There’s nothing quite like standing on shore with hundreds or thousands of fish blasting bait out of the water mere feet in front of me. The energy, chaos and visual aspects of an inshore “blitz” are intoxicating. Conversely, often the most frustrating days fishing are when I have a seemingly endless glut of fish in front of me but I cannot catch a single one! Sometimes I could almost reach down and grab them, but cast after cast, they snub my offering and leave me ready to throw my rod into the surf. A similar scenario, albeit somewhat less frustrating, is when I see large fish slashing and attacking bait, yet all I’m catching is small schoolies.
This seems to happen more than one would think. If you have a few years fishing the salt under your belt, you may have experienced it. However, I always believe there’s a way around it; after all, the fish are there and feeding with reckless abandon, so the hard part is taken care of. Yet, despite the fish not taking their offering, some anglers insist on just casting the same plug or two over and over into the melee, hoping something will change. What they are thinking I can only guess, but I believe they assume that because the fish are feeding aggressively that it’s just a matter of time before they catch something.
This is not a good tactic. Waiting for the fish to cooperate is inviting the skunk—you need to go on the offensive and figure out what they want. Even if I’m catching a fish every handful of casts in a blitz, I’m not content. If the fish are going bananas at my feet, I should be hooking up every cast. One way I have recently begun to increase my catch numbers in these classic fall blitzes is to fish glide baits heavily. Sometimes called stick baits, these plugs are the perfect blitz busting plugs.
Glide baits originated in freshwater fishing—specifically musky fishing—and they quickly became popular with fishermen at the Cape Cod Canal. While they have proven to be extremely successful for anglers up and down the coast, they remain somewhat underutilized by the masses. So much so, I believe I’m letting you in on a personal secret that allows me to out-fish poppers, tins and swimmers by as much as 20 to 1.
Why Glide Baits?
First, glide baits are versatile. Many assume they are only good for areas with current. This is inaccurate. I use them everywhere: on sand beaches, in boulder fields, in big surf, and calm backwaters. The glide baits I use can be fished many different ways: fast and loose, or slow and low, and everything in-between. This is a huge advantage over the ubiquitous poppers used by most anglers during day time blitzes—glide baits can be implemented essentially anywhere, at any time. During a daytime blitz, I start by fishing glide baits with a moderate retrieve and a rapid tip action similar to how I work a pencil, but with smaller jerks of the rod. This puts the glide bait just below the surface, or waking on the surface, making a lot of commotion. Worked with slower tip action, the plug will begin to shoot rhythmically back and forth subsurface, like an underwater spook plug. The action will vary with the specific plug you’re using, but this hyper-erratic motion seems to really draw the fish when surface plugs and swimmers are coming up short.
Two of the author’s favorite glide baits include the Sebile Stick Shadd (left) and the Savage Gear Freestyler (right) in different sizes depending on what bait is present.
I also rely heavily on working both small and large glide baits slowly with sharp, random, jerks and twitches. This seems especially effective if stripers and blues are on bunker, or larger baits, where the predators sit below the forage fish waiting for the injured individuals to fall out of the school. Casting a glide bait out, letting it sink for a moment (or longer!) and then working it slowly with erratic twitches, seems to be irresistible to cow bass, and I have landed more than a few big fish using this technique. Just hold on when you twitch it, because that’s nearly always when the hit comes, and it is often violent!
Next, glide baits are deep, big-profile plugs. Even if you’re using the small 1-ounce Sebile Stick Shadd, it is relatively deep for its length. This is in contrast to many other plugs like the SP minnow or a pencil popper, which are slender profiles. This can be a huge advantage if the fish are on deep-bodied baits such as peanut bunker, adult bunker, snapper blues, mullet, etc. However, even if they aren’t, the deeper profile can attract the attention necessary to garner a strike when the surf is a proverbial soup of bait and predators. For example, I was on a spearing blitz last year where the fish were especially picky. Poppers and bucktails were useless, and while I could get them to hit an SP Minnow, the cast-to-hook-up ratio was only about 10:1. Frustrated, I put on a small glide bait and began hooking-up every cast. In this situation, I believe the glide bait was cutting through the noise and making itself seen.
Further, the fat, large profile of a glide bait seems to attract bigger fish. This past September I was fishing a blitz where bass were attacking silver-dollar sized peanut bunker. The bass would roll into the surf riding the white water of a wave, and I only had a short moment to cast to them before they sped back out to deeper water. I started with a small spook plug, and I was immediately into schoolies on every cast. After catching a couple dozen, I began to get bored, and decided to try a glide bait. My first cast was rewarded with a fish pushing 15 pounds, and I landed several more to low-teens. This repeated for three days in a row—schoolies on spooks and poppers, bigger fish on glide baits. I would have had no idea if I hadn’t decided to try the glide bait. It always pays to experiment.
Another key to the blitz-busting capacity of the glide bait is they cast phenomenally. They are no tin, but they cast about as far as a comparable popper. And the larger sizes cast as well as the smaller sizes if used with properly-sized gear. This makes them especially effective if you find yourself on an adult bunker blitz, but the fish are on an outer bar, or if you’re casting into a strong on-shore wind. While a metal lip might be a perfect plug when the fish are on big bunker, good luck casting one into a 30mph on-shore wind. And if the fish won’t take a popper, glide baits offer a similar profile as a metal lip and easily cast twice or three times the distance. Add in the versatility in which you can fish them, and you’ll be hard-pressed to find a plug that is better suited for these “bait on the bar” situations.
Finally, glide baits offer another advantage in blitz situations: they can be fished with single trebles or two inline hooks. Whichever you use, it makes no difference in the action or fishablility of the plug, and may even slightly increase the casting distance. When I’m fortunate enough to be in a blitz situation, I want to be able to get the fish off the plug as quickly and safely as possible so I can get back in on the action fast. Fishing with a single hook makes releases much easier on the angler and fish. Wasting time unhooking rear trebles from smaller fish is especially frustrating, and has led to more than a few injuries to my hands and the fish.
Glide Bait Options
I mainly rely on readily-available plastic glide baits. In my plug bag you’ll find the following: the suspending 1-ounce Sebile Stick Shadd, the 1-1/2-ounce Savage Gear Freestyler, the 3-1/4-ounce Freestyler (a personal favorite), and the 3- and 4-ounce slow-sink Sebile Stick Shadds. Sebile offers a staggering array of sizes and weights, and I have used others than those listed, but find the above to be my favorites. It is easy to pack several of these plugs as even the largest slides between the tubes in most surf bags.
Most glide baits cast well, cutting through a wind just as good if not even better than many poppers. This is just one of many reasons why the author prefers them to poppers in many different situations.
A few notes about these plugs. The small Sebile is not through-wired so one must be cautious with drag pressure. I’ve yet to break one, but I’ve bent the hanger substantially even on smaller fish. However, it is the perfect peanut imitator, and worth its small space in your bag. The Savage Gear Freestyler plugs are overall my favorite. They are inexpensive, come with two sets of strong forged hooks and have a thick profile that produces excellent action. For me, they are the more versatile of the two brands. Savage is coming out with a new line of Mackerel glide baits this fall that look phenomenal, but I have yet to test them. The larger Sebiles in slow-sink still sink faster than the Savages, but they cast better, and the increased sink rate makes them useful in a strong surf or current sweep. The fast-sink models are less useful where I fish, but have their time and place in Nor’Easter storm situations.
In addition to the glide baits produced by Sebile and Savage Gear as noted above, several other manufacturers produce similar plugs in plastic form. The Yo-Zuri Diving Slider was produced with pelagics in mind so it has the strength to stand up to most inshore gamefish and produces a great sub-surface side-to-side swim. Rapala produces several glide baits in the X-Rap Saltwater SubWalk, X-Rap Twitchin’ Minnow and X-Rap Long Cast Shallow, Williamson makes the SubSurface Pro, Strategic Angler produces some great crossover glides that work both inshore and off, and Tsunami will be introducing the Surface Striker this winter. On the wooden side, glide baits have become the “in” lure for garage builders to produce the last few years. Several options include glides produced by Fatty Lures, Loki Lures, Surf Asylum, RM Smith and others.
The list goes on and on for plastic and wooden glide baits, so don’t be afraid to try different manufacturers to see what works best for you; just make sure you have a few of these versatile plugs in your bag for the last of the late fall blitzes!
Arguably, rifles are harder to shoot (and harder to shop for) than pistols and shotguns. Out to a certain distance, rifle shooting is pretty straightforward, but long-range shooting might be the most difficult kind of shooting there is. What’s more, you’ll often see many kinds of scopes and attachments on rifles. Do you need any of that stuff? How do you know if you do?
Buying your first rifle doesn’t have to be hard or confusing, as long as you ask the right questions and follow the right steps.
Most people buy rifles for one of three reasons: hunting, home defense or sport shooting. Most rifles are designed primarily for one of these three purposes, although some can fill multiple roles fairly well. For your first rifle, we recommend focusing on just one of these applications — whichever is most important to you. Later in this guide, we’ll offer some tips on how to choose the best rifle for your specific needs. If you’re more interested in a different kind of firearm, we have a guide to buying your first handgun and a guide to buying your first shotgun, too.
Know the Law
Under federal law, you must be at least 18 to purchase a rifle from a gun shop or licensed firearm dealer. Most states have the same requirement, but in some places, the minimum age may be higher. Be sure that you understand the law before attempting to purchase a firearm.
Other legal requirements apply. To purchase a rifle, you must:
Not have any past criminal convictions, with certain limited exceptions
Not have undergone treatment for drug or alcohol addiction within the last five years
Not suffer from any disease or mental illness that could impair your judgment
Be a U.S. citizen or legal immigrant
Obey all other state and county laws in your place of residence
If you need help finding or understanding your local firearm laws, contact the police department or sheriff’s office. They’ll be happy to help you fill in the blanks.
Types and Parts of Rifles
Before you buy your first rifle, you should have a basic understanding of the vocabulary of firearms, as well as the types of rifles and how they work. We won’t cover everything there is to know about rifles here, just the fundamentals. You can find a more detailed breakdown in our guide to identifying the parts and functions of a rifle.
Rifle bullets are measured by caliber, which describes the diameter of the bullet in either inches or millimeters. Generally, you can assume that the measurement is in inches if it doesn’t have a “mm” specification, as in “7mm.” Larger bullets typically travel faster, hit harder, and inflict more damage, but depending on your needs, that may not be the ideal outcome.
The barrel is the part of the rifle through which bullets travel after being fired. The end of the barrel (from which bullets exit) is called the muzzle, and the end closest to the shooter is called the breech or chamber.
Depending on the type of rifle, bullets (also called “rounds”) are loaded into a detachable magazine, a tube magazine, or directly into the chamber by hand.
A magazine is a container that feeds bullets into the chamber, usually by means of a spring. Detachable magazines, as the name suggests, can be separated from the gun entirely. Tube magazines, on the other hand, are integrated into the rifle itself.
The bolt is a heavy, cylindrical part driven by a spring or operated by hand. Its function is to push bullets out of the magazine and into the chamber.
The charging handle, if present, enables the shooter to manually retract the bolt, and the bolt release allows it to return to its normal forward position.
The stock rests against the shooter’s shoulder to provide support and stability.
The trigger actuates the firing pin when pulled. The firing pin, in turn, strikes the primer of the bullet currently loaded into the chamber, igniting the gunpowder and causing the rifle to fire.
Action Type
There are many different rifle action types, but in most cases, the differences are negligible from the user’s perspective. For simplicity, we’ll go over semi-automatic rifles (a broad category), bolt-action rifles, and lever-action (or pump-action) rifles.
The majority of rifles owned and sold today are semi-automatic. These rifles use detachable or integrated magazines and fire one round with each pull of the trigger, with no further action required from the shooter. Many novice shooters prefer semi-automatic rifles for their simplicity and ease of use, although they’re typically more expensive.
Bolt-action rifles are close behind semi-automatic models in popularity. They may use detachable or integrated magazines, or they may require rounds to be loaded directly into the chamber by hand. After firing, the shooter must manually retract the bolt to eject the empty casing, then close it to chamber a new round. Bolt-action models are easy to use and often cheaper than semi-automatic rifles, making them another great choice for your first rifle.
Today, lever-action and pump-action rifles aren’t very common, but they’re still popular with certain kinds of shooters. Both have integrated, tubular magazines similar to those found on many shotguns. Shooters load rounds into the magazine individually, then chamber rounds by actuating the forearm or lever mechanism. Some shooters prefer inexpensive, pump-action rifles chambered in small calibers, such as .22LR, for target practice or varmint control.
Caliber Selection
When you’re ready to start shopping for your first rifle, we recommend choosing a caliber or range of calibers first, based primarily on the role you most want the rifle to fill.
There’s no official consensus on where the dividing lines are between small, medium, and large rifle calibers, but there are some especially common and popular calibers within each group.
Popular small calibers include .22 LR, .22 WMR and .17 Hornet
Popular medium calibers include .223/5.56, 7.62x39mm and 6.5mm
Popular large calibers include 30-06, .308, and .50 BMG
If you plan to go hunting, caliber selection depends on what you want to hunt; you’ll need bigger bullets for bigger game. Sport and recreational shooters also choose calibers based on the particular sport. Different events call for different calibers, and there’s a lot of variance. Home-defense rifles should generally be medium-caliber, but overpenetration may be a major concern; we’ll cover this in more detail toward the end of this guide.
Carrying or Transporting Rifles in Public
In most states, it’s legal and fairly straightforward to transport long guns in your vehicle. Keep them in a case and unloaded to be safe. You can also check cased guns as baggage when you fly domestically—just make sure you comply with all TSA and airline-specific regulations.
It’s also legal to drive through firearm-unfriendly states with guns in your car, as long as you comply with all provisions of the Firearm Owners’ Protection Act (FOPA). For more information, check out our guide to traveling with guns.
Other Considerations
Safety
Most modern rifles have external safety mechanisms that must be toggled off before the rifle will fire. Be sure to familiarize yourself with the safety mechanism of any rifle before you buy it, as there are many different kinds. Always follow the four rules of gun safety, and if you have kids, make an airtight plan for keeping your guns out of their hands (our gun safety guide for parents is a good start).
Reliability
In the context of firearms, a gun is reliable if it consistently fires when it’s supposed to (and never fires when it’s not supposed to). Most modern rifles are highly reliable, but be sure to emphasize this point in your research.
Capacity
Magazine-fed rifles typically hold between five and thirty rounds. In general, a bigger magazine is better, but some states have implemented legal restrictions on magazine capacity, so make sure you know the law. There are also some situations wherein you may want or need a smaller magazine — more about that in the next section.
Size, Length and Weight
A rifle’s overall size, weight and caliber are three of the biggest variables that determine how easy or hard it is to fire it. In particular, smaller shooters will find it more difficult and uncomfortable to fire large, high-caliber rifles.
Pay special attention to a rifle’s length and weight if you plan to install any firearm attachments, such as scopes, bipods or extended magazines. It’s easy to get carried away with attachments, too many of which can make a rifle too bulky and awkward to use effectively.
Price
Guns are expensive, and high-quality guns are really expensive. Even so, we don’t recommend looking for the cheapest rifle you can find. Cheap rifles are more likely to be poorly designed or manufactured, either of which can lead to safety or reliability problems. There’s nothing wrong with shopping around for a good deal, but in our experience, it’s best to spend a little more on a well-made gun that you can count on for a lifetime.
Accessories
New shooters should buy only those accessories that are truly essential for the rifle’s intended purpose. For example, if you want to hunt deer or compete in long-range shooting sports, a decent or high-end scope is virtually mandatory. A sling and a hard-sided case are good investments for any rifle shooter.
Ease of Use
There is such a thing as “too much gun.” If you’re new to rifle shooting, start simple and master the fundamentals first. To that end, a mechanically simple rifle with few or no accessories is often best. Once you’ve become familiar with a rifle’s parts and operation, you can confidently upgrade to a fancier, more complicated model if you want to.
Cleaning
There’s usually a linear relationship between simplicity and ease of cleaning. Bolt-action plinking and hunting rifles that have only a few moving parts are quick and easy to clean, whereas some semi-automatic models can require much more labor-intensive maintenance. Whichever way you go, never underestimate the importance of keeping your rifle meticulously clean.
Choosing the Right Rifle for Your Needs
Now that we’ve gone over the basic considerations, we’ll offer a few tips on choosing your first rifle based on its primary purpose.
Hunting
You’ll want to choose the caliber of your hunting rifle based on the kind of game you plan to hunt. Your local Game and Fish department likely enforces restrictions regarding minimum calibers for large game (bullets that are too small can’t ensure a clean kill and cause the animal unnecessary suffering). Conversely, you don’t want a large-caliber rifle for small game; there won’t be much usable meat left behind.
In some states, there are also restrictions on magazine capacity for hunting rifles. The intent behind these laws is to encourage hunters to take careful shots so as to maximize the chances of a clean, humane kill — an important skill to practice, even if it’s not mandated by law.
A high-quality scope is arguably the most important part of a hunting rifle. Any experienced long-range shooter will tell you that an expensive scope on a cheap rifle will serve you better than a cheap scope on an expensive rifle.
Sport Shooting
Again, we can’t offer much specific advice on choosing a rifle for sport shooting because it will depend heavily on the sport. There is one useful rule of thumb, though: don’t spend a ton of money on a rifle right out of the gate. Start with a basic, affordable rifle that complies with the rules of the sport and give yourself some time to make sure you want to stick with it for a while. If you do, you can upgrade your gear later on.
Home Defense
Pistols and shotguns are typically better home-defense weapons than rifles, but not always. The biggest problem with using rifles for home defense is overpenetration. Rifle bullets travel much faster than pistol and shotgun projectiles, meaning they tend to go through more things before finally stopping. This can be a real problem indoors; rifle bullets are more likely to penetrate multiple walls, possibly hitting your other family members, or even your neighbors several houses over. You could be held civilly or criminally liable if you accidentally shoot an innocent bystander while defending your home.
If you do choose a rifle for home defense, keep the caliber relatively small. Calibers like 5.56 are popular for home defense because they offer decent stopping power without a wildly increased risk of overpenetration. Be sure to also choose ammunition specifically designed to minimize penetration, such as hollow-point rounds or frangibles. Or you could opt for a shotgun to defend your home instead.
Finally, bear in mind that rifles are long, meaning they’re difficult to maneuver in small rooms or hallways. Regular training on using long guns in close quarters can help mitigate this concern.
Once you’ve narrowed your list of potential rifles down to a few candidates, test them out, if possible. Many gun ranges rent out rifles for $10 to $20 per hour so you can try before you buy. If you’ve never fired a rifle before, sign up for a beginner’s class or ask an experienced friend to help you get started. After following all the steps in this guide, you’ll be well-prepared to buy a rifle perfectly suited to your needs. Happy shooting!
We asked a top-tier firearms expert a fundamental question: What is the largest caliber bullet on Earth? The Barrett M82 .50 caliber sniper rifle is noted for being the largest-caliber rifle that can generally be owned by civilians. According to the National Firearms Act of 1934, calibers larger than .50 are not actually illegal. But they are highly restricted, and some communities and states still ban such firearms and their ammunition. Both the weapon and the ammunition are considered destructive devices under the NFA and therefore require a background check and transfer.
Certain historic firearms are exempt, however – notably the German-produced Mauser 1918 Tankgewehr, T-Gewehr, the world’s first anti-tank rifle. While it was chambered for the 13.2mm TuF (Tank und Flieger) round – which is .525 caliber – it is generally legal to own. (Check with local law enforcement to make sure.)
Other firearms must be rechambered to be fully legal. One noteworthy example is the British, World War II-era Boys Anti-Tank Rifle, which was produced as a .55 caliber weapon. When that rifle was offered for sale as military surplus after the Second World War, most were rechambered to .50 in order to comply with the NFA.
Yet neither the Boys Anti-Tank Rifle nor the T-Gewehr is the largest-caliber firearm offered for sale today. A common misconception is that the .700 Nitro Express has the distinction of holding the largest-caliber bullet – but that’s not correct. The cartridge was introduced in 1988 by boutique gun makers Holland & Holland of London, England for big game hunting and as a scaled-up version of the .600 Nitro Express. Single factory-loaded .700 Nitro cartridges now typically cost around $100.
Meet the .950 JDJ
When it comes to a rifle cartridge, nothing is larger than the .950 JDJ, which uses 240 grains of powder to push a 2,400-grain bullet at 2,100 feet per second (FPS). In addition to being the largest caliber on the market today, it has also been measured as generating 277 foot-pounds of recoil, or approximately 10 times as much as a 30-06 rifle. For that reason, shooters must use scopes, bipods, and other components that are designed to handle the force.
The .950 JDJ large caliber rifle cartridge was developed by American gunsmith and weapon designer J. D. Jones of SSK Industries. It has a bullet diameter of 0.950 inches, while its case length is 2.75 inches. Projectiles are custom-made and commonly weigh around 3,600 grains, or roughly half a pound.
Despite the fact that it is nearly double the size of a .50 caliber bullet, SSK was able to receive a sporting use exception to deregulate its rifles and accompanying rounds. It can be owned like any other Title I rifle by an American citizen at age 18. However, SKS only manufactured three of the rifles and actually stopped producing the ammunition in 2014.
Few may ever get a chance to shoot this rifle, but the question to ask is whether you’d even want to try.
MORE: Zumwalt – The Navy’s Stealth Destroyer Firing Hypersonic Missiles?
MORE: Could the U.S. Navy Bring Back Battleships?
A Senior Editor for 1945, Peter Suciu is a Michigan-based writer who has contributed to more than four dozen magazines, newspapers, and websites with over 3,000 published pieces over a twenty-year career in journalism. He regularly writes about military hardware, firearms history, cybersecurity, and international affairs. Peter is also a Contributing Writer for Forbes. You can follow him on Twitter: @PeterSuciu.
At SHOT Show 2024, Beretta treated us to one of the more exciting reveals during their special range event.
The Italian firearms company rolled out the Ultima Patrol…a new 12-gauge semi-automatic shotgun with a particular set of skills.
This black sheep of the A300 family is not into hunting or clays; it’s a tactical shotgun with modern features.
And while we had a brief encounter with it in Las Vegas, we weren’t going to leave a judgment call like this up to a first blush.
We got the A300 Ultima Patrol and practically ran to the range to test it out. So follow along as we walk through the specs, features, and performance.
Beretta has done a bang-up job of packing a lot of features into this tactical semi-automatic shotgun while keeping the price reasonable.
Specs & Features
Specs
Caliber: 12 gauge (3” chamber)
Choke: Mobilchoke
Length: 38”
Barrel Length: 19.1”
Action: Semi-auto (gas operated)
Weight: 7.1 lbs.
Capacity: 7+1
Comes with: cardboard box, owner’s manual, extra spacers
Features
Oversized controls
Accessory mounts
Enhanced loading port
Source: Beretta
Background
The Ultima Patrol is a new addition to the A300 family of shotguns which, up until now, has only offered hunting and sporting models.
Building on the same receiver, Beretta shortened the stock and included other features more befitting a tactical gun while keeping it in that middle-ground price range.
Many will draw the obvious comparisons to the 1301 and will want to know the main differences. The 1301 is made in Italy, while the Ultima Patrol is made in Tennessee.
Beretta 1301
In addition, the Ultima Patrol’s barrel is not cold hammer forged, but it does utilize a shorter forcing cone in conjunction with a falling lock bolt.
By contrast, the 1301 uses a longer forcing cone and rotating bolt head.
Who Is It For?
The owner’s manual states this shotgun is not recommended for hunting applications.
While birds of many a feather might rejoice at this news, who did the oldest gun manufacturer in the world have in mind for this shotgun?
While strictly a guess on my part, I suspect Beretta is trying to take advantage of that recent lull in production of the Remington 870 — a trusted accessory to many law enforcement agencies.
Should a worthy yet affordable alternative rise up, many departments would have to consider it.
The shortened overall length and features make this gun a fighter that’s easier to handle in confined spaces. It will be right at home in its namesake role in law enforcement agencies across the U.S.
However, those same features also make the Ultima Patrol a great option for a home defender.
The gun is pretty complete as is and could easily serve either role with minimal accessories.
Fit & Feel
The first thing I noticed about this shotgun was how light it is.
Beretta lists it at 7.1 pounds, but my scale showed it at 6 pounds, 15 ounces, with an optic added. Next was the texture on the grip and forend.
It’s aggressive, to say the least, and made of black plastic, but does a great job staying in your hands as a result. The only minor problem was the QD mount in the stock. It wouldn’t hold a QD.
After contacting Beretta, I trimmed back a little of the plastic around the recess. This worked like a charm.
Light sanding with a Dremel flattened the edges enough to allow the QD to seat.
The receiver of the model we tested was a very nice shade of grey with a flat finish, though there’s a black and camo model available too.
The sights are a ghost ring rear and a red fiber optic front. These were great, but I opted to use the included Picatinny rail on the top of the receiver to mount a red dot.
I don’t often expect much from a shotgun trigger, but the Patrol’s is nice.
It broke cleanly at an average of 2 pounds 13 ounces with zero pre-travel. Reset was crisp, audible, and tactile and occurred after a couple millimeters of return travel.
The magazine tube easily accommodated seven rounds of 2 3/4” shells, but I found I was also able to ghost-load another shell on top of the lifter.
With one in the chamber, this created a total capacity of 9 shells ready to go!
How Does It Shoot?
With the relatively light weight of the Ultima Patrol, I was curious to see how it would handle recoil. The butt pad isn’t enormous but consists of a gel-like rubber that does much to mitigate the jarring blow of 12-gauge shells.
The recoil is still substantial, but the gas system and butt pad make it manageable. We shot well over 150 rounds during testing and didn’t need ice or Advil at the end of the day.
Luckily our range day didn’t look like this
I was impressed with the speed of the gun and how quickly I was able to empty the magazine, though Beretta says the 1301 is a little faster.
It took three runs of this drill to sufficiently heat up the barrel enough where caution was required on the reload.
Using the front sight, I experienced intuitive aiming, a comfortable cheek weld, and good eye alignment without having to adjust my head.
Later, the added height of the red dot broke my cheek weld slightly, but this was easily compensated for.
At SHOT Show, Beretta reps revealed to us that the Ultima Patrol was optimized for use with Federal’s Flitecontrol buckshot. They kindly sent along some for us to use during testing.
There is often a misconception about how much spread you get with shotgun pellets.
I patterned the Ultima Patrol at 10, 15, and 20 yards with Federal’s ammo and was impressed with the tightness of the groups.
Starting at 10 yards, the group of nine pellets was around 3 inches. Even at 20 yards, the pellets were spread over a group of only 7 inches.
With time and practice, a shooter could get comfortable making some shots requiring accuracy using this shotgun and ammo combo.
Another key point was loading. I’m no quad loader (yet), but I still enjoyed the work Beretta clearly put into the loading port, widening it and chamfering the edges.
With the right angle used, I didn’t catch my thumb on the lifter when stuffing shells, and I really appreciated that.
The included adhesive hook-and-loop strip was a welcome addition, and I stuck on some shell carriers to affect my reloads.
What Sets it Apart?
This is a tactical shotgun option that is feature-packed and has Beretta legacy but is made here in America for a price that’s mid-ranged. It’s not the 1301, but pretty darn close for several hundred dollars less.
A300 Ultima Patrol1301 TacticalOverall LengthBarrel LengthWeightGaugeMSRPBeretta A300 Ultima Patrol vs. 1301 Tactical
By the Numbers
Reliability: 5/5
We ran around 150 shells through the Patrol, a variety of sizes and brands. Everything fed, fired, and ejected with perfect reliability.
Ergonomics: 4/5
The ergonomics on the Patrol are extremely sound. There currently isn’t an option for a pistol grip stock.
Accuracy: 4/5
We experienced good accuracy when testing the Patrol, particularly with the Flitecontrol ammunition.
Customization: 3/5
The M-LOK slits, pic rail, and QD ports are welcome additions you can use to add the accessories you like. In addition, the Patrol comes in black, gray, and tiger stripe camo.
Value: 4/5
With all the features in the Ultima Patrol and the mid-range price, it’s a compelling value and worth considering in lieu of the vaunted 1301.
Overall: 4/5
Upgrades for A300 Ultima Patrol
For testing purposes, we utilized the Bushnell RXS-250, and it handled the 12-gauge recoil from beginning to end without faltering.
This budget option was easily bright enough to see in direct sunlight, so bright in fact that it distorts a tiny bit on the highest setting.
Despite this minor issue, the dot was still very usable, with its 4 MOA dot offering 10 total brightness settings in an aluminum frame featuring multi-coated glass.
Final Verdict
Beretta is serving up a solid value in the A300 Ultima Patrol, offering a package not found on comparable guns at this price point.
Law enforcement administrators looking to outfit all their units will love the mileage they get with their budgets, and officers will enjoy the reliability and feature set.
The rest of us stand to benefit, too — by having access to a highly functioning, pedigreed, home defender made right here in America.
What’s your gut reaction to the A300 Ultima Patrol? Let us know in the comments below. Be sure to check out our top picks in 10 Best Home-Defense Tactical Shotguns [Hands-On]!
")
")
")
")
")