“Master the art of precision shooting with dry firing air rifles. Enhance your aiming skills, trigger control, and muscle memory without using ammunition. Discover the benefits of this essential training technique for rifle enthusiasts and competitive shooters alike.”
dry firing air rifle
Dry firing an air rifle refers to the act of pulling the trigger without any ammunition or pellets loaded into the gun. This practice is often used by shooters for various reasons, such as improving their shooting technique, testing the functionality of their rifle, or practicing target acquisition and sight alignment. Dry firing provides an opportunity for shooters to focus solely on their trigger control and overall shooting mechanics without the distraction of recoil or the need for ammunition.
However, it is important to note that not all air rifles are suitable for dry firing. Some models may require a pellet in order to properly function, while others may have specific safety mechanisms that prevent dry firing altogether. Before attempting to dry fire your air rifle, it is crucial to consult the manufacturer’s instructions and guidelines to ensure that it is safe and appropriate for your particular model. Additionally, always make sure that your air rifle is pointed in a safe direction and follow proper firearm safety protocols when engaging in any shooting activity.
In conclusion, dry firing an air rifle can be a beneficial practice for improving shooting skills and muscle memory. However, it is essential to ensure proper safety measures are in place to prevent any damage to the gun or potential injury. By incorporating dry firing into regular training routines, shooters can enhance their accuracy and overall performance.
Canada goose hunting is the fastest growing hunting sport in Minnesota. Our state harvests more geese than any state in the country.
Many hunters new to the sport are unaccustomed to firing at such a big bird. More familiar with shooting ducks, they often fire with too light a load at geese too far away. To improve hunters’ effectiveness and reduce the crippling of geese caused by ill-placed shots, the DNR has begun teaching hunters how to shoot more effectively. Through a brochure, “Get Your Goose,” and seminars held each fall at Thief Lake and Lac Qui Parle wildlife management areas, hunters are learning how to improve their odds of bagging a honker.
Although it’s a big bird, a goose has a relatively small vital zone. The total area in which pellets will kill a goose is just one-tenth the bird’s total size. To ensure they hit the vital zone with enough ?oomph,? waterfowl hunters need to pattern their guns and find the correct loads.
Most experts say the best loads for geese are sizes 1, BB, BBB, or T steel shot. For most hunting situations, BB or BBB shot is the most effective shot size. Both have plenty of pellets, but still enough energy to bring down a goose. Guns are usually 10- or 12-gauge. Because steel shoots tighter patterns than lead does, the best chokes for geese are modified and improved modified. However, each shotgun choke is unique, which is why hunters should pattern their particular guns.
To test loads, place a 40- by 40-inch-square sheet of paper at the same distance as flying geese that will be shot at. (For most hunters and situations, that’s about 30 to 50 yards). Fire at an aiming point you mark on the paper. Do this on five sheets. Then, on each sheet, draw a 30-inch diameter circle around the densest pattern area on each sheet and count the pellets that hit inside the circle. This is the “pattern density.” Try different loads and chokes until one is found that puts enough pellets (from 35 for heavier loads up to 55 for lighter loads) into the circle, which ensures that enough will hit the goose’s vital zone for a clean kill. Another common mistake of beginning hunters is to shoot at geese flying out of range (“skybusting”). This can cripple birds, flare off approaching geese, and may cause approaching flocks to fly even higher. Some exceptional shooters have the skill to occasionally drop a bird “from the stratosphere,” but for most hunters, a kill at over 50 yards is just dumb luck and poor sportsmanship. A good rule of thumb recommended by goose guides is this: If the end of your gun barrel covers more than half the bird, it is beyond 45 yards and is too far away for a clean kill.
It takes practice to find the correct lead for geese. The big birds have slow wing beats that make them appear to be lumbering along. But actually, geese move as fast as a mallard. Lead accordingly.
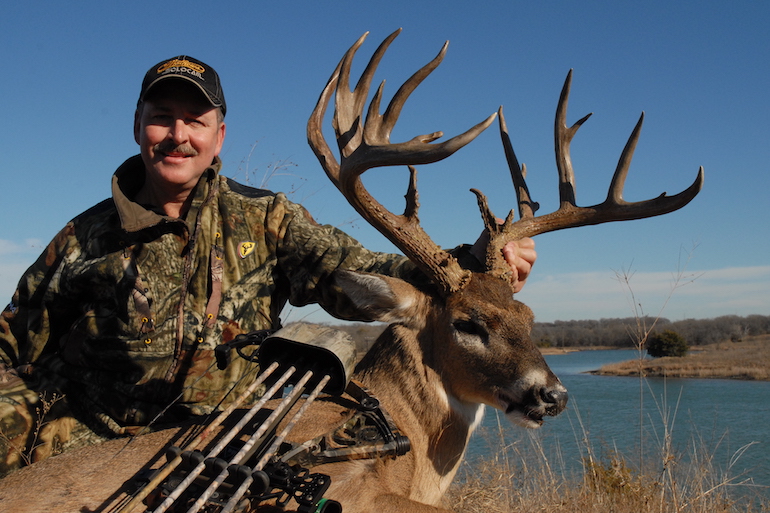
While November deer hunting gets most of the headlines, those hunters who are willing to punch the clock to the late winter buzzer can still take the trophy whitetail of a lifetime. Texas bowhunter Dale Moses did just that a few years ago, preserving through a long season of hunting that eventually culminated with a cold winter day shot that downed a big non-typical whitetail he had dubbed Captain Hook. (Photo by Lynn Burkhead)
Read deer hunting articles each fall, and you’ll see a lot of stories, a lot of photographs, and a lot of chest-thumping about the month of November. Outdoor writers are notorious for their November deer hunting praise and I’m as guilty as the rest of them.
In short, it’s the Whitetail Chamber of Commerce’s best advertising material, the month when the woods are alive with colorful leaves falling to the ground on a freshening north wind and deer-hunting prospects are at their very best.
That’s because November is when estrous does are plentiful. Mr. Big and his antlered buddies are throwing caution to the wind, and every deer trail has the potential of a whitetail love triangle straight out of the latest Yellowstone episode.
But then there’s the month of December, a time when the deer woods are suddenly as barren as Ebenezer Scrooge’s bankrupt soul, a collection of weeks as dead as the proverbial door nail pulled straight from the opening lines of Charles Dicken’s “A Christmas Carol.”
If you find yourself hunting in December with an empty buck tag in your back pocket, well, good luck. Because you’re going to need it, right?
Not necessarily. Play your cards right in the season’s 11th hour—and follow these five buzzer-beating tips—and you just might end the season smiling as big as the redeemed soul of old Ebenezer when he hears Tiny Tim cry out “God bless us everyone!”
Curious as to what you can do to tag a late-season buzzer-beater buck? Follow these five cardinal rules for late-season success.
The first rule is to hunt the passage of strong cold fronts. Especially on the day or two leading up to the frontal passage as the barometer is falling, clouds are gathering, and wildlife are noticing that a storm is brewing.
Like humans do with their pre-winter storm milk and bread run rituals that wipe out the shelves at the local grocery store, wildlife do something similar as they get up, feed heavily and pile on the calories to prepare for the coming blast of Old Man Winter.
Read more: Tag a Whitetail When It’s Hot, Cold, Wet or Windy
That’s what a bowhunting friend of mine named Tarif Alkhatib did a few years ago when he arrowed a gnarly horned, multi-tined non-typical buck in North Texas as the first Arctic blast of the season moved in.
Bundled up in his Under Armour hunting gear as the front barreled through and dropped temps into the lower 30s with light freezing precipitation, Alkhatib downed the buck as it moved quickly by his stand.
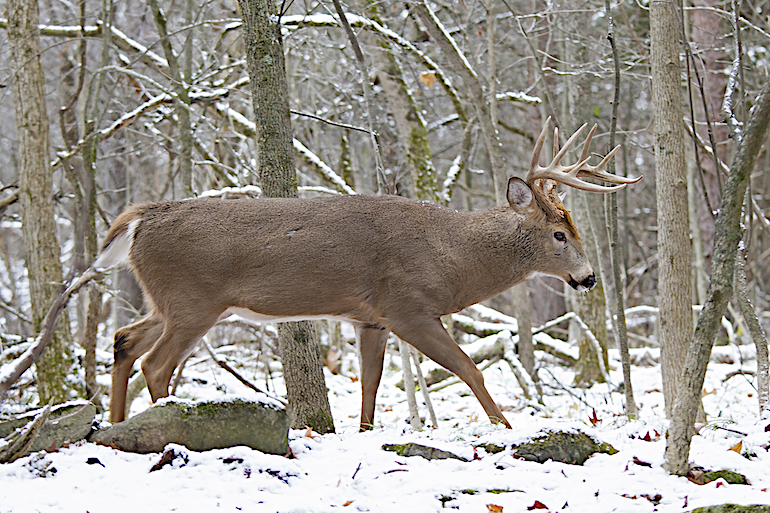
Late-season deer are active before and after a cold front. (Photo by Lynn Burkhead)
One good shot from his Mathews bow and the dedicated archer was soon on the ground shaking from both excitement and the cold as he tagged one of several wall-hangers that he’s knocked down in recent seasons.
Keep in mind that the same principle applies to a day or two after a storm, as deer get back on their feet and come out to feed and move around when the sun starts shining, the precipitation ends, and temperatures start to slowly moderate.
2. Hunt the Food
The idea noted above leads to the second rule of late-season success — hunt near high-calorie food sources. In the Midwest, that might be a cut corn field or a snow-covered soybean field. In the Deep South, it could be a green food plot or an oak tree with a few acorns still laying around. And in Texas, where I live, it could be a corn feeder shelling out golden nuggets twice a day.
Even the buck of a lifetime can come calling if the weather is cold and there’s adequate whitetail food around. (Shutterstock image)
Hunting late-season food is exactly what Robert Taylor did at the end of the 2012 season when he arrowed a huge North Texas non-typical whitetail that was chronicled in the pages of North American Whitetail.
The key to Taylor’s hunt — which came on the evening of Dec. 29 as cold weather and the remains of the region’s 2012 White Christmas dotted the landscape — was food.
Read More: Field of Dreams Offer Food for Whitetails, Success for Hunters
That food was the combination of a feeder spitting corn out and a food plot that promised local deer high-caloric intake during the cold snap. That was enough to lure in several does, a good 10-point buck, and the huge bruiser that Taylor ended up shooting. All on a five-acre plot of land, no less.
Unfortunately, the Taylor buck rode a bit of a scoring roller coaster – it received a green score of 249 2/8 inches, then a 60-day entry score of 254 4/8 inches, and finally a revised Pope and Young Club panel score of 219 1/8 inches. While the middle number would have made it a Texas bow buck record, 219 and change is nothing to sneeze at and proof positive that even the buck of a lifetime can come calling if the weather is cold and there’s adequate whitetail food around.
3. Hunt Thick and Nasty Cover
On an outdoor writer’s deer hunt last December in Oklahoma with Kevin Reese and the Sight Mark optics crew, I pushed my hunting luck to the very end. But hunting a box-blind stand in a Sooner State pecan bottom during the final hour of the final day of my hunt at Dakota Stower’s most excellent North Texas Outfitters operation, I was rewarded for nothing more than sheer persistence. And sitting in a post-rut deer stand situated next to some of the area’s thickest and gnarliest cover.
Focus on an area’s thickest cover during the post-rut. (Photo by Lynn Burkhead)
As high cirrus clouds streamed in and muted the last hour’s shooting light that was filtering into the pecan bottom, a good 8-point buck stepped out of the creek bottom’s nasty vegetation where he had holed up and bedded down the entire day. But as he trotted through a brief window of a last-hour shooting opportunity before ducking back into the thick cover, one shot from my rifle put down the only deer I would tag in all of 2019.
A short while later, I was discarding the recipe for “tag soup” I had carried in my back pocket last fall, not to mention looking through my phone contact list for the number of a favored taxidermy shop, all thanks to my own buzzer-beater buck.
4. Hunt the Secondary Rut
A fourth rule in tagging a December bruiser is to remember that November doesn’t always have the market cornered on rutting activity.
That’s because of the secondary rut which occurs when does that weren’t bred in last month’s breeding frenzy actually cycle into estrous again approximately 28 days later.
The key to hunting the secondary rut successfully are to find scrapes that have been reopened, to identify and hunt preferred natural food sources that mature bucks tend to key on, and to be in the woods when late-born fawns come into their first estrous cycle in December. (Photo by Lynn Burkhead)
While some hunters debate the strength of secondary rutting activity and its effects on big buck hunting potential, you won’t find Dallas hunter Sherman Wyman arguing about it. That’s because Wyman capitalized on the secondary rut on Dec. 24, 2005 when he shot a B&C non-typical buck netting 226 4/8 inches on his low-fence ranch near Wichita Falls in the state’s Red River country.
Read more: Second Rut, Last Chance
“I’ve shot a lot of big deer around Christmas time,” said Wyman. “(In North Texas), everyone thinks once Thanksgiving or the first of December has come and gone, you’re done.”
Obviously not.
In Wyman’s mind, the keys to hunting the secondary rut successfully are to find scrapes that have been reopened, to identify and hunt preferred natural food sources that mature bucks tend to key on, and to be in the woods when late-born fawns come into their first estrous cycle in December.
5. Punch the Clock
A final rule to notching a tag on a December buzzer-beater buck is to employ the deer-hunting version of the photographer’s old “F8 and be there” rule.
For photographers of old-school training, that rule means to put your digital camera on manual, set the f-stop to F8 and be there for the shot.
That idea rings true for late season deer hunters too.
A deer hunting physician I once knew practiced this rule near my North Texas home many years ago just before Christmas when he carved time out of his busy holiday and professional schedule, braved some intense cold weather, and got to the nearest deer stand as the season was winding down.
Deer season, as well as the holiday season, that is.
Read more: How to Rally for a Late-Innings Whitetail
Dr. Wade was rewarded for his consistent punching of the clock that December when he arrowed a beautiful 163 5/8 inch net typical, a wide and beautiful racked buck that adorned the good doctor’s Christmas cards that year.
My good friend Dale Moses, a passionate bowhunter and retired Texas Game Warden, has taken numerous big deer over the years with his Mathews bow, a few of those wall-hangers getting tagged in the season’s final days. That includes a late-season buzzer-beater back in 2013, one that he dubbed “Captain Hook.”
Just after Christmas that year, in a frigid stretch of weather that was gripping the North Texas woods Moses had hunted all season, his cat-and-mouse game with this big non-typical finally ended. The whopper non-typical buck placed well in the Texas Big Game Awards Program that year, scoring 184 0/8-inches.
Want to do something similar as the 2020 deer season winds down? Then get out of that easy chair, leave the warmth of the fireplace behind, and get into your deer stand, even if it’s the season’s final hours.
Because when it comes to tagging a buzzer-beater buck, you just never know, right?
“How many guys do you know that were out on a (North Texas) deer stand on Christmas Eve?” asked Sherman Wyman.
The truth is, not very many.
Only the ones whose inner hunting flame still burns hot enough to drive them out the warm comfort of home and into the chill of the late-season whitetail woods.
Which is exactly where they hope to be to beat back Jack Frost’s wintertime chill while tagging a buzzer beater buck just in time for Christmas delivery.
Administrative Note: The information above comes from the manufacturer and is only informational. The actual ballistics obtained with your firearm can vary considerably from the advertised ballistics. Also, ballistics can vary from lot to lot with the same brand and type load. When manufacturer ballistic data was unavailable, ballistics were calculated using a ballistics calculator.
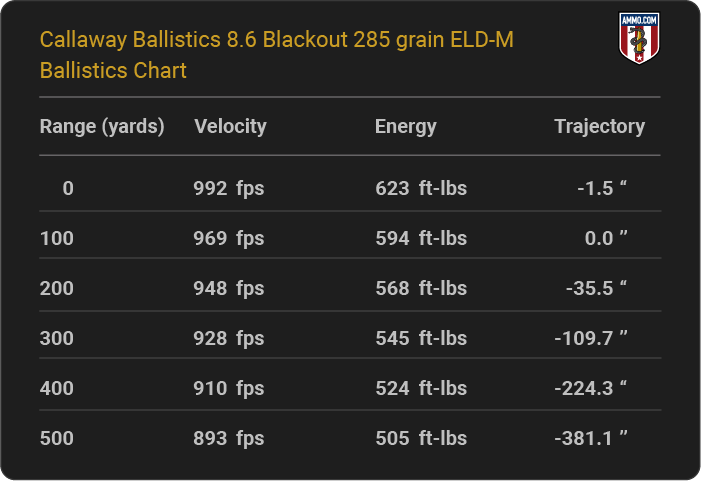
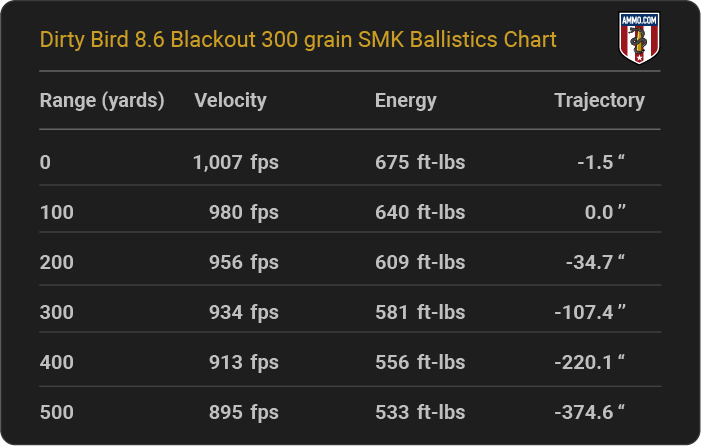
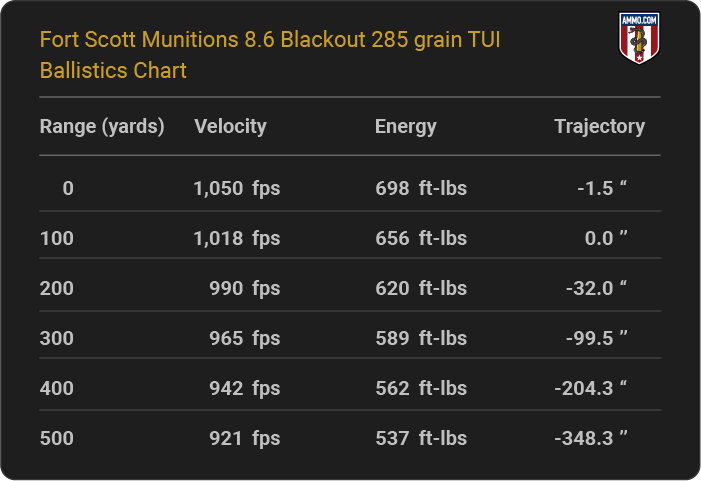
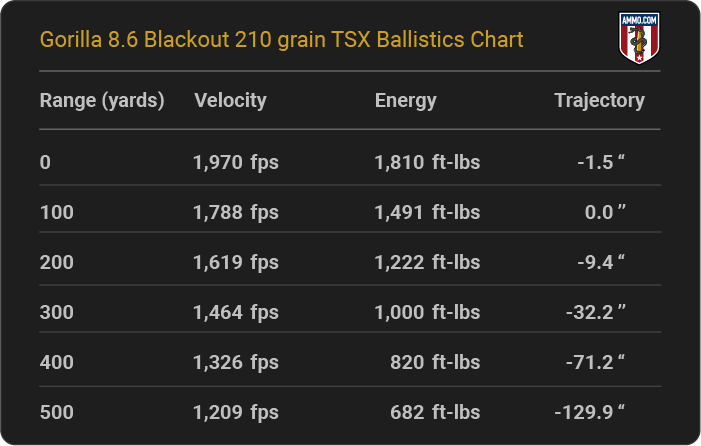
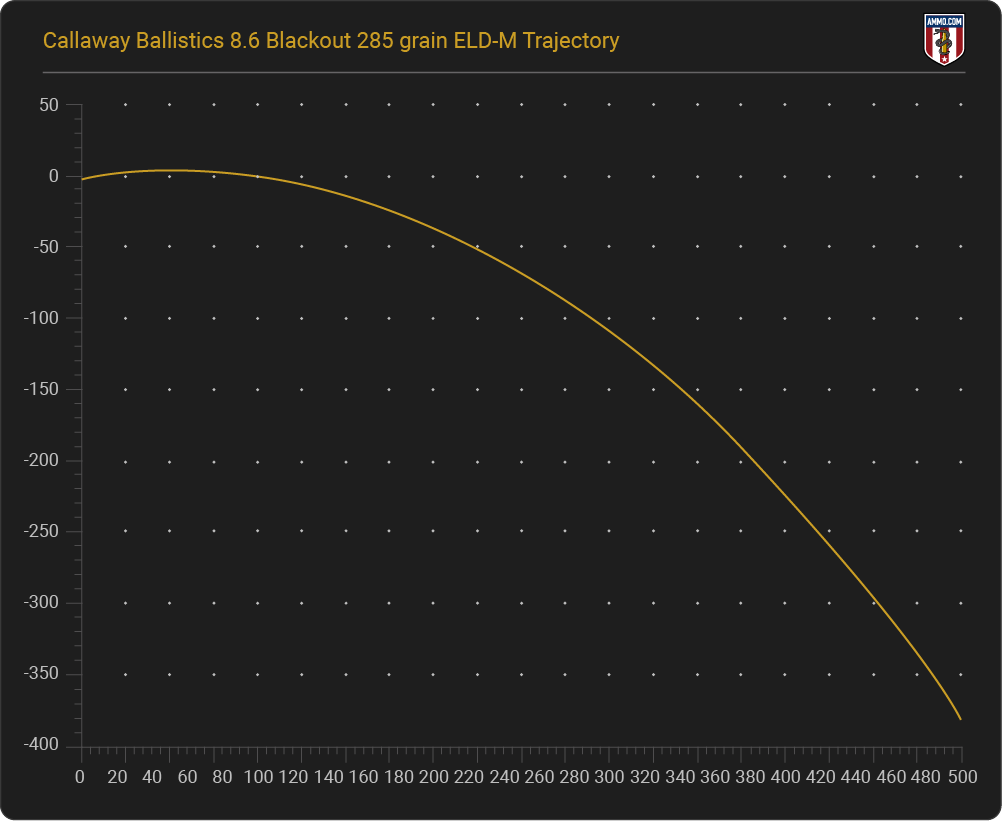
8.6 Blackout Ballistics Trajectory Chart
The trajectory measures a bullet’s flight to its target based on bullet drop (in inches). Below, you’ll find an 8.6 Blackout bullet drop chart that gives you a general idea of the 8.6 Blackout trajectory.
Note: The chart above is an example of one 8.6 Blackout load, and actual ballistic performance may vary depending on bullet weight, lot, barrel length, and environmental conditions while shooting.
The 8.6 Blackout is not what we shooters consider a long-range round. As you can see, it quickly drops off after 100 yards, which is abysmal compared to a round like the 6.5 PRC or even the 300 BLK.
8.6 Blackout Muzzle Velocity (FPS)
Muzzle velocity is the bullet’s speed when it leaves the firearm barrel. It’s measured in feet per second (fps). Generally, a longer barrel length allows for more powder to burn, generating a higher muzzle velocity. Bullet design and weight will also affect muzzle velocity.
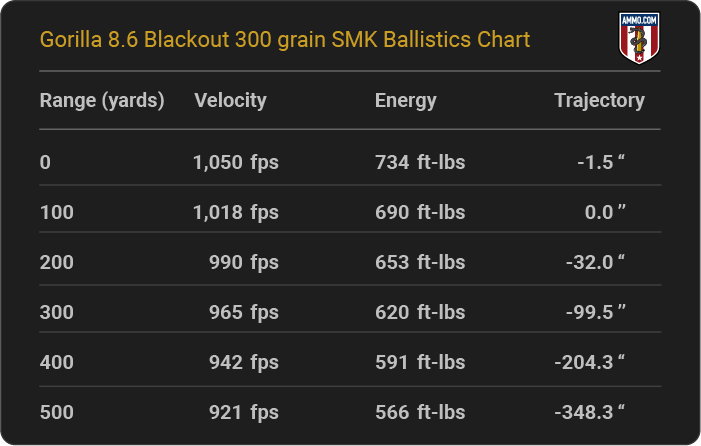
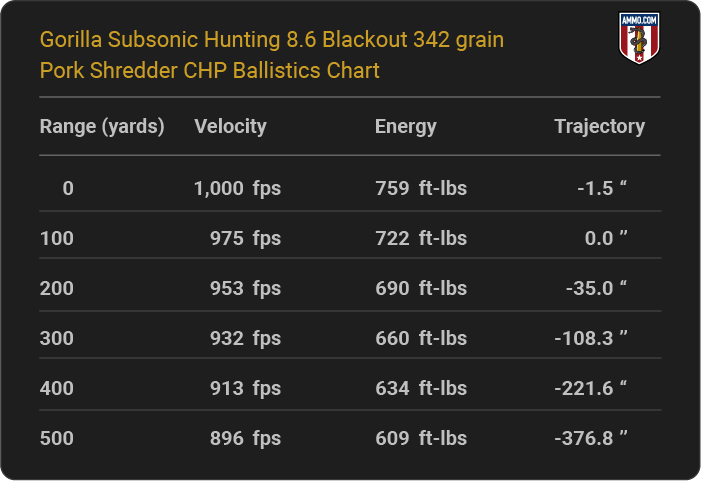
You should expect a muzzle velocity of around 1,000 fps for most 8.6 Blackout ammo, including the Gorilla Subsonic Hunting 8.6 Blackout 342-grain Pork Shredder CHP. However, the Gorilla 8.6 Blackout 210gr TSX has a much higher-than-usual muzzle velocity of 1,970 fps. This is partly due to the lighter bullet, which takes more powder to propel heavier bullets faster.
8.6 Blackout Muzzle Energy
Muzzle energy is how much force a bullet delivers to its target at a given range, measured in foot-pounds of energy (ft-lbs). The terminal performance of a round will depend on whether it’s a supersonic load or subsonic load, bullet weight, bullet design, barrel length, and several other factors.
The muzzle energy of the 8.6 Blackout is nothing to gasp at, generally hitting 623 ft-lbs to 729 ft-lbs of energy. However, the Gorilla Ammunition with a 210gr Barnes TSX has a much higher muzzle energy of 1,810 ft-lbs of energy.
How Do 8.6 Blackout Ballistics Compare to Other Rifle Cartridges?
Ballistic performance depends on an incredibly high amount of factors from the gun, whether it’s a bolt action rifle or a semi-auto rifle like the AR-10 platform, and barrel length; a short barrel will cause the bullet to react differently than a long barrel, plus all the environmental factors and the ammo.
This is why results vary considerably even amongst the same caliber bullets, making comparing different calibers much more difficult.
However, we’ve compared a couple of common rifle calibers to the 8.6 Blackout just to give you an idea of its performance capabilities.
8.6 Blackout vs. 223 Rem
First things first: When comparing these two calibers, we must be fully aware of the bullets’ size differences. The heaviest 223 Remington bullet is 77 gr, while the 8.6 BLK is loaded with bullets as heavy as 342 gr. So, with this in mind, the ballistics will be drastically different.
The muzzle velocity of a 77gr 223 Rem bullet is 2,750 fps, and one of the fastest 8.6 Blackout bullets is a 185 gr bullet with a muzzle velocity of 2,200 fps. But when we step up to the heaviest bullet for the 8.6 Blackout (342 grains), the velocity is more than cut in half to 1,000 fps.
The 8.6 Blackout also has a low muzzle velocity compared to the 223 Remington. The same 77 gr 223 Rem bullet has a muzzle velocity of 1,293 ft-lbs, double most 8.6 Blackout rounds. However, the 210 gr TSX 8.6 BLK bullet has a higher muzzle energy of 1,810 ft-lbs; the 223 Rem cannot produce this much muzzle energy.
Because the 8.6 Blackout was designed to be shot through a carbine with a suppressor, the trajectory is pretty embarrassing, to say the least.
The 210 grain TSX 8.6 BLK bullet is the flattest shooting 8.6 Blackout round, and when zeroed in at 100 yards, it has 9.4 inches of drop at 200 yards and 129.9 inches of drop at 500 yards. When zeroed in at 200 yards, yes, the 223 Remington shoots flat enough to zero in at 200 yards; the bullet drops 54.73 inches at 500 yards and passes over 600 yards before it drops more than 130 inches.
The differing intended purposes can account for the drastic differences. The 8.6 Blackout is an excellent close-quarters self-defense and a close-range big game hunting rifle. Meanwhile, the 223 Rem is fun to take varmint hunting and plink with at the range.
8.6 Blackout vs 6.5 Creedmoor
The 8.6 Blackout and 6.5 Creedmoor are the closest you can get to having an even comparison regarding the 8.6 BLK. This is because the 6.5 Creedmoor case is the parent case of the 8.6 Blackout.
Some shooters claim the 8.6 Blackout is the big brother to the 6.5 Creedmoor and 300 Blackout; this is primarily due to the size of the bullet each caliber shoots and not based on the ballistics.
The 6.5 Creedmoor Hornady ELD-Match 120 gr bullet has a muzzle velocity of 2,910 fps, and the closest the 8.6 Blackout comes to that is 1,970 fps with a 210 gr Barnes TSX bullet.
Regarding muzzle energy, the 6.5 Creedmoor sits around 2,400 ft-lbs whether you’re shooting the 120 grain or 140 grain bullet. However, the 8.6 Blackout hovers around 700 ft-lbs of energy and tops out at 1,810 ft-lbs with a 210 gr bullet.
I’m sure you know what’s coming concerning the trajectory. To be fair, the 6.5 Creedmoor was designed for long-distance shooting, whereas the 8.6 Blackout was not.
When zeroed in at 100 yards, the 210 grain 8.6 BLK bullet drops over 9 inches by the 200-yard mark and basically 130 inches by the 500-yard mark. In contrast, the 6.5 Creedmoor can be zeroed in at 200 yards and only drops 46 inches by 500 yards.
Frequently Asked Questions
The team at Ammo.com has gathered and answered some of the most commonly asked questions we receive regarding 8.6 Blackout ballistics.
What is the effective range of the 8.6 Blackout?
The effective range of the 8.6 Blackout is 1,000 yards with supersonic rounds, but 300 yards tends to be the max for most shooters as the trajectory is terrible.
What is the supersonic velocity of an 8.6 Blackout?
The supersonic velocity of an 8.6 Blackout round is 2,400 fps, according to Faxon Firearms.
Is 8.6 Blackout the same as 8.6 Creedmoor?
Yes, the 8.6 Blackout is the same as the 8.6 Creedmoor.
What barrel length is recommended for optimal performance with the 8.6 Blackout cartridge?
A 12” barrel is the recommended barrel length for optimal performance with the 8.6 Blackout cartridge. However, to shoot further distances, stepping up to a 16-inch barrel is not a bad idea.
What barrel twist rate is recommended for the 8.6 Blackout?
A 1:3 in or 1:4 in barrel twist rate is recommended for the 8.6 Blackout.
There are a few things to consider when buying a thermal scope to ensure you get the best one for you.
Resolution
Much like your flat-screen television, thermal scopes have a resolution, which significantly affects image quality.
Thermal scopes have two resolutions to consider: the display resolution and the sensor resolution.
To put it simply, a sensor resolution is a resolution you will get while using thermal imaging, and the display resolution will be your standard view.
So, if you have a 160 x 120 pixel sensor and a 1280 x 720 display, your targets will only come in 160 x 120 while using thermal.
Battery Life
Some scopes are energy hogs and will drain your battery quickly.
However, several models on this list will last over 10 hours of continuous use between charges.
Features
Many features come with thermal scopes, including smart features, various magnifications, video recording, and range finding.
Make sure you pick the features that are important to you.
Below are the 12 best thermal scopes on the market.
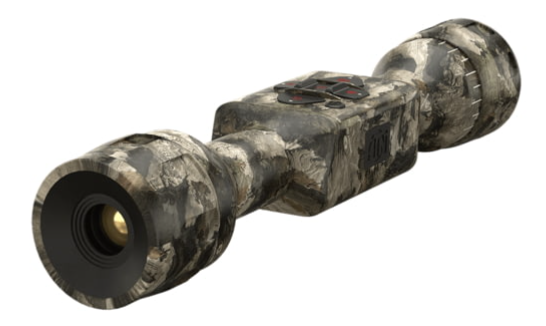
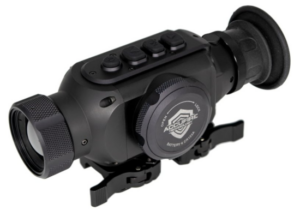
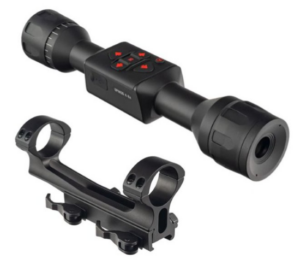
#1. ATN ThOR LT 3-6x50mm Thermal Rifle Scope
Magnification: 3x – 6x
Sensor Resolution: 160 x 120 Pixels
Battery Life: 10+ Hours
Waterproof: Weather Resistant
Magnification Type: Variable
The ATN ThOR LT 3-6x50mm Thermal Rifle Scope is a variable 3x – 6x magnified thermal scope perfect for nighttime hunting.
It has a 30mm tube and a 50mm for excellent visibility.
With the latest thermal technology, it has a display resolution of 1280 x 720 pixels with a 160 x 120 pixels sensor resolution.
They made it to withstand the elements with a weather-resistant IP rating and a lightweight, durable aluminum body.
You can use it for 10+ continuous hours, and it comes with White Hot and Black Hot Color modes.
Other features include multiple reticle patterns, a 3D accelerometer, and a one-shot zero.
If you are looking for a solid thermal scope with excellent battery life, the ATN ThOR LT 3-6x50mm Thermal Rifle Scope is perfect for crossbows, rifles, and other weapon systems.
It is available from Optics Planet. Here’s where to buy it: www.OpticsPlanet.com
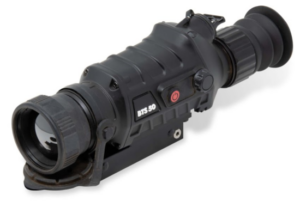
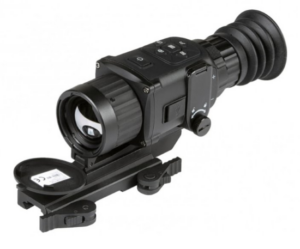
Pulsar’s Core RXQ30V 1.6-6.4x22mm Thermal Imaging Rifle Scope is an excellent thermal option for close-range hunts.
It has a 22mm objective lens, a 640 x 480 pixel display, a 384 x 288 thermal sensor with 985 yards of detection, and a 50Hz refresh rate for excellent visibility.
The Pulsar RXQ30V comes with a green sapphire display mode, white-hot mode, and black hot mode.
The scope can easily attach to the most popular models of rifles and crossbows with a Weaver/Picatinny mount.
They constructed the scope out of heavy-duty glass-nylon composite and can be operated in extreme temperatures (-13 degrees to 122 degrees Fahrenheit).
It comes with 2x CR123A batteries, and a single charge can last up to 4 hours.
The Pulsar Core RXQ30V 1.6-6.4x22mm Thermal Imaging Rifle Scope is an excellent addition to any weapon.
It is available from Optics Planet. Here’s where to buy it: www.OpticsPlanet.com
The Burris BTS 50 3.3-13.2x50mm Thermal Rifle Scope has unique features that set it apart from its competition.
It has a high-resolution 400 x 300 pixel screen with several customization options to match your tastes.
The scope provides seven different color palettes and ten reticle options to form the best combination for you.
An excellent feature is the heat tracking utility where it will highlight the area with the most heat for faster target acquisition.
The battery can last up to 5 hours of continuous use, and the scope comes with multiple thermal options.
It also includes integrated stadiametric rangefinding for accurate shooting at unknown distances.
If you are looking for a thermal scope with plenty of viewing options and a high-resolution screen, the Burris BTS 50 3.3-13.2x50mm Thermal Rifle Scope may be right for you.
It is available from Optics Planet. Here’s where to buy it: www.OpticsPlanet.com
The Accufire Technology Incendis Clip-On 1 – 4x 30mm Thermal Imaging Rifle Scopes has a super intuitive double reticle and can be used as a standalone scope, standalone monocular, or an attachment for your favorite optic.
It has four heat displays to choose from: White-Hot, Black-Hot, Red Accent, and Green-Hot.
It has a variable magnification of up to 4x and has a display resolution of 1024 × 768 pixels, a core resolution of 384 x 288 pixels, and a 60Hz refresh rate for a sharp image.
The Incendis can operate in harsh environments with an operating temperature range of -22 degrees to 122 degrees Fahrenheit.
If you want to upgrade your current scopes capabilities, the Accufire Technology Incendis Clip-On 1 – 4x 30mm Thermal Imaging Rifle Scope is perfect for you.
It is available from Optics Planet. Here’s where to buy it: www.OpticsPlanet.com
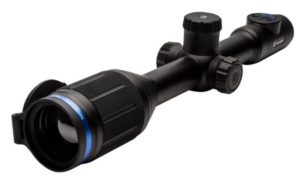
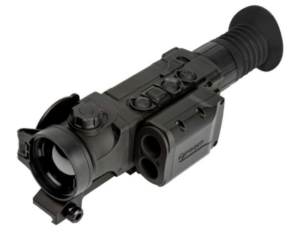
The Pulsar Thermion XM50 5.5-22x42mm Thermal Rifle Scope is a second focal plane variable scope with a 5.5x to 22x magnification.
The XM50 has some impressive features that make it one of the best thermal scopes on the list, but it is expensive.
You will clearly see your target in any lighting conditions with a maximum heat range of 2,500 yards.
It has an impressive 1024 x 768 pixel display resolution and a 340 x 240 sensor resolution.
One of the remarkable features of this scope is the built-in recording with recoil activation.
You can capture or live-stream your most intense hunts in 1024 x 768 resolution.
Another pleasant feature is that you can store up to five different rifle profiles into the scope for easy swapping between your weapon sets.
With an integrated rangefinder, you will have pinpoint shooting at any distance.
It also has a lifetime warranty.
The Pulsar Thermion XM50 5.5-22x42mm Thermal Rifle Scope is an excellent buy if you have the money.
It is available from Optics Planet. Here’s where to buy it: www.OpticsPlanet.com
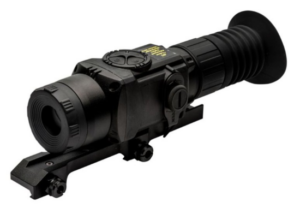
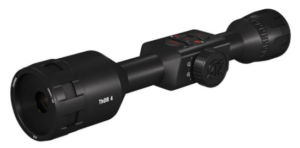
#6. ATN ThOR LT 4-8x50mm Thermal Rifle Scope
Magnification: 4x – 8x
Sensor Resolution: 160 x 120 Pixels
Battery Life: 10 Hours
Waterproof: Weather Resistant
Magnification Type: Variable
The ATN ThOR LT 4-8x50mm Thermal Rifle Scope has a 160 x 120 sensor resolution, a 1280 x 720 pixel display, and a 60 Hz refresh rate.
You will be able to clearly see your target with up to 8x magnification.
It has an impressive battery life with up to 10 hours of continual on a single charge to last you your entire hunt.
They had this thermal scope with a hardened aluminum body resistant to the harshest weather.
Other features include multiple reticle patterns, a white-hot mode, a black-hot mode, and a 3D accelerometer.
If you are looking for a balance between value and features, the ATN ThOR LT 4-8x50mm Thermal Rifle Scope will not let you down.
It is available from Optics Planet. Here’s where to buy it: www.OpticsPlanet.com
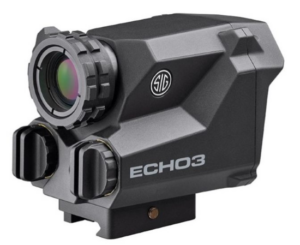
#7. Sig Sauer ECHO3 1-6x23mm Thermal Reflex Sight
Magnification: 1x – 6x
Sensor Resolution: 320 x 240 Pixels
Battery Life: 6 Hours
Waterproof: Yes
Magnification Type: Variable
The Sig Sauer ECHO3 1-6x23mm Thermal Reflex Sight is an excellent thermal sight for predators and hog hunters.
It has a high-resolution sensor core with 320 x 240 pixel resolution and a 30 Hz refresh rate.
You can connect it to any BDX smart device via Wi-Fi or Bluetooth to capture images or recordings of your hunt.
The recorder is recoil activated, and the display has eleven color pallets and several brightness levels.
It also has a MOTAC (Motion Activated Display), which activates on motion to save battery life, but the sight can last over six hours of heavy use on a single charge.
If you want a reflex sight style thermal scope perfect for hog hunting, buy the Sig Sauer ECHO3 1-6x23mm Thermal Reflex Sight today.
It is available from Optics Planet. Here’s where to buy it: www.OpticsPlanet.com
The AGM Global Vision Rattler TS25-384 1.5x25mm Compact Thermal Imaging Rifle Scope is a compact thermal scope perfect for medium-range hunts.
The sensor core resolution is 384 x 288 pixels and a 1024 x 768 OLED display with a 50 Hz refresh rate, making it easy to see in any weather, including fog, rain, or smoke.
They made it to withstand harsh weather with an IP67 water resistance level and an operating temperature of -4 degrees to 131 degrees Fahrenheit.
It has a 4.5-hour battery life, but you could extend it via a USB 5V power bank.
An excellent feature is that you can easily stream or record your hunts via Wi-Fi.
It also includes a limited three-year warranty.
The AGM Global Vision Rattler TS25-384 1.5x25mm Compact Thermal Imaging Rifle Scope is perfect for anyone who wants a durable thermal scope that can record video at a medium range.
It is available from Optics Planet. Here’s where to buy it: www.OpticsPlanet.com
#10. Pulsar Trail 2 LRF XP50 Thermal Rifle Scope
Magnification: 2x – 16x
Sensor Resolution: 640 x 480 Pixels
Battery Life: 8 Hours
Waterproof: Yes
Magnification Type: Variable
Pulsar’s Trail 2 LRF XP50 Thermal Rifle Scope has the highest sensor resolution on the list with an impressive 640 x 480 pixel resolution for excellent image quality.
It also has a 1024 x 768 pixel resolution display with several modes, reticle options, and illumination color options.
They built this scope to last with a lightweight glass-nylon composite housing and an IPX-7 waterproof rating.
With a built-in rangefinder with a maximum range of 1,100 yards, you will get accurate shots at any distance.
It has a 16 Gb internal storage to record your hunts and comes with built-in Wi-Fi to access your app to record or stream your hunt.
The Pulsar Trail 2 LRF XP50 Thermal Rifle Scope is the best thermal scope on this list, but it is also the most expensive.
It is available from Optics Planet. Here’s where to buy it: www.OpticsPlanet.com
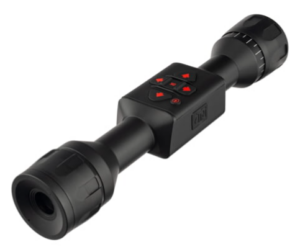
#11. ATN ThOR 4 1.25-5x19mm Thermal Smart HD Rifle Scope
Magnification: 25x – 5x
Sensor Resolution: 384 x 288 Pixels
Battery Life: 18 Hours
Waterproof: Weather Resistant
Magnification Type: Variable
The ATN ThOR 4 1.25-5x19mm Thermal Smart HD Rifle Scope has smart features that the other ATM ThORs lack.
It includes smart features such as Wi-Fi, Bluetooth 4.1, GPS, iOS/Android apps, recoil activated recording, and a MicroSD card slot for recording.
Other features include a built-in rangefinder, 3D GS7 Gyroscope, 3D Accelerometer, 3D Magnetometer, and an E-Compass.
With a massive 18-hour battery life, you can hunt all day without needing to worry about your battery life.
It also includes a three-year limited warranty.
If you want a solid thermal scope with smart features, the ATN ThOR 4 1.25-5x19mm Thermal Smart HD Rifle Scope is an excellent choice.
It is available from Optics Planet. Here’s where to buy it: www.OpticsPlanet.com
#12. ATN ThOR LT 320 3-6x30mm Thermal Rifle Scope
Magnification: 3x – 6x
Sensor Resolution: 320 x 240 Pixels
Battery Life: 10+ Hours
Waterproof: Weather Resistant
Magnification Type: Variable
The ATN ThOR LT 320 3-6x30mm Thermal Rifle Scope has an internal rechargeable battery that lasts up to 10+ hours on a single charge, saving you money on batteries.
They made it to last in any environment with a weather-resistant design and an aluminum body.
It has a 3x to 6x variable magnification with a display resolution of 1280 x 720 pixels and a sensor resolution of 320 x 240 pixels at 60 Hz.
It has a simple design, making thermal imaging easy to use for fast target acquisition.
If you are looking for a rechargeable thermal scope, the ATN ThOR LT 320 3-6x30mm Thermal Rifle Scope is an excellent choice.
It is available from Optics Planet. Here’s where to buy it: www.OpticsPlanet.com
References / Resources
How To Choose A Thermal Rifle Scope
Night Vision vs. Thermal Scopes
How To Sight In A Thermal Scope
See Also
Best Spotting Scopes For Hunting & Target Shooting
Best Air Rifle & Pistol Scopes
Best Laser Sights For Pistols
Best Night Vision Goggles & Binoculars
Best Rangefinders For Hunting & Golf
Affiliate Disclosure: This post may contain affiliate links. If you click and purchase, I may receive a small commission at no extra cost to you. I only recommend products I have personally vetted. Learn more.
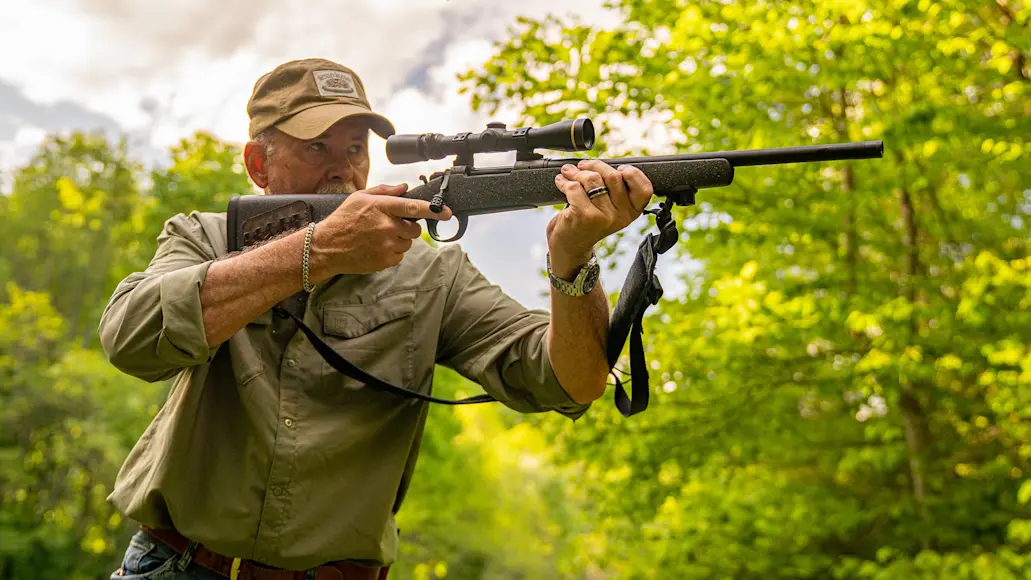
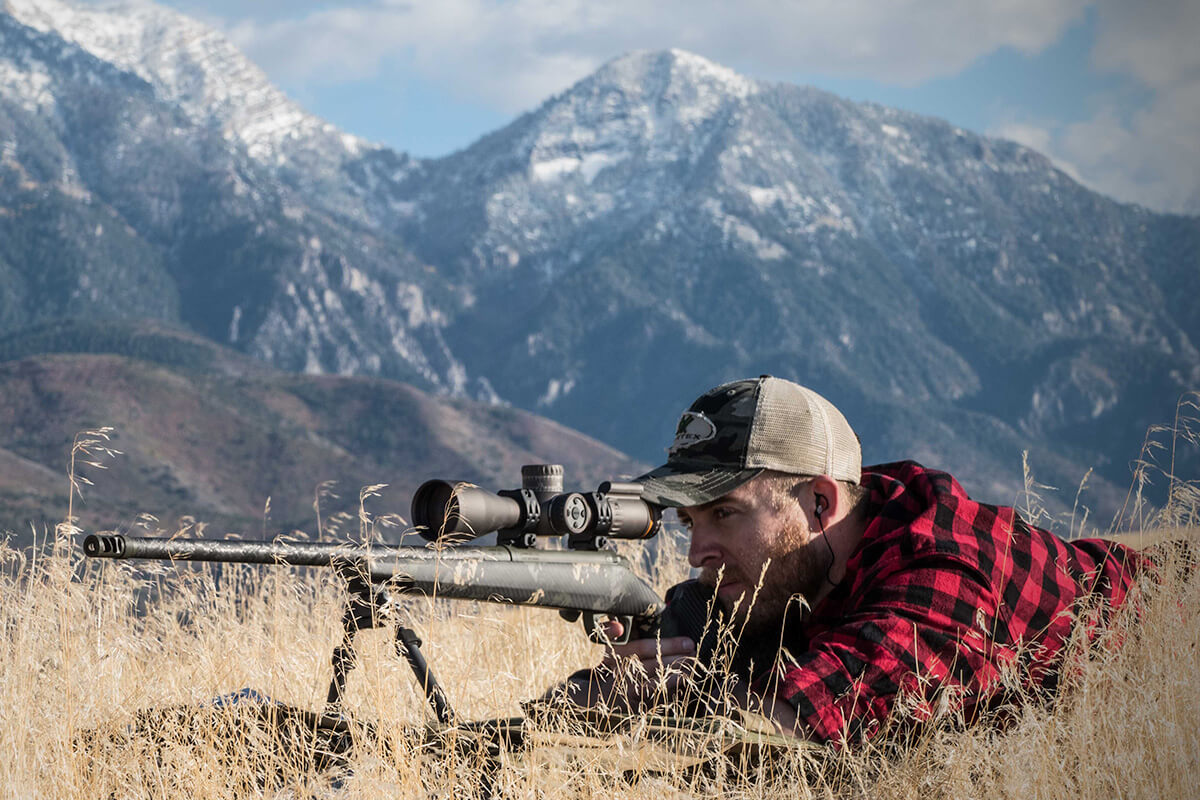
Whether a first or second focal plane scope is best depends on your intended purposes.
Tactical and competitive shooting sports are crossing over into the hunting world more than ever, sparking frequent debates about whether first or second focal plane scopes—or more accurately, the reticles inside the scopes—are better.
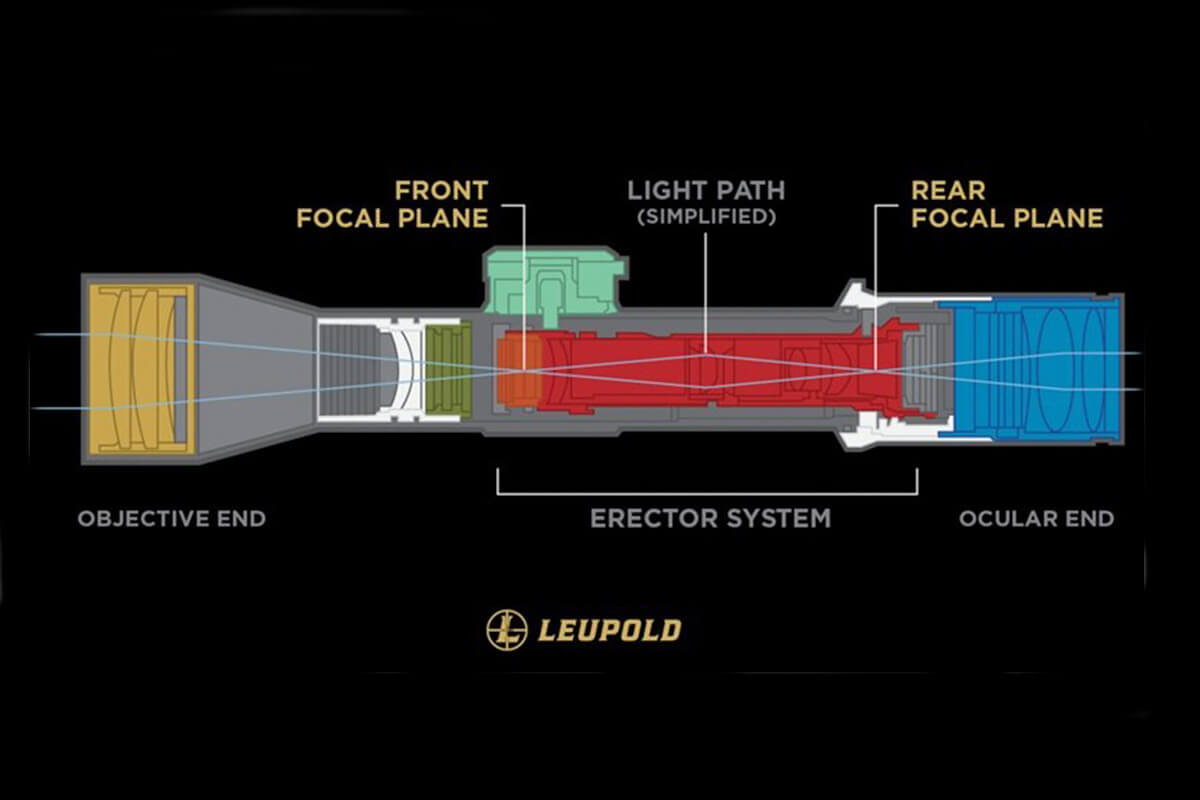
Also known as front and rear focal plane, this refers to the position of the lens etched with the reticle, in relation to the zoom mechanism.
If the reticle-etched lens is in front of the zoom mechanism, it’s called a first, or front, focal plane scope. The reticle is superimposed over the image in the scope on the same plane, so as you zoom in or out, the reticle larger or smaller, maintaining the same size in relation to your target.
This graphic shows the placement of a reticle on the front focal plane, and on the rear focal plane. The magnification assembly (zoom mechanism) lies between them.
If the lens etched with the reticle is behind the zoom mechanism, it’s called a second, or rear, focal plane scope. In this design, the reticle stays the same apparent size inside the scope all the time. As you zoom in or out, the image seen inside the optic gets larger or smaller but the reticle does not.
There are significant advantages and disadvantages of each type. Proponents of first focal plane designs are vociferous in proclaiming the virtues of their favorite. Users of second focal plane scopes tend, quite candidly, to be less educated in optic technicana, and unfortunately often just listen without debating.
Here’s the short answer as to which is actually best: It depends entirely on the intended purpose of the scope. If you’re a military sniper, or a “tactard” plinker, or a PRS competitive shooter, front focal plane scopes are best. If you’re a hunter, second focal plan scopes are usually best.
Here’s why.
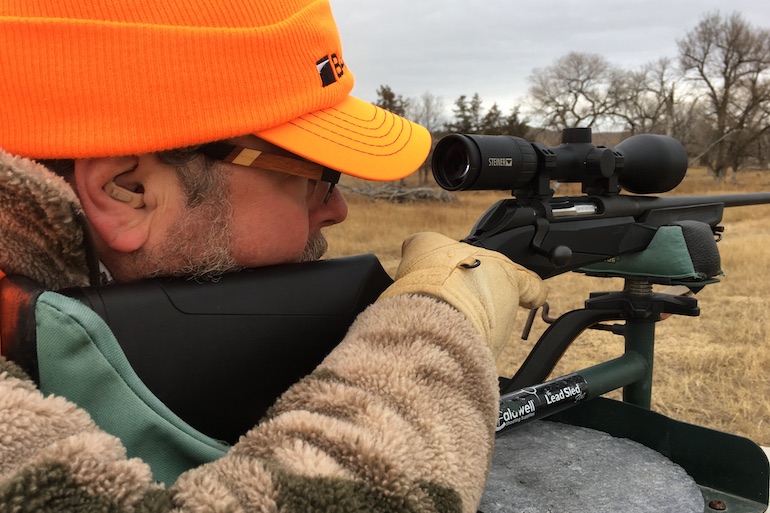
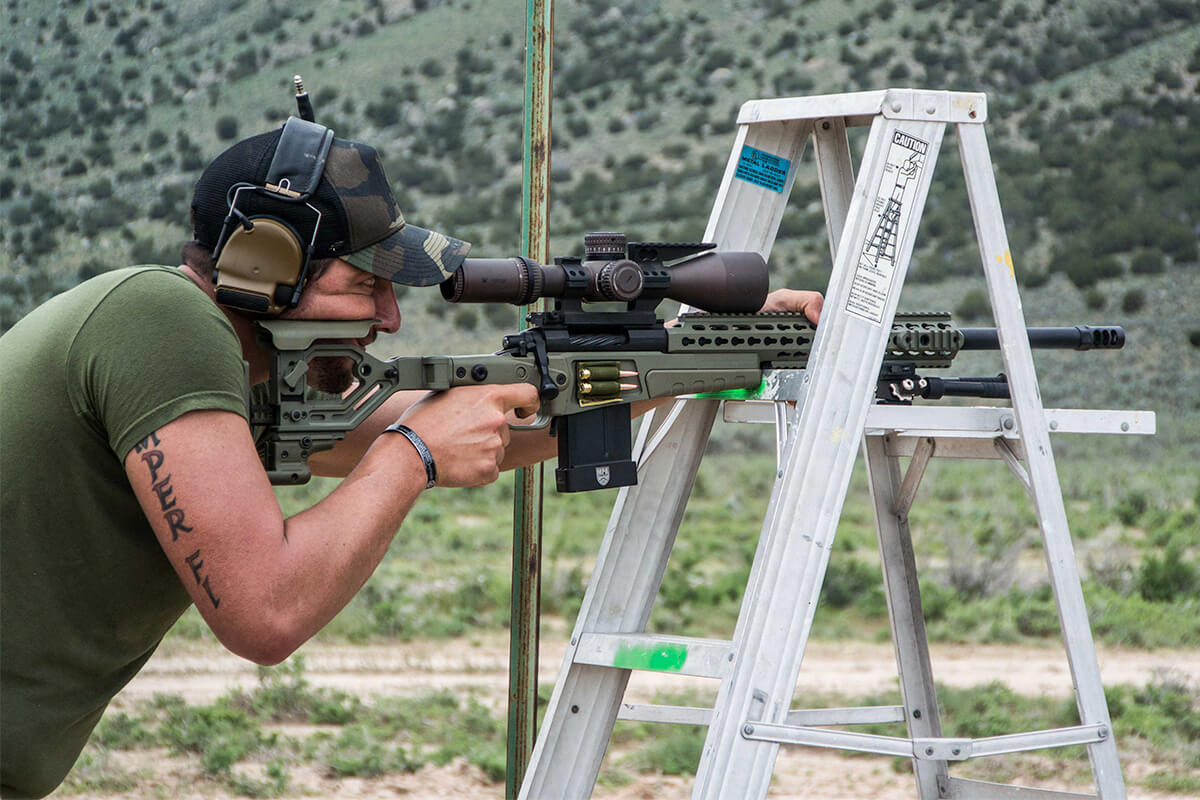
Tactical and competitive shooters are generally best served with first focal plane scopes, because they can accurately use reticle hash marks to hold for wind or a bit of bullet drop/point of impact error no matter what magnification the scope is on.
Front Focal Plane Scopes
Military and tactical-type shooters often rely on hash reticle hash marks to compensate for wind drift, and for on-the-fly minor variances in bullet impact above or below expected point of impact. In a first focal plane scope, the hash marks on the reticle crosswire are the same predictable value no matter what magnification the scope is set on. Whether you are zoomed way in on a very small target, or zoomed way out so as to maximize our field of view when engaging multiple or moving targets, .2-MIL hash marks are always .2 MILs. If you need to hold for 6 MILs of wind drift, just use the appropriate hash mark and squeeze the trigger.
That’s it for the advantage of first focal plane reticles, folks. It’s a very simple, yet critical characteristic. The disadvantages are more nuanced, and as a result are harder for many shooters to grasp—until experienced for themselves.
Here’s the down side to front focal plane reticles: When the scope is zoomed way in, the reticle grows to the point where it becomes outlandishly thick. It can easily become so thick it obscures your target, making precise aiming difficult.
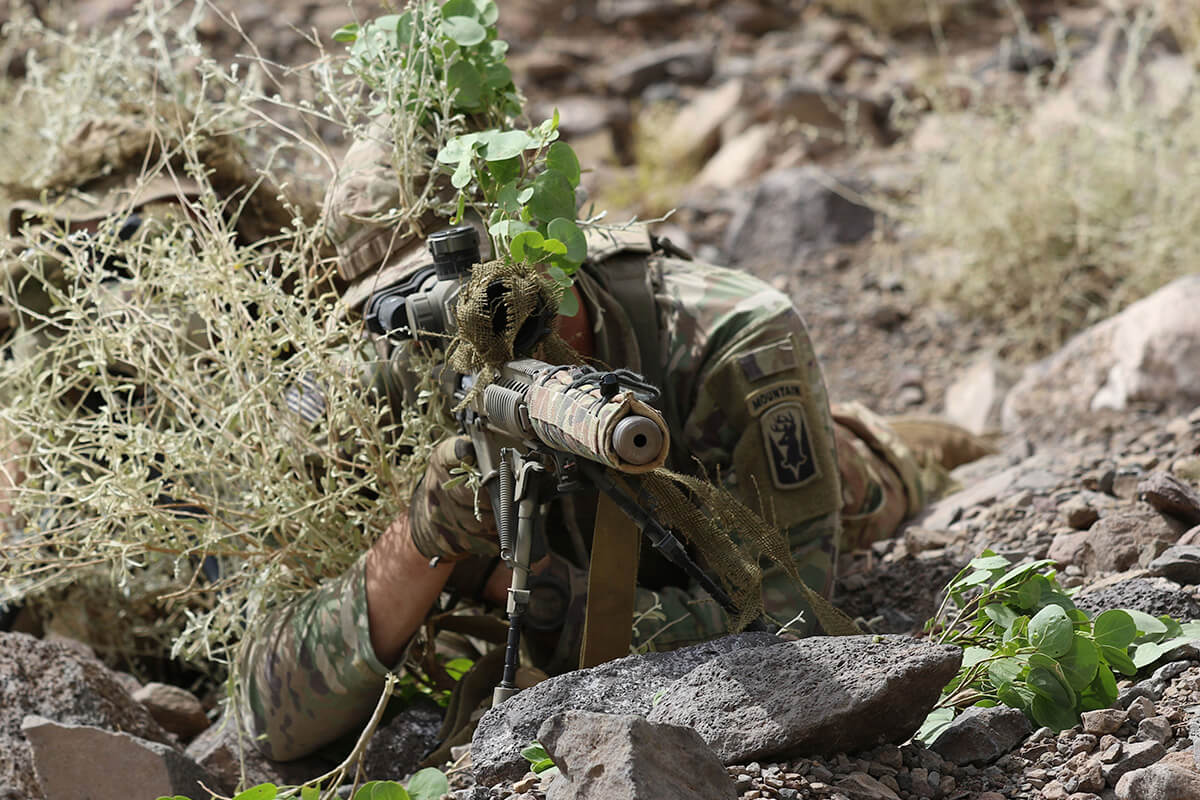
Modern snipers generally use front focal plane reticles.
To compensate, most optic companies make front focal plane reticle crosswires really thin near the center. Unfortunately, that makes it so when you zoom way out, the reticle becomes super thin and can nearly vanish.
Most tactical and competitive shooters prefer to shoot with their scope on 10x or more, so it’s not really a problem for them. However, if you use a first focal plane reticle while hunting, that vanishing reticle on low power can be debilitating.
This is particularly true in low light conditions, and when the game animal is against a brushy background. To gather enough light to see the animal, you’ve got to zoom the scope all the way out. (Scopes gather and transfer light most effectively on low power.) Trouble is, with the reticle now spiderweb-thin, it vanishes in the twilight, especially if there’s brush around the animal.
Where legal, illuminated reticles can help overcome the vanishing-reticle syndrome. However, many states do not allow illuminated reticles for hunting. Plus, most illuminated reticles are too illuminated, meaning the entire thing or at least the major percentage of the reticle glows. A tiny pinpoint of light in the center of the reticle is wonderful; a Christmas tree worth of vibrant glowing reticle is distracting and can make it difficult to see through and find your quarry in the fading light.
Hunters are generally best served with second focal plane scopes. Most game is shot with the scope on low magnification, where a front focal plane reticle shrinks until it has nearly vanished. Busy backgrounds and low light exacerbate the issue.
Second Focal Plane Reticles
Second focal plane scopes are the world standard for hunters, and for good reason; the reticle stays the same size whether zoomed in or out. You can crank up to top magnification and see the wings on a fly at 100 yards; the reticle doesn’t become grossly fat. You can zoom all the way out for low-light hunting, and the reticle stays perfectly visible rather than thinning to obscurity.
I’m gonna take a cheap-shot at pseudo-tactical shooters that proclaim second focal plane reticles are outdated and near useless: Most shooters making such claims have little real-world experience on live targets, in wild environments; on stealthy game that moves only when the shadows grow long. Be a little more open-minded, and listen to the guys that consistently stalk and kill the wariest wild game, from torrid deserts to frigid timberline, in all kinds of weather and light conditions. You’ll learn something about what works best for hunting.
So, if second focal plane scopes are so good, what’s the down side? It applies to technical extended-range shooters that calculate wind holds, or hold over a distant target using reticle hash marks to compensate for bullet drop rather than dialing up.
Here’s a prime example of how a front focal plane reticle shrinks until it nearly vanishes in most front focal plane reticles. It’s not usually an issue with target, tactical, and competitive shooting, but plays havoc when hunting. March Scopes image.
If a second-focal-plane reticle incorporates hash marks, it has a significant Achilles Heel: They are only good at one magnification setting. For example, my favorite hunting reticle is Leupold’s WindPlex. It’s got one-MOA hash marks on the horizontal crosswire to help shooters accurately compensate for calculated wind drift. However, those hash marks span exactly one MOA only on max power. For example, a 3-18x 44mm Leupold VX-6HD must be zoomed all the way to 18x for the hashes to have exactly a one-MOA span.
I don’t like to shoot at game animals on max power. It’s hard to find your quarry when you’re zoomed all the way in. You almost never spot your own impacts, because the field of view is small and recoil causes your rifle to jump. It’s hard to find the animal for a fast follow-up shot. In Mexico, I once failed to get a critical second shot into an animal because my scope was on 18x. The big coues buck trotted off when the bullet hit, and I couldn’t get back on him.
Shown is Leupold’s WindPlex second focal plane reticle. It’s hash marks span one MOA when the scope’s magnification is zoomed all the way in. At all other power settings the hash marks are useless—except for the half-power setting, at which the marks span two MOA. That’s useful enough for most hunters.
Thankfully, there’s a shooter’s hack that helps: Set your scope on half power, and double the value of the hash marks. Set on 9x (halfway down from 18x), my Leupold reticle’s hash marks span two MOA.
As a result, unless inside 300 yards, I rarely use anything but half-magnification when hunting with second focal plane reticles equipped with hash marks.
There you have it: the primary pros and cons of first versus second focal plane scopes. Maybe, like me, you own and use both, and pick up whichever is appropriate for the task at hand. Perhaps you use just one rifle for everything from backcountry hunting to long-range cross-country NRL Hunter matches. In the end, only you can decide which is best for your purposes.
Popular graphs such as this are massively misleading and do shooters and hunters a disservice: They show the first focal plane reticle in a theoretical (but senseless) best light. It’s a foolish hunter indeed that zooms his scope out at long range, as depicted, and zooms in to 20x for those close shots. It’s ridiculous. Invasion the first focal plane scope zoomed to 15x, aiming at the tiny, faraway deer on the left. The thick reticle would nearly obscure the deer.
I won’t go as far as to belittle the, uh, little .17 Winchester Super Magnum. It’s a unique cartridge that does what no rimfire has done before. It’s the fastest rimfire ever designed and actually performs spectacularly – for a rimfire.
What I will do is ask, why? The great charm about rimfires is that they’re versatile and inexpensive to shoot. The .17 WSM, superb distance performer that it is, is neither. While it’s capable of perforating a prairie dog farther away than “common” rounds, such as the .22 Magnum, most savvy shooters have transitioned to centerfires when distances stretch that far. And up close the .17 WSM is actually going too fast: Squirrels and cottontails suffering a body shot from it leave the hunter with little but fluff.
By stew-pot decree, any rimfire not well suited for small-game hunting is, well, not really a rimfire. It’s an outcast. What some folks charitably term a “niche” cartridge.
Contrast that with the .22 Magnum. While it’s not as aerodynamic as its .17-caliber sibling, it hits authoritatively within the rimfire’s realm – inside of 150 yards or so. For small-game hunting, full-metal-jacket projectiles minimize meat damage; likewise valuable pelts about to be separated from their host furbearer. Butchers effectively use a .22 Mag pellet between the eyes on even the biggest steer.
Government trappers prefer it for killing troublesome mountain lions – cats die in the tree instead of being knocked out, hurt and fighting mad, into their pack of valuable dogs.
And, finally, even homeowners have viable ammunition choices engineered specifically for self-defense to choose from. If that’s not versatility, what is? – Joeseph von Benedikt
.17 WSM
Hunters need just two rimfire cartridges for small game: a .22 LR if they want to eat it and a .17 Winchester Super Magnum (WSM) if they wish to kill it. The .22 Winchester Magnum Rimfire (WMR) splits the difference between the two, crushing them both in all the categories that don’t matter.
The .22 WMR fires a projectile too fast for use on tablefare, such as squirrel or rabbits. What’s more, the bullets are ballistically inefficient at longer range. See for yourself. With only a 5 mph breeze, Hornady’s .22 WMR 30-grain V-MAX drifts 6.9 inches and strikes with 94 ft.-lbs. of energy at 150 yards. At that same range, Winchester’s .17 WSM 20-grain load drifts only 2 inches and carries an impressive 230 ft.-lbs. of energy. At 200 yards, where the .22 WMR is running on fumes, the .17 WSM is still scooting right along and carries twice the energy of the .17 HMR, itself a long-range rimfire.
What about bullet weight and penetration, two attributes the .22 WMR does possess? They simply don’t matter on game that can fit inside your mother’s purse. What about coyotes? Skip both and use a centerfire.
However, if you must use a rimfire on predators, opt for the 25-grain .17 WSM load. Using its superior velocity, the .17 can and will knock down any coyote within 150 yards as long as you hit your mark. You’ll be surprised at the long-range killing power of this little thumper, and you’ll save a few bucks in the process.
Speed kills, and the .17 WSM slaughters the .22 WMR in velocity, trajectory, wind drift, and retained energy. Its rimfire lethality is far superior to anything stamped “.22 WMR.” – D. Faubion
I’ve tested over 200+ scopes at this point — including the best AR-15 optics.
That’s why my optic reviews has been featured on various publications like:
Burris
Vortex
The National Interest
American Shooting Journal
…and more.
I personally buy every scope from my own money. In fact, I never accept outside financial support from scope manufacturers (and never will).
Why? I believe honest reviews are better than paid reviews.
Read Before You Buy
I don’t like getting ripped off. I hope you don’t either.
That’s why I created this quick section on choosing the best 22 rimfire scope for your actual needs (rather than what marketing sells).
Here’s what you need to know.
How To Choose A Rimfire Scope
In the 1990s, the Navy Seals used a .22 specs ops pistol (called Ruger MK II).
Why? 4 reasons:
Accuracy
Quietness
Cheapness
Recoil (virtually none)
This is why the .22lr caliber is the most popular cartridge today. Out the box, the 22LR can easily hit 50 yard targets without a sight.
However, with the best 22LR scope, you can easily surpass 100+ yard targets..
So how much magnification do you need? To find out, we first have to determine the 3 common…
Rimfire Shooting Distances
Here are the 3 most common ranges:
Close Range: <50 yards
Medium Range: Between 50 to 100 yards
Long Range: 100+ yards
Don’t know which range to choose? That’s OK. Just keep reading and I’ll break it down.
But if you do know your range (or ranges), then select it so you can find…
The Best Magnification for Rimfire Scopes
Before you can find the right magnification, you must first understand WHAT magnification is.
Put simply:
Magnification is how much the optic ‘enlarges’ the image. That’s it.
How do you find the right amount? By choosing a shooting distance based on your use.
Close Range (<50 yards)
This is where 22LR rifles excel.
If you mostly plink at close range, then you’re going to need:
Magnification:1 – 4X power
Alternatively, you can use a red dot for your rimfire rifle for fast target acquisition.
Speaking of red dots, I recommend reading my best pistol red dot sights guide if you’re into close range pistol shooting.
Also:
If you’re looking for added magnification or if you have astigmatism, check out my recent review of the best holographic sights.
Medium Range (50 – 100 yards)
This is the range majority of 22LR users shoot. Most people use it for small game hunting or plinking. If that’s the case, you’ll probably need:
Magnification: Between 4 – 7X power
A fixed 4X or low power variable magnification optic (LPVO) is recommended.
Long Range (100+ yards)
Not many people go past 100 yards.
But sometimes you must due to hunting or competitive shooting, then choose:
Magnification: 7X and up
If you need more than that, then head on over to my best long range rifle scopes guide. With all that said, here’s…
The Bottom Line On Magnification
Choosing a good scope for 22LR is as simple as choosing a shooting distance and then getting the right magnification.
If you don’t do this, you’ll likely buy the wrong amount (or type) of magnification for your uses. I’ve seen this more times than I can count. Don’t be that guy.
Instead, I highly recommend reading this section.
A quick pro tip:
If you combine magnifications (medium + long range), you’ll need a low powered variable powered scope. This allows you to use more than one magnification.
I hope this magnification guide helped you out. You’re now ready to find the best scope for .22 rifles below.
Let’s get started!
The 5 Best Rimfire Scopes/.22LR
If you’re pressed on time, here’s a quick list of the best rimfire scope:
Leupold VX-Freedom 3-9×40: Best 22LR Scope
Athlon Ares 4.5-30×56: Best Scope for 22LR Benchrest
Bushnell Trophy TRS-25: Best Rimfire Scope Under $100
Leupold VX-Freedom 1.5-4×20: Best Scope for 22LR Squirrel Hunting
Vortex Razor HD LH 1.5-8×32: Best for Competition
1. Leupold VX-Freedom 3-9×40: Best 22LR Scope
The Leupold VX-Freedom 3-9×40 is the best .22 rifle scope.
In fact:
I’ve hand-tested it on multiple .22LR AR-15s for a wide variety of hunting applications and casual target shooting. Trust me when I tell you I loved it, especially for my Colt M4.
By the end of this review, you’ll know if the Leupold VX-Freedom is for you.
Let’s dive in!
Glass Clarity & Reticle
The glass is crystal clear, with no edge distortions or color aberrations.
The VX-Freedom comes with a standard duplex reticle in the second focal plane.
SFP means the reticle size will remain the same even as the target size increases and decreases through its magnification range. It was effortless to incorporate hold over at varying distances.
If the duplex reticle not your cup of tea, the VX series has mil dots and ballistic reticles as an option.
Leupold also offers a custom dial service (CDS) model to provide a custom adjustable turret tailored to your ballistic specifications.
Eye Relief & Eye Box
The Leupold VX-Freedom has 4.17”/3.66” of forgiving eye relief, which keeps me from getting hit in the eye.
The scope offered a wide field of view between 100-200 yards, which is the distance I typically shoot targets.
Durability and Weight
Despite the price range, I was impressed with the durability and overall quality of the Leupold VX-Freedom 3-9×40.
The 1″ main tube is 12.39” long and weighs about 12.2 oz. It’s constructed from aircraft quality aluminum, making it waterproof, fog proof, and shockproof.
Also:
This rugged optic was impact tested on 3x the recoil of a .308 which is why it’s also known as one of the best AR-10 scopes on the market.
Elevation & Windage Knobs
The elevation and windage turrets were a little mushy.
It felt like they might twist off or break if I got too rough with them, but I will say the elevation and windage tracked true.
The adjustments are in ¼ MOA for both, a fine level of adjustment detail for under $300.
On the other hand, zeroing was a breeze. In less than ten rounds, I was pounding away at 200-yard steel plates with no issues.
I put 300 rounds on the VX-Freedom with my Ruger AR-556 rifle, and it had no problems holding zero.
Parallax & Magnification
The Leupold VX-Freedom sports a 3-9x variable magnification and 40mm objective, making it an excellent choice for medium to long-range shooting.
Speaking of long range, I have an updated list of the best 6.5 Creedmoor scopes you can use to perfect your long-range shooting.
The best part?
The zoom ring is super easy to turn. It features a large raised part that worked perfectly with thick gloves and cold, wet fingers.
Mounting & Rings
Unfortunately, this budget-oriented scope doesn’t come with accessories.
I have the VX-Freedom mounted on my Glenfield Marlin 22 model 60 using the Leupold Rifleman Scope Rings (Model #56533 – Rifleman Rings 1″ – .22 RF 3/8-inch Rings).
They come with a hex key and set screws. Furthermore, these rings allow enough clearance to use the front sights without having to remove the scope.
Also:
I purchased the Leupold Alumina Lens Shade 4″ 40mm for anti-reflection and scratch resistance.
Lastly, I replaced the flimsy bikini caps with the Leupold Alumina Flip Back Lens Cover.
Is the Leupold VX-Freedom worth it?
If you’re looking for a well-built scope from a renowned optics manufacturer, the Leupold VX-Freedom 3-9×40 is absolutely worth it.
Why? It’s got…
Quality glass
Low price tag
Second Focal Plane
Multiple Reticle Options
Great eye-relief distance
3-9x Variable Magnification
Weatherproof and shockproof build
To top it all off, the VX-Freedom comes with Leupold’s Lifetime warranty. If it breaks, they will repair or replace the scope without charge: even if you aren’t the original owner or lost the receipt.
For under $300, the Leupold VX-Freedom 3-9×40 is the best .22 scope that is not only budget-friendly but provides top-of-the-line performance.
2. Athlon Ares 4.5-30×56: Best Scope for 22LR Benchrest
The Athlon Ares 4.5-30×56 is the first scope I have purchased made by Athlon and I am a little annoyed I hadn’t found the brand earlier in life.
They produce high quality scopes that far outperform the price tag.
Here’s why the Athlon Ares 4.5-30×56 is the best benchrest shooting scope I have found to date…
Glass Clarity & Reticle
The clarity of the Athlon Ares 4.5-30×56 has blown me away. I have had scopes that are in the $2000-3000 range that can’t compete with this scope.
Whether it’s indoors or outdoors this scope has outperformed anything in it’s category.
I use this scope outdoors most often and the brightness has been fantastic so far.
I am not the most accurate shooter; however, with this kind of clarity, I have been shooting some of the tightest groupings of my life.
The FFP reticle on the Athlon Ares 4.5-30×56 is beautiful and well illuminated. The configuration fits my needs perfectly.
Eye Relief & Eye Box
The eye relief on this scope has been unbelievably versatile.
I will admit as you move higher in the magnification, it can be difficult to find the sweet spot. Overall, my experience with the eye relief has been simple and reliable.
This scope is the best scope for ruger american rimfire. I have mine calibered in .22 so I don’t have too much of an issue with recoil.
The eye relief is more than comfortable for a .22 recoil and it would definitely still be comfortable with a firearm that has much more recoil.
Durability
The durability on the Athlon Ares 4.5-30×56 has been outstanding so far. It has a few scratches but in my opinion a scope and firearm look better dinged up.
I buy my firearms and scopes to be used and slightly abused and this scope has certainly rolled with the punches.
Elevation & Windage Knobs
The turrets on the Athlon Ares 4.5-30×56 are some of the most premium feeling turrets I have ever used.
An unbelievably satisfying click sound every motion. Chincy turrets irritate me to no end.
The turrets have a 0.25 MOA click value and the adjustment has been perfect for zeroing.
My experience zeroing the Athlon Ares 4.5-30×56 was one of the easiest processes I have gone through.
This thing had to have been perfectly zerod in 5-10 shots.
Although I don’t dislike the process, I am glad it was quick and simple and I could spend the rest of my day enjoying the scope.
Parallax & Magnification
The Athlon Ares 4.5-30×56 has a magnification of up to 30X which is unbelievable to me.
I definitely am not the most capable shooter, but the extra magnification has given me some of my best groupings and confidence to date.
Parallax on the scope has been nonexistent. Even at 30X I haven’t noticed any.
The combination of clarity, magnification, and lack of parallax makes this scope an absolute no brainer in my opinion.
Mounting & Rings
When I purchased the Athlon Ares 4.5-30×56, I also purchased some 34mm Vortex Optics Precision Matched Riflescope Rings.
They work fantastic and add a very good look to a great looking scope. Easy to mount on my rifle and haven’t had to mess with them since.
In addition to this, I also purchased a 56mm Athlon Sunshade which was a must in my book.
Is the Athlon Ares 4.5-30×56 worth it?
The Athlon Ares 4.5-30×56 is in no way a cheap scope; however, for the price you get the quality of a scope that is 2 to 3 times more expensive.
This scopes has been one of my favorite purchases this year. Here’s why:
Clarity
Build quality
High magnification
In short: The Athlon Ares 4.5-30×56 is one of the most expensive scopes I have ever purchased and I do not regret a cent of that purchase.
You truly do get what you pay for with this scope and I have highly recommended it to all of my range buddies.
3. Bushnell Trophy TRS-25: Best Rimfire Scope Under $100
Penny for penny, the Bushnell Trophy TRS-25 is the best budget red dot on the market.
In fact, you’ll get the best rimfire scope for under $100!
I use this scope for target shooting, home defense, and hunting and it performs great in every environment.
Want to hear more? Keep reading…
Glass Clarity & Reticle
The TRS-25 has crystal clear glass.
The lenses are multi-coated, which reduces glare and helps to draw in light for better clarity in dim environments.
The best part is that it has an Amber-Bright coating that helps you distinguish between different shades of brown. You’ll easily be able to tell the difference between a brown tree and a brown animal when you’re out hunting.
This scope has a 3 MOA red dot reticle with 11 brightness settings.
It has an easy adjustment dial, so you can set the brightness to whatever setting works best for your own personal preference or the time of day.
The red dot is bright and crisp both in the bright sunlight and during dawn or dusk.
It also has an extended battery life, so you don’t have to worry about losing your dot in the middle of a hunt.
If you prefer not to worry about batteries, I recommend checking out my best prism scopes as an alternate option.
Eye Relief & Eye Box
With all red dot scopes, you get unlimited eye relief.
This means you’ll be able to have both eyes open, which gives you access to all your peripheral vision and promotes high situational awareness.
On top of that, you get super fast target acquisition because you don’t have to worry about eye or head position like you would with a LVPO.
Durability
The Bushnell Trophy TRS-25 was built to last.
It features shockproof construction to withstand any rough treatment. I’ve definitely banged mine on a few trees, with no evident damage.
It also is O-ring sealed, which makes it completely waterproof, even if it’s dunked under water.
Plus, it is nitrogen purged. This means you’ll never have to worry about it fogging up in humid environments.
It is compact and light, weighing only 4 oz, which makes it one of the best scopes for Ruger 10/22.
It also comes with a 1 year warranty, so you have plenty of time to test it out for any issues.
Elevation & Windage Knobs
The elevation and windage knobs are nice and tight.
You can easily use a dime to make your adjustments and they give a nice, positive click.
I zeroed mine in at 50 yards in a matter of minutes. I’ve shot thousands of rounds with this scope and have yet to need to readjust it.
Parallax & Magnification
You’ll get 1x magnification with the Bushnell Trophy TRS-25.
This is perfect for target shooting, hunting, and home defense. It gives you optimum vision at short range and works well for most intermediate distances as well.
If you want to use it for long range, it is possible if you add on a magnifier. You will lose out on your unlimited eye relief though.
The parallax is fixed at 50 yards and I haven’t noticed any issues with it.
Mounting & Rings
This scope mounts easily to most picatinny rails.
It is compatible with rifles, shotguns, pistols, and muzzleloaders, so it is an extremely versatile scope.
Depending on the type of weapon you’re mounting it to, you may need a riser, which is not included. You can choose the height that works best for your firearm. There’s a 0.83
or 1” option.
You’ll also get a nice rubber scope cover with the TRS-25.
Is the Bushnell Trophy TRS-25 worth it?
This scope is the best red dot you’ll find at a budget friendly price.
It has:
Multi-coated lenses
Amber-Bright coating
3 MOA red dot reticle
11 brightness settings
Best bang for your buck pricing
Rugged durability w/1 year warranty
If you’re looking for the best rimfire scope under $100, try the Bushnell Trophy TRS-25. You won’t be disappointed.
4. Leupold VX-Freedom 1.5-4×20: Best Scope for 22LR Squirrel Hunting
Looking for the best .22 rimfire scope for squirrel hunting? Look no further than the Leupold VX-Freedom 1.5-4×20.
With all the glass quality and clarity you’ve come to expect from Leupold, you’ll be able to accurately pop tiny varmints in all lighting conditions.
Let me show you…
Glass Clarity & Reticle
The Leupold VX-Freedom has a very clear picture.
I was impressed that Leupold was able to maintain such clarity in a lower-price range scope.
Unlike many scopes in the $200-$300 price-range, the VX-Freedom has fully multi-coated lenses and exceptionally clear glass.
Edge-to-edge, I found the sight picture to be crisp. Using Leupold’s Twilight Management System to drastically reduce stray light glare, there’s no haziness or fuzziness in my view.
I had perfect color contrast, even in low light situations.
Leupold boasts that their superior light transmission will give hunters an extra 20 minutes of shooting light. After putting this scope through its paces in the early morning and fading daylight hours, I found this to be true.
Armed with my Leupold VX-Freedom and my trusty .22 rimfire, I was able to be out when the squirrels were most active.
The second focal plane fine duplex reticle didn’t obscure even the tiniest target. I easily made headshots on squirrels within 100 yards.
For those interested in a hashed reticle, the Pig Reticle for hog hunting is listed as an option from some sellers.
Even for the range, this scope would be an awesome option for .22 benchrest shooting. No matter what you use your .22 rimfire for, the Leupold VX-Freedom will perform well.
That’s why I recommended the Freedom as my go-to hunting scope in best rifle scopes guide.
Eye Relief & Eye Box
I found this scope to have a pretty long eye-relief from 3.75 to 4 inches.
The eyebox was generous though, I didn’t have any trouble maneuvering behind the scope and maintaining a clean view through the scope.
Durability
Leupold is king when it comes to making a durable scope, and this little guy was no exception.
The lenses are coated with DiamondCoat 2 which not only improve light transmission, but provide scratch resistance.
The scope is argon/krypton purged making it fogproof in the toughest weather conditions.
It’s also sealed to withstand being submerged in over 30 feet of water.
I do not treat my scopes kindly. I haven’t bothered to cover this scope on my hunting trips. It has been tossed around, dropped, knocked and abused. Still works great, still holds zero.
Elevation & Windage Knob
I think the turrets are where Leupold compromised quality for cost on this particular optic. The turrets on the Freedom VS-Freedom are not at the same quality level that I am used to on higher-end Leupold scopes.
The finger click turrets felt mushy to me. I had a hard time telling when they finally “clicked” when making adjustments.
With that said, I didn’t have to work hard to zero the scope. I was able to sight in my gun in less than 5 shots.
The turret adjustments were definitely better than other budget scopes, but not up to par with what Leupold usually produces.
And that’s to be expected. Leupold has to cut corners somewhere to keep the price of this optic low. I would rather have slightly mushy turrets than crappy glass.
Parallax & Magnification
The magnification range for the VX-Freedom is 1.5-4x. This is perfect for small game hunting. In fact, I have taken it out to squirrel hunt several times and I loved it.
I found it easy to get headshots with this scope. Precision target shooters would be very pleased with this optic.
If I was shooting larger targets and a heavier caliber, I could easily push the range out to 400 yards. This low magnification range scope can outcompete many of the others in its class.
There is no parallax adjustment on this optic, but with such a low magnification range, parallax shouldn’t be an issue.
Mounting & Rings
No mounts or rings are included with the VX-Freedom which has a 1 inch main tube.
I choose to mount my optic with Leupold Rifleman rings that include a base.
These rings are affordable and easy to install.
Leupold did not include any lens caps either. I personally don’t have a need for covers.
I think that the scope is built well enough, it doesn’t matter. But if you would like covers, you can buy a set separately.
Is the Leupold VX-Freedom 1.5-4×20 worth it?
I think the Leupold VX-Freedom 1.5-4×20 is definitely worth the investment for anyone doing close-range, precision .22 rimfire shooting.
To recap its features, it has:
Fine Duplex Reticle
DiamondCoat2 Lens Coatings
Twilight Maxlight Management System reduces glare
Highly durable design withstands the Punisher, an extreme recoil/shock simulator
Honestly, the glass clarity of the VX-Freedom meets the standard Leupold has set with its higher-end scopes. At about $300 you will be hard pressed to find a clearer picture.
5. Vortex Razor HD LH 1.5-8×32: Best for Competition
As much as I like bells and whistles and all the fancy features on my scopes, sometimes simple is the way to go.
If I’m hunting hogs on my property or deer in the nearby woods then I don’t need the extra weight some of those scopes pack on.
At those times, you can’t beat a Vortex Rimfire Scope.
They’ve got the incredible quality I’ve come to expect from Vortex and they’re lightweight and sturdy. Which is why it’s one of the best .308 scope on the market.
But if you’re looking for a simple, elegant, and effective scope, then keep reading and I’ll tell you why this one can’t be beaten.
Glass Clarity & Reticle
The glass is ultra-clear and incredibly crisp.
This scope has HD extra-low dispersion lenses that are fully multi-coated and anti-reflective.
Colors are true through it and the resolution is great.
Whether I’m zoomed all the way to 8x or sitting at 1.5x, the clarity is the same and I can see everything I’m looking at.
The anti-reflective coating is great for when I’m hunting in low light as it lets all the light in without ruining my view.
One of its best features is the G4 BDC reticle which gives you both a target dot and hash marks in your crosshairs.
It’s simplicity and uncluttered design makes it a dream for any hunter.
Take advantage of the lens cover and cloth that are included to keep your lens performing at its best.
Eye Relief & Eye Box
It’s got a 3.8” eye relief and a generous eye box.
There’s plenty of room to maneuver regardless of your magnification setting.
While it’s not as much eye relief as some higher-end scopes have, I’ve never had an issue with it being cramped.
Durability
Like all Vortex scopes, this one is incredibly durable.
It’s made of a single piece of aircraft-grade aluminum that is hard anodized and covered in an Armortek coating.
That makes it super scratch resistant and helps it to be shockproof.
No matter what trees my scope has been banged against or brush it’s gotten caught on, it hasn’t gotten a single scratch on it yet.
On top of that its Argon gas purged to prevent internal fogging, which is a huge plus on fall mornings when the temperature is fluctuating.
Finally, it’s also waterproof thanks to the O-ring seals that prevent moisture, dust, and debris from getting into it.
You’d be hard-pressed to find another manufacturer with the level of durability that Vortex offers in its scopes.
Whatever environment or temperature you take this scope hunting in, it’s gonna perform amazingly.
Elevation & Windage Knobs
The low-capped large-diameter turrets make it really easy to read your elevation and windage adjustments.
The turrets are easily turned with finger pressure, although I do wish the click was a bit more audible. It’s there, but it’s quiet.
The caps are a nice feature though as they help protect the turrets from getting accidentally bumped out of place.
If you’re anything like me, that’s a great feature to have when you’re moving through the brush.
The scope was very easy to zero at 100 yards and it’s had no problems keeping zero.
Parallax & Magnification
The magnification is 1.5-8x with a 32mm objective lens.
Although the magnification range starts at 1.5x, for me it really felt like a true 1x.
If it’s not true, it’s so incredibly close I couldn’t tell the difference.
The zoom is fast and insanely smooth from 1.5-8x and everything in between – just like my best ACOG clone.
I had no issues with parallax until I got up to 8x magnification, but it was easy to fix and wasn’t a lasting issue.
Mounting & Rings
You’re gonna have to buy your own mount for this one as it doesn’t come included.
I use and recommend the Monstrum Cantilever Ring Mount.
No products found.
It’s easy to use, durable, and user-friendly.
Is the Vortex Razor HD LH 1.5-8×32 worth it?
I’ll admit, I’m a bit of a Vortex fan. Their optics are high quality and they stand by their products.
This is a great little scope if you’re looking for something simple and sleek.
Let’s review:
Capped turrets
G4 BDC reticle
Argon gas purged
Incredible durability
1.5-8x magnification range
Crystal clear multi-coated lens
Shock, fog, and waterproof & scratch resistant
If none of that convinces you, maybe the incredible Vortex Lifetime Warranty will.
No matter what happens to your scope, Vortex has got you covered. Go check out the Vortex Razor HD LH and decide for yourself.
How to Sight in .22 Rifle with Scope
By now, you’ve found the right optic for your rimfire rifle. You’re now ready to shoot.
No so fast.
It doesn’t matter how good of a shot you are. If your scope isn’t sighted properly, then you’re gonna miss.
I’m going to show you how to sight in your .22 rifle step-by-step.
Let’s dive right in.
Everything You Need to Get Started
You technically can zero in your gun with just a target.
However, from experience, I’ve found these following tools greatly simplify the sight-in process.
Here are the tools:
Ear and eye protection: You’re going to have to fire live rounds. These protect your eyes and ears from potential damage.
Gun Rest: This keeps your rifle as steady as possible throughout the process. This way you don’t accidentally move the gun between shots and potentially throw off the hit comparisons. You can either use a professional gun rest or a cardboard box like this.
Target: A paper target that’s anchored to something immovable (like steel).
Range: Indoor ranges are recommended but an outdoor one with windbreakers and damp or grassy ground to prevent dust clouds works fine.
Got these 4 things? Good. It’s now time to learn…
How to Sight In Your 22 Rifle Scope
Some guides may direct you to remove your scope from the mount for certain adjustments, but that shouldn’t be necessary.
If you already have your scope set on a good mount, then there’s no need to take it off for zeroing.
The biggest thing to focus on is being patient. Take your time with each step of the process and make sure you get it right.
Step 1: Set Everything Up
Get your target set up downrange and fully secured. Make sure there is a solid backdrop to catch your shots.
Aim your rifle towards the target and use your gun vice (or whatever material you’ve chosen to keep your gun secure) to anchor it in place. The surface you rest your rifle on should optimally be level.
This is also the time to put on your safety equipment. This includes the shooting glasses and some form of ear protection.
How far away you shoot from is up to you. I recommend doing it at 100 yards, as anything less just isn’t precise enough. Doing it at more than 100 is simply inviting more interference from wind or other factors.
Step 2: Aim for the Bullseye
Focus your crosshairs directly on the bullseye and fire. This is where the patience comes in, as you need to take your time and make sure you don’t affect the shot at all. The gun and scope need to do all the work.
Take note of where your shot landed on target. If the mark isn’t noticeable, then use a marker to make it so. If you completely missed, then try to figure out where the shot went and adjust your aim accordingly.
Step 3: Make Adjustments
Once you’ve fired, do your absolute best not to jostle the rifle at all. If you do, you will have to repeat the previous step.
Using your windage and elevation turrets, make adjustments until the crosshairs are perfectly centered on your previous shot.
After this, you can adjust the rifle itself until the crosshairs once again point at the bullseye. Make sure you don’t accidentally touch the turrets while reaiming.
Step 4: Shoot Again
You’ll once again need to align your crosshairs directly on the bullseye and fire. In a perfect world, this is where the bullet will go directly into the bullseye. In reality, it should be very close, but may not be perfect.
You’ll need to repeat the previous two steps until your shots are comfortably close to the bullseye. Once your shot gets close to the center, keep your crosshairs on the bullseye and fire again to make sure that there was no user error in the process.
Step 5: Cool and Repeat
It’s very likely that your scope and rifle are already sighted, but it’s always better to be safe than sorry.
Give your gun some time to fully cool down before once again shooting at the bullseye. This is just a last little test to make sure everything is truly sighted.
If the bullet lands in a surprising spot, then you may need to repeat the earlier steps to make sure that you’ve completed each one properly.
Conclusion
This is a necessary step to get the best accuracy from your rifle and scope.
The rifle and scope do a lot more work than many people think, and getting them properly sighted makes sure that they can do their job well.
Patience and safety are the biggest factors to keep in mind. Taking your time with each step will make everything go smoothly and will actually speed up the process significantly.
Having your safety equipment and a good backdrop are absolutely essential and part of the responsibility each gun owner has to keep themselves and others safe.
Now that you’ve made it through the guide and gotten your scope and gun sighted, you’ll have a much easier time doing it again in the future.
Just always err on the side of caution and follow each step with patience and precision.
Best Distance to Sight in Your .22 Rifle
Easily, the most popular caliber is .22 lr. Not only is the round itself affordable and accurate, but you can easily get a great quality rifle (I’m looking at you, Ruger 10/22), for under $150.
If you want to get fancy, it’s easy to spend thousands of dollars on an upgraded, tricked out .22 competition rifles.
Or you could easily have a formidable varmint gun in a price range in between. There’s enough variety in .22 lr availability to please every taste and budget.
Lightweight and with low recoil, .22 lr is an easy caliber for novice shooters to learn the fundamentals and for experts to fine-hone their skills.
You’re probably here because you put a scope on your shiny new .22 lr and you’re ready to start popping squirrels.
Before you get going though, we need to zero in your scope so that you can effectively place your shots at any distance.
I’m going to walk you through the best distance to zero your scope.
It probably isn’t what you expected it to be.
The Trouble with Variable Distance Shooting
There’s a bit of a debate online as to which is the best distance to sight in your scoped .22lr. Some say to sight it in for the distance you will be shooting, which is the obvious answer for plinkers and set-distance target shooting.
If you’ll be shooting at 50 yards every single time you head to the range, then 50 yards is where you need to set zero.
But if you plan on hunting small game with your .22lr rifle, you will want to be able to accurately hit the kill zone of your living targets from a wide range of distances. Small game animals have smaller kill zones.
We’re talking tiny kill zones. If you over or under shoot by a couple inches on large game, you’ll likely still be able to kill the animal. If you are high or low by more than 1.5 inches on a squirrel, you can completely miss.
For example, if you zero your hunting rifle at 50 yards, your bullet will drop 2 inches at 75 yards and 6 inches at 100 yards. Because of initial bullet rise, at 25 yards, you’ll be 2 inches too high.
That means that your bullet will hit 2 inches higher than you aimed your crosshairs at 25 yards, but then you’ll be 2 inches below the bullseye at 75 yards. At 100 yards, if you aim right at the bullseye you’ll be 6 inches too low.
That’ll leave you completely missing the squirrel at any distance other than 50 yards. Zeroing your rifle at 50 yards is a terrible idea for varmint hunters.
Ballistics
Before I explain why 50 yards is awful, let’s back up to the basic physics of firing a shot and finding zero on your scope.
When you fire a gun and the bullet leaves the muzzle, your bullet moves forward it rises, reaches an apex and then drops as the bullet begins to slow down and falls back to earth. If you were to plot the path of the bullet, it would make an arch, or to be technical, a parabola. Let’s think about it like throwing a softball.
Ideally, you’d want a flatter curve so you have a smaller margin of error at any point along the bullet’s path. To get a flatter curve, the bullet needs to move faster. It needs more muzzle velocity.
Thinking of the softball example, you need a faster pitch to get a flatter curve. A slower pitch will give you a loftier curve. Same with muzzle velocity and ballistics: a slower bullet will have a more dramatic curve; a faster bullet will be flatter.
Like your softball, your bullet will slow down and drop drastically as you increase distance traveled. This is called bullet drop. After 100 yards, your bullet will slow down so much that it will drop significantly, not proportionally.
Remember that 50 yard zero example a minute ago? You’d think that if the bullet drops only 2 inches at 75 yards, it would drop 4 inches by 100 yards, right? Nope. The bullet slows down tremendously over the longer distance and the drop is actually equal to 6 inches. A variation of 6 inches is huge when hunting small critters.
So, how do we correct this?
When you zero your rifle this means that you are setting your line of sight to coincide with the bullet’s impact somewhere along its trajectory curve.
Sighting in your rifle at, say 50 yards, means that you have made the necessary adjustments to your line of sight so that the bullet’s path will intersect, or cross that line, at 50 yards. All other factors removed, your bullet will hit bullseye at 50 yards. When using iron sights, your point of view is even with the muzzle of your rifle. Easy.
But you aren’t hunting with iron sights. You have a scope.
A scope raises your line of sight 1.5 inches above the muzzle. This changes your curve and increases your margin of error throughout a range of 100 yards.
So, how do we sight in our scope to give us the smallest margin of error along a 100 yard range?
I’m so glad you asked! Let’s apply what we just learned about bullet trajectory…
First, use a high velocity round to flatten that trajectory curve as much as possible. You might have to try a few types to find a fast round that works well with your gun.
For a rundown of ballistics from different manufacturers, check out this handy table:
Second, sight your rifle in at 75 yards.
The Magic Number
Why 75 yards you ask? Because it gives you the smallest margin of error along your bullet’s trajectory within a 100 yard range.
We’re planning on shooting small, living things, right? And you want to shoot your small, living thing and make it a small, dead thing. To do that you don’t need to impact right on an exact point, you just need to land your shot within a small area on the body of your small, living thing. This area is called the “kill zone”.
We won’t always find these small, living things at consistent distances. Sometimes, we get lucky and they are right in front of us, sometimes, they are a ways out. No matter the distance, we want the best chance of impacting the small, living thing in the kill zone with minimal adjustment on our scope.
This is where 75 yards becomes our magic number for sighting in your varmint scope. I could walk you through the math, but it’s really tedious, so I’m not going to. Suffice it to say that using the bullet’s trajectory and our line of sight, a zero at 75 yards will give us the smallest deviation of the bullet’s trajectory along our line of sight within 100 yards.
If you want to go digging into it, you can learn more here.
Basically, at a distance of 75 yards you will have a deviation of +-1.5 inches above or below your target throughout a practical hunting range of 0-75 yards. That’s a deviation of less than a full squirrel. This will put you in the kill zone at any distance without having to stress about holdover or holdunder.
At point blank, your shot will be 1.5 inches high. At 25 yards, you’ll be just over a 0.5 inch high. At 50 yards, you’ll be just over 1 inch high, and right on at 75 yards. See, no matter the distance, you’ll be landing shots within the kill zone and blasting critters.
If you are shooting at 100 yards, you’ll have a bullet drop of 3 inches. At this distance you’ll want to aim a little high to compensate for the bullet drop.
Practice & Take Notes
While all of this is pretty straight forward, it isn’t foolproof. A lot of things can impact your bullet’s travel to its target. The shape of your bullet, the ambient temperature, wind speed and direction, even air pressure can affect your shot.
It’s still a great idea to take notes when out shooting so that you can do some fine-tuning.
As you try different types of ammunition, you’ll find rounds that work really well with your rifle and some that don’t. Keep a notebook in your gun bag and make notes of this.
You may find a sweet spot for holdover at specific ranges. Make notes of this too.
Above all, go shooting. Get familiar with your rifle and your scope. The more muscle memory you build, the more instinctive your shooting will become.
Write down anything that worked, and anything that didn’t. The more detailed you are in your notes, the more you can fine-tune your setup and hone your skills.
Happy hunting!
Now It’s Your Turn
I hope you enjoyed my best rimfire scopeguide.
Now I want to turn it over to you:
Which rifle scope will you pick?
Let me know by leaving a quick comment down below.
If you have decided that shooting sports are now your thing or just want to purchase a handgun for self-defense, you must have already googled something like gun store near me or where to buy ammunition. Well, the whole topic of firearms possession is complex. But while ammo is not as regulated as firearms, you still must know federal and local ammo-related laws to avoid legal consequences. That is why you should read on, as this article provides an in-depth examination of the several legal issues surrounding ammunition. But before we begin, a little disclaimer – we are not lawyers, and the information given here is only for reference. Always check current gun and ammo legislation and consult professionals.
Ammo regulation is a topic that has gained significant attention in recent years, particularly due to the increasing frequency of mass shootings in the United States. While guns are subject to federal restrictions, ammunition sales are generally less regulated. This disparity in oversight has led to concerns about how easy it is for individuals to stockpile large amounts of ammunition without raising any red flags.
Many laws apply only to guns and not to ammunition. For instance, firearms sellers must generally be licensed as dealers and retain records of gun sales, providing a paper trail that can be used by law enforcement to trace firearms involved in criminal activity. There are no such requirements for businesses selling ammo.
Another example is the requirement for people to show ID and pass a background check, intended to prevent those with criminal records or other disqualifying factors from obtaining firearms. However, typically, no such checks are required for ammunition purchases.
Furthermore, there is a law saying that handgun sales across state lines must be processed by a local seller, which helps maintain some level of control over the distribution of firearms. In contrast, ammunition can often be purchased online or across state lines with relative ease.
Lastly, high-volume handgun sales are regulated to prevent individuals from buying multiple guns at once. Ammunition, however, is not subject to the same restrictions, allowing people to amass significant stockpiles without any legal barriers.
As of 2024, federal ammo regulations mainly focus on banning sales to specific individuals and forbidding the production, import, and sale of armor-piercing rounds. Although federal law stops certain buyer categories from acquiring ammunition, it doesn’t mandate sellers to perform background checks, leaving room for prohibited purchasers to slip through.
By the way, there is a common misconception regarding green-tip 5.56 NATO ammunition closely related to .223 ammo. It has often been mistakenly labeled as armor-piercing due to its steel penetrator tip. However, it does not meet the legal definition of armor-piercing ammunition. Back in time, the purpose of the green tip was to signify a steel penetrator within the bullet (instead of a plain lead core), intended to enhance its performance against hard targets.
California & Other State Ammunition Laws
State laws regulating ammunition sales vary across the US, with some states implementing stricter regulations than others. For instance, six states – New York, California, Connecticut, Illinois, Massachusetts, and New Jersey – have enacted laws regulating ammo sales and requiring background checks. Other states impose ammunition access restrictions through age limits or by banning specific categories of potentially dangerous individuals.
Let us consider the laws of these six states. New York and California mandate point-of-sale background checks for ammunition purchases, ensuring that only eligible individuals can buy ammo. In Connecticut, state agencies issue ammunition certificates, which must be renewed every five years. Illinois takes a slightly different approach by requiring residents to obtain a Firearm Owners Identification (FOID) card to legally purchase or possess firearms and ammunition. Massachusetts necessitates residents to obtain a firearm permit or license to purchase ammunition. Lastly, New Jersey enforces strict regulations on handgun ammunition purchases. Residents are typically prohibited from acquiring any handgun ammo unless they present a valid firearm purchaser identification card or a permit to purchase a handgun.
Ammunition Serialization
For several years now, gun reform advocates have been discussing the implementation of ammunition serialization technology as a potential solution to improve firearm regulations. Ammunition serialization is a process that involves assigning unique identification numbers to individual cartridges, providing a traceable link between the ammunition and its point of sale. This system can help law enforcement track the origin of bullets used in criminal activities, potentially leading to the identification of firearms and their owners. By marking each round with a serial number, either on the casing or the bullet itself, investigators can more efficiently connect recovered ammunition to specific purchases, sellers, and buyers. While ammunition serialization has the potential to significantly improve the crime-solving process, it also raises concerns about logistical challenges, increased manufacturing costs, and potential privacy issues for lawful gun owners. Despite these concerns, the concept of ammunition serialization continues to be explored.
The most comfortable tree saddles for saddle hunting have a lot of easy adjustments so that you can maintain comfort when hunting. If you’re tired of uncomfortable saddles or are new to saddle hunting and want to be sure you’ll get a saddle that you will enjoy yourself in, keep reading.
This post contains Amazon and other affiliate links, which means I’ll receive a commission if you purchase through my link, at no extra cost to you. Of course, you are not obligated to use my links, but it does help fund these posts in hopes of bringing more value to you!
Single-panel saddles utilize one piece of fabric to sit on whereas a double-panel saddle has two panels that can be moved independently. I’ve tried a lot of saddles and I haven’t necessarily found that one type is better than the other, it comes down to what feels better for you. I personally think the single panels are more comfortable.
Some saddle hunters believe that two-panel saddles are better because of more adjustability. However, as you’ll see in this post there are some single-panel saddles that have unique features that allow them to be even more comfortable than double-panel saddles.
Most Comfortable Hybrid Tree Saddle
JX3 Hybrid by JX3 Outdoors
Say goodbye to hip-pinching and numb legs & feet! Because of the metal frame, there is ZERO pinching at the hips or anywhere else like other saddles. Comfort is where the JX3 Hybrid really outshines conventional saddles. Check out my full review of the JX3 Hybrid.
I had no issues sitting in the JX3 Hybrid tree saddle for 10 hours straight. It’s like a recliner in a tree, making it one of the most comfortable tree saddles for hunting.JX3 Hybrid Maneuverability Using Lone Wolf Climbing Sticks with Ameristep Screw-In Step Platform
Check JX3’s Price
Metal Frame
The JX3 Hybrid has a metal frame. This is unlike conventional saddles which are made entirely of fabric and rope. There are some major comfort benefits of the metal frame. One benefit of the metal frame is that even when you’re in awkward leaning trees the JX3 remains comfortable because the metal frame blocks the negative effects of gravity. In conventional tree saddles, gravity places more stress on your knees which makes them uncomfortable faster.
Metal Fork
Another benefit that the metal frame supports is the optional adjustable metal fork that can be attached to the frame which rests against the tree. With this fork, you separate yourself from the tree even further and gain more grip when maneuvering around the tree.
JX3 Hybrid Metal Fork Against Tree
Adjustable Backrest
The backrest is also adjustable, allowing for adjustments to be made easily in the field while being used. If you start getting tired of sitting in a certain way, you can make the adjustments so you recline comfortably again.
JX3 Hybrid Adjustable Backrest And Straps
Your body can fully relax in this saddle. If you want to take a nap for a while, it is easy to do so. You can’t nap well in other saddles because you can’t lean back in them for long periods of time. Additionally, when you lean forward your head and neck get kinked on the bridge strap. This is not the case with the JX3 Hybrid. Instead, it’s like being in a recliner in a tree. It’s truly incredibly comfortable and I can’t say enough good things about its comfort.
Dryad Drey Hybrid Hammock Saddle
The Drey is very comfortable and gives the JX3 Hybrid a run for its money. This saddle is much more lightweight and packable than the JX3 Hybrid and is almost as comfortable (although not quite as comfortable). However, you still get 80+% of the comfort, in most cases it is worth the reduced comfort, especially for serious mobile hunters.
Dryad Drey Hammock Saddle – Using it as a regular saddleDryad Drey Hammock Saddle Cocoon
Most Comfortable Single Panel Hunting Saddles
CRUZR XC
The Cruzr XC is another very comfortable tree saddle for hunting because of its upgradeable adjustable bridge (both length and position). Another innovative feature of this single-panel saddle is that it has extra pleats to easily adjust the size of the saddle while you’re in the tree. With these adjustments, there is no hip pinch which single-panel saddles are notorious for. For this reason, the Cruzr XC is one of the most comfortable and best overall hunting saddles on the market.
CRUZR XC Saddle
Tethrd Phantom
The Tethrd Phantom basically needs no introduction. It is one of the most popular saddles on the market and for good reason. The Phantom addresses hip pinch and has reduced the pinch from earlier models. It’s a very comfortable saddle for how packable, lightweight, and mobile it is.
Most Comfortable Double-Panel Hunting Saddles
CRUZR Archon
Cruzr shows up a second time in this review. This time it is a double-panel alternative. Double-panel saddles are generally more comfortable because of their increased adjustability. The Archon is very comfortable for this reason. However, it is surprising how comfortable its single-panel brother is (Cruzr XC).
More Saddle Hunting Resources:
Hopefully, you found this review of the most comfortable tree saddles for hunting helpful. Find the best saddle hunting information easily by navigating to one of my more specific articles:
Saddle Hunting Reviews and Comparisons
JX3 Hybrid Saddle Review | Best Tree Saddle For Hunting?
Aero Hunter Tree Saddle Review: A New Tribe Tree Saddle For Hunting
17 Best Climbing Sticks For Hunting Compared
14 Best Saddle Hunting Platforms In 2024
Best Saddle Hunting Gear | Maximize Your Saddle Hunting Setups
Saddle Hunting Pros and Cons | Should You Make The Switch?
Best Brands To Look For When Buying Hunting Saddles
Tethrd
JX3 Outdoors
Cruzr
New Tribe Aero Hunter
Best Places To Shop For Saddle Hunting Gear
Some great places to find saddle hunting gear include:
"Master the art of precision shooting with dry firing air rifles. Enhance your aiming skills, trigger control, and muscle memory without using ammunition. Discover...
")
")
")
")
")