Home Blog Page 58

Buckshot vs Birdshot: What’s the Difference?

0

Buckshot vs BirdshotThe terms “buckshot” and “birdshot” are often used a lot when discussing the different types of shotgun ammo. Many new shooters are confused about the difference between them, and that’s OK because we were all a little confused the first time we stepped up to the ammo counter.

In this article, we will explain the differences between birdshot vs buckshot so that you know exactly which shotgun loads to get for your shooting needs.

The Difference Between Buckshot and Birdshot Explained

The difference between birdshot and buckshot is the size of projectiles (shot/pellets) loaded into the shotgun shell and their penetration ability. Buckshot shells have larger pellets in lower numbers while birdshot shells have smaller pellets in much higher quantities. Buckshot loads have high penetration while birdshot typically has lower penetration ability.

Understanding Birdshot

Of these two shotgun shells, birdshot is the smaller of the two. Birdshot loads fire smaller pellets, but this allows ammo manufacturers to jam a lot more of them into the shell. When you pull the trigger on your Remington 870 or any other shotgun, the shot from the shell leaves the barrel and begins to separate and move outward from each other.

As its name implies, birdshot is primarily designed for hunting birds like quail, grouse, pheasant, duck, goose, and even turkey. However, birdshot is capable of small game hunting and is quite capable against rabbits, squirrels, and even snakes.

Although primarily developed for bird and small game hunting, birdshot is also used for shotgun shooting competitions such as skeet, trap, and sporting clays.

As small game animals and birds like quail and pheasants do not require a lot of stopping power to fell, birdshot loads are designed to give the hunter the highest probability of a successful harvest. This is why smaller pellets are used, as they create a wider pattern, and increase the chance of a successful hit.

birdshot pellet chart

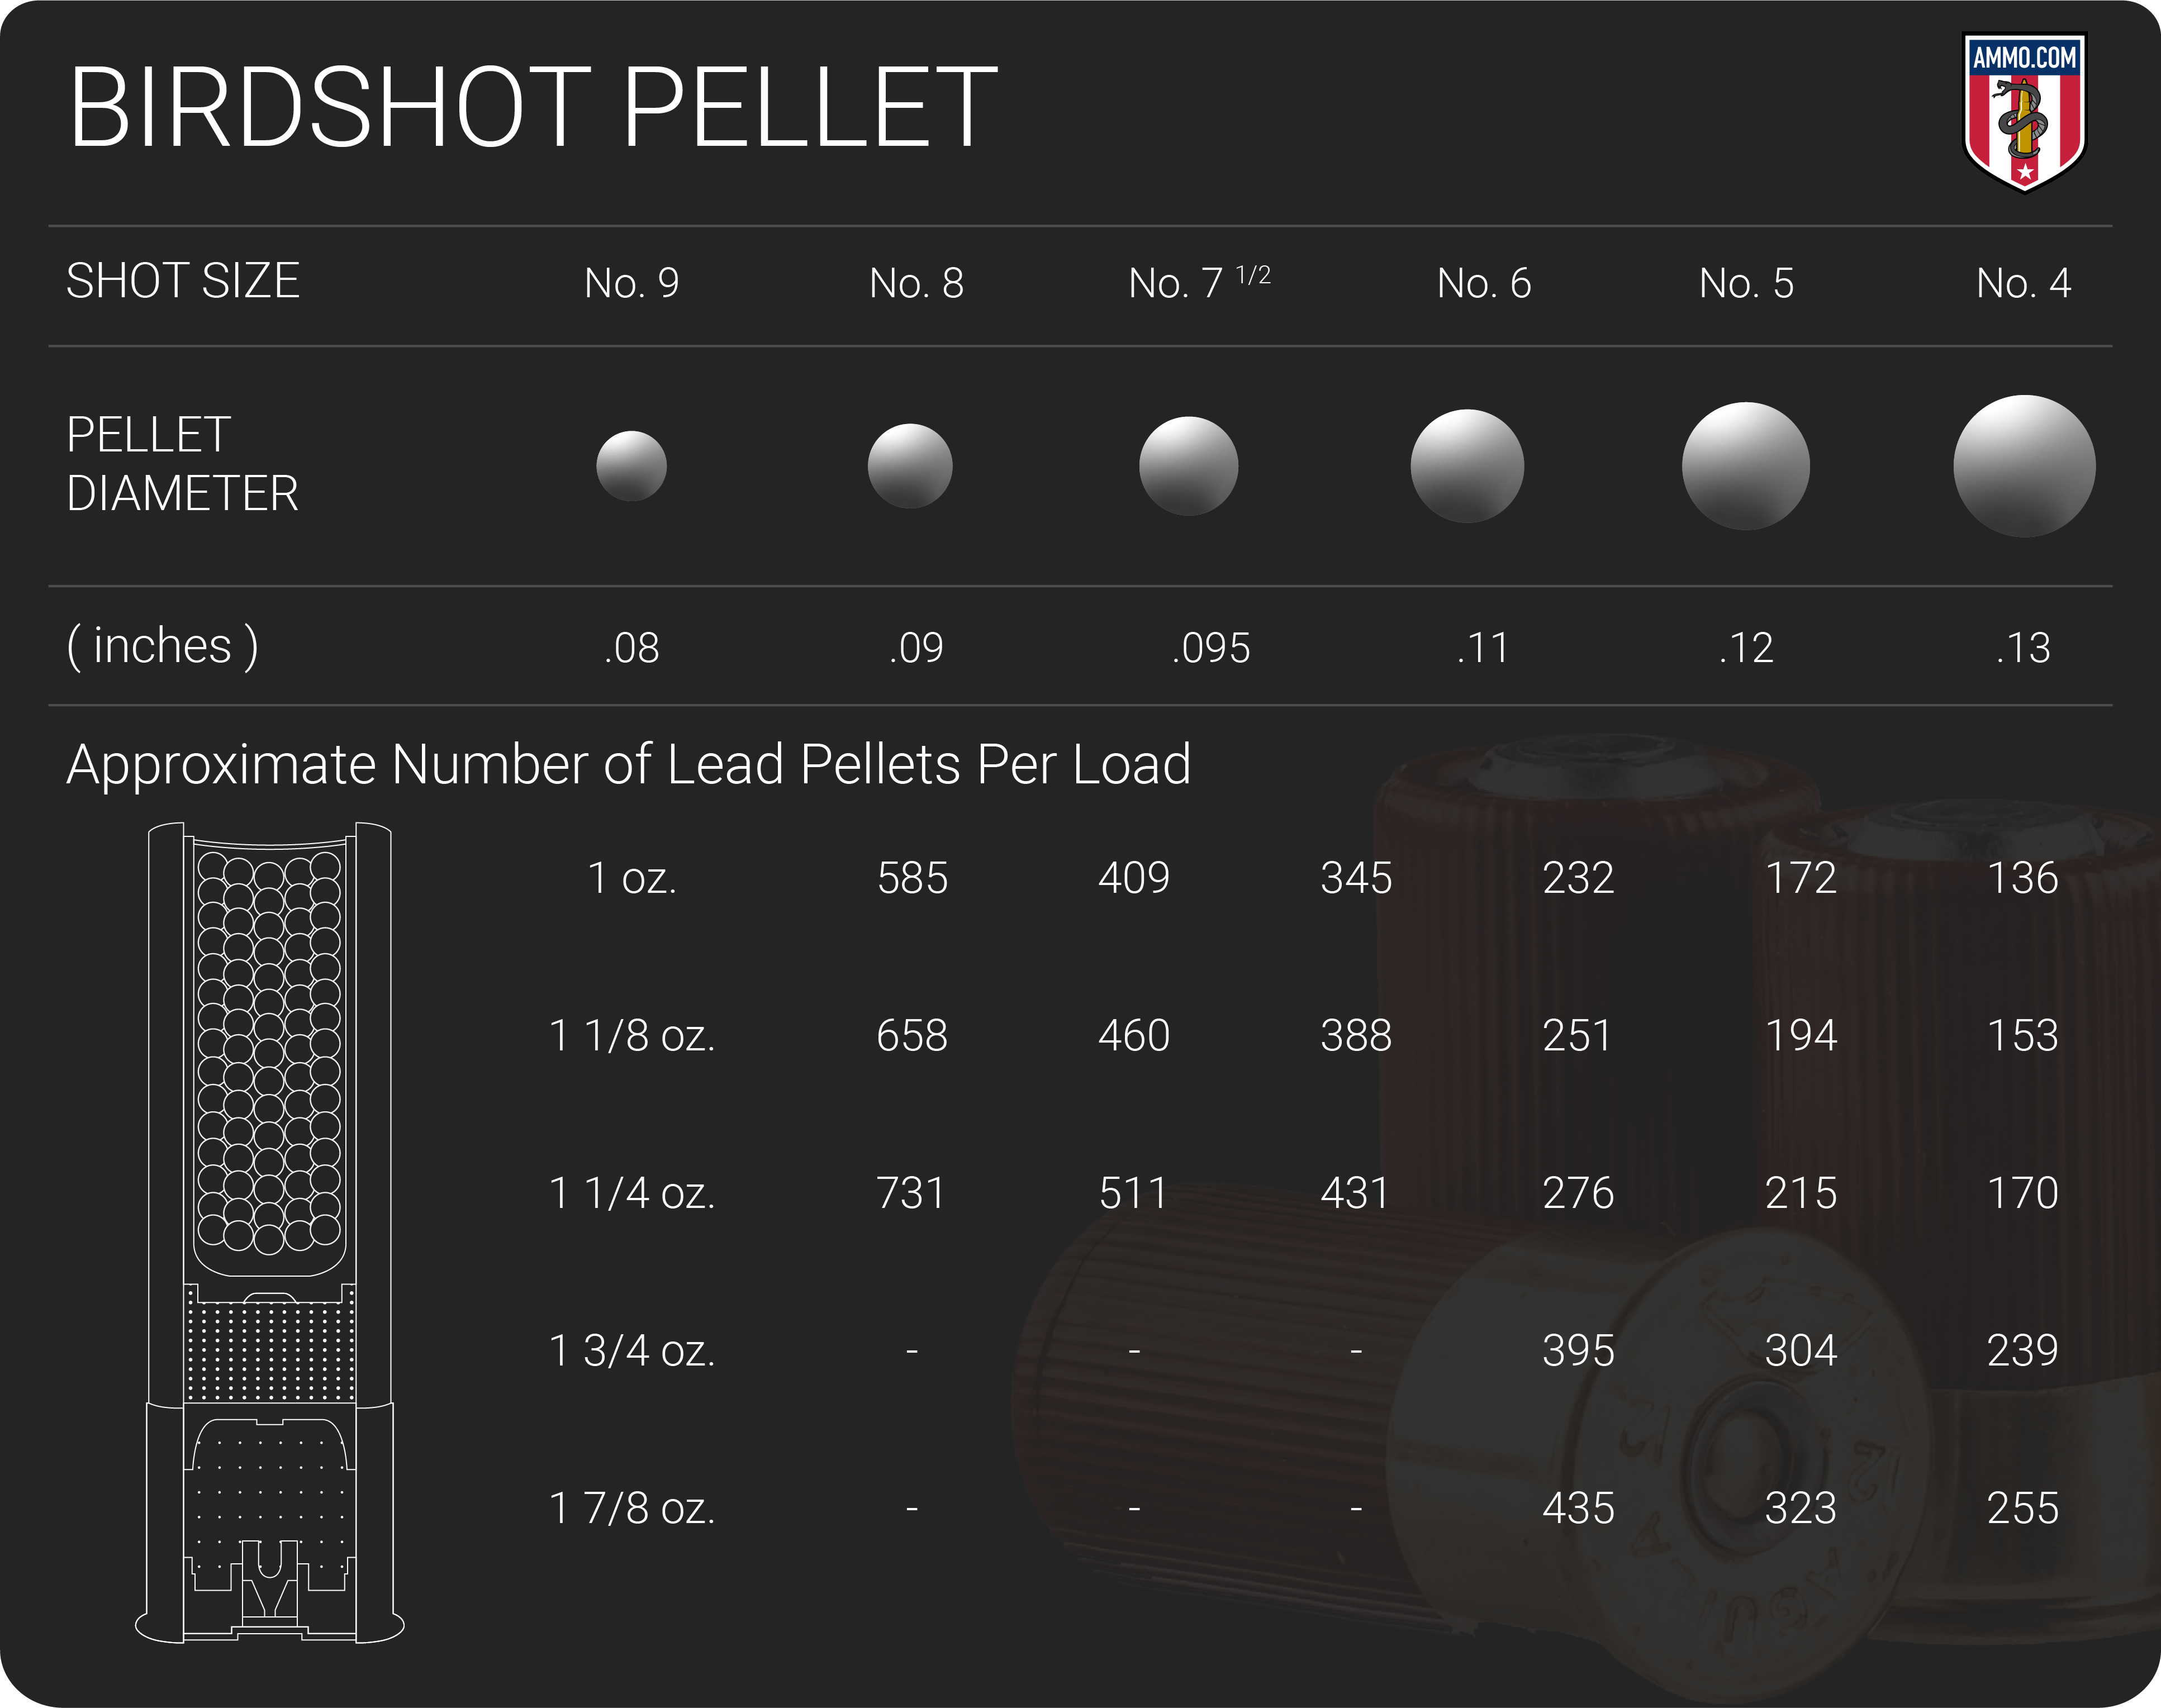
Pellet shot size works on an inverse scale, just like shotgun gauge, meaning that the larger the shot number, the smaller the pellet size. For example, #5 shot is larger than #8 shot. The most common birdshot sizes you’ll see at the ammo counter are 7, 7 ½, 8, and 9 which can be used for bird hunting and sporting clays.

Although some birdshot loads can carry well over 500 pellets, these lightweight projectiles don’t carry a lot of kinetic energy. Although perfect for felling birds or bursting clay pigeons, they are less effective on large game or in self-defense.

For that you’ll need something with a bit more oomph behind it…like buckshot.

Understanding Buckshot

Buckshot, like its name suggests, was designed for hunting medium to larger game. As a “buck” is a term for a male deer, buckshot was primarily designed for whitetail hunting.

Buckshot fires larger pellets but fewer of them. Furthermore, they are often loaded with more powder than birdshot, giving them higher recoil but increased penetration and range. Just like birdshot, when you pull the trigger on that Winchester SXP 12-gauge shotgun, the pellets exit the barrel and begin to separate. However, unlike birdshot, buckshot typically has a tighter pattern as you want all that stopping power put into a smaller area to harvest big game.

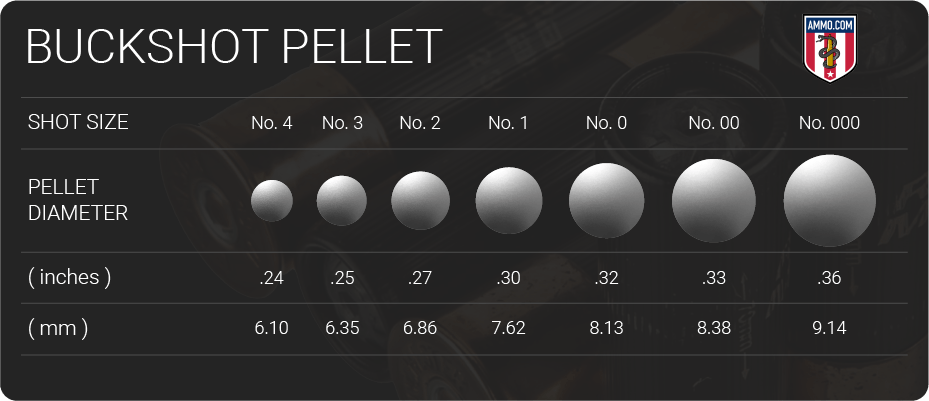
Just like with birdshot, buckshot gauge is measured in reverse. This means that No. 4 Buck will be smaller than No. 1 Buck.

The most common buckshot load is 00 Buck. Pronounced “double-aught buck”, 2.75” shotgun shells carry around 8 pellets while 3” magnum shells can hold around 12 pellets. 00 Buck pellets measure 0.33” in diameter, almost the same size as a 9mm Luger handgun bullet.

Buckshot is typically not used on birds or small game due to the amount of kinetic energy it carries. Using buckshot on a bird is considered, by many, unethical and typically renders the majority of the meat inedible.

Although buckshot might not be the best choice for bird hunting, it’s widespread use by law enforcement has led many homeowners rely on a home defense shotgun loaded with 00 buckshot shells for protection.

buckshot pellet chart

Pattern/Spread

The way a shotgun shell disperses its shot on a target is referred to as its pattern or spread. The type of pattern a shell has is typically tailored to its intended purpose.

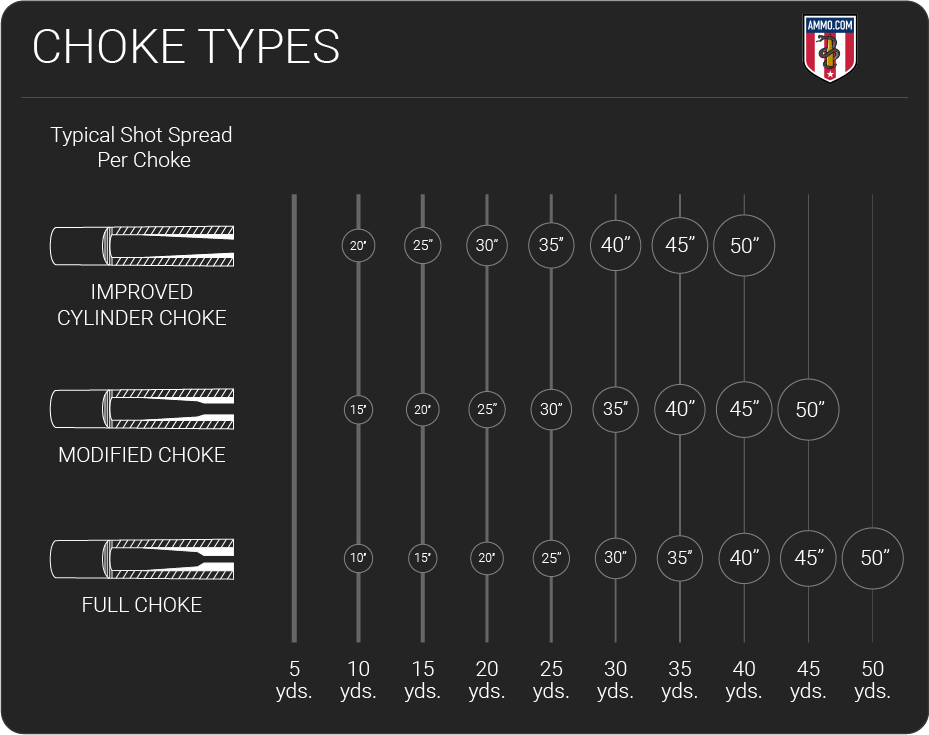
However, there are other factors that will affect pattern as well. Certain shotgun barrels are designed to constrict near the muzzle, thereby tightening the pattern of the shot as it exits the barrel. This is known as a choke.

Some shotgun barrels have the ability to have chokes screwed into them from the muzzle while others have a choke integral to the barrel itself. It is not advisable to fire shotgun slugs from a barrel with a choke.

However, when it comes to buckshot vs birdshot, buckshot will generally have a tighter pattern while birdshot will have a wider pattern.

This trend directly reflects what each shotgun shell is designed to do.

As birdshot is meant to be fired a fast-moving targets like pheasants or clay pigeons, shooters want a wider spread of shot to increase their chances of a hit. On the other hand, buckshot loads are designed to deliver all its power into a smaller, more localized area to ethically harvest larger game or for self-defense.

choke type

Effective Range

Shotguns are typically considered close range firearms, and neither buckshot nor birdshot is intended for long range shooting.

As spheres are not very aerodynamic, buckshot and birdshot will quickly lose velocity and kinetic energy as they exit the barrel and begin to spread. Birdshot is especially susceptible to this, as the small pellets don’t have much kinetic energy to begin with and are more affected by air resistance than heavier buckshot loads. However, as buckshot is heavier, it will be affected more severely by gravitational forces.

Effective range is highly dependent upon the pattern a shotgun load has in your firearm. Although there are some brands of shotgun shells specifically designed for longer range shooting, the general effective range for both buckshot and birdshot is around 40 yards.

Stopping Power/Penetration

A 12-gauge shotgun is highly regarded by military, law enforcement, and civilian shooters for being an incredibly powerful firearm for close range defensive situations or hunting.

Although buckshot and birdshot both generally have the same effective range, buckshot will have deeper penetration as it is firing a larger shot size with heavier pellets.

As the amount of kinetic energy needed to effectively harvest a bird is considerably less than what is needed for deer or home defense, birdshot is generally loaded lighter. On the other hand, buckshot is loaded hotter as it requires more penetration and kinetic energy to take down a deer or a bad guy.

Without question, buckshot will have deeper penetration and stopping power in most situations.

Price/Availability

Birdshot is more often less expensive than buckshot.

Shotgun ammunition is very affordable to the point that only extremely high-volume competitive shooters even consider reloading shotgun hulls.

For 12 gauge shells, target loads suitable for sporting clays or small game hunting, like Winchester Super Target, can be had for around $0.60/round. While a 00 Buck defense rounds, like Hornady Critical Defense, will generally cost upwards of $1/round or more.

The difference in price is often attributed to the difference in materials cost between the two types of shotgun ammo. Buckshot pellets are typically made from solid lead, while birdshot is typically made from a steel-core with only a coating of lead. Furthermore, buckshot is loaded with more powder and requires high-brass shotgun hulls to accommodate the higher pressure the shell creates. On the other hand, birdshot uses low-brass shotgun shells as less powder is needed to achieve the desired muzzle velocities for the smaller shot size.

Hunting

The best shotgun ammo for hunting primarily depends on what game animals a hunter plans on harvesting.

Birdshot is the ideal choice for upland game, quail, pheasant, ducks, geese, and turkey, while buckshot is better for hogs, coyotes, and deer or other larger game animals.

The simple truth is that buckshot is not needed for small game animals, as these thin-skinned critters don’t require a lot of kinetic energy to humanely harvest. Furthermore, birdshot increases the probability of a clean kill as it fires considerably more pellets in a wider pattern than buckshot.

On the flip side, birdshot is not powerful enough to harvest large game animals and lacks the penetration needed to reach the vital organs. The wide pattern of birdshot means that large game hit with it will likely only be wounded and endure inhumane suffering. This is where buckshot is the better option, as its deeper penetration and tighter pattern have the power needed to humanely harvest large game.

Make sure to follow all of your local laws regarding hunting deer with buckshot, as some states and territories prohibit their use and only allow the use of shotgun slugs for deer.

Home Defense

The 12-gauge shotgun is highly respected as an incredibly effective home defense tool. Many homeowners rely on the stopping power that 12 gauge shells offer, however there is quite the debate raging over the effectiveness of birdshot for home defense.

The major point of contention centers around over-penetration. As buckshot is more powerful, there is the potential that a round could pass through drywall and injure one of your family members. There is some merit to this point, as birdshot loses a lot of its kinetic energy at range, it is less likely to punch through drywall. However, do not fool yourself into thinking that drywall is impenetrable to birdshot, as a close range shot will punch through sheet rock with little issue.

It is this author’s opinion that a homeowner should NOT use birdshot for home defense, and instead use buckshot for its overwhelming stopping power.

When in a home defense situation, a responsible citizen should bring enough power to bear to stop a bad guy in a single shot. The truth is, unless you are at close range (around 10 feet or less), birdshot lacks the penetration needed for self-defense.

To illustrate this one need only recall a hunting accident in 2006 when then Vice President Dick Cheney accidentally shot Texas attorney Harry Whittington in the neck and chest with birdshot. Whittington’s injuries were non-fatal and he made a full recovery. However, this would have been a different story had Cheney been using buckshot.

Buckshot provides the penetration needed to stop a threat quickly, which is the goal of any home defense situation. Although there is the potential for over-penetration when using buckshot, the advantages buckshot provides far outweigh this. Following the cardinal rules of gun safety and knowing what lies behind your target is the key to protecting you and your family members in any home defense scenario.

Many shotgun ammo manufacturers like Remington, Hornady, and Winchester currently offer buckshot defense loads specifically tailored for home defense. These loads maximize the penetration capability of buckshot while minimizing the potential for over-penetration making them ideal for protecting your loved ones from harm.

Conclusion: Birdshot vs Buckshot

Buckshot and birdshot are two different types of shotgun ammo that have drastically different intended uses.

Birdshot fires a lot of smaller projectiles in a wide pattern that is ideal for hunting upland game, waterfowl, and for use in sporting clays competitions. Capable of firing hundreds of small pellets at a time, birdshot gives shooters a higher probability of scoring a hit on their target but lacks the penetration needed for self-defense.

Buckshot fires larger pellets in smaller quantities and tighter patterns to maximize penetration and stopping power. It is ideal for hunting medium to large game as well as for protecting the lives of yourself and your family members in a home defense situation. Although more powerful, buckshot does have the potential to over-penetrate, so care needs to be exercised when firing buckshot loads in self-defense.

Selecting the best shotgun ammo for you depends primarily on your needs as a shooter, just make sure that you get all of your shotgun ammo here at Ammo.com and be ready for any situation!

Mathews V3X Review

0

“So, I guess here it is, we’ll just announce the 2022 flagship right now. The all-new 2022 (******) from Mathews!” This is how we ended the 2021 Mathews V3 review. There’s no crystal ball, no palm reading, or tarot cards. For a few years I wondered just how Mathews could keep improving? Over the last few years though, they have made it easy to predict the future. Not the specifics, just the fact that they aren’t sitting back waiting. Year after year, they are innovating, proving, and advancing technology. This year’s flagship, the V3X, is no different.

The V3X stage is set on the Proving Ground, which you can watch here.

Mathews V3X Review

Like the 2021 V3, this year’s V3X has many of the tried and true features. The Integrate MX dovetail rest mount, Center Guard cable system, Switch Weight modules, and CrossCentric Cams are a few of the more prominent things to carry over. More info here.

New for the V3X, and visibly hard to miss, is the Bridge-Lock Sight technology. This allows dovetail sights to be mounted directly through the riser. This eliminates the external mounting bracket, creating a cleaner look, improved balance, less hand shock, and a more compact profile. This feature is compatible with all dovetail sight brands that I have tried, and don’t fear-the V3X is still compatible with all external sight mounts as well.

Mathews LowPro Quivers

In conjunction with the Bridge-Lock, next in line are the new LowPro quivers. These are designed around the geometry of the V3X. Moving the sight to the center of the riser allowed the engineers to bring the fixed and detachable versions over 50% closer to the riser. These are more precise and fit tighter, helping keep the streamlined balance position that Mathews is creating. Like previous models, the LowPro series is available in both one and two-piece versions. More information can be found here.

Mathews Stay Afield System

One of the biggest fears of backcountry hunters, and those who travel across the U.S and the World, is having a mishap during the hunt. Losing a peep or needing to fix strings and cables on the fly isn’t a worry anymore. With specially modified cams and this bow-specific set of cables, the Stay Afield System is the new lightweight bow kit that will save more than one hunt this fall. At less than ½ ounce, this is a must-have. You can learn more about the system here.

29″ and 33″ ATA Options

Like the V3, the V3X is available in two lengths. 29” and 33’’, so slightly longer than the V3 was. It is available in draw weights of 5lb increments, and draw lengths of ½-inch increments.

Mathews V3X Setup and Testing

Similar to last year I received the review bow in late October, while I was out on other hunts. Like a kid at Christmas, it’s always exciting to see what Mathews put together. It didn’t take long to get the box ripped open, and begin setup.

The setup was fast and super simple. I was able to slide in my HHA Tetra Max dovetail bar and lock it into the Bridge-Lock-such a simply ingenious system. Within another 15-20 minutes, I was able to get the rest, loop, and peep sight all tied in. It was time to fling a few arrows to get sighted in and feel this bow’s shot sequence for the first time.

Like normal, I measure and eye everything close, then go to 5 yards and shoot one arrow. Then I make adjustments, and then another arrow at 10 yards. I make that set of adjustments and shoot another at 20 yards. At this point, I am pretty dialed. I’ll then shoot three arrows at distances out to 50. When comfortable, I’ll dial 60 yards and shoot that until I’m confident enough to pick my sight tape.

On this particular day, I didn’t have a lot of time, but I was able to get 20 arrows in, and was comfortably hitting 4” circles at 50 yards, with broadheads. So slightly over an hour after unboxing, I was headed to the tree stand. I was particularly excited. This was only my second sit in Wisconsin, I had a brand-new rig, and I would only have one more sit after this one before the rifle season opened.

The Real Test

That sit was uneventful, and the following morning I had commitments that kept me out of the tree until 2:00 that afternoon. It wasn’t much after 2:00, though, when I could see a doe feeding my direction through the oak trees. Within 20 minutes she was at about 30 yards and I started preparing for the shot. Over the years I have come up with a very specific shot sequence, it’s become second nature; automatic if you will. Anytime anything in that equation changes, things aren’t as fast, and become less automatic.

With a new rig in my hand, I was now drawn and working through each step of the process when I heard the crunching of leaves behind and below the doe. In seconds, I could see the flash of brown and shine of antler as this buck worked his way up towards us. Within seconds he spotted the doe, grunted, and began trotting towards her. She bolted away from us and then made a loop around. This path had her coming directly under me. I drew again, and as he took a shortcut, it put him on a line 24 yards in front of me-and wide open. With two loudmouth grunts, he came to a stop and I was able to get through the process, sending an Iron Will Solid through both shoulders. He only went 25-yards.

That Was Fun, Now Back to the Bow

Being new, and not totally second nature, I took a little more time with the shot process. When the shot broke, three things came to mind immediately. Wow, that was quiet, literally almost silence, other than the arrow smashing through the buck. I felt no hand shock, barely any bow movement, and lastly, it hammered him!!

Specs from the website:
  • Brace Height 6.5” (6” on the 29” ata)
  • IBO Rating up to 336 FPS
  • Axle to axle available in 29”and 33”
  • Draw Weight available in 60/65/70/75
  • Let-Off 80 or 85%
  • Weights of 4.67# and 4.47# for 33” and 29” respectively
  • MSRP $1299

Once again I used the Mathews Bow Builder for custom strings, cables, and accessories. I chose the new Granite finish, which I really like. I use an HHA Tetra Max dovetail with this, a two-piece low-profile quiver, and outfit it with a Jakt Gear bow and wrist sling.

Conclusion

My final thoughts on this bow are incredible. As I alluded to in the hunt recap, it is unbelievably quiet, and the bow movement upon shot release is almost nonexistent. It’s honestly hard for me to believe. It’s got a solid back wall, the balance is tight, and it is the nicest bow I’ve ever shot. Start building yours here.

I do have to be very careful when I’m at the back wall, it seems ready to take off at any point if I relax at all. More time with it will be the only way to see how it works out.

The only other thing to watch is the LoPro quivers. They will mount and fit with a sight that is mounted externally, but you will lose a couple of the arrow slots, as the arrows would hit the sight mount if mounted externally.

I’ll reiterate, how amazingly quiet this bow is. I can see this being a big advantage in certain situations like jumpy whitetails, western antelope, and longer-distance shooting at some animals. Less noise should hopefully keep those edgy animals from jumping the string so much.

I’ve shot almost every Mathews built since the early 1990s. It’s an amazing company (and just an hour from my house.) Just like about anyone else, I have the ability to shoot a bow from any bow manufacturer that I like-and I do every year from many companies to stay in the loop and formulate honest opinions. And I still keep coming back to Mathews. I’m looking forward to getting my hands on a 29” version to see how it shoots…and even more looking forward to seeing what the 2024 Mathews will bring to the table…stay tuned.

Comment on this review or ask Les questions here.

More archery content available here.

6 Reasons to Avoid a Clover Lawn

0

A lot of people tell me they’re interested in switching their traditional grass lawn over to a clover lawn. Now, a clover lawn could mean you are intentionally adding clover to your lawn, or it could mean you are planting only clover. Usually the people I encounter are considering a lawn made up entirely of clover — no other plants… a monoculture.

When you search Google Images for lawn alternatives you are sure to find some beautiful eye candy showing gorgeous, perfectly uniform lawns made up entirely of microclover, a cultivar of white clover bred to grow to a very short height. The human eye seems to be really attracted to simple, clean, and manicured. They like patterns and uniformity. I’m all for minimalism and simplicity, but nature often is not a fan. Nature wants diversity, chaos, checks and balances.

Clover lawn eye candy
Pretty, isn’t it? Image from Treehugger

I think most people find appeal in a clover lawn because it doesn’t need to be mowed. It also would possibly need less watering and fertilizing (though that doesn’t need to be done in a grass lawn either). These points appear at first glance to equate to fewer resources — great! They might also be attracted to the fact that clover simply is not grass, so it’s counter-culture (also wonderful).

But while I applaud anyone looking into lawn alternatives, this particular approach has some major problems.

1. It’s still a monoculture.

Monocultures, cultivation of a single plant in a given area, are difficult to maintain, especially in medium moisture environments where clover thrives. You will be battling weeds if you want to maintain a clover-only lawn. Monocultures are also risky, because you’re putting all your eggs in one basket (or is it “seeds in one packet”?). If your clover fails, there are no other plants there to cover the soil and you’ll need to start all over again attempting to establish something in exposed soil.

2. Grass will show up.

Unless you consistently use a grass-specific herbicide, grass will grow in your clover lawn. If you are trying to maintain a clover monoculture, this means you will either have to spray or pull the grass. Pulling grass, especially in an area the size of a lawn, would be exhaustive or in some cases outright impossible. If you don’t spray or pull the grass, you will need to mow the grass to avoid fines if you live in a city (most cities have ordinances limiting grass/weed heights). All of these options directly contradict many of the reasons most people are looking into a clover lawn.

Image of clover lawn by Zdeněk Chalupský on Pixabay
Image by Zdeněk Chalupský from Pixabay
3. It has less foot traffic tolerance.

Clover isn’t quite as tolerant of foot traffic as grass. For example, if I were to go outside and practice Taekwondo forms in the lawn, and I picked a spot that was more clover than grass, the repetitive spinning and pivoting would completely tear up the delicate clover stems and leaves. In comparison, grass can withstand much more abuse. I can practice for an hour in the same spot on grass, and it’ll just be flattened and spring back to full force within a day or two.

4. It’s less aggressive.

Clover is simply less aggressive than grass in spreading and growing. When you are trying to grow a lawn, this quality is highly desired. That’s why grass is used in high foot traffic areas. It’s a tough plant, but it also grows and spreads like crazy, so even if the plant is harmed, it just rapidly clones and reseeds and all is good again.

5. It dies back in the winter.

Clover also dies back in the winter and needs to grow back from the roots in the spring. So there will be a period of time where there is no ground cover. And what do you get when you mix zero plant cover with spring rain? Yes, mud. With grass, the plant above the soil stays intact but goes dormant. Then it springs back to life in the spring. Even before it’s green, it’s still there, covering the soil in a thick mat and preventing erosion and mud pits.

6. It’s resource intensive.

A clover monoculture lawn will be just as hard to maintain as a grass monoculture lawn. It may require herbicides or hours and hours of labor pulling grass and weeds. And it may need to be watered in times of drought. Plus, if you currently have a grass lawn, you will need to kill or remove the current living plants to sow the clover seeds. Then you will need keep everyone off, water consistently, and battle a major onslaught of weeds who will flock to your exposed soil until the clover is established.

My opinion

What I foresee for people who try to convert to a clover lawn is that they will eventually give up the battle against the grass and start mowing it. What they will end up with is a grass lawn with clover — which is great because clover is a very useful and beneficial additive to lawns (it fixes nitrogen), along with other great plants that tolerate mowing and foot traffic. But, it would have been a lot easier, cheaper, and less painful, to have just started off adding some clover seed into their grass lawns.

Diverse lawn with spider web
My lawn has clover, dandelion, plantain, chicory, queen anne’s lace, yarrow, and of course, grass. Wildlife from spiders to bees to rabbits to birds all enjoy the diversity.

The bottom line: If you need a lawn (find out here) use grass, but also allow biodiversity so it’s less boring, cheaper, easier to maintain, and better for the local ecology. Plants that show up in your lawn and stay there, are plants that want to grow in those conditions. As long as they are not considered invasive species let them grow! All plants have evolved to be here because they serve a purpose in their ecosystems. Nature has handed them to you as a gift. Learn what each plant is — most weeds also have human uses, too. They might be edible or medicinal or useful as cut flowers. They might also help fertilize and/or aerate your lawn and give food to wildlife. When you open your heart and your lawn to a variety of plants, amazing things happen.

9 Best Crossbow Broadheads for Deer in 2024 – Unbiased, Expert Ratings

0

The best crossbow broadhead for deer in 2024 is the Muzzy Trocar for its incomparable penetration and accuracy on large game.

Once so simple, choosing your crossbow broadhead has become far more complex over the past years, with the introduction of new technology to add more ‘functionality’ to the best crossbow broadheads available.

Choosing the right broadhead is a personal decision, not only depending on the shooting conditions (distance, wind), but also personal preference regarding desired penetration, accuracy, wound channel and blood trail.

You can only glean so much information online, so honestly, my best advice is to read the reviews, and then get out there and try the different broadheads until you find one that you love.

Our crossbow broadheads review covers the:

  • NAP Spitfire Crossbow
  • Swhacker 100-grain 2-inch-cut Mechanical Broadheads
  • G5 Outdoors Montec Fixed-blade Broadheads
  • Excalibur Boltcutter Fixed-blade Broadheads
  • Muzzy Trocar Fixed-blade Broadheads

Best Crossbow Broadheads Features

First of all I’ve rounded up some definitions of terms you’ll hear often when talking about crossbow broadheads throughout the reviews:

Cutting diameter

It refers to the minimum potential wound size a broadhead can cause, or in other words the width measurement from blade tip edge to blade tip edge.

In theory a wider diameter has more chance of damaging important tissue and reaching vital organs, although there is a possible trade off with accuracy (more surface area for the wind to take hold) and penetration (less likely to enter the animal so far).

Shock collars

A small ring placed below the broadhead where it fixes to the arrow which a) keeps the broadhead steadily in place and b) absorbs shock upon impact in order to protect the broadhead.

Grain weight

Broadhead weight is measured in grains, and most will come in both 100-grain and 125-grain options, maybe even up to 150. I generally recommend the 100-grain for best accuracy over 20-50 yards, and the 125-150s for upwards of 50-60.

The 125-grain will also provide more penetration on bigger game, and given the shorter arrows used for crossbows, can provide more weight to the front of the arrow (“front-over-center” balance), maintaining stability and reducing cross-wind influence.

Blade Tip

There are two options here, either chisel-tips which are designed for a big impact on big game, with thick hides – fur, fat and bone. Or, you can opt for the cut-on-contact tip, which aims to slice immediately with deep penetration. See informative discussion here.

Number of blades

Broadheads generally come in one, two or three-blade variations. Arguably, the two-blade achieves better penetration, and the three-blade increases the wound channel. For this reason (but not always), you would do better with two-blades for bigger game to penetrate deep and split bone.

Honestly though, there are other more important factors such as where you hit the prey, with what force, cutting diameter, what type of broadhead, and at what angle.

Fixed-blade or mechanical

Fixed-blades are traditional arrowheads where the broadhead blade is firmly attached to the head. There are also some ‘removable’ fixed-blade broadheads which allow you to replace a single blade, rather than the whole broadhead.

Mechanical broadheads have retractable blades which come out on impact, making the arrow flight as uninterrupted and aerodynamic as possible.

Fixed-blade or mechanical crossbow broadheads: what should I use?

Types Of Crossbow Broadheads502*214

Up until recently I’d have said that the fixed-blade won hands down every time. However, the mechanical broadhead is becoming more and more effective, giving experienced hunters a headache when faced with the choice.

Although mechanical broadheads are good 90% of the time, I know few people that would opt for a mechanical broadhead when faced with that really tough, make or break shot to take down the biggest game – it’s just too unreliable.

That said, maybe this perception is changing little by little, so let’s look at the facts regarding fixed-blade and mechanical broadheads.

How do mechanical broadheads work?

When an arrow is flying through the air towards its target, the more surface area that the broadhead has, the more susceptible to influence from crosswinds it will be, taking it off-course.

Step up the mechanical broadhead.

The idea of a mechanical broadhead is to reduce the surface area of the broadhead and improve on aerodynamic drag, by retracting the blades until the moment of impact, upon which the blades deploy to further increase the damage.

If the blades are withdrawn during flight, this should also improve concentricity. Concentricity is essentially the arrow spinning perfectly through the air around its centre, ensuring that the mechanical blades don’t deploy while in the air, before impact.

Ideally an arrow is steered by its fletching at the back, however what’s known as planing can occur, where the wide-surface-area broadhead takes control of the arrow’s flight path, causing long-distance inefficiencies.

A mechanical broadhead is forgiving on beginner hunters or poorly tuned crossbows.

It sounds wonderful, however mechanical broadheads have their drawbacks. These mechanical heads have a tendency not to deploy, or may come apart upon impact, ultimately failing to penetrate sufficiently and leaving the animal in distress, or getting away.

Fixed-blade broadheads

What the fixed-blade makes up for is clinical impact, or in other words strength and penetration.

These days fixed-heads have excellent designs, which make them exceptionally aerodynamic to the point where they may even match mechanical broadheads, a lot of the time.

A question of quality

Broken Crossbow Broadhead

Mechanical broadheads generally fail for one of two reasons.

Either the blades do not retract, and therefore they remain exposed during the flight, subjecting the arrow to influence by the wind.

Or they malfunction on impact. A high-quality design uses high-quality mechanical blades which are better fixed to the broadhead, or may even be heat-treated so that they bend, instead of snapping off.

Making sure that the broadheads you purchase are made of steel instead of aluminium will help with concentricity, too.

Choosing the best crossbow broadheads for your crossbow

The best crossbow broadheads are designed with the following functions in mind:

Penetration

An arrow may kill in any one of the following ways:

  • Blood loss
  • Damage to the nervous system
  • Destruction of vital organs
  • Septicemia or asphyxiation

The further through an animal the projectile goes, the more likely the hunter to achieve their goal of an ethical kill.

Questions to ask yourself:

  • How deep into the animal does your arrow seat itself?
  • Does it go all the way through, causing faster bleeding and a faster, more ethical death?
  • How does the crossbow broadhead contribute to that penetration?

Accuracy

Accuracy speaks for itself. we want to be accurate to not only hit our prey, but hit it exactly where we want to for an ethical kill.

Questions to ask yourself when reviewing the best crossbow broadheads:

  • How well does the bolt and broadhead leave the crossbow?
  • How many touch points are there with the crossbow which could alter its course on the way out?
  • Does the broadhead’s form (surface area) make it more or less susceptible to influence by the conditions, such as wind or rain?
  • Once the bolt leaves the crossbow, how does the broadhead affect the bolt’s concentricity? Does it spin more or less evenly for a true aim? Mechanical broadheads are particularly guilty of unbalancing an arrow.

Wound channel

Wound channel refers to the size of the channel made by the arrow, through the prey. An arrow kills in any one of the following ways:

  • Blood loss
  • Damage to the nervous system
  • Destruction of vital organs
  • Septicemia or asphyxiation

For an ethical kill, a large wound channel is more likely to achieve its goal. Does the crossbow broadhead help to achieve this?

Blood trail

More blood makes it easier to track game after you shoot them. The best designed crossbow broadheads, aside from causing a large wound channel, maintain heavy blood loss so as to track the animal easily.

  • Best crossbow in 2024
  • Fastest crossbow in 2024

Best Crossbow Broadhead in 2024 Reviews

The following best crossbow broadheads ratings are in no particular order, as the best depends on the game you are hunting, expected shooting distances and your experience.

NAP Spitfire Crossbow Review

Use on: small to medium-sized game over all distances

If you’re looking for a mechanical broadhead which flies like a field point and leaves a great blood trail, then the NAP Spitfire could well be the broadhead for you.

When I tested them, I had good penetration working with the 125-gr, maybe as it has a slightly smaller cutting diameter of 1.5 inches.

This nonetheless provides a reasonable wound channel and large enough blood trail to track the animal. If you get good contact though it won’t get very far thanks to the ‘Trophy Tip’ which is designed to penetrate on larger game.

Nonetheless, I’d probably use these broadheads on small to medium-sized game. The combination of the penetrative tip, decent cutting diameter and mechanical action make it perfect for deer hunting.

It has three cut-on-contact diamize sharpened blades, and the ferrule on the spitfire has microgrooves for enhanced accuracy and penetration.

Pros

  • best mechanical broadhead for crossbow
  • Best crossbow broadheads for deer
  • Decent blood trail

Cons

  • The blades have a tendency to open while stalking game

>> Check Price on Amazon <<

Swhacker 100-grain 2-inch-cut Mechanical Broadheads Review

Use on: small to medium-sized game over all distances

The Swhacker set of 3 broadheads are dependable mechanical broadheads, almost guaranteed to deploy thanks to their solid design.

It has a hardened high-carbon-steel, cut-on-contact, two-blade point which is razor sharp. Once you look past the initial point, you’ll find a first set of wing blades designed to cut straight through hide and the first set of ribs.

Once contact has been made, this first set of blades helps to deploy the second set of edges which don’t touch anything during initial penetration, instead opening only once inside the game, to wreak havoc on the animal’s internal organs. You won’t see too many animals make it more than 100 yards before coming to a halt.

On top of this, the Swhacker has a massive cutting diameter of 2 inches. Even if your aim is slightly off, you’re bound to hit a vital organ and bring your game down.

I found the broadhead to demonstrate solid penetration and durability, and I even found (impressively) that it could hang onto the target when tested at angles, too.

I’d use this happily on any small or medium-sized game over all distances. Find out more about the Swhacker brand and all their crossbow broadheads.

Pros

  • Great penetration from angles
  • Wide cutting diameter
  • Unique design

Cons

  • Accuracy: had strange outlier from grouping during testing which was so disappointing as I really liked this broadhead

>> Check Price on Amazon <<

G5 Outdoors Montec Fixed-blade Broadheads Review

Use on: medium to large-sized game over all distances

I would be happy to use these G5 Montec broadheads on deer, no problem. In fact, you could even make a case for use on bear and elk, as the blade angle of the Montec is designed for solid penetration, along with a thinner, more penetrative cutting diameter of 1 1/16 inches.

Despite a reduced wound channel, you’ll get a decent blood trail from heavy penetration which should easily make its way through the animal, especially over shorter distances.

Often overlooked, it’s a really simple broadhead to use – you just screw it on and shoot, and it also allows for easy sharpening, meaning you can get good (re)use out of it.

This was important, as I found that it could definitely do with a little more sharpening straight out of the box.

This 100% stainless steel broadhead is spin-tested to ensure the required weight and centricity to perform over long distances.

Pros

  • One solid unbreakable piece
  • Good for small, medium and large game

Cons

  • Blunted out of the box

>> Check Price on Amazon <<

Excalibur Boltcutter Fixed-blade Broadheads Review

Use on: medium to large-sized game over all distances

I really like the Excalibur Boltcutter, in fact until I did all these recent tests it was (and maybe still will be) my fallback broadhead, whenever I wanted to feel 100% confident.

It’s got a 3-blade head with a small 1 1/16-inch diameter to maximize penetration at all distances; it’s deadly for the very biggest game out there.

It has been designed to improve accuracy over 300 FPS, stabilizing quickly as it leaves the bow.

It’s made of stainless steel to withstand high impacts and improve penetration, and it represents the perfect blend of strength, speed and accuracy.

It’s one drawback is that it costs a little more than most blades, but you can replace the individual blades, or even reuse the blades by sharpening the whole head to offset the cost and get more use out of them.

Pros

  • Optimized penetration
  • Enhanced accuracy over distances
  • withstands high impact
  • streamlined design

Cons

  • Expensive

>> Check Price on Amazon <<

Muzzy Trocar Fixed-blade Review

Use on: medium to large-sized game over all distances

The Muzzy Trocar is a three-blade fixed broadhead with a short stubby nose. The arrowhead has less surface area allowing for better arrow flight.

The hardened steel Trocar head-tip achieves extreme penetration, and the ferrule – built from solid steel – won’t buckle when striking bone, making it the perfect choice for large game.

It doesn’t compromise on accuracy either, thanks to the special right-helix design for solid stability; Muzzy claim they fly just like field tips, and from our experience with them, they aren’t wrong. When I tested it this broadhead achieved both the insane grouping, and massive penetration.

I like this broadhead because it’s completely customizable too. You can change the blade between three cutting diameters, between 1 inch and 1 1/14inches.

Pros

  • Best crossbow broadheads for accuracy
  • Best crossbow broadheads for penetration

Cons

  • N/A

>> Check Price on Amazon <<

Conclusion: the best crossbow broadheads

I found the level to be really high, and any misgivings that I had in the past about mechanical broadheads are slowly going away.

I’d even go so far as to recommend the Swhacker mechanical broadhead as the best crossbow broadheads for small game over any distance, with the Spitfire not far behind.

I liked the mechanical so much with small game because pretty much any hit with the two-inch cutting diameter would be enough to take down the animal, and the arrows would be forgiving thanks to their improved aerodynamicity.

There’s a good argument for the Swhacker or Spitfire moving up to medium-sized game like deer too. I think this is then a question of personal preference, where you should really try out both types and see what works with your crossbow specifications and personal needs.

When I moved up to large game, I decided that you can’t look any further than the Muzzy Trocar. It won hands down for penetration and accuracy, which for me are the two most important factors when shooting big game over any distance.

The Ammunition Market In 2024

0

A Shifting Market

Paul Bastean, managing director at Ultimate Defense in St. Peters, Mo., said the ammunition market is shifting for dealers. Larger retailers are getting the ammunition they need, he said, but smaller retailers still are having a difficult time.

“If you have the capacity to buy a pallet, you can get ammo,” he noted. “If you only have the capacity to buy three cases, you don’t get it. If a wholesaler or manufacturer can put a label on 360 cases of ammo and send it to one place, or send 360 cases of ammo to potentially 100 different places with 100 different mailing labels, both for the same amount of markup, they’re going to send it to the one place.”

Because Ultimate Defense has been buying ammo by the pallet, Bastean said they have developed a new and different relationship with other retailers around them.

“We get along with a lot of the local gun shops in our area,” he shared. “We are now their ammunition distributor.”

According to Bastean, ammunition prices are finally starting to come down from what they were during COVID.

“U.S. manufacturers are fighting with importers now, and they’re losing,” he observed. “Importers are driving the price down.”

Bastean thinks this will continue to drive prices down, and if imported ammunition remains as available as it is now, smaller retailers will start to be able to buy lesser quantities of ammo again.

“But it may not happen,” he cautioned. “We’re not in an election cycle yet, but we can kind of see it from where we are, and this election cycle is going to be a doozy.”

Bastean said the imported ammo he’s seen is primarily from Magtech and Sellier & Bellot.

“That’s a lot of what we’re getting offered,” he said. “We’re seeing a lot of it not only from our wholesaler reps but also on emails. It’s also a lot of what my competition is advertising.”

Domestic manufacturers are struggling with price, Bastean observed.

“Winchester just came to us and they’re not even in the realm of being price competitive in 9mm,” he said. “We haven’t had a box of 9mm Winchester in here for two years or so.”

One thing affecting ammunition sales, he contends, is the effect the economy is having on disposable income.

“The guy who’s been a gun guy for more than five years has a cache of ammo he’s sitting on,” he said. “It’s never enough, but it’s at least enough that he feels comfortable he has some. The new shooters we’ve seen in the past two or three years still buy a box here and there, but inflation and disposable income are going to squeeze everything a little bit tighter. We’ve seen a slight reduction in training and memberships and from year to year, we’ve seen a pretty substantial reduction in ammunition sales.”

At one point, Bastean recalled, Ultimate Defense was the only retailer in the county with any ammunition. During that period of time, they saw a massive increase in the amount of ammunition they were selling because they were the only game in town. Then in the middle of 2022, some of the big-box stores started getting ammunition, and the store’s ammo sales decreased.

Head to Head: 6.5 Creedmoor vs. 6.5×55 Swedish

0

Among the myriad campfire discussions regarding the choice—and performance—of hunting cartridges, there are two words which have become a source of controversy over the last twenty years: “Six Five.” There was a time in the not-too-distant past, where very few hunters or shooters paid any attention to the 6.5mm cartridges. Despite the attempts by Winchester and Remington—with the .264 Winchester Magnum and 6.5 Remington Magnum, respectively—the bore diameter never really caught on here.

Four rifle cartridges on table with one showing 6.5x55 Swedish head stamp.

My first experience with the 6.5s was when a friend asked me to mount and zero a scope on his rifle—a 6.5×55 Swedish. He had sent along a couple of boxes of older Norma ammunition with 156-grain round nose softpoint ammo, and I was immediately intrigued by those long, lean bullets and lack of recoil. Looking into the ballistics, I couldn’t understand why the caliber wasn’t more popular. The .260 Remington was just a few years old at the time, and hadn’t really made huge waves yet, and the handful of .264 Winchester Magnums that were floating around were a rarity at best.

Fast forward fifteen years, and the 6.5 Creedmoor would be gaining a good head of steam, despite a relatively slow start. Garnering a following among the target crowd first, and ultimately among hunters, the Creedmoor seemed to bring the 6.5mm diameter to the masses, while the .260 Remington and 6.5-284 Norma just couldn’t achieve that level of popularity. Why would the Creedmoor gain acceptance, when we had such a similar level of performance in a cartridge released at the end of the 19th century? Let’s pit them against one another to find out.

Hornady 6.5 Creedmoor ammunition on gray background.

The 6.5×55 Swedish is a rimless cartridge with a case head diameter slightly larger than the 7mm and 8mm Mausers (0.479-inch vs. 0.473-inch), with a 25-degree, 17½-minute shoulder, and a case length of 55mm (2.165 inches). With a cartridge overall length of 3.150 inches (or 80.0mm), the 6.5×55 can be crammed into a short-action receiver, but is best served by a long-action. Introduced as a military cartridge simultaneously by Norway and Sweden in the 1890s after a series of military trials, the 6.5x55mm cartridge remains a very popular cartridge among the Scandinavian countries, being used for game species as large as European moose. You may find several names for this cartridge, including 6.5x55SE (the European CIP designation), 6.5×55 SKAN (in Scandinavia) and 6.5×55 Swedish Mauser; the SAAMI-approved name for the cartridge is 6.5×55 Swedish. Depending on the brand of ammunition, the 6.5x55mm will drive a 140-grain bullet to a muzzle velocity ranging from 2,500 fps to as high as 2,735 fps. Most of the major manufacturers have a load or two for the Swede, though some have become seasonal or are made in limited runs. Lapua offers a 155-grain load at 2,559 fps and Federal loads their 156-grain Fusion at 2500 fps, for those who appreciate the advantage of heavier projectiles. There are a good number of rifles available in 6.5×55, including the Tikka T3 and Sako 85, and over the years the Remington 700, Winchester 70 and Ruger No. 1 have all been chambered for the Swede.

Federal Fusion 6.5x55 Swedish rifle cartridge box with two rounds of ammunition on white background.

The 6.5 Creedmoor was developed by Hornady, and is the .30 T/C cartridge necked down to hold 6.5mm projectiles. Also a rimless cartridge, the Creedmoor uses a 30-degree shoulder for headspacing and a 1.920-inch case to allow longer bullets to be used in a standard short-action magazine. Developed as a long-range target cartridge, the high sectional density and ballistic coefficient of the 6.5mm bullets were certainly put to use with good effect, and though the Creedmoor didn’t exactly explode onto the scene, it became a buzzword by 2013 and 2014. Driving a 140-grain bullet to just over 2700 fps, the Creedmoor has all but knocked the .308 Winchester out of the spotlight among long range target shooters, and has developed a reputation as a sound hunting cartridge for game animals all the way up to elk and moose, though I feel there are better tools for the largest ungulates. The Creedmoor has been hailed by some as the “be-all-and-end-all” cartridge, capable of killing any game animal on earth, and well, that’s just not the truth. It is, undeniably, a great deer and antelope cartridge. It is perfectly suited for a short-action bolt rifle, as well as the AR-10 platform.

Almost all rifle manufacturers offer a gun chambered for 6.5 Creedmoor, even down to the lever-actions like the Henry Long Ranger. If you were looking for a rifle to do double duty as a hunting gun and a long range target rifle, the 6.5 Creedmoor is a perfectly sensible choice. Recoil is minimal, and that is also another of the Creedmoor’s appeal.

Federal Premium 6.5 Creedmoor Fusion ammunition.

How do the two compare? Well, in deference to the older firearms, I feel the 6.5×55 Swedish suffers from the same fate as the 7×57 and 8×57 Mauser, in that much of the factory ammunition isn’t loaded to its full potential. When it is loaded properly—as in the Hornady Superformance line—it is fully the equal of the much more modern 6.5 Creedmoor. I feel that the 155- and 156-grain bullets, like the Lapua Mega and Norma Oryx, actually extend the versatility of the 6.5×55 Swedish, and can give it a slight advantage over the Creedmoor. Where the Creedmoor does have an advantage is in the sheer availability of the ammunition. There is a wide selection of hunting bullets, ranging from 120 to 143 grains, and of various construction methods. From the Hornady ELD-X to Federal’s Fusion and Terminal Ascent, to Nosler’s AccuBond and Barnes’ LRX, the hunter has plenty to choose from. Sadly, the same cannot be said for the 6.5×55 Swedish; the bullets are there, but the production numbers are not.

So with very similar velocities—the Creedmoor has a slight advantage—and comparable bullet weights, though the Swedish has some heavier offerings, who gets the nod? Were it not for the sheer availability of the Creedmoor rifles and ammunition, I would call this a draw; the performance is just too similar to say one is the more advantageous design. I actually prefer the 6.5×55 Swedish, primarily from a reloader’s point of view, as there is a bit more room in the case. But I’m pretty sure there isn’t a game animal which could ever tell the difference between the two cartridges. In this one, the Creedmoor—probably due to some excellent marketing on the part of Hornady—wins out; the wide selection of available factory ammo and premium hunting projectiles gives it the edge.

Looking for previous installments of our “Head to Head” series? Click here.

Calling All Hogs: Sounds are Key to Hunting Success

0

Hog Sounds for Hunting

Creating hog sounds for hunting is a crucial element to have success on your next hog hunt. In the past few years, several studies have been done to determine the effects various sounds have on wild hogs. The findings reflect a fact I have known most of my life: hogs are especially responsive to what they hear. Sounds they respond to vary. It could be a twig snapping when a hunter stalks within bow range of a sounder of wild hogs. It could be the low guttural grunts of a sow in estrus. Or it may be the squeal of a piglet in distress. Sounds are definitely a trigger that causes wild hogs to respond with various actions. While the sound of a distressed piglet could cause an entire sounder to charge, the “courting grunts” might be ignored by all but a boar in breeding mode. And boar hogs are always on the outlook for a receptive sow.

I’ve spent a good bit of time around hogs, both wild and domestic. I learned as a boy that hogs will come running to—or away—from certain sounds. My dad raised domestic hogs. Each fall, when the acorn crop hit the ground, he let the hogs out to fatten on the abundant free crop. Because he wanted to keep check on the porkers, he trained them to the sound of the honking car horn on our old International pickup. I can still see those hogs bounding out of the woods on our little farm, heading toward that honking sound, and the ears of dried corn they knew awaited them.

My electronic call had been emitting the sounds of a distressed piglet for several minutes.

Summer Night Calling For Hogs Has Never Been Easier

Then, out in front of my calling position came a sounder of 10 or 12 wild hogs charging straight toward me. I watched them come from a couple hundred yards along the edge of a cut-over corn field. They came within about 40 yards when they stopped, bristles up on the backs of the sows. They paused long enough for me to settle the crosshairs right behind the jaw, in the center of the neck, on a good “eater” sow weighing about 120 pounds.

While this was a calling session that went perfectly, I can also tell you about times when I tried every sound on the caller’s library and had no sign of a porker. Like calling any other game animal, using sound to entice hogs to within shooting range is not an exact science. But, when it works, few things in the outdoors are more exciting!

hog sounds for hunting

A Hog Hunting Boom

When the wild hog boom hit full scale in Texas around 1980, I was already a seasoned hog hunter. Being raised in northeast Texas between the Red and Sulphur Rivers, I knew about hunting wild porkers.

About 40 years ago when hog hunting suddenly became a “thing,” folks from far and wide began pouring into Texas to hunt hogs with outfitters. Many of them leased land specifically for hog hunting. At about this time I had my first “official” training in the art of using a call to bring porkers within range of my bow or rifle. I had a good friend from southeast Texas who was a major duck hunter, and he built his own waterfowl calls. He also loved hunting hogs. When he called one day to say he had developed a new way of hunting hogs, I was all ears (no pun)!

Hog Sounds for hunting from Outdoor Specialty Media Group on Vimeo.

My buddy hunted near the Louisiana border on leased land having some very heavy cover. Lots of switch cane grew along the creeks there, and that provided perfect cover for the area’s large number of wild porkers. Because the hogs had made well-worn trails through the vegetation, their travel routes were easy to find.

We determined that the key to success would be to hunt mid-day when the sounders of hogs were bedded back in the thick stuff. We would ease to the edge of the cover, get within bow range, and either find some natural cover to hide behind or quickly fashion makeshift blinds with machetes.

Sound Success

After that, my friend would go to work with that call. He always started with a series of contented grunts like the sounds that undisturbed, feeding hogs make. Occasionally, he’d create a pig squeal, the sound smaller pigs make when being slapped around by bigger hogs. He would also throw in deeper grunts and what he called a courtship call, which was a fast series of softer grunts.

Once he started, he didn’t stop until he either ran out of breath or we shot a hog. Once I learned that wild hogs would readily come to a variety of sounds, I began using his calls and enjoying success. I have found that regardless of the type of call being used, the key to success is simply being within hogs’ hearing distance.

Later, I discovered electronic calls with speakers that could either emit calls at a soft volume or blast sounds out to distant hogs. The first electronic calls I used were cassette tapes. They worked better for me than the mount-blown calls I previously used. The actual sounds were probably recorded from a pen of domestic hogs rather than squeals and grunts made by hogs in the wild. I did enjoy limited success, especially when hunting areas of heavy cover. There I could get relatively close to spots where I expected the porkers to be.

hog sounds for hunting leads to success

Next-Level Hog Calls

With today’s technology, calling wild hogs has been taken to the next level. For the past several years, I have used an electronic call made by Convergent Hunting Solutions called “The Bullet HP.” As anyone with experience calling game knows, the animals don’t always come running, regardless of how good the call sounds. This holds true with everything from predators to waterfowl.

However, I’ve learned that the odds of getting a wild hog within shooting range are very good. I’d estimate them as being about 60 percent for times when I’m calling in areas nearby the hogs. I usually can at least bring them out of cover. Getting them out into the open for a killing shot is sometimes a different matter, though. Especially considering the heavy cover areas where I often hunt.

When I’ve been hunting relatively open ranchland, I’ve watched hogs come from several hundred yards to the sound of the call when I turn the speaker to high volume. Lone boars often come in slowly, stopping frequently with their snout in the air to test the wind. Sometimes sounders of hogs with sows come in at a gallop to the sound of what they think is a piglet in distress.

Set Up Downwind

Because of hogs’ excellent sense of smell, it’s important to set up downwind of the area where you are calling. While hogs are not nearly as sensitive to movement as turkeys or deer are, don’t think for a minute that they can’t see well. Especially when you’re positioned in open cover. One reason many people think hogs are “half-blind” is that they are low to the ground, so weeds and brush often limit their vision. I have experienced having hogs who were out in the open spook when they spotted me 300 yards away. Rather than set up a portable blind when calling, I usually fashion a brush blind or just conceal myself in cover. First, I make sure I have good visibility out in front and to the sides of my setup.

Hog sounds for hunting gone right
Wild hog after a successful hog hunt

Effective Calling

I’ve found the distressed piglet sound to be very effective in triggering a response from a sounder of hogs. The sound of an aggressive boar or boar fight can also be effective, especially for calling in boars. I’ve noticed one thing that’s true for boar hogs, much as it is for Whitetail bucks. You can often see a “satellite” younger buck skirting around an area where there’s a receptive doe. Most likely hoping to move in on it while other “big boys” are battling. On many occasions, I’ve had younger boars skirt the area around my calling location. The big porkers will usually come straight toward the sound instead. They won’t be at a dead run, but they usually come straight toward the call with a cautious, stop-and-go gait.

Choice of Caliber

Much of my calling has been done during daylight hours, although hunting after the sun sets can be extremely exciting. I have an AGM Rattler thermal scope mounted on my little .223 bolt action Mossberg Patrol rifle for night hunting. Some folks say my caliber choice is too light for hunting hogs. That might be so if shooting running hogs at several hundred yards. But for close work, when I can place my shots in the neck just behind the ear, I’ve found it works great. I love wild pork and have found this caliber and shot placement destroys very little meat. I also don’t have to spend time searching for wounded hogs in the dark.

In Conclusion

Calling wild hogs is just another tool for putting meat in the freezer. If you are new to this idea, you might want to give it a try. Hog hunting isn’t quite as simple as setting up your electronic caller, hitting a button on your cell phone to trigger an app, flipping the safety off your rifle, and shooting a hog every time. First, you have to pattern the hogs. Then you must study the terrain to determine which locations to set up in that is best for success. I can tell you for certain that when you watch that lone boar or sounder of wild porkers heading toward your calling position, your adrenaline level will likely go through the roof! It can be challenging keeping those crosshairs steady with a toothy boar coming your way at close quarters!

For more hog hunting tips, check out this Pack-In Hog Hunting article!

How to Butcher a Deer – Grinding Venison

0

Even if you are just beginning to learn how to butcher a deer, the easy tips in this quick start guide will have you grinding venison like a professional!

Many hunters throw away a lot of money paying someone else to butcher their deer when they could easily do it themselves. I don’t think it is because people don’t want to process it themselves, they just don’t know how. And frankly, there aren’t a lot of good resources online showing you how to do it right.

So with that in mind, I wrote up this very thorough quick start guide. Whether you have been grinding venison for years or looking to do it for the first time, this guide will give you professional results every single time.

Grinding Venison

Is deer processing equipment expensive?

You can buy a respectable meat grinder for less money than it costs to process one deer, which is all you really need to get started. Tip: When first starting out, each time you harvest a deer use the money saved from not paying a processor to buy another piece of processing equipment (grinder, vacuum sealer, sausage stuffer, smoker, etc…). In no time you will have an enviable setup.

What Grinder Do I Need to Grind Venison?

Any size grinder can do the job, but a larger one will make your life easier. I find the LEM Big Bite #8 .35 HP grinder (affiliate link) to be perfect for processing one deer. You won’t regret getting as large of a grinder as you can reasonably afford, particularly if you are butching multiple deer at once. If you can’t afford a big grinder don’t fret, I also spent years using small el-cheapo models and they did the job too. Heck, our grandparents used hand-crank grinders (affiliate link) and survived just fine!

Other Equipment Needed to Butcher Deer

In a perfect world, you would own a sausage stuffer and a vacuum sealer (affiliate links). The sausage stuffer is great not only for making venison sausage but also for stuffing ground venison into freezer bags. However, if you can’t afford these right away, don’t worry, they are not required.

Adding Fat to Venison

Grinding beef or pork fat with your venison adds flavor, acts as a binder, and most importantly adds moisture to your meat. The amount of fat needed varies depending on what you plan to cook.

How much fat do I need?

  • 0-10% Fat – Use for heavily seasoned, loose meat meals such as venison chili, sloppy joes, and tacos.
  • 20% Fat – Best for juicy venison burgers, venison meatloaf, and venison meatballs.
  • 30% Fat – Ideal for making summer sausage and snack sticks.

Best Fat for Grinding with Venison

Beef fat adds a noticeable ‘beefy’ flavor to your venison. Pork fat has a more neutral flavor but goes rancid quicker in the freezer. I typically use beef fat in my normal grind to get a longer freezer life, but I use pork fat when making venison sausages because the neutral flavor allows the sausage seasonings to shine through better. Honorable mention: Bacon fat – great flavor but pricey.

Where to buy fat

Your local butcher shop (not grocery store) will have beef or pork trim you can purchase for cheap. It is best to call in advance. Every butcher I have spoken to has also been happy to share thoughts, tips, and best practices for grinding meat and sausage making.

Do I have to grind venison with fat?

There are a lot of people who prefer to grind venison without any fat added, for both the cleaner venison flavor and fewer calories. Just don’t invite me over for burgers.

How to grind venison

How to Grind Venison

Your grinder has multiple grinding plates that are ideal for different uses.

  • All-purpose grind: If you are going to grind all of your meat one way, use this grind. Run meat and fat through the medium grinding plate, alternating between meat and fat for even distribution. Then grind everything through a second time. This grind mimics the texture of store-bought hamburger.
  • Chili grind: The all-purpose grind is commonly used for chili, but if you want to grind meat specifically for a great chili, grind the venison once through the coarse grinding plate. No need to add fat. The coarser grind will stand up to a long simmer without getting mushy or falling apart.
  • Sausage grind: Grind meat and fat through a medium grinding plate, then run a second time through using a fine grinding plate. Alternatively, using the all-purpose grind method works as well if you prefer a coarser grind to your sausages. A good sausage recipe should specify the best grind for that sausage as well.

Tip: Your meat and fat grinds most easily when semi-frozen. Warm fat smears easily and can get stuck on the grinding plate/blade. Briefly sticking your grinding attachments in the freezer prior to use, also helps keep the meat and fat cold.

How to store venison

Vacuum sealing protects well against freezer burn and extends the freezer life of your meat. However, inexpensive wild game freezer bags (affiliate link) work well too.

How to butcher deer

Trapping: Choosing Traps for Coyote Trapping

0

By Trapline Editor Hal Sullivan

From left to right: Three sizes of coyote trap: No. 1.75 with 5 inches of jaw spread; No. 2 with 5-1/2 inches; No. 3 with 6-1/2 inches.

It’s a perennial question—how big of a trap do I need for coyotes? Seems like someone at every trapping convention I attend asks if he can catch coyotes with the No. 1.5 footholds he already owns and sets for fox and coon, and I hear countless tales of coyotes caught in No. 1.5 traps, all of which are no doubt true.

But if you set out to be a coyote trapper with a bunch of No. 1.5 traps, you’re just setting yourself up for disappointment. The trap is simply too small to be a reliable coyote catcher.

If you want to move up to coyote trapping, you need something a little bigger. That would be the No. 1.75 class of traps. Give or take a little, 1.75 traps have an inside jaw opening of about 5 inches. Some people think this still is too small for coyotes. I disagree. In fact, I catch a lot of coyotes with these traps. I do concede they are the smallest I would want to use for coyotes, and the relatively small jaw spread must be considered when making sets. If a coyote’s foot isn’t pretty much centered in a No. 1.75 when the trap fires, it isn’t going to get a good grip. I take precautions to prevent this.

Solid trap bedding is important with any trap, even more so when setting a trap of this size for a coyote. There’s a good chance the coyote might not step exactly on the trap pan, and if it steps on a jaw, instead, I don’t want that trap to wiggle, or, worse yet, flip up out of the bed.

A coyote is a heavy animal, and its foot exerts a lot of pressure. When I’m checking a bedded trap for stability, I don’t push gently on it, I push hard. If the trap moves, I adjust the bedding until it doesn’t. If a trap moves underfoot, a curious coyote is likely to stop working the set and instead dig up that trap.

I also make the trap bed as small as possible, so I don’t have to repack a lot of loose dirt outside the trap jaws. If this dirt isn’t packed in really well, a heavy-footed coyote may sink into the loose dirt, back off and start digging.

Truth is, you are going to have some misses with these small traps, when the coyote’s foot isn’t centered on the pan within the small radius of the jaws. The trick is not to arouse the coyote’s curiosity, or worse yet, spook it with a poorly bedded trap. If you don’t spook it or educate it, you might catch it on the next step or the next visit. The trick is to make sure everything stays in place until the coyote steps squarely on the trap pan.

I also put a significant amount of tension on the trap pan. If a trap is set exclusively for coyotes, I don’t want it to fire until 4 pounds of downward pressure is being applied by the animal’s foot.

If you’ve never set a trap with 4 pounds of pan tension, you may think it way too much. Four pounds is a lot of weight. You can set a half-gallon plastic jug of water on a trap pan with 4 pounds of tension, and it may not fire. But trust me, when the coyote shifts its weight to that foot, it will be pressing down harder than 4 pounds, and the trap will fire.

If I want to also have a shot at catching a fox, I may back off to 2 or 3 pounds.

This heavy pan tension serves two purposes. First, it prevents the trap firing if perchance the coyote just brushes the pan with the edge of its foot. No. 1.75 traps have a small enough jaw radius that a coyote’s foot may straddle a jaw and still touch the pan. You don’t want the trap to fire at that point, because it won’t get a good hold on the coyote’s foot, if it gets a hold at all. You not only want the coyote’s foot centered on the pan, you also want that foot to be pushing down hard before the trap fires.

Think of it like the diving board at the old swimmin’ hole. If the board is so rotten it breaks when you first touch it with a toe, you’ll still be balanced with your weight on your back foot and probably won’t fall in. But if the board has a little strength left, and you step all the way onto it before it breaks—down you go.

With heavy enough pan tension, by the time the pan breaks free, the coyote has committed enough weight that the foot falls, and the coyote can’t react quickly enough to pull that foot back out. It literally falls into the trap, which helps the little jaws get a better grab on its paw.

Foot guides are the final thing I apply at the set to get the coyote’s foot squarely centered in the trap. Foot guides are small objects placed outside of the set trap’s jaws to help steer the coyote’s foot directly onto the pan. Foot guides should be just big enough that a coyote would be uncomfortable stepping on top of them.

Don’t overdo it and build a wall around the trap. The foot guide is more a subtle hint, something the coyote notices and processes in the back of its mind, just as it does every other time it takes a step.

At a dirthole set, small clods in the dirt pattern make natural foot guides. Otherwise, stones no bigger than a golf ball, small sticks or other debris from nearby the set can be used.

I typically place three foot guides in a triangle around the trap, being careful not to locate any of them above the jaws or over the levers of the trap. Sometimes it’s helpful to put the guides in place before sifting the final covering of dirt or chaff over the set trap.

If a No. 1.75 gets a good grip on a coyote’s paw, it should hold that coyote. You can soup the trap up with four coils and other modifications, but a stock two-coil No. 1.75 should catch the average coyote and also make a pretty good trap for red fox, too, though it may be a little too much for the smaller grays.

If I’m trapping where I’m fairly certain I’m only going to catch coyotes, especially if I am being commissioned to remove said coyotes, I’m going to set a No. 2 trap, the next size up. In general, the No. 2 is a 5-1/2-inch trap as opposed to the No. 1.75, which is a 5-inch trap. A half-inch may not sound like much, but it can make a big difference in the way trap jaws catch and hold a coyote.

Just be aware that there is no industry-wide standard to the numbering system. Some No. 2 traps have a jaw spread no greater than some No. 1.75 traps.

You need to check for yourself.

Here, we also begin to hit legal restrictions on jaw spread. In Ohio, we are not allowed to set a trap on dry land that has an inside jaw measurement greater than 5.625 inches. I check to make sure each No. 2 trap has an inside jaw spread of at least 5.5 inches but no more than 5.625.

Again, buyer beware.

With the No. 2, we enter the realm of dedicated coyote traps, and since I set these traps specifically for coyotes, some of mine are outfitted with Paws-I-Trip, a replacement pan and dog system that produces 3 to 4 pounds of pan tension. It works on mechanical advantage. There is no bolt to tighten, and there is nothing to go out of adjustment.

Yes, it is slightly more tension than I want for a fox, but again, these traps are dedicated to coyotes, and I am not trying to catch fox with them.

When setting this larger trap, I still follow the same rules for careful bedding and foot guides as I follow when setting the No. 1.75. The half-inch of extra jaw spread just provides a bigger working area and an increased chance at getting a good across-the-pad catch on a coyote.

On the upper end of the range of coyote traps are the 6- to 6-1/2-inch traps. The numerical size means even less with traps of this size. It seems trap makers assign No. 3 and No. 4 designations almost at random. Some No. 3 traps are actually larger than some No. 4. Perhaps because of this, some manufacturers instead designate their traps by the actual measured jaw spread, for example 650 for a 6.5-inch trap.

I certainly applaud that choice.

I follow the same setting procedures and don’t think there is much need for a coyote trap larger than 6.5 inches. So, for me, that runs the gamut of coyote traps.

The No. 1.75 is as small as I want to go, but used carefully, it can make a very serviceable trap for coyote and also fox. Bigger traps are less appropriate for fox but better suited for coyotes. Know the law and then decide what is the best fit for you—as well as the local coyotes.

Forrest Fenn’s Treasure Poem Deciphered – Update: Treasure has been FOUND

0

After being diagnosed with cancer in 1988, Forrest Fenn, a retired Air Force Pilot and gallery owner, was inspired to hide a treasure chest in the Rocky Mountains of the United States. It is to this treasure chest that’s filled, supposedly, with jewels and gold, that this poem leads. Fenn intended for the treasure to inspire a public search. He claims that the treasure is hidden in a medieval bronze box featuring relief scenes of knights and maidens with flowers.

The search is detailed in a memoir he self-published in 2010 titled, The Thrill of the Chase: A Memoir. In it, Fenn tells stories from his life which supposedly also contain clues to the location of the gold. It’s in the chapter “Gold and More” that this poem is found. In the six stanzas of this poem, there are supposedly nine clues that together will lead a searcher to the buried treasure.

The story, book, and poem have inspired a search for the treasure across four states through which the Rocky Mountains reach. Since the book was published and Fenn began speaking about the treasure, five people have died while searching for it. Additionally, there are have several controversies related to the treasure. These include arrests for digging in state parks and lawsuits against Forrest Fenn.

Forest Fenn Treasure Poem

Structure of the Forrest Fenn’s Treasure Poem

The Treasure Poem by Forrest Fenn is a six stanza poem that follows a simple rhyme scheme. This is something that should be taken into consideration when unpacking what might be a beneficial clue what might simply be a rhyming word. There are in total, supposedly, nine clues hidden within the six stanzas. This can be thought of in several different ways. First, that each sforrentence is a clue. There are a total of nine sentences in the poem but some seem to be much more important than others.

The first stanza is a single sentence and is supposedly one of the least important stanzas of Forrest Fenn’s Treasure Poem. The second speaks of “warm waters” a “canyon” and walking. In the third sentence, Fenn discusses the “Home of Brown” which is undoubtedly important. Then the fourth sentence mentions words like “Meek” and “loads” which are likely part of a clue.

The fifth sentence is about the blaze and how fast one must look for the treasure. The six mentions the unusual word “trove”. In the eighth Fenn speaks of listening closely to his words and it being “worth the cold”. Then, in the final sentence, he uses the word “brave” and says that you have to be “in the wood”.

Alternatively, one might consider the nine clues as going from start to finish, beginning with the word “Begin” in the second stanza. This leads one to the canyon down that’s too far to walk. Then, onto the home of brown and no place for the meek. Next, there is the end which is coming closer and the creek up which one can’t go with a paddle. Then there are the waters, the heavy loads and the blaze. Finally, the ninth clue is to move quickly down.

Analysis of the Forrest Fenn’s Treasure Poem

Stanza One

As I have gone alone in there

And with my treasures bold,

I can keep my secret where,

And hint of riches new and old.

In the first stanza of the Forrest Fenn’s Treasure Poem, the speaker, who is Forrest Fenn, begins by describing his treasure and the initial process of hiding it. The first stanza is commonly believed to be less important than the second or third, but its existence at all makes it necessary to consider. These lines might also contain some hint as to which “warm waters,” mentioned in the second stanza, one should start at.

The first line references travelling somewhere alone. Fenn was supposedly alone when he buried the treasure and perhaps he was thinking while writing that the person who found his treasure would be too. Or, maybe the word is hinting at the location being a lonely one. It could be a solitary natural element like a peak or outcropping.

He speaks in the second line of this being a “bold” act, or of his treasures as a “bold” thing to possess or find. It could be that the steps he took to hid it were “bold,” perhaps there was something risky about what he did, despite his age or due to it. The word “bold” might also refer to the name of an element of the landscape.

The third line is very vague, as is the fourth. It reads very much like a line added to rhyme with “there” at the end of the first line. The “riches” are spoken of as “new and old” in the fourth line. Again, very vague. There is not much to go on here. Perhaps there is some “old” yet still valuable in the place where he hid the treasure. Some have drawn connections between this line and Fenn’s past as an acquirer, and some would say, thief, of Native American art and artifacts.

Stanza Two

Begin it where warm waters halt

And take it in the canyon down,

Not far, but too far to walk.

Put in below the home of Brown.

Fenn has hinted at the fact that searchers should begin with the phrase “Begin it”. It is the first clue in the poem. This is why the first stanza is often ignored. The first phrase alludes to a place where “warm water’s halt”. This is often taken to mean a hot spring, maybe the last in a series or the last place where one can find warm waters before descending down into a canyon.

Water is one of the most important images in this poem, made even more so by Fenn’s assertion that the treasure is “wet”. Searchers are meant to take the canyon down, maybe by boat or car as it is “too far to walk”. But, it isn’t that far. It is important to keep in mind Fenn’s age when he hid the treasure. It wouldn’t have been possible for him to hike tens of miles into the backcountry.

One of the most interesting hints in the poem, “below the home of Brown” is in the fourth stanza. Could this be a real home of someone named Brown? A building that looks brown? The home of something that is brown? Forrest Fenn is quoted as saying that the “brown” clue is one of the most important. If one can decipher what it is referring to, the treasure is within reach.

As with the other stanzas, connections can be made with both locations and names. For example, canyons like “Downtown Canyon or “south Canyon” have been mentioned in regards to the second line. The word “Brown” has spawned the consideration of places like Brown Mountain Campground and Browns Canyon National Monument in Colorado. The former is connected to one of the most promising locations, Kirwin, Wyoming.

Stanza Three

From there it’s no place for the meek,

The end is ever drawing nigh;

There’ll be no paddle up your creek,

Just heavy loads and water high.

The third stanza is also considered to be quite important. It alludes to something dangerous (perhaps) about the location. It is “no place for the meek”. But, this by no means is clear cut. It could refer to a place name or the name of a person like Joe Meek who was run off by Blackfoot Native Americans. This is one of the more promising connections in Yellowstone National Park. He wandered off and ended up discovering a hot spring. This connects back to the second stanza as it is the last hot spring at the base of Cinnabar (brown colour) Mountain. There are also connections to Sphinx, Montana and a specific creek that runs through lands that also relate to this stanza.

The next lines refer to “your creek,” another mystery that includes the searcher in the poem. A reader might also interpret these lines to refer to a waterfall. This makes sense with the last line of the stanza and the reference to “water high”. There is something about the creek that leads there that is difficult. There will be “no paddle up your creek”. Is it impossible to paddle up?

Stanza Four

If you’ve been wise and found the blaze,

Look quickly down, your quest to cease,

But tarry scant with marvel gaze,

Just take the chest and go in peace.

The fourth stanza of Forrest Fenn’s Treasure Poem alludes to the end of the quest. While travelling along this river “you” have to be looking for a blaze. This immediately connects to trail blazes but nothing is quite that simple or the treasure would already have been found. Fenn has alluded to the “blaze” as something solid that one can’t remove. It is something permanent that one would be unable to tamper with. Other clues from Fenn include its colour. He has stated that it’s white, such as a rock or tree, something impossible to carry away. There might be other connections to events, place names, and people.

Once you find that place then you have to quickly look down and it’ll be there, the quest will be over. It is below the surface of the water and if you waste time you won’t be able to grab it or see it.

This stanza provides what appears to be the last most important clues of the poem. As with the other sections, these lines would appear less vague and mysterious if one were in the right location.

Stanza Five

So why is it that I must go

And leave my trove for all to seek?

The answers I already know,

I’ve done it tired, and now I’m weak.

Fenn asks a question in the first lines of this stanza. The word “trove” sticks out as an alternative to treasure. As usual, the word “trove” might relate to a place name or a person. It could also speak to the nature of the hiding place.

The last line “I’ve done it tired and now I’m weak” might contain some clue as to the location of the hiding place. It could reference the effort it took for him to get there and get back or the words “tired” and “weak” might have an alternative meaning entirely.

Stanza Six

So hear me all and listen good,

Your effort will be worth the cold.

If you are brave and in the wood

I give you title to the gold.

The sixth stanza acts as a conclusion to the previous five but that doesn’t mean that it should be disregarded. The first lines draw the reader’s attention, perhaps for the last clue. There are also place names that are connected to listening and hearing.

In the second line, he refers to the “cold”. This is most obviously related, (possibly), to the cold of the water one has to reach into to get the gold. The last lines speak of the woods and of bravery. Some believe the word “brave” might relate to a Native American brave rather than to the act of bravery. The word “wood” is also interesting. It could refer to a river of that name.

Possible Locations Related to Fenn’s Treasure, from Poetry Experts

We asked three of our writers, who have interesting takes, following the analysis, where they think Forrest Fenn’s treasure is:

  • Emma (poetry expert and author to this analysis)
  • LJ (poetry expert and actor who portrayed a pirate, and therefore knows a bit about treasure)
  • Jack’s thoughts on where the (poetry expert on Poem Analysis):

Forrest Fenn Treasure Found

On the 6th June, according to Forrest Fenn’s official website, Forrest Fenn’s treasure had finally been found.

Forrest Fenn stated:

It was under a canopy of stars in the lush, forested vegetation of the Rocky Mountains and had not moved from the spot where I hid it more than 10 years ago. I do not know the person who found it, but the poem in my book led him to the precise spot. I congratulate the thousands of people who participated in the search and hope they will continue to be drawn by the promise of other discoveries. So the search is over.

Forrest Fenn’s Treasure Poem Deciphered - Update: Treasure has been FOUND

Did Poem Analysis Contribute to the Treasure being found?

At Poem Analysis, we are over the moon one lucky explorer has finally found Forrest Fenn’s treasure. However, it did make us wonder…

Did we help the explorer find the treasure?

Here’s what we know so far:

  • We have a dedicated team of poetry experts, that have analyzed over 4,480 from 1106 different poets. We like to think our team knows a thing or two about poetry!
    • Three members of our team, taking into consideration their poetry expertise and experience, made educational guesses as to where the treasure was located.
  • We published this article on the 15th May 2020, 22 days before Forrest Fenn releases news of the treasure being found.
  • As soon as we published our article, we ranked top spot for some crucial search phrases relating to the poem.
    • “forrest fenn poem analysis” Forrest Fenn’s Treasure Poem Deciphered - Update: Treasure has been FOUND
    • “forrest fenn poem meaning” Forrest Fenn’s Treasure Poem Deciphered - Update: Treasure has been FOUND
    • “forrest fenn poem deciphered” Forrest Fenn’s Treasure Poem Deciphered - Update: Treasure has been FOUND

We cannot confirm definitively that our article helped find the treasure. However, putting the crosses together, that we analyze thousands of poems, contributed with three objective guesses from our team where the treasure was, ranked highly for people to see the article, and the treasure was found a mere 22 days later, when it had not been found for over 10 years, it could suggest our analysis helped!

An important point to remember is that Forrest Fenn’s treasure map gave people the opportunity to explore the wilderness. Reconnect with nature and have an adventure with friends and family. Although there was a treasure that was found, it does question, ‘what is the real treasure?’ Is it materialistic things such as the actual treasure, or is it the journey?

Congratulations to whoever found the treasure – @Forrest Fenn, we are ready with your next challenge!

Best Air Rifle Deals

Popular Posts

How to choose the right Air Gun Caliber for your game?

0
A story is told of three Native American hunters. Two are smart, the other somewhat ignorant. On the first day of the hunting season, one of...

Can a 22 air rifle kill a deer?

0
"Debate over whether a 22 air rifle can effectively take down a deer has sparked curiosity among hunting enthusiasts. With its lower muzzle velocity...

Best Distance for Sighting In an Air Rifle

0
Shooting with an air rifle always seems like a thrilling experience, but if you are a newbie then you have lots to learn. One...