Home Blog Page 43

10 Best Cellular Game Cameras

0

Imagine a calm evening in the woods captured by your cellular game camera. As the sun sets, a mysterious presence appears on the screen. Is it a magnificent deer or a cunning coyote? 

You’re left wondering about the secret lives of these mysterious forest inhabitants and wanting to witness them remotely. This is where you’ll need only the best cellular game camera to help you monitor wildlife even when you’re not close to it. 

Unsure which one to choose? I’m here to help you navigate the options and find the best cellular game camera based on my first-hand experience with the best models in 2024. Without any delay, let’s start exploring: 

Best Cellular Game Cameras Reviewed 

Table of Contents

REOLINK KEEN Ranger PT Cellular Trail Camera – Best for panoramic coverage and remote monitoring.

Camojojo HD Live Cellular Trail Cam – Ideal for capturing swift wildlife action with its 0.2s trigger speed 

Moultrie Mobile Delta Base Cellular Trail Camera – Best for economical cellular trail monitoring.

Moultrie Mobile Edge Cellular Trail Camera – Best for enhanced battery life and data management.

SPYPOINT Link-Micro-S-LTE Trail Camera Cellular – Best for small games and extended battery life.

Muddy Outdoor Manifest 2.0 Cellular Trail Camera – Best for high-resolution images and video quality.

SPYPOINT LINK-MICRO-LTE Cellular Trail Camera – Best for compact design and low-impact scouting.

TACTACAM outdoor Reveal XB Cellular Trail Camera – Best for quick setup and versatile options.

SPYPOINT LINK-MICRO-LTE-V Cellular Trail Camera – Best for fast trigger speed and affordable value.

Bushnell 30MP CORE Trail Camera – Best for dual-sensor technology and reliable day/night performance.

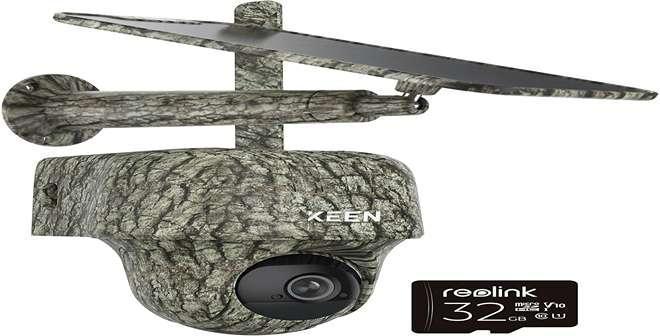
1. REOLINK KEEN Ranger PT Cellular Trail Camera

After experiencing this top-tier cellular game camera, I can confidently recommend it to outdoor enthusiasts and hunters alike. What I specifically loved about this camera was its exceptional panoramic coverage and remote monitoring capabilities. 

But that’s certainly not all it has to offer! Speaking of which, here are some other key features that make REOLINK KEEN my top choice when considering the best cellular game cameras: 

IMG_256
Buy Now

Key Features: 

Reliable Connectivity: This LTE 4G cellular game camera is powered by a solar panel, making it perfect for off-grid locations.

Exceptional Image Quality: A true 2K 360° view offers a native 4MP resolution, ensuring crystal-clear images and videos day and night.

Real-time Alerts: The camera’s intelligent algorithms and PIR sensor reduce false alarms, sending timely notifications with attached images directly to your phone.

Cost-Effective: This camera includes a 32GB microSD card (expandable to 128GB) and free Cloud service, offering flexible storage options.

User-Friendly: It’s remarkably easy to use, with simple access and customization through the Client, Reolink App, and even Alexa.

Weather-Resistant: Its robust and waterproof design ensures it can withstand various weather conditions, making it perfect for outdoor use.

Pros

Comes with an efficient solar panel for continuous use.

User-friendly app for easy management.

Accurate motion detection with customizable settings.

High-quality imaging for clear visuals.

Cons

Inconsistent video and live stream performance.

Absence of effective customer service support.

2. Camojojo HD Live Cellular Trail Cam

Next up is Camojojo’s trail camera. My experience with Camojojo’s trail camera has been nothing short of remarkable, largely attributed to its lightning-fast 0.2-second trigger speed that flawlessly captures dynamic wildlife images. 

Here are additional standout features that, in my opinion, elevate Camojojo as the premier cellular game camera and a noteworthy inclusion on this list:

IMG_257
Buy Now

Key Features: 

0.2-Second Trigger Speed: Captures swift movements with a rapid 0.2-second trigger speed and a detection range of up to 20 meters (65 feet) for precision.

Real-Time Live Streaming: As one of the best cellular game cameras for hunting, Camojojo offers clear and uninterrupted live video streaming. Hence, you can access up-to-the-minute hunting insights. 

Real-time Alerts: Precise PIR sensors and smart algorithms significantly reduce false alarms. Get timely notifications on your phone with attached images.

Cost-Effective: Camojojo includes a 32GB microSD card (expandable to 128GB) and free Cloud service, ensuring flexible storage without extra costs.

User-Friendly: The camera offers a smooth usage experience with convenient access and customization via the Client, Reolink App, and Alexa for a seamless experience.

Weather-Resistant: Designed to withstand various weather conditions, this camera is ideal for outdoor settings in different environments.

Pros

Convenient mounting bracket for easy adjustments.

Superior video quality for capturing even the fine details.

Immediate video results, excluding the need to wait for long.

Wide coverage and reliable signal.

No need for memory cards, as content is stored internally.

Cons

Night picture and video quality don’t match daytime clarity.

Intermittent issues with the live stream on the app.

3. Moultrie Mobile Delta Base Cellular Trail Camera 

After using this cellular game camera, I was thoroughly impressed. The standout feature that caught my attention was its remarkable 24MP image resolution for photos and videos. But that’s not all of what it had to offer. Instead, I also came across the following features during my experience of using the camera: 
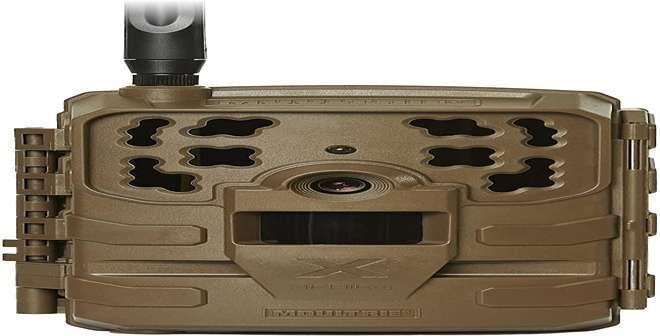
IMG_258
Buy Now

Key Features: 

High Image Quality: Boasting 24MP resolution for photos and videos, it captures detailed images day and night, thanks to 36 invisible IR LEDs providing excellent night vision.

Fast and Reliable Connectivity: Operating as an LTE 4G cellular game camera, this camera ensures a robust and dependable connection, whether you’re in remote or urban areas.

Smart App Control: The Moultrie Mobile app simplifies camera setup and control, allowing you to easily view images on your smartphone.

AI-Powered Image Scanning: Images are scanned with artificial intelligence to identify subjects like bucks, does, turkeys, people, and vehicles. Receive alerts for specific image types, catering to wildlife enthusiasts and hunters.

Cloud-Based Storage: All images are uploaded to a cloud-based server, providing 24/7 access even after canceling your subscription, ensuring safe and cost-free access to your images.

Weather Resistant: The camera’s impact and weather-resistant casing ensures it can withstand various outdoor conditions, providing longevity and reliability in the field.

Pros

Great image resolution (24MP) for clear photos and videos.

Efficient battery usage with proper settings.

Easy setup and quick network connection.

Simple and user-friendly mobile app.

Long-lasting battery life, thanks to the solar panel that comes along. 

Option to manually trigger a snapshot in the app.

Cons

Oversensitive motion detection may capture distant objects.

The wide-angle lens may not capture taller objects effectively.

Inconsistent performance in different settings.

4. Moultrie Mobile Edge Cellular Trail Camera

Based on my experience, the Moultrie Mobile Edge Cellular Trail Camera is an excellent choice for budget-conscious enthusiasts looking for cost-effective cellular game camera options with top-notch hunting and wildlife monitoring features. Here’s what sets this camera apart:

IMG_259
Buy Now

Key Features: 

Effortless Connectivity: The camera’s Auto Connect technology seamlessly links to the strongest signal across multiple networks, ensuring I stay connected even in remote locations.

Streamlined Memory and Storage: With built-in and unlimited cloud storage, I bid farewell to the hassle of SD cards. It automatically clears space for new shots, providing ultimate convenience.

Stunning Image Quality: It offers stunning game shots, capturing detailed 33MP photos and HD 720p videos day and night with exceptional clarity.

Night Vision Brilliance: In low-light conditions, this cellular game camera with night vision features an enhanced IR LED setup that shines up to 80 feet. This allows you to enjoy clear and vivid night captures.

Flexible Power Options: I appreciate the flexibility in power options, as the Edge can run on either 8 or 16 AA batteries, and it’s compatible with the Moultrie Mobile Solar Power Pack (sold separately).

User-Friendly Setup: Setting it up is a breeze – just scan the QR code, and you’re ready to go. No more complicated instructions or time-consuming setups.

Pros

Seamlessly connects to the strongest signal.

Built-in unlimited cloud storage.

Captures detailed 33MP photos and HD 720p videos.

Enhanced IR LED setup for clear night captures.

It can run on AA batteries or a solar pack.

Cons

Slow to capture and take pictures.

Notifications may take time to show.

Requires frequent resets and reconnections.

5. SPYPOINT Link-Micro-S-LTE Trail Camera Cellular 

The SPYPOINT Link-Micro-S-LTE Trail Camera is one of the top cellular game cameras in 2024 for its integrated solar panel technology, reliable connectivity, reduced environmental impact, and advanced mobile scouting tools. Besides this, I also like this camera for its: 
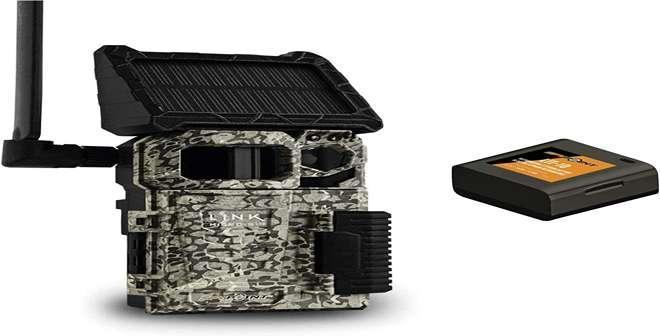
IMG_260
Buy Now

Key Features

Effortless Charging: The integrated solar panel charges the included LIT-10 rechargeable lithium battery pack, eliminating frequent battery changes and saving time and money.

Minimal Environmental Impact: Cellular capabilities reduce the need for frequent site visits, minimizing human pressure on wildlife and supporting environmental conservation.

Comprehensive Mobile Scouting: SPYPOINT offers advanced scouting tools to analyze data, identify patterns, and plan successful hunting strategies, providing a complete mobile scouting solution.

User-Friendly Design: The LINK-MICRO-S-LTE seamlessly merges advanced cellular technology with an intuitive and straightforward platform, catering to the needs of seasoned tech-savvy hunters and newcomers to cellular trail camera technology.

Pros

Effortless setup.

Regular picture transmission.

Cost-effective.

No need for frequent battery replacement with solar charging

Cons

Slow shutter speed.

Limited maximum SD card size (32GB).

Reliability issues in staying connected to the cell tower.

6. Muddy Outdoor Manifest 2.0 Cellular Trail Camera

Another notable camera on our list is the Muddy Outdoor Manifest. It’s renowned for its exceptional high-resolution image and video quality. An excellent choice for wildlife enthusiasts. Besides this, this is the best cellular game camera due to the following features. 
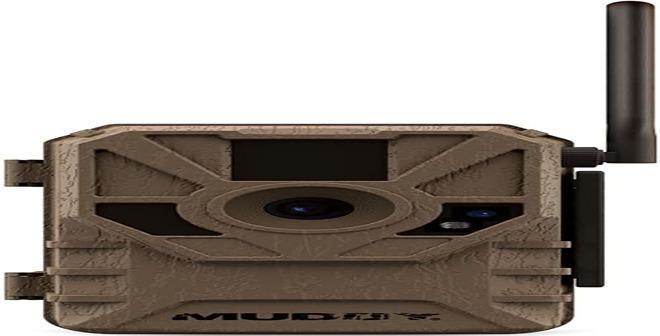
IMG_261
Buy Now

Key Features

Fast LTE 4G Connectivity: This cellular game camera keeps you connected even in remote areas, so you never miss a moment of wildlife activity. 

Crisp 16-Megapixel Images: With a rapid 0.8-second trigger speed, this trail camera captures every detail, providing clear and detailed photos of your outdoor adventures. 

Easy Remote Access: The Muddy COMMAND app offers seamless control from Android and iOS devices, giving you convenient access to your camera’s settings and captured media. 

Tough, Weatherproof Build: It’s designed to withstand harsh weather conditions and outdoor wear for long-lasting durability, making it reliable in various environmental scenarios. 

Effortless Setup: Mounting is simple, ensuring optimal performance without complicated installation procedures. 

Consistent High-Resolution Images: Its high-resolution image-capturing capability makes it one of the best cellular game cameras for hunting and outdoor photography, delivering consistent, high-quality images every time you use it.

Pros

Fast 4G Photo Upload

Good Picture Quality

Durable Build

Efficient Battery Life

Cons

Complicated Photo Sharing/Deletion

It isn’t easy to use

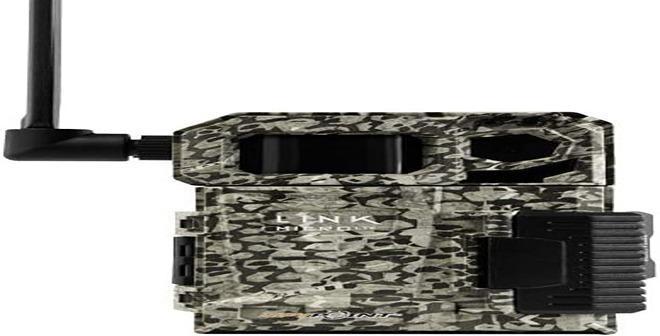
7. SPYPOINT LINK-MICRO-LTE Cellular Trail Camera

The SPYPOINT LINK-MICRO-LTE ranked at number seven on my list. This camera is considered the best LTE 4G cellular game camera due to its compact design and low-impact scouting. Its standout features also include exceptional battery life and efficient motion detection.
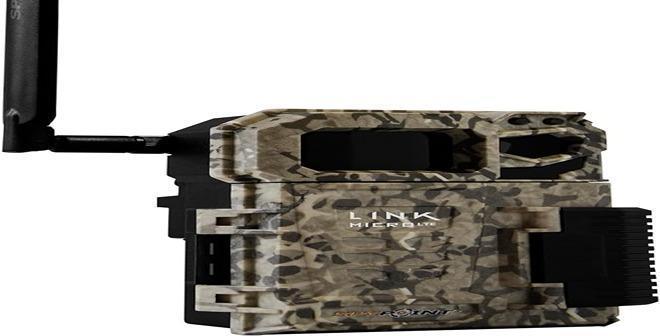
IMG_262
Buy Now

Key Features

Effortless Connectivity: As another LTE 4G cellular game camera, this SPYPOINT camera offers a reliable and seamless connection, even in remote areas, ensuring you stay connected throughout your adventures.

Impressive Night Vision: Equipped with a 4 LED infrared flash, this camera detects motion up to 80 feet away, delivering outstanding performance in low-light conditions.

Ultra-Compact Design: Its stealthy, compact build ensures discreet placement, reducing the chances of startling the wildlife you aim to capture.

Minimized Human Impact: Transitioning to a cellular trail camera like the LINK-MICRO-LTE reduces your physical presence in hunting areas, minimizing stress on local wildlife and benefiting you and the animals.

Advanced Scouting Tools: SPYPOINT provides a comprehensive mobile scouting solution with advanced tools for data analysis, pattern tracking, and successful hunting strategies, keeping you well-informed and ahead of the game.

Pros

Conveniently access pictures remotely from up to 60 miles away.

Quick transmission.

Accessible photo storage plans.

Easy setup and use.

Runs well on lithium AA batteries.

Cons

Potential language barrier with customer service.

Connectivity issues after battery change.

8. TACTACAM Outdoor Reveal XB Cellular Trail Camera

What made me add the TACTACAM Reveal XB Cellular Trail Camera to this list of the top 10 best cellular game cameras is its quick setup and versatile options. Besides that, this camera also provides high-resolution images and video quality, making it an excellent choice for wildlife enthusiasts. 
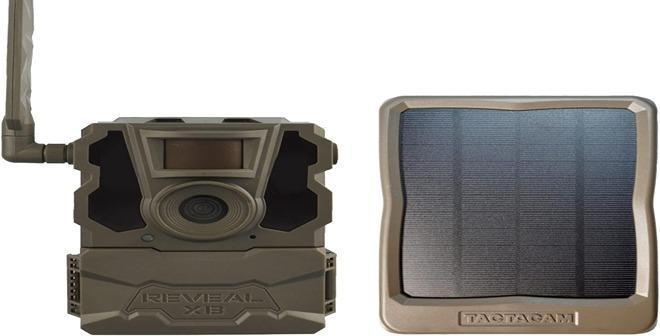
IMG_263
Buy Now

Key Features

Seamless Connectivity: This camera operates on AT&T and Verizon’s LTE/4G networks, ensuring continuous connectivity even in remote areas. On-board Wi-Fi simplifies setup and offers live view options with an LED signal strength indicator.

Ultimate Remote Scouting Tool: Ideal for areas with limited access or proper monitoring, the Reveal XB Camera provides real-time wildlife observation, even from a distance.

Robust and Weatherproof: Compact and rugged, the Reveal XB Camera thrives in extreme outdoor conditions, guaranteeing reliability in various weather scenarios.

Camera Features: With multi-carrier compatibility, it offers photo resolutions from 8MP to 24MP. HD photo and video requests via the app provide high-quality media capture. Its no-glow IR technology excels in nighttime operations, and its PIR sensor detects motion up to 80 feet away.

Advanced Technology: Equipped with integrated GPS for location tracking and an external port for a solar panel, the Reveal XB Camera ensures uninterrupted operation. Its IP66 waterproof certification enhances durability. 

Pros

Ideal for all weather conditions.

Remote control convenience.

Efficient cellular capability.

Lightning-fast trigger speed.

Dual sensors for day and night clarity.

User-friendly interface.

Cons

Lack of included camera power supply.

Inconsistent results when using a solar panel.

9. SPYPOINT LINK-MICRO-LTE-V Cellular Trail Camera

As I delved into some of the best cellular game cameras of 2024, the SPYPOINT LINK-MICRO-LTE-V instantly stood out for several compelling reasons, making it an excellent choice for wildlife enthusiasts. 

Its fast trigger speed and affordable value are complemented by high-resolution image quality, ensuring you capture every moment with clarity.

IMG_264
Buy Now

Key Features

Top-Notch Performance: It has an impressive 0.5-second trigger speed and sharp 10MP image resolution. This feature ensures that you precisely capture wildlife activity without any delay. 

Compact and Covert: Its ultra-compact design excels in remaining discreet, a valuable asset in wildlife cameras. This feature enhances your chances of unnoticed wildlife documentation.

Wildlife-Friendly: This cellular camera helps reduce human interference by enabling fewer visits to hunting areas. Wildlife can behave more naturally, offering a win-win scenario for both observers and animals.

Tech-Savvy Scouting: SPYPOINT packed this camera with advanced scouting tools, simplifying data analysis and pattern tracking. Stay one step ahead in planning your hunting strategies.

Pros

Quick and straightforward app configuration.

Swift notification upon motion detection.

Accessible and friendly tech support.

Unlimited transmissions in the first month.

Cons

Limited photo downloads without extra payment.

Occasional long customer service wait times.

Shorter battery life than expected.

10. Bushnell 30MP CORE Trail Camera

Last but not least, I can’t end this list of the top 10 best cellular game cameras without mentioning the Bushnell 30MP CORE 1080p Trail Camera. What impressed me about this camera was its dual-sensor technology and reliable day/night performance, ensuring you capture wildlife activity around the clock with exceptional clarity.
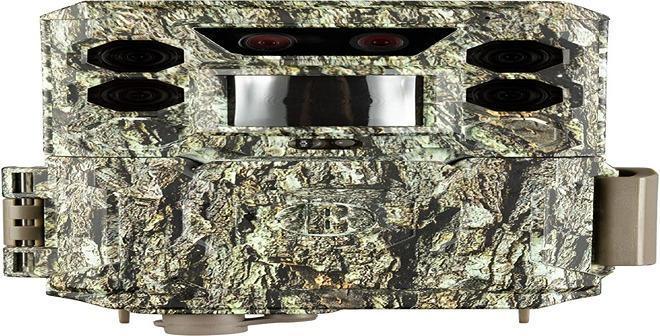
IMG_265
Buy Now

Key Features

High-Quality Images & Video: Captures 30MP photos and records 1080p videos at 60fps for top-notch image quality.

Exceptional Night Vision: Boasts an 80-foot no-glow infrared night range, ideal for low-light conditions and nocturnal wildlife.

Lightning-Fast Trigger: Offers a rapid 0.2-second trigger speed and 0.6-second recovery rate for swift wildlife capture.

Dual Sensor Technology: Utilizes dual sensors for sharp daytime images and consistent nighttime illumination, ensuring 24/7 clear and well-illuminated images for better wildlife tracking and hunting planning.

Pros

Easy to set and use

Effective for garden and pest surveillance.

Efficient detection circuit (100-foot).

True no-glow feature for stealthy monitoring.

Cons

Occasional difficulty while turning it on.

Delays in photo+video mode.

Adds a logo in the corner of all images and videos.

Summing Up

Cellular game cameras have revolutionized how we approach surveillance, wildlife monitoring, and hunting. They offer immediate insights into the activity on your property and are invaluable tools for hunters seeking to capture game movements near their feeders. 

Each of the 10 cellular game cameras mentioned above represents cutting-edge wireless trail camera technology, whether it’s REOLINK KEEN’s remote monitoring capabilities, Camojojo’s rapid trigger speed, or the rugged durability of Muddy Outdoor Manifest 2.0.

So whether you want to keep an eye on your land or enhance your hunting strategy, these distinctive cellular game cameras stand out as the top cellular game cameras in 2024.

FAQs

Are cellular game cameras worth it?

Yes, cellular game cameras are worth it, especially if you enjoy monitoring wildlife remotely. They enable remote image and video viewing via your phone, enhancing convenience, especially for scent-conscious deer hunters with cameras in distant or remote locations.

What is the difference between WIFI and cellular game cameras?

The distinction between WIFI and cellular game cameras lies in their connectivity. Wireless cameras utilize Wi-Fi for image transmission, while cellular cameras rely on 4G cellular networks and data plans.

Do game cameras require the internet?

No, game cameras don’t require internet. They work independently, recording wildlife images and videos stored on memory cards.

How & What to Do with Different Cuts of Deer Venison Meat

0

(Last Updated On: November 5, 2024)

Since I was hunting and harvesting meat in my teens, I was trying to come up with ideas on how to honor and add extra value to the meat I worked for in the wild.

Now 20 or so years later, I still use a lot of wild venison meat cuts for many projects, and often for meat curing and salami making.

I wanted to provide some information about what I cook and use with the various cuts of venison meat. It’s a little different in New Zealand, where I do most of my hunting with an abundance of wild deer and many are semi-farmed also.

I’ve eaten/butchered farmed venison and been able to contrast the differences.

This article relates to both with some generic aspects due to the slight variation in the deer species (ie. fat vs lean meat). In New Zealand we have about 6 species of deer.

We aren’t required by hunting regulations to remove the whole carcass hunting public land, often we are semi-burying the meat or just leaving it for the scavengers.

The most common cuts to harvest and use are the loin along each side of the spine “back steaks” as well as back legs (hind leg). Since this is where the majority of the meat from the animal is.

If you think about most cuts and edible aspects of the deer, here is the framework.

Many cuts and areas of the deer can be used for slow cooking to tenderize. Whilst other cuts like the loin and tenderloin are best for fast cooking methods. The deer’s heart and liver are the best parts for cooking first after the animal is killed whilst the offal is fresh.

I assume you have a basic idea of butchering a deer, since this is about what you can do with the deer meat, including all the major muscle groups and subprime muscle groups.

Most hunters I know will look at mincing a good percentage of the meat they harvest. The other aspect is cubing or dicing the meat for dishes like stews and curries.

How To Use Different Cuts of Deer or Venison Meat

There are so many ways you can look at the muscles and edible parts, to make it simple, the basic categories for how you cook the venison are slow or fast. Then after this, I will look at it from the sections or different areas of the deer/venison animal with some added thoughts.

  • Slow Cooking Venison= Often Cooked in a liquid
  • Fast Cooking Venison = Often Cooked under Direct Heat until rare to medium done

Slow Cooking Venison

  • Neck
  • Shank
  • Ribs
  • Any Meat of the Deer
  • Bones for Marrow
  • Trotter/Hoof

For slow cooking, I like braising methods, but I’ve always found the ribs hard work since many deer in New Zealand are so lean.

I hunt with just a knife often, I don’t have a bone saw to take bone on shanks or neck cuts. Unless the hunt is on friendly farmers land, where we can drive a 4wd or quad motorbike to retrieve the whole carcass.

Unless the deer is small, often isn’t the case where we hunt locally.

The main deer across wide aspects of New Zealand is the red deer, which is often a large-bodied animal.

If you simmer or slow cook any aspect of the meat, you can break down the muscle fibers with a stew or other liquid-based broth. I’ve found this just takes time and patience. Depending on the deer species and toughness of the meat, after 3-4 hours this can be achieved.

Since there is a lack of collagen or sinew in the loin or tenderloin. These cuts of meat aren’t very successful when slow cooked I have found.

Browning slow cook cuts of the meat will bring the natural sugars to the surface and helps the overall flavor a lot I’ve found.

Fast Cooking Venison

  • Heart
  • Liver
  • Back Steak
  • Tenderloin
  • Aged Rump (Hind Leg)
  • Aged Sirloin (Hind leg)

If you are harvesting a deer, heart and liver are the first and most logical things to eat, as long as they are fresh and not overcooked. They are rich in minerals and can be sliced and fried or cooked on an open fire very easily with a stick.

TIP – Overcooking is easily done with offal, so keep a close eye on it whilst frying!

The tenderloin would be the next option for me, then it would depend on the age and type of deer whether the loin could or would be used, normally aged.

Cooking or Frying a loin until rare done-ness is another way of making it pleasant to eat without aging.

Aging other cuts of the hind leg are often necessary to make it enjoyable and break down the toughness.

Edible Parts of a Deer in Detail

Now I will look at the deer areas and meat sections of the venison/deer.

  • Loin (Backsteak)
  • Tenderloin
  • Hind Quarter (Back Leg)
  • Forequarter (Front Leg)
  • Neck Cuts
  • Offal & Organs
  • Ribs

For each of these above categories, I will go into detail based on what I know and what I have used to make food or wish to try in the near future.

If you dry age or wet age different subprime cuts of the front or back legs, you can ‘technically’ get more fast frying or cooking cuts.

Loin (Backsteak)

Options for Venison Loin

  • Steak Cuts
  • Salt Cured and Hot Smoked
  • Dry Cured (Lonza, Lonzino, braesola but with venison)
  • Italian Style Biltong Dried (or Cold Smoked)

Lean meat from the area adjacent to the spine.

Depending on the species of the deer, this could be short or long. The diameter may vary somewhat as well. The cut goes from in front of the back leg muscles, right up until the upper neck.

In a fine dining restaurant I was associated with in Scotland, the head chef showed me the technique they used for aged cuts, submerge in extra virgin olive oil with fresh rosemary sprigs and juniper. It was left in the fridge and cooked when needed.

Because the oil protected the meat from oxidation, it was able to be kept for up to 2 weeks and cooked when needed.

Traditional most harvesters and hunters of meat will use this cut for steak. However, it can be used for many salted then possibly cold or hot smoked recipes.

Venison Loin Recipe Links

  • Venison Loin with Red Peppers
  • Venison Steak Diane

If you need some tips on wet aging steak cuts of venison in your fridge – here is an article I wrote on how.

Tenderloin

Options for Tenderloin Venison

  • Fast frying – oil, salt, pepper
  • BBQing – direct heat and hot
  • Roasting

Very soft meat from a deer, some love it. Some find it lacks flavor, it’s one of the cuts that could be used straight after harvesting to some extent I’ve found. I treat it very similar to the loin, in terms of cooking.

Personally, I like to add some spices and flavor, such as juniper berries, rosemary, pepper, or other hard green herbs.

This a fast fry cut, soft and cooked fast. The muscle isn’t used a lot by the animal, so it tends to have soft intramuscular aspect to it.

Really very similar to the loin or back steak in some ways, maybe some folks can taste the difference.

I do eat sugar and saturated fat, however, they are often used as shortcuts to flavor, in my opinion, I see many recipes where bacon is wrapped around or criss-crossed lean meats. Sure this works, however, cooking rare is my personal preference to taste quality meat instead.

Tenderloin Recipe Links:

  • Venison Tenderloin in Blueberry Sauce
  • Roasted Tenderloin

Hind Quarter (Back Leg)

  • Rump
  • Top Side
  • Bottom Round
  • Eye of Round
  • Sirloin Tip
  • Tri-Tip
  • Shank
  • Hind Leg Bone

Here is a very informative article on deboning a hind leg of venison I found online.

Rump, Top Side, Bottom Round, Eye of Round, Sirloin Tip, Tri-Tip
  • Roast
  • Indirect Hot Smoked
  • Aged and Sliced for Steak
  • Wet Pickled/Brined and Pastrami Style (Acidic Brine)
  • Cube or Mince Meat
  • Dry Curing any of these Cuts
  • Jerky or Biltong

Either slow or fast cooking can be done with many of these venison hind leg muscles.

Once you have removed the sinew binding between the different muscle groups, there are so many options!

Venison Pastrami has been amazing! I have used a simple portable smoker, as well as a pellet grill smoker for this.

Hot Smoking Indirect, otherwise known as Low and Slow Smoking coined the Modern term, developed from German and Czech-Slovakia early American immigrants. Basically, heat on one side and passing or surrounding meat at temperatures of approximately 200-250°F (with either charcoal/wood or pure offset wood chunks)

I love to make slow cooker stews or many different types of masala-based curry with venison also.

Any venison makes great mince/ground meat. I even did a blind tasting with a bolognese I made with beef mince and venison mince. Since my partner was reluctant to eat venison I harvested when I met her.

Guess what?

She could not taste the difference! Although, I know that based on the time of the year, diet, and species of deer there are a milder or more intense game meats.

The easiest ways to age the rump meat is, ideally hanging the entire hind leg in a chiller or fridge environment for 7-12 days.

Often I don’t have the use of a chiller fridge.

Here is an article I wrote on wet aging venison meat, or another simple technique is to vacpac the cuts, for 1-3 weeks in your fridge (although I don’t like the single-use plastic aspect of this, there are environmentally friendly vacpac bags available).

Summary of Aging Venison

We take the subprime cuts like sirloin, rump, and loin (back steak or backstrap), place them on a non-reactive grill to create distance, then onto a baking tray. It then is wrapped with cling film / cling wrap (which again I am not fond of). The goal here is to have it aging in the normal kitchen fridge.

However, not sitting in the blood or juices that comes off the meat is what ‘spoils’ meat quickly. From what I have learned, the temperature being barely above freezing will also mean the unwanted bacteria growth will be minimal.

Unwanted bacteria on meat is exponential as the temperature increases. This is why from harvesting venison through to any type of cooking or dry curing/salami making. Keeping the temperature as cold as possible is very important.

7-10 days with this method, which we have been using for many years.

Another method that uses too much plastic in my opinion, is vac packing this fast cooking cuts for 2-3 weeks in the back of the kitchen fridge. You can also marinate at the same time using this method as well.

I have also been reviewing a dry aging and dry curing cabinet fridge from the USA. Here is a link to the article I wrote on it, this could be use for dry aging venison.

Main Hind Leg Recipes

  • Venison Roast
  • Simple Slow Cooker Venison Recipe
  • My Biltong and Jerky Article
  • Whole Venison Leg Roast Recipe
Shank

One of the toughest parts of the deer, long slow cooking in liquid is the key here.

Definitely slow cooking in liquid is needed for this tough area which is lean and has a lot of connective tissue, the collagen-rich aspects will create a wonderful broth with a few herbs, spices, and vegetables.

It is also one of my favorite parts of the deer!

Hind Leg Bone

Ideal for stock, or a wonderful treat for a dog. On the farm, we would freeze bones, and give the dog a treat every now and then. A frozen bone will give a dog a longer level of enjoyment!

Forequarter (Front Leg)

  • Shoulder
  • Chuck
  • Shank

Options for Forequarter Meat

  • Minced Meat
  • Cubed Meat
  • Deboned, Wet Brined, and Smoked/Cooked
  • Dry Cured

Most of the time when we are processing the front leg of the deer, it’s extra labor and takes time to remove a lot of the sinew. If you are hunting the venison, often you have to work around the hole from the bullet (or arrow/bolt).

There is a fair amount of meat, but it takes that extra time to get the tough sinew off from a wild animal.

Once trimmed of sinew, blood clotting, etc, the meat is often in the diced or minced pile. I will highlight below some of my favorite recipes around this.

I haven’t aged any front leg muscles, but I am sure with patience you could get a tender fast cooking chunk or muscle. Generally, I have always cubed or minced the meat from the front leg.

Shank of Forequarter

Same as Hind/Back Leg, slow cooking in liquid is best! The bone can be utilised in the same way, I’ve read that as humans we weren’t really hunter/gathers so much as scavengers who would brake bones for the marrow, tens of thousands of years ago!

Front Leg Recipe List & Links

Any red meat cubed or minced recipe could be used for this meat. It would literally be 10,000s of recipes, just use google.

Same as Hind Leg in some ways, expect more sinew, however.

Neck Cuts

Options for Neck Cuts

You need a bone saw to work through the bone/meat section of the neck, there is meat but of course a lot of bone and connective tissue. This is definitely long slow cooking, again ideally in liquid in my option.

Venison Neck Recipes

  • Osso Bucco (shank or neck could be used)
  • Neck Braised
  • Pressure Cooker

Flank

Options for Venison Flank

  • Tenderized and Crumbed (Schnitzel)

A thin cut of meat, often I am not focused on.

Has potential, if you are willing to take the time to extract and trim the flank properly.

Here is a guy on u tube way more interested in flank than me.

Organs and Offal

  • Heart
  • Liver

Options for Heart and Liver

  • Fast frying, Sauteed
  • Terrine or set in aspic (using collagen to gelatine to create a jelly structure)
  • Crumbed and deep fried
  • Liver Pate

Sliced and Fast frying is my favorite method since these are the best fresh and soon after harvesting.

It’s often forgotten about, the offal carries so many minerals and vitamins. The issue is, if it is a wild animal, often there is a penetrating, expanded bullet going through this region.

Now let’s move on to the ground or minced venison in more detail with some more ideas.

What To Do With Ground Venison

  • Fresh Sausage
  • Hot Smoked Salami
  • Dry Cured Salami
  • Minced Jerky
  • Cottage Pie
  • Burger Patties
  • Tartar (raw option, Hungarian Style)

Minced meat is a beneficial thing, however when you have minced pork, beef, or other farmed animals of the red meat type. For any sausage or salami, you have to use a minimum of 20% pork fat (because it’s neutral in flavor), I focus on 28-30% pork fat for nearly all my fresh sausage links and salami.

It can be embedded with fat generally speaking, red meat like venison from the wild isn’t. The farmed venison I’ve come across has a minimal amount of fat, apart from the odd animal.

Fat from some certain deer in America, I’ve heard doesn’t taste too nice. I’ve never experienced that though in New Zealand where I hunt.

Pork fat is the neutral flavored fat that is used generally speaking, for sausage, salami, or even burger patties.

Venison meat is lean, but I’ve found cooking with it, basically it is the same as cooking with beef mince, unless you overcook it to the point of complete dryness or if you have cooked it would some kind of liquid to keep the cooking environment wet.

My favorite uses for minced venison is to use it for, sausages, salami, lasagne, cottage pie and many other dishes/recipes.

In some ways minced and cubed venison meat is the most versatile for cooking or making smallgoods like sausages or salami. I often cube the meat and freeze it if I am going to make dry cured salami.

Minced Venison Meat Recipes

  • Venison Salami Recipes
  • Venison Sausage Recipes
  • Minced Jerky Recipe
  • Basic Pemmican (Fat, Dried Fruit, Meat)
  • Venison Patties Recipe

Biltong

For venison, many different cuts can be used for this basic type of cured and dried product. Unlike jerky, this meat-based snack is preserved, whilst also having a lot of flavor!

I am a big fan of Biltong made from venison, I often used many of the subprime cuts in the hind leg.

I am using salt and often malt vinegar to ‘cure’ the meat, using the salt to inhibit the unwanted bacteria that spoils it. The other preserving ingredient is vinegar, I have used red wine or malt vinegar mainly. Vinegar creates a more acidic environment which the unwanted spoiling bacteria don’t like very much.

The vinegar also has the same effect as cooking, called ‘denaturing’ the proteins. I can’t explain the exact science. It definitely works though!

Here is something I wrote about biltong.

Pickling and Preserving Venison Meat

Canning or preserving venison cubes in a jar are other ways of preserving the meat without refrigeration.

I haven’t tried these methods yet, but have been reading and researching them. Here is some detailed information about it.

You have 2 options, either pressured sterilization with a pressure cooker.

For pressure cooking, there is hot or raw packing, here is an article with a lot more info on this.

Sous Vide

The key to sous vide is all about cooking in a water bath at a precise temperature with little variation. Also, often it’s placed into a vac-packed sealed bag to seal in all the flavor.

I’ve eaten sous vide venison, and you can truly get the precise rare vs cooked aspect you desire. Although, it’s in a way a lot more work, and often using single-use plastic vac seal bags, which I try to avoid.

I have found reusable sous vide bags, they do last for multiple cooks.

Difference Between Wild Deer and Farmed Deer

Most wild deer I have come across are lean, I have heard of deer across USA and Europe that have fat. From my experience fat is more likely with farmed deer, it can also add flavor. I think it goes back to the saying, it is what it eats.

Some of the finest deer I have eaten have been wild animals, with access from the forest onto fertile grass farmland. Which creates more fat development for the red or fallow deer, and the fat was very mild.

HATCH MAGAZINE

0

Once the heat of summer arrives and mayfly hatches wind down, some anglers believe dry fly fishing opportunities largely disappear. While heavy hatches and water boiling with rising trout may indeed be a memory until next spring, opportunities to find fish feeding near the surface still abound. As temperatures rise, terrestrial activity increases, and it is well known that terrestrials—ants, beetles, crickets, inchworms, and more—offer excellent dry fly opportunities. But taking proper advantage of terrestrial season means covering all your bases, both above and below the water.

Get Them Wet

As noted, it is no secret that terrestrials can offer anglers superb dry fly fishing. What is less known is that terrestrials also offer some of the best subsurface opportunities of the season. Terrestrials are land dwelling insects, which makes them poorly suited for aquatic environments. Although terrestrials can and sometimes do stay afloat when they unintentionally fall into the water, they often become submerged. When a popular food source becomes submerged, the chances that a trout will decide to eat it increase. This is partially because these insects are helpless once they slip below the water’s surface, but also because trout, like most fish, are far more secure feeding when subsurface.

For fly anglers this means carrying—and fishing—both dry and sunken terrestrial patterns. In fact, even though most of what you’ll read or hear about terrestrial fishing focuses on the surface, I feel some of the best opportunities are found deeper in the water column.

Often, the best time to fish submerged terrestrials is when dry fly opportunities are present. At these times, choosing whether to fish a dry or sunken terrestrial pattern can mean deciding whether to catch a fish or two on the surface, or considerably more fish below. While I admit there are times when I prefer the excitement of surface action even if it’s intermittent, equally as often I prefer the more consistent action typical of fishing sunken terrestrials below the surface.

Heat

The hotter the weather (if water temperatures are within ethical limits to target trout) the better the terrestrial fishing will be. Warmer and drier weather not only generates terrestrial activity, it also appears to draw them closer to the streamside, where lush vegetation is in greater supply.

Wind

Warm days with strong winds are also a good time to fish terrestrials, as these winds displace these insects into nearby streams. If you’ve honed your ability to cast in windy conditions, you may also find you’ll have this wind-created “hatch” of beetles, ants, grasshoppers and more all to yourself, as foul weather keeps many anglers at home. Although most terrestrials that have been displaced by the wind will be found closer to the stream bank, your patterns are likely to produce strikes both near and far from the bank. This is especially true on smaller to medium sized streams, where the distance from drifting from bank to mid-stream is smaller than on larger streams and rivers.

Rain

A sudden rain event is another great opportunity for fishing terrestrials. I learned this quickly while fishing in northern Portugal during the 2006 World Fly Fishing Championships. Jorge Pisco, our team’s guide, mentioned that the region we were fishing was subject to afternoon thunderstorms. He then recommended we use larger ant patterns (sunken or floating) immediately after any rainstorm. The river we were fishing had dense vegetation with wide leaves full of ants. When the rain came, it created a slip-and-slide effect, flushing many of the ants into the water. Jorge’s advice turned out to be spot on for that Portugese mountain stream, and I’ve used that same approach with great success any time after a rainstorm appears during a warm day.

B-E Aggressive

Another common sense tip is to be aggressive when casting near brush, vegetation, and other overhanging obstacles. Trout not only use these objects for protection but also as a supply chain of food. And when trout are nestled deep with the comforts of prime lie—an area offering both food and shelter—rarely do they move far for food. This is where you need to present the fly within the trout’s strike zone. A basic rule of thumb is to assume you’re not fishing correctly if you’re not occasionally hanging your fly in the brush and vegetation. Don’t be afraid to lose a fly. Be aggressive.

Two Birds, One Stone

One of my favorite approaches with terrestrial fishing is “killing two birds with one stone,” with a dry-dropper approach. Often, I’ll use a hi-vis foam ant as the dry fly and attach a wet ant off the bend. When fishing shallow riffle water, I’ll use an unweighted ant. If I need to fish deeper, I’ll attach a perdigon-style wet ant. But keep in mind you don’t need to bounce bottom with drowned terrestrials, so my dropper length typically ranges between 1 and 2 feet. Most commonly, I’ll employ this dry-dropper approach when fishing deeper water, where fish are more likely to feed below the surface. When fishing shallow banks with overhanging trees, I usually stick to using a single dry fly.

Think Local

Lastly, pay close attention to what terrestrials are active in the areas you fish. For example, starting around the middle of June, a small green inchworm begins to appear on my home waters. This small, chartreuse worm must be a trout delicacy, as I’ve seen large, seasoned fish move good distances for a fallen inchworm. A small chartreuse foam cylinder tied on a long curved shank hook does a great job imitating a floating worm, while a green weenie works great as a sunken pattern. Any active terrestrials within your area can be imitated with both a floating and sunken pattern, so my advice is to be ready to fish at and below the surface during this summer season.

Precision of cementum annuli method for aging male white-tailed deer

0

Introduction

Estimating the age structure of a population is a key component of many wildlife management programs, as demographic parameters (e.g., survival and fecundity) that can be important to population modeling are typically age-specific [1-3]. Furthermore, age-specific prevalence rates of highly-transmissible diseases (e.g., chronic wasting disease) have been of recent concern [4,5]. The age structure of harvested animals is typically used to reconstruct a population’s age structure, especially in cervid populations [6,7]. Inaccurate estimates of a population’s age structure could lead to potential downstream impacts on demographic and epidemiological models [7,8].

The most common method used to estimate age of white-tailed deer (Odocoileus virginianus) and other cervids is the tooth replacement-and-wear (TRW) criterion. Severinghaus [9] developed the TRW aging criterion for white-tailed deer based on unique teeth eruptions at younger ages and the wear and degradation of the same premolars and molars of the lower jaw at older ages. Aging deer using the TRW method is popular among management agencies because it can be conducted quickly in the field at relatively little cost [10]. Previous studies have shown the TRW method is prone to considerable error because it is partially subjective, especially at older age classes [10-14]. Error in the TRW method at older ages has led to recommendations to implement TRW aging categories for adult white-tailed deer that bin older age classes together: either suggesting the binning of all deer ≥2 years of age together [10,11,14-16] or differentiating deer 2 years of age from deer ≥3 years of age [12,13,17], with both points-of-view suggesting an independent age class for deer 1 year of age (yearlings), since a unique tooth eruption pattern can often identify the age class [9].

A more labor-intensive and expensive, but more accurate, option for aging deer is cementum annuli (CA) aging, which involves the counting of annual rings, the CA, in the roots of cross-sectioned incisors. Seasonal rates of cementum deposition in the root tips that coincide with body growth produce alternating light and dark bands, with the dark bands representing the CA [18,19]. The CA method has been established as a more accurate method than TRW through the comparison of known-age individuals, especially at northern latitudes [11,13,20]. While CA is more accurate than TRW, with the exception of a sample of 97 known-aged deer in Wisconsin that were aged 100% accurately by the CA method [15], error has been documented with CA aging in relation to known-age individuals with error rates ranging from 15-28% in northern latitudes [11,13,20]. While assessing error rates of CA age estimates in comparison to known-age individuals is the only method to identify the accuracy of CA aging for certain, obtaining known-age individuals is difficult outside of captive facilities and capture-recapture studies. In response to the challenges of obtaining actual accuracy rates of CA aging, evaluating the precision between the CA age estimates of multiple incisors from the same deer is an option for samples from wild populations of unknown ages because if factors known to affect CA accuracy can also be shown to be related to the precision of CA aging, the measurement of precision can provide insight related to accuracy of the CA method [10]. Few studies, however, have evaluated the precision of CA ages in white-tailed deer [10,11,21]. While Roseberry [11] and Storm et al. [10] extracted paired incisors from individual deer after harvest, DeYoung [21] extracted separate incisors one or two years apart from live deer. Precision of CA age estimates has also been examined in other cervids such as mule deer (Odocoileus hemionus; [22]) and moose (Alces alces; [23]). Storm et al. [10] and Asmus and Weckerly [22] examined factors influencing the precision of paired CA ages. Factors included the sex of the individual, precipitation during the individual’s life, the level of certainty assigned to the CA age estimates, as well as the age of the CA age estimates [10,22].

Managers must make decisions on how best to use limited resources when deciding on what methodology to use to age deer. Additional information is needed to help resolve whether, excluding fawns, two (yearling, ≥2 years of age) or three (yearling, 2 years of age, ≥3 years of age) age categories should be used if managers decide to rely on TRW for aging. While the accuracy of CA aging has been thoroughly investigated, further evaluation of factors affecting the precision of CA aging is warranted to provide guidance to managers on what factors they must consider when evaluating CA aging data. To that end, the first objective of this study was to evaluate the precision of the CA aging method of paired incisors from wild male white-tailed deer in Iowa. We hypothesized that precision would decrease as the age of the CA age estimate increased, the level of certainty of the estimate decreased, and that precision would be dependent upon the batches in which the teeth were aged, an a posteriori consideration after viewing the CA data. Our second objective was to evaluate factors influencing the level of certainty assigned to CA age estimates. We hypothesized that the level of certainty in the age estimates would decrease with age and be influenced by the batch in which the age estimates were aged. Our third objective was to assess congruence between the age estimates from the CA and TRW methods specifically when deer aged using TRW were aged exclusively as yearling, 2 years of age, or ≥3 years of age. We hypothesized that congruence between the two aging methods would be greatest within the yearling age class and lower for both of the older age classes because the TRW criteria within the yearling age class relies on the presence or absence of a tooth while older ages are determined by a subjective assessment of tooth wear.

This High-Fence Bull Elk Could Break an SCI World Record. It Scores More Than 648 Inches

0

A freakishly huge bull elk that was killed on a high-fence ranch in southeastern Idaho could potentially set a new world record in Safari Club International’s Record Book. Brian Dhooghe harvested the bull from Broadmouth Canyon Ranch, and he brought the meat from the animal into Bay City Sausage in Aberdeen, Washington, to be processed last week.

The local game processor shared photos of the massive bull’s rack on Facebook, where they’ve generated upwards of a thousand comments. The majority of those comments are negative, as many took the opportunity to criticize the idea of shooting elk on a game preserve.

Outdoor Life, the Boone & Crockett Club, Pope & Young Club, National Deer Association, and other hunting organizations do not believe that taking animals behind a high fence qualifies as traditional fair chase. But still, high-fence hunts are a multi-million dollar business in the U.S., and simply turning a blind eye, or leaving negative comments on a Facebook post, won’t change that. So, it’s worth taking a closer look at these types of hunts—or shoots—and some of the animals they produce.

Some commenters on the Facebook post questioned if the animal was even real, and a few claimed the pictures were Photoshopped. But according to Kyle Strode, who works at Bay City Sausage and saw the rack in person, it’s real, alright.

“Yeah, it was pretty wild. I took a picture of the rack,” Strode tells Outdoor Life, adding that he knew Dhooghe from processing some of his other animals over the years. “Brian has been bringing stuff in forever. So, yeah. It’s a legit animal.”

Outdoor Life was also able to catch up with Dhooghe, who shared the story behind the giant bull.

“What the hell is that thing?”

Brian Dhooghe never claimed his bull was wild or that he killed it “way out in the boon-toolies.” He says he didn’t travel to Idaho just to shoot a record-sized bull that he could brag about. His trip to Broadmouth Canyon Ranch was a 50th birthday present from his wife. The trip was initially booked in 2020, and after a two-year pandemic delay, Dhooghe went out to the ranch last Monday.

He says he had originally paid to shoot a 500-inch bull (for context, the Boone & Crockett Club world-record nontypical elk, known as the famous Spider Bull, scored 478 5/8 inches), but then the head guide made him a deal he couldn’t pass up. The guide mentioned a record-class bull they had walking around the 10,000-acre ranch. He told Dhooghe if they could find it, he could shoot that elk in addition to a mid-500’s bull, and he threw out a price that Dhooghe was willing to pay.

In most high-fence operations, the client chooses which species and size of animal they would like to shoot and then is charged accordingly. For example, Bull Basin, a high-fence operation in Colorado charges $15,900 for a 381- to 399-class bull. Most of these operations guarantee success.

“They had told us this potential record was walking around, but I wanted a nice, big, sexy-looking bull to mount on the wall. And this thing is definitely not that,” Dhooghe says. “He’s ugly. I mean he’s awesome, but kind of freaky lookin’. It looks like something prehistoric, like, what the hell is that thing?”

dhooghe bull 2
Brian Dhooghe’s bull was given a green score of 648 and 4/8. Brian Dhooghe

Dhooghe shot his first bull (which scored 571 inches) during one of his first mornings on the ranch. The next day, he joined a group of four other folks for an afternoon elk drive, where the shooters lined up at the end of a patch of timber and the guides walked through the trees pushing the animals out. The others were looking for 300- to 400-class bulls, so when they saw the record-sized bull step out, there was no question as to who would take the shot.

“We’re all sitting there when up comes this thing,” Dhooghe says. “We saw him close to 400 yards, so I put him in my scope and the damn thing didn’t even fit in there!”

Dhooghe shouldered his .300 Weatherby and waited for the bull to reach 150 yards. With the bull quartering to him, he aimed in front of its shoulder and fired. The hand-loaded, 180-grain Nolser Accubond bullet took out the bull’s heart, and after trotting about 15 feet, the massive animal cartwheeled over and died.

A High-Fence World Record?

Two of the guides at Broadmouth Canyon Ranch are certified as scorers by SCI. Dhooghe says that when they put a tape to the bull’s rack, they conservatively scored it at 648 and 4/8 inches.

Unlike Boone and Crockett and the Pope and Young Club, which don’t allow animals harvested on high-fence ranches into their record books, SCI recognizes these trophies as potential records. The organization simply categorizes them as “estate animals.”

Read Next: The Biggest Nontypical Whitetails of All Time

Dhooghe still has to wait until the mandatory 60-day drying period is up. At that point, he plans to bring the rack to an SCI-certifed master scorer in Washington State. If the master scorer concurs with the original green score, the rack will then be judged by a panel of five or six master scorers, who would make the ultimate call as to whether Dhooghe’s bull replaces SCI’s current world record for the biggest bull ever killed with a rifle.

To clarify, bigger bulls have been killed at Broadmouth Canyon Ranch. This September, a hunter named Brian Bailey shot an elk there with a pistol that scored 689 and 6/8 inches, according to the ranch’s Facebook page.

Outdoor Life reached out to SCI, but their Record Book Committee was unwilling to comment on Dhooghe’s bull until they see it officially. SCI’s Online Record Book has two separate books for non-typical Rocky Mountain Elk—one for elk harvested on high-fence ranches and the other for free-range animals. Looking at the high-fence record book, the biggest bull killed with a rifle was harvested from Bull Basin Ranch in Gunnison, Colorado, in 2020. It scored 648 and 2/8. The high-fence record book also includes two larger bulls: a 649-and-2/8-inch bull taken with a crossbow from a ranch in Utah, and a 671-inch bull killed with a muzzleloader from an undisclosed location in Saskatchewan.

High-Fence Controversy and Ethics

The overwhelming number of negative reactions to Bay City’s original Facebook post are proof that a lot of people (hunters included) have strong opinions about high-fence hunting. Many hunters bristle at the notion of killing an animal inside a fenced enclosure—no matter how large the enclosure may be. They make a distinction between “hunting” and “shooting”, saying that high-fence operations violate the most basic fair chase principles and create unnaturally large specimens that are more akin to livestock than wild animals. To many hunters, these outsized antlers and breeding programs designed to grow the largest racks possible degrade the importance of truly wild animals which earn every inch they grow and season they survive.

Plus, high-fence whitetail operations are under extra scrutiny these days as they’ve been connected to the spread of Chronic Wasting Disease.

dhooghe bull 3
The fact that the bull was killed on a high-fence ranch has led to criticism from a number of hunters. Brian Dhooghe

“Bought bull, high fence pet,” one commenter wrote. “Basically an animal raised like a beef cow that rich dudes pay to shoot. Would be no different or challenging than running down to your local dairy and shooting a Holstein cow with its head in a feed trough.”

It’s important to note that Dhooghe never violated any laws and never did anything to bring this heat upon himself. He didn’t brag about the elk or lie about where it was shot (the way some high-fence hunters have with trophy animals). In fact, Dhooghe isn’t even on social media. If it wasn’t for Bay City’s post, hardly anyone would know about the bull he harvested in Idaho.

“I don’t have Facebook, but my wife does,” he says. “I was looking at some of those comments and I had to quit looking because all it did was piss me off. All these people on there…can’t you just be happy for a guy to kill an animal like that?”

Dhooghe admits that he understands all the controversy around what SCI calls “estate animals.” At the same time, though, he says that regardless of what most people think, not all high-fence operations are created equal.

Read Next: Our Favorite Cartridges and Rifles for Hunting Elk

“I think there are places out there that give this kind of hunt a bad name. Where they keep them in a pen and you basically go out and pick one, so they can kick it across the field and you shoot it,” he says. “This place isn’t like that at all. They bring these elk in and then they turn them loose on 10,000 acres. My bull had been on that ranch for four years. He’s not a tame elk like everyone wants to think he is.”

No matter how much the hunting community decries high-fence hunting, there are clients willing to fork over tens of thousands of dollars in return for a guaranteed opportunity at trophy-class animals that they won’t get otherwise. And, there are plenty who say these hunting estates have their place. The North American Elk Breeders Association lists several reasons for why game preserves exist, including the opportunities they provide for physically challenged hunters, and the incentive they give landowners to turn a profit while maintaining large, undeveloped open spaces as wildlife habitat.

“I just can’t let it bother me, and it really doesn’t,” Dhooghe says about the vitriol over his giant bull. “I think I was 12 years old when I started hunting, and I never dreamed I would shoot an animal like that, or even have the opportunity to. I’m ecstatic about it.”

How To Be A Better Night Hunter – Simple Guide To Follow

0

Hunting is an exciting sport that some people enjoy doing. It’s a sport that gives you an adrenaline rush.

Night hunting can be even more exciting because of the activity levels of animals. You are more likely to be successful when hunting at night.

However, night hunting can also be challenging. You need to hunt in poor visibility conditions that could make it hard to detect animals and identify their whereabouts.

Here is a simple guide if you are wondering how to be a better night hunter.

How To Be A Better Night Hunter – Simple Guide To Follow

Follow this guide to ensure that you become a successful night hunter. Night hunting indeed comes with many challenges. However, when done correctly, night hunting can be a rewarding experience.

Remember to follow the below tips to ensure you get the best night hunting experience.

Speak With Other Experienced Hunters

Experience can always help you see things from a different angle. It’s the same with hunting. Those with a lot of experience in night hunting will be able to give you an insight into this whole subject.

Experienced hunters will also have unique stories of their hunting trips in the past. Their encounters will teach you a few lessons on hunting successfully at night.

They will give you tips and advice which you will not be able to learn otherwise. You can join them on their hunting adventures and learn the techniques and a few tricks they use to become successful.

Equip Yourself With The Right Gear

Night hunting is ideal for stalking your prey in the dark and getting close enough for a clean shot. However, none of this is possible if you don’t have the right hunting gear.

Here are some of the essential hunting gear that you should have.

The right ammunition

As much as you need a good air rifle for hunting, you must also use the correct ammunition. For instance, you might need to use a heavy bullet that will penetrate through the animal’s hide, especially when hunting deer.

On the other hand, a lighter bullet will be sufficient if you’re hunting animals like rabbits and squirrels.

A good light source

Will help you see the path ahead. However, it could also alert the prey of your presence.

Therefore, you need to use a light source suitable for night hunting. Examples are red-dot sight or night vision sights – more on this later. These lights give you good vision at night without giving away your position.

Other hunting gear

Here is a list of hunting equipment you should carry at night.

  • Weapon – Rifle or crossbow with ammunition or arrows
  • Quiver
  • Knife
  • Rangefinder
  • Flashlights or night vision lights
  • Food and water
  • First aid kit
  • Night vision binoculars
  • Camera

Find A Suitable Location And Have Patience

At night, it’s difficult to see your prey. Therefore, you need to find a suitable location with a good view of the open terrain. A clear and broad view will be advantageous in your search for prey.

Even after finding a good spot, getting your first prey could take a long time. That is why hunters need to have patience.

Another critical fact to note is to know when to go hunting. There are times when large numbers of animals roam around, while at other times, there are fewer. So, it’s vital to plan your hunting trip at a time when there are a lot of animals out there.

Use The Correct Lighting

Lighting plays a vital role in night hunting. You can’t use just about any light source available. For best results, you need to use the correct lighting, apt for night hunting. Animals are very swift runners; you can easily miss the game due to insufficient lighting. 

Many hunters make the mistake of using white light due to its sharpness. However, white light is inappropriate for hunting as it scares away the game, including foxes, bobcats, and coyotes. Therefore, these animals won’t come close enough for you to get a good shot.

The recommendation is to use red light, which softens the bright light and reflects a soft glow that illuminates the animal’s eyes. Target the light a little above the animal’s head so it won’t run away.

Use Night Vision

There are several night vision scopes in the market if you can afford them for your hunting trip. These include night vision scopes, riflescopes, or thermal imaging devices.

 These are devices that are specifically designed for night hunting. These devices make things clear and bright in low-light conditions.

However, these devices are costly, so many hunters avoid buying them. However, if you are a frequent night-hunter, you should consider investing in these devices.

The thermal scope is ideal to use if you are chasing the game. The thermal heat mapping in these devices increases your visibility.

The rifle scope is perfect when the hunter and prey are both static. It needs only a tiny amount of light to increase the visibility of the game.

The night vision scope gives you a large field of view and is tough to withstand heavy recoil. 

Hunting Call

Hunting calls are an excellent way to attract prey. It is a method that has been in use for thousands of years. In hunting calls, hunters mimic the sound of other animals to call the game.

It is an excellent technique for hunting at night due to limited visibility and concealed prey. Traditional methods use mouth calls that professionals used at the time.

However, now you also get digital call devices that are useful in this regard too. 

The right call will bring the game closer. So, as soon as it is in sight, all you need to do is to aim and shoot.

Dress Appropriately

Dressing appropriately is crucial for successful night hunting. You need to wear dark clothing that will blend with your surroundings.

You could also wear camouflage face paint to conceal your identity even more. It will keep you from being noticed by animals, thereby not signaling your presence.

Ensure you wear comfortable clothes and shoes, so you don’t make a noise while stalking prey.

Use Scent-Free Products

Animals are extremely sensitive to smells, more so than humans. It is their way of detecting predators. Therefore, you must ensure not to hide your position while hunting at night.

You can use scent-free soap to remove all traces of human scent in your body. You can also use scent-free detergent to reduce odor when washing your clothes.

Another product is a scent-free deodorant that you can apply to your underarms to reduce your scent further.

Final Thoughts

Hunting at night is an excellent way to catch prey, as it is when you’re most likely to see them. Becoming a better hunter at night is not challenging if you follow this simple guide.

Make sure you are well-equipped with gear specifically meant for use when hunting at night. Using the correct equipment with the right tactics will help you be successful in your night-hunting trips.

Frequently Asked Questions

Is It Better To Hunt At Night?

It’s better to hunt at night as it is when you’re most likely to see animals and get most of your kills. Many hunters recommend nighttime as the best time to hunt specific prey, including deer.

Why Do Hunters Use Red Lights At Night?

Red lights are suitable for hunting at night as they provide better eyeshine, which helps locate animals better than other colors.

Do Deer Move in the Rain?

0

For the past couple of decades, I’ve held the belief that deer move more in the rain. Not heavy rain, mind you, but light to moderate precipitation. I can count the number of times I’ve sat in a treestand or ground blind, had little deer movement, and then they came out of the woodworks as the rain started falling from the sky.

I killed my biggest buck ever in the rain, which I self-filmed for Realtree’s Monster Bucks.

I sat through a steady rain shower, and as it began to subside, deer poured out of the bedding area in front of me. First, a couple of nice 2-year-olds. Then a yearling buck. Then the giant velvet 8-pointer. Even more bucks, does, and fawns walked out afterward. They all fed out in the clover in front of me, all while it misted rain. Eventually, I got a shot opportunity and made it count.

That wasn’t the only incident I’ve seen or shot deer during or just after a rain event. It’s happened numerous times.

That said, I think rain is more likely to get deer on their feet on warmer days, especially during the early season. Generally, rain cools you down, which gives deer reprieve from the heat, effectively getting them up on their feet.

I think rain showers that occur mid- to late-afternoon have even more power to get deer up and moving. When conditions align with crepuscular (dawn and dusk) movement, I believe it increases deer activity, even more than crepuscular movements without additional triggers.

But I’m not a biologist, and my experiences aren’t peer-reviewed research studies. So, let’s look at some deer science.

Deer move in the rain, right?

What’s Does Research Show about Deer Movement in the Rain?

Several colleges with teams dedicated to whitetail biology and behavior have attempted to address this question. While general whitetail behavior isn’t the focus of most wildlife agencies and DNRs (they focus on resource management), even some of them have studied the impact of rain on whitetail movement.

said Levi Jaster, a big game program coordinator for the Kansas Department of Wildlife and Parks.

Moriah Boggess, a deer biologist with the Indiana DNR, initially expressed similar input.

Some Research Shows More Deer Movement in Light to Moderate Rainfall

Interestingly, some biologists and experts have discovered data or had experiences that suggest deer do, in fact, move more, if only slightly, during light to moderate rainfall. Both Boggess and Jaster have mixed feelings on the subject.

This doe doesn’t seem to mind the rain.

Boggess says that other researchers have found light rain can increase deer movement, but heavy rain can decrease it. Still, he says there is no consistent effect of rain across all the whitetail’s range. That’s a reasonable conclusion, though, mainly since whitetails inhabit a very diverse range of climates and habitats.

Despite the inconclusive research studies, Boggess’ own experiences suggest deer do move more during light rain.

Even Jaster relays that there might be something to it.

The scientific results on record are still inconclusive. The conclusion on whether or not deer move in the rain is likely somewhere in-between. Fortunately, you can test this theory on your own.

The author watched this buck feed in the rain for nearly 30 minutes before getting a shot at it.

Some Pros and Cons of Hunting in the Rain

Rain can impact other aspects of deer hunting, too. General deer movement isn’t the only factor. Understanding how it limits hunters and how hunters can leverage it is important to know.

For example, most people believe that light rain and moisture increase the effectiveness of a deer’s nose. Boggess says,

Other negatives apply, too. Jaster says,

Don’t forget the positive aspects, though. It also helps to wash away scent, so there might be both positives and negatives.

The most significant advantage to rain might be quiet walking, though.

Boggess notes that rain softens twigs and leaves, which offers perfect stalking conditions. On rainy days, perhaps slowly still hunt and scout your way through deer habitat. Jaster says rain and wind likely make it more challenging to see hunters’ movements, too. So, that’s good.

Overall, it’s still not completely understood whether or not deer move more in the rain.

Josh Honeycutt poses with the big deer he shot while it was raining.

But I think deer tend to move more during light rainfall, especially during the early season when temperatures are warmer and when the rain event occurs in the early morning or late afternoon. Perhaps only the deer I hunt like their salad with dressing, but I doubt that’s true.

No matter what, the more deer data you can start accumulating, especially from the deer you hunt, the better. You might discover some exciting things about the specific deer you hunt.

Barracuda | The Best Cast Net for the Money?

0

Barracuda Cast Net Brand Buy Barracuda Cast Net

The answer is simple. If you’re looking to buy a new cast net and you want the best, then Barracuda is your brand. You’ll find them for sale in the best pro tackle and bait shops, and you’ll also find them being used daily by the pros. Full time charter captains spend every morning cast net fishing for the day’s bait. Why do these professional guides throw Barracuda cast nets? The quality of the craftsmanship they know is going to last and the performance they get from a perfectly balanced net. You won’t save much money on a cheap net from Walmart, Amazon or Ebay. Especially when you have to replace it so often and it only opens half the time. When it really comes down to it, and you need a cast net that’s going to pop open, sink fast and catch that precious bait for the day. The pro’s choice is Barracuda. If you’re a beginner and just starting out, you might as well buy what the professional anglers are using.

The Best Cast Net Size: This depends on whether you’re just starting out, or have been throwing for a while. If you’ve never thrown one before, then an 8 foot net is the place to start. Smaller nets like 6 feet are good for throwing out of kayaks or if you’re wade fishing. Below are some throwing instructions for 8, 10 and 12 footers. The size of the net is measured in how tall it is when held up or the radius when open. Thus an 8 foot net will cover 16 feet of water when opened. After you’re consistently getting the 8 footer to open, then it’s time to step it up if you want to catch more bait per throw. Most anglers go to a 10 footer next. This is where most seasoned net throwers are most comfortable. 12 foot nets are typically found on professional vessels. These guys have been doing it a while and probably throw it every day if they pack a 12 footer.

Cast Net Size vs Skill Level:

  • 8′ = Beginners
  • 10′ = Experienced Throwers
  • 12′ = Professionals

The Best Mesh Size: Now that you’ve chosen the right size net for your level of throwing experience, you’ll need to figure out your proper mesh size. This primarily depends on two factors; the depth you plan to cast in, and the size of the bait. Luckily these two tend to go hand in hand.

For shallow water applications of 3 feet or less, you’ll want to go with a 1/4 mesh. This is for targeting shrimp and small minnows, usually off the beach. The smaller the mesh size, the slower it will sink. If you throw a 1/4 mesh in 6 feet of water it will sink to the bottom too slowly and your bait will swim out from under it.

When casting in 3 to 6 feet of water, a 3/8 inch mesh is the size for you. This is the most popular mesh size on the Boca Coast because we target White Bait, Green Backs, Pilchards, Herring, Scaled Sardines, Pin Fish, etc. The 3/8″ mesh works the best here because it sinks fast, it can be used in deeper water and it also works well in shallow water.

In the winter time, the bait tends to be in deeper water. When casting into 6 to 15 feet of water, you’ll want to throw a 1/2 inch mesh. This is where the size of the bait vs mesh can become an issue. If the bait is too small for your 1/2″ mesh, you’ll end up with what’s known as a Christmas tree. This is when your mesh is too big and the bait gets gilled or caught up in the mesh. You can pick them out one by one or scrape them off with your bait well net, but it’s unlikely that any will survive. This is when you’ll want to chum them up to the surface so you can deploy your 3/8″.

If you’re catching very large bait near a bridge or structure, then you may be casting in 8 to 20 feet of water. A 5/8 inch mesh will get the net down to the bottom quickly, but you may also have issues with gilling bait at times. It depends on your target species. This may also call for chumming them up into the water column in order to cast a smaller meshed net.

If you’re targeting large bait like Mullet, then 1 inch mesh is appropriate because it will sink very fast and the bait is big enough that you won’t have concern about it getting gilled up in mesh of the net.

Mesh Size VS Bait & Depth:

  • 1/4″ = Minnows & Shrimp: 3′ Deep or Less
  • 3/8″ = White Bait & Pin Fish: 3′ to 6′ Deep
  • 1/2″ = Large White Bait & Ballyhoo: 6′ to 15′ Deep
  • 5/8″ = Very Large Bait Fish: 8′ to 20′ Deep
  • 1″ = Mullet: 4′ to 20′ Deep

Cast Net Throwing Instructions For Beginners

How To Throw An 8 to 10 Foot Cast Net: There are several methods of throwing a cast net. When you’re a beginner and first starting out, the 8 foot net is the easiest to throw. Throwing a 10 footer is very similar and you can throw both with this method. Best part is you don’t use your teeth or put a wet net on your shoulder! This is the dry method and our personal favorite!

How To Throw A 12 Foot Cast Net: When you’re ready to join the “One & Done” club with the pros, here’s Captain Blair Wiggins from TV’s Addictive Fishing showing his technique for tossing the big nets.

Where & How To Chum: Depending on the time of year and water temperature, you may be anywhere from the beach to a flat or even a bridge looking for bait. Visit our page about Chum and learn all about the techniques and locations for finding bait and chumming it up to the surface for cast netting.

Why Barracuda: The build quality, materials, design and performance are the best. Ask anyone who has experience with other nets and you’ll probably hear how the Barracuda nets POP open. Other nets sound like a band-aid being pulled apart and you can hear the difference in sound when you’re out on a flat pre-dawn. That’s because they use a large 3.25”, 4 section, custom built horn (at the top). The larger horn allows the braille lines to travel through it faster with less resistance. The sections keep the braille lines from getting tangled in the net which solves a common and annoying issue with the cheap ones. Their mesh is a proprietary monofilament that exclusive to Barracuda. It has exceptional strength, durability and flexibility. Most importantly; it has a faster sink rate. For example; their Pro nets weighing in at 1.4 lb per foot, actually sink faster than other brand’s nets with 1.5 lb per foot. They’re constructed of a 6-panel mesh which allows for a better spread and opening. And Finally; round leads sink fast, retain bait because they don’t plane and also reduce snags.

Also be sure to register your new net on their website, because they come with a Limited Lifetime Warranty! That’s right, if your Barracuda gets ripped, torn or destroyed, you can turn it in for a new one at 50% off MSRP. No other manufacturer offers that and you just can’t beat it!

Conclusion: Read the reviews, talk to charter captains and go check out the cast nets at your local bait & tackle store. Hold a Barracuda in your hands and compare it to any other brand. Notice how soft and limp the Barracudas are. That’s the one you want. You’ll soon learn Barracuda is the first choice in cast nets and why they’re official cast nets of the Boca Coast. If you’re in the market to buy a new cast net for catching bait, then hopefully this page has helped you figure out what brand and size to buy. Most of our pro anglers and guides throw a 3/8″ mesh net in shallow water during the majority of the year. A 1/4″ is good for a couple months in summer when the baits get small. Many also have a 1/2 inch mesh in their arsenal for winter and deep water netting. Learning how to throw the net and chum up the bait will improve your catch rate tremendously. The Boca Coast is the Inshore Fishing Capital of the World and the white bait (pilchards) is the go to bait for lunker snook, redfish and tarpon. Ask any professional angler and they’ll tell you that nothing beats live bait if you want to catch fish. Getting out there and catching your own bait is both rewarding and fun. It adds another aspect of fishing to your day that you’ll certainly enjoy and soon learn improves your angling experience. Tight Lines & Full Nets friends!

What to Do with Old Fishing Rods: Recycling Ideas to Consider

0

What to Do with Old Fishing RodsLike with any hobby, shopping for gear can be just as fun and exciting as the activity itself.

This is why lots of people end up with multiple tools, especially if their hobby benefits from upgrading and replacing their old stuff.

This is the case for anglers and fishing enthusiasts, so many also wonder what to do with old fishing rods.

If you’re one of these folks who want to declutter and get rid of your old fishing gear without tossing them to the bin, you’re in luck.

We have just rounded up 5 ways to recycle these stuff, so make sure to read on.

What to Do with Old Fishing Rods

1. Turn them into decor.

If you have old fishing gear on hand, it would be highly likely that you’ll thoroughly enjoy the activity and you wouldn’t mind if others knew about your hobby.

If you’re thinking of introducing some elements of this hobby into your interiors, then you easily use your old fishing rods as decor.

Some mount their vintage rods as is to add some rustic vibe to their space.

Others use them as an accent to wall hangings to add more personality and humor to their decor.

If you’re quite creative, you can also come up with your own way of displaying them around your home.

2. Re-use them for gardening.

If your old rods are still in great shape, you can easily repurpose them around the house. Most folks use them as gardening stakes as their flexibility comes in handy for such an outdoor use.

3. Re-use them as shelter rods.

Spinning and fishing rods on an old tableAnother way to repurpose old fishing rods is by turning them into shelter rods.

So if you like to set up your own little shelter when you spend some time outdoors, you don’t have to purchase rods that are specifically made for such purposes anymore.

4. Use for spare parts.

In case you’re the handy type and you would want to have a go at tweaking and tuning the mechanisms of your fishing gear, it would be ideal to hold on to your old fishing rods and reels. This way, you’ll have on hand spare parts for your projects.

Even faulty old rods can still find a lease on new life through this method, so it can be worth a shot.

The only downside is that you might end up hoarding old gear instead of decluttering your collection.

5. Donate them.

Last but definitely not least is donation. There are several organizations that accept old fishing rods, even the ones that don’t work anymore, so they can hand them down to folks who need them but can’t afford them.

These groups often work with the youth, so if you want to inspire younger generations to enjoy this beautiful sport, you should take this option into consideration.

Conclusion

There are lots of great reasons why you should find out what to do with old fishing rods.

Not only will this help you cut down the waste you create through your hobby but it will also let you help others as well.

Top 10 Panfish Ice Lures of All Time

0
Top 10 Panfish Ice Lures of All Time

History can’t be revised, retold, or rewritten. It is what it is. And the reality is that many of the greatest ice fishing lures—particularly those for panfish—were invented by John Butwinski of Little Atom. But it’s important to understand that the evolution of modern ice lures for panfish, and the basis for many of today’s fundamental designs, goes back to the 1950s. I fear the “rest of the story” has never been adequately told.

Most panfish specialists have fished the Little Atom Nuggie, Wedgee, and Noodle— some of the first micro-sized ice plastics. What few know, however, is that Butwinski designed many classic designs—Shmoe Spoon, Rat Finkie, Atom Ant, Purist, and Rembrandt. Most of these have been mimicked once Little Atom’s original patents expired, Butwinski having passed away in 1982. Rick and Don DeBaere purchased Little Atom in 1984 and unveiled some original ice fishing plastics in 1989, including the Tease Tail, based on drawings sketched by Butwinski in the 1960s.

Little Atom designs such as the Duppie, Skimpie, and Wedgee caught fire in the 1990s, quickly becoming go-to lures in early ice competitions. Rick DaBaere released the Nuggie in 2004, which Phil Morse tipped on a Fiskas jig to win the North American Ice Fishing Circuit (NAIFC) Championship. The Fiskas/Nuggie pairing became a tournament phenom, accounting for at least six NAIFC Championships. In terms of prominent, productive, important ice plastics, I rank it number one of all time.

Little Atom Rat Finkie: Almost every veteran ice angler has fished this masterpiece jig, yet few know the Rat Finkie was invented in 1964 by Butwinski, founder of Little Atom Lure Company. The original Finkie launched the trend toward horizontal-hanging ice jigs, the focus of countless designs to come. The objective remains to present the jig in a nearly parallel posture, positioning the hook at the optimal hook-set angle.

Little Atom Panfish Ice Lure

The Rat Finkie has been a confidence jig for me, triggering bites day after day, season after season. Other Finkie assets: Fine-wire hook, soft tubular body, and the fact you can tip it with a single larva or softbait to create the illusion of a tiny bite of food, natural in appearance and texture.

Five rows in my 30-year old Scientific Anglers box are crammed with Finkies, most solid white-glow, glow-pink, or solid purple. The white glow pattern with a single waxworm or half a Little Atom Wedgee has probably put more sunfish on the ice for me than any other three lures combined. The #12 and #14 sizes are tops for finessing big bluegills, while larger ones are awesome crappie jigs, tipped with a tiny minnow, jumbo waxie, or color-matched Wedgee or Ice Mite plastic.

Lindy Ice Worm: An extension of the horizontal jig concept, the tri-segmented Lindy Ice Worm (previously called the Genz Worm), was created by the master himself. Dave Genz intended it as a lure to reach deep perch faster, though it works in many situations. Two key features give it a rapid, nearly horizontal drop: An oversized head segment and an eyelet positioned further down the hook shank. Snug the knot tight to create a 90-degree angle between line and hook shank. Then tip it with a mass of eurolarvae to get the Ice Worm rocking as you jig it. A Berkley PowerBait Ice Whipworm also creates a segmented worm effect, an awesome big perch combo.

Lindy Ice Worm Ice Lure

Fished over soft-bottom zones, this combo is killer for fish feeding on bloodworms. Genz advocated a slow, vertical climb, emulating the ascending actions of midge larvae as they vacate their benthic habitat. Drop the jig to the bottom and slowly inch it upward, using little rod tip quivers to make the jig dance as it rises, before dropping it back into the substrate.

Of note for this season is the introduction of a tungsten Lindy Ice Worm, along with tungsten renditions of their Toad, Bug, and Fat Boy.

Little Atom Shmoe: Created by Butwinski in 1959, the Shmoe Spoon remains deadly for most veteran crappie anglers, though often under other names. The Shmoe’s magic stems from its two-tone colorations—glow head, contrasting body—as well as its light-wire hook. Tip it with a small minnow, with the hook lightly piercing the skin parallel to the dorsal fin, point toward the head.

Little Atom Shmoe Ice Lure

This combo has been so effective for crappies, perch, and walleyes that it could appear beside the definition of deadstick. The original thin gold hook remains an indispensable detail, pairing beautifully with tiny minnows. It’s light enough to keep baits alive and kicking, and can be bent repeatedly without breaking. I open the hook gap slightly, so it’s barely offset, and it hooks and holds crappies and walleyes better.

The Shmoe’s so productive fished in place with a lively minnow that it’s not necessary to jig it. But when you see fish eyeballing it on sonar or a camera, a fluid sweep of the rod, followed by a slow fluttering pause, usually closes the deal.

Fiskas Wolfram Epoxy Jig: Unlike the bass segment of the sport in which casual anglers follow tournament results like box scores, most ice fishers pay little attention to competitive events. That’s unfortunate when you consider some of the biggest breakthroughs—such as tungsten jigs and plastics—first gained fame in circuits such as the ‘Trap Attacks and NAIFC.

Fiskas Wolfram Epoxy Ice Lure

Anglers such as Mike McNett, Tony Boshold, and Phil and Jeff Morse have won so many NAIFC events with Fiskas Wolfram (tungsten) jigs that it’s surprising the tungsten trend took so long to go mainstream. Jamie Olson, owner of yourbobbersdown.com—primary North American distributor of Sweden-based Fiskas jigs—says more tournament money has been won with a 4-mm Fiskas E Series jig, white with glow red bead, than any other single ice lure. He ought to know, having sold thousands of them to tournament anglers out of his van during in the early tourney days.

A Fiskas Wolfram jig, coupled with a Little Atom Wedgee or Nuggie, is the archetypal tungsten-plastic pairing and Fiskas remains my all-time favorite. Hooks are fine-wire, durable, and sticky sharp. The paint doesn’t chip and their red and purple jigs with glow beads on the hook shank remain favorites. You can tie them with a loop knot to add jig action and pivot, but I’ve become a fan of the snell knot tied around the base of the head, which serves like a barb for holding softbaits in place.

Fiskas N24 Balance Ice Lure

Fiskas N24 Balance: It’s amazing that anglers continue to overlook this incredible bluegill jig, especially considering it’s in the same category as the classic Rapala Jigging Rap. Fiskas offers 29 varieties of “balance” lures, and the N24 “Gill Getter” is maybe the most remarkable. With a single hook on either side of the jig’s head, sunfish and other reluctant biters can’t bite it without getting stung.

Past NAIFC champion Phil Morse is a balance lure fanatic, tipping one hook on the Gill Getter with a Micro Nuggie. “No matter how or where ‘gills bite this jig, they can’t avoid one of the tiny hooks,” he says. “It glides beautifully after you twitch it and returns to a perfect horizontal posture at rest.” It’s tiny, just 1/50-ounce with two #18 hooks. But amid tough bites, it’s hard to beat.

Akara Disco Ball Ice Lure

Akara Disco Ball: We’ve often written in In-Fisherman about the value of through-head style tungsten jigs for fishing thread-thin lines for small fish. If you ask top ice anglers from Latvia, Russia, and North America to agree on one elite ice jig, it would almost certainly resemble a gold Akara Tungsten Mormishka Disco Ball.

Through-head jigs require the angler to tie a snell knot, passing the line through the jig’s head, and wrapping it around the hook shank. The advantage is a knot that doesn’t require repositioning or retying nearly as frequently as other designs, and a jig that hangs at the same near-horizontal posture. The knot also serves as a barb or keeper to secure softbaits.

What separates gold disco ball heads from plain or painted heads is the reflective properties of the multi-faceted metallic surface. When you look at this jig on an Aqua-Vu camera, you can’t miss the sparkle its faceted surface creates. Gold can be an exceptional hue for bluegills and crappies. I spent most of the 2015 season fishing this jig for sunfish and never regretted it. And it’s a confidence jig for some of the best panfish anglers I know.

Jeff

Jeff’s Jigs Tungsten Zoo Bug: A departure from about every other jig you’ve fished, the Zoo Bug is an exceptional Daphnia mimic, the only one I know of. In 2013, master fly and jig tier Jeff Wenger and I began discussing the possibility of producing a super-realistic zooplankton imitation. Wenger blew me away with the Zoo Bug, a beautiful transparent-bodied jig-fly with anatomically correct antennae and an internal tungsten bead. Unique to the Zoo Bug is its semisoft epoxy exterior, weighted body, and remarkable underwater action, mimicking the real thing in a supersized rendition.

It’s garnered a considerable following, particularly among younger tournament anglers and guides, prompting Wenger to quit his “real job” and become a full-time tier. He sells loads of these jigs, staying busy year-round.

Give it short darting actions with a Thorne Bros Quiverstick Stealth or other fast-tip ice rod, imitating the bug-like stop-and-go motions of live Daphnia—one of the primary wintertime foods of crappies and sunfish. Tip it with a single waxworm, a trio of eurolarvae, or a plastic tail, such as a J & S Plastics Ice Mite Jr., or fish it plain.

With the success the Zoo Bug, Wenger also offers Tungsten Copepods, Scuds, and a sweet shrimp imitation. Don’t go to Devils Lake without a stash of his Tungsten Shrimp, a favorite producer of big crustacean-munching perch.

Northland Tackle Forage Minnow Spoon Ice Lure

Northland Tackle Forage Minnow Spoon: Probably the lure responsible for more big perch than any other in my box, a 1/32- or 1/16-ounce Forage Minnow Spoon is an amazing lure. With a bent shape in a small package, its thin silhouette is suggestive of food.

Given the spoon’s lifelike qualities, you can’t fish it wrong by imparting tiny twitches or raising it by slowly elevating your rod tip or reeling. Try to get perch and crappies to chase the lure up in the water column until they can’t resist striking. That failing, quickly flutter the spoon back to bottom and start over again.

Tip each tine of the red treble hook with multiple maggots or a small minnow head. I’ve also had success with a Northland Impulse Perch Eye. Choose a tipping that’s heavy enough to make the hook pivot and dance with the slightest movement of the lure.

Salmo Chubby Darter: The original “ice crankbait,” the Salmo Chubby Darter is another one with a cool story, created by In-Fisherman digital editor Jeff Simpson. He carved prototypes for what would become the Salmo Chubby Darter over 15 years ago. “I grew up fishing South Dakota’s prairie lakes, which lack structure or edges,” Simpson says. “The fish there are nomads; you have to move and drill constantly to stay on the bite. The idea behind the Chubby Darter was to create a lure that would call fish to me.

Salmo Chubby Darter Ice Lure

“I carved the first ones from balsa, then weighted them with enough lead to sink. That first day, my friend Paul Schamber laid on the ice and watched the action. Within seconds of jigging the first Chubby Darter, walleyes and perch were surrounding and striking it. Everywhere we drilled a hole and dropped the bait, fish seemed to swarm it. Salmo in Poland didn’t stray from my original prototypes, other than to add sweet paint jobs and build the lures from foam instead of wood.

Simpson says the Darter was the first of its kind, with an action similar to a crankbait, vibrating and darting on the upstroke, wobbling on the fall. It’s may be the best ice lure for triggering jumbo crappies, perch, and walleyes I’ve fished, depending on what size you select among 4 options from 11â’„3- to 21â’„2 inches.

Rapala Jigging Rap: The W2 and W3 Jigging Rap is, like several others on this list, a timeless, hall of famer that always catches fish. Over deep flats or along drop-offs, the Rap remains an efficient, alluring option, particularly for big perch and crappies. For years, we talked about tipping the treble hook with maggots or a minnow head. Today, we know this is generally unnecessary. Keep it twitching and dancing as you jig it in the water column, daring fish to chase and commit. Pause frequently.

Rapala Jiggin Rap Ice Lure

Fished with one of the micro braided lines (I like 3-pound test Sufix Nanobraid) and an 18-inch leader of 4-pound fluorocarbon, a W2 Jigging Rap also is an overlooked bluegill bait, selecting for big fish. One overlooked presentation involves holding the Rap still, just above fish level, and occasionally quivering it nervously.

*In-Fisherman Field Editor Cory Schmidt, Brainerd, Minnesota, is an avid ice angler and industry insider.

Best Air Rifle Deals

Popular Posts

Master Small Game Hunting with an Air Rifle: Tips and Techniques

0
"Experience the thrill of small game hunting with an air rifle! Embark on a captivating journey as you test your accuracy and precision in...

What can you kill with a 177 air rifle?

0
"Unleash Your Precision: Discover the Power of a .177 Air Rifle to Take Down Targets with Accuracy. Explore the Versatility and Potential of this...

How Do Break Barrel Air Rifles Work?

0
A break barrel air rifle is a type of airgun where the barrel breaks open at a hinge point just above the breech. This...