Home Blog Page 34

Salt R8 v. Asquith v. Sector v. NRX+ | Selecting a saltwater fly rod

0

A detailed review and performance comparison of Sage Salt R8, Scott Sector, G.Loomis Asquith and NRX+ fly rods

Saltwater Rods Cropped 2Saltwater fly rod review model-by-model comparison

This much-anticipated and perhaps overdue head-to-head review was spurred by the introduction of the Sage Salt R8. We compare saltwater rods every day in conversations with customers, but with the Salt R8 introduction, we felt the time was right to put these four series under the microscope. Each represents the leading edge of unique rod design legacies and all will be among the very best available to global saltwater anglers for many years to come.

As of this writing, these are the rods that drive the debate. We recommend and sell plenty of Winston Air Salt and Sage Igniters, as well as the underrated Winston Alpha+, but all of those are fundamentally unique and less often compared directly with the Salt R8, Sector, Asquith and NRX+. Every Igniter is stiffer, or “faster,” than any rod in this review. Every Winston, whether an Air Salt or Alpha+, is less stiff, or “slower” than any of these rods. One and all fine fly rods, they represent the extremes of preference and purpose and are thus excluded from this comparison.

Our goal in this article is to differentiate similar models to help anglers choose the rod best aligned with their fishing preferences and casting style. We cast each rod group side-by-side with two fly lines to distinguish the nuances of casting range, feel, line speed, accuracy, power and presentation. Occasionally we landed on a universal favorite, a rod we all preferred regardless of line choice. More broadly, however, the range of our observations and preferences likely reflects the diversity of our customers. All of these rods will catch fish, but each has distinct character, so choose a rod that quickens your heartrate when you reach for it!

Alternative configurations: Scott Sector 8’4″ and 2-piece models are fantastic fly rods. If your rod will live on a boat, strongly consider one of the 8’10” 2-piece Sectors. The convenience of a 2-piece rod is undeniable for the local angler. Scott’s 8’4″ Sectors fly way under the radar, too, and while not described in this article, we implore anglers to consider one on merit of lightness, casting ease and accuracy. Unfairly categorized as “boat rods,” we find the 8’4″ Sectors to be lethal fishing tools and a pleasure to cast whether on foot or afloat. Some misconceive that a shorter rod is somehow weaker. They are actually stronger fish fighters because the lever between hand and fish is shorter.

At the end of the day, most anglers prefer a 9′ 4-piece saltwater fly rod. In our opinion, the Asquith, Salt R8, Sector and NRX+ are the most compelling choices. So, let’s get on with it. Which one will make your heart race?

This article was written by John Duncan with input on every rod model from Fly Shop Manager Parker Thompson and Richard Post, our Buyer and all-around fly fishing assassin.
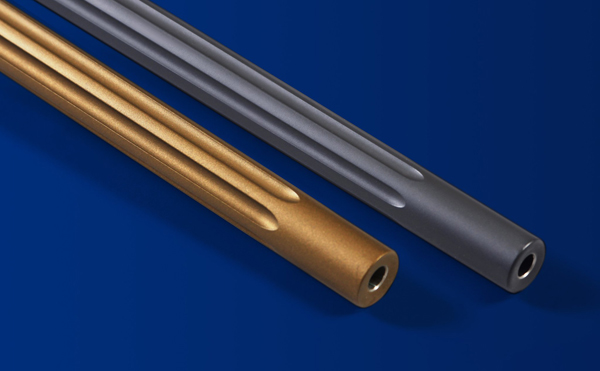
Sage Salt R8

Introduced in January 2024, the Salt R8 brought Sage’s saltwater fly rods back to the everyday angler. They are a joy to fish: light, explosive, intuitive and accurate. Components are second to none. The grips are smallest in class, a gracefully contoured full Wells that lacks nothing for purchase or leverage but seems to fit the hand of every angler just a little better. The Salt R8 are legacy defining rods, taking us back to the day when Sage was the first and last word in saltwater fly rod design.

Defining characteristics: lightness, easy power, high line speed and great loops with popular saltwater lines

G.Loomis Asquith

GLoomis Logo, SmallYears after its introduction (2016), the Loomis Asquith continues to astound anglers who have never cast one. While no rod will be considered “perfect,” rod designer Steve Rajeff clearly achieved or surpassed his ideals with the basic action of these fly rods. Some consider the grips to be chunky and unrefined; others find the components underwhelming, but none argue that Asquith rod blanks stand alone in flex and recovery characteristics, using more of the rod with greater resilience to generate the highest line speed of any fly rod.

Defining characteristics: elite power, lively feel throughout the blank, line speed at all distances, ability to fish any fly line

Scott Sector

Apart from the G Series, there is no fly rod that exemplifies the Scott design ethos more than the Sector. It is obvious to those within the industry that Rod Designer Jim Bartschi moves slowly and purposefully. He is one of those guys who doesn’t speak often, but when he does, everyone listens. When introducing a new fly rod, his goal is for it to stand at the top for a decade, or possibly longer. The Sector, introduced in 2019, is a marvel of design and performance. Some say it has “ideal saltwater action.” An incredibly broad range of anglers love these rods. Countless Telluride Angler customers have purchased multiple rods in the series after fishing their first. As casters and rod reviewers, we notice that Sectors cast the most popular fly lines better than other rods, including flats classics such as the SA and Rio Bonefish tapers.

Defining characteristics: perfectly tuned to their line weights, progressive action, sensational range

G.Loomis NRX+

GLoomis Logo, SmallDescendant of the rods that made G.Loomis famous (GLX, NRX), NRX+ saltwater rods are trusted worldwide for their dependable performance, familiarity to the angler and indisputable power. Like lounging in a favorite armchair, many anglers get comfortable with an NRX+ and never want to leave. They are not the lightest rods in class, nor constructed with jewel box components, but the NRX+ are built to last and built to cast, as we rediscovered in several highly competitive line weights. (Intro 2019)

Defining characteristics: power and stability in challenging conditions, familiarity, durability

Model-by-Model Comparisons

Salt R8 690-4 v. Sector 906-4

A subtle difference in action delineates these fine fly rods. The Sector is a tad stiffer in the butt and mid-section, resulting in a more “classic saltwater action,” in the words of Richard Post. It has more “gas,” and possesses a higher gear. You can lean on this rod, haul it aggressively, fish it with a variety of lines including specialized trout streamer and bass lines, which tend to fold lesser fly rods. The Salt R8 feels a little more “finessey,” in Parker’s appraisal, more oriented toward small flies and probably a better crossover rod for trout, except in the heavy streamer category. Both rods handle a Rio Elite Bonefish and Rio Flats Pro, but the Sector with a Rio Bonefish throws the tightest loops for presenting size #6 and #8 flies on the flats. Both offer plenty of feedback, but the Sage Salt R8 has more “touch,” a possible benefit in the trout arena.

Asquith 790-4 v. Sector 907-4 v. Salt R8 790-4 v. NRX+ 790-4

Only the 12-weight category possesses rods more diverse in character. The Asquith 790-4 defines its series. Light and springy beyond compare, this superhero fly rod would be the preference of any angler, except the grip is the same as on the tarpon rods in the series. It’s thick. If you don’t mind a hefty grip, this rod is among the most spectacular saltwater fly rods you will ever fish. Otherwise, keep reading. The Sage Salt R8 has the lightest, most airy feel of the group. You can’t stomp on the butt section like the Asquith, NRX+ or Sector, so choose this rod for smaller flies and classic flats applications. This would be the ultimate Christmas Island or Belize bonefish rod, but lacks the bottom end of the others. The Sector 907-4 is the opposite. As Rich describes, “it wants you to cast off the butt.” The Sector 907-4 is ideal for someone with a relaxed casting stroke, or for fresh/salt crossover with large flies. It is probably the best bass bug rod under comparison, for example, while still a lovely rod for bones or redfish. If you fish a heavy-headed redfish line, the Sector 907-4 is your rod. The NRX+ falls into the “workmanlike” category, “old school,” according to Parker Thompson, “stiff from tip to butt.” “You have to stay on it,” according to Rich. We all agreed that the NRX+ 790-4 needs the head weight of a Flats Pro line to bring it to life, which is telling. It tolerates a strong double haul and outright needs one with an SA or Rio Bonefish taper. This rod is a popular choice among freshwater anglers who use super aggressive streamer lines for transporting articulated streamers, Zonkers, pike and bass flies.

Asq890doublecropped

Sector 908-4 v. Salt R8 890-4 v. Asquith 890-4 v. NRX+ 890-4

This contentious group of fly rods could start a barfight, probably has. It earned our recognition for “muddiest category,” a cohort of 8-weights that proudly demonstrates the state of the art. If you own an 8-weight and it’s not one of these, you’re missing something.

The Asquith offers the greatest possible line speed without bumping to the next line weight. It toes the line, however, because with a standard bonefish taper, the ASQ 890-4 requires a strong double haul for greatest distance and pretty loops. It responds to power better than any comparable rod, but also requires precision input from the caster. We cast it with a Rio Bonefish Taper and Rio Flats Pro, the latter of which brought it to life in the hands of every caster, including Duncan, who sometimes appears asleep at the wheel. By comparison, the Sector is more finely tuned to its line weight and purpose. The Asquith has more top end potential, but nothing casts a Rio Elite Bonefish as intuitively as the Sector 908-4. If Rio were to describe the way this line is intended to present a fly, the preferred rod would be the Sector. Ranginess and loop control are unequalled with the Sector, a remarkable fly rod that seems born for bonefish. The Sector doesn’t like the Rio Flats Pro, so it may not perform as well as the Asquith with a Rio Outbound or other shooting-style line, but for true-to-line-weight fly lines, it’s a truly refined rod.

So here comes the Salt R8 890-4, one of our favorite rods in that series. It feels stiffer than the Sector but less than the Asquith. Whereas the Sector and Asquith both flex progressively (evenly, based on the amount of line in the air), the Salt R8 has a distinct sweet spot high on the blank. It’s a prototypical “tip casting rod,” but unlike its genetic forerunners, it’s an easy rod to cast. With a Rio or SA Bonefish Taper, a moderate double haul produces explosive line speed and the tightest loops you can imagine. In the end, it casts and fishes much like the Sector, just 5% stiffer. It feels even lighter than the Sector, but the caster needs to be a little more “on it,” as Rich would say. The Sector is better short and extra-long, but the Salt R8 is magic in the fishy 40’-60’ zone.

We cast the NRX+ 890-4 last in this group and it made us go back to the beginning and re-cast the other three rods. This is the best rod in the NRX+ series. While not as light and playful as the others, it is perhaps the most stable and “automatic” of them all. I had mis-pegged this rod as one that required overlining, or overpowering in the cast. Not so. It’s stiff enough to be better with a Flats Pro than with a regular Rio or SA Bonefish taper (the Rio Flats Pro is extra-heavy in the head), but casts all of these with some of the nicest loops you’ll ever see come out of a fly rod and with the greatest stability and accuracy of any rod under comparison. It’s not light or sweet in the tip, but the casting capabilities of this rod are undeniable. It is the best “large fly” rod in the group, too, so pike/musky/striper anglers take note. This is the night train.

Sector 909-4 v. Asquith 990-4 v. Salt R8 990-4 v. NRX+ 990-4

Since 9-weights are the new 10-weights for permit, we cast the rods in this category with a Rio Elite Permit and Rio Flats Pro, both of which require a rod with torsional stability and plus power to deliver a wind-resistant fly. Since we didn’t compare these rods with a Rio or SA Bonefish line, we feel compelled to observe that the Scott Sector 909-4, paired with a Bonefish taper, is perhaps the single finest 9-weight saltwater fly rod we’ve ever cast, without variance in our opinions.

9-weights are such versatile rods, the preferred line weight for countless species and one that crosses over from bones and reds to permit, stripers, roosterfish, baby tarpon and golden dorado. The Sector 909-4 throws a Rio Elite Permit as well as any fly rod. It picks up a very long line for easy second shots, critical in permit fishing. True to the series, this progressive action rod lacks the raw butt section strength of the Asquith or Sage Igniter, so there could be better rods for casting heavy shooting heads over the surf from steep beaches, but for flats applications, it’s the rod to beat. The Loomis Asquith is the stiffest rod in class, fishing like a 9 ½ weight, but offers the greatest line speed with adequate input from the caster. It also handles the heaviest specialty lines, such as the Rio Outbound, better than any of the others. The Rio Elite Permit underlines the rods slightly, but a firm haul loads and delivers spectacular loops and line speed. Choose the Sector for a combination of bonefish and permit. Choose the Asquith for permit and striped bass, if you fish bass from the beach.

The Salt R8 is built for comfort rather than speed. Ideal for all day casting, we recommend this rod with heavy lines, including the Rio Flats Pro, for repetition casting. It’s an excellent boat striper rod, for example, and also an excellent jungle rod, where you might cast all day for a golden dorado or two.

The NRX+ 990-4 casts like a Cadillac in overdrive. It is the heaviest rod in hand, but impressive at distance and in complete control with any fly line. Loop shape is outstanding with a Rio Permit line, but it has plenty of bottom end for the Rio Flats Pro, Outbound Short or SA Titan Taper lines.

Tarponcropped

Asquith 1090-4 v. NRX+ 1090-4 v. Salt R8 1090-4 v. Sector 9010-4

Parker sums it up well by observing that both Loomis rods have a “big game feel,” fishing at the top of their line class, leaning into tarpon territory. They have very stiff butt sections that feel like they were designed independently from the rest of the rod for the exclusive purpose of fighting heavy fish. This creates a slight feel of disconnection between the hand and fly line, but the power of these two rods is undeniable.

We cast all four rods with a Rio Elite Permit line and a Flats Pro. The Asquith was the best rod with the Flats Pro, but we noticed that line speed and presentation were better on all rods with the Elite Permit taper. The Asquith is the best rod for 2nd shots as the lower rod’s stiffness rips line off the water with authority, but this rod loses its trademark “springy” feel beyond 70’ on the cast. It is outstanding for aggressive beach fishing for heavy striper and roosterfish applications, where the caster is inherently overpowering the rod and needs to hold the line extra high to clear the surf. The NRX+ has a stiff butt, soft mid-section and stiff tip. It feels “hinged,” always wanting to cast from the middle of the rod, automatic in the 40-60’ range but not as light or playful as the Sage or Scott. Both Loomis rods emphasize power over presentation.

The Scott and Sage are both better permit fishing rods, and better all-day casters for false albacore, striped bass, etc. The Sector is the easiest casting but least powerful rod in the group. Being a 10-weight, it has plenty of power for permit and will be an excellent choice for less experienced casters and those who simply don’t possess a powerful casting stroke. The Salt R8 requires more input from the caster, but generates higher line speed and handles both the Permit taper and Flats Pro line with authority, whereas the Flats Pro is too heavy on the Sector. The Salt R8 feels lightest of the group and casts tight loops in the greatest range. It’s a powerful, nimble rod that best embodies the 10-weight saltwater class.

Sector 9011-4 v. Asquith 1190-4 v. Salt R8 1190-4 v. NRX+ 1190-4

The Sector is outstanding with both the Rio Flats Pro and Rio Elite Tarpon line, loading just the right amount on each swing for shots at any distance. It has the greatest range of any rod in this group, from shortest to longest. Butt section power is spectacular without making the rod heavy or clunky. This is a marvel of progressive-fast rod design. The Asquith 11-wt fishes like an 11 ½-wt. It is probably the best fish-fighter in the group, the best 11-weight for Boca Grande and other places where 100lbs+ tarpon are common. It has the most butt section resilience for second shots, but the rod feels underlined when starting a cast fly-in-hand. For many anglers, it would take a few extra swings to generate line speed. This is a great rod for guys who hammer their cast. The NRX+ is actually springier than the Asquith, especially with the heavy-headed Rio Flats Pro. It is one of the most progressive rods in the NRX+ series, reminiscent of the 8-weight, casting well in a really wide range, but it’s also the heaviest rod in this group. The Salt R8 requires a long, strong stroke. It’s bouncy on short casts, but accuracy and line speed come when you dig into the butt section. You can’t tip-cast this rod, nor stab it into the wind, but it casts a variety of lines quite well at distance. Of all the rods in this series, the Salt R8 1190-4 will draw the most mixed reviews. Cast it before you buy it.

Saltr8doublecropped

Sector 9012-4 v. Asquith 1290-4 v. Salt R8 1290-4 FG v. NRX+ 1290-4

The Sector 9012-4 is unique from the other 12-weights. In our hands, it’s underpowered for this line class, easy to load but hard to cast with power and command. The butt section is certainly stiff enough to fight large tarpon, but the angler should choose this rod only if seeking the slowest action tarpon rod available. Consider fishing it with an 11-weight line.

The Asquith, on the other hand, provides the most casting and fish fighting power while somehow also being the lightest rod in class. The only caveat is that the caster needs to throw with power and confidence. That’s the inherent nature of 12-weight fishing, of course, but the Asquith 1290-4 is a rod that asks for power and delivers power. It is, quite simply, a mind-blowing fly rod. The NRX+ isn’t far behind, surprisingly springy and intuitive with a heavy-headed line, like the Flats Pro. It’s notably heavier than the Asquith or Salt R8, but throws well at distance.

The Salt R8 1290-4 is a surprising favorite in this group. While not quite as powerful as the Loomis rods, it provides an excellent balance of castability and command. Light for a 12-weight, it has greater stability than the Sector #12 or the Salt R8 1190-4. We were surprised at how well it handled both the Rio Elite Tarpon and Rio Flats Pro, the latter of which felt heavy and clunky on many rods that we cast on this day. Range and feel are excellent and the rod has enough stiffness in the butt to pick up line for second shots, always critical in tarpon fishing.

Telluride Angler guide Paul Xanders with a Sector-caught permit.

[Fly Rods Page] [Scott Sector Page] [Sage Salt R8 Page] [G.Loomis Asquith Page] [G.Loomis NRX+ Page]

What does it really mean to “tune” your bow?

0

What does it really mean to tune a bow

I hear it often this time of year, “I need to get my bow tuned up” or “I’m having trouble getting my bow to tune.” Generally speaking, tuning a bow might seem mysterious or at least something that can only be done by your local pro shop. While your local pro shop is a great resource to get your bow tuned, tuning a bow is something that every bowhunter should at least understand and, in many cases, do themselves. So let’s talk about what tuning actually means.

How do you define a well-tuned bow?

For me, my ultimate goal is to deliver a broadhead-tipped arrow to the exact spot I intend it to hit. Specifically, I want it to hit at 20 yards all the way to 80 yards. I want the arrow to enter as straight as possible, cutting efficiently and carrying as much kinetic energy through as it can. I also want the bow to be a little bit forgiving to a slight tweak in my form in a less than perfect situation. I want it to hold well and be accurate. I also want to be able to spend the preseason months practicing with both field and broadhead-tipped arrows. I want them to hit together and I want my practice to build my confidence and confirm that my form and bow and arrow setup are as lethal as I can get them. That is what I consider a well-tuned bow. With that, let’s jump into how to tune a compound bow.

Some suggest that a bow has to “paper tune,” which is a visual indication of what an arrow is doing very quickly after it leaves the bow. Others discard paper tuning altogether and suggest that “bare shaft” tuning is the only way to properly tune. A few other types of tuning methods that are tossed around are “group tuning,” “broadhead tuning,” “walk-back tuning” and, perhaps, even torque tuning although that is addressing a more specific issue. Every method has its fans and its critics. Personally, I like to utilize multiple methods. By doing this, I gain greater confidence in my setup.

Nocking point, rest location and cam timing

Whether you are pulling a brand new bow out of the box or you are starting over and setting your bow up again from scratch, the first thing I like to do is bottom out both the top and bottom limbs. Next, I visually check for cam timing. By cam timing, I mean that both cams are in sync and both roll over at the same time. Well-timed cams allow the draw stops on each cam to contact the cables or limbs at exactly the same time. Many of the newer compound bows have indication marks or holes on the cams that you can look at to see if the cams are timed.

Checking cam timing on Mathews VXR

For example, my Mathews VXR has a hole on each cam that you can look at to see where the cable is in relation to the cam. Each cable centered visually through those holes tells me that the bow is likely in time. Cam timing is important. If one cam is reaching full rotation before the other, it will result in an arrow that, if receiving more rotation from one cam, results in an arrow that will show either high or low paper tears that you probably won’t be able to work out by moving your rest or nocking point. Long story short: do a quick check visually for cam timing before you even get started.

What if my cams are not in time?

Cam timing on Mathews VXR 31.5 bow

Cam rotation can be manipulated by adding or even removing twists from the cables in order to get the draw stops hitting at the same time. If you twist a cable, you are effectively shortening it, thus increasing the distance the draw stop has to rotate to stop. Untwisting does the opposite — it lengthens the cable and reduces the distance of rotation for the draw stop to hit. I always try to utilize twisting cables or strings rather than untwisting. Also, be aware that the twisting and untwisting can have other impacts on draw length and draw weight.

Also at this point, I like to do a quick measure of the axle to axle length and the brace height to see if those measurements meet the manufacturer’s recommendations. Axle to axle is measured from the center of the top axle to the center of the bottom axle on the shelf side of the bow. Brace height is measured from the deepest part of the grip to the bow string. If your bow appears to have good cam timing and the brace height and axle to axle are close to factory spec, then my next step is to set a nocking point.

To set a nocking point, my method is to measure the distance between the two axles and set my nocking point so the arrow is centered between that. I then tie in my nocking point. After that, I install my rest and lock it down with my arrow at a 90 degree angle to the string.

Another method is to attach your rest is to put your bow in a bow vise. Use a level and the vise to put your bow in a position that your string is perfectly vertical (i.e. level). Next, use an arrow on your string and adjust your rest height so that the arrow is running through the center of the berger hole (rest attachment hole) and it is 90 degrees running from your leveled string. At that point, tie in your nocking point(s) and secure your rest vertically.

After I have the nocking point tied in, my rest attached and the arrow squared, I set the horizontal location of my rest. I start with my rest at 13/16” from the edge of the riser. I may end up moving that if need be, but that’s a good starting point. For my Mathews bows, that is the magic spot for my rest.

Checking bow cam timing on homemade draw board

With the nocking point and rest set, I tie in my D-loop. After that, I draw the bow several times to get a feel for the cam timing. A draw board is the best way to check timing, but if you do not have one you can have someone watch your cams as you draw. You can also get a good feel for it yourself by slowing down and drawing your bow repeatedly. Never draw a bow without having an arrow nocked.

Arrow selection & other accessories

Before moving to the next step of actually shooting the bow you have to think about arrow selection and the other accessories you are going to put on your bow.

You will need to shoot an arrow that has the proper spine for your setup. By spine, I mean the stiffness of the arrow. If the arrow is too weakly spined or too stiffly spined for your bow, it will be very tough and likely impossible to tune. Most arrow manufacturers have charts they provide where you can find your draw length and draw weight. The chart will indicate the proper spine for you to shoot.

Another method, which is what I would recommend, is to utilize the “shaft selector” software that is available online through a company called Archers Advantage. The cost is about $10 and, with it, you can build setups and generate an arrow that is perfectly tailored to you.

Archers Advantage for tuning bow

For example, I can input the model of bow, my draw length and draw weight. Then, I can play with arrow spines, lengths, components and I can create the perfect arrow for my bow. It’s a great product and I highly recommend it.

After you have picked an arrow, I’d suggest that you work on getting your stabilizer(s) and sight attached. Anything on your bow, including your accessories — even your peep sight — is going to impact the tune. I’ve seen guys shoot a bare bow that tuned perfectly and then added a stabilizer setup and they suddenly have a bad paper tear or poor bare shaft results.

Finally, you have your bow set up and are ready to fire a few arrows and start to tune.

Paper Tuning

Paper tuned Mathews VXR bow

I like to start out by paper tuning. For one, it’s relatively easy to do in a small space and I can do it at home in my equipment room. To paper tune your bow, you’ll need a bow, arrows, a frame that can hold a piece of paper that you can shoot through and a target placed behind it. The goal of paper tuning is to stand approximately 6’ to 8’ from the paper and shoot an arrow through the paper into the target. The resulting “tear” through the paper is a perfectly centered hole. A perfect tear would indicate the arrow is leaving the bow with true flight. In order to get a perfect paper tear, your arrow rest, nocking point, cam timing, grip and arrow spine all have to be correct.

Fixing paper tears

Left paper tear while tuning bow

Left tear (nock left – point right)

RestCam(s)ArrowCable guardMove rest rightMove cam(s) left or short left yokeUse stiffer arrow or decrease point weightMove cable guard toward arrow

Right paper tear while tuning bow

Right tear (nock right – point left)

RestCam(s)ArrowCable guardMove rest leftMove cam(s) right or shorten right yokeUse weaker arrow or increase point weightMove cable guard away from arrow

High paper tear while tuning bow

High tear (nock high – point low)

RestNock pointCam(s)Cable guardMove rest upMove nock point downTwist cable for top camTake a 1/4″ turn out of top limb bolt

Low paper tear while tuning bow

Low tear (nock low – point high)

RestCam(s)ArrowCable guardMove rest downMove nock point upTwist cable for bottom camTake a 1/4″ turn out of bottom limb bolt

A combo of tears can be fixed by combining methods. For example, a high left tear might be fixed by moving the rest right and up. Generally, I would recommend you start with the easiest adjustment and retest before moving to steps like stiffer or weaker arrows, cam shimming, etc. More information on how to tune a Mathews bow with top hats can be found here.

Bare shaft tuning

Bare shaft tuning

After paper tuning, bare shaft tuning is my second step in the process. Bare shaft tuning is quite simple, but you have to have relatively good, repeatable shooting form. Start with two or three bare shafts (no fletchings) and two or three regular fletched arrows and shoot them, starting at about 15 to 20 yards. The goal is to have the bare shaft and the fletched arrows hit the exact same point. The bare shaft should enter the target at the same vertical and horizontal plane/angle as the fletched arrows. A well-tuned bow will group those arrows together and they will enter the target exactly the same way.

But what if they do not hit together?

Similar to the paper tuning method, your options for getting good bare shaft flight are to move the rest, the nocking point, the cam(s) left or right, adjust the left or right yoke, adjust the cam timing or make changes to your arrow setup.

Bare shaft tuning fix (point of impact)

Bare shaft leftBare shaft rightBare shaft highBare shaft lowRestMove rest leftMove rest rightLower restRaise restNock point-Raise knocking pointLower nocking pointCam(s)Move cam rightMove cam left-YokesTwist right yokeTwist left yoke-Cam(s)Move cam rightMove cam left-Cam Timing-Twist cable bottom camTwist cable top camArrowsMaybe too stiffMaybe too weak-Other causeDraw length maybe too shortDraw length maybe too long-

As you begin to tune, make changes in small increments. It also helps to record the changes you make and monitor the results. It may take days to work out the tune, ensure that you are shooting with good form and executing good shots.

Walk back tuning

Walk back is yet another method to help you guarantee that your bow’s centershot is true, meaning your rest is in the proper position left to right. The process is simple: you shoot at a single spot on a target using the same pin at a variety of distances and monitor the results.

First, apply a piece of tape vertically straight up and down (plumb) through the middle of your target. Make sure you have an aiming point that the tape runs through. Then sight in your twenty yard pin to that aiming point. Now, moving back to 30, 40, 50 and 60 yards, aiming and shooting at the same aiming point and using your same 20 yard pin at each distance. If you shoot a single pin slider, do not move your sight. At each distance, use the same 20 yard pin.

A well-tuned rest center shot will yield in a straight vertical line. Every arrow should be vertically in a line in the tape, 20 all the way to 60 yards ( I ). If the line of arrow runs off to the left ( / ), you will need to move your rest to the right. If your arrows run off to the right ( ), you’ll need to move your rest to the left.

Make small changes and reshoot as you go. Remember that after you make an adjustment to your rest you will likely have to move your sight and resight in again at 20 yards before starting the walk back process again. Recording your adjustments and results can help you keep things moving in a positive manner. Once again, this may take a few days to make sure you get good shots and results.

Torque tuning

For those that have even more time to test and tinker, torque tuning might be worth considering. Torque tuning essentially is adjusting your rest into a position (forward or farther back) so that when your grip is less than perfect (like it regularly is in a hunting situation) your arrow will still fly true.

To start, sight your bow in at 20 yards. Then, draw your bow and slightly torque your grip so that the riser has more pressure to one side or the other (use common sense, do not derail your bow) As you do so, take note of what direction your stabilizer is pointing, then put your pin on the target and fire an arrow.

If the arrow impacts the direction that your stabilizer was pointing when torqued, move your rest farther back and repeat. If the arrow impacts the opposite direction of the way your stabilizer was pointing, then move your rest farther forward and repeat. Overall, you are trying to find the sweet spot where, if you have less than perfect grip and are torquing the bow, the arrow will still impact the desired spot. After you find the spot, test your results by torquing the bow both left and right and shooting to confirm your results. You can also step your yardage back to 30 or even 40 yards and repeat to fine-tune your rest location for maximum forgiveness.

Broadhead tuning

How to broadhead tune arrows

Finally, good broadhead flight is the reason we all started tuning in the first place and, if you’ve done the work with other methods like paper tuning and bare shaft tuning, it should be really close already.

A fixed-blade broadhead is going to have more surface area than your field tips and because of this will exaggerate an error in flight. Before I begin shooting broadheads, there are a few steps I like to take to ensure that any issues I might see are not the issues with the arrow/broadhead and are, indeed, issues with tune.

The first step is to install a broadhead and check for alignment by spinning each arrow. Any misalignment will cause a wobble in the arrow and poor flight. To check each arrow, use an arrow spinner like the Pine Ridge Arrow Inspector. Spin each arrow, taking note of the broadhead tip, watching for any wobble in the tip. Another method that I prefer is to put the tip of the broadhead up against a cardboard box and as you spin the arrow you will see the point start to make a circle in the cardboard if there is any misalignment. Perfect alignment will result in a pin hole in the cardboard and perfect alignment.

If the arrow tip does make a circle in the box, rotate the arrow tip until it’s in the top most position then use a sharpie to mark the arrow tip at that position. Rotate that arrow 180 degrees from that mark and then apply pressure to the point of the head on a hard surface. What you are wanting to do is to bend or push the insert in alignment with the broadhead. Recheck alignment by spinning the arrow and broadhead again. After your arrow/broadhead combos are put together, it’s time to shoot them.

For a detailed look at broadhead tuning, you can check out an article and video I did on this here.

Hopefully, your broadheads fly perfectly and impact along with your field tips out to 80 yards, but sometimes that is not the case. One of the most common questions I get about broadhead flight is how do I get my broadheads to fly with my field tips? Also, what is your broadhead flight telling you about your tune? The first thing I would suggest is that you should not automatically just move your sight so your broadheads are impacting where you want. That is a Band-Aid and you won’t be able to practice with field tips and have them impact where you want. Below, I have included a table to help you get your broadheads and field tips hitting together.

Broadhead tuning your bow

IssueRest fixCam fixBroadheads hitting leftMove rest leftMove cam rightBroadheads hitting right Move rest rightMove cam leftBroadheads hitting highMove rest down or move nock point upTwist cable for bottom camBroadheads hitting lowMove rest up or move nock point downTwist cable for top cam

After you make adjustments to your rest to get your field tips and broadheads hitting together, then move your sight to re-sight in your pins. This method will ensure your bow is well-tuned (good paper/bare shaft tune) and your broadheads and field tips hit exactly where you want them to!

Mathews VXR at the range

Finally, I’ll provide another table below that can help in your tuning efforts and setting your bow to spec.

General tuning cause and effect

Twisting stringUntwisting stringTwisting cableUntwisting cableAxle to axleDecreasesIncreasesDecreasesDecreasesBrace heightIncreasesDecreasesIncreasesDecreasesHolding weightIncreasesDecreasesDecreasesIncreasesDraw lengthDecreasesIncreasesIncreasesDecreases

In conclusion

Home bow shop tuning Mathews VXR

Hopefully the COVID-19 pandemic will pass quickly and we can all get back to some normalcy and prepare for the fall hunting seasons. While we have some time at home, stay safe, enjoy time with family and put some real effort into having the most well-tuned bow you have ever entered a season with. All the best!

goHUNT INSIDER bar 2

Fishing Hook Basics: Types, Sizes, & Uses

0

By Discount Tackle Staff

There is nothing better than being out on the water with your friends and family enjoying nature, laughing, talking, and fishing. And the experience can only be improved when you have everything you need for a fun day fishing; having all the right fishing baits and tackle is essential to making the most of your time on the water.

A fishing hook is perhaps one of the most crucial fishing tackle items after your fishing rod and reel. This means a good selection of fishing hook types and hook sizes can be essential to making your fishing trip memorable and productive.

In this blog post, we break down the four major categories of fishing hooks and explain the different sub-types that make up each category, the rigging techniques and baits they are most often used with, and the species they are used to target. Finally, we provide a short explanation of hook sizing and hook strength naming conventions.

Type & Uses of Fishing Hooks

Artificial & Soft Plastic Bait Hooks

As their name indicates, artificial and soft plastic hooks are used for artificial and soft plastic bait rigs using soft plastic jerkbaits, worms, swimbaits, creature baits and more. Some of the most popular styles include worm hooks, extra wide gap (EWG) hooks, flipping hooks, drop shot hooks, and weighted and unweighted swimbait hooks.

Gamakatsu Black EWG Offset Worm Hook

In conjunction with weights and sinkers, worm hooks and EWG hooks can be used for Texas and Carolina rigging soft plastics. Drop shot hooks’ primary use is pretty self-explanatory: drop shot baits, but these hooks are often used for wacky and Neko rigging soft plastic worms and stickbaits, as well. That said, some tackle makers even make dedicated wacky and Neko hooks too. Swimbait hooks can be used with soft jerkbaits and paddle tail swimbaits.

Use of Artificial & Soft Plastic Bait Hooks

These hooks are ideal for freshwater fishing for species like largemouth bass, smallmouth bass, spotted bass, crappie/panfish, trout, pike, muskie, and walleye, as well as small inshore saltwater fishing species like redfish, sea trout, flounder, drum, and striped bass. Because of their rigging versatility, you can use them in rocks, weeds, and even timber.

Bait Hooks

Bait hooks are used for rigging live or cut bait such as live baitfish, strip baits, live nightcrawlers, fish eggs, and chunks of shrimp, crab, and other crustaceans. Popular styles of bait hooks include baitholder hooks, octopus hooks, J-hooks, circle hooks, and aberdeen hooks.

Eagle Claw 186AH Ringed Eye Baitholder Hook

Baitholder hooks have little barbs (sometimes called slices) along the shank of the hook that help keep chunks of cut bait on the hook. Octopus hooks get their name from their shape, which resembles an octopus tentacle. These hooks are used for a wide variety of fish species in both saltwater and freshwater and are often rigged with a live baitfish or egg clusters. J-hooks are somewhat similar to octopus hooks, except their shape more closely resembles the letter “J” (hence their name). These hooks are typically used for bait fishing for offshore saltwater species like tuna, sailfish, wahoo, and marlin.

Berkley Fusion19 Circle Hook

Circle hooks can be used with almost any type of bait and are unique in that they don’t require the angler to “set” the hook, but rather the hook sets itself in the corner of the fish’s mouth as it tries to swim away with your bait. Circle hooks are also best for catch and release fishing because they are the least likely to mortally wound the fish when they’re hooked.

Aberdeen hooks are very light and delicate and are almost exclusively used for fishing live minnows and other live baitfish to target crappie and other panfish like bluegill, sunfish, and bream.

Use of Bait Hooks

Bait hooks can be used in different casting, trolling, and jigging set-ups for freshwater species such as trout, salmon/steelhead, catfish, panfish, perch, and walleye, as well as virtually all saltwater fishing species.

Saltwater Hooks

Saltwater hooks, as their name implies, are intended to be used for saltwater fishing. Hooks that fall into this category are typically constructed with hard metal wire that is then molded into sharp and long points. Although you will find saltwater fishing hooks in many shapes and sizes, they are usually made of one of two materials: high-carbon steel or stainless steel. Saltwater hooks must also be made with corrosion-resistant finishes like tin to survive in corrosive saltwater environments.

Gamakatsu Heavy Duty Live Bait Hook

For our purposes, we define saltwater hooks as any hook suitable for use in saltwater, meaning there is some overlap with other categories. For example, a hook like Gamakatsu’s Heavy Duty Live Bait Hook is classified as both a baithook and a saltwater hook because it used for bait fishing, but also robust enough to survive saltwater environments and big game species. Similarly, heavy-duty treble hooks like Mustad’s 3565 DuraSteel O’Shaughnessy Treble Hook 2X Strong are both treble hooks and saltwater hooks because they have a treble hook design that is suitable for saltwater usage.

VMC 7237 InLine Single Hook 1X Coastal Black

That said, there are few styles of hooks that are, broadly speaking, only used for saltwater fishing. These include jigging assist hooks used on metal saltwater jigs and inline single hooks used on saltwater trolling and casting hard lures (aka plugs).

Use of Saltwater Hooks

Saltwater hooks are suitable for use for casting, jigging, and trolling with both artificial lures and real bait for all saltwater species. Thanks to their strength, certain types are also a good choice when targeting big game freshwater species like catfish, pike, muskie, and sturgeon.

Treble Hooks

Treble hooks are hooks with three points on them. They are most often used on hard baits and lures, but can also be found on some soft body swimbaits, live bait rigs, and even fished alone with dough baits for trout, panfish, and catfish.

Mustad D3551 Dough Bait Treble Hook

In addition to varying sizes and strengths, treble hooks also come in a wide variety of hook shank sizes and bends. For example, there are short shank trebles that have a shorter shank section between the eye of the hook and where the shank diverges into its three points. This shorter shank style is best fished on hard baits that will be retrieved near grass and vegetation because the hook points are closer to the body of the bait and do not snag as easily. When properly hooked up with, the shorter shank trebles also do a better job of keeping fish pinned and make it harder for them to use the hook shank for leverage to throw the hook.

Owner ST-36 Round Bend Treble Hook Black Chrome

Another popular treble hook style are round bend treble hooks. Just like their name implies, round bend treble hooks have a hook points parallel to the hook shank, which creates a perfectly round bend in the hook. The purpose of this design is to make it easier to hook fish that swipe at the lure instead of fully committing to striking it. There are a few other subtypes of treble hook designs, such EWG treble hooks and feather-dressed treble hooks, but for simplicity’s sake we will end our discussion here.

Use of Treble Hooks

Treble hooks are used in both freshwater and saltwater fishing on casting and trolling lures, crankbaits, metal jigs/spoons, swimbaits, and a few other specialty, niche bait rigs. They generally are not good for use around heavy vegetation and weeds because they are highly prone to snagging.

Fishing Hook Sizes & Strengths

In addition to a wide range of shapes and designs, fishing hooks also come in many different sizes and wire gauge strengths. Different sizes and strengths are used for different species and bait presentations.

Fishing Hook Sizes

Fishing hook manufacturers make hooks in an incredibly wide range of sizes; everything from the tiniest treble hooks for trout and panfish all they way to massive circle hooks used for shark fishing.

The size of a fishing hook is based on both the width between the point and the shank of the hook as well as the overall length (or height) of the hook shank.

Fishing hook size naming conventions can be somewhat confusing. Generally speaking, mass produced fishing hook sizes range from 18 all the way up to 12/0 (pronounced “12-aught”), with size 18 being the smallest and 12/0 being the largest. For hook sizes between 1 and 18, the higher the number, the smaller the hook. In other words, a size 1 hook is much larger than a size 18 hook. For sizes 1/0 and above (there is no such thing as a size 0 hook), higher numbers equate to larger hooks, meaning a 12/0 is much bigger than a 1/0.

Fishing Hook Strengths

While its pretty obvious that fishing hooks are made in lots of different sizes to match different size fish, did you also know that hooks are also made from different wire gauges or thickness? Usually, they run from extremely thin wire to thicker gauge wire. For instance, fine wire, 1X strong heavy wire, 2X strong heavy wire, 3X strong heavy wire, and 4X strong heavy wire, and higher.

Stronger hooks are used for big game species like catfish, tuna, marlin, and sturgeon, while lighter fine wire hooks are used on more delicate species like crappie, trout, and perch.

Final Thoughts

Fishing hooks come in a myriad of styles, sizes, and strengths and each has characteristics, benefits, and intended uses. A fishing hook is an important part of fishing and being familiar with the various parts, sizes, and types of fishing hooks will help you in choosing the perfect hooks for your next fishing trip.

So, the next time that you are on the water pondering what fishing hook to use do not fret. Follow our breakdown, and you will easily determine at the type of fishing hook that will help you put more fish in the net!

Air Gun 101: What You Should Know about Air Rifle Barrels Before Buying

0

Have you ever heard the phrase: “Imitation is the sincerest form of flattery”?

The Chinese must have been very sincere in emulating this proverb.

I recently spotted one counterfeit brand that threw me to the floor.

Whoever thought of parading Microsoft as Michaelsoft must be a very funny fellow.

What happened to patent laws?

Anyway, that’s what happens to many other brands, at least as seen in the following:

  • Dolce and Gabbana – Dolce and Banana
  • Nike – Mike
  • Johnnie Walker – Johnnie Worker
  • Game Boy – Game Child
  • Starbucks Coffee – Sunbucks Coffee – Stars & Bucks Coffee
  • Playstation  – Polystation
  • KFC – KFG

Anyway, this is not an anti-counterfeit campaign.

We’re here to talk about air rifle barrels.

Ever wondered why there is much consistency on Lothar Walther barrels as opposed to other barrels?

Or to start on the same ground, what is the barrel of your air rifle?

Does it really matter if it is from the US or Germany or South Africa or China?

Let me answer these questions one by one to demystify the misconceptions surrounding airgun barrels .

The function of the barrel

The air rifle barrel essentially guides the ammo from the moment the trigger is pulled to the moment it flies out into the air.

It usually takes the shape of a rounded tube and is made of high-strength metal.

The hollow space inside the shooting tube is what we refer to as the bore

This has a specific internal diameter, the most popular being .177, .20, .22, .25, .357, .45, and .50 –  in short, the air rifle caliber.

=> For more on differences between .177, .22, and other calibers, see this post

Most air rifles involve propelling the ammo by means of rapidly expanding gases.

The expansion of these gases is usually explosive in nature, and that’s what fires the pellets with such high velocity.

It follows then that the barrel must be strong enough to contain these expanding gases, be it nitrogen, air, or CO2. 

The chamber

This is the compartment at the rear end of the barrel where the pellet sits in readiness for firing.  

The Bore

This is the hollow interior of the barrel.

The ammo accelerates through this part once the air rifle is fired. 

To stabilize the ammo while still within the barrel, manufacturers designed the coveted rifled barrels.

These have a series of helical grooves around the internal diameter of the barrel. 

As the ammo surges forward, it spins along the longitudinal axis of the bore and is more likely to maintain a straight trajectory.  

Smoothbore rifles are those that don’t contain riflings .  

The muzzle

This is the front end of the barrel through which the ammo exits the barrel.

The muzzle needs to be expertly machined so as to ensure the great accuracy of the rifle. 

Visualize a scenario where there are tiny gaps around the pellet as it jets out of the barrel.

The pressurized gases are likely to destabilize the ammo and veer it off the intended trajectory . 

Factors influencing the accuracy of air rifle barrels

1. The rifling method

As already mentioned, a rifled barrel is more advantageous than a smoothbore barrel in terms of maintaining a constant projectile.

This is the very start of the ballistic flight and it needs to be correct. 

One thing you need to note is that the rifling size and configuration affect the twist rate of the barrel.

This refers to the distance the ammo must travel for it to rotate once.

There exists an optimum twist rate that makes the projectile most stable.

Too low a twist rate will affect the stability of the projectile – and the same is true for too fast a twist rate. 

2. Steel used

Not all steel is of the same quality.

You can expect what will happen if the barrel is made from low-quality steel.

The machining quality of the riflings, as well as the muzzle, will be compromised, and this will affect the stability of the projectile.

3. Rifling speed

The faster the rifling process the poorer the end quality of the product.

Some manufacturers are known to rush through the process so as to lower production costs .

The worst-case scenario is having the barrel of the gun explode when firing pellets.

Your investment will vanish in your own eyes and you risk fatal injuries.

Frequently Asked Questions

1. What is a rifled barrel?

A rifled barrel is one whose hollow interior incorporates longitudinal notches as opposed to being smooth.

This helps to stabilize the pellet or BB as it accelerates along the barrel.

2. Do air rifles have rifled barrels?                

Of course, yes.

But not all of them do.

Rifling is a technology that requires high-capital investments to achieve.

Not all manufacturers are willing to spend so much money on their production process.

So quite a lot of air rifle models have barrels that are not rifled.

3. Should I oil my air rifle barrel?                

No! Please don’t.

There is a great possibility of the oil finding its way into the bore of the barrel.

When you fire a pellet, the high friction may cause the oil to combust .

When this is repeated with every shot, the airgun seals get damaged with the high heat and the gun stops working.

Instead of oiling, use a cleaning rod.

Also, consider firing a cleaning pellet once in a while. 

For the exterior of the barrel, take care not to expose it to moisture as it may rust.

Immediately you realize that water has splashed on the barrel, clean it with a dried piece of cloth.

Purchase some rust protection spray for added protection. 

4. Rifled vs Smooth Bore Barrel?

How much more accurate is a rifled barrel than a smooth bore barrel? Watch the video below to find out:

5. Is it bad to dry fire an air rifle?

Dry firing refers to shooting the air rifle without a pellet in it.

Some air rifles are specially designed to allow dry-firing.

This is especially seen in target shooting airguns, which it is expected to dry fire time after time as you test the trigger and trigger pull.

If this is the case, the manufacturer will state it plainly in the user’s manual.

However, some other guns, especially the spring-powered airguns, can suffer great damage through dry-firing.

The seals can be easily damaged through dry-firing.  

Conclusion

You now know what a good air rifle barrel looks and feels like.

Do not stop for any old thing that you find out there.

Quality matters for the longevity of your airgun and your safety. 

Sometimes it may be difficult to differentiate between good quality steel and low quality steel.

Ensure that you read detailed and honest air rifle reviews before you make the final purchase decision. Better to be safe than sorry. 

What sound does a squirrel make? (Surprised Answers!)

0

As an outdoor enthusiast who has spent countless hours observing wildlife, I’ve always been fascinated by the diverse vocalizations of squirrels. These charismatic creatures, often seen darting across our yards and parks, are far from silent neighbors. In fact, they’re quite the communicators, with an impressive repertoire of sounds that serve various purposes. Let’s dive deep into the world of squirrel sounds and decode what these chatty creatures are trying to tell us.

The Language of Squirrels: Understanding Their Vocal Arsenal

Squirrels are remarkable communicators, capable of producing an array of vocalizations that serve different purposes in their daily lives. From warning calls to mating signals, each sound in their vocabulary has a specific meaning and context. Let’s explore the main categories of squirrel sounds and what they signify.

Warning and Alarm Calls: Nature’s Security System

One of the most common and important sounds in a squirrel’s vocabulary is their alarm call system. These calls are essential for survival, helping to alert other squirrels and even different species about potential dangers in the area. Here’s what to listen for:

The “Kuk” is a short, sharp barking sound that squirrels repeat rapidly when they spot a threat. Think of it as their version of “Hey, watch out!” This sound is often the first line of defense when a squirrel spots something suspicious.

Following the “kuk” is often the “quaa” – a lower intensity sound that serves as a secondary warning. This combination of calls helps other squirrels understand not only that there’s danger, but also what kind of threat they’re facing.

Perhaps most interesting is their sophisticated system for distinguishing between ground and aerial predators. The “seet” call – a high-frequency but quiet sound – is specifically used for ground predators like cats or dogs. When they spot an aerial predator like a hawk, they’ll combine this with a bark, creating what’s known as the “seet-bark” call. This distinction helps other squirrels know whether to look up or down for the threat.

(For more on the best air rifle for squirrels, see this post)

Territory and Dominance: The Sound of Squirrel Real Estate

Squirrels are territorial creatures, and they’re not shy about letting others know when they’re crossing boundaries. Their territorial sounds include:

  • Rattles and screeches that serve as warning signals to intruders
  • Aggressive chattering produced by rapidly grinding their teeth
  • Sharp, threatening screeches when another squirrel gets too close to their space

These sounds are particularly common during feeding times or when protecting their nests. If you’ve ever watched squirrels at a bird feeder, you’ve probably witnessed this vocal display of territory defense.

The Language of Love: Mating Calls

During mating season, squirrels become particularly vocal, using specific sounds to attract mates and communicate their intentions. Male squirrels produce a soft “muk-muk” sound while pursuing females – a gentle vocalization that’s meant to be non-threatening and attractive to potential mates.

Females respond with their own specific vocalizations, including “kuks” and “quaa” sounds when they’re receptive to mating. These mating calls are typically softer than their alarm calls but still distinct enough to be recognized by interested suitors.

Baby Talk: The Sound of Squirrel Infants

Baby squirrels, known as kits, have their own unique set of vocalizations that develop as they grow. Their vocal development follows an interesting timeline:

  • At 3 days old: First capable of making soft squeaks
  • At 3 weeks: Can produce growling sounds when hungry
  • At 4 weeks: Develop the ability to make short screams
  • Throughout infancy: Use high-pitched chirps to call their mother

The “muk-muk” sound, interestingly, is also used by babies when they’re hungry – the same sound that adult males use during mating season, but in a completely different context.

Squirrels in Human Spaces: Understanding Urban Wildlife

For those living in areas with squirrel populations, understanding their sounds can be particularly useful, especially if they’ve taken up residence in or around your home. Here’s what to listen for:

Morning and Evening Activity Squirrels are most vocal during their peak activity periods – early morning and late evening. During these times, you might hear:

  • Scurrying and scratching sounds as they move about
  • Rolling noises from nuts and acorns being transported
  • Gnawing sounds as they work on maintaining their teeth or creating nest spaces

In Your Attic or Walls If squirrels have made their way into your home, they create distinctive sounds:

  • Light running and scratching noises
  • Rustling sounds from nest-building activities
  • Rolling sounds from stored food items
  • Squeaking and chattering during social interactions

The Nighttime Exception: Flying Squirrels

While most squirrels are active during the day, flying squirrels break this rule. These nocturnal creatures make high-pitched chirping sounds and can even produce ultrasonic vocalizations that humans can’t hear. If you’re hearing squirrel-like sounds at night, you might have flying squirrels in your area.

Practical Applications: Using Squirrel Sounds

Understanding squirrel vocalizations has practical applications for both wildlife enthusiasts and homeowners:

For Wildlife Watching:

  • Learn to identify different species by their unique call patterns
  • Understand squirrel behavior and social interactions
  • Predict potential threats in the area by interpreting warning calls

For Home Management:

  • Identify the presence of squirrels in your structure
  • Determine the best times for humane removal
  • Distinguish squirrel sounds from other wildlife

Frequently Asked Questions (FAQs)

Q: Why do squirrels make a crying noise?

A: Squirrels make crying-like sounds primarily when they’re in distress, injured, or when baby squirrels are hungry and calling for their mother. This sound can also be a warning call to alert other squirrels of danger.

Q: Do squirrels make noise at night?

A: Most squirrels are diurnal and quiet at night, except for flying squirrels, which are nocturnal. If you hear squirrel-like sounds at night, it’s likely either flying squirrels or possibly a different animal entirely.

Q: What does it mean when a squirrel chatters its teeth?

A: Teeth chattering is typically a sign of aggression or territorial defense. It’s a warning signal to other squirrels or potential threats to stay away from their space.

Q: How can I tell if the sounds in my attic are from squirrels?

A: Squirrel sounds are typically heard during daylight hours and include scurrying, rolling (from nuts), and scratching noises. They’re usually louder than mice but quieter than raccoons.

Q: What sound does a squirrel make when in danger?

A: When in danger, squirrels typically make a series of “kuk” and “quaa” sounds, which are sharp, repetitive barking noises. They may also screech if directly threatened.

Q: Are baby squirrel sounds different from adult squirrels?

A: Yes, baby squirrels make distinctly softer, higher-pitched sounds than adults. They typically make squeaking noises and soft “muk-muk” sounds when hungry or calling for their mother.

Ammo and Law: Navigating the Complex Legal Framework

0

If you have decided that shooting sports are now your thing or just want to purchase a handgun for self-defense, you must have already googled something like gun store near me or where to buy ammunition. Well, the whole topic of firearms possession is complex. But while ammo is not as regulated as firearms, you still must know federal and local ammo-related laws to avoid legal consequences. That is why you should read on, as this article provides an in-depth examination of the several legal issues surrounding ammunition. But before we begin, a little disclaimer – we are not lawyers, and the information given here is only for reference. Always check current gun and ammo legislation and consult professionals.

Federal Ammunition Laws

Ammo regulation is a topic that has gained significant attention in recent years, particularly due to the increasing frequency of mass shootings in the United States. While guns are subject to federal restrictions, ammunition sales are generally less regulated. This disparity in oversight has led to concerns about how easy it is for individuals to stockpile large amounts of ammunition without raising any red flags.

Many laws apply only to guns and not to ammunition. For instance, firearms sellers must generally be licensed as dealers and retain records of gun sales, providing a paper trail that can be used by law enforcement to trace firearms involved in criminal activity. There are no such requirements for businesses selling ammo.

Another example is the requirement for people to show ID and pass a background check, intended to prevent those with criminal records or other disqualifying factors from obtaining firearms. However, typically, no such checks are required for ammunition purchases.

Furthermore, there is a law saying that handgun sales across state lines must be processed by a local seller, which helps maintain some level of control over the distribution of firearms. In contrast, ammunition can often be purchased online or across state lines with relative ease.

Lastly, high-volume handgun sales are regulated to prevent individuals from buying multiple guns at once. Ammunition, however, is not subject to the same restrictions, allowing people to amass significant stockpiles without any legal barriers.

As of 2024, federal ammo regulations mainly focus on banning sales to specific individuals and forbidding the production, import, and sale of armor-piercing rounds. Although federal law stops certain buyer categories from acquiring ammunition, it doesn’t mandate sellers to perform background checks, leaving room for prohibited purchasers to slip through.

By the way, there is a common misconception regarding green-tip 5.56 NATO ammunition closely related to .223 ammo. It has often been mistakenly labeled as armor-piercing due to its steel penetrator tip. However, it does not meet the legal definition of armor-piercing ammunition. Back in time, the purpose of the green tip was to signify a steel penetrator within the bullet (instead of a plain lead core), intended to enhance its performance against hard targets.

California & Other State Ammunition Laws

State laws regulating ammunition sales vary across the US, with some states implementing stricter regulations than others. For instance, six states – New York, California, Connecticut, Illinois, Massachusetts, and New Jersey – have enacted laws regulating ammo sales and requiring background checks. Other states impose ammunition access restrictions through age limits or by banning specific categories of potentially dangerous individuals.

Let us consider the laws of these six states. New York and California mandate point-of-sale background checks for ammunition purchases, ensuring that only eligible individuals can buy ammo. In Connecticut, state agencies issue ammunition certificates, which must be renewed every five years. Illinois takes a slightly different approach by requiring residents to obtain a Firearm Owners Identification (FOID) card to legally purchase or possess firearms and ammunition. Massachusetts necessitates residents to obtain a firearm permit or license to purchase ammunition. Lastly, New Jersey enforces strict regulations on handgun ammunition purchases. Residents are typically prohibited from acquiring any handgun ammo unless they present a valid firearm purchaser identification card or a permit to purchase a handgun.

Ammunition Serialization

For several years now, gun reform advocates have been discussing the implementation of ammunition serialization technology as a potential solution to improve firearm regulations. Ammunition serialization is a process that involves assigning unique identification numbers to individual cartridges, providing a traceable link between the ammunition and its point of sale. This system can help law enforcement track the origin of bullets used in criminal activities, potentially leading to the identification of firearms and their owners. By marking each round with a serial number, either on the casing or the bullet itself, investigators can more efficiently connect recovered ammunition to specific purchases, sellers, and buyers. While ammunition serialization has the potential to significantly improve the crime-solving process, it also raises concerns about logistical challenges, increased manufacturing costs, and potential privacy issues for lawful gun owners. Despite these concerns, the concept of ammunition serialization continues to be explored.

The Primal Fear: Unraveling the Mystery Behind the Beast God from Princess Mononoke

0

Unveiling the Enigma: Exploring the Fear of the Beast God from Princess Mononoke. Journey into the depths of Studio Ghibli’s iconic film as we dissect the compelling reasons behind our apprehension towards the enigmatic and awe-inspiring Beast God, shedding light on its profound symbolism and impact on viewers.

Exploring the Fear of the Beast God in Princess Mononoke

Exploring the Fear of the Beast God in Princess Mononoke

In the film Princess Mononoke, the Beast God represents a primal and elemental force that is often associated with nature and its unpredictability. This powerful and intimidating character can evoke fear and unease in viewers. The imposing presence of the Beast God, as well as the uncertainty it brings, taps into primal fears and archetypal symbols that resonate on a deep psychological level.

The design and behavior of the Beast God may contribute to the fear it evokes. In its true form, it appears as a giant boar covered in bloody, writhing worms that poison everything it touches. This grotesque imagery can be terrifying to some viewers, as it represents a destructive force that consumes and spreads death.

Additionally, the Beast God’s role as a protector of the forest and its inhabitants adds to its intimidating nature. It holds immense power over the surrounding area and animals, which can make viewers feel small and insignificant in comparison. The character’s relative silence throughout the film, along with its unnerving smile, further adds to its eerie presence.

However, it is important to note that none of these characters are truly harmful. Nago, the Boar God, was cursed with human poisons and driven by greed and evil. The Forest Spirit and Night Walker are protectors of the forest who only harm humans who threaten or hurt their domain.

To understand the underlying reasons for your fear of these characters, it may be helpful to analyze the themes and symbolism in Princess Mononoke. By delving deeper into the film’s exploration of nature, humanity’s impact on it, and our primal fears of uncontrollable forces, you can gain insight into why these characters elicit such strong emotions.

Overall, Princess Mononoke skillfully portrays our innate fear of nature’s power through its depiction of intimidating characters like the Beast God. By tapping into universal concerns about our place in the natural world and the unpredictability of its forces, the film evokes a primal fear that resonates with viewers.

Understanding the Psychological Fear of the Beast God in Princess Mononoke

Understanding the Psychological Fear of the Beast God in Princess Mononoke

The Beast God in Princess Mononoke represents a primal and elemental force that is often associated with nature and its unpredictability. This can evoke fear in some viewers because it taps into deep-seated human fears of the unknown and uncontrollable aspects of the natural world. The character’s imposing presence and the uncertainty it brings can create a sense of unease and fear.

Additionally, the design and behavior of the Beast God may tap into primal fears and archetypal symbols that resonate on a deep psychological level. The giant boar-like appearance of Nago, for example, with its mass of bloody, writhing worms, can be terrifying to some viewers. The transformation of the Forest Spirit into the Night Walker, with its unnerving smile and immense power, can also contribute to feelings of fear.

It is important to note that while these characters may appear frightening, they are not truly harmful. Nago was cursed with human poisons and the Forest Spirit and Night Walker are protectors of the forest who only harm those who hurt it. Understanding the underlying reasons for your fear can involve analyzing the themes and symbolism in the film to gain insight into your emotional response.

In conclusion, the psychological fear evoked by the Beast God in Princess Mononoke stems from its representation of nature’s power and unpredictability. The character’s design, behavior, and association with primal fears tap into deep-seated human anxieties about the unknown and uncontrollable aspects of life. By exploring these themes further, one can gain a deeper understanding of their own emotional response to these powerful fictional characters.

Unveiling the Deep-seated Fears Evoked by the Beast God in Princess Mononoke

Unveiling the Deep-seated Fears Evoked by the Beast God in Princess Mononoke

Princess Mononoke is a film that delves into the complex relationship between humans and nature, and one of the most striking representations of this is the Beast God. This character represents a primal and elemental force, often associated with nature’s unpredictability. Its imposing presence and the uncertainty it brings can evoke fear in some viewers.

The design and behavior of the Beast God tap into primal fears and archetypal symbols that resonate on a deep psychological level. When encountering such a powerful and intimidating character, it is common for individuals to feel fear or unease. In the case of Princess Mononoke, this fear may be intensified due to the character’s association with nature and its untamed forces.

The Beast God’s appearance as a giant boar covered in writhing worms that poison everything it touches adds to its terrifying presence. The imagery of death, sliminess, and evil running at top speed can be genuinely frightening for viewers. The combination of these visual elements creates a sense of danger and unease.

Furthermore, the Forest Spirit’s transformation into the Night Walker adds another layer of fear. This ethereal deity possesses immense power over the forest and surrounding area, capable of giving and taking life. The Night Walker’s unnerving smile, relative silence throughout the film, and its resemblance to a dragon with spikes on its back contribute to its intimidating presence.

It is important to note that none of these characters are truly harmful. Nago, the cursed boar god, was driven by human poisons such as greed and evil. The Forest Spirit and Night Walker serve as protectors of the forest, only targeting those who harm it. Understanding these underlying reasons can help alleviate some fears associated with these characters.

In conclusion, Princess Mononoke explores deep-seated fears through its portrayal of powerful and intimidating characters like the Beast God. The primal and elemental forces represented by these characters, combined with their design and behavior, tap into archetypal symbols that resonate on a deep psychological level. By analyzing the themes and symbolism in the film, viewers can gain a better understanding of their own fears and appreciate the intricate storytelling of Hayao Miyazaki.

The Primal and Elemental Fear of the Beast God in Princess Mononoke

The Beast God in Princess Mononoke represents a primal and elemental force, often associated with nature and its unpredictability. Its imposing presence and the uncertainty it brings can evoke fear in some viewers. The character’s design and behavior may tap into primal fears and archetypal symbols that resonate on a deep psychological level.

One reason for the fear of the Beast God is its association with nature and its unpredictability. Nature is often seen as powerful and uncontrollable, and encountering a character that embodies this power can be unsettling. The Beast God’s immense size and strength, as well as its ability to transform into the Night Walker, contribute to its intimidating presence.

The design of the Beast God also plays a role in evoking fear. Its appearance as a giant boar covered in writhing worms creates a visually grotesque image that can be disturbing to some viewers. The use of primal fears, such as sliminess and death imagery, adds to the overall sense of unease.

Additionally, the symbolism behind the character may contribute to the fear it evokes. The Beast God represents primal forces and natural balance, which can be overwhelming for humans who are used to having control over their surroundings. The idea of a creature that holds such power over the forest and all living creatures within it taps into deep-seated fears of losing control or being at the mercy of something greater than oneself.

Overall, the fear of the Beast God in Princess Mononoke stems from its representation of primal forces, its imposing presence, and its association with nature’s unpredictability. The character’s design and symbolism add to this fear by tapping into deep psychological fears and archetypal symbols.

Analyzing the Symbolism and Themes Behind the Fear of the Beast God in Princess Mononoke

Analyzing the Symbolism and Themes Behind the Fear of the Beast God in Princess Mononoke

The fear evoked by the Beast God in Princess Mononoke can be attributed to its symbolism and the themes it represents. The character of the Beast God serves as a representation of a primal and elemental force, often associated with nature and its unpredictability. This symbolism taps into deep-seated fears that humans have towards powerful and intimidating forces.

The imposing presence of the Beast God, along with the uncertainty it brings, can evoke fear in viewers. Its immense size and ferocity create a sense of unease, as it embodies a force that is beyond human control. This fear is further intensified by the character’s design and behavior, which tap into primal fears and archetypal symbols that resonate on a deep psychological level.

Additionally, the Beast God’s role as a protector of nature adds another layer to its symbolism. It represents the balance between humans and nature, highlighting humanity’s destructive impact on the environment. The fear experienced by viewers may stem from an awareness of their own complicity in this destruction, as well as a recognition of their vulnerability in the face of nature’s power.

Furthermore, the fear associated with the Beast God can also be seen as a reflection of our innate fear of the unknown. The unpredictable nature of this character mirrors our own anxieties about what lies beyond our understanding or control. It serves as a reminder that there are forces in existence that are far greater than ourselves, which can provoke feelings of awe and terror.

In conclusion, the fear experienced when encountering the Beast God in Princess Mononoke is rooted in its symbolism and representation of primal forces, as well as its role in highlighting humanity’s destructive impact on nature. The character’s imposing presence and unpredictable behavior tap into deep-seated fears within viewers, evoking both awe and terror. By analyzing these themes and symbols, we can gain a deeper understanding of the underlying reasons for our fear.

The Terrifying Power of the Beast God: Unraveling the Fear in Princess Mononoke

The Terrifying Power of the Beast God: Unraveling the Fear in Princess Mononoke
The Beast God in “Princess Mononoke” represents a primal and elemental force, often associated with nature and its unpredictability. Its imposing presence and the uncertainty it brings can evoke fear in some viewers. The character’s design and behavior may tap into primal fears and archetypal symbols that resonate on a deep psychological level.

One reason for the fear of the Beast God is its association with nature and its unpredictability. Nature has always been a source of awe and fear for humans, as it is both beautiful and dangerous. The Beast God embodies this duality, with its immense power and ability to bring both life and death. Its unpredictable actions, such as transforming into the Night Walker at night, add to the sense of fear and unease.

Additionally, the design of the Beast God may contribute to its terrifying nature. Its face, particularly when transformed into the Night Walker, can be unnerving with its eerie smile and relative silence throughout the film. The spikes on its back also give it a menacing appearance, reminiscent of a dragon or other mythical creature. These visual elements tap into deep-seated fears and archetypal symbols that resonate within our subconscious.

It’s important to note that while the Beast God may evoke fear in viewers, it is not inherently harmful or evil. In fact, it is portrayed as a protector of the forest and only harms those who threaten it. Understanding these underlying themes and symbolism in “Princess Mononoke” can help us explore our own fears and anxieties about nature’s power and our place within it.

Overall, the fear experienced when encountering powerful or intimidating characters like the Beast God in “Princess Mononoke” is common due to their representation of primal forces, their unpredictable nature, and their visual design that taps into deep-seated fears. By analyzing these aspects of the film, we can gain a deeper understanding of why these characters elicit such strong emotional responses.

In conclusion, the fear of the Beast God in Princess Mononoke stems from its mysterious and powerful nature. As a symbol of both destruction and regeneration, it represents the unpredictable forces of nature that humans often struggle to control. The film’s exploration of this fear highlights humanity’s complex relationship with the natural world and serves as a reminder to respect and coexist harmoniously with all living beings.

New World Record Turkey Taken by Bow!

0

LAST UPDATED: May 8th, 2015

Wow, this is a turkey to be proud of… A new world record! Congratulations Todd Pringnitz. I was just surfing the web and found his site and story about his new world record turkey. Here it is:

New World Record Turkey Taken by Bow!

For many turkey hunters, the thought of a world record animal must occupy their brains much like the elusive giant whitetail bucks that I have been dreaming about my whole life. In all the thoughts that have entered my brain, shooting a world record turkey was the farthest thing from my mind when my good buddy Dan Johnson and I headed to our Bale Blind on the afternoon of April 13th.

I’ve turkey hunted the last few years without any-luck. My only previous experience having any sort of encounter with a tom turkey would be in my back yard back in my home state of Michigan. I somehow found a way to miss a tom turkey at about 8 feet. Needless to say, I didn’t exactly have a huge goal going into this turkey season. In-fact, I would have been pumped to kill any tom turkey with my bow! If it happened on video that would just have been an added bonus. I mean we’re whitetail video producers right?

Thankfully, the persistence of my good friend Dallas Ft. Worth to film my first few hunts of the season would end up being one of the best things to ever happen in my life. Our hunt started earlier in the year when while shed hunting I happened to find my long-lost decoy laying under a bunch of brush out in my CRP field. I remembered the location, and figured I’d grab it the first day I headed into the field turkey hunting. Thankfully I grabbed it a few days before I started hunting because there was an ant nest inside of it, and they were biters! I hosed it out, but didn’t have the stake to hold it in the ground. After digging through my old arrow pile, I found an arrow that would work just fine.

Throughout our first afternoon in the field, Dallas and I filmed a giant tom working the opposite side of the corn field as us. We called at the tom several times, but despite his gobbling and strutting action, he just wouldn’t come closer. I still considered this pretty darned cool because he was definitely a mature tom turkey, and we got some footage of him.

The following afternoon would find Dallas and myself back into the same Bale Blind in-hopes of seeing the giant tom from the day before. When putting out the decoy, we actually busted a hen from the field, so we didn’t even know if we would be seeing much. Within a few minutes, Dallas was performing his “box call magic”, and the wait was on.

About 45 minutes later, we saw a tom turkey enter the field. It was clear that he was a pig of a turkey, but he was leading a hen. He would work up to about 30 yards in-front of her, and then strut back. I honestly didn’t think he was going to come close because he was entertaining the hen. He worked back and forth within about 60 yards, and started circling parallel to us in the blind. With a hen decoy in-front of the blind, we called a little here and there to try to get his attention enough so that he would see the decoy.

With an occasional view of his strutting fan through the standing corn, he started coming closer to the opening in-front of our blind. I was very aware of the distances and shooting arrangement because we had been deer hunting from the same set-up this past late deer season here in Iowa. I knew if he was in the opening, he was within 40 yards, which was a bad place for him to be. He started working closer and seemed like he was committed to coming into the decoy.

New World Record Turkey Taken by Bow!
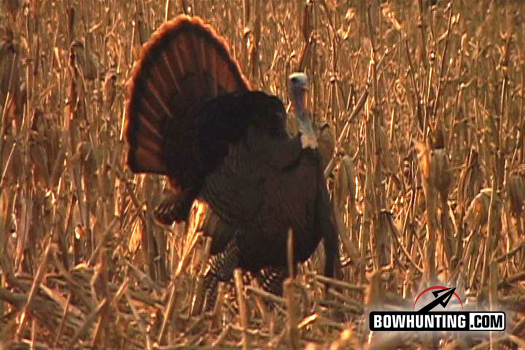
This is a picture of the giant turkey entering the field. My first thoughts were “he’s a shooter”…

As he entered the opening, the old tom was clearly a giant turkey. Even though this tom was interested in the hen decoy, he seemed very cautious. He stayed out at a 35-40 yard parameter around the decoy and our bale blind, never coming closer to investigate the mangy looking hen with arrow fletching strangely sticking through the top of her back.

New World Record Turkey Taken by Bow!
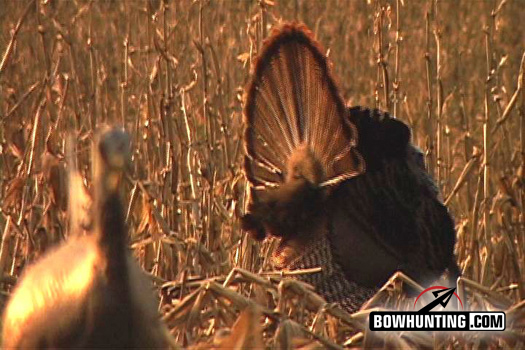
This shows my not-so-fancy decoy set-up in-front of our blind with the big tom circling at 35 yards…

New World Record Turkey Taken by Bow!

In the back of my mind throughout these moments was the “Shipwreck” encounter that we had in the same corn field only a few months earlier. “Shipwreck” was the 190 class giant I had at 35 yards from a ground blind and I just couldn’t get a shot into him. With the same exact type of “cautious investigation” as the “Shipwreck” encounter, I wasn’t about to make the same mistake again. With the tom starting to walk back to the hen he was tending, I committed to the 35 yard walking shot and came to full-draw. A quick check with Dallas behind the camera, my anchor was locked, and an arrow was soon in-flight “tom-ward bound”.

New World Record Turkey Taken by Bow!
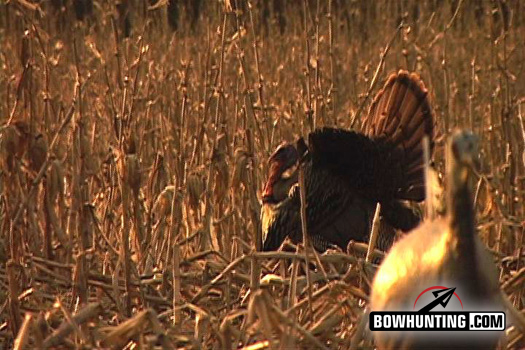
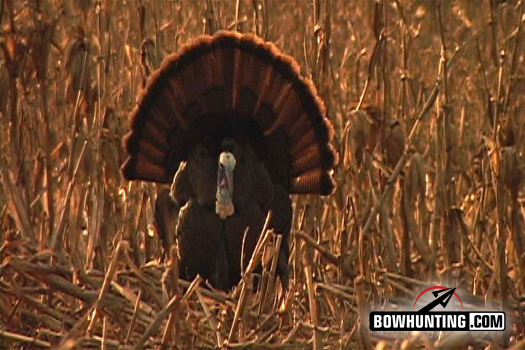
This is when the tom started heading back toward the other hen in the field. It was now or never!

Of all the arrows I’ve ever release, boy am I glad this one was true. I hit the tom pretty-much dead-center of his body with a loud “thwack”. Dallas started screaming “you smoked him – you smoked him” and I couldn’t believe I had just shot my first tom turkey. After talking a short bit in the blind, we wanted to go track the bird and make certain he was done. After walking across the field, we saw the turkey and he was still alive. After making a quick stalk, I was able to center another arrow through the bird as he started his “death flap”.

New World Record Turkey Taken by Bow!This is Dallas and I in the bale blind just after the shot…

Still not knowing we had just shot the world record, Dallas and I were most concerned with putting the beautiful bird out of his misery. It wasn’t until I peeled back the feathers on his chest when all the beards separated and one after another was visible. My trembling hands sifted through the beards trying to keep track of them as they counted of. 1, 2, 3, 4, 5, and finally 6 beards were exposed and I couldn’t believe my eyes. I’d seen and heard of multiple bearded turkeys, but 6 wasn’t something I’d ever heard of. I proclaimed to Dallas; “I just shot a 200 class Boone and Crocket Turkey Dude”…. Yeah, I still had no idea.

New World Record Turkey Taken by Bow!
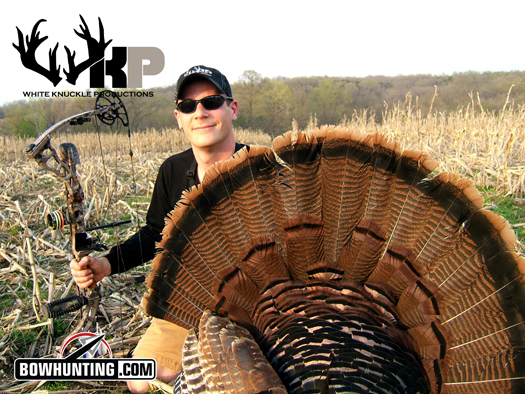
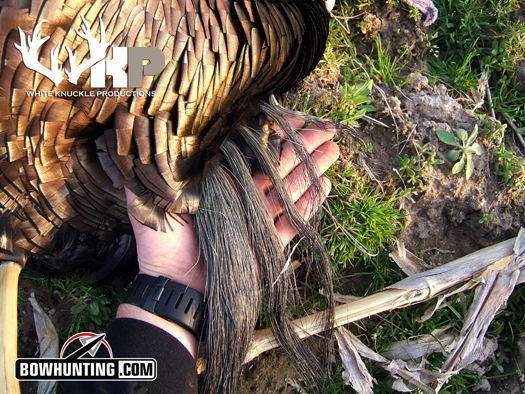
Here is a picture I took of the beards in my hand after just realizing the turkey was a multi-bearded freak bird!

After taking our trophy pictures and making some phone calls, things started to take a turn to the ridiculous. I was SO excited to have killed this tom, I swear I don’t think I would have been any-more excited knowing what I had really just shot. Anyone who has seen our deer hunting videos before already knows what I’m talking about. I can shoot a doe and nearly start crying. Ok, maybe not that bad – but it’s pretty embarrassing I can tell you! This is no exception, but it is what it is. I’m not going to apologize for being myself. Ok, I apologize for those who don’t “get me” because sometimes I hate watching my own stuff!

New World Record Turkey Taken by Bow!

Sitting in a Huntmore chair that I was fortunate enough to engineer for Huntmore owner Scott Hoffman; well, this is the best testing we can do. Pretty cool I get to combine my skills of product design with my passion for hunting. I’m a very fortunate guy to have Scott many years ago on a hunt in Effingham, Illinois!

Chris Brackett (Arrow Afflictions) was the first guy who let me know exactly what I had shot in his way “You idiot, you just shot a state record or something”. After sending him a cell picture of the beard he replied, “You just shot the new world record, you XXXXX”… I think you get the idea.

New World Record Turkey Taken by Bow!
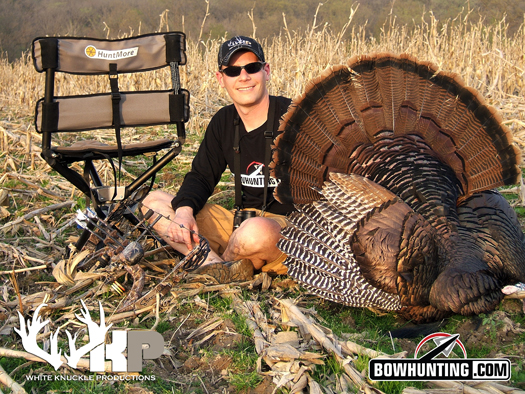
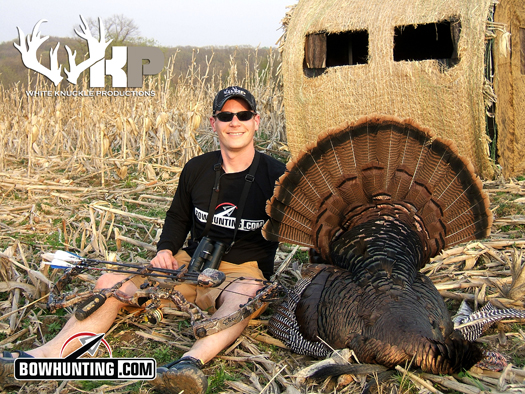
This is the Blind Ambitions Bale Blind that we used for this set-up. It worked perfectly!

After doing some “we don’t know how to properly measure turkeys – measuring”, we came to the conclusion that this indeed could be the new world record turkey. By this point all Dallas and I could do is laugh. I mean seriously; I’ve spent the last 22 years of my life basically “living for whitetails”. Every waking second of every single day I spend dreaming of bucks, planning, and working for the upcoming season. As soon as one is complete, we’re already working on the next aspect of our year-around pursuit.

New World Record Turkey Taken by Bow!
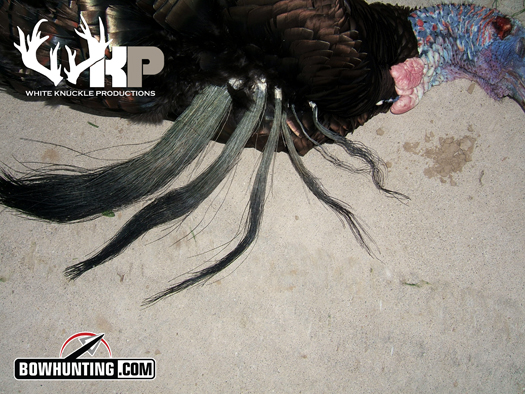
Here’s another picture of the Iowa freaks beard.

The only comparison I can make is to the 12 year old that goes out for the first time bowhunting and shoots a 200 class whitetail. I indeed was just that of the turkey world, and I knew things would never be the same. With that being said, I’ve hunted hard enough over the past many years to realize there is always an element of “luck” in any hunt. I always considered all of my luck to be “made”. In this particular case however, it was not only luck, it was dumb luck! What do you do, every serious turkey hunter is probably going to hate me, but I guess there’s nothing I can do about that now.

The turkey was officially scored by Hazel Creek Taxidermy; and has been entered as the new archery World Record for the Eastern turkey in the NWTF record books. The entire experience has been eye-opening to say the least. I’d just like to thank the NWTF and Hazel Creek Taxidermy for their help with this unknown world of turkey hunting that I have just been thrust into. They have all been just awesome! Most of all, I want to thank my good friend, team member, and cameraman Dan Johnson (Dallas Ft. Worth). Without you brother, we wouldn’t have this experience documented to share with the entire world! The turkey and sport deserves it, and without you this would never have been possible. So, thank you so-so much dude! To think that a 9-fingered guy would film the new world record turkey kill – well, I don’t think you’re missing right index finger would have ever imagined. Definitely not right now anyway.

I would never have imagined in a million years that I would ever be “that guy”. Now that it’s done, I just can’t wait to share the story with everyone. I can only imagine how many “shaking heads” there will be when watching me completely not realize what I have just shot. To those guys, believe me, I feel your pain! With that being said, I’m not going to complain about being “that guy”…

My World Record Archery Eastern Tom Turkey had over 49” of combined beard length. He weighed 25.9 pounds, and had 1-1/4” spurs. He scored 149.6875 which beat the previous record of 139.2400. It could be broken tomorrow, but for the moment it’s pretty cool! Good luck to all the turkey hunters out there! Looks like I’ve got a new spring activity to get serious about. Unfortunately, it’s all down-hill from here!

Freshwater Sushi: Can You Eat Freshwater Fish Raw? | Fish'n Canada

0

Ever since the sushi fad first touched down in Canada, we have been avid consumers. Starting hesitantly, as most did, with California Rolls and eventually working our way up to plates full of Sashimi, sushi has become a staple of our diet and has become the same for millions of people across North America.

Being avid anglers, however, eating this much fish caught by other people seemed somewhat wrong. Lake caught walleye and pike had always been more enticing to us than haddock or cod and our choice of salmon has always favoured lake-bound Kokannee over farmed Atlantics.

So, to combine our favourite hobby with one of our favourites foods, we decided to give our favourite freshwater quarry the full sushi treatment – taking a freshly caught walleye from a pristine northern Ontario lake, filleting it on the front of the boat, and eating walleye sashimi right on the water as we fished.

Ang and Pete holding walleye on a lake

All was perfect in the world of Fish’n Canada… that was until we told a local biologist about our experiment.

After a full lecture about metre-long worms, small yellow grubs, and other parasites, we were just happy to have made it home alive.

Fast-forward 20 years, the fear instilled in us by that biologist has all but worn out and we are ready to tackle the subject once more and, with a little help from our friends, answer the question of “can you eat freshwater fish raw?” once and for all.

The Doc’s Perspective

Gord Pyzer holding a walleye
“The Doc” Gord Pyzer

Gord Pyzer is known as “the Doc” not just because he has put doctorate-level hours into fishing, but because he has over 30 years of experience as a senior manager with Ontario’s Ministry of Natural Resources.

This made him the perfect man to run our raw fish questions by as he would know exactly what kind of potential parasites our favourite fish were holding and what kind of damage they would do if they were consumed by humans.

What kind of parasites do freshwater fish carry?

Yellow Grub

Yellow Grub - A Common Fish Parasite | Oklahoma State University
Yellow Grubs nestled into a Bluegill (Photo courtesy Craig Banner, Oregon Department of Fish and Wildlife)

Yellow Grubs are perhaps the most common parasite we see in our fresh water fish, often found nestled into the tails and flesh of panfish such as Perch and Bluegill. These unsightly grubs (actually parasitic flukes) make their way into the water via fish-eating birds, where they then mature inside aquatic snails before venturing out in their mature form to find their host fish.

Thankfully, these grubs are harmless to humans and, even if eaten live and raw, would only add a bit more protein to your diet.

Black Grub

A Northern Pike infected with Back Spot Disease

Black Grubs, more commonly called Black Spots, are very similar to Yellow Grubs in every way except the markings they leave on the fish.

Like the Yellow Grubs, these parasitic flukes enter the water through fish-eating birds, mature inside of snails, and then find their target fish.

Once the worm enters its final host, the fish responds by forming a hard cyst made from a black pigment to trap the worm, creating small black spots throughout the fish’s body and temporarily pausing the spread of the parasite. These cysts remain closed until the fish is eaten, typically by birds, where the cycle starts over again.

Thankfully (again), this parasite is not transmittable to humans but will add a bit of crunch to your fillets if they are not picked out.

Broad Fish Tapeworm

A close-up of a broad fish tapeworm

If you found the last two parasites gross, you may want to stop reading.

Known formally as Diphyllobothrium latum, the broad fish tapeworm is the largest tapeworm that can infect humans and is present in many of our freshwater fish. “Large”, in fact, may be a bit of an understatement as these behemoths have been measured in humans at over 30 feet in length.

In our recent podcast episode, Gord gets into a story about a friend of his experiencing this first hand after consuming some undercooked Lake Trout.

Since these parasites like cold water, Lake Trout are one of the more frequent hosts of these worms, however, they are also very prominent in Whitefish, Northern Pike, Walleye, and Smallmouth Bass.

Fortunately, for those cooking their fish, these worms will not survive the frying, baking, or smoking process and, if you have eaten a lot of trout, you have likely consumed them without noticing. For us sushi eaters, however, contracting these worms is a real possibility.

Gord’s Reccomendation:

Gord says that the decision to eat raw fish ultimately comes down to your perception of risk vs. reward. As he says in the podcast, “is eating that piece of raw fish really worth a 25-foot tapeworm?”

From Gord’s perspective, the answer to this question is obvious and he would much rather fry up his fresh-caught walleye than take the chance and consume it raw. As Gord says, “there are no medals for self-inflicted wounds.”

The Chef’s Perspective

Chef Antonio Meleca
Chef Antonio Meleca

After getting scared to death by Gord’s tapeworm stories, we wanted a more positive take on eating raw freshwater fish.

Chef Antonio Meleca is not only a chef to the stars and host of Fish’n Canada’s Fish du Jour series on YouTube, but is also an avid angler who frequently consumes his catches raw

In fact, Antonio has blended his hobby and his work on several occasions, including once with Kit Harington of Game of Thrones fame, where he prepared Smallmouth sushi and sashimi, caught by the actor right on the shores of Lake Nipissing (listen here).

So how did Kit and Antonio survive the process tapeworm-free?

How do you prepare freshwater sushi?

Antonio says that anytime he prepares freshwater sushi, he uses the same process he would for tuna or salmon. This starts with the gutting process, which should start as soon as possible after the fish is caught. When filleting, Antonio says he is then always keeping a close eye on the flesh for grubs or worms. In most of our non-bottom-dwelling freshwater fish, these parasites are not microscopic and can be easily spotted or felt.

Next, the fish has to be frozen for at least 48 hours below -18 C. In the sushi world, this is called IQF (Individually Quick Frozen) and is the time and temperature necessary to kill any harmful parasite that could be living in the meat. Unfortunately, most household freezers cannot reach these temperatures so some local connections to those with commercial-grade freezers may have to be made.

After the freezing process has been completed, the fish can be prepared any way you like. On the day with Kit Harington, sashimi and ceviche were the preference. However, Antonio has also used raw Smallmouth and Walleye for rolls which are sweetened with brown sugar and soya sauce.

Antonio’s Reccomendation:

Antonio says that freezing fish at the IQF standard -18C for two days makes it perfectly safe for consumption and, when done correctly, can make excellent tasting sushi of your favourite freshwater fish. Antonio does emphasize, however, that household freezers DO NOT reach these temperatures and, as a disclaimer, he cannot recommend making sushi at home without the proper equipment.

The Food Safety Perspective

To break the tie, we wanted to interview someone who could give us the food safety perspective of eating freshwater fish raw.

That man was Ken Cashin, a food safety consultant at Innovative Quality Solutions on Prince Edward Island.

In our interview with Ken, he echoed much of what both Gord and Antonio had said by stating that when eating any raw food, whether it be trout, salmon, beef or oysters, there is always a risk.

However, some fish provide a far greater risk than others. With oysters, for example, which act in the ocean as filters for known toxins, people rarely think twice about consuming them raw despite the massive health risks that can result from improper handling.

With something like a raw freshwater trout or walleye, on the other hand, the risks of serious illness are far lower yet many people wouldn’t dream of consuming it raw.

Ken’s Reccomendation

Like Gord, Ken says eating raw fish is all about weighing risks and deciding how much you really want that sushi. Like Antonio, Ken also reiterates that all risks can be avoided through proper handling and freezing. “The process is simple,” said Ken, “freeze the product, kill the worm.”

The Verdict

So can you eat freshwater fish raw?

The quick answer is yes.. with a caveat.

As both Antonio and Ken pointed out, the parasites found in our freshwater fish cannot survive the IQF freezing process carried out on traditional sushi, meaning all you have to do to make your fish safe to eat raw is to freeze it at -18 C for at least two days.

This, however, is much easier said than done as most household freezers cannot reach these temperatures.

For those looking to skip this process, the decision to eat raw freshwater fish ultimately comes down to your own calculation of risk vs. reward and whether you think your eyes are keen enough to spot the tapeworms that are patiently waiting to grow to record sizes in their next host.

Let us know in the comments below whether freshwater sushi will be added to your next shore lunch menu.

For the full interviews with all three of our guests, check out the podcast on Apple Podcast, Spotify, Google Play, or wherever else you get your podcasts.

AirForce Texan Big Bore Review – Make Shooting Great Again

0

AirForce Texan Big Bore brings happiness for all the people eagerly waiting for something that is entirely made in the USA.

Here is your favorite air gun that does make shooting great again.

Air Force Texan is a name you cannot deny when it comes to accuracy or energy.

They offer you dead-on accurate shots which will mix with your skill and do wonders.

It has always been difficult to choose the best air gun for shooting or gifting your close one who is fascinated by air rifles.

However, the Air Force Texan will do your job smoothly.

Here, I will discuss in detail the features of this terrific air rifle, its pros and cons so you can decide your move easily.

AirForce Texan Big Bore is all about power and accuracy.

If you are a regular hunter, you will know how these two can change your shooting experience altogether.

PCP rifles are gaining popularity these days and for all the right reasons.

Here we will first talk about the gun-type then review every single part for better insight,

And see why AirForce Texan Big Bore is one the best PCP air rifles in 2024.

AirForce Texan Big Bore – Gun Type

This is a pre-charged pneumatic (PCP) rifle that creates air pressure mechanically rather than having any chemical reaction inside the tank which is the powerhouse of the entire system.

If you are new to PCP guns, I recommend you read this post to see if PCP air rifle is the best choice for shooting enthusiasts

The air compresses and creates havoc pressure, which is later used to throw projectiles.

Air Force Texan big bore allows air pressure as high as 3000 psi to give its best performance.

Being an air rifle, AirForce Texan comes with an exotic air tank.

I can leave all the power and accuracy aside.

The outlook of this particular rifle is enough to steal the show.

If you take a seat among air rifle enthusiasts frequently this is going to earn you some high level of jealousy.

AirForce Texan Big Bore air tank is filled in various ways.

You can use a hand pump or a compressor.

Conventional hunters are still huge fans of using hand pumps but let me warn you that is going to be very tiring.

If you are not very confident of the physical work, I suggest you leave it up to a compressor.

There are numerous compressors available in the market.

I will be sharing the details in the latter part of this Air Force Texan big bore air rifle review.

Now that you have filled the tank, the valves inside the reservoir create a blockage, and due to this the pressure increases.

When you pull the trigger, the pressure releases through a comparatively narrow path turning all the potential energy into velocity.

Thus your projectile lands in the desired location.

The pressure and performance of the air rifle are not proportional though it may look so from the principle.

Way too high air pressure which is out of the range of the gun may cause permanent blockage making it completely nonfunctional.

AirForce Texan Big Bore is a single-shot gun.

This means you have to load the gun for every shot.

Though there are multi-shot guns available in the market, the accuracy of single-shot guns is still unbeatable.

From another point of view, it makes you a better hunter.

You know you have to go through all the work and hassle before you could take another shot.

Therefore, you try your very best to make that one shot count.

Regular use of single-shot guns improves your focus, target, and ultimately performance.

The barrel of AirForce Texan Big Bore is not shrouded making it pretty loud.

It is not okay if you plan to shoot in silence in the backyard or want to take a couple of squirrels down.

However, there’s more to Air Force Texan big bore and do not lose heart as I got the solution for loudness.

Continue with the Air Force Texan big bore review and discover the wonders it can do.

Moving on to the next part of the rifle, this particular model of Air Force Texan offers you two-stage non-adjustable triggers.

Though their position can be adjusted according to your need.

The trigger section contains a detailed review of the trigger and makes the sir clear for the beginners.

AirForce Texan Big Bore is available in four different calibers.

They offer you 0.257, 0.30, 0.357, and 0.45.

The power, velocity, accuracy varies from caliber to caliber.

It also provides you with commendable safety.

The textured grip deserved to be mentioned as well.

click for the lowest price

So far, I gave you an overall idea of the rifle and what are the main features you will be dealing with in case you get an Air Force Texan big bore.

Now let us do some detailed research work on every single part to make a smart buy.

AirForce Texan Big Bore is available in four different calibers: 0.257, 0.30, 0.357 and 0.45

Stock

AirForce Texan Big Bore comes with a synthetic stock.

Now I know a lot of you will stick up your nose hearing synthetic stock, but they are much more realistic than wood stock.

Nothing can outshine the class of a wood stock but they are heavier than synthetic ones.

When it comes to air guns, your first priority is performance and convenience not the look

And to be truthful Air Force Texan big bore is absolute beauty even with its synthetic stock.

They are lighter than the wooden ones which you can handle easily and carry from one place to another as well.

The textured grip adds more uniqueness to it.

The butt plate can be rotated from left to right for some cast-on or cast-off adjustment.

Sight

Sight is one of the most important features of any shooting equipment.

Airforce Texan comes with no open sight though it offers you an 11 mm dovetail rail on the upper part of the body.

It is very important to put your illumination parts, surveying equipment, and range in sync for a successful shoot.

AirForce Texan Big Bore gives you full freedom to choose your own scope.

Do not rush into something popular just because people are saying it works well.

Air Force Texan lets you use a very wide range of accessories where the price range also satisfies all kinds of pockets.

You would not need some high-rated scope that is used in air guns usually as the Air Force Texan big bore has very little reverse recoil.

Go with something that serves your purpose and is affordable at the same time.

You can also think about Picatinny or weaver rail but in that case, you will need an adapter for Air Force Texan to accommodate those scopes.

There are numerous dovetails to pica tinny or dovetail to the weaver adapter available in the market,

And it would cost you around $40-50 to get a generous one.

Velocity, accuracy and power

Hands down we are talking about the most powerful air rifle in the world.

Whoever talks like “just an air gun” has definitely no clue about the power of Air Force Texan big bore.

To start with, you take a lead bullet of .45 caliber and Air Force Texan will deliver it with 500 ft-lbs energy at a speed of 100 fps.

Now, who talking about power! I will give you a detailed chart of velocity and energy airforce Texan produces in the case of different pellets.

Here are some of the test results that will give you a better idea of the power and accuracy in relation to certain ammo.

Accuracy

CalibersPelletsDistancesGroups
.308JSB EXACT DIABOLO, 50.15 Gr50 yards1/2"
.308JSB Exacts....50.15 gr25 yardsnickel size
.457340 grain 100 yards0.75"
.457143 grain round ball50 yardsone hole
.457150 gr ball75 yards3/4"
.457Air Venturi FP 350 gr50 yards0.73"
.357Aero Magnum 50 yards0.66"
.357Predator Polymag50 yards1.42"
.357Aero Magnum 100 yards1.31"

Chrony tests

CalibersPelletsFPSFPE
.357JSB Diabolo Exact 81.02 gr1100217.74
.30Slug 85 grains 1040204.19
.457Air Venturi Round Ball 143 Grains1016327.85
.357Air Venturi Round Ball 66 grain1066166.58
.357Air Venturi Flat Point 127 grain847202.36
.30Nielson 122 gr. hollow point
692129.76
.30Hunter Supply 134 gr. s.p.
721154.71
.457Semi-wadcutters 215 Grains835332.94
.457Air Venturi Round Ball 143 Grains, 1044 346.17
.457Slugs Nielsen 350 gr809508.77
.457Slugs 405 gr765526.42
.457Air Venturi FP 350 gr710391.87
.257Nielsen 85gr1048207.35
.257Areo Magnum 70gr1139201.7
.457Air Venturi PHP 250gr813367.01
.457Air Venturi SWC 265gr820395.76
.457Air Venturi FP 350 gr746432.62
.457Air Venturi FP 405 gr704445.82
.357Aero Magnum 128gr915238.02
.357Predator Polymag 81gr989175.97
.457Roundball 143 gr907261.28
.457Hollow point 200 gr848319.43
.457Round Nose 350 gr791486.38
.457Round Nose 405 gr750505.98
.457Hunters Specialty 310gr806447.29
.457Hunters Specialty 350gr769459.7

Air Force Texan is good to take down small to medium range games anytime.

In fact, it’s one of the best air rifles for hunting on the market.

Trigger

Air Force Texan big bore offers you a two-stage trigger, though they are not purely adjustable.

You can only adjust the position of the trigger.

In simple words, the trigger is crisp and clean.

In the Air Force Texan big bore trigger breaks at 32 ounces.

Being on the heavier side, you can always tell when the trigger is going to break.

This predictability increases the rate of success.

The valve of Air Force Texan big bore can be tuned to either maximum power or maximum consistency.

You can analyze your needs and make the right tuning.

Cocking and loading

Cocking and loading in an Air Force Texan big bore is very easy.

To start with, the butt plate on the Air Force Texan is adjustable, which gives you the highest flexibility against the length of this air gun.

While cocking, you pull the lever out that will cock the gun. Yes, it is that simple.

Then load the magazine and pull it back.

You are all set to fire your first shot.

You can see a side lever along the body of the Air Force Texan, which when closed automatically enables safety.

This is one striking feature of the Air Force Texan big bore.

It offers you incredible security that is enabled automatically.

Loudness

In this case, let me tell you the scenario in a very short and simple way. Air Force Texan big bore is LOUD!

Yes, if you are thinking about squirrel shooting without letting your neighbors know, then this should not belong in your drawing-room.

The barrel is not baffled nor shrouded so there is no silence mechanism.

However, I have the solution here.

There are numerous silencers available in the market which would do magic on your Air Force Texan.

One of the available products is Donny FL Emperor Suppressor which is claimed as quiet as raindrops.

You can choose from the wide variety available in the market and make your Texan quiet and perfect for lawn shooting.

Shooting Ability

As I mentioned above, an Air Force Texan is a single-shot air gun.

It has an in-built manometer to keep track of the pressure inside the barrel.

As with a decrease in pressure, you will find the performance deteriorating.

Maintenance

The Air Force Texan big bore is not a very high-maintenance air gun.

It was designed to provide you with endless shooting moments with minimum care.

There would be nothing for ages and then if you see slugs because of lead pellets,

Leave a note for your second generation to wipe it clean with a cloth.

If that does not suffice, but one or two drops of oil and your Air Force Texan big bore is new again, ready to serve your grandchildren.

Accessories

The Air Force Texan is a PCP gun with a 490 cc tank which offers a maximum pressure of 3000 psi.

If these numbers make any sense to you, then you already know what I am going to say next, if not let me clarify the fact that you need an external source to fill the tank.

You can use a hand pump but practically that would be very tiring so go for an air compressor and choose one available in the market.

If you don’t know how to choose the right air source for your PCP rifle, I suggest you use only compressed air or dry nitrogen for your Air Force Texan big bore tank.

Apart from the air pump, you will need a sight as it comes with no open sight.

Same as the tank there is a wide variety available in the market for sight and scope

So you can choose the perfect one according to your need and mood.

The Texan comes with a dovetail rail though with cheap adapters you can use pica tinny or weaver ring.

To eliminate the loudness you can use a silencer on the barrel and spending a little would not hurt as these accessories are here to last long.

Specifications

I have discussed in detail all the features but while picking the air gun, I know you could be in a hurry, so I am here to sum it all up. Here I am giving you the product specifications at one go.

  • Completely made in the USA.
  • This is a pre-charged pneumatic rifle, which works on compressed air pressure.
  • The body offers a side lever for better and easy access and loading.
  • Air Force Texan is a single-shot rifle.
  • It comes with a 11 mm dovetail ring for attaching your favorite scope.
  • The barrel of an Air Force Texan big bore is 34” long.
  • Two-stage trigger and the position can be adjusted.
  • Automatic safety, which can be controlled manually as well.
  • The grip is textured.
  • Air tank is 490 cc with a maximum pressure of 3000 psi.
  • Air Force Texan offers pressure relief devices.
  • In-built manometer to keep track of the pressure inside the tank.
  • Optic rail is extended for better mounting.
  • The power of the rifle could be adjusted according to your need,
  • Pull length is between 13.825” and 15”.
  • Butt plate can be adjusted depending upon your body weight and size.
  • There is no silencer, which makes the Air Force Texan big bore a loud air gun.

Air Force Texan is good enough to take down small to medium games anytime

Pros and Cons

ProsCons
  • The undeniable best feature of air force Texan big bore is its power, it is one of the most powerful air guns ever made and it really narrows the distance between the power of a firearm and that of an air rifle.
  • Accuracy is unbeatable with air force Texan big bore air gun.
  • Automatic safety to avoid any accident.
  • Durable and reliable.
  • Low maintenance.
  • Synthetic stock for extreme weather usage and light weight as well.
  • This rifle is not silenced. The loudness could be an issue in some gaming.
  • No scope attached with this air force Texan.
  • The air tank is right below your face increasing risk of mishap.

Price

Air Force Texan will cost you around $1000 to $1200 depending upon your caliber choice.

If you add the accessories like air tank, sight, and silencer, it would cost you another $300-$400

But considering the power and accuracy of the rifle, it should not be an issue.

This durable air gun is a one-time purchase and with proper accessories, you can have the best shooting experience.

Not only that, an Air Force Texan is a legacy you can leave behind.

Customer review

Air Force Texan is the name you can trust and so does the world of hunters.

The positivity and high spirit that surround Air Force Texan are always confidence boosters for new buyers.

They have done everything right with the air gun, and all that you would spend on this air gun will be totally worth the quality according to all the customers.

How does the AirForce Texan compare to other air rifles?

Airforce Texan vs Benjamin Bulldog

SpecificationsAirforce TexanBenjamin BullDog
Caliber.30, .45.357
Max Velocity1270 fps, 1000 fps910 fps
Muzzle Energy238 ft/lbs200 ft/lbs
Loudness5-High4-Medium-High
Barrel Length34.0”28.0”
Overall Length48.0”36.0”
Shot Capacity15
BarrelRifledRifled
Front sightNoneNone
Rear SightNoneNone
Scopeable11 mm dovetailWeaver/picatinny
TriggerTwo-stage non-adjustableTwo-stage non-adjustable
ButtplateAdjustableRubber
Best forHuntingHunting
Trigger pull2.06 lbs3.0 lbs
ActionSideleverSidelever
SafetyAutomaticManual
PowerplantPrecharged pneumaticPre-charged pneumatic
FunctionSingle-shotrepeater
Max shots per fill1210
Weight7.65 lbs7.7 lbs
Cylinder size490 cc340 cc
StockSyntheticSynthetic
GripAmbidextrousAmbidextrous
ColorBlackBlack

Starting with power, Airforce Texan still leads with an incredible muzzle energy of 238 ft/lbs for the .30 caliber.

The Benjamin Bulldog is a bit less powerful, with muzzle energy of 200 ft/lbs for the .357 caliber.

However, this is still enough to eliminate most of the large game you have long wished to hunt.

Coming to the length, the Benjamin Bulldog is 12 inches shorter than the Airforce Texan.

Similarly, the barrel lengths differ by 6 inches.

It is good to understand that the length of the gun is simply an aesthetic feature rather than a functional one.

Airgun Academy confirmed that there is no correlation between the barrel length of the air rifle and accuracy.

It is a misconception that longer barrels are more accurate than shorter ones.

Air rifles with longer barrels can at times be even less accurate than those with shorter barrels, and vice versa.

Likewise, the muzzle velocity of the air rifle is not entirely dependent on the length of the barrel.

As such, it all boils down to your taste.

Get the Benjamin Bulldog if you fancy a shorter air rifle.

Another significant difference is that the Airforce Texan is a single-shot air rifle

Whereas the Benjamin Bulldog is a multi-shot air rifle with a capacity of 5 shots.

Both single-shot rifles and repeaters have their pros and cons.

Personally, I prefer the single-shot rifle for my hunting expeditions.

You see, by having a single shot, I really have to make it count.

Even so, others prefer the repeater air rifles because they have backup shots if they miss the first or second one.

Airforce Texan vs Umarex hammer

SpecificationsAirforce TexanUmarex Hammer
Caliber.30, .45.50
Max Velocity1270 fps, 1000 fps1000 fps
Muzzle Energy238 ft/lbs700 ft/lbs
Loudness5-High5-High
Barrel Length34.0”29.5”
Overall Length48.0”43.75”
Shot Capacity12
BarrelRifledRifled
Front sightNoneNone
Rear SightNoneNone
Scopeable11 mm dovetailWeaver/Picatinny
Best forHuntingHunting
Trigger pull2.06 lbs3.0 lbs
ActionSideleverBolt Action
SafetyAutomaticManual
PowerplantPrecharged pneumaticPre-charged pneumatic
FunctionSingle-shotRepeater
Max shots per fill124
Weight7.65 lbs8.5 lbs
Cylinder size490 cc393 cc
StockSyntheticSynthetic
GripAmbidextrousAmbidextrous
ColorBlackBlack

What amazes me about the Umarex Hammer is the unheard-of muzzle energy of 700 FPE.

That is nearly three times the muzzle energy of an Airforce Texan.

You can imagine what that means given that the Airforce Texan is already powerful enough to down large game.

In fact, people question whether the Umarex Hammer is really an air rifle.

It is far above the typical air rifle in terms of power.

Call it a beast if you wish – you will have defined it well.

If you fancy such power in your hands, go for the Umarex Hammer. In this case, at a reduced cost!

The average price for the Airforce Texan is about $1,200 while the Umarex Hammer goes for about $900.

Might the price difference be simply attributed to the brand?

Remember Umarex is a German company while Airforce is an American company.

With the Airforce Texan, you will have about 12 shots per every fill of the 490 cc cylinder.

On the other hand, the Umarex Hammer has a 393 cc cylinder that supports only 4 shots when full.

As earlier mentioned, psychologically, the fewer shots you have per fill, the more focused you will be with shooting since you want to make every shot count.

Airforce Texan vs Condor

SpecificationsAirforce TexanAirforce Condor
Caliber.30, .45.22
Max Velocity1270 fps, 1000 fps1250 fps
Loudness5-High5-high
Barrel Length34.0”24.0”
Overall Length48.0”38.75”
Shot Capacity11
BarrelRifledRifled
Front sightNoneNone
Rear SightNoneNone
Scopeable11 mm dovetail11mm dovetail
TriggerTwo-stage non-adjustableTwo-stage, non-adjustable
ButtplateAdjustableRubber
Best forHuntingHunting
Trigger pull2.06 lbs3.0 lbs
ActionSideleverBolt-Action
SafetyAutomaticAutomatic
PowerplantPrecharged pneumaticPre-charged pneumatic
FunctionSingle-shotSingle-shot
Max shots per fill1250
Weight7.65 lbs6.1 lbs
Cylinder size490 cc490 cc
StockSyntheticSynthetic
GripAmbidextrousAmbidextrous
ColorBlackBlack

With 50 shots per fill, the Airforce Condor outdoes the Airforce Texan.

Having 50 shots helps you concentrate more on the shooting bit rather than on the technical bit of refilling the cylinders.

That is especially true if you dislike air rifles for the fact that you have to refill them over and over again.

Both the Airforce Texan and the Airforce Condor are single-shot air rifles, in contrast to the repeaters.

Single-shot air rifles in a way make you more conscious of your shooting, in that you will not want to waste a shot.

You will also notice that the Airforce Condor is significantly shorter than the Airforce Texan.

This however does not affect its performance.

Whether a gun has a short or long barrel does not really matter.

The Airforce Condor comes in 4 models – the .177, the .20, the .22, and the .25 caliber.

The .177 caliber gives a rip-snorting muzzle velocity of 1450 fps.

This is way above what the .30 caliber of the Airforce Texan can achieve (1270 fps).

At only 6.1 lbs, the Airforce Condor feels much lighter than the 7.65 lbs Airforce Texan.

I can advise you to go for the Airforce Condor if ease of carrying is a vital consideration for you when choosing air rifles.

Airforce Texan 357 vs 45

The major difference between these two guns is their caliber.

Your choice of bigger or smaller caliber depends on what you intend to do with the air rifle.

Bigger caliber air rifles tend to have lower muzzle velocities.

With a decreased muzzle velocity, you expect the pellet to start deviating from the straight path at some distance from the shooter

Which is less than that recorded with an air rifle that has a high muzzle velocity. 

Is your intention to kill rats within the house?

Then you certainly don’t need a very high muzzle velocity.

A hunter in the wild will however need an air rifle with high muzzle velocity given that prey may not always be very near the shooter.

In other dimensions, the higher the caliber the higher the penetration power.

A .45 pellet will deliver more energy to the prey.

The Airforce Texan .45 produces muzzle energy of up to 400 FPE while the Airforce Texan .357 produces about 340 FPE.

The difference here is not that large. Bigger pellets can also be shot without being swayed by the wind.

Bonus: Airforce Texan vs Concrete block

Believe it or not, pellets shot from the Airforce Texan Big Bore are able to destroy concrete.

Twang n Bang, Inc tested the Airforce Texan on a 150 mm thick concrete block and the block cracked into two with just two shots.

This just confirms that the Airforce Texan is one of the most powerful air rifles in the world.

Conclusion

To sum up, Air Force Texan is the American dream in the world of air rifles, which offers you durability, power, and accuracy in a single box.

Best Air Rifle Deals

Popular Posts

Gas vs Spring Piston: Which One is Better?

0
Today, you can find 5 different types of air rifles available in the industry. They are: spring pistons, gas pistons, PCP air rifles, variable...

.22 vs .25 Air Rifle: The Ultimate Comparison Guide

0
When I first got introduced to the world of rifles, I often thought that a bigger caliber meant better performance. So, I thought that...

Air Rifle vs BB Gun: Understanding the Key Differences and Choosing the Best Option

0
"Air Rifle vs BB Gun: Unveiling the Key Differences and Choosing the Perfect Weapon for Your Shooting Needs. Delve into this comprehensive guide to...

Air gun 101: The differences between .177 & .22 – Which jobs they do...

0
I’ve always believed the popular phrase: “It’s not the size of the dog in the fight that matters - but rather the size of the...

What Is An Air Rifle?

0
If you have stumbled upon this article, chances are that you probably have a pest problem at your house. This is a very common...