Most of the time deer seem like ghosts walking through the woods. For the hunter it might sound like the forest is filled with everything but deer. In reality, though, deer are quite vocal animals, and they express themselves with a variety of noises that all mean different things, from warnings to sweet talk.
Knowing these sounds is essential to the effective hunter. Not only can they let him know where deer are and what they’re doing, but certain sounds may repel or attract certain types of deer at certain times. It might sound complicated, but there are definitely harder languages to learn.
In the end learning the vocabulary of deer speak is a lot of fun.
If you’re looking to imitate a deer you should checkout how that’s possible by reading our roundup of the best deer calls. Or maybe you’d like an article outlining the characteristics and locations of all the different types of deer that make up the deer family?
We’ve also another similar article that covers the sounds that Elk make.
What sounds does a deer make when scared or nervous?
One of the things that have helped deer survive for so long is their herd mentality. They take care of each other. One way they do that is by warning each other when there’s danger. Specifically, there a few sounds you should be aware of because if you hear them, it probably means a deer knows you’re around and has just alerted the rest of the herd.
Sniffs
If a deer begins to sense something is off, they may start making sniffing sounds. Not only are they trying to get a better smell, one of the easiest ways they can find you out, but they’re also putting the rest of the herd on edge. The sniff doesn’t sound much different than a human sniff, only stronger and deeper. Imagine air being sucked in through a deer’s large nose.
Deer sniffing at 1:05
Stomps
Along with sniffing, suspicious deer may begin lightly stomping their hooves. This happens when they first suspect danger but aren’t quite sure where or what it is yet.
The noise sounds just like a wood block striking the ground and is usually noticeable since the deer are otherwise as silent as mice. The stomping puts the rest of the herd on alert so that they can more easily pinpoint the threat.
Snorts
The snort happens when a deer is positive there’s danger around. It means whatever methods you’ve employed to camouflage your body, noises and scents haven’t been enough. The snort sounds similar to a human sneeze, and nothing is more disheartening than hearing it off in the distance just when you’ve given up for the day and decided to start making your way out of the woods. The deer will snort, raise its tail and run away. The sound will alert other deer, and they’ll all do the same.
Listen to both stomps and snorts in this video
What sounds does a deer make when angry?
When they’re in the rut, male deer shed some of their usual cautiousness in order to chase the does. This certainly applies to their sounds as well, and a buck in the rut will be a lot louder than usual. In fact, he’ll make a variety of sounds to intimidate other bucks or warn them of his presence, and he’ll respond to sounds that make him think there’s another male around. He’ll make sounds to try to seduce the does as well.
Buck Grunt
Bucks make a loud grunting sound to show their dominance. While all deer make soft, long grunts to call to one another, the deep, short grunt of the buck is the male claiming the territory and does in it as his own. He’ll usually make it when he’s decided on a specific doe to chase, and he’ll continue making the grunts as he chases her. The sounds are also attractive to the females.
A buck grunt is one of the sounds that can be mimicked to attract a deer. Some examples are listed here in our roundup of the best deer calls.
Listen to buck grunts at 2:40 into this one
Rattling Antlers / The Buck Rattle
The buck rattle isn’t a vocalization of the deer. It’s the sound of two bucks fighting. When they spar, they clang their antlers together making a rattling sound. Before the rut begins, this can be light sparring just to size each other up, but when the does are in estrus, this becomes serious fighting to determine dominance.
If other bucks hear the sounds of antlers rattling, they know two males are fighting and will usually come to watch, especially the dominant buck of the area because he’ll want to know who’s fighting in his territory. This is why imitating this sound can attract them.
Hunters or naturalists looking to lure deer often use man made materials to mimic these sounds, there are some great examples in this roundup of the best rattling antlers.
Snort-Wheeze
The snort-wheeze is an especially aggressive sound used to intimidate rivals. It sounds just like the name implies: a snort followed by a raspy wheeze. Two bucks vying for territory and does may make these sounds at each other to display their dominance. If one buck is smaller or more timid, the noise might send him running, but the more aggressive males usually make this sound just before they spar. This noise combined with the rattling antlers really gives the impression of a fight and will attract curious and dominant bucks to the area.
There are some example products that allow you to make rattling antler and snort wheeze sounds in our roundup of the best deer calls.
Snort-wheeze at 0:20
Other deer sounds
Being herd animals, deer need some way to communicate, and one of those ways is sound. They don’t just make noises to show fear or anger, but they also make different sounds when they’re excited, happy or even bored. Does especially have a wide range of vocalizations they use with each other and their fawns.
Doe Grunt
The grunt of a doe is much higher than that of a buck because the females have smaller bodies, and just like in humans, this results in a shorter airway. The does don’t grunt to show dominance, though. Basically, they just do it to talk to one another. Deer are highly social, and they try to gather together when they can, so a grunt is the deer’s way of telling others it’s around and ready to mingle, so to speak. The mothers also grunt to call the fawns if it’s feeding time or if they’re moving to a new location.
Listen to the due grunt at 1:14
Doe Bleat
Does also bleat in social situations. The bleat is a higher-pitched vibrating sound, similar to that of a goat. They mostly do it when they are gathered together or with their fawns, and it signals contentment.
Doe in Heat Call – Estrus Bleat
When the does go into heat and are ready to mate, they make their own sound to seduce the bucks. This is the estrus bleat and it’s higher than the bucks’ calls. It almost sounds like a kazoo. When a doe wants to mate, she’ll stop and make the bleat which lets the buck chasing her know she’s ready. This can be one of the loudest noises deer make and is very distinctive.
Listen to the doe bleat at 1:00
What sounds does a baby deer make?
Baby deer, or fawns, make a lot of different noises to communicate with their mothers. The does have strong maternal instincts and respond quickly to calls from their babies. Consequently, if you’re hunting a doe, the best way to attract her may be to mimic the sounds of a fawn.
Nursing Whine
When the fawns are nursing or trying to nurse, they whine. It’s a rising and falling pitch that actually sounds a lot like a rusty screen door blowing in the wind, but the fawns make it to bond with their mothers. Like most social communication between deer, it is not audible from much of a distance.
Fawn Distress Call
If a fawn is in danger, it will call for its mother’s help. The call sounds like a loud continuous cry that can sometimes be eerily human. If it’s enough to make you feel like you need to go see what’s wrong, just imagine how it sounds to a mother deer. Does will normally come fast to find the crying fawn, even if their own babies are safe by their side. As you can imagine, the noise increases in volume depending on how much the fawn feels in danger. It might be quiet and rhythmic if the fawn is merely lost and looking for the herd, or it could be loud and panicked if it’s being chased by a predator. You’re mostly likely to hear this sound at the beginning of the season when fawns are still small and dependent on their mothers, and that’s also when you’ll have the best luck imitating it, though it can be successful year-round.
Fawn Bleat
Fawns also make a goat-like bleating sound similar to the does when they are happy. Because of their small bodies, the pitch is higher than that of the adults, but it serves basically the same purpose. The fawns bleat when they’re playing with each other or socializing with their mothers, and it encourages social bonding within the herd. You’re likely to hear young deer playing around and bleating while their mothers feed.
Chuck Adams reveals what it takes to keep bowhunting—even into your 70s.
Chuck Adams is perhaps the greatest bowhunter of all time. That’s a bold statement, but consider this. In 1990, Adams became the first archer in history to harvest all varieties of North American big game—a feat called the Super Slam. As I write this in early August 2022, he has more than 210 Pope and Young record-book entries, which is more than any other hunter in history. In addition, he’s racked up six bowhunting World’s Records. Adams turned 71 in May, and I was able to track him down before he headed back to Alaska to hunt solo for Sitka blacktail deer. Here’s what he had to say.
You started bowhunting in California when you were 13. Why bowhunting?
The minimum age you could hunt big game there was 12, and both my grandfathers and dad had great hunting spots. As a young kid, I would think about hunting deer all year. Using a rifle, I got my deer down in a few days, and I thought it was a lot of anticipation for the pay off. I took up bowhunting, so I could hunt more and kill less. I got my first deer with a bow at 16. It took me three years to do that, just like my hero Fred Bear.
How do you continually get out there and get it done? What’s your secret?
It’s probably genetics. My dad was packing deer on his back when he was in his 80s. And I live a really healthy lifestyle. I don’t drink alcohol. I don’t eat domestic red meat—it’s all wild game. I’m out there hiking around and doing something all the time. I can tell you I still feel like I’m 30. I carried three deer back to my camp [last season] about five miles. The average Sitka deer is 60 pounds of boneless meat.
How often do you practice shooting your bow?
I talked to a doctor about 20 years ago because my friends were having shoulder issues. My doctor said I would be better off shooting less. So that’s what I did, and I’m one of the few guys over 60 that I know who has had no shoulder problems. And I usually shoot a 75-pound bow.
I’ll usually start shooting 20-30 arrows twice a week in May. Then in July, I shoot about 60 arrows each week. I always warm up with about five minutes of shoulder rolls. I also take time between shots to re-oxygenate my muscles. When I shot tournament archery, I watched people shoot too fast, and they didn’t let their muscles or their mind recoup between shots.
Did you ever go on a hunt and think you weren’t going to make it back?
I wrote about the “Death March” in one of my books about a hunt in British Columbia in the 1970s. We had 29 horses and mules when we started, and nine of them died on the trail because of malnutrition. The hunt was set up with one of the companies I worked with, and they didn’t do their research. It started snowing, and we didn’t dare ride the horses except to cross the streams, which we did 28 times—I counted. If we all hadn’t been in good shape, I’m not sure what might have happened.
How much does luck play into hunting—bowhunting in particular?
It’s huge—sometimes. For example, I didn’t expect to kill the new World’s Record typical velvet Sitka deer last year, and it was the first deer I saw on the trip. Overall, though, luck is fairly small when it comes to planning. The most important thing in bowhunting is persistence. If you’re persistent enough, you will overcome anything.
Do you ever kill anything without big antlers? Do you take all that meat home?
I love the meat, and I pack it all out. I eat the heck out of wild game. Nowadays in Alaska, the excess baggage fees have gotten so high that I donate some meat to the local mission on the island. If my bush pilot needs meat, I’ll sign it over to him. And the laws are pretty clear about wanton waste. This year I applied for a cow elk permit in Wyoming, which I’ll probably get. And one in Montana, too.
Most folks can’t say they hunt for a living. Can you say that?
No. I make a living, so I can hunt. I write, do seminars, TV shows and rep a few companies that I like, so I can go hunt. If I felt any pressure to hunt, I think I’d quit. I hunt for fun, not to make money.
Any hunt you would never want to do again?
Polar bear. I was 1,000 miles away from my outfitter, and it was a rodeo from start to finish. My guide said he had the best dogs, but they had supposedly run away, so he had another set of dogs that were terrible. They ran away from the first bear we saw. I ended up stalking that bear myself.
Do you have a state or terrain that speaks to you more than others?
My two favorite states to hunt are Montana because of the variety of game and Alaska because there you can hunt most species without a guide. I only go with a guide if it’s legally required. I’ve been bowhunting for 50 years, so I don’t really need one. Guides do have knowledge of the area. But honestly, I wouldn’t want another Chuck Adams guiding me because two bowhunters make twice as much noise as one.
In just about every photo I see of you, you’re wearing the same faded camo and old boots. Why not upgrade to high-tech camo?
I don’t think all those new camo patterns work as well as merino wool and traditional stuff. I think it’s a stunt. That stuff is too expensive. You can fade a pair of black Levis and be just fine. Today, I would say there is a cult following all those camo patterns. When guys show up at hunting camp all wearing the same fancy camo, I just laugh.
Any plans to hang up your bow and take up golf?
I’ll hang up my bow when I can’t put one foot in front of the other. I’ve got 211 Pope and Young animals, the most of any hunter, and my buddy Frank is trying to catch me. That’s really not the reason, but I am challenge oriented. I can’t stand the thought of running a race and even seeing anyone close. I hunt because I love it. I think the bottom line is that I enjoy bowhunting as much as I ever have. The glitter has never worn off for me.
Learn more about Chuck Adams at his website, www.chuckadamsarchery.com. Or follow his exploits on Instagram @Chuckadamsarcheryofficial.
PJ DelHomme writes and edits content from his basement office in western Montana. He runs Crazy Canyon Media and Crazy Canyon Journal.
Other Articles You Might Like:
12 Tips to Help You See More Deer on Archery Opener
Material — Pick a blade that won’t rust easily, and can last you forever.
Thin, Flexible Blades — Slice through the fillet with ease, and make precise cuts.
Sharp-Edged Blades — Pierce the fish and remove the fish bones intricately.
Blade Length — The optimal blade length for a fillet knife varies by fish. Check out the table below.
Handle Type—Choosing a handle that comfortably fits into your hand is essential. It allows for a firm grip.
Gladiator Series 7″ Flexible Fillet Knife
Let me preface this by saying I’ve only gotten into fish in the last 6 years or so (I’m 33 at the time of writing this). Now, before you rush to judgement, I remind you I live in a country that is globally known for its meat and people here will prefer beef over just about anything. Sad, right? But those are the facts.
That’s why, when I first attempted to cook my first fish at home, I was disappointed at the fact that I did not own the proper tools to process it. Longer story short, I ended up cooking the entire fish but it felt like cheating, in a way. I couldn’t help but feel that something was missing so, after a quick online research process, I went ahead and ordered myself a fillet knife.
Filleting, for those of you who don’t know, is basically separating the flesh of the fish from the bone. This is achieved by making smooth, precise cuts along the fish’s backbone, from the tail to the head. Initially, it might sound like a daunting task but a fillet knife can make the job way easier thanks to its flexible yet robust blade, giving you more control over the entire processing endeavor.
And while its raison d’etre might be filleting fish, the fillet knife should also be your go-to tool for the earlier stages of the fish preparation process, aka de-skinning and deboning. Other culinary tasks such as whipping up poultry fillets, producing ultra-thin slices of carpaccio meat, and even deveining shrimp are also among the things a filleting knife can excel at.
So, you see, when you invest in a quality fillet knife, you’re actually investing in a highly versatile tool that will greatly enhance your entire cooking process.
But enough of the chit-chat, let’s get down to business. Here’s everything you need to know about what makes a good fish fillet knife.
What makes a good fish fillet knife?
What is the best knife for filleting fish?
What is a filleting knife used for?
What is the difference between a fillet knife and a boning knife?
There are several aspects that you want to look out for in a good fish fillet knife. These include:
Material — Pick a blade that won’t rust easily, and can last you forever.
Thin, Flexible Blades — Slice through the fillet with ease, and make precise cuts.
Sharp-Edged Blades — Pierce the fish and remove the fish bones intricately
Blade Length — A cheaper blade might be good for small-fry but you want something that can handle all manner of catches.
Handle Type—Choosing a handle that comfortably fits into your hand is essential. It allows for a firm grip.
Material
You may only be using your knife at home, but a key thing to remember is: fillet knives are also likely to be used on a fishing expedition. This means they’re going to be exposed to saltwater.
You might be wondering how that’s relevant?
All fillet knives should be corrosion-resistant because of this. A high-carbon stainless steel blade ensures that your knife remains in prime condition, even if it gets wet.
Cheaper knives do sell themselves as being made out of stainless steel, but you’ll find they’re less brittle and lacking the high-carbon the higher end knives offer. These will rust more quickly and lose their sharp-edge.
It’s one of the first aspects you should look for in picking a good knife.
Thin, Flexible Blades
The keyword here is control, and this is something often overlooked. Your knife needs to be thin and flexible, so you can make clean precision cuts.
Imagine trying to do that with a cheap and thick knife.
You’ll likely tear the flesh, and snap the fish’s bones as you make the cut — in turn, that makes it more liable those bones will get lost and end up on your plate!
Sharp-Edged Blades
You’ve found the perfect blade. It’s made of the highest carbon steel, it’s thinner than a piece of string, yet when you go to make your cut, it hardly leaves a mark on the fish!
That’s because you need a sharp-edged blade.
It says that an ideal fillet knife’s edge will have an angle of 12-17 degrees. It’s one of the finer bevels.
A fillet knife needs to be sharp so you can make a smooth cut, just like butter!
It also helps with the fish bones, too. If you spot an elusive bone inside your fish, you wouldn’t want to tear at it with a blunt blade. That could ruin the entire filleting process.
You want to get underneath the bone with a fine point and get it out with ease.
That’s why you need a sharp knife.
Blade Length
It’s easy to overlook the blade length.
You pick up a knife and assume it’s good for the job. 9 times out of 10, it probably is.
However, with a fillet knife, you may be making your life more difficult.
While smaller sized knives allow for more flexibility, when filleting large fish you need a longer blade.
We’ve made a handy guide to help you:
Knife LengthFish Type 4-6” inch blade. Perch Trout Walleye Pan Fish Mackerel 7-8” inch blade. Pink Salmon Salmon 8”-9.5” inch blade. Codfish Tuna Catfish Halibut
Having two or three blade sizes available is a brilliant idea, as you’ll always be prepared — no matter what type of fish you plan to cook!
Knife Handle
Similar to the length, another aspect often overlooked is the handle. Luckily, however, this one is a matter of preference!
Choosing a handle that comfortably fits into your hand is essential. It allows for a firm grip.
Remember: A firm grip means better control. Better control means a better cut.
These are the main three different types of handles available on the market:
Wood — Comfortable to hold and very sturdy. Slippery when wet.
Rubber — Better grip than wood, easier to clean. Not as sturdy as wood.
Plastic — Better grip than wood, easier to clean. Not as sturdy as wood.
2. What Is the Best Knife for Filleting Fish?
As you might’ve inferred from my lengthy preamble, the best knife for filleting fish is, wait for it, the fillet knife. Featuring a lightweight blade that gently curves from the handle to the tip, the fillet knife is the best suited knife to turn a whole fish into a series of longitudinal strips of flesh also known as, yes, you’ve guessed it, fillets.
With a blade length ranging from 6 to 11 inches, this member of the boning knife family is pretty much the only tool you’ll need to de-skin, debone, and filet your freshly caught fish like an actual pro.
In terms of variety, there are two main types of fillet knives out there that you can easily find on any online retailer:
Japanese-style fillet knives, usually called deba, which are less flexible but extremely sharp thanks to their single-beveled blade (it’s only sharpened on one side).
On the other hand, Scandinavian (also known as German) fillet knives are also popular, featuring a double-beveled blade with a heftier feel.
At the end of the day, there is no right or wrong when choosing between these two varieties. It all comes down to preference—Japanese fillet knives offer more precision at a granular level but Scandinavian fillet knives are sturdier and therefore better suited for outdoor activities.
If you’ve made it this far, we assume that you might’ve done some research on your end, trying to determine which fillet knife to finally purchase. You might’ve read about Bubba Blade or Rapala, known for their state-of-the-art folding fillet knives and fishing knives. And while we encourage you to follow your heart, we’re not here to tell you what you already know.
We take it for granted that you wouldn’t be reading this article if you weren’t looking for something different, something that could both spice up your kitchen and accompany you on all of your trips and excursions. A unique fillet knife that looks good and, most importantly, feels good.
For that reason, we handpicked a few items from Dalstrong’s wide assortment of fillet knives to offer you a couple of forward-thinking solutions to your current filleting dilemma.
Let’s get started!
1. Filet Knife 6″ | Shadow Black Series | | NSF Certified
There’s no denying it, the Shadow Black Series 6” Filet Knife is one mean-looking knife. Its pitch-black titanium coating makes it look like something Batman would use on his fishing trips. Skin, bone, sinew—nothing stands a chance against its 7CR17MOV-X vacuum-treated steel blade, painstakingly hand sharpened to 16-18° per side for optimal performance.
Pros:
Peerless design.
Black, non-reflective titanium-nitride coating for corrosion-resistant, non-stick properties.
Features an ergonomic handle for maximum comfort.
Cons:
At 6”, it might not be the best option for working with larger fish.
Its unique looks might not be for everyone.
2. Curved Fillet Knife 6″ | Gladiator Series
The Gladiator Series’ 6” Curved Fillet Knife is a true all-around performer. From filleting fish and poultry to finely mincing onions and shallots, the versatility of this excellent knife knows no boundaries. Forged from a single piece of high-carbon German ThyssenKrupp steel, its blade is designed for laser-sharp precision.
Pros:
Beautiful hand-polished finish.
Excellent edge retention.
Comes with a PerfectFit Dalstrong Sheath.
Cons:
Its design is a bit more conservative than other knives on this list.
Some cooks might prefer a thinner fillet knife blade.
3. Fillet Knife 6″ | Delta Wolf Series
Don’t be fooled by its size, the Delta Wolf Series 6” Fillet Knife is one ruthless performer. Inspired by the Special Operations Force of the same name, it features a high-carbon 9CR18MOV steel blade with a narrow tip that will allow you to filet, trim, de-bone, de-skin, and butterfly with minimal effort. Whether in your kitchen or in the great outdoors, this stunner of a knife is sure to turn heads wherever you go.
Pros:
Edge is painstakingly hand sharpened to 8-12° for optimal performance.
The triple-riveted G10 camo handle is designed to withstand the most extreme conditions.
Comes with a gorgeous PU Leather Sheath.
Cons:
Some outdoorsy cooks will prefer a slightly longer knife to work with large fish.
Its stealthy looks might not be everyone’s cup of tea.
4. Shogun Series 6″ Fillet Knife
A part of Dalstrong’s very own Shogun Series, this 6” fillet knife marries centuries of Japanese knife making knowledge with modern technology to superb results. With a blend of Japanese high-carbon AUS-10V steel and 66-alternating layers of SUS410 damascus, its blade offers the perfect balance between maneuverability and strength.
Pros:
Stunning Tsunami Rose pattern on the blade.
Nitrogen cooled for enhanced harness, flexibility and corrosion resistance.
G-10 Garolite handle adorned with a classy copper mosaic pin.
Cons:
Its price point might be a little high for casual home cooks.
Believe it or not, more conservative chefs will prefer a clean stainless steel finish as opposed to the Damascus steel’s distinctive pattern.
5. Fillet Knife 6.5″ | Crusader Series | NSF Certified
Last but not least, we have the Crusader Series’ 6.5” Fillet Knife. Sporting a minimalist design inspired by medieval swords, this knife will become a trusted ally in your kitchen for all things filleting. Built from a single piece of German-made ThyssenKrupp stainless steel painstakingly sharpened at 16-18 degrees per side, the Crusader is one stellar piece of craftsmanship that will stand the test of time.
Pros:
Full tang blade for strength and robustness.
Its seamless transition from the blade to the handle makes it super hygienic and easy to clean.
Comes with a handcrafted Acacia wood magnetic sheath to keep your knife secured and in place.
Cons:
Some folks prefer the feel of a traditional wooden handle.
Its modern looks might be a turnoff for more conservative chefs.
3. What Is a Filleting Knife Used For?
Fillet Knife 6″ | Shadow Black Series
Like we established before, a fillet knife’s main purpose is to produce thin strips of flesh from an entire fish known as fillets. Due to its flexible blade, the fillet knife can cut around the contour of the bones, joints, and skin, making sure nothing goes to waste.
But far from being a one-trick pony, the fillet knife has many aces up its sleeve. Some of the things you can also do with a filet knife include:
De-bone, filet, and remove the fat from a whole chicken.
If you don’t own a meat slicer, the fillet knife can act as a decent substitute to get ultra-thin slices of beef.
Since this type of knife is specially designed to work with fish, it can also come in handy when removing the scales and removing all of the internal organs. This process is also known as cleaning.
Cut, slice, and peel fruits and vegetables.
Create sophisticated garnishes for your salads and cocktails.
Pro tip: If you want to look cool while filleting fish for a fancy dinner at home, check out our collection of aprons.
4. What Is the Difference Between a Fillet Knife and a Boning Knife?
While there might be some overlap between these two, the truth is that they serve two entirely different purposes.
Let’s start with the specs:
Boning Knives
Designed to separate bones from meat and fish.
Average blade length: between 5 and 7 inches.
Type of blade: usually flat with a straight and slightly curved tip.
Removes meat from heavy bones or tiny bones from fish.
Slightly thicker than fillet knives.
Fillet Knives
Thinner and more flexible than most other knives.
Average blade length: between 6 and 11 inches
Type of blade: features a gentle upward curve that ends in a sharp curved tip.
Perfect for removing scales from a fish without damaging the meat.
Can’t handle excessive force like a chef’s knife—it’s mostly meant to perform delicate tasks.
To sum it up, fillet knives are a part of the boning knife family but are generally designed to work solely with fish. Their fillet blade is thinner and more flexible than most boning knives, allowing for a greater degree of control. Like we’ve mentioned before, a fillet knife can perform many other tasks but an irresponsible use can dramatically reduce its lifespan and damage the sharp blade.
Boning knives, on the other hand, are a bit sturdier and can easily process larger pieces of beef and game. While they’re considered more versatile than fillet knives, boning knives are not as flexible and will not perform as well with delicate meats such as fish. This requires a level of flexibility and finesse that only the fillet knife possesses.
Pro tip: What’s your sharpening go-to method? Whetstone? Sharpening steel? Regardless of your weapon of choice, this nifty sharpening tutorial covers pretty much all you need to know about keeping your knife blade’s sharp edge.
There’s just no way around it. Processing fish requires a high quality fillet knife. Your average kitchen knife or chef’s knife just won’t do.
If you want to step up your fish-processing game, you need a fillet knife with corrosion-resistant properties. This is a must, since prepping fish means you’ll be working mostly in wet environments. Most modern high-carbon stainless steel blades will do just fine.
Also, when working with fish, hardness is not so much of a concern. What you need is a thin and flexible blade that can breeze through the fish’s fragile bones and skin without leaving a full-on carnage on your cutting board. A good fillet knife can transform an entire fish into precisely cut fillets with surgical precision.
Note: There are also electric fillet knives that can work just as well as a fixed blade. That said, they’re generally larger, heavier, and more expensive. Now, that wouldn’t be a problem if you were only using it in your kitchen but think about your fishing trips: would you wanna carry around a power source wherever you go? We didn’t think so either.
Frequently Asked Questions
What is the best quality fillet knife?
The best quality fillet knife can vary depending on personal preferences and needs. Factors to consider include the knife’s blade material, sharpness, flexibility, and handle comfort. Brands like Wusthof, Victorinox, and Bubba offer reliable options. An electric fillet knife, like those from Rapala or American Angler, can also be a good choice for efficient filleting. A comfortable handle with a nonslip grip enhances safety and control.
6. Dalstrong Film – The Fishmonger & The Sea
SHOP FILLET KNIVES TODAY
You can also check in with our Expert Knife Finder Quiz and get specific recommendations based on your needs.
Written by Pablo Perez
When he’s not adding way too much butter to his recipes, Pablo likes to write about knives, music, food, cinema, and all of the other things that make life worth living.
“Unlocking Precision and Power: Discover the Superior Air Rifle Springs for Unmatched Performance”
air rifle springs
When it comes to air rifles, the role of springs cannot be overstated. Air rifle springs play a crucial role in powering the weapon and propelling pellets or BBs. These springs are essential components that provide the necessary force to compress air within the rifle’s chamber, which in turn generates the energy needed for each shot. As such, choosing the right type of spring is paramount for ensuring optimal performance and accuracy.
There are various types of air rifle springs available on the market, each offering different characteristics and benefits. One popular option is the coil spring, known for its reliability and durability. Coil springs are designed to withstand repeated compression without losing their strength over time. Another common choice is gas ram or nitro piston technology, which utilizes compressed gas instead of a coiled spring. This alternative offers advantages such as reduced recoil and smoother cocking action.
Whether you prefer traditional coil springs or innovative gas ram systems, selecting high-quality air rifle springs is essential for achieving consistent power and accuracy in your shots. Additionally, regular maintenance and lubrication of these springs are crucial to prolong their lifespan and ensure reliable performance throughout extended use. By understanding the importance of air rifle springs and making informed choices regarding their selection and upkeep, shooters can enhance their shooting experience and achieve better results on target.
In conclusion, air rifle springs play a crucial role in the functioning and performance of these firearms. Understanding the different types and qualities of springs is essential for shooters to achieve optimal accuracy and power. Regular maintenance and proper replacement of worn-out springs can significantly enhance the longevity and efficiency of air rifles.
It isn’t often that the whitetail world gets a legitimate chance to headline a “biggest ever” or “new world record.” By definition, only rarely do trophies of this magnitude come along.
For instance, the current overall Boone & Crockett non-typical world record “Missouri Monarch” was found way back in 1981. It’s also now been over a quarter-century since Saskatchewan hunter Milo Hanson shocked the world by taking a new No. 1 B&C typical. The “Nebraska General” shed antlers, the largest free-range typical set ever recorded, were found in 1959 but only brought to public attention in 1996.
In 2000, Mike Beatty broke the Pope & Young word record — which had stood since 1962 — with a 294 0/8-inch Ohio non-typical. And in 2004, Tony Lovstuen’s 307 5/8-inch Iowa muzzleloader buck was recognized as the largest whitetail ever taken by a hunter. He held that rank until 2016, when we were treated to muzzleloader hunter Stephen Tucker’s 312 0/8-inch Tennessee non-typical, which was recognized as the largest whitetail ever taken by a hunter. And then, last fall, Luke Brewster arrowed a 320 5/8-inch Illinois giant that has taken the crown from Tucker as the newest top non-typical hunter kill.
Interestingly, on the heels of the Brewster buck, we have another whitetail sending shock waves throughout the antler community.
The December/January 2018 issue of North American Whitetail magazine featured a monstrous 9-point buck from southern Indiana. The deer, taken by hunter Andrea Moffett, had a gross typical score of 200 inches and a B&C net score at 180 4/8. Those numbers put the Moffett buck among the world’s elite whitetails. But it is the 2015 shed antlers from the buck that are going to blow away any misconceptions about just how big a wild deer can possibly grow.
Photo courtesy of Shane Indrebo
The current world record matched set of typical shed antlers listed in the North American Shed Hunters Club (NASHC) record book is from a buck known as “The Nebraska General.” That matched 6×6 set has an official record book score of 195 1/8 net inches following asymmetry deductions (without a spread credit). The largest 5×5 typical sheds listed in the NASHC record book belong to the so-called Fleming sheds from Saskatchewan with a net score of 181 2/8 (again, no spread credit). The preliminary measurements of the Indiana sheds will put them very near, or slightly over the Fleming sheds as the world’s largest known 5×5 set.
The final numbers on a score sheet determine where a set of antlers will rank. However, a score is only a number — it does not always tell the entire story or describe just how big a set of antlers might truly be. Seeing the rack in person is the only way to understand the full size and visual impact the antlers have. And while the Moffett buck carried the 2015 set of antlers, he was beyond any doubt in my mind the largest typical whitetail to ever walk the earth!
Let me explain. It would be impressive enough if these antlers were given a final official score that meets or exceeds the reigning world record for 5×5 sheds. That would make them huge in their own right. However, once you add on a conservative inside spread of 30-plus inches, these Indiana sheds enter a realm all of their own! Positioned as they would have been on the buck’s head, these antlers could score as high as 220 or even higher with a spread credit, netting around 210-213 after asymmetry deductions.
These numbers are unheard of for a 5×5. (Again, the Milo Hanson buck, a basic 6×6, is the largest intact typical rack ever, at 213 5/8). The Indiana buck’s left side alone could cross the coveted 100-inch mark, as that with only five points (counting the main beam). There is a very realistic expectation for these sheds to not only surpass the existing world record 5×5 sheds, but the left antler could be a world-record single, too. The typical mark for a single currently stands at 98 6/8 and is held by the Reissmann shed, a right side from Illinois in 1991.
I was recently given the privilege of not only seeing and holding the Indiana antlers myself, but also was able to compare them to the racks of many other top-end whitetails. When I picked up the sheds for the first time, I was literally speechless! I stood and stared at them and could only shake my head, mostly in disbelief. I could not believe a whitetail, not to mention a 5×5 typical, could ever reach the size and magnitude of what I held in my hands. I was eventually able to form words, but even then I could only say, “Oh, my gosh” over and over. After 30 years of being around world-class whitetails and having the honor of seeing in person and in many cases holding them, I thought I had seen it all. But as soon as I picked up these sheds, I immediately understood that I had been completely wrong in my thinking.
I was recently invited to New Richmond, Wisconsin, and to the office of Antlers by Klaus. Klaus Lebrecht is the world’s leading replicator of world-class whitetails; it was here that I was given the privilege to compare the Indiana sheds to the racks of other world-class bucks, including world records and many Top 10 entries. Albeit, I was comparing them to replicas, but those replicas are exact in scale and measurements. I can say with the utmost confidence that no other whitetail rack can hang with these sheds! They literally embarrass former and even current world records, both hunter-taken trophies and shed sets. I had intentions to take quality side-by-side comparison photos, but I soon realized that doing so would only diminish the perception of any racks I set alongside them! I simply could not do that to some of the biggest deer in the world.
Photo courtesy of Shane Indrebo
Ohio antler collector Keith Snider recognized the sheds as being world class, and he negotiated their purchase from the Moffett family. They’re now the centerpiece of the “Whitetail Legends” display and are scheduled to be seen and enjoyed by thousands of deer hunters and antler enthusiasts across the continent. The giant sheds made their first public appearance at the Kansas Monster Buck Classic in Wichita earlier in January, and official measuring for NASCHC is tentatively scheduled to take place during the 2019 Iowa Deer Classic in Des Moines, March 1-3.
If you ever have the opportunity to hold these shed antlers in your hands, I’m willing to bet that one of your impulsive reaction will be to run out the door with them — not to steal them, but to show them to everyone you know! I fought with this same urge; antlers of this magnitude need to be seen and enjoyed by all hunters and collectors alike. It was a great privilege to have been given the inside information, photos and story on these sheds in October 2018, but it was very hard to keep them quiet. It was one of the toughest secrets I’ve ever been asked to hold.
There is more to be written about these colossal antlers. The entire story is one of wonder and miracles. I’ll be sure it gets told in its entirety in the near future. In the meantime, I hope you get an opportunity to see them in person. You will not be disappointed in the least. If fact, I’m certain you will agree you have seen the largest 5×5 ever known to have walked the earth!
Using the right fishing rig is essential for catching trout successfully, and knowing which rig to use for what conditions can make the difference between catching your limit or getting skunked.
There’s a perfect trout rig for almost every situation, and that’s why it’s so important to master rigging for trout, as this will allow you to choose exactly the right fishing rig for your purposes.
In this article I’ll cover the 9 best trout rigs, and will discuss what each of them is ideally suited for.
In order to rig for trout, you need to choose one of three basic types of rigs:
Rigs that present your bait suspended underneath a bobber or float
Rigs that present your bait close to the bottom with a weight
Rigs that enable you to cast and actively retrieve an artificial lure
While these three types of fishing rigs cover almost all trout fishing applications, they come in a variety of different shapes and forms, each of which is best suited for slightly different trout fishing setups.
So if you’re a beginner, chances are that you’re confused about all the different options of rigging for trout.
However, the great thing is that you can get started with just two or three of the most versatile trout fishing rigs, and then add more specialized rigs once you know what kind or rig works best for your pond, lake or stream.
Now let’s look at each of the most important trout rigs in more detail, to help you choose the best rig for your purposes.
And in case you’re also looking for the best bait to use with your trout fishing rigs, check out our article on what is the best bait for trout?
Trout fishing rigs with bobbers
Bobber rigs are among the most effective trout fishing set ups, and work especially well when fishing in shallow ponds and streams, as well as in shallow bays of bigger lakes, or basically in any situation where trout are active close to the water surface.
Now let’s look at the two main types of bobber rigging for trout.
Trout rig with fixed bobber
This is one of the simplest trout rigs, and consists of a fixed bobber attached to the line, as well as a hook and sinker to weigh down the baited hook in the water.
The depth at which the bait is presented depends on the distance between the hook and the bobber.
How to tie it: Attach the bobber to the line, and then tie the end of the line to the hook. The most common type of bobber used for this fishing rig is a round red and white bobber, but you may want to choose a pencil shaped bobber instead, which offers less resistance when a trout takes the bait.
If you’re not sure how to rig a fishing line for trout, take a look at our article on what fishing line should you use for trout?
When to use it: This is a great fishing rig to use in shallow ponds and streams, as well as any situations where trout are feeding close to the surface. It’s very easy to set up and a lot of fun to fish with, which makes it an excellent choice for beginners who want to try trout fishing in a stocked pond.
But keep in mind that the maximum depth you can fish this rig corresponds to the length of your rod, since you can’t cast the fishing rig effectively if you set the bobber higher than that.
How to use it: The best way to use this fishing rig is to cast it out with a baited hook and wait for a trout to bite, which is indicated by the bobber being pulled down underwater.
When you see this, set the hook immediately, so the trout doesn’t have a chance to spit out the hook when it feels resistance on the line. This is the best setup for trout fishing in streams and rivers, where you can use it to drift your bait into the best locations that hold trout.
Slip bobber rig
This is another commonly used trout rig, and should be part of every trout angler’s arsenal of fishing tools.
Using a slip bobber rig (aka sliding float rig) makes the fishing rig more compact and easier to cast with than a fixed bobber rig.
How to tie it: Tie a bobber stop on to your main line, and then thread the line through your bobber and tie the line to the hook. The best hook size depends on your bait, but generally lies somewhere between size 8 and 14.
If you’re unsure about choosing the right hook size for different trout line setups, take a look at our article on the best size hook for trout.
Attach a split shot or two to the line between the bobber and the hook. This stops the bobber from sliding down onto the hook and it also weighs down your bait, helping to present it at the right depth to the trout .
Keep in mind that some baits (like powerbait) float in the water, and you may need to add extra split shots to make the baited hook sink down to the desired depth.
When to use it: The slip bobber rig is the best choice when trout are feeding in midwater, and if you can’t reach them with either a fixed bobber rig or with a bottom fishing rig.
The great thing is that you can fish practically any depth with this fishing rig, as you just need to move the bobber stop up the line to whatever depth you want to set the bobber.
How to use it: Estimate the depth of the water you’ll be fishing in, and set the bobber stop to that depth. Then bait your hook and cast out your fishing rig to the desired spot and wait for a fish to grab the bait.
Bottom fishing rigs
Bottom fishing rigs are often the best choice when trout are found in deeper water, as they tend to feed close to the bottom most of the time. There are several options available to you in this rig category, so now let’s look at the most important ones.
Slip sinker rig
This is the simplest bottom fishing rig around, and is the one most often taught to novice trout anglers. This rig has been in use for more than a century, and continues to perform well in many situations where trout hold close to the bottom.
How to tie it: Thread a 1/8 or 1/4 oz sliding sinker (either a bullet or egg sinker) onto your main line, and then tie the line to a barrel swivel. Attach a leader to the other end of the swivel, and tie your hook to the leader. Choose the type and size of hook depending on the type of bait you want to use.
When to use it: This rig is most commonly used in lakes where trout hold in water deeper than 5 or 10 feet. It’s a great rig to use from shore, since you can cast it relatively far, and cover a lot of water with it.
It’s important to use this fishing rig with floating bait, since you don’t want your baited hook lying on the bottom where trout won’t notice it. You can use it with either powerbait (which is designed to float), or worms injected with air to make them float.
How to use it: This is the most common bait rig used for trout fishing setups, and is usually fished passively. Most anglers cast it out to a promising fishing spot and then wait for a bite. If you do this, make sure to check your rig regularly to see if the bait is still on the hook, and also test different fishing spots.
Carolina rig
This rig is very similar to the slip sinker rig, but unlike the slip sinker setup it is often fished actively with artificial lures instead of passively with bait, which is why we list the two options separately.
How to tie it: Start by threading your main line through a 1/8 to 1/4 oz sliding sinker. Next, thread the line through a plastic bead, and then tie it to a swivel or snap swivel. The bead stops the weight from banging into the swivel during retrieval, which protects the knot on the swivel from being damaged while fishing, and this is more important if you want to fish it actively.
When to use it: You can use this option anywhere where trout are feeding close to the bottom. It’s a great option to use when fishing in lakes, reservoirs and ponds, but you can also use it in rivers.
How to use it: While you can also use this fishing rig with a baited hook and fish it passively until a trout comes by and bites, the strength of the Carolina trout fishing rig lies in fishing it actively with a floating lure.
You can use a floating jig head with plastic lures such as trout magnets or power worms. After casting out, let your rig sink to the bottom, and then slowly retrieve it with a jigging movement.
Split shot rig
This is basically a finesse version of the Carolina rig, and instead of a sliding sinker it uses one or more split shots attached to the line. Since trout can be finicky at times (especially when fishing in heavily fished waters), it’s always great to have some finesse techniques up your sleeve.
How to tie it: Tie your main line to a swivel or snap swivel, and then add one or two split shots to the line right above the swivel. Next, tie a 1 to 2 foot long fluorocarbon leader to the swivel, and then tie your hook to the other end of the leader.
Next, thread a soft plastic lure onto the hook, and your trout fishing line setup is good to go.
In most cases you’ll want to use a floating lure on this rig, which will result in presenting your lure right in the strike zone every time the split shots sink to the bottom.
When to use it: This rig is a great option if you notice that the trout are finicky. This is most often the case in heavily fished waters, and especially in clear water it can be advantageous to use a finesse rig that’s harder for the fish to spot. It’s also a great trout fishing set up for small creeks.
How to use it: Cast the rig out and let it sink to the bottom. Then slowly retrieve it with jigging movements of your rod tip. The main disadvantage of the split shot rig is that it can’t be cast as far as the Carolina rig, since it comes with less weight on the line. Because of this, it’s better to use it when fishing in smaller lakes, rivers and streams.
Drop shot rig
This is another great trout fishing rig setup for bottom fishing, and one of it’s key advantages is that it allows you to place your lure in the strike zone and keep it there for a long time. Similar to the two previous rigs, it’s most often used with soft plastic lures.
How to tie it: Start by tying your main line to a 4 or 5 foot fluorocarbon leader with a double uni knot, and then tie the end of your trout leader to a 1/8 to 1/4 drop shot weight.
Next, take a bait hook and place it facing upwards, and form a loop with the leader line about 1 foot above the drop shot weight.
Pass the loop through the eye of the hook from below, and then tie an overhand knot with the loop. Finally, pass the hook through the loop, wet the line, pull tight, and you’re ready to start fishing.
When to use it: While the drop shot rig was originally developed for vertical fishing in deep water from a boat, most bass anglers can tell you that this rig works equally well for fishing from shore, and can even be fished in very shallow water. It’s a great trout fishing setup for beginners fishing in lakes and rivers.
How to use it: Cast the rig out and slowly retrieve it by hopping the weight along the bottom, while jigging the lure up and down. If you figure out where the strike zone is, you can keep the drop shot fishing rig there, and simply wiggle the lure in place without moving the weight. That way you can keep your lure right in front of the fish for a long time, without having to retrieve it and cast again.
Lure rigs
While all of the fishing rigs discussed above can be used as trout fishing setups with either natural bait or artificial lures, some options for rigging for trout are only intended to be used with lures. Let’s take a look at the most important rigs of this type that you should know.
Spinner rig
The spinner rig is the most commonly used lure fishing rigs for trout. It is most often used with spinners (such as a rooster tail or panther martin), but it can also be used when fishing with any other artificial lure designed for casting and retrieving.
How to tie it: Tie your main line to a swivel or snap swivel, and add one or two split shot weights just above the swivel. Next, tie a 2 to 4 foot fluorocarbon leader to the other eye of the swivel, and then tie your lure to the other end of the leader.
Depending on the size and weight of your lure, adjust the number of split shots to achieve the right depth during retrieval. The swivel prevents line twist of your main line, but if you’re using a lure that doesn’t generate twist, you can also tie the main line directly to the leader.
When to use it: This is one of the most versatile trout set ups, and can be used in almost any setting, from small streams to deep lakes. In most cases you should try to fish this rig in the middle of the water column, but can also go deeper than that if the trout are holding close to the bottom.
How to use it: Simply cast out the fishing rig and start retrieving. Depending on how deep you want to fish it, you can adjust your retrieve speed, and you can also experiment with letting the rig sink to the bottom before you start reeling it in. However, if you’re trout fishing over weed beds, make sure to keep your lure above the weeds.
If you’re interested in fishing with trout spinners, check out our complete guide to trout fishing with spinners.
Trout fishing rig setup with bobber and jig
This is a great rainbow trout rig to use if you’re fishing over weeds, as you can fish it slowly without getting the jig snagged in the weeds.
How to tie it: Depending on the depth of the water, you can use either a fixed bobber or a slip bobber.
So start by setting up one of the two bobber rigs (as described above), and instead of tying a bait hook to the end of the line, tie a 1/16 or 1/8 oz jig head to the line. Next, you can bait the jig head with any of a wide variety of plastic lures, and you’re ready to start fishing.
When to use it: This is a great trout fishing setup for beginners when fishing over weed beds, and when want to keep your lure just above the weeds. You can achieve this by setting exactly the right depth with your bobber.
This trout rig setup is also great for drift fishing in streams and rivers, and again you should adjust the setting of your bobber to present the lure just above the bottom.
How to use it: If you’re trout fishing in a lake, cast out the fishing rig and let the jig sink as far as it can (at which point the bobber stands up straight). Then lift your rod tip to retrieve the fishing rig about 4 to 5 feet, and then pause to let the jig sink down again.
What this trout fishing setup achieves is that your jig will be slowly pulled up and then allowed to sink again. In the case of a plastic worm, this results in the worm wiggling through the water, which is highly attractive to most trout.
See also: How to rig when trolling for trout
Ned rig
The ned rig is most familiar to bass anglers, but few people know that it also works really well for catching trout. The key feature of the ned rig that makes it so effective when fishing for trout is that it is usually fished with a floating plastic tail, which is ideal for catching trout.
How to tie it: This is the simplest fishing rig to tie in this collection. If you’re using fluorocarbon as your main line, you can tie that directly to the mushroom jig head of the ned rig and you’re ready to start fishing. If you’re using braided line as your main line, it’s best to use a 2 to 4 foot fluorocarbon leader, since that’s much less visible in the water.
When to use it: You can use this rig whenever trout are feeding close to the bottom, and it works equally well in lakes, rivers, and streams. The only situation when you shouldn’t use this rig is if you’re fishing in a lake with a lot of vegetation on the bottom, which is likely to get your ned rig snagged.
How to use it: Cast it out and let it sink to the bottom, then retrieve it for 3 or 4 feet with a jigging motion, and let it settle on the the bottom again. Repeat this until you get a bite.
What are the best trout rigs?
The 3 best trout rigs are:
Slip bobber rig
Slip sinker rig
Spinner rig
Between them, these three setups cover all the three main types of rigging for trout, and if you can set each of them up and fish them effectively, you’re off to a great start.
The slip sinker rig is perfect for presenting a bait close to the bottom, which is the best depth to target trout in most situations.
The slip bobber rig, on the other hand, can be used to present a bait suspended underneath a bobber, which is great when fishing for trout that are active higher in the water column.
And the spinner rig is a great basic setup for active trout fishing with lures, which is an ideal way to cover a lot of water in search of hungry trout.
If you’re currently looking for a new trout rod, check out our article on what is the best rod for trout fishing?
What are the best trout bait rigs?
The 3 best trout bait rigs are:
Slip sinker rig
Slip bobber rig
Fixed bobber rig
Each of these fishing rigs is well suited for baiting your hook with natural baits like worms, maggots, minnows, corn, salmon eggs, or scented baits like powerbait.
In addition, all of them can be used for fishing passively, by casting out your fishing rig and then waiting for a trout to pass by and take the bait.
Trout worm rigs
The best rigging for trout to use with worms is either the slip sinker rig, or the slip bobber rig. The former rig is the ideal choice if you know that trout are feeding close to the bottom, and the latter rig is better if trout are feeding higher in the water column.
When using a slip sinker with a worm as bait, it’s important to make sure that your baited hook floats in the water, as trout will not eat it if it’s lying directly on the bottom. Traditionally, this has been done by injecting air into the worm with a worm syringe (which you can get in most tackle shops).
More recently, many anglers are fishing with floating jig heads baited with worms to make their bait presentation float in the water, and another great trick is to put a small marshmallow on the tip of your hook, which also makes it buoyant.
Finally, no matter which trout worm rig you use, it’s usually best not to use a whole nightcrawler on your hook, as this is too big to fit into the mouth of a trout. Instead, cut off a 1 or 2 inch piece of the worm, and thread it onto the hook.
The best hook type to use for this rig is a baitkeeper hook, which prevents the worm from sliding down the shank of the hook.
Minnow rigs
The best trout rig to use with minnows is either the slip bobber rig, or the fixed bobber rig. Your hook size should be between size 8 and 12 (depending on the size of the minnow). The best way to hook a minnow for trout is through the upper lip.
Small fish form a large part of the diet of many trout species, which is why they can be such a good bait.
Bobber rigs are great for fishing with live minnows, since you can easily spot a trout bite when the bobber goes down, and this allows you to delay your hook set long enough to give the trout a little extra time to get the minnow fully inside its mouth.
Which one of the two bobber fishing rigs you choose depends on the depth of the water you want to fish in, and on the depth at which trout are active.
When fishing with live minnows as trout bait, it’s important to weigh them down with split shots, so they stay at the right depth.
Salmon egg rig
The best trout rig setup to use with salmon eggs is one of the following:
Slip bobber rig
Fixed bobber rig
Drop shot rig
Your hook size should be between size 8 and 14, and if you use a larger hook, you can thread several salmon eggs onto your trout hook. No matter which fishing rig you choose, you need to cast very gently in order to avoid ripping the eggs off the hook during the casting process.
If you’re trout fishing in a lake or pond, the best choice is a bobber rig, as that allows you to present the salmon eggs suspended in the water. But if you’re trout fishing in a stream or river, you can use a bobber rig to drift the salmon eggs with the current.
Alternatively, you can also use a split shot rig to drift the salmon eggs right on top of the bottom of the stream. The latter approach is better for getting it right in front of the trout, but it’s harder to detect bites with this style of fishing.
Egg rigs also work very well for steelhead fishing, and it that’s something you’re into, check out our article on how do you rig for steelhead bank fishing?
Final remarks
This concludes our article on rigging for trout, and hopefully we’ve helped you find exactly the right rig for your fishing technique.
Different trout rigs are ideally suited for different trout fishing tactics – bait fishing, lure fishing, trout fishing from shore, trout fishing from a boat, as well as fishing in diverse bodies of water, ranging from small streams to big lakes.
Now that you understand the basics of what each of these fishing rigs is designed for, this should help you to choose the best trout setups to help you to catch more fish in your local trout fishery.
Lake Trout Ice Fishing Tips and Tricks January 11, 2022 — Comments from resorts, outfitters and guests.
I used to fish for Lake Trout a lot more than I do these days. Not that I didn’t love it, I did, but since I became addicted to ice fishing for panfish, Laker’s sort of wound up on the back burner for me.
Lately though, not only readers, but some family members too, have been asking questions about how to get set up for ice fishing Lake Trout. Since it’s been a while for me, I decided that the best way to handle the questions by getting some tips from my friends who fish for Lake Trout a lot more than me. This way, I can do justice to their questions while I also use the project as a refresher course to help fill in gaps in my own knowledge.
I started by calling my friend Andy Arola (photo left), he’d just returned home from a successful ice fishing trip for Lakers. As it happens, he and his crew were fishing on Clearwater West, a lake that I’ve fished in the past too, it gave us some familiar experiences to compare.
Before we get into the “how-tos” of catching them, let me interject this; the obvious best way to catch Lake Trout is to select a lake that has a lot of them. However, traveling to the best of the best Lake Trout Lakes takes commitment. So, if you’re planning on dabbling, learning the ropes so-to-speak, it might be a good idea to check out some of the lakes in your own back yard first.
No matter where you live in the Midwest, you can find them close to home. Obviously, some lakes are better than others, it pays to do your research ahead of time and pick the one that you believe offers a reasonable opportunity for you and your circumstances.
Once you arrive at the lake, Arola offers this advice; “My best overall depth range averages about 35 to 45 feet deep, especially during morning and evening. Sometimes, during midday, I’ll move out deeper, but I rarely fish water depths over 70 feet deep.”
Structure is important but differs from the type of spots that walleye anglers might choose to fish. Mid-lake structures, bars and humps for example get little attention from Arola. Shoreline related rock points or sandy shoals get the most attention. Early and late in the day, stick tight to the structures closest to shore. During mid-day, loosen up the perimeter and experiment in deeper water.
Judging how long to fish in a spot is subjective, the rule of thumb is to make short moves first but expand the search area when necessary. Arola; “If I’m seeing lots of baitfish on the screen and there is an occasional Lake Trout sighted, I’ll stick close to the area. When I do move, it will be typically short distances, 100 to 200 yards. But if the screen is blank and there are no signs of bait or predators on the locator, we will make both longer and more frequent moves, sometimes a couple of miles between stops. When you land on the right area, you will see fish roaming in and out of range.”
The gear he uses daily is somewhat lighter than you might expect. A 34 inch, medium to medium-heavy action rod paired with 15-pound test braid is standard. A 6 foot long, 8-pound test fluorocarbon leader is used to help give his lures the most natural appearance. Arola; “I’m a big believer in using reels with smooth and reliable drags, they protect the lighter line from breaking when a larger or stronger fish makes an unexpected run.”
Arola does have one heavier action rod rigged up and uses it when larger fish are observed. The heavy artillery is a 36-inch, heavy action rod with 30-pound test braid and an 8 foot long, heavier fluorocarbon leader.
Arola’s views about fishing gear echoes the advice I got from Grant Prokop, 1000 Lakes Sports, earlier this winter when I was shopping for Christmas gifts. Prokop: “Getting set up with heavier rods and line is great for when you’re hooking up with big enough fish. But most of the time, anglers encounter fish that average smaller, 3 to 7 pounds or thereabouts. Stiff rods don’t offer enough give and take to prevent giving the fish slack line. A lighter action rod stays loaded up much better and makes losing those average size fish a lot less likely.”
Personally, I’ve never had an ice rod which was devoted to lake trout fishing. A medium-heavy action Ugly Stick, 30 inches long I think and rigged with 10 pound test has served as my pike-walleye-trout combo rod. Admittedly, if I ever hooked a really big lake trout, I’d probably lose it. But so far, I have never hooked one big enough to give me that problem.
Arola’s array of trout fishing lures is fairly simple. “My #1 favorite lake trout lure is a ½ ounce white bucktail jig, white, it has to be white!” Arola says. “Some of my friends like using the white tubes with a 3/8 or ½ ounce tube head stuffed inside them, but I like the action of the bucktails better.”
Arola suggests that we should also have one rod rigged up with a jigging spoon too. It should be flashy, but not too heavy. I asked if something like a ¼ ounce Quiver Spoon would be a good choice. “Yes, you want it to flutter down slower and give off lots of flash, that allows fish more time to find and strike it.” Arola added.
Finally, I asked for an opinion about the weather and which, if any weather patterns were more favorable than others for finding trout in an active mood. Truthfully, I was hoping that he’d validate my observation that showed a preference for cold, clear weather patterns. But Arola didn’t go that far, he said, “I don’t really think that matters, the weather pattern might influence where or how we fish, but we catch fish when it’s cloudy just as often as we do when it’s clear. I think we may fish shallower on a cloudy day or deeper when it’s clear, but that’s about the only real difference.”
If you never tried it, you should, it is a hoot. For me, catching them is fun, and I like to eat them too. But the real thrill is getting the strike, one second nothing is happening and the next, there’s somebody shouting fish on!
So, with the lake trout season upon us, getting rigged and ready doesn’t sound that complicated, does it? Maybe this is your year to give a try.
Chances are pretty good that if you’re interested in hunting alligators on a recreational basis, you’ve already applied for one or more of the state alligator hunting lottery drawings available in every coastal state from North Carolina to Texas (plus Arkansas). Recreational alligator seasons are available in all of these states and season dates typically fall between August and October, depending on which state you’re hunting in. Lottery drawings take place during the summer to allot a limited number of harvest tags to a large number of interested hunters and most alligator states have made their selections and notified their lucky hunters by the end of July.
Recreational alligator hunts are a relatively new concept in most of these states, with the exception of Florida, Texas, and Louisiana, the states with the larger alligator populations, which have historically relied more on commercial harvest to control gator numbers.
The American alligator, once hunted nearly to extinction, has now recovered to the point that regulated recreational harvest of the animals is now allowed in Southeastern coastal states.
Lottery hunt selections are typically for a certain segment or zone of each state in an attempt to spread the harvest and hunting pressure evenly. Baiting for alligators is illegal in recreational hunting except in Florida, Texas, and Louisiana where it is restricted to mostly private lands.
American alligators are riverine in nature, mostly preferring fresh water but will venture into brackish and salt waters at times. Accordingly, alligators can be found in rivers, swamps, sloughs, lakes and ponds. Adult alligators are opportunistic feeders. Food sources include birds, fish, and mammals, as well as other reptiles and amphibians, either dead or alive.
Selected hunters typically spend a few days, or nights where allowed, afield in their allotted hunt area trying to pattern alligator traffic before the season opens. From telemetry studies, most alligators maintain a home range that varies between 1 and 13 square miles. These same studies also document strong fidelity to their individual territories. Alligators mate during the months of May and June, during which time both male and female gators may travel outside their ranges, but later in the year, during alligator hunting seasons, remain within their home ranges.
All alligator hunting states require the animal be tagged immediately after harvest.
Finding and Patterning Alligators
While a host of environmental factors such as food, water levels and water quality may dictate how far and wide an alligator may travel across it’s territory, seeing an alligator in a particular area is the most utilized patterning practice in preparation of hunting. Larger and older specimens are solitary creatures and prefer to be far removed from human activity and will reside in remote, hard-to-reach locations. While American alligators are not entirely nocturnal, these animals are definitely more active after dark.
Like many predatory species, alligators are vocal creatures. Both male and female gators have a range of vocalizations. Some hunters swear by an ability to call gators into an area, or at least make them show themselves, by making a low-pitched kissing sound produced by mouth with their lips sucked in. Another auditory method is to imitate prey by making splashing sounds that mimic a small mammal in distress.
Try This Recipe: Nashville Hot Alligator
In states that allow night hunting, many hunters rely on chance encounters with gators by shining search lights on the water. An alligator’s eyes will shine bright red when light is reflected off of them. The hunter then attempts to ease in close enough to attach a line to the animal before it submerges.
Because alligators spend the majority of the time under water than above it, the best way to estimate the size of one is judging the distance between its nostrils and it’s eyes, which is all the animal typically shows above water when cruising or hunting. Scientific studies support a scale of 1 inch distance between eyes and nostrils to 1 foot of overall body length.
Alligator Hunting Gear and Training
The methods for attachment of a line, which vary by state, include hand-held snatch hooks Thrown by hand or cast with rod and reel), harpoons, snares, or bowfishing archery tackle. In the majority of states that allow recreational alligator hunting, it is illegal to shoot an alligator with a firearm until the animal is brought under control with a rope firmly attached.
Realizing the complexities of alligator hunting and the relative newness of the sport, most alligator states offer either online training, in-person seminars, or both to educate hunters on what equipment is legal in that state and how to best use the equipment to harvest an alligator.
Legal hunting methods vary by state. Most states do not allow the shooting of an alligator until it is roped under control.
Because wrestling a large alligator boatside is usually more work than one person can handle, most states allow “assistant” hunters to participate in the hunt. These individuals do not have to be drawn or randomly selected, but must accompany an alligator tag bearer and may have separate license requirements in order to participate in the hunt.
A Nod to Conservation
American alligators were on the brink of extinction as recent as the early 1970’s, mostly due to unregulated hunting. Since that time, gators in the southern coastal states have rebounded in number to the point that limited harvest is allowed. This harvest is highly monitored with the issuance of tags to only a few selected hunters and requirements that all animals be tagged immediately upon harvest as well as the labelling of alligator parts once processing has taken place. Harvest reports are also required and each state compiles hunter success, participation and animal length and weight calculations in order to properly monitor harvest.
Alligator hunting seasons are in themselves a success story in animal conservation. By allowing limited harvest of these magnificent animals, hunters can help reduce the amount of unintended alligator/human interactions, which often leads to the destruction of the offending alligator, and provide recreational opportunities, population control, and make full use of the animal.
MORE ON ALLIGATOR HUNTING: Listen to Gamekeeper Podcast’s ALLIGATOR SEASON WITH RICKY FLYNT
With this technology, the air rifle has a shrouded sound, which diminishes the noise by 50%.
Besides this, the Hatsan Bullboss incorporates an anti-double feed system.
The anti-knock system ensures that there is no air leakage if the air rifle is dropped.
The Hatsan Bullboss can be customized according to the shooter’s preferences.
It is not only the features that can be adjusted but a Picatinny optics rail and a 6-slot Picatinny rail can be bought to add.
Hatsan tells us that the Bullboss air rifle will be even more customizable in later years as more add ons and upgrades become available.
Here I will be discussing all the features and the benefits of the Hatsan Bullboss air rifle and will leave it up to you to make an informed decision on whether it’s the best air rifle for you.
The Hatsan Bullboss has a butt pad that is adjustable for the length of pull.
The butt pad is quite friendly for your use.
All you have to do is to loosen the two screws located on the right of the stock.
After that, you have to tighten the screws so that the pad becomes solid.
Note that there is no stock length of pull and butt pad adjustment on the Bullboss model.
How to maintain Hatsan Bullboss
Here, I will be discussing the ways you can maintain the Hatsan Bullboss.
Magazine O-Rings Replacement
You shoot hundreds of times, so the magazine in which the O-rings retain the pellets should be replaced from time to time.
As you substitute the magazine, the cocking lever of the rifle becomes stiff to operate.
Moreover, if you reposition the O-ting in its groove, this may also alleviate the stiffness. Oiling can also be beneficial.
Lubrication Of The Rifle
After every 500 to 1000 shots, it is recommended to clean the barrel with a cleaning rod.
Never lubricate inside the barrel.
Always keep in mind to unload the rifle before oiling or cleaning.
Make sure that the gun barrel is clean and not blocked. Periodically apply the oil on the following parts of the air rifle.
The mechanism
The pellet probe
The cocking lever sliding surface
The stern of the magazine pin
Magazine release
Outer O-ring
The magazine axis hole
You should not attempt to disassemble the Hatsan Bullboss when it is charged, but you do have to remove and replace the air cylinder.
Never fire the Hatsan air rifle when the cylinder is empty. Otherwise, the air rifle can be damaged.
Manual Safety And Precautions
It is of the utmost importance to have safety measures when you are dealing with something dangerous.
The safety button can be set to ON and OFF manually, according to your will.
If you want to ON the safety button, pull the lever to the rear. In this way, your trigger cannot be pulled.
Moreover, if you want to turn off the safety, push the safety button forward.
Here are some precautions while using the air rifle.
Make sure the air gun is not cocked while you fill the air cylinder.
Safety is in the ON position; the magazine is not mounted in the air gun.
If the air tube is empty, fill in the air tube after cocking the air rifle and keeping the cocking bolt open at the rear.
You must have a concern for the safety measures before filling the air cylinders.
It is compulsory for the shooters to wear eye and ear protection while filling the air cylinder.
You have to monitor the air pressure from the air gauge of the hand pump/scuba charging kit while you fill the air cylinder.
Do not come in contact with eye contact while you fill the air cylinder.
The air gun will fire if not cocked correctly.
Never pull a firearm towards you by the muzzle
Do not walk, jump or run when carrying a loaded air rifle
The air gun should not be used under the influence of alcohol
Bullboss – Speed and Accuracy
Here we will measure the speed and accuracy of the Bullboss.
CALIBER
.177 Caliber
.22 caliber
.25 caliber
MAXIMUM MUZZLE VELOCITY
1170 fps
1070 fps
970 fps
ENERGY
27 ft.lbs
38 ft.lbs
42 ft.lbs
MAGAZINE CAPACITY
10
10
9
AIR TUBE VOLUME
200cc
200cc
200cc
FILL PRESSURE
200BAR
200BAR
200BAR
NUMBER OF SHOTS PER FILL
160
150
135
NUMBER OF SHOTS AT OPTIMAL VELOCITY
55
45
45
OVERALL LENGTH
935mm
935mm
935mm
BARREL LENGTH
585 mm
585 mm
585 mm
WEIGHT
4.3 kg or (9.5 lbs.)
4.3 kg or (9.5 lbs.)
4.3 kg or (9.5 lbs.)
The results may differ up to 20% owing to the change in pellet weight, temperature, elevation, shape, and other aspects.
The above results are gained with the energy when there was no constraint on the rifle calculated with the air tube at optimal pressure value .
PCP air rifles start at the minimum velocity, and then they tend to augment and acquire the highest of optimal pressure value, and then again start to decrease as the air tube pressure goes down.
Jim Chapman takes the Hatsan BullBoss air rifle in .25 caliber, to see how it will perform against feral hogs in central Texas, and the result will surprise you:
How about the Hatsan Gladius?
Another Hatsan PCP air rifle, the Hatsan Gladius comes with a maximum of 10 shots and manual loading.
The Gladius has a side lever action like the Hatsan Bullboss.
The Gladius is also available in an extended version ( Gladius Long) with a 585mm barrel and 100 fps (30 m/s) more muzzle velocity.
It allows the air rifle to perform better than Bullboss.
Below we will weigh up the Bullboss and the Gladius to find which is best.
Speed and Accuracy
The chart below details Hatsan Gladius’ velocity, energy, weight, and barrel length, and clarifies the speed and accuracy of the air rifle.
Model
Max. Muzzle Velocity
Energy
No. Of Shots per Fill
Weight
Barrel length
Joules
Ft.lbs
Gladius
1070 fps
30
22
90
4.65 kg (10.2 lbs.)
495 mm
970 fps
42
31
85
4.65 kg (10.2 lbs.)
870 fps
46
34
80
4.65 kg (10.2 lbs.)
Gladius long
1170 fps
36
27
85
4.8 kg (10.6 lbs.)
585 mm
1070 fps
51
38
75
4.8 kg (10.6 lbs.)
970 fps
57
42
65
4.8 kg (10.6 lbs.)
Due to some changes in temperature, pellet shape, pellet weight, and elevation, the Muzzle velocity can differ a bit.
The reviews for the Hatsan Bullboss .25 calibers are mostly in favor of the air rifle.
Users are happy with tools like spare magazines; tools to clean the Hatsan Bullboss air cylinder, and the consistency, power, and ease of use.
The weight of the Hatsan Bullpup is distributed so evenly that it is very easy on the shoulders.
Customers relay that it feels lighter than it actually is.
One of the reviews reveals that for the power output, the air rifle is very quiet, and can do some damage at 20 yards.
Additionally, shooters appreciate the synthetic stock and the cocking lever.
Their experience mentions that it is not an effort to cycle the next round to take another shot.
Overall, the Hatsan Bullpup is recommended by users to use at .25 calibers; the shooters find it performs the best among the 3 calibers.
Many people claim that the regulator is not necessary, but if you would like to shoot small targets at varying distances, a consistent shot string would be required for that shooter.
For most hunting, the accuracy level of the Hatsan Bullpup is quite adequate while pressure is in the green arc.
Customers find the lever action better than the bolt action.
Likewise, the magazine is easy to load and seems to operate flawlessly.
Some customers have also suggested some changes that could be made to the Hatsan Bullpup.
First of all, the first rail does not feel the sturdiest with a bipod hooked up.
The trigger of the Hatsan Bullpup is considered excellent, but it is a 2-stage trigger.
Customers would also like to see the Hatsan Bullboss QE featuring interchangeable calibers while keeping the same power and accuracy.
This is because the Bullboss does not have the same potential for three different calibers; instead, they perform differently.
Also, people claim it would be better if the butt pad was able to be adjusted.
While comparing the Hatsan Bullboss to the Gladius, customers prefer the Gladius for being an accurate and long-distance air rifle.
However, the price of Gladius is a bit higher, so that is to be expected.
Overall, people’s impressions of the Hatsan Bullboss air rifle are very positive.
Concluding Thoughtson the Hatsan Bullboss QE
The Hatsan Bullboss QE rifle encompasses each and everything you wish for your hunting trip, or even for backyard use.
The versatility & ergonomics of the Hatsan Bullpup stock make your shooting experience comfortable and memorable.
The incorporated QE technology in Hatsan Bullboss .25 adds a certain quiet to the air rifle,
Which is also loaded with realistic features like a detachable air cylinder, Picatinny rails, anti-double pellet feed, and a two-stage adjustable trigger.
In addition to this, the air rifle is perfect in accuracy and speed, and it comes with inside lever action, which is far better than a bolt action.
Other than this, the .177 caliber air rifle, .22 caliber, and .25 caliber air rifle give the best shot experience.
All three features perform differently but not the same way.
When we think of ivory, we think of an elephant’s tusks, or the teeth of a walrus, a whale or a hippo. But few people realize elk in North America are actually carrying around a remnant from their prehistoric ancestors, which you can find in their teeth. However, these “ivories” can be easy to miss if you don’t know where to look. Today, we’ll discuss what exactly they are, and why they’re worthwhile to hold onto.
Hundreds of thousands of years ago, the ancestors of what we now call elk are believed to have had full-fledged tusks, similar to the Asian Muntjac deer, which still has upper canine tusks. Although it’s likely the ancestors of elk used their tusks to fight in the same way Muntjac deer do today, evolution produced the antlers we admire today, making the tusks virtually useless. Even though they’ve completely disappeared, there is still a pair of ivories hidden in the upper jaw.
Depending on where you are, you may hear people refer to them as “eye teeth,” “whistlers,” or “buglers,” but each is referring to the same thing. And, just like any other tooth, they’ll slowly wear down and stain over time as the elk continues to age.
This question has been asked for thousands of years, as Native Americans once used elk ivories as a form of currency. Today, they still carry a certain value, particularly among jewelers and craft enthusiasts, but it’s difficult to put a dollar amount on them. Considering a pair of elk ivory earrings could go for $30-$40 on eBay right now, it’s safe to say they aren’t a commodity. However, even as common as elk are in North America, few people even know these ivories exist, so there is still a rarity element that creates a certain level of demand.
Some states regulate which parts of an animal you can and can’t sell, though, so make sure to check your local game regulations before you start wheeling and dealing. Considering the lack of monetary value, many hunters try to turn the ivories from a harvested elk into a memento by which they can remember their hunt.
How to remove elk ivories
Here is the tricky part. Many hunters down their elk in extremely remote areas of the North American wilderness. After all, the best elk hunting is often in the hardest-to-reach spots. Your first and only thought may be packing your animal out, which does unfortunately make it easy to forget about those two special, hidden teeth. And, most hunters will tell you that getting them out certainly isn’t easy, as it will take a lot of labor and patience with a knife to dig them out. You have to be careful not to damage them, too, meaning you should avoid using a pair of pliers to pull them.
Hushin, one of the more popular hunting YouTube channels, demonstrated a fairly easy and efficient way to extract them in the video above. You’ll see Eric Chesser uses a block and a hammer to get the job done despite the head being fairly dried out, which should have made it even more difficult.
Eric says an old hunter taught him the trick. It seems like there is almost always a better way to do things found by an old timer, isn’t there? He simply uses a hammer and block of wood to quickly pop the ivories out of the jaw. We’d recommend using this technique if you have a block and hammer handy. It might be a good idea to throw these items in the back of your truck before your first elk hunt of the year.
Why you should keep your elk ivories
Even if it appears that elk ivories don’t have a lot of monetary value right now, that doesn’t mean it will always be true. If you’re the kind of lucky hunter who gets to bag an elk every year, put those elk teeth away and save them for a rainy day. Who knows what they’ll be worth in the future?
If you’re good with crafts, this is a good chance to make a gift for someone special that comes from the heart. Maybe your significant other “tolerates” your hunting obsession. A handmade elk ivory pendant or piece of jewelry would be a good way to say thank you.
You could also use them to form lasting memories. Did your child just shoot his or her first elk? Make them a pendant to wear around their neck. You could even make matching ones, one for you and one for them. They’re sure to hold a lot of sentimental value as your child grows older.
But perhaps the best reason to hang onto elk ivory is to simply utilize as much of the animal as you can. As hunters, we owe it to the animal to let very little go to waste. Even if you can’t see a use for the ivory right now, hang onto them. You just may find the perfect use in the future.
For more outdoor content from Travis Smola, be sure to follow him on Twitter and check out his Geocaching and Outdoors with Travis YouTube channels.
READ MORE: EVERYTHING THERE IS TO FIGURE OUT ABOUT COLORADO ELK HUNTING
Unveiling the truth behind dry firing a Gamo air rifle, this intriguing headline delves into the possibility of safely practicing without ammunition. Join us...
"Unleash the Power: Mastering Break Barrel Air Rifles for Maximum Performance. Discover expert tips and techniques to enhance the power and precision of your...
"Understanding the Legalities: Felon Ownership of Air Rifles in Tennessee"
can a felon own an air rifle in tennessee?
In the state of Tennessee, the ownership...
Exploring the Pros and Cons: Pump Air Rifle vs Break Barrel - Unveiling the key differences and advantages between two popular air rifle mechanisms....
")
")
")
")
")


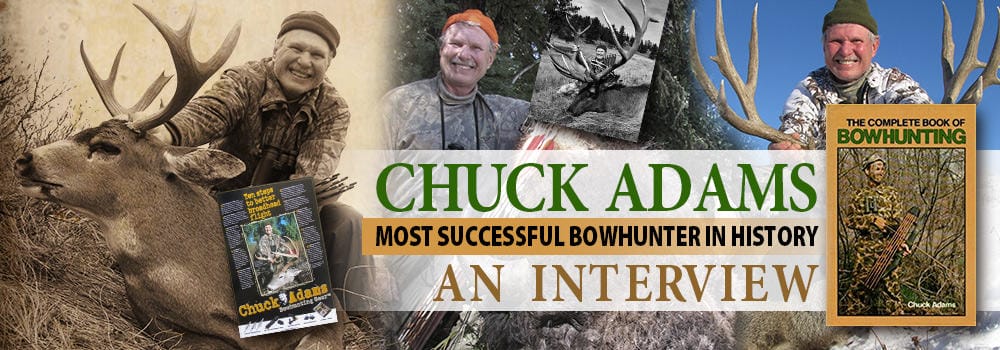
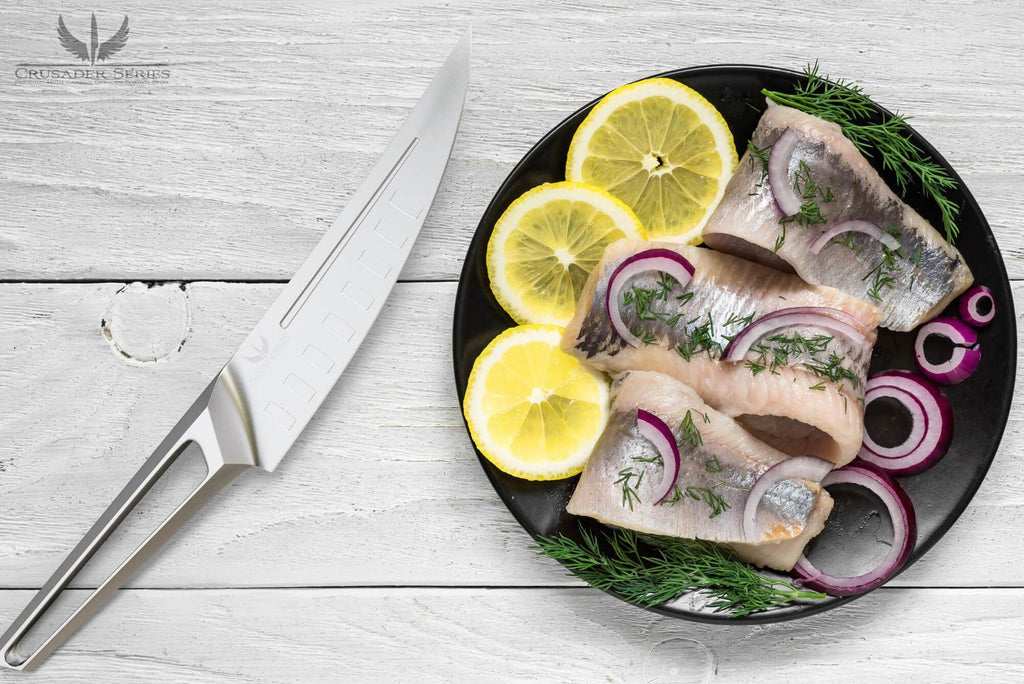
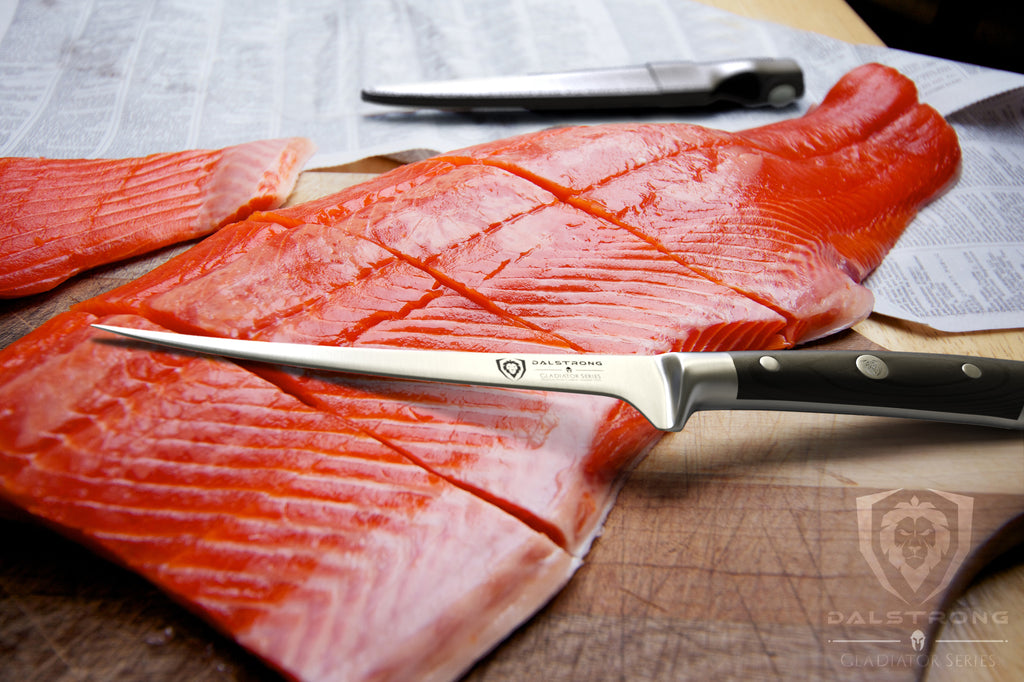
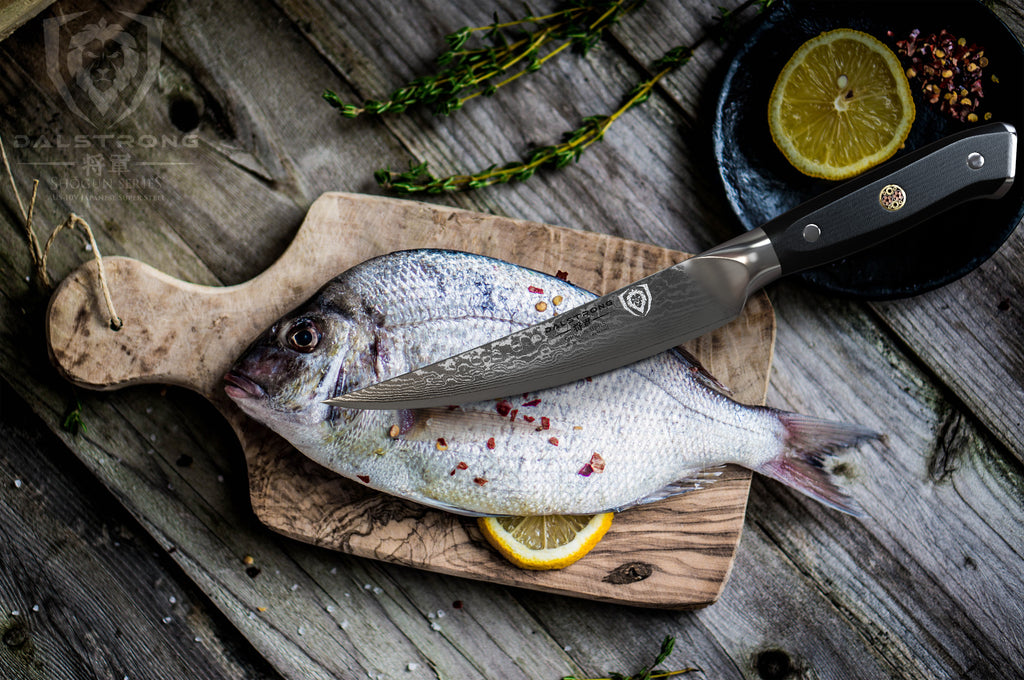

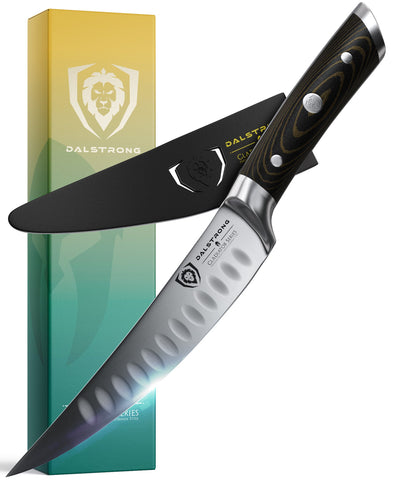
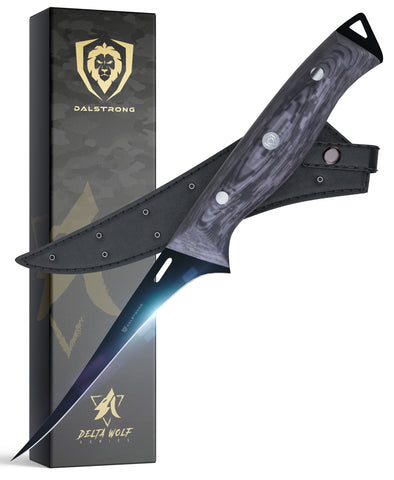
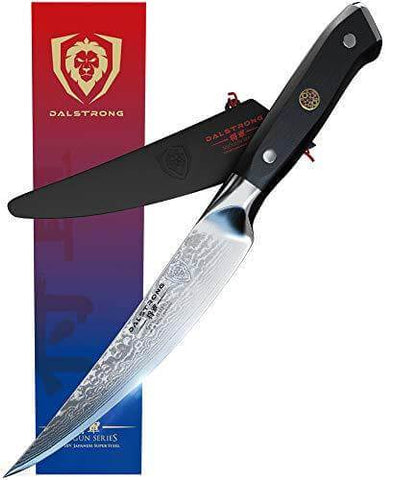

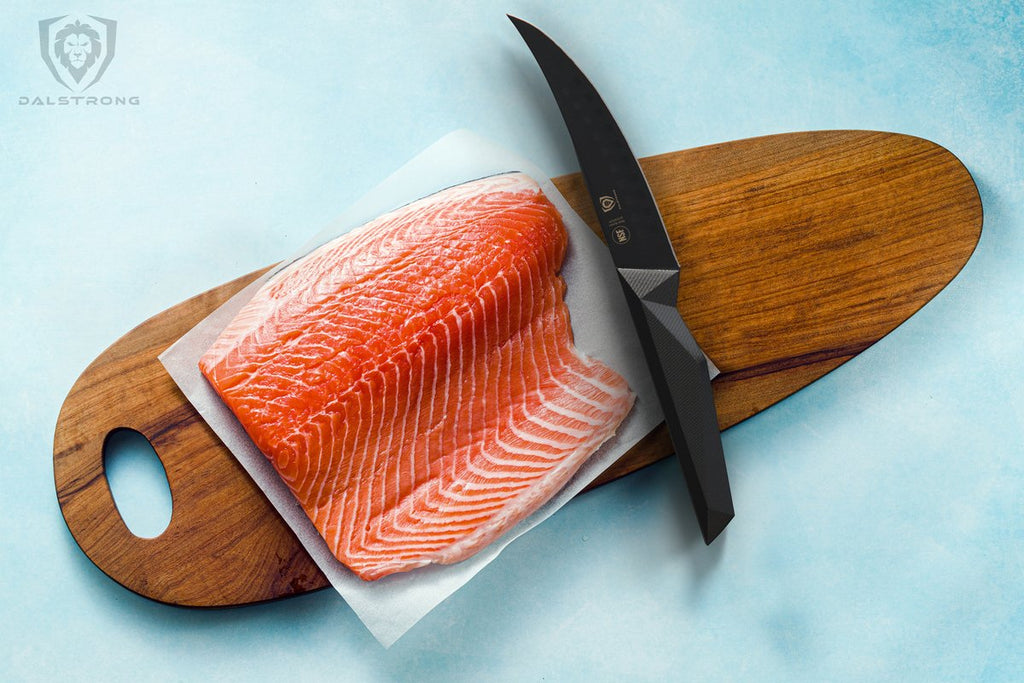 Fillet Knife 6″ | Shadow Black Series
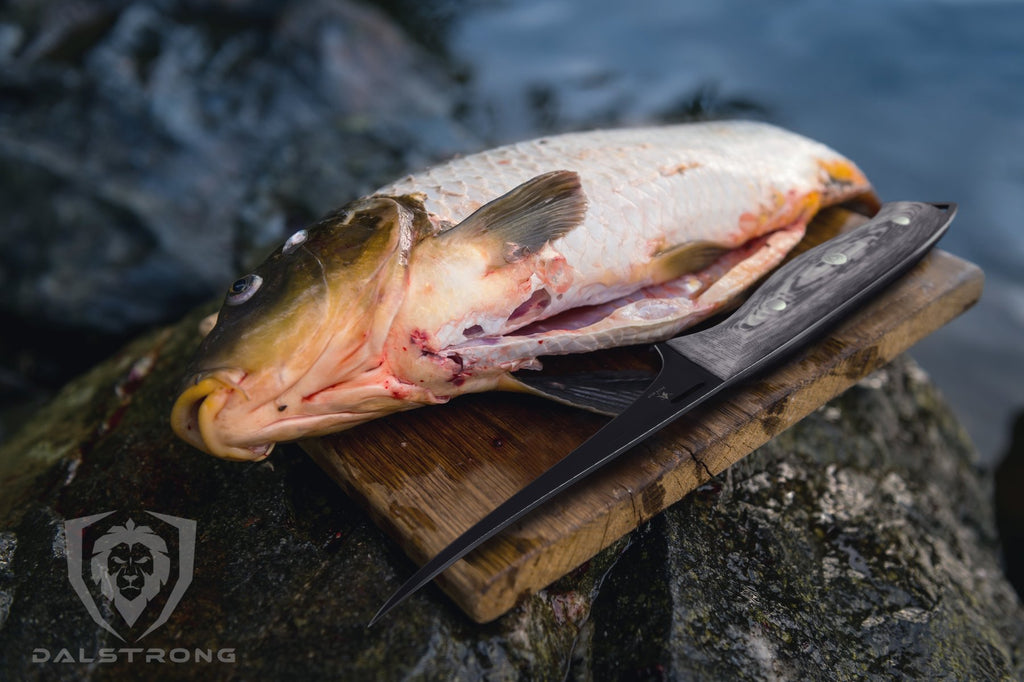


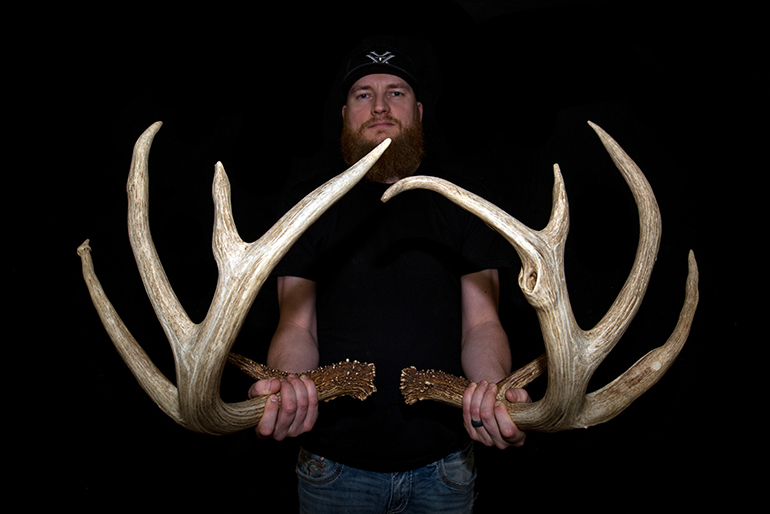
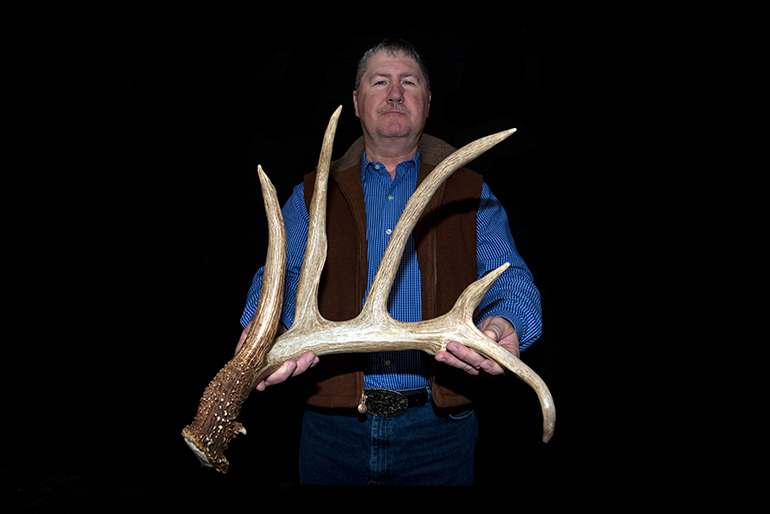

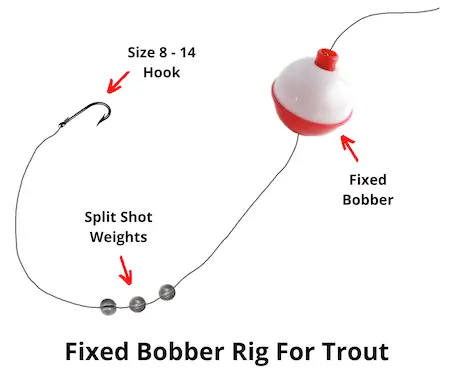
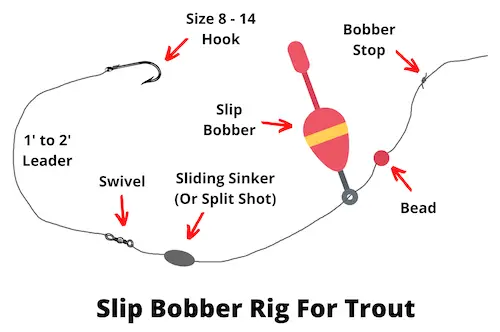
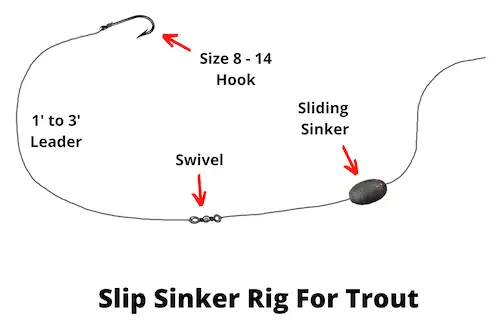
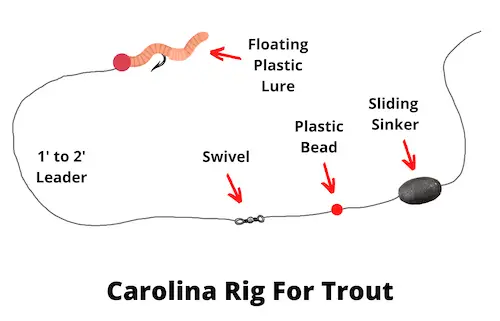
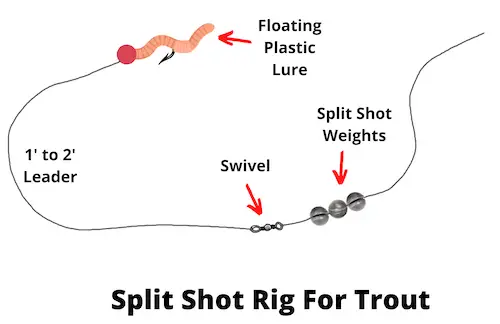

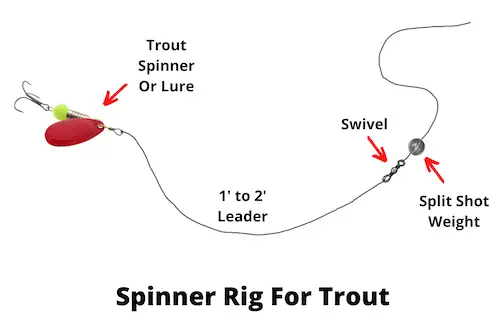
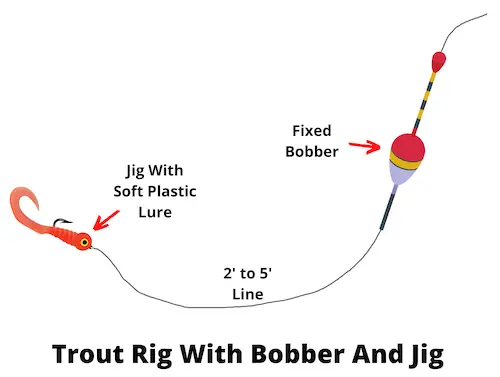
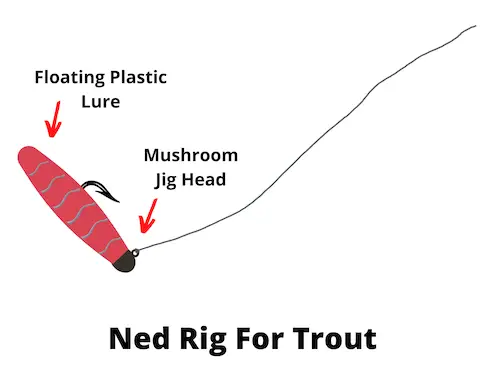
 I used to fish for Lake Trout a lot more than I do these days. Not that I didn’t love it, I did, but since I became addicted to ice fishing for panfish, Laker’s sort of wound up on the back burner for me.
 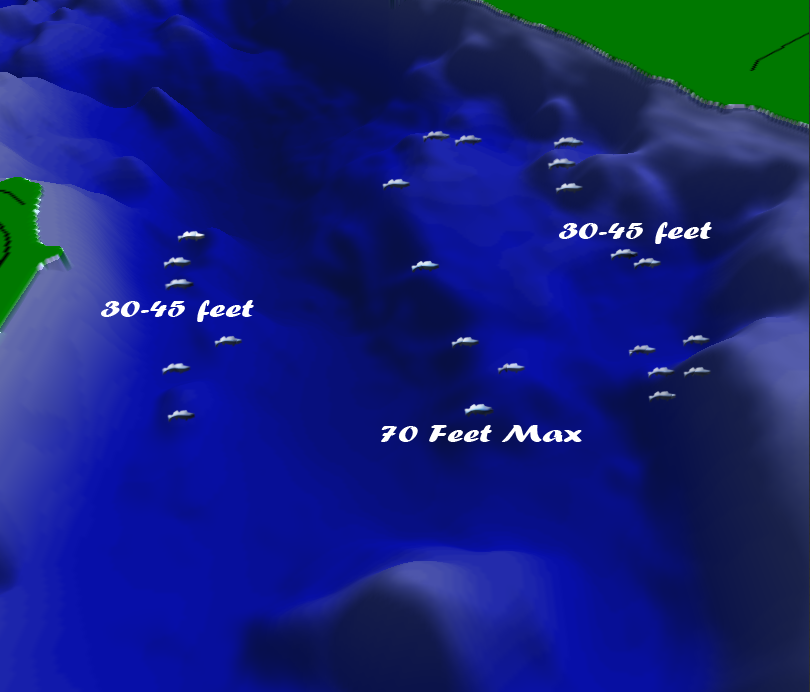 Structure is important but differs from the type of spots that walleye anglers might choose to fish. Mid-lake structures, bars and humps for example get little attention from Arola. Shoreline related rock points or sandy shoals get the most attention. Early and late in the day, stick tight to the structures closest to shore. During mid-day, loosen up the perimeter and experiment in deeper water.
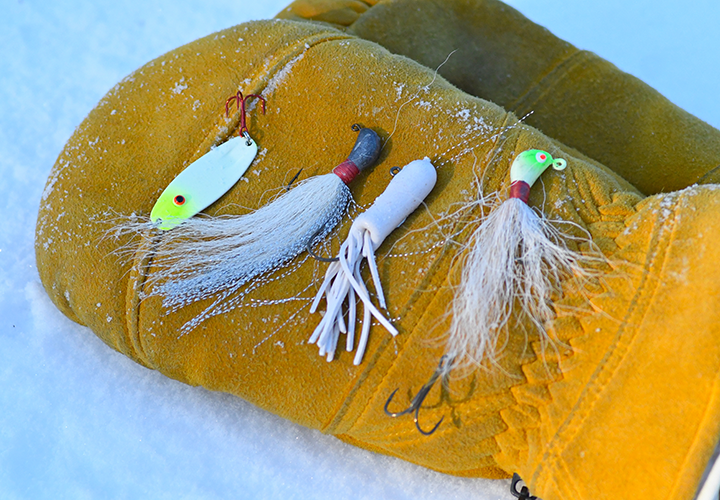 Personally, I’ve never had an ice rod which was devoted to lake trout fishing. A medium-heavy action Ugly Stick, 30 inches long I think and rigged with 10 pound test has served as my pike-walleye-trout combo rod. Admittedly, if I ever hooked a really big lake trout, I’d probably lose it. But so far, I have never hooked one big enough to give me that problem.