If you’re not flying down The Big Mountain in Whitefish going mach speed, hiking Glacier National Park, or visiting the best places in Montana for 2024 than you’re not taking advantage of the best things that Montana has to offer.
Whether you’re sitting by Flathead Lake, jaunting through Custer National Forest in Billings, or just hanging with the good people of Big Sky Country, Montana is the best. It was tough to narrow down the top ten best places to live in this Northwest state.
But, HomeSnacks did it. How’d we do it? We consulted the numbers. In total, we analyzed the 32 cities for important factors like cost of living, crime, unemployment rates, rent and median home values for every place with over 2,000 residents.
We discovered fantastic places in Montana to live for every stage of life and every budget. Glasgow is the best for families just starting, Dillon is excellent for people looking to retire, and make sure to give Sidney a second look if you don’t have to worry about a budget.
Have we piqued your interest? Want to know more about our methodology and where the best places in Montana are located? Keep reading.
What is the best place to live in Montana for 2024? According to the US Census and FBI data, Whitefish is the best place to live in Montana if you care about home values, low crime, and high quality of life.
Read below to see how your hometown and other amazing Montana cities ranked. Hint: if you live in the greater Helena area, consider yourself one lucky Montanan.
If you’re looking for something more national, check out the best states in America or the best places to live in America.
Mapping The Best And Worst Places To Live in Montana
Best Places To Live In Montana Size Requirement
Before we even started to collect data on the best places to live in Montana, we had to answer a tough question: Is it fair to pit Helena with a population of 32,060 against places with a population of 18?
We firmly decided no, that just isn’t fair.
So to create our ranking, we broke the best places to live into three tiers:
Cities — Populations over 2,000
Towns — Populations between 1,000 and 2,000
Small Towns — Populations below 1,000
This left us with 32 cities, 62 towns, and 215 small towns.
We then decided, no matter how much anyone loves their town, the best cities to live in Montana have more of everything and therefore you need to have over 2,000 people to truly be ‘the best’.
Now we also realize that city living might not be your cup of tea, so we ran the same analysis on the best towns and then again for the best small towns.
You can see the results of those best place rankings at the end of the article.
Summary: The Best Places In Montana
If you’re looking at areas in Montana with the best economic situations, where there’s lower than average crime, and a lot to do, this is an accurate list.
Whitefish made a strong showing to take in the overall number one spot for the best place to live in Montana for 2024.
Best Towns To Live In Montana
King Arthur Park (Pop. 1,137)
Scobey (Pop. 1,175)
Montana City (Pop. 2,878)
Four Corners (Pop. 4,003)
Glasgow (Pop. 3,363)
Colstrip (Pop. 2,288)
Helena Valley Northwest (Pop. 3,967)
Plentywood (Pop. 1,881)
Baker (Pop. 1,866)
West Glendive (Pop. 1,922)
Best Small Towns To Live In Montana
Belknap (Pop. 291)
Kerr (Pop. 115)
Turah (Pop. 426)
South Hills (Pop. 529)
Park City (Pop. 944)
Sweet Grass (Pop. 95)
Saddle Butte (Pop. 175)
Huntley (Pop. 478)
Gibson Flats (Pop. 253)
Rader Creek (Pop. 234)
If you’re curious enough, here are the worst places to live in Montana according to the data:
Speed shouldn’t be your focus when using a knife, but gutting a deer isn’t complex. Follow this simple four-step process, and you’ll have it field-dressed in no time. (Lynn Burkhead photo)
With the deer on its back, lift its rump and slide something beneath its hindquarters to expose anal and/or vaginal openings. Using a sharp, “pointy” knife with a 4- to 6-inch blade, puncture the skin an inch to one side of the anus. Push the knife straight in to its hilt. Keeping it level and pointed straight ahead, cut a coring hole around the anus. If you shot a doe, include the vaginal opening in the cut.
Make one more knife pass around the pelvic canal’s interior to cut all connective tissue between the colon and pelvic canal. Don’t sever the colon. With one hand, tug lightly where the anus connects to it. Reach inside the pelvic canal with your index finger and tear any remaining connective tissue so the colon slides freely. Leave it and proceed.
Cut a coring hole around the outside of the anus and sever all connective tissues around the colon. (Illustration by Kevin Hand)
Cut 2
Retrieve your knife and straddle the deer at its sternum, facing its rear. (Some hunters prefer to make this cut from the pelvis to sternum, but I recommend working from the sternum to the pelvis, as you can straddle the ribcage to keep the carcass fairly immobile.) Find the sternum bone’s flat surface and cut about a 5-inch slit through the hide atop the sternum. Point the knife toward the deer’s rear and hold it so the blade’s edge faces upward. With your free hand, form a “V” with your index and middle fingers and slide them safely beneath and behind the blade on each side.
Press your two guide fingers inside the cut on the sternum, push lightly into the abdomen and lift the hide from inside. With your two guide fingers leading the way, and being careful not to cut into the stomach and intestines below, use the blade’s tip to slice the hide from the sternum to the deer’s pelvis. Don’t cut into the pelvis; there’s no need to cut or saw through the pelvic bone. At this point, you can also remove a buck’s penis and scrotum, or a doe’s udders.
Cut 2: Use two fingers to guide your knife as you open the abdomen, being careful not to puncture the intestines and stomach below. (Illustration by Kevin Hand)
Cut 3
Pull the cavity open and locate the diaphragm. This is a taut membrane separating the chest cavity (lungs and heart) from the liver, stomach and intestines. Carefully cut the diaphragm away from both sides of the body cavity to the spine below.
Cut 3: Cut the diaphragm away from the body cavity’s interior walls. (Illustration by Kevin Hand)
Cut 4
Using your free hand, reach far inside the chest cavity to the neck and find the esophagus (windpipe), which feels like the ribbed tube on an elk call or vacuum cleaner. Using extreme care, reach up inside with your knife and cut through the esophagus above where you’re holding it with your other hand.
While keeping one hand firmly around the esophagus, withdraw your knife and lay it on the ground. Now reach back inside, grip the esophagus with both hands and pull firmly. Everything inside the deer—stem to stern—will pull free of the deer’s interior. You’ll need to pull hard at times to tear some connective tissue, but more cuts shouldn’t be needed.
Watch the innards as you pull them from the abdomen. If the bladder is full, guide it gently with one hand as it slides out with the rest of the entrails. If you properly cored the anus and colon, they’ll pull into the abdomen and slide out with everything else.
Flip the deer belly down and splay its legs to drain pooled blood from the body cavity. While it drains, clean and stow your gear for the pack-out.
Cut 4: Sever the esophagus and pull all of the innards from the abdomen. (Illustration by Kevin Hand)
Follow these steps, and gutting the deer will be your easiest task of the day.
The Leupold VX-R is a high-end scope with a mid-level price tag.
It’s durable, accurate, and lightweight. Plus, the Illuminated Ballistic Firedot reticle is excellent for rapid target acquisition.
In fact:
It’s one of my favorite hog gun scopes.
I expected quality from a Leupold scope, and I wasn’t disappointed. Here’s why…
Glass Clarity & Reticle
The glass is clear and produces a bright image.
The best part?
I can easily hunt in low light conditions (dawn or dusk). Here’s why:
Leupold applied their Index Matched Lens and Twilight Max management system. Combined, it allows for crazy bright views in dark conditions.
The VX-R uses one of my favorite red dot reticles:
The Ballistic Illuminated Firedot.
The dot is bright and draws the eye naturally to center without obscuring the target. This works especially well when I’m trying to take down running game.
The lines on the bottom post allow me to push my shots out beyond 200 yards and still maintain accuracy.
There are 8 brightness settings, and I was able to find the perfect settings for daylight and night shooting pretty quickly.
However, there was one thing I didn’t like about the VX-R:
The brightness button.
Instead of a dial, the VX-R uses a button to cycle between the light levels. And sometimes, it’ll get stuck. If this happens to you, simply unscrew the battery cap and put it back on, and the button should work fine again.
It’s not a deal-breaker, but I do wish they had a dial instead.
Speaking of dial, the VX-R uses a battery to power the illumination. It’s nice, crisp and equipped with an auto on/off feature.
This is literally a battery saver since I sometimes forget to turn off the illumination. Due to this, I didn’t need to change my battery for months now.
Eye Relief & Eye Box
The eye relief sits at a comfortable 3.7-4.2 inches.
I have mine right at 4 inches on my AR and it’s extremely easy and comfortable to line up with.
With that much eye relief, I could easily mount the VX-R on a higher recoiling rifle and not worry about scope bite.
Related: Best .300 Blackout Scopes and Optics
Eye box is generous and easy to settle into. I’ve found that it maintains field of view even when I zoom it all the way in.
Durability
The VX-R packs in all of the durability you’d expect from a Leupold scope.
The tube is machined from aircraft grade aluminum. This means that the tube is not only tough, but it’s also light, weighing in at 15.3 ounces.
The VX-R is waterproof up to a depth of thirty three feet. So if you accidentally drop your scope in water, it should still be fully functional.
It’s also fully fogproof and scratchproof – like the Leupold Rifleman 4-12×40 – so you can use it in all environments and conditions.
Elevation & Windage Knobs
The turrets are easy to use and turn with a solid, stiff click.
I was able to zero the scope to 200 yards very quickly and have had no issues with any drifting, even after months of shooting.
The turrets proved to be reliable.
Speaking of which, Leupold offers CDS (Custom Dial System) elevation turrets that you can order specific for your caliber and bullet load. I didn’t find this necessary, but it’s a great option to have.
The CDS is a custom elevation dial tuned to your exact load, velocity, and shooting conditions. This means all you have to do is range your target, set the dial, and fire away.
Parallax & Magnification
The VX-R gives you 3-9x variable magnification which is great for close to mid-range shooting.
The best part?
The reticle is set in the second focal plane. Which means, when magnification is changed, the reticle’s size remains the same.
I’ve had zero problems with the reticle obscuring the target, even when I dial the magnification all the way up.
In fact, the image remains clear, even at 9x. No fuzziness or distortion — just a crisp view.
In case you’re wondering about parallax, there is none…
Because the VX-R comes from the factory with parallax eliminated. So all you have to do is zero it in and go shoot.
Mounting & Rings
If you don’t have a mount, I recommend using the Mark AR 30mm mount. It fits like a glove and holds zero well.
Also, the VX-R ships with a scope cover to help keep your scope clean and protected when not in use.
However, I’d recommend some Butler Creek flip-up lens caps (size 02A)…
…and a 40mm Leupold Sunshade if you shoot in sunny conditions.
Is The Leupold VX-R For You?
Overall, the Leupold VX-R is a monster of a mid-range scope, especially when used with an AR or other tactical rifle, like the M1A.
Here’s why. It’s got:
Clear glass
3-9x magnification
Second focal plane
Auto-shutoff battery saver
Reliable, hand adjustable turrets
Ballistic Illuminated Firedot reticle
Extremely durable, waterproof, and fogproof
The VX-R brings all the quality and reliability that I would expect from a Leupold but at a reasonable price. If you want to start stepping up your glass game, then the Leupold VX-R is for you.
Plus, the Leupold Lifetime Warranty means that even if you somehow manage to damage the VX-R, you’re covered.
So if you’re ready to take the next step in quality riflescopes, give the Leupold VX-R a try.
I doubt you’ll regret it.
FAQ
If you own a VX-R riflescope or recently bought one, how do you like it so far? Let me know in the comments below. Also, I’ve written an in-depth guide on the best .22-250 scopes on the market.
When my husband first started hunting large game over a decade ago, I wanted nothing to do with the gut pile. Now? I’m rummaging through it trying to find all the good, often overlooked cuts of meat, and put as much of that animal to use as possible. This includes the almighty venison liver.
When it comes to nutrient-dense organ meats, the liver is the next logical step after trying venison heart. While the heart is very mild in flavor and most reminiscent of a really good steak, the liver takes a bit of a stronger palate and a more acquired taste. But, there are plenty of ways to make the often pungent flavor of the liver much more mild and worth the effort.
Historically, hunters would sautee the heart and liver at deer camp, eating the nutrient-dense organ meats before they ever left for home. But, today, that doesn’t happen as much. The liver, however, is arguably one of the most nutritionally dense foods on the planet, full of essential nutrients like Vitamin A, Vitamin B, copper, folate, and iron. But because of its often pungent flavor, it’s often overlooked.
The liver is full of blood vessels, which gives it a pretty pungent flavor. This is especially true for large animals, but if you’ve had calves liver, or pig liver and enjoyed it, you’ll probably like deer liver.
The flavor profile for liver is pretty iron-like and a bit bitter, this is especially true of older bucks, while the flavor of younger bucks (less than 2 years) and does flavor is a bit milder from the start.
While the flavor in and of itself can be enough to turn some folks off from it if it’s prepared correctly you can turn any liver hater into someone who enjoys this nutrient-dense food.
So, how do you prepare it properly? To begin, you’ll want to simply remove the liver from your deer. While most animals have a bile duct you need to worry about and remove, deer actually don’t possess a gallbladder, so all you need to do is remove it. Once removed, you’ll want to thoroughly rinse it with cool water.
Next, you’ll want to slice or cube your liver. Not only will this increase the surface area for soaking out some of that pungent flavor, but it will also enable you to remove any gristly bits and veins from the liver tissues.
Then, you’re on to soaking. I recommend soaking your liver for 12-48 hours, changing the liquid at least once. For the mildest flavor, I recommend soaking the liver in milk, but you can also use saltwater. Saltwater doesn’t seem to pull out as much flavor as milk, though.
Of course, you can just eat fresh liver without soaking it, soaking it isn’t a safety concern, but a taste concern. We usually harvest, rinse, and soak it and eat it the next day, but it’s really a personal choice.
The longer you soak it, up to two full days from harvest, the more mild the flavor. What you use and for how long you soak is up to you, but if you’re trying deer liver for the first time, I suggest soaking it for at least 12 hours in milk or buttermilk before cooking it.
After soaking, you’ll simply remove the liver and rinse it off. I pour mine in a colander and rinse it under cool water until the milk is off and pat dry.
Cooking Venison Liver & Onions
After you’ve soaked and rinsed the liver, it’s just a matter of frying a little bacon, slicing up some onion, dredging the liver in seasoned flour, and frying it in butter in a cast-iron skillet.
Begin by dicing up bacon and frying it in a couple of tablespoons of butter. Once crispy, remove the bacon to a plate lined with paper towels to dry, leaving the grease in the skillet.
Meanwhile, combine flour, seasoning salt, black pepper, garlic powder, and paprika to make your dredge.
Dredge the liver pieces in seasoned flour, coating each side well. Continue until all of the pieces are well coated.
Slice onion into thick rings and brown them in the hot skillet of bacon grease over low heat.
Once the onions are nice and browned, move them to the side of the skillet away from the heat. Melt more butter and add your liver to the skillet, being sure not to crowd the skillet.
Brown the liver slices to a golden brown, over medium-high heat, for about four to five minutes for each side and remove to a plate lined with paper towels, until you’ve finished the entire batch, adding more butter as necessary.
The trick to flavorful, tender liver is to allow each side to brown, flipping the liver as little as possible, while not overcooking it (which results in tough liver).
Add all of the liver, onions, and bacon back to the skillet and toss together until mixed thoroughly.
Tips for Cooking Deer Liver
Soak the liver for a minimum of 12 hours to remove the bitter flavors. Whole milk works well, or you can try salt water or a buttermilk soak.
Keep the onion slices large, you want them similar in size to a bite of liver.
Don’t overcook your liver. To keep it tender, you’ll want to cook it until there’s still a tiny hint of pink in the center.
Pull the liver out of the refrigerator, drain, rinse and leave out while you prepare the rest of the ingredients so it’s warmer when you cook it.
Cooking this dish in a cast iron skillet will yield the best results, but if you don’t have one any large skillet will work equally well.
If you’re looking for ideas on how to reconnect with your food, nature, and the heritage way of life, you’ve come to the right place.
Join over 40,000 like-minded folks in my Facebook group, The Self Sufficient Life. You can join by clicking here.
Scopes and sights will instantly improve your performance on the range or while hunting small game.
In low light conditions, it is not easy to acquire your target with stock iron sights.
A scope or sight will provide you a visible reticle in all lighting conditions that not only allows you to engage your target quickly but also increases your accuracy.
Note: You need to be at least 18 years of age to purchase any of the below air rifles, as well as adhere to the local laws governing their usage.
What to Consider When Buying an Air Rifle/Pistol Scope
Scopes and sights are performance enhancing accessories that are a must for long distance shooting.
To ensure you get the right accessory, you need to know the different sights, how much magnification you need, and the scope’s durability.
Type of Sight
You can mount red dot, reflex, and scopes to many air weapons if you have the required mounting hardware.
Even if your air pistol or rifle does not include the mounting platform you need, you can purchase adapters in most cases.
If you need an adapter, check out this site: www.AirgunDepot.com
Magnification
Reflex and red dot sights have 1x magnification which is perfect for short to medium distance shooting.
Scopes can offer 16x magnification, which is perfect for medium to long distance shooting.
Durability
While you are at the range or hunting small game, the weather may take a change for the worse.
When this happens, you will want your gear to be waterproof, shockproof, and durable.
Below are the 14 best air rifle and pistol scopes.
#1. UTG Hunter IR 3-9×40 AO
Image: AirgunDepot.com
Reticle: .25 MOA
Magnification: 3x – 9x
Weight: 21.1 oz.
Water Resistant: Yes
Price: $124.99
The UTG Hunter IR 3-9×40 AO was created with airgunners in mind to provide you a crystal clear image of your target with its emerald-coated optics.
The scope is excellent for precision shooting at various ranges with 3x to 9x magnification.
An excellent feature of the UTG Hunter is that the .25 MOA reticle’s color can change to ensure that you do not lose your target.
It comes with 36 reticle colors to choose from for a customized targeting experience.
The bright mil-dot reticle is perfect for all lighting conditions, including cloudy days.
It can withstand the elements with its durable design that is fog proof, shockproof, and rainproof.
With everything included to attach it to your weapon, the UTG Hunter IR 3-9×40 AO is perfect for any long distance shooter.
It is available at Airgun Depot. Here’s where to buy it: www.AirgunDepot.com
#2. UTG SWAT IR 3-12×44 AO
Image: AirgunDepot.com
Reticle: .25 MOA
Magnification: 3x – 12x
Weight: 23.2 oz.
Water Resistant: Yes
Price: $154.99
The UTG SWAT IR 3-12×44 AO provides shooters with up to 12x magnification making it one of the best long range air rifles scopes available.
Much like the Hunter IR 3-9×40, it includes an adjustable 36 color mil-dot reticle for better target acquisition in various settings.
To give you the best zero, it comes with .25″ windage and elevation adjustments and 10 yards to infinity parallax modifications.
With an emerald coating on the lens, you will have superior visibility for target practice or small game hunting.
It includes everything you need to attach to your air rifle to include Weaver/Picatinny rings and 2 hex wrenches.
It is a bargain at $154.99 and will assist you with providing tight shot groups.
It is available at Airgun Depot. Here’s where to buy it: www.AirgunDepot.com
#3. UTG CQB BugBuster IR 3-9×32 AO
Image: AirgunDepot.com
Reticle: .25 MOA
Magnification: 3x – 9x
Weight: 13.9 oz.
Water Resistant: Yes
Price: $117.99
The UTG CQB BugBuster IR 3-9×32 AO will provide you with a sharp picture that pops.
UTG secured the top three spots on this list for their value, function, and durability.
The BugBuster is like the Hunter IR 3-9×40 AO but with a few key differences.
It is more lightweight without sacrificing durability and is designed for close quarters combat.
The scope has parallax adjustments starting at 3 yards instead of 5 for a closer zero.
A downside is that the BugBuster does not have a 36-color adjustable reticle and instead has either a red or a green reticle option.
This is not a game changer for most people, but it may be worth spending the extra $7 if that is important to you.
Like the other UTG scopes already mentioned, it has an outstanding limited lifetime warranty.
It is also shockproof, fog proof, and rainproof.
You can not go wrong with this or the other UTG scopes on this list.
It is available at Airgun Depot. Here’s where to buy it: www.AirgunDepot.com
#4. CenterPoint Optics 32mm Open Reflex Sight
Image: AirgunDepot.com
Reticle: 1 MOA
Magnification: 1x
Weight: 5.5 oz.
Water Resistant: Not Specified
Price: $39.99
The CenterPoint Optics 32mm Open Reflex Sight is perfect for any close range shooting with its 1x magnification and 1 MOA reticle.
With unlimited eye relief, you will get pinpoint accuracy no matter how far your head is from the reflex sight.
You have the option of 4 different reticles that are available in either green or red.
It comes with an integrated weaver mount making it perfect for air pistols or rifles.
Weighing in at only 5.5 oz. it is super lightweight and compact at only 3.25″ long.
CenterPoint backs their sight with a limited lifetime warranty.
The CenterPoint Optics 32mm Open Reflex Sight is perfect for speed drills and quick target acquisition.
If you are looking for a solid performer at a great price, this may be the sight for you.
It is available at Airgun Depot. Here’s where to buy it: www.AirgunDepot.com
#5. BSA 30mm Red Dot Sight
Image: AirgunDepot.com
Reticle: 5 MOA
Magnification: 1x
Weight: 5 oz.
Water Resistant: Not Specified
Price: $33.59
The BSA 30mm Red Dot Sight is a high-performance red dot sight at an excellent price.
Built with a Picatinny/Weaver base, it can quickly attach to your favorite air rifle or pistol.
The 30mm tube provides you an extensive field of view, and the 5 MOA reticle makes it easy to acquire your target.
You can stay on the move with unlimited eye relief while taking down targets since you do not need to worry about your head placement.
To provide precise shots every time, the sight comes with .5″ windage and elevation adjustments.
If you want a red dot sight for close quarters shooting, the BSA 30mm Red Dot Sight is an excellent option at a great price.
It’s definitely the best air rifle scope for the money, all things considered.
It is available at Airgun Depot. Here’s where to buy it: www.AirgunDepot.com
#6. Mantis 3-9×32 AO
Image: AirgunDepot.com
Reticle: .25 MOA
Magnification: 3x – 9x
Weight: 16 oz.
Water Resistant: Yes
Price: $71.99
The Mantis 3-9×32 AO is a heavy-duty scope that is constructed out of high-grade aluminum.
The aluminum body also makes it super lightweight coming in at only 1 lb.
With durability in mind, the Mantis is fog proof, waterproof, shockproof, and it comes with a limited 1-year warranty.
It has a .25″ mil-dot reticle that provides a solid point of aim.
You can magnify your target up to 9x for precise shooting.
It also has a parallax adjustment of 5 yards to infinity to provide a clear picture no matter how far your target is from you.
The durable design, powerful magnification, and visibility make the Mantis 3-9×32 AO an excellent choice.
It is available at Airgun Depot. Here’s where to buy it: www.AirgunDepot.com
#7. Hawke Vantage IR 4-12×50 AO
Image: AirgunDepot.com
Reticle: .25 MOA
Magnification: 4x – 12x
Weight: 21.2 oz.
Water Resistant: Yes
Price: $209.99
The Hawke Vantage IR 4-12×50 AO is the second most expensive scope on this list but do not let the price tag scare you because it is packed full of features.
It is a great all-around scope with a magnification of up to 12x, making it perfect for long-distance shooting.
To take full advantage of the range of this scope, you will need a high-FPS air rifle or pistol.
It includes a 1″ mono-tube chassis that is 13.7″ long and weighs only 21.2 oz.
The .25″ MOA red or green reticle can easily sight in on your target with 10 yards to infinity parallax adjustment.
The reticle has 5 green and 5 red illumination settings for clear visibility in low light settings.
It is designed to last and is shockproof, fog proof, and waterproof.
The Hawke Vantage IR 4-12×50 AO is perfect for those who want a long-range scope with a 50mm objective lens.
It is available at Airgun Depot. Here’s where to buy it: www.AirgunDepot.com
#8. UTG 1×39 CQB Target Dot Sight
Image: AirgunDepot.com
Reticle: .5 MOA
Magnification: 1x
Weight: 13.1 oz.
Water Resistant: Yes
Price: $79.99
The UTG 1×39 CQB Target Dot Sight has a .5 MOA green or red T-Dot reticle, providing faster target acquisition.
It has flexible eye relief and has a wide 85′ field of view with a 39mm objective lens.
With a 42mm center height, it has co-witnessing for rear and front sights.
It is quick and easy to attach and detach the UTG 1×39 CQB Target Dot Sight to your air rifle or pistol with the patented quick-detach lever lock.
The scope also includes an integrated sunshade, which prevents glare and optimizes the amount of light that enters the sight.
It is barely noticeable on your weapon with a weight of under a pound, making it comfortable for all-day shooting.
You get a 2-year limited warranty and the quality that you expect from UTG.
If you are looking for a solid dot sight for your air pistol or rifle, the UTG 1×39 CQB Target Dot Sight is a top pick.
It is available at Airgun Depot. Here’s where to buy it: www.AirgunDepot.com
#9. CenterPoint TAG Series IR 4-16×40 AO
Image: AirgunDepot.com
Reticle: Not Specified
Magnification: 4x – 16x
Weight: 17.44 oz.
Water Resistant: Yes
Price: $99.99
The CenterPoint TAG Series IR 4-16×40 AO provides some serious magnification of up to 16x, making it perfect for long distance shooting.
With a 40mm objective lens, you can get clear visibility of your target at extreme distances.
The reticle has a TAG style that can alternate between red and green.
It has a 10 yds to infinity AO parallax setting to provide a sharp image no matter how far your target is.
You get a 6.3′ to 25′ field of view at 100 yards for better situational awareness.
It includes a limited lifetime warranty and a CR2032 to power the scope.
If you are looking for a 16x scope on a budget, the CenterPoint TAG Series IR 4-16×40 AO is your best option.
It is available at Airgun Depot. Here’s where to buy it: www.AirgunDepot.com
#10. UTG Hunter IR 4-16×40 AO
Image: AirgunDepot.com
Reticle: .25 MOA
Magnification: 4x – 16x
Weight: 22.3 oz.
Water Resistant: Yes
Price: $142.99
Think of the UTG Hunter IR 4-16×40 AO as the older brother to the Hunter IR 3-9×40.
It has all the same outstanding features, but it has a magnification up to 16x, making it a solid choice for long distance shooting.
It has a 36-color illumination-enhanced .25″ mil-dot reticle making it perfect for any lighting conditions.
It is 14.57″ long and weighs only 22.3 oz.
The scope comes with everything you need including a flip-open lens caps, 1 CR2032 battery, 2 hex wrenches, and high Weaver/Picatinny rings.
With the included limited lifetime warranty, this scope’s value can not be beaten.
If you are on a tight budget, go with the CenterPoint, but go with UTG Hunter if you have a large budget.
It is available at Airgun Depot. Here’s where to buy it: www.AirgunDepot.com
#11. Hatsan 1×30 Red Dot Sight
Image: AirgunDepot.com
Reticle: .5 MOA
Magnification: 1x
Weight: Not Specified
Water Resistant: Not Specified
Price: $29.99
Hatsan’s 1×30 Red Dot Sight is the lowest priced sight/scope on this list, but that does not mean they cheaply made it.
It has the standard 1x magnification found on most red dot sights and has a 30mm objective lens for an excellent field of view.
With unlimited eye relief, you can quickly acquire and engage your target.
It mounts to a dovetail platform and has a quick-detach standard dovetail base.
If you want a budget red dot sight that will give you quick, precise shooting in low light environments, look no further than Hatsan’s 1×30 Red Dot Sight.
It also includes a limited 1-year warranty.
It is available at Airgun Depot. Here’s where to buy it: www.AirgunDepot.com
#12. Hawke 30 SF Compact IR 4-16×44 Airmax, Ill. AMX
Image: AirgunDepot.com
Reticle: AMX Reticle
Magnification: 4x – 16x
Weight: 21.9 oz.
Water Resistant: Yes
Price: $389.99
At $389.99, the Hawke 30 SF Compact IR 4-16×44 Airmax, Ill. AMX is the most expensive scope on this list.
This premium scope has excellent features that set it apart from the other scopes on this list and would be the top pick if it was not for the price point.
It has a glass-etched red-illuminated AMX reticle, and the lens has 16 coated layers for better clarity.
The reticle has 6 levels of brightness for superior low light targeting.
This scope has a wide-angle lens for better downrange situational awareness.
The scope can take on the elements since it is waterproof, shockproof, and nitrogen purged.
With a side focus parallax correction, you will have excellent visibility from 10 yards to infinity.
While it’s a bit expensive, it’s easily considered as one of the best air rifle scopes available for sale right now.
It is available at Airgun Depot. Here’s where to buy it: www.AirgunDepot.com
#13. Hatsan Optima 3-9×40 AO
Image: AirgunDepot.com
Reticle: Not Specified
Magnification: 3x – 9x
Weight: 19 oz.
Water Resistant: Yes
Price: $79.99
Hatsan’s Optima 3-9×40 AO provides solid performance with a magnification up to 9x, giving you precise aim.
With the parallax being adjustable, you will have crystal clear visibility from 10 yards to infinity.
The scope includes a mil-dot reticle and has a 40mm objective lens, and is easily considered one of the best air rifle scopes on the market.
Not only is the scope waterproof, but it is also shockproof, fog proof, nitrogen-filled, and has a fully coated optical lens.
This competitively priced 9x air rifle scope also includes a 1-year warranty.
Hatsan’s Optima 3-9×40 AO may be right for you if you want a balance of function and value.
It is available at Airgun Depot. Here’s where to buy it: www.AirgunDepot.com
#14. Hawke Micro Reflex Dot 3 MOA
Image: AirgunDepot.com
Reticle: 3 MOA
Magnification: 1x
Weight: 2.5 oz.
Water Resistant: Yes
Price: $129.99
Hawke constructed the Micro Reflex out of aluminum for added durability.
The aluminum is lightweight, and the sight only weighs 2.5 oz.
For additional clarity and protection, the lens is fully multi-coated with 25 layers of protection.
The 3 MOA reticle provides quick target acquisition with unlimited eye relief.
The reflex sight comes with an 8-stage digital brightness control for precise shooting in low light environments.
A unique feature of this sight is that if movement is not detected for 5 minutes, the sight will automatically turn off to save battery life.
Hawke designed it with an integrated weaver mount for easy installation on your favorite air pistol or rifle.
It also has a 2-year limited warranty.
It is available at Airgun Depot. Here’s where to buy it: www.AirgunDepot.com
See Also
14 Best Red Dot Sights for Pistols, ARs, and Shotguns
12 Best Reflex Sights
10 Best Military Grade Binoculars
References / Resources
Air Gun Laws in the US
Affiliate Disclosure: This post may contain affiliate links. If you click and purchase, I may receive a small commission at no extra cost to you. I only recommend products I have personally vetted. Learn more.
The rule of hunting is getting to understand your prey. Expert hunters know this, and sometimes they get particular when choosing their weapons depending on what you are hunting. If you are a novice hunter, it is easy to make the mistakes I did when starting. I used heavy-caliber rounds for all my hunting experiences. Though suitable for taking down big game it literally destroyed small game.
When you are hunting small game like squirrels, it is unnecessary to use heavy gunfire. You will need to have the best air rifles for squirrel hunting. Hunting any game is not easy, especially small games like raccoons and squirrels.
In this article, all my focus is on exploring the best air rifles in the market and the different features they all have that make them ideal for squirrel hunting.
Using an air gun will improve any hunter’s marksmanship and shooting skills while using any rifle. It is the first form of practice you need before challenging yourself with big game hunting. Spring-powered air guns have adverse recoil as well, and this will let you handle the full recoil of a rimfire or bore rifles as well.
When going out for target practice, it is cheaper to do it with an air rifle than with a full bore rifle. The logic is that the costs of an air gun are more affordable, yet it offers a similar hunting experience. When you get better aim using the air gun rifles, the same will reflect when hunting big game using a rimfire or center rifle.
When hunting for small pesky rodents like vermin rats and squirrels on your farmyard, air guns are safer and will not destroy farm machinery when you miss your target. Besides using it for pest control, air guns can be for entertainment as well. Not many states have dire ramifications for possessing and owning an air rifle gun. Therefore you can use it to shoot at targets with your friends when they come over.
Why I Like Them?
Air rifles are a silent killer when you fix it with a moderator that takes away the noise when you fire. Because of this, you can hunt as many squirrels and vermin rats on the go before realizing they are being picked out one by one.
Unlike using a rifle or shotguns, air guns will not need regular cleaning each time you fire. It is because they never use chemicals as fuels; therefore, they are not complicated to handle.
Also, because air rifles have little recoil compared to rimfire and center rifles, they will not stress your body each time you fire. It makes them the preferred choice for people with disabilities and the aged who require little resistance and complications.
Headshots are very effective for taking down even big game animals. The advantage is it preserves the meat if you plan to eat it. Because air rifles have limited power and chemicals, the meat stays free from peppered pellets you would have if you used a shotgun instead.
Review of the Ten Best Air Rifles You Can Find in the Market Today
Gamo Magnum Air Rifle .22 Cal
I will start with the first air rifle that I tried during my squirrel-hunting quest—the Gamo Magnum Air Rifle .22 Cal. The first thing I noticed when I handled it for the first time is how sturdy it is. It also feels lightweight, which is a bonus if you want to use it for longer hours. There is also so much control when locking into targets, especially fast-moving targets.
The good thing about the Gamo Magnum air rifle is that it gives a clean but lethal shot. I realized that the squirrel I hunted was not battered to a pulp, and the meat was preserved. Another advantage is how much power it has yet subtle and causes only slight vibrations you can handle after you fire it. Few vibrations mean a firm hand and can easily get the second shot accurately if you need more than one shot to kill a squirrel.
The Gamo Magnum air rifle comes fitted with a rear sight and front scope for improved accuracy. The front scope is fixed, but you can make adjustments on the rear sight. One thing that favored my quest when using the Gamo Magnum air rifle is the excellent optics. The field of view is clear and reliable, which makes you hit targets accurately.
I had the advantage of speed, as the .22 Cal used on the Gamo Magnum air rifles has a fast velocity. They move at 1300 feet per second. It is safe to use as it has a recoil pad that reduces the recoil to a paltry 74%. It is also waterproof since I used it in the rain, without any hiccups.
Pros
It has minimal vibration
The Gamo Magnum air rifle has a high velocity .22 Cal
Adjustable trigger
Reduces the felt recoil by up to 74%
It offers the hunter powerful shots
It comes inclusive with useful accessories
Cons
I found it to be more loud compared to other air rifles under review here.
Hatsan 95 Air Rifle Combo
It is one of the best air rifles for squirrels as it has two features that other models do not have. The first thing I loved about this rifle is that it has a high-quality and two-stage trigger that makes it easy to engage. The second aspect is that the trigger pressure is ideal, and it let me take shots at the precise moment I wanted.
The Hatsan 95 Air Rifle Combo is a gun that is also aesthetically appealing. The steel barrel looks nice, yet it manages to fire accurately with minimal effort.
With this particular air rifle, you can have three versions: .22, .25, and .177 — and each will give you exceptional performances. The .22 has a maximum velocity of only 1 000 FPS, which is decent as it builds on accuracy. On the other hand, the .177 caliber is the best for all long-range shooting as it offers a velocity of up to 1,300 FPS. The .25 is the least in terms of velocity as it only has a maximum velocity of 650 FPS.
The Hatsan 95 Air Rifle Combo comes with open sights that I found the best for taking clear shots. Because it is the best for both mid and short-range shooting, I rank it as one of the best air rifles for squirrel hunting.
The Hatsan 95 Air rifle has a beautiful design of walnut wood. It will give you superior accuracy and is a rifle with superior features than most.
Pros
Accurate
Anti-beartrap mechanism
Sturdy gun
Clean shots
Lightweight
Cons
Some people may find it difficult gun to cock
The grouping is sometimes spread in a few of the rifles made.
Gamo Varmint Air Rifle .177 Cal
Hunting pesky tree rats and squirrels can be a fun sport if you have the Gamo Varmint air rifle. Sometimes after having a bad day, all I need is to feel better, and hunting squirrels offers more resolve than the rigorous process of hunting deer, hogs, or ducks.
The Gamo Varmint air rifle is a .177 Cal designed to remove the stress pests bring to your life. It is a simple air rifle that fires a caliber up to 1250 feet per second. With such firepower, it is enough to fall a squirrel from a tree minimizing the rare chance of missing your target.
The Gamo Varmint Air Rifle is also an all-weather gun with excellent stability, which combines well with quality to give you maximum performance. It is lightweight and synthetic stock that is also easy to carry everywhere you go.
It uses match-grade polymer steel, and the jacketed barrel is somewhat fluted, which adds speed and spin to your ammunition. The Gamo Varmint air rifle uses a two-stage and adjustable trigger that gives the feeling of a comfortable and customized fit. The thick butt-pad will absorb most of the recoil, and this ensures a smooth shooting experience for all hunters.
Pros
Sturdy gun
Clean shots
Lightweight
Accurate
Cons
Is somewhat louder than other air rifles
Gamo Whisper Silent Cat Air Rifle
Another best air rifle that I tested is the Gamo Whisper Silent Cat Air rifle because it has decent speed and accuracy. It has a maximum velocity of 1200 FPS, which is fast enough for hunting squirrels from mid to short-range distances.
The Gamo Whisper Silent Cat Air Rifle operates using a single cocking system, which is ideal for smooth shooting. It also uses automatic cocking to make it faster to shoot and easy to operate. The most crucial feature I loved about this air rifle is that it has a first and second stage of trigger adjustments that make it precise and comfortable.
The barrel is of the Gamo Whisper Silent Cat Air Rifle is fluted and has a polymer jacketed steel. The air rifle is also dead silent as it has a noise dampener that makes it undetectable to the squirrel population. It means that you cannot disrupt the squirrels because the gun makes no noise when your fire. The dampener has the potential to reduce the noise from air rifles by almost half.
You would not disrupt the squirrels since this air rifle comes with a noise dampener that is not detachable. The noise dampener can minimize the noise produced by air rifles by almost half, which allows you to attract more squirrels.
The design comes with a rubber pad for the butt of your air rifle. It takes away the recoil and makes for comfortable shooting as well. It comes with the best optics, which makes you shoot accurately at your targets. The sights are both waterproof and fog proof, which makes it a durable all-season air rifle.
Pros
Powerful shots
Reliable optic sight
Durable
Quiet operation
Cons
The scope is sometimes wobbly
Benjamin Trail NP XL Magnum
The Benjamin Trail NP XL Magnum is among the best air guns for novice hunters. It has a total length of 4.25 inches and is considered among the full rifles available under this review. The aesthetic wood stock design makes it a lightweight air rifle at only 9.7 pounds.
It has a thumbhole stock that feels comfortable for all hands and coupled-up with a good grip that adds to your pinpoint accuracy shots.
The Benjamin Trail NP XL Magnum uses Benjamin’s Nitro Piston Technology and is also a single hot air gun. The manufacturer replaced the steel spring as the source of power with this new technology as its main aim is to reduce the feel of recoil when you fire.
Through the use of Nitro Piston technology, you can have improved accuracy as you have a faster locker time. It can fire pellets at 1100 feet per second, making it a lethal rifle for hunting small game like squirrels and rabbits.
It has a quiet but simple break barrel as its action. Because it reduces noise, you can take a second shot if you happen to miss your first one. The trigger is also smooth and is only a brisk 3.5 pounds. The weight of the trigger is not adjustable, which is a downside, but if you are a straight shooter, you will have no qualms with this design.
Most novice hunters will enjoy using this air rifle for target practice as the skills can easily be transferred to the full gun when hunting for a big game. Every shot you fire will carry a 30-foot-pound of downrange muzzle energy. The Benjamin Trail NP XL Magnum, therefore, is among the most hard-hitting air rifles that take down small game with a single shot. The hard punch is a welcome feature as I like to consider the humane side of killing prey; it should be a quick and painless death.
Pros
Powerful shots
Reliable optic sight
Durable
Quiet operation
Cons
The weight of the trigger is not adjustable
Seneca Dragon Claw
Under this review, this is the most potent air gun rifle in the market. The Seneca Dragon Claw is for situations where you need one shot, and it must be the killer shot. When I was using the Seneca Dragon Claw air rifle, I preferred the .50 Cal.
One thing I admire most about this rifle is the pre-charged pneumatic design. It makes this beast gun able to fire .50 Cal up to 679 feet per second and a 230 ft.-lbs muzzle energy. With this kind of firepower, it is no surprise that you can hunt and successfully kill both small and medium-sized game like small hogs, foxes, coyotes, and possums.
The outstanding feature of the Seneca Dragon Claw air rifle is that it uses dual tanks of 500cc air capacity. The dual tanks are under your air rifles barrels that give it balance when handling it. It also comes with the best adjustable sights accompanied by a dovetail rail to mount the optics on your rifle’s barrel. It has an appealing aesthetics as the wooden stock finish on the fore-end is quite attractive.
Pros
Sturdy gun
Clean shots
Accurate and powerful
Cons
The dual tank feels cumbersome and makes the rifle heavy
Benjamin Vaporizer SBD Air Rifle
The Crosman Benjamin Rogue SBD is an improved version of the original Benjamin SBD. The acronym SBD stands for Silencing Barrel Device. As a result, this reduces the noise when you fire the rifle and is up to three times more silent than other air rifles in the market.
It is also a powerful rifle as it fires the .177 caliber design pellet up to 1,400 feet per second. If you are looking for a silent killer’s true definition, then you must try the Benjamin Vaporizer SBD. When hunting for small prey like rabbits and pesky pests like squirrels, it is a brutal rifle that kills on impact. It, therefore, offers the prey a humane, quick, and painless death.
The Silencing barrel device is odd-looking, but I love how it functions well and is also out of the way, so it doesn’t block the adjustable scopes. Another essential feature worth mentioning is the two-stage trigger that gives a smooth squeeze.
Pros
Accurate
Sturdy gun
Clean shots
Lightweight
The most silent air rifle because of the SBD
Cons
Appears complicated and not for the novice hunter
Beeman R7 Air Rifle
The Beeman R7 is one of the smallest and compact air rifles in the market today. Yet, despite the size, it is still powerful enough to fall small pre like squirrels. It is also not lacking in the accuracy department as it has excellent balance and control. When I was using it, I discovered that it is remarkable at hitting fast-moving objects as it also has high speed and velocity. It can fire a .177 pellet up to 700 feet per second.
It is a model that takes after the popular Beeman R1 air rifle. The idea behind the same design was to create a shorter, lighter, and comfortable to shoot weapon. An excellent feature that complements the design is the use of a double joint cocking lever, which reduces the effort when cocking.
The barrel design is a spring-piston that can propel a .177 Cal accurately and at faster speeds. The trigger is also adjustable and breaks at 1.25 lbs.
The Beeman’s reduced effort cocking device makes it unique and an overall excellent break barrel design. The fact that it is 5 inches shorter and 2.5 pounds lighter than the Beeman R1 makes it the clear winner.
The Beeman R7 is among my favored air rifles because it comes with adjustable scopes and mounts for all your optical needs.
Pros
Lightweight
Sturdy
Adjustable trigger
Cons
Some people feel like it lacks enough killer power
Benjamin Fortitude Gen2 PCP Air Rifle
When you want a simple design, then the Benjamin Fortitude is among the top air rifles. It is also easy to use and affordable. The Benjamin Fortitude has all the features you need to hunt and kill small game like rabbits and squirrels. The pellets come in two sizes you can choose from, either the .117 or—22 caliber pellet rifles. For the .117Cal, you will have a 950 FPS, and the .22 offers up to 800 FPS.
It is a bolt action and a single-shot air rifle that has a 10-round rotary magazine. The Benjamin Fortitude weighs a paltry 5.3 pounds and is an all-weather type of design. It is lethal at distances under 100 yards, and this is why I love it for all my hunting experience. The single-stage trigger design allows a constant pull that makes it accurate.
Pros
Easy to use
Lightweight
Accurate
Lethal at distances under 100 yards
Cons
None worth mentioning
Air Arms TX200 Hunter Carbine
It is an elegant and refined air rifle design. It has a sleek appearance, and it does back it up with more firepower. The Air Arms TX200 Hunter Carbine is a compact and lightweight .177 rifle known to be the best for target shooting and hunting of small game. This gun has excellent accuracy and can send a pellet downrange up to 930 FPS. It comes with an underlying under lever of 34 pounds cocking effort.
The Air Arms TX200 Hunter carbine is the best for hunting small game as it is lethal for prey like rabbits and squirrels. It is exceptionally lightweight and has a beautiful wooden stock finish that makes it aesthetically appealing. It has decent handling, and it is easy to use and the best for the novice hunter.
The most impressive feature is the two-stage adjustable trigger that is coupled-up with a barrel from Lothar Walther to give it precision and accuracy.
Pros
Easy to use
Lightweight
Accurate
Sleek design and a two-stage adjustable trigger
Cons
Expensive is not a con as you cannot drive a Ferrari that you cannot afford.
There are many better and easier options for starting a fire than a fire piston, but what’s the fun in that? Sure, matches and lighters are easy to use- but they can’t create a spark out of thin air. Fire pistons are a marvel, and that explains why you’re just as likely to see them in science class as in a survival kit. They work by rapidly compressing air, similar to diesel engine compression. There aren’t a huge number of fire pistons to pick from, but that doesn’t mean they are all made equally.
This is where we come in. We’ve researched the best fire pistons, compared them, and now the results are in: the overall best, a beginner option, and an upgrade option. If you need a compression fire starter, one of our picks will bring the heat.
Contents (Jump to a Section)
This fire piston is one of the larger ones we tried and that gave it a leg up. Besides the ergonomic hickory handle, this piston was the easiest to use by far because it had high compression volume paired with precise machine quality.
Needing less lubricant and providing consistent embers makes this one rise above the other pistons when comparing them for survival scenarios.
Here is what you get with the hickory-handled piston:
Aluminum chamber and piston, hickory housing
Includes char cloth, spare o-rings
4.5″ L x 0.875″ D
2 ounces
It’s a reliable, effective, and easy-to-use fire starter so it’s easy to see why this Hickory Fire Piston is the best.
This mid-sized pocket piston comes at a rock-bottom price. It’ll get the job done and comes with everything and the kitchen sink put together as a ‘fire piston kit’.
Don’t worry about stocking up on Vaseline, char cloth, and other tinder because this kit comes with plenty. This makes it ideal for stashing in kits or as a gift for that survivalist (or physicist) friend of yours.
Here is how the SXTL measures up:
Aluminum chamber, copper piston
Includes instructions, char cloth, jute fiber, lubricant, paracord, spare o-rings, and storage tin
3.8″ L x 0.55″ D
2 ounces
If you are looking for an inexpensive but complete option, the SXTL Fire Piston is what you need to try a new fire-starting method.
Wilderness Solutions is one of the few brands making a wide selection of fire pistons. Being the smallest survival-oriented option, the TERA-Light stood out and ended up proving its worth.
Here are the full specs:
Aluminum chamber and piston
Includes instructions, char cloth, jute fiber, spare o-ring
3.4″ L x 0.75″ D
2 ounces
Lifetime warranty
If you are looking for a compact and quality solution, grab a TERA-Light Pocket Fire Piston.
Our research narrowed the field down to several brands and types of pistons that we compared: Wilderness Solutions, SXTL, Coherny, American Heritage, Ti Survival, and more.
You can see our full list of review criteria below in the What to Look For section, with an explanation for each.
We considered almost every fire piston we could get our hands on. They used a wide range of materials and come in several sizes. We did reduce our comparisons down to pocket pistons although larger pistons can have more reliable ignitions due to larger compressions chambers.
There is one smaller model masquerading as many brands (presumably due to dropshipping), but it is easily recognizable with two o-rings on the end of the small compression cylinder. It did not perform well in our tests.
We’re always looking for new and better solutions, so if you have a fire piston that you swear by, let us know in the comments. We review most of our tested equipment annually so we can try to get it in the next roundup round and see if it will beat out our top picks.
What to Look For
The best fire pistons have a few features to look for:
Value
Precision Quality
Compression Volume
Size & Weight
Durability
When you get the right blend of these, you can find a piston that will consistently compress to generate plenty of heat. Below, we break down what each of these features means for the fire pistons that truly set themselves apart.
Value: Cost vs. Benefit
The amount of money you spend on something like a fire piston shouldn’t blow out your entire budget. Fire pistons are not cheap as far as fire starters go, where you can get matches, lighters, ferro rods, and more for cheaper.
You never want to spend too much money on one thing when it comes to survival gear. It’s better to diversify your equipment and budget to make sure you are covered for a wide range of scenarios.
Precision Quality
Friction during the compression of a fire cylinder fights against you making an ember. But, you need friction to keep a good seal as the chamber is compressed to compress the air inside of it instead of allowing it to escape.
Many of the brands we tested address this with multiple o-rings (instead of one) and plenty of lubricant (petroleum jelly).
We found that when the compression cylinder and piston are machined precisely to be closer fits, you need less o-rings and lubricant to be effective. Larger fire pistons worked better as well, presumably because we were compressing more air.
Compression Volume
This size of the compression chamber can be measured approximately by the piston rod. When it is machined precisely for a good fit, it fits very close to snug and seals well with the help of a single o-ring.
When you compare piston rod sizes between different fire pistons, you can see approximately how much air is being rapidly compressed. Since you are using the same motion to compress these, more air compression equals a larger energy transfer into heat.
Size & Weight
While larger pistons can get hotter, you don’t necessarily need that if you are lighting char cloth and other easily ignitable tinder. Size can be a hindrance if you plan on keeping it in your pocket or in a kit.
Most of the pistons we compared weigh just a few ounces so this isn’t an issue for our suggestions, but it could be if you insist on carrying a diesel cylinder around with you.
Durability
The durability of the fire pistons mostly came down to their consumable parts: the o-rings. When you get a pocket piston, you aren’t getting medical or industrial grade o-rings so we did find them dry rotting and degrading over time, friction, and ignitions. A few of the options we suggest provide spares, acknowledging that the o-rings are a consumable part.
Lubricants were also needed- damage to the pistons and chambers can happen. We had some marring on our brass piston after many uses. The material type contributes, as we compared fire pistons with chambers and pistons using everything from brass to titanium.
How to Use a Fire Piston
Fire pistons are easy to use, but do require some prep work and maintenance.
First, you’ll need to pull the piston out of the compression chamber. Inspect the o-ring to make sure it is intact.
Lubricate the o-ring area with petroleum jelly if needed but keep the jelly away from the tip.
Next, carefully add some tinder to create an ember inside the tip of the piston. It should stick out slightly. Char cloth works exceptionally well, and you only need to tear off the size of a fingernail and wad it up.
With the tinder in position, insert the tip of the piston into the chamber just past the o-ring.
Next, holding the handle of the piston, rapidly press the piston into the chamber (you can slam it against something hard like a tree, but don’t break it!)
Carefully remove the chamber from the piston, being sure not to drop the ember from the tip of the piston rod. Blow on the ember lightly to make sure it ignites fully. Transfer the ember to a bird’s nest to start a fire.
John does a great job of explaining compression pistons and specifically walks through our top pick:
Who Needs a Fire Piston?
Fire pistons are a niche fire starter, similar to a magnifying glass. For survival, we regularly rely on lighters, matches, and ferro rods. But just like magnifying glasses- that doesn’t make learning new fire skills useless.
Fire pistons can be considered for these kits:
Bug Out Bag (BOB)
INCH Bag
Besides using them for survival, compression pocket pistons are useful in demonstrating and teaching physics.
Sources and References
All of our experience and the testing we do to determine the best fire piston are useless without listing our research sources and references. We leaned on these for the book knowledge that we paired with our hands-on testing and practical survival experience:
Fox, R. (1969). The Fire Piston and Its Origins in Europe.Technology and Culture. Volume 10. Issue 3. Pages 355-370. (Source)
Güémez, J., et al. (2007). Physics of the fire piston and the fog bottle. European Journal of Physics. Volume 28. Issue 6. Page 1199. (Source)
Denker, J. (2010). Fire Pistons. The Physics Teacher. Volume 48. Issue 3. Page 207. (Source)
The Final Word
Fire pistons are clever little tools that accomplish what seems impossible- using air compression to generate enough heat to create an ember. While they aren’t the most practical fire starter, they are certainly worth learning and having as a backup.
Here are a few other guides and reviews our subscribers have found helpful:
The Best Ferro Rod for Survival Fire Starting
Best Survival Tinder for Fire Starting
Bug Out Bag (BOB) Guide, Gear List, and Checklist
We presented quite a lot of information, but as always: if you have any questions let us know and we would be happy to help. Our research and testing found the Hickory Fire Piston to be the best option given its value, precision quality, compression volume, size/weight, and durability.
Keep exploring, stay prepared, and be safe.
You’ve Been Missing Out
Join the 2+ million preppers that rely on our prepping advice by subscribing to TruePrepper.
Practical guides and tips
Useful survival giveaways
Free, forever
< 0.4% of people unsubscribe
Thanks for subscribing, reading, and welcome to the club.
The Evolution of a Spike Deer: From Young Buck to Mature Antlers
The evolution of a spike deer, from a young buck to mature antlers, is an interesting process that takes place over several years. In the context of hunting, a “spike deer” typically refers to a young male deer with unbranched antlers. These spikes are generally second-year antlers, which develop after two little round knobbys grow on the top of the skull. The following year, these knobbys push through and form spikes.
As the deer matures, its antlers may develop into more complex shapes and configurations. The third year is when they shed those spikes and grow actual antlers, which are generally forked. At this stage, the deer would be considered a 4-point buck.
Every year, the animal will shed its antlers and they will be replaced by bigger and more elaborate ones. Their antlers usually get bigger with more points each year, up to a point. When a buck lives past his prime and his teeth are worn down, his antlers may not grow as well.
However, there can be variations in antler growth due to genetic factors or other abnormalities. For example, there have been cases where a deer had nine points on one side and only one spike on the other. These anomalies can result from genetic defects within the deer’s lineage.
Managing deer populations is important for conservation purposes. Overpopulated deer can cause problems such as damage to vegetation or increased risk of accidents on highways. Hunting can help control population numbers and provide a source of food if the harvested deer is used for consumption.
In some cases, people have attempted to domesticate deer. Reindeer are semi-domesticated animals that have been used for various purposes like pulling sleds laden with supplies. They were domesticated from wild caribou over 1000 years ago.
Overall, understanding the evolution of a spike deer provides valuable insights into their life cycle and helps inform wildlife management practices.
Understanding the Complexity of Spike Deer in Hunting Contexts
In the context of hunting, a “spike deer” typically refers to a young male deer with unbranched antlers. These spikes are generally second-year antlers, which grow after the first year when the deer has two little round knobbys on the top of its skull. In the second year, these knobbys push through and form spikes, much like wisdom teeth.
As the deer matures, its antlers may develop into more complex shapes and configurations, so it may no longer be considered a “spike deer.” For example, in the third year, they shed those spikes and grow actual antlers which are generally forked. Then you have a 4 point buck. Every year, the animal will shed its antlers and they will be replaced by bigger and badder ones.
However, there are exceptions to this general pattern. Factors such as genetics and environmental conditions can influence the growth and development of antlers in deer. In some cases, a buck may not grow larger or more complex antlers even as it ages due to factors like poor nutrition or genetic defects.
It is important for hunters to understand these complexities when determining whether or not to target a spike deer. While some hunters may choose to pass on shooting spike deer in hopes that they will grow into larger bucks in future years, others may see value in culling spike deer from the population to promote healthier genetics and manage population numbers.
In conclusion, spike deer refer to young male deer with unbranched antlers in hunting contexts. However, their antler development can vary based on factors like genetics and environmental conditions. Understanding these complexities is essential for making informed decisions about harvesting spike deer during hunting seasons.
Debunking the Myth: Not All Spike Deer Stay as Spikes
Understanding Spike Deer in the Context of Hunting
In the context of hunting, a “spike deer” typically refers to a young male deer with unbranched antlers. However, it is important to note that not all spike deer stay as spikes throughout their lives. As the deer matures, its antlers may develop into more complex shapes and configurations, so it may no longer be considered a “spike deer.” This means that the term “spike deer” is not always an accurate representation of the deer’s antler size or age.
Growth and Development of Antlers
Typically, spikes are usually year and a half old bucks. They lose their antlers every year and grow a new set of antlers. With each passing year, their antlers usually get bigger with more points. However, there is a limit to this growth potential. When a buck lives past his prime and his teeth are worn down, he may not be able to consume enough food for optimal antler growth. In such cases, his antlers may not grow as well as they did in previous years.
Variations in Antler Size and Configuration
While it is generally true that bucks’ antlers tend to get bigger with age, there can be variations and exceptions to this pattern. For example, there have been instances where bucks have been observed with only four points on their antlers despite being seen for multiple years. These anomalies can occur due to various factors such as genetics or environmental conditions.
It is also worth mentioning that some younger bucks may exhibit spikes during their second year before shedding them and growing actual forked antlers in their third year. The number of points on the antlers can vary depending on individual genetics and other factors.
The Importance of Deer Population Management
Deer population management is crucial for maintaining a healthy ecosystem. Overpopulation can lead to several issues, including damage to vegetation, increased risk of deer-vehicle collisions, and competition for limited resources. Proper culling of deer populations is necessary to maintain a balance between the deer population and its environment.
While hunting can be an effective method for managing deer populations, it is important to adhere to legal regulations and ethical practices. This ensures that only appropriate deer are harvested while allowing the population to thrive in a sustainable manner.
In conclusion, the term “spike deer” in hunting refers to young male deer with unbranched antlers. However, not all spike deer stay as spikes throughout their lives as their antlers can develop into more complex shapes and configurations. The growth and development of antlers depend on various factors such as age, genetics, and environmental conditions. Proper deer population management through regulated hunting is essential for maintaining a healthy ecosystem.
Factors Influencing Antler Growth in Spike Deer: Age, Nutrition, and Genetics
Antler growth in spike deer is influenced by several factors, including age, nutrition, and genetics.
Age plays a significant role in antler development. A spike deer is typically a young male deer with unbranched antlers. As the deer matures, its antlers may develop into more complex shapes and configurations. This means that a spike deer may no longer be considered a “spike” as it grows older.
Nutrition also plays a crucial role in antler growth. Bucks require sufficient nutrients to support the growth of their antlers. If a buck’s teeth are worn down and it cannot eat as much, its antlers may not grow as well. Therefore, proper nutrition is essential for optimal antler development.
Genetics can also influence antler growth in spike deer. Some bucks may have genetic traits that result in larger or more elaborate antlers compared to others. However, genetic defects can also occur, leading to abnormal or deformed antlers.
In conclusion, the factors influencing antler growth in spike deer include age, nutrition, and genetics. Understanding these factors can help hunters and wildlife managers make informed decisions regarding deer management and conservation efforts.
The Importance of Managing Deer Populations: Culling Spikes for Conservation
Deer populations play a crucial role in ecosystems, but their numbers need to be managed to ensure the health and balance of the environment. One method of population management is culling spikes, which refers to removing young male deer with unbranched antlers.
Culling spikes is important for conservation because it helps maintain a healthy deer population. By removing young males, it allows older bucks with more developed antlers to breed and pass on their genes. This helps ensure genetic diversity within the population and promotes healthier offspring.
Additionally, culling spikes can help prevent overpopulation. When deer populations become too large, they can cause damage to vegetation and crops, leading to negative impacts on other species and ecosystems. By selectively removing spikes, it helps control the growth of the population and reduces the risk of habitat destruction.
It’s worth noting that culling spikes should be done carefully and based on scientific research and population studies. It’s important to consider factors such as the overall health of the deer population, available habitat resources, and any potential impacts on other species in the ecosystem.
In conclusion, culling spikes is an important conservation strategy for managing deer populations. By selectively removing young male deer with unbranched antlers, it helps promote genetic diversity, prevent overpopulation, and maintain a healthy balance within ecosystems. However, careful consideration should be given to ensure that culling practices are based on scientific research and conducted in a responsible manner.
Domesticating Deer: Exploring the History and Role of Reindeer
Domesticating deer is a practice that has been carried out for centuries, with one notable example being reindeer. Reindeer, also known as domesticated caribou, have played a significant role in various cultures around the world. They have been used for transportation, as a source of food and clothing, and even as a symbol of cultural identity.
Reindeer were domesticated over 1000 years ago by indigenous peoples in northern Eurasia and North America. These animals were selectively bred for specific traits that made them well-suited for their roles in human society. They were trained to pull sleds laden with supplies, guided using reins, hence the name “reindeer.”
The domestication of reindeer has had a profound impact on the communities that rely on them. These animals provide not only transportation but also a valuable source of food and materials. Reindeer meat is highly nutritious and rich in protein, while their hides are used to make clothing and shelters. In addition, reindeer antlers are sought after for their medicinal properties.
While reindeer are considered semi-domesticated, they still retain many of their wild instincts. They are hardy animals that can withstand extreme cold temperatures and navigate through harsh environments. Their ability to find food in barren landscapes makes them invaluable to communities living in remote regions.
In conclusion, the domestication of deer, particularly reindeer, has played an important role in various cultures throughout history. These animals have provided transportation, food, clothing, and other essential resources to communities living in challenging environments. The relationship between humans and reindeer showcases the adaptability and resilience of both species when working together for mutual benefit.
(Note: This response is generated by an AI language model and may not fully reflect accurate information or personal opinions.)
In conclusion, while a spike deer is typically identified by its single-point antlers, it can sometimes grow additional points as it matures. This means that not all spike deer will remain spike deer for their entire lives. Therefore, it is important to consider other factors and consult experts when classifying deer based on their antler characteristics.
Three days without water is the general rule of thumb for how long we can live without it. Given its importance, we should be well versed in the many methods for finding water in the wild.
The most obvious source is a body of water such as a river or lake. But what about another resource that is all around us? I am talking about trees.
Trees can contain a huge amount of water in the form of sap. This sap contains vitamins, minerals, sugar but is primarily made up of water. Since the tree is like one big filter, this sap is perfectly fine to drink. But the question then becomes how to get at it. For that, you will need a tree spile. To be fair, you do not have to carry a modern spile to tap a tree but it sure makes it easier.
Chances are you may have seen one of these without even knowing it. Either in person or through TV I bet you have seen maple syrup collected from a tree.
To do this a hole is drilled in the tree, a spile is tapped in and a bucket is hung from the spile. A spile is simply a hollow metal tube that directs the sap into a bucket, rather than letting it run down the bark.
Choosing A Spile
There are a few different options when it comes to choosing this tool. There are different styles that can make the tapping process a bit easier. Some have an end that comes more to a point while others are more rounded. But I am more concerned about the materials they are made from.
Generally, they are made from aluminum, stainless steel, and plastic. Aluminum and plastics options are certainly going to be lighter in weight and cheaper to buy. I believe I even have seen some of the plastic spiles for under a dollar.
This is my personal opinion but I lean towards the stainless steel spiles. They are more expensive but they are less prone to breaking or bending like aluminum or plastic options. I am also not concerned with weight as even a stainless steel spile is quite light and I will only be carrying one. Again that is just my preference and I’m sure the other people have had just as much success with the other types.
Before Using a Spile
First, not all trees can or should be tapped. I am only familiar with tapping maples and birches but I do know there are other trees that can be tapped. If you are interested in trying this process I would recommend that you learn what trees can be tapped and if they are in your area.
Secondly, this method is somewhat seasonal as it works best in late winter to spring. This is when the tree is experiencing very cold nights, below freezing, and then above freezing daytime temperatures.
This temperature difference causes a higher sap flow or pressure within the tree. When a hole is created in the tree, the sap has a place to escape. When this is timed correctly, a gallon or more of sap can be collected in just a few hours.
How To Use A Tree Spile
Once a tree is selected, using a spile is quite easy. It is my recommendation that all of the tools and collection container be ready to go beforehand so as not to waste any sap. Here is a list of the tools you will need.
Drill bit, knife, or some sort of spike for creating the hole in the side of the tree.
Spile
Collection container: This could be a cup, water bottle or anything that will catch and hold the sap
Cordage: While cordage is not required it may be helpful to hold the collection container in place.
Impact tool: This can be the butt of a knife, a hammer, or a sturdy branch but you will need something to tap the spile into the tree.
When all of these tools are collected and laid out in front of you, go ahead and follow the steps below.
Step One
Remove a small section of the bark being careful to remove just enough for the spile. Considering that the tree is giving you something it is always good to keep conservation in mind. Only take what you need in order to keep the tree as healthy as possible
Step Two
A hole needs to be drilled for the spile to be tapped into. Ideally, this would be done with a drill which most people do not carry in a pack, some do, but most do not. The tip of a knife will work or a spiked tomahawk.
Step Three
Clean out some of the loose debris from the hole and insert the spile angling the front end slightly downward. The spile does not need to be at an extreme angle, and in fact, it shouldn’t be. It only needs to provide enough of a slope that the sap will run down it. Now, use the butt of a knife handle or a piece of wood and tap the spile firmly into the hole.
The spile does not need to be hammered in but it should rest firmly enough in the hole that it can support the weight of a collection container.
Step Four
Hang a collection container from the spile or place it on the ground beneath it. If it is on the ground just make sure it will not tip over.
Step Five
After you are done tapping a tree it is best to pack the hole with clay or dirt. This will help prevent that area from becoming infected.
Video
Check out this great video demonstrating how to use a tree spile:
Final Words
Unless the sap is being stored in very cold conditions it should be consumed right away, within the first day or two at most, otherwise it can go “bad.”
But with one little tool and five easy steps, you now know how to collect water from a tree. Thanks for reading.
Editor’s Note: Mark and Terry Drury have been a part of the Mossy Oak family as long as there has been M.A.D. Calls and Drury Outdoors that produces videos and TV shows. But the history of the Drury brothers and Mossy Oak goes back even farther than the history of Drury Outdoors. Mark Drury was a salesman for Mossy Oak in Missouri, Iowa and Kansas while in college, but Mark did more than sell Mossy Oak camouflage. He was one of the early members of the Mossy Oak family. When Mark and his brother Terry founded Drury Outdoors, Mossy Oak was right there for them and with them. According to Terry Drury, “Some of our best friends in the early days were Toxey Haas, the creator of Mossy Oak, and his dad, Fox Haas, Ronnie “Cuz” Strickland, Bill Suggs and the late Bob Dixon. Our company and our family plans to continue with Mossy Oak, until we go out of business, or we pass away.” Drury Outdoors produces “Bow Madness,” “Dream Season,” and “Thirteen,” all TV shows airing on the Outdoor Channel. The company also produces “Natural Born,” which airs on the Pursuit Channel. Also “King of the Spring” may return in the spring of 2015 on the Outdoor Channel.
“Our show, ‘Thirteen’ is the way Mark and I have divided-up deer season from what we’ve observed, documented and used to predict the movement patterns of older-age-class bucks throughout the 13 weeks of deer season,” Terry Drury explains. “In the 13 weeks that the show airs, we’ll be sharing all the information we have and use each season to consistently take trophy bucks all across the United States. We also allow the viewers to see the mistakes and blunders that we make as well as our successes.”
Phase one of “Thirteen” is titled, “In the Beginning” and runs from September 13 – September 25. At this time of year, not having much wind and having warm-to-hot temperatures are the factors that most impact deer movement. Here’s what we do. We study the most recent Reconyx trail-camera pictures we have, and we hunt the does. We never hunt in the mornings, and we never try to take an older-age-class buck during this period. Everyone needs to assess the buck-to-doe ratio of the whitetails on their properties every year before deer season starts. In areas with many more does than bucks, then you need to harvest does with a bow then, if your state allows harvesting does with bows. That’s exactly what we do. We try not to hunt anywhere we know a mature buck has been seen by our trail cameras, and we try to hunt the fringe regions of our property.
EHD (Epizootic Hemorrhagic Disease) hit our deer herd pretty hard last year, especially our mature bucks. To balance the buck-to-doe ratio on our land, to sharpen our skills as hunters and to improve the accuracy we’re attempting to achieve with our bows, we use the “In the Beginning Time” of deer season to prepare to hunt and take older-age-class bucks. Many hunters prefer to take does at the end of the season after the bucks have finished breeding. However, we prefer to take does at the beginning of the season to sharpen our hunting and woodsmanship skills and also to reduce our doe population before breeding season starts.
We don’t hunt in the mornings during Phase 1, because just before daylight and right at daylight is when the older-age-class bucks are moving. We’re more likely to spook them then than we are to harvest them. If your trail cameras don’t produce pictures of a mature buck moving during daylight hours, then you’re almost doing more harm than good by hunting early in the morning.
Here’s the exception to that rule. If an unusually cold front moves through our hunting lands, giving the mature bucks a reason to move, then we may hunt them. But at this time, the pictures you’ll most often get on your trail cameras will be from 4:30 pm until 4:30 am, which means you won’t have an opportunity to take them with a bow. When we’re hunting deer, Mark and I have our own Hippocratic Oath – do no harm. We feel you’re doing more harm than good for your hunting area, if you’re walking around there and having your scent there at a time when you’re less likely to see a buck.
Too, one question Mark and I often are asked is, “When hunting in hot weather, how do you keep the biting flies, mosquitoes, gnats and no-see-ums off you?” Mark and I both use Thermacell that puts out an odor that I’m convinced won’t spook the deer but do get rid of the bugs. If the bugs are going to be really thick, I’ll use two or three Thermacells.
Tomorrow: Terry Drury Explains Phase 2 – Greener Pastures Deer Hunting – September 25 – October 12
")
")
")
")
")


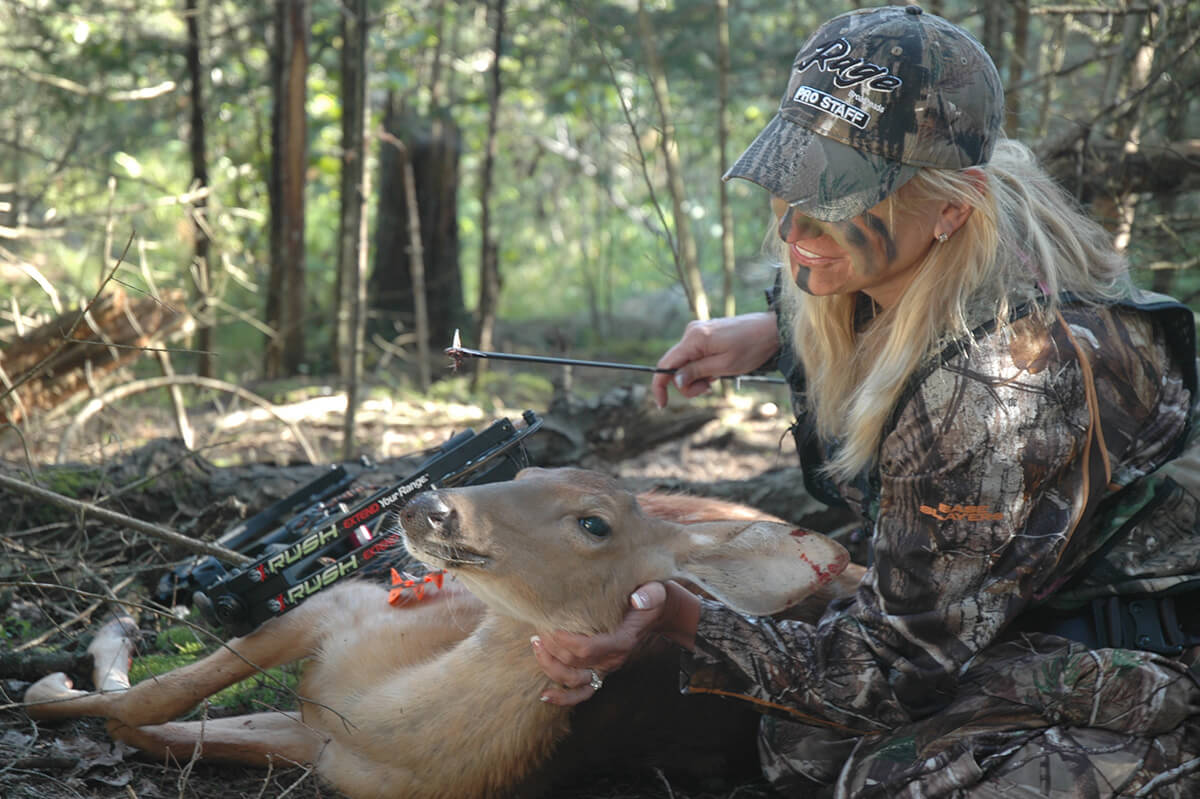
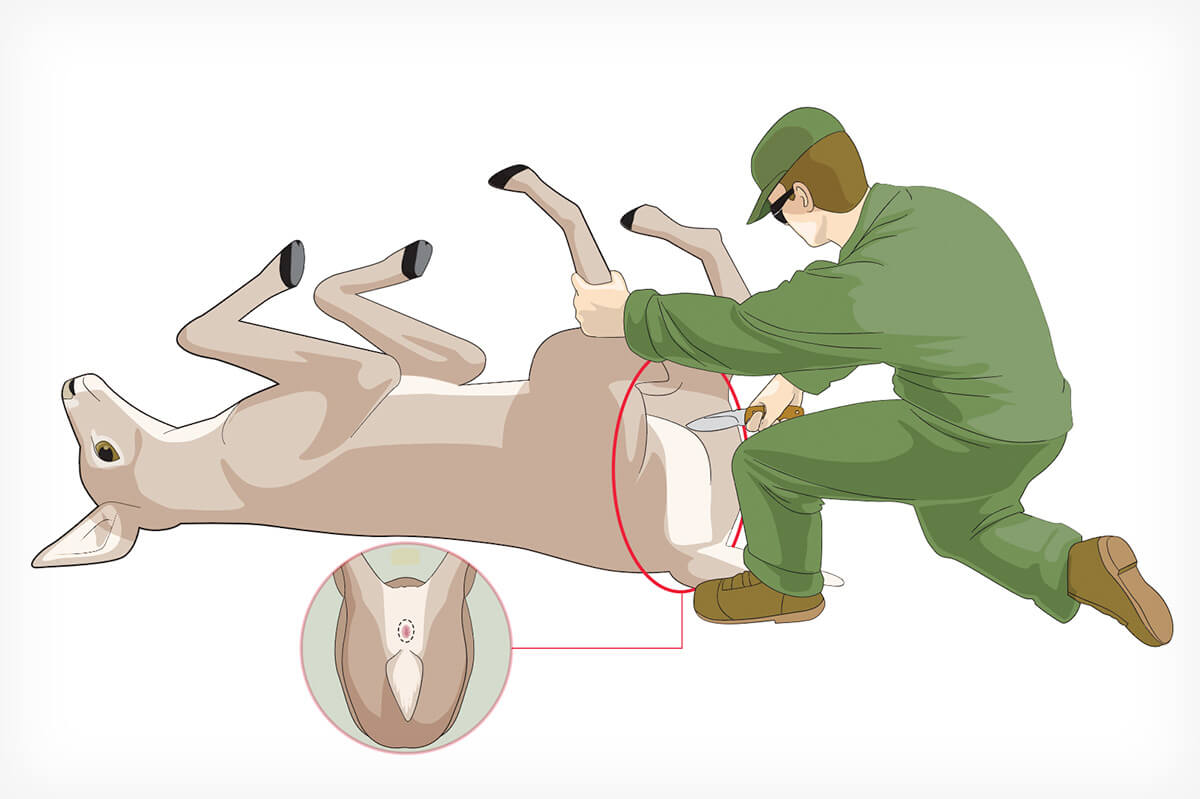


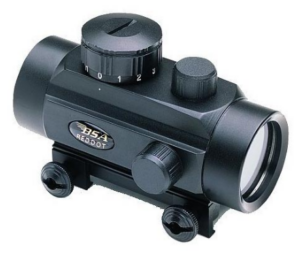
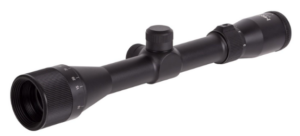
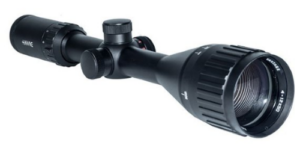
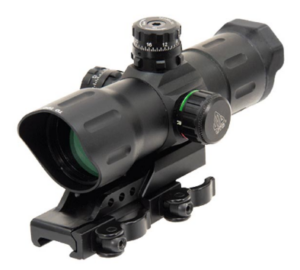
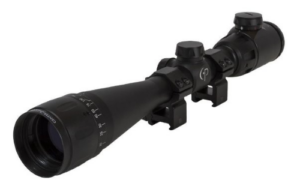

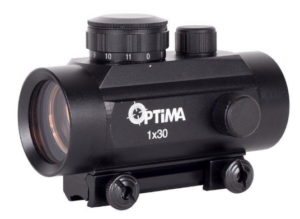
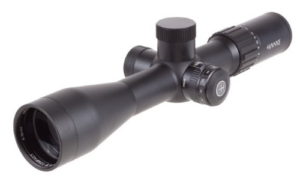
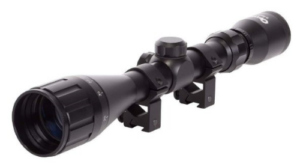

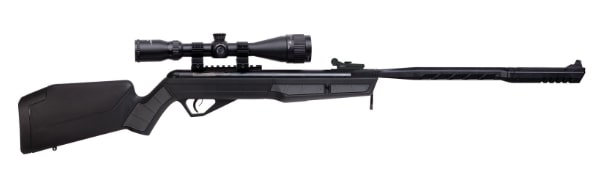


 Phase one of “Thirteen” is titled, “In the Beginning” and runs from September 13 – September 25. At this time of year, not having much wind and having warm-to-hot temperatures are the factors that most impact deer movement. Here’s what we do. We study the most recent Reconyx trail-camera pictures we have, and we hunt the does. We never hunt in the mornings, and we never try to take an older-age-class buck during this period. Everyone needs to assess the buck-to-doe ratio of the whitetails on their properties every year before deer season starts. In areas with many more does than bucks, then you need to harvest does with a bow then, if your state allows harvesting does with bows. That’s exactly what we do. We try not to hunt anywhere we know a mature buck has been seen by our trail cameras, and we try to hunt the fringe regions of our property.


