Home Blog Page 122

Staccato P

0

Let’s take a look at the Staccato P 2011 and what it has to offer. The Staccato brand used to be known as STI. They rebranded a few years back and are now called Staccato.

While doing that, they updated the look of their guns and pretty much just changed their marketing scheme.

The Staccato 2011s have a number of models, including a concealed carry model, full size model, and what we’re going to talk about today, the Staccato P.

Most people don’t realize that there is a pretty big difference between a 2011 and a 1911, and we did a quick article on it. You can check that out if you want, and the 2011 is slightly different than the 1911. It’s mostly due to the frame and a lot of times the caliber.

The caliber isn’t necessarily the only difference, but a lot of times the 2011s are 9mm, but there are 45s. So, let’s get into the Staccato P, because after all, that’s what you’re here for.

Staccato P Features

Let’s talk about the Staccato P’s features. You definitely want a gun at this price point to have features.

Pistols can only have so many, but for over $2,000, you do expect to get some very basic but at the same time advanced and polished features. This gun definitely comes with top notch features, so let’s dive into them.

Grip/Ergonomics

The grip on this gun is very interesting. If you don’t know, 2011s are two piece frames.

The second piece of the frame allows you to interchange it with polymer, an aluminum, titanium, or tungsten even frame for your 2011.

Staccato P Grip Frame

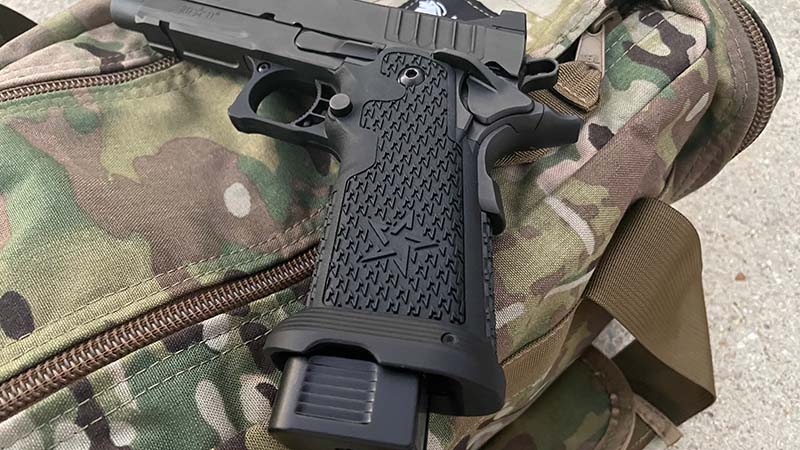
That makes it very light and also somewhat modular. It’s very interesting to grab this gun, because it’s all metal top construction and polymer grip.

When you grab the bottom, it almost feels like you’re grabbing a Glock frame but this one is much more polished.

The grips have the Staccato logo, which is a stylized star, and then the grip texture pattern.

Texturing

The texturing on the grips is actually interesting, because it’s the star logo turned on itself and duplicated.

It provides a pretty decent tactile feel but it’s not as abrasive as some grips, but at the same time, it does its job, and it does it well in that when you’re shooting it.

If you have a firm grip this grip texture is gonna be just fine.

Overall, I have no issues with the grip. Now, there is no way to change the panels on the 2011 like there would be if this was a 1911, because this frame would have to come totally off.

So if you want to change that, you would obviously have to get a whole different lower. The grips are actually molded into the trigger guard, and you would have to change out the whole piece.

Now that can be done, but obviously you’re going to be limited to what Staccato offers, so you pretty much have to take the grip out of the equation in this.

There is still your normal screw on the grip panel but here’s only one of them. It’s at the top of the grip, and that’s standard when you start talking 1911s.
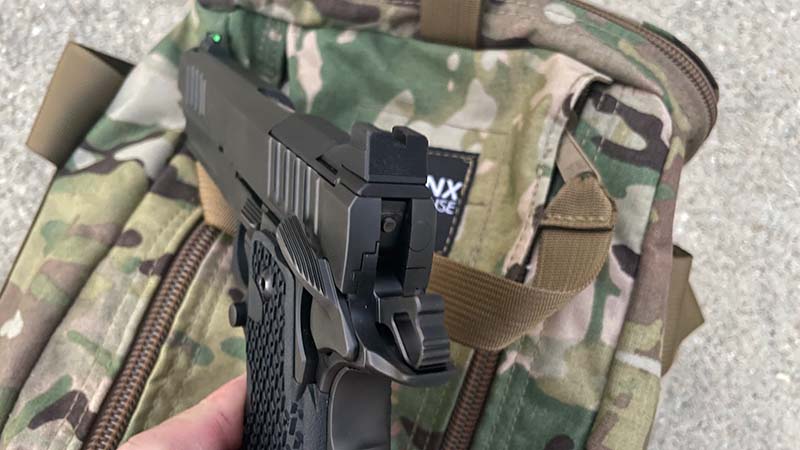
Sights

Let’s talk a little bit about the standard Staccato P’s sights. This particular model is the RDO.

That stands for the red dot optic model, but naturally it still comes with sights, the front being a fiber optic sight.

I actually really like this fiber optic sight. I believe it’s green, although my green and yellow sometimes are a little rough.

Overall shooting this, I really like the fiber optic sight, and I’m not a fiber optic sight person.

Sights Picture on the Staccato P

However, it does work well on this gun. The rear sight has just your normal U, and has very sharp edges, but it also doesn’t have any dots, which I really like.

I like to run this style of iron sight, it reminds me of the Trijicon sight on my Glock 19, so this really fell into place.

Granted, I don’t have fiber optic sights on my Glock 19, but again, I don’t know why it really works for this gun. I don’t like fiber optic sights on nearly any other gun, so I’m rather surprised I liked it on the Staccato P.

I don’t know if it’s because it’s the 1911 or 2011-style gun that makes me like it, but I like it. That’s all I can tell you.

Overall, the sights are really good. You can change them, but personally, I wouldn’t. The only reason I would change this on this RDO model is to add a red dot sight.

Red Dot Sight

I plan to add a Trijicon RMR to the Staccato P RDO. Once it arrives I’ll at it to the gun and report bag.

Controls

So, let’s discuss the controls. The controls are your standard 1911 style controls. This is a single-action gun, which means you have to have the hammer cocked, obviously. Let’s start from the back and move to the front.
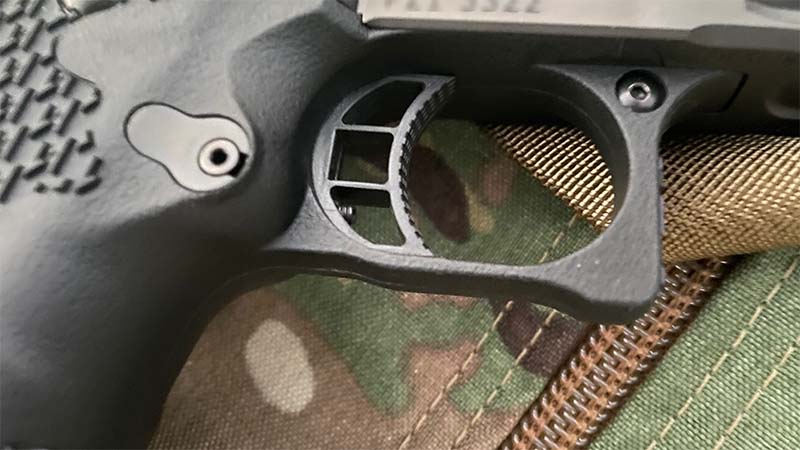
Safety

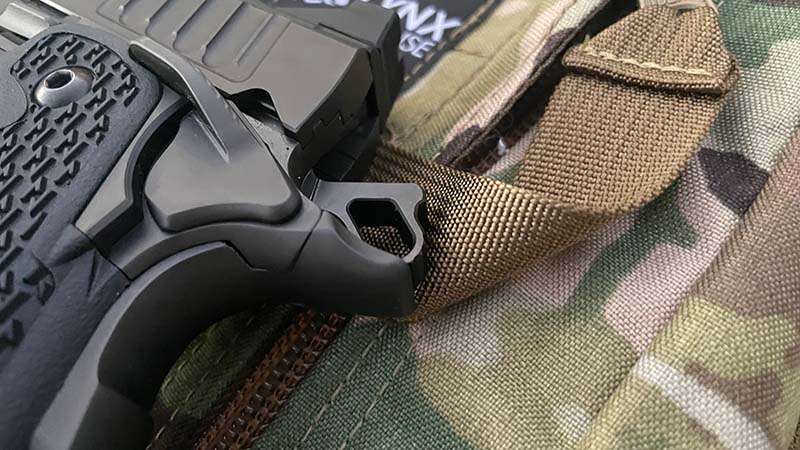
On the back of the grip, you have your palm safety. With that, you’re not going to be able to pull the trigger unless you have established your master grip and the palm safety’s activated. This palm safety is polymer-like the grip, so it’s not a metal pressure plate.

Safety on Staccato P

Grabbing it is seamless, and if you’re establishing your correct master grip, you’ll have no problems with this.

Moving forward on the gun, you have your safety. This safety is what you’d expect from a 1911 style safety.

It’s very tactile. There is a definite loud audible click.

It’s very easy to pull down. It’s very easy to engage with your thumb. It’s a simple push up. It’s a simple pull down.

It’s ambidextrous, so it’s on both sides. Overall, good safety. Not a fan of pistol safeties, but I understand the 1911s are going to have them, and on this one, it’s good.

I really like it. No problems with it, especially on the 1911. The lines are cut out. It’s very clean. It looks great, and it functions phenomenally.

Slide Stop

Moving further up the gun, we’ll go to the slide stop/slide release.

Of course, it’s still, a 1911 style gun.

There is one slide catch/release, whatever you want to call it. It’s only on the left side of the gun.

staccato p slide stop

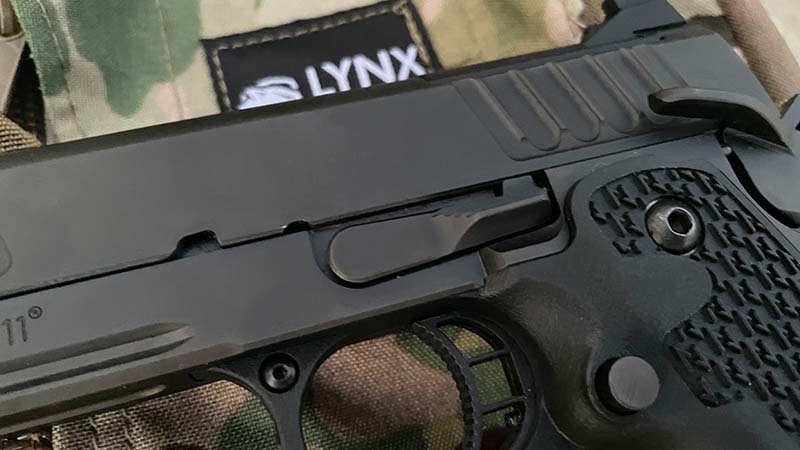
I found that it sits forward pretty far from my right thumb. I’m a right-handed shooter, so when it’s forward, it’s hard for me to get to it.

So, if I’m going to pull down on it to release the slide with the gun in the normal grip position, I’m going to pull down on it with my left thumb.

With that being said, I think it’s important to say that it is very easy. It is much easier than a stock Glock slide release.

It functions easily. It has a nice little ledge that allows you to pull down and send the slide forward.

Overall, this thing’s great. It does sit into the frame a little bit, which is an interesting design, but it’s not a negative. It’s just an observation.

Magazine Release

Last but not least for the controls is the magazine release. If there are any cons on any of the controls, it’s going to be the mag release.

Again, it’s just a little small quarter of an inch dot right behind the trigger well, that releases the magazine.

It works fine, but it is kind of gritty. It’s harder to press, but when you do, it does release the magazine and everything’s fine.

Overall, it’s a very minor complaint. It’s not something that is a deal breaker. I would just like to see something that is a little larger and easier to push.

It’s almost not worth mentioning, but in an effort to be fair, consistent, and thorough, it needed to be mentioned.

Trigger

So let’s talk about the trigger on the Staccato P.

They’re known to be hit or miss. This one is a polymer trigger and it is adjustable.

I have not adjusted it from the factory setting.

Stock Trigger on the Staccato P

When you pull it, there is very little take-up, like most 1911s. You hit a wall, and upon pulling it, there’s just a very small wall, and then you get a decent little break and then release.

The reset will require you to go all the way out on the trigger, so the release is all the way back out, and then you come back and it’s a little squishy. The trigger’s not great, but it does work. It’s decent, and I’ll write more about that later.

Action

The 2011, like any 1911-style pistol, is a hammer-based design. It’s a single-action pistol so the hammer must be cocked for the gun to fire.

The hammer is extremely smooth and light weight. If you needed to manually cock the hammer for any reason you’ll have no issues making that happen.

staccato p hammer

If you want to replace the hammer you can, Staccato even offers that option with two types of coatings as well as four different styles to choose from.
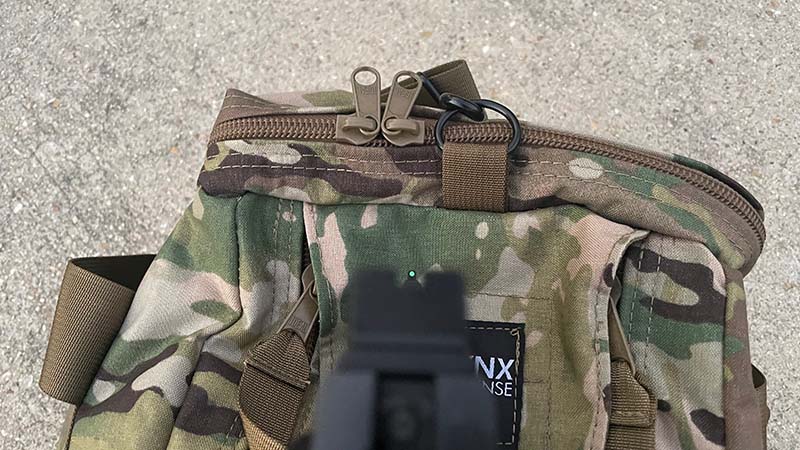
Range Bag

If you are looking for the perfect range bag for your Staccato P than look now further than the Lynx Defense Pistol Range Bag.

It’s the perfect size and fit for the Staccato P or any 2011 in your collection.

Our Pistol Range Bag can fit all of the accessories you need to carry along with your Staccato P 2011.

While the Staccato P does come with its own case if you want to carry more than just your Staccato and its magazines you’ll want to upgrade to a larger pistol bag.

If you want to carry some ammo and range gear then grab a Lynx Defense Pistol Range Bag and head to the range.

Accessories

While the accessories for most 1911 and 2011 are available in abundance. But some of the Staccato P accessories are limited to what you can get from Staccato.

Staccato Grips/Magazine Releases

The grips and specifically the grip frame on the Staccato P can be completely removed and replaced.

There is a number of aftermarket options including full grip frames from Extreme Shooters or you can have a stippling service stipple your grip.

Personally, I like the Staccato P’s grip frame and texturing so I wouldn’t mess with it personally, but to each their own!

Staccato Trigger

The one issue I have with this gun is the plastic or polymer Staccato trigger. You would expect something at this price point and this level of firearm would at least come with a metal trigger.

Metal triggers are important to me because I feel like there is less of a chance they can be broken.

You can change out the trigger on the Staccato P and there are a number of YouTube videos and Forum posts that explain the process.

There are also a handful of people that tell you a gunsmith needs to do it, while that’s not a bad idea if you feel comfortable enough then don’t hesitate to make the trigger upgrade yourself.

Magazines/Bases

Magazines for the Staccato P aren’t cheap, thankfully it comes with 3 magazines from the factory.

staccato p magazines

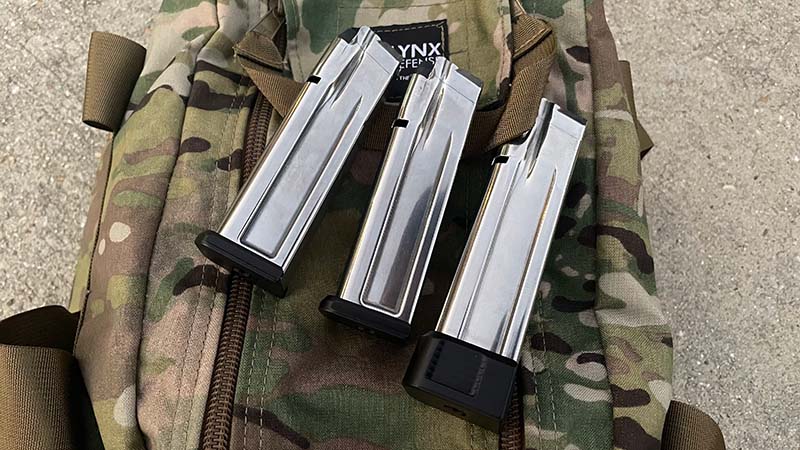
The 17 round magazine for the Staccato clocks in at $70 /piece. So while they aren’t cheap they are metal and quality.

Aesthetics

Let’s talk about the aesthetics of the Staccato P. This thing looks great. All black gun, stainless steel barrel, so it’s silver. This thing is jet-black all over. All the parts match.

staccato p right side

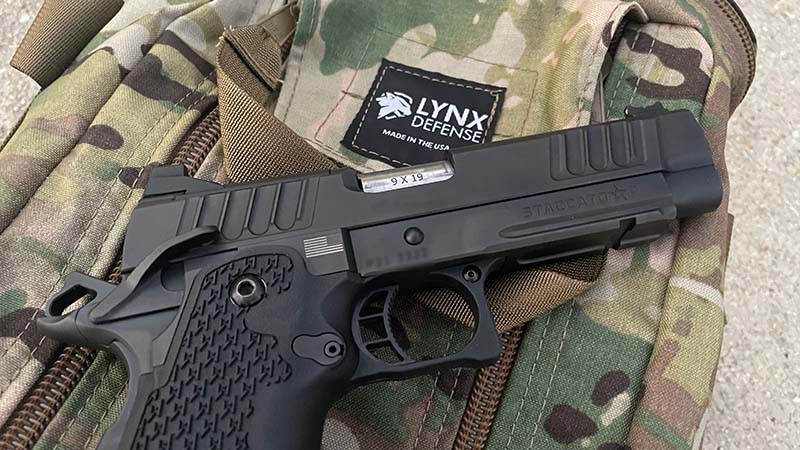
The slide matches, and the barrel and the guide rod are stainless steel silver, so they all look great.

The overall design of this has two CNC cutouts on the front and the back, so it has front serrations and rear serrations essentially, but they are a design of their own unique style.

I really like the branding that’s done on the Staccato. You have 2011 cut into the frame on the left side, and you have “Staccato P” cut into the frame on the right side.

You have the serial number etched into the frame, as well as the slide. It’s an interesting place in the slide. The serial number is actually in the mag well, so when you slide your slide back on the wall of the chamber, you have a matching serial number.

There’s also an American flag etched into the frame. Looks to be laser engraved, into the frame on the right side, just behind the trigger, just above the grip. Very, very tastefully done.

The magazine well has a plastic flared mag well. The thing is spot on if you ask me. There are even little cutouts where you could grab your mag if you needed to with your fingers.

The magazine well is exceptionally done. Underneath the frame, you have the name of the manufacturer, Staccato, etched in, and also the manufacturer’s location, which is Georgetown, Texas.

Overall, the aesthetics of this gun are impeccable. You get what you pay for four on the aesthetics. Form, function, and fantastic-looking gun. Going to be hard to beat the overall look and feel of this gun.

Shooting

Let’s talk about shooting the Staccato P.

Shooting the Staccato P, it’s a dream. It’s very much like the Para Ordnance 1911 that I have.

It’s not a 2011 because of the frame. It is a 1911, but it’s a Double Stack 1911 chamber of 9mm. It is as smooth as this gun.

Now, the frame is a little wider in the grip, which makes this gun for my small hands feel better while shooting.

Recoil is very, very, very negligible with this gun, and you can stay on target impeccably easily. I can’t stress how flat this gun is while you’re shooting it. This gun in 9mm is just an absolute dream to shoot.

The smoothness, the trigger, the reset, the magazine, everything just comes together.

Staccato P Final Thoughts

Once you shoot it, is it worth $2,300? Yes, and I think that’s an important thing to note that you’re getting what you pay for here.

I own a Para 1911 Double Stack. Would I pay for this if I already have that? Probably not, because they are nearly equal in all regards as far as shooting goes. If you wanted something new and up-to-date, then absolutely the Staccato P is a no-brainer.

But with that being said, if you already own a 2011 or you own a Double Stack 1911, I’m not sure the Staccato is bringing much to the table for you.

But if you don’t and you are in the market for one, the Staccato P is where I would go. There is no doubt. I would not look any further. This is where I’m going. This is great. This gun is phenomenal. If you want a 2011, pick up a Staccato P.

The end.

P.S. – If you want a blast from the past check out the similarities between the Browning Hi-Power and the double stack 1911’s of today.

FAQs

10 Pheasant Hunting Tips

0
Patience and persistence can lead to great rewards.

Keep these 10 pheasant hunting tips in mind to get more pheasants in your sights.

From hot, dry weather early in the season to crowded conditions at state wildlife areas where birds are released, pheasant hunting can be a challenge. Yet veteran hunters have learned to use weather, heavy hunting pressure and wary birds to their advantage and shoot bag limits of roosters each fall.

Here are 10 tips from some of the best pheasant hunters around -hunting guides, state wildlife area managers and hunting club owners -on how to find more birds on public and private lands through the West.

1. USE A GOOD BIRD DOG

Each fall, many hunters are successful by walking through cover and flushing birds without a dog. But the most successful hunters are those with a good bird dog, be it a Lab or a pointer. Not only will a dog help you find more pheasants and other upland birds, but can also track down pheasants after they are shot.

“I’ve noticed that really good bird dogs are a huge advantage,” says Vince Oredson, a state wildlife area manager in Oregon. “I’ve seen fields get hunted over and over throughout the day. And then someone with a dog with a good nose will go in and find birds right away.”

Some hunters prefer Labs, which are excellent at flushing pheasants from heavy cover and also unmatched when it comes to tracking down birds after they are shot.

Others like a pointer, which will locate pheasants hiding in grass and brush and let their owner know exactly where they are.

“A flushing dog that can get into the heavy cattails and other cover can be an advantage in the middle of the day,” Oredson says.

“The pointer dogs work better in the shorter grass where the birds will be early in the morning.”

Burt Holzhauser owns the Rising Sun Hunting Preserve in California, one of the West’s best private-land pheasant hunting areas. He utilizes both Labs and English setters at his ranch.

“You have to have a dog,” Holzhauser says. “You lose too many birds because you knock them down and won’t be able to find them without a dog.”

Some private hunting clubs provide dogs and handlers for an additional charge.

2. LEARN TO DRIVE BIRDS

Jeremy Eubank is a very successful hunting and fishing guide from eastern Washington. He likes to drive pheasants early in the season when hot, dry weather limits success for many hunters.

Eubank’s technique works with or without dogs, although his Lab helps him bag even more birds. He will have one or more hunters take position at the top of a hill or ridge and wait. Then he pushes the birds to them by walking a slow zigzag pattern through brush and other cover.

Pheasants will often retreat uphill, running through the cover and then fly once the cover ends. That’s where the other hunter should be stationed.

Eubank cautions hunters to avoid pushing pheasants downhill. They will often take off flying before they near the hunters waiting to ambush them.

3. HUNT NEAR WATER

Oredson, the manager of Denman Wildlife Area in southern Oregon, and Holzhauser – whose Siskiyou County, Calif., ranch is rated as one of the best pheasant hunting destinations anywhere – get chances to see pheasants under all types of weather conditions. Early in the season and during dry weather patterns, pheasants will often hang out in areas with lots of water.

“They are going to be closer to the water holes,” Holzhauser says of birds in dry weather. “They are going to be in the good cover.”

Oredson agrees: “The birds will gravitate to streams and water holes during hot weather.”

Also look for birds near other water sources, aside from with streams and ponds – such as faucets, irrigation canals, livestock watering containers, pump houses and irrigation equipment.

4. PRACTICE MAKES PERFECT

Private hunting clubs are gaining popularity with hunters as places to train their dogs before hunting pheasants on public-land areas. Hunting clubs and preserves often open before the general pheasant season and are great places to give bird dogs exposure to pheasant hunting.

Break out your rain gear and waterproof boots after the first big storm of fall for some of the best opportunities of bagging a pheasant.

“I have quite a few people who start young dogs here,” Holzhauser says. “I can flag the birds or tell the hunter exactly where they are. You know your dog is on a bird and not a rabbit or something else.”

Hunting clubs also often have a variety of types of cover to expose flushing and pointing dogs to differing terrains, vegetation types and hunting situations.

“I like to mix it up,” Holzhauser says of training new dogs. “I put them through everything from grain fields to tall wheat grass to sagebrush.”

It’s also a good idea to get reacquainted with your shotgun before the season starts – instead of when your dog points to or flushes the first rooster of the season.

“Practice shooting some clay pigeons before the season,” Oredson suggests. “Go out to the gun range and make sure your gun is functioning right. Pattern your shotgun. Make sure you are shooting a good pattern.”

Just as deer hunters scout before rifle season opens, good pheasant hunters will make a trip to their favorite hunting area before upland bird season begin. Watching where the birds are without hunters around will reveal locations to keep an eye on early in the mornings and late in the afternoons. Scouting for pheasants will also reveal cover types to be aware of once hunting opens.

5. SELECT THE RIGHT SHOT

While many hunters prefer 20-gauge shotguns for pheasant hunting, some like a 16-gauge. And the ever-popular 12-gauge, also used for duck and goose hunting, will suffice.

At Holzhauser’s ranch, lead shot is allowed. “I like No. 5 lead shot,” Holzhauser says.

“Something comparable to 4 and 6s. A heavy load, because the birds are tough enough that 7 1/2 isn’t going to knock them down.”

Holzhauser has seen hunters shoot birds with 7 1/2 shot. Despite being hit, the birds will often survive the blast and live.

If using steel shot, go with a bigger size than if you were using lead. On public lands, lead shot often cannot be used. Instead, size-4 steel shot is a good choice.

“Four seems to be the most popular size shot,” Oredson says. “You have a little less range with steel. If you keep them under 50 yards, you should do fine,” he says of shot range.

6. TIME YOUR HUNTS

Just like most hunting and fishing, pheasant hunting tends to be at its best early in the morning and again in the evening.

Mornings are best because the birds are often found in grasses or other light cover, searching for food. Once hunters and dogs arrive, the birds will retreat to heavier cover until pressure eases. They will then begin searching for food again.

At private hunting clubs, however, hunting is good throughout the day, as birds are often released several minutes to a few hours before hunters begin their hunt. Hunters can tell hunting club managers what type of hunt they want, from beginner to more challenging and if they want the birds disoriented or not.

On public grounds later in the day, the birds will come out again when hunting pressure drops off.

7. FIND PHEASANT SIGNS

When hunting new areas, Holzhauser says there are several giveaways – including tracks and crowing – to indicate if there are birds in the area.

“You will see them crossing the road,” said Holzhauser. “You’ll hear the roosters crowing.”

Late in the evening, pheasants will come out and feed before bedding down. You can often see them at dusk, which is a good time to scout for pheasants.

When scouting a new pheasant hunting area, Oredson suggests you look for birds where corn is growing.

“Corn seems to be a magnet for pheasants,” Oredson says. “They like the shade, they like the green cover and they like the corn itself. Pheasants also like thick cattails. Marshy areas hold a lot of birds, but they are a little harder to hunt.”

8. BE PATIENT

Many hunters become frustrated when they don’t bag a rooster within the first half hour of hunting.

Be patient, says Oredson. “If things aren’t working, take a break, sit down, eat a sandwich.” he says.

“Things change all the time. Another hunter can push birds into our area. Don’t get too frustrated. Sometimes you have to let the birds come to you.”

If you know birds are in an area but have hunkered down, slowly work the area with your dog. Break down the entire area and methodically going through all the cover with your dog.

9. HUNT THE COLD

The first really cold spell of the year can produce some of the best pheasant hunting of the season.

“The advantage of cold, wet weather is it’s easier on the dogs, and it makes the scenting conditions better for the dogs,” Oredson says.

Break out your rain gear and waterproof boots after the first big storm of fall for some of the best opportunities of bagging a pheasant.

Pheasants can also be easy to track on muddy or snow-covered ground.

10. KNOW THE REGS

Study the hunting regulations in your state before hunting. Regulation books will often include public-land release sites for pheasants.

Some Western states hold paid pheasant hunts, where hunters can harvest roosters on public land for a fee of about $10 a bird. There also are junior or youth pheasant hunts in many states.

California, Oregon and Washington all have information about the youth and adult state wildlife area pheasant hunts on their Web sites and in their regulation books.

Hunters must also be aware of tag and recording requirements. In Oregon, for example, you can be fined for bagging a pheasant and not recording it on your tag, just like keeping a salmon without recording it on your fishing license.

Also be aware of any hunter orange requirements, load or firearm restrictions or hunter education requirements for your state.

IT ALL STARTED HERE

Although the Plains States have a reputation for top-quality pheasant hunting, pheasants were first introduced to the U.S. in the Pacific Northwest.

After ring-necked pheasants were brought in from China in 1882, Oregon’s Willamette Valley was the first place in the U.S. to sustain wild populations of the birds.

Pheasants were also introduced to the Longview, Wash., area at the same time. The newly introduced birds thrived, and their populations quickly grew into the tens of thousands.

Eastern Oregon, eastern Washington and northeastern California still have good numbers of wild pheasants, although the birds are not as plentiful as they once were because of changes in the agricultural industries.

Pheasants thrive in farming areas of each state, but also are found in state wildlife areas where they are raised and released for hunters.

There also are private hunting clubs in each state where hunters can pay for each bird they want released.

Best .22 LR Rimfire Ammo: Accuracy, Plinking, & Hunting

0

Most people’s first time shooting is with a .22 LR firearm.

But what .22 LR ammo do you choose?

There are dozens, even hundreds, of brands and types, so what is the best one?

Fully Upgraded 10/22 with Magpul Stock and Tandemkross Upgrades
Fully Upgraded 10/22

Is there a best one? As with any other type of ammo, what .22 LR you buy depends on what you want to do with it.

But don’t worry; I’ll walk through my favorite rounds for cheap plinking, hunting, accuracy, and even going subsonic.

Popular .22LR Ammo
Popular .22LR Ammo

Here are the current best options, with the most budget options coming in around 6 cents per round.

Lucky Gunner also has more obscure varieties, and Creedmoor Sports has more competition loads.

Best .22LR Ammo

For Plinking

1. Remington Thunderbolt

Usually, the cheapest rounds…but some guns don’t like them.

Mine have no complaints, but I read enough about them that I would test them out first before taking the plunge and stacking deep.

2. Federal Auto Match

With this one, you get 325 rounds of affordable .22 LR that’s mostly available nowadays. No complaints in my bolts or semi-autos.

3. Federal Champion

I’ve shot the most with Federal Champion (and most of my .22 LR ammo reserve is this brand).

For hunting, the name of the game is to get a quick/clean kill without making too much of the meat inedible.

Usually, this means going with a high-velocity, hollow-point (HP) bullet.

What do you think of Federal Champion? Be sure to rate it below!

For Hunting

4. CCI Stinger

CCI is the gold standard in small game hunting — fast, accurate, and deadly with its copper-plated 32-grain hollow point bullet.

Can’t go wrong with this one, and has enough oomph to cycle semi-autos.

5. CCI Standard Velocity

Again, CCI makes this list — this time in the form of the Standard Velocity.

To be honest, this is one of my favorite all-around loads in terms of price and reliability.

For Suppressed Shooting

6. CCI Subsonic HP

Are you seeing a pattern here? CCI hits our list again with the Subsonic HP variant. This one happens to be my favorite overall subsonic round.

You get the accuracy and reliability of CCI, and it’s not so slow (1,050 feet-per-second) that it can’t run on semi-autos.

7. Aguila Super Colibri

Powder? Who needs powder?

These rounds run off only the primer meaning they are super quiet and super slow (420 feet-per-second).

Downside is…they won’t run in your semi, though.

For Long Range Precision

8. Lapua Center-X

This is generally accepted as the gold standard for long-range .22 LR shooting. If you’re ready to spend some money and get the best, Lapua Center-X is the first you should try.

It won’t be the absolute best for every rifle — but odds are it’s at least in the top three for your rifle.

Center-X is exclusively what I shoot at matches of 100 yards or longer.

9. SK Ammo — Standard Plus, Rifle Match, Long Range Match

Frankly, I have no idea what the difference is between these three. I’ve tested all three, and my results depend on the rifle. But all of my rifles love at least one of them.

SK Rifle Match and Long Range Match are both 1 MOA for me at 100 yards; Standard Plus opens up a little but has a better standard deviation normally.

Pick one or all three and give them a try!

10. Norma TAC-22

I like this one since it works well in my semi-auto guns, like the 10/22 and .22 LR AR clones.

If you’ve got a suppressor or want to be a little quieter…going subsonic is the way to go.

It sounds like a cap gun instead of having the *CLAP* of a faster-than-sound bullet.

Match Your Ammo To Your Use

From plinking to hunting to long-range, we have all of the recommendations.

Broadly speaking .22 LR fits into a few use cases:

  • Plinking
  • Hunting
  • Suppressed
  • Long-Range Precision

Plinking is just what it sounds like. It’s learning how to shoot or teaching others. It’s keeping your skills sharp. Or maybe you just want to turn some money into noise and have a good time!

Fully Upgraded 10/22

In any of those cases, you want reliable ammo strong enough to cycle semi-auto guns and hopefully cheap.

Hunting might be super- or sub-sonic for use with suppressors. Either way, you want reliable ammo and should be willing to pay a few more pennies for it.

Suppressed is its own category since the ammo is weaker than normal. Sometimes a little weaker, sometimes a lot. You can hunt with it if the critter is small enough and you’re close enough, or you can just have fun with it.

Long-Range Precision is gaining a lot of popularity with NRL22 and NRL22X! We’re going to assume that you want to shoot at least 100 yards with your .22 LR, but 400+ isn’t out of the question, either. You’ll want very consistent ammo that is reliable and sub-sonic. This…won’t come cheap (for .22 LR).

Bergara B-14r on the ShadowTech PIG0311
Bergara B-14r on the ShadowTech PIG0311. Precision .22 LR Goodness

“But what about self-defense!” you might ask. Unfortunately, .22 LR cartridges can’t be relied upon to effectively stop a threat or go off every single time.

Modern .22 LR is decent, but we don’t consider it reliable enough for self-defense — not when other options like 9mm and .45 ACP are out there.

Final Thoughts

So there you have it…our roundup of the best .22 LR for plinking, hunting, accuracy, and even sub-sonic.

More Popular Ammo Brands

As with anything ammo-related, try a box out before you commit to a case or more, as some .22 LR guns are notoriously picky when it comes to ammo.

Did we miss any that you really think belongs here? Let us know! If you’re looking for a new .22 LR, take a look at the 7 Best .22 LR Rifles! And for more calibers, check out Best Places to Buy Ammo Online.

Grow Bigger Bucks: Cull Bucks With Missing Brow Tines (G1)

0

Question: “We deer hunt in Uvalde County and have been trying to manage our deer. This year we have seen a 3 1/2 year old buck that would be a main frame 7 point deer if he had brow tines, but he is missing his G1s. The buck has decent beam lengths and the mass is pretty good. Will this whitetail buck ever produce brow tines in the future? The guys on our deer lease are trying to decide if we want cull this buck or leave him until next year. Should we shoot all bucks that have no brow tines to improve the deer herd or should we just wait until they are at least 4 1/2 years old?”

Response: The only way to improve the buck component of your deer herd will be to remove the bucks with unwanted antler characteristics. These deer that hunters refer to as management or cull bucks. Young bucks that have missing brow tines turn into old bucks with missing brow tines. But it gets worse. They breed each fall, spreading the gene for missing brow tines. I’ve seen ranches where most of the bucks had missing brow tines. Don’t go there!!!

Good Deer Management: Cull Bucks with Missing Brow TinesThe presence or absence of a brow tine, or the G-1 as they are referred to on a score sheet, are the most inheritable trait for antlers. Bucks that are missing one or both brow tines should be candidates for management by harvest. You don’t want the gene for missing G-1 passed on. The next time one of the hunters sees him while deer hunting they need to remove this buck as quick as possible.

Buck management or culling must begin as soon as possible. The big mistake in letting undesirable bucks get to 4 1/2 years of age or older before removal is that they have at least 3 years to spread their unwanted genes around the deer herd. Judge all of the bucks on your deer lease against one another by age and remove the animals that are obviously lower in quality. Deer management only works when the entire herd is managed, but decisions must be made on an animal by animal basis. Shoot your buck with missing brow tines the next chance you get.

Confessions of a fisherman, hunter and tinkerer

0

Image

A few years ago I wanted some new decoys and I had some shells and a couple full bodies. I had also hunted over Silos with friends, so I knew they would work. I looked at the prices and being the eternal tinkerer that I am, I said “I can make those WAY cheaper than that!” and off I went. 😀 I researched making them and did all the planning. Now I will talk to you about making your own silhouette decoys and the process for making them.

They are just made out of 4mm Corrugated cardboard, welding rods and spray paint. you get a lot of decoy for very little money and a bit of sweat equity. I bought 3 sheets of 4mm plastic cardboard from a sign shop and I think being careful spacing them and using a few magnums I got 44. If I got rid of the magnums I probably would have got over 4 dozen. The picture below has 15 here on a 4×8 sheet and I got 17 on another by not using magnum decoys.

Image

and some of the cutout silos:

Image

I borrowed a buddy’s silos to use as patterns. I traced his on 1/4″ plywood and used them as a pattern. I think the centers are copies of some commercially sold stuff and the two outer one are magnums. You can trace existing Silos or just draw your own patterns. If I did it again, I would probably not use the magnums again. They take a lot of space up when making the silos and in my opinion, don’t look any better in the field.

I used welding rod as I had seen some one else suggested before and melted them in so I never leave a rod in the field to blow a tracker tire as that sure to lose rights to hunt next year! I cut them out one at a time with a box cutter knife. I bough 3 sheets for $36 something in ’07 and got 15 on one and 17 on the other. I trimmed out the last sheet and ended up with 4 dozen decoys.

Here is the finished on with the folder spray patterns I made next to them

Image

To prepare the silos to paint the plastic cardboard I laid the silos on my work bench one at a time and sanded them with an orbital sander and 80 grit. I wanted them rough so they would hold the paint and reduce any possible shine.

The far right template is used to make the white cheek. The one on the top right is used to protect the black neck area when spraying the body. Top left to protect the tail and white from body paint. Left middle to protect tail when spraying white belly. And bottom left to spray white belly again if over spray got on it.

I sprayed several to get a pattern of how to make them. I do the black head and tail first. Then the white belly both two coated. Then gray the body and then camo brown the upper and center body. The lightly over spray the brown to lighten it some and fade it into the gray, Very little !! I use Krylon camo brown for the Canada Goose and it’s too dark so I lightly dust with grey primer at 18″ and lighten it up.

Next I made a template for feather lines. I took a goose picture and photo shopped it for black lines where all the feather lines are. Then printed it on manilla folder and out out the area when the black lines where. Then clothes pinned the template over the decoy and used a dusting of grey primer to make the feather lines. Below is what my template looked like.

Image

Here is the finished silo with the template next to it.

Image

My advice is to fit them with the rods just before painting. I am using welding rods and knocking off the covering. Heating the tip and pushing it in. Then pull it out and heat the last inch quick and back in all the way and let it melt in to stay for eternity.

One thing I learned. Make sure the holes inside run head to tail or parallel to the ground. The welding rod does not want to stay in when the holes are going up. That’s how you want the lines to run on yours, or less than 45 degrees from parallel with the ground. When the holes run parallel with the ground the necks and tails seem to be a lot stronger, you just have to heat and melt the rods into the silo. They are also much easier to paint with the stakes in and out in the yard than on the work bench. I paint one then go to the next and leave them out to dry.

Some of the welding rods came loose later on and I pulled them all and use Gorilla glue and they have never come out again.

Trail Camera Placement Strategies for Different Times of the Year

0

If you’ve made the mistake of leaving your trail cameras hanging on the same tree from opening day until post-rut then it’s time to start looking at the calendar and designing a better trail camera strategy for different seasons.

Please note this trail camera placement strategy guide does not give exact dates due to our global customer base and that every region is a little different. Shoot, even Northern and Southern deer hunters in the States will have different time schedules when they move trail cams, but you get the point!

Early Spring Trail Camera Strategies

Even if you like to track spring gobblers during this time of year (and who doesn’t), you can still kick off your trail camera tour. The only thing needed is a little attractant to get the ball rolling. For the most part, this includes one ingredient – salt.

Not only are minerals a good attractant, but introducing an intruder into the area is a great way to arouse a buck’s interest. This can be accomplished with a licking branch and some natural, pre-orbital gland secretions.

As soon as the leaves start to gobble up, the landscape buck antlers will start growing, and they will naturally seek out salt and other minerals. Whitetail does and fawns will also be attracted to these sites, and capturing them on camera is a great way to determine how many new deer have been added to the herd as well as how many does are in the area. This info will be precious in a few short months when the rut kicks in.

Doe bedding areas or suspected big buck hideouts are great locations to start mineral sites in early spring. Look for pinch points and funnels that will drive deer to your salt block and, ultimately, your trail camera. If you live in agricultural areas, then field edges are a great place to start. Once travel routes have been revealed, you can always choose to delve deeper into cover and start a new mineral site to get closer to bedding or staging areas.

Summer Trail Camera Strategies

By now, your food plot should be in full swing. If so, a trail camera set up along the fringes would be a great way to capture that nocturnal buck who only hits the fields at night. In areas where baiting is legal, trail cameras could be set up over bait to get the same results.

Either way, food will be the primary driving force for deer movement, so it only makes sense to hang your trail camera in areas where deer will be feeding. Summer is also a good time to consider staking out a water source with your trail camera to help deer movement. Don’t dismiss the value of a central hub of H2O in your hunting area. Hang that trail camera.

On a side note, this is also a great time to conduct a trail camera survey if you have a private tract of land you will be hunting on. It’s hands-down the best way to monitor your deer herd population. You’ll be able to estimate your deer density, fawn recruitment, sex ratio, the age structure of your bucks, and more.

Early Fall Trail Camera Strategies

As I eluded to earlier, things change. Those locations that proved so good in early and late summer are now proving to be different. This is simply due to changes in food and cover. Leaves are turning and falling, and deer are ready to find alternate food sources – like acorns!

In addition, testosterone is gradually starting to build in male deer. This causes a variety of behavioral changes, which will ultimately change deer movement and sightings. To keep up with these changes, you must move your trail cameras.

Food sources can change throughout the course of a season, so become familiar with all types, especially those that appear naturally in your hunting area.

Food can still be a hot ticket, but bedding areas, travel routes, and staging areas are usually where you will find a lot of buck movement. Some of the images you capture will be in daylight but expect many of them to occur under cover of darkness. That’s just the nature of the beast when you’re dealing with mature bucks.

Nevertheless, you can’t formulate a plan of attack until you get confirmation a big buck is in the area – day or night. So start by capturing the image first, then move on.

Pre Rut/Rut Trail Camera Strategies

Things get hectic during this time frame as bucks move with reckless abandonment, looking for a hot doe. In the weeks leading up to the actual breeding phase, bucks will leave a bevy of signs announcing their aggression and intentions. Look for that sign and consider hanging your favorite trail camera somewhere nearby.

Once the actual breeding begins, you can expect a drop in mature buck movement as they are pushing does into more secluded areas to not only avoid the pressure from other bucks but the onslaught of hunting pressure as well. Your trail cameras and treestands should be moved as well.

I like pinch points, oak flats, logging roads, secluded ridge top saddles, field edges, and the fringes of doe bedding areas or anywhere else the females congregate. A camera hung somewhere along my entry, and the exit route means I can check it on days that I hunt without disturbing the bucks I am chasing before the hunt. This also allows me to decide if the area I am hunting is worth returning to or if I should pull up the stakes and move on.

Post Rut/Winter Trail Camera Strategies

Everything old is new again as the urge to breed is over, and the focus once again shifts to food. And while you may want to keep a few cameras hanging over remaining food sources, it wouldn’t hurt to keep one in the areas you used during the rut. There is always the chance that the buck you’re after hasn’t given up hope and is still searching for love. Only your trail camera will tell you if that is the case or not.

In addition, this is a great time to conduct an end-of-the-season or winter trail camera survey. With deer searching for food, you’ll be able to get a tally of the bucks that made it through the year, as well as an understanding of your property’s deer density, buck to doe ratio, age structure, and more. Just like the trail camera survey you should run in late summer, this information is critical to understanding how you should approach the upcoming season.

Conclusion

Deer movement is one of the most important keys to getting the most out of your trail camera. Adjust your trail camera strategies to match each phase of the whitetail season, and you will gain a plethora of knowledge that will ultimately lead to more filled tags. The trick is finding a way to manage all of that trail camera knowledge and data. Once that happens, all of the puzzle pieces will start to fall into place—best of luck.

PS – If you’re using trail cameras and haven’t tried DeerLab’s trail camera photo management service, we invite you to sign-up for our free 30-day trial. We think it will completely change the way you view trail camera photos.

Coldboremiracle

0

Introduction

I may certainly be biased in my thinking, but I think that first focal plane riflescopes are perhaps the best development of the last couple decades. Sure they existed before then, but they have only become prevalent to the general shooting public over the last ten or fifteen years. Before we get too deep into the subject, lets make sure we both understand what this subject is about. So we are on the same plane so to speak.

This is the US Optics TS8X, a front focal plane LPVO

Focal Planes

No, I’m not talking about an aluminum lifting body flying through the atmosphere, I’m talking about a point of focus used in your shooting. When you look through a scope and see the magnified image of the target, you are looking through several lenses inside the scope. A first focal plane scope (often called a front focal plane) has the reticle placed effectively before the magnification.

A second focal plane riflescope as you might imagine has the reticle placed after the magnification feature of the scope. These two different construction techniques allow for two differing functions. Most of us have likely used the more traditional second focal plane scope. When the magnification ring is turned and the scope zooms in or out, the reticle remains unchanged. For most of the past, with simple duplex or crosshair reticles, this wasn’t a big deal as the only relevant point on the reticle was the tiny intersecting point at the middle.

The view from a Crimson Trace FFP scope

As reticle technology has grown over the years, additional points (subtensions) of hold have been added to our reticles. These additional reticle markings are for measuring hits and misses as well as holding wind corrections and holdovers. This is only relevant to the discussion in that the values of these additional points can change when used in a second focal plane optic. In a first focal plane scope, the reticle is magnified with the image. As the scope zooms in, both the target and the reticle increase in perceived size. The advantage to this lens configuration is that the reticle values stay the same regardless of what magnification the scope is set to. Second focal plane reticles typically register full value when they are at their maximum magnification.

Which is Better for long-range?

Despite a revolutionary change towards front focal plane scopes, one is not necessarily better than the other. Its simply based on the user’s preference or purpose. Both types of riflescopes have their pros and cons, so better is not the way to look at it. For example, if you are shooting extreme long range (ELR) competitions then you likely would prefer the finer size of a second focal plane reticle on a target that is three-thousand yards away. And on the other hand, if you are shooting a PRS Match where you have to quickly call your own shots and make corrections at varying ranges it helps to have your subtensions uniform regardless of magnification setting. So while some folks will try to convince you that one is better, keep in mind what you plan to do with the scope.

Some folks favor SFP scopes for their hunting rifle scope

Pros and Cons

To help you better make a choice between these two scope configurations, I’ll discuss a few of the pros and cons of either selection. First focal plane scopes as I mentioned keep the reticle values intact regardless of what magnification setting you use, this comes at an additional expense. Many manufacturers offer near identical scopes in both FFP and SFP, with the latter being the more affordable option. If reticle usage isn’t part of your routine then this may not be a justified expense. Whereas if you use reticles frequently, it is well worth the added cost.

As I mentioned above, reticle thickness can be a downside to FFP scopes depending on the reticle design. As the reticle increases in size with magnification it can obscure the target or aiming point. Second focal plane scopes don’t have this issue as the reticle is always the same size. They also don’t become so fine as to become illegible at lower power. If you have poor eyesight or other issues related to reticle size, you may be better off with a SFP scope.

A traditional Winchester model 70 with an FFP scope and Warne Rings

If you are looking for a very high magnification optic like a 5-50X, you will find that nearly all of them are SFP, their reticles would otherwise disappear at low power, or cover up a truck at maximum power. If you do use your reticle for measuring hits, misses, and range features with a second focal plane reticle, you may need to refresh your math skills. Using a SFP reticle to measure things at any magnification besides its calibrated setting will require you to calculate the actual value based off the magnification setting and the measurement with the reticle. Some people like math but they should not be trusted.

Shop all riflescopes at Euro Optic
Scopelist Also has a great selection of riflescopes
And maybe if you’re looking for something cheaper, shop at Palmetto

Conclusion

There is no wrong or right answer when it comes to focal planes, there is only an evaluation of their applications. Things such as engagement distances and moving targets should surely be considered when deciding which way to go. I have fully embraced the FFP revolution that has occurred these past years, and I think the huge increase in FFP market share tells that I am not alone. The rapid expansion of long-range shooting and related competition has likely driven the trend.

Whether you are a competitive shooter, a military or law enforcement sniper, or just a redneck hunter with serious intentions, the FFP scopes of today can give you an edge that shooters of the past would lust after. But that’s not to say SFP scopes are inferior, as the brilliant shooters of the past have shown us.

-CBM

Bullwinkle Disease in Whitetail Deer

0

Bullwinkle Disease in Deer

The term “Bullwinkle disease” sounds more like a joke about someone than an actual ailment. As it turns out, Bullwinkle disease in deer is a thing. It’s a true-to-life disease that can impact deer. Although quite rare, it seems white-tailed deer can get an infection that causes their muzzle to swell. In turn, their face looks more like the cartoon moose Bullwinkle than that of a normal, healthy whitetail.

Wildlife vets know that the head swelling is caused by a long-term bacterial infection in soft tissues of the afflicted deer’s face. However, the most fascinating part of Bullwinkle disease is that no one knows how deer get it. Or even where the bacteria comes from.

Bullwinkle Disease in White-tailed Deer

Bullwinkle Deer

Source: “The Southeastern Cooperative Wildlife Disease Study (SCWDS) has been studying the parasites and diseases of white-tailed deer for more than 56 years. With so much time and effort invested in this area, one would think that few surprises would be left, but that doesn’t ever seem to be the case. Since 2005, we have received samples from ten deer with oddly deformed muzzles, as well as reports of several other affected deer. The swollen muzzles give them a strange appearance and prompted someone to call them “Bullwinkle deer,” based on their resemblance to the 1960’s cartoon character.

Although the cases reported to us are uncommon, they occur over a wide geographic area. In fact, affected white-tailed deer have been submitted to SCWDS from as far north as Michigan and as far south as Alabama. Furthermore, the condition also has been confirmed in a mule deer buck in Idaho.

Bullwinkle Disease in Deer & Head Swelling

The swollen faces are the result of chronic inflammation in the soft tissues of the muzzle. Deer with lumpy jaw can also have swollen jaws, but not to the same extent. The inflammation also is seen in connective tissues in the oral cavity, but it is much more severe on the nose and upper lip. All of the deer examined have had similar colonies of bacteria within the inflammatory infiltrates. Attempts to culture the bacteria have been frustrating. This is possibly due to chronicity of lesions, freezing and storage of samples prior to submission. Alternatively, it may be due to excessive growth of secondary bacterial contaminants.

White-tailed Buck with Bullwinkled Disease

Staining characteristics and DNA sequencing of the bacterial colonies observed suggest they differ from other organisms known to cause problems in deer. Investigations continue into the bacteria’s potential role in the development of this condition.

So far, all of the reported cases have been in hunter-killed deer or deer observed in the wild. Some deer have been thin, but there have been no reports of mortality directly attributed to this disease. One landowner reported having seen the same affected deer at a backyard feeder for nearly two years. Many of the deer observed or killed have been known to visit feed sites. However, the association with feeding is anecdotal. At this time, we do not know the factors that may predispose a deer to develop this unusual condition.

The lesions are certainly dramatic, but this disease does not appear to have any negative consequences for deer populations. Cases are relatively infrequent and are not clustered. It is possible that this problem has always occurred in deer, but at a very low prevalence. However, it has become very easy for photographs to be widely circulated among hunters and biologists in a very short period of time. We can attribute that to hunters, trail cameras and the internet.

This rapid sharing of information may have increased the detection and submission of rare and unusual cases, such as the Bullwinkle disease in deer we see here. Prepared by Kevin Keel, University of California-Davis”

World’s Largest Yellowfin Tuna

0

World’s Largest Yellowfin Tuna John Petruescu’s 445-pound giant well eclipses previous mark

SAN DIEGO, CA – EXCEL Captain/Co-owner, Justin Fleck (Pelagic Pro Team) backed his 124’ long range vessel into its slip at Fisherman’s Landing at 4:00am, Sunday, December 9th, 2012. On board, the crew prepared to unload an incredible catch of big Yellowfin Tuna taken at Hurricane Bank, Mexico. The trip’s twenty-two anglers gathered their gear and belongings and began sorting their fish. Amongst the catch was what many anticipated to be the largest Yellowfin Tuna ever caught (to date).

Below: Angler John Petruescu stands alone with the giant, and now holds the record of largest Yellowfin Tuna ever caught.

At the landing, located in San Diego Harbor, a large group of news reporters, film crews, photographers, and excited on-lookers anxiously awaited first glimpse of the historic fish. Anticipation mounted as 7:00am approached – the advertised time at which the behemoth was to be weighed.

At proper light the signal was given, and a rented skyhook fired up to hoist the giant to get an official weight. The large crowd fell silent as they pressed in to view the certified scale. As the digits settled, the crowd erupted in hoots and hollering as the scale rested at a staggering 445.0-pounds.

Angler John Petruescu – a rookie long-ranger – now holds the honor of landing the largest Yellowfin Tuna ever caught.

Below: Proof in numbers – the landing’s certified scale rested at 445.0-pounds // Star of the show – John Petruescu had many-a-picture to take for the media on hand.

John used a 5-pound skipjack tuna as bait to fool the beast. His rig – a 12/0 Mustad 7691 hook, 130-pound Momoi monofilament, and 130-pound Line One spectra backing, on a Shimano Tiagra LRS 50W reel and a Seeker Black Steel 6460XH rod.

Said John when asked about the fight, “He almost spooled me three times and I had to increase or decrease the (reel’s) drag often.”

John continued, “As the fight got close to its end, all I could see was the fish’ head, so I just kept reeling. Capt. Justin said, ‘OK John, you can free spool now, we got him.’ It took four gaffs to bring it in through the gate.”

Below: John and his brother, David (left), were both on the same trip together // _EXCEL _Captain, Justin Fleck (right), and John Petruescu are all smiles after official weigh-in of the biggest yellowfin tuna ever landed.

John’s fish has also eclipsed the recent 427.5-pound Yellowfin, caught by Guy Yocom off Cabo San Lucas (pending IGFA world-record), and the current all-tackle record of 405.2-pounds caught by Mike Livingston aboard Vagabond in 2010.

“I couldn’t even watch the scales,” said an elated Justin Fleck, master of EXCEL . “In my head I knew it was big, but I still couldn’t look.”

Below: The Crew of EXCEL _took a minute to pose with the incredible catch, Pelagic banner in tote. Pelagic is proud to be the Official Apparel Provider of _EXCEL . Photo courtesy of Jason Fleck, Head Chef, _EXCEL _Sportfishing.

Although John’s fish won’t qualify as a new world-record (a crewmember had to briefly grab the rod to help John get the fish around the anchor line), this catch will certainly go down on record as the world’s biggest Yellowfin Tuna caught to date – 445-pounds.

__

Photos and story by Colin Sarfeh, PelagicGear.com

Video footage from the official weigh-in of John Petruescu’s 445-pound Yellowfin Tuna at Fisherman’s Landing, December 9th, 2012.

If you want to catch a giant, book a trip with _EXCEL _by visiting www.ExcelSportfishing.com

Best Rifle Scope For Varmint Hunting 2024 (Suit a Range of Budgets)

0

This article contains affiliate links. We may earn a small commission if you purchase via these links.

Varmint hunting is more than just an adrenaline-pumping sport, hobby, and means to earn a living.

It’s a way to manage pest populations from getting out of hand, reduce predacity on your livestock, and prevent the risks associated with disease transmission. Sounds a little more serious now, right?

So, what’s the best scope to mount on your scout, AR, or .22 rifle when you want to make an example of the jack rabbits plaguing your garden or the coyotes stalking your chickens?

Every stalker’s hunting conditions are different, so you’ll have to answer that question for yourself. But, we’ll give you a hand in which direction to aim when you’re ready to scope-up and eliminate your prey!

Top Varmint & Coyote Scopes

It would be ideal if those pesky pests prowled your property in broad daylight and slept at night like human beings do. Unfortunately, that’s hardly ever the case. Predators like hogs, coyotes, and wolves will require some stealth and the right equipment come dusk. Rodents like squirrels and prairie dogs make for a fun take-down during the day, and you may even have to be several hundred yards away to get that shot.

Because hunting conditions are going to vary widely, you best know what rifle you want to mount your varmint scope to and consider the range of your actual hunting grounds. This means that there’s not going to be the “one” scope that will get the job done, they’re all going to be different. The scope you will need will depend on what, where, and when you’re hunting.

  • Are you wild boar hunting at night? Playing whack-a-mole with groundhogs? Out-foxing the kitten-snatching fox?
  • Are you in the open plains of Wyoming or are sub-100 yard shots the average distance out where you live?
  • Will you be better off with a night vision rifle scope for nighttime hunting?
  • Is your rifle a quiet .22 LR for near-shots, or is it a .223 Remington or .220 Swift for long-distance prowess?

If you’re looking for the one-size-fits-all suggestion here, you’re going to be terribly disappointed. But, if you need an idea on what scopes could fit the bill because you already know the essential tidbits of your hunt and prey, you’re in the right place!

We’ll dish up some of the most well-known and approved varmint scopes that should give you a head start in the buying hunt.

Our Picks for the Best Rifle Scope for Varmint Hunting

1. NightForce NXS 5.5-22X56

Yeah, we went all out with this one. The NXS is good for everything, and it looks like a bad-ass that will get the job done – because it can! It has the best of everything you’d need to take down prairie dogs at 1000 yards and beyond. Crank up your power and expect to see image quality stay true.

The SFP, glass-etched, illuminated reticle with 2 MOA tall and 2 MOA wide crosshairs means extreme precision on small targets for those really long distances. The 30mm tube, Hi-Speed Turret System, and 1250G-resistance all speaks to its expertise in the field.

If there’s a scope you want on your varmint rifle or really any rifle you’re serious about hunting with, it’s going to be this NightForce. With the NXS on your side, vermin won’t stand a chance!

2. Vortex Crossfire II 3-12X56 AO Hog Hunter

If you’re in the South, you might already own one of these bad boys, and you can probably attest that it’s true to its name. The Crossfire II is an ideal scope for the avid hog hunter. When nighttime looms without the right gear and equipment, feral hog hunting shouldn’t be attempted. Instead, head out with the right stuff to be better prepared for success. What’s the right stuff? We’re glad you asked.

It would look like an illuminated center-dot reticle with V-Brite, robust and durable 30mm tube, and provisions for image focus and parallax correction – the AO. The right stuff should also include a weight that can handle heavy recoil for some serious loads barreling out towards the pig.

A lot of the right stuff sounds just like a great Vortex scope. Ha! Whaddaya know? The Vortex has it all.

3. Burris Fullfield II 4.5-14×42

Entry-level price point, mid-range performance, and high-end customer satisfaction. The Fullfield II is the right kind of mid-range scope to take deer, elk, and of course, varmints. Whether it’s squirrels, coyotes, rabbits, or foxes, this Burris scope is a hunter’s scope.

Pros:

  • Price
  • Adjustable objective
  • Ballistic Plex reticle
  • Made in Philippines
  • Lifetime warranty

Cons:

  • No other reticle available

The Fullfield II 4.5-14×42 is only available with the Ballistic Plex reticle. If you don’t like it, you may want to choose a different scope. However, it’s simple, uncluttered, and can be matched with any caliber. The Burris Ballistics Reticle Analysis Tool is an excellent calculator that will provide you with the distances for each holdover.

Being in the second focal plane, crosshairs might be a little thick for hitting squirrels at 800 yards, but it will definitely put you in range if you’re looking at bigger prey like foxes and coyotes. As additional info, it’s wire and non-illuminated.

Instead of a side focus, the Burris scope has an adjustable objective (AO) for focusing at various distances. Turrets are capped and offer up ¼ MOA adjustments with a total of 40 MOA in elevation and windage travel. According to buyers, it tracks excellently and remains accurate out to 700-800 yards. It can handle big-boy kick too beyond 50BMG.

Given its low price point, the Burris Fullfield II is a popular, quality riflescope. Since Burris backs it with their Forever Warranty, it makes the deal even sweeter. Even small things like losing the caps have been quickly replaced by the manufacturer. What you’ll need to get on your own are lens caps. It’s not such a big deal when you can grab the scope for less than $200.

4. ATN X-Sight LTV 3-9x

There are hunters that need night vision for their nighttime varmint and coyote hunts. This is where the ATN X-sight is a welcome scope to this lineup. Affordable, accurate, and simple. ATN nails it with the new design.

Pros:

  • Price
  • Digital NV
  • Ultra-lightweight
  • One Shot Zero
  • Long battery life

Cons:

  • Not smart

The LTV series of X-Sight scopes is a simplified and scaled-down version of the older X-Sight II line. Even though it’s done away with all the extra bells and whistles of digital NV, many love the bold move to make this happen.

This results in a scope that is affordable, incredibly lightweight at 1.6 lbs, and it’s a whole lot slimmer than the night vision scopes of yesterday.

It features ATN’s One Shot Zero that allows you get on point with no wasted ammo. They also kept the HD video recording feature that you can upload online to share your hog hunting success on social media.

Like many old scopes that would only last for a few hours on one battery charge, the LTV scope one-ups them all with a long-lasting battery life of 10 hours. That’s plenty of time to make one heck of a night for hogs or coyotes.

With night vision on your scope, you can take your varmint hunting skills beyond your own honey holes. Take on contracts for local ranchers and teach the kids how to rid the farm of rats. Night vision scopes could improve your varmint hunting efforts.

5. Burris Scout 2-7X32

If you haven’t heard of the Scout, shame on you! You need to get moving more as scout rifles are made to see action, and you won’t get any action if you’re not on the prowl. The Burris scope is incredibly lightweight which is perfect for lighter rifles like an AR as it won’t weigh it down or seem top-heavy.

It’s designed to sit forward on your rifle, so you have all that generous eye relief, the ability to keep two eyes open for increased situational awareness, and full clearance for mounting in front of the ejection port.

It might be a little scope, but in no way is it little in performance and quality. Index-matched, Hi-Lume coatings, one-piece tube, double internal spring-tension system, and full weatherproof-ability makes this Burris optic a winner in the field. Since it’s designed to be extremely compatible with scout setups, no vermin will escape your sights. We almost feel sorry for the little guys – not!

6. Maven CRS.1 3-12×40

To hunt in lowlight or to pick out tan varmints against tan terrains calls for the clearest and sharpest of glass. Maven answers that call with the CRS.1 3-12×40 hunting riflescope.

Pros:

  • C-series glass
  • CSHR reticle
  • Lightweight
  • Lifetime warranty
  • Made in Japan

Cons:

  • No FFP model

The CRS series of riflescopes from Maven are designed for the hunter with SFP reticles, mid-range magnification, and are completely fogproof and watertight. While FFP is becoming more popular in the hunt, SFP is still a practical focal plane for many hunting conditions and average distances, and the CRS series cater to that.

Based off the C-series of Maven’s binoculars, the CRS.1 has exceptionally clear, high contrast, sharp glass, as confirmed by my field test. Having been sourced and made in Japan, it speaks to both the optical and build quality of the scope. With superb resolution for picking out details in low light and noticeable edge-to-edge clarity, this is mid-range quality at an entry-level price point.

The CSHR reticle is wire, in the second focal plane, and based off the RS.1 SHR reticle. As such, it remains the same size from low 3x to high 12 power, and I found it to be highly visible in both lowlight and daylight bright conditions.

3x mag
3X Mag
6x mag
6X Mag
9x mag
9X Mag
12x mag
12X Mag
CSHR reticle at various magnifications – Images by Tina Fa’apoi (Own Work) for Target Tamers

Very simple yet effective, the reticle has BDC holdovers along the elevation crosshair. Turrets are low-profile and capped. Adjustments are made in ¼ MOA clicks and the 1” tube offers up a total of 50 MOA travel. These are audible and I was also able to feel the adjustments with gloves on.

From the reticle type to the magnification range, the CRS.1 scope offers the varmint hunter extreme close-range work to long-range potential. That reticle has thin center crosshairs to put it on the coyote or prairie dog even at great distances.

Backed by a lifetime unconditional warranty, Maven presents an uncomplicated rifle scope for the straightforward pest hunter.

7. Barska 4-16X50 AO Varmint

The Barska 4-16X50 AO Varmint rifle scope has earned a mention. For a scope under $100, it’s a great buy to get a taste of what high power, illuminated reticles, and parallax correction features can do for your varmint hunting.

It’s in in no way fair to compare this scope to other brands and quality that we’ve mentioned in our lineup. But, if you’re on an extremely tight budget, and you want to plink off some pests around the farm and property line, the Barska rifle scope might just make you proud!

What to Look For in a Varmint Rifle Scope

The oft repeated features are going to be reiterated over and over again whenever we recommend a rifle scope for any purpose. Buying the best of what you can afford will never get old here. Buying the best glass you can afford plus some is a mantra we live by.

To help clarify what your needs could be, let’s start with magnification. Go higher for long ranging distances, and stay with low power scopes for close-mid ranges. The higher the power, expect to spend more for ultimate clarity.

Illuminated reticles are essential to varmint hunting since critters come out of the woodworks when the sun calls it a day. Variable reticle brightness may also make all the difference when it can potentially wash out your target and sight picture.

BDC reticles are nice to have and can be vital for extreme long-range shots. However, a complicated reticle at night can easily complicate things. Know your gun and your what your rounds will do at given distances, and then a simple duplex reticle should be all you need.

Lastly, your rifle matters a lot. High-velocity and flat shooting caliber guns get it done! But, whether you’re a .22-250 or .223 loyalist, we’re not going to join in on the age-long debate right here.

  • Quality glass – The best glass is always the best buy. You’ll see a lot more and a lot further versus trumped-up scopes with poor glass.
  • Quality coatings – Same rules apply when shopping for quality glass. The coatings should match the quality glass and cost of the scope.
  • Magnification – 1-9x is plenty enough power for close-mid range shots. Higher power scopes are for long shots – you won’t need it in the woods, but you will need it for wide, open plains over several hundred yards.
  • Repeatability – Scope has to hold zero. Check on track record or be brand-specific.
  • Reticles – Opt for an extremely accurate BDC reticle for extreme long-range shooting. Basic crosshairs should get the job done for most hunting if you intimately know your rifle and loads.
  • Illuminated reticles – Enables fast target acquisition and better low-light potential.
  • Low light quality – Varmint hunting at night can’t be done if you have a low-grade scope. For nocturnal creatures or varmints that are most active at night, a night vision rifle scope or high-quality low-light scope will go miles in how long you can stay out.
  • Cost – Hunting closer to dusk? Spend more. Daylight hunting rodents sub-400 yards? You can compromise on price if budget limits you. Otherwise, spending more money on a quality scope will never be a regretful purchase.
  • Warranty – Optics will fail at some point in time. Whether it fails after a few hundred rounds or after decades of service is what matters. Invest in your scope, and ensure you buy from a company that can offer a warranty that matches the quality of the scope. Warranty not good enough? Be brand-specific.

“Last Call”

Deer and elk hunters get to mount their trophy racks to their walls. Do varmint hunters feel swindled out of their physical show of success? Not at all! While a feathered mess of a crow might not be wall-worthy, a handsome pelt makes for a conversation starter, gift, or a comfy pair of slippers.

Vermin can spread disease, cause harm to livestock, and devastate crops. The potential dangers are enough of a reason to assuage the threat – a call which many hunters are more than willing to answer. We wish you happy hunting after you’ve checked in with local, state, and federal regulations. Good luck!

Further Reading
  • How to Measure Scope Ring Height (With Pics & Calculations)
  • How to Adjust a Rifle Scope: 6 Scope Adjustments Explained!
  • How to Level a Scope on a Rifle [Step-by-Step With Pics]
  • What is a Rifle Scope Ruler (Mildot Master) & How to Use It?
  • How to Lap Scope Rings (& Is Lapping Really Necessary?)
Best Air Rifle Deals

Popular Posts

How to choose the right Air Gun Caliber for your game?

0
A story is told of three Native American hunters. Two are smart, the other somewhat ignorant. On the first day of the hunting season, one of...

Air gun 101: Everything you need to know about air rifle accuracy

0
Wyatt Earp has said: Fast is fine, but accuracy is everything And I just thought how many airgunners are obsessed with muzzle velocity and muzzle energy,...

Pump Air Rifles vs Break Barrel

0
Exploring the Pros and Cons: Pump Air Rifle vs Break Barrel - Unveiling the key differences and advantages between two popular air rifle mechanisms....