When you are making sausages at home, the type of fat you want to use depends sometimes on the type of fat you can get.
The big assumption is that all fat is the same – but it is not quite like that.
When making sausages it’s either fresh sausage, smoked/cooked (hot smoked) sausage, or a type of dry-cured salami sausage; I love making all of them, that is why I started this website eatcuredmeat.
I want to elaborate on the best techniques I’ve discovered over the years to make my sausage with fat.
All pork fat is not the same, because it depends what part of the pig it comes from.
Important factors are also how hard the fat is and what melting point it has.
Pure back fat is the best choice, Boston butt or shoulder fat is an alternative depending on the ratio of meat to fat. Often this ratio is 20-25% fat in Boston butt or shoulder which is suitable for sausage making.
Type of Pork FatConsistencyMelting PointGood for Sausage
Hard Pork Fat
My resources for back-fat to make sausages or salami are a commercial bacon company and also a good local butcher.
About 15 years ago, when I started sausage making, I could get pork fat for free from any butcher. The challenge nowadays is, that many butchers don’t cut up animals anymore – they are retailers sometimes.
Their meats/sausages arrive in boxes already processed at a central meat works and they will then just displayed and sold.
I was super lucky to come across a pig’s head for sale the other day. To take the jowl off was quite straightforward. First I wanted to use it for sausages, but I decided to make a dry-cured Guanciale (Italian cured meat) from each one, they say it’s like pancetta but different.
It was quite a firm piece of pork and the first one I extracted from a pig’s head. It was interesting to see the texture and the interconnective fat that was embedded into the meat.
It was actually similar to the marbled fat of a Boston pork cut from the upper shoulder (it depends, of course, on the age of the pig).
As you can imagine, this part of the animal’s head gets a lot of muscle movement from chewing. So, this meat was incredibly firm compared to all the other cuts of pork I use.
Shoulder or Boston butt carries marbling fat throughout the meat rather than white fat and meat separated (if you get a whole shoulder you do get bands of this as well). That is why it’s popular for low & slow bbq smoking/cooking because the embedded fat will melt and moisten the meat when it’s cooked in the butt.
When making sausages you can see the meat or fat you’ll be grinding, and whether it has more or less fat than the meat – to figure out your ratio (more on this below).
I am not talking about the different types of fresh sausages, that are emulsified or processed for a more generic texture such as hot dog or baloney.
Soft Pork Fat
Pork belly can still work for making sausages – it’s only an issue if you don’t keep it at or near freezing point temperature.
If you’re just learning about sausages, this is definitely one of the key points to remember: Always have your meat and fat at near near-freezing point.
With the mechanical process of mincing or grinding meat, the movement will create heat, and the heat can smear/mix the meat and fat together, which is not ideal when making sausages.
Unless your target is an emulsified, more generic consistency.
I’ve used pork belly for making fresh sausages and salami without an issue, but I’ve also been very careful keeping things around freezing point.
That’s why we use sometimes a large 1 (hp) horsepower meat grinder. We place the attachment and auger in the freezer, so when the grinding starts, everything is kept a little bit cooler. Can do this also with the 1/2 hp grinder below.
What is the Best Fat to Meat Ratio for Sausage
A 20% minimum fat-to-meat ratio is required for making most types of sausage. The maximum allowed fat in certain commercial sausages is 50%. 25-30% is ideal for many sausage recipes.
If you don’t have enough fat in sausages, it’s a waste of all the effort. The dryness makes the whole sausage nearly inedible.
Trust me I’ve been there and done that – this is not a nice outcome.
Recently I tried to reproduce the 700-year-old Bavarian Nuremberg bratwurst sausage, which you can enjoy in restaurants and also as street food around Nuremberg, Germany.
Looking through many recipes for this, I decided on 40% of pork fat. This is a very delicious sausage that literally melts in your mouth! (LOTS of marjoram, white pepper, allspice)
I’ve also found it’s quite hard to judge pork belly in terms of the fat-to-meat ratio. It just depends on how fatty the pig is and what age. Often older pigs = more fat!
Generally speaking 20 to 25% would be a rough guide for the ratio of fat to meat for pork belly.
What Cuts of Meat for Sausage
Shoulder, front leg, back leg, belly, or even the jowl or cheek of pork.
To be honest, the pig head had not much meat, apart from the jowl cheek. The jowl is on the outside of the cheek. Just for information and just in case, you want to cook the tongue – it tastes a bit like liver!
Key tips I’ve learned over the years for making sausages.
The first tip is: Taking time to remove the sinew is really important for having a good finished product. The worst thing is when you find bits of connective tissue in the sausage.
Any lymph nodes or non-meat bits should be removed. Blood doesn’t help either and spoils faster than meat. Take your time and remove it, as best as you can.
The second big tip is: Always do a test pattie after you have done your grinding and adding salt and spices.
If you’ve done your binding right by mixing it together then it should be tacky and sticky.
Another tip: If you make patties and squish it onto your palm, and hold your hand upside down, does it fall off? If it does, the meat and fat need more binding, so you have to work it more or let the dough hook do it.
I’ve read in meat science textbooks, that the myosin is then released in the meat which creates this desirable ‘tackiness’.
As I said earlier fry up a little meat patty – try it and you will know what the finished product would be like.
Another tip – Be extra careful deboning, I’ve left a cartilage chunk in the meat when deboning a leg of venison. Oh dear, the chunks were spread across 80 pounds / 40 kg of sausage!
Venison, Beef, and many other types of meat can be incorporated, as long as they have that 25% fat (in some recipes where the meats are more emulsified, olive oil or rapeseed oil is being added to the meat without the fat).
Always keep in mind for a non-emulsified fresh sausage you still want 25% fat to meat ratio to make it work.
I often use very lean wild meat like venison for my sausages which has to have the added fat.
Using Fat That Isn’t Pork for Sausage
Beef, chicken, and lamb fat can be used for making sausage – although, these meats have a different taste that isn’t neutral like pork fat.
Beef Fat
Beef fat is often yellow in color, so it can change the whole look of these sausages without dabbling into the other additives. Sometimes it’s more white, maybe depending on grain or grass-fed.
Always go for grass-fed, grain-fed is normally more intensive reared.
It has a certain flavor that definitely is far from neutral, compared to pork fat.
It’s still completely enjoyable, it depends on your personal preferences.
Chicken Fat
Chicken sausages made with chicken thighs have a lot of the fat incorporated into the meat, often blends intermuscular. That’s also why, if you fry thighs it’s very hard to overcook them!
I’ve eaten chicken sausages but I haven’t made them, so I can’t tell about this one.
Lamb Fat
Definitely has a taste of its own, and again it’s far from neutral. First, you have to like the fat flavor. The flavor of lamb sausages also depends on the age of the animal and whether being fed on the milk of the mother only. Older sheep’s meat/fat (mutton) for sausages has a very distinctive flavor and needs LOTS of garlic and rosemary for a kind of ‘funky’ flavor (in my mum’s opinion / it’s a classic combo).
Grind or Cutting Fat for Sausage
It completely depends on whether you’re making salami or a fresh sausage and on the sizes of your grinding plates.
For a smaller 25 or 28-mm sausage, a maximum of 4-6 mm when you are grinding, would be appropriate.
But for a 50 or 60-mm dry cured salami, you may be better at cubing the fat 5-12mm.
This is important for the type of sausage you want to make. Cubing the fat is another option for a more visual aspect.
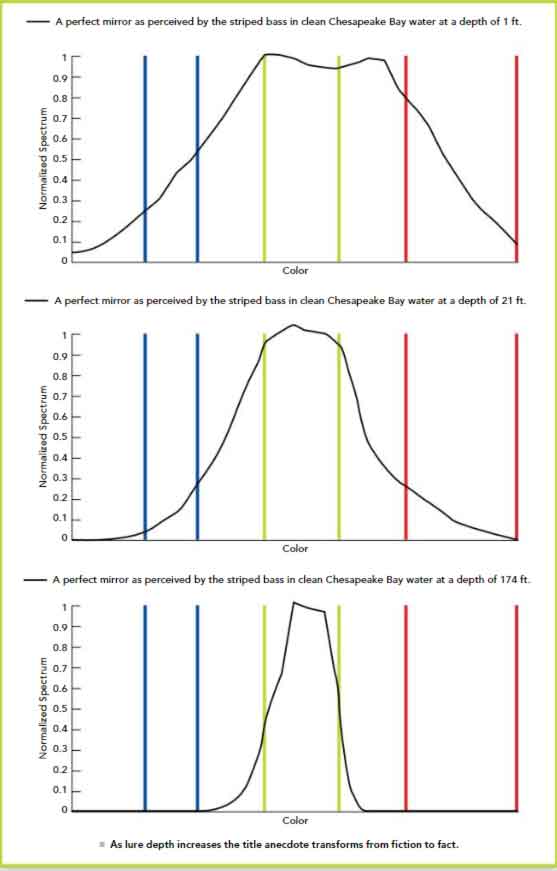
Chances are the title anecdote is engrained deep in your subconscious, whether you grew up fishing the Chesapeake Bay or simply visited a local tackle shop while passing through the watershed. For those of us that fall into the former category, we likely accepted this as truth largely by way of trust in our mentors, followed by empirical validation of our own. Walk down any aisle in a local tackle shop, however, and you’ll be presented with a wide spectrum of color choices, most if not all of which will catch fish under certain conditions. So, what is it about chartreuse that made this particular color so pervasive that it was immortalized by the late great Lefty Kreh? To be honest, I never truly asked myself this question until I began to look at the problem through the lens of optics. A quick Google search of “if it ain’t chartreuse it ain’t no use” will present similar takes by local experts, so I make no claim to be the first to broach the subject. That being said, let’s consider the results of a simple optical analysis of the subject.
Unimpressed with the author’s surf caught dink, Beau Taylor Parr begins to ponder the validity of the title anecdote.
A wise man once taught me to seek simple models that develop physical intuition. Implicit in this statement is that these simple models must be constructed with physics that sufficiently describe the phenomenon which we seek to understand. In this light, let us reduce the complexity of the problem from which we derive such simple pleasure: to elicit a visual reaction strike in the daytime, light rays emanating from the sun must first travel through the vacuum of space for tens of millions of miles before reaching the edge of Earth’s atmosphere. At this interface, worldly optical phenomena begin. Some of these rays are reflected back into space in a mirror-like fashion, while the remainder pass through. Most of the time these rays are bent onto a new path when entering Earth’s atmosphere. For these rays to reach Earth’s surface, they must then travel along a path on which some rays are misdirected and/or plucked from thin air, by a variety of atmospheric constituents such as gaseous molecules and suspended particulate. Each ray of light represents a single color and the number of these rays that are misdirected and/or plucked from thin air depends on that color. As such, the color content at the edge of Earth’s atmosphere will differ from that on the Bay’s surface.
The process described above is again at play when a new interface (such as water) is introduced. The optical model described here therefore considers that rays reaching the Bay’s surface(1) are subject to being reflected, passed through, bent, misdirected(2) and/or plucked from the water column(2) all before being reflected by a lure. A perfect mirror for which all colors are completely reflected has been used instead of a lure of specific color (we’ll assess the effect of this lure choice soon enough). A detector with the daytime color response of the striped bass’ retina(3) has been situated immediately following the perfect mirror to complete the model. This color response is measured by electroretinography and accounts for the fact that not all colors are equal, as far as the striped bass’s retina is concerned. The results of this simple analysis are presented for clean Bay water at a depth of one foot, the average depth of the Bay (21 feet) and the deepest spot in the Bay (174 feet).
The deeper you go, the more chartreuse seems like a natural winner.
At a depth of one foot, most of the color content that was present on the Bay’s surface has persisted and the effect of the color response of the striped bass’ retina is prominent. You’ll notice that the color response of the striped bass’s retina tends to rank colors in the chartreuse band as being most significant, although at this shallow depth most colors are still at your disposal in terms of lure selection. In proceeding to 21 feet, a depth to which you’ve undoubtedly dropped a jig or two, the progressive action of the plankton-filled water column acts like a sponge for blue and red colors. As well, as the pickiness of the striped bass’ retinal color response has begun to turn our perfect mirror into a chartreuse mirror. At a depth of 174 feet, the kind of optical transformation that striped bass dream about has effectively completed.
Not a fan of even the simplest of models without empirical validation? Neither am I. You may take some comfort in that Navy divers at depth in the Long Island Sound most commonly reported white targets as green, white, and yellow(4) – in that order. Keep in mind that that chartreuse is also referred to as yellow-green. Still not convinced? Well I’ll need the help of our community to take this argument further. For the underwater photographers in the audience, I’d like to present an open challenge to get images of a chartreuse and white lure falling into the depths of the Bay, as viewed through a filter corresponding to the color response of the striped bass’s retina.
Surely, you have chartreuse in your tacklebox.
Let’s take a moment to reflect once more on the title anecdote. Regardless of whether or not striped bass can distinguish between individual colors or their brains simply rank colors differently, you’d best consider choosing a lure color that reflects or misdirects yellow-green, such as chartreuse, if you’re fishing at depth and want to elicit a visible reaction strike. As to the veracity of “if it ain’t chartreuse it ain’t no use,” you already knew that in reality it’s not absolute. To flip the script, you might consider choosing a lure color (such as black) that strongly plucks chartreuse from the available light for optical contrast to the yellow-green aquatic environment.
Don’t get out your pitchforks just yet—I’ll be danged if you see me throwing anything other than chartreuse on the first cast. That is unless we’re talking about fluorescence colors, which don’t play by the same rules…
-By Michael Brupbacher
1. U.S. Department of Energy (DOE)/NREL/ALLIANCE
2. E.O. Hulburt, Optics of distilled and natural water, Journal of The Optical Society of America, 35(11), 1945, 698-705.
3. A.Z. Horodysky, R.W. Brill, E.J. Warrant, J.A. Musick, R.J. Latour, Comparative visual function in four piscivorous fished inhabiting the Chesapeake Bay, The Journal of Experimental Biology, 213, 2010, 1751-1761.
4. J A S. Kinney, S.M. Luria, D.O. Weitzman, Visibility of colors underwater, Journal of the The Optical Society of America, 57(6), 1967, 802-809.
From left to right: Three sizes of coyote trap: No. 1.75 with 5 inches of jaw spread; No. 2 with 5-1/2 inches; No. 3 with 6-1/2 inches.
It’s a perennial question—how big of a trap do I need for coyotes? Seems like someone at every trapping convention I attend asks if he can catch coyotes with the No. 1.5 footholds he already owns and sets for fox and coon, and I hear countless tales of coyotes caught in No. 1.5 traps, all of which are no doubt true.
But if you set out to be a coyote trapper with a bunch of No. 1.5 traps, you’re just setting yourself up for disappointment. The trap is simply too small to be a reliable coyote catcher.
If you want to move up to coyote trapping, you need something a little bigger. That would be the No. 1.75 class of traps. Give or take a little, 1.75 traps have an inside jaw opening of about 5 inches. Some people think this still is too small for coyotes. I disagree. In fact, I catch a lot of coyotes with these traps. I do concede they are the smallest I would want to use for coyotes, and the relatively small jaw spread must be considered when making sets. If a coyote’s foot isn’t pretty much centered in a No. 1.75 when the trap fires, it isn’t going to get a good grip. I take precautions to prevent this.
Solid trap bedding is important with any trap, even more so when setting a trap of this size for a coyote. There’s a good chance the coyote might not step exactly on the trap pan, and if it steps on a jaw, instead, I don’t want that trap to wiggle, or, worse yet, flip up out of the bed.
A coyote is a heavy animal, and its foot exerts a lot of pressure. When I’m checking a bedded trap for stability, I don’t push gently on it, I push hard. If the trap moves, I adjust the bedding until it doesn’t. If a trap moves underfoot, a curious coyote is likely to stop working the set and instead dig up that trap.
I also make the trap bed as small as possible, so I don’t have to repack a lot of loose dirt outside the trap jaws. If this dirt isn’t packed in really well, a heavy-footed coyote may sink into the loose dirt, back off and start digging.
Truth is, you are going to have some misses with these small traps, when the coyote’s foot isn’t centered on the pan within the small radius of the jaws. The trick is not to arouse the coyote’s curiosity, or worse yet, spook it with a poorly bedded trap. If you don’t spook it or educate it, you might catch it on the next step or the next visit. The trick is to make sure everything stays in place until the coyote steps squarely on the trap pan.
I also put a significant amount of tension on the trap pan. If a trap is set exclusively for coyotes, I don’t want it to fire until 4 pounds of downward pressure is being applied by the animal’s foot.
If you’ve never set a trap with 4 pounds of pan tension, you may think it way too much. Four pounds is a lot of weight. You can set a half-gallon plastic jug of water on a trap pan with 4 pounds of tension, and it may not fire. But trust me, when the coyote shifts its weight to that foot, it will be pressing down harder than 4 pounds, and the trap will fire.
If I want to also have a shot at catching a fox, I may back off to 2 or 3 pounds.
This heavy pan tension serves two purposes. First, it prevents the trap firing if perchance the coyote just brushes the pan with the edge of its foot. No. 1.75 traps have a small enough jaw radius that a coyote’s foot may straddle a jaw and still touch the pan. You don’t want the trap to fire at that point, because it won’t get a good hold on the coyote’s foot, if it gets a hold at all. You not only want the coyote’s foot centered on the pan, you also want that foot to be pushing down hard before the trap fires.
Think of it like the diving board at the old swimmin’ hole. If the board is so rotten it breaks when you first touch it with a toe, you’ll still be balanced with your weight on your back foot and probably won’t fall in. But if the board has a little strength left, and you step all the way onto it before it breaks—down you go.
With heavy enough pan tension, by the time the pan breaks free, the coyote has committed enough weight that the foot falls, and the coyote can’t react quickly enough to pull that foot back out. It literally falls into the trap, which helps the little jaws get a better grab on its paw.
Foot guides are the final thing I apply at the set to get the coyote’s foot squarely centered in the trap. Foot guides are small objects placed outside of the set trap’s jaws to help steer the coyote’s foot directly onto the pan. Foot guides should be just big enough that a coyote would be uncomfortable stepping on top of them.
Don’t overdo it and build a wall around the trap. The foot guide is more a subtle hint, something the coyote notices and processes in the back of its mind, just as it does every other time it takes a step.
At a dirthole set, small clods in the dirt pattern make natural foot guides. Otherwise, stones no bigger than a golf ball, small sticks or other debris from nearby the set can be used.
I typically place three foot guides in a triangle around the trap, being careful not to locate any of them above the jaws or over the levers of the trap. Sometimes it’s helpful to put the guides in place before sifting the final covering of dirt or chaff over the set trap.
If a No. 1.75 gets a good grip on a coyote’s paw, it should hold that coyote. You can soup the trap up with four coils and other modifications, but a stock two-coil No. 1.75 should catch the average coyote and also make a pretty good trap for red fox, too, though it may be a little too much for the smaller grays.
If I’m trapping where I’m fairly certain I’m only going to catch coyotes, especially if I am being commissioned to remove said coyotes, I’m going to set a No. 2 trap, the next size up. In general, the No. 2 is a 5-1/2-inch trap as opposed to the No. 1.75, which is a 5-inch trap. A half-inch may not sound like much, but it can make a big difference in the way trap jaws catch and hold a coyote.
Just be aware that there is no industry-wide standard to the numbering system. Some No. 2 traps have a jaw spread no greater than some No. 1.75 traps.
You need to check for yourself.
Here, we also begin to hit legal restrictions on jaw spread. In Ohio, we are not allowed to set a trap on dry land that has an inside jaw measurement greater than 5.625 inches. I check to make sure each No. 2 trap has an inside jaw spread of at least 5.5 inches but no more than 5.625.
Again, buyer beware.
With the No. 2, we enter the realm of dedicated coyote traps, and since I set these traps specifically for coyotes, some of mine are outfitted with Paws-I-Trip, a replacement pan and dog system that produces 3 to 4 pounds of pan tension. It works on mechanical advantage. There is no bolt to tighten, and there is nothing to go out of adjustment.
Yes, it is slightly more tension than I want for a fox, but again, these traps are dedicated to coyotes, and I am not trying to catch fox with them.
When setting this larger trap, I still follow the same rules for careful bedding and foot guides as I follow when setting the No. 1.75. The half-inch of extra jaw spread just provides a bigger working area and an increased chance at getting a good across-the-pad catch on a coyote.
On the upper end of the range of coyote traps are the 6- to 6-1/2-inch traps. The numerical size means even less with traps of this size. It seems trap makers assign No. 3 and No. 4 designations almost at random. Some No. 3 traps are actually larger than some No. 4. Perhaps because of this, some manufacturers instead designate their traps by the actual measured jaw spread, for example 650 for a 6.5-inch trap.
I certainly applaud that choice.
I follow the same setting procedures and don’t think there is much need for a coyote trap larger than 6.5 inches. So, for me, that runs the gamut of coyote traps.
The No. 1.75 is as small as I want to go, but used carefully, it can make a very serviceable trap for coyote and also fox. Bigger traps are less appropriate for fox but better suited for coyotes. Know the law and then decide what is the best fit for you—as well as the local coyotes.
It’s time to start planning (or dreaming about) your next trip to Africa.
It’s very common for hunters to dream of incredible big game hunting destinations, which often means visions of Africa. The Dark Continent is known for having some outstanding big game hunting and best places to hunt in Africa truly provide opportunities for hunters that are unmatched anywhere else in the world.
These countries have a wide variety and abundant populations of game to go along with some very unique terrain.
Here’s a rundown of the top five countries worth exploring scheduling a trip to. Keep reading to learn our choices for the best countries for hunting in Africa.
Mozambique
Though a relative newcomer to the safari game due to a long, devastating civil war that finally ended in 1992, Mozambique’s wild game populations have made a fantastic recovery, which is why it should now be considered one of the best countries for hunting in Africa.
The government is investing a great deal of time and money to repair infrastructure damaged by the war and their efforts are really starting to bear fruit.
Located on the southeastern coast of the continent, Mozambique offers excellent hunting for many species of big game on the massive, unfenced government concessions that make up most of the hunting areas in the country.
Mozambique is quickly becoming a premier destination for Cape Buffalo hunting. With an estimated population of over 50,000, Mozambique has the second largest population of Cape Buffalo in Africa. As a result, serious hunters should consider booking a Mozambique hunting safari to take advantage of the opportunities for Cape Buffalo hunting in the country.
In addition to buffalo hunting, three other members of the Big Five may be hunted in Mozambique: elephants, leopards and lions. However, elephant trophies taken in Mozambique cannot be imported into the United States.
Hunters traveling to Mozambique can also take advantage of some crocodile and hippo hunting that is among the best offered anywhere in Africa.
Though buffalo are probably the most popular big game animal in Mozambique right now, there are some good opportunities for plains game hunting there as well. Species available include sable, nyala, eland, kudu, bushbuck, reedbuck, waterbuck, warthog, duiker (Blue, Red, and Bush), grysbok, oribi, steenbok, and suni (among many others).
Of the countries on this list, Mozambique is probably the least developed. As a result, some of the hunting concessions may only be reached by air charter. This adds complexity and expense to hunts in the country. Additionally, travel to Mozambique from the United States can be complicated, as there are no direct flights between the countries. Travelers typically must stop in Europe or South Africa first.
The way things stand now, I do not recommend Mozambique as a destination for a first trip to Africa. However, veteran hunters should be able to appreciate the outstanding hunting opportunities in Mozambique, especially for dangerous game.
Zimbabwe
Zimbabwe has long been a favored destination for hunters from all over the world and offers some of the best hunting for dangerous game in all of Africa (and at a reasonable price to boot).
In addition to buffalo, elephant, leopard, and lion, there is also fantastic hippopotamus and crocodile hunting in Zimbabwe. You can add to that the hunting opportunities for plains game such as eland, zebra, kudu, impala, tsessebe, roan, waterbuck, wildebeest, sable, bushbuck, warthog, and duiker. In fact, when hunting in a well-managed safari area, such as the renowned Bubye Valley Conservancy, hunters may encounter incredibly large and diverse populations of both dangerous and plains game in the same area, which is something few other places in Africa can match.
Unfortunately, the United States Fish and Wildlife Service recently banned the import of elephant trophies taken in Zimbabwe. It is unknown how long the ban will remain in place, but no elephants hunted after April 2014 may be legally imported into the United States and it does not appear that this policy will change anytime soon. While it’s still legal to hunt elephants in Zimbabwe, keep in mind that American hunters may not bring their elephant trophies home.
Though the infrastructure of Zimbabwe tends to be better developed than that of Mozambique, the transportation network still lags behind that of other countries. Some of the more remote concessions may only be reached by air. There are no direct flights to Zimbabwe from the United States and most flights stop in the United Kingdom or South Africa first. The other potential downside to hunting in Zimbabwe is the unstable political situation there.
Though there is good plains game hunting in Zimbabwe, the country is best known for dangerous game hunting. With that in mind, I recommend Zimbabwe as a destination for seasoned hunters primarily pursuing game like buffalo.
Tanzania
Ever since Theodore Roosevelt hunted there during his famous 1909 safari, hunters all over the world have dreamed of a safari in Tanzania. Hunters often conjure visions of vast herds of plains game moving across the plains of Tanzania, and for good reason. Tanzania has a wildlife population that no other country in Africa can match, both in variety and in sheer numbers, which is why it is considered one of the best countries for hunting in Africa.
Among many others (Tanzania has over 50 species of animals that may be hunted), hunters may pursue zebra, wildebeest, eland, impala, warthog, Greater and Lesser Kudu, hartebeest, topi, bushpig, Roosevelt Sable, Fringe-Eared Oryx, roan, waterbuck, and multiple species of gazelle (most commonly Grant’s and Thompson’s).
In addition to plains game hunting, Tanzania has incredible dangerous game hunting, especially for buffalo. Tanzania is home to nearly a quarter of a million buffalo, the largest population of any country in Africa. Understandably, Tanzania produces some of the biggest buffalo in Africa and the current No. 3 and No. 6 buffalo in the SCI record book were hunted in Tanzania.
The country also offers excellent hunting for elephant (though Tanzania is also subject to the same USFWS elephant import ban as Zimbabwe), lion, leopard, hippopotamus and crocodile.
The biggest downside to hunting in Tanzania is the price tag: on average, Tanzania is the most expensive country in Africa to hunt. However, you really do get what you pay for with the opportunity to hunt a stunning variety of animals with plenty of chances to shoot a nice trophy.
For those that can afford it, Tanzania is a great place for a trip to Africa for either plains or dangerous game. For those on more of a budget, it may be better to hunt somewhere else first.
Namibia
Located on the west coast of Africa between Angola and South Africa, Namibia was one of the best kept secrets in African hunting for a long time. However, hunters have recently discovered that Namibia has some of the best (and most reasonably priced) plains game hunts anywhere on the continent.
Since the Kalahari Desert occupies much of southern and eastern Namibia, the country is home to some of the largest populations of Kalahari Gemsbok and Springbok in the world. In addition to gemsbok and springbok, Namibia also offers good hunting for kudu, eland, wildebeest, zebra, blesbok, warthog, sable, roan, hartebeest, steenbok, duiker, and klipspringer. Namibia is also among the few countries where cheetah may be hunted, and the only place where hunters may pursue the Damarra Dik Dik and Hartmann’s Mountain Zebra.
Though leopard may be hunted in most of the country, lion, elephant, and buffalo are only present in the extreme northern portion of the country. Most of the hunting for these three species is conducted in the Caprivi Strip, a narrow corridor stretching out from northeastern Namibia. Since the Caprivi Strip is so small, only a handful of these species are hunted there each year.
On the upside, Namibia is one of only two countries (South Africa being the other) where elephant may be hunted and their trophy imported into the United States. Additionally, Namibia is the only country in the world where Black Rhinoceros may be hunted, though the tags are rare, expensive, and controversial (as Corey Knowlton found out). Namibia is therefore the only country where a hunter may conduct a “Classic Big Five” safari (Black Rhinoceros, elephant, buffalo, lion, and leopard).
Namibia also has a very well developed infrastructure. Unless hunting in the Caprivi Strip, virtually all of the hunting concessions in the country may be accessed via road after flying into the capital of Windhoek. As a result, travel around the country is relatively simple and it is not too difficult to hunt at multiple concessions in widely separated parts of the country on one trip.
Though Namibia is not terribly difficult to travel to, travelers from the United States must unfortunately stop in Europe or South Africa first. Fortunately, most of the hunting outfitters in Namibia are very reasonably priced and can provide hunting for a wide variety of species. The Namibian government also recognizes the tangible benefits of sustainable hunting on both an economic and a conservation level. For this reason, the Namibian government is firmly entrenched to fight off attacks by anti-hunters on the practice, thus likely securing the Namibia on the list of the best countries for hunting in Africa for many years to come.
With all of this in mind, I recommend Namibia as a great destination for hunters on their first trip to Africa, especially for hunting plains game.
South Africa
Long known as being one of the crown jewels of African hunting, South Africa boasts some of the most diverse populations of wildlife on the entire continent and is unquestionably one of the best countries for hunting in Africa.
From deserts to swamps to forests to mountains, South Africa has virtually every type of terrain in existence, along with the wildlife that inhabits those ecosystems. Greater Kudu, Cape Eland, nyala, waterbuck, sable, roan, Lichtenstein Hartebeest, Red Hartebeest, Black Wildebeest, Blue Wildebeest, blesbok, impala, springbok, bushbuck, warthog, bushpig, Mountain Reedbuck, klipspringer, Cape Grysbok, duiker, and oribi are among the many species of plains game that may be hunted in South Africa.
In addition to plains game hunting, hunters can pursue most species of dangerous game, such as hippopotamus, crocodile, lion, and leopard in South Africa. There is also incredible hunting for Cape Buffalo in the northeastern portion of the country. Not only does the area have a very large population of buffalo, but the trophy quality of the bulls there is outstanding. Currently, five of the top 10 buffalo in the SCI record book were hunted in South Africa.
Additionally, though not known for exceptional trophy quality, elephant may also be hunted in South Africa and imported into the United States. Finally, by substituting White Rhinoceros (which may be hunted and/or darted in South Africa) for Black Rhino, a hunter can also complete a Big Five hunting safari in South Africa.
South Africa has potentially the best developed infrastructure on the entire continent. After flying into Cape Town or Johannesburg, a hunter can access virtually the entire country via road, or by a regional airline to smaller airports in all corners of the country. South Africa is also one of the few countries on the continent accessible via direct flight from the United States.
Since South Africa is such a well known hunting destination and because the country is so easy to access, the average price of a hunt there is on the high side, though not nearly as high as Tanzania. Even with this in mind, a South African hunting safari is still quite a bargain and is an ideal way to experience Africa for the first time, especially for someone interested in hunting a number of very diverse animals.
What do you think of our choices for the best countries for hunting in Africa? Did we miss any?
Like what you see here? You can read more great hunting articles by John McAdams on his hunting blog. Follow him on Facebook The Big Game Hunting Blog, on Twitter @TheBigGameHunt, and on Instagram The_Big_Game_Hunter.
NEXT: THIS IS THE MOST INCREDIBLE CAPE BUFFALO HUNTING VIDEO YOU’LL EVER SEE
Turkey hunting is a popular activity among hunters in many regions of the world. Hunters must be able to spot evidence of turkeys in the vicinity to improve their chances of success. Turkey’s poop is one of the most reliable indicators. Understanding the appearance of turkey poop may assist hunters in identifying likely feeding and roosting locations as well as the size and gender of the bird. We’ll provide a brief overview of the physical characteristics of turkey poop in this post and discuss why turkey hunters must be able to recognize it.
The internal anatomy of male and female turkeys differs, with males having a rudimentary internal sex organ that may influence the shape of their droppings. So, depending on the sex of the bird, the look of turkey poop might change. The poops of male turkeys are long and thin, only curving at one end, and include some uric acid on the surface. These excretions are about 2.93 inches long and 0.39 inches in diameter. On the other hand, female turkeys often make droppings that spiral into a wider and stretchy coil to contain eggs. In addition, turkey poop often has a “J” form and sometimes has blunt ends that curve in one direction.
Physical Characteristics of Turkey Poop
CharacteristicDescription ShapeBlunt ends, curls in one direction, shaped like a “J”, spiral. Differs as per gender. Colorgreenish or grayish brown in color TextureUsually firm and cylindrical, but can vary based on diet and hydration SizeGenerally larger than chicken feces, up to 1 inch in length
Identifying Turkey Sign
Recognizing turkey signs is crucial for hunters who wish to discover possible hunting grounds and raise their chances of success. The following are some pointers on how to spot turkey poop and other indications of activity nearby:
Identifying Turkey Poop: Turkey poop may be recognized by its compact, cylindrical shape and gritty texture. They often have a tapered end and stand out for their color and scent. It’s critical to identify them from other animal waste in the vicinity, such as that of deer or rabbits, which might resemble them in size and form but vary in texture and color.
Other Signs of Turkey Activity: Besides looking for bird droppings, hunters should search the area for further indications of turkey activity. Feathers, scratch marks on trees or the ground, footprints, and regions where turkeys roll around in the soil to dust themselves are a few examples. Hunters might use these indications to find prospective roosting and feeding locations.
To discover viable hunting grounds and improve their chances of success, hunters must be able to recognize turkey signs. Hunters may find and hunt turkeys more successfully by being acquainted with the physical qualities of bird droppings and other signals of turkey activity.
What Turkey Poop Can Tell Us: Size, Shape, and Gender Identification
Turkey droppings’ size and shape might provide information about the bird’s gender and size. A bigger bird often has larger droppings, while a smaller bird typically has smaller droppings. The form of the droppings may also determine the gender of the bird. Females often produce more spiral-shaped droppings, whereas males typically produce more J-shaped droppings.
GenderPoop Shape Male TurkeyLong and narrow, curls towards one end with white uric acid Female TurkeySwirls into a coil, spacious and stretchy to accommodate eggs
How Turkey Poop Can Reveal a Bird’s Diet and Health
Turkey poop’s color and texture may also inform the bird’s diet. For instance, if the droppings are greenish, the bird may have been consuming grass or other plants. Dark brown or black droppings might indicate that the bird has been consuming seeds or insects. The texture of its droppings may also determine the bird’s nutrition and state of hydration. Dehydration may be indicated by crumbly, dry droppings, while moist, flowing droppings may suggest more liquid diets.
Using Scratches and Droppings to Locate Roosting Spots
Turkey sign may also be used to find suitable roosting and feeding locations. Scratch marks may identify them at tree bases, bare ground areas, and droppings. For instance, many bird droppings in one spot can indicate that the birds are roosting nearby. There may have been bird feeding in that region if there were scratch marks on the ground.
Conclusion
In conclusion, turkey hunters must comprehend the physical properties of bird poop. Hunters can determine the size, gender, and diet of turkeys by analyzing the size, shape, color, and texture of their droppings. They may also use this information to pinpoint prospective roosting and feeding locations. Hunters might improve their chances of success in the field by being aware of these crucial hints. The next time you go turkey hunting, look out for and take advantage of bird poop. Happy searching!
Foul-weather hunting can bring the best opportunities when other hunters are staying home
There are many obligations in my life that distract me more than I’d like from hunting and fishing. Work, farm life and family all pull my attention out of the woods. Yes, there are days when I just can’t justify spending all day in the duck blind or tree stand. But as many excuses as there are to keep me out of the woods, I never allow weather to be one of them. As the saying goes, “a smooth sea never made a skilled sailor.”
Why you shouldn’t be a fair-weather hunter
A fair-weather hunter is someone who is only found hunting or fishing when it’s a blue bird day and the sun is shining high and bright. It seems as though precipitation has the power to stop most folks from even entering the woods. Most people will consider this a “lost day.” Don’t be most people. Time and again I have found myself completely alone in areas that are usually littered with hunters or anglers, all because a low-pressure system is threatening to dump a few inches of snow or rain. I have experienced some of the best hunting and fishing during these rare moments of respite. These days are essential for accessing areas without alerting animals to your presence, determining what sign is the freshest, what specific food sources are being targeted, and overall, broadening your understanding of the game you are pursuing. Animals also tend to be a little more one-track-minded on such days, seeking food and shelter usually in conjunction with each other. Coupled with the lack of human presence, it’s sometimes hard for me to settle on a place to hunt.
As the climate patterns continue to shift across the globe, extreme weather events become the norm. Hunters must adapt to these effects to successfully take advantage of the hunting seasons. The grow season in the foothills of the White Mountains of New Hampshire is typically mid-May to mid-September. Lately, however, we have been experiencing more snowstorms throughout the early spring compared to late fall and early winter. This climatic shift has also led to prolonged periods of drought throughout the summer and a much wetter fall season. This means more chance for snow during our spring turkey season and a higher probability of heavy rainstorms during waterfowl and deer seasons. But, if you are determined enough to make every effort to get into the woods regardless of the forecast, then you can capitalize on opportunities you, and many others, otherwise would have missed.
While rain and snow tends to put a damper on most human activities, fish, birds, and most game have no choice but to continue life regardless of significant weather events. This seems especially true when it comes to waterfowl. I have shot more ducks and geese in driving rain, sleet, fog and snow than I have on clear, sunny, warm days. Most rainy day duck hunts I’ve been on were fast in-your-face shoots, ending almost as quickly as they began with a limit of dabblers. Sure, you may be soaked from boots to barrel, but there is nothing better than successfully executing a hunt in less than desirable conditions and coming out the other side, all the wiser and more grateful for the roof above your head and the food on your table.
In 2017, the year was punctuated by major flooding events, one of which completely obliterated a local NHFG fish hatchery along the Baker River. Heavy rains at the end of October led to massive flooding along the Pemigewasset River and its tributaries. Jumping on the opportunity, my brother and I spent the earlier part of the storm scouting groups of ducks and geese in some of our favorite spots. With more rain in the forecast and rivers already breaching their high water marks, we figured half our spots would be inaccessible because most of the routes in would be inundated. We adjusted our strategy and scoured the local agriculture that parallels the rivers.
In the contour of an extinct oxbow, long cut off from the river and since cultivated for years, we happened upon several hundred mallards and black ducks piling into a newly flooded cornfield. In the adjacent block of oaks and beech we could hear wood ducks whistling, and somewhere on the far side of the field, a hundred geese were trumpeting. If there’s a waterfowl hunting heaven, this is what it must look like. We silently sat and watched the geese loaf along the back of the flooded oxbow and feed across the hillside. Strings of mallards worked their way through the submerged corn stubble, like feathered vacuums, devouring the left over crop.
The next morning with a loose plan in hand, we let the river dictate our access and setup beneath overhanging pine bows overlooking a transition between the timber and the corn. With limited time available before work we quickly threw out a string of floaters in front of us with a few full-bodies making their way up the corn. As dawn quietly approached, the torrent of the river was interrupted by a flurry of wings and whistles. The wood ducks were the first to arrive. They left as quickly as they came, albeit fewer in their ranks. After several agonizingly long minutes, the mallards graced us with their presence, settling amongst our spread. A few volleys and a couple handfuls of ducks later, we marched out of that flooded field soaked and grinning. We spent the next three days hunting that spot and hit our limits two out of three days. A week later there was a foot of snow and the river was frozen.
Tips for making the most of foul weather hunting
Hunting on short notice, over a new feeding ground, in an area that birds can’t typically access via water usually leads to grumbling and a dose of ibuprofen. To pull off a hunt in driving rain and in close proximity to a swollen river takes both luck and skill. The luck is finding the birds; the skill is in beguiling them. It’s through quiet observation that I’ve learned where and how to hunt. I don’t advise chasing divers in open waters when the water is choppy and the wind is howling, unless you like constantly chasing decoys and bilging water out of your waders or boat. During storms, time is better spent hammering the backwater with plenty of cover, while freshly flooded cornfields almost always make for great puddle duck and goose hunts. Of course, finding the X is always first and foremost, especially when the forecast is set to change.
With seasons as short as they are and limits constantly subjected to changes in population size, today’s hunters should seize any opportunity to get outdoors in order to succeed. If time is taken to properly scout and understand the behavior patterns of the animals you intend to pursue, your success rates will climb. Utilize every rare, solitary moment in the woods to sharpen your hunting skills, especially when most people are still relaxing at home, out of the woods and out of the mire.
Duck Blind Quick Tips and Hacks
The Origins of Retrievers: Hunting Dog Confidential Episode #8
A Introduction to Jump Shooting Ducks on Upland Hunts
But there’s more to these simple scopes than meets the eye. Which means I’ll be breaking down each scope and its features.
So which air rifle scope is your perfect match?
Keep reading to find out.
Basics of Air Rifle Scopes
These scopes are pretty much the same as a regular rifle scope. They magnify the image you’re aiming at and you’ll be on the same visual plane as your target.
Air rifles themselves are known for their amazing accuracy, so they’re a great addition to your regular range lineup.
But what makes air rifle scopes unique?
These scopes can withstand the double recoil and vibration of an air rifle. So that, plus your improved accuracy, makes the scope completely worth it.
Before we get into the good stuff, let me remind you to please never put a firearm scope on an air rifle. They’re not meant to be together, no matter how cool you may think that would be.
Now, here’s the two different types of air rifle scopes:
Fixed Air Rifle Scopes
The fixed air rifle scope is set to one magnification level. Which means it can’t be adjusted.
But what’s the advantage of a scope that can’t zoom in?
Once you’re sighted in, there’s almost no adjusting required.
So you can get to your target shooting much faster, which is something we can all celebrate.
And what kind of shooting is great for fixed scopes?
If you’re into hunting small rodents or other varmints at a closer range, this is the scope for you.
It’s also nice for the occasional short-range plinking session!
Variable Air Rifle Scopes
The variable air rifle scope can adjust magnification levels between 3-15x. So it offers a great amount of zoom power for shooting longer distances.
But is there a disadvantage to this scope?
Unlike the fixed scope, the variable scope will need adjustments more often while in use after sighting.
And what’s a great activity for this scope?
If you’re looking to hunt larger game at long-range distances, this is your match for an air rifle scope.
What’s the Deal with Objective Size?
Does objective size matter?
It always does!
When you’re looking for the best objective size lens for you, here’s two things to consider.
First, the larger the lens means better magnification.
Second, a larger lens allows more light to enter the scope. Thus, giving you a much brighter and clearer sight before your eyes.
So if you’re planning to use an air rifle scope in low light conditions, such as sunrise or sunset, pick out a larger objective lens.
To find the size of the objective lens, look at the last number in the scope description.
For example, the average variable scope is 3-9×32.
The first numbers before the ‘x’ indicate the magnification power. The number after that ‘x’ gives you the size of the objective lens.
So this scope can magnify between 3-9x and has a 32mm objective lens opening.
All About Mounting Hardware
Now that you’ve chosen your perfect air rifle scope, let’s mount that thing!
Every scope needs to connect to a firearm. So a one-piece or two-piece scope mount is used to fit around the scope. It’s then tightened onto a rail that sits on top of the air rifle.
Mounting is important. And you’ll need certain mounts for certain air rifles depending on the build or recoil power.
For a high-powered spring air rifle with a lot of recoil, I’d highly recommend a one-piece mount.
Why?
One-piece mounts are much stronger than two-piece mounts. They can also withstand more intense recoils from high-power air rifles.
For low-powered spring air rifles with a lot less recoil, a two-piece mount is perfect.
Other Types of Mounting Hardware
To get more specific about the mount you’ll need, check out these various types of mounts:
High mounts are best for larger scopes because it allows the scope to sit higher on the gun. Only use these mounts for 50mm objective lenses and higher.
Medium mounts are slightly smaller than high mounts. These mounts are perfect for 44mm objective lenses or less.
Speciality mounts are required for some air rifles that need a unique mount to fit properly.
Also be aware of the size of your scope tube, which comes in 1 inch and 30mm sizes.
So make sure that the mount you need will also fit around the scope tube.
How to Find a Quality Air Rifle Scope
We all work hard for our money, so finding a high-quality scope is a game-changer.
But how do you find a high-quality scope that’s also worth your money?
Spend some time considering what you’d be willing to spend for a scope. Also think about how often you’ll use this scope and what kinds of shooting you’ll be doing.
After you’ve decided on what you think is a high-quality scope, consider buying one that’s a little bit of a step up in quality.
Why?
Because with air rifles and their scopes, you definitely get what you pay for.
For example, an air rifle scope can generally cost between $30 to $400 and beyond.
Now, I’m not telling you to go break the bank. There are affordable options, of course.
But if you’re looking to use an air rifle scope quite often, then I’d highly recommend buying one that will last you at least a couple of years.
Just like any other piece of equipment, you want it to work well and hold up to the test of time. So you may have to be willing to pay a little more than what you had planned.
But I promise you that it will be well worth it. Especially when you’re having a blast shooting off that air rifle and scope combo.
And there you have my best tips for finding your perfect air rifle scope.
Now go out there and find your perfect match!
Air Rifle Scope vs. Regular Rifle Scope
Despite appearing very similar on the outside, an air rifle scope and a regular rifle scope are built differently.
They are more than capable of being mounted on either type of gun, but doing so recklessly can quickly lead to a broken scope.
Learning the types of guns that can use either scope is important to make sure you’re not flushing money down the toilet by breaking the scopes. However, it’s still possible and sometimes useful to use a scope on the opposite gun.
I’ve done the research and put together a quick guide to show the pros and cons of each type of scope as well as when it’s safe to mount it on a different gun.
Let’s get started!
Differences
One of the biggest differences between the two scope types is how they handle recoil.
An air rifle recoils differently than a normal rifle, and will actually recoil forwards after the initial backwards recoil. This force is not taken into mind with normal rifle scopes, so the forward recoil will tear most rifle scopes apart.
This video takes a deeper look into why air rifles tend to destroy regular rifle scopes:
Parallax is another big difference between the two.
The set parallax for air rifle scopes tends to be around 10m, while many rifle scopes have theirs set around 100m. While air rifles can shoot further than 10m, the scopes are designed for the shorter distance shooting that they excel in.
At the end of the day, the scopes are designed for different types of guns. Unless a scope was specifically designed for both, there will be certain issues with magnification and accuracy due to the change in ammunition.
Similarities
Despite the significant differences in shooting bullets vs. air gun pellets, the scopes have several similarities.
Believe it or not, air rifle scopes are just as tough and durable as high end rifle scopes. In some cases they can even be heavier and thicker.
Air rifle scopes still function well on a regular rifle scope. The opposite is rarely true, but there are a few exceptions. Some companies will actually design their rifle scopes so that they can withstand the stress from the different recoil of an air rifle.
There is an exception if you mount an air rifle scope on a very powerful rifle. The powerful recoil will overwhelm the air rifle scope and break it. They aren’t designed to handle extreme force on one recoil, but rather the moderate force on two.
What This Means
While it’s tempting to save some money and swap the same scopes between different types of rifle, I don’t recommend it. There are plenty of great rifle scopes, and buying a proper one for each rifle can save you much future grief.
Some rifles are listed and designed to work with either one, but getting a scope specific to your type of rifle is always better.
The recoils vary considerably, so getting a scope that specializes in handling this is better than a scope that’s decent at it.
The different ammunition is also something to consider, as a bullet will travel much differently than an air gun pellet.
For the most part, regular rifle scopes will give you more accuracy over longer distances, while the air rifle scopes are better at closer ranges.
At the end of the day, it’s much cheaper to buy two scopes than it is to constantly break your current ones trying to make them work on different guns!
The 4 Best Air Rifle Scope
If you’re pressed on time, here’s a quick list of the best air rifle scope:
Hawke Airmax Airgun Scope 2-7×32: Best Overall Scope for Air Rifle
ATN X-Sight: Best for Night Shooting
UTG 3-9X32: Best Scope under $100
BSA Outlook 3-9X40: Best for the Budget
1. Hawke Airmax Airgun Scope 2-7×32: Best Overall Scope for Air Rifle
The Hawke Airmax 2-7×32 is the best scope I’ve come across for an air rifle.
This optic is a target shooters dream. With a specialty reticle and a huge operative range, there isn’t much you can’t do and do well with the Hawke Airmax.
Choosing a scope for an air rifle is a little bit different than choosing a firearm scope. For more info on what makes an air rifle scope different, check out this guide to air rifle scopes.
To see the best overall airgun optic on the market, keep reading…
Glass Clarity & Reticle
The glass clarity on the Hawke Airmax is fantastic.
The high quality glass is fully multi-coated in 16 layers, so I know it will stay as clean as it was when I took it out of the box.
What really impressed me was the glass-etched reticle. The Hawke Airmax scope uses an AMX reticle,, which was specifically designed for air rifles. The mil-dot reticle floats comfortably in the center of the sight picture. It’s easy to see and kept me on target anywhere from 10 to 100 yards.
The Airmax is optimized for target shooting. It is a serviceable option for varmint hunting, but if that’s your primary objective, check out my first choice for varmint hunting.
Eye Relief & Eye Box
The eye relief is 3.5 inches, which is generous in my book.
The wide eye box made it easy for me to find my target fast.
Durability
The Hawke Airmax Scope is lightweight, durable and best of all, nitrogen purged.
Why does that matter?
Nitrogen purging ensures the scope is 100% waterproof shatterproof and fog proof.
The only issue I had with the design is the lens cap. I found it a little flimsy and hard to maneuver with one hand, so I replaced it with a Butler Creek lens cap.
Elevation & Windage Knobs
The turrets are perfect for in field adjustment.
The Hawke Airmax has extra large turrets that feel good in the hand, and turn easily with a satisfying click. Each click is .25 MOA which makes it easy to get a fine zero. It held zero like a champ.
Parallax & Magnification
The 2-7x magnification is a lot to work with.
I feel confident about taking this to a competition anywhere up to 100 yards. The image is clean, and the parallax turret is east to adjust.
I like this scope for long range target shots, but the variable magnification works perfectly anywhere above ten yards out with no tunneling.
If you are looking for a lower range fixed magnification scope you might want to look into a rimfire scope instead.
Mounting & Rings
To mount the Hawke Airmax, you will need a 1-inch dovetail or pic rail mount kit. I used these Hawke dovetail rings.
You will need a hex screw, which you probably already have. In case you don’t, Winchester makes a nice gun screw set.
Is the Hawke Airmax Airgun 2-7X32 worth it?
The Hawke Airmax is one of the best scopes out there for competition air rifles.
It’s priced surprisingly low for such a great optic. What makes it my top choice is…
Lightweight build
Audibly clicking turrets
Non-telescoping magnification
Specialty AMX reticle made for air rifles
And of course, Hawke backs up their quality promises with a no-fault lifetime warranty, so you can shoot with confidence. If you take your sport seriously, I highly recommend giving the Hawke Airmax Airgun Scope 2-7×32 a try.
2. ATN X-Sight: Best for Night Shooting
The ATN X-Sight 4K Pro is the best sight for night shooting.
In fact, I purchased this optic strictly as a night scope for hog hunting. After seeing how it tremendously improved my accuracy, I kept it on my AR-15 and tested its performance during casual target shooting and deer hunting.
By the end of this review, you’ll know if the ATN X-Sight is for you.
Let’s dive in!
Image Clarity & Reticle
The image quality is bright and clear.
The ATN X-sight is equipped with several reticle patterns and color options, which makes shooting easy. It doubles as both a digital daytime optic and a night vision scope: definitely worth its price tag.
Speaking of night vision…
The X-Sight 4K PRO sports an Enhanced HD NV Mode. I’m certainly seeing a higher quality than other “Night Vision” scopes, including the units that cost thousands of dollars more than the ATN X-Sight.
Although the scope does come with an IR attachment light, I chose to upgrade it with the ATN IR850 SUPERNOVA IR Attachment.
Take my word: it was worth every penny. I was hitting small game at night out to 300 yards without issues.
The ATN X-sight also features a built-in rangefinder and ballistic calculator that’s amazingly accurate.
You just enter your gun and ammo specifications via the ATN Obisidian App on your smartphone, and it takes into account everything that affects your trajectory, including— Relative Humidity, Wind Speed, Wind Direction, Temperature, Barometric Pressure, and Elevation.
Recording and Streaming
Recording videos with the X-Sight 4K Pro came out to be very clear at 10X zoom. Unfortunately, the quality started degrading as I was approaching full zoom. This isn’t uncommon with digital scopes, though.
I did extensive research before buying this scope and found that most shooters who have issues with the product freezing or being pixelated don’t understand the technology.
Make sure you read the instructions on the manual thoroughly and make sure to upgrade the firmware to the latest version.
Also, you can easily google any problem and find a solution- just like you would do with an iPhone.
Moving on, let’s talk about the Recoil Activated Recording (RAV) feature. This was super helpful to me. I didn’t have to worry about pressing the record button every time.
Why?
Because as soon as the X-sight detects recoil, the RAV feature automatically saves that 10-second snip before the shot and 10 seconds afterward.
The videos are stored on the removable micro SD Card for viewing at a later time. The dual streaming option also allows you to simultaneously record and Livestream your hunts. How cool is that?
Eye Relief & Eye Box
The eye relief is excellent, ranging from 3-3.5 inches.
On the flip side, the ATN X-sight’s eye box is a bit narrow.
The 3-14x scope has 460 ft field of view at 1000 yards, while the 5-20x version has 240 ft.
Durability and Battery
This ATN X-Sight is very durable, and the buttons are tactile. The ruggedness reminded me of the battle-tested ACOGs.
The X-sight doesn’t get damaged if left out in the sun, nor does it have to be protected from light exposure, unlike other regular night vision scopes.
The entire unit weighs about 2.2 lbs, which tips the heavier side of the scale, but compared to an AR-10 with a standard scope, the weight difference is about the same.
It took about six hours to fully charge. However, once fully charged, it is said to provide a continuous use of up to 18 hours.
It ran it for about 12 hours on the range, and the battery indicator wasn’t even at the halfway mark, so I’d say ATN advertises the battery life accurately.
Zeroing
Zeroing was remarkably easy thanks to the ‘One Shot Zero’ feature. All you need to do is take one shot, align it with the crosshairs, and push a button. This is extremely helpful if you’re a beginner.
It took me less than 20 rounds using the .308 Winchester to get it perfectly zeroed.
My personal favorite feature is the Profile Manager. Essentially, you can save multiple zeroing-in data for different firearms and ammo. You can easily switch weapons without having to reset everything. This saved me a lot of time in the range.
Magnification
This ATN X-Sight 4k Pro can be purchased with two magnification options: 3-14x50mm and 5-20x65mm.
Which one should you get?
Get the 3-14x50mm if your target range is between 25-250 yards. BUT if you plan on zooming in, you will lose a lot more clarity with the 3×14 than the 5×20.
So if you’re shooting out past 250 yards frequently, I recommend getting the 5-20x65mm model.
Mounting & Accessories
Fortunately, ATN has eased the hassle of a complicated setup.
The ATN X-Sight comes with a versatile mounting system that includes standard rings, an L shape ring, and a Picatinny rail. Simply pick the right ones for your needs.
It took me less than 10 minutes to mount the scope on the Hardened Arms 16-inch 7.62x39mm AR-15 upper.
Word of advice: make sure your mounting screws stay tight. I check mine every time I go to the range. They haven’t come loose yet, but it’s good to keep on top of it.
The sight also comes with a heap of accessories, including:
Eyecup
Sunshade
Lens cover
UBS-C cable
Cleaning cloth
Is the ATN X-Sight 4k Pro worth it?
The days of breaking the bank to have an excellent night vision scope are over. The ATN X-sight is a game-changer.
Why? It’s got:
One-shot zero
4K UltraHD Sensor
Excellent Night Vision
Long-lasting battery life
Recoil Activated Recording
3-14x or 5-20x magnification
Fog proof, dustproof, and fully waterproof
Built-in Smart Rangefinder & Ballistic Calculator
1080p HD Video Recording & Photos to your smartphone
Plus, the scope comes with ATN’s 2-year warranty for returns and repairs, the accessories are covered for one year, and the battery for six years.
For under $1000, the ATN X-Sight 4K Pro displays exceptional quality and value for day and night shooting.
3. UTG 3-9X32: Best Scope under $100
I love the UTG 3-9X32, and you will too.
It has a wonderful reticle, easy adjustment, and includes everything.
If you’re looking for a budget scope, this is the one.
Read on to find out why.
Glass Clarity & Reticle
The image is bright even at high magnification, though I have noticed a little darkening after sunset at 9x power.
The lenses are multi-coated in emerald green to increase light transmission as much as possible, and it works well.
There is a little tickle of distortion right at the edge of the field of view, but not a big deal to me.
You can change the color to red or green, but even if your battery dies you still have the regular black reticle. I bring extra CR1620 batteries in the field with me.
The UTG 3-9X32 reticle is also very usable for a mil-dot. There are nine dots in any direction, giving plenty of different points of aim without the need to touch a turret.
Eye Relief & Eye Box
The eye relief is listed as 3-4 inches, so you need to stay inside that range to get a clear image.
This is probably the one con of the scope, but for my 30-06, it isn’t an issue at all. That’s right where I had the Leupold mounted before moving it to another rifle.
It can be a problem if you have a target 22 and you like to snuggle with your optic. Overall though, I would say that the eye relief is just about right for most shooters.
(If you like it longer or shorter you might want to check out these Ruger 10/22 optics.)
Durability
The UTG 3-9X32 BugBuster is nitrogen purged and built around a framework of strength over all else.
I have yet to have any issue with it holding zero. It literally needs to come loose from the rail to throw it off, and I love that in a scope.
It’s never fogged or given me any kind of problem, even on wet mornings hunting rabbits in 40 degree weather over snow from the previous day.
The caps and sunshade are a bonus, and they help to keep everything well protected and dust free until you are ready to take your rifle out to the field.
UTG has something they call a “True Strength” platform that their scopes are built around, something about the way the pieces inside fit together to keep things in alignment. Whatever it is, it works. My hunting rifle stays on target season after season, and it hasn’t let me down yet.
Elevation & Windage Knobs
The bad news is the knobs require an allen key to adjust.
The good news is that all of the required hardware for the scope is included, even the wrench for the windage and elevation knobs.
Actually I lied, you don’t need to wrench to adjust them in the field, just for zeroing in at the range. The wrench loosens a securing bolt and allows the turret cap to spin freely, so once you are dialed in you can set your tick marks to zero.
This is becoming a pretty common feature on scopes, but in case you are wondering, it allows you to adjust for windage or elevation in the field and then return the knobs to zero without counting clicks.
Speaking of clicks, the adjustments on the turrets are ¼ MOA. Perfect for long-range shooting, whether in competition or hunting mountain goats across a wide canyon.
And yes, there’s a very satisfying click when you turn them.
Parallax & Magnification
Magnification of the UTG 3-9X32 BugBuster is straightforward. Just twist the power ring near the turrets and go, like any other scope.
There is an added bonus that a diopter adjustment comes with a lock. Once you have the reticle clarity set for your eyes, there’s no need to touch it ever again.
Parallax on the BugBuster is adjustable on the end of the scope. That is, where the objective lens is located. A quick twist sets you up anywhere from infinity to as close as three yards.
I’ve dialed in the parallax to the required setting, looked through while moving my head about with the rifle in a rest, not a single problem. The reticle follows the target.
Mounting & Rings
Everything is in the box, even the mounts. I don’t think I need to tell you what a relief that was. Shopping for rings is my least favorite part about being a shooter.
The rings also come with quick-detach mechanisms and fit on Weaver or Picatinny rail systems. If you are going to be dressing up your little black rifle with a long-range scope, you won’t have to shop around for detachable rings.
And what’s more? They’re pretty darn sturdy. Torture tests are conducted by UTG for durability under normal wear-and-tear conditions, and the rings are built just as rugged as any I’ve seen. I think I said earlier, and I’ll repeat it here, I’ve never yet had to re-zero this scope.
Is the UTG 3-9X32 worth it?
This scope is for long-range shooters who want a quality piece of glass at an affordable price range.
The key features of this scope are:
9 mil-dots
¼-MOA clicks
Illuminated reticle
Easy turret adjustment
Quality glass on a budget
All hardware and tools included
Parallax adjustment down to 3 yards
It’s hard to beat this scope for less than 100 clams. I’ve tried almost every budget scope on the market, and found most of them severely lacking. But the UTG 3-9X32 BugBuster gets the job done and does it amazingly for the price.
It also comes with a lifetime warranty.
If you want to put a powerful scope on your rifle, the UTG 3-9X32 is what you need.
4. BSA Outlook 3-9X40: Best for the Budget
The BSA Outlook 3-9×40 is the best scope on a budget.
In fact,
There might not be a lot of flashy features on this scope, but the ones it has I’m ready to compare to optics worth 3x the price.
Keep reading to find out…
Glass Clarity & Reticle
I never would have guessed this scope’s price tag looking through the glass.
The image through the scope is crisp and clear.
For a sub-$100 scope, the glass is incredible. The fully multi-coated lenses are a premium feature that deliver a crisp, clean image.
I will say that at the highest magnification settings, there is a minimal amount of fisheye around the outside of the image. However, it’s hardly noticeable unless you’re looking for it.
The BSA Outlook is outfitted with a simple MIL dot reticle.
I only say simple, because the MIL dot reticle is visible clean without a complex system to distract your eye. In reality, the MIL dot reticle can do so much for the shooter in a small space.
I’m a big advocate for the MIL dot reticle, because, at a glance, you can judge wind, bullet drop compensation, range, and target size regardless of your rifle caliber.
It’s ideal for long-range shooters, varmint hunters, and tactical marksmen.
The BSA Outlook’s reticle is also on a second focal plane, meaning the reticle grows or shrinks with magnification. It’s easy to see at all magnifications for fast and fearless target acquisition.
Eye Relief & Eye Box
This scope has a solid 3.7-4 inches of eye relief. Plenty of space to avoid injury to the eye in case of a strong kickback from the firearm.
The eye box is also forgiving, not causing my eyes to fatigue like other cheap optics.
Durability
Break barrels are brutal on a scope, and I’ve had my fair share of optics eaten up by high recoil. So when my BSA Outlook was still kicking after over 800 rounds, I was more than impressed.
The one-piece constructed optic body from durable, lightweight aluminum is built to withstand serious recoil from even the most powerful air rifle.
It’s the whole durable trifecta of waterproof, shockproof, and fog proof construction.
The low-glare, matte black finish is not only stylish but also helpful when you need to camouflage your position when hunting close-range.
Elevation & Windage Knobs
The low profile elevation and windage turrets have crisp, positive clicks.
Adjustment turns very smoothly on everything from the turrets to the adjustable objective. They’re especially nice for scope in this price range
They do have on flaw though: the hash marks don’t line up exactly on the turrets and each line is offset by a fraction of a hair.
However, they’re still accurate to the ¼” MOA adjustment, and I’d take that over loose adjustments.
Zeroing was easy once I got on paper. And with only a few adjustments on the turrets, the scope has held zero for over 800 pellets.
Parallax & Magnification
So, how much magnification do you get? A very versatile 3x-9x.
At 3x, the image is crystal clear.
As the optic reaches max magnification, there is a minimal amount of fisheye and blur on the outer edges of the image. However, the imaging is still lightyears ahead of other scopes in its price bracket.
This broad magnification range increases accuracy for short to medium ranges with absolutely no parallax at all.
Here’s how I know:
I took my laser range finder and started testing at 10, 20, then 30 yards to verify focus and parallax settings. The marks were good, and I’m more than impressed by the results.
It’s a solid 10 to infinite parallax adjustable scope.
Mounting & Rings
The BSA Outlook comes with its own two-piece dovetail rings. They’re solid with four bolts in each ring.
A set of rubber lens caps are also included to increase the longevity of your lens’ lifetime.
Is the BSA Outlook 3-9×40 worth it?
If you’re looking for an affordable scope that offers versatility and durability for even the highest recoiling air rifle, then the BSA Outlook is my recommendation.
Here’s why:
MIL Dot reticle
Included dovetail rings
Fully multi-coated lenses
Limited one-year warranty
Tactile hand turn/zero reset turrets
And the bonus is it won’t break the bank.
If you’re looking to ring steel without losing a chunk of change, the BSA Outlook 3-9×40 is the air rifle scope for you.
Now It’s Your Turn
I hope you enjoyed my best air rifle scopeguide.
Now I want to turn it over to you:
Which scope will you pick for your air rifle?
Let me know by leaving a quick comment down below.
3. Benjamin Maximus – Best Budget Air Rifle Under $500
The Benjamin Maximus Air Rifle may not be packed with extra features, but it sure is one of the best-rated air rifles under $500 for its price!
It’s a no-frills entry-level air rifle that offers the decent necessities any beginner shooter will enjoy.
Even advanced shooters will be impressed with what this air rifle has to offer.
Value For Money
I know how pricey air rifles can be, but it doesn’t mean you have to purchase the priciest air gun out there to get value.
The Benjamin Maximus proves just that, offering one of the most affordable rifles available
Without compromising on quality and performance.
Granted, it isn’t the quietest and it requires a high-pressure air supply all the time,
Though the rifle makes up for it with its price and ease of filling up.
Excellent Accuracy
The accuracy is spectacular, and it had standard muzzle energy when we tested it.
It offers a maximum muzzle velocity of almost 1,000 FPS, with an energy of between 19-22 ft per lb.
Its consistency is just as admirable, best used with mid-to-heavy weight lead pellets for both accurate and consistent shots that vary only by an ounce or so.
However, you can also use lightweight pellets and still produce similar results.
Just take note, this isn’t a regulated PCP so the velocity drops after firing.
Simple and Efficient
The air rifle is long and pretty lightweight to handle.
For its price and shot performance, it’s easy to hold and maneuver.
Plus, it only requires a 2,000 PSI fill pressure, which makes it easier to fill using hand pumps.
Additionally, it’s easy to shoot with as it offers adequate grip and stability.
The only con is the breech design, which renders it a bit difficult to load pellets.
The Benjamin Maximus only requires a 2,000 PSI fill pressure, which makes it easier to fill using hand pumps.
Pros and Cons
Pros
Cons
One of the most affordable air rifles available
Has an easy to fill pressure of up to 2,000 psi
Offers satisfactory consistency and accuracy
Has no noise suppressor and is quite loud
The air rifle's sight is unprotected
Final Verdict
The Benjamin Maximus Air Rifle offers good value for your money but is best recommended for beginners in training.
If you’re on an extreme budget for an air rifle, this is a satisfactory choice that offers amazing accuracy and ease of use.
Many users have raved about its top-notch performance, though you should be wary of the noise it can make!
I admire the air rifle’s body, which is lightweight and easy to carry around, as it’s only 42 inches long and weighs less than seven pounds.
For an entry-level air rifle at a more affordable price, it has a ton of features to offer, including:
The removable rotary magazine, a velocity of up to 800 FPS, as well as a fill pressure that can take up to 3,365 PSI.
That’s definitely not bad for a cheap air rifle for beginners.
The Gamo Urban has a ton of features to offer, including a removable rotary magazine, a velocity of up to 800 fps, as well as a fill pressure that can take up to 3,365 psi.
Pros and Cons
Pros
Cons
Strong hits and accuracy when shot
Great for beginners with exceptional accuracy
Easy to fill and lightweight body
Quiet operation for added comfort
Not the best pressure gauge and shot count
Some complaints of the trigger comfort
Final Verdict
This entry-level PCP air rifle packs a punch for the cost, handling well regardless of the shooting scenario you’re in.
With its lightweight feel and the beastly power that shoots repeatedly with accuracy, beginners will definitely enjoy practicing with this one.
The only thing I wish is that it had a higher shot count and better pressure gauge.
You certainly long to know more about your favorite airgun reviewer. Of course, I’m Sean Campbell by name. What else?
I was born in the Maverick County of Texas way back in 1983. One story by my dad during my early childhood years has always struck a chord with me
My dad and mum were cattle grazers. We didn’t own a ranch as such. Some of our neighbors did. All we had was about 50 heads of cattle. These fitted perfectly in our 10-acre piece of land.
My dad would never stop talking about Charles Goodnight, one of the richest cattle barons in Texas in the late 19th Century. Together with his friend Oliver Loving, they used to drive thousands of Texas Longhorns for hundreds of miles for sale. The paths they used came to be known as Goodnight-Loving Trail.
“Always work as hard as Charles Goodnight!” My dad would forever urge me.
That spiked my interest in the cowboys. On my 10th birthday, I successfully convinced my dad to buy me full cowboy regalia. On top of that, I got my first locally-made crossbow. If only I was of age, I would have acquired my first Winchester 1873. That was my dream rifle.
The weeks, months, and years that followed were a pure cult. Picture a gang of small boys fully dressed as cowboys and armed with ‘weapons of mass destruction’. Cattle grazing was never boring again. We would spend the day scouring through the shrubs and bushes for whatever tiny living thing we could pin down with our lethal arrows.
For me, grazing and outdoor life seemed the main business of the day. Schooling was more of a part-time activity, though the major part of weekdays was spent in class. I schooled at Pete Gallego Elementary School in Elm Creek, and thereafter Eagle Pass High School.
Math was my favorite subject. Once it was introduced to me as a ‘game of numbers and symbols’, it captured my heart, soul, and mind. I would effortlessly practice solving math problems every other day. No need to reveal my grades, but be sure they were outstanding.
Throughout my school years, I was part of the scout group. For unknown reasons, I shunned other sports. Football never got into my blood. Nor did baseball, volleyball, and the like. By being a scout, at least I was assured of a camp in the woods once or twice a year. Boy Scouts of America mobilized us to be part of the Karankawa and Huisache camps.
It was during these camps that I improved my survival skills. Think of things like:
Finding and purifying water
Building wilderness survival shelters
Starting fires without a matchstick or lighter
Navigating in the wilderness to avoid getting lost
Signaling rescuers in case lost
Performing survival medical operations
Food acquisition to ward off starvation
Later on, I enrolled in the United States Naval Academy to study marine sciences. I strengthened my skills in seamanship, navigation, naval engineering, leadership, and naval electricity and electronics.
Work history
After several years of job searching, I landed a job with the United States Marine Corps, specifically the Marine Infantry division. FYI, the marine infantry units are responsible for locating, marooning, and destroying any enemy forces threatening the peace of our beloved nation.
One of my international combat tours was in 2010, where we actively participated in the Battle of Sangin in the Helmand Province of Afghanistan.
After all those years of weapon handling, it occurred to me that I could better spend my time making, selling, and repairing firearms. You’ve probably already realized that I’m such a hands-on guy. And I just can’t help it.
I joined the Georgia-based Ashworth College in 2011 for a self-paced diploma in gunsmithing. It took me 2 years since I was juggling my studies with other worthwhile life commitments.
In 2013, I got a job with the National Rifle Association (NRA) as a firearm instructor. That has kept me busy up to date.
Family
Outside my work hours, I spend my time hunting, practicing shooting, doing outdoor photography and repairing people’s rifles.
All these achievements would not have been possible without my dearest wife, Katie Anderson. We surprisingly met in high school – and not in college as most people do. Not that we started dating then. We were simply general acquaintances. Life’s mercies finally led us to tie the knot at a private function in the summer months of 2010. Whether I was late in marrying or earlier than expected, it doesn’t bother me.
What matters is that I love my wife and she loves me back. Our union was blessed with one kid, whom we named Larry, in honor of the world-renown American television and radio host Larry King.
Why do I hunt with air guns (and not crossbows or real rifles)?
I prefer air rifles to real rifles because of the following two factors:
Air rifles are less noisier than real rifles. For this reason, game animals tend to stand in place and decipher the origin of the noise after a shot from an air rifle. This allows for quick follow-up shots to ensure the animal doesn’t escape the wounded. Conversely, the loud noise produced by real rifles causes great alarm and panic to both game animals and people living or passing nearby.
Secondly, with air rifles, I can carry as many pellets as I wish to and never risk running short of ammo. That may not always be possible with real rifles as there are limitations on how many rounds and magazines one can carry. Being deep in the woods without ammo is risky as wild animals can turn on you anytime and harm you.
I also prefer air rifles to crossbows because of these two reasons:
Reloading a crossbow seems to take more time than reloading air rifles. When in the hunting field, I always need to act quickly and swiftly as possible. One second wasted in loading the ammo may mean losing a potential kill.
In the case of a mishit, a pellet lodged in an animal’s body is less disturbing and painful than an arrow lodged in the same animal. Thus when hunting with crossbows, I may be forced to track down animals that I fail to kill with the first shot, as hunting ethics dictate.
My favorite airguns
For the 2 decades I’ve actively handled firearms, I’ve owned and operated quite a several numbers of real firearms and air rifles. Here are my favorite airguns:
.45 Texan SS (330 FPE)
.308 Texan SS (196 FPE)
.25 Airforce Condor (60 FPE)
.22 Hatsan BullBoss (28 FPE)
.22 Gamo Urban (23 FPE)
.22 Benjamin Marauder (20 FPE)
Beeman R9
HW 90 and HW50S
Diana RWS 48, 350 and 460
As you can see, I have a varied collection of several calibers, both small and big. I mostly use the .177 and .22, and sometimes the .25 air rifles for rabbits, squirrels, and small game hunting. The .30 and .308 are specifically for deer hunting. My favorite hunting states are Michigan, Ohio, South Carolina, and Pennsylvania.
I often use the .45 Texan SS for deer hunting. My daily schedule at times gets tight, and so I prefer to spare the little time I get off work for hunting and other outdoor activities.
That’s pretty much all about me. If you’re reading this and you frequent the areas I’ve mentioned, I hope our paths soon cross. Otherwise, for all the rest, let’s keep interacting online.
Trees with long, slender seed pods are easily identified in woodlands and parks. The distinctive bean-like pods may look like a string of pearls, long flattened brown cases, or slender cylindrical seed pods measuring up to 24” (60 cm) long. Many of these trees with long seed pods are in the bean family Fabaceae and have similar seed cases containing several round or oval seeds.
Catalpa trees are the most commonly identifiable trees with long seed pods dangling from branches. Other trees known for their long flattened or cylindrical seed-filled pods include black locust, eastern redbud, palo verde, mimosa, and trumpet trees. Depending on the species, the long seed pods can measure between 4” and 24” (10 – 60 cm) in length.
This article explores some of the most fascinating trees with long seed pods. From the iconic catalpa tree to locust, redbud, and coffee trees, we will examine the characteristics of each tree to identify the tree species.
Trees With Long Seed Pods (Pictures and Identification)
Let’s look in detail at the most common trees with long seed pods.
Catalpa Trees (Catalpa)
Catalpa trees have some of the longest seed pods you will likely find on trees. These ornamental deciduous trees have long, pencil-like pods that grow between 8” and 24” (20 – 60 cm) long.
The slender brown seed pods dangle from branches and persist through winter. On a leafless tree, the long slender pods look like brown icicles.
Northern Catalpa (Catalpa speciosa)
Long, thin cylindrical seed pods grow on the northern catalpa tree. The bean-like capsules emerge green and turn brown as they ripen in fall.
Each pencil-thin pod of the northern catalpa tree measures 8” to 20” (20 – 50 cm) long and is filled with flat, light brown winged seeds measuring 1” (2.5 cm) long.
The northern catalpa is a large-sized deciduous tree native to North America. Apart from the long green-bean-like seed pods, the tree is identified by its white, trumpet-shaped flowers and heart-shaped leaves measuring 8” to 12” (20 – 30 cm) long.
The northern catalpa trees grow 50 to 100 ft. (15 – 30 m) tall with an irregular canopy 40 ft. (12 m) wide.
Due to the catalpa tree’s long, thin brown seed pods, it’s also called the cigar tree.
Southern Catalpa (Catalpa bignonioides)
Long slender seed capsules are an identifying feature of the southern catalpa tree. These brown bean pods are slightly flattened and measure 6” to 20” (15 – 50 cm) long and 0.3” to 0.4” (0.8 – 1 cm) in diameter.
Like the northern catalpa, the rounded pods of the southern catalpa tree emerge green before turning brown in fall. They persist on the tree through winter.
Other identifying features of the southern catalpa are its clusters of small funnel-shaped white flowers, large leaves measuring up to 10” (25 cm) long, and reddish-brown bark.
The southern catalpa is difficult to distinguish from the northern variety. However, comparing the long seed pods and flowers, you’ll notice that the southern catalpa fruit and blossoms are slightly smaller.
Honey Locust Tree (Gleditsia triacanthos)
The honey locust tree is a fast-growing, hardy tree known for its long, reddish-brown, flattened seed pods.
The easily identifiable slender pods of the honey locust tree measure 18” (45 cm) long and have a twisted shape. An unusual feature of the long brown seed pods is their honey-like, sweet pulp that matures in early fall.
Also called the thorny locust tree, the deciduous tree is native to North America. One of the characteristics of the locust tree is its thorny trunk and branches. The stiff, sharp spines on the tree grow in dense clumps.
Honey locust trees have finger-like clusters of fragrant yellow flowers and pinnately compound feathery leaves.
Honey locust trees with huge brown seed pods grow 65 to 100 ft. (20 – 30 m) tall.
Black Locust Tree (Robinia pseudoacacia)
The black locust tree is a fast-growing, deciduous tree with flat, purplish-brown bean-like pods.
Each long, thin seed pod of the black locust tree measures 2” to 4” (5 – 10 cm) long and up to 0.5” (1.3 cm) wide. The long dark brown pods contain several dark orange-brown seeds that ripen in late fall.
One of the attractive features of the black locust tree is its fragrant white flowers. The loose clusters of white blossoms grow up to 8” (20 cm) long and bloom in late spring or early summer.
Leaves on the black locust tree are dark green and consist of small leaflets growing on stems.
Fast-growing black locust trees grow 30 to 50 ft. (9 – 15 m) tall and up to 35 ft. (10.5 m) wide.
Eastern Redbud Tree (Cercis canadensis)
The eastern redbud tree is a beautiful ornamental, pink-flowering tree with brown, bean-like seed pods in the fall.
Eastern redbuds are known for the masses of pea-like rosy-pink and purple spring blossoms. After blooming, the pink flowers give way to long brown flat seed pods 2” to 4” (5 – 10 cm) long.
Long seed pods on eastern redbud trees contain small pea-like seeds 0.25” (0.6 cm) long.
After the tree’s heart-shaped green leaves drop in the fall, the dangling brown pods provide visual interest throughout winter. Redbuds are small ornamental trees growing 20 to 30 ft. (6 – 9 m tall).
Additionally, eastern redbud trees are easy to care for and maintain, adding value and beauty to any landscape in USDA zones 4 to 9.
Judas Tree (Cercis siliquastrum)
The Judas tree produces masses of brownish-purple seed pods measuring 4” (10 cm) long.
These flattened purplish seed casings appear in summer and persist through winter. Also known for its abundant rosy-purple clusters of spring flowers on bare branches, the ornamental tree adds beauty and shade to a landscape.
The pink-flowering Judas tree grows 15 to 25 ft. (4.5 – 7.5 m) tall and wide. In addition to its attractive deep pink flowers and dangling showy seed pods, the tree features heart-shaped leaves.
These seed pods emerge red in the spring, mature to green, and turn yellow or brown in the fall.
Mimosa Tree (Albizia julibrissin)
Also known as the silk tree, the mimosa tree produces brown, flat elongated seed pods 4” to 8” (10 – 20 cm) in length. In addition to its flattened bean pods, the tree is identified by its pom-pom-like clusters of pink flowers.
Each mimosa tree bloom consists of silky threads that look like fluffy pink powder puff.
The fast-growing mimosa tree grows 20 to 40 ft. (6 – 12 m) tall and up to 50 ft. (15 m) wide.
Apart from its flat seed pods and fluffy pink flowers, the deciduous tree has attractive fern-like foliage consisting of 20” (50 cm) long bipinnate leaves.
Mimosa trees are drought-tolerant and low maintenance and add a touch of elegance and beauty to a subtropical landscape.
Cape Wattle (Paraserianthes lophantha)
Cape wattle is a fast-growing shrub or small tree with clusters of dark seed pods measuring 4” (10 cm) long. The smooth, flattened pale brown seed casings contain several black seeds.
The Cape wattle seed pods follow pale greenish-yellow bottlebrush flowers that appear in early summer and persist through winter.
Also known as fernleaf wattle, crested wattle, or plume albizia, this unusual tree can be found on the west coast of the US. The small shrub-like tree grows up to 40 ft. (12 m).
Apart from its flattened brown curled seed pods, the fernleaf wattle tree has fern-like foliage like the mimosa tree.
Palo Verde Tree (Parkinsonia florida)
The Palo verde tree is a sun-loving desert tree known for its flat, thin, seed pods with pointed ends.
Each flattened brown pod of the Palo verde tree contains two large brown seeds. The pods’ tan color contrast with the tree’s green branches and stems. The long brown seed pods measure 2” to 3” (5 – 7.5 cm) long.
The eye-catching features of the palo verde tree are its green bark, bright golden-yellow spring flowers, and small bluish-green leaves.
Palo verde is tolerant of drought, heat, and arid conditions. The ornamental tree grows 20 to 25 ft. (6 – 7.5 m) tall and up to 20 ft. (6 m) wide.
Royal Poinciana Tree (Delonix regia)
The royal poinciana tree is a stunning tropical tree known for its huge brown seed pods and fiery red-orange flowers.
Popular in Florida landscapes, the royal poinciana tree produces flattened, brown or black seed pods measuring up to 24” (60 cm) long. Each stiff, strap-like pod can hold up to 50 seeds.
The most attractive feature of the royal poinciana tree is its large clusters of brilliantly colored red or orange flowers. The tropical flowers have four spoon-shaped petals measuring 3” (7.5 cm) long.
When in bloom during summer, masses of vibrant flowers cover the tree’s spreading, rounded canopy.
Royal poinciana trees grow 30 to 65 ft. (9 – 20 m) tall and have a spreading canopy up to 60 ft. (18 m) wide.
Kentucky Coffee Tree (Gymnocladus dioicus)
The Kentucky coffee tree is a slow-growing deciduous tree with long, flat seed pods and small leaves. The attractive reddish-brown bean pods grow in clusters and measure 10” (25 cm) long and up to 3” (7.5 cm) wide.
Leaves of the Kentucky coffee tree are bipinnately compound with up to nine pairs of small leaflets on leaves 3 ft. (1 m) long.
The Kentucky coffee tree is characterized by its dark brown, fissured bark, zig-zag stems, and purplish-brown pods containing oval seeds.
Traditionally, the seeds are roasted and used as a coffee substitute—hence the name coffee tree.
Kentucky coffee trees grow 60 to 80 ft. (18 – 24 m) tall and up to 55 ft. (17 m) wide. They are excellent shade trees for large landscapes, and their large brown seed pods create visual appeal in the winter. However, they can become messy when they drop.
Acacia Tree (Acacia)
Acacia trees are a group of sun-loving thorny trees that produce clusters of long seed pods. Depending on the tree species, acacia seed pods can be twisted, straight, or coiled. Some of the long, seed-filled elongated pods can have a fuzzy texture.
The acacia tree pods contain red seeds, and the pods can be brown, black, or green and measure between 2.8” and 8” (7 – 20 cm) long.
Apart from the colorful seed pods, attractive features of acacia trees are their feathery fern-like foliage and strikingly beautiful flowers that look like white or yellow puffballs. Acacia trees grow between 20 and 50 ft. (6 – 15 m).
These trees are suitable for use as shade trees in hot climates.
Desert Willow (Chilopsis linearis)
Desert willow is a small to medium-sized shrub-like tree known for its showy, trumpet-shaped pink flowers and long, linear seed pods. The slender seed pods grow 6” to 10” (15 – 25 cm) long and contain several winged seeds.
The tree’s showy funnel flowers thrive in hot, dry climates, making the tree an ideal desert plant.
Desert willows look stunning in arid landscapes when the large purple, pink, or white flowers bloom from May through September. The tree is also identified by its willow-like leaves and huge elongated seed pods that persist through winter.
Desert willow grows 15 to 40 ft. (4.5 – 12 m) with an open, spreading crown.
Trumpet Trees (Tabebuia)
Trumpet trees are a tropical tree species that are famed for their showy trumpet-shaped flowers in shades of pink, yellow, and purple. After blooming, trumpet trees produce long, slender brown pods in a banana or cigar shape.
Depending on the tree species, the seed pods can measure between 3” and 12” (7.5 – 30 cm).
Trumpet trees have moderate growth and can reach heights of 20 to 40 ft. (6 – 9 m) tall. The colorful trumpet-shaped flowers can measure 1” to 4” (2.5 – 10 cm) long and bloom in early spring on bare branches.
Yellow Bells (Tecoma stans)
Yellow bells is an eye-catching shrub-like small tree with clusters of showy yellow trumpet flowers, lush foliage, and many string-like long seed-filled pods. The slender bean pods grow 8” (20 cm) long and contain numerous winged seeds.
These blow away when the seed pods ripen, crack open, and release the seeds.
Although the narrow seed pods provide some visual interest, it’s the stunning brightly-colored yellow flowers that are attractive. Flowering continuously from spring until late fall, the fragrant yellow blossoms add plenty of color to a subtropical landscape.
The shrubby plant grows 10 to 25 ft. (3 – 8 m) tall and up to 20 ft. (6 m) wide.
Amur Maackia (Maackia amurensis)
Amur maackia is a deciduous slow-growing tree with flat seed pods, fragrant, white pea-like blossoms, and attractive coppery-bronze bark.
The Amur maackia tree’s flat bronze-colored seed pods measure 2” to 3” (5 – 7.5 cm) long. Its white flower clusters are dense panicles growing up to 8” (20 cm) long.
This ornamental Amur maacikia tree is known for its stunning white flowers that bloom in mid-summer. Useful as a shade tree or lawn tree in temperate climates, the hardy broadleaf tree grows 20 to 30 ft. (6 – 9 m) tall and wide.
After its leaves drop in the fall, peeling cinnamon bark and brown seed pods provide visual winter interest.
Purple Orchid Tree (Bauhinia variegata)
The purple orchid tree is a magnificent flowering tree with flat, sharply pointed seed pods and stunning orchid-like flowers.
The deciduous small shrub-like purple orchid tree blossoms in winter with clusters of five-petaled pink, white, or purple flowers. These are followed by flattened strap-like seed pods measuring 12” (30 cm) long.
The sun-loving purple orchid tree thrives in tropical landscapes in USDA zones 9 to 11. Sometimes growing as a large shrub, the multi-stemmed tree can grow 20 to 35 ft. (6 – 10.5 m) tall. In the right climate, the pink-flowering tree is ideal as a specimen shrub, small shade tree, or border plant.
Carob Tree (Ceratonia siliqua)
The carob tree is an evergreen tree that produces long edible seed pods. The legume seed-filled fruit can be relatively thick with a curved or straight shape. Carob pods turn from green to a glossy dark brown, almost black, as they ripen.
The sweet leguminous pods grow 4” to 10” (10 – 25 cm) and contain eight to 12 seeds.
The carob tree is native to Mediterranean regions and grows up to 50 ft. (15 m) tall and wide. The term carob comes from Greek, meaning horn-shaped, and refers to the shape of the large curved seed pods. The drought-tolerant trees are ideal for hot climates and xeriscaping.
Exploring the Pros and Cons: Pump Air Rifle vs Break Barrel - Unveiling the key differences and advantages between two popular air rifle mechanisms....
")
")
")
")
")


 Review – The Best Name In The Air Rifle Game")