Repair Your Rubber Boots In No Time – Easy Tips to Fix Cracks and Leaks

0
859

Rubber boots are essential for those rainy days when you don’t want your feet to get wet. But if they start to leak or crack, it can be frustrating. That’s why we’ve put together this guide on how to fix them fast.

You don’t have to go through the hassle of buying a new pair of rubber boots just because they start to leak or crack. With our easy tips, you can have them fixed up in no time. So don’t wait – Repair Your Rubber Boots In No Time!

Don’t let a little crack or leak in your rubber boots turn into a big problem. Here are five ways to repair them quickly and easily in our compilation.

Read on here for more information on repairing cracks and leaks in rubber boots!

Can You Repair Rubber Boots?

Repairing Rubber Boots

Yes, it is possible to repair rubber boots. However, the extent of the repair will depend on the type of damage and the available materials. For minor damages, such as small holes or cracks, a patch can be used to fix the problem. More extensive damage, such as large holes or tears, may require the use of a patch and a sealant. If the damage is too severe, the boot may need to be replaced.

5 Ways to Repair Cracks and Leaks in Rubber Boots

If your rubber boots have cracks or leaks, there are several ways you can repair them. You can buy a rubber boot patch kit, use vulcanizing cement, use a sealant, use a hot glue gun, or use boot covers. Let’s see how these tips can be used to repair rubber boots that leak and crack.

1. Rubber boot patch kit

Repair Rubber Boots with rubber patch
Repair Rubber Boots with a rubber patch

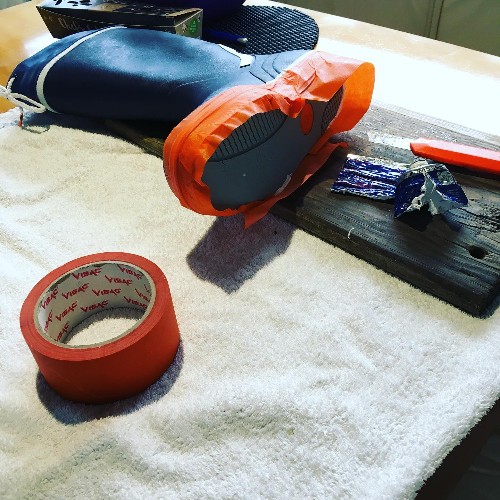
A rubber boot patch kit comes with a piece of rubber and instructions on how to apply it to the boot.

The process included in applying the patch may vary, but the kit will come with everything you need to complete the repair.

You can follow these steps:

  1. Clean the area around the hole or leak with a damp cloth.
  2. Cut the patch to size, if necessary.
  3. Apply the adhesive to the back of the patch.
  4. Peel off the backing and apply the patch to the boot.
  5. Press down on the patch to adhere it to the boot.
  6. Wear the boots after the adhesive has dried completely.
See also  The Dark Side… Night Fishing for Big Brown Trout Let’s Face It, in Most Cases Those Big Brown Trout in Your Local River Aren’t Falling Victim To a Size 10 Woolly Bugger or a 16 Prince NymphTo be honest, you’re probably unaware of what lies beneath the surface tucked against a log jam or wedged under that giant boulder mid-river that you’ve fished countless times. In most cases in my night fishing experience, there’s almost always a much bigger fish that shows itself at night than any other previous fish you’ve might have seen during the daylight hours.The majority of the largest trout I have ever seen were at night in less than 24” of water. Some of the most dominant predators on the planet feed at night… and brown trout are no different.Before we go further into tips, tactics, and tackle, I’d like to preface that night fishing obviously has its additional challenges and even dangers. Safety is by far the utmost importance when fishing, especially night fishing. Understanding every inch of the river you plan on night fishing is extremely important. Knowing every boulder, drop off/ledge, and casting obstruction can prevent you from going for an unexpected swim, broken rod, or even a hook to the face (speaking from experience). Always wear eye protection (clear or light illuminating lenses), two headlamps (you’ll drop one in the river), and try to take a fishing buddy with you just for peace of mind.Where I live in Pennsylvania as well as many places in the country, night fishing is more of a seasonal approach. By all means, you can night fish every month of the year and find some success, but there is definitely a “prime time” to be on the water. Typically, I personally begin my night fishing season during the “post hatch” season. After the majority of the caddis and mayflies hatch in May, and the water becomes skinny and shallow, this is when I find brown trout to be starved and more eager to eat larger meals.This Will Change the Way You Fly Fish Pressured WatersNight fishing in May, June, and even early July definitely produces plenty of fish, but not THE fish we’re all looking for. Once August rolls around and water temps begin to drop into safe fishing temperatures, that’s when you need to fish until the wheels fall off. Sleep becomes a thing of the past and coffee becomes your best friend. Your best shot at consistently catching brown trout 20”+ and even 24”+ is between August and October.The worst conditions for daytime fishing are your best conditions for night fishing. Low and clear water is by far the best water conditions to target big brown trout at night. Dominant brown trout adapt and hide so well during these conditions during the daytime which make them almost impossible to target. Once the sun begins to fade, the fish will migrate out of structure and move into feeding areas for the night.Swing It! Spey Streamer Fly Fishing TipsA mistake anglers often make is fishing the same deep hole they typically would fish during daytime. Brown trout will move into shallow sandy tail-outs, or push into the head of a run where the water might be less than 24” in depth. The inside seam of a deep pool also offers a great ambush point for a large brown trout.Tackle used when night fishing is very similar to fishing big streamers. Any 6wt, 7wt, or 8wt will suffice. On larger rivers, a trout spey or switch rod works great for swinging streamers or skating rodent patterns across the surface. A floating fly line is the most versatile line for night fishing in my opinion. You can fish surface flies, “pushers” that sit barely subsurface in the surface film, or even a streamer if you want to swing a baitfish into deeper pools. Your leader is extremely important when night fishing as well. Typically when fishing a surface style fly, keeping the leader short and stout is critical. Two feet of 20lb tippet to a blood knot, followed by three feet of 15lb tippet is typical when fishing surface style flies. Your leader needs to be strong and abrasion resistant. It’s not “if," it’s “when” you toss your flies into a tree.I have personally witnessed brown trout eat mice, rats, bats, baby birds, and even water snakes. A large brown trout over 24” is not much different than a musky. Don’t be afraid to think outside the box when night fishing. The biggest brown trout I’ve hooked at night was on a 6” rat pattern. The most important aspect of fly design for night fishing in my opinion is how much vibration, water displacement, or surface disruption you can create while not sacrificing your hook gap. Thin, but wide profile deer or foam body mouse flies work great. If using streamers, a pusher style fly that rides high in the water column seems to be extremely effective as well.Tied with a Surface Seducer Double Barrel Popper & Slider Body.How to fish you fly is totally dependent upon on moon phases, cloud coverage/ambient light, and speed of the current. A mouse is not going to swim upstream against the current.The two most effective retrieves are: Down and across just like you would swing a wet fly Casting upstream and working the fly back to youIf the current is a classic soft dry fly drift, I almost always work the fly down and across. Your rod tip height as well as your casting angle will dictate the speed of the fly. While fishing short and soft inside seams of a faster run/pool, orienting yourself downstream or below the fish will enable you to cast directly upstream and work the fly right to your feet. This is also a fantastic approach to work upstream along parallel with a heavily wooded bank. I have seen countless times where a fish will strike multiple times with this approach and ultimately eat the fly at your feet after missing 3-4 times in one drift.Be sure to always start your casts short, most fish are sitting right at your feet!At the end of a long night as the sun begins to rise; rest assure, that legendary fish most likely got away. More times than not, they have to make a series of mistakes in order for you to land them. Whether it ran you into a long jam, bent a 1/0 hook, or it came off just short of the net; the giants of the dark will keep you coming back for more. Tip your cap, swig some spiked coffee and keep after it. More often than not, they’ll leave you with a memory rather than a photo that you will never forget. Some nights, all you’ll have left is a fly patch full of chewed up foam. Want More Content Like This? Join the Flymen Mailing List at the bottom of the page!About Stephen Nymick:Stephen Nymick is owner of Stephen Nymick Fly Fishing LLC, and a Guide for Steelhead Alley Outfitters. He began fly fishing at just 5 years old on his local streams in Western Pennsylvania. The day his father took him out to get his first fly rod, he also came home with his first fly tying kit. Stephen has been fly fishing exclusively for over 20 years and has guided for 7 years. Throwing big streamers or mice for brown trout and swinging flies for Steelhead are Stephen’s true passions. You can follow Stephen on Instagram @stephennymick. For further questions, email Stephen at paflyco@gmail.com. To book a trip, contact Steelhead Alley Outfitters at 888-453-5899. Written by Stephen Nymick Filed under brown trout,  fly fishing,  fly fishing tips,  fly tying,  freshwater Tweet Comments on this post (8) Feb 26, 2024 Hi Sir/ We are manufacturers of fishing flies based in Uganda. We have qualified tiers who can maintain the best quality that a customer needs, we strictly deliver on time and use the right size of hooks.We tie all types of flies according to the customers orders.We are now looking for someone whom we can partner with for progress in both parties. Thank you as we wait to hear from you soon. under management by Fred— Fred luyali Apr 21, 2022 Hi,Re night time fishing for trout article.Thank you for a thoroughly informative article.Could you let me know what the chewed up flies in the picture are called and do you have any tying instructions you could send me?Kind RegardsDerek Coles— Derek Coles Oct 31, 2021 Dear Sir, I am Betty, a professional custom fly tier and the owner of a tube fishing flies fly group in business. With an experience of 20 years in fly tying in fulling mill company, I do produce all categories of fly patterns etc,Nymphs,Dries,Wets,Salmons,Saltwater, Pikes,Terrestrials etc. The quality of flies lies within my finger tips. I am always impressed with each and every fly that comes out of my vice.I have 20 good fly tiers who have experience in producing quality flies for the fly market globally. I will be glad if you would test my flies sample to match the quality of the same. I can assure you that with my flies you will emerge the best in the flies industry. If you are ready to foster flies business with me, I will be supplying you with a lower price per 1 dozen.I am eagerly waiting to hear from you. Best regards— Fred luyali May 04, 2021 This piece really got me thinking about my terminal obsession with netting three footers out of the Colorado where I live. I’ve actually landed a couple of those ghost browns @ zero-dark-thirty, and broke off even more. Your piece has me plotting already for some unconventional post-hatch, stealthy Ninja type spey missions.— Matthew Fullenwider Mar 18, 2021 I’m gonna be that guy and say that my biggest after dark brown came at 11:55 pm in mid-March…but overall I agree that late summer is the best time to raise fish in the late hours of the night. I would also add that a full moon is bad for mousing but great for streamers.— Patrick Houlton Mar 17, 2021 Nice article. Exactly what areas do you guide ?— John Kersting Mar 17, 2021 Great article, very insightful.— David Mar 17, 2021 Excellent article. I just started drifting my big tailwater after sunset last September to get the feel of casting streamers and catching fish after dark in big flows. Managing the boat and maintaining situational awareness is not for the faint of heart. One thing I wish the article had mentioned was technical specs on headlamps for night fishing— Drew Gilchrist Leave a comment Name Email Message

With a few minutes and effort, rubber boots can be repaired easily!

2. Use vulcanizing cement

Rubber boots are repaired with vulcanizing cement when they leak or crack. It works by bonding the two pieces of rubber together, which creates a strong seal that prevents further leaking.

Vulcanizing cement is available at most hardware stores and can be applied easily with a brush or roller. This type of repair is often used on rubber boots that are exposed to harsh weather conditions or frequent wear and tear. It results in a strong and durable repair that will last for many years.

3. Use sealant works

A sealant is a material that is used to fill in gaps or cracks, sealing them off from the rest of the surface. When applied to rubber boots, it creates a barrier that prevents water and other liquids from seeping through the cracks and leaks. This can be an effective way to repair and extend the life of your rubber boots.

The application process includes the following steps:

  1. Start by cleaning the surface of the boot where the sealant will be applied. Use a damp cloth to remove any dirt, debris, or other foreign objects that could prevent the sealant from bonding properly.
  2. Apply the sealant to the cracks and leaks, using a putty knife or other similar tool.
  3. Smooth out the sealant so that it is level with the rest of the boot surface. Boots should be worn after the sealant has completely dried.

Sealants are typically made from silicone, latex, or other synthetic materials. They can be purchased at most hardware or home improvement stores.

When selecting a sealant, be sure to choose one that is specifically designed for use on rubber. Follow the instructions on the packaging to ensure proper application and drying time.

4. Use a hot glue gun

Rubber boots can be repaired with a hot glue gun if they have cracks or leaks. It works by heating the glue so that it can be easily applied to the affected area.

The hot glue will then cool down and harden, creating a seal that will prevent further water from leaking through.

To use a hot glue gun, first, make sure that the area to be repaired is clean and dry. Then apply a layer of glue around the perimeter of the hole or crack.

See also  Air Guns Handling Guide - What you should know before buying your first air rifle

Be sure to smooth out any air bubbles so that the seal is as watertight as possible. Allow the glue to dry for several hours before wearing the boots again.

Hot glue guns are a quick and easy way to repair small cracks and leaks in rubber boots. However, they are not intended for use on larger holes or tears. If the damage to your boots is too severe, you will need to replace them entirely.

Mote read: Glue for rubber boots

5. Use boot covers

The Use of a boot cover works to repair the Cracks and leaks in rubber boots by providing a temporary seal that will allow the user to continue using the product while it is being repaired.

This method is often used when there is a small crack or leak that needs to be fixed, and it can be done quickly and easily without having to replace the entire boot.

Almost any hardware store or home improvement store sells boot covers, and they are typically made from a flexible material that can be easily applied to the affected area.

Once the cover is in place, it will need to be held down with a piece of tape or a similar product so that it does not come off while the boot is being repaired.

Once the repair is complete, the boot cover can be removed and the boot will be as good as new. In some cases, the use of a boot cover can also help to prevent further damage to the boot, which can save the user money in the long run.

Best way to patch rubber boots

There are many ways to patch a hole in rubber boots, but the best way depends on the size and location of the hole.

For small holes, use a strong adhesive like epoxy or super glue. For bigger holes, patch the hole from the inside with a piece of rubber or PVC pipe. If the hole is near the edge of the boot, you may also need to reinforce the edge with a strip of rubber or PVC.

Once you’ve patched the hole, be sure to test the repair by walking in a puddle or spraying the boots with water. If the repair seems secure, your boots should be good as new!

Conclusion

In conclusion, rubber boots are a great way to keep your feet dry and protected from the elements. However, they can sometimes leak or peel, and they may also crack if they’re not properly cared for. If you have a pair of rubber boots that are in need of repair, be sure to follow the steps outlined in this article so that you can get them back in working order. And when shopping for rubber boots, be sure to keep the above information in mind so that you can choose a pair that will last you for many years to come.

See also  7 Best Rimfire Scopes For 22LR (Complete List)

Thanks for reading!

FAQs

How to fix peeling rubber boots?

If your rubber boots are peeling, there are a few things you can do to try and fix the problem. First, make sure that the boots are clean and dry. If they are dirty or wet, they will be more likely to peel. Next, try using a mild soap or detergent to clean the boots. If this does not work, you can try using a rubber boot conditioner. Finally, if none of these things work, you may need to replace your boots.

How to find a leak in rubber boots?

There are a few ways that you can tell if your rubber boots leak. One way is to simply fill the boots with water and then check for any drips or leaks. Another way is to put the boots on and then step into a puddle or pool of water. If you see any water coming in through the boot, then you know that you leak. Finally, you can also check the inside of the boots for any water or moisture. If you see any signs of water, then you most likely leak into your boots.

How do keep rubber boots from cracking?

There are a few things you can do to help extend the life of your rubber boots and prevent them from cracking.

One is to make sure that you store them in a cool, dry place when they’re not being worn. If they’re exposed to too much heat or sunlight, the rubber will break down more quickly.

Another is to avoid wearing them in rough conditions whenever possible. If you know you’re going to be walking through mud or puddles, try to put on a different pair of shoes first and save the rubber boots for when you need them.

And finally, you can treat the surface of the boots with a silicone-based protectant. This will help create a barrier against water and dirt, and it will also make the boots easier to clean. Simply apply the protectant with a cloth or brush and then buff it dry.

Previous articleRifles for Big Sky Turkeys | Hunting Wire
Next articleDiscover the Fascinating Points on Deer Antlers: Unraveling the Mysteries
Ethan Smith
Ethan Smith is a seasoned marine veteran, professional blogger, witty and edgy writer, and an avid hunter. He spent a great deal of his childhood years around the Apache-Sitgreaves National Forest in Arizona. Watching active hunters practise their craft initiated him into the world of hunting and rubrics of outdoor life. He also honed his writing skills by sharing his outdoor experiences with fellow schoolmates through their high school’s magazine. Further along the way, the US Marine Corps got wind of his excellent combination of skills and sought to put them into good use by employing him as a combat correspondent. He now shares his income from this prestigious job with his wife and one kid. Read more >>