Howdy folks! Its been a little longer than anticipated since my first installment in the Euro-mount series. My apologies on that, been some busy times around the homestead this month. That said, the mercury is flirting with triple digits outside, and I think that is just the excuse I needed to move us along to the next step in euro-mounting your deer skull: how to finish the cleaning.
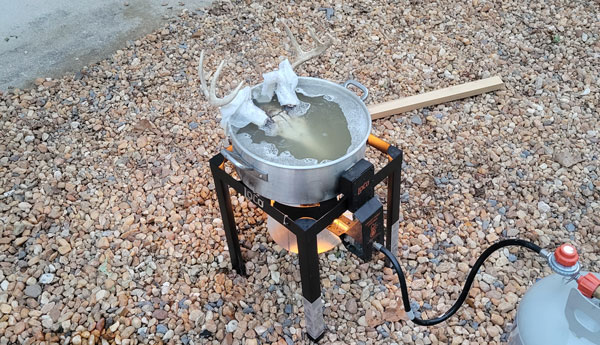
Boil Here’s the stage that convinces damn near everyone they don’t want to DIY their own skull. Is it hard? No, not really. But its a little much for weak stomachs to handle. Get yourself a cheap stock pot you never want to use for anything edible ever again, and a propane burner-this is one bone broth you’re not gonna want to make in the kitchen. Fill the pot full of water, throw in some salt and bring it to a boil. While the temperature is rising, wrap the bases of the antlers in some cheap rags, then wrap those rags in duct tape. The rags will prevent the duct tape from taking the finish clean off the antlers, while the tape itself will prevent the boiling water from steaming off any of the color. Once the water comes to a boil, the trick is to not put the skull in right away (anxious though you might be, after waiting forever for 18-odd quarts of water to boil). Instead, reduce your heat and wait until the water hits a nice rolling boil, instead of a frothy hard boil. Failing to do so could damage connective tissue that holds the bones of the skull together, meaning you’ll have alot of gluing to do at the end. Teeth will likely loosen even at a rolling boil-we’ll discuss how to deal with that later.
Once you’ve achieved your rolling boil, set the skull in the water without submerging any of the antler bases. One trick I often use it to a lay a paint stir across the top of the pot, and slide it under the antler bases to prop them out of the water. If you don’t have one, the rim of the pot can also work. This does mean the crown of the skull will be out of the water, so here comes the hard part. For the next two to four hours, your ONLY job is to ensure the water stays at a rolling boil, refrain from taking the skull out to examine it (if you’re lookin’, it ain’t cookin’), and every 10-odd minutes, spend about two minutes ladling water onto the uncovered portion of the skull to loosen the meat up there.
Boiling done, remove the skull and immediately get at the eyes and roof of the mouth (if you’ve not already removed it) with pliers and a sharp knife. Next, removed as much skin and meat as you can from the base of the antlers. This is some of the hardest material to cut away, as it latches to the base of the antler, so you’ll benefit from attacking it while its still hot. Slit in a downward motion, fully severing the band of skin, and try to peel it back like a wrapper. Repeat as many times as necessary until its clean. Finally, with some needle-nose pliers, pull out some of the brain from the cavity opening in the back. You won’t get it all, but don’t worry. That part comes next.
Pressure Washing Once upon a time, I used to just boil and slice at skulls, in quite possibly one of the longest processes known to man. No longer. Fire up your pressure washer, put on a medium-strength nozzle, and watch the newly softened meat completely disappear from your skull. As this, obviously, will blow the skull around quite a bit, I like to secure it by using a wooden pallet as a base, and sticking the antlers in between the boards. When trying to get the top (be mindful not to hit the antlers), I wedge it against the side of the pallet. To finish off the brain tissue, spray the pressure washer directly into the brain cavity-it will wash all the material right on out, and will not damage anything internal. Take extra care around the nose bones. While I have never seen water pressure break one, I have seen it jar the skull so much that they snap off against the ground. Make sure your skull is very secure before you move to their cleaning. Finally, scrubbing with a wire brush can take care of any stubborn bits left hanging on at various points around the skull.
Sometimes, if you skimped on the boiling (or if you didn’t heed my warning about taking the skull out and looking at it every quarter hour-don’t ask me how I know), you’ll need a reboil and a rewash. Don’t worry-as long as you keep it to a rolling boil as before, the extra time in the water still won’t damage anything, and it will likely only need an hour or so this time. If your skull is looking convincingly clean, however, it’s time to whiten, fix any blemishes, and mount. For how to do that, tune back in next week! (But go ahead and order yourself some 40 or 50 volume hydrogen peroxide in the meantime).


