Home Blog Page 81

Walther P22 Review [Hands-On]: Perfect Rimfire Trainer

0

.22LR is not only great for plinking, but a great introductory round for new shooters.

I originally bought the Walther P22 to teach my wife to shoot, and after thousands of rounds, and plenty of new shooters…I can say that it is a near perfect training pistol.

It has tons of features found on more expensive guns and with relatively affordable .22LR ammo, the P22 can be a no-brainer buy. Read on to see if it fits your purpose!

Features and Specs

Key Specs

  • Caliber: .22LR
  • Capacity: 10+1 rounds
  • Barrel Length: 3.42 in
  • Overal Length: 6.3 in
  • Width: 1.1 in
  • Height: 4.5 in
  • Weight: 17 oz
  • Frame: Polymer
  • Grips: Textured polymer

Key Features

  • Interchangeable backstraps
  • Windage adjustable rear sight
  • Captured recoil spring
  • Double action/single action trigger
  • Threaded barrel
  • Ambidextrous mag release and slide safety
  • Has 2, 10 round mags
  • Safety: manual external, fire pin block, mag disconnect
  • MSRP: $339

More information can be found at Walther.

Pros & Cons

+Great training tool for higher caliber pistols+Can be easily threaded for a suppressor+Super light recoil+Comfortable grips+Ambidextrous controls

-Cheap feeling sights-Gets dirty easily but that’s .22LR

Background

The Walther P22 was one of the original semi-auto .22LR handguns and has been satisfying shooters since 2002.

The latest generation is now called the P22 Q and comes in a bunch of colors and variants.

Walther P22 Q Variants

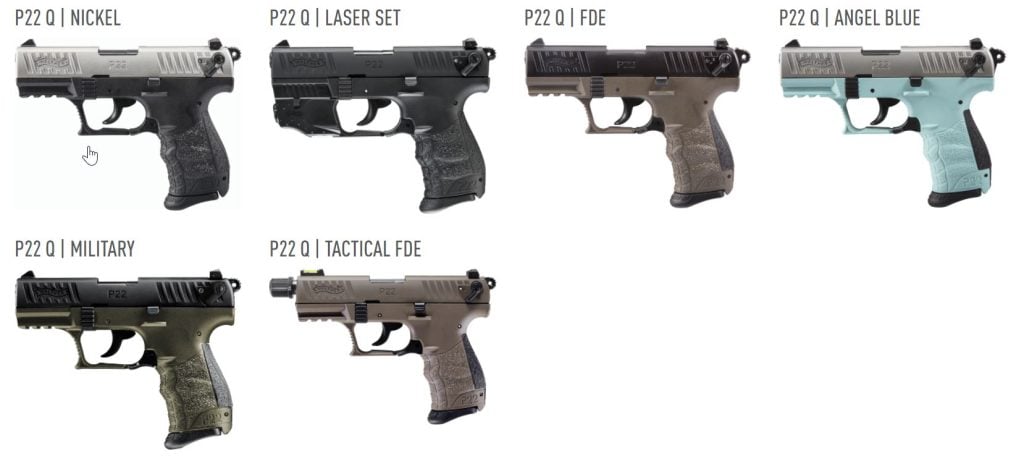
We love how there’s now threaded versions and also versions that come with a laser.

Fit & Feel

The P22 is a solid handgun that has the fit, finish, and features of a much more expensive gun. A lighter polymer frame is the perfect match for the softer shooting .22LR caliber.

Walther P22 Side
Walther P22 Side

Barrel

Like most .22LR caliber handguns, the P22 has a fixed barrel design so takedown is a bit different than most full-sized guns, but the additional steps are straight forward.

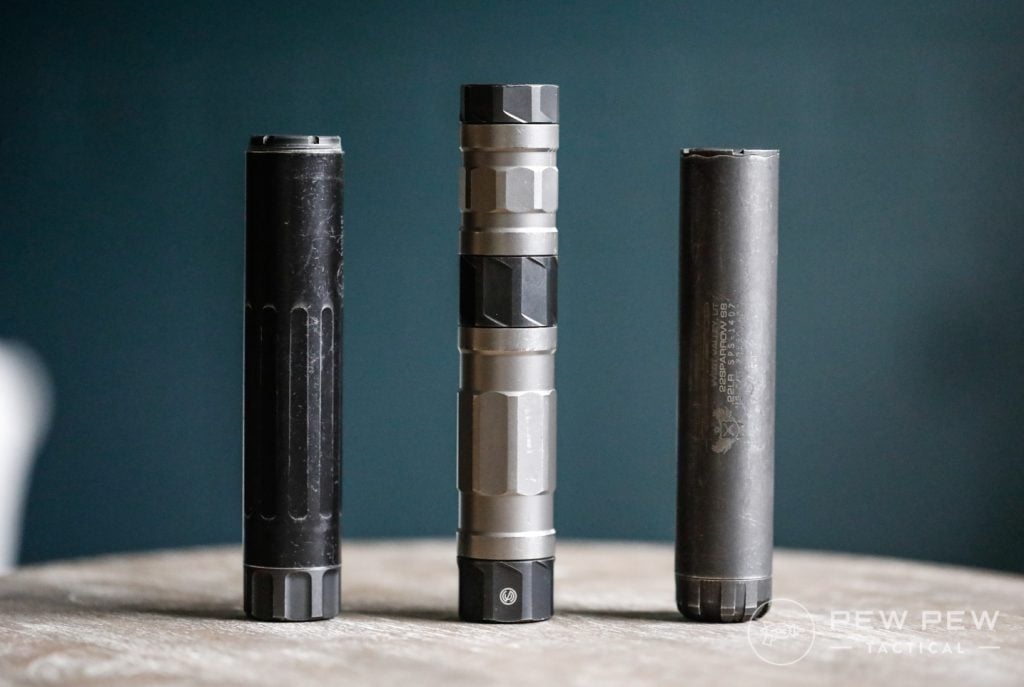
A nice feature of this barrel nut is that an adapter is all that’s required to convert your barrel to a threaded barrel version if you live in a state that allows silencers.

Even though it is fixed barrel, cleaning the barrel is easy as it removes quickly with the supplied wrench, or if you choose, you can simply clean it while it remains attached to the frame.

Need some inspiration for a .22LR can? Check out our Best Rimfire Suppressors article.

Best .22 Suppressors

Slide and Frame

While this is a budget-priced gun, it does come with some features not normally found on lower priced guns.

A serrated slide for better grip makes the slide more easier to work, even with sweaty or wet hands. Even the hammer has serrations for added grip!

A loaded chamber window isn’t what most would consider critical, but it is a nice feature that doesn’t get in the way and gives you a simple way of seeing what condition your firearm is in.

Under the slide, you’ll find an accessory rail to mount lasers and lights on making for some nice options.

The magazine release and safety levers are ambidextrous but the slide stop is still built for right-handed shooters.

I’m also not a huge fan of the safety lever on the actual slide, but it is engineered well, and easily accessed by my thumb without having to change my grip.

It also has a very positive feel so you know when you’ve placed the P22 in fire or safe mode.

Grip

Make no mistake about it, this gun is small, and therefore, the grip is also thin and small.

Finger grooves line the grip which is a nice texture; not too rough on contact but provides good grip.

Walther P22 Grip

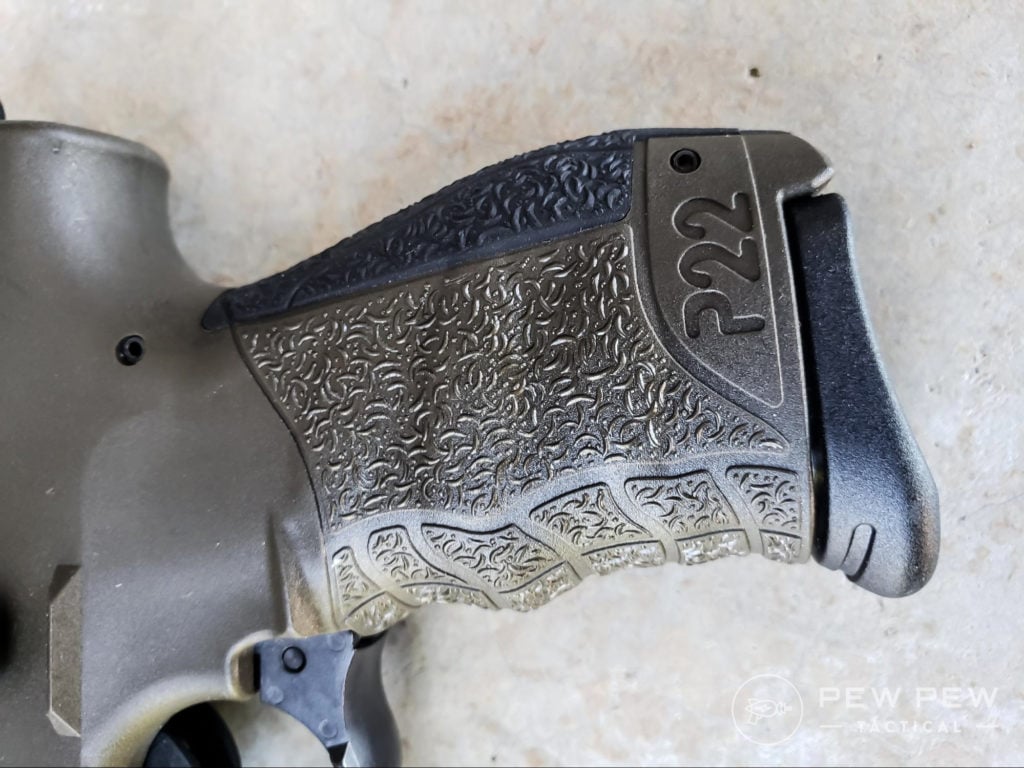
Out of the box comes an additional back-strap to better fit larger/smaller hands.

Most of the time, a very thin profile gun means an uncomfortable grip, but there are two things working in the P22’s favor…

First, the P22 comes with ergonomic panels, and second, .22LR is a such a low recoil round that the thinner grip doesn’t create the hand fatigue a larger caliber might.

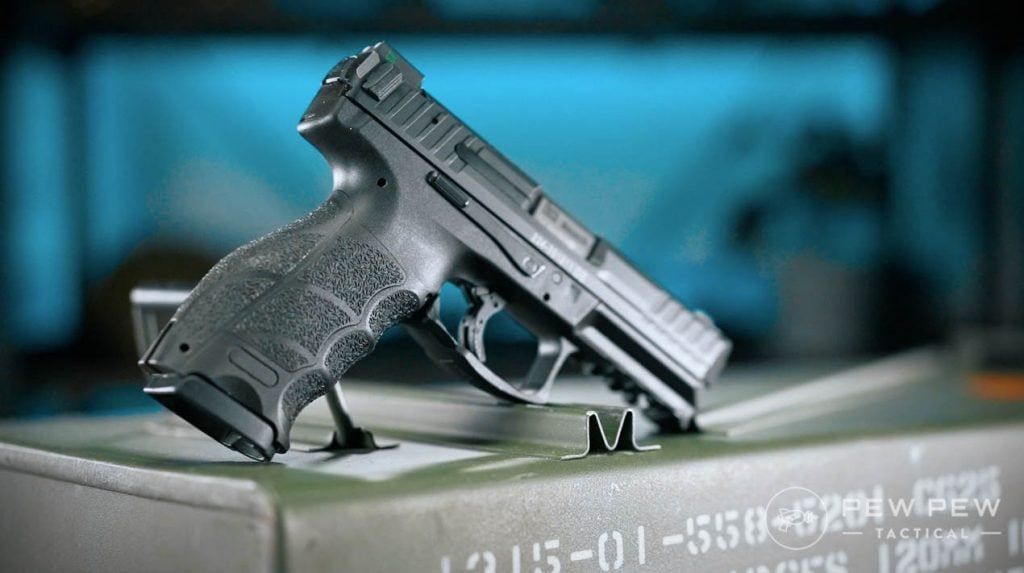
I find the grip is similar to the HK grip on the P30 or VP9 and it is straight up comfy. For my medium sized hands, I love how snug the gun feels.

HK VP9
HK VP9 Grip

What’s even better is that my wife, who has small hands, loves the feel of the grip and overall gun.

Trigger

The action is a DA/SA with a manual safety. You have the mechanical safety on the slide, but the P22 also includes a magazine disconnect safety which prevents the trigger from being pulled unless there is a magazine in the gun.

Newer P22s also have a safety de-cocking feature that allows you to safely drop the hammer using the manual safety.

The DA/SA action is predictable but some may find the 11lb DA pull undesirable, but most of the time you are shooting it in the light 4lb SA stage.

Sights

For me, the only thing that feels “cheap” on the gun is the fact that it comes with what dot polymer sights. While this is good enough for range use, they are no one’s favorite sighting system.

How Does It SHoot?

I have never had an issue shooting different ammo types in the P22, but I have seen that a lot of P22 users claim that their handgun is picky on ammo.

Most agree that higher powered rounds don’t have issues.

Federal ammo is the ammo I consistently run through my 22lr guns and I have always had great success.

Yes, there have been some rounds that stove-pipe or FTE, but I think that is to be expected in any 22lr gun.

I feed by P22 a steady diet of 36 grain Federal, 40 grain Federal Target, and 40 grain CCI.

Sub-sonic ammo will definitely be unpredictable as it the right might not have enough power to cycle the slide.

Keeping the gun clean is definitely important in keeping jams to a minimum. I try to clean my P22 frequently, especially the feed ramp and slide rails.

Walther P22 and Magazine

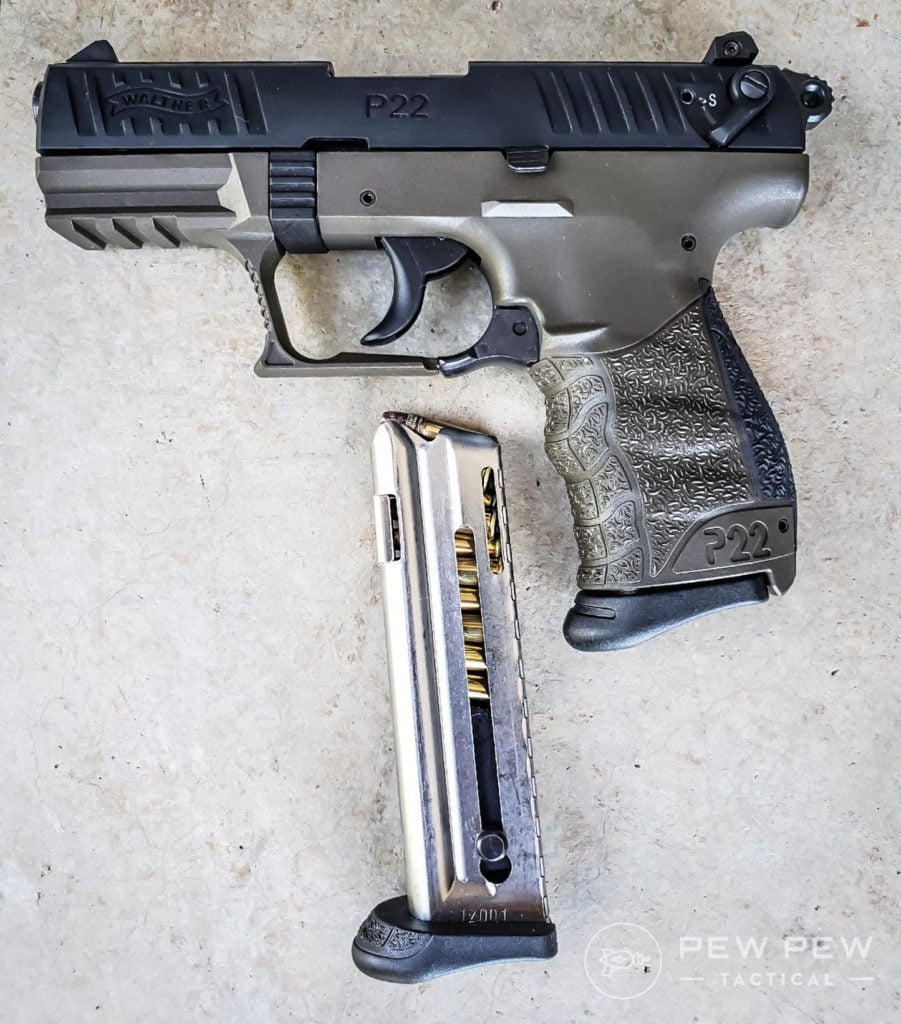
The P22 magazines are metal but pretty thin. Don’t expect these to stand up to too much abuse – thankfully, extra mags won’t break the bank.

Accuracy

My view of .22LR ammo changed after I took my first Appleseed rifle marksmanship clinic. While this doesn’t have anything to do with the P22, it does have everything to do with the round it shoots.

I showed up to the Appleseed clinic with my stock Ruger 10/22 (with a trigger upgrade) and bulk Federal ball ammo (not match, not high velocity). 1” Targets were set back 25 yards and was told to put 5 rounds inside the target with iron sights.

After balking and then realizing they were serious, I definitely cried some internal tears. But by the end of the clinic, not only was I able to do this (shooting prone), but I left with complete confidence in the accuracy of the .22LR round.

With the P22, it is accurate enough to make shooting enjoyable. We are not taking it to target competitions, but making my steel silhouettes ring is easy and a ton of fun.

I would estimate it at 2MOA if you’re doing your thing.

My wife, who doesn’t shoot nearly as much as I do, is able to comfortably put shots on target. This is due to several factors, which include grip comfort, the light weight of the gun, and the lack of recoil and sound.

Recoil

Anyone who has shot .22LR knows that the recoil is minimum.

Even in higher velocity rounds, it is still extremely manageable, making follow-up shots easy and accurate, especially since subsequent shots are single action with the lighter trigger pull.

What Sets It Apart?

For a while the P22 was the go-to semi-auto .22LR pistol out there. Now you have some competition with the Glock 44, Taurus TX-22, and the Sig Sauer P322.

Glock 44 .22LR
Glock 44 .22LR

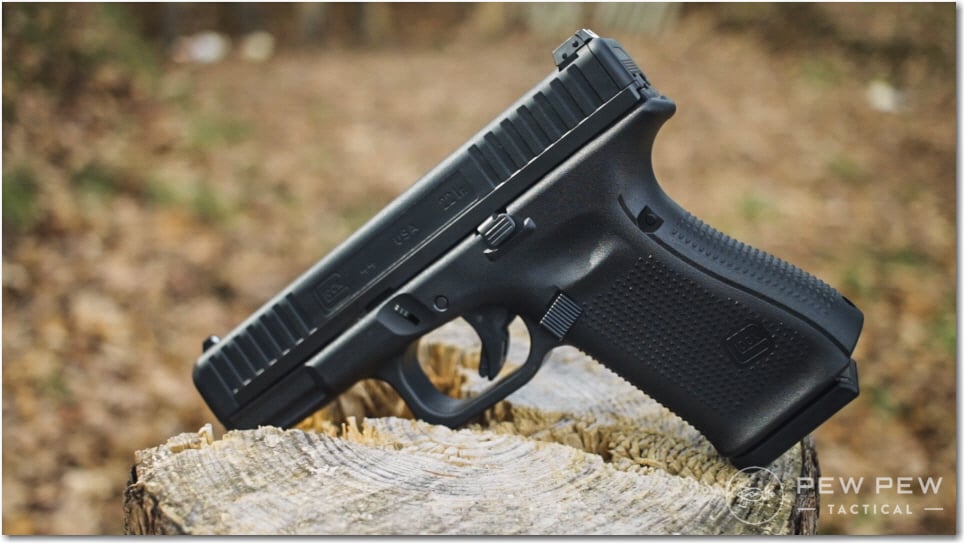
Though the TX-22 and Sig Sauer hold more rounds, the P22 can still hold its own based on ergonomics and reliability.

Takedown for cleaning, since you’ll be doing a lot of it, is easy with this tutorial:

By The Numbers

Ergonomics 4/5

The P22 is extremely comfortable, offering some customization of the rear grip panel. With a thin gun width, it is very comfortable to hold with both hands. All of the functions of the handgun (safety, magazine release, slide stop, trigger) are easy to manipulate and many are ambi.

Accuracy 4/5

For having a fun day at the range, it does it perfectly. There is a target barrel that can be purchased which is a longer 5” barrel, but the shorter 3.42” barrel is plenty accurate for plinking.

Reliability 4/5

.22LR handguns get dirty, and it is true that these P22s need to be kept clean (like any other .22LR handgun). If you allow it to get dirty, you may begin to experience issues. I am notorious for not cleaning my guns often and I do notice it with my P22, mostly because of how dirty .22LR ammo is.
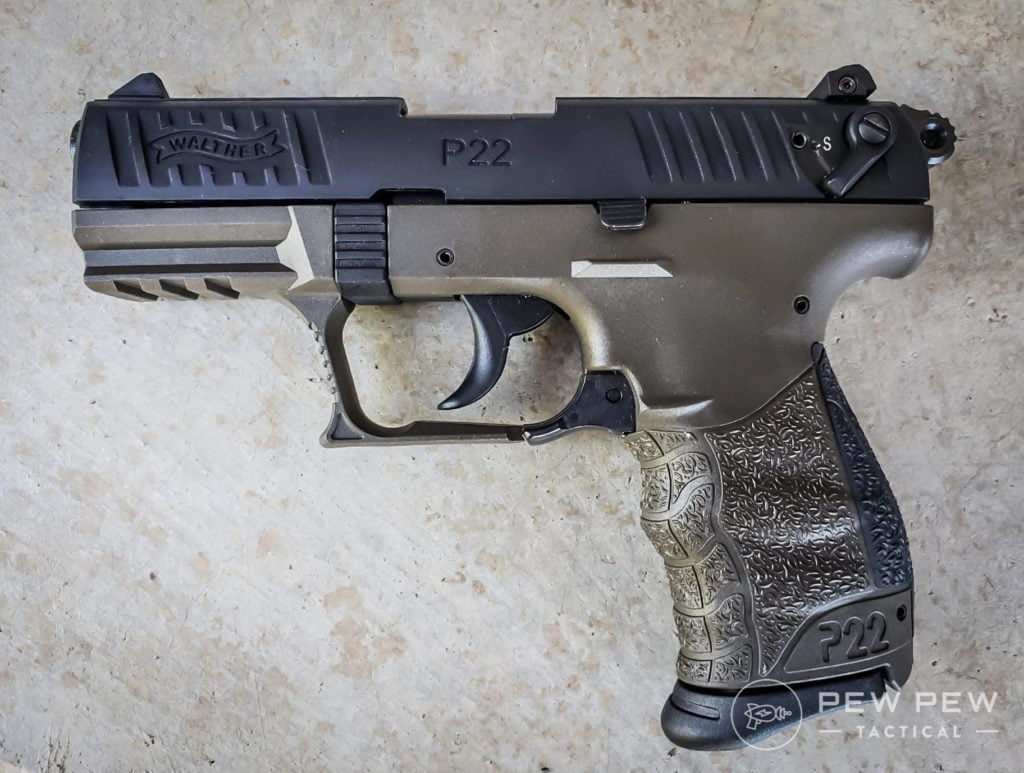
Looks 5/5

For a .22LR, I think the P22 looks the best. Besides the fact that it is a small gun, it looks impressive. You can get the P22 in a variety of colors/configurations.

I love the military color scheme on my P22! The serrations on the slide with the Walther marking looks sharp with the grip stippling an attractive functional and beautiful addition as well.

Upgrades: 4/5

There isn’t a huge selection of upgrade parts but there is a decent amount, most of them made or sold by most retailers. Having an accessory rail means that you can fit lights and lasers (or knives) on the end of the handgun

Price/Value 5/5

The price is hard to beat! A fraction the cost of larger caliber handguns, the P22 is affordable, allowing you to invest your money into ammo and accessories. For the features it has, I believe it to be one of the best values on the market.

Overall 4/5

I love the P22! There is something special about this lightweight, feature-packed gun. My friends love to shoot it and many have made their own P22 purchase after shooting mine.

It is so much fun to shoot and is great to teach friends how to shoot. Walther hit a home run with this gun and jammed something amazing into a perfect little pistol.

Upgrades

You’ve got a rail up front so you can always add a light…our favorite go-to is the TLR-1 HL series.

And like we mentioned above…if you want to suppress the P22 all you need is an adapter kit.

And you can always do with extra mags with all the lead you’ll be slinging downrange.

Verdict

This Walther P22 is just plain fun. How else can you send thousands of rounds down range without worrying about ammo cost?

The best part is not having to compromise comfort or features for that cheap and fun range experience.

I can say from experience that the P22 is pure gold with plenty of features, accuracy, and comfort!

How do you like your P22? Got another go-to 22LR plinker pistol that you love? Let us know in the comments! If you’re ready for a rifle to go with your pistol, take a look at the Best .22LR Pistols!

Ruger Buckmark with Banish 22

The 6 Best Walkie-Talkies You Can Buy Today

0

We all love our mobile phones, but we appreciate their limitations. While your phone could serve you well in the city, it might prove inadequate when you go to the wild, where mobile coverage is limited. In addition, most mobile phones cannot withstand the adversities of the elements — rain, ice, snow, and scorching sun could destroy your delicate mobile device.

When you have to operate in areas with inclement weather, the best way to keep in touch with family and friends is by using a walkie-talkie. Walkie-talkies are known for their hardiness. While some of these gadgets have limited features, others are created to stand up to the most adverse weather conditions — you’ll find walkie-talkies that operate perfectly in rainy and snowy conditions.

Some walkie-talkies have outstanding battery life and a great range. Moreover, with your handheld radio, you can talk to groups of people simultaneously. This is a matter not to be trivialized, as you can imagine what would happen if you went for a mountain adventure and then lost contact with a colleague — your walkie-talkie could be the only way to find out where the lost colleague is.

Today’s market is awash with thousands of different walkie-talkie brands and when you go shopping, you might be overwhelmed by the diverse choices. To help you make the best purchase decision, we have compiled the following list of the 6 best walkie-talkies you can buy today.

  • Best Overall: Motorola Talkabout T800
  • Best for Winter Activities: Backcountry Access BC Link 2.0
  • Best Walkie-Talkies for Hunting: Midland X-talker T10
  • Best Budget Option: Motorola T600
  • Best Range: DEWALT DXFRS800
  • Best-Looking Walkie-Talkie: Cobra ACXT645

Best Overall: Motorola Talkabout T800

When you go hiking or camping in remote areas with no cell phone coverage, the Motorola Talkabout T800 could be your best companion. The radio boasts a range of up to 35 miles and, depending on the terrain, this gadget will keep you connected when your cell phone fails.

Communication using the Motorola Talkabout T800 is clear and interference-free as the radio has 22 channels and 121 privacy codes. Its built-in flashlight makes it ideal for nighttime activities.

Moreover, the T800 is designed to be waterproof and dustproof, with an IPX4 rating, which means that it can withstand splashing water from any direction. The radio will come in handy during emergencies as it enables you to ask for emergency assistance using its emergency alert button.

The Motorola Talkabout T800 operates on FRS and GMRS frequencies and has a maximum power output of 2 watts. It also comes with a rechargeable battery that provides up to 10 hours of continuous use. Courtesy of its in-built Bluetooth feature, you can pair it with a smartphone, enabling you to communicate with your team even when they are out of range.

For a radio with a host of great features, the Motorola Talkabout T800 is also competitively priced. The price, together with its long battery life, high durability, and emergency features makes the Motorola Talkabout T800 the best overall walkie-talkie you can buy today.

Check out the Motorola Talkabout T800 on Amazon.

Best for Winter Activities: Backcountry Access BC Link 2.0

For lovers of backcountry skiing, the aptly named Backcountry Access BC Link 2.0 is the two-way radio to go for. With a six-mile range and operating on FRS and GMRS frequencies, the Backcountry Access BC Link 2.0 ensures clear and strong communication even in remote areas.

One of the most notable features of the BC Link 2.0 is its Smart Mic, which is equipped with push-to-talk functionality and allows users to control the radio without having to remove it from their packs. The device also has a large LCD display making it easy to read and navigate through the menu options.

Made for the harsh outdoors, the BC Link 2.0 has a waterproof rating of IP56 and its rugged construction means that it can handle drops and impacts without breaking down. It has a rechargeable lithium-ion battery that provides up to 12 hours of continuous use to help you stay connected through long trips.

For its durable construction and user-friendliness, the Backcountry Access BC Link 2.0 is one of the best walkie-talkies that you can buy today.

Check out the Backcountry Access BC Link 2.0 on Amazon.

Best Walkie-Talkies for Hunting: Midland X-talker T10

When you’re going hunting and are not certain about how the weather will behave, bringing the Midland X-talker T10 with you would be a great idea as the radio is designed to alert you about adverse weather conditions in your location.

It’s not surprising then that this radio is beloved by hunters and other outdoor enthusiasts who operate in areas of unpredictable weather. The X-talker T10 has 22 channels which allow users to communicate with others who are using the same channel.

Additionally, the radio has 38 privacy codes, which help to prevent interference from other radio users. Boasting a range of up to 20 miles, this radio is ideal for use in remote areas.

Its backlit display helps you operate optimally in low-light conditions, and its 26-hour battery life means that you can continue with your activities for a long time away from a power source. A reasonably priced product, the Midland X-talker T10 is also highly portable as it weighs a mere 3.9 ounces and stands 5.5 inches tall.

Check out the Midland X-talker T10 on Amazon.

Best Budget Option: Motorola T600

When you require a high-performing two-way radio at an affordable price, you can’t go wrong with the Motorola T600. Meant for outdoor enthusiasts, this is a durable and waterproof gadget that you could take with you for hiking, camping, or on construction sites.

The Motorola T600 has a range that can reach up to 35 miles, depending on the terrain and weather conditions. This makes it ideal for use in remote areas where cellular reception is not available. The radio comes with NOAA weather alerts, allowing users to stay updated on severe weather conditions in their area.

A highly durable product, the Motorola T600 is IP67 rated, meaning that it is waterproof and dustproof, making it ideal for use in all kinds of weather conditions. In addition, it has a built-in flashlight for use in emergencies.

The T600 also offers a number of other useful features, such as 22 channels, 121 privacy codes, and a keypad lock. The radio is compatible with other FRS/GMRS radios, making it easy to communicate with other users who may have different types of radios.

Priced at $98.99 on Amazon, the Motorola T600 is a budget product because it has features that you would normally expect to find in pricier radios. This makes it one of the best walkie-talkies you can buy today.

Check out the Motorola T600 on Amazon.

Best Range: DEWALT DXFRS800

One of the most outstanding features of the DEWALT DXFRS800 is its range. At about 300,000 square feet, this is one two-way radio that has an astounding range and, conditions allowing, would be ideal for large-scale projects.

The use of the DEWALT DXFRS800 ensures secure transmission thanks to its 22 preset channels and 121 privacy codes. The radio also features a bright backlit display and a keypad lock to prevent accidental button presses.

This walkie-talkie is a durable product that will withstand harsh conditions. It has an IP67 rating for water and dust resistance. It is also designed to meet MIL-STD 810 standards for shock resistance. This means that it can withstand drops and impacts without getting damaged.

The radio also comes with a belt clip and a rechargeable battery that can provide up to 18 hours of talk time. While it’s pricier than other two-way radios on the market, its long battery life, durability, and range make the DEWALT DXFRS800 a worthy investment.

Check out the DEWALT DXFRS800 on Amazon.

Best-Looking Walkie-Talkie: Cobra ACXT645

With Bluetooth connectivity, the Cobra ACXT645 is a two-way radio that can be connected to smartphones. This way, the walkie-talkies ease communication in remote areas. The radio has a GPS tracking mechanism to assist users who might be in distress. It’s, therefore, a great companion for outdoor activities in the wild.

It has a range of up to 35 miles, making it easy to communicate with others even in remote areas. The radio has 22 channels, including 10 NOAA weather channels that provide real-time weather information.

The radio’s weather alert function ensures that you are always aware of any severe weather conditions in your area. This is essential for outdoor activities. To help you continue activities in low-light conditions, the radio has a built-in LED flashlight.

The radio has a rugged and durable design and a water-resistant exterior to ward off light rain. Thanks to its in-built VOX feature, you can use the radio hands-free. This feature is particularly useful when you are engaged in activities that require your hands, like rock climbing.

In terms of battery life, the Cobra ACXT645 has a rechargeable battery that lasts for up to 12 hours. It also has a battery saver mode, which helps to conserve battery life when the radio is not in use.

The radio comes with a micro-USB charging cable that allows you to charge the battery easily. At 5.1 ounces and available in Black and Orange, this radio is both portable and quite good-looking.

Check out the Cobra ACXT645 on Amazon.

How to Pick the Best Walkie-Talkies: Step by Step

Given the vast diversity of features in the walkie-talkies available on the market today, there are some considerations to take into account to acquire a gadget that will serve you well. The most crucial factors to consider include:

Range

When you’re out hiking with friends, you need a handheld radio that covers a wide enough range to make sure that you stay in touch. While the figures advertised on some products tend to be rather huge (over twenty miles, for example), the reality on the ground is quite different.

Owing to obstructions from rocks, vegetation, and even weather changes, the range of your walkie-talkie could be highly limited. One sure way to increase the range of your gadget is to opt for a walkie-talkie with a long antenna.

While some of the gadgets with long antennas might have limited power, this might be the trade-off you could be forced to consider if the range is important for your activities.

Battery Life

When you’re engaging in activities that take you away from a power source, you want to have a walkie-talkie with substantial battery life. A gadget with a good battery might cost you a lot upfront but, in the long term, it saves you money since you will spend less on batteries.

While good battery life is important, if you end up with a walkie-talkie with limited battery life, you should consider investing in an alternative powering solution, such as a power bank or a solar panel, that you could take with you when you spend substantial time away from a power source.

Waterproofing

When you engage in activities in the wilderness, there is a very high chance that your walkie-talkie will be exposed to some form of a water hazard. For this reason, you want a gadget that’s fully waterproofed.

Waterproofing is a critical measure of a walkie-talkie’s durability and failure to obtain a gadget that meets this requirement might mean that you’ll need to replace your walkie-talkie sooner than you expected.

The best way to find out whether a walkie-talkie will meet the required durability requirements is by looking at its IP rating. Ideally, you should opt for a radio with a high IP rating.

Portability

While your walkie-talkie performs the critical function of keeping you in touch with colleagues and the outside world, its usefulness will be determined to a considerable degree by its portability. When a walkie-talkie is too heavy, moving around with it could prove inconvenient and tiring and it helps to invest in a lightweight gadget.

Sound Quality

There are organizations that use walkie-talkies to enable communication between groups of workers in different locations. Should that be the case, you want to ensure that the communication between the groups is perfectly clear by investing in gadgets with high sound quality.

And while your walkie-talkies could have been serving you well in the past, should you notice that they have lost their clarity, it might be time to conduct some maintenance. If your radios are not cleaned regularly, the speakers and microphones could be stuck with dust and debris, and cleaning them could improve communication.

What to Know Before Buying the Best Walkie-Talkies

Your walkie-talkie is an important investment that could serve you well for many years. For some organizations, normal operations might be greatly hampered without the use of these gadgets and this will adversely affect the organization’s bottom line.

Given the crucial role that these gadgets play, it’s important to realize that the walkie-talkies you buy will need regular maintenance if you want them to remain in tip-top condition for a long time. Neglected and abused, walkie-talkies break down prematurely, and depending on the number of gadgets you have, replacement costs could be crippling.

Before parting with your money for a walkie-talkie, it’s also important to note that there are countless brands on the market and that some have better reputations than others.

While products from the big brand names might look expensive, these are products that have been tried, tested, and trusted for generations and you’re therefore safer with products from companies such as Motorola, DeWalt, and the others we have reviewed above.

Using the Best Walkie-Talkies: What It’s Like

While the walkie-talkie is a crucial gadget, your experience with it will ultimately depend on how well you use it and how much routine maintenance you give it. Should you experience poor reception from your gadget, before seeking help from a technician, you first need to confirm that you’re positioning your walkie-talkie properly.

Are you, for instance, holding your gadget upright? When you try to communicate with a walkie-talkie that’s lying on a flat surface, you limit the radio’s signal; hence, the poor reception.

Damaged or improperly attached antennas could also distort communication. Should your troubleshooting efforts identify a broken antenna, replacing this critical part of the radio might be the only option. In many situations, walkie-talkies are life-saving gadgets.

When you’re out in the wild and can’t physically locate a colleague, this precious gadget could be your only hope. In some workplaces, people work alone. For the management to be confident that these workers are safe, they rely on walkie-talkies.

Two-way radios have advanced safety features that enable the lone worker to send emergency messages. Moreover, in an emergency, GPS tracking can be used to locate a missing person.

The image featured at the top of this post is ©Kabardins photo/Shutterstock.com.

Best Binoculars for Hunting Out West

0

The best binoculars for hunting out west have a higher magnification as well as a list of other qualifications to help you spot more elk, antelope, or mule deer.

Years ago I had the good fortune of going on my first elk hunt at the NRA Whittington Center in northern New Mexico. I’d been sent there by my then-employer Sporting Classics magazine to cover the Center’s 40th anniversary. The hunt was a bonus.

Thinking back to the preparation aspect of the trip, there was a lot of discussion about the rifle and the ammunition. Some of the senior editors who’d been on many successful western hunts even suggested boots and clothing layering systems. They also stressed the fact that I’d enjoy myself much more if I went into the hunt with strong lungs and legs. But I can’t for the life of me recall a single discussion on optics.

I guess it was already assumed that I had a scope on my rifle that was “good enough.” And since binoculars were never mentioned and I didn’t know any better, I headed west with the 8x I use to deer hunt in the thick eastern hardwoods. Needless to say, they didn’t perform well, mostly because the magnification was too low. Here is what I learned from that trip and several subsequent adventures about what makes up the best binoculars for hunting out west.

Best Binoculars for Hunting Out West

High magnification binoculars are a critical part of a successful hunt.

Best Binoculars for Hunting Out West

First and foremost, the best binoculars for hunting out west have long-range performance with a wide field of view that allows you to pick out well camouflaged animals in vast terrain must be built into the binocular. My guide at the Whittington Center had an extra 10x binocular that he allowed me to use during the hunt. And while 10x definitely works, I’d get my hands on the more optimal 12x binocular.

Out on the plains, high magnification in your binocular can be the difference between putting a lot of time and energy into stalking a 65-inch pronghorn rather than a world-class 80 incher. You ought to be able to define the characteristics of the animal before making the decision to go after it. Only a binocular with high magnification will allow you to do that.

Great Low Light Performance

It was warm for October in northern New Mexico. The first three days we didn’t see many elk. The ones we did spot were at the edges of the dark timber at first light and last. This is why you need a binocular with great low-light performance. Whether you’re considering a 10x or 12x, go for a 50mm objective lens. The combination of superior light-transmitting glass and a larger objective lens will allow you to pick up more animals as they move between feeding and bedding areas at dawn to dusk.

Ruggedness & Weather Resistance

Ruggedness and weather resistance will always be high on the list of most important factors when it comes to the best binoculars for hunting out west. The western terrain is tough, so your equipment should be too. In the mountains, especially in the fall, the weather changes every hour. It’s not an unusual occurrence to watch a snow storm blow through a warm, sunny day at 8,000 feet. A binocular that’s both water and fogproof with argon gas and sealed with o-rings will provide you a tool that will function in all conditions.

A binocular built with a magnesium alloy body is about as durable as it gets. Wrapped in rubber armor and your glass is protected even if you slip and fall right on top of them. Oftentimes, the terrain is steep and footholds uncertain. Especially in the heat of the moment when you’re trying to get set up on a big bull or buck.

Lightweight

Magnesium alloy is also super lightweight, which allows you to hold the binocular steady for longer periods of time. While we’d always suggest using a harness to evenly distribute the weight when you’re spending days in the woods, a lighter binocular won’t hurt your neck or traps in the event you’re having to move quickly over rough ground.

Tripod Adaptable

When you’re hunting out west, plan on spending a lot of time behind the binocular. There is the element of luck that puts you in range of an animal on the first morning. But most often, at least one or two days are devoted to scouting and glassing. Using a quality lightweight tripod along with a binocular tripod adapter will take stress off your body and allow you to glass for extended periods of time. And there is the “human tripod,” described by TRACT co-founder Jon Allen, where you sit as low as possible, move your hands to the ends of the objective barrels, and pull your elbows into your chest. A solid foundation and less shake will allow you to see more game more often.

Best Binoculars for Hunting Out West

Glassing with the TORIC 12.5×50 mounted on a tripod helps you cover a lot of ground efficiently.

Hunting in the west is usually quite the adventure. There are so many animals, birds, trees, and landscapes that make having the best binoculars for hunting out west worth your while. These things you’re able to see well will remain ingrained in your memory for years to come.

If you need help choosing the perfect binocular and accessories for your hunt out west, please contact us at:

Email: [email protected] Phone: 631-662-7354 LIVE Chat: tractoptics.com

Gamo Coyote Review

0

Since Gamo is known for their excellent quality air rifles, we decided to get something in the mid-level range, which was the Gamo Coyote SE!

This gun is extremely accurate, but I especially like their unique design which makes shooting fun and comfortable.

For a mid-level air rifle, it surely delivers and can be used in many shooting situations.

So what makes the Gamo Coyote PCP Air Rifle such a worthy investment? Read on to find out!

Ultimate Gamo Coyote – Guntype

This is one of the cheaper air rifles for its range and accuracy, coming in cheaper compared to those with similar specifications.

It’s consistency makes it a great investment in the competitive market of air rifles today. It is one of the best PCP air rifles for the money!

gamo coyote review


This gun is a pre-charged pneumatic bolt-action air rifle with a multi-shot mechanism.

It’s a great choice since they’re ready to be shot after pulling the trigger.

Pre-charged pneumatic (or PCP) are guns that utilize high-pressurized air in the chamber,

Which gives off up to 4,000 psi when filling it through hand pumps or scuba tanks.

What’s great about a PCP is that it is recoilless and still offers the highest accuracy and power that you’re looking for.

Furthermore, it requires little cocking effort and is best when using large-caliber pellets .

The Gamo Coyote is more advantageous than the spring-powered or gas piston,

Which requires more practice in cocking and has difficult-to-find parts.

(For more on the 5 types of air rifles you need to know before buying, see this post.)

Stock

One of the things I love most about the Gamo Coyote SE is its looks.

It takes on the Coyote’s traditional looks but with improved design, having the well-finished wood stock and a quality rubber buttstock.

The wood stock may be chunky but it should still be appreciated for its construction all the same.

While some people like synthetic stocks for the designed grip, wood provides a more traditional feel

And actually increases the accuracy with its natural weight and material.

(For more on the in-depth comparison between synthetic and wood stock, see this post.)

Because it’s compact and easy to hold, it’s easy to shoot.

It also has the ambidextrous stock with checkering, making consistent holding a treat.

So regardless of your dominant hand, you’ll be able to adjust it for an accurate shot.

Ammo

The Gamo Coyote offers the ability to house three different calibers: 0.177, 0.22, and 0.25.

(For more on how to choose the right air gun caliber for your game, see this post.)

This air rifle uses 10-shot magazines that are easy to load, though you can also use single-shot adapters if you want single loading.

Its bolt action functioned without issues throughout my test, which improved the bolt operation and my shooting experience.

gamo coyote ammo


You’ll enjoy shooting with this air rifle because of its comfort and excellent accuracy.

And although this gun has a sleek design and compact size, it is surprisingly heavy when compared with other air rifles!

Just like other high-power air rifles, this one isn’t best used with lightweight pellets.

It gives off better accuracy and high muzzle energy when using mid-weight to heavy lead pellets.

The accuracy of the Gamo Coyote was most consistent when using mid-weight pellets made by another manufacturer.

With that being said, being able to use non-Gamo pellets is a huge plus .

This makes purchasing pellets more accessible and convenient.

You still get the best speed and accuracy even when using other pellet types, so long as they fit the mid-weight or heavier weight range.

Again, I don’t recommend using pellets with lighter weights!

Velocity, accuracy and power

The Gamo Coyote’s design is not just for looks.

Because it is a regulated design, the design actually improves muzzle velocity

And provides a greater accuracy potential when shot in longer ranges.

The Gamo Coyote offers a muzzle velocity of over 1,000 FPS when using lightweight PBA pellets.

With lead pellets, it can achieve a 960 FPS muzzle velocity.

For example on the 0.177 caliber, and depending on the pellets you use, it has a power of up to 40 FPE and a velocity that reaches 1,345 FPS.

gamo coyote specification

As for its consistency, the Gamo Coyote was superb, with a trigger pull weight that averaged two pounds and only varied by one ounce!

The accuracy was excellent when using mid-sized pellets as opposed to lighter ones.

The gun tested with excellent accuracy goes to the Crosman Premier HP 14.3 Grain, while the only poor test was from the Gamo Raptor Platinum 9.7 Grain.

The Gamo Coyote also offers extreme accuracy for its price range, competing against even costlier air rifles out there.

Its consistency and accuracy are what make it enjoyable to shoot any time, anywhere.

Heavier pellets were able to be shot with consistent accuracy.

This makes the Gamo Coyote one of the most consistent air rifles to date.

My only dislike was using smaller pellets (which I normally don’t like anyway).

Chrony tests give us results as follows:

PelletsFPSFPE
Gamo Raptor Platinum 9.7 Grain (.22)1054.9323.97
H&N Field Target Trophy Green 10.03 Grain (.22)1033.1723.77
RWS Hobby 11.9 Grain (.22)958.1624.26 
Crosman Premier HP 14.3 Grain (.22)901.91 25.83
JSB Jumbo Exact 14.35 Grain (.22)891.8225.34 
H&N Field Target Trophy 14.66 Grain (.22)893.6026.00
H&N Baracuda Match 21.14 Grain (.22)758.3126.99

The Crosman Premier HP 14.3 Grain was by far the best-tested air rifle with the most accuracy.

The only poor test was from the Gamo Raptor Platinum 9.7 Grain. The rest had good to very good accuracy.

the gamo coyote whisper is an excellent purchase for beginners and intermediate shooters

It’s important to note that the Gamo Coyote comes without double feed prevention.

So avoid operating your bold action more than once before you pull the trigger to prevent jams.

The legendary Keith Warren from High Road Hunting used the Gamo Coyote to drop a hog with one single head shot.

Sight

The Gamo Coyote only comes with the scope, but you can choose from a variety of scope styles.

There aren’t any fitted iron sights, though it does have the long scope dovetails which are located on top of the air rifle’s breech.

These dovetails are a great addition since you’ll be able to easily install eye relief requirements and the scope of your liking.

(For more on how many types of air gun sights out there and which one is suitable for you, see this post.)

Fortunately, all PCP air rifles don’t give off as much recoil, so shooting is comfortable and there’s no need to purchase mounts to reduce recoil.

The standardized scope is made with Gamo’s high-quality manufacturing and it surpasses expectations with clear views and easy mounting.

Trigger

Most of Gamo’s PCP Air Rifles come with the Gamo’s Custom Action Trigger, a two-stage trigger that includes manual safety.

With this custom action trigger, you can customize your full-length triggers to fit your shooting expertise preference.

While the instruction manual says your trigger pull weight shouldn’t be under three pounds,

Using it with two pounds didn’t really have any safety hazards.

I still recommend that you keep it around the 3-lb range just to be safe.

Its accuracy is satisfactory, having a lighter pull weight and overall consistent shots.

The first stage was a bit too light though, and I would appreciate it if it had a bit more weight for the first stage.

This lightness wasn’t a huge problem but more of a personal preference.

I love the configuration and highly appreciate Gamo’s original custom action trigger for its customizability!

Loudness

While users report it had exceptionally low noise when shot, this only works with the right accessories and shroud.

Unfortunately, the air rifle comes without a fitted silencer.

It will be pretty loud even with the proper hearing protection.

Shooting Ability

What makes it one of the best PCP air rifles to date is its quality design and compact body, which makes shooting a breeze.

It holds well and you’re able to handle it regardless of your dominant hand and stance.

It’s very compact, having the length almost of a carbine, which makes balancing and handling much easier.


You’ll like holding it without the feeling of clunkiness or hitting anything along the way.

It does feel heavier than it looks, so be wary of this when you want to carry it during long hunting trips!

gamo coyote comes with repeater function

Because of that, I highly recommend the Gamo Coyote for pest control and small game.

With its excellent accuracy, you’ll be able to target, shoot, and hit your aim successfully, using the air rifle for years to come.

(For more on the best air rifle for rabbits, see this post)

Accessories

Besides the scope, it comes with a warranty and instruction manual.

The instruction manual covers all the basics but should be expanded;

It provides only two pages of instructions for each language.

I would appreciate more information on refilling the air rifle and other necessary details.

It also does not come with an adapter for probe connection to refill the tank nor does it come with built-in silencers.

You’ll need to purchase these individually.

Specifications

Here are the key features and specifications the Gamo Coyote has to offer:

• Available in .177,.22 and .25 caliber

• 10rd removable rotary magazine

• Comes with a built-in manometer

• Self-regulated valve

• Ambidextrous stock

• Checkered forearm and grip

• Shock Wave Absorber recoil pad

• Multi-shot mechanism

• Maximum velocity of up to 1,000 fps

• The loudness of up to three-medium

• 10-shot capacity

• Rifled barrel

• No front or rear sighs

• 11mm dovetail scope

• Two-stage adjustable trigger

• Ventilated rubber buttplate

• Bolt-action

• Manual safety

• Pre-charged pneumatic power plant

• Repeater air rifle

• 20 maximum shots per fill

• 153cc cylinder size

• Shrouded

• Best used for small game hunting or plinking

• Barrel length: 24.5 inches

• Overall length: 42.9 inches

• Weight: 7.65 pounds

Warranty

One helpful aspect when purchasing the Gamo Coyote SE PCP Air Rifle is that it comes with a five-year limited warranty from Gamo themselves.

However, they don’t offer spare parts in case there are any repairs or maintenance needed once the warranty expires.

It makes upgrading a hassle and expensive since you have to look for parts compatible with the air rifle.

Customer review

Many customers have raved about the Gamo Goyote’s usability and its shooting capabilities, which are impressive.

Compared to many air rifles within a similar price range, it still has the best accuracy and consistency.

This makes it such an enjoyable air rifle to use in any shooting situation, may it be for hunting small to medium game, or in the shooting range and competitions!

(For more on the best air rifle for squirrels, see this post)

While the Gamo Coyote SE PCP Air Rifle is exceptional and well-known for its speed and accuracy,

There are still some issues users hope will improve in the long run. 

There is one minor design flaw, which is where the pressure gauge is located.

It’s located near the air tube’s end, making it difficult to read immediately.

To assess the pressure gauge you are forced to look down from the muzzle,

Which is fairly uncomfortable and can be a safety hazard if your safety isn’t engaged while checking the levels.

Overall, this gun is a worthy long-term investment since it is built with all-around exceptional accuracy.

This beautiful air rifle will last in the long run. I recommend it to anyone with a moderate budget for the mid-range Gamo Coyote PCP Air Rifle.

Pros and Cons

ProsCons
  • It feels comfortable to shoot with
  • The air rifle has the compact design
  • Offers excellent accuracy even with heavy pellets
  • Solid and durable, built for any shooting situations
  • Big shroud for silent shooting
  • Cycles smoothly without much effort
  • Ambidextrous and easy to switch hand use
  • Easy to adjust the custom action trigger
  • Excellent quality construction made from Europe
  • Power and accuracy superb even from long distances
  • Great for hunting and the shooting range
  • Need to purchase shroud or it shoots loud
  • Doesn't come with sling studs
  • The pressure gauge is located inefficiently
  • Has a difficult probe fill system
  • Moderator is made of plastic, though works okay
  • Compact but a bit on the heavier side
  • Extra magazines come at an expensive price

Price

The Gamo Coyote Whisper is an excellent purchase for beginners and intermediate shooters alike and is priced at $500.

Though it isn’t the cheapest option, it still provides users with great value for their money, offering high-quality European parts and an amazing build.

Furthermore, it comes with a five-year warranty from Gamo to ensure that you’re fully covered in case you experience any issues.

gamo coyote come with excellent accuracy

Additionally, its design is favorable since it comes with well-blued metal parts and a smooth finish.

It isn’t by far the best of all PCP air rifles but is decent compared to others in its price range.

As for me, I highly appreciate its beauty combined with a comfortable recoil factor.

I wish the pressure gauge was located in a better spot. Overall, a worthy investment!

Wrapping It Up

If you’re excited to test out this amazing product, I highly recommend Gamo for your next air rifle purchase.

If you have any questions or want to share your own reviews on the Gamo PCP Coyote, then comment below. Your thoughts are much appreciated.


6 Signs Your Bowstring Went Bad

0

Is there anything worse than lining up the perfect shot and having it miss because you didn’t check your bowstring? When it comes to your bow, it’s the bowstring that will go first. To keep this from happening at the worst of times, you need to know how to tell if your bowstring has gone or is about to go bad.

This article will focus on compound bows, but only because compound bows have more string issues than more traditional bows. This means that, if you’re using a longbow or a recurve bow, then you’ll also be able to find answers about your bowstring in this article because there are six key signs we look for:

Sign 1: Spotting a broken string or cable is a clear sign that your bowstring has gone bad and the only way to fix it is to replace it.

Sign 2: A frayed bowstring isn’t quite broken yet, but it is very close and will negatively affect your shooting experience, you can apply wax in an attempt to keep it together, but it is often best to just replace it.

Sign 3: As the string is pulled back shot after shot, stretching can occur. This is why you need to know how to recognize if you’ve overstretched your bowstring. Your bowstring will need to be replaced more often for stretching if you use it a lot.

Sign 4: As your bowstring gets older, there is a very real chance that it will stop being as waxy as it should be. A dried out bowstring is a sign that your string is going bad.

Sign 5: A bowstring is typically covered in a layer of thread called the serving. When this starts to separate from the string, you have an issue. This can be kept together with some tender care, but it is often a sign to replace your string soon.

Sign 6: Finally, if your bowstring is getting old, then it may be a good idea to replace it anyway because it’s just inviting problems. The older a string gets, the less structurally stable it is, and it is typically safer to replace before use.

So there you have it, six signs that your bowstring is going to need replacing. But if you really want to learn about each of these, then you will need to stick around to read the rest of the article.

Sign 1: A Broken String

This is the easiest problem to spot because it stands out. If you’re using a longbow or a recurve bow, then it will be literally impossible not to spot this problem. A compound bow will be a little different, however.

A compound bow doesn’t just have the main bowstring the way that a longbow does but rather it has quite a few cables that help in firing. These cables are all just as important as your main bowstring and, if any of them have broken, then you will have a hard time firing correctly.

These days, the material used for the strings and cables on your bow are most likely a highly durable fibre. These break less often than classic bowstrings, which had been made either from plants or the hide of hunted animals. However, these new synthetic fibres can break.

When you’re packing your hunting or target shooting gear, before you even leave the house, make sure you check your bow for any broken strings. If you are still new to archery and don’t know everything, you should check on your compound bow, then simply run your finger along each string and cable to see if it is broken anywhere.

Once you get to where you’ll be shooting, go ahead and check the strings one more time. This is a smart idea to do before you start shooting. Plus, if you run the finger test mentioned above, then this habit will also let you catch the next sign of a bowstring gone bad.

Sign 2: A Frayed String

A frayed string is harder to spot than a broken string because a frayed string is still fully connected. However, some part of the string is being rubbed against a solid object, and such can happen where the string meets the bow, or it is simply experiencing too much tension through usage and is starting to fray.

While a bowstring is made out of lots of fibres, they are worked into a string because each individual fibre isn’t very large. As these tiny strings begin to break apart, you see the larger overall bowstring fraying. If it is left without maintenance for a long time, eventually, a frayed bowstring will break.

A Frayed Archery String

If you are checking your gear before you leave the house, then you have the perfect opportunity to spot fraying. Many people notice that their bowstring is starting to fray, yet they keep using it anyway. They seem to think it will be easier to use the string a little longer than it is to simply replace it. They might even add some wax or something to the bowstring to keep it together, but there is no way to fix a frayed bowstring.

The section of your bowstring that is fraying represents the weakest part of your bow. As you continue to use it, you only manage to make it weaker. Eventually, the string has to snap, but you will be unable to predict when. It will happen when it does.

If you’re drawing an arrow when it snaps, which is likely considering how fraying happens, you are at risk of major injury. A string breaking on a compound bow has been known to cut through flesh and even muscle. Always, always check your string for fraying before use.

Sign 3: A Stretched String

Stretching your bowstring is the most important part of archery. If you can’t stretch your bowstring, then you can’t shoot an arrow. So, just how exactly can a stretched string be a bad sign?

What happens when you are shooting an arrow is that you are creating a tension in the bowstring. You are pulling it back when it wants to be at its resting position. When you let go of the bowstring it snaps back to this position. However, drawing back and firing your bow in this manner causes a release of energy within the bowstring, then on to the arrow. The more often you shoot, the more energy we are talking about. This energy appears in how the bowstring will start to stretch a little bit more each time it is fired.

As your bowstring begins to stretch, there isn’t much to worry about. It happens naturally anyway, and a little bit of stretch doesn’t really mess with your accuracy. But, as this continues, there will be a clear effect. More energy from each shot is absorbed by the bowstring, resulting in less energy making it to the arrow, thus also resulting in weak and inaccurate shots.

The stretching of the bowstring is called creep, and it typically happens somewhere between shooting 50 to 100 arrows. The fibers in the bowstring are being stretched out, making the string itself longer. Creep happens most often due to shooting, but poor storage of a bow in an overly hot location will also produce creep.

The only way to fix a stretched bowstring is to change it. You can’t shrink down a stretched string; you can only throw it out. Before you head out into the woods for some archery, try drawing back your bowstring a couple of times to see if it is as taut as it is supposed to be. If it isn’t, then you should replace the string.

This is one of the more common ways for your bowstring to go bad, as it happens naturally based on how much you are using it. Depending on the number of arrows you are shooting in a session, this could be a long time coming, or it could happen in a single afternoon. How often you experience a stretched string is entirely up to how much you shoot. If you shoot a lot, then you’ll want to keep extra bowstrings on hand whenever you go out.

Sign 4: A Dry String

A bowstring should be waxy. You may find that the string’s feeling in y0ur hand and fingers isn’t particularly pleasant; after all, when you first picture using a bow, you probably didn’t imagine the string as being waxy. However, this aspect is actually important for the string. A waxy bowstring is a functional bowstring, whereas a bowstring that has dried out is difficult to work with and reduces accuracy while increasing the risk of breaking.

Your bowstring needs to be waxed periodically. This is done by using a wax stick. These pretty much just look like a tube of lip balm, except you would run it over your bowstring rather than your lips. After you go over the string with the stick, make sure you use your thumb and forefinger to go over the string and work the wax into it fully. You can tell your string needs to be waxed when it feels dry to the touch, or if you see small hairs sticking out.

A Dry Archery String

These hairs sticking out from the bowstring are often described as “furry” as in “I have a furry bowstring.” It is this furry look that is the most disconcerting. The furry aspect of the bowstring comes from where the fibres that make up the string are starting to wear. A fresh waxing will help to keep the hairs in place and looking slick but it isn’t the end all solution. In time, you will find that your bowstring is looking furrier and furrier.

As a bowstring begins to reach the end of its life, it gains more issues staying waxy. You will find yourself needing to apply wax more and more often to prevent it from becoming furry. When this starts to happen ,you know that you’ll need to replace your bowstring very soon. This is because a dry bowstring leads to a furry bowstring, which then leads to a frayed bowstring.

So, not only do you need to check your bowstring to see if it is dry or waxy, but you will also need to pay attention to how often you are waxing it as well. It is a good idea to keep a record of how often you are waxing your bowstring. This can be on a calendar or in a notebook, but it can be just as easy to keep the record in your phone. Seeing how often you need to wax will help you to get a better sense of how long the bowstring will last overall.

Sign 5: A Seperated String

A bowstring is covered by a layer referred to as the serving. This is a thread that covers up the fibres of string. Compound bows also have serving overtop of the various cables that the bow uses. The serving is mostly there to go over the nocking area of the bowstring and help keep the arrow in the same position, firing with the same amount of power.

A compound bow has serving typically over any of the areas where the bowstring or one of the cables comes into contact with any of the pieces of the bow, like the roller guard or string stop. Those who use a compound bow must make checking the serving a part of their regular maintenance and check-up. This begins with the bowstring but then stretches out into the other areas where the serving has been added.

Serving should be a tight coil that wraps around the bowstring. But, because it is still made out of a fiber, it can break just as easily as your bowstring itself. Over time, the serving begins to separate and come apart from the string and cables that it is protecting.

When checking your serving, keep in mind that you should replace any you see that are starting to separate. However, the serving around the nocking area is absolutely the most important, and it must be changed immediately because it will have a direct effect on your shot, your accuracy, and the safety of the bow itself.

Sign 6: An Old String

The final reason is that you simply have a bowstring that is too old. All of the previous signs arise from the use of the bow itself. Each part of the bow degrades over time due to repetitive use. This is a natural part of archery and something that every archer needs to learn to deal with.

However, another issue that could cause your bowstring to degrade is time. You should never, ever have a bowstring on your bow that is more than two years old. The same goes for the cables used by a compound bow. If you are firing your bow regularly, then you’ll never make it this long without replacing them, but if it’s in storage, then it is easy to let a lot of time go by before using it again. Replace the bowstring before you hit this range.

If you’ve never had to change a bowstring before, don’t worry; it really isn’t that hard. This informative video will walk you through how to change your string and your compound cables:

You can purchase new strings for your bow individually or in bulk. I like making use of both from time to time. For example, I like to keep a lot of strings around, but I’ll also splurge from time to time to get a more expensive string like this one. I find it helps give a sense of the real difference between bowstrings. Spoiler: often there is very little.

Old strings should not be trusted. As much as you may just want the ability to pull your bow out of storage and give it a couple shots, it is always best to replace the string prior to shooting. There is not a set timeframe that works to set when a string should or shouldn’t be replaced, but I won’t shoot a string that hasn’t been tested in over a year. It is just safer to replace it with a new one and check all the pieces in the process.

Outro

So there you have it—six ways you can tell that your bowstring is going bad, ranging from the obvious to the more stealthy. The important thing to understand about this topic is that none of what you read matters in the least if you don’t put it into practice.

This means that you absolutely must make checking your bowstring a regular part of using your bow. You should never, under any circumstances, start shooting your bow before you have inspected it. Your bow may be a simpler weapon compared to a hunting rifle, but it requires just as much care and respect to keep it firing correctly.

So, next time you’re ready to hit the range or woods to start taking some shots, make sure you stop and inspect your string first. It’ll make your life a thousand times easier in the long run.

Locating Bucks During the Mule Deer Rut

0

It’s a beautiful thing when testosterone kicks in and gnarly old mulie bucks quit thinking. Nocturnal monarchs strut around in broad daylight, thicket-loving old hermit bucks stand silhouetted on open ridges, and alpine-country cliff dwellers descend to mingle with does in less protected, more accessible habitat.

In most regions, you’re not allowed to hunt mule deer during the rut. All you can do is take a detour through areas high in doe numbers on your way to work, break out the spotting scope, drool all over the front of your business suit, and take some shaky iPhone photos through the ocular lens.

Mule deer bucks are notorious for using the rough terrain to their advantage. That’s why it’s so crucial to find them when their guard is down during the rut.

But if you really want to hunt bucks during the mule deer rut badly enough, there are ways. No, I’m not talking about poaching.

Several great mule deer states offer some sort of a late-fall rut hunt. Usually, it’s in a limited-draw area, and you’ll put in for half your life in the hopes of pulling a tag. However, there are exceptions. Frequently, those exceptions involve archery equipment and lots of cold weather, so you’ll have to be both adaptable and tough to capitalize on them.

Take my home state of Utah. Ask any local hunter if Utah offers a general-season mule deer rut hunt, and he’ll laugh ruefully in your face. Utah, like many Western states, manages for hunter opportunity, not hunter success.

But after a minute a light will go off in some cobwebbed recess of that local’s brain, and he’ll say something like, “Actually, if you’re willing to work your way through a labyrinth of suburban neighborhoods, park near city water tanks or whatnot, and climb near-vertical slopes into the Wasatch Mountains, there’s an extended-season archery unit€¦.” Hunters may pursue big old bucks until mid to late December on the west-facing, extremely steep slopes above Salt Lake City.

These deer are never rifle hunted. Some years ago, a law prohibiting hunting with rifles was created due to fears of rifle bullets flying out over the city. That’s not to say that the local deer are dumb — far from it.

They get hunted from mid August to the end of the year. But it’s a legitimate rut hunt, and you’ll see big bucks working does among the oak brush clinging to the steep slopes. Whether you’re man enough to climb and put a stalk on one is up to you. I’ve put many a stalk on mature bucks on those slopes and blown all but one.

Just like chasing whitetails, peak movement for mulies will happen when the sun is low.

A buddy and I found a big buck near the bottom of the far slope in a steep, very rugged knife-bottomed draw, tending a doe in estrus. After racking our brains for a way to put a successful stalk on him, it dawned on us that if spooked uphill, the ledges and cliffs above him would funnel him through a 20- yard-wide gap in the rocks atop the far ridge. There was simply no other way for him to go — assuming he went up instead of fishhooking around.

It was worth a try. I won the toss and spent the next three-and-a-half hours in knee-deep snow, dropping clear down to the valley floor to get across the draw without spooking the buck, then climbing the gut-wrenching far ridge. Finally in position, I thumbnail-scraped the eighth-inch layer of ice off my bowstring and arrow and waved at my partner. He piled off the far slope in a cloud of powder, going right at the buck.

Just about the time I could no longer stand to wait, antler tips showed suddenly above the bulge of the slope below me. With my heart doing jumping jacks on my stomach, I focused on a spot at the front edge of his shoulder, planning to smoothly draw my recurve and shoot as he passed only 18 yards away, leading the region I wanted to hit by just a few inches.

Suddenly in the perfect spot, tongue hanging out from climbing the slope, the buck stopped. In disbelief, I drew to anchor, rushed the shot, and missed right over the 170-class buck’s back. I still haven’t forgiven myself.

Destination Testosterone: Where To Hunt

While many hunters believe that the mule deer rut occurs at the same time as the whitetail rut (and in some regions it’s true), most of the violent rutting action I’ve observed occurred after the first of December.

Finding a place to hunt can be complex. Studying the regs in the state you want to hunt is a great start, but a call to a wildlife biologist can prove a worthwhile shortcut. Biologists can point you to areas with high deer populations, tell you about migration patterns you’d otherwise be unaware of, and suggest routes to access remote public land.

Sometimes the land where rut hunts occur is private, and knocking on doors to ask permission to hunt can prove as fruitless as a celebrity marriage. Fish & Game agencies can often help by referring you to cooperating landowners that participate in open-access programs. High-tech GPS mapping programs that display blocks of public within private lands can also be very useful.

Killer Methods: How To Hunt

Once you’ve found a region and a legal spot to hunt and obtained a tag, get your boots on the ground and find out where the does congregate during late November and December. Rutting bucks are as predictable — and as unpredictable — as teenagers with high hormonal levels, and usually the old bucks can be found patrolling doe populations.

I once read that a good way to tag a monster buck during the rut was to find the biggest group of does in the area and watch that group — sniper style — day after day. Sooner or later, a gnarly old buck will swagger out of the nearest thicket and start sticking his nose under the tails of those fine-looking does.

A less boring method is to roam and glass doe groups from a healthy distance. Sooner or later, you’ll find a big buck as he cruises through during the mule deer rut. Be warned: With a bunch of buck-ravished, spooky doe eyes on the lookout, stalking can be tougher than sweet-talking a pretty girl at a church quilting bee.

Hunting mulies requires patience, because you never know what buck will be found in the next group of does.

If there’s good fresh snow, tracking can be effective. Take a skillful buddy along, put him on a promising big track, and veer out to the side, climbing high points in the terrain and watching out in front of your partner as he works the track. You might just catch a big old buck sneaking through the thickets ahead of him.

If you’ve got a long season, where you can relax and have a little fun, try rattling in edge cover near high doe populations. While I’ve never personally rattled in a mulie buck, my brother has — big ones.

If you catch an amorous but lonely buck just right, he might come stomping in snorting steam, blood and fire in his eyes. More probably, the big bucks in the area will just raise their heads at the sound and look long and hard — which can be just the trick you need to get a clear look at a buck to evaluate his rack.

In the end, though, glassing is where it’s at. Cover a lot of country during high movement periods at dusk and dawn and carry powerful binoculars that suck up light, along with the very best spotting scope you can afford. When you find the buck you want, move on him with everything you’ve got because you may never see him again.

Hunting mule deer in the rut is a far cry from hunting rut-crazed whitetails. They don’t vocalize much, they aren’t really callable, and they don’t hold predictable rutting territories. On the other hand, they do become visible.

A highly visible monster mule deer is the most contagious carrier of buck fever in the world, and if you decide that hunting rutting mulies is on your bucket list, you’ll contract it sooner or later.

Be warned: There is no cure.

What Animals Can I Hunt with an Air Rifle: A Quick Guide

0

Air rifles are becoming increasingly popular as a method for hunting small game animals.

They offer a relatively quiet and efficient way of hunting, making them appealing to both experienced hunters and newcomers.

With a variety of calibers and powerplants to choose from, air rifles can be customized to suit the type of game one intends to target.

This versatility ensures that air rifle hunting can be a satisfying pastime for individuals with varying interests and skill levels.

For those looking to hunt small game such as squirrels, rabbits, and birds, an air rifle is an ideal tool for the job.

Equipped with the right ammunition, one can achieve a humane and precise kill that relies on accuracy rather than brute force.

Smaller calibers such as .177 are typically used for hunting birds, while larger calibers like .22 are well-suited for furry animals like rabbits and squirrels.

When considering which air rifle to use for hunting, it is important to research the specific hunting laws in one’s state, as they can vary significantly.

Some states may allow the use of air rifles for hunting larger game, while others may have specific guidelines regarding the type of animals that may be hunted with air-powered firearms.

By understanding these regulations, hunters can ensure that their air rifle hunting activities are both safe and legal.

Legalities and Hunting Regulations

When it comes to hunting with air rifles, understanding the legalities and regulations is essential before you head into the field.

Here we will explore license requirements, prohibited species, and hunting seasons.

License Requirements

In general, a hunting license is required to hunt with an air rifle.

License requirements vary from state to state.

Some states may have specific regulations for air rifle hunting, while others may treat air rifles as traditional firearms.

It is crucial to check with your state’s Department of Wildlife or similar agency to determine the proper license(s) needed.

Prohibited Species

Not all animals can be hunted with an air rifle.

States have specific regulations on which species are allowed to be hunted using this type of weapon.

Commonly permitted game includes:

  • Small game: such as rabbits, squirrels, and woodchucks
  • Upland birds: such as grouse, pheasant, and quail
  • Certain predators: such as raccoons and foxes

On the other hand, some states only allow air rifles for hunting game smaller than deer or bears.

It’s crucial to consult your state’s hunting laws to ensure you are within legal parameters.

Hunting Seasons

Hunting seasons for air rifle users generally follow the same seasons as traditional firearms or archery.

Depending on the state, there may be special seasons designated specifically for air rifles.

Keeping track of relevant hunting seasons, such as:

  • Small game: typically open during the fall and winter months
  • Upland bird hunting: varies by state, with seasons ranging from late summer to early winter
  • Predator hunting: often year-round, with some seasonal restrictions depending on the species

Remember to stay informed about your state’s hunting regulations and season dates to avoid penalties and ensure a safe and enjoyable hunting experience.

Air Rifle Calibers for Hunting

When it comes to hunting with air rifles, choosing the right caliber is crucial to achieve a humane and effective kill.

Let’s take a look at a few various calibers suitable for hunting different types of game.

.177 Caliber

The .177 caliber air rifle is the smallest and most common caliber.

It has the longest range and is suitable for hunting small game, like squirrels and rats up to 60 to 80 yards.

With its lower power and muzzle energy, .177 caliber is best suited for smaller game and pest control.

.22 Caliber

Moving up in size, the .22 caliber air rifle offers more power and is ideal for hunting small to medium-sized game, such as rabbits and squirrels.

It can push a 14.3-grain .22-caliber pellet upwards of 850 fps.

.25 Caliber

.25 caliber air rifles provide even more power, making them a good choice for larger pests like raccoons, opossums, and woodchucks.

The increased caliber size offers more energy upon impact, which can be helpful when hunting these types of animals.

.30 Caliber

The .30 caliber air rifle is a solid choice for those looking to pursue mid-sized game, such as hogs and coyotes.

With even more muzzle energy and a larger projectile, this caliber offers a balance between precision and power, making it suitable for hunting these types of animals.

.35 Caliber

.35 caliber air rifles are a popular choice among hunters who are targeting larger game.

Some states have a minimum caliber requirement of .35 for airgun hunting, and this caliber provides a significant increase in power compared to smaller calibers.

With at least 400-foot pounds of energy at the muzzle, it is sufficient for taking down larger game.

.45 Caliber

For even larger game, a .45 caliber air rifle is recommended.

Producing 700 to 800 ft.-lbs. of energy, this caliber is suitable for hunting whitetail-sized animals.

The increased energy and bigger projectile size contribute to a more effective and humane kill.

.50 Caliber

Finally, the .50 caliber air rifle is the largest and most powerful option for airgun hunters.

Best suited for big game, this caliber offers top-level power and velocity, ensuring the highest chances of a successful and humane hunt.

It’s essential to check local laws and regulations, as not all states permit the use of .50 caliber air rifles for hunting.

Remember that regardless of the caliber you choose, practicing shot placement and knowing the limitations of your air rifle is crucial to ensure a humane and ethical hunting experience.

Choosing the Right Air Rifle

Accuracy

When selecting an air rifle for hunting, accuracy is crucial. You’ll want a gun that consistently hits the target, allowing for clean, ethical shots.

Spring- or gas-piston-powered airguns are recommended for small game hunting, offering the necessary velocity for an accurate shot.

Some factors that influence accuracy include pellet type, gun weight, and the shooter’s skill.

To maximize accuracy, it’s essential to practice regularly and familiarize yourself with the rifle before hunting.

Power and Range

The power and range of your air rifle mainly determine the type of game you can hunt.

The most popular air rifle calibers are .177 and .22.

The .177 caliber provides a more powerful impact, thanks to its lighter weight and greater kinetic energy. However, for larger game or more extended ranges, consider a .30 to .35 caliber air rifle, which can shoot Diabolo pellets at 50 to 100 ft-lb.

These higher-caliber air rifles can be used for hunting small game or predators.

Keep in mind, though, that air rifles for big game hunting should have at least 300-foot pounds of energy (fpe) to ensure an ethical kill.

Not all air rifles can achieve this power, so always check the rifle’s specifications and consult with local game laws.

Popular Models

There are several popular air rifle models on the market suitable for hunting.

It’s essential to research and select an air rifle that suits your hunting needs and complies with local regulations.

Factors such as accuracy, power, range, and your preferred game type will help you make an informed decision.

Recommended Air Rifles for Hunting

When it comes to air rifle hunting, there are various options available that cater to a range of different game animals.

Three top air rifles suitable for hunting are the Airforce Texan, Hatsan Piledriver, and Umarex Hammer. Each of these air rifles offers unique features and capabilities.

Airforce Texan

The Airforce Texan is a popular air rifle for hunters.

This high-power, pre-charged pneumatic (PCP) rifle comes in various calibers (.257, .308, .357, and .457), allowing the hunter to choose the perfect caliber for the game they are targeting.

With power levels of up to 500 ft-lbs, this air rifle has both the capacity and accuracy necessary for some larger game.

This air rifle features:

  • PCP system for powerful and consistent shooting
  • Top-loading air tank for easy refilling
  • Adjustable power settings
  • Rifle length: 48 inches; weight: 8 pounds

Hatsan Piledriver

The Hatsan Piledriver is another high-quality choice for airgun hunting enthusiasts.

Delivering muzzle energies of up to an impressive 800 ft-lbs, this powerful PCP air rifle is available in .45 and .50 calibers, suitable for various game animals.

Some notable features of the Hatsan Piledriver include:

  • PCP system with a large air reservoir for longer shooting sessions
  • Side-lever action for easy cocking and reloading
  • Quiet Energy Technology (QET), reducing the noise emitted when fired
  • Rifle length: 44.3 inches; weight: 10.6 pounds

Umarex Hammer

For hunters looking for a versatile air rifle that packs a punch, the Umarex Hammer might just be the answer.

This PCP-powered rifle sports a unique configuration that allows it to shoot both .50 caliber bullets and arrows. With a 4,500 psi air tank, the Umarex Hammer has up to 700 ft-lbs of energy.

Key features of the Umarex Hammer include:

  • Muzzle Energy Selector (MES), allowing for customized power levels
  • Lightweight design, weighing only 8.5 pounds without a scope
  • Air tank capacity for up to 5 shots per fill
  • Rifle length: 43.75 inches

These three air rifles offer a variety of options for airgun hunters, from PCP systems to different calibers and power levels.

Depending on the specific game targeted, one of these rifles is sure to help achieve a successful hunting experience.

Types of Pellets and Ammunition

When hunting with an air rifle, choosing the right type of pellets and ammunition is essential for a successful and ethical hunt.

Let’s explore the different types of pellets and ammunition available for air rifles, such as pellet weight, hollow-point pellets, and shotgun ammunition.

Pellet Weight

The weight of a pellet plays a significant role in its accuracy, velocity, and energy upon impact.

Lighter pellets typically have higher velocities but may be more affected by wind and air resistance.

Heavier pellets, on the other hand, have slower velocities but offer better penetration and accuracy, especially at longer distances.

Some popular options for airgun ammunition include:

  • .177 Caliber: Ideal for small game hunting and target shooting
  • .22 Caliber: A versatile option for medium-sized game and pest control
  • .25 Caliber: Suitable for larger game and providing more knockdown power

Hollow-Point Pellets

Hollow-point pellets feature a hollowed-out cavity in their nose, which allows the pellet to expand upon impact.

This expansion increases the pellet’s surface area and energy transfer, resulting in better penetration, greater shock, and more effective wound channels in your prey.

Hollow-point pellets are especially effective for hunting small game and pest control.

Some airguns, like the AirForce International 94 Spring .25 caliber, consistently shoot 18-grain domed pellets at 700 feet per second, making them an excellent choice for hunting small game animals like squirrels or rabbits.

Shotgun Ammunition

In addition to traditional pellets, some air rifles can also be used with shotgun ammunition.

This type of ammunition features multiple projectiles, which provide a more extensive shot pattern and increased chances of hitting your target.

Shotgun ammunition for air rifles typically comes in .357 to .50 caliber sizes.

In conclusion, understanding the different pellet types and ammunition options is crucial in making the right choice for your air rifle hunting needs.

It’s also essential to consult your state’s hunting laws and guidelines to ensure that you are using the correct caliber and energy for the specific game you are hunting.

Remember to always practice safe and ethical hunting.

Hunting Small Game with Air Rifles

When it comes to hunting small game, air rifles can be an efficient and effective tool.

They are often quieter and less expensive than traditional firearms, making them popular among hunters who pursue squirrels, rabbits, and various species of birds.

Let’s look at how air rifles can be used for hunting these common small game animals.

Squirrels

Squirrels can be an entertaining and challenging target for air rifle hunters.

These nimble creatures are quick and agile, making them difficult to hit at times.

A quality air rifle with decent accuracy and power is crucial for successful squirrel hunting.

Many hunters find that a .22 caliber air rifle firing at 1070 fps, such as the Hatsan BullBoss, provides the ideal balance between power and precision.

When hunting squirrels, it’s important to aim for the head or heart to ensure a quick and ethical kill.

Patience is also key, as these critters can be quite wary and may take some time before revealing themselves.

Rabbits

Rabbits are another popular target for air rifle hunters.

Like squirrels, they can be skittish and require a stealthy approach.

The use of an air rifle allows hunters to get closer without alerting their quarry, increasing the odds of a successful hunt.

An air rifle with sufficient power for hunting rabbits should be chosen. Some hunters opt for .22 caliber rifles, while others prefer more powerful options like the .35 caliber.

Again, a well-placed head or heart shot is vital to ensure a humane kill.

Birds

Birds are a diverse and challenging group of small game animals to hunt with an air rifle.

Some hunters focus on pigeons, while others target crows or even larger game birds like pheasants.

Regardless of the specific bird species, an air rifle must have both accuracy and power to be effective.

It’s crucial to know the energy requirements for the particular bird species being hunted, as it will determine the necessary features of the air rifle.

For example, a .22 caliber air rifle might be suitable for smaller birds like pigeons, while a larger caliber and higher energy output (e.g. .45 or .50 caliber) may be necessary for hunting whitetail-sized game.

Accuracy, patience, and a keen understanding of hunting regulations in your state are essential components in the successful and ethical pursuit of small game animals with air rifles.

Larger Game Hunting with Air Rifles

Air rifles are not just for plinking cans or shooting small pests.

With the development of big-bore airguns, hunters can now ethically harvest larger game animals such as hogs, deer, and coyotes.

Let’s take a look at the possibilities and challenges of hunting larger game with air rifles.

Hogs

Hunting hogs with air rifles is becoming increasingly popular among hunters.

Powerful airguns such as .45- and .50-caliber air rifles are capable of delivering enough energy to

The Biggest Whitetail Deer Ever Killed: A Look into the Record Books

0

Whitetail deer hunting is one of the most popular forms of hunting in North America. These majestic creatures can be found throughout the United States and Canada, and their impressive antlers make them a popular target for hunters. But have you ever wondered what the biggest whitetail deer ever killed was? In this article, we’ll take a look at the record books and explore some of the biggest whitetail deer ever taken down by hunters.

The Boone and Crockett Club

The Boone and Crockett Club is a non-profit organization dedicated to the conservation and management of wildlife and their habitats. Founded in 1887 by Theodore Roosevelt and George Bird Grinnell, the club is best known for its record-keeping system for big game animals. The Boone and Crockett Club’s scoring system is based on the size of the animal’s antlers, and it is the standard by which all other record-keeping organizations measure big game animals.

The Top 5 Biggest Whitetail Deer Ever Killed

According to the Boone and Crockett Club’s records, the top 5 biggest whitetail deer ever killed are as follows:

1. The Jordan Buck – This massive whitetail deer was taken down by hunter Al Jordan in 1914 in Danbury, Wisconsin. The Jordan Buck’s antlers scored an impressive 206 1/8 inches.

2. The Hole-In-The-Horn Buck – This famous whitetail deer was taken down by hunter Larry Gibson in 1940 in Peoria County, Illinois. The Hole-In-The-Horn Buck’s antlers scored 205 0/8 inches.

3. The Missouri Monarch – This massive whitetail deer was taken down by hunter Jim Jordan in 1981 in St. Louis County, Missouri. The Missouri Monarch’s antlers scored 198 2/8 inches.

4. The Beatty Buck – This impressive whitetail deer was taken down by hunter James Beatty in 2000 in Greene County, Ohio. The Beatty Buck’s antlers scored 294 0/8 inches.

5. The Hanson Buck – This massive whitetail deer was taken down by hunter Milo Hanson in 1993 in Saskatchewan, Canada. The Hanson Buck’s antlers scored an impressive 213 5/8 inches.

While these are the top 5 biggest whitetail deer ever killed according to the Boone and Crockett Club’s records, there are many other impressive whitetail deer out there. In fact, there are over 7,000 whitetail deer in the Boone and Crockett Club’s record book, each with their own unique story.

Factors that Affect Antler Size

While genetics play a large role in determining the size of a whitetail deer’s antlers, there are other factors that can affect antler size as well. These include:

1. Age – As a whitetail deer gets older, its antlers will typically grow larger.

2. Nutrition – A whitetail deer that has access to high-quality food sources will typically have larger antlers than a deer that is struggling to find food.

3. Habitat – Whitetail deer that live in areas with ideal habitat conditions (such as good cover and access to water) will typically have larger antlers than deer that live in less ideal conditions.

4. Hunting Pressure – Whitetail deer that live in areas with high hunting pressure may have smaller antlers due to the fact that hunters are selectively targeting larger deer.

Conclusion

While the top 5 biggest whitetail deer ever killed are certainly impressive, it’s important to remember that hunting is about more than just taking down the biggest animal. It’s about being a responsible and ethical hunter, respecting the animals and their habitats, and enjoying the outdoors. Whether you’re a seasoned hunter or just starting out, always remember to hunt safely and responsibly, and to respect the animals and the land.

How to Sight in a Bow (Fixed & 1-Pin) & What Distance To Set Your Pins At

0

Have you just purchased your first bow sight and you need to sight it in?

What are the right sight marks for you?

What is the best way to sight-in your bow?

The only way to find out is to get out there and start somewhere, and we’ll show you where that is.

We’ll discuss common distances used to set your pins as well as our favorite way to sight in your bow.

What Distances to Sight in Pins on Your Bow?

What is the best distance to sight in your bow? You’ll find various answers here and there according to the preferences of the person providing the advice. We’ll lead you straight as the best distances for you will depend on a few things:

  • Draw weight/bow speed
  • Type of bow hunting
  • Personal preference for maximum shooting distances

All these factors will be addressed as we discuss the most commonly used sight marks for many bow shooters.

Top Pin Setting

The most common top pin setting for both timber and the open fields is 20 yards.

These days, most compound bows are fast enough to see very little difference in arrow trajectory between 10-20 yards. When this is the case, the first pin is usually set at 20 yards that also serves as a pin for 10-25 yard distances. You may be a few inches high when using the 20-yard pin for a 10-yard shot, and you may be a few inches low for a 25-yard shot.

To enable accurate and precise shots using your 20-yard pin this way, you’ll have to know how your bow, arrows, and sight setup will perform. Get to shooting off some arrows!

Do you have a 5-inch difference or more? Do you need to start with a 10-yard pin instead? If you’re shooting from a tree stand, you just might. You must also know the positions and kill-zone sizes of your game if you’re a hunter.

Low poundage bows that includes 40lb draw weights will require a top pin that should be set for 10 or 15 yards. It’s about shot placement that includes getting close enough to your target with it in a position to take an ethical shot.

Factors to think about:

  • How fast is your bow?
  • Where and what are you shooting?
  • Become proficient with setup to predict how it performs between 10-25 yards.
  • See instructions for your bow sight if there is a recommended top pin distance.

5-Yard Distance Increments

You may see some shooters with sight marks in 5-yard increments. An example includes: 15, 20, 25, 30, 35, and 40 and other similar variations. Again, personal preference is the rule here.

Consistent 5-yard increments are usually seen on sights that have 5 to 7 or more pins, and there are both pros and cons to this pin setup.

Advantages include less gap shooting, pin for every reasonable distance, and smaller yardage increments for confident shooting.

However, the disadvantages can outweigh the benefits. When increments are small, and you have a generally fast bow, the pins will be stacked very close together. It’s likely you will choose the wrong pin to shoot with.

Pins too close together can also block out a significant amount of the target. The more pins you have, the more it clutters your field of view.

10-Yard Distance Increments

Even 10-yard distances are the most common and versatile setup for hunters for many types of prey in the field. It may start with a 20-yard pin and continue from there, or it may start with a 15 or 25-yard pin and follow suit.

10-yard increments allow enough space between the pins to adequately see the target and to appropriately shoot the gaps when necessary. However, difficulty in achieving accuracy and precision at ranges further than 50 yards increases especially when you gap shoot. When you extend your pins out to longer distances, arrow drop, user error, and form issues are magnified.

Holding over or holding under isn’t so easy to do when you’re cold, hungry, tired, or you’re pumping with adrenaline due to the 10-point buck that just came into view 30 or so odd yards away. It may now be helpful to split the distance in 5-yard increments for the bottom pins such as 20, 30, 40, 45, and 50 or 20, 30, 35, 40, and 45. Find the variation that works for your bow setup and your shooting style.

Think about:

  • How many pins should be in your 10-yard increment setup?
  • What maximum distance are you comfortable and skilled enough at to make an ethical shot?

The more pins you have, the further you can shoot out in practice whether you realistically take shots out this far in the field. Practicing at 60 and 70 yards can make your 20-40 yard groupings tighter and easier to make. However, it does clutter your sight picture and it may encourage you to take shots you shouldn’t in the field.

Where is the Middle Ground?

The middle ground is more about having the right number of pins for your setup. There’s no need to clutter your sight picture with more pins than you realistically use in the field.

A general rule of thumb is 3 pins for many hunting applications, and 5 pins for Western or long shot hunting. Of course, there are hunters that do very well with a single pin bow sight to eliminate the process of gap shooting altogether. Where do you sit in the single vs multi-pin debate?

If you’re one of those hunters who push your bottom pins down as far as they can go to get them out of the way, but you keep them for the “just in case” moment, a fixed pin with a floater bow sight would serve you better.

Many times, the bow sight manufacturer will recommend in the setup and sighting-in instructions what distance the first pin should be set with and the distance increments for the following pins.

While 10-yard increments are certainly the standard and is a versatile setup, the goal is to find what setup works best for you. You won’t know it until you get out there and start practicing.

How to Sight-In a Bow

General Preparation Instructions for Sighting In

  • Mount your sight to your bow.
  • Be prepared to spread out sighting-in process over a course of several days due to fatigue that can compromise everything from correct form to accuracy.
  • Have necessary gear and equipment ready i.e. targets, arrows, appropriate laser rangefinder, etc.
  • Safety first: ensure you have the appropriate backstops and area clearance to shoot.
  • Start close to the target: 10 yards to get on paper and to reduce adjustment issues later.
  • Adjust in small increments at a time.
  • Have Allen wrenches or required tools to make adjustments to sight.
  • We like the “one axis at a time” method of sighting in. This process may incorporate use of leveled tape in the shape of a sideways “T”, as a cross, or any target that helps to focus the eye to aim in straight lines.

How to Sight In With a Fixed Pin Bow Sight

  1. Stand approximately 10 yards away from your T target. Starting with the windage axis (left/right), you will want to aim for the vertical part of the target. Let off 3-5 arrows in a line.
  1. Examine the arrows position in relation to the vertical line of the T. Being this close to the target, you want to make sure you’re as dead-on the center of the line as possible. Margins of error will be magnified when you step back to fine-tune your adjustments at longer distances.
  1. To make adjustments, follow the arrow. If your arrows are left of the T, make an adjustment to move the entire sight housing If your arrows are right of the T, make an adjustment to move right.
  1. Repeat this process until your arrows are dead-on center on the vertical line.
  1. Stand approximately 10 yards away from your T target. If necessary, move the top pin high up towards the top of the housing to leave enough adjustment room for the remaining pins on sights with 5-7 pins. Let off 3-5 arrows in a line using your top pin as an aiming point for the horizontal part of the target to begin adjustments for the elevation axis (up/down).
  1. Examine the arrows position in relation to the horizontal line of the T. You don’t have to be so precise with this at 10 yards. If the arrows are further than 6 inches of the line, follow the arrow to make adjustments by moving the entire sight housing. If your arrows are above the line, make an adjustment to move the sight up. If your arrows are below the line, make an adjustment to move the sight down.
  1. Repeat this process until your arrows are within 6 inches of the horizontal line.
  1. Step back to the distance you want to set your first pin for which is likely 20 yards. The top pin is the only pin you can set by moving the entire sight housing at this point in the process. Let off 3-5 arrows aiming with your top pin to hit dead-on the center of the horizontal line as possible. Now is the time to be precise with your adjustments by moving the entire sight housing up or down.
  1. Once you’re hitting dead-on with your 20-yard pin, it’s time to sight-in the remaining pins which will all be adjusted individually. Typically, the next pins will be set for 30, 40, and 50 yards, if applicable. Stand at the distance you want to set your next pin for, let off 3-5 arrows using the appropriate pin to aim with and shoot for the horizontal line of the target.
  1. Examine the arrows in relation to the horizontal line of the T. Be precise in making individual adjustments for the appropriate pin. Again, follow the arrow. When you’re successfully hitting the center of the line, it’s time to move to the next pin until all remaining pins are set for their distance.
  1. Go back to 30 yards and let off 3-5 arrows for the vertical line to fine-tune your windage (left/right) axis with any adjustments if needed. You might notice you may be slightly off at 30 yards since variations in accuracy are magnified at longer distances.
  1. Fine-tune any adjustments by double checking you’re consistently hitting the lines at your set pin distances. If you need to make any fine-tuning adjustments to your 20-yard pin at this point, do it by adjusting the individual pin, not by moving the entire sight housing.

How to Sight In a Bow Sight With 1 Pin

Each manufacturer and model of single-pin sights will have slightly different sighting-in instructions and sight tapes provided. It’s important to follow the setup recommended by the manufacturer to achieve maximum potential and accuracy from your sight.

A well-accepted method is the 20/60 setup which we’ll explain below.

  1. Stand approximately 10 yards away from your T target. Starting with the windage axis (left/right), you will want to aim for the vertical part of the target. Let off 3-5 arrows in a line.
  1. Examine the arrows position in relation to the vertical line of the T. Being this close to the target, you want to make sure you’re as dead-on the center of the line as possible since margins of error will be magnified when you step back to fine-tune your adjustments at longer distances.
  1. To make adjustments, follow the arrow. If your arrows are left of the T, make an adjustment to move the entire sight housing If your arrows are right of the T, make an adjustment to move right.
  1. Repeat this process until your arrows are dead-on center on the vertical line.
  1. If you’re using calibration tape provided by the manufacturer, go ahead and stick it on your wheel or bar now. Turn the wheel or knob all the way to the top until it stops. Stand 20 yards away from your T target. Let off 3-5 arrows in a line using your pin as an aiming point for the horizontal part of the target to begin adjustments.
  1. Follow the arrow. If you’re low, turn the wheel/knob down in small increments at a time. Repeat this process until your arrows are dead-on center on the horizontal line.
  1. If using calibration tape, note the reference number the indicator is lined up with as this is your 20-yard mark. If not, use a pencil or marker to mark where your 20-yard mark is.
  1. Step back in 10 yards at a time to sight-in for 30, 40, and 50 yards. Dial down the wheel/knob each time you move back.
  1. Finally, get sighted-in at 60 yards and make the adjustments necessary by following the arrow. Take note of the reference number the indicator is lined up with or mark this spot as this is your 60-yard mark. Additionally, fine-tune your windage (left/right) axis now to ensure consistent shots.
  1. Match the correct sight tape for your markings or number references provided by the manufacturer and apply it to the wheel or bar. Use the sight-tape to double-check you’re hitting consistently at the matched distances.

Put it to the Test!

Once you’re done sighting-in, it’s time to pull out the 3D and 10-ring targets and put your skills to the test. You may be surprised to find your groups are tighter than ever. But, is this the only way to sight in a bow?

Everyone may use a slightly different sighting-in method, the same way they may use different distances to sight in their pins. Some may adjust for both left/right at the same time as they’re adjusting for up/down shots. It happens to be the mainstream way of adjusting especially when using traditional 10-ring targets.

Use the system you’re most familiar with. Get to know what distances or sight-in method you like best by getting out there and nocking some rounds. Sight in and shoot sharp!

Further Reading

  • How to Measure Scope Ring Height (With Pics & Calculations)
  • How to Adjust a Rifle Scope: 6 Scope Adjustments Explained!
  • How to Level a Scope on a Rifle [Step-by-Step With Pics]
  • What is a Rifle Scope Ruler (Mildot Master) & How to Use It?
  • What is a Prism Scope? Prism VS Reflex VS LPVO!

Hybrid Bass Fishing | The 5 Best Baits for Epic Fights

0

Hybrid Bass are pound for pound the hardest-pulling fish in freshwater.

In 1995, I was crappie fishing with a white road runner, 4-pound test line, and an ultralight. I was bringing the lure back to the boat using a lift-and-drop technique. Suddenly, my line darted to the left so fast the water was spraying from the line. My drag started screaming and the fight was on.

I turned on the trolling motor and followed the fish to keep from getting spooled. That fish fought hard for 5-10 minutes! I thought I would never land it! Finally, I held a 6-pound hybrid striper (a.k.a. wiper). It was the best fight of my life and came as a complete surprise. After this first experience, I have made it a point to chase wiper every chance I get.

Targeting these bruisers can be fairly straightforward. Hybrids are super aggressive fish and travel in packs like wolves. This means you can literally wear your arm out catching one after another! Here are my top 5 hybrid bass lures for chasing big fish.

Links on this page are part of the Amazon affiliate program. If you click on them and make a purchase within 24 hours, we may receive a small commission. Thank you!

#1 – Hybrid Bass Explode on Big Prop Baits

There is absolutely nothing like seeing your topwater bait get knocked 3 feet in the air and then engulfed by a 6-8 pound hybrid bass. I saw this the first time fishing a 2-3 inch prop bait for largemouth bass. A big hybrid slapped it straight up in the air and then smashed it when it landed.

I had seen big chop baits used for Peacock Bass and immediately wondered: “Will hybrids attack them the same way?” A few weeks later, I had my answer. I was bass fishing when I heard the sound of a hybrid feeding frenzy one hundred yards away. I flung my new wood chopper bait before I even got close.

My adrenaline surged as it got smashed the same way my smaller prop bait had. For the next 30 minutes, I battled fish after fish! Catching fish any way is fun. However, if you tell me I can catch fish after fish and see the explosion… I dare you to tell me that’s not the #1 way to catch hybrid bass!

Another bonus of this hybrid topwater lure is you can actually draw the school of hybrids towards you. When two or three of you are in a boat splashing these baits around, it can draw these surface feeders to you. There are two great benefits of this. First, you don’t spook the school and end the feeding frenzy. Leave that to the jet skiers. Second, you can draw some of the largest fish from the perimeter of the frenzy!

This technique is best mid-summer to late-fall when the shad population is larger and the white-bass spawn is complete. Hybrid bass will target both.

The Luhr Jensen Wood Chopper bait I used is very hard to find, however, River2Sea recently made a topwater it named the “Big Mistake”. This bait works much the same way and will have your rod bending in no time.

Other topwater options for more subtle days include the Storm chug bug, Rebel Pop-R, or Spooks. I haven’t thrown a River2Sea Whopper-Plopper or the Berkley Choppo for hybrids yet, but would love to hear from some of you that have!

Due to the explosions and absolute fun, these are my at the top of my best hybrid bass lures list.

#2 – The Versatile Paddle-tail Swimbait

The simple reason this classic lure is at number two is versatility. You can fish fast (spring to fall) or slow (winter). It can be fished deeper: add a little weight or tie it with a 4-foot leader behind a deep-diving crankbait. It can also be fished near the surface. Again, I love to fish it fast almost like a wake bait.

Even though the swimbaits are reliable they do have a drawback. Hybrids will destroy them! You can go through a bag pretty quickly. Therefore, it’s a good idea to have more than one bag on hand.

The Sassy Shad and similar paddle-tail swimbaits are great lures to catch hybrid year-round.

#3 – Hybrid Bass Burning a Lipless Crankbait

WARNING!!! This technique may move you towards early carpel tunnel surgery. Check your drag!

One summer day headed out in a Bass Buster Boat with two fishing buddies we saw strange wakes and flashes of white just under the surface. There was no surface feeding but there was definite chasing going on! We tied on 3/4 ounce lipless crankbaits in shad patterns. Then we cranked them back as fast as we could just under the surface.

We caught fish after fish. I was shaking off 4 pounders as fast as I could looking for that big hybrid bite I dreamed of catching. Something in the 8-10 pound class. While I didn’t achieve that, all three of us caught 4-6 pound wiper on every cast for over an hour. Without a doubt, it was one of those special days.

Lipless crankbaits are also versatile in technique. You can speed burn them or yo-yo them with a lift and drop. At times, trolling a lipless crankbait is a great way to relax and catch fish.

#4 – Old Reliable – The Spoon

Spoons are great for the heat of the summer and the cold of winter. Both times of the year, hybrids will be deeper on the river or creek channels. Verticle jigging a flutter spoon is a great technique to reach the school and coax them into biting.

#5 – The A-Rig (a.k.a. Umbrella Rig)

These rigs mimic a school of shad. Exactly what these schools of hybrids have been rounding up. The A-Rig can also be retrieved fast or slow with varying weights to reach the depths of the school. However, the A-Rig is not without its challenges. You could be faced with catching multiple fish on one cast. That’s a great problem to have!

Final Cast

Hybrids are undoubtedly one of the most fun, hardest-fighting fish for fishing enthusiasts. They are sure to instill some amazing memories for young and old. We hope you too find these lures to be the best lures for hybrid striped bass. Coming soon…we will explore some of the best places to pursue the hybrid bass in Texas.

Until then, tight lines and fin time. We hope to see you out on the water chasing ThePerfectComb for some epic wiper fights.

Best Air Rifle Deals

Popular Posts

PCP vs Spring Piston: Which one is better?

0
When reading about guns in the search for the first one that would be perfect for you, an age-old debate comes into question. Should...

Best Air Rifle Brands – Who Makes the Best Pellet Gun?

0
In Jeff Bezos’ own words: "A brand for a company is like a reputation for a person. You earn reputation by trying to do hard...

Synthetic vs Wood Stock: The Final Showdown Between Brunette And Blonde

0
I understand that you’re here to get some quick facts on synthetic vs wood stocks Probably to guide your purchase.  Quick alert - the debate...

How far can an air rifle shoot accurately?

0
An air rifle's effective shooting range depends on various factors, including the type of rifle, the caliber, and the power source. Generally speaking, most...

Air Rifle vs BB Gun: Understanding the Key Differences and Choosing the Best Option

0
"Air Rifle vs BB Gun: Unveiling the Key Differences and Choosing the Perfect Weapon for Your Shooting Needs. Delve into this comprehensive guide to...