Do you have an open area on your hunting property you wish you could screen off in order to get to or from your stand without bumping deer? Or maybe you’ve got a crop field or food plot you wish you could block from the road or section off from a larger field. Or perhaps you just want to break up a monotonous landscape to make it hunt bigger. If any of these thoughts have crossed your mind, chances are you googled something like ‘screen trees for hunting property’ or ‘best tree/shrub/plant to create a screen’ or ‘fast growing screen trees’.
That last one is especially relevant because in today’s world, we want everything NOW!
Well . . . not gonna lie, we are in the same boat for our hunting property. We have a low-lying swamp just off the road, which sits a good 4 feet higher than the swamp, so spotting deer from a vehicle is a breeze. Also, the swamp is not your typical cattail and dogwood type swamp, it’s mostly medium height grasses with a few willow clumps scattered throughout – so you can see deer when they are up and walking. During hunting season, we’d constantly see vehicles slowing and stopping to observe deer from the quiet country road, eventually they’d run off and seek better cover – obviously, this wasn’t a positive thing. Not to mention, the increased possibility of poaching, especially with us being absentee landowners. Thus, I began my search for a fast-growing screening tree or shrub that was water tolerant (because we’d have to plant them along the edge of the swamp).
A general planting map showing our line of trees to obstruct view into the swamp. The separate clumps are to break up the openness and hopefully act as buck bedding areas.
I started to research screen tree varieties and species online. I came across several sites that offered what I was looking for, but ultimately the price was more than we were willing to pay. Keep in mind, we were looking to screen off approximately 425 yards of road frontage, which with one tree every five feet (1 tree/5 ft.) we needed approximately 300 trees to create a thick enough screen to create a visual barrier into the swamp – multiply that by $6-$10 per tree and it adds up really quick. Nonetheless, most of these sites were offering similar varieties of trees, so I had a good starting point. Now it was time to search deeper into the interwebs to find a tree farm or nursery with an affordable price.
If you’re after a fast-growing screen tree, you’ll likely have two options to choose from – a hybrid poplar or a hybrid willow of some sort. Long story short, we finally stumbled across Kelly Tree Farms, based out of Clarence, Iowa and they offered the details, photographs, pricing, and fast growing screen trees we were looking for. We opted for 300 of what they call the Austree Hybrid Willow. At a $1 per tree (or cutting) it seemed reasonable.
Before showing you pictures of our plantings, I wanted to mention that we intend to plant another row of these Austree willows staggered behind the first row using clippings from this year’s willows (free). Also, we plan on planting some type or variety of coniferous trees (likely spruce) behind the willows to provide a long-term, year-round screen for the deer in the swamp.
We will be updating this blog throughout the year to track the progress of the living and supposedly fast growing whitetail screen. But first, here are a few things I learned along the way when trying to purchase the perfect screen tree for deer online.
It’s hard to find a website with good images of what the screen tree will look like down the road (we plan on changing that with this blog). Kelly Tree farms showed nice examples as well.
There’s no “perfect” screen tree out there.
Don’t expect a screen the very first year.
Think about future plantings and a more permanent screen.
Get creative. Along with planting the line of screen trees we planted several clumps of seven willows to break up the openness and create more preferred bedding areas.
The hybrid willow screen trees came packaged in bundles of 100 cuttings. After a week of soaking in a bucket of water, roots were nearly two inches long and buds were sprouting from the tops.
We used an auger planting bit ($10 from hardware store) to drill the pilot holes for the cuttings. One thing to note, site preparation is key and they recommend a weed/grass free planting environment. A healthy dose of RoundUp (glyphosate) should take care of any competing vegetation.
Planting instructions said to leave 2-5” of the top unburied. Fill in around the roots to provide good soil contact.
Just a stick in the mud… hopefully it’s a couple feet tall the next time we see it. And that’s it, with four guys we had 300 trees planted in 3 hours.
Check back often as we will be updating the blog monthly with progress photos.
June 9th update. Growth after 2 weeks.
July 20th update. About 3 feet tall.
July 20th update. Multiple stems about 3 feet tall.March 21, 2018 update: They survived the first WI winter and starting to bud. Most of them have multiple stems and stand about 4 feet tall. We planted the hybrid willows on the outer edge of the screen to create a fast and more immediate screen, while the spruce trees grow up and create an evergreen screen for the future. Tallest tree is about 6 feet tall.
What’s that wild vine on tree? Are those grapes?! Wild grapes are closely related to table grapes and easy to identify for beginning foragers. In this post I’ll tell you everything you need to know about identifying, harvesting, and cooking with all their edible parts.
Wild grapes are the first wild fruit I ever picked, tasted, and really enjoyed cooking with. I first read about my local riverbank grape (Vitis riparia) that grow in the Midwest in the book The Forager’s Harvest by Samuel Thayer.
This post focuses on Vitis riparia-the most common wild grape in North America. Vitis aestivalis, the summer grape, I see occasionally but is not as common. There’s many other plants in the grape family you might find, like the fox grape and Oregon grape. Any edible wild grape can be used as I describe here.
The plants appear as spreading, woody vines with heart-shaped, lobed leaves. They climb trees and other plants to photosynthesize. Once you know them, you’ll be able to spot them at a distance from anywhere.
Key ID Points
The tough leaves have toothed edges with raised veins on the underside.
Very young leaves are light yellow-green.
Mature leaves are darker green. Each vine has small, young tendrils at the edge.
Leaves can vary drastically in size with some varieties.
The bark peels off in strips on the branches of older grape vines.
Wild Grape Look Alikes
There’s a few look alikes beginners should be aware of. The two most common I see are Canada moonseed and Virginia creeper. False grape (Ampelopsis sp.) is also a look alike but I don’t see it often, and it’s harmless if consumed on accident.
Canada Moonseed (Menispermum canadense)
Canada moonseed is also a vine, and could be mistaken for wild grapes at a distance. This is the only, real poisonous wild grape look alike I know of.
Canada Moonseed vs Wild Grape
Here’s a few key points on how to separate them from grapes:
Canada Moonseed:
Lacks teeth on the leaf margins
Is often noticeably paler green color, especially when young.
The stems are thinner and more delicate than grape vines.
Canada moonseed vines spiral around their support, while grapes do not.
The fruit contains a single crescent-shaped seed. Grapes have round seeds.
The fruit isn’t nearly as bountiful as grapes and doesn’t grow in tight clusters.
Virginia Creeper / Woodbine
Virginia creeper (Parthenocissus quinquefolia) is a common, aggressive growing vine. It’s the most common wild grape look alike I get messages about. The plant has palmately compound leaves made up of five serrated leaflets.
Virginia creeper fruit doesn’t grow in clusters like grapes. An easy way to separate it from grape plants is the berries fruit on red stems. The fruit tastes bad, but is harmless.
Habitat
Wild grapes grow just about anywhere. I see them creeping up yards and fences, climbing trees, and around the edges of forests. As the name implies (river grape) they also love to grow along rivers and streams.
My grandmother has a wild grape vine that has grown up her trellises on the side of their deck, and their friends come every year to pick the grapes and make wild grape wine.
Some grape varieties can make massive leaves.
When to Harvest Wild Grapes
Grape harvest season is generally around mid-late August, but my harvest plan begins much earlier. If you’re out foraging during the growing season, it’s easy to see where the grapes will be fruiting heavy. Make a note of spots you see during the year and come back when they’re ready.
When the grapes are ripe and deep purple (preferably without any unripe green grapes), cut off whole clusters with a scissors and put them in a box or other container.
I never bother to harvest grapes after a frost, as some recommend as, by the time the frosts come, our Midwest grapes will be dried out.
How to Make Wild Grape Juice
Once I bring the grapes home, I try to process them into juice quickly so they don’t dry out in the fridge. Here’s what I do:
Take the grapes, stems and all, making sure they’re clean and free of grit (taste a few to make sure and wash if you need/want) and put them in a large pot. Next, I mash the grapes up with a potato masher, mixing it around here and there to make sure I’m getting grapes from the bottom.
When the grapes are mashed up and juicy, I add some water, just enough to make sure that the grapes are completely covered by an inch or so of juice. The reason for the water is that wild grape juice is very thick, and a little extra liquid will make processing much easier-it will not dilute the strong flavor of your wild grape juice.
After the grapes are mashed up and I’ve added the water, I put the pot on the stove and allow it to get hot enough to steam. Don’t bring the pot to a boil, you just want to get it warm as it makes the juice relax and will help it go through a strainer, which will give you the highest yield possible.
I carefully dump the grape juice and skins into a colander in a large bowl, allow it to drain, then I remove the leftover skins and stems, allow them to cool until I can handle them, then wring out the juice.
Typically I use cheesecloth to wring out the juice, but you can do it by hand if you have to. This can be a messy process, and you’ll see in the video at the end of this post that I do it in a garage.
From here I strain the thick juice one more time through a fine strainer. The finished grape juice can be frozen, or processed into things like jelly or wild grape reduction, etc. You can use raw grape juice pressed from the fruit, but you’ll get a lot less juice, and it’s very strong.
Safety Note: Tartaric Acid
Wild grape juice isn’t something to drink as-is, since it’s very tart and thick. I can’t drink the juice raw at all, as my tongue is sensitive to it, and I know others that share my sensitivity.
The most important thing to know is the juice contains tartaric acid and calcium oxalate crystals that can cause loose bowels when consumed.
Thankfully it’s easy to remove the oxalate and tartaric acid as they settle to the bottom of the container after cooking and juicing. Let the juice settle overnight, then pour off the grape juice, discarding any sediment at the bottom.
What to Make with Wild Grapes
There’s lots of things you can do with your grape juice, as well as the edible grape leaves. Here’s a few examples.
Homemade Grape Vinegar
There’s still goodness left in those wild grape stems, skins and pits, and while you could pour some water over them, mix them up, and strain it to get a weak juice.
I prefer to use the leftover mash to make homemade vinegar that I use instead of red wine vinegar. It’s fantastic. See the full recipe with proportions for fruit scrap vinegar here.
A Red Wine Substitute
The finished juice is perfect for wine, jams and jellies, but there’s lots of other things you can do with it too. I use wild grape juice for all purpose cooking in recipes that call for red wine.
I also make a reduction from it you can use similarly to saba or balsamic vinegar reduction-a sort of wild grape molasses inspired by a traditional fruit juice reduction called pekmez from Turkey (typically made with mulberries).
Stuffed Grape Leaves
Wild grape leaves are essentially the same grape leaves sold in many stores, but it did take me a couple years and dating a Greek woman to figure it out.
Grape leaves should be harvested while you’re checking on grapes growing throughout the season. Once the grapes are ready, a lot of the leaves will be past-prime. I can collect hundreds of leaves from a single vine or two in an hour if I’m working quickly.
Fermented grape leaves are edible and fantastic for their most traditional use: stuffing. Since they’re tough, tannic and sour, you’re not going to be making a salad out of them, although I’ve had some preparations where the leaves are pickled or fermented and then cut into pieces and used in dishes.
Fermented grape leaves are traditionally used for stuffing (dolma, dolmathes, dolmades, etc) and it’s hard to find a better way to enjoy the leaves.
If you’ve ever had commercially pickled grape leaves, they can be very strong on the vinegar, and I know plenty of people that don’t care for them. Foraged grape leaves you pick yourself though, are a blank canvas for whatever flavor you like. See my recipe for fermented grape leaves.
Grape Tendrils
These are small, but fun if you have some grape vines growing in the house or around the backyard. The young, tender tendrils/tips of grape vines are nice and tart, and add a great taste to salads. Try them!
Wild Grape Jelly
Foraged grape jelly is one of the best you’ll ever have. It’s the grown up version of what you put on a peanut butter and jelly sandwich, but with a flavor beyond comparison of the watered-down jelly in stores. It’s easy to make, and I often don’t even use pectin as the seeds are naturally high in it.
It’s been quite a journey watching Travis “T-Bone” Turner on Bone Collector but it seems like this is the end for this extremely talented hunter. In late 2021, Travis was diagnosed with an extremely fast-growing malignant cancer, and the only way to get rid of it was to amputate his leg!
Keep reading this Travis “T-Bone” Turner Bio to learn more. 2222
What Happened To Travis “T-Bone” Turner From Bone Collector?
It was February 1, 2022, when Travis “T-Bone” Turner first revealed the devastating news via IG and FB that he was having a leg amputation surgery.
According to him, he went to a hospital in July 2021 to treat an infected tick bite. And while he was there, the star also asked an ER doctor about the knot on his right shin. Since the knot was roughly the size of a grape, the doctor told him it was likely nothing but to keep an eye on it.
By next month the knot had grown to the size of a golf ball, and he was immediately referred to a general surgeon. Furthermore, when the turn for his examination arrived, the knot was even bigger with two additional knots beside it.
And when the knot finally grew to the size of a tennis ball and was “busting through the skin and bleeding,” the doctors knew they needed to perform a biopsy.
10 days after the biopsy, Travis was informed that he had fibrosarcoma, a rare form of extremely fast-growing malignant cancer. In addition, it was so larger and intertwined that it was impossible to remove all of cancer by removing the tumors.
Thus, he was prompted to amputate his leg.
The surgery then took place on the first week of Feb 2022, and by the second week, Travis was on the recovery road. “Just a quick update. The surgery went well. My leg stump is sore. But still in great spirits and feel good other than that,” Travis updated his fans on Feb 9, via FB post.
Travis “T-Bone” Turner Weight Today
Travis “T-Bone” Turner was reportedly over 136 kg (300 lbs) as of 2022. However, after the leg amputation surgery, he must have lost a certain amount of weight.
If you don’t know, this isn’t Travis’s first surgery. Back in late 2004, he underwent stomach bypass surgery, after which his weight steadily declined from 247 kg (544 lbs) to 227 kg (501lbs) on Oct. 20, and down to 172 kg (379 lbs) on April 30, 2005.
Who Is Travis “T-Bone” Turner Wife?
Travis “T-Bone” Turner’s wife Michelle Turner is a teacher who reportedly worked at Coweta County School in Coweta County, Georgia.
The two were married back on December 23, 2003, after dating for over 2 and a half years. And even as of 2022, the lovebirds were still going strong, with Travis never shying away from flaunting her over his socials.
On Michelle’s 39th birthday (i.e on June 8, 2019), Travis took it to his FB to write, “Happy Birthday to my lovely wife Michelle. My ride or die, a partner in crime, baby mama. Main squeeze, better half, anchor of the homestead.”
Talking about their kids, Travis and Michelle welcomed their son named Archer on September 28, 2005. And yes, the name “Archer” comes from their obsession with the archery thing.
Travis “T-Bone” Turner Net Worth
Travis “T-Bone” Turner garnered a net worth of under $700 thousand by 2022.
An archery guru and hunter, Travis first made his mark in the hunting world after winning the 1991 ASA Archery World Championship. At the time, he was also working as the owner and manager of one of the largest archery shops in Georgia. And with the win, he was able to make long-standing relationships with companies such as Realtree, Hoyt, Bone Collector, and Whitetails Unlimited.
The guy then went on to work as a bow technician for national celebrities and pro athletes. Finally, in 2008, he received an invitation from Michael Waddell to join his dream team of Bone Collector and got shot to the international limelight.
Besides these, Travis also was working as a spokesman for Whitetails Unlimited.
To mention his qualifications, Travis is an ASA and APA certified professional archer who is a 4-time Georgia State Cham. He is well-versed in wildlife management, has a great reputation in the outdoor industry, and owned “TboneOutdoors.com.”
Travis “T-Bone” Turner Age
Travis “T-Bone” Turner was 41 years of age when he had his leg amputated in 2022.
He receives his birthday wishes on August 8, making him of the Leo zodiac.
Who Are Travis “T-Bone” Turner Parents?
Travis’s parents were hunters too. His dad was a fireman in Dayton, but the family then had to move to Atlanta when he was transferred. And that was where Travis learned how to hunt.
Out of all the people that influenced him, Travis said that his dad was his number one icon. “He took me squirrel hunting and fishing when I was 4 or 5 years old. He bought me my first bow for getting good grades when I was 9 or 10,” the star explained.
Unfortunately, Travis’s lost his mother to cancer in 2020.
Related FAQs
Where Is Travis “T-Bone” Turner From?
Travis was born in Dayton, Ohio, and grew up in Atlanta.
As of 2022, he resided in Hogansville, GA, with his wife and son.
Is Travis “T-Bone” Turner On Instagram?
Yes, here’s his IG @tboneoutdoors.
Also, find him on FB @tboneoutdoors, Twitter @tboneoutdoors, and Youtube @tboneoutdoors.
How Tall Is Travis “T-Bone” Turner?
Travis is a 6 feet 3 inches (190 cm) big-framed guy.
Iguanas are a type of lizard that is found in warm climates. They come in a variety of sizes, with the largest species reaching up to six feet in length. The biggest iguana in the world is the green iguana, which can grow up to seven feet long and weigh up to 20 pounds. Green iguanas are native to Central and South America, and can be found in the wild in countries such as Costa Rica, Panama, and Ecuador.
Its brightly colored and dragon-like appearance make it one of the most popular iguana species. They are mostly harmless to humans, but they can be irritating. The largest iguana genus in the world is the Fiji crested iguana. Almost all Melanesian iguanas are critically endangered, according to the International Union for Conservation of Nature. Only the Marine iguana can be found in the ocean, and it is the only reptile known to spend a significant amount of time in the water. Their swimming abilities allow them to dive to depths of 65 feet and a depth of 15 feet. One of the largest spiny-tailed species in the world, measuring more than four and a half feet in length.
The Galapagos Islands are home to all three species of the genus. The blue iguana was thought to be 69 years old when it died. A Rock iguana’s longevity is well-known. A 41-year-old captive-born rock iguana is currently the world’s longest-living rock iguana. A dry forested area with eroded limestone and sparse vegetation is ideal for Rock iguanas. The ten species recognized are vulnerable, endangered, critically endangered, and two of them have been declared as critically endangered. A green iguana has a typical size of almost five feet, though some have grown to be nearly six feet long.
The biggest iguana found in florida is the green iguana. It is a large, tree-dwelling lizard that is native to Central and South America. The green iguana is the largest member of the genus Iguana and can grow to be over 6 feet long and weigh up to 20 pounds.
There is no native iguana species in Florida. Invasive species currently occupy the majority of the state’s land. Despite the fact that these lizards are misunderstood and wreaking havoc, they are frequently misdiagnosed as invasive nuisances. Their feces and elaborate burrows have caused significant damage to man-made and natural structures. The Mexican spiny-tailed iguana grows to be a little shorter than 5 feet and weighs between 5 and 15 pounds. In the 1970s, independent reptile release programs were the most effective way to introduce these lizards to South Florida. By the time Florida’s environmental agencies could intervene, there were thousands living in various counties.
A Mexican spiny-tailed iguana is the most common iguana species found in Florida. Adult green iguanas can grow to be over five feet long and weigh more than 15 pounds. They are prolific breeders, laying nearly 40 eggs per hour. According to research, Florida currently has over 20,000 residents. Fewer cold spells have resulted in them surviving in winter, thanks to climate change.
Largest Green Iguana Ever
Credit: blogspot.com
Each species has its own size, but the largest iguana measured was 5.2 feet long. Two of the ten recognized species are vulnerable, four are endangered, and four are critically endangered.
A iguana is a stocky lizard with a broad head, a saggy skin on its throats, and spines that protrude from its head, neck, backs, and tails. The green iguana, which measures between 5 and 7 feet, is the longest of the iguanas. For example, the female rock iguana can lay up to 20 eggs. The mother’s actions indicate that she is leaving the eggs alone. A baby iguana is completely independent for the first three years of its life. Predators and habitat loss are responsible for the extinction of many young birds. The Galapagos marine iguana, despite its dark skin, can swim through water like a crocodile. The population of the Fiji banded iguana has decreased by 50% between 30 and 45 years. People in Central and South America raise and consume iguanas on farms.
Biggest Iguana Caught In Florida
In Florida, the largest iguana on record was 4 feet 5 inches long and weighed 35 pounds. It was caught in 2009 by a fisherman in Key West.
Ich habe gerade den grten Leguan aller Zeiten gefangen, wenn Sie meine Instagram-Geschichte gesehen haben, wir haben noch ein monster Die Seiten von der Dings ist auch hier verrckt, and ber das fest ist das gemacht. The Ding ist gewaltig, oh nein, geht es ins Rollen gebracht, Bruder, hr von rollen, Baby, das ist so im Gegensatz The 400 Pfund we’re offering is for a limited time, so I’ll take advantage of it. When you want to hear a fangen, sing hier. Ich hier diesen Angelschnur haben, aber die Hundert-Pfund-Test von diesen Angelschnur ist, hier diesen Angelschnur trotzdemern. Ich brauche dich, um, derzeit sehr heim, hier, ihr heute, das weiter daran ziehen. I’m glad I chose trainieren rather than boarding a plane, and I’m glad I chose train-enriching rather than boarding a plane. In der grten dominanten wilder Leguan, he ist.
Is that a sign of my life? Weiter hier berspringst schauen geben, wie er hier so beeindruckend ist? I am so fortunate that I have so many great friends, especially in Germany, that I have found a special place for them all, so thank you very much for all of the wonderful things you have given me. I will be pleased to report that I have found a special place for them Is that versuche you’re looking for, or is it just you making a fool of yourself? ich in Sd Florida, die hier aber die We have Bass Pro Shops located in every city across the country; if you want to make sure you get the best service and prices, please visit our store. Is there any significance to Iggy Jungs, bleiben Sie dran, danke fr Abonnieren, or werde ich es Ihnen sagen Jungs ber die TV-Shows, die herauskommen, and lasst mich e
Giant Iguanas In Florida: Just A Rumo
Despite this, the state has been rumored to be home to giant iguanas. People believe there are giant iguanas in Florida because they have seen the animals on TV or in photos. In Florida, there are no native iguanas; instead, iguanas are invasive species. As a result, there is no such thing as an iguana that can grow to be enormous in Florida.
Iguana Lifespan
An iguana’s lifespan ranges between 12 and 15 years. An iguana can live for more than 20 years if it is properly cared for.
It’s worth noting that iguanas are fairly long-lived lizards, particularly captive-bred ones. A baby iguana that is sold in captivity can live up to 30 years. The average lifespan of a iguana is thought to be 20 years. Pets like these require special housing and veterinary care, so some people may not be appropriate for them. For iguanas to be kept, they must be kept in a comfortable environment. As a young adult, a 42 enclosure is commonly used by keepers. Because your rhinoceros iguana requires UVB lamps, you should select the best UVB lamp for him.
When basking on the iguana, both UVA and UVB are welcome. The rhinoceros iguana‘s name is derived from a bony-plated pseudo-horn or outgrowth that resembles rhinoceros horn. Skin colors range from blue grey to a dark green to brown, depending on the skin type. It is critical to feed a variety of foods to Iggy in order for him to be healthy and happy. At all times, iguanas require fresh, clean water. When it comes to humidity, your iguana should be in a good range of 65-80%. It shed like any other reptile or lizard as a result of its being a rhinoceros iguana.
It can be difficult to shed hair when the air temperature is insufficient or too hot. When you gnashed a iguana, you needed to keep its humidity constant. After two or three years of age, juvenile iguanas shed a thin layer of skin on their bodies. To avoid sticking to the animals new skin, the air must be humid enough to prevent it from sticking. Make sure the products are simple to clean and replace.
There are no predators in the wild that can keep the Grand Cayman blue iguana in check for 40 years. Despite their lack of human intervention, they are impressive. A 40-year-old rhinoceros iguana, known only as Rhino, has been recognized as the world’s oldest living iguana by Guinness World Records. Rhino, the world’s oldest rhinoceros, reached 40 years and 278 days old on November 27, 2020, and lives at the Australia Zoo, which was purchased by Steve Irwin’s widow,Terri, in 2011. Steve Irwin, a wildlife conservation and film maker who was killed by a stingray while filming sharks in 2003, was a well-known wildlife conservation and film maker. The rhinoceros is a testament to the preservation of Irwin’s conservation legacy. This incredible story of survival is an inspiring example of the power and resilience of nature.
The Daisy Red Ryder 1938 75th Anniversary Special Edition – Best Beginner BB gun
Pop quiz:
What’s a classic gun that American kids and adults love altogether?
A Daisy Red Ryder .
Correct. And what’s even better than a Daisy Red Ryder?
A Daisy Red Ryder 75th Anniversary Edition. Oh yeah .
That’s right, buddy.
This special edition got a huge update with an aluminum cocking lever, solid maple wood stock with the golden band on the forearm, laser-engraved graphics in the stock.
It’s eye-catching, lightweight, and well-constructed. This classic rifle makes you fall in love at first sight
Shooting consistently out of the box with extremely high velocity (supersonic included) and superb knock-down power, the Air hawk shoots and feels like the legendary RWS 34 but at 1/2 of the price:
It’s hard to beat this rifle in its price range and that’s why the Ruger Air Hawk deserves a place in the top 5 rifle list.
The purpose of this list, obviously, is to save you time and effort by not going through the hassle of digging into each model among the hundred choices of air rifles in this price range.
All of these rifles are affordable, convenient, and have impressive features worth more than the price you pay for them.
Also, an air rifle under 100$ is not just an air rifle.
The skills you practice with them will directly transfer to the firearm.
The Beretta autoloader has been a mainstay in sporting circles and in game fields for many years, and the line has continued to evolve and improve. Beginning with the Model 300 in the late 1980s, the 300 quickly morphed into numerous specialty versions for target shooting, waterfowl, and upland game hunting. The latest iteration is the A400 Xtreme Plus (“A400XP” for short). The new model draws on its history, respects the past, and employs the latest in high-tech shotgun technology. The result is a superior product.
The Beretta A400 Xtreme Plus was unveiled on May 5, 2018, at the NRA Annual Meeting in Dallas. It’s built in Italy and is billed as the ultimate for superior reliability for all conditions encountered in waterfowl hunting. It offers advanced barrel technology and a host of ergonomic features that will surely tantalize the clay-target shooter. It is packed with features that make it evolutionary, darn functional, and pleasant to shoot.
High-Tech Features
I recently received a new A400XP for testing, and I was impressed. One of its more unique features is the configuration and construction of the barrel. This multifaceted process is called the Beretta Steelium Plus barrel technology. Beretta proudly notes that it makes more than 500,000 barrels a year, and the company doesn’t skimp on the A400XP barrels. They are made of steel alloyed with molybdenum, chromium, and nickel that results in a superior shotgun barrel. A400XP barrels are drilled, reamed, and cold-hammer-forged, just like a fine rifle barrel. Then they are vacuum-relieved, giving the steel what Beretta says are the ideal characteristics for optimal ballistic performance.
The A400XP barrel has an “Optima-Bore” profile with a 14-inch forcing cone, instead of the more usual 6 inches. This gradual taper results in a reduction in perceived recoil, better patterns, and long-range performance, even with steel shot. The ventilated rib has a 7×7 stepped design with a red fiber-optic front sight and a metal mid-bead.
The A400 Xtreme Plus comes with five screw-in Optima-Choke HD choke tubes, including Full, Modified, Improved Modified, Improved Cylinder, and Cylinder.
The A400XP uses what Beretta calls “Optima-Choke HP” choke tubes. They extend about a half-inch from the muzzle and are clearly marked as to choke constriction. Five constrictions are provided, from Cylinder to Full. Steel shot is okay in all except Full and Improved Modified.
The action is equally unique with the “Blink” gas-operating system, as in “quick as the blink of an eye.” The rotating bolt head and the new gas valve make the A400XP 36 percent faster cycling than other shotguns. The design of the gas piston keeps powder gases from “leaking out,” so the gun can cycle faster. This also reduces the amount of gases that get into the action by about one-half, so cleaning intervals are substantially lengthened.
The receiver is a half-inch shorter than its predecessor, reducing the gun’s overall length. A great feature is that the aluminum-alloy receiver is drilled and tapped (for husky 8-40 screws), so adding a scope or dot sight for turkey hunting is a snap.
The receiver has an enlarged loading port, an extended charging handle, and a long lever-like bolt release for easier operation with gloves. The trigger is very good, breaking cleanly at 5 pounds, 6 ounces. The magazine capacity is four rounds, and a plug to reduce it to two is provided.
A terrific feature of the A400XP is the cartridge cut-off lever on the left side of the receiver, reminiscent of the Browning A-5. This allows a live round to be ejected from the chamber and the bolt to be locked open. This is great for crossing a fence or getting back into the truck for the jaunt to the next hedgerow. It also allows the hunter to quickly switch loads without disturbing the rounds in the magazine. This is especially handy if a fat Canada goose is gliding toward your decoys when your gun is stoked with duck loads.
The stock has a really effective recoil-reduction system, a big plus for waterfowlers and high-volume target shooters. Tests have shown that a shotgun has two distinct recoil impulses. The first is when the shell goes off, and the second is when the bolt slams back into the receiver. The “Kick-Off Mega” in the A400XP stock is a hydraulic recoil-dampening system positioned between the pistol grip area and the buttstock proper. It reduces the axial movement that makes the stock smack the shooter’s cheek from that second impulse. The soft comb pad helps here, too. In addition, there is a traditional rubber recoil pad on the end of the stock. The forearm and pistol grip areas have nice, soft padding that not only provide a good handhold, but also soak up a little kick. The A400XP’s stock fit me perfectly, but a shim kit is provided, so the user can adjust the drop and cast, if desired.
Steve liked the A400 Xtreme Plus’s trigger pull. It broke at a crisp and clean 5.38 pounds.
The A400XP is available in 12 gauge only and with a 26- or a 28-inch barrel. My test gun has a 26-inch barrel with the Max-5 camo finish, and it is really attractive. It is also available in several other finishes.
Crushing Clays
Guns are made to be shot, so I proceeded to put all sorts of ammo through the new A400XP. There were no bird seasons open when I had the gun, but clay targets are always in season. I have a trailer-mounted target thrower, so I towed it out to the pasture north of my vineyard and proceeded to crush clays—and in the process scare the daylights out of every grape-eating scavenger in the area.
I wanted to give the new gun and myself every advantage, so I screwed the Cylinder choke tube into the barrel and blazed away. The targets were pretty close, and the wide-open Optima HP tube literally smoked every target I centered. As a test of the recoil sensation, my wife whacked a few clays with the gun and pronounced the recoil “mild.” However, she was not enamored with the A400XP’s 8-pound heft and quickly returned to her 6-pound 20 gauge.
The A400XP has a 3.5-inch chamber, so it can shoot 2¾-, 3-, and 3½-inch shells without any adjustment. I had several target loads with 7/8, 1, 11/16, and 11/8 ounces of shot, plus a couple of lighter handloads. The gun’s operator’s manual states the gun will digest loads down to 7/8 ounce, presumably at a velocity of around 1,200 fps, but suggests that “best initial performance” is with shells loaded with “11/8 ounces of shot.” This is code for “break the gun in” first with full-charge target loads before shooting the wimp loads, and my functioning tests proved Beretta right.
The author says the A400 Xtreme Plus swings smoothly. Its balance and handling characteristics are spot-on.
Few folks chronograph shotshells because it is a bit tricky. But just as with rifles and handguns, it’s really the only way the shooter can get an idea what a given load is doing in his or her gun. This is especially true with shotshells. The velocities of handloads and even high-dollar factory loads can vary all over the place. I shot my test loads over the Oehler Model 35P chronograph to see what kind of performance they delivered. As a rough index of momentum, I borrowed the pistol shooter’s “power factor.” This is just the weight of the shot charge in grains, times the velocity in fps, divided by 1,000. Basically, you need a power factor of about 500 or higher to work the action.
Of course, all of the ammo with 11/16 ounces of shot and up worked peachy-keen. However, neither my light skeet hand-loads with 7/8 ounce of shot at a velocity of 1,044 fps nor my shells with 1-ounce shot loads at 1,182 fps would work the A400XP’s action. The empties would usually eject, but not feed a second round from the magazine or lock the bolt back if the magazine was empty. The same is true of Winchester’s “Low Recoil” load with 26 grams (0.917 ounce) of #9 shot that likewise would not cycle the action. This is a very light load—the listed velocity is just 980 fps—and it averaged only 958 fps out of the A400XP.
The results with these last three loads are of little consequence, as few folks are going to shoot such light loads in their duck guns anyway. As the saying goes, it was only a test.
The forearm and pistol grip areas have soft padding that provides a good handhold and also soaks up a little kick, and Steve thinks the Realtree Max-5 camo finish is very attractive.
Two of the best shooting loads I tried were Federal’s new Gold Medal Grand and Grand Handicap ammo. Both are loaded with 11/8 ounces of hard #7½ shot. The Grand is listed at 1,200 fps, and it averaged 1,142 fps out of the A400 Xtreme Plus. The Handicap, which is listed at 1,235 fps, measured 1,199 fps. Frankly, I couldn’t tell the difference between shooting them. Both crushed clays with authority, and cycling was 100 percent reliable. As best I could determine, the A400XP patterned “50 percent/50 percent,” and my best hits on clay targets were when I aimed dead center at the target.
Overall, the A400XP is a pretty impressive shotgun. It handles great and is well balanced. It never malfunctioned as long as it was fed a proper diet. The Max-5 camo not only is good-looking, but also blends well in marshes and upland cover.
My first impression was that the gun was a little heavy, but shooting and swinging soon proved that the balance and handling characteristics were spot-on. It swung smoothly and encouraged a good follow-through—critical for hits on crossing targets. If I just pointed the gun correctly and kept it moving, it smashed clays convincingly. Plus, the soft comb pad helped me keep my head on the stock (“Stay in the gun,” as the great Nick Sisley says). And the cumulative effects of recoil seemed modest over the course of shooting several boxes of ammo.
The A400XP’s push-button manual safety is in front of the trigger, and at first it perplexed me. Every other pump or autoloader I’ve shot had the safety behind the trigger, so it took me a while to get used to it.
I must caution users to keep their fingers and other body parts away from the ejection port when the action is open. The breechbolt release button is a lever about an inch long. It has a lot of leverage and is very easy to press and release. It is not difficult at all to accidentally close the bolt on your finger or fingers.
Viewed retrospectively, the new A400XP is traditional and brand-new at the same time. It’s interesting to review what the “experts” of the early 20th century thought were the established norms for the weight and barrel length of the “perfect shotgun.” In W.W. Greener’s opus The Gun and Its Development, the ninth edition of which was published in 1910, the shotgun’s perfect weight was determined to be 96 times its shot charge. In those days, the British considered 1 ounce of shot about right, so this suggested a gun weight of exactly 6 pounds. For a 11/8-ounce charge, it came out to 6.75 pounds.
The buttstock features Beretta’s “Kick-Off Mega” hydraulic recoil-reduction system that is very effective, a rubber recoil pad, and soft comb pads.
The classic work The Shotgunner (1949) by Bob Nichols was published just at the beginning of a new era of shotguns and their ammo. In those days, it was gospel from across the pond that a shotgun’s barrel length should be about 40 times its bore diameter. For a 12-gauge bore of 0.729 inch, this equates to 29.16 inches, and indeed, most European game guns had 30-inch barrels. However, even Greener later equivocated on barrel length somewhat and admitted that good results could be had with 28-inch barrels.
The barrel length and weight of the A400XP are fairly close to the ideals of Greener and Nichols. The gun I tested weighs exactly 8 pounds. This translates to a ratio of 113.8, not radically different from the 96 Greener envisioned. And the available barrel lengths of 26 and 28 inches are fairly close to Nichols’s suggestion of 29 inches.
So it is good that things that have worked for decades are perpetuated, while at the same time incorporating advanced features that make the shotgun even better. Greener and Nichols, eat your hearts out.
A reflex sight that doesn’t run on batteries or solar power? Ruger says, “Yes!” with its new, low-profile Ready Dot.
by Rob Reaser
There is no question that red dots are “the thing” for a growing number of pistol shooters and EDC adherents. As such, there are many red dots on the market to choose from for full-size handguns to the micro-compact variety. The latter pistols, by virtue of their small size, favor a more minimalist approach in red dot optics — reflex versus enclosed emitter, diminutive lens, “always on” or “shake-to-wake” activation instead of on/off buttons, and a low profile for use with the factory open sights when backup is needed.
There are many good miniature red dots available, but as far as we know and have tested, all micro reflex red dots are battery-powered…except one.
Ruger just released the Ruger Ready Dot. It looks like a conventional micro red dot and pretty much acts like one except that it doesn’t require batteries to operate.
Instead, the Ready Dot incorporates a simple fiber optic system to gather ambient light and display it onto a 12 mm multi-layer coated lens. Since there are no batteries to maintain and no switches to turn on and off, the Ready Dot is, well, always ready. Of course, since the system requires ambient light to be gathered and reflected off the lens, the Ready Dot does not function in darkness or in low light levels.
Think of it as the crystal radio version of today’s advanced electronic red dots; it works as designed, but with limitations.
Construction, as you can see, is about as simple as it gets. The housing is black polymer fitted with an impact-resistant, optical-grade polymer lens. The fiber-optic light-gathering coil sits where the battery would be on an electronic red dot, with the output end of the coil permanently affixed in the emitter position.
Although Ruger engineered the Ready Dot for use with the company’s Max-9 micro 9mm and thus uses the Shield RMSc mounting pattern, the unit will work with most handguns that feature the RMSc footprint.
For testing, I pulled out my Sig P365 since it came from the factory with the slide cut for RMSc-pattern optics. The downside to choosing this handgun to host the Ready Dot was that I would lose the factory rear sight. That did not end up being a deal-breaker, though, as I will explain shortly.
Installing the Ready Dot onto my P365 began by removing the two screws securing the rear sight to the slide. These buggers were on TIGHT and threatened to round out the hex slots when I applied torque. Rather that risk having the screws permanently lodged in the slide because of damaged screw heads, I pooled a few drops of Kroil on them and let it work its magic for a few hours. That was enough to allow the screws to be safely backed out of the slide.
With the rear sight screws removed, the sight is freed of the slide.
Next, the slide cover was removed.
The Ready Dot dropped expertly into place with no alignment issues.
While the Ready Dot comes with two M4x0.7 8mm screws for installing the sight onto the Ruger Max-7, those screws will not fit the Sig P365 bushings. Variations in screw type, slide cuts, and adaptor plates among assorted handgun models means the Ready Dot may not work on all micro handguns even if they feature the RMSc footprint, so check with the gun manufacturer before you buy. For my P365 installation, M3x0.5×10.6 screws got the job done and the Ready Dot chassis fit perfectly into the slide cut.
Here is the non-enhanced, non-altered image of the Ready Dot. Boasting a whopping 15 MOA diameter, the red dot is big, bold, and quick to acquire. It is also crisp, with a parallax-free distance of 10 yards.
Of course, the vibrancy and visibility of the dot is wholly dependent upon the ambient light. The more light gathered by the fiber-optic, the brighter the image, and vice versa. Part of my testing included a heavily overcast day — so dark it seemed more like dusk than mid-afternoon. Still the Ready Dot made itself quite evident. Inside of the house, visibility varied considerably when transitioning between dim and well-lit rooms.
Background lighting also figures prominently in the red dot’s visibility. If you’re standing in a dark room and aiming into a lighted room, the dot is difficult to pick up. When outside, though, the red dot stands ready.
I mentioned earlier about the Ready Dot requiring me to eliminate the factory rear sight on the Sig. Given the practical effective range of this and most micro-compact pistols, and the relatively short distance of most self-defense encounters, the lack of a rear sight is not a huge drawback. The tritium dot on my factory front sight is clearly visible through the Ready Dot lens, and placing the bottom of the dot at the bottom of the Ready Dot lens corresponds to the same sight alignment as if the rear sight were present — the exception being any left or right shift. To keep that under control, the Ready Dot chassis has a ramped, U-shaped cut-out to help with sight alignment when the red dot is not visible.
The one thing I was curious about before I installed the Ready Dot was its co-witness with the factory front sight because there is no ability to make windage or elevation adjustments. As it turned out, the red dot corresponded with the factory sight just fine, so there were no issues with point-of-aim, point-of-impact performance. Will that be the case for every handgun that hosts the Ready Dot? I can’t say. But then again, we’re talking about micro-compact pistols with a typically short engagement distance.
Although the Ruger Ready Dot will not give the 24/7 aiming solution of a battery-powered red dot, it is not trying to compete with those models. This is for the shooter who prefers a hands-off, zero-maintenance, always ready red dot suitable for most situations. And with an MSRP of $99.95, this is an easy buy for anyone with a handgun featuring an RMSc optic cut slide who wants to try their hand at a red dot.
“Exploring the world of deer hunting in Wisconsin? Discover the affordable gateway to this thrilling experience on public land! Uncover the costs associated with entering this popular sport, as we delve into an insightful guide, ensuring you have all the essential information to embark on your exciting deer hunting journey.”
Exploring the Costs of Deer Hunting on Public Land in Wisconsin
Deer hunting on public land in Wisconsin can be a cost-effective option for hunters. Unlike hunting on private land, which often requires permission or leasing fees, hunting on public land is accessible to all hunters with a valid license. The cost of a resident gun deer hunting license in Wisconsin is $24, making it an affordable option for many hunters. For those aged 12-17, the cost is even lower at $20, and children under 12 can hunt for just $7.
One of the advantages of hunting on public land is that there are no additional fees or lease costs associated with accessing the property. Public lands in Wisconsin include state parks, forests, wildlife areas, and other designated areas where hunting is permitted. These lands are managed by the Department of Natural Resources and provide ample opportunities for deer hunting.
In addition to the affordability of hunting on public land, there are also safety benefits. Public lands are often well-marked and have designated hunting zones to ensure the safety of hunters and other outdoor enthusiasts. The DNR also provides hunter safety education programs to promote responsible and safe hunting practices.
However, it’s important to note that while hunting on public land may be more affordable, it does come with its own set of challenges. Public lands can be heavily hunted and may require more effort to find a suitable location and avoid crowded areas. Additionally, access to certain areas may be limited during specific seasons or times of the year.
Overall, deer hunting on public land in Wisconsin offers an affordable and accessible option for hunters. With proper planning and research, hunters can enjoy a successful and cost-effective deer hunt while taking advantage of the state’s abundant natural resources.
Benefits of Deer Hunting on Public Land:
– Affordable: A resident gun deer hunting license costs $24.
– Accessible: Public lands in Wisconsin are open to all hunters with a valid license.
– Safety: Public lands often have designated hunting zones and safety education programs.
Challenges of Deer Hunting on Public Land:
– Competition: Public lands can be heavily hunted, requiring more effort to find suitable locations.
– Limited Access: Some areas may have restrictions or limited access during certain seasons or times of the year.
Budgeting for a Deer Hunting Adventure on Wisconsin’s Public Land
1. Planning Your Expenses
When budgeting for a deer hunting adventure on Wisconsin’s public land, it’s important to consider all the necessary expenses. Start by determining the cost of your hunting license, which is $24 for residents and $200 for non-residents. If you are bringing along any minors or teenagers aged 12-17, their licenses will cost $20 each. Children under 12 can hunt without a license.
2. Accommodation and Transportation
Next, consider the costs of accommodation and transportation. If you plan to stay in a hotel or cabin near your hunting area, research the prices and make reservations in advance. Alternatively, you can opt for camping at one of the many public campgrounds available in Wisconsin. Remember to factor in fuel costs if you’ll be driving to your hunting location.
3. Gear and Equipment
Deer hunting requires specific gear and equipment, such as firearms or bows, ammunition or arrows, tree stands or blinds, clothing, boots, binoculars, and field dressing tools. Make a list of all the necessary items and research their prices to estimate your expenses accurately. Consider purchasing quality gear that will last multiple seasons.
4. Food and Supplies
Don’t forget about food and supplies during your hunting trip. Plan your meals ahead of time and create a grocery list with essential items like snacks, water bottles, cooking ingredients, and disposable utensils if needed. It’s also wise to bring a first aid kit in case of any minor injuries.
5. Miscellaneous Expenses
Lastly, account for any miscellaneous expenses that may arise during your deer hunting adventure. This could include additional permits or tags if you plan on harvesting more than one deer, taxidermy fees if you choose to mount your trophy, or any unexpected costs that may arise.
By carefully budgeting for your deer hunting adventure on Wisconsin’s public land, you can ensure that you have a memorable and enjoyable experience without breaking the bank. Remember to plan ahead, research prices, and prioritize essential expenses to make the most of your hunting trip.
Understanding the Financial Investment of Deer Hunting in Wisconsin’s Public Areas
Deer hunting in Wisconsin’s public areas is not only a popular recreational activity but also a significant financial investment for hunters. The annual November gun deer season, which draws the most participants and has the biggest economic impact, contributes greatly to the state’s economy. With an expected sale of about 550,000 firearm deer licenses this year, the Department of Natural Resources (DNR) generates substantial revenue from license sales alone.
In addition to license fees, hunters also contribute to the local economy through their spending on equipment, lodging, food, and other related expenses. The influx of out-of-state hunters from all 50 states and more than a dozen foreign countries further boosts tourism and brings in additional revenue to Wisconsin.
The financial investment in deer hunting extends beyond just the purchase of licenses and expenses during the hunting season. Many hunters invest in specialized gear such as firearms, ammunition, camouflage clothing, tree stands, binoculars, and other accessories. These purchases not only support local businesses but also contribute to the broader outdoor industry.
Furthermore, public land management and conservation efforts play a crucial role in maintaining robust deer populations and ensuring sustainable hunting opportunities. The DNR allocates resources for habitat improvement projects, wildlife research, population management strategies, and law enforcement activities related to deer hunting. This investment helps maintain healthy ecosystems while providing recreational opportunities for hunters.
Overall, deer hunting in Wisconsin’s public areas represents a significant financial investment that supports local economies, outdoor industry businesses, and conservation efforts. It is an important contributor to the state’s economy while also providing valuable recreational opportunities for both residents and visitors alike.
Benefits of Deer Hunting Investment:
– Boosts tourism and brings revenue from out-of-state hunters
– Supports local businesses through spending on equipment and supplies
– Contributes to the broader outdoor industry
– Funds habitat improvement projects and wildlife research
– Maintains healthy ecosystems and sustainable hunting opportunities
Financial Aspects of Deer Hunting:
– Sale of firearm deer licenses generates substantial revenue for the DNR
– Hunters spend on equipment, lodging, food, and other related expenses
– Investment in specialized gear such as firearms, ammunition, and accessories
– Public land management and conservation efforts require financial resources
– Overall economic impact extends beyond the hunting season.
Breaking Down the Expenses of Deer Hunting on Public Land in Wisconsin
Deer hunting on public land in Wisconsin can be an exciting and rewarding experience, but it’s important to understand the expenses involved. Here is a breakdown of the costs you can expect when hunting deer on public land in Wisconsin.
Licenses and Tags
To hunt deer in Wisconsin, you will need to purchase a hunting license. For residents, a gun deer hunting license costs $24. Non-residents, on the other hand, will need to pay $200 for a gun deer hunting license. Additionally, there may be additional fees for certain tags, such as antlerless deer tags. It’s important to check the specific regulations and fees for the county or area where you plan to hunt.
Equipment
Proper equipment is essential for a successful and safe hunt. This includes firearms or bows, ammunition or arrows, camouflage clothing, boots, binoculars, and other necessary gear. The cost of equipment can vary depending on your preferences and budget. It’s important to invest in high-quality gear that will last and perform well in various weather conditions.
Travel and Accommodation
If you are traveling from out of state or a considerable distance within Wisconsin to hunt on public land, you will need to consider travel expenses. This may include fuel costs, lodging accommodations if staying overnight, and meals during your trip. Planning ahead can help you find affordable options that fit within your budget.
Additional Costs
There may be additional costs associated with deer hunting on public land in Wisconsin. For example, if you choose to use bait as part of your hunting strategy and are in one of the 14 counties where baiting is legal, you’ll need to purchase corn or other bait. It’s also important to consider any potential costs for processing or butchering your harvested deer, as well as any taxidermy services if you choose to have a trophy mounted.
While hunting on public land in Wisconsin can be an affordable option compared to private land hunting, it’s important to budget and plan accordingly. Understanding the expenses involved will help ensure that you have an enjoyable and successful hunting experience.
The Price Tag of Pursuing Deer on Wisconsin’s Public Hunting Grounds
Pursuing deer on public hunting grounds in Wisconsin comes with a price tag. While the cost of a resident gun deer hunting license is $24, non-residents will have to pay $200 for the same license. However, it is worth noting that there are discounted rates available for younger hunters aged 12-17 ($20) and children under 12 ($7). These licenses can be purchased online at gowild.wi.gov or from sporting goods stores and other license sales outlets listed on the interactive map provided by the Department of Natural Resources (DNR).
Once a hunter successfully shoots a deer, it must be registered by 5 p.m. the day after it is recovered. This registration process can be done online at GameReg.WI.Gov or through a phone call to (844) 426-3734. It is important to note that all harvested deer must be registered to comply with regulations.
When it comes to baiting deer, there are certain restrictions in place. Baiting is legal in 14 counties but prohibited in 58 for the 2024 gun deer season due to state laws aimed at preventing chronic wasting disease. In counties where baiting is allowed, hunters are limited to using two gallons of corn or other bait at a site. For specific details on baiting regulations, individuals can visit dnr.gov.wi.
In terms of safety, there has been a positive trend towards fewer shooting incidents during Wisconsin’s gun deer hunting seasons. This improvement can be attributed to mandatory hunter safety education and the use of blaze orange clothing. The shooting incident rate in recent years has been approximately 1 per 100,000 participants. Additionally, the increased use of tree stands and reduced reliance on deer drives has contributed to safer hunting practices.
Overall, pursuing deer on Wisconsin’s public hunting grounds requires obtaining the necessary licenses, following registration procedures, adhering to baiting regulations, and prioritizing safety. By doing so, hunters can enjoy a successful and fulfilling hunting experience in the state.
Calculating the Cost to Engage in Deer Hunting on Public Land in Wisconsin
Calculating the cost to engage in deer hunting on public land in Wisconsin can involve several factors. Here are some considerations and expenses to keep in mind:
1. Hunting License: In order to hunt deer in Wisconsin, you will need to purchase a hunting license. The cost of a resident gun deer hunting license is $24, while non-residents will pay $200 for a license. There are also reduced rates for youth hunters aged 12-17 ($20) and those under 12 ($7).
2. Tags: Each hunter is typically authorized to harvest one buck and at least one doe with their license. The number of antlerless deer tags available in each county is determined through a process involving recommendations from the County Deer Advisory Council, review by the Department of Natural Resources (DNR), and the Natural Resources Board.
3. Equipment: Deer hunting requires certain equipment such as firearms or archery equipment, ammunition or arrows, tree stands or blinds, camouflage clothing, boots, knives, and other accessories. The cost of these items can vary depending on personal preference and quality.
4. Transportation: Traveling to public hunting lands may require fuel costs for vehicles or transportation fees if using public transportation.
5. Lodging: If you plan on staying overnight during your hunting trip, lodging expenses should be considered. This could include hotel stays, camping fees if applicable, or renting cabins or other accommodations.
6. Food and Supplies: Bringing food and supplies for your hunting trip is essential. This includes meals for the duration of your stay, snacks, water or beverages, cooking utensils if necessary, coolers for storing harvested game meat safely, and any other necessary supplies.
7. Miscellaneous Expenses: Additional expenses may include hunting permits or stamps required for specific areas or activities (e.g., state park permits), processing fees if you choose to have your harvested deer processed by a professional butcher, taxidermy fees if you decide to mount a trophy, and any other personal expenses or incidentals.
It is important to note that these costs can vary depending on individual choices, preferences, and circumstances. It is recommended to plan and budget accordingly to ensure an enjoyable and successful hunting experience in Wisconsin’s public lands.
In conclusion, the cost of getting into deer hunting in Wisconsin on public land varies depending on several factors. While there are expenses such as licenses, permits, and equipment, it is possible to start with a modest budget. By researching affordable options and considering second-hand gear, individuals can pursue this popular outdoor activity without breaking the bank.
The freshwater drum (Aplodinotus grunniens) is a common fish found across much of the United States as well as parts of Canada and Central America. Also known as “sheephead,” this fish is unfortunately derided as a “rough” or even “trash fish” by some. Yet the freshwater drum is an eager biter that can put up a good fight when caught on rod and reel.
Drum get their name from the croaking or drumming sound they make. Drum species that dwell in saltwater like the red drum are very popular fish. Red drum are widely sought after for both sport and table fare. While those drum are popular game fish, the freshwater drum is mostly ignored. Since the fish are similar in so many ways, I don’t really have an explanation for that.
An average freshwater drum
In the early stages of life, immature freshwater drum are a food fish for many predators. As they grow they can take on enough size to put them out of range for all but the largest of predators. In most of their range freshwater drum commonly reach weights of 1 to 5 pounds (0.5-2.26kg). They can also get much larger than that. The world record freshwater drum weighing 54 pounds 8 ounces (24.7 kg) was caught in Tennessee’s Nickajack Lake back in 1972. Freshwater drum can live quite a while too. Some drum in the upper midwest have made it passed 70 years of age.
I’ve caught a lot of freshwater drum from Pennsylvania to Kentucky. Most were under five pounds, though a select few were much bigger than that. They were usually incidental catches that come when I am fishing for another species or no species in particular. I’m never disappointed to catch a freshwater drum in any case. Some of the larger drum I’ve hooked into were actually quite memorable.
Freshwater drum are deep bodied fish. They vary in color from a bright silver to a deep bronze reminiscent of smallmouth bass. They have a rounded snout and a long dorsal fin that stretches almost all the way back to the tail. The freshwater drum resembles the red drum in some ways, but the freshwater drum has a much deeper body and lacks spots.
The freshwater drum has a wide range that may not have been accurately defined yet. For example, the state record freshwater drum in Virginia was caught in Buggs Island Lake (also known as John H Kerr Reservoir) in 2018. That body of water down on the North Carolina border is well out of the range shown on most of the freshwater drum range maps I’ve been able to find.
Freshwater drum can be found from Canada down to Guatemala. The fish live at least as far east as Vermont and as far west as Montana. They’re common throughout much of the Mississippi River watershed and several great lakes including Lake Erie, Lake Huron, Lake Ontario, and Lake Michigan. They’re abundant in rivers like the Green, Ohio, Monongahela and Wabash. They are also common in a lot of smaller streams like Redstone Creek, Ten Mile Creek, and Pike Run in Pennsylvania.
Sheepshead will often come in shallow to feed and reveal themselves. You can also see them in some slower moving clear rivers and streams. So freshwater drum are usually not difficult to locate; and you can even sight fish for them at times. Yet they can also be present yet out of view. It’s pretty common to catch these fish when going for other species like catfish in muddy waters.
How to catch Freshwater Drum
Before I tell you about catching these fish, I want to let you know that I may earn commission when you make purchases through links on this page. This commission helps support my website, but it does not influence what I write. I only recommend products that I have found to be effective.
Freshwater drum are opportunist feeders. They will eat everything from small aquatic nymphs to minnows and crayfish. They can be caught on everything from flies like the San Juan Worm to lures like the Original Floating Rapala.
This big drum took a nightcrawler
That said, live bait is undoubtedly the most effective if you are looking to catch freshwater drum specifically. Most of the freshwater drum I’ve caught over the years took red worms or nightcrawlers. The bait was either drifting naturally with the current or held on the bottom with a sinker. Based on my experience with these fish, I am doubtful that anything would work better. Minnows can work, but drum seem to key in more on easily available worms.
Of course other things do catch freshwater drum. When it comes to flies they seem to be especially partial to the Clouser Minnow which they likely mistake for a crayfish. I’ve also seen them go after small nymphs tied competition style on jig hooks.
Freshwater drum will also attack small jigs like Lindy Little Nippers and Road Runners fished on spinning gear. Especially if they are tipped with maggots or wax worms. As any carp angler can tell you, freshwater drum will also eat doughball too.
Lures that look like Freshwater Drum
As I mentioned above, a lot of fish dine on young freshwater drum. Some very large predators may even attack larger drum later in life. Where legal, some anglers cut freshwater drums into strips and fish the meat as cutbait. This can work well for blue catfish and large channel cats. For most other predator species a lure that looks like a freshwater drum would be more effective.
I don’t know of any lures that are made to look exactly like a young drum. Yet there are many lures available that resemble small freshwater drum in one way or another. Lures with deep bodies, silver or bronze colors, and rattles come close to the real thing. Those are the lures I would look to if I found predator fish keyed in on immature drum.
The Carp RT Jackall Gantarel Jr resembles a freshwater drum
Both the Silver Rapala Rap-V and Chartreuse Olive Spro Little John Crankbait look enough like young drum to fool predator fish. They both put off sounds too, which could resemble the croaking noises that freshwater drum actually make. In any case both of these lures catch fish. Of course there’s no way to be sure what the fish think these lures are when they grab them. It may very well be that they are simply acting out of predatory instinct, though some colors absolutely outfish others at times.
If you’re looking to really replicate a freshwater drum you might want to consider the Jackall Gantarel Jr swimbait in “Carp RT” color. I haven’t fished with this lure yet, but it looks more like a freshwater drum than any other I have ever seen. I don’t think they were meant to resemble drum at all, but in terms of overall shape and even shade these things are right on the money. I wouldn’t hesitate to try one out anywhere I knew that fish were feasting on young freshwater drum.
Red frankfurters in a grocery case in Lewiston, Maine. Local and regional traditions are important in many ways, and can be informational, historical, or even humorous in nature. For example, some of the oddest hot dogs I’ve seen are the red frankfurters of Maine. I was curious when I saw these in the grocery store so I asked a manager if they were hot or somehow spicy. “No, they’re not.” How are they different from other natural casing frankfurters from the same meatpackers? “They taste the same” was the answer. Then why are they red? “I really don’t know, that’s always confused me, too.”
Red frankfurters are served in what are called Frankfurter or Frankfort Rolls.
Curious, I flipped over one of the packages of red frankfurters:
Ingredients: Beef and pork, water, corn syrup, contains 2% or less of salt, potassium lactate, flavorings (including extractives of paprika), dextrose, sodium diacetate, ascorbic acid (vitamin C), sodium nitrate, FD&C red #40 and red #3, in a natural lamb casing.
Searching the case I found some meatpackers also throw in FD&C Yellow #6.
I then located the Natural Casing Frankfurters from the same meatpacker:
Ingredients: Beef and pork, water, corn syrup, contains 2% or less of salt, potassium lactate, flavorings (including extractives of paprika), dextrose, sodium diacetate, ascorbic acid (vitamin C), sodium nitrate, in a natural lamb casing.
The only obvious difference is the red coloring. The amounts of the other ingredients may have differed, but it wasn’t likely. From a food manufacturing standpoint, I imagined the process would put the completed natural casing frankfurters through a vat of dye prior to packaging.
None of it made any sense at all.
Prepping the red hot dogs and buns in an electric skillet. The buns are buttered before grilling.
Local media in Maine reports on this from time-to-time, noting not only the popularity but also versions of the reason behind the red coloring:
“W.A. Bean & Sons … has been making the natural casing treats since 1918 … ‘We are the only makers of the red hot dogs left in the state of Maine,’ [Sean Smith, director of marketing and sales development] said … W.A. Bean produces an estimated 400,000 pounds of snappers each year, both under its own name and the Rice’s label that the family began producing nearly a decade ago, after negotiating a deal with its former owner and former competitor.
Smith said the company used to have a large U.S. map on display, with push pins marking everywhere their snappers were shipped, sometimes in orders as large as 10 pounds at a time. Over time, the map became so crowded that maintaining it was no longer feasible … Maine exiles also snatch them up while visiting ‘home’ to bring back to share with their families and friends, Smith said, noting that one W.A. Bean fan from North Carolina drives north every three or four weeks to get a fix of his favorite dog.
It isn’t entirely clear why the red coloring was introduced. One legend has it that the coloring historically was added by the original European makers of frankfurters to mask less-than-premium ingredients … Smith, however, speculated that W.A. Bean added its signature coloring as a way of making its frankfurters stand out amid a sea of competitors. ‘And it took off.’” [Gagnon, 2012]
It’s the perception of the red vs. natural colorings that is odd, that not only do people prefer it but that they’ll go to great lengths to make sure that’s what they eat, even though there are no flavor differences.
I also know of one sixth grader in 2018 who will only eat the red ones because, as his mom laughingly told me on social media, “My son won’t eat the brown. Says they taste weird.” Another acquaintance had this to say:
“Red hot dogs are popular in Hawaii too. When I was signing the papers to close on the house, the mortgage guy was telling us all about a trip he just took to NY, but he ended up staying in the room because he got sick and he thought it was the ‘brown hot dogs’, his colleague said, disgustedly, ‘YOU eat BROWN hotdogs?!’ The rest of us died laughing.”
The cuisinologist in me had to discover the true origin, and as it turns out, it does exist. The London-based Newcomen Society “exists to encourage study of the history of engineering and technology from ancient times to the present day.” The former American arm of the Society, founded in 1939 and disbanded in 2007, held their “1992 Maine Meeting” in Portland. Joseph “Chet” Jordan, grandson of the local meatpacker Jordan’s Meats founder and Chairman of the company at the time, was the Guest Of Honor. He gave the address “Jordan’s Meats: A Thriving Business in Its Third Generation-built Primarily on ‘hot Dogs’” on October 9th. The Society subsequently published the text of his address in 1993 as a 24-page pamphlet with historical photos from Jordan’s Meats. Mr. Jordan’s address specifically addressed the history of Maine’s red frankfurters.
“… Charles and Richard Schonland … were sons of German immigrants, and their father ran the leading sausage business in Lawrence [Massachusetts]. In 1891, the brothers had decided to found their own company and ‘investigated several cities’ before deciding on Portland. Schonlands began operations in a leased building … but later built their own building … Schonlands introduced the so called ‘red franks’ to Maine, and their distribution was Portland, Lewiston, Auburn, Biddeford, Saco and Sanford. This is why the ‘red franks’ today are still popular in those areas. They colored their hot dogs red to differentiate their product from the competition … Pa worked at Schonland Brothers, where he learned much and planned for the day when he could start his own company … [I]n 1927, the year I was born, my parents founded Jordan’s Ready-To-Eat-Meats … In 1935 a major benchmark was reached when Pa purchased Schonland Brothers, his former employers … [T]he red hot dogs that so many people associate with Jordan’s are only one of our many products. As I mentioned before this was a kind of trademark for Schonland Brothers which was continued by Jordan’s after the purchase. In fact, it was Jordan’s who introduced the red franks to Aroostook County in the mid-1930s. The ingredients of the red frank are identical to those in our uncolored franks, but demand for the red frank is still traditional in many parts of the state.” [Jordan, 1993: 8, 10, 12, 13, 14]
The tradition of Maine’s red hot dogs has relocated since Chet Jordan’s address. Jordan’s Meats had bought C.H. Rice Co. in Bangor back in 1962. [Jordan 1993: 19] The Iowa Beef Co. subsequently purchased Jordan’s in 2001, which Tyson Foods then bought in 2003. Tyson then closed Jordan’s Augusta plant, where Rice’s red frankforts were made, in 2004. Later that year, the Rice family bought its name back from Tyson Foods and formed a partnership with Bangor sausagemaker W.A. Bean to begin making the Rice version of the red hot dog again. [Associated Press, 2004] In 2008 Kayem Foods of Chelsea, Massachusetts, announced they had purchased the Jordan’s Meats brand from Tyson Foods, along with six other local brands. [Kayem Foods, 2008] Tyson Foods had closed the Jordan’s Meats plant in Portland in 2005, which then burned on May 6, 2010. [Hoey, 2010] As of the time of this writing, W.A. Bean is still producing both their own and the C.H. Rice versions of Maine’s red hot dog in Bangor and is the only in-state manufacturer of the product. [Gagnon, 2012]
Frankfurt or New England Rolls
Hot dog buns next to Frankfurt Rolls at a Hannaford store in Maine. A “Frankfurt Roll” or “Frankfurter Roll” in New England and New York state is a top-split bun with flat sides that’s either buttered and grilled for use with New England hot dogs or seafood rolls, or steamed for use with coney dogs or frankfurters.
The traditional story of the Frankfurt or Frankfurter Roll used with Maine’s red hot dogs, as well as other preparations such as the Lobster Roll, is that sometime in the 1940s the Howard Johnson’s chain commissioned the J.J. Nissen baking company in Maine to create the roll for their fried clam sandwich. USA Pan® is also credited with developing the pan to create the roll. [Tucker, 2020]
The same style of bun is marketed in other parts of the country as a “coney” or “New England” roll. These are two brands available at a grocery store in Ohio. Wonder also offers a New England roll, available in various parts of the U.S.
Images provided by Food Historian Dr. Eleanor Bartlett of the University of Cambridge (@historyeats) indicated that evidence from Europe strongly suggests this really wasn’t a new development in any manner. The soft French roll, a light bread dough rolled out thinly then rolled into a tight cylinder before baking closely to one another, had been included in paintings as far back as the early 17th century. Visually almost identical to the roll developed by J.J. Nissen, it appears the only real differences are the addition of the top slice for insertion of the meat or seafood components, and the buttering and grilling of the sides of the rolls.
Left: Kitchen interior with a maid preparing meat and gentlemen drinking at a table beyond, by Jeremias van Winghe, 1613; Right: The Baker, Job Adriaenszoon Berckheyde, 1681.
A Frankfurt Roll as made by Country Kitchen, a commercial bakery in Lewiston, Maine.
Another issue with the traditional story of the New England roll pan is that, according to their web site, USA Pan® wasn’t founded until 2009. It’s a subsidiary of Bundy Baking Solutions, makers of factory baking pans and equipment. According to the USA Pan site Bundy Baking was founded in 1959, while the Bundy Baking Solutions site indicates 1964. Both of these facts discredit the supposed J.J. Nissen/USA Pan® connection in the 1940s described in [Tucker, 2020].
Other sources provide a seemingly more accurate history. In the Boston Globe Holly Jennings wrote “J. J. Nissen knew it would need a special pan for an automated production line. Industrial baking-pan manufacturer Ekco Products designed the first commercial pan for the bakery.” [Jennings, 2013] As Ekco had been founded as a manufacturer of non-electric houseware in 1888, this origin makes more sense. Ekco became a subsidiary of American Home Products in 1965. Bundy Baking Solutions founder Russell T. Bundy had begun his career at Ekco. Chicago Metallic had acquired Ekco in 1996, and Bundy Baking Solutions then acquired Chicago Metallic in 2005.
Some of the verbal history in [Jennings, 2013] appears to be a bit of marketing though. One of the interviewees stated “The hinged and side-sliced hamburger and hot dog buns used in most regions of the country today … did not come until later, sometime in the mid-’50s, with the invention of the mechanical side slicer.” This is disproven in U.S. Patent 2,059,108, “Frankfurter Roll Slitting Machine”,assigned to Laurence G. Hobbs and Knut J. Cederholm of Fitchburg, Massachussetts, on October 27, 1936.
Download (PDF, 499KB)
To bake the buns properly, USA Pan® offers a retail ten-bun New England Hot Dog Bun pan for use with any recipe for the buns, which is the pan I’ll use here. Why 10, and not 8? I’m guessing that’s because the end buns only have one side that’s flat and grillable. This pan shows up in the catalog for Bundy subsidiary Chicago Metallic.
For retail New England bun production, Bundy Solutions’ industrial New England pan, with capacities such as six 12-bun loaves, is considered a custom baking pan having various available options and configurations for industrial bakery use. It’s from the Hot Dog, Sub & Hoagie Bun Pan collection from their American Pan subsidiary.
One issue with this pan is that it’s not very tall, at 1-5/16″, so buns made with it are really too short to fill very well. The technique described in many recipes for it mention inverting a baking sheet over the pan, weighted by a piece of cast iron. As the buns cook upside down, this ensures the bottoms of the buns are flat. Photos then show the bottoms of the buns even with the top of the pan.
The real trick is to find a recipe that rises enough to become taller than the New England Hot Dog Bun pan. I needed to find one that gives the buns an extra 3/4″ to grow, to just over 2″ tall.
Many commercial Frankfurt or New England rolls are made of a simple bread dough. The recipe USA® Pan offers for use with their pan includes milk, butter, and potato flakes. It also describes the dough as being stretched and placed in the pan as a whole before the second proofing instead of the rolls being individually formed. This is clearly how the commercial buns are made that are available in New England groceries, and would be the most authentic. Unlike many other recipes it calls for instant yeast vs. active yeast.
To get the buttery sweetness of a good New England classic, you could use one of the better recipes for a Parker House Roll, such as this recipe from the James Beard Foundation. Originally developed at Boston’s venerable Parker House Hotel, the roll is not only still served there, its recipe has been printed in countless cookbooks since Fannie Farmer’s first Boston Cooking School Cook Book in 1896.
Other available recipes available include butter, and either milk or milk flakes, minus the potato flakes, making for a fluffier roll with less density. A version from The Flavor Blender illustrates forming the buns individually. King Arthur Flour has posted this recipe for a version which also includes potato flour or flakes. In the King Arthur version the buns are formed in the pan as a flat layer, which is then cut into the individual rolls after baking.
The following recipe is a modification of the recipe for the pan itself from USA Pan®. Modifications include using more water to get a fluffier bun that can grow more, and not using a sheet pan and weight to flatten the dough as it bakes as suggested in other recipes for the pan. This allows the buns to grow past the hight of the pan, giving them more room for fillings.
Notes On This Recipe
The New England Hot Dog Bun Pan is available from USA Pan® at: https://www.usapan.com/new-england-hot-dog-bun-pan-1190ne
The New England Hot Dog Bun Pan from USA Pan® has a silicone coating that doesn’t respond well to non-stick sprays or metal utensils. It’s best not to use either with it. However, it it makes you feel better, greasing and flouring the pan is alright, although it’s not necessary.
In some ovens, particularly smaller convection ovens, the tops of the buns won’t be quite browned. About 9 minutes into the bake time, remove the buns from the oven and flip them out to check the tops. If they haven’t started browning, set the baked bun mass right-side-up on a baking sheet and bake the remaining 9 minutes until the tops are golden brown.
Bibliography
Associated Press, October 27, 2004. A dog-meet-dog world – Longtime Bangor competitors combine their frankfurter forces. seacoastonline.com.
Gagnon, Dawn, August 17, 2012. Bangor company’s “red snapper” hot dogs are a beloved taste of Maine. Bangor, Maine: Bangor Daily News.
Hoey, Dennis, May 7, 2010. Fire tears through Jordan’s Meats site. Portland, Maine: Portland Press Herald.
Jennings, Holly, July 2, 2013. New England-style bun, from HoJo’s to homemade: Boston Globe.
Jordan, Joseph, 1993. Jordan’s Meats: A Thriving Business in its Third Generation-Built Primarily on ‘Hot Dogs’. Portland, Maine: The Newcomen Society Of The United States.
Kayem Foods, May 20, 2008. Kayem Foods Acquires Jordan’s, Deutschmacher, Kirschner and Essem Brands From Tyson Foods. Chelsea, Massachusetts: Kayem Foods Press Release.
Tucker, Aimee, May 6, 2015. The New England Hot Dog Bun. Dublin, New Hampshire: New England Today
")
")
")
")
")


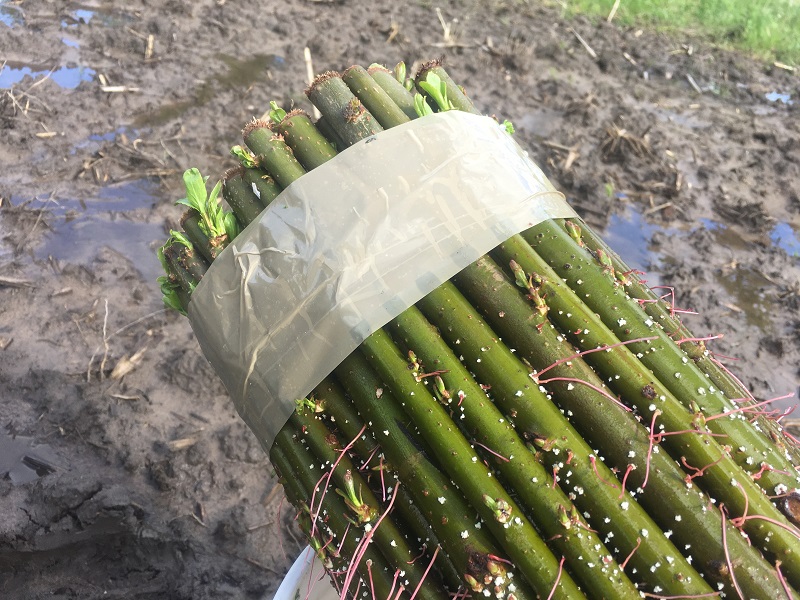
 June 9th update. Growth after 2 weeks.
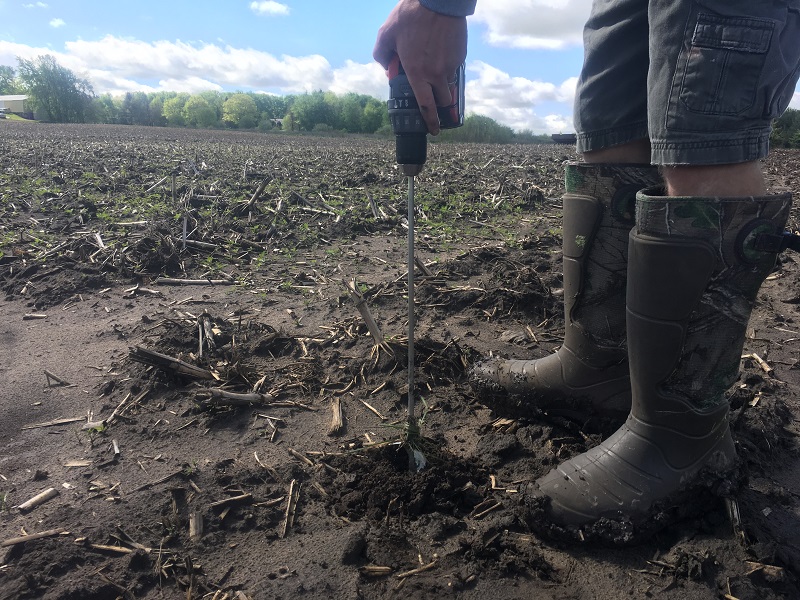 July 20th update. Multiple stems about 3 feet tall.March 21, 2018 update: They survived the first WI winter and starting to bud. Most of them have multiple stems and stand about 4 feet tall. We planted the hybrid willows on the outer edge of the screen to create a fast and more immediate screen, while the spruce trees grow up and create an evergreen screen for the future. Tallest tree is about 6 feet tall.


 Credit: Oddee
 Credit: blogspot.com


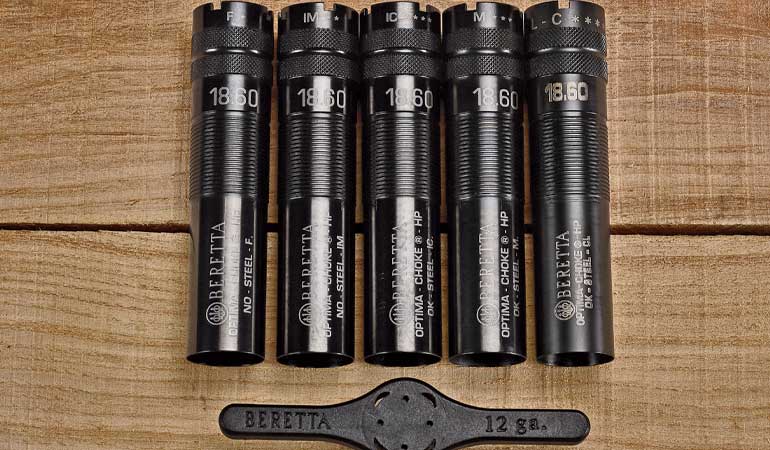


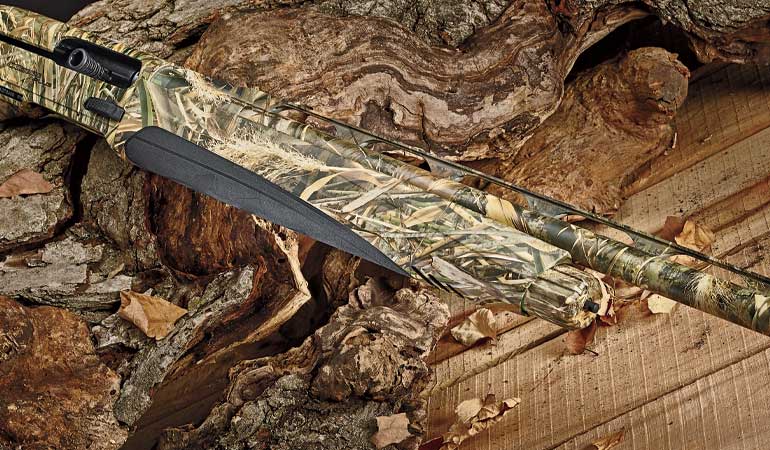
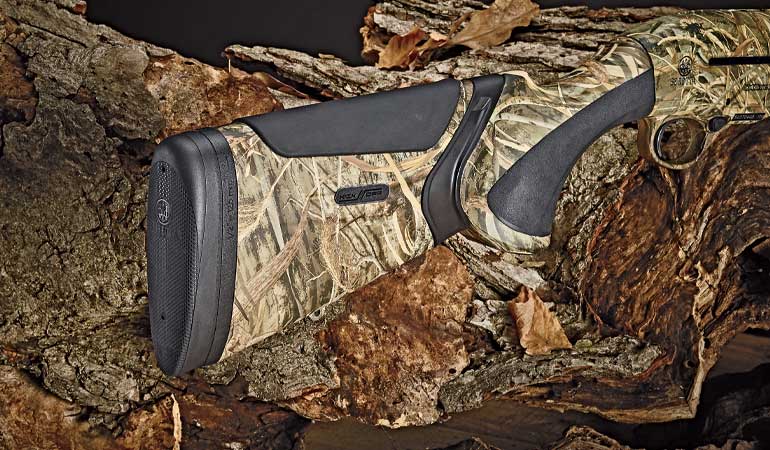


 An average freshwater drum
 This big drum took a nightcrawler
 The Carp RT Jackall Gantarel Jr resembles a freshwater drum
 Red frankfurters in a grocery case in Lewiston, Maine. Local and regional traditions are important in many ways, and can be informational, historical, or even humorous in nature. For example, some of the oddest hot dogs I’ve seen are the red frankfurters of Maine. I was curious when I saw these in the grocery store so I asked a manager if they were hot or somehow spicy. “No, they’re not.” How are they different from other natural casing frankfurters from the same meatpackers? “They taste the same” was the answer. Then why are they red? “I really don’t know, that’s always confused me, too.”
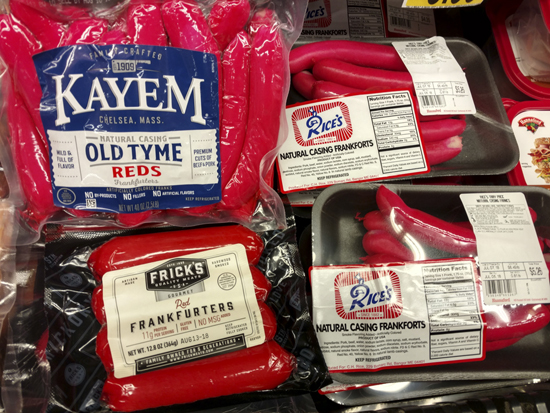 Red frankfurters are served in what are called Frankfurter or Frankfort Rolls.
 Prepping the red hot dogs and buns in an electric skillet. The buns are buttered before grilling.
 Hot dog buns next to Frankfurt Rolls at a Hannaford store in Maine. A “Frankfurt Roll” or “Frankfurter Roll” in New England and New York state is a top-split bun with flat sides that’s either buttered and grilled for use with New England hot dogs or seafood rolls, or steamed for use with coney dogs or frankfurters.
 The same style of bun is marketed in other parts of the country as a “coney” or “New England” roll. These are two brands available at a grocery store in Ohio. Wonder also offers a New England roll, available in various parts of the U.S.
 Left: Kitchen interior with a maid preparing meat and gentlemen drinking at a table beyond, by Jeremias van Winghe, 1613; Right: The Baker, Job Adriaenszoon Berckheyde, 1681.
 To bake the buns properly, USA Pan® offers a retail ten-bun New England Hot Dog Bun pan for use with any recipe for the buns, which is the pan I’ll use here. Why 10, and not 8? I’m guessing that’s because the end buns only have one side that’s flat and grillable. This pan shows up in the catalog for Bundy subsidiary Chicago Metallic.


