Introducing the High Velocity Air Rifle: Unlocking Precision and Power. Experience unrivaled accuracy and impressive speed with our cutting-edge air rifle. Engineered to deliver maximum performance, this advanced firearm pushes boundaries, propelling pellets at incredible velocities. Perfect for target practice or small game hunting, it guarantees unmatched precision and an exceptional shooting experience. Elevate your shooting skills with the high velocity air rifle – a true game-changer in the world of firearms.
high velocity air rifle
A high velocity air rifle is a type of air gun that propels pellets or bullets at a significantly higher speed compared to traditional air rifles. These rifles are designed for various purposes, such as hunting, target shooting, or pest control. With their increased velocity, they offer improved accuracy and greater range, making them popular among enthusiasts and professionals alike.
One of the key advantages of a high velocity air rifle is its ability to deliver exceptional power while still being relatively quiet and recoil-free. This makes it an ideal choice for hunters who want to minimize noise and disturbance in their surroundings. Additionally, the high velocity allows for a flatter trajectory, meaning the bullet or pellet maintains its path over longer distances, improving accuracy and reducing the need for frequent adjustments.
When choosing a high velocity air rifle, it’s important to consider factors such as caliber size, power source (spring or gas), and overall build quality. Different calibers offer varying levels of power and versatility, catering to different shooting needs. It’s also crucial to ensure that the chosen rifle complies with local regulations and safety guidelines to ensure responsible use.
In conclusion, high velocity air rifles offer a powerful and accurate alternative to traditional firearms. With their advanced technology and precision, these rifles provide an effective means for target shooting and pest control. Additionally, their quiet operation and affordability make them a popular choice among enthusiasts. Whether for recreational purposes or practical use, high velocity air rifles are a reliable option worth considering.
WILKES-BARRE — The Pennsylvania Board of Game Commissioners this week approved a host of changes that will improve the efficiency and effectiveness of the Agricultural Deer Control Program — better known as the Red Tag Program — which helps farmers address crop-damage issues through the hunting of antlerless deer.
“The Agricultural Deer Control Program is designed to allow farmers to manage the deer populations on their property,” said Game Commission Bureau of Wildlife Management Director Matthew Schnupp. “The changes adopted today make it easier for landowners to enroll in the program, while making it more convenient for hunters to participate through an expanded season and increased number of tags.”
The changes, which were recommended to the Game Commission by those who use the program, will become effective in November 2022.
Changes include:
• An individual hunter no longer would be limited to obtaining one permit for a Red Tag property; they could get up to four. The higher limit is consistent with that used in the Deer Management Assistance Program (DMAP), which also helps landowners meet deer-management goals through antlerless deer hunting. Hunters would be able to keep all deer they harvest.
• The summer period during which Red Tag hunting is closed (currently May 16 – June 30) would be expanded to April 16 – July 31. Permits would be valid from Aug. 1 through Sept. 15, then from Feb. 1 through April 15. Permits would be issued for the license year that begins July 1 and runs through June 30.
• Landowners no longer would be required to report Red Tag harvests. Instead, similar to DMAP, hunters would report for each permit regardless of harvest success.
• All licensed hunters, not just hunters who are Pennsylvania residents, would qualify for Red Tag permits.
• The red snap tags that are the namesake of the Red Tag Program, would be replaced with standard harvest tags issued through HuntFishPA.
• Landowners no longer would need to enroll in the Game Commission’s Hunter Access program before using the Red Tag program, and Red Tag properties no longer would need to be posted with signs.
Antlerless deer, elk licenses
The board voted to allocate 948,000 antlerless deer licenses statewide, which is up from the 925,000 licenses allocated for 2021-21.
Hunting licenses for 2022-23 go on sale in mid-June and become effective July 1. After hunters purchase a general hunting license, they may apply for antlerless deer licenses based on staggered timelines, which will be outlined in the 2022-23 Pennsylvania Hunting & Trapping Digest, to be given free to all license buyers.
The board also voted to issue 178 elk licenses (60 antlered, 118 antlerless) across three 2022-23 seasons. For the one-week general season to run Oct. 31-Nov. 5, 31 antlered and 70 antlerless tags have been allocated. In the archery season open only in select Elk Hunt Zones, to run from Sept. 10-24, 14 antlered and 15 antlerless licenses are available. And there are 15 antlered and 33 antlerless licenses available for the Dec. 31-Jan. 7 late season.
All elk licenses will be awarded by lottery, and hunters must apply separately for all seasons they wish to be eligible to hunt. Each application costs $11.97, meaning a hunter can enter all three drawings for $35.91. Individuals can be drawn for a maximum of one elk license per license year.
More turkey firearmsrestrictions considered
The Pennsylvania Board of Game Commissioners gave preliminary approval to a measure that would provide the Game Commission yet another tool to respond to below-goal turkey populations.
In years past, reducing the length of the fall turkey season was the primary method to increase turkey populations. But last year, the Game Commission eliminated the use of centerfire and rimfire rifles in fall turkey season, noting that relatively few hunters used rifles, but rifles were responsible for about one-third of the fall turkey harvest. That provides an additional means to protect turkey populations without reducing season length.
The measure the board preliminary approved would eliminate the use of other single-projectile firearms — muzzle-loading rifles and handguns, and slug guns — in the fall turkey season. It will be brought back to the July meeting for a final vote.
When eliminating the use of rifles in the fall turkey season, the Game Commission noted that relatively few fall turkey hunters used rifles. Survey data suggested only 14% of fall turkey hunters statewide primarily used rifles, but rifles were responsible for 33% of the harvest.
Eliminating the use of other single-projectile firearms in fall turkey season would seem to impact even fewer hunters. The Game Commission has observed very few fall turkey hunters afield with single-projectile muzzle-loaders or shotguns. At the same time, eliminating the use of those firearms in the fall turkey season works toward the Game Commission’s goal of finding methods other than season-length reductions to stabilize fall turkey harvest numbers.
“Season length adjustments are a part of managing wild turkey populations, and reducing season length sometimes is a necessity,” said Commissioner Scott Foradora, who represents District 3 in north-central Pennsylvania. “But through alternative methods such as restricting the firearms that can be used in the season, season length reductions might be avoided, giving all hunters the opportunity to spend more time in the woods.”
DMAP might be availableon leased hunting lands
Lands where hunting rights have been leased and where a fee has been charged for hunting might soon be eligible to enroll in the Deer Management Assistance Program, commonly known as DMAP.
The Pennsylvania Board of Game Commissioners today gave preliminary approval to a measure that would change the regulation that excludes leased hunting land from the program. The measure will be brought back to the July meeting for a final vote.
DMAP enables public and private landowners to better address their own deer-management goals for properties. Lands enrolled in DMAP are allotted a number of antlerless deer permits that can be purchased by hunters.
Landowners can make the permits available directly from license-issuing agents, or they can choose to issue coupons that then are redeemed for permits. In either case, DMAP permits cost $10.97 each. Hunters can obtain no more than four permits each for properties where coupons are issued, and no more than two permits each for other properties. Each DMAP permit can be used to hunt and harvest an antlerless deer during any established deer season.
The change preliminary approved by the board wouldn’t have major impacts on the DMAP program, but would make a significant difference for landowners who now are excluded.
The Game Commission has determined only about 5% of hunting lands are leased. On those properties, however, the only tool landowners and lessees presently have to address deer-population concerns is WMU-based antlerless licenses allocations, which might not be enough.
Applying the same rules to leased lands and private lands enrolled in DMAP makes sense because public access isn’t required to enroll in the program. Additionally, restricting DMAP to certain lands to encourage public access historically did not lead to significantly more public access or the prevention of leased lands. Leased lands still exist and are part of the Pennsylvania landscape.
Measure could allow for newroad-killed deer disposal option
Permitted professionals hired by those wishing to address nuisance-wildlife problems might soon receive authority to pick up and dispose of road-killed deer.
The Pennsylvania Board of Game Commissioners gave preliminary approval to a measure that would allow nuisance wildlife control operators, who already are regulated by the Game Commission, to offer road-killed deer pick-up from roadways and private property.
Presently, the responsibility for picking up and removing deer carcasses from roadways is split between the state Department of Transportation and the Game Commission, which sometimes hires contractors to collect and dispose of deer.
Each year, the Game Commission receives thousands of calls from the public concerning deer carcasses along roadways and on private property. The agency often will assign its wardens to collect and properly dispose of these carcasses as their schedules and work duties permit, which in some cases doesn’t meet residents’ expectations.
Nuisance wildlife control operators could provide the public an additional resource for road-killed deer removal.
The measure will be brought back to the July meeting for a final vote.
More than 1,000 acresadded to game lands
The Pennsylvania Board of Game Commissioners today and recently approved of acquisitions that would add more than 974 acres to state game lands. Among them are:
• A 278-acre tract in Bear Creek Township, Luzerne County. This land, which adjoins State Game Lands 91, was offered by Natural Lands for the option price of $42,000 lump sum. Natural Lands can acquire the property through partnership grants provided by the Pennsylvania Department of Conservation and Natural Resources and the Open Space Institute.
• A 4.59-acre tract in Bell Township, Clearfield County. This parcel within State Game Lands 87 is being donated by Diversified Production LLC.
• A 158-acre parcel in South Londonderry and West Cornwall townships, Lebanon County, and Rapho Township, Lancaster County. This land, which adjoins State Game Lands 145, is being offered for donation by Natural Lands, which can acquire the property through partnership grants provided by the Pennsylvania Department of Conservation and Natural Resources and U.S. Fish and Wildlife Services.
• A 54-acre tract in Miller Township, Perry County.
• Two tracts totaling 192 acres in Greene and Whiteley townships, Greene County.
• A 288-acre tract in North Bethlehem and West Bethlehem townships, Washington County.
Additionally, the Game Commission acquired one-ninth interest in the 39.76-acre Lola L. Woodring estate property adjoining State Game Lands 311 in Benezette Township, Elk County.
The Game Commission also has acquired a portfolio of oil, gas and mineral rights in Erie Crawford, Venango, Forest, Warren, McKean and Elk counties. These interests, which were donated by Payday Holdings LLC, of Frisco, Texas, are not surveyed and have not had exhaustive title searches conducted. The commissioners accepted the donation by notational vote in December 2021.
Reach Bill O’Boyle at 570-991-6118 or on Twitter @TLBillOBoyle.
Open sights have been a crucial component of firearms for centuries. Despite advancements in technology, they remain a popular choice among shooters of all skill levels. Whether you are a seasoned marksman or a novice, having a solid understanding of the different types of open sights, their workings, advantages, disadvantages, and how to use them effectively can significantly improve your accuracy and overall performance.
In this article, we will delve into the world of open sights and provide you with a comprehensive guide to help you make the most out of this crucial component of your firearm.
Open sights, also called iron sights, are an integral part of rifles, shotguns, and handguns. They offer a straightforward aiming mechanism that does not rely on batteries to function. They are often mandatory by law in specific hunting situations and are typically made of robust metal materials to withstand the rigors of regular use.
Open sights are made up of two components: a front sight and a rear sight. The front sight is a fixed post or bead that is positioned at the end of the barrel or on a ramp near the muzzle. The size and shape of the front sight can vary depending on the type of firearm and its intended use. For example, a shotgun used for bird hunting may have a larger front bead, while a rifle used for precision shooting may have a thinner, more precise front post. The rear sight, on the other hand, is typically a notched plate or aperture that is mounted on the barrel or receiver. Some open sights may have a basic notch in the rear sight, while others have a more complex aperture that can be adjusted for windage and elevation.
To aim using open sights, a shooter lines up the front sight with the rear sight, aligning them with the target. This process is known as “sighting in” the firearm. Once correctly aligned, the shooter can aim and discharge the weapon.
The Benefits of Using Open Sights
Credit: Envato Elements/ valeriygoncharukphoto
Open sights offer several benefits compared to other types of sights. Some of these benefits include:
1) Cost-Effective
Open or iron sights are generally much less expensive than other types of sights, such as telescopic sights or red dots, making them a popular choice for beginner shooters or those on a budget. By choosing these sights, shooters can enhance their accuracy and shooting skills without breaking the bank.
2) Lightweight
Other types of sights, such as telescopic or red dot sights, tend to be heavy which can be burdensome, causing discomfort and strain on the shooter’s arms, shoulders, and back. Open or iron sights, on the other hand, are significantly lighter, allowing the shooter to move and aim their weapon with greater ease and accuracy. This reduction in weight also reduces the likelihood of fatigue on the shooter’s body, enabling them to remain focused and alert for more extended periods, resulting in better shooting performance.
3) Does Not Require Batteries
Open sights have a significant advantage over electronic sights in that they do not require batteries or electricity to function. This means that they can be used in any environment, without the worry of the batteries running out or malfunctioning.
Additionally, since these sights do not have any electronic components, they are not susceptible to electronic interference. This makes them an excellent option for shooting in areas with high levels of electromagnetic waves, such as areas with high-voltage power lines or around electronic devices.
4) Quick Target Acquisition
One of the key advantages of open or iron sights is their ability to facilitate quick target acquisition. In hunting or self-defense scenarios, every second counts, and the simplicity of open sights can prove to be a vital factor in reacting quickly. By merely aligning the front and rear sights with the target, the shooter can quickly and efficiently acquire their target, without the need for additional adjustments or sighting mechanisms.
5) Durability
Open sights are renowned for their durability, making them an excellent choice for shooters who require a rugged and reliable aiming device. Unlike electronic sights, which can be sensitive to impacts or exposure to harsh environments, these sights are typically made of high-quality materials and designed to withstand the rigors of frequent use in various environments. The robust construction also makes them less likely to malfunction or require maintenance, providing shooters with a reliable and low-maintenance aiming device.
6) Consistent Accuracy
Open or iron sights are simple and reliable, which can lead to consistent accuracy in shooting. With practice and proper alignment, shooters can achieve consistent accuracy with open sights, even at longer distances. This consistency can be particularly important for hunters or target shooters who need to hit their target with precision.
The Different Types of Open Sights
Credit: Envato Elements/ ASphotostudio
The four main types of open sights are v-notch sights, u-notch sights, buckhorn sights, and semi-buckhorn sights. Here’s a brief description of each:
1) V-Notch Sights
V-notch sights are one of the most common types of open sights, and they’re often found on pistols and rifles. As the name suggests, they feature a V-shaped notch cut into the rear sight, which serves as the aiming point. The front sight is typically a post or bead that is centered in the V-notch. To aim, you need to align the top of the front sight with the bottom of the V-notch on the rear sight, and then center the front sight in the notch.
V-notch sights are popular for their simplicity and accuracy at short and medium ranges. However, they are not very precise, and you cannot adjust them for windage or elevation.
2) U-Notch Sights
U-notch sights are similar to V-notch sights, but they feature a U-shaped notch instead of a V-shaped notch. This type of sight is often found on shotguns and rifles intended for target shooting or hunting purposes. To aim, you need to align the top of the front sight with the top of the U-notch on the rear sight, and then center the front sight in the notch.
The U-shaped notch on U-notch sights offers an advantage over V-notch sights by helping to frame the target, simplifying the aiming process. While these sights are not as precise as other sighting options and cannot be adjusted for windage or elevation, they still offer greater precision than V-notch sights.
3) Buckhorn Sights
Buckhorn sights are a type of open sight that is often found on lever-action rifles. They feature a curved notch with a small protrusion in the center that serves as the aiming point. To aim, you need to align the front sight with the center of the buckhorn notch.
Buckhorn sights are well-suited for fast shooting at close to medium ranges, but they can be challenging to use for more precise shooting at longer ranges.
4) Semi-Buckhorn Sights
Semi-buckhorn sights are similar to buckhorn sights, but they have a flatter, less curved notch. This type of sight is often found on bolt-action rifles, and it’s preferred by some shooters for its versatility and accuracy at longer ranges. To aim, you need to align the front sight with the top of the semi-buckhorn notch.
Which Open Sight Should You Choose?
Credit: Envato Elements/ Vailery
The type of open or iron sight that you should choose depends on a variety of factors, including personal preference, shooting style, and the intended use of the firearm.
For those who prioritize simplicity and ease of use, V-notch sights are a good choice. They are suitable for handguns and rifles and are commonly used for close to medium-range shooting, including self-defense, hunting, and recreational target shooting. They are also ideal for shooting in low-light conditions, as the contrast between the front and rear sights is easy to see.
For those who require greater precision and accuracy, U-notch sights are a better option. They are particularly useful for shotguns and rifles that are used for target shooting or hunting, where precise aiming is critical. The U-shape of the notch provides a more precise aiming point than V-notch sights, making them suitable for longer ranges.
Buckhorn sights are ideal for shooters who need to quickly acquire and aim at targets at close to medium ranges. These sights are frequently used in lever-action rifles used for hunting or fast-paced shooting sports. However, they are not recommended for precise shooting or longer ranges because the curved notch can make it challenging to align the front sight with the target accurately.
On the other hand, semi-buckhorn sights provide a more versatile and accurate open sight for shooting at longer ranges. They are commonly found on bolt-action rifles used for target shooting or hunting. The flatter, less curved notch on the rear sight provides a more precise aiming point than a buckhorn sight. Although these sights are suitable for longer ranges, they can also be used for close to medium-range shooting.
Step-by-Step Guide on How to Use Open Sights Effectively
Credit: Envato Elements/ Vailery
Now that you know the different types of open sights and which one is best suited for you, here is a step-by-step guide on how to use them effectively:
1) Begin by Properly Aligning the Sights
Before using open sights, make sure they are properly aligned for your firearm. Adjust the rear sight so that the front sight post is centered in the notch. If the sights are misaligned, you will not be able to aim accurately, and your shots will miss the target.
2) Assume a Stable Shooting Position
Stand in a stable position with your feet shoulder-width apart and your body slightly leaned forward. Place your dominant hand on the grip of the firearm, and your non-dominant hand under the barrel or foregrip for support.
3) Bring the Firearm Up to Your Shoulder
Bring the firearm up to your shoulder while maintaining a stable shooting position. Ensure that the butt of the firearm is pressed firmly against your shoulder, and your cheek is resting against the stock of the firearm.
4) Focus on the Front Sight
When aiming with open or iron sights, it is important to focus on the front sight. The target and rear sight should be hazy while the front sight should be clear. This helps you aim accurately.
5) Maintain a Consistent Sight Picture
Once the sights are aligned and you have focused on the target, focus on maintaining a consistent sight picture. This means keeping the front and rear sights in the same position relative to each other and the target throughout the firing sequence.
6) Squeeze the Trigger
With your sights aligned and your firearm aimed at the target, squeeze the trigger gently. Avoid jerking or flinching, as this can cause your shot to miss the target.
7) Follow Through
After firing the shot, continue to focus on the front sight and keep the firearm steady for a moment before lowering it. This helps you to ensure that your shot was accurate and can help you make any necessary adjustments to your aim for future shots.
3) Practice, Practice, Practice
Using open or iron sights effectively takes practice. Make sure to spend time at the range honing your skills and becoming familiar with the sights and the shooting process. Shooting at different distances and in different lighting conditions can also be beneficial. By practicing frequently, you can develop muscle memory and ultimately enhance your precision.
Summary
Open sights are an integral component of firearms, and selecting the appropriate sight is vital to improving your shooting experience. With a diverse range of open sights available, it’s crucial to evaluate your shooting needs and preferences. Whether you use your firearm for hunting, target shooting, or self-defense, there’s an open sight that suits your requirements.
Once you have selected the right open sight for your firearm, it’s time to practice your shooting skills. That’s where EasyShot shooting targets come in handy. At EasyShot, we offer a variety of high-quality shooting targets that can help you improve your accuracy and precision. With durable construction and multiple designs, our targets are perfect for all types of shooting practices. Check us out today!
If you’re out on a hike, or just poking around the back 40, you’re likely to see mushrooms growing from trees in the woods. Some of them are edible, some aren’t. For the purposes here, I’ve gathered useful, common mushrooms you can eat, since that’s what I’m usually looking for.
It’s important to know that the title is a little misleading. While mushrooms may appear to grow on trees, what we see is only the fruiting body that will eventually make spores and attempt to reproduce. The mushroom life force, or mycelium, is inside of the tree, waiting for the right conditions (temperature, rain, and seasonality) to fruit.
Most of the mushrooms I look for that grow on trees grow on living, or injured trees. As you’ll see, there is some overlap between the two. Here’s a few very common mushrooms you might see on your next hike.
Oyster Mushrooms (Pluerotus and others)
Oyster mushrooms (Pluerotus species and relatives) are some of the most common mushrooms found on trees. Most of these are easy to identify, and all are edible with no poisonous mushroom look alikes.
H. ulmarius. P. citrinopileatus. S. serotina. (photo credit Ariel Bonkoski)P. dryinus. P. populina.
Depending on where you are and what kind of trees are in your area, there can be a number of different species to look for. All oyster mushrooms have gills and white spore prints.
Elm oyster mushrooms (Hypsizygus ulmarius) grow on elm trees and box elder.
Aspen oyster mushroom (Pluerotus populina) grows on aspen.
Pluerotus dryinus is found late in the season growing on oak and beech.
Late Fall Oyster (Sarcomyxa serotina or Mukitake) is eaten in Japan. There’s been confusion over claims it contains carcinogens, but that information has been disproven and the mushroom is fine to eat. Reference.
Golden Oyster Mushrooms are a new, invasive species that grows on elms, cherry and other hardwoods.
Chicken of the Woods (Laetiporus)
Chicken of the woods are extremely common, edible, and found around the world. They grow from living and dead trees, stumps, and over roots. Depending on the species they can grow from coniferous or deciduous trees. There’s a number of species, and all of them are edible, with caution. Read more about them in my post Chicken of the Woods Mushrooms.
Hen of the Woods or Maitake Mushrooms (Grifola frondosa)
Similar to chicken of the woods, maitake are a parasite of trees, typically white and red oak, but occasionally on maple. They cause a butt rot in the host tree, and are common on stumps, downed trees, and living trees.
Long appreciated in Japan where they’re known as maitake (dancing mushroom) they’re edible, delicious, and widely appreciated by many foragers East of the Rocky Mountains. Read more about them in my post on Hen of the Woods.
Resinous Polypore (Ischnoderma resinosum)
This common parasite of hardwood trees appears in the summer and is common on oaks. It’s a good mushroom for foragers to know as it’s edible and underappreciated, meaning it tastes great, but not a lot of people harvest it.
Some people call it salisbury steak of the woods, or beef of the woods, and that’s a pretty good comparison. Read more about them in my post on Resinous Polypore/Ischnoderma resinosum.
Hericiums
The genus Hericium includes lions mane and its cousins is commonly found on dying oak trees. While the coral tooth fungus (Hericium coralloides) and bearded tooth mushroom (Hericium americanum) seem to prefer dying and fallen oak trees covered in moss, lions mane (Hericium erinaceous) also likes to grow on trees that are still standing. All Hericium are edible, and taste great. Read more about them in my post Lions Mane and Hericium Mushrooms.
Enokitake (Flammulina velutipes)
Enokitake, also known as enoki and the velvet shank mushroom, are parasitic, saprobic decomposers of wood, especially elms. These are the same species of edible mushroom found in stores, but have brown stems and a yellow to orangeish cap when exposed to sunlight.
They appear in the Spring and will continue to fruit throughout the year. Make sure to be able to identify Galerina marginata if you plant to eat them. Read more about them in my post on Enokitake or Velvet Shank Mushrooms.
Pheasant Back (Cerioporus squamosus)
Also known as the dryad saddle, the pheasant back is a parasite and decomposer of hardwood trees, especially box elder and elms. Named for it’s cap scales that resembles pheasant feathers, it’s a common Spring mushroom, but can be found throughout the year.
It’s edible, and tastes very good, but gets tough quickly as it grows so it must be sliced thinly. Read more about them in my post on Dryad Saddle or Pheasant Back Mushrooms.
Wood Ear (Auricularia judae)
Wood Ear Mushrooms, also known by the outdated name of “Jews Ear” are a common decomposer of hardwood trees, often seen growing on branches. Long enjoyed in Asian cuisine, they can be added to soups and broths, especially wood ear mushroom ramen.
Witches Butter (Tremella mesenterica)
Another common tree mushroom is witches butter. This is a commonly found yellow jelly fungus often seen on fallen branches. It has a lobed appearance, and is slimy or sticky when wet.
It’s an edible mushroom, and some foragers like to simmer it in sugar syrup to make mushroom jelly candies. If you want to try that, you can substitute them in my recipe for candied black trumpet mushrooms.
Mushrooms That Prefer Dead Trees
Some mushrooms prefer dead or rotting trees over living ones, although some species like Hericium enjoy feeding on both. Here’s two very common ones you might come across.
Turkey tail (Trametes versicolor)
One of the most common mushrooms on trees in North America, and a popular mushroom mostly known for its “medicinal” benefits. Turkey tails are a decomposer of logs and stumps of deciduous trees, and on the rare occasion, coniferous trees. They’re widely used as a medicinal in things like mushroom tinctures.
Crown coral (Artomyces pyxidatus)
The crown coral mushroom is very common where I live in Minnesota. These only grow from dead, fallen logs that are decaying, and will never grow from live wood. They’re commonly confused with species of coral mushroom or Ramaria, some of which are edible. The key to separating the two genera of fungi is that Ramaria will only grow from the ground, where crown corals only grow from dead and dying wood. Learn more about them in my post on Crown-Tipped Coral Mushrooms.
Tree Feeding Mushrooms and Other Fungi
Besides the mushrooms mentioned here, there’s also many other mushrooms that may grow on trees that you may not notice. One of the most common are crust fungus. There’s many different genera here, including Phlebia, Stereum, and Thelephora. They’re common wood-decomposing fungi.
Another example is cherry knot fungus (Apiosporina morbosa), also known as black knot. It appears as charcoal-like swelling black growths on branches of cherry trees that have been injured, as well as plum trees. Cherry knot fungus will inhibit fruiting, but can be kept in check by regular pruning or fungicides.
Fishing for buffalo is becoming more and more popular in the US and many anglers, who are new to the sport, wonder about the best ways of catching this awesome species. So I decided to write a detailed guide on how to catch buffalo fish in order to help you get going.
In order to successfully catch buffalo fish, you will need heavy carp rods, carp reels, a strong braided mainline, and #4-#8 wide gape hooks. Buffalo fish are best fished for on the bottom and caught on hookbaits such as boilies or tiger nuts.
If you want to get expert tips on how to catch buffs, what gear and baits to use, and where to fish for buffalo, all you have to do is keep reading.
Disclaimer: This article includes expert advice provided by Texan buffalo angler James King. James has caught several lake records and was kind enough to share some of his best tips with Strike & Catch.
When it comes to buffalo fish, using the right gear is absolutely essential. Not only when it comes to the presentation of your baits, but also because buffalo fish are extremely strong fish. Getting them on the hook is only half the battle, fighting and successfully landing them is the really difficult part.
It is here that fishing with heavy and qualitative gear really pays off!
Rods
You will want to use heavy 2-section carp rods with a length of 12ft and a test curve of at least 3lb. Rods like that will both let you cast out your rigs very far and have a strong enough backbone to fight even the biggest and strongest of buffalo.
When it comes to carp rods, both Shimano and Daiwa are two solid brands that you can trust 100%. They make really high-qualitative rods for a very decent price. I use 3 Daiwa rods myself and they have landed me a ton of fish over the years. Check out the Daiwa Black Widow Carp Rod on Amazon here.
Reels
Heavy artillery carp reels are also something that I recommend strongly when fishing for buffs, as they will do most of the hard work together with you during the fight. Big pit reels that can hold a lot of line are definitely the way to go, both for casting and for fighting buffalo. Because when they charge off, they can go a long way!
Once again, Daiwa is the brand of choice here. You should definitely check out their Daiwa Crosscast Carp. It’s a superb real that is definitely capable of handling big buffalo. Take a look at this awesome reel on Amazon here.
Line
The third really important component when it comes to your gear is your mainline. Now, you can choose between monofilament and braid, and if this article would have been about carp, I’d suggest mono. For buffs, however, braid is definitely the better choice!
Braid has almost no stretch to it, which is a huge advantage when fishing for buffalo, as they are extremely careful when picking up your hookbait. You will want that hook to set as quickly as possible, and a no-stretch mainline will certainly help in that regard.
Additionally, braid has the ability to transfer even the slightest of movements from your hookbait to your rod tip much faster than mono does, which means that you will be able to detect even the most careful of takes.
a strong braided line of 30lb test is what you are looking for here and the one braid I use for all my fishing and one I can highly recommend is the Power Pro. I don’t think there is a better braid out there, to be honest! You can check out the Power Pro on Amazon here.
Pro Tip: Connect 4-5 feet of 40lb fluorocarbon to the end of your mainline and cover it with a sinking rig tube of the same length to both protect the fish and to make your end tackle even stronger and more abrasion-resistant.
Rigs
The best rig for buffalo is a classic carp rig, consisting of the following end tackle:
a barrel or quick change swivel
a 4-5 inch braided hooklink (30 to 40lb test)
a size 4 to 8 wide gape or long shank carp hook
That’s basically it! This will make for a very effective hair rig that can catch you a ton of buffs! To make this rig even more effective, you can also put on an anti-tangle sleeve (helps a lot for those long-distance casts), as well as a short piece of shrink tube that’ll go on the hook shank (for a better hook set if and when the fish hooks itself).
RELATED ARTICLE: You can check out this article if you want to learn how to tie a simple hair rig!
The short hooklength further aids the hook set, as the hook will set almost immediately after the fish has picked up your bait.
Bank Sticks or Rod Pod
Fishing for buffalo is a waiting game and if you are using more than one rod, putting them on a couple of banksticks or a rod pod can be a very good idea.
This way, they are secured (use butt rests) and off the ground and you can use bite alarms to better detect the often careful buffalo takes.
Bite Alarms and Bobbins
Electronic bite alarms are super useful when fishing for buffalo. They make the need to constantly check your rods obsolete and also let you fish through the night. Although when it comes to buffalo, keeping an eye on your rods is never a bad idea, as the bite alarms can certainly miss the occasional slow or careful take.
That’s why bite alarms should be used in combination with hangers, or bobbins. These will help you notice less obvious bites and can accurately indicate the, for the buffalo so typical, drop back take, which will be explained further down in the article. A cheap set on bobbins can be found on Amazon right here.
Landing Net
Buffalo fish can get huge, which is why you’ll need a wide and deep net in order to securely land them. A 42inch carp landing net is the perfect fit for big buffalo. You can find a great carp landing net on Amazon here.
What Is the Best Way to Fish for Buffalo?
Finding the Fish
If you’re not fishing pay lakes, but instead target natural waters with wild buffalo in them, you will often find yourself fishing water systems of considerable size. Put in other words, buffalo can most often be found in gigantic lakes and larger river systems, and finding them there is not always the easiest of tasks.
If you’re lucky, you will be able to spot fish somewhere in the lake, but all too often, that is just not possible.
Try to find any kind of features that hold food and hence attract fish. Those can include:
Weeds
Reeds
Small islands
River mouths
Drop-offs (especially attractive during summer, when the shallow waters are too warm)
Pro Tip: If you fish a water you are not familiar with, ask the local fishermen for advice! Most of them will be happy to share some good locations and give you some valuable tips!
Pre-Baiting
So, once you’ve decided on a spot you want to try out, a good tactic is to pre-bait it. If there is food in your spot, the fish will find it, as opposed to you having to search for them.
Of course, there is never a guarantee, but as buffalo fish, much like carp, really like to feed a lot, pre-baiting can definitely improve your chances.
Now, what and how much you put out is really up to you. Generally speaking, the more you can throw in the better! You can pre-bait your spot with anything from feed corn, beans, nuts, to boilies and pellets. Trust me, they’ll eat it all.
Pro Tip: Stay clear of processed ingredients such as Jello! Instead, use lots of good attractants like salts and oils to make your particles even more powerful.
Pack Bait
Once you are ready to start fishing, consider using bigger balls of pack bait around your weights or method feeder. The additional bait, which will be presented extremely close to your actual hook bait, will certainly get the attention of any buff that is now in the area.
Additionally, pack bait and the bait cloud it produces attract a lot of small fish, which, in turn, capture the interest of bigger fish, like buffalo and carp.
Pro Tip: Buffs like hot and spicy stuff! So make sure to flavor your pack bait with chili or curry powder!
Fox Paste Bomb
As mentioned in the gear section above, using an inline paste bomb is by far the most effective way to fish for buffalo. Not only will a weight of 3 or 4oz keep your hookbait pinned down on the bottom, it also allows you to chuck out really big and heavy balls of pack bait.
If you know how to handle a 3lb carp rod, casting out a 3oz weight with an additional 4oz of pack bait 70 yards or more can be a relatively easy task. And being able to get that much feed out with each and every cast is a huge advantage! You can purchase the Fox Paste Bom at Big Carp Tackle here.
The Hook Set
Now that you have baited up your swim and cast out your rods, it’s time to wait for that take. When it comes, you gotta be 100% ready!
Despite their impressive size and brud force, buffalo fish actually feed and bite very cautiously and it’s extremely easy to miss a bite when it comes.
Unlike carp, who will almost always hook themselves against the weight of your bottom lead and then immediately swim off, buffalo won’t really notice that they have been hooked. Due to their very thick and fleshy lips, they simply won’t feel the hook when it penetrates.
And as they don’t really seem to care much about the weight hanging off their mouths either, they’ll just keep grazing and feeding.
All too often, this behavior will lead to the classic drop back, which is the best bite indicator you can get when fishing for buffs!
When they’ve been hooked and carry on feeding or swimming around lazily, they will often lift the weight off the bottom. This will cause your mainline to go slack and the hanger, or bobbin, on your bite alarms to drop down.
At best, you will get the visual indication of the bobbin moving and a few beeps from your bite alarm, but that’s usually it. So if you want to be able to fight and land that buff, this is when you’ll have to pick up your rod!
What Are the Best Baits for Buffalo?
Buffalo fish can be caught on a variety of both natural and artificial baits. The ones that are best suited for big buffs and for the type of rig presented in this article include:
Boilies and Pop-Ups/Dumbbells (fish them snowman style: 1 boilie and 1 pop-up on the hair)
Tiger Nuts
Plastic Tiger Nuts
Pro Tip: The artificial baits are especially effective in waters that hold crayfish or turtles, as they have a much harder time getting those baits off the hook or hair.
All three bait types can be presented on a simple hair rig and will fit the buffalo’s fairly small mouth perfectly.
The somewhat bigger boilies and pop-ups come in handy on waters with a lot of smaller baitfish, as they won’t be able to get those baits into their mouths and hence do not produce unnecessary bites. You can find high-quality boilies and pop-ups over at Big Carp Tackle.
If your fishing spot is not disturbed by any smaller fish, you can also use the following baits for buffalo:
corn
artificial pop-up corn
worms
What Is the Best Time of Year to Catch Buffalo?
In the southern parts of the US, the best time to catch buffalo fish is between December and May. During that period of the year, the temperatures in both air and water are more moderate, which means that there is more oxygen in the water.
This spells more active fish that feed on a more or less regular basis throughout the day.
In the northern parts of the US, as well as in Canada, the best time to catch buffalo is between late summer and late fall.
Where Can You Catch Buffalo Fish?
While a majority of lakes with the biggest buffalo can be found in the state of Texas, you can actually find them in most US states.
Their geographical distribution stretches Canada in the north to Texas and Alabama in the deep south.
In Canada, they can be found in the Milk River and Qu’Appelle River that flow through Alberta, Saskatchewan, and Manitoba. They also inhabit Lake Winnipeg.
In the northern US, they are native to midwestern and eastern states such as Wisconsin, North Dakota, Montana, and Minnesota. They then follow the midwestern and eastern parts of the US all the way down to Texas, Alabama, Oklahoma, and Louisiana.
The major water systems in which they can be found include the Hudson Bay and Mississippi River drainages.
Do Buffalo Fish Fight Hard?
While buffalo are extremely subtle feeders and are generally fairly slow-moving fishing, they can turn into real steam locomotives once they realize that they’ve been hooked.
Unlike carp, which often swim hither and thither and in a somewhat panicky and uncontrolled way, buffalo often simply charge off into one direction and keep to it.
But that’s exactly the difficult part when fighting them. Consider a 50lb fish that seems to have near unlimited power and energy reserves and that swims off with relentless force and determination!
Now, try to imagine that powerful fish at the end of your fishing line. If you can imagine that, you understand the need for all the heavy gear I mentioned above!
How Big Can Buffalo Fish Get?
The smallmouth buffalo, which is the buffalo type that is most commonly found and fished for in the States, is a species that can reach really impressive sizes. Fish of over 60lb aren’t that unusual and fish that have weighed in at over 80lb have been caught in the US.
As the species isn’t all that popular, not too many fish get caught and so, no one really knows how big they can get. It is not impossible that there are 100lb+ specimens swimming around in some major lakes of the south! Imagine hooking up to a fish that size!
Currently, the US and world record smallmouth buffalo is a fish of an incredible 82lb 3oz. That behemoth was caught by angler Randy Collins on Athens Lake (Texas) back in 1993.
Related Articles
What Is the Difference Between Buffalo Fish and Carp?
“Unlocking Precision: Exploring the Revolutionary Air Rifle Trigger System for Unparalleled Accuracy and Control.”
air rifle trigger system
The air rifle trigger system plays a crucial role in determining the accuracy and performance of an air rifle. This intricate mechanism is responsible for releasing the compressed air that propels the pellet forward, making it an essential component of any airgun. The trigger system consists of various parts such as the sear, trigger blade, and spring, all working together to provide a smooth and controlled release of the shot.
One key aspect of an air rifle trigger system is its adjustability. Different shooters have varying preferences when it comes to trigger pull weight and travel distance. Therefore, many modern air rifles are equipped with adjustable triggers, allowing users to personalize their shooting experience. These adjustments can help achieve a crisp break, reduce trigger creep, and enhance overall accuracy.
When selecting an air rifle, it is important to consider the quality and design of its trigger system. A well-designed trigger will feature minimal take-up and overtravel while providing a consistent pull weight from shot to shot. Additionally, safety mechanisms such as automatic safeties or two-stage triggers may be present in certain models to prevent accidental discharges. Understanding and appreciating the intricacies of the air rifle trigger system is crucial for both beginners and experienced shooters alike.
In summary, the air rifle trigger system plays a crucial role in ensuring accuracy and precision during shooting. By understanding the various types of triggers available, shooters can make informed decisions to enhance their performance. Whether it’s a single-stage or two-stage trigger, proper maintenance and adjustment are key to achieving optimal results. Ultimately, investing in a high-quality trigger system is essential for both professional and recreational shooters seeking improved accuracy and overall shooting experience.
The Gamo Urban air rifle has a Cold-hammer forged barrel.
It is wonderfully smooth, accurate, and vigorous at 35000 hammer strikes that forge a barrel.
Cold Hammer Forging refines the surface of rifling, the structure of the grains producing the mirror-like finishing in the bore, presenting an accurate and reliable air rifle.
The accuracy permits that you can shoot adequately for a sustained time.
Urban is the first gunning brand that has introduced the Cold-hammer forged barrel at such a reasonable price.
Gamo urban air rifle comes with a silencer, which is integrated with whisper maxim.
It allows the rifle to work silently without any hindrance or disturbance.
Accordingly, it can be said that Gamo Urban .22 cal is noise-free when compared to other guns.
Gamo Urban Vs. Benjamin Marauder
The Gamo urban air rifle is worth $299, and is a silent, accurate, and reliable air rifle. At PyramydAir, it has the lowest price in its class along with shipping charges.
It fits comfortably in the hands and easily handles.
The accuracy can be improved but is pretty good at this price.
Due to PCP, magazines are much more expensive to refill.
You must first go for a detailed analysis of the product to understand its reliability.
The Gamo Urban PCP review provided by the customers mostly ends up with positive feedback because the rifle is basically in a very stylish black color.
Moreover, the customers like the concept of silent shot introduced in the Gamo urban air rifle.
This allows them to shoot in the backyard or their gardens during weekends or the evening without any noise especially.
When you are uninterrupted while shooting your rifle, with no noise, then you perform well without any hindrance.
The Gamo Urban .22 review shows that there is less noise, but they are not claiming that rifle shoots with zero noise.
Another thing that is liked is the accuracy of the Gamo Urban .22 cal, particularly from 25 yards.
The higher prices of pre-charged pneumatic rifles have often kept customers away from the weapon,
But the reasonable cost with quality features attracts more customers.
The Gamo Urban PCP air rifle reviews are positive which urges the shooters to at least try once.
Moreover, the shooters call the Gamo Urban .25 the perfect gun for the backyard.
The customers with negative comments talked about the magazine, as maybe they did not know precisely about the refills.
As per the magazine, there is a $50 cost.
But, if they tend to read this article, all their confusion may vanish eventually.
Those who did not have accuracy in shooting, gave a try to .22 Gamo Urban PCP air rifle,
And it is impressive to read the reviews that their shooting accuracy has genuinely developed, and their confidence has improved.
In addition to this, the combo introduced by the manufacturers is also liked by customers a
As they have significant accessories where they can change anything according to their requirements.
Concluding thoughts
With the high quality and the great look, the Gamo urban air rifle .22 is a market leader.
It’s reliable and affordable, granting you a great time shooting!
This month we shall take a closer view of the 270Winchester and how it compares to the 7 Rem Mag and the smaller 308Winchester
The following is a closer ballistic comparison of the 270Winchester, 7Rem Mag and 308Winchester. Together we shall go through their ballistic qualities as well as gauging their relevance in a real world scenario. I augur that this article will make you take a closer look at the cartridge and bullet combination you are using as well as question the way you make use of it.
Wherever I travel to, it seems hunters and shooters alike get into the debate between these 3 popular rifle cartridges. Is the 270Winchester an underestimated long range contender? Is the 7 Rem Mag a superior round? Where does the 308Win stand in this competitive rifle cartridge scenario?
A – 270Winchester (I already have one & it’s worked for so many hunters so why change it)
B – 7rem Mag (I Love 7mms, love the ballistic performance and can take out anything way out there)
C – 308Winchester (Ammo I can find anywhere, It’s killed everything under the sun. good enough to shoot FTR and Palma competitively)
Blaser R8 in 7 Rem mag, a popular round for open plains hunting or larger game at shorter ranges
In this series of Cartridge Wars – ballistics by Rifletalks, I shall attempt to dispel some myths as well as shed some factual data in ways which I hope will be easier to understand when comparing rifle cartridges. Keep in mind, here we are speaking of rifle cartridges in their standard CIP factory load format.
Surgeon Rifles 308Winchester – custom rifle, from PRS to mountain hunts & African plains game – all rounder topped with a March 2.5-25×42 MTR3 Illum. Reticle. Same scope we used on our 1mile rifle.
Factory loaded 270Winchester VS 7 Rem Mag VS 308Winchester
Each of these cartridges, 270Winchester, 7rem mag and 308Winchester can be handloaded to enhanced specs such as longer over all lengths, increased powder capacity, slower powders, better bullets, longer barrels etc. However, most shooters will acquire a rifle with a barrel length from 22-26 inches as made by most factories. Most of these cartridges, will shoot and burn 100% of their powder charge in a 24inch barrel. Naturally longer barrels provide additional speed as well as added challenges of maneuvering longer heavier barrels so let’s stick to 24inch. Having a few 30inch barrels myself, I’m well aware of this.
In order to find some common base line, I chose the loads as loaded by Hornady Precision Hunter ammunition. I shot this ammo in 6.5 Creedmoor and 30-06 and I believe it is outstanding and fairly well priced at around €2.20 a pop.
270Win – A closer look at bullet choice
The bullet choice is largely the most important component which connects you to your target. It cannot be overlooked. High ballistic coefficient hunting bullets are not as easy to find although most manufacturers nowadays like Hornady, Berger, Sierra, RWS, Norma and Lapua have all come up with their own line of high ballistic coefficient hunting bullets.
Some cartridges have seen better traction particularly due to their bullets being widely used in other popular cartridges, hence enjoying a wider selection of bullets. Take the 308Winchester (7.62) for instance, you can shoot anything from 110grain to 240grain bullets (if you have the correct rifle twist rate)
Wherever you are in the world, you will find ready loaded 308Win ammo, bullets as well as powder, primers and rifles chambered for this cartridge. It’s comparable to the Land Rover Defender of rifle cartridges.
The 7 Rem mag also enjoys a huge variety of highly accurate 7mm bullets (.284). 7mm bullets are highly sought after in competition, made popular by cartridges like the 284Win among others as well as being very popular in hunting cartridges like 7×64 brenneke, 280ackley improved, 7×57, 280rem, 7RUM and more recently, the mighty 28 Nosler. Remember, it’s not the cartridge that makes it a hunting round but the bullet it is loaded with and to a large extent the weight of the rifle platform from which it needs to be fired from.
7mm (0.284) Above is an extensive line up of 7mm bullets https://www.accurateshooter.com/gear-reviews/bulletguide/
The 270Winchester on the other hand has enjoyed years as a leading hunting rifle cartridge but what is it’s ballistic performance like compared to the 7rem mag and the 308Winchester?
On my last trip I heard a lot of discussion about the 270win, the 7rem mag and the 308win. It seems all hunters and shooters have owned one of these cartridges, either because they inherited a rifle chambered for this cartridge or else it was just the first rifle they bought.
During our latest trip in the Pyrenees, one guy turns to me and asks, Rod should I change my Voere 270win Luxus for a better mountain hunting rifle? My reply, what are you going to gain over your existing chambering? He said, well I’ll get a flatter shooting round. From my target shooting experience, I know this largely depends on the bullet you are shooting rather than the cartridge or rifle. As soon as I got home, I started digging into this.
I know that the Austrian brand Voere lbw luxus 270win makes high quality rifles having shot their 338 Lapua mag version a few times grouping extremely well at 800m with it. In order to be able to guide this fellow shooter, I decided to show you their performance on 2 different levels, Drop in MOA as well as Windage in MOA. You may then decide for yourself.
In my view, Windage is what really influences my choice of that specific bullet & cartridge combination. Why?
Bullet Drop doesn’t bother me, once I laser my target and given I know my actual muzzle velocity, I will dial in that elevation and that will take care of drop. Irrelevant of how fast a cartridge you are shooting, past 400m they are all going to drop considerably that you will have to use a laser range finder before making the shot and you WILL need to know how much it drops exactly. For the scenario below, I am assuming you have dialed in your elevation after you acquired the ballistic solution from the many ballistic applications out there. I prefer Kestrel as it takes into consideration my real time atmospheric conditions as well as the ballistics and it’s spot on once you true your ballistic trajectory.
Read Review of this 270Win Voere LBW rifle
270Win Vs 7 Rem Mag vs 308Win Ballistics
Below: Notice how close the 270Winchester is to the 7rem Mag to 700m…. Do you still want to change your rifle mate? Why not try changing the bullet first.
270 Win – Windage
Read about the Voere LBW rifle above in 270Win here.
Windage on the other hand is a trickier skill set and comes by practicing sending rounds down range as well as practicing with a wind meter off the range. Most hunters seem not to spend a lot of time on the rifle range, they just zero their rifles at 100m and they set off. If you’re hunting short distance, that approach will be fine. If on the other hand, you’re expecting long shots as in some known regions of the world as is mounting hunting, that’s not going to cut it.
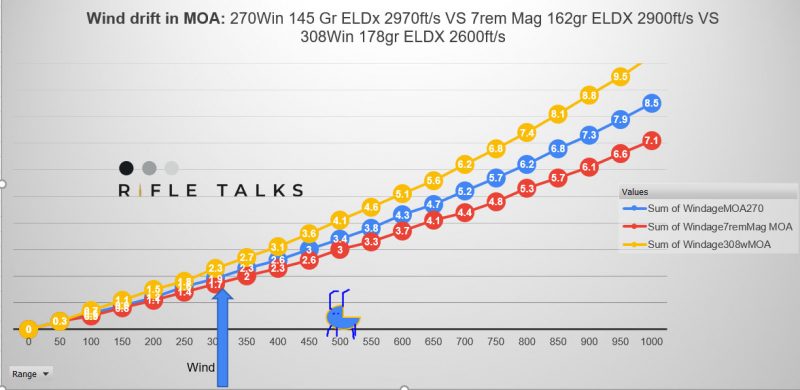
The wind drift table below shows these 3 popular rifle cartridges 270Winchester, 7 Rem Mag and 308Winchester and their wind drift component. I placed a game animal at 500m to give a practical example. The lateral deflection gives you an idea of how much drift you would get due to wind.
Ok so let’s find out the difference between the 270Winchester, 7Rem Mag and 308Winchester using some numbers and real-world case scenarios.
Let’s take the diagram above. We have a plains game ranged at 500m. We have a 10mph wind blowing from 3 o’clock (Full value wind). Below you can see how much each cartridge/bullet combo will drift, both in inches and MOA. For those new to adjusting for wind in MOA, at 500m/546 yards 1MOA = 5.6inches.
So let’s assume you have dialed in windage for this distance or you’re holding off your shot using the reticle hash marks. Now the wind speed drops to 7mph from 10mph but still blowing from 3 o’clock. This happens often and if you do not notice, you will be caught out. By how much?
Below: Here are the wind drift values for a 7mph wind.
When do faster cartridges matter?
Faster Cartridges like the 7rem mag and 270Winchester matter. If you were shooting a 308Winchester and the wind drops to 7mph, you now need:
16 inches of Right wind hold instead of 23 inches for a right wind, that’s 7inch difference.
Your 270Winchester would need 14 inches instead of 20 inches that’s 6 inches difference while your
7 Rem mag would need 12 inches instead of 17 inches, that’s 5 inches less correction.
Depending on which way the animal is looking, if it where looking into the wind, you would probably just miss it or just hit it as you would have over compensated but if it were looking away from the wind, you would miss and hit the animal in its hind legs.
Scenario A
Below you can picture this scenario where you are taking a shot at 500m in a 10mph from 3 o’clock (known as full value wind) We are holding off 4 MOA Right wind to compensate for the wind drift. We are shooting the bullet into the wind so that it will bring it back to where we want it to impact.
Should the wind speed change and the shooter not realize, this is what would happen assuming the wind direction does not change. The effects are further accentuated if the wind direction changes.
5mph wind – miss, shot would hit in front of the animal. (over compensate)
7mph wind – maybe a miss or barely hit (over compensated)
10mph wind – shot impacts exactly as shown below right in the lungs. (correct)
15mph wind – gut shot (under compensated)
b) Scenario B – 10mph wind from 3 o’clock with an animal facing away from the wind.
In order to hold 4MOA of Right Wind, we are aiming at his hind legs. Again we are pushing the bullet into the wind so that the wind brings it back to where we want it to impact.
Wind drops to 5mph – Gut shot (over compensate)
7mph wind – Gut shot (over compensated)
10mph wind – shot impacts exactly as shown above right in the lungs. (correct)
15mph wind – Miss (under compensated)
With a 308Winchester, our Right Wind hold is almost the width of the entire animal at 500m.
Holding Off Windage with your 308Winchester
What does holding off look like in real world scenario? While on the range I managed to take this shot. We were not going to shoot the sheep, it’s just to show you what it looks like. The more you hold off, the large the chance for a miss. Here we are holding 6MOA LEFT WIND meaning we are shooting the bullet into the wind so that it would then blow it back on target. Do you want to learn how to develop a perfect load in under 50 rounds?
Reticles like the 4Wi on the new Swarovski z8i 3.5-28x50P have 2MOA hashmarks on 28x magnification for you to hold wind.
How do Faster cartridges like the 270Win and 7 rem Mag help us?
They basically narrow down the window that you should hold off as well as diminishing the error bracket. If you ever saw a wind plotting sheet on an Fclass score card, you would see something like this. Dots below the targets plotted to show where the bullet impacted when we dialed a specific wind correction.
Wind plotting chart for a 20 round string at 1000 yards
Above: Notice the dotted lines that I drew up to show where the bullet impacted the target relative to my wind correction for that shot. It also gives me an idea of how much the wind changed and consequently its effect on my bullet over a 20-shot string at 1000yards. In this scenario we went from 4MOA estimate to 8.25 MOA Left wind call. That’s with a 284win shooting a 180grain VLDs at 2910ft/s, same performance of 7 rem mag!
How do you know how much you have to dial? You can work it out, there is a simple formula to get you there.
(Wind in MOA for 10MPH @3o’clock X by wind speed (mph) X wind direction value (0.5, 0.7, 0.85) = Wind Correction
Then you have to shoot and practice on the range to get proficient at that. A few hundred rounds a year done well will get you there.
Instead of holding all that wind, I prefer dialing in that wind component into my windage turret.
In the picture below, the shooter is dialing in 6 MOA RIGHT WIND. In this case he will not have to hold off his Windage. He will hold dead on target- centre mass. This is a learned skill and you have to practice, dial, adjust, shoot till you gain confidence adjusting the turrets with your eyes closed.
I took this picture through my Swarovski ATS 25-50×65 Spotting scope during Europeans while peeping at some of the windage adjustments during a course of fire. This ukrainian shooter had 6MOA on the very flat shooting 300WSM.
Swarovski z8i long range hunting scope
Swarovski BTF Elevation and Windage turrets enable you to do just that. Simple and fool proof to work with. I genuinely believe these are some of the best made turrets out there. Easy on, Easy Off. Moreover, these high quality windage turrets on the Swarovski Z8i enable you to dial 4 Mrad Left or 4Mrad Right then they stop turning, you can never get caught one full turn out. Read more about this Swarovski z8i scope which we used on a hunt in the Pyrenees.
Swarovski BTF Elevation and Windage turret. You can get these from Williamevans
After reading this article, will you be switching to another cartridge or will you explore how your own rifle/cartridge/bullet combination can provide you better ballistics? Contact Us with any feedback you may have and signup to our newsletter!
Tired of leaky waders? In this guide, I’ll show you how to repair breathable waders, so you can get back on the water in no time.
After a heavy 2021 of fly fishing, my Simms waders developed a leak in the neoprene bootie. It is one of those miserable feelings standing in the water and feeling the cold water creep in.
The good news was that I had wool socks so it wasn’t too cold but my whole right leg was soaked.
Many people would send them back to the manufacturer but I had heard stories about how long Simms was taking to repair waders. People were telling me that they were going to have to wait months before Simms would repair their waders.
I had repaired a pair of GoreTex Simm’s waders before that I cut open on a rock so I knew how to fix the legs, but I didn’t really know how to fix the bootie-or if that was even possible.
As it turns out, Simms does not recommend repairing the booties at the seam. So, if you have a leak in the seam, you are better off sending it for them to put on new booties.
My hole appeared to be in the big toe area and nowhere near the seam, so I gave it a try. Low and behold, it worked perfectly.
A fishing friend of mine is sitting on several pairs of leaking waders because he won’t try to fix them himself. Well, to be honest, he tried once, and it didn’t turn out well for him or the waders. I think he’s waiting on me to offer to do it for him.
So, if you find yourself in the same situation, here are the steps I took:
There are a few ways to identify leaks. One way is to turn your waders inside out. Put rubbing alcohol into a spray bottle and spray the legs of the waders, seat area, and chest. Basically, any place you want to check for leaks.
Holes show up as a little black dot.
Circle those dots with a magic marker.
Another way is to fill the waders with water. However, Simms cautions that you should not fill the entire wader all the way to the top but only as high as the knee area. Anything more and you risk damaging your waders because of the weight of the water can rip seams. In my case, I could see that the neoprene was worn right near my big toe.
In my research, I discovered that the big toe was one area that was frequently damaged by rubbing or large toenails.
Rips and tears are pretty obvious. In my case, I could easily see through my waders to know I had worn away the neoprene in the bootie.
Get Yourself Some Aquaseal And Patches
Aquaseal will be your friend.
This rubber cement-type product is highly recommended by wader companies for repairs. It is durable and flexible and works on waders, neoprene wetsuits, and dry bags for repairs that last.
Simms and Aquaseal offer wader repair kits that include Tenacious Tape patches to make the repairs more precise and permanent. I highly suggest getting these kits because everything you need is right in the kit.
Be Patient And Build Layers.
The key to using Aquaseal is to make sure you don’t glob it on all at one time, but you put build it up in layers. I just used a little bit at first over the worn area. I went a little larger than the worn area and let it dry overnight.
Let the area cure.
The next day, I put a little more on and let that dry. I did this for about 3 days straight.
By the end, the Aquaseal glue had dried nicely, and I tested the bootie again by filling it up with water and it held.
Don’t Do It All At One Time
My friend who is waiting for me to do his wader repairs can be impatient at times.
So, he put Aquaseal on all the black dots that he saw, turned the waders over and somehow the legs got stuck together. I recommend that you do one leg at a time, or the front or the back at a time, let it dry and switch.
Don’t let the legs touch while the glue is still wet, or you will be like my friend and have a pair of Simms G4’s where the legs are glued to each other.
Test Your Repair
There is nothing worse than having ice-cold water steep into your waders on a cold winter day on the river. So, test your repair.
If you can fill your waders with water because your repair is below the knee, test them by filling them up to the knee. That’s how I tested my booties.
If they are above the knee, then spray the alcohol again on your waders and look for the black dots.
The good news was that using the technique above, I now have a dry pair of waders and it only took a few days to repair. If you have the time, most wader companies will offer to do repairs. You will have to be patient. Or you can give it a try and do it yourself.
One pro tip that I read says to store your Aquaseal in the freezer.
When you want to use it, put it in warm water to heat up. I can’t tell you if this works or not because I just put it in a Ziploc bag and put it in the freezer. I haven’t needed to use it since my initial repair.
In the world of big bore air rifles, few names carry as much weight as the Dragon Claw. When Seneca announced the release of the Dragon Claw II, enthusiasts hoped for meaningful performance improvements rather than mere aesthetic updates. After extensive testing and evaluation, we can confidently say that Seneca has not only met but exceeded these expectations, delivering a powerhouse that maintains the cherished characteristics of its predecessor while significantly advancing its capabilities.
The Dragon Claw II maintains the classic aesthetic that made its predecessor popular, presenting itself as a harmonious blend of traditional craftsmanship and modern engineering. At first glance, you might struggle to distinguish it from the original model – a testament to Seneca’s respect for the platform’s heritage. The most noticeable external change is the redesigned cocking handle, a modification that proves to be far more than cosmetic.
Design and Construction
The rifle features a handsome Monte Carlo hardwood stock with a raised cheekpiece that favors right-handed shooters without alienating left-handed users. The checkering on both the forearm and grip provides positive control without being aggressive, demonstrating attention to both form and function. The metal action showcases detailed dragon imagery on the left side and the Seneca logo on the right, adding a touch of artistry to the utilitarian design.
The 21.65-inch rifled steel barrel terminates in a threaded muzzle protected by a removable cap, while dual air reservoirs beneath provide a substantial 500cc total air capacity. The integration of these components results in a well-balanced weapon that feels solid without being unwieldy.
Performance Analysis
Power Output: A Significant Leap Forward
The most dramatic improvement in the Dragon Claw II lies in its power output. Where the original model delivered 230-240 foot-pounds of energy (FPE), the new version was advertised to achieve 340 FPE. Our testing revealed even more impressive results:
Calibers
Pellets
FPS
FPE
.50
Air Venturi Round Ball 177 gr
630
156.03
.50
Air Venturi FP 336 gr
556
230.7
.50
300 grain Pellet
738
362.9
.50
Air Venturi 210gr
640
191.04
.50
Air Venturi 336 gr
545
221.66
These numbers represent a paradigm shift in big bore air rifle performance, with the first shot exceeding the advertised maximum by over 45 FPE. This kind of power puts the Dragon Claw II firmly in the territory of serious hunting weapons, capable of ethically harvesting a wide range of game.
The rifle demonstrates impressive versatility across different ammunition types:
With 177-grain round balls:
Peak velocities of 850-860 FPS
Maintains 800+ FPS for 4-5 shots
Continues above 700 FPS for 8-9 shots
With 336-grain slugs:
Delivers 3-4 shots above 300 FPE
Maintains hunting-worthy power throughout the string
With Air Bolts:
Achieves speeds over 600 FPS
Ranks among the fastest arrow-launching air rifles available
This flexibility in ammunition choice, combined with consistent performance across different projectile weights, makes the Dragon Claw II an exceptionally versatile hunting platform.
Practical Considerations
Air Management and Filling
The dual 500cc reservoirs operate at a maximum pressure of 3000 PSI, accessed through a female quick-disconnect foster fitting. While hand-pump filling is possible, it’s not practical for regular use given the volume. We strongly recommend either a carbon fiber tank or a personal compressor like the Air Venturi RovAir for both shop and field use.
Through extensive testing, we found that optimal performance often comes from slightly under-filling:
2850 PSI fills provided the most consistent two-shot groups
3000 PSI fills sometimes resulted in an errant first shot followed by 2-3 consistent shots
Shooting Characteristics
The Dragon Claw II demands a different approach than typical air rifles. Success requires:
A firm hold more akin to black powder rifles than traditional airguns
Proper follow-through technique
Understanding of pressure curves and their effect on point of impact
Regular monitoring of reservoir pressure
The learning curve is steeper than with smaller caliber PCPs, but the reward is exceptional power and accuracy once mastered.
Mechanical Elements
Trigger and Safety System
The non-adjustable single-stage trigger breaks at approximately 5 pounds 9 ounces – notably better than the advertised 7 pounds. While not match-grade, it’s entirely appropriate for a hunting-focused weapon. The manual safety, integrated into the trigger group, functions only when the action is cocked – a detail that users should keep in mind during operation.
Cocking System
The redesigned cocking mechanism represents one of the most successful upgrades. The longer cocking handle with its ball detent system provides:
Better leverage for managing the increased power
More positive engagement
Improved reliability
Two distinct cocking positions for different ammunition weights
Sighting Systems and Optics
The rifle comes equipped with:
Fixed front sight
Fully adjustable rear sight
11mm dovetail rail for optic mounting
During testing, we used a Hawke Endurance 30 WA 1-4 x 24 scope, chosen for its:
Quick target acquisition
Excellent clarity
Compatibility with existing iron sights
Practical field-of-view for hunting scenarios
The scope mounting system accommodates compact optics without requiring removal of the iron sights in many cases, providing welcome flexibility for different hunting situations.
Hunting Applications
The Dragon Claw II’s power output makes it suitable for a wide range of game, including:
Whitetail deer
Feral hogs
Javelinas
Coyotes
Various small to medium game
The ability to use different ammunition types – from round balls to heavy slugs and air bolts – allows hunters to optimize their setup for specific game and hunting conditions. The power increase over the original model provides greater confidence in ethical harvesting at practical hunting distances.
Field Performance and Practical Use
Shot Management
Understanding the Dragon Claw II’s unregulated nature is crucial for field success. Users should:
Determine their optimal fill pressure for consistent first shots
Plan shot opportunities around the gun’s sweet spot
Maintain awareness of remaining pressure
Keep shot counts conservative for hunting applications
While the rifle can deliver multiple effective shots, treating it as a single-shot hunter’s tool tends to produce the best results.
Environmental Considerations
The rifle proves capable in various field conditions, though users should account for:
Temperature effects on pressure
Field filling requirements
Weather protection for the fill port
Practical shooting positions in hunting scenarios
Maintenance and Care
Regular maintenance should include:
Pressure system checks
O-ring inspection and maintenance
Proper lubrication of the cocking mechanism
Clean and protected storage
Regular inspection of the ball detent system
Target Market and Value Proposition
The Dragon Claw II clearly targets:
Serious big bore airgun hunters
Performance-oriented shooters
Users seeking maximum versatility in ammunition choice
While not primarily designed for target shooting or casual plinking, it excels in its intended role as a hunting tool, offering:
Exceptional power
Reliable performance
Versatile ammunition compatibility
Traditional styling with modern capabilities
Specifications
Precharged pneumatic (PCP)
Single-shot
Rifled barrel
Bolt-action with longer cocking handle
Fixed front sight
Fully adjustable, removable rear sight
Dual air chambers (500cc total air capacity)
3,000 psi max fill pressure
Built-in manometer (pressure gauge)
11mm scope rail (use only compact scopes)
2 power levels (first bolt stop is low power, second is high)
Up to 860 FPS with 177 grain round balls
Up to 600 FPS with Seneca Air Bolts
Up to 340 FPE with 336 grain flat nose slugs
Hardwood Monte Carlo stock with checkered forearm & grip
Raised right-hand cheekpiece
Includes Male Quick-Disconnect Foster Fill Connection on rifle
Recommended uses:
Small/medium/large game hunting: hogs, buffalos, deers, groundhogs, coyotes, javelinas.
Pros and Cons
Pros
Cons
Great looking
Powerful and consistent
Can shoot multiple projectiles (bullets or arrows)
The Seneca Dragon Claw II represents a significant evolution in big bore air rifle design. By maintaining the core qualities that made the original successful while substantially improving performance, Seneca has created a worthy successor to the Dragon Claw name. The power increase is not merely incremental but transformative, opening new possibilities for airgun hunters.
The rifle’s success lies not just in its raw performance numbers, impressive as they are, but in how those improvements have been implemented without compromising the platform’s fundamental character. The learning curve and shot management requirements might deter casual users, but for serious airgun hunters and enthusiasts, these are small prices to pay for the capabilities offered.
For those seeking a powerful, versatile big bore air rifle that combines traditional craftsmanship with modern performance, the Dragon Claw II delivers. It’s not just an upgrade to a successful platform; it’s a statement about what modern big bore air rifles can achieve.
")
")
")
")
")