“Enhance Your Precision: Explore the Best Break Barrel Air Rifle Scopes for Unparalleled Accuracy and Target Acquisition.”
Break barrel air rifle scope
A break barrel air rifle scope is a crucial accessory for any shooter using a break barrel air rifle. Designed specifically to enhance accuracy and precision, this type of scope is mounted on top of the rifle’s barrel and provides magnification for better target acquisition. With its advanced optics and adjustable features, a break barrel air rifle scope allows shooters to make precise shots over longer distances.
One of the key advantages of a break barrel air rifle scope is its ease of use. The break barrel design allows for quick and simple reloading, making it an ideal choice for both beginners and experienced shooters. The scope ensures that every shot counts by providing clear visibility of the target, even in low light conditions. Whether you are hunting or participating in target shooting competitions, a break barrel air rifle scope greatly enhances your chances of hitting your mark with accuracy and consistency.
In conclusion, a break barrel air rifle scope is a valuable accessory for enhancing accuracy and precision in shooting. It offers improved visibility, adjustable magnification, and reliable performance. Whether for hunting or target practice, investing in a compatible and high-quality scope can greatly enhance the overall shooting experience with a break barrel air rifle.
Have you adopted a hunting dog breed? As with all types of dogs, selecting the perfect name for your an exciting, albeit slightly daunting task. Whether you want to honor your dog’s breed heritage or you plan to train your dog as a loyal hunting companion, search through our list of hunting dog names for one you can call out in tranquil dawns or whisper in hushed woods.
Hunting dogs have been man’s faithful companion for millennia, and their names often carry weighty legacies, inspired by mythology, hunting terminology, renowned hunters, and nature itself. So whether you’re a fan of traditional names like ‘Ranger’ and ‘Hunter’, or seeking more unique names like ‘Artemis’ or ‘Oakley’, we have you covered.
Aella: In Greek mythology, Aella was an Amazon warrior known for her swiftness. It means ‘whirlwind’.
Artemis: Greek goddess of the hunt and wild animals.
Atalanta: A Greek heroine, famous for her swift foot and hunting skills.
Bellona: Roman goddess of war.
Britta: A Swedish name meaning ‘strength’ and ‘exalted one’.
Calypso: Means ‘she that conceals’, from the nymph who was skilled at hunting in Greek mythology.
Ceridwen: Welsh goddess of rebirth, transformation, and inspiration.
Chase: An English word for ‘hunt’, it also makes a great dog name.
Cleo/Clio: One of the muses in Greek mythology who inspires heroic pursuits.
Diana: Roman goddess of the hunt and moon.
Echo: A nymph from Greek mythology, known for repeating voice.
Freyja: Norse goddess of love, beauty, and war.
Gaia: The ancestral mother of all life in Greek mythology.
Harper: Old English name for someone who plays the harp, but it can also signify a hunting horn.
Huntress: The female form of ‘hunter’.
Juno: Roman goddess who was a protector of the state and women.
Kali: Hindu goddess of destruction, time, and doomsday.
Kira: Means ‘ruler’ or ‘leader’ in Russian.
Luna: Means ‘moon’ in Latin, the celestial body often associated with night hunts.
Minerva: Roman goddess of wisdom and strategic warfare.
Misty: This name can signify the mysteriousness of forests during hunts.
Nyx: Greek goddess of the night, a strong name for a hunting dog.
Oakley: For Annie Oakley, the Wild West sharpshooter. (Did you know that Annie Oakley met her future husband in a shooting match with him? He traveled with a dog named George. Annie was quickly smitten with George so her soon-to-be fiance courted her by sending her cards “signed” by George.)
Odessa: Means ‘long journey’ which can be symbolic of long hunting expeditions.
Pandora: Means ‘all gifted’ in Greek, from the myth of the first human woman created by the gods.
Puma: After the large, stealthy cat that is an excellent huntress.
Raven: Inspired by the intelligent bird often associated with hunting magic in various cultures.
Rhea: A Greek Titaness, mother of gods, and skilled in many ways.
Ripley: A character from the “Alien” series, known for her toughness and survival skills.
Rover: A traditional name for a dog who loves to explore or rove.
Saga: Norse goddess of history and storytelling, a fitting name for a dog that will share many hunting tales.
Scout: Ideal for a dog who’s good at finding game.
Shadow: A great name for a dog who’s a silent follower during hunts.
Skadi: The Norse goddess of bowhunting, winter, mountains, and skiing.
Sphinx: A mythical creature with the body of a lion and the head of a human, known for her cunning.
Storm: For a dog with a wild spirit, like the untamed weather.
Terra: Means ‘earth’ in Latin, a grounding name for a hunting dog.
Tracker: Directly related to the hunting ability of dogs.
Truffle: A fitting name for dogs used for finding truffles, a type of fungi that’s a culinary delicacy.
Valkyrie: In Norse mythology, they are female figures who choose who lives and dies in battle.
Wilder: English origin, this name signifies someone who’s wild and free.
Male Hunting Dog Names
Ajax: In Greek mythology, Ajax was a brave and powerful warrior.
Apollo: The Greek god of music, poetry, and light.
Archer: This English name stands for ‘bowman’, an excellent choice for a hunting dog.
Artemis: Although traditionally a female name (the Greek goddess of the hunt), it can also work well for a male hunting dog.
Atlas: A Titan in Greek mythology known for his strength and endurance, he was condemned to hold up the sky for eternity.
Beowulf: The protagonist of an Old English epic poem, known for his bravery and strength.
Blaze: Represents a trail or a fast-moving fire, perfect for a swift hunting dog.
Chase: English origin, this name symbolizes a hunter’s pursuit.
Falcon: A bird of prey known for its incredible hunting skills.
Fletcher: An English name that means ‘arrow-maker’.
Gunner: A strong name of Scandinavian origin that means ‘bold warrior’.
Hawkeye: Denotes sharp vision, like the Marvel superhero who’s an expert archer.
Hunter: An obvious choice, this English name is self-explanatory and popular.
Jäger: The German word for ‘hunter.
Leopard: Named after the big cat known for its hunting skills and agility.
Orion: A Greek mythological hunter, who was placed among the stars as the constellation of Orion.
Ranger: Means ‘forest guardian’ in French, fitting for a hunting dog.
Rex: Latin for ‘king’, it signifies a dog that rules the hunting ground.
Scout: Someone who gathers information stealthily, this name is fitting for a hunting dog with a keen sense of smell and tracking skills.
Spartan: Referring to the ancient Greek warriors known for their discipline and bravery.
Tracker: An English name that directly relates to the tracking ability of hunting dogs.
Wolf: Named after the wild canine known for its hunting skills in packs.
Bird Dog Names
Are you adopting a bird dog? Our previous dog Irie was a German Shorthaired Pointer mix who loved nothing better than long walks in the woods. Here’s a look at some good bird dog names both related to appearance and inspired by their breed heritage.
Bird Dog Names Related to Appearance
Brindle: This term is used to describe a coat color pattern on dogs that appears somewhat similar to a speckled pattern.
Camo: Short for ‘camouflage’, which can often appear as a speckled pattern.
Cheetah: This big cat has a beautiful, spotted coat.
Confetti: This name could reflect a coat that looks like it has small pieces of different colored spots.
Dot: A simple and cute name for a speckled dog.
Dotty: A fun, affectionate take on ‘Dot’.
Freckles: An adorable name for a dog with a speckled coat.
Galaxy: Like the night sky filled with stars.
Leopard: Named after the big cat with a famously spotted coat.
Marble: Like the stone that often has a ‘speckled’ appearance.
Mosaic: Referring to the art form using small pieces to create a whole.
Mottle: A term that means to mark with spots or smears of color.
Oreo: Like the cookie, black and white.
Pebbles: For a coat that resembles the varying colors of pebbles.
Pepper: Ideal for a dog with black or grey spots.
Pinto: A Spanish word meaning ‘painted’ or ‘spotted’, used to describe horses with coat colors that include large patches of white.
Pixel: A cute, modern name for a dog with a coat that looks pixelated with different colors.
Polka: As in polka dots.
Pongo: From the Dalmatian character in 101 Dalmatians.
Smudge: A spot or blot, perfect for a dog with a speckled coat.
Speckle: Directly refers to the small spots or patches of color.
Splatter: A pattern created when a liquid splashes over a surface – a unique name for a speckled dog.
Sprinkle: Just like sprinkles on a cupcake, your dog’s speckles might remind you of this.
Splotch: A blot or a spot of color.
Spot: An obvious but classic choice for a speckled dog.
Starry: If your dog’s coat reminds you of a starry night sky.
Sundae: Like the dessert topped with a mix of different toppings.
Bird Dog Names Related to Birds
Whether you plant to hunt with your bird dog-or getting out and enjoying nature with your bird dog breed, here’s a list of potential names tied to birds, speed and the outdoors.
Aero: Greek for ‘air’, perfect for a dog that is as light and swift as the air.
Avian: Means ‘relating to birds’.
Breeze: Ideal for a fast and nimble bird dog.
Comet: For your swift and unstoppable hunting companion.
Dove: Named after the bird, symbolizing peace and harmony.
Eagle: A strong, noble bird that’s a skilled hunter.
Feather: Symbolic of the bird-like lightness and agility of your dog.
Flight: Represents the action of flying, usually referred to birds.
Gale: A very strong wind, representing speed and power.
Harrier: A type of bird of prey, also a breed of hound dogs.
Hawk: Named after the bird of prey known for its keen vision and speed.
Jet: Signifying speed and agility.
Kestrel: A bird of prey known for its hunting abilities.
Lark: A small, often singing bird, for your cheerful companion.
Merlin: A species of falcon, also the name of a legendary wizard.
Nimbus: Latin for ‘cloud’, signifying lightness and speed.
Osprey: A fish-eating bird of prey.
Peregrine: Named after the fastest bird in the world.
Raven: A bird known for its intelligence and adaptability.
Robin: After the bird species, for a friendly and sociable dog.
Skye: A name inspired by the wide open sky where birds dwell.
Sparrow: Named after the small, agile bird.
Swift: As the name implies, it represents swiftness. It’s also a type of bird.
Talon: The sharp claws of a bird of prey.
Wing: Symbolic of the bird-like agility and grace of your dog.
Zephyr: A gentle breeze, perfect for a swift and quiet bird dog.
Duck Dog Names
These names are all related to ducks and their environment. They could be ideal for a hunting dog bred to retrieve waterfowl, such as a Labrador Retriever, Chesapeake Bay Retriever, or a Golden Retriever.
Anas: From the Latin word for ‘duck’.
Aqua: Latin for ‘water’, where ducks often dwell.
Bayou: A slow-moving creek or a swampy section of a lake or river.
Brook: A small stream where you might find ducks.
Caddis: Named after the aquatic insect, a common food for ducks.
Canvas: Short for Canvasback, a type of duck.
Creek: A small stream, an environment frequented by ducks.
Decoy: The replica used to attract ducks during hunting.
Diver: Many duck species dive for their food.
Drake: The term for a male duck.
Eider: A type of duck found in the colder parts of the Northern Hemisphere.
Fin: As ducks are aquatic birds, this name relates to water and swimming.
Flapper: Referring to the flapping sound a duck’s wings make.
Flyway: The migration routes used by ducks.
Gadwall: A type of duck common in North America.
Lagoon: A shallow body of water separated from a larger body of water (like a sea) by barrier islands, sandbars, or coral reefs.
Marsh: A type of wetland, a common habitat for ducks.
Merganser: A type of diving duck.
Migrate: Referring to the migratory nature of many duck species.
Pintail: A type of duck known for its distinctive tail feathers.
Quack: The characteristic sound a duck makes.
Reed: A type of tall, slender grass that often grows in wetlands where ducks live.
Ripple: Named for the small waves ducks create when they swim.
River: Many ducks are river-dwelling.
Scaup: A type of diving duck.
Shoveler: A type of duck named for its unique, shovel-like beak.
Splash: Named for the sound a duck makes when it lands in the water.
Teal: A small, fast-flying type of duck.
Webber: For the webbed feet that make ducks such efficient swimmers.
Widgeon: A type of dabbling duck.
Pheasant Hunting Names for Dogs
Autumn: Pheasant hunting season often takes place in the fall.
Blaze: Referring to the bright, fiery colors of a pheasant.
Bramble: These are often found in the habitats where pheasants live.
Brush: Named after the type of vegetation where pheasants are often found.
Buster: A name that signifies breaking through the brush to flush out pheasants.
Copper: For the beautiful, copper-colored plumage of some pheasants.
Cornfield: A place where pheasants often hide.
Covey: A term for a small flock of birds, including pheasants.
Flush: This term refers to the action of startling birds into flight.
Forest: Pheasants can often be found in forested areas.
Golden: For the golden color found on many pheasants.
Grassland: A type of terrain where pheasants often live.
Harvest: The term can refer to the hunting season.
Hedgerow: A place where pheasants often hide.
Meadow: Refers to the open fields where pheasants can be found.
Quill: A term for a bird’s feather.
Rooster: A term for a male pheasant.
Rustic: Refers to the countryside where pheasant hunting often takes place.
Sage: For the sagebrush landscapes where some pheasant species are found.
Setter: A type of gundog used for hunting game birds.
Thicket: A dense group of bushes or trees where pheasants often hide.
Timber: Refers to wooded areas where pheasants might be found.
Upland: Referring to upland bird hunting, which includes pheasants.
Whistle: Named for the unique sound many pheasants make.
Wilderness: Representing the wild areas where pheasants live.
Woodland: A term for forested areas, part of the natural habitat of pheasants.
When picking a name for your pheasant hunting dog, consider these options that represent the environment, the quarry, and the experience of the hunt. Ultimately, choose a name that fits your dog’s personality and the role they play in your hunting outings.
Famous Hunting Dog Names
Bang Away: Boxer, Westminster Best in Show winner in 1951.
Belle: from the novel Big Red by Jim Kjelgaard.
Blue: Coonhound, from the book Where the Red Fern Grows by Wilson Rawls.
Bran: Irish Wolfhound, owned by the legendary Celtic hero Fionn mac Cumhaill.
Buck: from Jack London’s novel The Call of the Wild.
Bullet: Roy Rogers’ trusty companion on his TV show.
Chief: from the movie The Fox and the Hound.
Copper: also from The Fox and the Hound.
Duke: Bloodhound, from the television series The Beverly Hillbillies.
Gelert: Legendary Welsh hunting dog.
Luath: Labrador Retriever, from the movie The Incredible Journey.
Marley: Labrador Retriever, from the book and movie Marley & Me.
Old Dan: Redbone Coonhound, from Where the Red Fern Grows.
Rin Tin Tin: German Shepherd, a famous movie star in the 1920s and 30s.
Snoopy: Beagle, from the comic strip Peanuts by Charles M. Schulz.
Sounder: Coonhound, from the novel Sounder by William H. Armstrong.
Gun Names for Dogs
Beretta: A famous Italian firearm manufacturer.
Blaser: A German firearm manufacturer known for its high-quality hunting guns.
Bolt: Referring to the bolt action of some types of firearms.
Browning: Named after John Browning, the famous American firearms designer.
Bullet: Projectile fired by a majority of firearms.
Caliber: A term used in firearm measurements.
Carbine: A short-barreled rifle.
Colt: A renowned American firearms manufacturer.
Flintlock: An older type of firearm ignition system.
Gauge: A term used to measure the bore size of shotguns.
Gunmetal: a fitting name for a gray dog.
Hammer: External component of a gun’s firing system.
Henry: An American firearms manufacturer.
Kimber: A company that produces a wide variety of firearms.
Magnum: A term often used to describe a powerful gun or large caliber.
Mauser: A German arms manufacturer.
Musket: An old-style gun that was loaded from the muzzle.
Powder: Explosive mixture used to propel a bullet.
Remington: For the American company Remington Arms originally founded in 1816.
Ruger: An American company known for its rifles, shotguns, and pistols.
Savage: An American company known for producing firearms for hunting.
Scope: Telescopic sight used on many hunting rifles.
Shell: Brass casing containing primer, powder and a projectile bullet.
Trigger: Firing mechanism on a hunting firearm.
Winchester: American firearms manufactured by the Winchester Repeating Arms Company.
More Dog Name Posts You Might Like
113 Werewolf Names for Dogs Sure to Make You Howl
110+ Star Names for Dogs: Celestial Names for Your Stellar Pup
Exploring the Pros and Cons: Pump Air Rifle vs Break Barrel – Unveiling the key differences and advantages between two popular air rifle mechanisms. Delve into this comprehensive comparison to make an informed choice for your shooting needs.
Pump air rifle vs break barrel
When it comes to choosing an air rifle, one of the main decisions to make is whether to go for a pump air rifle or a break barrel. Each type has its own set of advantages and disadvantages, so it’s important to understand the differences between them before making a purchase.
A pump air rifle, as the name suggests, requires manual pumping to compress air before each shot. This means that it doesn’t rely on any external power source such as CO2 cartridges or batteries. Pump air rifles are typically more affordable and easier to maintain compared to other types of air rifles. They also offer variable power adjustment, allowing shooters to customize their shooting experience. However, they usually have a lower velocity and can be tiring to use if shooting for extended periods.
On the other hand, break barrel air rifles are known for their convenience and power. With a simple break of the barrel, these rifles automatically compress and store air for the next shot. This makes them quick and easy to reload without the need for constant pumping. Break barrel rifles often have higher velocities and greater accuracy than pump models. However, they tend to be more expensive and require regular maintenance due to the complex mechanisms involved. Additionally, break barrel rifles may have limited options for power adjustment.
In conclusion, when comparing pump air rifles and break barrel rifles, it becomes clear that both options have their advantages and disadvantages. Pump air rifles offer ease of use and affordability, while break barrel rifles provide higher power and accuracy. Ultimately, the choice between the two depends on individual preferences and shooting requirements.
Choosing hunting boots can be a challenge, especially if you’re pressed for time. After all, there are many factors to consider before lacing up a pair of boots, whether it’s for a hunt through rugged terrain or a spring turkey hunt in a field. We’re here to help you narrow down the possibilities with recommendations for boots suited to various purposes. Each has been put to the test in the field. Consider this your one-stop guide for picking out your next pair of hunting boots.
Vaprtrek boots with a height of eight inches are offered by Irish Setter Boots in both men’s and women’s sizes. After years of using both men’s and women’s Vaprtreks, I can safely say they’re equally comfortable, durable and useful. These boots have 400-gram Primaloft insulation to help keep feet warm—but not too warm. They are made using full-grain leather and ArmaTec XT, an abrasion-resistant, tough material. The boots have a Mossy Oak Break Up Country camouflage exterior to reduce the risk of game animals catching glimpses of movement.
These are the boots to get when you want durable yet fairly lightweight boots for spring or fall hunts. They have an exceptionally long life, even for those of us who hunt heavily. I’ve been so impressed by these boots that I now have a pair in each truck, in the mud room and on my boot rack. They are that versatile and dependable.
Most Versatile Hunting Boots (Best Hunting Boots for multiple terrains)
This boot style provides a bit of a “two-fer” because it covers both the 400-gram and 1000-gram Thinsulate boots. There’s simply no better boot for truly cold weather or challenging mountain hunts than the Kenetrek Mountain Extremes. These boots are more rigid than lighter-weight boots that are meant for less strenuous hunts. Their rigidity and impressive toughness is very useful when you’re chasing predators or mountain goats. The 400-gram boot is, of course, a bit lighter and not as toasty as the 1000-gram version. However, each has its purpose depending on the temperatures you’re facing.
Kenetrek Mountain Extremes are the perfect cold weather boot that are also tough enough to withstand seriously rugged terrain, like you need when chasing mountain goats. (Photo credit: Kenetrek)
When you pair the Mountain Extreme with Kenetrek’s Ultimate Liner Lightweight Over-the-Calf Sock, (with or without a heavier boot sock over it), you have the perfect combination for difficult winter hunts. Features of the Kenetrek Mountain Extreme include 10-inch uppers with a one-piece vamp construction tongue. That means there aren’t openings where water or snow can get in. They have double- and even triple-stitching at high-stress points and K-Talon outsoles. Yes, these are heavier boots on your feet than some others, but they are well worth that facet when you’re braving snow and ice. While others in your hunt team are suffering, your feet will be doing great. These boots are made in Italy and they last for quite some time.
Most Comfortable Hunting Boot
Dryshod Evalusion Hi Super Lightweight ($174.95)
The Dryshod Evalusion Hi Super Lightweight Hunting Boot gets the top pick for the most comfortable hunting boot on the market. They have a Dureva technology/compound that eliminates the need for a secondary rubber sole and provides extreme comfort in most any situation. Aside from comfortable it is also an extremely quiet boot due to their multi-lug tread resulting in silent flexing and bending when curving over the ground’s elements. The lugs provide good traction, but are not too aggressive that they pick up and retain mud. This boot maximizes air circulation and prevents moisture builup with its Densoprene Foam that both keeps your foot warm and keeps moisture out.
For those of us who like a rubber boot for the beginning of white tail hunting season, this one comes out on top for several reasons. The insole has a good, supportive arch, making them comfortable to walk long distances without having sore arches. Their 16-inch height makes it easy to ford wet areas or even small streams. The outsole design is wide, giving you a firm support underfoot, and helping to prevent ankle twists when traversing rugged ground. The wide heel sole provides great stability, plus gives a convenient point to grab when you are trying to kick off the boots. The design of the boot upper helps to keep your calf area warm, which in turn keeps your lower foot warm. Yet the shape of the upper hugs your calf just enough to not have the boot “slap” against your shin and back of your calf while walking, and allows a hunter to let rain pants come down over the outside of the boot, rather than tuck them into the upper. Experience has shown they are comfortable in temperatures from 30’s to 60’s. They run true to size, I would recommend buying a half size larger to allow for the use of a good wool sock.
The Dryshod Evalusion comes in Super Lightweight Ankle length and Hi in brown, black, camo, and more. Prices vary from $129.95-$192.39 depending on color and sizing options. Dryshod is known for dependability and durability and this shoe should withstand the test of time and hours spent walking.
Aside from dry, warm, comfortable, and breathable – the shoe is also extremely light making it an easy walk. What keeps it from being best overall is just simply preference. We haven’t found a non-lace shoe that stands up to lace shoes when it comes to those on the go but from a slip-on option this shoe rises to the top.
Snake boots are more of an issue in the southern part of the country, but these boots prove useful anywhere across the nation.
The Rocky Prolight Hunting Waterproof Snake Boot is designed for unisex wear. It spans sizes from 4 to 15, medium or wide. (You need to read the size chart to determine men’s sizes, because that’s how Rocky sizes these boots). These boots have 16-inch uppers. Unlike some snake boots, they’re made in lace-up style, which is nice if you prefer to keep your boots secure and keep out more than just snakes.
Mine (female) have served me well in numerous states and have proven to be the correct height for blocking any snakes that are froggy enough to try striking as you walk by. (The worst you might feel from that is a quick bump as they bounce off the boot.) This aspect is especially useful in Texas, where seeing venomous snakes is never a surprise and is always expected. So, when it’s prime snake time, you want these boots.
Rocky Prolight Hunting Waterproof Snake Boots are a solid choice for terrain that’s likely to contain some venomous creatures. (Photo credit: Rocky)
These boots utilize Rocky’s waterproof system. It’s one that remains breathable, so the boots are able to resist mud and rain, keeping your feet dry. They’re constructed from full-grain leather and nylon, and they have a polyurethane and rubber outsole. With a total weight of about 1.5 pounds, they’re really not excessively bulky, especially when you consider their height. These aren’t awkward or uncomfortable snake boots, either. Do your legs get hot with these? I’d say yes, but not ridiculously so, and that is a small price to pay for protection from our fanged friends. Rocky gives these boots a Mossy Oak Break Up camo outer layer to help them blend in and uses tan leather over the stress points.
Best Hunting Boots for those on the go:
Danner Pronghorn ($246.46)
The Danner Pronghorn boot is produced in men’s sizes, but I’ve found that the sizing works just fine for women, too. That’s not something you can say about all boots, since women do tend to have narrower feet.
These boots are considered the foundation of the company’s hunting boot line-up. They are now in their fifth iteration, which is impressive. Danner Pronghorns are made to keep you comfortable and stable during your hunt—both important elements. These boots are great for deer hunts and any hunt that involves light to moderate hiking. Their 400-gram boots with a GORE-TEX waterproof liner.
Looking for a nice mid-weight boot that’s ideal for fall days? You’ll want the Danner Pronghorn. (Photo credit: Danner)
Their eight-inch, full-grain leather upper is resistant to wear and also delivers fantastic longevity. The 400-gram PrimaLoft insulation helps keep your feet from getting excessively cold without being too much for warmer weather. These boots also have a Realtree Edge camo pattern, so the colors are great for most terrain. A Vibram midsole cushions feet during the hiking portion of hunts and a TERRA FORCE NEXT platform gives users solid arch support. Danner Pronghorns are excellent boots for hunts, whether you’re chasing feral hogs, whitetail deer, or turkeys. These are the kind of boots that will have you wanting to buy multiple pairs (believe me).
Best Hunting Boots for around the house:
Lacrosse AlphaTerra ($154.65-$170.56 depending on size)
It’s a tossup whether to list the massive benefits of Lacrosse’s muck boots or focus on the AlphaTerra, because this is a company that produces some wonderful mud boots.
The AlphaTerra by Lacrosse is a nice, shorter boot that’s great for transitioning from the woods to home or vice versa. The AlphaTerra is a slip-on, but it does have a side-zip closure as shown here. (Photo credit: Lacrosse)
We’re focusing on the AlphaTerra because these are the ankle-height boots that should literally live in your truck or by the back door. Who among us hasn’t decided to go on a hunt at the last minute, or forgotten their favorite hunting boots at home? Lacrosse AlphaTerras come in men’s and women’s sizes. The women’s version is currently only offered in black and white. If you’re a woman who wants camo or boots that don’t have high-visibility strips of white, you may want to stick to men’s sizes.
The Mossy Oak Bottomland-patterned AlphaTerra has a six-inch height. It’s a one-piece, pull-on boot with no laces or buckles, although it does have a zipper closure on the side. They’re made from rubber and insulated neoprene with an EVA midsole. They offer stellar water protection (as long as you remember their shorter height). These boots also make wonderful transition boots between a muddy field and home, or from a hunt to your kid’s soccer practice. They’re comfortable enough to wear just about anywhere and they are also a lot easier to clean than many other boots. For those of us who have a tendency to wear hunting boots more often than not, the Lacrosse AlphaTerra is a nice option that doesn’t quite scream, “I’d rather be in the woods,” and manages to look and serve as a functional, useful shorter boot.
Best Hunting Boots for Muddy Terrain:
Frogg Toggs Ridge Buster Mud Boot ($68.13-$169.99 Depending on Size and Color)
The Frogg Toggs Ridge Buster Mud Boot makes the list for best muddy terrain but could almost make it for its cold weather applications as well (depending on which Thinsulate you choose on the 600/1200 options). Although it’s a higher boot it boasts all day comfort and has the option as mentioned above to be a warm boot (1200g thinsulate) or a breathable boot (600g thinsulate) for the springtime mud hunts.
These boots come available in Mossy Oak, RealTree Edge, Brown, and RealTree Timber. There are available options as a Mud Boot, a Knee Boot, and a Lite Mid Boot. and they make both men and women’s models. Frogg Toggs is a brand you can trust with excellent customer service and response should you need it. Their boots are durable, dependable, and made for most any conditions – including fishing boots as well!
During the 2006 deer season, Kentucky whitetail hunters returned with a bang to post a near-record harvest of 122,233 animals – just shy of being 10,000 more than the previous season. Following the highest harvest on record in 2004, the 2006 season missed the mark of 124,752 by just 2,500 deer. Hunters obviously found a good deal more success in the Kentucky woodlands last season.
Or else it was time to restock the freezer from the big harvest two years before.
Either way, the numbers certainly show that whitetails in the Bluegrass are alive and well – and plentiful.
Over the past five seasons, harvest numbers had climbed steadily from approximately 115,000 in 2002, to 116,000 in 2003, and then the record season of about 124,000 in 2004.
In 2005, the significant drop in the kill back to 112,000 or so didn’t seem to fit the upward trend. Kentucky Fish and Wildlife Department Resources (KDFWR) deer biologists weren’t sure why the decline occurred. After a record season, the chances of topping it the very next year are normally slim. Yet a reduction of more than 10,000 was somewhat unexpected.
Perhaps the hop up from 2005 to 2006 of about 10,000 animals was likewise a little unusual. With the additional harvest data from 2006 now in hand, it’s certain that the herd remains in excellent shape – and that in 2005, hunters just didn’t take as many deer as they did the year before, when the record was set.
That year, the weather was quite warm early in the season. Perhaps deer didn’t move as much as usual. Or maybe other conditions made hunting tougher than it normally is.
Whatever the reason, 2005 was an off year, though the 2006 season was another story altogether. Hunters got on track and took very nearly the minimum 125,000 deer that KDFWR biologists would like to see harvested each season.
It’s interesting to note that of the 20 counties with the highest density of deer per square mile from last year, only one county within that list changed for this year.
Using harvest numbers versus the number of square miles of habitat as an indicator, Logan County entered the top 20 counties for highest density, while Scott County dropped out. All of the remaining counties listed using 2005 season data stayed on the list after 2006 data was calculated.
Of the top 20 Kentucky counties, eight show a density of 10 deer per square mile, while all the other 12 have better than seven deer per square mile. Note that the counties with the best densities aren’t necessarily the counties with the highest harvests. Counties with less habitat can have a lower harvest, yet rank high in deer per square mile – just because in general, fewer deer are taken from smaller counties.
Statewide, the Commonwealth had 37 counties with a harvest of 1,000 animals or more, eight with over 2,000 and two more with more than 3,000 deer taken. Last year, then, more than a third of Kentucky counties produced harvests of 1,000 deer or better.
Likewise, five other counties on the top 20 deer-density list had fewer than 1,000 taken, but scored very well using that parameter as an measure of herd size.
From all indications, the 2007 season should give hunters the same opportunity to be successful, reach that magic mark and help keep the herd in balance and in check.
Here’s the breakdown by wildlife region of the trends in herd growth throughout Kentucky, and where you can expect to find the highest concentrations of deer this fall.
SOUTHEAST REGION
Last season, if you recall, in Kentucky’s toughest region for deer hunting, one lone county topped the 1,000 deer-per-county harvest minimum we use to help determine the better places to find numbers of whitetails.
Last season, three counties came on strong and made the cut – although interestingly, the county wasn’t one of the three in 2005.
Whitley County had a harvest of over 1,000 animals in 2005, but reported a few less in 2006. But a reported 958 whitetails wasn’t too far off the mark. Likewise, Casey and Cumberland counties also nearly broke the 1,000-mark harvest club. Each had more than 970 deer taken last year.
This indicates that these three counties are knocking on the door of having much improved herd numbers, say, over just five years ago – despite having less-than-ideal habitat for deer to thrive in.
In the Southeast Region last season, top performers were Green County at 1,225, Pulaski County at 1,009 and Adair County at 1,001. You’ll note by looking at the map that these counties, as well as the others mentioned, are not in the heart of the Cumberland Plateau. Rather, they lie on the outskirts of the more mountainous Southeast Region.
That’s a key in locating where more whitetails will potentially be in this neck of the woods. Yet in much of the region, things are starting to blossom nicely, given the Southeast’s overall habitat quality.
Last season, the total number of deer taken in the Southeast Region was 17,770, a significant jump from the previous season. Most of the 29-county region saw a jump in individual county harvests last season. Generally, these counties still register as the lowest in density, or deer per square mile, but numbers do appear to keep climbing slowly.
Several counties in the middle of the pack for this region saw jumps of 50 to 100 more deer harvested last year. Last season, more than 20 counties reported harvests of over 400.
Counties in the region that ranked highest in deer density were Cumberland, Taylor and Adair, all of which are carrying about three deer per square mile of habitat. In this region, Cumberland and Taylor counties – though not among the counties with 1,000 or more deer harvested – are still good spots to find more deer this season.
NORTHEAST REGION
In 2006, the Northeast Region reported more than 16,000 deer taken, which was also an increase over the previous season. In terms of harvest, the better counties remained the same as the previous season. Once again, Bracken County is tops in the Northeast in terms of highest deer density, holding 7.66 deer per square mile. But Boyd and Robertson counties are barking at Bracken’s heels, with six deer per square
mile – give or take.
The biggest harvest numbers from last year were posted in Lawrence, with more than 1,500 being taken. In this region, Bracken (with 1,450), Carter (1,427), Lewis (1,303) and Greenup (1,220) all posted high deer densities, at almost four deer per square mile.
Lewis comes in just shy of three deer per square mile, and Carter and Lawrence fall in between the highs and lows out of this bunch.
In this region, the top five counties all saw good increases in harvest over the previous year, a sign of the excellent 2006 season throughout Kentucky. They’ll likely top the 1,000 mark again this season, and perhaps be joined Morgan or Boyd counties, which narrowly missed the list last year. Both counties had takes well over 900 in 2006.
Counties in the Northeast Region continue to be generally managed under a four-deer season limit. In some cases, only two of those four may be taken with a firearm. This restriction cuts down on the number of antlerless deer being taken, given that most hunters are going to hold out to take their one buck with a gun.
In fact, a majority of hunters take only one deer anyway, often taking a doe late in the season when if no buck can be found.
Counties with some of the lowest harvests and densities in the region are Martin, Montgomery, Magoffin, Menifee and Floyd. Although deer are present, hunting these counties will be no doubt tougher. For their best chance of success, hunters in these counties will need to scout for pockets of higher deer numbers.
Generally, counties like these remain under a stricter management approach, trying to maximize herd growth in the shortest amount of time. During some periods of the season, that may mean no hunting of antlerless deer with a firearm, so be sure and check seasonal regulations for all the details.
BLUEGRASS REGION
During the 2006 deer season, both the Bluegrass and Green River regions placed 16 counties apiece in the 1,000-harvest club. But overall, the Bluegrass Region was responsible for adding about 3,000 more animals to the total statewide harvest than was the Green River Region. These two counties are tops in Kentucky for producing large numbers of white-tailed deer. Both contain the best habitat and receive the most hunting pressure, which adds up to higher harvests. Bluegrass Region hunters took more than 36,500 deer in their 31-county area of central and north-central Kentucky.
The Bluegrass Region is where hunters will find the most generally liberal gun-hunting season. A large number of counties open to a 16-day modern gun season, for either sex of deer the entire time.
Most counties also offer unlimited doe harvest – a reflection of how well a county’s herd is doing.
A majority of the counties (16, to be exact) on the top 20 deer-density list are located in the Bluegrass Region. Ironically, that region also carries some counties such as Bourbon, Fayette and Jessamine that lie right at the bottom of the list. They offer extremely limited habitat, compared to other more rural counties in this region.
Outside the top spot, Bluegrass Region counties occupy all the rest of the first 10 slots for highest numbers of deer per square mile. Statistics for Boone, Shelby, Owen and Gallatin counties are right at or above the 12-deer-per-square-mile mark, while Anderson, Campbell, Spencer, Henry and Pendleton all offer nine to 10 deer per square mile.
Chinook Salmon are the king of our rivers. They are the largest salmon we catch on the Pacific Coast. And once they travel out of the ocean feeding grounds back to the river to spawn, can offer one of the most exciting fishing experiences in the Pacific Northwest. Whether you have a boat or want to fish for these giants from the river bank, I have a few winning techniques to share with you!
Fishing for Chinook Salmon in rivers from the remote reaches of Alaska southbound down the Pacific Coast gives us plenty to get excited for. The northern reaches of their range brings great fishing as early as June. And as we move south towards my neck of the woods in Washington, September to November is the peak time for river fishing. Each region hosts its own favored techniques. But I can say that Oregon Chinook aren’t that much different from British Columbia Chinook. And you can’t go wrong with any of these fishing techniques throughout their entire Pacific Coast range.
Backtrolling Plugs for Chinook Salmon
Of all the boat fishing tactics, fishing with plugs is one of the most popular. A plug like a Kwikfish, Flatfish or Maglip really draws the eye of a Chinook. They wiggle and dive in the river current. Most of the time, the best fishermen will take bait wrapping thread and tie on a sliver of sardine fillet to the underside. This slows down the action of the lure and releases a heavenly scent for Chinook.
Wrapping Plugs
Chinook really get to biting when there is the perfect match of lure attraction and smell. Throughout most of their range, the wrapped bait of choice is sardine. But many of the best river Chinook fishermen will also use herring, anchovy, albacore tuna belly or sand shrimp wraps. I usually don’t deviate from sardines, but it’s worth following the local trend. Wherever you may be back trolling plugs for Chinook.
How to Fish Plugs for Chinook Salmon
Every river section can host travelling Chinook, holding Chinook or both. You can either anchor your boat in a run or hole, or slowly back troll down the stretch. You will need to judge the situation and determine what is best. If they are travelling, you can anchor with confidence and wait for them to come to you. In other situations, maneuvering your drift boat, raft or jet sled slowly down with the currents can put the plugs directly in front of Chinook and force them to either back down river or strike. Back trolling requires steady boat control, as you don’t want your plugs swinging from side to side. You want a straight track line down the current seam.
Your guys just let the wrapped Kwikfish out 40′. Why 40′? Because that’s what you decided, and of course you are the captain so they better damned well do as you say! You slowly back down the current through the run. The right rod closest to the steep bank starts pulling hard from a Chinook! Your buddy Darryl is patient and waits (what seems an eternity but in reality is only 5 seconds). The rod is doubled over and once the Chinook has turned downriver to race back to the safety of the ocean, pulling line out of the reel, Darryl grabs the rod and the battle is on! Well done Darryl! Many a weaker man would fold under pressure and yank on the fish before it is hooked properly.
Backbouncing for Chinook Salmon
You have just found a spot that looks like Chinook mecca. You anchor your boat ahead of where you think Chinook will be stacking up. Or set your guys up and slowly back down current into the zone.
The anglers have a juicy cluster of eggs, with a sliding dropper to a sinker. If the lead is too heavy it won’t back down into the zone. If it’s too light the bait won’t be in the Chinook zone along the river bottom for very long. This technique is all about the slow play. You need your bait to slowly back down right in front of the fish and give them plenty of time to see, smell and munch. You drop it down, lift the rod slightly to allow the sinker to back down another foot. Hold, lift, back down, and repeat until you are past the holding zone or get bit. The bight can feel subtle.
If the process seems painstakingly slow, you are doing it right. You let them munch. Let them eat. Then once you know they are committed, you hammer back and give the biggest hook set of your life! It’s a really fun technique and one of my favorites.
2/0 to 5/0 Gamakatsu Octopus Hooks
20 to 40 Pound Fluorocarbon Leader
Swivels and a dropper with a 1 to 6 ounce cannonball sinker, depending on current and depth
Salmon eggs put up with a good Egg Cure
Float Fishing for Chinook Salmon
Bobber fishing with cured salmon eggs is one of the best Chinook Salmon fishing techniques in the river’s deepest and slowest pools. Chinook will often hold in those deep spots. Most of the time, you want to have your bait as close to the river bottom as possible. Some of my favorite Chinook holes are as deep as 20′ and I want my cured eggs dredging the bottom where they are holding. A floating braided mainline is key, and you will be mending it and give control as so it doesn’t pull or push the natural drift of your float and bait. As soon as the float pulls under, I reel as fast as I can to catch up to it. I’ll follow up with a hefty hook set once the rod is bent and loaded over on a Chinook.
Drift Fishing for Chinook Salmon
I love and hate drift fishing for Chinook. I love when I find a deep and gentle run that allows me to bounce bottom with a cluster of cured salmon eggs and get bit by a Chinook. However, I hate seeing people drift fishing with beads or yarn for Chinook, where they know as well as I do that they are essentially snagging them. Drift fish with something they are going to bite! Use just enough lead to occasionally tap bottom. Knowing that your presentation is near the river bottom, in the zone. If you are trying to drag a hook into a Chinook without having them bite… Shame! Much shame! And may a curse be placed on your fishing career!
Plunking for Chinook Salmon
Plunking for Chinook is a little bit of a dying art, but in certain areas can be very effective. You find a lower river spot where you know they will be pushing up with the next high tide. You rig a juicy bait presentation. Maybe top it off with a little added float and attraction such as a Spin N Glo. The pyramid sinker is rigged off a sliding dropper. Just enough weight to anchor it in the current. The rod gets placed in a riverside rod holder. Then you sit back, sip the coffee, and wait for a grab. Best done with friends for some chit chat and jovial conversation.
Twitching Jigs for Chinook Salmon
Twitching marabou jigs used to be a very hush-hush proposition for Coho Salmon. Then the word got out. Now it’s rare to float down a river in the fall and not see everyone twitching for salmon. Chinook Salmon can be coaxed to bite if the jig is right.
Once you pitch in that jig, let it fall and then pop it up with a lift of the rod tip. Lift and fall, lift and fall. That is the name of the game. Purples and pinks tend to be the winning choice. Black and chartreuse are also a crowd favorite.
Rolling Spinners in the River for Chinook Salmon
Washington’s rivers are prime areas to roll large spinners for Coho. Chinook often times surprise us by biting them as well. Alaska anglers use spinners as a mainstay for Chinook Salmon river fishing. Down in the lower 48, a size 4 or 5 spinner is the ticket. Up North, feel free to pitch a size 5 or 6 spinner for the big boys. Cast that spinner into a slow pool or run, let it sink, and retrieve it back as slow as you possibly can. Just fast enough to get that spinner blade to spin, but no faster! Blue Fox Vibrax and Steelhead Slammer Spinners are great options!
“Experience the Power of Precision: Unleash your shooting potential with Helium Air Rifles. Combining cutting-edge technology and unmatched accuracy, these rifles redefine the art of marksmanship. Whether you’re a seasoned shooter or new to the sport, our helium-powered air rifles offer unparalleled control, consistency, and performance. Elevate your shooting experience and hit your targets with pinpoint precision like never before.”
helium air rifles
Helium air rifles are innovative firearms that utilize compressed helium gas instead of traditional air or CO2 as the propellant. These rifles offer several advantages over their counterparts, making them a popular choice among shooting enthusiasts. The use of helium as a propellant provides consistent and reliable power, resulting in superior accuracy and performance. Additionally, helium is lighter than air or CO2, enabling these rifles to be more compact and easier to handle.
One significant benefit of helium air rifles is their reduced recoil. The low recoil produced by these rifles allows for better control and precision while shooting, particularly for long-range targets. This makes helium air rifles ideal for various applications such as target shooting, pest control, and small game hunting. Furthermore, the absence of vibrations from recoil ensures less strain on the shooter’s shoulder and increases overall comfort during extended shooting sessions.
The use of helium also contributes to a cleaner shooting experience with fewer maintenance requirements. Unlike traditional firearms that generate residue from combustion or CO2 guns that produce condensation inside the barrel, helium air rifles eliminate these issues. This results in less fouling and buildup within the barrel, reducing the frequency of cleaning needed. Moreover, since helium is readily available and environmentally friendly, it offers an economical and sustainable alternative to other propellants.
In conclusion, helium air rifles provide a unique and efficient alternative to traditional firearms. With their lightweight design and impressive accuracy, these rifles offer an enjoyable shooting experience while minimizing recoil and noise. Additionally, the use of helium gas ensures consistent power and longer shots. As more individuals seek eco-friendly options in various fields, helium air rifles emerge as a promising choice for both seasoned shooters and beginners alike.
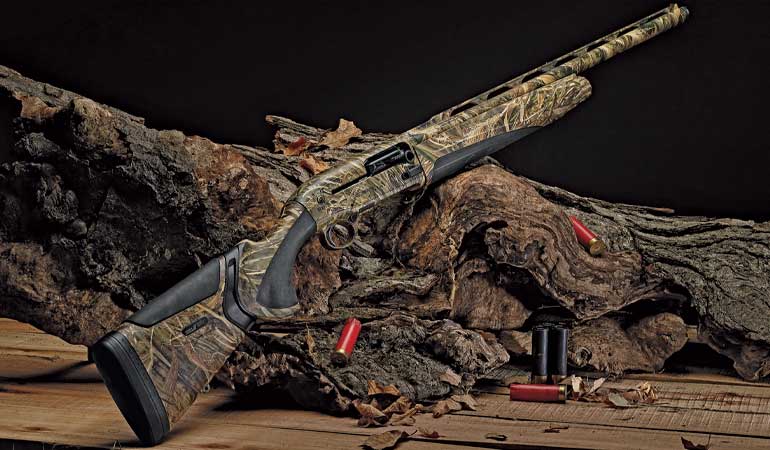
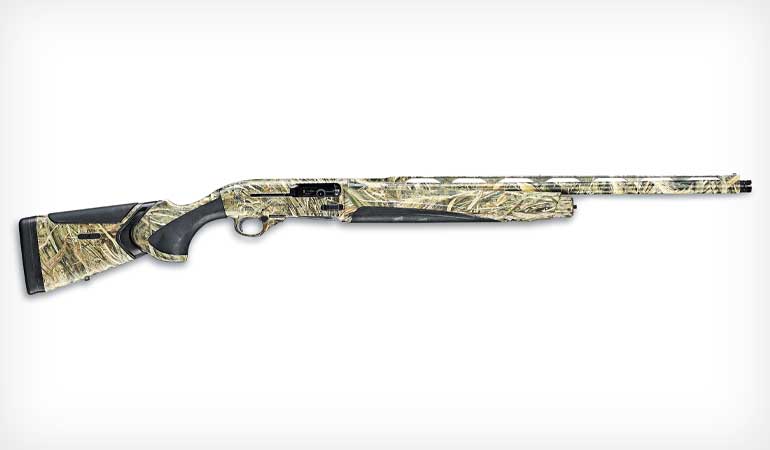
The Beretta autoloader has been a mainstay in sporting circles and in game fields for many years, and the line has continued to evolve and improve. Beginning with the Model 300 in the late 1980s, the 300 quickly morphed into numerous specialty versions for target shooting, waterfowl, and upland game hunting. The latest iteration is the A400 Xtreme Plus (“A400XP” for short). The new model draws on its history, respects the past, and employs the latest in high-tech shotgun technology. The result is a superior product.
The Beretta A400 Xtreme Plus was unveiled on May 5, 2018, at the NRA Annual Meeting in Dallas. It’s built in Italy and is billed as the ultimate for superior reliability for all conditions encountered in waterfowl hunting. It offers advanced barrel technology and a host of ergonomic features that will surely tantalize the clay-target shooter. It is packed with features that make it evolutionary, darn functional, and pleasant to shoot.
High-Tech Features
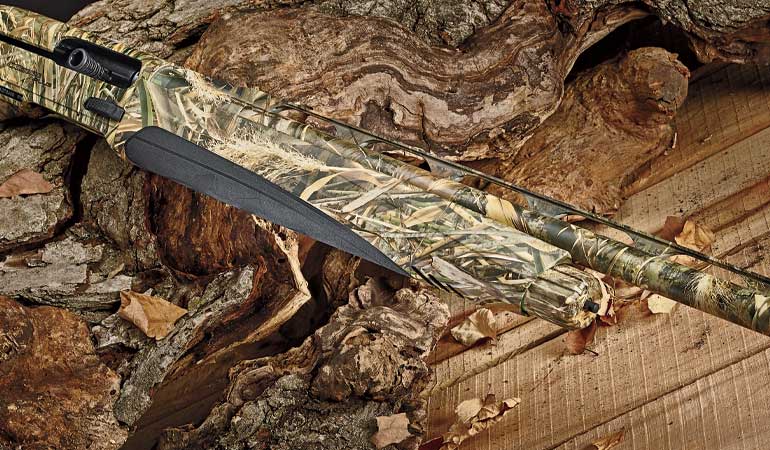
I recently received a new A400XP for testing, and I was impressed. One of its more unique features is the configuration and construction of the barrel. This multifaceted process is called the Beretta Steelium Plus barrel technology. Beretta proudly notes that it makes more than 500,000 barrels a year, and the company doesn’t skimp on the A400XP barrels. They are made of steel alloyed with molybdenum, chromium, and nickel that results in a superior shotgun barrel. A400XP barrels are drilled, reamed, and cold-hammer-forged, just like a fine rifle barrel. Then they are vacuum-relieved, giving the steel what Beretta says are the ideal characteristics for optimal ballistic performance.
The A400XP barrel has an “Optima-Bore” profile with a 14-inch forcing cone, instead of the more usual 6 inches. This gradual taper results in a reduction in perceived recoil, better patterns, and long-range performance, even with steel shot. The ventilated rib has a 7×7 stepped design with a red fiber-optic front sight and a metal mid-bead.
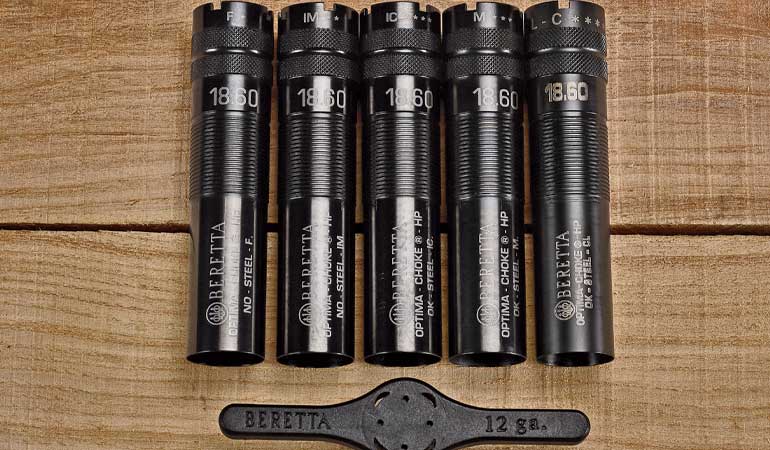
The A400 Xtreme Plus comes with five screw-in Optima-Choke HD choke tubes, including Full, Modified, Improved Modified, Improved Cylinder, and Cylinder.
The A400XP uses what Beretta calls “Optima-Choke HP” choke tubes. They extend about a half-inch from the muzzle and are clearly marked as to choke constriction. Five constrictions are provided, from Cylinder to Full. Steel shot is okay in all except Full and Improved Modified.
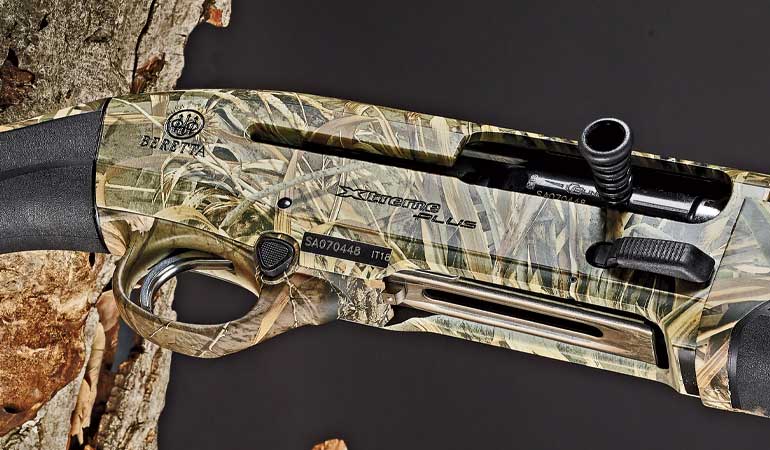
The action is equally unique with the “Blink” gas-operating system, as in “quick as the blink of an eye.” The rotating bolt head and the new gas valve make the A400XP 36 percent faster cycling than other shotguns. The design of the gas piston keeps powder gases from “leaking out,” so the gun can cycle faster. This also reduces the amount of gases that get into the action by about one-half, so cleaning intervals are substantially lengthened.
The receiver is a half-inch shorter than its predecessor, reducing the gun’s overall length. A great feature is that the aluminum-alloy receiver is drilled and tapped (for husky 8-40 screws), so adding a scope or dot sight for turkey hunting is a snap.
The receiver has an enlarged loading port, an extended charging handle, and a long lever-like bolt release for easier operation with gloves. The trigger is very good, breaking cleanly at 5 pounds, 6 ounces. The magazine capacity is four rounds, and a plug to reduce it to two is provided.
A terrific feature of the A400XP is the cartridge cut-off lever on the left side of the receiver, reminiscent of the Browning A-5. This allows a live round to be ejected from the chamber and the bolt to be locked open. This is great for crossing a fence or getting back into the truck for the jaunt to the next hedgerow. It also allows the hunter to quickly switch loads without disturbing the rounds in the magazine. This is especially handy if a fat Canada goose is gliding toward your decoys when your gun is stoked with duck loads.
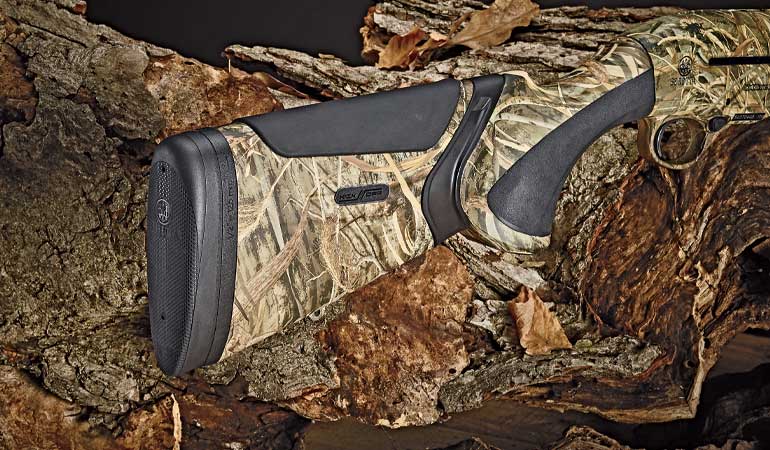
The stock has a really effective recoil-reduction system, a big plus for waterfowlers and high-volume target shooters. Tests have shown that a shotgun has two distinct recoil impulses. The first is when the shell goes off, and the second is when the bolt slams back into the receiver. The “Kick-Off Mega” in the A400XP stock is a hydraulic recoil-dampening system positioned between the pistol grip area and the buttstock proper. It reduces the axial movement that makes the stock smack the shooter’s cheek from that second impulse. The soft comb pad helps here, too. In addition, there is a traditional rubber recoil pad on the end of the stock. The forearm and pistol grip areas have nice, soft padding that not only provide a good handhold, but also soak up a little kick. The A400XP’s stock fit me perfectly, but a shim kit is provided, so the user can adjust the drop and cast, if desired.
Steve liked the A400 Xtreme Plus’s trigger pull. It broke at a crisp and clean 5.38 pounds.
The A400XP is available in 12 gauge only and with a 26- or a 28-inch barrel. My test gun has a 26-inch barrel with the Max-5 camo finish, and it is really attractive. It is also available in several other finishes.
Crushing Clays
Guns are made to be shot, so I proceeded to put all sorts of ammo through the new A400XP. There were no bird seasons open when I had the gun, but clay targets are always in season. I have a trailer-mounted target thrower, so I towed it out to the pasture north of my vineyard and proceeded to crush clays—and in the process scare the daylights out of every grape-eating scavenger in the area.
I wanted to give the new gun and myself every advantage, so I screwed the Cylinder choke tube into the barrel and blazed away. The targets were pretty close, and the wide-open Optima HP tube literally smoked every target I centered. As a test of the recoil sensation, my wife whacked a few clays with the gun and pronounced the recoil “mild.” However, she was not enamored with the A400XP’s 8-pound heft and quickly returned to her 6-pound 20 gauge.
The A400XP has a 3.5-inch chamber, so it can shoot 2¾-, 3-, and 3½-inch shells without any adjustment. I had several target loads with 7/8, 1, 11/16, and 11/8 ounces of shot, plus a couple of lighter handloads. The gun’s operator’s manual states the gun will digest loads down to 7/8 ounce, presumably at a velocity of around 1,200 fps, but suggests that “best initial performance” is with shells loaded with “11/8 ounces of shot.” This is code for “break the gun in” first with full-charge target loads before shooting the wimp loads, and my functioning tests proved Beretta right.
The author says the A400 Xtreme Plus swings smoothly. Its balance and handling characteristics are spot-on.
Few folks chronograph shotshells because it is a bit tricky. But just as with rifles and handguns, it’s really the only way the shooter can get an idea what a given load is doing in his or her gun. This is especially true with shotshells. The velocities of handloads and even high-dollar factory loads can vary all over the place. I shot my test loads over the Oehler Model 35P chronograph to see what kind of performance they delivered. As a rough index of momentum, I borrowed the pistol shooter’s “power factor.” This is just the weight of the shot charge in grains, times the velocity in fps, divided by 1,000. Basically, you need a power factor of about 500 or higher to work the action.
Of course, all of the ammo with 11/16 ounces of shot and up worked peachy-keen. However, neither my light skeet hand-loads with 7/8 ounce of shot at a velocity of 1,044 fps nor my shells with 1-ounce shot loads at 1,182 fps would work the A400XP’s action. The empties would usually eject, but not feed a second round from the magazine or lock the bolt back if the magazine was empty. The same is true of Winchester’s “Low Recoil” load with 26 grams (0.917 ounce) of #9 shot that likewise would not cycle the action. This is a very light load—the listed velocity is just 980 fps—and it averaged only 958 fps out of the A400XP.
The results with these last three loads are of little consequence, as few folks are going to shoot such light loads in their duck guns anyway. As the saying goes, it was only a test.
The forearm and pistol grip areas have soft padding that provides a good handhold and also soaks up a little kick, and Steve thinks the Realtree Max-5 camo finish is very attractive.
Two of the best shooting loads I tried were Federal’s new Gold Medal Grand and Grand Handicap ammo. Both are loaded with 11/8 ounces of hard #7½ shot. The Grand is listed at 1,200 fps, and it averaged 1,142 fps out of the A400 Xtreme Plus. The Handicap, which is listed at 1,235 fps, measured 1,199 fps. Frankly, I couldn’t tell the difference between shooting them. Both crushed clays with authority, and cycling was 100 percent reliable. As best I could determine, the A400XP patterned “50 percent/50 percent,” and my best hits on clay targets were when I aimed dead center at the target.
Overall, the A400XP is a pretty impressive shotgun. It handles great and is well balanced. It never malfunctioned as long as it was fed a proper diet. The Max-5 camo not only is good-looking, but also blends well in marshes and upland cover.
My first impression was that the gun was a little heavy, but shooting and swinging soon proved that the balance and handling characteristics were spot-on. It swung smoothly and encouraged a good follow-through—critical for hits on crossing targets. If I just pointed the gun correctly and kept it moving, it smashed clays convincingly. Plus, the soft comb pad helped me keep my head on the stock (“Stay in the gun,” as the great Nick Sisley says). And the cumulative effects of recoil seemed modest over the course of shooting several boxes of ammo.
The A400XP’s push-button manual safety is in front of the trigger, and at first it perplexed me. Every other pump or autoloader I’ve shot had the safety behind the trigger, so it took me a while to get used to it.
I must caution users to keep their fingers and other body parts away from the ejection port when the action is open. The breechbolt release button is a lever about an inch long. It has a lot of leverage and is very easy to press and release. It is not difficult at all to accidentally close the bolt on your finger or fingers.
Viewed retrospectively, the new A400XP is traditional and brand-new at the same time. It’s interesting to review what the “experts” of the early 20th century thought were the established norms for the weight and barrel length of the “perfect shotgun.” In W.W. Greener’s opus The Gun and Its Development, the ninth edition of which was published in 1910, the shotgun’s perfect weight was determined to be 96 times its shot charge. In those days, the British considered 1 ounce of shot about right, so this suggested a gun weight of exactly 6 pounds. For a 11/8-ounce charge, it came out to 6.75 pounds.
The buttstock features Beretta’s “Kick-Off Mega” hydraulic recoil-reduction system that is very effective, a rubber recoil pad, and soft comb pads.
The classic work The Shotgunner (1949) by Bob Nichols was published just at the beginning of a new era of shotguns and their ammo. In those days, it was gospel from across the pond that a shotgun’s barrel length should be about 40 times its bore diameter. For a 12-gauge bore of 0.729 inch, this equates to 29.16 inches, and indeed, most European game guns had 30-inch barrels. However, even Greener later equivocated on barrel length somewhat and admitted that good results could be had with 28-inch barrels.
The barrel length and weight of the A400XP are fairly close to the ideals of Greener and Nichols. The gun I tested weighs exactly 8 pounds. This translates to a ratio of 113.8, not radically different from the 96 Greener envisioned. And the available barrel lengths of 26 and 28 inches are fairly close to Nichols’s suggestion of 29 inches.
So it is good that things that have worked for decades are perpetuated, while at the same time incorporating advanced features that make the shotgun even better. Greener and Nichols, eat your hearts out.
Canada goose hunting is the fastest growing hunting sport in Minnesota. Our state harvests more geese than any state in the country.
Many hunters new to the sport are unaccustomed to firing at such a big bird. More familiar with shooting ducks, they often fire with too light a load at geese too far away. To improve hunters’ effectiveness and reduce the crippling of geese caused by ill-placed shots, the DNR has begun teaching hunters how to shoot more effectively. Through a brochure, “Get Your Goose,” and seminars held each fall at Thief Lake and Lac Qui Parle wildlife management areas, hunters are learning how to improve their odds of bagging a honker.
Although it’s a big bird, a goose has a relatively small vital zone. The total area in which pellets will kill a goose is just one-tenth the bird’s total size. To ensure they hit the vital zone with enough ?oomph,? waterfowl hunters need to pattern their guns and find the correct loads.
Most experts say the best loads for geese are sizes 1, BB, BBB, or T steel shot. For most hunting situations, BB or BBB shot is the most effective shot size. Both have plenty of pellets, but still enough energy to bring down a goose. Guns are usually 10- or 12-gauge. Because steel shoots tighter patterns than lead does, the best chokes for geese are modified and improved modified. However, each shotgun choke is unique, which is why hunters should pattern their particular guns.
To test loads, place a 40- by 40-inch-square sheet of paper at the same distance as flying geese that will be shot at. (For most hunters and situations, that’s about 30 to 50 yards). Fire at an aiming point you mark on the paper. Do this on five sheets. Then, on each sheet, draw a 30-inch diameter circle around the densest pattern area on each sheet and count the pellets that hit inside the circle. This is the “pattern density.” Try different loads and chokes until one is found that puts enough pellets (from 35 for heavier loads up to 55 for lighter loads) into the circle, which ensures that enough will hit the goose’s vital zone for a clean kill. Another common mistake of beginning hunters is to shoot at geese flying out of range (“skybusting”). This can cripple birds, flare off approaching geese, and may cause approaching flocks to fly even higher. Some exceptional shooters have the skill to occasionally drop a bird “from the stratosphere,” but for most hunters, a kill at over 50 yards is just dumb luck and poor sportsmanship. A good rule of thumb recommended by goose guides is this: If the end of your gun barrel covers more than half the bird, it is beyond 45 yards and is too far away for a clean kill.
It takes practice to find the correct lead for geese. The big birds have slow wing beats that make them appear to be lumbering along. But actually, geese move as fast as a mallard. Lead accordingly.
I’ve never intentionally gone shed hunting, but my daughter, Vayda, and I have been lucky enough to find antler sheds in the spring on a couple of occasions. Vayda has an eye for deer antler sheds.
She was only four years old when she found her first deer antler. We were walking through a cornfield at my grandma’s house in early spring during one of our Thursday visits. At the time, there were a couple of miniature ponies in the pasture adjacent to the cornfield and Vayda liked visiting them. She picked up the broken antler and asked why her stick looked so funny. I was shocked when I confirmed it was an antler on closer inspection.
She was proud to show off her find to my grandma and mom. And she was even more pleased when my dad told her how impressed he was later that evening.
I wouldn’t say a hobby was born. She didn’t find her next antler sheds until she was eight years old, and again, by total coincidence. This time a couple of mature bucks had each dropped an antler next to our house, just out of the yard under the cover of the pine trees sheltering where they liked to bed down.
We had only moved in six months prior to the find. Although we regularly observed the deer feeding on the apple trees in the backyard at dawn and dusk, we hadn’t realized they slept and migrated through the pines that bordered our yard.
When Vayda came running out of the woods with the large antlers, we thought she may have found a set. But after further inspection, we realized the antlers she had found had to have come from two different deer.
Every year a buck deer grows a new set of antlers. The process starts after they shed last year’s rack sometime between late January and early March. Their antlers fall off because their hormone levels decrease after breeding season. If winter has been particularly tough and food sources have been scarce, deer may shed their antlers earlier than normal.
Once their antlers have been shed, they begin growing a new rack. Most bucks will have noticeable velvet-covered nubs by May. The new antlers will continue to grow through September. During late summer, the antlers will harden and the velvet outer covering will be rubbed off on small trees and shrubs. Bucks also use their antlers to spar with competing bucks in their territory and establish dominance in preparation for breeding season that begins in October and ends in December.
February through March is an ideal time to look for deer antler sheds because they will be in the best condition and the easiest to spot. After the snow melts before the spring vegetation starts to green up and grow thicker deer antlers will be the easiest to see. Additionally, finding them soon after they are shed is better because rodents will find antlers that have been laying on the ground for a while and gnaw on them for their minerals and to wear down their teeth.
How to find deer antler sheds
Scout during winter. Deer often seek places with food availability and cover during the winter. Looking for deer tracks in the snow is a great way to locate the places they frequent. Deer are most active at dusk so this is the best time to try and observe active deer.
Bucks stick together. Bucks separate from does and fawns during winter and travel in groups with other bucks. An area where you found one shed will often have others from bucks in the same group.
Look in areas that aren’t heavily hunted. Fewer bucks survive in heavily hunted areas, so areas that are not hunted can be the best places to find antler sheds.
Locate food sources. Locating food sources is a great way to narrow down places deer have frequented throughout the winter. But they aren’t necessarily the same places deer frequented during the fall. Sometimes agricultural fields become hotspots after harvest; however, woody browse in woodlots are also a favorite food source for deer in winter. Learn to identify which plants deer prefer. Oak and other late-producing mast trees attract deer during winter.
Look around bedding areas. Deer spend a lot of time in their beds conserving energy during the winter. They prefer coniferous woodlots because they provide dense cover from the wind and snow. Tall grasses, brushy thickets and heavily wooded areas are other common bedding sites. They also prefer areas that are south-facing to maximize the amount of direct sunlight they get. The southern edges of a forest or the south face of a hill would be ideal for deer during winter. The best time to check bedding areas is around ducks when deer vacate them to forage.
Check around obstacles on travel paths. Deer make travel paths from their food source to their bedding area. Once you’ve located a travel path, look for sheds near obstacles like fences or ditches. Sudden movements caused by jumping and running can knock antlers lose.
Walk slowly and have a keen eye. Walking slowly allows your eyes more time to separate antlers from broken sticks and corn stalks. Train your eyes to look for parts of antlers instead of the entire antler, so you don’t walk past a shed.
"Master the art of precision shooting with dry firing air rifles. Enhance your aiming skills, trigger control, and muscle memory without using ammunition. Discover...
")
")
")
")
")