Like with any hobby, shopping for gear can be just as fun and exciting as the activity itself.
This is why lots of people end up with multiple tools, especially if their hobby benefits from upgrading and replacing their old stuff.
This is the case for anglers and fishing enthusiasts, so many also wonder what to do with old fishing rods.
If you’re one of these folks who want to declutter and get rid of your old fishing gear without tossing them to the bin, you’re in luck.
We have just rounded up 5 ways to recycle these stuff, so make sure to read on.
What to Do with Old Fishing Rods
1. Turn them into decor.
If you have old fishing gear on hand, it would be highly likely that you’ll thoroughly enjoy the activity and you wouldn’t mind if others knew about your hobby.
If you’re thinking of introducing some elements of this hobby into your interiors, then you easily use your old fishing rods as decor.
Some mount their vintage rods as is to add some rustic vibe to their space.
Others use them as an accent to wall hangings to add more personality and humor to their decor.
If you’re quite creative, you can also come up with your own way of displaying them around your home.
2. Re-use them for gardening.
If your old rods are still in great shape, you can easily repurpose them around the house. Most folks use them as gardening stakes as their flexibility comes in handy for such an outdoor use.
3. Re-use them as shelter rods.
Another way to repurpose old fishing rods is by turning them into shelter rods.
So if you like to set up your own little shelter when you spend some time outdoors, you don’t have to purchase rods that are specifically made for such purposes anymore.
4. Use for spare parts.
In case you’re the handy type and you would want to have a go at tweaking and tuning the mechanisms of your fishing gear, it would be ideal to hold on to your old fishing rods and reels. This way, you’ll have on hand spare parts for your projects.
Even faulty old rods can still find a lease on new life through this method, so it can be worth a shot.
The only downside is that you might end up hoarding old gear instead of decluttering your collection.
5. Donate them.
Last but definitely not least is donation. There are several organizations that accept old fishing rods, even the ones that don’t work anymore, so they can hand them down to folks who need them but can’t afford them.
These groups often work with the youth, so if you want to inspire younger generations to enjoy this beautiful sport, you should take this option into consideration.
Conclusion
There are lots of great reasons why you should find out what to do with old fishing rods.
Not only will this help you cut down the waste you create through your hobby but it will also let you help others as well.
Joe Rogan has a lot of friends. But some of his best friends are people who he met through hunting. There is a certain bond that happens when you go out into the wild, track an animal down, and then share the meat over a fire for dinner.
Since he picked up hunting in 2012, Rogan has been hunting with a lot of different people including, hunting experts Steven Rinella, Doug Duren, Cameron Hanes, John Dudley, Ben O’Brien, Mike Hawkridge, and Ryan Callaghan, and friends Bryan Callen, Jocko Willink, and Andy Stumpf.
Also see: 7 Reasons Why Elk is Joe Rogan’s Favorite Meat
*Joe Rogan and Bryan Callen share a laugh while hunting
For Joe Rogan’s first hunt, he couldn’t have picked a better, more skillful hunting guide than Steven Rinella.
Rinella is one of the best hunters in the world and the host of MeatEater, a show about hunting and eating wild game. He also authored several books, including the popular The Complete Guide to Hunting, Butchering, and Cooking Wild Game.
Ryan Callaghan is a guide who also accompanied Joe Rogan and Bryan Callen on their first hunt. He serves the role of MeatEater‘s Director of Conservation.
Check out this incredible video of Steven Rinella and Ryan Callaghan getting charged by a female grizzle bear and her cubs.
Cameron Hanes
A frequent JRE podcast guest, Hanes is an extremely skilled bow hunter and a really good friend of Rogan. He is a former Under Armour sponsored athlete, now sponsored by Origin, and a complete beast in long distance running.
Hanes helped mentor Rogan’s bowhunting skills and shooting technique. On one particular hunt, Cameron helped Joe hunt a huge mule deer with a rifle when it got out of bow range. They’ve also been elk hunting in Utah together.
He has authored a few books, including Backcountry Bowhunting and Bowhunting Trophy Blacktail and has been on the JRE podcast over 10 times.
Also see: Who Is Cameron Hanes? A Look at His Amazing Life
John Dudley
John Dudley is a professional archery athlete and a world renowned archery coach. He won the International Bowhunting Organization (IBO) National Championship for archery.
Dudley’s brand, Nock On Archery, is complete with a podcast, apparel store, archery instruction, and bowhunting gear.
Dudley and Rogan like to go elk hunting together and then grill out with the guys. He has been on the JRE podcast 5 times.
Also see: The Amazing Life of John Dudley: Nock On Archery & Hunting
Ben O’Brien
O’Brien is the Director of Hunting for MeatEater and the host of The Hunting Collective podcast. He’s been on the JRE podcast twice so far in episodes #987 and #1215.
Petersen’s Hunting magazine featured a fantastic article written by O’Brien called Eat What You Kill: How Joe Rogan is Celebrating the Wild Meat Movement, which is definitely worth checking out.
Mike Hawkridge
Hawkridge, owner of AlphaDog Outdoors, is a lifelong hunter and skilled outdoorsman. He serves as a hunting guide that is available for hire, located in British Colombia, Canada.
Joe Rogan and Ben O’Brien hired Hawkridge for a late season bull moose hunt. The hunt was successful and they tagged a big one.
Here’s what Joe Rogan had to say about Mike Hawkridge:
When you meet him, get a good look at him and take it all in, because in this ever feminized world we’re living in, real men like him are the last of a dying breed.
-Joe Rogan on Mike Hawkridge
Bryan Callen
Rogan and Callen are both stand-up comedians and have known each other for over 20 years.
When Rogan decided to go hunting, Callen was the guy he wanted to go with him. According to Callen, Rogan called him up and pitched him an idea, saying “We’re going hunting man and I need you there.” Callen replied, “Count me in!”
Here is what Joe has said about Bryan:
“Bryan is one of my best friends if not my best friend. We’ve essentially been best friends since the day we met. He’s one of the funniest human beings I’ve ever met in my life.
He’s not a whiner, not a complainer, he’s not a guy that’s not going to be able to deal with the cold. He’s not going to fall apart or freak out. He’s a man. He can do anything, he’s just that dude.”
-Joe Rogan on Bryan Callen being his choice
Bryan explained that his conception of hunters before he went hunting was stereotypical:
“You get a bunch of guys with beer guts in camouflage and they go out and blast whatever they see.
What I came away with was a notion of profound respect for what it takes to be a good hunter and the understanding of the animal you are hunting, it’s behavior and the environment in which you’re in.”
-Bryan Callen
Also see: How Does Joe Rogan Cook Elk Steak: A Mouth-Watering Recipe!
Jocko Willink
Willink, a former Navy Seal and JRE podcast guest, went on a bow hunt in Northern Utah with Joe Rogan, Cameron Hanes, and Andy Stumpf. Jocko said, “You couldn’t really ask for a better crew of people.”
“There is something very primal about going hunting. It’s kind of like jiu-jitsu.”
“You are out, you’re stalking, sneaking around. It has a lot of correlations to my old job (navy seal). You’re trying to be quiet, setting up tactics, trying to maneuver on the enemy, on these animals.”
-Jocko Willink
Andy Stumpf
A formal Navy Seal officer, Stumpf went on the above mentioned hunt with Joe Rogan, Jocko Willink and Cameron Hanes in northern Utah.
In 2015, Stumpf set a world record by skydiving from 36,500 feet in an effort to raise money for the Navy Seal Foundation. He’s also been on the JRE Podcast multiple times.
Also see: 8 Navy SEALS That Have Been on Joe Rogan’s Podcast
Doug Duren
A farmer and conservationist, Duren hosted Joe Rogan, Bryan Callen, and Steven Rinella on his farm to hunt.
In 2014 Duren said, “A year ago I would have been completely against having two comedians come here (his farm) to hunt.”
Joe Rogan, Doug Duren, Bryan Callen, and Steven Rinella
Doug warmed up to the idea after hearing Rogan and Callen on the JRE podcast, realizing that they were two smart, funny as hell guys, who also respectful of hunting and wildlife.
Joe told Doug after the hunt, “ Thanks for being a great host. Thanks for being a great guy and providing us with an opportunity to have an incredible experience. You can’t have a better time, you can have a different time, but you can’t have a better time.”
Are you a newcomer to the world of crossbow hunting. Or have you been away from the sport for a few years and just need a refresher on the basics? Either way, having a working knowledge of all the components of your crossbow is both useful and critical.
Being familiar with the parts that make up your crossbow and how each part works will make it easier to maintain your bow. Proper maintenance will help you get optimal performance from your crossbow when you need it.
Two different styles of crossbows exist – compound bows and recurve bows. These crossbows do share some common basic parts. In its simplest form, a crossbow resembles a rifle with a horizontal bow mounted to the stock. It launches a bolt (or arrow) from the rail fixed on top of the barrel instead of firing a bullet.
How does each component of a crossbow work? Here’s an overview of each part and how it functions:
A. Stock
The portion of the crossbow you hold, away from any danger points, when you shoot a bolt. It rests against a shooter’s shoulder when in use. A stock is usually composed of wood or is injection molded from plastic or other composite materials. It serves as the functional base of the crossbow, tying the barrel, trigger and sight bridge together. Stocks are available in many configurations.
B. Foregrip
Your aiming hand rests under this part of the crossbow. Foregrips help give you better control of your shot so that you don’t fire off an errant bolt as easily. It helps you steady your aim and keep lined up with your target. Some crossbows feature removable foregrips or collapsible foregrips.
C. Trigger & Safety
The trigger is what releases the string and fires your bolt. Trigger mechanisms utilize two basic designs. It is either located directly underneath the latch that holds the string in a cocked position or the latch mounted behind the trigger. A safety prevents accidental release of a bolt and may engage manually or automatically once a crossbow is cocked. Some crossbows feature a dual safety system.
D. Barrel
A component also known as a rail or track, the barrel features a grooved track on top that aligns a bolt with the string. This creates consistent accuracy each time you shoot. Barrels can be composed of multiple materials. Polymers or plastic are common material for barrels in cheaper bows. Aluminum barrels are more common in higher end crossbows. It is light and stronger than plastic and stays straight. Carbon fiber barrels are also becoming more popular because they reduce overall weight on the crossbow.
E. Risers
This is the section of the crossbow where the limbs attach. Risers come in multiple configurations. It serves a primary purpose of holding the limbs of the bow at a certain angle. Typically risers are made from cast aluminum or machined aluminum. Some crossbows will feature a magnesium riser. Carbon fiber risers are also becoming an option.
F. Limbs
These are the ends of a horizontally mounted bow. Limbs are longer in recurve bows than compound bows because the length is needed to create similar power to that generated in a compound crossbow. The string connects to the end of each limb. Limbs on a crossbow are much heavier than on a vertical bow because the power stroke in a crossbow can be more than half as short as a typical vertical bow.
G. Cams
In a compound crossbow, cams are wheels mounted at the end of each limb. The string is attached to the cams and when it is pulled back, the wheels turn. This motion bends the limbs and stores a large amount of kinetic energy, which is then released once the trigger is pulled. These wheels can be round or oval shaped. The shape dictates the draw force curve of a bow and how much energy is transferred and stored when the string is pulled back.
H. Cable
Another component that is exclusively found on compound crossbows. The cable works in tandem with the cams for the purpose of reinforcing the crossbow and adjusting its firing power. Cams act like pulleys in keeping the cable taut underneath the barrel as the string is pulled back.
I. String
The most essential crossbow component. It is what propels a bolt forward. A string will influence the crossbow’s firing power and performance. It determines the feet per second (FPS) that a crossbow launches a bolt. Commonly used string materials include polyester fiber, synthetic fiber, and natural fiber. The material is chosen based on breaking strength, weight, and stretch capability. A string must be both light and durable in order to effectively transfer maximum energy from the bow to the bolt.
J. Serving
Wound tightly around the string, a serving protects a string from the arrow retention spring which holds it in the cocked position. The serving is approximately four inches long. It contacts and rides across the rail once the trigger is activated and the crossbow is fired at its intended target. It should always be centered on either side of the latch to assure that each shot will be consistent.
K. Flight Groove
A grooved track on top of the barrel between bow and latch. The flight groove serves an extremely important purpose. It allows the arrow to lie in perfect alignment with the bow’s string. This creates consistent accuracy each time a bolt is shot at an intended target. The flight groove goes right down the center of the barrel and allows the fletching to glide down the barrel without interference.
L. Arrow Retention Spring
A metal bar designed to hold the bolt in the flight groove until the trigger releases the latch. It keeps the bolt from slipping out so that you can transport the crossbow from one location to another and keep it cocked so it is ready to fire if an animal suddenly emerges. You can flip it over or point it straight down without jarring the bolt loose. The retention spring is typically molded using steel or plastic.
M. Latch
This is the mechanism that’s designed to capture the string when the crossbow is drawn. The latch works by holding the string in place and keeps it taut until it is released by pressing the trigger.
N. Sight
Aids in aligning the bolt with the intended target to improve accuracy when a shot is fired. Three types of crossbow sights include pin and peep, red dot and scope. Pin and peep sights feature an adjustable pin as a front aiming point and a rear sight peep hole molded from metal or plastic. This type of sight does not fog up or require batteries. Red dot sights are battery operated and have one to three aiming points. Scopes are the most widely used sighting method and offer multiple options in aiming points and magnification. Crossbow specific scopes vary from a rifle scope in that they are specially designed to meet ballistic performance and vibration of a crossbow.
O. Sight Bridge
This is where you mount a sight on the crossbow and hold it in place. It is a vital feature for any crossbow. A sturdy sight bridge gives a sight a solid base and that is so crucial for achieving consistent accuracy with each shot. Some crossbows connected the sight bridge to the trigger housing. Others bolt it to the stock. Sight bridges are typically made from a strong lightweight metal like aluminum.
P. Cocking Stirrup
A metal foothold used to aid in cocking the crossbow. It is a hoop-shaped piece of metal at the front of the crossbow. You place your foot directly inside the stirrup to prevent the bow from slipping while you draw back the string into cocking position. It is mounted to the end of the barrel or riser. The stirrup also protects the end of the bolt from being damaged while on the move.
Q. Quiver
Container for carrying bolts. Quivers are available in multiple shapes, sizes, and configurations. You can mount a quiver under the bow or on top of it. Some quivers can also be mounted parallel to the bow itself or mounted parallel to the barrel. A typical quiver holds 3 to 4 bolts and includes a plastic hood to protect broadhead blades from getting damaged or causing damage.
Parts of a Crossbow Bolt
Crossbow bolts are hunting arrows specifically designed to use with a crossbow. A traditional compound bow cannot fire a bolt. They work exclusively with crossbows. The design is similar to hunting arrows, but bolts are shorter in length because of the power stroke difference with a crossbow. Most bolts range from 16 inches to 22 inches long. 20 inches is the average length.
Bolts are composed of these specific elements:
A. Shaft
This is the main body of a bolt. The shaft is typically composed of aluminum or carbon fiber. These materials are lightweight and do not splinter like wood or cheap plastic. They are also highly resistant to bending.
B. Spine
Each shaft offers varying degrees of stiffness or resistance to bending. This stiffness is termed as the shaft’s spine. Greater resistance to bending means a shaft has more spine.
C. Grains
This is the unit used to measure the weight of the shaft. Manufacturers will either list the total weight of grains on a bolt or list a grains per inch (GPI) value for the bolt. To calculate the total weight of a bolt from its GPI value, just multiply the GPI value by the length of the shaft. You can covert the weight from grains to grams simply by multiplying the total number by 0.0648.
D. Nock
A plastic or aluminum attachment that fits directly onto the back of the shaft. The nock serves the purpose of keeping the bolt in place while you line up to take a shot. Multiple varieties of nocks are available. The primary types are the half-moon nock or flat nock. Capture nocks, multi-groove nocks, and Omni nocks are other options. Different nocks carry different requirements. With a half-moon nock, for example, it has a groove you need to align with the bow’s string before firing a bolt.
E. Fletching
The vanes or wings at the back of a bolt. Arrow fletching is located in close proximity to the nock. It helps stabilize the bolt during flight. The fletching keeps the bolt from pitching or swaying in the air and keeps it going in the right direction toward the intended target. It causes the bolt to spin on its axis after it is released from the bow in order to increase stability. Bolts typically come pre-fletched with vanes molded from plastic and varying in length. Longer fletching is used with longer bolts.
F. Head
Crossbow bolts use two types of heads: field points and broadheads. Field points are ideal for target practice. They offer a pointy tip and no sharp edges. Field points aren’t recommended for hunting anything except some small game because they won’t strike with enough force and do enough damage to quickly kill larger prey. Most field points weigh from 125 to 150 grains and can be screwed into the front of the bolt shaft. Broadheads possess a sharp blade and are used for hunting. Crossbow shafts can utilize three different types of broadheads – fixed blade, removable blade, and expandable blade. Just like field points, they weigh from 125 to 150 grains. You can shoot regular compound bow broadheads, but you’ll get the very best performance with the specialized crossbow heads.
Time to Go Shoot!
One of the best parts of using a crossbow is learning how each component works. It helps you understand how to properly use it and care for it. Now that you know every inch of your crossbow from top to bottom, there’s only one thing left to do. Time to get it tuned up and get yourself ready to enjoy hunting season!
The Seneca Sumatra 2500 with .22 Caliber is a long-standing market option.
It is the most powerful air rifle, as well as the sports competitor’s air rifle in the world of PCP.
This air rifle comes with a lever-action, can shoot exceptionally well whether slinging pellets or even with cast lead slugs.
It is proven to deliver the best results in time with high power and accuracy .
The Seneca Sumatra 2500 has a rotary magazine with six-shots, giving the look of an old revolver from the west.
Its barrel threads are 10mm x 1.0.
What makes it a fantastic hunting tool is that it is extended enough to lever the pellet easily.
Likewise, it comes with a fixed blade front sight & an entirely adjustable rear.
Also, the air rifle has an option to mount any scope you wish to choose an 11mm dovetail rail.
The lever-action of the air rifle allows you to handle it very quickly while shooting to make sure you have easy follow-up shots.
The Seneca Sumatra 2500 has an engraved receiver, classic lines reminiscent of hunting shotguns, barrel
And air tube with a deep blued finish, and attractive hardwood hardware.
If you are looking for a high power air rifle for varmint hunting, target shooting, and pest control, the Seneca Sumatra 2500 is unbeatable with its unique, traditional, and yet distinctive appearance.
Note that the muzzle velocity recorded during the test was with the Seneca Sumatra 2500’s power adjustment wheel positioned at its lowest setting.
While changing the muzzle velocity to a higher value would increase the muzzle velocity by 6 to 7 percent.
AdjustableTrigger and CockingEffort
The Seneca Sumatra 2500 is being known for its best performance among the shooters.
The trigger pull weight averaged 3 Pounds 7 ounces.
Such pressure is excellent for hunting without any disturbing.
The primary purpose of the Sumatra 2500 is to make air rifles comfortable for the hunters.
The trigger has two-stage actions, but during the test, only one single could be detected by the HAM team.
Moreover, the trigger of the air rifle is adjustable for weight pulling, and there is a manual instruction guide to give instructions for how this is to be done.
During the analysis of the trigger, the setting was left as done by the manufacturers.
If you fire many shots, the cocking lever might be a little uncomfortable on the back of your hand.
Compared to the side-lever, the cocking effort is looking hard.
Of course, if you shoot consistently, then it would become smoother or more manageable.
During the HAM test, the cocking effort for the Seneca Sumatra 2500 measured at around 21 lbs.
Along with this, the manual safety is conveniently located just behind the trigger.
It is a push that worked well for the HAM testers.
Overall, the performance of the trigger and cocking effort is satisfactory;
You can have a powerful air rifle with surety in your hands for next hunting or shooting experience.
Rick Eutsler from AirgunWeb has tested this gun intensively in the video below:
Impressive Sight And Scope
The Seneca Sumatra 2500 has a set of simple iron sights.
There is no need for any screwdriver need to alter the elevation for fiber optic or the rear sight.
Many shooters may choose to fit the scope instead of any of the views; rather, they take it as a backup.
The air rifle has the “premium bundle,” which includes a Tech force-branded 4 – 12 X 40 A0 Scope and leaper high profile rings.
The Seneca Sumatra 2500 carbine air rifle with a tech force scope is well balanced in size and efficiency for better results.
It includes AO (adjustable objective) for sharp focus down to the 7.5 yards range,
And the 12 X magnification is as high as most of the hunters can exploit proficiently in the field.
Here, we can close that the optical quality of the air rifle seems good.
The air rifle has a mil-dot reticle in the scope considered to be an essential and indispensable tool for practical airgun use.
The mil-dot reticle has selectable red and green illuminations when required by the shooter if he/she has a low-light shot.
The air rifle has a front focusing ring which is somewhat best for warmer or moderate temperatures.
But it is not that suitable for the snowy time like January in upstate New York.
Consistency
The Seneca Sumatra 2500, while the test revealed that it has excellent accuracy, has a wide range of pellets.
It was only Gamo platinum PBA pellets that showed the result which was not that good but better than the expectations at least.
Overall, the accuracy of the air rifle is classified as excellent over a wide range of pellets.
Measurement of the muzzle velocity consistency/standard deviation for the Sumatra 2500 tested by the HAM team.
The air rifle was consistently inconsistent!
The range for the standard deviation was between 14 to 21 fps, with an average of 17.38 fps.
The reason behind it is its unregulated design.
As soon as you fire, the next shot will be slower because the pressure is reduced for the air rifle.
Due to this reason, the upcoming shot will also be reduced.
The high power output of the air rifle means that this shot-to-shot drop is more distinguished than you would finish
With the lower-powered unregulated PCP air rifles, for instance, the Benjamin Marauder.
Shooting Ability
It is to make clear that the Seneca Sumatra 2500 air rifle is heavy.
Seneca Sumatra weighs 10 pounds and 3 ounces when fitted with the scope.
It is the sign that the shooter must use the sling in the field.
The balance of the air rifle is pretty good on the shoulders, therefore; it gives a good cheek weld.
The Sumatra 2500 is heavy as it is weighted.
RATEAGUN has given it a score of 4.5, which means that it is easy to shoot with the air rifle.
With the six-shot rotary clip, the Sumatra 2500 is accessible in loading and gives a consistent follow-up shooting ability while hunting in the field.
Pellets of the air rifle were also tended to fall out of the clip if it carried around in a pocket for shooting.
So, it is not such an excellent decision to pre-pod clip and transports them into the field.
If you compare two rifles, Benjamin Marauder vs Seneca Sumatra PCP air rifle, you would see that Seneca Sumatra 2500 air rifle has a more abundant reservoir
This means filling it with a hand pump would take a lot of time.
The Seneca Sumatra 2500 air rifle has most of 6 to 20 consistent shots while Benjamin marauder gives you 80 shots per fill.
You can note another feature that the price of the Benjamin is around $600 and the Seneca Sumatra 2500 is for sale at $700.
During the test, the HAM team noticed that a few H&N field target trophy green pellets would not fit into this gun at all.
The Seneca Sumatra air rifle is not manufactured to use with the super light pellets.
It is good to find that the manufacturer of the Sumatra 2500 air rifle has put the features which have increased the protection level for the shooter, indeed.
If we see Benjamin marauder vs Seneca Sumatra, this is the better advantage the Sumatra 2500 air rifle has over Benjamin Marauder.
It allows the gun for “double-loaded” if the shooter loses track of the loading air rifle and firing sequence.
This safety measure makes it better than other air rifles.
The Seneca Sumatra 2500 air rifle looks like an “over and under” shotgun rather than an air gun.
Because it has a double air tube under the barrel, this is an unusual-looking air gun, but with an excellent appearance.
Finishing of the air rifle, Sumatra 2500 is commendable, with reliable and deep bluing for some parts and glossy and shiny black paint.
The receiver, cocking lever, and trigger are all castings, with the receiver having a deeply inserted hunting seen on either side.
We call the Seneca Sumatra 2500 carbine not indexing, as it is the long rifle with a shorter barrel.
The Seneca Sumatra is not auto-indexing but the Benjamin marauder does have the auto-indexing with ten shots repeater.
Wood finishing is generally perfect, with finely checkering.
Slight roughness was detected on the sides of the buttstock.
As a whole, the appearance and finishing of the Sumatra 2500 air rifle are tremendous and satisfying while shooting.
A not-so-quiet air rifle
The Seneca Sumatra 2500, if described for the sound, would say that it is, without any doubt, a LOUD air rifle.
If you are looking for an air rifle with silent volume so that you would not disturb the people around you, then Sumatra 2500 would not deliver this feature.
There is no silencer system in the air rifle.
As it is not a family air rifle and you will not be used in the home backyard.
The Sumatra 2500 uses a lot of air while shooting in each shot.
You may have to wear ear defenders on the range from where you will be hunting.
Without any doubt, the Seneca Sumatra 2500 is not fitted with a suppressor of any type.
Value for money
The Seneca Sumatra 2500 is sold at a reasonable price, about $700 in the market.
The scope and rings account for over $110 of that number.
At such street price, you have a potent and efficient hunting air rifle.
There is of course an additional cost for the air supply, like any other PCP air rifle.
If you take the Seneca Sumatra 2500 air rifle, it gives about the “bang of the buck” of any multi-shot PCP air rifle for high power, accuracy, and reasonable price.
There is a manual operating guide for you to get information while buying the Sumatra 2500 air rifle.
The US distributor, Air Venturi, has the full range of all the parts available for the Seneca Sumatra 2500
And provides support for the 12-month warranty on the air rifle.
Manufacturer’s Claim Analysis
The manufacturers claimed that the muzzle velocity of the Seneca Sumatra2500 air rifle in .22 Calibers is 1100 fps.
But while shooting was done during the HAM test, the value exceeded the 1350 fps for 21.14 grain.
The muzzle velocity of the air rifle is extremely conservative, as the test results showed.
As the manufacturers claimed the accuracy of the Seneca Sumatra 2500 air rifle is very likely to achieve by a good shot on an average, calm day.
The HAM team tested the air rifle with a wide range of pellets in 10 shot groups.
Even the makers have not claimed on that level the air rifle Sumatra 2500 works.
The air rifle is an accurate air rifle with great effort and energy.
One more thing, the makers have claimed for the two-stage trigger.
But, when the HAM test was conducted, it was astonishing to see that the team only found the single-stage trigger
And gave the remarks for the trigger being ok and not that impressive.
Pros & Cons
Pros
Cons
Highly powerful
Easy to shoot
High accuracy tested with pellet by HAM team
Cannot double feed pellets
Great appearance
Six consistent shots
Best for real shooters/hunters/small game
Best pellet tested is H&N field target trophy
The air rifle Sumatra 2500 has been rated as 4.5 at RATEAGUN
.380/9mm to deliver the best quality shots
It is LOUD! And there is no such authentic way to fix any of the silencers
Heavy on shoulders
Uses lots of air
Not that cheap
Not family-friendly
Single-stage trigger found but not the two-stage trigger
Specifications
.22” Calibers (5.5 mm)
1100 fps maximum velocity
Loudness is 5-high
Barrel length is 24.”
Overall length is 43.”
The shot capacity is 6
Barrel is rifles
Blade and ramp front sight
Adjustable for windage and elevation rear sight
11 mm dovetail scope-able
Two-stage adjustable trigger
Rubber butt plate
Suggested for hunting
Lever action
Manual safety provided
The power plant is pre-charged pneumatic
Repeater function
Maximum shots per fill are 33
Body type rifle
Weight 8 lbs.
Stock is manufactured with hardwood
Ambi grip
Brown in color
Fixed front sight
Ambidextrous Monte Carlo tock
Male quick disconnect foster fitting with a cover
500cc air reservoir
Up to 20 maximum shots on high power and up to 33 maximum shots on medium power
And users are encouraging people to buy the air rifle for the reason that it is precise enormous hitting power with excellent finishing and appearance.
In the same way, the six-shot cylinder magazine is also appreciated.
The look or appearance of the air rifle is of high quality.
It has a lot of power in higher settings as well.
Customers claim that the air rifle is most accurate when adjusted between 800 and 950 fps depending on the weight you are shooting at.
Many customers own the .25 Calibers on a set of medium power and at a distance of 50 yards.
Customers are satisfied with the power of the gun as the comments show that the results are far better than their expectations.
Shooters after the use also like the looks of the air rifle as the Seneca Sumatra 2500 air rifle is made with hardwood
Which gives a traditional look to the air rifle.
After that, when it is used, it looks great in your hands.
There are many things that customers have recommended to change.
The trigger is not two stages, and the adjustment is not that satisfactory.
Among customers, the trigger is not being loved.
The magazine does not have the capability of preloading and carrying in your pocket.
Another suggestion from the customers is for the loudness of the air rifle.
The Sumatra 2500 is so loud that it disturbs the fun during the shooting.
The main focus of the customers is on the noise level as they have experienced.
I would not say that you can avoid the noise; instead, you have to bear if you are an accurate shooter
And wish to have an air rifle full of power and accuracy.
In summation, the Seneca Sumatra air rifle is the rifle for the real shooters.
It is the most powerful air rifle, but it is not the rifle for family use.
We can say that it is not a family-friendly air rifle.
You cannot give it to any untrained beginner; instead, the Seneca Sumatra 2500 is for the trained or professional hunter.
From an appearance point of view, the quality of the wood is also commendable! This is one of the best PCP air guns on the market today!
The HAM Team has been testing a 30 Caliber FX Wildcat Mark II for some time. Overall, this is quite similar to the original FX Wildcat in .22 caliber we tested two years ago. After all, it is a “Mark II” version of the same basic gun…
Background
The .22 cal Wildcat earned a HAM Gold Award with a 93% score, so it’s clear that the Wildcat is a great air rifle. This time we’re looking at the Mark II version.
This has longer (700 mm, that’s 28 Inches) barrel, combined with a higher capacity HPA reservoir. These are appropriate for the increased power output of the larger caliber.
Wildcat Mark II models also incorporate the FX SmoothTwist X interchangeable barrel liner system. This allows users the ability to exchange barrel liners for pellet or slug use, for example.
There’s a range of barrel liners in varying twist rates and bore specifications for compatibility with various airgun projectile weights and shapes.
We tested the regular, pellet liner in this 30 Caliber FX Wildcat Mark II.
.30 Caliber Specifics
.30 caliber is rapidly increasing in popularity. However there is still not a huge range of pellets available for it. The HAM Team had some tins of 44.75 Grain JSB Exacts. We also had some .30 caliber Predator Polymags.
Given that the 30 Caliber FX Wildcat Mark II is clearly a hunting gun, we had expected to use the Polymags for our main testing. Unfortunately – and surprisingly – the Polymags proved too long to fit into the Wildcat’s magazine.
So we undertook all the testing with JSBs…
Overall Impressions
As we know from the previous Wildcat test, this air rifle is a beautiful, fine-handling “traditional” bullpup air rifle. It’s traditional because it has a full, regular stock – either laminate, walnut or synthetic, to your choice.
If anything the 30 Caliber FX Wildcat Mark II is slightly more comfortable to shoot than the original – in the HAM Team’s opinion. We preferred the somewhat greater muzzle-heaviness of the large caliber version.
The sidelever action remains a pleasure to use and the trigger pulls back with almost no pressure at all. The average pull weight was 1 Lb 2 Oz. That’s very close to that of the .22 caliber gun we tested before and an indication of very consistent manufacturing and assembly at the factory.
In spite of the very light trigger pull weight, the second stage is very easily detected. It’s no problem at all to hold the trigger just at breaking point. Sear release is crisp and predictable.
As usual, the HAM team tested the Wildcat’s trigger as received “out of the box”. We saw no need to make any adjustments.
The gun we received was supplied with a separate Donny FL silencer, although we didn’t find the need to install it for our testing as the factory moderator muted the report sufficiently for us.
The overall shooting weight of the test gun was 9 Lb 2 Oz – including the mounted Holland’s scope. Length was 35 1/4 Inches. Both these figures would, of course, be slightly higher with a silencer added.
HAM Tester Doug Wall is a left-hander. However he found the Wildcat pleasant to shoot as the magazine protrudes very little from the receiver and because the cocking lever is mounted amidships.
The magazine is very easy to load. However there’s no “blank shot” prevention. The Wildcat does not warn you if there’s no pellets remaining in the magazine. So you do have to keep count of the number of shots fired.
Scopes
We tried the 30 Caliber FX Wildcat Mark II with two scopes. First was the MTC Cobra F1 4-16 x 50. This scope balanced well with the Wildcat and the First Focal Plane configuration clearly offered benefits for a dedicated hunting air rifle.
Then we swapped the MTC scope with a Holland’s Game-Getter 2.5 – 15 x 50 model. This dedicated hunting scope was also mounted using Leapers UTG PRO rings.
Although designed primarily as a hunting scope for firearm use, the Game-Getter displayed some interesting benefits, including the oversize elevation and windage turrets. We’ll be talking more about this scope in a future post in HAM.
Using the UTG PRO high rings, we had no problems achieving a good sight picture with either scope.
As with the first version, the 30 Caliber FX Wildcat Mark II has a fixed buttpad. It worked just fine like that for both shooters. But we felt that an adjustable buttpad would not be too much to ask on a $1,700 (plus scope) air rifle – just in case.
Speed And Accuracy
The 30 Caliber FX Wildcat Mark II tested by HAM was a powerful and accurate air rifle.
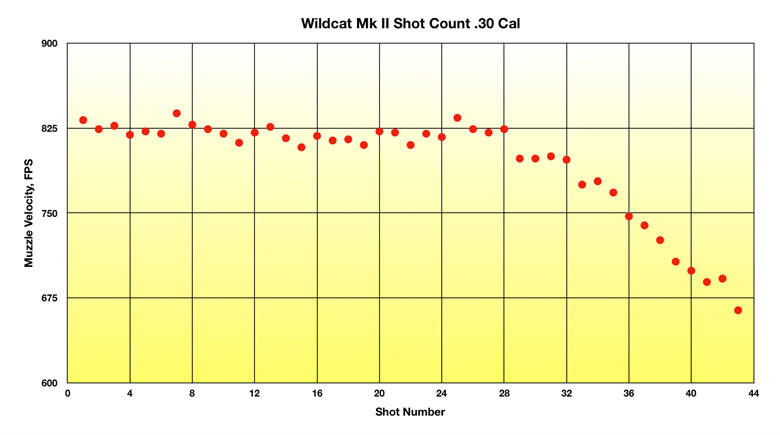
Shooting the 44.75 Grain JSBs, we recorded a 10-shot average Muzzle Velocity of 825.4 FPS. This translated to a solid 67.41 Ft/Lbs of Muzzle Energy.
As the graph below shows, the 30 caliber Wildcat achieved 28 consistent shots from a fill of HPA before “falling off” of the regulator. While there was still plenty of power available after shot 28, it would definitely make sense to re-fill with HPA to ensure vertical accuracy.
Of course, 28 consistent shots is plenty for almost any airgun hunter. Combined with the 8-shot magazine, that represents a very practical, usable combination of power and shot count.
As for accuracy, this “one hole” group of 5 shots at 25 Yards was deemed very acceptable by the HAM Testers. This combination of Wildcat, Game-Getter scope and JSB pellets certainly shoots!
At 50 Yards, the 5-shot group had opened out a little, possibly due to some gusts in the crosswind. However, this was still very satisfactory hunting accuracy.
We left the scope windage and elevation unchanged for the 50 Yard shots. The drop from 25 Yards (the sight-in range) was 1 5/8 Inches.
Conclusions
The 30 Caliber FX Wildcat Mark II tested by HAM proved to be powerful, consistent and accurate. It’s clearly a very capable bullpup air rifle that would be a pleasure to own.
We’ll finish this review by repeating the conclusions from the review of the original Wildcat. “The FX Wildcat air rifle is beautifully-designed and manufactured bullpup that’s a joy to shoot. It has the power and accuracy to be an outstanding hunting air rifle.”
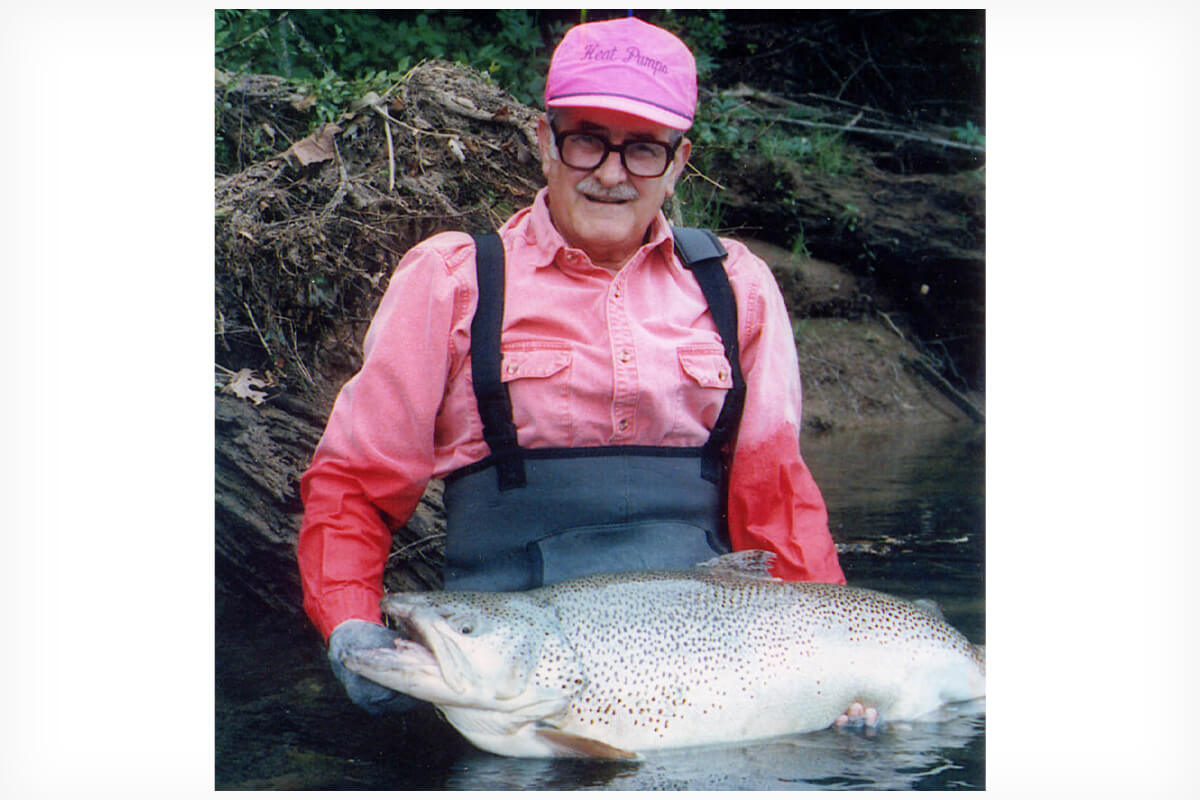
Howard “Rip” Collins is pictured with the then-world-record brown trout (40 pounds, 4 ounces) caught in May 1992. (Photo courtesy of Gregg Patterson)
Recently, a post on the Friends of the Little Red River Facebook caught my attention for a couple of distinct reasons.
The post, which showed a smiling young man holding a huge fly rod and a large brown trout from the river, was reason enough as it read:
“Personal Best Brown. Was Speechless. Sorry, I don’t have a weight or length, wanted to get it back in the water after the battle it put up. Considering the length of my net, was definitely close to or shy of 30-(inches). Hope to see someone else enjoy this fish down the road!”
The young man who caught the fish is Shen Catteau, a great friend of my two sons, Zach and Will. He’s from our hometown in North Texas and was the valedictorian at Denison High School when he graduated. After moving to Searcy, Ark., to attend Harding University, he was smitten with the fly rod, brown trout, and the nearby Little Red.
So, obviously, with a fish that was likely north of 15 pounds, and being caught and released by a hometown friend of my two boys, there was reason enough to smile. And I’d like to think that somewhere, the late Howard “Rip” Collins would think so too, beaming a huge heavenly grin from the other side of eternity.
If the name of Rip Collins rings a bell with fishing-history buffs—and fly anglers who love the trout-rich Ozark tailwaters in Arkansas—it should. Because 30 years ago, one of the most remarkable anniversaries in American angling history passed by quietly, probably just the way that Collins would have wanted it. More on that in a minute.
As astute observers might remember, it was Colins’ huge fish catch a generation ago near the river’s Swinging Bridge area (now called Barnett’s Access), that drew the attention of the angling world and really put the Little Red on the map. That catch came on May 9, 1992—Mother’s Day, that year—when Collins took an impromptu fishing trip and landed a then-world record brown trout from the chilly waters of the Little Red River tailwater near Heber Springs, Ark.
While the White River and Norfork River to the north were already well-known for huge brown trout catches—including a 1988 world-record catch of 38 pounds, 9 ounces in the Norfork River by Huey Manley—the Little Red was a bit more carefully guarded secret, a tailwater popular with anglers from Arkansas, to Memphis, Tenn., eastern Oklahoma and North Texas.
Collins—who has been gone for a number of years after a bout with cancer in the late 1990s—changed all of that in 1992, with a catch that went viral even before the Internet was going strong and social media was hardly a dream.
As angling history buffs might recall, Collins was a retired lieutenant colonel—one report says in the U.S. Army and another says in the U.S. Air Force-and normally a serious fly angler, according to a story by Sports Illustrated writer Robert H. Boyle.
With the 30th anniversary of the late Howard “Rip” Collins’ world record brown trout being observed just a few days ago, the Little Red River tailwater below Arkansas’ Greer’s Ferry Dam continues to produce world class trout. Shen Catteau (above), who fell in love with fly fishing the river after moving from Texas to Searcy, Ark. for his college years, landed this huge brown trout on a fly rod earlier this month. After a lengthy fight, Catteau released the fish quickly following a quick photo, not even measuring or weighing his personal best brown. Most observers think the fish measured near or above the 30-inch mark and weighed more than 16 or 17-pounds, an angling feat that would have undoubtedly have made Rip Collins smile. (Photo courtesy of Shen Catteau)
But when the then 64-year old Heber Springs resident took his boat out to test a balky engine on Mother’s Day, May 9, 1992, he brought along angling buddy Van Cooper and a spinning rod. After tying on a 1/32-ounce olive green marabou jig to the four-pound test line, Collins then made a cast heard around the world about 11 a.m. that morning.
What happened next is the stuff of angling legend, as Collins hooked a 40-pound, 4-ounce behemoth brown trout from the Little Red that would become an International Game Fish Association world record.
Were it not for the excellent account of Collins’ world-record catch in my friend Steve Wright’s book Ozark Trout Tales, many of the details surrounding the moment might have been lost to the passage of time.
A World-Record Tale
Wright, who has gone on to be one of the top story writers for B.A.S.S. down through the years—including this year’s Bassmaster Classic won by Jason Christie—got his outdoors journalism start in northwestern Arkansas, where he spent a year traveling the region’s rich trout waters, gathering stories and interviews in the shadow of the Boston Mountains. Eventually, those tales formed the backbone of his great book, an out-of-print volume still available on Amazon, eBay, Alibris and the like.
According to Wright’s tale of Collins and his epic catch, the angler was losing interest in the Little Red River and wasn’t even planning on fishing that fateful day. Instead, the troublesome outboard motor needing a test drive lured him out with his neighbor, Van Cooper.
While Cooper initially out-fished Collins, a tip from the late hall-of-fame fly angler Lefty Kreh lodged in Collins’ mind about matching flies and lures to the color of a riverbed, caused the angler to switch jig colors from white to olive green.
Moments later, Collins pitched his jig near a historically good beaver hut spot and began the retrieve. When the take came, he thought he had initially hooked a log. Seconds later, however, as the 4 ½ foot Browning spinning rod doubled over and the thin monofilament line pulled away from the Shimano Mark I reel, he knew otherwise.
And when the angler saw the huge fish—which later measured at 40 ¼ inches in length—he quickly knew that a different game was afoot than the other big trout and bass he had previously hooked in his angling lifetime that began as a boy in Indiana, continued in the military overseas, and finally came full circle as he retired to the Arkansas Ozarks.
“It looked like Shamu the whale,” Collins told Wright of his late-morning catch.
During the course of the long fight, Collins adjusted the drag pressure down almost all of the way, as the fish swam upstream and eventually tried to break off in a thick moss bed.
As Collins told Wright, that was an unusual tactic for the longtime angler. But given the trout’s enormous size, the abundance of laydowns and moss beds in the Little Red, and the lengthy fight that took around 20 minutes, it was totally necessary.
“Never in my lifetime have I changed the drag when I was fishing,” Collins is quoted in Wright’s Ozark Trout Tales. “But if I had left that drag setting the way it was, I would never have landed that fish.”
We Need a Bigger Net
Eventually, after repeated threats of getting into moss beds and breaking off, Collins had the fish positioned to land it. Since Collins and his angling buddy had hit the water simply looking to test the motor out. The addition of spinning gear was almost an afterthought and neither man had a net handy.
And when a nearby boat was flagged down, the first possible net was too small. Finally, another boat happened by with a big net and the fish was finally secured. Sort of, that is, since only its head went in the net and no one could reportedly lift the trout aboard.
Collins knew he had caught a monster, but still didn’t know that it was world-record class. A stickler for catch-and-release tactics, he took the big fish back to a nearby dock and put it in a submerged wire cage to keep it alive.
Later that day, as word of the huge trout began to spread around the Ozarks, outdoor writer Bryan Hendricks picked up the story in an article he wrote earlier this year about the iconic photograph that Gregg Patterson took of Collins standing waist deep in the river and carefully cradling the huge fish.
In Hendrick’s Jan. 23, 2022 story in Little Rock’s Arkansas Democrat Gazette newspaper, the tale is told about how Collins summoned Patterson, then with the Arkansas Game and Fish Commission, and told him about the huge fish.
“Rip said that he thought he’d caught a line class record, and he asked me to come up and verify it for him,” Patterson told Hendricks.
Special Delivery at Post Office
Since the catch was on Mother’s Day, Patterson reportedly told Collins that he’d come up later in the day, after church services had let out. When he arrived that evening, the journalist was startled by the size of the exceptionally large trout.
“I took one look, and I said, ‘Rip, I’m sorry, but this isn’t a line-class record,’ ” Patterson said to Hendricks. “He looked all disappointed. I said, ‘Hold on, Rip. This is THE world record. The all-tackle world record!”
Indeed, it was, as a crazy and historic angling tale continued to unfold in the Ozarks. A hatchery truck from the nearby Greer’s Ferry National Fish Hatchery was eventually summoned early the next day and the fish was transported to the Heber Springs Post Office location—where a certified scale awaited—to be officially weighed.
“There were seven or eight people in line at the post office waiting to do their post office stuff,” Patterson said in the newspaper story earlier this year. “We came in the door with this great big fish wrapped in a sheet. Big trout are a big deal in Heber Springs. They’re a big part of their economy. The guy working the counter knew exactly what was going on.”
When the fish was quickly weighed, the scale settled on 40 pounds, 4 ounces. The IGFA confirmed the world-record application and the Collins brown trout became the species’ benchmark, a spot that it would hold for almost two decades. Incidentally, there was/is much speculation that Collins’ fish weighed even more, perhaps as much as 43 or 44 pounds, since it wasn’t weighed until 24 hours later.
Collins’ world record was eventually supplanted in 2009, when a 41-pound, 7-ounce brown trout from Michigan’s Manistee River took the top spot. And today, the world record is held by a controversial trout from New Zealand, one that weighs 44-5.
Unfortunately, the stress on Collins’ world record was too much and it died before it could be released, or even be transported to an aquarium like the one at the nearby Springfield, Mo., location of Bass Pro Shops. If you’re into angling history, you might remember that’s where the one-time Texas state record largemouth bass, a fish named “Ethel” by the guide, Mark Stevenson, who caught her in Nov. 1986 at famed Lake Fork—had lived for several years.
“Due to my own stupidity and inexperience, I killed her,” Collins told Wright.
From either the catch, the loss of the record catch, or both, Collins went on to form the Friends of the Little Red River conservation organization prior to his death, an organization that continues to this day.
And while Collins and his big trout are both gone, their memories live on 30 years after their brush with fame. As do the huge brown trout of the Little Red River and the even bigger smiles by anglers like Shen Catteau.
So you’re at your favorite local sporting goods store, looking at the deer feeders, and you notice that they’re a little on the pricey side. Not only that, but they’re mostly pretty simple designs. And you think to yourself, “I wonder if I could just make my own and save some money?”. Well, you can!
An effective DIY deer feeder is easy to make, even for the most mechanically challenged. You can make them as simple or as complicated as you want, and with some creativity, you can make one out of stuff you already have lying around, taking up space on your property. Here are five ways you can quickly build your DIY deer feeder that will be higher quality than the store bought ones and a heck of a lot cheaper too.
PVC Pipe Gravity Feeders – Quick and easy to make, transport, and set up. You can make them in different sizes to hold more or less feed. And they have the added benefit of being low profile and unobtrusive.
Buckets & Drums – These can hold larger amounts of feed, so they don’t have to be filled as often and can be made from discarded, easily obtained materials.
Tripods – A tripod mounted bucket or drum gives you more versatility with placement, and they’re more stable. They can also be equipped with a motorized automatic feeder to drop feed on a schedule or use the simple gravity feed method.
Troughs – Simple frame construction to hold protein or corn. Instead of spilling onto the ground, the feed fills a trough.
1. Poor Man’s PVC Feeder
This design is just what it says, all the materials can be bought at your local hardware store for $50 or less, and the only tools needed are a drill and a hacksaw.
You pour your corn or whatever feed you’re using into the top of the tube, and gravity keeps it moving downward as it gets eaten.
It has a drain at the bottom to let out any rainwater that gets in to keep the feed from becoming moldy. Deer will have no problem getting their snout into the pipe to retrieve the feed.
Bill Of Materials
One PVC pipe of the desired length (at least 3’ and up to 10’) and 6” diameter
Two 6” PVC slip-on end caps
One 6” PVC Wye (Y) coupler
Several small eye-bolts (number depending on length)
One can PVC primer
One can PVC cement
Spray paint for camouflage
Power drill
Hacksaw
Steps
Cut the 6” PVC pipe to the desired length. The longer it is, the less often you’ll have to fill it, but longer ones will be harder to reach to fill.
Primer the end of the pipe and one female end of the Wye coupler following the directions for use. Add cement to both pieces and attach them.
Drill some holes for drainage in one of the end caps, primer and cement the inside edge, and attach it to the bottom of the Wye coupler.
Drill holes along the side of the pipe to attach eye-bolts. These will be used as strapping points to secure it to the tree. Number required depends on length.
Take the end cap that will cover the top of the feeder and drill one hole in the center and one in the side, with a corresponding hole in the main pipe. Attach one eye-bolt in the top to use as a handle. The second eye-bolt will attach the lid to the pipe to keep the raccoons from raiding your feeder.
You can mount your new feeder to a tree with bungee cords, ratchet straps, or rope. You can also find pre-made drain caps at the store but make sure the holes are small enough to keep your feed in.
2. 5-Gallon Bucket Deer Feeder
Another easy-to-build and ridiculously affordable feeder. It uses a 5-gallon bucket to hold the feed, with a small hole cut into the bottom.
A wooden bridge is fitted across the inside of the bucket about two inches from the bottom that suspends a length of an all-thread rod through the hole. A large tin can is suspended from the bottom of the rod so the wind or nudging deer can cause the feed to fall from the hole.
The feed is kept in the bucket until the can is moved by a washer slightly larger than the hole suspended on the rod an inch or so below the hole, just enough to keep the feed in the bucket until the rod is moved when a small amount of feed will drop to the ground.
Bill Of Materials
One 5-gallon bucket with a lid
One ¼”-20 all-thread rods (threaded along the whole length) about 36” long
Five ¼” washers and one 2” washer
Six ¼” nuts
One 1” x 2” board 16” in length
One large tin can (or similar item)
Power drill
Saw
Steps
Cut a 1” wide hole in the bottom of the bucket
Cut two 2” long sections off of the board then trim the board to fit across the bottom of the bucket (most 5-gallon buckets are 10.33” across at the bottom)
Drill a hole through the middle of the board aligned with the hole in the bucket, large enough to allow the rod to swing slightly, nail or screw 2” pieces to the end of the board as supports, place in bottom of the bucket
Place 2” washer on the rod with ¼” washers and nuts on each side, double nuts on the lower side to keep it securely in position on the rod
Secure the rod from the wooden bridge through the hole in the bucket, adjust the 2” washer so it’s about 1” below the hole
Drill ¼” hole through the side of the can in the middle, attach to end of the rod with nuts and washers
Use a rope to hang your 5-gallon feeder over your spot, adjusted so the deer can reach up and nudge the can for feed. Ensure your 2” washer is placed so the feed can flow, but not too quickly. The sound of the feed plinking on the can will also attract other deer in the area when they get accustomed to it.
3. 55-Gallon Drum Gravity Feeder
This one takes a bit more work to make but it’s very economical to build. If you live a long way from your property or can’t get out there very often, this will hold enough feed to last for a while.
This plan leaves the lid attached to the drum to make sure rainwater stays out. It’s simply a 55-gallon drum mounted a few feet off the ground on a wooden platform and held in place with a ratchet strap.
Four 2” holes are cut around the bottom of the drum and 2” PVC elbows are inserted and cemented in place to channel the feed. Then cheap and readily available 12” drywall mud trays are bolted underneath the channels to hold the feed.
The drum can be filled by removing the plugs on top and using a large funnel. It’s secure and stable and works quite well.
Bill Of Materials
One watertight 55-gallon plastic drum
Materials for platform
Four 2” PVC elbow joints
Four 12” drywall mud trays
Eight screws
PVC cement
Power drill
Steps
Build a platform to hold drum 2’ off the ground securely. You can do this with boards, concrete blocks, or even PVC tubing. Just be sure it can handle the weight and won’t tip over.
Cut 2” holes at four points around the bottom of the barrel about 4” up.
Insert 2” elbows into holes and cement in place. You can cut off part of the elbow to let the feed enter at a lower angle.
Drill holes in corners of drywall mud trays and corresponding holes in the drum to attach the trays underneath the feed channel. Screw trays in place.
Attach drum to the platform with a ratchet strap.
You’ll want to use spray paint to camouflage your feeder before you begin. If you have a white plastic drum you can leave a strip unpainted so you can observe the feed level.
4. Tripod Feeder
If you’re looking to build a feeder that’s easy to transport, holds a lot of feed, and automatically distributes feed on a timed schedule, this is the plan for you.
This design uses a metal or plastic drum of whatever size you choose equipped with a motorized automatic feeder such as the type manufactured by American Hunter, Moultrie, and other companies.
Aluminum tubing is used to make a tripod with detachable legs that can be easily taken off for transport and reattached with a quick release pin. The brackets to hold the legs are made from tubing slightly larger than the legs so that they can slide inside and be secured with a pin.
A hole is cut into the bottom of the drum to allow feed into the motorized feeder. A funnel can be fitted to the inside bottom of the drum to ensure that all the feed is used.
Bill Of Materials
One metal or plastic drum, camo painted
Aluminum tubing, two different diameters
Six 1/4” bolts with washers and nuts
Plastic tubing caps
Motorized automatic feeder
Large funnel
Power drill and bits
Hacksaw
Basic hand tools
Steps
Cut leg tubing to the desired length. For bracket tubing, cut three 14” lengths.
Flatten 4” on one end of bracket tubes and drill two ¼” holes for bolts. Drill another hole 4” from the round end for connecting pin.
Cut hole in the bottom of the drum the approximate size of the feeder entry
Drill holes in drum and attach brackets with bolts
Drill ¼” hole in leg tubes 4” from the end that will slide into the bracket
Bolt automatic feeder to bottom of the drum, fit funnel over the hole in the bottom
Install tubing caps on end of legs and attach to bracket with a quick-release pin
Remember to put a piece of plywood under leg caps to keep legs from sinking in soft ground.
5. Protein Trough
This simple design can be done in several ways, but this plan is super sturdy and will last for years. It uses a 55-gallon drum cut in half to hold the feed, mounted on a covered platform made with 4” x 4”s and corrugated roofing panels. A little wood construction experience will help, along with access to the appropriate power tools.
Bill Of Materials
55-gallon plastic drum with lid
Three 4” x 4” x 8’ treated beams
Three 2” x 4” boards
Three sheets of corrugated roof panels
¼” bolts, nuts, and washers or screws
Steps
Cut 55-gallon drum in half
Construct frame, and two upright posts mounted on beams with a crossbeam at the top and another about 32” above the ground.
Build a roof frame on the platform with 2” x 4”s
Attach corrugated roofing panels to frame
Make sure the roof covers enough to protect the feed and brace the posts with 2” x 4” sections.
Roy Weatherby was a visionary in the firearms industry. From his early experiments with ultra-velocity rounds to the development of his supremely safe action and his early adoption of polymer stocks, Weatherby was always at the leading edge of hunting rifle innovation. He was also a brilliant marketer. I still recall the images of a tree blown into so many matchsticks by a single .300 Wby. round and Roy palling around with famous actors like John Wayne and Roy Rogers.
Dressed in fancy Monte Carlo stocks and chambered for hard-hitting magnums, the Weatherby Mark V became the “it” hunting rifle of the mid-20th century. But all that fancy walnut came at a price, one many hunters simply couldn’t afford.
Roy Weatherby understood the need for a workingman’s Mark V, and in 1970 the company announced the Vanguard. Vanguard rifles were—and are—built on Japanese Howa push-feed actions. At the time of their inception, they rivaled popular rifles like the Remington 700 and Winchester Model 70, and Vanguard guns remain a popular option for big game hunters.
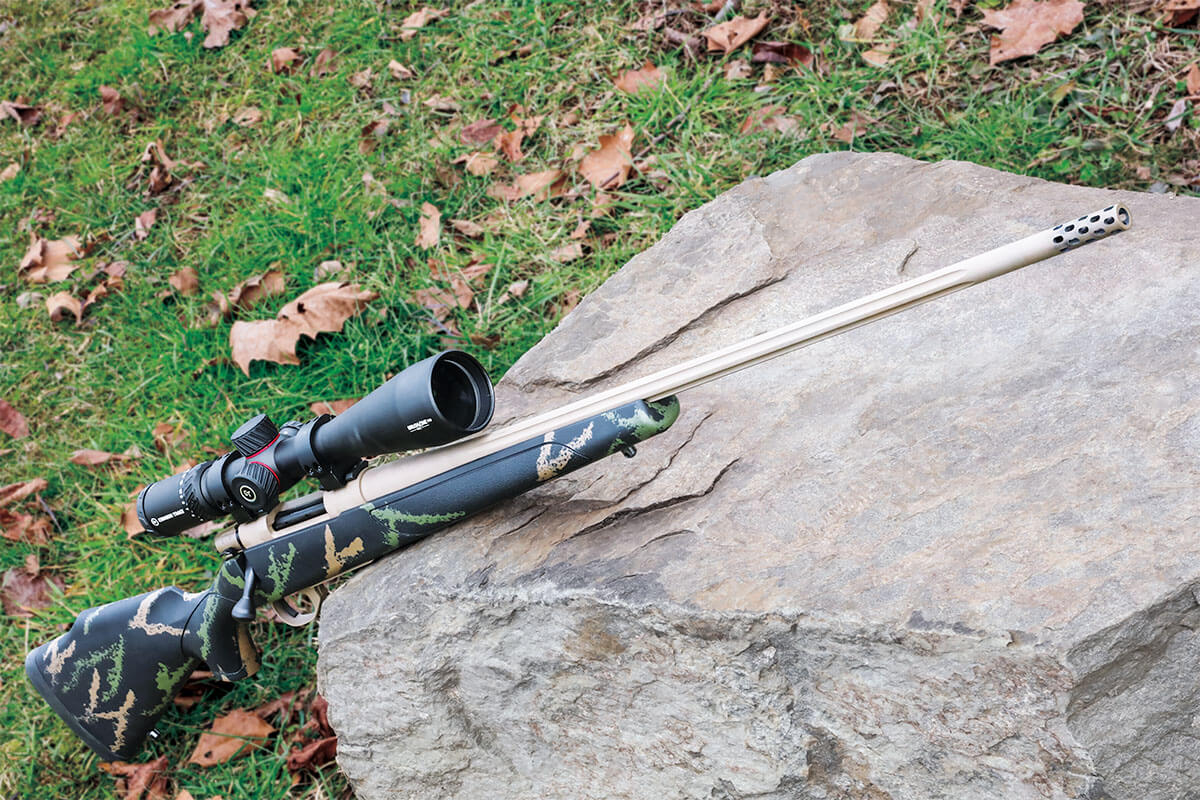
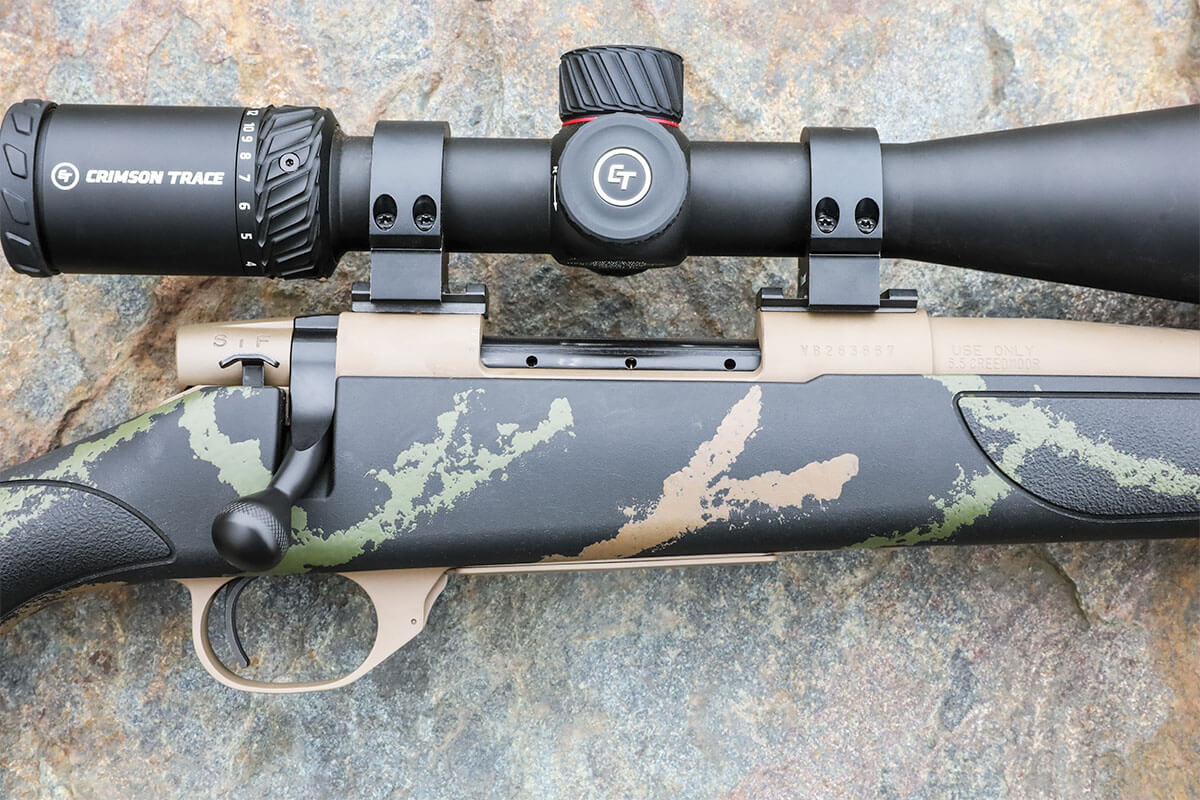
Vanguard High Country rifles are equipped with Weatherby’s removable Accubrake ST, which significantly reduces felt recoil.
Recently, the bolt-action rifle market has been flooded with inexpensive, sometimes coarsely built, budget rifles that provide good accuracy but lackluster aesthetics. But Vanguard rifles have always been a step above those basic entry-level guns, combining solid construction with modern good looks at a price that the working hunter can afford.
As of this writing, there are 19 different Vanguard models currently available, ranging from .22-250 to .375 H&H Mag. There are Vanguards for smaller-statured shooters on up to rifles meant for dangerous game. There are Vanguards with wood stocks and synthetic stocks and package deals that include a Leupold 3-9x40mm scope. Suggested retail prices range from the mid-$500 mark up to $1,149.
“While originally launched in only a few configurations, the Weatherby Vanguard now boasts value-added features such as Cerakoting, barrel fluting, custom stock painting, barrel threading and custom floorplates,” said Adam Weatherby, Roy’s grandson and Weatherby’s current CEO. “Although the barreled action is still manufactured in Japan, these new features are all applied at our new facility in Sheridan, Wyoming.”
Over the years I’ve tested or hunted with seven different Vanguard models and have been impressed with every one of them. Vanguard rifles feature sub-m.o.a. accuracy and are backed with an accuracy guarantee—one of the first rifles at this price point to offer such a guarantee. A Vanguard Backcountry in .257 Wby. Mag. I once tested produced average groups around a half-inch with two different Weatherby loads, and I regret not buying that gun when I had the chance.
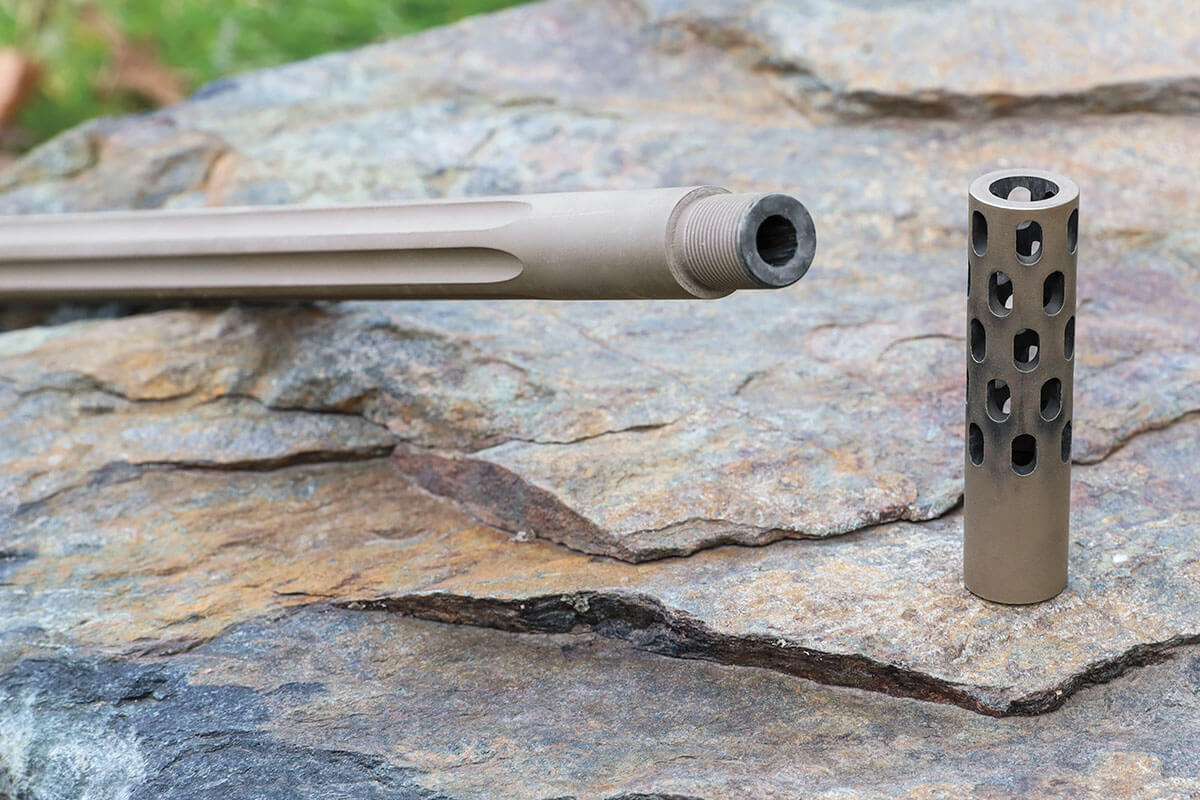
The Vanguard’s machined bolt features three gas ports. The flat dark earth Cerakote on the barreled action is nicely complemented by a green and tan stock.
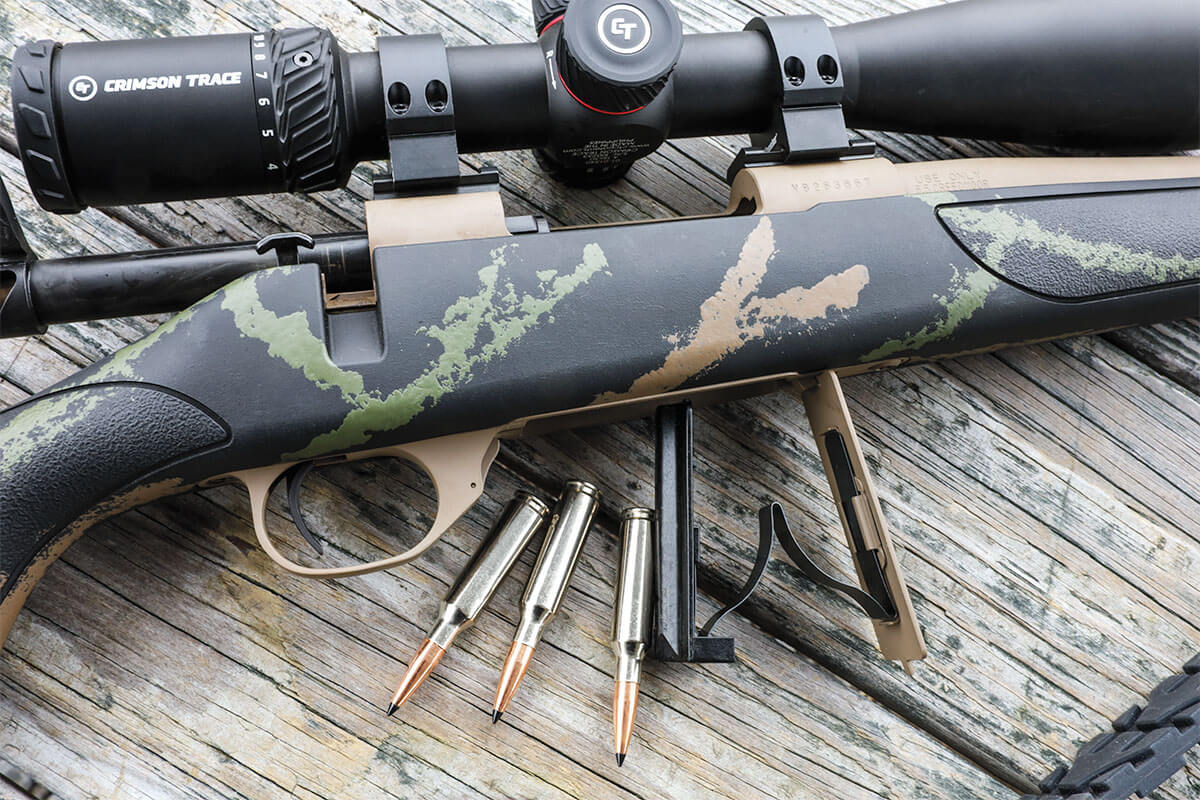
The newest member of the Vanguard family is the High Country model. As the name suggests, the High Country is designed to be light enough to carry on big game hunts at high elevations where the oxygen is thin and every ounce of rifle weight is a burden. The High Country I tested in 6.5 Creedmoor weighed just 7.15 pounds with its 24-inch fluted barrel.
The cold-hammer-forged barrel is finished in flat dark earth Cerakote for corrosion resistance, and it’s threaded 1/2×28. It comes with Weatherby’s Accubrake ST muzzle brake, which adds two inches to the barrel, as well as a seamless thread protector. The barreled action is free-floated and incorporates an integral recoil lug.
The synthetic stock features Weatherby’s trademark Monte Carlo comb. It’s black with green and tan sponge-paint accents, and the stock is equipped with textured grip panels and a right-hand palm swell. I’m a fan of the grip angle, which puts my shooting hand in the correct position.
High Country rifles are available in nine chamberings—five standard rounds and four magnums. Standard cartridges, including the 6.5 PRC, have 24-inch barrels while magnum chamberings sport 26-inch barrels and weigh a couple ounces more. The Vanguard High Country rifle carries a suggested retail price of $949, which places it in competition with Browning’s X-Bolt Composite Stalker ($910) and Bergara’s B-14 Wilderness Ridge ($975).
All Vanguard guns share the same push-feed bolt action with a small claw extractor and plunger ejector. Like the Mark V, the Vanguard rifles come with three gas ports in the one-piece machined bolt, as well as a fully enclosed bolt shroud, to help prevent injury in the event of a case failure. The bolt body is fluted to shave weight.
Most Vanguard rifles, including the new High Country, come with internal box magazines and hinged floorplates. Capacity for standard cartridges is 4+1.
The Vanguard High Country is easy to top-load through the generous ejection port. Unlike some bolt-action hunting rifles that are finicky about loading and feeding, the Vanguard isn’t. A floorplate release is recessed into the front of the trigger guard. The release on my gun was a bit tight, but that’s not a bad thing, as the odds of an inadvertent mag dump are exceedingly low.
All current Vanguard rifles are equipped with a two-stage trigger. That has resulted in some shooters mistakenly calling Vanguard triggers “creepy,” but the take-up is intentional and acts as a safety mechanism without employing a blade. Initial take-up is smooth and light, and after that it it requires minimal finger pressure to drop the sear.
Weatherby Vanguard triggers average between two and four pounds, and they are user adjustable. The one on my sample averaged 3.4 pounds for 10 pulls on a Wheeler gauge.
The three-position safety is the rocker-type design and is easy to manipulate. In the rearward position the trigger is deactivated and the bolt is locked. In the middle position the bolt can be manipulated with the safety engaged. Pressing the safety rocker forward allows the gun to be fired.
I like three-position safeties because the bolt can be locked when walking so that brush and limbs don’t inadvertently open the action and the rifle can be loaded and unloaded with the safety engaged. Weatherby safeties can also be manipulated silently so if you suddenly find yourself close to game, the metallic “snick” of the rifle’s safety won’t catch the animal’s attention.
The bolt stop is located on the left rear side of the receiver, and it’s easy to operate. A small cocking indicator tab that extends under the rear bolt shroud lets you know the gun’s condition.
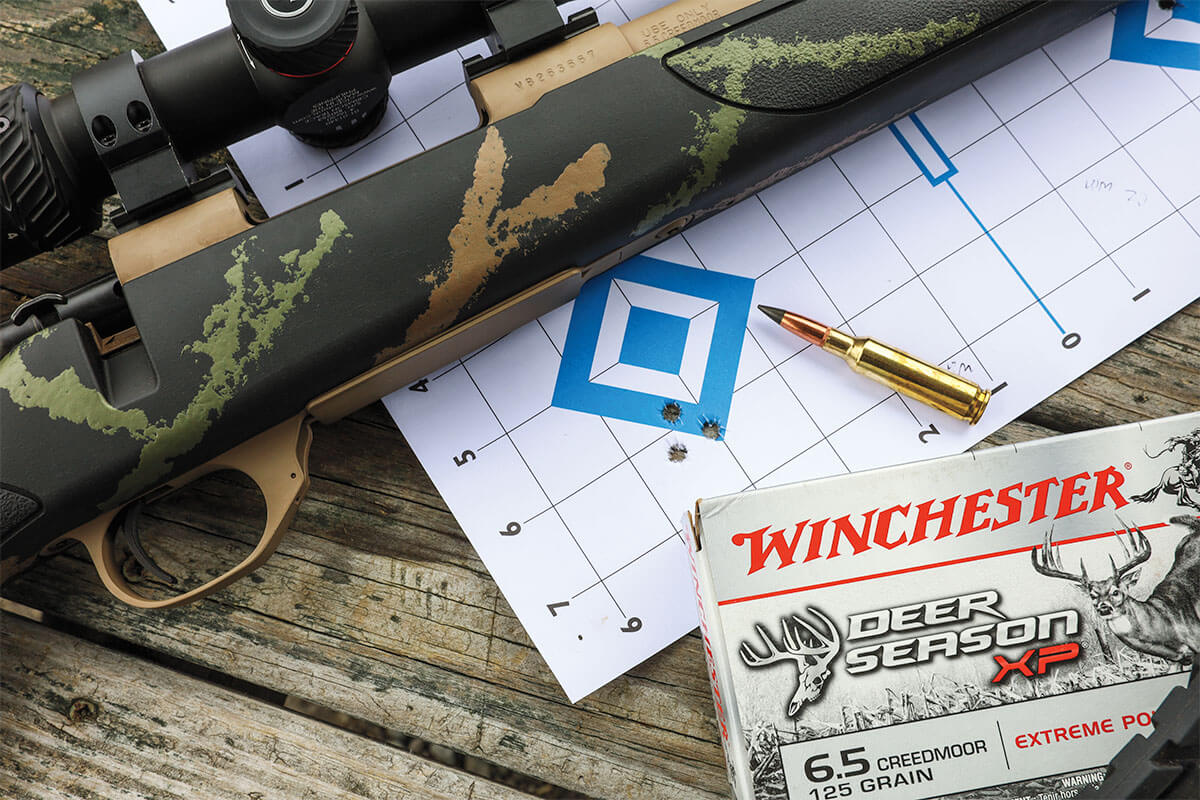
The test rifle managed to print sub-m.o.a. groups with all three loads, including this 0.44-inch cluster with Winchester’s Deer Season XP.
The High Country is drilled and tapped to accept Weatherby Vanguard/Remington 700 bases, which simplifies scope mounting. I topped the High Country with a Crimson Trace 4-16×42 Brushline Pro riflescope with BDC reticle. The Monte Carlo stock placed my eye in correct position behind the optic.
4-16×42 Brushline Pro: Check Price & Buy Now
I tested the High Country at the range with three different 6.5 Creedmoor loads. All three produced at least one three-shot group under an inch at 100 yards, and the best group of the day measured just 0.44 inch. A tack-driver, in other words, and well in line with the rifle’s guarantee for sub-m.o.a. accuracy.
The 6.5 Creedmoor produces mild recoil, which is one of its benefits, but having the removable Accubrake ST is a nice touch—and will be very much appreciated on the .300 Wby. Mag. version of the gun. This relatively new brake from Weatherby promises recoil reduction of up to 53 percent. All Vanguard rifles handle recoil well, and the dense black Vanguard recoil pad does a good job of absorbing kick.
In addition to range testing, I also got to use the Vanguard while hunting hogs and deer at a field-to-table event in Texas, and the High Country had no issues gathering meat. My first shot came when an old, heavy whitetail buck followed a group of does out of the oaks during late afternoon. A doe at the edge of the oaks caught the old buck’s attention, and he trotted away from the harem into the cover of the trees.
At any moment the buck might disappear from view, and since it’s difficult to have a field-to-table event without meat, I decided to try to make a shot on the deer before he vanished into the deep woods. There was a narrow window between two oak trunks through which I would have to weave the bullet, but I had confidence in the High Country rifle and took the shot. The buck was quartering away, and after the rifle cracked, I heard the thwop of the 129-grain Hornady bullet. The buck dropped.
The next shot came the following morning when I spooked a group of hogs at a feeder. My guide Ray and I had crept into a position on a hill overlooking the feeders and the hogs scattered. Because we wanted a pig for the table, I chose a small sow, and as she ran through the broken brush I led her by a half-body length and touched off the Weatherby. The same distinct bullet slap echoed up the canyon, and we found the hog 30 yards from where she had been when the bullet struck her shoulder.
The modern crop of affordable sub-m.o.a. hunting rifles means more challengers for Weatherby’s Vanguard guns. But the Vanguard has something that few of its competitors can boast about: five decades of experience redefining the affordable bolt-action hunting rifle segment.
“My grandfather first introduced the Vanguard as a lower-cost alternative to the Mark V rifle,” Adam Weatherby said. “From its hammer-forged barrel to consistent tight tolerances and an accuracy guarantee, it grew to become a wildly successful project that is now its 50th year of existence.”
There are guns less expensive than the Vanguard, and a few of them carry an accuracy guarantee that matches Weatherby’s. But very, very few guns offer the combination of high build quality, consistent accuracy and bang-for-your-buck value that Vanguard rifles promise. That was the case five decades ago when this model made its debut, and it remains so today.
Weatherby Vanguard High Country Rifle Specifications
So you’re heading out on your big elk hunt and considering which caliber to use. Whether you’re a beginner or an experienced hunter, choosing the right one for the job is essential. After all, your success depends on it! To help make this decision easier, we’ve compiled a comprehensive guide outlining some of our favorite — and the best — calibers for elk hunting.
How we determined the best caliber for elk hunting.
There’s not a single rifle cartridge that can be called the “best” for elk hunting. The perfect rifle cartridge for the hunt depends on various factors, including the terrain, the type of game hunting, and personal preference. However, after much research and discussion, we’ve identified a few top categories that stand out from the crowd regarding elk hunting.
Best caliber overall. This one is a bit of an all-rounder caliber and can be used in various hunting scenarios. We wanted to find an elk cartridge that could cover everything, so we focused on several calibers widely accepted and proven to work well in different scenarios.
Best caliber for long-range elk hunting. Long-range shooting is a popular way of taking down game from a distance. We had to consider bullet drop, wind drift, and the effective range of the cartridge.
Best caliber for brush hunting. Brush hunting requires staying essentially relatively close to your prey while stalking them. As such, recoil becomes an important factor when selecting a cartridge. We prioritized calibers offering minimal recoil and fast follow-up shots.
Best lightweight caliber. One of the most important things to consider when elk hunting is weight. You’ll carry your rifle for extended periods, and a light caliber can make all the difference in how much you enjoy the hunt. We looked at calibers that offered good power without the extra bulk.
Best caliber for take-down power. If you’re hunting elk, especially in the western states with large herds, you want a caliber that will pack enough punch to take down a big bull. We looked at calibers with proven knockdown power and deep penetration capabilities.
Now that we’ve established what we were looking for in these categories let’s discuss why finding an elk cartridge that is perfect for you is crucial.
The importance of finding the right caliber for your elk hunt.
For elk hunting, accuracy and consistency are king. You need a cartridge to do the job without being overly powerful or cumbersome. An elk cartridge that is too slow will leave you with meat damage, while one that’s too fast can cause excessive recoil and shoot through the animal instead of stopping it in its tracks.
The right caliber for you depends on the type of terrain and game you’re hunting, your budget and preferences, and your shooting skills.
Range.
One of the most critical aspects of elk hunting is the range you will shoot. If you’re hunting in an open field, a long-range cartridge like the .308 Winchester or 6.5 Creedmoor might be your best bet. Not only is the bullet weight important, but you’ll also need to consider an optic for your elk rifle.
Environment.
Another important factor to consider is the environment in which you’ll be hunting. A light caliber might be best if you’re hunting in dense brush or woods since you won’t have to lug around a heavy rifle all day. If you hunt in open country, a heavier caliber will give you more power at longer ranges.
Take-down power.
When it comes to elk hunting, take-down power is key. The right cartridge should offer enough energy to penetrate the animal deeply and cause an instant kill. Bullet construction is also important here; some cartridges are designed with controlled expansion to penetrate deeper without damaging too much meat (this is called a controlled expansion bullet).
Weight.
Finally, you’ll want to consider the overall weight of your rifle. If you carry a gun all day, you’ll want something lightweight but still packs enough punch to finish the job. If you’re patiently waiting in a stand or a blind, a heavier rifle might not be an issue.
Breaking down the best elk cartridge.
With all that out, let’s get into our top picks for the best elk cartridges. We think you’ll find something that fits your hunting needs here.
Best caliber overall — .338 Winchester Magnum.
For the best overall elk cartridge, we selected the .338 Winchester Magnum. This powerful magnum packs a serious punch and can take down large game at long distances. It offers great accuracy and consistency, making it an excellent choice for hunting in open fields and brush. Plus, with its recoil-taming features, the .338 Win Mag is still relatively easy to shoot accurately.
What we love the most about the .338 Winchester Magnum is its versatility. This big-game cartridge is suitable for elk and moose, giving you plenty of options for hunting large game. Whether you’re taking down the biggest bull elk you’ve ever seen or even going deer hunting, the .338 Winchester Magnum is up to the task.
Best caliber for long-range elk hunting — .300 Winchester Magnum.
Easily one of the most popular cartridges for long-range elk hunting, the .300 Winchester Magnum is an ideal choice. This classic magnum cartridge offers power and great accuracy at extended ranges. It’s also relatively easy to control in various shooting positions, making it a top pick for experienced hunters who want to take their shots from a distance.
Its ability to handle strong winds sets the 300 Win Mag apart from other long-range cartridges. It’s high ballistic coefficient and flat trajectory make it an excellent option for hunting in windy conditions. And with its controlled expansion bullets, you can expect deep penetration and minimal meat damage.
Best caliber for brush hunting — .30-06 Springfield.
Sometimes, elk hunting in the brush can be a challenge. You need a powerful cartridge to take down your prey but still lightweight and easy to maneuver in tight quarters. That’s where the .30-06 Springfield comes in. This classic deer and elk cartridge is an excellent choice for brush hunting due to its moderate power and low recoil. Plus, with its flat trajectory and controlled expansion bullets, you can expect good accuracy and deep penetration in tight spots.
Our favorite thing about the .30-06 Springfield is its affordability. The factory ammo offers great performance at a reasonable price, and it’s also widely available and easy to find in most gun shops.
Best lightweight caliber — .270 Winchester.
The .270 Winchester is a great choice for hunters who need a lightweight cartridge with plenty of power. This classic deer and elk cartridge offers moderate recoil and excellent accuracy at extended ranges. It’s also quite versatile, as it can be used for various game animals, including elk and deer.
The thing we love the most about the .270 Winchester is its recoil. Compared to other elk rifles, a rifle chambered in .270 Winchester has mild recoil. Hunters of all experience levels can accurately shoot their target with manageable recoil. And with its excellent accuracy, you can be sure to take down your elk in one shot.
Best caliber for take-down power — 7mm Remington Magnum.
Finally, we have the 7mm Remington Magnum. This popular elk cartridge is known for its unmatched take-down power and flat trajectory, making it an excellent choice for long-range hunting. It has superior ballistics and offers excellent accuracy, allowing you to take down your target precisely.
With the high muzzle velocity of the 7mm Rem Mag, this wouldn’t be a good choice for close-range hunting. But if you’re looking for a cartridge that can easily take down a big bull elk at extended ranges, then the 7mm rem mag is your best bet.
Pro tips for finding the perfect elk hunting rifle.
Finding good elk cartridges is only half the battle; you must also find the perfect elk hunting rifle. Here are some pro tips for finding the right setup:
Understand Your Hunting Environment: The terrain and environment where you’ll be hunting can significantly impact the type of rifle you need. For instance, a lighter, more maneuverable rifle might be your best bet if you’re hunting in dense forests with shorter sight lines. On the other hand, if you’re hunting in open spaces where longer shots are expected, a heavier, more stable rifle that’s accurate at long distances would be ideal.
Consider the Caliber: As discussed earlier; some calibers are better suited for elk hunting than others. Powerful rounds like the .338 Win Mag, .270 Winchester, and .300 Winchester Magnum are all good choices. Consider what you feel comfortable shooting and what will effectively take down an elk.
Choose the Right Action: Bolt action rifles are popular among elk hunters because they’re reliable, accurate, and can handle powerful rounds. However, lever action and semi-automatic rifles can also be suitable, especially if you anticipate needing quick follow-up shots.
Check the Weight: Remember that you’ll likely carry your rifle for a long while hunting. Balance the need for a powerful, stable gun with the practicality of hauling it around all day. Lightweight rifles are easier to carry but might have more recoil.
Look for Quality Optics: A good scope can make a huge difference in successful elk hunting. Look for optics with clear, bright images and a good magnification range. A quality scope can help you make accurate shots at various distances.
Our hunting experts have bought countless rifles over the years and agree that following these tips can help you pick the perfect elk hunting rifle. You’ll be ready to hit the woods and bag your next big bull with the right setup.
FAQs for elk hunting Calibers.
To round off our comprehensive guide to elk hunting calibers, here are some frequently asked questions—
What is the best caliber for elk hunting?
The best elk hunting calibers depend on your hunting style and environment, but some of the most popular options include .300 Winchester Magnum, .30-06 Springfield, .270 Winchester, and 7mm Remington Magnum. These are all great choices for taking down an elk at extended ranges.
What is the most accurate caliber for elk hunting?
The .300 Winchester Magnum is widely considered one of the most accurate cartridges for elk hunting due to its flat trajectory and high ballistic coefficient. It’s also a powerful round that can effectively take down large game animals.
How far can you accurately shoot an elk?
The effective range for taking down an elk will vary depending on the caliber, shooter experience, and environmental conditions. As a general rule of thumb, most elk hunters should have no problem making accurate shots out to 500 yards with the right rifle and optics. Of course, it’s always best to practice shooting at various distances to develop good shooting habits and accuracy.
Is a .308 big enough for elk?
A .308 Winchester is generally considered big enough for elk hunting. The rule of thumb for the minimum amount of kinetic energy needed to kill a mature elk is 1500 ft-lbs, which a .308 can deliver. However, it’s important to consider shot placement and the hunter’s ability to shoot accurately.
Is 6.5 Creedmoor or 308 better for elk?
The debate between 6.5 Creedmoor and .308 Winchester for elk hunting is a topic of much discussion among hunters. Both bullet weights have strengths and weaknesses, and their choice largely depends on your needs and circumstances. The 6.5 Creedmoor has a slightly flatter trajectory, less wind drift, and less recoil than the .308 Winchester, making it easier to shoot accurately, particularly at longer ranges. However, it’s worth noting that some hunters consider the 6.5 Creedmoor too light for elk, with most suggesting a minimum of 1,500 ft-lbs of energy for a clean kill. On the other hand, the .308 Winchester is known for its superior frontal surface area and wound channel creation, which can lead to more effective kills. Its ammunition is also more widely available and typically cheaper, making it a more economical choice for many hunters.
What is the preferred rifle shot for elk?
The preferred shot on an elk is a broadside shot. This shot placement affords the best chance of striking the animal’s vital organs while still allowing for maximum penetration. Ideally, you should aim for the highest point of the shoulder to ensure a clean kill.
Can you shoot a bedded elk?
Yes, you can shoot a bedded elk, but it is important to ensure an ethical shot. This means considering the wind direction, background noise, and the animal’s position. If you doubt whether your shot will be ethical, it’s best to wait until the elk stands before taking the shot.
What is the best follow-up shot for elk?
The best follow-up shot for an elk depends on the initial hit placement and the circumstances of your hunt. If you’ve made a clean kill, there’s no need to take additional shots. However, if you haven’t achieved a clean kill with your initial shot, you’ll want to take another shot as soon as possible. A quick follow-up shot can help ensure the animal is taken down humanely and quickly.
Finding the right caliber.
The quest for the perfect elk hunting rifle and caliber is a personal journey heavily influenced by your unique hunting style, environment, and comfort level.
Whether it’s the .338 Win Mag with its sheer stopping power, the .30-06 Springfield’s brush hunting prowess, the .270 Winchester’s light recoil, or the 7mm Remington Magnum’s exceptional take-down ability, each caliber offers unique advantages.
Remember, a critical part of your success in the field is not just the rifle and its caliber but also understanding your hunting environment, the rifle’s action type, weight, and optics quality. And never underestimate the power of trying before buying.
Armed with these insights, you’re on your way to finding the perfect partner for your next elk-hunting adventure.
Brandon Burks and the 8.52 pound stare record meanmouth bass
*Editors Note: Originally reported to be the world record meanmouth bass, IGFA officials recently informed Brandon Burks that his record would not count because his Alabama Rig had five hooks instead of the IGFA maximum allowance of three. However, since Texas allows anglers to fish Alabama Rigs with five hooks, Brandon’s bass will be the state record, which now weighs more than the world record.
State Record Meanmouth Bass
The state record meanmouth bass weighed 8.52 lbs and was caught from Lake O.H. Ivie by fishing guide Brandon Burks who was using an Alabama Rig in January 2022. Meannmouth are a hybrid species usually consisting of half smallmouth and half spotted bass. However, Brandon’s fish and the previous world record were the rarer, largemouth and smallmouth combo. The last two state record meanmouth bass were both caught from O.H. Ivie Lake a little more than a year apart.
Big Bass Factory
A 10+ largemouth pulled from O.H. Ivie
Lake O.H. Ivie has become one of the most talked-about big bass lakes in the country because of the blimp-like bass being pulled from its waters. Two 14+ pound largemouth were caught within the first two weeks of 2022 and the lake has reported dozens of bass weighing over 10lbs in the previous seasons.
The Catch
The Texas Parks and Wildlife measuring board measuring Brandon’s bass at 23″ inches.
On the day of the catch, Brandon was guiding a client near specific structure areas where he noticed bluegill stacking up amongst the forest of trees left standing when the reservoir was flooded in 1990.
By making casts that stayed within view of his forward-facing electronics, Brandon and his client were working their A-rigs through the timber and among the large concentrations of baitfish without getting snagged. The target fish were suspending bass that nestled themselves within the standing timber as they waited to chow down on passing bluegill.
By using years of on-the-water experience with trophy caliber bass, Brandon applied a specific cadence and technique to help trigger the inactive fish into biting. Once he hooked the massive bass, he jacked up on the fish while simultaneously winching down on the reel handle, this technique might seem aggressive, but it was needed to help pull the big fish up and away from the standing timber.
After an epic battle, the client helped net the fish, which they both assumed to be a largemouth until further inspection. After taking another glance, Brandon was realized he had the world record meanmouth bass on his hands. Unaware of the meanmouth species, the guide client remained skeptical when Brandon claimed, “This is a world record fish.” Eventually, they made their way back to the ramp and contacted Texas Parks and Wildlife, who sent a representative to the boat ramp.
The Texas Sharelunker representative pulled a sample from the fish, confirmed its weight and length, and then watched Brandon release his world record catch back into the lake.
Big Bass Family
Before guiding full-time Brandon worked in the concrete business alongside his father who is an established Texas tournament angler himself. In fact, Brandon’s dad landed a 13lb largemouth from lake O.H. Ivie last year which was followed up by a 12lb fish reeled in by Brandon on the same day.As a guide he specializes in fishing tech and, more specifically, the Garmin Livescope and Lowrance Ghost forward-facing sonar units. With the latest electronics, Brandon can see and do things never before possible in fishing. For example, he can cast 80 feet in front of him and watch his lure being retrieved live on screen through his entire cast. He’s able to lift the lure over a brush pile, around a tree limb, or slow it down for a brief pause if he notices a trailing bass on the screen. Watching fish interact with his lures, or clients’ lures in live-action via today’s latest fishing technology is part of what makes Brandon Burks guide experience so unique. After leaving his job working in concrete and transitioning to a full-time guide, he made it his mission to differentiate himself from the crowd.
His on the water electronic demonstrations allow customers to try live sonar units before making a purchase but most commonly he’s jumping on a client’s boat and helping them dial in their new gear. System settings, on-the-water tutorials, and installation help are all common questions Brandon helps answer.
“If someone is willing to spend thousands of dollars on their electronics, why not pay a little bit more to get really dialed in with a guide,” Brandon said. “I have so much experience on the water and I can help eliminate the learning curve quickly and get guys familiar with their units”
Having the latest technologies and gear is great, but you still have to know how to use it. And that’s where Brandon comes in.
Unveiling the truth behind dry firing a Gamo air rifle, this intriguing headline delves into the possibility of safely practicing without ammunition. Join us...
")
")
")
")
")


 Like with any hobby, shopping for gear can be just as fun and exciting as the activity itself.
 Another way to repurpose old fishing rods is by turning them into shelter rods.