")
")
")
")
")


Illustrations by Peter Sucheski
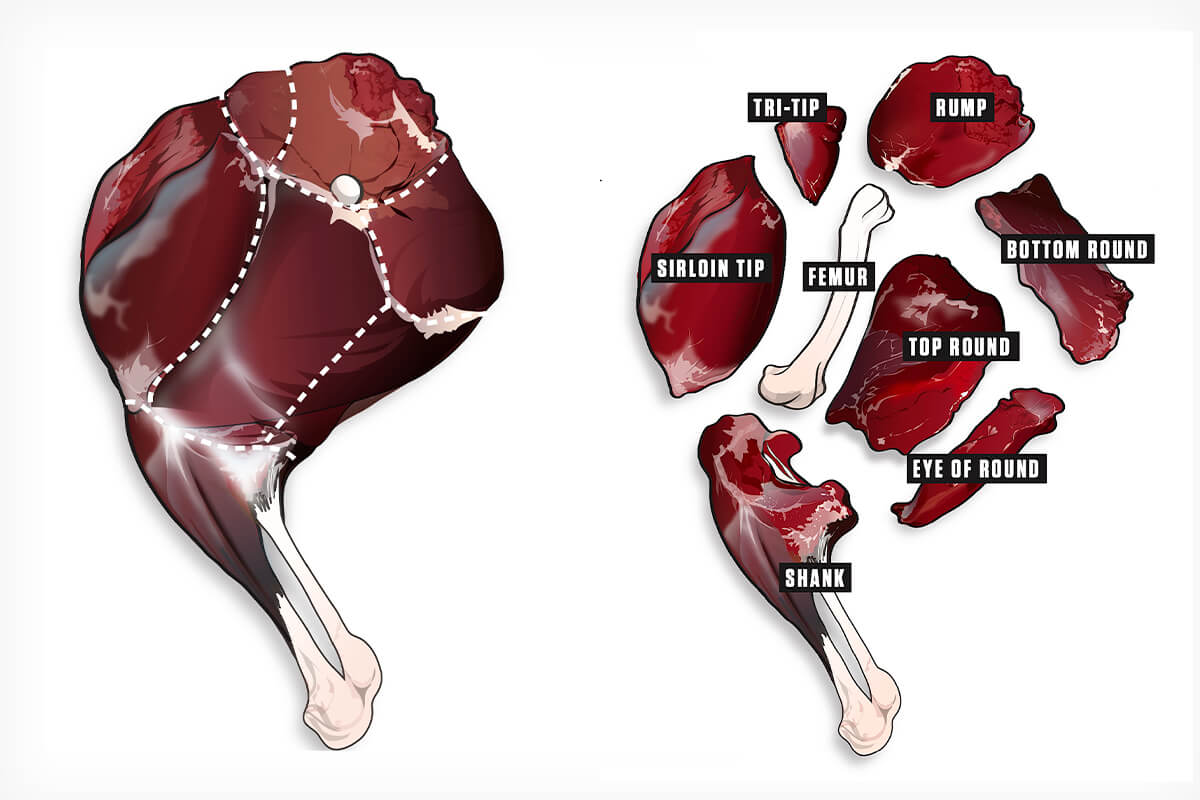
Most hunters know how to remove choice cuts like the backstraps and tenderloins from deer. Fewer are as familiar with the legs, particularly the hindquarters.
This is a shame, as the rear legs offer fantastic cuts fit for various cooking styles. They’re also not as difficult to break down as many perceive.
First, if possible, hang the deer at least a day or two in cool temperatures to allow rigor mortis to subside. Also consider dry-aging before butchering. Done correctly in safe temperatures (33 to 40 degrees), it yields more tender and flavorful meat.
When it’s time to start cutting, use an area that provides ample space for the hindquarter and your tools. Consider a curved, semi-stiff boning knife and a straight, more flexible fillet knife for separating connective tissue and trimming. You also want a large cutting board, gloves, paper towels, a meat-storage container and plastic sheeting to cover the work surface and make cleanup easier.
There are two main ways to butcher a hindquarter: by removing the leg bone before separating the cuts or by taking individual cuts directly off the bone. Both are correct and often involve simply separating muscles along natural seams of connective tissue. I do better when removing the bone first, so I’ll focus on that method.
Table of Contents
THE PROCESS
Step 1
Remove any hair, dirt, blood-shot and excess fat on the skinned hindquarter. All can contaminate meat and negatively affect flavor. Removing fat also helps reveal lines of connective tissue you’ll use to separate muscle groups.
Step 2
Remove the shank by slicing along the sinew lines between it and the round. Do this on both sides of the hindquarter with the tip of a boning knife. Cut the ligament opposite the shank. Then work the knife tip gently around the joint at the knee (not sawing at the bone) while using your offhand to move and apply pressure to the joint. Slowly, you’ll separate the shank from the round without needing a saw. If intended for grinding or stews, remove the shank meat from the bone.
Step 3
Set the round down with the inside facing up. The femur’s ball should be visible. Starting here, make a straight, shallow cut along the nearby seam down to the kneecap. You should feel the femur running beneath the tip of your knife.
Step 4
Cut on both sides of the kneecap and pull the meat back with your free hand. Continue cutting to expose the length of the femur. Work the blade tight around the bone’s contours, alternating cuts along both sides. Keep the blade flat against the curve of the bone, and don’t cut into the meat below. While holding the kneecap up with your offhand, cut below it and along the femur toward the ball until the entire bone is clear and comes free.
- READ MORE: 4 Steps to Field-Dress a Deer
Step 5
Pull the round apart with your hands. The still-connected individual cuts should lay flat on the cutting board in front of you. You’ll see a mass of connective tissue with a particularly thick concentration near the center of the round. Inside is a gland, which you should carefully remove by trimming the surrounding connective tissue. Left in place, it can taint the meat.
Step 6
Separate the cuts along connective tissue lines with your hands and knife tip. Seams are evident, so let nature be your guide. You should never have to cut into muscle. Trim excess fat and sinew, but leave the silverskin that surrounds muscles to protect meat during freezing. Leave cuts large to avoid exposing more meat to air.

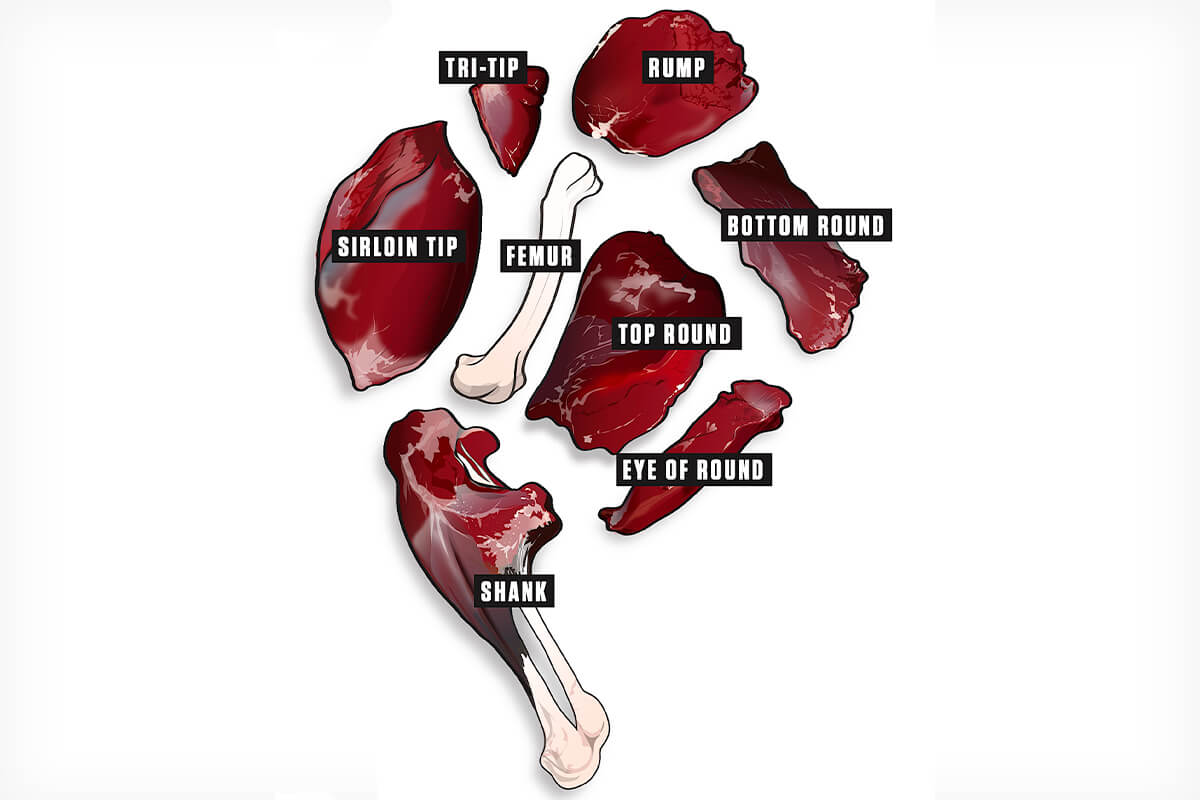
THE CUTS
Larger cuts include the top and bottom rounds, eye of round and sirloin tip. You also have the sirloin butt (rump), tri-tip and shank. All are great in their own ways.
Top and Bottom Rounds
Pulled from the deer’s hamstring area, these cuts are quite versatile. They’re tender enough for cutting into steaks and hardy enough for making roasts or enduring low-and-slow cooking methods, like smoking or braising. Cube them into kabobs or slice thin for jerky or stir-fry. Or butterfly and pound them out for chicken-fried steak or jagerschnitzel.
- LEARN MORE: 15 of the Best Venison Sausage Recipes
Eye of Round
Called the hidden tenderloin because of its appearance, many cook them similarly. Pan-sear or grill whole, or as medallions. It’s also good as jerky or fajita meat, or it can be cured.
Sirloin Tip
Also called the sirloin, football or knuckle, the sirloin tip is tougher than the rounds but still makes great steaks, especially on young or aged deer. It’s perfect for a roast. Or it can be smoked, braised, ground up or turned into jerky.
Tri-Tip
A well-known beef cut, the tri-tip is mostly overlooked on venison hindquarters because of its small size and how it blends in with the sirloin tip. It’s great for flash-searing. Like tenderloins, lean toward rare and medium rare.
Sirloin Butt (Rump)
This cut’s size depends on how well you removed the hindquarter. It’s often small and used for pot roast, stew or grinding meat.
- MORE RECIPES: 10 Most Popular Venison Dishes
Shanks
Shanks get a bad rap. They’re tough, sinewy muscles that deer use often. Cooked improperly, they’re almost inedible. Cooked right—low and slow in liquid—they’re delicious. Shanks are perfect for osso bucco, braising on the bone or simmering in a broth to produce succulent stew meat.
SEAL THE DEAL
Should you use an external or a chamber vacuum sealer for meat storage?
The most common vacuum-sealing device is the external vacuum sealer. Place the open end of a sealer bag into a tray, clamp the lid down and suck air out of the bag. The other option is a chamber vacuum sealer. The entire bag goes inside the machine, and the sealer removes all air within the chamber—inside and outside the bag.
External vacuum sealers are inexpensive, and their design permits sealing larger cuts of meats. Chamber vacs excel at sealing liquids and other moist items. They’re great for marinating meats or for sous vide applications. They require more money upfront and are less portable.
With adjustable seal time and vacuum settings, and an integrated bag roll holder and cutter, the MEAT! Pro External Vacuum Sealer ($179.99; meatyourmaker.com) ups any hunter’s meat-preservation game. It’s also equipped with a removable drip tray for easy cleanup. For the hunter who freezes lots of meat or seals liquids often, there’s the MEAT! Chamber Vacuum Sealer ($799.99). This one also has adjustable seal time and vacuum settings, as well as a manual seal time mode. If you want professional-quality sealing, this is the ticket.


