This review started when I said mean things about Turkish shotguns online. My comments were generally targeting the gas-operated bullpup magazine-fed guns, but I have had a generally negative view of most Turkish shotguns. That opinion is based on a parade of Turk shotguns that have come through the shop where I work. As a category, they have more issues than shotguns of other origins. But they also have price points that tend to be much lower. I was soon contacted by a VP at Four Peaks Imports who threw down the gauntlet. He offered to send out a shotgun from their lineup because he thought shooting one would change my mind. I respect his approach of choosing a public hater as a potential reviewer, and letting the product speak for itself. I selected the Aksa S4, and in short order, it showed up at my FFL.
Semi-Auto Shotguns @ TFB:
Mossberg 940 Pro Turkey Shotgun in Mossy Oak Greenleaf
Weatherby Expands Element Lineup with New Element Turkey Shotgun
New Enhanced Girsan MC312 Tactical Shotgun from EAA
Mossberg Unveils The New 940 Pro Tactical Semi-Auto Shotgun
The Benelli M4 is a legend. There can be no debate on that point. It has been used by militaries, police forces, competition shooters, and people who just like nice shotguns. It has graced the silver screen and been used in Triple-A video games.
Whenever a gun reaches icon status, there will be clones. Some clones are more of an homage to a design, others are quite literal “clones” of the original. The Aksa S4 is the latter. Parts are generally interchangeable, including common upgrades like magazine tubes or stocks. It is not a Benelli but is impressively similar to the original.
My negative view of Turkish shotguns generally stemmed from the obscene gas-operated bullpup magazine-fed guns that clutter the shelves of too many retailers, but the actual range of Turk scatterguns is very broad. There are pump guns with prices so low they look like misprints, and there are CZ-branded guns competing in the higher tiers. As a whole, this category of shotgun tends to cost less than comparable models made in the USA or places like Italy and Japan.
The S4 In Action
Gun reviews are intrinsically limited by (usually) having a sample size of one, and by not having unlimited time or ammunition. Multi-year, 10,000-round reviews across 20 sample guns would be an incredible source of data, but it is simply not feasible unless you are running some type of government procurement program. I was footing the bill for ammo and I most certainly do not have a Department of Defense budget. With those caveats in mind, it was time to start shooting.
I did not lubricate anything, clean the gun during the review, or put thread locker on any screws before the initial break-in. Some reviews of similar models insist that these steps are necessary before shooting a Turkinelli. Instead, I stuffed shells in the magazine tube and started shooting. Gas-operated shotguns usually need some rounds through them before they operate reliably. That was true for the Aksa S4. In the first 50 rounds or so, there were a few failures to feed and failures to extract. After the first few boxes of shells, it smoothed out and operated normally.
I wanted to put a wide range of shells through the Aksa S4 because semi-auto shotguns can be picky with ammunition. I fired 550 rounds of birdshot, primarily 1 1/8oz and 1oz Winchester and Federal as found in your local Walmart. Outside of the initial break-in and one hang-up in the burndown (discussed below), it ran this ammo 100%. Some semi-automatic scatterguns struggle with this cheap ammo, but the Aksa S4 ran it like a champ.
I also fired 110 mixed rounds of buckshot, slug, and turkey shells. The loads fired included Federal Law Enforcement buckshot and slugs, Fiocchi buckshot and slugs, cheapo no-name buckshot from a baggie in my basement, Winchester military 00 buck, and the least-expensive turkey shells from my local Sportsman’s Warehouse. Everything cycled fine, with the exception of Fiocchi low recoil buckshot. It did not like that load at all. Thankfully, that was the outlier.
The manipulations are exactly the same on the Aksa S4 and the Benelli M4. I have shot Benelli shotguns in the past and there were no differences in the manual of arms. Both the M4 and S4 benefit from larger aftermarket bolt release buttons and extended bolt handles. Extended magazine tubes can also be added, though that can trigger 922(r) compliance issues. I chose to stick with basic upgrades for this review, which would not change any functional parts of the Aksa S4. I added a piece of industrial Velcro to the left side of the receiver for use with Esstac Shotgun Cards, and a Vortex Crossfire red dot on the factory optics rail. Some reviews of similar guns reported that the optics rail came loose after firing. This gun did not have that issue.
The BurnDown
James has a history of blasting shells through shotguns as fast as he can to see what survives. Some guns handled it well, some did not. I wanted to do something similar, but with 200 rounds due to scarce ammunition and high prices. I did the burndown toward the end of the review, with about 325 rounds through the gun already. If something was going to fail, it would be more likely to fail with preexisting wear and tear before the real pain commenced.
The burndown was pretty simple. Load up 5+1, fire as fast as I could, load up 5+1 more, and do it again. There also were some top-off single loads mixed in too when I dropped a shell or missed the count on a reload. This was a truly unreasonable sustained rate of fire. The Aksa S4 got so hot that it scorched the leather glove on my lead hand through the handguards. My wife asked if I had eaten barbeque for lunch that day because the burning smell was so pronounced.
How did the Aksa S4 fare? Excellent. It has one hiccup, a failure to feed at round 178 of 200. I pressed the bolt release button and the round fired and cycled normally. Once the gun cooled off a little, I fired the remainder of the buckshot, slugs, and turkey shells. All fired normally with no drama, including some 3″ magnum Ultra Turkey 1 3/4 ounce loads that damaged me, but not the gun. I was able to land a head shot on a 2/3 IPSC steel target at about 60 yards with a 3″ Federal slug as well.
General Thoughts
A few sources had suggested that these guns were prone to parts breakage around the 500-round mark. I did not find that to be the case, but this is only one sample gun. What I can say from my totally non-scientific-definitely-not-an-engineer perspective is things look pretty good inside, and nothing looks like it is on the way to breaking.
The Aksa S4 includes 3 chokes (1 in the gun, two in a case), as well as a choke tube wrench. The wrench is pretty flimsy but it was able to remove the choke for the last few shells of the review. I did not see any marking on the chokes, so I used the age-old method of putting my finger in the front end to see how constrictive they were. I installed the most-constrictive one, and the patterns did shrink. Detailed patterning of shotguns is time intensive and beyond the scope of this review. What I can say is the chokes are there and if you feel like changing it up and looking at patterns, that option is available to you out of the box.
Conclusion
“Is it just as good?” is the wrong question. A clone that costs 70% less than the original Italian masterpiece will never be just as good. This is true with Italian guns, motorcycles, and food.
The real question should be “is it good when judged on its own merits?” and my answer is yes. It is a lot of gun for the money. Unlike many budget-oriented guns in its class, there is an aftermarket thanks to the M4 parts interchangeability. And it just might make you pick up a Benelli to round out the set some day.
It wasn’t long after we first got into camping that we realized there must be a better solution for carrying propane for our Coleman stove than in the disposable one-pound cylinders. After finding out that fifty million of the steel canisters are disposed of each year by campers like us, and that a quarter-million of them simply become litter, we decided it was time for a better solution.
Full Disclosure: This post includes affiliate links to the adapters we use. Our readers never pay any extra when using these links and we may earn a small commission.
Thinking that we were doing the environmentally responsible thing, we bought a small brass adapter on eBay and began refilling our own 1 lb propane bottles, only to learn later that doing so makes them illegal to transport. One-time use, disposable propane cylinders aren’t designed to the same specifications as refillable ones, and thus aren’t lawfully transportable, according to the Department of Transportation. Thankfully, we never had any accidents while transporting our refilled bottles, yet if we had, we might have been liable for any damages and paid a hefty fine.
One Incident in 10 Years Was Enough
After about a decade of refilling used one-pound Coleman and Bernzomatic propane bottles, we only had one of them develop a leaking valve, after it had been re-used about ten times. About halfway down Old Monarch Pass, west of Salida, CO, we smelled propane wafting from our cooking gear box in the back of the Jeep and had to pull over to deal with a leaking 1 lb Coleman bottle. Gas wasn’t leaking from the small relief valve on the side of the cylinder (as sometimes happens with abrupt temperature changes) but rather from its main valve, which had probably began to wear out with reuse.
This incident was enough to convince us that (in addition to being illegal to transport) refilling our used one-pound propane canisters probably wasn’t the safest alternative.
From the DOT Website:
From the DOT’s website. At least one fatality has resulted from refilling DOT 39 cylinders (disposable 1 lb. type)Adapter for one lb. propane cylinder to 20 lb. tank.
Refilling 1 lb Propane Cylinders (For Emergency Use Only)
If a situation ever arises where you really need to re-fill a Coleman or other one-pound disposable propane cylinder (for use in a Mr. Buddy portable heater during a blackout, for example) the simple process we used does work. However, there’s even a better way than this, which we’ll get to later.
Whichever method you use, always remember that propane is a dangerous, flammable gas, so performing this process carefully and safely is very important. The photos above show some of the steps we used to refill our disposable Coleman one-pound propane bottles.
There are many videos showing how to do this and our post isn’t meant to be a tutorial on how to do so, but we’ll explain the basic principle of how it works.
Turning to the left to tighten the bottle adapter onto the 20 lb. tank.
How We Once Refilled Our One-Pound Disposable Propane Canisters
Disclaimer: The following is not to be used as instructions and is for illustrative purposes only.
Back when we used to refill our used Coleman propane cylinders using the old method, we’d find a clear spot outside on a cool day when there was some breeze blowing. After purging the remaining gas from our one-pound cylinder, we attached it to an inverted 20 lb. tank, and slowly opened the main valve. After about thirty minutes, we’d close the main valve, return the tank to its normal upright position and unscrew the 1 lb. canister. A better description of the whole process can be found here, on a website that sells a tank adapter similar to the one we used.
(Some people chill their 1 lb. propane canisters in a small bucket of ice water, etc. This condenses the gas and lowers the pressure so you can refill with a bit more propane. Careful not to overfill!)
To make sure we hadn’t overfilled them, we’d always perform a quick check using an old postal scale to see that our newly refilled 1 lb. propane bottles wasn’t any heavier than a new store-bought one, as well as to check for leaks before storing it away.
Downsides of This Method
You typically can’t ever fill a 1 lb. bottle to the same level as when it was new. *
Unless you’re using a special stand, the upturned tank is awkward and can tip over.
Disposable 1 lb. bottles and their internal valves aren’t made to same standards as refillable ones.
DOT-39 cylinders (disposable type like Coleman, Bernzomatic) are illegal to transport if refilled.
* There is a way do get more gas into a cylinder, but it requires loosening the pressure-relief valve and/or chilling the bottle.
The Flame King kit includes this easy to use valve system, which is much simpler to work with than the one-piece brass fitting that we had been using – no wrench needed.
Two Better Alternatives To Refilling Used 1 Pound Propane Bottles.
Option 1 – Flame King 1 lb. Refillable Cylinders
Since learning that owner-refilled disposable cylinders aren’t legal to transport, and that they’re not made to the same specifications as refillable ones are, we switched to carrying a couple of DOT approved refillable one-pound propane cylinders, made by Flame King. This simple system uses a special filling valve with a long extension, along with an optional propane tank stand, which solved the problem we once had of inverting the 20 lb. tank during the refilling process.
Option 2 – 5 lb Refillable Mini Tanks
The Gas Growler holds lbs of propane, lasting that much longer than a one lb bottle.
A five pound refillable propane cylinder also works very well for fueling camping stoves, with the added benefit of lasing five times longer than 1 lb. bottles, and being refillable anywhere larger tanks are filled. The Gas Growler is one example of a five pound mini-tank that is easily stored in the back of a vehicle in it’s padded carrying case. Many in the overlanding community like to carry this size propane tank since one can last as long as a month, depending on how many meals you cook a day.
The Bottom Line: Should You Ever Refill a 1. lb Propane Cylinder?
Coleman, Bernzomatic and other brands of disposable propane cylinders don’t feature heavy-duty brass tank fittings or long-life internal valves. Disposable cylinders aren’t made with the same thickness of steel (just pick one up and you’ll feel the difference) nor do they have the DOT seal of approval for reuse which would make them legal for transport. However, when making the decision to refill a cylinder, the real reason you should avoid this practice is for your own safety and that of others, not for fear of being caught by the DOT.
Benefits of Refilling Your Disposable 1 lb Propane Bottles With a Flame King or Similar System
When it comes to saving money, using some kind of reusable, refillable propane cylinder for your Coleman stove is really a no-brainier. There are the environmental benefits as well, plus not having to deal with properly disposing of all the empty canisters at the end of the camping season. In terms of savings, it currently costs about $20 to fill a 20 lb tank, while a 1 lb bottle costs us around $5 at Walmart. It’s easy math, and you can clearly see that refilling an approved tank can save a lot of money over the long run.
This 5′ extension hose features an adapter that allows you to use a 20 lb. bottle to fuel your Coleman or other camping stove which uses 1 lb. bottles.
In addition to sometimes running our Coleman camping stove directly from a 20 lb. tank, using a 5′ propane adapter hose, we’ve also been using two 16.4 ounce Flame King propane cylinders. Because these are so easy to refill, we normally don’t bring a 20 lb bottle unless we plan on being gone for more than a week.
At about $52 for the Flame King Refill Kit, which includes one refillable cylinder, we estimate that we’ve saved enough this camping season so far to pay for it already.
Disclaimer: We don’t advocate refilling used disposable propane bottles. This article does not constitute instruction. When using any approved system to refill a re-usable 1 lb cylinder, be sure to follow all of the manufacturer’s instructions to the letter. Full Disclosure: This post may include affiliate links to products we recommend. Our readers never pay any extra when using those links.
Hunters stink and none of them can smell they’re own scent. That’s right. As much as we don’t want to admit it, everyone has a scent and none of us can smell it because our brains recognize it as our own.
Not to mention, humans have a very poor sense of smell compared to wild animals like deer, elk and bear.
For hunters, the bad news is that there is nothing you can do to get rid of your smell. You can wash and scrub all you want and the game you are pursuing can still smell you. And if game catches a whiff of your smell, you are out of business.
As a hunter, the best you can do is to try mask your scent from wild animals, when you are in the field. Of course there are countless products available that promise to effectively mask your scent, but not all of them work. Here are some tips on how you can mask you smell when you are hunting.
Avoid unnatural smells
A human’s scent can be easily detected by wild animals. With this in mind, it is important to not make your situation worse by adding unnatural smells that would increase the odds of an animal detecting you.
Common unnatural smells include gasoline, coffee, cigarettes, aftershave, detergents and soaps. Avoid these smells at all cost, if you want to remain undetected when hunting.
Reduce body odor
Body odor should not be confused with human scent. Body odor is produced by the growth of bacteria when you sweat. One way for hunters to reduce body odor is to use a soap that contains enzymes that kill bacteria. These soaps can help prevent bacteria growth when you sweat. Another step you can take is to dress in layers to help prevent overheating and sweating.
Dress to reduce smell
The clothing you wear can also help reduce the odds of animals smelling you. Scent control hunting clothing is specially manufactured so it prevents the production of bacteria. With less bacteria, you are less likely to smell. Of course this is not perfect, but it can make a significant difference.
Natural smells
One way to mask your scent is to use a natural smell that is familiar to animals and will not alert them to your presence. Rubbing dirt, leaves, pine needles and other natural materials on your clothing will help mask your scent from animals. Typically these materials have stronger scents than humans. They will not completely mask your odor, but they can help.
Overload
Among the many products available to help mask scents are sprays known as receptor overload. The spray confuses animals, because it overloads their system by bombarding them with so many different smells they cannot process them. This causes their brain to ignore the smells, thus keeping your scent masked from the animal.
Stay downwind
It may seem elementary, but one of the best ways to mask your scent is to keep your scent away from the animals you are hunting. Before you begin hunting, check the wind direction and make sure you are downwind of the direction from which animals will be approaching. This is a simple tactic, but it is very effective, even on days where there is very little wind.
So you just shot a buck on the fifth day of a seven day solo hunt in the backcountry, and you’re 6.5 miles from your truck. Now what? Well, unless you can find some horses running around…you’re probably going to need to get your buck broken down and start to burn some boot leather packing it out on your back. The old motto “releasing the arrow is the easy part, the real work begins after you get an animal down” couldn’t be more true. An ideal situation would be to have a friend help you take care of the meat and pack an animal out. However, sometimes you have to get creative and dig deep when doing it solo.
Before you get in this situation, you should plan ahead and before trying to tackle this task. Believe me…nothing is worse than experimenting on quartering out and/or de-boning an animal in below freezing weather conditions without the proper gear to get the job done. You want to get that animal properly broken down while taking the required steps to get all of the meat removed….all while doing it efficiently. Getting your meat ready to pack out in a timely manner, while minimizing contact with debris on the ground, will help ensure that you have tasty steaks for the dinner table.
There are many advantages to packing out your bow kill. However, there are just as many pitfalls to the process if you don’t know what you’re doing.
Packing out your own animal is all about knowing your physical limitations. Don’t try to bite off too much if you are not adequately prepared to pack a large animal like a bull elk out of the mountains solo during the early part of September. We all owe it to ourselves to get the meat out as quickly as possible. When in doubt, try to contact a few friends to help you pack meat, even if it means hiking to get cell service or heading back to your truck and driving to town.
Equipment NeededGear choices for packing out an animal are sort of like gear choices for setting up a new bow. There are a lot of options for each type of person. Personally, I have found the following items make the job easier on myself and have proven to work great throughout my bowhunting career. When it comes to knives, I prefer to carry the lightest knife for preparing my trophy in the field since I will be carrying this knife each day. You do not want to carry a heavy saw or giant knife in your pack if you don’t need to; just like all of your backpacking gear, you want it to be as light as possible yet still get the job done. The less weight you have in your pack, the harder you can hunt…the harder you hunt…the more successful you can be. (shop for backpacks)
The right game bag can make hauling your meat easier, as well as keep it cool, while also keeping your backpack clean of blood and odor.
I’ll be the first to admit…I don’t like carrying the extra weight of game bags in my backpack each day I hunt. But, I am hunting and therefore expecting to kill something, and even though I love the experience of the hunt, I am not just taking my bow out for a walk. It is for this reason that I pack game bags each day I am hunting, no matter if it’s a daytrip for antelope, a weeklong hunt for elk where I am moving camp each night, or a weekend mule deer hunt where I am headed back to the same tent location each night. Game bags prevent your hard earned meat from getting contaminated from a variety of sources such as dirt, sticks, and insects. I just keep thinking in my mind how miserable it would be if I didn’t have game bags with me when I make a kill. Like the old saying goes, “I’d rather have it and not need it, than need it and not have it.” It’s also a great idea to pack garbage bags if hunting during the hot early season, to give you more options for preventing your meat from spoiling. Placing your meat in garbage bags and then placing them in a stream will ensure they stay cool while you pack the rest of your meat.
Game BagsI have used a lot of different brands and materials of game bags over the years, and I think I have finally found the perfect system for my style of hunting. Cotton has fairly decent breathability, but it doesn’t hold blood well, is difficult to reuse after washing due to staining and odor retention, and it tears easily. Canvas game bags are too heavy for most situations where you are backpacking them in. These would be a great option if you’re hunting from a horse. I prefer a light-weight, breathable, synthetic game bag, as it seems to solve these problems. I rarely get blood on the inside of my pack, they don’t retain odors after washing, and they are extremely lightweight. One thing to look at with synthetic game bags is breathability- make sure if you’re hunting a long distance from your vehicle that your game bags allow your meat to cool. The worst thing would be a game bag that keeps the heat in. Those types of bags might be the lightest weight, but they sacrifice the most important reason for a game bag in my opinion. Not having breathability will potentially spoil your hard earned meat.
A good knife it vital to “post-shot” success. The right one will be lightweight and sharp as a razor.
Cut It And Cool ItA person can quarter or de-bone an entire animal with just one knife and without using a heavy saw. I prefer to use a lightweight knife that has replaceable surgical blades. In total my knife and extra blades weigh just a few ounces. This system eliminates having to carry the weight of a sharpening stone each day. I do carry a small multi-tool that works perfectly for cutting branches out of the way before you start to break down your animal. For example, this past fall (2012) my mule deer buck lodged into some trees and pinned his rack in some branches when he collapsed. Having a small multi-tool saved me some heavy lifting as I was able to cut the branches away freeing my buck to slide down the steep slope to a small flat bench where I could work break him down. (backpack videos)
One important part about packing out your own game is how you will store your meat once you get back to your truck. For this reason I always bring along a cooler that I will place my first load of meat into while I make multiple trips for the rest of the meat. You do not want your meat sitting in the back of your truck all day, since that’s an invitation for insects and/or other animals to chew on it. If you’re in very rugged terrain, it is a good idea to pack trekking poles or leave a set at your truck that you can grab after your first load. They will provide some support for your body and help balance the weight when you’re putting on the miles with a heavy pack.
If you have to leave meat behind, find a place that will keep it cool and out of the hands of bears, insects, or other predators that may move in and steal your hard-earned trophy.
TacticsIf the animal is within your comfortable carrying distance, then you can probably get by with quartering your animal and leaving the meat on the bone. I used to quarter and pack all animals that I shot because I didn’t want to take the time in the field to de-bone it. Well…after packing a bunch of animals through the years, I finally said I had enough, and now I de-bone everything. De-boning an animal makes your pack weigh a lot less, makes it easier to fit multiple game bags full of meat in your pack, and it helps cool your meat down faster.
Small-framed animals such as antelope don’t necessarily require a complete “d-boning” process. Instead, many can be quartered and hauled back to the truck.
The Right Way To Pack ItI place my de-boned hindquarters in one game bag each and do the same for the front shoulders. All the rest of the meat (backstraps, tenderloins, neck, brisket, etc.) will get divided into the front shoulder bags. You will soon find out there is a proper way to pack meat out in a backpack and a way that will hurt your body. Place all your meat as close to your back as possible in your backpack, but keep it off the bottom of your pack for balance reasons. Nothing is more uncomfortable than having a heavy object strapped to the outside of your pack that will pull your body backwards or to the side. (choosing the right pack)
When I have gear with me on the first pack out, I will place all my extra clothes in the bottom of my pack with my sleeping bag. The rest of my gear (tent, food, etc.) will get distributed to the outside pockets to make room for the meat inside of the pack. If you’re concerned about getting a little blood on the inside of your pack then it will be useful to place your de-boned meat in a garbage bag. Some packs have load slings that enable the bag to move away from the frame, allowing the meat to be placed right next to your back, while still enabling your gear to be placed inside your backpack. I really love this design for comfort reasons and ease of carrying my gear out on the first trip.
You may have a good backpack, but if it isn’t loaded correctly, the load will wear you down fast; possibly even injure you.
It is also very important that you utilize your compression straps on the outside of your pack. Nothing is more frustrating than hiking out with a heavy load of meat and a big buck rack on the outside of your back and having the rack bounce up and down or the meat falling around in the backpack. It will wear you out in a hurry…trust me on this one. Don’t ever try to stand and lift the pack up to your shoulders either. For one…it will hurt and two it has the potential to tear your shoulder straps by forcing all the weight to that one area. Instead, before I load the meat in my pack, I will place my pack near a spot that allows me to sit down on a bench and slip the shoulder straps on and get my waist belt buckled. Then I just need to lean forward and stand up. If that is not an option in the area you shot your animal, then I would suggest sitting down and getting your pack strapped on and do those same steps, but before you try to stand, roll onto your hands and knees facing uphill and then push yourself off the ground. Once standing, you will be able to adjust the shoulder straps, sternum strap, and waist belt. (backpack forum)
With a Polycarbonate Frame, AirTrack Suspension, and 4700 cubic inches in carrying capacity, the all-new Badlands Summit is designed to handle any load you can through at it.
The best advice I was ever given was don’t pack out what you are not going to use or consume. If I know I am not going to mount the buck, I will remove the entire hide from the skull and start to remove some of the meat from it as well. Also, I will remove the lower jaw because I have never found a need for it. I usually do a skull mount of most of my average bucks, but if you really want to lighten more of your pack out weight, then you can cut the skull plate in half below the antlers.
Backpack ConsiderationsHaving a pack that can handle the extra weight of meat plus gear is something to take into consideration before your hunt. You cannot place a heavy load in a pack that isn’t designed for that function. Lightweight packs may be great for ease of hunting, but most of the time they lack the comfort and adjustability of a do-it-all type pack. I am a huge fan of a pack that I can use for a week long hunt, and if I harvest an animal I can use that same pack to haul meat out. I am not easy on my backpacks- to me they are a tool to haul weight and haul it comfortably. So I will use my same pack for hunting as well as getting my hard earned protein to the table.
Another great option if you don’t want to get your nice backpack a little dirty or if it cannot handle the weight, is to have an external frame meat pack waiting for you at the truck. This way you could process your animal in the field, hang the meat in a shaded tree to cool, and then hike back to your vehicle to retrieve your meat hauling pack. It comes down to personal preferences and whether or not you’re willing to burn more miles going to get a different pack. Personally, I follow the “less trips mentality, so I chose a backpack that can do anything I ask of it.
Closing TipsI always keep my knife and tags in the same pocket on my pack. That way I have peace of mind knowing that I won’t lose them or dig through all my gear after I make a kill to find them. For attaching your tags to your trophy, keep it simple and use electrical tape. I always bring along a short section just for tags, since you don’t need a full roll of extra weight. If you shot anything larger than a deer such as an elk or a moose and you need to make multiple trips, make sure you place your meat high in a tree away from the reach of bears.
The end goal is memories on the wall, and a freezer full of healthy venison. Take the right approach and this will be an easily achievable goal.
Also for multiple trips, ensure your meat will be in the shade most of the time while you are packing the first few loads of meat and select a location with ample breeze to further cool the meat while you are away. Another great option for keeping your meat safe from insects or bacteria is using a mixture of citric acid powder and water. Citric acid will slow bacteria growth and prevent flies from trying to get through your game bag. This would be a great option for the solo hunter who is chasing elk deep in the backcountry. Finally, always be cautious while cutting up meat and returning to meat hanging in a tree in bear country….you never know what could be waiting when you return.
Chemicals at first glance can be confusing. How are we supposed to know what all the different herbicides on the market do and which ones to use, when we can barley even pronounce the lengthy words that look like they fell out of an organic chemistry textbook. “What herbicide can I spay on my food plot?” is one of the most common questions we get, so I decided to create an herbicide guide to help fellow food plotters understand chemical weed control.
Before Planting-
Before planting any of our food plot blends, it is important to kill off all vegetation in the plot area. This creates an area that is free of any weed competition, allowing the seeds get established without fighting other plants for resources. In order to kill all vegetation, I recommend using a glyphosate product. The chemical glyphosate is found labeled under many different trade names, the most popular being “Roundup”. Glyphosate is a non-selective herbicide meaning that it will kill most plants that it comes in contact with. Glyphosate works by absorbing though the leaves of the plant then spreading to all parts, disrupting amino acid production need for growth. It is important to note that glyphosate only affects actively growing plants and does not affect seeds in the soil. After the plot area has been sprayed and killed off, the seed can be no-till drilled in, or the plot area can be disked and planted.
Preemergent herbicides can also be used as a preventative application to keep weeds out of your food plots. Preemergent chemicals are used just as they sound, they are applied to the soil before the weeds germinate and emerge. Thus, with preemergent herbicides, weeds are not sprayed when they are found in the food plot, instead the area is sprayed beforehand to keep the weeds from coming up all together. There are residuals in these chemicals which stay active in the soil and has a residual killing effect on germinating plants for a specific amount of time. These chemicals can be a great tool for food plotters, but it’s important to read the herbicide label to see what crops the specific chemical is approved for and to see how long the residual effects will be on the soil as that may dictate what can be planted in the plot area later on down the road. Some chemicals won’t allow planting of specific crops within a certain time period of the application due to the ability of the chemical to kill of specific germinating seeds.
Weed Control in Fall Annual Plot- This includes our food plot blends: Brassica Banquet, Canola Crave, Greenfield, Max-Attract, Root King Radish, Shake & Rake, Trophy Grazer Oats, Turbo Turnip, Ultra Forage, & Wicked Greens
Weed control in fall annual plots is usually not necessary as long as the food plot area was prepared correctly before planting. There may be some weeds that will show up in the plot, but most will die after the first frost. The weeds should not get to a threshold where they will need chemical control in fall annual plots.
Weed Control in Perennial Plots- This includes our food plot blends: Alfa-Feast, Champion Chicory, King Ladino White Clover, Monster Mix, & Rackup Red Clover.
Weed control is a necessary aspect if you plan to keep your perennial plots lasting for years to come. Spraying onto growing vegetation to kill the weeds that are already in you plot calls for a post emergent herbicide, and a selective herbicide at that. Since you will be spraying onto some foliage that you want to keep but some that you want to kill, it is important to get an herbicide that is selective and only kills the weeds.
To understand what selective chemicals to use on perennial plots, its important to understand two main types of weeds, grass weeds and broadleaf weeds. Grass weeds have leaves that are narrow blades. Common grass weeds would be Crabgrass, Goosegrass, Giant foxtail and so on. Broadleaves, in contrast, are plants where their leaves are not a narrow blade but a more rounded leaf. Examples of common broadleaf weeds are Ragweed, Redroot Pigweed, Pale Smartweed, Cocklebur and this list goes on for miles.
The seeds that are in our perennial mixes such as clovers, chicory, and alfalfa all fall into the broadleaf plant category. With that being said, controlling grass weeds in perennial plots can be accomplished by applying a grass specific herbicide. This herbicide will only target the grass type plants and will not harm the broadleaf plants. One type of grass specific herbicide is Clethodim, which is safe on any of our perennial food plot blends.
Controlling broadleaf weeds in perennial plots can be a little bit trickier but can still definitely be done. All of the plants in our perennial plots are considered broadleaves, so we have to select an herbicide that can kill the broadleaf weeds but not our broadleaf plants that we want to protect. For our King Ladino White Clover and our Rackup Red Clover, we recommend using a 2,4 DB herbicide commonly found labeled as “Butyrac”. This will not harm the clover but can kill many broadleaf weeds. If you have both broadleaf and grass weeds in your clover, do not mix clethodim with 2,4DB in the same tank. Instead, you can either spray the plot in two different applications, one with clethodim then go back later with the 2,4 DB, or you could use Imazamox as a single application.
When chicory is added into the mix with our blends, Monster Mix, Alfa Feast, and Champion Chicory, we suggest using the chemical, Imazamox, which can be found labeled under “Imox” and “Octivio”. The great thing about Imazamox is it can control both grass and broadleaf weeds, but it is important to read the label as the plot will need to be sprayed when the chicory is at a specific crop stage in order for it to not be harmed by the chemical.
It is important to note that I only listed a small selection of chemicals on the market and there are many other chemicals that will work. When using chemical herbicides, it is always important to read the label because it will tell you how to safely use the chemical, what crops it is safe on, what weeds it kills, and what rate to apply the chemical.
North Carolina is one of the top 10 hunting states with almost 700,000 paid license holders. And these hunters are serious about whitetail deer. It’s the most popular game animal with nearly 250,000 hunters spending an average of 15 days per season going after their quarry. If you want to harvest one of the more than 200,000 deer taken in the state each year, be sure you’re aware of the season dates and regulations.
North Carolina deer hunting seasons vary by region, though it’s worth noting that the archery season starts on September 10 everywhere.
Also be aware that the “gun” season for each zone applies to antlered deer only. You can only hunt antlerless deer in an “either-sex gun” season. These are a bit more complicated, so it has its own separate section below.
The archery seasons are either sex unless otherwise specified.
Northeastern and Southeastern Zones
WeaponDates
Central Zone
WeaponDates
Northwestern Zone
WeaponDates
Western Zone
WeaponDates
Either-Sex Deer Seasons
Regardless of their zone, each county in North Carolina follows one of five types of either-sex season in which both antlered and antlerless deer can be taken. These often coincide with part of the standard antlered-only gun season.
Type of Either-Sex SeasonDatesCounties
North Carolina Bag Limits
North Carolina has a pretty high bag limit of six deer, though there’s a season maximum of two antlered deer. There is no daily bag limit.
If you want to hunt more than six deer, it is possible to get bonus antlerless harvest report cards that allow for an additional two antlerless deer per card during the special urban archery season in the participating towns and cities.
Urban archery season lasts from January 14-February 19, and you can find the participating municipalities on page 66 of the North Carolina Inland Fishing, Hunting & Trapping Regulations Digest. The report card costs $11 for both residents and non-residents.
North Carolina Licenses and Costs
North Carolina is a fairly hunter-friendly state in that all you need is a license to hunt deer and any other game animal. In fact, you can even get a combo license that covers both hunting and fishing.
That said, there are many different kinds of licenses divided between annual and lifetime licenses with different prices for residents and non-residents. To be considered a resident, you have to have lived in North Carolina for six months or have established a permanent residence for 60 days. Students attending a university in North Carolina as well as active-duty military stationed in North Carolina or from North Carolina and stationed outside the state.
Anyone hunting in North Carolina needs a license except for:
A landowner, their spouse or their dependents under 18 hunting on their own land
Members of the armed forces serving outside of North Carolina in the state on leave for 30 days or less
Youth under age 16 as long as they have completed a hunter safety course or are accompanied by an adult
Combo Licenses
Annual LicenseDetailsResident CostNon-Resident CostLifetime LicenseDetailsResident CostNon-Resident Cost*For those born on or before August 1, 1953, residents can buy senior lifetime licenses when they turn 65. For those born after that date, they may purchase the senior lifetime license at age 70.
Big game includes deer, bear and wild turkey, so if you’re a whitetail hunter, make sure to get the appropriate license. If you already have a lesser license but want to hunt deer, you can add it on. It costs $14 for residents and $100 for non-residents.
In addition to the above prices, residents of Georgia, South Carolina, Tennessee and Virginia receive specific discounted non-resident prices for licenses, so make sure you check the digest.
Hunter Education Requirement
You must take a hunter education course and receive a certificate of completion to get a hunting license in North Carolina. The only exceptions are if you have a valid license acquired before July 1, 2013, or obtain an apprentice permit. Hunters with an apprentice permit must be accompanied by a licensed adult 18 years old or older. The Hunting Heritage Apprentice Permit is free.
What Weapons Can You Hunt With in North Carolina?
Archery
North Carolina allows bowhunting with longbows, recurve bows, compound bows and crossbows. Recurve and longbows must have a draw weight of at least 40 pounds while compound bows must have a draw weight of at least 35 pounds. Crossbows have a minimum draw weight of 100 pounds. Broadheads must have a cutting diameter of at least ⅞ inch.
Blackpowder
During blackpowder season, North Carolina only allows firearms manufactured before 1898 that cannot use fixed ammunition or replicas of such a weapon that haven’t been modified to fire fixed ammunition.
Gun
During deer gun season, North Carolina allows the use of shotguns no larger than 10 gauge and pistols with no restrictions on length or caliber. Additionally, any rifle is legal except for fully automatic rifles or those prohibited by specific counties.
Can You Hunt With an AR-15 in North Carolina?
Yes, you can hunt with an AR-15 in North Carolina. The only exceptions are if you have modified your AR-15 or similarly styled rifle for automatic fire or if the specific county has a law that supersedes the state regulation.
What Types of Deer Are Popular in North Carolina?
Whitetail deer are the only species of deer native to North Carolina. There are around 200 elk present in the state, but it is not legal to hunt them. As a result, whitetail deer is by far the most popular game animal, which is also true for the country in general. In 2022 North Carolina deer hunting season, nearly 250,000 hunters spent 3.7 million days harvesting overing 200,000 deer.
What Else Is Popular to Hunt in North Carolina?
Although more people hunt deer in North Carolina than any other game, it’s actually only the fourth most harvested animal. In 2022, doves were by far the most heavily hunted with a total harvest of more than 830,000. Ducks and squirrels were second and third respectively.
Discover the contrasting realms of stalking and stand hunting for deer in this captivating exploration. Uncover the nuances that set these hunting techniques apart, as we delve into their unique approaches, benefits, and challenges. Gain a comprehensive understanding of the key differences between stalking and stand hunting, and enhance your knowledge of these thrilling pursuits in the wild.
1. Understanding the Distinctions: Stalking vs Stand Hunting for Deer
When it comes to hunting deer, there is a heated debate between two methods: stalking and stand hunting. Stalking, also known as spot-and-stalk hunting, involves staying mobile and trying to spot deer either at a distance using binoculars or up close as you walk through areas of deer activity. On the other hand, stand hunting involves setting up in one location and waiting for deer to come to you, typically using a tree stand or elevated blind.
Stalking has several advantages. One of the main benefits is the ability to quickly move to another area if one spot is not productive. A spot-and-stalk hunter can scout out multiple potential locations where deer may appear throughout the day and move between them as needed. This increases the chances of encountering feeding, bedding, and traveling bucks.
Stalking also allows for tracking down a moving deer. If a hunter spots a nice buck just out of range while stand hunting, they would have to let it go. However, a stalking hunter can potentially flank the deer and approach it from another direction.
Another advantage of stalking is that it requires less setup time and gear compared to stand hunting. Stand hunters need to set up their stands before the hunt or carry them along on the day of the hunt, which can be cumbersome and potentially scare away deer. In contrast, spot-and-stalk hunters only need their hunting gear and a weapon.
Additionally, stalking provides an opportunity to see more of nature and beautiful vistas while moving through different areas. It can be an adrenaline rush for hunters who prefer being on the same level as their game and find it more exciting and fulfilling.
However, there are some downsides to stalking as well. It is more physically demanding since hunters are on their feet for most of the day. Spot-and-stalk hunters need to be in good physical shape to handle long hours of walking or hiking.
Stalking also exposes hunters more to weather conditions compared to stand hunting. If caught in an open area during a storm, stalkers may be out in the weather without the protection of a shelter or trees. Stand hunters, even without a shelter, have the branches and leaves above them for some cover.
Another disadvantage is that noise and movement can spook deer during stalking. It requires patience and careful movement to avoid scaring away deer as you approach them. Generally, stalking is not as productive as stand hunting, which is considered more successful overall when it comes to harvesting deer.
Now let’s turn our attention to stand hunting. One of the advantages of stand hunting is that it provides a place to sit or stand and observe, potentially out of the weather. Hunters can quietly wait for deer to come within range without having to move around.
Stand hunting also offers a more stable shooting platform compared to shooting offhand while stalking. Even if all you have is a tree to lean against or a harness to stabilize yourself, it still provides better stability than shooting on the move.
Additionally, being elevated in a stand gives hunters a better view of the hunting area compared to ground/still hunting. This elevation allows for a broader overview and may help spot deer that could be missed from a ground position.
Stand hunters also have the advantage of being able to trim brush and branches around their stands to clear shooting lanes. By setting up their stands early, they can take the time to prepare their shooting areas for better accuracy.
Furthermore, pre-ranging different landmarks from the stand location can help make more accurate shots at deer. This is especially useful for bow hunters who need precise distance measurements.
In terms of safety, having a known location in case of trouble is another benefit of stand hunting. By GPS marking their stands and letting others know where they are located, hunters can be found easily if something goes wrong during their hunt.
Moreover, stand hunting potentially offers a better chance of bagging a mature buck. These older bucks are often more cautious and easily spooked, making it difficult for stalkers to get close. Stand hunting provides a better opportunity to observe their movements and plan a shot.
However, stand hunting has its disadvantages as well. Setting up temporary or portable tree stands can be heavy and difficult. It requires carrying and assembling complex equipment, which can be a hassle.
There is also the possibility of someone else occupying your stand if you hunt in an area with multiple hunters. This can be frustrating and limit your access to productive hunting spots.
Stand hunting may not always provide the best view depending on the terrain, brush, leaves, and trees that could block sightlines. In some cases, sitting on a stool at the base of a tree with a clear view through the underbrush may be more effective.
Lastly, stand hunting can be potentially dangerous if proper safety precautions are not taken. Falling out of tree stands is a common cause of hunting injuries and fatalities. Hunters must wear safety harnesses and learn how to use them correctly to prevent accidents.
In conclusion, both stalking and stand hunting have their advantages and disadvantages when it comes to deer hunting. Stalking allows for mobility, tracking moving deer, and experiencing nature up close but requires physical endurance and can be less productive overall. Stand hunting provides stability, better views of the area, easier shot preparation, potential safety benefits, and higher chances of bagging mature bucks but requires setup time, restricts movement during the hunt, and may limit visibility in certain situations. Ultimately, the choice between these two methods depends on personal preferences, physical capabilities, terrain conditions, and desired outcomes for each individual hunter.
2. Exploring the Contrasts: Spot and Stalk vs Still Hunting for Deer
When it comes to deer hunting, there is a hot debate between spot-and-stalk hunting and still hunting from a stand. Each method has its own advantages and disadvantages, and understanding these contrasts can help hunters make an informed decision.
Spot-and-stalk hunting, also known as stalking, involves staying mobile and actively searching for deer throughout the day. Hunters scout out potential locations where deer are likely to appear and move between these spots in search of their target. This method allows for flexibility, as hunters can quickly change locations if one area is unproductive.
One advantage of spot-and-stalk hunting is the ability to track down a moving deer. Unlike stand hunters who have to let a deer go if it moves out of range, stalkers can flank the deer and approach from another direction. This mobility gives them an advantage in pursuing their target.
Another benefit of spot-and-stalk hunting is the opportunity to see more of the hunting area. By staying on their feet and moving through different locations, hunters can enjoy beautiful vistas and experience nature firsthand. This type of hunting can be an adrenaline rush as well, as it requires finding and tracking down the deer rather than waiting for it to come to you.
However, spot-and-stalk hunting also has its disadvantages. It is more physically demanding compared to still hunting from a stand. Stalking requires being on your feet all day, which can be tiring if you are not in good shape.
Additionally, spot-and-stalk hunters are more exposed to weather conditions compared to those in stands or blinds. If caught in an open area during a storm, they may have less protection compared to stand hunters who have shelters or tree cover above them.
Stalking also requires patience and careful movement to avoid spooking deer. Noise and movement can easily scare off the prey, making it challenging to approach them unnoticed. In terms of success rate, spot-and-stalk hunting is generally considered less productive compared to stand hunting.
On the other hand, still hunting or stand hunting involves setting up in one location and waiting for the deer to come to you. This method is favored in heavily wooded areas where visibility is limited. Stand hunters use tree stands or elevated blinds to gain an advantage in spotting deer from above.
One advantage of still hunting is the stability it provides as a shooting platform. Hunters in stands have a better chance of taking accurate shots compared to stalkers who often shoot offhand after moving. Still hunting also requires less physical exertion once the stand is set up, allowing hunters to relax and enjoy their day.
Being elevated in a stand also offers a better view of the hunting area, potentially spotting deer that ground hunters might miss. Stand hunters can trim brush and branches around their shooting lanes for clearer shots and pre-range different landmarks for more accurate shooting.
However, still hunting has its drawbacks as well. Setting up a stand can be heavy and difficult, requiring complicated setup processes. There is also the risk of someone else occupying your chosen spot before you arrive.
Safety is another concern with tree stands, as falling accidents are common among hunters using this method. It is essential to wear a safety harness and learn how to use it correctly to prevent injuries.
In terms of visibility, still hunting may not provide the best view depending on local terrain and vegetation cover. Some areas may require ground-level observation rather than being elevated in a stand.
Ultimately, the choice between spot-and-stalk hunting and still hunting depends on personal preference and the specific conditions of the hunting area. Both methods have their advantages and disadvantages, so hunters should consider factors such as terrain, weather conditions, physical fitness level, and desired level of excitement when making their decision.
3. Decoding the Variations: Stalking or Stand Hunting – Which is Better for Deer?
Stalking and stand hunting are two popular methods of deer hunting, each with its own advantages and disadvantages. Stalking, also known as spot-and-stalk hunting, involves staying mobile and actively searching for deer throughout the day. This method requires scouting and knowledge of potential deer activity areas. Stalkers can move to different locations if one area is unproductive. They have the opportunity to track down a moving deer and potentially flank it from another direction. Stalking allows hunters to see more of nature and enjoy beautiful vistas. It can be an adrenaline rush as hunters find and track down the deer themselves.
On the other hand, stand hunting involves setting up in one location and waiting for the deer to come to you. This method is often favored in heavily wooded areas where visibility is limited. Stand hunters have a stable shooting platform, which can improve accuracy. They can clear shooting lanes by trimming brush and branches, providing better opportunities for a clean shot. Stand hunters also have a known location in case of trouble, making it easier for others to find them if needed.
There are pros and cons to both stalking and stand hunting. Stalking is more physically demanding as hunters are on their feet all day and exposed to weather conditions. It can be challenging to avoid spooking deer with noise or movement during stalking. However, stalking allows for quick movement between different areas and potentially tracking down a moving deer.
Stand hunting provides a more relaxed experience as hunters wait patiently for the deer to approach their location. It offers a better view of the hunting area from an elevated position, allowing hunters to see more than those on the ground. However, setting up stands can be heavy and difficult, requiring extra effort before the hunt begins.
In terms of success rates, stand hunting is generally considered more successful overall, especially when targeting mature bucks in certain regions. However, individual experiences may vary.
To increase chances of success in either method, hunters should keep quiet and minimize noise that could alert deer. Paying attention to wind direction and scent control is crucial to avoid detection. Scouting the area before the hunt allows hunters to identify potential deer movement patterns and focus on key areas. Being aware of the background behind you can help prevent deer from spotting your movement. Moving slowly, staying low, and hiking regularly in the off-season can also improve hunting outcomes.
In conclusion, both stalking and stand hunting have their advantages and disadvantages. The choice between the two methods ultimately depends on personal preference, hunting conditions, and specific goals.
4. Comparing Strategies: Spot and Stalk Hunting vs Stand Hunting for Deer
When it comes to deer hunting, the debate between spot and stalk hunting versus stand hunting is a hot topic among hunters. Both strategies have their advantages and disadvantages, and it ultimately depends on personal preference and the specific hunting situation.
Spot and stalk hunting, also known as stalking, involves staying mobile and actively searching for deer throughout the day. Hunters scout out potential locations where deer are likely to appear, such as creek crossings or bedding areas, and move from one spot to another in search of their prey. This method allows for flexibility and the ability to quickly change locations if one area is not productive.
One advantage of spot and stalk hunting is the potential to track down a moving deer. Unlike stand hunting where you have to wait for the deer to come to you, a spot and stalk hunter can flank the deer by quietly approaching from another direction. This method requires stealth and patience but can result in a successful shot at a moving target.
Another advantage of spot and stalk hunting is that it requires less setup time and gear compared to stand hunting. A spot hunter only needs knowledge of the area, essential gear, and a weapon. This makes it more accessible for hunters who prefer a minimalist approach or do not have access to tree stands or elevated blinds.
Spotting and stalking also offers hunters the opportunity to see more of nature and enjoy beautiful vistas while on the move. It can be an adrenaline rush as you try to find and track down your prey rather than waiting for it to come within range.
However, spot and stalk hunting does have its drawbacks. It is more physically demanding as hunters are on their feet for most of the day. If you are not in good physical shape, this method can quickly wear you out.
Being exposed to weather conditions is another disadvantage of spot and stalk hunting. Unlike stand hunters who may have the protection of a tree or blind, spot and stalk hunters are more exposed to the elements. This can be challenging if bad weather rolls in during your hunt.
Noise and movement can also spook deer when spot and stalk hunting. Stalking requires patience and careful movement to avoid alerting deer to your presence. Dry leaves on the ground or impatience can make it difficult to approach deer without startling them.
In terms of success rates, stand hunting is generally considered more productive than spot and stalk hunting. Stand hunting involves setting up in one location, such as a tree stand or elevated blind, and waiting for deer to come within range. This method is particularly favored in heavily wooded areas where visibility is limited.
One advantage of stand hunting is that it provides a stable shooting platform. Whether using a tree stand or leaning against a tree, hunters have better stability compared to stalking hunters who often have to shoot offhand. Stand hunting also allows for better views of the surrounding area, especially if elevated in a tree stand.
Stand hunters can also trim brush and branches around their stands to clear shooting lanes and pre-range different landmarks for more accurate shots. Additionally, being above the deer’s line of sight increases the chances of remaining undetected.
However, there are some disadvantages to stand hunting as well. Setting up stands can be heavy and difficult, especially with portable stands that require assembly. There is also the possibility of someone else occupying your chosen stand location if you arrive later.
Safety is another consideration with stand hunting as falls from tree stands can result in injuries or even death. It is important to wear safety harnesses correctly and take precautions when using elevated stands.
In conclusion, both spot and stalk hunting and stand hunting have their pros and cons. Spotting and stalking offers flexibility, mobility, and an adrenaline rush but requires physical endurance and careful movement. Stand hunting provides stability, better views, and potentially higher success rates but requires setup time and can be less exciting for some hunters. Ultimately, the choice between these strategies depends on personal preference, hunting conditions, and individual skill level.
5. Evaluating Approaches: The Differences Between Stalking and Stand Hunting for Deer
When it comes to hunting deer, there are two main approaches that hunters debate over – stalking and stand hunting. Each approach has its own advantages and disadvantages, and it ultimately depends on the preferences and goals of the hunter.
Stalking or Spot-and-Stalk Hunting:
– Stalking, also known as spot-and-stalk hunting, involves staying mobile and actively searching for deer throughout the day.
– Hunters scout out potential locations where deer may appear at certain times of the day, such as creek crossings or bedding areas.
– The advantage of spot-and-stalk hunting is that if one area is not productive, hunters can quickly move to another location.
– This approach allows hunters to potentially track down a moving deer by flanking it from another direction.
– Spot-and-stalk hunting requires less setup time and gear compared to stand hunting.
– It offers the opportunity to see more of nature and beautiful vistas while being on the move.
– Many hunters find spot-and-stalk hunting to be an adrenaline rush as they have to find and track down the deer themselves.
However, there are some potential disadvantages to spot-and-stalk hunting:
– It can be physically demanding, as hunters need to be on their feet for most of the day.
– Hunters are more exposed to weather conditions compared to stand hunters who have a sheltered position.
– Noise and movement during stalking can easily spook deer, making it challenging to get close enough for a shot.
– In terms of success rate, spot-and-stalk hunting is generally considered less productive than stand hunting.
Stand Hunting:
– Stand hunting involves setting up in one location, either in a permanent or temporary tree stand or elevated blind, and waiting for deer to come within range.
– More white-tailed deer are taken using stand hunting than any other method, especially in heavily wooded areas where visibility is limited.
– Stand hunting provides a stable shooting platform and allows hunters to relax and enjoy their day in the stand.
– Being elevated in a stand can provide a better view of the hunting area and potentially spot deer that ground hunters might miss.
– Hunters can trim brush and clear shooting lanes from their stand location for better shooting opportunities.
– Stand hunting also offers the advantage of pre-ranging landmarks for more accurate shots.
However, there are some potential disadvantages to stand hunting:
– Setting up tree stands can be heavy, complicated, and time-consuming.
– Other hunters may occupy your chosen stand location, leading to disappointment and potential conflicts.
– Falling out of tree stands poses a significant risk, making safety harnesses essential.
– The view from a stand may not always provide the best visibility due to terrain or vegetation.
In conclusion, both stalking and stand hunting have their pros and cons. Stalking offers mobility, excitement, and the opportunity to track down moving deer. Stand hunting provides stability, comfort, and potentially higher success rates. Ultimately, the choice between these two approaches depends on personal preference, physical condition, hunting environment, and individual goals as a hunter.
6. Unveiling the Techniques: A Closer Look at Stalking and Stand Hunting Methods for Deer
Stalking and stand hunting are two popular methods used in deer hunting, each with its own set of techniques and strategies. Let’s take a closer look at these methods:
Stalking Hunting Techniques:
– Stalking, also known as spot-and-stalk hunting, involves staying mobile and actively searching for deer throughout the day.
– Prior scouting is crucial for a successful stalk hunt. Identifying potential areas where deer may appear at specific times can increase your chances of encountering them.
– Stalkers often use binoculars to spot deer from longer distances or move slowly through prime areas of deer activity to get closer for an ethical shot.
– The spot-and-stalk approach is commonly used in open areas or mountainous terrain where a significant hike may be required to locate mule deer or black-tailed deer.
Advantages of Stalking Hunting:
– Flexibility: If one area is unproductive, stalk hunters can quickly move to another location.
– Tracking Opportunities: Stalk hunters have the advantage of potentially flanking a moving deer by approaching from a different direction.
– Minimal Setup Time and Gear: Unlike stand hunting, stalk hunters only need knowledge of the area, essential gear, and their weapon of choice.
– Enhanced Nature Experience: Stalk hunters get to enjoy beautiful vistas and experience nature more intimately than those who stay in one place.
– Adrenaline Rush: Spot-and-stalk hunting can be thrilling as it requires finding and tracking down the deer rather than waiting for it to come to you.
Potential Disadvantages of Stalking Hunting:
– Physical Demands: Stalking hunting can be physically demanding as it involves being on your feet for extended periods.
– Exposure to Weather: Stalk hunters are more exposed to the elements, especially in open areas, compared to those in stands or blinds.
– Noise and Movement: Stalking requires patience and careful movement to avoid spooking deer, making it challenging for some hunters.
– Lower Success Rate: While stalking is considered a pure and exciting form of hunting, it may not be as productive as stand hunting in terms of bagging a deer.
Stand Hunting Techniques:
– Stand hunting involves setting up in one location, either on a tree stand or ground blind, and waiting for deer to come within range.
– Many white-tailed deer are harvested using stand hunting methods, which are favored in heavily wooded areas with limited visibility.
– Stand hunters often choose locations based on factors like creek crossings, bedding areas, food sources, game trails, or antler scrape marks.
Advantages of Stand Hunting:
– Stability: Stand hunters have a stable shooting platform, whether using a tree stand or leaning against a tree with a harness for support.
– Less Physically Demanding: Once the stand is set up, stand hunters can relax and enjoy their day without constantly being on their feet.
– Better View: Elevated stands provide an improved overview of the hunting area compared to ground/still hunting.
– Clear Shooting Lanes: Stand hunters can trim brush and branches to create clear shooting lanes towards expected deer activity areas.
– Accurate Shots: By pre-ranging landmarks from the stand location, bow hunters can make more precise shots at deer.
Potential Disadvantages of Stand Hunting:
– Heavy Setup: Some portable tree stands can be heavy and complicated to set up properly.
– Occupied Stands: In popular hunting areas, your chosen stand location may already be occupied by another hunter.
– Safety Concerns: Falling out of tree stands poses potential dangers. It is essential to wear a safety harness and use it correctly.
– Limited Visibility: Depending on the terrain and vegetation, stand hunting may not provide the best view of deer activity.
– Inconsiderate to Other Hunters: Setting up stands in productive hunting lanes can lead to conflicts with other hunters.
In conclusion, both stalking and stand hunting methods have their advantages and disadvantages. Stalking offers flexibility, tracking opportunities, and an adrenaline rush but requires physical endurance and careful movement. Stand hunting provides stability, better views, and clear shooting lanes but may involve heavy setup and limited visibility. Understanding these techniques can help hunters make informed decisions based on their preferences, terrain, and target species.
In conclusion, stalking and stand hunting are two distinct methods used for deer hunting. Stalking involves actively pursuing the animal on foot, while stand hunting entails waiting in a fixed location. While both techniques have their advantages and considerations, it ultimately comes down to personal preference and the specific hunting situation. Understanding these differences is crucial for hunters to choose the most suitable approach based on their skills, terrain, and desired experience.
Walleye fishing is a popular and enjoyable activity for anglers across the world. One of the most effective techniques for catching walleye is using jigs.
Walleye jigs are specially designed lures that mimic the natural movements of prey fish, which walleye typically feed on. They are available in various shapes, sizes, and colors, and each has its unique features that make it effective in certain fishing conditions.
Whether you are a seasoned angler or a beginner, understanding the different types of jigs, how to choose the right one, and how to use them can significantly increase your chances of a successful catch.
In this article, we will cover everything you need to know about walleye jigs, including the different types, factors to consider when choosing them, tips for using them, and the best ones to use in different water conditions.
Walleye jigs come in various shapes, sizes, and styles, and each has its unique characteristics that make it effective in certain fishing conditions. Here are some of the most popular types of walleye jigs:
Roundhead Walleye Jigs
Roundhead jigs are the most common type of walleye jig. They have a round head and a single hook and are available in various sizes and weights. They are versatile and can be used in a wide range of fishing conditions.
Standup Walleye Jigs
Standup jigs have a flat-bottomed head and a vertical line tie that causes them to stand upright on the bottom. They are effective in rocky areas and can also be used in weeds.
Weedless Walleye Jigs
Weedless jigs are designed to be fished in weedy areas without getting caught up in the vegetation. They have a hook that is recessed in the jig’s body, making it difficult for weeds to snag it.
Swimbait Walleye Jigs
Swimbait jigs are similar to roundhead jigs but have a longer shank and a wider gap hook. They are used with soft plastic swimbaits and are effective when fishing in deeper water.
Bucktail Walleye Jigs
Bucktail jigs are made with a hair or feather skirt and are effective in clear water. They mimic the movements of baitfish and are best used with a slow retrieve.
Factors to Consider When Choosing a Walleye Jig
Choosing the right walleye jig is essential for a successful fishing trip. Here are some factors to consider when selecting a walleye jig:
Water Depth The depth of the water you’re fishing in is an important consideration when choosing a jig. Roundhead jigs are effective in shallow water, while standup jigs work best in deeper water. Swimbait jigs and blade baits are ideal for fishing in depths of 20 feet or more.
Water Clarity The clarity of the water also plays a crucial role in jig selection. In clear water, use jigs with natural colors and avoid using ones with bright colors that might spook the fish. In murky water, use jigs with bright colors that stand out and attract the fish.
Time of Day and Season The time of day and season can also affect the effectiveness of the jig. During early mornings and late afternoons, use jigs with brighter colors to increase visibility. In the winter, when the water is colder, use smaller jigs with slower retrieves.
Structure of the Lake The structure of the lake, such as rocks, weeds, and drop-offs, can influence jig selection. Use weedless jigs when fishing in weedy areas to avoid getting snagged, and use standup jigs when fishing in rocky areas to prevent snagging.
Consider these factors when selecting a walleye jig, and you’ll be well on your way to hooking into some big ones.
Tips for Using Walleye Jigs
Using walleye jigs can be a highly effective way to catch fish, but it’s important to use them correctly. Here are some tips for using walleye jigs:
Cast and Retrieve Technique One of the most common ways to use a jig is with the cast and retrieve technique. Cast the jig out and let it sink to the bottom, then retrieve it with short, quick jerks to make the jig bounce off the bottom. Vary the speed and depth of your retrieve until you find what works best.
Jigging Technique Jigging is a popular technique for catching walleye with jigs. Let the jig sink to the bottom and then use a sharp upward motion of the rod tip to lift the jig off the bottom, then let it sink back down. Repeat this motion, varying the speed and intensity of the jigging until you get a bite.
Drift Technique Drifting is an excellent technique for covering a large area of water quickly. Simply drift with the wind or current, casting the jig out periodically and allowing it to sink to the bottom.
Vertical Jigging Technique Vertical jigging is an effective technique for fishing in deep water. Position your boat over the desired spot and drop the jig straight down, letting it fall to the bottom. Then, use an upward motion of the rod tip to lift the jig off the bottom and repeat the motion until you get a bite.
By using these techniques, you’ll be able to catch walleye with jigs more effectively. Don’t be afraid to experiment with different techniques until you find what works best for you.
Best Walleye Jigs to Use
Selecting the right jig can make all the difference in your walleye fishing success. Here are some recommendations for the best walleye jigs to use:
Northland Fishing Tackle Fire-Ball Jig: The Fire-Ball Jig is a versatile and effective jig that is designed to imitate the movements of baitfish. It has a short-shank hook that allows you to thread on a live minnow or soft plastic bait. It’s available in various colors and sizes and is ideal for fishing in shallow to mid-depth water.
Rapala Jigging Rap: The Jigging Rap is a popular jigging lure that features a balanced design and a center treble hook. It mimics the movement of a dying baitfish and is effective in both shallow and deep water. It’s available in various sizes and colors.
VMC Neon Moon Eye Jig: The Neon Moon Eye Jig is a versatile jig that features a unique 3D holographic eye and a super sharp hook. It’s available in various sizes and colors and is ideal for fishing in clear water.
B-Fish-N Tackle H2O Precision Jigs: The H2O Precision Jig is a high-quality jig that features a custom-designed head and a super sharp hook. It’s ideal for fishing in weeds and can be used with live bait or soft plastics. It’s available in various sizes and colors.
Keitech Tungsten Super Round Jig Head: The Super Round Jig Head is a weedless jig that features a tungsten head and a screw-lock bait keeper. It’s available in various sizes and is ideal for fishing in weedy areas.
These are just a few of the best walleye jigs to use. When selecting a jig, consider the water conditions and factors outlined in section III, and choose a jig that best fits your needs. Remember to experiment with different jigs and techniques until you find what works best for you.
Conclusion
Fishing for walleye with jigs can be a thriling and rewarding experience, but it takes knowledge and skill to be successful. By understanding the different types of walleye jigs, the factors to consider when choosing them, and the tips for using them effectively, you’ll significantly increase your chances of catching more fish.
Remember to select a jig that best fits your needs based on the water conditions and factors outlined in this article. Finally, don’t be afraid to experiment with different jigs and techniques until you find what works best for you. With the right knowledge, skills, and equipment, you’ll be well on your way to reeling in the big ones and enjoying epic fishing adventures.
For 25 years Green Bay Trophy Fishing has guided and provided helpful information to anglers in and around Door County. We are some of the most experienced fishing guides in Green Bay and pride ourselves on being experts on everything related to fishing in the area.
If you are interested in booking a walleye fishing charter, you can view our rates or contact us here.
Today, we embark on an exhilarating journey to explore one of the ocean’s most fearsome predators – the barracuda. Known for its powerful speed, sharp teeth, and stunning silver appearance, the barracuda is a formidable sight beneath the waves. However, what truly sets this creature apart is its jaw-dropping record – the title of the biggest barracuda ever caught.
In this article, we’ll present the compelling facts and figures surrounding this colossal catch, providing an insightful look into the world of barracudas and the thrill of angling for these remarkable fish. So, fasten your seatbelts as we unravel the tale of the largest barracuda ever recorded!
A barracuda is a predatory fish belonging to the Sphyraenidae family, found in warm, tropical, and subtropical waters across the globe. These fierce marine predators are known for their streamlined, elongated bodies, equipped with razor-sharp teeth, making them one of the most formidable hunters in the ocean. With a reputation as aggressive and fast swimmers, barracudas are at the top of the food chain in their aquatic habitats.
Physical characteristics
Barracudas typically have a silvery or grayish appearance with dark markings on their upper bodies, aiding in camouflage while hunting. They possess a long, cylindrical shape, which allows them to reach impressive speeds in pursuit of prey. These fish can grow to various sizes, with some species reaching lengths of up to six feet or more.
Feeding habits
As carnivorous predators, barracudas have a diverse diet, primarily consisting of small fish like anchovies, herrings, and mullets. They are ambush predators, often lying in wait near reefs, drop-offs, or underwater structures and using their incredible speed to strike unsuspecting prey.
Range and habitat
Barracudas inhabit many marine environments, including coral reefs, coastal waters, and open seas. They are commonly found in the Atlantic, Indian, Pacific Oceans, the Caribbean Sea, and the Gulf of Mexico. These fish prefer warm waters, typically 25 to 30 degrees Celsius (77 to 86 degrees Fahrenheit).
Behavior and threats
Though barracudas are generally solitary hunters, they can occasionally be seen in loose groups, especially around areas teeming with food sources. While they rarely threaten humans, barracuda attacks have been reported, often involving the fish mistaking shiny objects or dangling jewelry for prey.
Importance in ecosystems
Barracudas play a vital role in maintaining the balance of marine ecosystems. As apex predators, they help control the population of smaller fish, preventing them from overwhelming their environments. Additionally, barracudas prey on larger predators, contributing to the intricate web of life beneath the ocean’s surface.
What is the average size of barracudas?
Barracudas, renowned for their impressive size and fearsome appearance, exhibit considerable variability in their dimensions depending on the species and the environment in which they reside. On average, barracudas range from relatively modest lengths to strikingly large proportions. Let’s delve into the typical size specifications of these powerful predators.
The average size of barracudas can vary significantly across species. Generally, the smaller species, such as the pick handle Barracuda (Sphyraena jello) and Guinean Barracuda (Sphyraena afra), measure around 1.5 to 3 feet (45 to 90 centimeters) in length. On the other hand, larger species like the Great Barracuda (Sphyraena barracuda) can grow to formidable lengths, often reaching 4 to 6 feet (120 to 180 centimeters).
What is the largest barracuda ever caught?
In the world of angling, an astonishing record is held by a massive barracuda. On July 8th, 2019, in the waters off the coast of Fort Dodge, Florida, American fisherman Arin Long was stunned when he reeled in what would become the biggest barracuda ever caught!
Weighing in at a whopping 78 pounds (35.3 kilograms) and measuring a staggering 5 feet 8 inches (176 centimeters), this colossal catch beat the previous record previously held by an angler in Texas, which weighed 68 pounds (30.8 kilograms).
After reeling in his impressive haul, Long had to enlist the help of several onlookers to lift the massive fish onto shore. He then proudly posed for a photo with the monstrous catch, and his epic tale quickly gained traction on social media.
While Long’s feat is certainly an incredible accomplishment, it serves as a testament to the awesome power of these remarkable fish. As one of nature’s most intimidating predators, barracudas are known for their impressive size and strength, making them a thrilling challenge for any angler.
So, if you’re lucky enough to find yourself in the waters near Fort Dodge, keep an eye out – who knows, you are the one to best Arin Long’s record!
How to catch a barracuda
Catching a barracuda can be an exhilarating challenge for anglers across the world. With their formidable strength and lightning-fast speed, these marine predators will test any fisherman’s mettle! To help you get started, here are a few tips and tricks for catching barracudas:
Equipment
Since barracudas possess tremendous strength, it’s important to use appropriate tackle when angling for these fish. Your best bet is to select a sturdy rod-and-reel combo with a fast action, matched with a strong braided line in the 20-40 pound (9-18 kilogram) range. You’ll also want heavy-duty hooks and lures to stand up to the barracuda’s powerful jaws.
Set-up and bait
Since these predators are ambush hunters, you’ll want to set up your tackle in areas where they can easily hide and surprise their prey. This could include deep channels, rocky outcrops, coral reefs, or even manmade structures like sunken boats or pilings. To attract the barracudas ‘ attention, you’ll want live bait such as pilchards, herring, or mackerel.
Techniques
Once you’ve set up your tackle and bait, it’s time to start fishing! Cast your line out into the water and pay close attention to any signs of movement – a telltale sign of a barracuda nearby. If you’re lucky, the fish will strike, and the fight is on! When battling a barracuda, you’ll want to use steady pressure to tire it out and avoid any sudden jerks that could break your line.
As with fishing, patience and practice are key when angling for barracudas. With the right equipment and techniques, you should be able to catch your first barracuda in no time. So, grab your tackle and head out into the waters – who knows what kind of adventure! Good luck!
Where are barracudas found?
Barracudas are found in warm, tropical waters around the world. These fierce predators inhabit many marine environments, from coral reefs to coastal areas and open seas. They can be commonly found in the Atlantic, Indian, and Pacific Oceans, the Caribbean Sea, and the Gulf of Mexico. Barracudas have also been spotted in the Mediterranean and Red Seas.
In addition to their range, barracudas are found at various depths, from shallow coastal waters to deeper offshore locations. Though they prefer murky areas where they can easily hide from prey, they can likely be encountered in almost any marine habitat. So, if you plan on fishing for barracudas, you’ll find them wherever the waters are warm!
The presence of barracudas in an area usually indicates a healthy marine environment. As apex predators, they help maintain balance in their ecosystems by controlling the population sizes of smaller fish and serving as prey for larger animals. In this way, they keep oceans and other aquatic habitats flourishing – a reminder of these remarkable creatures’ invaluable contributions to the life beneath the ocean’s surface.
Can you eat barracuda?
Although barracudas have razor-sharp teeth and powerful jaws, they are not considered a threat to humans. There has never been a recorded instance of an unprovoked attack on a human by a barracuda.
If you encounter one in the wild, it’s best to avoid handling them. Barracudas are strong and wild animals, so respecting their space and leaving them alone is important. It should also be noted that barracudas can become aggressive if they feel threatened or if you try to feed them, so it’s best not to do either.
In terms of eating barracuda, the answer is a bit more complicated. While they are considered delicious and nutritious fish, barracudas can contain levels of ciguatera toxin that can cause serious health issues in humans if eaten. It’s important only to consume barracuda caught in safe, clean waters and thoroughly cooked before eating.
Overall, barracudas are an intriguing species with fascinating behaviors and fascinating appearances. And while they can be a thrilling catch for experienced anglers, it’s important to take the proper safety precautions when fishing for or handling these powerful predators!
How can people help conserve barracudas?
Barracudas are an integral part of marine ecosystems. Yet, human activities such as overfishing and habitat destruction often threaten them. To help conserve these powerful predators, there are a few things that people can do:
Support sustainable fisheries
One of the easiest ways to help conserve barracudas is to buy seafood from sustainable sources. By ensuring that your seafood comes from fisheries that practice responsible fishing methods, you can help preserve the barracuda populations.
Reduce pollution
Pollution from runoff and oil spills can devastate marine life, including barracudas. To help prevent this, try to reduce your use of plastic materials and dispose of any hazardous waste properly. Additionally, you can support organizations working to protect oceans from pollution.
Engage in conservation activities
Engaging in conservation activities is a great way to help barracudas and other marine species. This could be as simple as joining a beach cleanup or volunteering with an organization dedicated to ocean conservation. You can also spread the word about the importance of conserving barracudas by talking to your friends and family about the threats they face and how to protect them.
By following these simple steps, we can all help to ensure that barracudas remain a part of our world’s marine ecosystems for generations to come. It’s up to us to be their guardians – let’s do our best!
Introduction to the characteristics and usage of minnows
First, let’s take a look at the characteristics of minnows and how to use them.
Before choosing a minnow, it is a good idea to first learn more about minnows.
A minnow is a lure that resembles a small fish.
Minnows are one of the many types of lures, and their main characteristic is that they resemble small fish.
Not only does it look like a real fish, but it also swims just like a real fish.
Therefore, it has the ability to catch sea bass in areas where there are many small fish that serve as bait for sea bass, as well as in areas where there are not so many.
It is also easy to use, and the basic operation is just to reel it in.
Sometimes you need to give it a little action, but basically just reeling it in is enough to catch fish, so it is easy to use even for beginners.
As you can see, the minnow is one of the most basic of lures, yet easy to handle, and is quite suitable for beginners.
Minnows are great for any situation.
I mentioned above that minnows work well both in areas with and without small fish as bait.
In fact, minnows have the power to catch sea bass anytime and anywhere, regardless of where, when or when they are used.
Therefore, it is best to use it for the first cast at the point where you are going for the first time or when you are not sure if you can catch fish.
You can also determine whether to use more intense or natural lures based on the reaction of the sea bass to the minnow.
In other words, minnows are the standard for all lures and are essential for sea bass fishing.
This is the first lure you should buy if you are a beginner in sea bass fishing.
Keep a few different types of minnows on hand.
And there are three types of minnows: the floating type that floats when stopped, the sinking type that sinks, and the suspending type that stops on the spot.
Each of these three types of minnows has its own strengths in certain situations and times of the year, and it is recommended to have more than one type available if possible.
However, if you can only afford one of them, we recommend the floating type.
The floating type is a type of minnow that dives deep when reeling in and rises to the surface when stopped.
The floating type is the easiest type to catch for beginners because the action of stopping and floating often attracts sea bass.
For this reason, we have picked up recommended minnows, focusing on the floating type.
Choose one of these minnows and you’re good to go! 6 Recommended Minnows
Here are six types of minnows for seabass fishing that we actually recommend.
The X-Sense Silent Assassin 140FAR-C is a minnow from the sea bass fishing lure series sold by Shimano.
The action and size of the lure are easy to handle, making it suitable for beginners who are new to lures.
It features Shimano’s original center of gravity shifting system called AR-C, which gives it more flying distance than other minnows of the same size.
It will definitely be very useful when sea bass are bouncing in the distance.
The color lineup includes models that glow like actual fish scales.
Recommendation 2: Daiwa Seabass Hunter Z
The Seabass Hunter Z is a great minnow for those who are just starting out in fishing and have never handled a lure before.
The lineup includes two of the most frequently used and easy to handle sizes, 9cm and 12cm.
Its swimming action is that of an orthodox minnow, so just reeling it in is enough to appeal to sea bass.
Another major attraction of this minnow is its price, which is less than 1000 yen.
Most other minnows cost around 1500 yen, so this price is quite reasonable.
You may want to buy more than one of several colors.
Recommendation 3: Daiwa Shoreline Shiner Z Set Upper 125S-DR
The Shoreline Shiner Z Set Upper is one of the most popular minnows among the many sea bass fishing minnows.
Of course, they are popular because they can be fished, and even beginners can significantly improve their chances of catching fish.
And these minnows sink slowly when stopped, a type called slow sinking.
It is recommended to use it when you cannot catch fish easily with floating type minnows or when you are targeting deep water.
It can be used in quite a wide range of situations because it can also provide enough distance.
Be sure to purchase these along with the floating minnows.
Recommendation 4: Megabass ONETEN Jr.
SW is a lure that was originally popular as a minnow for bass fishing, but was developed for the salt lure game.
It has enough flying distance as a lure for sea bass fishing, so it can be used to attack a wide range of distant points.
It is a minnow that is good at exploring efficiently when you don’t know the conditions of the day at the fishing spot.
It is also attractive because it has a quick darting action when the rod is lightly agitated.
The darting action stimulates the predatory instinct of sea bass lured by the natural action.
Recommendation 5: Megabass X-80SW
The X-80SW is a recommended lure for those who are looking for a minnow with power that moves greatly and appeals to a wide range of people.
The body is larger than the minnows we have introduced so far, allowing it to fly a considerable distance.
When you just reel it in, it swims in a big left-right motion called wobbling.
There are very few minnows that can make this wobbling motion as large as this minnow, so it will be able to make sea bass that do not respond to other minnows respond.
And the type is slow sinking, which enables you to keep attacking the same depth steadily.
Recommendation 6: Jackall Big Backer Gulf Minnow
The Big Bucker Gulf Minnow is a minnow from the Big Bucker salt game lure series sold by Jackal.
This product was originally developed to target bluefish such as yellowtails, but it is also very useful when targeting sea bass.
It has a solid weight of 27g, so it can be used for long-distance casting in large rivers and offshore embankments.
Of course, when you are targeting sea bass, you may also catch bluefish such as yellowtails, and the durability of the lure is such that it can handle such situations without problems.
If you want to fish for sea bass and other big fish that can be caught in the ocean, please consider purchasing this product.
If you want to go sea bass fishing, buy a minnow first!
Minnows are an essential lure for sea bass fishing and should be the first lure you purchase if you are a beginner.
Since these lures can actually catch sea bass, many types are sold by various manufacturers.
Among them, the six minnows introduced here are easy to handle and are recommended for beginners, so please refer to them.
"Understanding the Legalities: Felon Ownership of Air Rifles in Tennessee"
can a felon own an air rifle in tennessee?
In the state of Tennessee, the ownership...
")
")
")
")
")


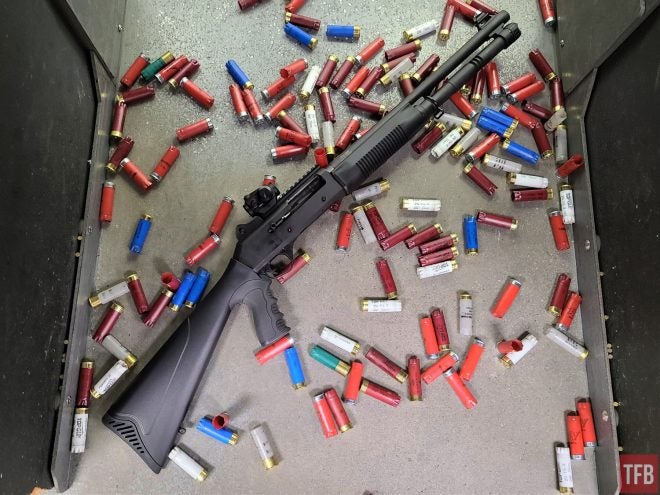
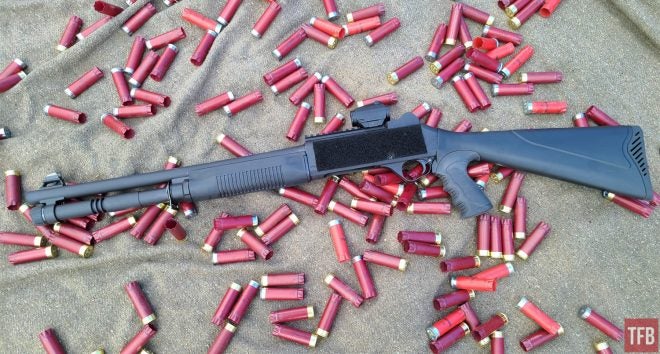
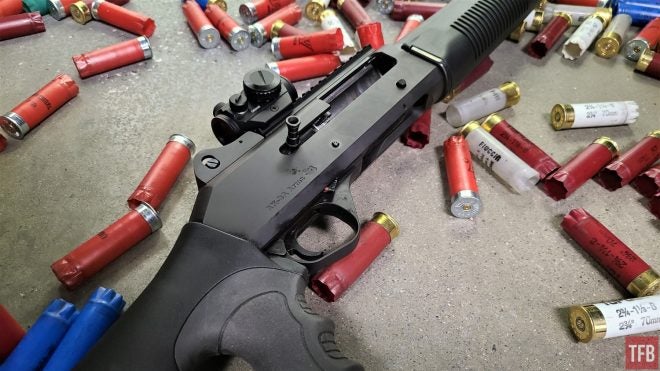

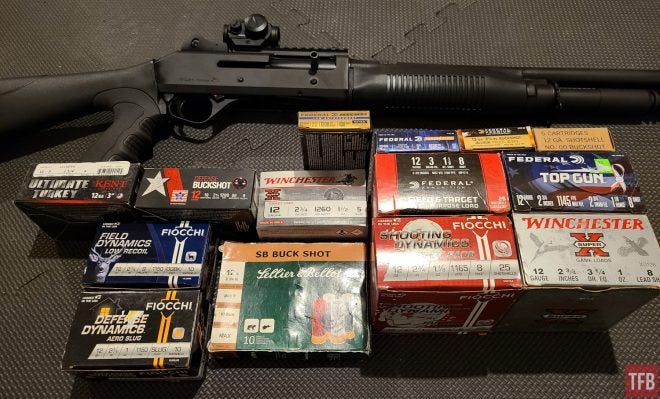
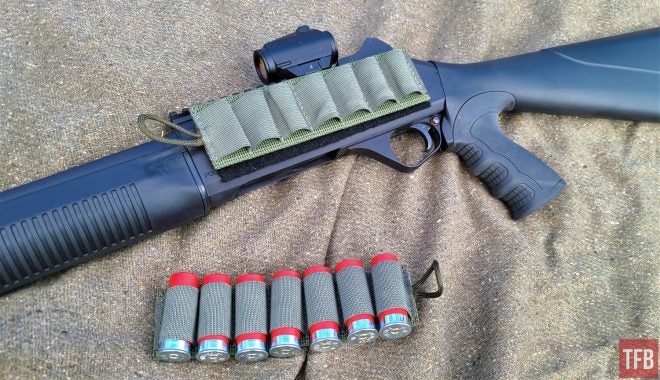
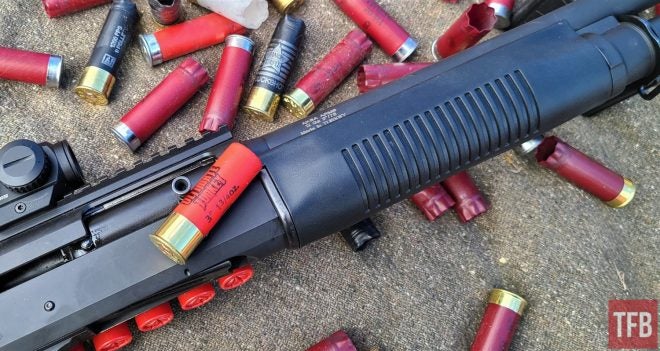

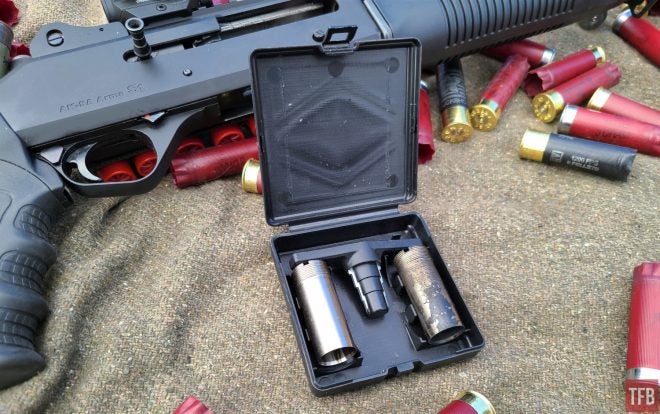


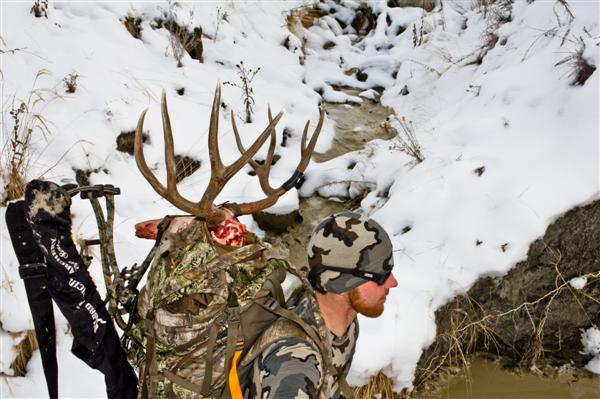

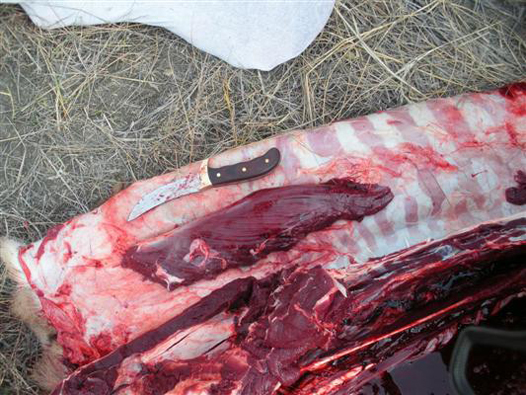
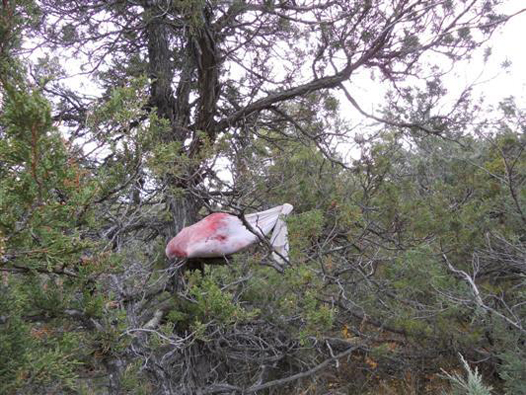
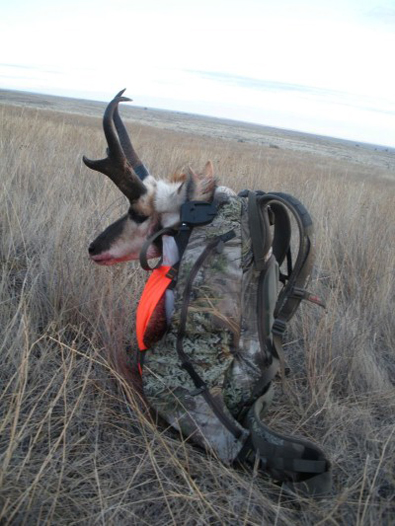
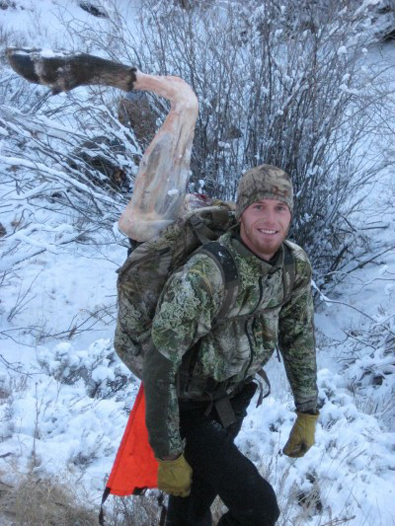
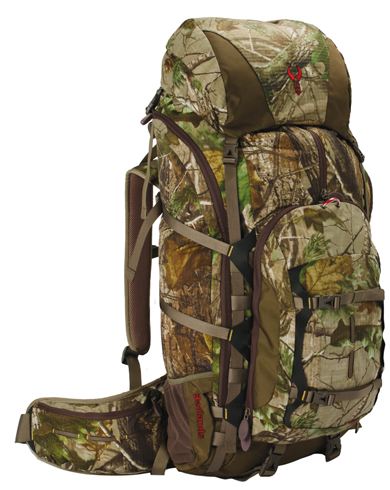


 SW is a lure that was originally popular as a minnow for bass fishing, but was developed for the salt lure game.
 The X-80SW is a recommended lure for those who are looking for a minnow with power that moves greatly and appeals to a wide range of people.
 The Big Bucker Gulf Minnow is a minnow from the Big Bucker salt game lure series sold by Jackal.


