")
")
")
")
")


Table of Contents
Bird hunting and dog training are full of terminology and words that new hunters need to learn.
To walk the walk, bird hunters need to first learn to talk the talk. Deciphering the various terminology of the pointing dog world can be confusing. Dog training verbiage is not universal. It can vary regionally, and the dogs you are running or the program you are following may have their own verbiage, too.
Listen to more articles on Apple | Google | Spotify | Audible
When I picked up my first Deutsch Kurzhaar (DK) pup, I was greeted with a long list of required breed tests. I found myself swimming in alphabet soup in short order. I remember being told I had to run my DK in a young dog test called the Derby. When I asked how the testing system worked, the answer was a series of acronyms that ended up sounding like the teacher in Peanuts: “Wha, wha, whawa, wha.” With an overwhelming blank stare and a grin, I knew I had work to do.
Similar to learning a foreign language, there is a lot to learn when it comes to the linguistics behind training hunting dogs. Like the English language, there are many variations of saying the same thing. In this article, I will help provide you with some understanding of some of the more universally accepted terminologies we use in the field.
Bird Dog Field Terminology
Here is a glossary of terms often referred to during a hunt in the field.
- Back Casting – Backcasting is when a dog hunts behind the handler. Dogs are primarily expected to remain in front of its handler.
- Backing – Backing is when another dog stops and visually points to another dog’s point without the aid of scent. The backing dog should stop at first sight and remain in place through the steadiness process.
- Biddability – A biddable dog is ready for learning with a balanced temperament and can learn very quickly.
- Blind Retrieve – A blind retrieve is a retrieve made without the dog visually seeing the game or bumper.
- Blinking – Blinking is when a dog overtly refuses to complete a task. Though most commonly associated with blinking birds, dogs can also blink for other tasks such as retrieving or backing another dog.
- Brace – A brace is hunting multiple dogs together in the field at once.
- Breaking – The act of breaking means coming off or leaving, such as breaking point to locate or capture game. As well as breaking from the blind meaning leaving the blind prior to being sent for the retrieve.
- Breaking Cover – The dog’s willingness to leave easy terrain to search heavier thickets or brambles to locate game.
- Bumper / Dummy – A bumper or retrieving dummies are types of retriever training equipment used to teach retrieving. A bumper comes is many shapes, sizes, weights, and colors. They can be thrown from a string or shot from a launcher. They can mimic the shape and size of real game such as the Dokken retriever training equipment.
- Cooperation – Cooperation is the dogs want to comply and work as a team player with its handler.
- Covert/Cover – It’s the likely areas where game can be found.
- Creeping – Creeping also known as cat walking is the act of slowly walking into birds before or after establishing a point. Dogs that creep often do so to get deeper into the scent cone potentially flushing a wary bird.
- Crittering – Crittering is sometimes used to describe a dog that is hunting “off target” game species such as deer, song birds, skunks, or porcupine.
- Delayed Chase – Delayed chase is when a dog is told to leave a bird and move up ahead though instead, the dog chooses to re-engage the chase.
- Desire – A dog with great desire has the passion and drive to get away from its handler to locate game. It’s the internal drive or fire that fuels all aspects of the hunt from the want to point, search, or desire to retrieve.
- False Pointing / Unproductive Pointing – A false point or unproductive point is when a dog points old scent and doesn’t realize the bird is no longer there.
- Flushing Dog – A flushing dog is characterized by hunting within gun range at all times and will put the bird in the air for close shooting opportunities. It can hunt both on land and in the water.
- Give/Drop/Release – These are commands telling a dog to relinquish the item it’s retrieving item into the hand of its handler.
- Gun shy – A gun-shy dog is so fearful of the sound of a gunshot that it paralyzes them in fear and can no longer be hunted at that time, or ever again depending on the severity.
- Gun-sensitive – A gun-sensitive dog can recover from its fear of the shot and continues to hunt.
- Hacking – Hacking is when a handler over-commands their dog to maintain control
- Honoring – Honoring is the act of showing interest yet not interfering with another dog’s work be it pointing or retrieving.
- Hold – Hold is a command telling a dog not to drop game or retrieving dummy/bumper.
- Long Nose – Describes a dog’s ability to scent birds at a great distance.
- Making Game – Making game describes when a dog is working scent to locate a bird.
- Marker Words – Words used to identify good and bad behaviors. Yes is a word commonly used to identify behavior we want to see more of and Bad or negative tone or noise to mark behaviors we want to see less of. The word No is commonly used however it’s not a good marker word as it sounds too much like whoa.
- Mouthing Birds – The unsavory act of playing with, breaking bones, and putting holes in the meat potentially making game unfit for the table.
- Marking -To mark is when the dog makes a visual connection to a bird or bumper that is in the air as well as on land or in the water.
- Nose Work – Describes a dog’s ability to use scent to locate game.
- Obedience – Obedience is the dog’s ability to quickly follow commands without hesitation.
- Passive Disobedient – A passive disobedient dog uses submissive acts such as cowering and rolling over as a way to avoid training pressure.
- Parading – Parading refers to the selfish act of swinging out and/or past the handler before returning to its handler for the finished retrieve.
- Pointing – Pointing is defined as an intense, convincing, unmistakable, and in the end productive stationary positioning of a dog in the presence of game.
- Poison Bird – A retrieving exercise where a handler asks a dog to ignore a marked “poison” bird, then requires the dog to follow a separate set of retrieving tasks.
- Popping – When asked to search or retrieve and the dog hesitates to require additional commands to comply often associated with trust issues. Often seen at the release for a retrieve and just before the finish of a retrieve.
- Productive – Describes a dog that finds many birds in its search.
- Purpose – The desirable trait of showing a purpose to find game in the dog’s search. Alternatively, a dog lacking in purpose runs the field as if being taken on its daily walk.
- Pushing out / Nosing out the bird – The act of using its nose to push up the bird into flight. Often seen in the early steadiness work of developmental dogs or dogs that know they are not allowed to catch the bird.
- Quartering – Quartering is a windshield wiper-type pattern out in front of a dog’s handler maximizing the potential of finding game by leaving little area untouched by the dog.
- Recall – Recall is the trained finished position of a dog that is asked to come to you. It can be in your general vicinity, at the immediate front, or directly to the handler’s side. Preferably, the dog would be at the non-gun side so as to not be under the gun.
- Regrip – The act of putting the bird down (without the mouth leaving the bird) so that the dog can more easily return the bird to its handler. It’s generally accepted that a dog can put down a bird to get a better grip as long as it’s not playing with the bird.
- Relocate – The act of a dog’s ability to relocate running birds or short-flighted birds to a re-establishing point, providing another opportunity to kill the bird.
- Roading or Riding In On Birds – When a dog locates the scent of a bird and encroaches upon it in an attempt to get as close as possible.
- Self-Hunting – Dogs that are self-hunters will be selfish in their hunting style. This includes trying to catch birds on their own, refusing to listen to commands, and running for the hills. These types of dogs are of little use for the on-foot hunter.
- Self Release – The dog releases from its position prior to being commanded to do so.
- Soft – Soft is a description given to a dog that struggles to handle light training pressures and becomes fearful and submissive.
- Started Dog – A developmental dog that has begun its steadiness process and has an obedience foundation under it.
- Staunching Up Your Dog – Staunching up your dog is the act of supporting a pointing dog by stroking its tail, back, and shoulders to send a message of encouragement and teamwork between the dog and its handler.
- Steady – A dog can be steady, staunch, or broke, meaning it will remain frozen in place until commanded to move. No matter the number of shots that go off, or the direction the bird flies, the dog’s feet remain planted on the ground.
- Stealing A Point – Stealing a point is when a dog points ahead of another dog already established on point to compete for the bird.
- Stop to Flush – When a dog stops when a target game bird flies.
- Taking A Line – Taking a line is asking the dog to run a straight line towards an undisclosed objective until commanded to stop or until reaching its retrieving objective.
- Takeout – A dog that chooses to attempt to capture the game on its own is ripping birds, pushing them out, nosing them up, self-released, or taking the bird out.
- Trash Breaking – Originating from training your dog to leave trash alone in your home, trash breaking describes the training involved to keep a dog from chasing off game species such as deer, porcupine, skunks, or snakes.
- Underfoot / Boot Licking – Underfoot or bootlicking is the act of hunting so tight to the handler that it is of little to use as a productive hunting companion.
- Upland Hunting – Upland hunting is an American term describing the hunting of various game birds such as grouse, quail, woodcock, and pheasants.
- Versatile Hunting Dog – A versatile hunting dog is a dog that can hunt many game species both on land and in water.
- Wild Flush – A wild flush is when a bird takes flight when a dog approaches the bird without an opportunity to acknowledge the scent of the bird.
- Zones of Fire – Zones of fire are used when multiple hunters gather around a pointing dog. Each gunner restricts their shooting to their zone of fire for safety reasons.
Bird Dog Field Commands
Each handler will need their own set of field commands. They are highly customizable and can be individually specific to each handler. Commands need to be easily understood by the dog; they’re usually either one or two words. It’s important to only use commands when needed and keep the list to only essential commands.
READ: How to Correctly Command Your Dog
Here are some commonly used field commands:
- Back – The command back means to turn and take a straight line 180 degrees away from you.
- Come/Here – This is the recall command from a stationary handler asking a dog to come to you and to finish at a specific place usually to your front or side. The come or here whistle command is traditionally two quick and short blasts or multiple short blasts in succession from a pea-less end of a two tone whistle. However, many prefer a single tone whistles for all commands.
- Come Around – Come around is a command given to a dog as you are moving. It commands the dog to check back or check in with its handler with the requirement to finish.
- Down – Down is a command to lay down and not to move. It has many hunting and home-living applications.
- Fetch – Fetch is the release command given to go and retrieve a marked retrieve of a bumper or game.
- Heel – The heel command tells the dog to come with you at your side. The dog’s front feet align with yours and remain close to your side, no further than a body width from you. The dog should also not touch your leg.
- Kennel / Crate – The command given for the dog to go into its crate. No matter if it’s in your truck, backyard, or a kennel in your home, a dog should easily go to its crate on command.
- Leave It – Leave it is another command with many applications. Leave the skunk, porcupine, grass, or feces alone, and don’t go back.
- Mark – The mark command tells a dog to look ahead for a visual cue to assist in its retrieve.
- Over – Over is a retrieving command asking a dog to take a 90-degree line right or left and remain on that line until the retrieving item is either found or another command is given.
- Place – Place is a command telling the dog to go sit or stand at a location commonly identified by a blind mat or place board.
- Turn Commands – Some handlers like to use a turn command in the field to control their dog’s search pattern. This can be one quick blast with a change of direction from the handler or a hand signal pointing in the direction for the dog to follow.
- Up Front – Commands the dog to move ahead of you in its search.
- Release Commands – A release command tells a dog that its work is done and it is free to make its own choices. Ideally, it’s a command not commonly used in normal conversation. Free, break, or release are common examples of a release command. However, using the word “okay” as a release command is a mistake many new handlers make as it’s often used in conversation, resulting in the inadvertent release of the dog.
- Sit – The sit command asks a dog to plant its hind end on the ground.
- Stay – The stay command lets the dog know you will be moving away from it and it must remain in place.
- Whoa – Whoa is the command to stop or sit and not to move. Commonly, it’s one long blast of the pea side of a two-tone whistle. That being said, handlers successfully use all kinds of whistles.
It’s important to follow a consistent set of commands from early on in your dog’s development. Oftentimes, handlers will attempt to have more of a dialogue in the field which tends to confuse the dog. Your dog studies you incredibly hard each and every day to become masterful at following your commands. We can encourage clarity by doing our part in keeping to the script. In doing so, you will find a far more responsive dog who accurately follows each and every command.
Training and Troubleshooting the Recall Command with Dogs
The Importance of Training Steadiness in Bird Dogs
How to Correctly Command Your Dog
Thinking About Dog Commands to Avoid Confusion in Training


 This section will give you a brief overview of the what, why and how behind hide glue. At its essence hide glue is made from extracting collagen from the hide, bones, sinew, etc. of an animal. It has been used throughout the years in everything from hunting bows to furniture and has even been found in Egyptian caskets.
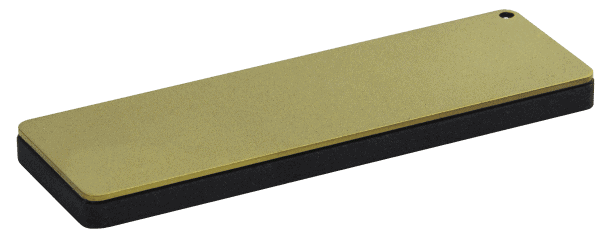 This diamond/ceramic whetstone is perfect for use in the field. https://www.fallkniven.com/en/knife/dc4/
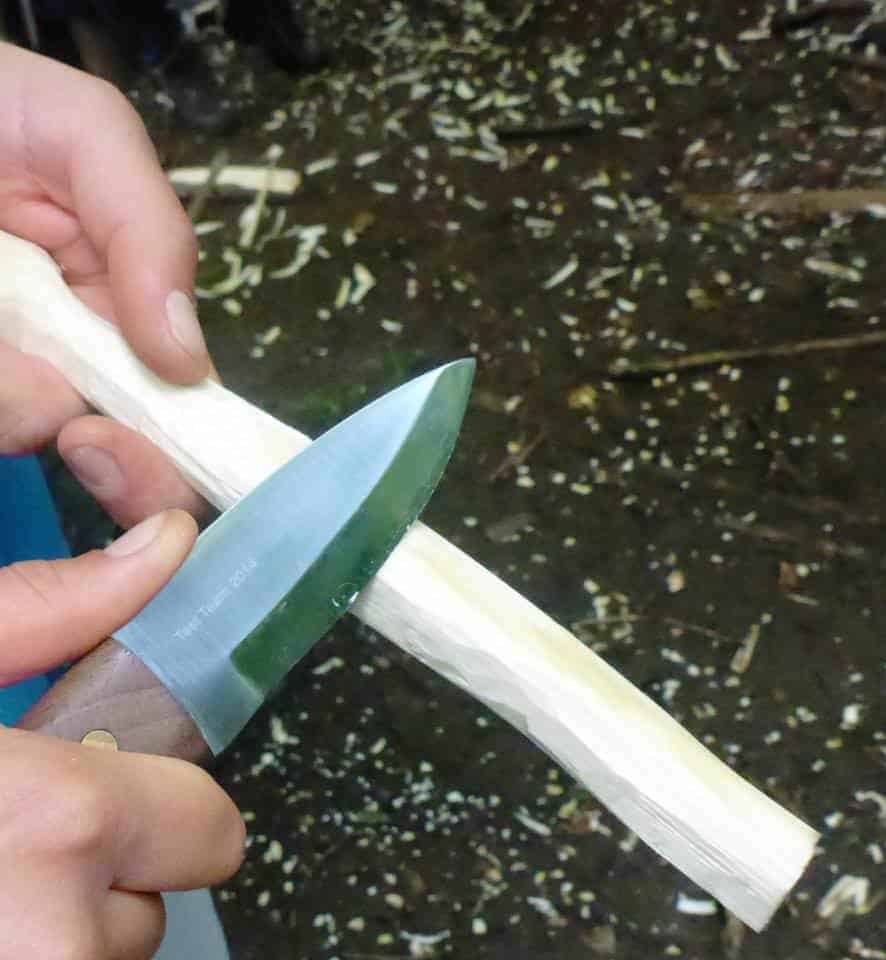 Wildway Bushcraft uses Bear Blades. “Constructed from superb quality D2 steel this knife is ideal for bushcraft and wood crafting. Our most popular knife due to its versatility and functionality, suited to tough daily use in the woods.” http://bearblades.co.uk/