In my previous life in professional baseball, I worked with ballplayers who exhibited incredibly strong affinities to particular brands and models of gloves, bats or cleats. Some of those affiliations had to do with sponsorship (some with superstitions), but mostly those loyalties derived from success on the field. As I’ve written before, I continue to be amazed by the correlations between bird hunters and ballplayers. Another one of these parallels exists in pheasant hunters’ brand loyalty and that’s what my focus is today.
In my estimation, pheasant hunters are largely gear junkies and that gear, in priority of importance, revolves around: their favorite breed of bird dog, shotguns, boots, ammunition and hunting vests.
So today’s blog post surveys the nation’s most well-renowned bird hunters to poll their favorites in each of these five categories. My assumption as I send out this survey is that like baseball players, expert pheasant hunters have a wide array of affiliations and there likely won’t be too many common answers. Let’s find out.
To start, here are my favorites:
Bob St.Pierre, Vice President of Marketing at Pheasants Forever and Co-host of FAN Outdoors radio on KFAN
1) Bird Dog Breed: German shorthaired pointer
2) Shotgun: Beretta 686 Onyx 12 gauge over/under with skeet chokes in both barrels
Ron Schara, Host of The Flush presented by Pheasants Forever on Outdoor Channel
1) Bird Dog: Raven, the black Lab, whistle trained
2) Shotgun: Benelli Super Black Eagle or Benelli Vinci with Carlson choke tubes
3) Boots: Irish Setter
4) Ammo: Federal Ammo’s Prairie Storm 2-3/4” lead 5 shot
5) Vest: Still looking for a good one; need deep pockets for ammo; easy reach for bird carrying pouch
Bill Sherck, Co-Host of The Flush presented by Pheasants Forever on Outdoor Channel
1) Bird Dog: My love of hunting dogs is pretty basic. I want a dog that can find downed birds, always. That’s A-1 in my book.
2) Shotgun: I have a 1929 LeFever Nitro Special 20 gauge that became a best friend of sorts. It is, by far, my ugliest, most beat up shotgun, but I shoot it well and I love the history. Serious patina.
10) Vest: Gander Mountain Guide Series Hunting Strap Vest
Chad Hines, Owner of Willow Creek Kennels
1) Bird Dog: German shorthaired pointer
2) Shotgun: Beretta 686 Onyx over/under 20 gauge
3) Boots: Merrill Moab Hiking boots – I use these for almost all hunting.
4) Ammo: Federal’s Black Cloud
5) Vest: Bird ‘n Light Vest
Matt Kucharski, Pheasants Forever National Board Member
1) Bird Dog: A tandem of German Shorthair Pointer and Labrador, trained to honor each other of course!
2) Shotgun: Ruger Red Label 20 gauge early season, 12 gauge late season. Skeet and IC chokes early season, IC and modified chokes late. Sadly, they’re not making them anymore.
3) Boots: Red Wing Irish Setter (short uppers) early season and Meindl Scotland GTX (or similar) late season
4) Ammo: Federal Upland Steel 4 shot. 3 inch in the 20. 2 ¾ in the 12.
5) Vest: Filson mesh strap vest for short walks, Bird ‘n Lite strap vest if I’m in the field all day or carrying Bob’s birds.
Jeff Fuller, host of Sporting Dog Adventures
1) Bird Dog: Labrador Retriever
2) Shotgun: Benelli
3) Boots: Danner Pronghorn
4) Ammo: HEVI-Shot Upland
5) Vest: Browning vest
Now it’s your turn. What are your favorites?
The Pointer is written by Bob St.Pierre, Pheasants Forever & Quail Forever’s Vice President of Marketing. Follow Bob on Twitter @BobStPierre and listen to Bob and Billy Hildebrand every Saturday morning on FAN Outdoors radio on KFAN FM100.
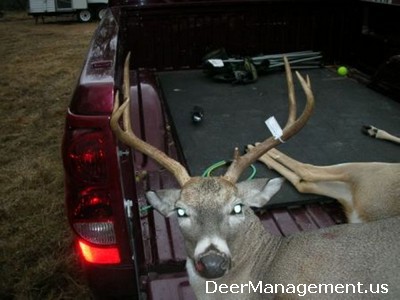
Question: “We deer hunt in Uvalde County and have been trying to manage our deer. This year we have seen a 3 1/2 year old buck that would be a main frame 7 point deer if he had brow tines, but he is missing his G1s. The buck has decent beam lengths and the mass is pretty good. Will this whitetail buck ever produce brow tines in the future? The guys on our deer lease are trying to decide if we want cull this buck or leave him until next year. Should we shoot all bucks that have no brow tines to improve the deer herd or should we just wait until they are at least 4 1/2 years old?”
Response: The only way to improve the buck component of your deer herd will be to remove the bucks with unwanted antler characteristics. These deer that hunters refer to as management or cull bucks. Young bucks that have missing brow tines turn into old bucks with missing brow tines. But it gets worse. They breed each fall, spreading the gene for missing brow tines. I’ve seen ranches where most of the bucks had missing brow tines. Don’t go there!!!
The presence or absence of a brow tine, or the G-1 as they are referred to on a score sheet, are the most inheritable trait for antlers. Bucks that are missing one or both brow tines should be candidates for management by harvest. You don’t want the gene for missing G-1 passed on. The next time one of the hunters sees him while deer hunting they need to remove this buck as quick as possible.
Buck management or culling must begin as soon as possible. The big mistake in letting undesirable bucks get to 4 1/2 years of age or older before removal is that they have at least 3 years to spread their unwanted genes around the deer herd. Judge all of the bucks on your deer lease against one another by age and remove the animals that are obviously lower in quality. Deer management only works when the entire herd is managed, but decisions must be made on an animal by animal basis. Shoot your buck with missing brow tines the next chance you get.
“Unleash your shooting potential with the Girardoni Air Rifle – a revolutionary firearm that combines power, accuracy, and elegance. Experience the thrill of precision shooting like never before, as this state-of-the-art air rifle delivers unmatched performance and craftsmanship. Whether you’re a seasoned marksman or a beginner in the world of shooting, the Girardoni Air Rifle is your ultimate companion for every target and competition. Discover the future of firearms technology with this iconic masterpiece.”
girardoni air rifle
The Girardoni air rifle is a historic weapon that revolutionized the field of firearms. Invented by Bartholomäus Girardoni in the late 18th century, this air rifle was ahead of its time in terms of technology and capabilities. It was one of the first successful repeating rifles, capable of firing multiple shots without the need for manual reloading.
The Girardoni air rifle gained significant recognition during its use by the Austrian military. With its impressive range and accuracy, it became a favored weapon for soldiers and marksmen alike. The rifle’s unique design utilized compressed air stored in a detachable reservoir, which allowed for rapid fire and reduced recoil compared to traditional firearms.
Despite its early success, the Girardoni air rifle eventually fell out of favor as advancements in conventional firearms surpassed its capabilities. However, its innovative design laid the foundation for future developments in air gun technology. Today, the Girardoni air rifle holds a special place in history as an important milestone in firearm evolution.
In conclusion, the Girardoni air rifle was a groundbreaking invention that revolutionized military tactics during its time. Its innovative design and impressive firepower made it a formidable weapon, enabling soldiers to shoot multiple rounds without reloading. Although it had its limitations and ultimately faded into obscurity, the Girardoni air rifle remains an important milestone in firearm history.
At first glance, moose and horses look somewhat similar. They’re both ungulates, or mammals with hooves, walk on four legs, and have a similar body and head shape. That’s about where the similarities end, though.
In the U.S., horses are almost exclusively pets, while moose almost exclusively live in the wild. Male moose have antlers; horses don’t. And while there are a few different species of moose, just like there are many horse breeds, horses are faster while moose are larger. Generally, a moose weighs up to 1,400 pounds (635 kg), while horses typically weigh a maximum of 1,200 (550 kg) pounds.
Here are 11 photos that help showcase the size difference between moose and horses.
On average, a moose will be heavier, taller, and longer than a horse. In fact, they’re the largest species in the family Cervidae, which also includes elk and deer.
2. There Are Some Exceptions
Image source. Instagram
While moose are typically larger than horses, there are some horse breeds that have the moose beat. The Shire horse, for example, is one of the largest horse breeds and can greatly outweigh a moose. A stallion Shire horse usually ranges from 1,950-2,400 pounds (900-1100 kg). The largest Shire horse, a gelding named Samson, topped the scales at 3,360 pounds (1,524 kg)!
3. A Little Bit Taller
Image source. Instagram
While the moose is closer to the camera in this photo, it’s still pretty clear that it’s taller than the horse. The average height of a moose at the shoulders is between 4 feet 7 inches (1.3 meters) and 6 feet 11 inches (2.1 meters), while horses, on average, are about five feet tall (1.5 meters).
4. Just a Bystander
Image source. Instagram
Though there have been people throughout history who have managed to domesticate moose, it doesn’t happen often. This moose seems perfectly content to watch his fellow ungulates pull a wagon.
5. Different Sizes for Different Climates
Image source. Instagram
Domesticated horses can be found all over the world today, but modern horses originally came from central Asia. Moose, however, are only found in the wild in the northern parts of North America and Eurasia. They stay warm thanks to their thick fur but also their massive size, which helps their bodies retain heat.
6. Watch the Road
Image source. CNN
While moose are usually larger, both moose and horses are big enough to cause big problems on the road. Both are typically taller than a sedan, and moose can be as tall as or taller than a pickup truck. While not as common as hitting a deer, there are still about 500 incidents involving moose each year in New England alone. Moose can also do much more damage to vehicles and are more likely to result in fatalities than an accident with a dear.
While it’s much less common to hit a horse, as they don’t often roam free, there are still a handful of incidents each year. They most often happen between October and December and usually on main roads. Things are especially bad in Amish country, where they use horse-drawn carriages instead of vehicles. Pennsylvania calculated that between 2007-2016, there were 633 crashes that involved horses and buggies, with a total of 23 deaths.
To avoid colliding with a moose or horse, use caution when driving through wilderness, farmland, or areas where horse-drawn carriages are common.
7. Keep a Safe Distance
Image source. Instagram
It’s hard to say what would happen if a moose and horse were to meet; there isn’t a lot of research done, and it would depend on the specific horse and moose. However, moose are known to be aggressive at times and, because of their size, can inflict serious damage. If you’re riding your horse and run into a moose, it’s best to keep your distance and get away as quickly and calmly as possible, especially if your horse spooks easily.
8. Watch Out for the Antlers
Image source. Naturally Gaited
While the body of a moose is typically going to be taller than the body of a horse, that size difference only grows when you factor in a moose’s antlers. The antlers, which are made of bone, average between four and five feet (1.2-1.5 meters) wide and can weigh between 25 and 30 pounds (11-16.5 kilograms). Only male moose, or bulls, have antlers, and they typically use their antlers to assert dominance.
9. An Aggressive Moose is a Dangerous Moose
Image source. Instagram
Most often, the male moose, or bulls, are the aggressive ones. While moose typically will leave you alone, they can also carry a parasite called a brainworm that increases their aggression. If an angry moose attacks a horse, the moose may fight using its antlers or by kicking with its front hooves. Moose can kick both straight ahead and sideways. Combined with their muscular build, this makes them particularly dangerous in a fight.
10. Sometimes, They Get Along Just Fine
Image source. Instagram
Just because moose are bigger and stronger doesn’t mean they can’t get along with their distant cousins. Blogger and horse trainer Carola Sossdorf adopted an orphaned moose named Emma when the moose was just a few days old. While a female moose is less likely to be aggressive anyway, being raised among other horses likely helped her get used to having horses around.
11. Care to Share?
Image source. Equine Ink
This photographer managed to snap a photo of a horse and moose sharing a meal, but that doesn’t happen often, in part because the two animals have different dietary needs. Both are herbivores, meaning they exclusively eat plants, but they choose different plants for their diets. Horses typically dine on grass and hay, as well as the oats in horse feed.
Moose, however, typically eat leaves and twigs from woody plants they can find in their natural habitat. Leaving food out for moose is not advised, as offering them food outside of their diet can cause them harm.
Final Thoughts
On average, you’ll find moose to be taller than horses, but there are always exceptions. Part of the reason moose are built to be larger is that their body mass helps them survive in the colder climates they inhabit. Because horses are domesticated in North America, they’re usually more used to being around people. Moose, however, can sometimes become aggressive, so it’s best to avoid them when possible.
Both animals are beautiful creatures with majestic, strong natures. While you can snuggle up to a horse, given the tendencies of moose, it’s best to watch them from a distance.
I’ve always associated the plant called deer heart with my times hunting Sitka blacktail deer in Southeast Alaska high country, which is something I’ve done pretty much every August since I was a kid. It’s a small, fragile plant that consists of a single heart-shaped leaf attached to a stem that usually doesn’t grow much higher than six inches. Deer heart grows from sea level, where it’s most tender and nutritious early in the summer, to mountain tops, where it’s best to eat late in the season. Deer follow it and other vegetation up mountains as summer advances. By mid-September, when deer heart is all but dead in the high country, deer descend to lower elevations for better browsing.
Last August, during a hunt, I came upon a deer I’d shot lying on a deer heart-covered bench, with semi-pulverized pieces of the plant in its mouth. There was an ethereal slant to the evening light, the sort that illuminates subtle, hard-to-see details of the landscape. I was surrounded everywhere by deer heart, except where there were cliffs, rockfaces, and the occasional clump of stunted mountain hemlock. I am frequently caught off guard by how something as seemingly simple as shifting light can reveal in an instant how miraculous the world is. I plucked a heart-shaped leaf and stuck it in my mouth. It’s peppery, like arugula, but has an aftertaste that oscillates between good and a little strong. I’d never thought a lot about deer heart, other than using the amount of it browsed as a gauge for where to hunt deer, and to try not to slip on it when it’s raining. I looked from the fields of deer heart to the dead animal, wondering why it’s so easy to become preoccupied with certain things while being blind to so much. I thanked and apologized to the deer, then sliced my knife through the hide along the backbone from the base of the skull to the tail. I cut one side of quarters free, peeled off a backstrap and, before removing a side of ribs, severed the heart and lay it upon its namesake plant.
It was dark by the time I hung my heavy game bags from a branch of a mountain hemlock. During the night I listened as the wind made the tent shudder and bushes crackle. I thought about brown bears. I washed off the deer’s blood the best I could and peed and spat around the tent, but I still smelled “delicious.” Years before, I left a trail camera on a salmon stream that had a high number of bears fishing on it a few miles from where I was hunting. As an experiment, I peed in front of where the camera was pointed to see how animals would react. I returned a few days later and found that most of the images showed bears running away, looking terrified. A young bear even dropped the salmon it was carrying in its rush to get away. One large bear, however, behaved differently. It came during the night and, instead of fleeing, crawled like a cat toward the camera. I imagined that animal crawling toward the tent and thought about becoming meat.
At home, I organized the deer meat in trays divided by roasts, steak, and scraps I’d grind into burger. I trimmed the bones; later, I’d render broth from them. My two young sons—one a toddler and the other three and a half years old—“helped” by sawing on meat with butter knives and dropping pieces of burger meat into the grinder. I sliced a heart thin and doused it with sesame oil and Montreal steak seasoning. When it was done, we snacked as I wrapped meat in freezer paper. Some people do not like the taste or texture of heart. It’s always the first part of the animal I eat, which is in a large part because it does not freeze well. It’s also delicious and, more than that, evocative of much of what I love about life in Southeast Alaska.
Three years prior, my wife and I gave our eldest son his first solid food. We wanted our kids’ first tastes of food to be of something we loved, that came from the streams and forests where we live. First we mashed up blueberries, then we tried coho salmon. It had not gone over well. Not long after, I brought a deer home and fed our son small bits of fried heart. He devoured them.
Once we had a couple of deer, as well as a good supply of salmon in the freezer, it was time to go berry picking. When the next sunny day came, we headed to one of our favorite blueberry patches in the mountains. I carried our toddler in a backpack. As we hiked a trail to a field of deer heart, his brother demanded, and constantly added details to, a story about dragons from his mother. Though it was only the third week of August, most of the plants were showing the first signs of brown. After placing the boys on drier ground where they could play and pick berries, my wife and I set to filling our buckets.
Food gathering, whether hunting or berry picking, is probably the most meditative activity I know. For a while I picked alone, my thoughts quieting as I focused on filling my bucket. Occasionally, the boys would punch or bite each other and scream and cry. Other times they giggled as they wrestled and popped blueberries into each other’s mouth. When I checked on them, they were taking turns smashing blueberries on each other’s heads, both of their smiling faces stained purplish red, sitting amidst deer heart.
The pickings were pretty good and after a couple hours we had a few gallons. I joined the boys and their mother on a small plateau covered in deer heart fringed with bushes heavily laden with blueberries. The light on the mountains had that same ethereal quality, revealing cracks and fissures worn by time in rockfaces and millions of deer hearts surrounding us.
It was hard to walk away from something so good. I placed my younger son in his backpack and, before leaving, searched for a tender looking deer heart. Near where a deer had been browsing, I plucked a leaf and then placed it in my mouth. I slowly chewed, its enigmatic taste engulfing my taste buds, as I followed my wife and older son down the mountain.
Muzzleloaders are single-shot firearms that differ from modern weapons in that you have to load each round manually through the barrel. There are no rounds or casings, but you do use primers, powder, a slug, and wadding. The challenge of hunting with a muzzleloader is that you only have one shot, and you best have the skills, accuracy, and tenacity to make that one shot count.
Many states have muzzleloader seasons and those who love the thrill of the muzzleloader hunt. You can target birds, waterfowl, deer – white-tailed deer, antlerless deer, antlered deer, and even a black bear. You are pretty much talking accuracy at less than 100 yards and that means that a muzzleloader deer hunter is going to have to be fairly skilled at getting close to deer. You can check your state’s game agency to see if a muzzleloading hunting season exists for you.
Why not? There is a great challenge in hunting with a muzzleloader. For deer season, you have got to know the target – from antlered bucks to antlerless deer – you will need to get close, and that means growing as a hunter to understand the terrain. You’ll also need to understand the species of deer and improve your ability to stay unrecognized in the natural world. Plus, there is the challenge of being able to make a single shot count. It takes great skill to get close enough to deer to take them down without a modern weapon. Hunting with a muzzleloader includes:
The Traditional and challenging method of hunting – you’ve got to be accurate because you have only one shot. That means you have to know your prey, and the environment where you hunt, and have the skills to make your one shot pay off.They are Quieter and less expensive than modern firearms – Expect most muzzleloaders to fire in the 160-decibel range, which can be quieter than a modern rifle.Early deer hunting season for most states – the muzzleloader season generally starts earlier making it less crowded and the targets are not as aware. Some states, such as California, offer muzzleloader hunters events, and some have seasons where the events are mixed with archery. You still need a hunting license but leave the centerfire rifle at home.Do People Still Hunt with Muzzleloaders?
Muzzleloader hunting is an elite sport. It is a natural progression – in a backward fashion – and a spot for folks who are good at hunting to end up. It is one thing to take down deer or bears with a modern weapon. You can, after all, plink a few rounds off quickly even if you are not toting a semi-automatic. But the thrill of muzzleloading is not in just reaching your bag limit on a single afternoon. It is the challenge of being good enough at hunting to come home with game that you had to work at to get.
Muzzleloader Hunting vs Other Methods
Archery is perhaps the method of hunting that comes closest to muzzleloader hunting. That is purely because you have to be good enough at hunting to get close to your target. It is also a slower reload than other options.
Hunting with a modern rifle or handgun is much easier than hunting with a muzzleloader, simply because the second shot is much faster than with a muzzleloader. Modern rifles also have a longer and more accurate range, meaning that your hunting skills can be subpar, and you will still likely get a shot in even if it is a longer distance.
Make no mistake, skill is required for all of these options, but tracking, setting up stands, and stalking prey are a lot more difficult if you have to get within 100 yards of your target – and truthfully, more like 50-75 yards.
Regulations and Restrictions
Regulations vary by state. Many states offer muzzleloader events or seasons for hunters, especially those hunting deer and elk. Some events are populated drawings, and states like California often have better odds. It is important to check with your local hunting bureau to understand the regulations where you hunt and where you plan to hunt. Regulations also exist based on state and local laws, such as in California where you cannot hunt with lead bullets.
Muzzleloader Accuracy and Range
The distance that a muzzleloader can shoot accurately is a variable. Suffice it to say that with an old version of a muzzleloader, and all the stars aligned, you might hit a target 100 yards away. That’s a big “might.” Some modern inline muzzleloaders extend that range to 200 yards. Still, there is a lot between what can and what will happen.
Factors That Affect Muzzleloader Accuracy
Aiming – Don’t be surprised if part of your local regulations for muzzleloader hunting involves, or rather, restricts the use of modern sights such as scopes. Aiming the muzzleloader is one of the biggest issues with accuracy. You will need to dial in the type of sights (iron sights) on the muzzleloader.
Loads – Being able to pour a consistent load is important. Whether you are using black powder or smokeless powder, getting a consistent load will improve your accuracy. Too much powder, too little powder, not tamping down the bullet accurately, and other factors impact how well the bullet leaves the barrel. Flintlock or percussion cap muzzleloaders – sometimes called percussion cap rifles – will both have improved accuracy when you produce uniform loads and clean the fouling from the barrel.
Fouling – There is a lot of residue left around after you fire a bullet from a muzzleloader. Junior hunters can improve their accuracy by learning how to keep the barrel clean.
Barrel Length – Muzzleloaders come with a variety of lengths for barrels. Keep a consistent barrel length as this is one of the critical factors in rifles of all makes and models.
How to Improve Muzzleloader Accuracy
1. Shoot the gun as often as possible. Understanding its nature is one of the best ways of correcting accuracy issues that involve stress, fear, and other common shooting issues.
2. Practice loading the gun so that each load is as close to even as possible. Hunting with a muzzleloader is not the same as being in a war with one. Accurate loads mean the gun is less likely to foul and drop accuracy. This also means that you can reload faster without loading errors.
3. Cleaning the barrel – Make sure you can quickly and accurately clean the barrel. Being good at field cleaning the gun is essential because a clean barrel means you are back in the hunt.
Shot Placement and Effectiveness
You might be wondering where to aim when shooting a deer with a muzzleloader. When hit behind the front shoulder, your bullet travels across the shoulders, the heart, and the lungs. The angle of that shot will change based on your angle to the deer. Visualize that path and take your aim so that the bullet travels across the heart and lungs.
The best spot to shoot a deer with a muzzleloader is the heart. That is a deadly shot, and it is fairly instant.
How long do you wait after shooting a deer with a muzzleloader before going after it? The general rule of thumb is about half an hour. If you know that you have not mortally wounded the deer, then wait a few minutes. What you want to avoid is dealing with an injured animal that has the fight part of the flight or fight in place.
What are the 3 Types of Muzzleloaders?
Flintlock – A physical flint and steel powder ignition – the flint strikes the frizzen which causes damage to the frizzen and the spark ignites the powder.Percussion Cap – The cap sits over a nipple. When the hammer hits the cap, it causes the mercury-based “powder” to ignite.Inline Modern – the hammer hits either a cap or primer which then ignites the powder in the barrel.
Muzzleloader Maintenance and Safety
Make sure the muzzleloader is unloaded before you begin to clean the gun.
1. Cleaning the barrel is the biggest chore and one that everyone should be able to handle in the field.
2. Home cleaning can be more detailed including cleaning the breach plate or conduit from where the hammer hits and the ignition begins.
3. Use an approved muzzleloader solvent to clean the inside of the barrel. On inline muzzleloaders, you often shoot a copper-jacketed bullet with plastic sabots – those can be tricky to clean because the copper and plastic will cling.
Not all muzzleloaders have a safety. When they do make sure the safety works and then activate the safety before you begin to clean. Keeping your gun clean is one of the best ways to keep accuracy high.
Muzzleloader Bullets from Berry’s
To recap the benefits of hunting with a muzzleloader remember that hunting skills are repaid when every shot matters. Take the time to learn as hunting with a muzzleloader not only gives you more options for special hunts such as those for thinning button bucks, antlerless deer, hunting on public land or private hunting areas, and a field that has fewer hunters.
In the modern world, hunting successfully with a muzzleloader is a rite of passage. It means that you have to pair hunting skills, accuracy, and patience, plus your knowledge of the target, environment, and changing conditions.
Berry’s offers Blue Diamond 50 caliber 250-grain muzzleloader bullets with a polycarbonate tip and proprietary sabot. Expect a tight fit and improved accuracy with the Blue Diamond 50 Caliber, a 250-grain bullet designed for black powder muzzleloaders. The bullet is appropriate for loads designed for deer, and smaller game, such as feral pigs, and even larger game such as a black bear.
Are you a moose lover and looking for perfect Moose Names? Do you find yourself mesmerized by the sheer magnificence and grace of these gentle giants? If so, then you’ve come to the right place! We have collected 150+ cool and catchy names for moose.
Choosing the perfect name for your majestic moose companion can be an exciting and rewarding experience. Just like naming any other pet, the right moniker can reflect their personality, capture their uniqueness, and deepen the bond between you. But with so many options available, it can be overwhelming to settle on that one special name.
Before diving into the world of moose names, it’s essential to have a basic understanding of these awe-inspiring animals. Moose (Alces alces), also known as elk in Europe, are the largest species in the deer family. They are distinguished by their impressive antlers, humped shoulders, and long, slender legs.
Moose are native to the Northern Hemisphere and are found in various regions, including North America, Europe, and Asia. Despite their massive size, they are gentle herbivores that prefer wooded areas and are excellent swimmers.
In this article, we’ll explore the world of moose names, offering a wide range of options that cover everything from traditional and classic names to creative and quirky ones. Let’s dive into the list.
Over 150+ names we have selected 30+ top names that you love. These best moose names are a combination of regal, nature-inspired, and whimsical choices.
Whether you’re naming a toy moose, a fictional character, or simply want to give your love for moose a playful touch, these names are sure to capture the spirit of these magnificent creatures.
Thor
Willow
Atlas
Luna
Mornington
Aurora
Rocky
Hazel
Maximus
Juniper
Finnegan
Stella
Josephus
Aspen
Winston
Maple
Hudson
Penelope
Moosey
Everest
Willow
Oliver
Misty
Mozilla
Ember
Angus
Clementine
Moosejaw
Savannah
Orion
Mabel
Buck
Murray
Cute Moose Names
These cute moose names are perfect for bringing out the adorable and lovable side of these majestic creatures. Whether you have a stuffed moose or a real-life moose friend, these names will add an extra dose of cuteness to their already charming nature.
Pick the one that makes your heart melt and enjoy the delightful companionship of your cute moose!
Bambi
Sprinkle
Marshmallow
Snickers
Cinnamon
Pudding
Fluffy
Noodle
Waffles
Mocha
Buttons
Fuzzy
Cupcake
Peanut
Honey
Cheeks
Sprout
Cookie
Pebbles
Lollipop
Chip
Snuggle
Muffin
Whiskers
Sparkle
Jellybean
Pompom
Fuzzball
Petal
Smooches
Cool Moose Names
These cool moose names are perfect for adding a touch of strength, power, and adventure to your moose’s persona. Whether you’re looking to name a fictional moose character or want to give your real-life moose a cool and distinctive name, these options are sure to make them stand out from the herd.
Choose the name that embodies the coolness you desire and enjoy the awe-inspiring presence of your moose companion!
Maverick
Thunder
Blaze
Diesel
Titan
Zenith
Jagger
Eclipse
Avalanche
Hunter
Odin
Storm
Magnum
Vortex
Blitz
Orion
Goliath
Surge
Rebel
Raptor
Nitro
Shadow
Stryker
Rocky
Koda
Maximus
Ace
Glacier
Jet
Arrow
Funny Moose Names
These funny moose names are designed to bring a smile to your face and add a touch of humor to your moose’s identity.
Whether you’re creating a funny fictional character or looking for a hilarious name for your stuffed moose, these playful options are sure to make you chuckle.
Sir Moose-a-Lot
Moose-tache
Mooseton Churchill
Moosey McMooserson
Captain Antlers
Moo-solini
Moose-squito
Monty the Moose
Moose-efarian
Moo-dini
Moosey Malone
Moose-alicious
Moo-la-la
Moose-amus Prime
Moose-nificent
Moose-cifer
Moose-tang
Sir Horns-a-Lot
Moose-erati
Moose-feratu
Moo-saic
Moose-terious
Moolicious
The Mooseinator
Deerly Moose
Moose-a-Tron
Moose-aphone
Shaggy Antlers
Mooster Chef
Moose-nose
Female Moose Names
These names encompass a variety of styles and characteristics, allowing you to choose the perfect one for your female moose companion.
Aurora
Willow
Daisy
Luna
Bella
Freya
Hazel
Ivy
Nova
Ruby
Luna
Stella
Athena
Mabel
Nala
Olive
Pearl
Quinn
Rosie
Savannah
Tessa
Uma
Violet
Wendy
Xena
Yara
Zoey
Cleo
Gia
Zelda
Baby Moose Names
Baby Moose Names are adorable and playful monikers for young moose. These names capture the youthful spirit and endearing qualities of baby moose, making them even more lovable.
Whether you’re looking for a name for a fictional story or seeking a unique name for a toy or pet, these names will add a touch of charm to your baby moose’s character.
Sprout
Bambi
Pippin
Caramel
Gizmo
Noodle
Peanut
Buttons
Coco
Willow
Snickerdoodle
Marshmallow
Dottie
Munchkin
Wiggles
Pudding
Twigs
Fuzzy
Poppy
Sprinkle
Bouncy
Fluffy
Cupcake
Pippin
Whiskers
S’mores
Olive
Nugget
Waffles
Cookie
Male Moose Names
Male Moose Names are strong and majestic appellations for male moose. These names reflect the powerful and dominant nature of male moose, showcasing their grandeur and magnificence.
Whether you’re looking to name a male moose character in a story or seeking a regal name for a figurine or artwork, these names will add a touch of nobility to your male moose’s persona.
Thunder
Atlas
Maverick
Titan
Hercules
Maximus
Odin
Brutus
Jagger
Thor
Magnum
Caesar
Apollo
Ranger
Diesel
Moose
Everest
Winston
Jasper
Rocky
Duke
Orion
Buck
Angus
Bandit
Hunter
Finn
Leo
Asher
Winchester
Badass Moose Names
Thorntusk
Brutus
Titan
Avalanche
Grimjaw
Vengeance
Ragnor
Shadowhorn
Thunderhoof
Fury
Ragnarok
Warhammer
Thunderstrike
Ironhide
Savage
Bloodfang
Stormbreaker
Goliath
Wrathbringer
Thunderstorm
Nicknames For Moose
Sparkles
Tinkerbell
Moosie-Q
Twinkletoes
Pipsqueak
Bambi
Eeyore
Jelly Belly
Petunia
Jinglepants
Simba
Petal
Spruce the Moose
Gus
Pebbles
Minnie Moose
Fifi
Igloo
Tiny
Famous Moose Names
Bullwinkle (Bullwinkle J. Moose) – A beloved moose character from “The Rocky and Bullwinkle Show,” a classic animated TV series.
Chocolate Moose – A famous character from the children’s show “Captain Kangaroo,” known for his chocolate-flavored antlers.
Morris the Moose – A popular children’s book character from the book series “Morris the Moose” by Bernard Wiseman.
Mortimer Moose – A character from the “Zoobilee Zoo” TV series, where he was a gentle and friendly moose.
Mighty Moose – A mascot for various sports teams, often representing strength and power.
Bull Moose Party – A nickname for the Progressive Party, formed by Theodore Roosevelt in the early 20th century for his presidential campaign.
Møøse (Monty Python’s Flying Circus) – A hilarious skit from the comedy series Monty Python, known for its absurdity and wordplay.
Eddie the Moose – The mascot for the NHL team Winnipeg Jets, known for entertaining the crowd during hockey games.
Moose Mason – A character from the Archie Comics series, known for his adventurous and mischievous nature.
Alces – A Latin term often used to refer to the moose species.
Conclusion
Hope you have selected your favorite names. Moose Names offer a wide range of options to capture the essence and personality of these magnificent creatures. Whether you’re looking for names for baby moose, male moose, or any other type of moose character, there are plenty of choices that reflect their charm, cuteness, or strength.
These names allow us to connect with moose on a more personal level and bring their unique qualities to life. So, whether you’re writing a story, looking for a pet name, or simply appreciating the beauty of moose, these names will add an extra touch of character and endearment to your experience.
Whitetail deer might seem like quiet creatures, but in fact they communicate vocally quite a bit. However, different deer noises may all sound the same or very similar to the untrained ear. The truth is, deer’s different vocalizations have lots of different meanings—all of which you need to learn in order to become a better hunter. Here’s what you need to know.
Understanding the behavioral intricacies of whitetail deer is no easy feat. These language complexities make hunting deer both fun and challenging. Fortunately, humans have been studying all of these vocalizations for years for both hunting and conservation purposes, which has led to a better understanding of what each noise means. We now can now decipher micro variations in dialect, giving us a deeper sense of what deer are trying to say.
Without question, learning these different vocalizations and what they mean will make you a better hunter. Learning the sounds deer make can make you that much better at deer calling. But it also helps you to understand why deer act the way they do in certain situations. Knowing how to identify the four common sounds deer make, what each deer sound means, and what prompted the deer to make it, will help make you a better hunter in the long run.
Deer Sound #1: Grunts and Growls
A grunting sound is easily the most common vocalization hunters will hear in the deer woods. The grunt is a standard form of communication, but there are a few different variations of grunts that all have slightly different sounds.
If you spend enough time in a blind or a stand watching adult deer and hear these grunts and observe the behavior that follows, eventually you start to make sense of the context of the situation, and you start to understand the nuances between common sounds and the different sounds that deer make—and begin to emulate them. You can emulate all of these sounds with a grunt call, which is particularly effective when a buck is riled up. Effective calling and timing of those sounds will bring a buck right to you.
The most common deer grunt is a low and quick “urp” sound, which is what’s called a contact grunt or social grunt. Both male deer and female deer use these grunts to announce their presence in an area and identify themselves to other deer, almost like saying, “Hello, I’m here.” They sound a little different between the sexes, but both serve as a way of establishing a social hierarchy.
The Doe Grunt
A doe grunt is one of the common sounds deer make. A doe grunt is much higher sound than that of a buck. Female deer have smaller bodies, and just like in humans, this results in a shorter airway. Does use grunts in a slightly different way than bucks do. Does don’t really grunt to show dominance, but more so to communicate with one another. Deer are highly social, and they try to gather together when they can, so a grunt is the deer’s way of telling others it’s around and ready to mingle, so to speak. The mothers also grunt to call the fawns if it’s feeding time or if they’re moving to a new location, almost like a mother raising her voice to her children.
I couldn’t count the number of times I’ve watched does feeding right out in front of me, only to start sparring with the younger deer and chasing them off. The whole time, the more mature doe was making this grunt noise, which became deeper, raspier, and more aggressive as she asserted more dominance.
The Buck Grunt
A buck grunt is a different sound that is a little deeper and guttural than that of a doe, which produce more of a higher, nasally sound. Bucks make a loud grunting sound to show their dominance. While all deer make soft, long grunts to call to one another, the deep, short grunt of the buck is the male claiming does and territory.
When most of us think of buck sounds, our mind gravitates to buck grunts. We think of that echoing, saliva-inducing sound that only comes from a buck during the rut. However, there’s again a wide range of variations, but all of them are unique to the peak of hunting season.
While bucks will use short grunts to stake out their territory and intimidate rivals, they sometimes use the same sound to establish dominance when chasing does, which many often call “trailing grunts.” The sound is virtually unmistakable and enough to get any hunter’s blood pumping, as it means only one thing: a buck is coming in hot on a doe’s trail, so get ready for action. The sound itself is somewhat of an excited “urp-urp-urp-rup” along with the ruckus of crunching leaves and cracking branches.
The Tending Grunt
Another type of deer grunt is a tending grunt. A tending grunt is a deer call made by bucks when they are following a doe during rut and want to mate. The tending grunt is a deep guttural call made of long, drawn-out notes, softly, without aggression or loudness—a guttural “urrrrrrrrrp” sound, which often includes a mix of short grunt sounds, too, all of which signify ownership to a doe, as well as other interested bucks. Big bucks use this grunt to assert their dominance, frustration, and let everyone in the area know what they are after. They also use it to ask the doe to stop so they can breed.
The Buck Growl
Slightly less common is the “buck bawl,” “growl,” “rage grunt,” “breeding bellow,” or “buck roar,” all of which are different names for the sound big bucks make when an estrous doe is near. Noticeably lower and a tad eerie, this guttural vocalization doesn’t even sound like it’s coming from a deer. The video above is a perfect example of just that. Rutting bucks make this sound when they’re frustrated—which is exactly what it sounds like—because they’re lonely or a doe hasn’t allowed them to breed yet.
A number of grunt calls have hit the market in recent years to create a version of this sound, but it’s a difficult one to pull off, and thus should be reserved for experienced callers. Without the perfect pitch and cadence, you’ll run the risk of scaring away bucks instead of attracting them. However, if you’re looking for a new challenge, or if you feel like you’re grasping for a new approach after failing with some of your default calls, it’s worth a try.
Deer Sound #2: Bleats
Doe bleats, much like grunts, have numerous variations, all dependent on a given situation. Like deer grunts, bleats happen in a variety of situations and each different sound has its own meaning.
A common doe bleat happens in social situations. The bleat is a higher-pitched vibrating sound, similar to that of a goat. They mostly do it when they are gathered together or with their fawns, and it signals contentment.
Bleat calls are interesting. Much like grunts, it seems bleats have many different meanings depending on the situation. First there are estrus doe bleats, which they make when they’re in heat but there aren’t any bucks around. The intensity of this sound comes down to how long the doe has gone without a suitor. Most of the can-style calls you can buy on the market are designed to resemble a more desperate mating call but does use bleats all year long for various purposes, one of which is to communicate with their fawns.
Additionally, fawn bleating can be a distress call. It’s this reason we hear this sound used for coyote hunting, as the agonizing sound triggers nearby predators who might be looking for an easy meal.
Deer Sound #3: Snort-Wheeze
A common sound deer make is the deer snort, or snort wheeze. The snort-wheeze is an intimidation call and one that’s just not a sound or deer call one hears very often. This one has a sound like the deer is trying to clear some stuffed-up sinuses. This is the call mature bucks like to use in the pre-rut and rut when they want to intimidate a rival away from their does. Hunters could potentially hear this one when there are two bucks in the same area during that prime time.
This deer snort call sounds exactly like it is described. It’s a short, loud sniff or snorting sound followed by a long wheeze. It’s a different sound than the common deer grunts and bleats hunters usually hear in the woods.
It’s also worth noting that bucks sometimes use the two parts of the snort wheeze on their own. For a large, dominant buck, they might only need to give a single snort to send a younger rival packing. Whatever sound they use, if you see and hear a buck making these sounds, do a scan of your surroundings. It is likely there is another buck in the area that you haven’t
Deer Sound #3: Blowing
One common sound that deer make, especially does, is blowing. Blowing is an alarm sound often accompanied by stomping. If you’re new to hunting, this is the most likely deer vocalization you will hear first. Veteran hunters know what I’m talking about. There are several stages to a doe sensing danger, and the annoying thing is, every one of them escalates as they warn other deer in the area that something just isn’t right.
Big, mature does especially are the ones you’ll hear blowing the most. These does are the wise old matriarchs of their group, and they’re always on the lookout for danger. Their instinct is to protect the baby deer in the group. Usually, if a doe spots you, it’ll start out with a stare-down, then the doe will start stomping her feet.
The foot stomping says to other deer, “Hey, something isn’t right here, be on alert!” Once the doe is certain there’s danger, she’ll loudly start blowing. It’s a very shrill sound, almost like a whistle. If it makes you jump when you hear it, that’s what the doe intended.
Once a doe starts making this sound, it’s gameover for your hunt. Does who have been spooked will often run off while continuing to make the sound as they vanish out of sight. This is the one call you don’t want to hear or emulate!
Deer Sound #4: Sniffs
Whitetail deer have an amazing sense of smell. If a deer begins to sense something is off, they may start sniffing the air, sometimes quite aggressively. Not only are they trying to get a better smell, but they’re also alerting the rest of the herd. The sniff doesn’t sound much different than a human sniff, only stronger and deeper. Imagine air being sucked in through a deer’s large nose.
READ MORE: Do Deer Eat Meat? Examining This Strange Phenomenon
If you’ve been shooting for a while, you’ve probably heard the best shooters talk about dry-fire training.
Dry fire training is a practice technique that simulates shooting and manipulating a firearm without using live ammunition. Instead, shooters use an unloaded gun to safely practice their shooting skills virtually anywhere without the expense, noise, and hazards associated with using live rounds.
Dry fire training is important for gun enthusiasts because it helps them become more comfortable, confident, and competent with their firearms while developing ‘muscle memory’ and refining their skills. Those who dry fire often see a dramatic improvement in accuracy, faster shooting speeds, and better overall performance in real-world shooting scenarios.
While many agree dry fire practice is an essential component of any training regimen, many people find dry fire training boring. Shooters rather shoot for live ammo at a range.
This is where dry fire training systems come into the picture.
They can make dry fire practice more efficient, effective, and fun, by providing realistic simulations, immediate feedback, and a wider variety of training scenarios than just using an unloaded gun.
Shooting is a perishable skill, so making dry practice enjoyable helps encourage people to continue practicing.
We’ve used all of the major dry fire training systems in the market, which we’ll be sharing with you later in this article.
But, let’s start with the best dry fire training systems based on our extensive testing.
We’ve tried every major dry-fire training tool on the market, and our cadre thinks the following training aids are the best overall.
Each product has its pros and cons that address one or more specific skill sets. Not one product on the market does it all, but each one will help make you a better shooter.
That said, before getting to the list, here are our recommendations based on common use cases and categories:
Best Overall: Mantis X10 Elite and the Mantis Laser Academy
Best for AR-15s: Mantis Blackbeard X
Best for Beginners: SIRT Pistol and Dummy Rounds
Best for Simulating Recoil: Laser Ammo’s Recoiled Enabled Pistols (if you want to use a training gun) and Coolfire Trainer (for your own gun)
Now, here’s the list of the best dry fire training systems with their key features and benefits.
How Laser-Based Dry Fire Training Systems Can Improve Your Shooting Skills
In our top 10 list, you’ll find quite a few laser-based dry-fire training systems.
They use a laser-emitting cartridge or a laser integrated into a dedicated training gun. When the trigger is squeezed, the laser device emits a brief red, green, or IR laser beam. This laser beam simulates the path of a real bullet and provides instant visual feedback on shot placement and accuracy.
There are two main parts to a common laser-based dry-fire training system:
Laser Cartridge or Training Gun: The laser cartridge is a small device inserted into a real firearm’s chamber or attached to the end of specific training gun barrels. Alternatively, some systems use dedicated training guns with integrated lasers, often replicating real firearms’ size, weight, and feel for a more realistic experience.
Target or Sensor System: The target can be a simple paper target, reflective stickers, or an electronic sensor system that detects the laser beam when it hits. Some electronic sensor systems can connect to a computer, smartphone, or tablet and use special software to track shot placement, timing, and other performance metrics, providing detailed feedback to the user.
Advantages of Using a Laser-Based Dry-Fire Training System
Safety: Laser-based systems provide a safe way to practice shooting skills without risking accidental discharge or injury because they don’t shoot a projectile.
Cost-Effective: Practicing with a laser-based system eliminates the need for purchasing live ammunition, which can be expensive, making it a more cost-effective alternative to live fire training.
Convenience: Laser-based training systems can be used in various indoor settings, allowing gun owners to practice their shooting skills anytime and anywhere without needing a shooting range.
Realistic Simulation: Many laser-based systems replicate the size, weight, and feel of real firearms, providing a realistic experience.
Immediate Feedback: Laser-based systems offer instant visual feedback on shot placement, helping shooters identify areas for improvement. Some systems also provide additional performance metrics through connected software.
Versatility: Laser-based systems can be used with various firearms and in various training scenarios.
Disadvantages of Using a Laser-Based Dry-Fire Training System
Lack of Recoil: Most laser-based systems do not simulate the recoil experienced when firing live ammunition, which may limit the development of specific shooting skills that require managing recoil effectively.
Initial Cost: While laser-based systems save money on ammunition in the long run, they can have a higher upfront cost than just using an unloaded gun for dry fire practice.
Compatibility: Some laser cartridges are designed for specific calibers, meaning users with multiple firearms may need to purchase different laser cartridges or adapters to practice with each gun. In addition, some laser cartridges may not work with specific laser targets.
Technical Issues: Electronic sensor systems and related software may occasionally experience technical issues or glitches, which could impact training sessions.
Improve Your Shooting Accuracy with These Computer-Based Dry Fire Training Systems
As referenced in the previous section, some laser training systems work with specialized software applications. Combined with laser-emitting devices or sensors, these applications are computer-based dry-fire training systems that provide detailed feedback on your shooting performance.
Computer-based dry-fire training tools fall into two major categories.
Laser Cartridges or Training Guns Combined with Camera System Software: As discussed above, when a shooter fires a laser beam from a laser cartridge or laser training gun, a computer or smartphone captures the laser’s impact point on a target. The camera system sends the captured data to a connected computer, smartphone, or tablet running specialized dry-fire training software. This software processes the data, tracks shot placement, timing, and other performance metrics, providing real-time feedback to the shooter.
Sensors Attached to Firearms: Another option uses sensors attached to a firearm that detect the movement of a gun, such as with the Mantis X10 Elite. Sensors collect hundreds, if not thousands, of data points, which computer software analyzes. The software offers various features for analysis, such as displaying shot groupings, calculating accuracy scores, and identifying patterns or areas for improvement. Users can track their progress over time and adjust their training routine based on the feedback provided by the software.
Advantages of Computer-Based Dry-Fire Training Systems
Like laser-based systems, computer-based dry-fire tools offer safety, cost-effectiveness, convenience, real-time feedback, and versatility.
Beyond that, computer-based dry-fire systems provide more detailed analysis and feedback on performance.
Moreover, they provide better progress-tracking features. Shooters can track their progress over time, allowing them to analyze their performance and improvement trends.
Lastly, several software applications will provide you with specific pointers based on areas you need to improve, sometimes offering video instruction, too.
Disadvantages of Computer-Based Dry-Fire Training Systems
Dry-fire training systems, like laser-based tools, can have a high initial cost, lack recoil, and may have compatibility and technical issues.
In addition, there can be a learning curve to using software. Some shooters may find setting up and using a computer-based system challenging, especially if they are not tech-savvy.
Recoil Systems: The Secret Weapon for Effective Dry Fire Training
If you’re serious about firearms training and dry fire, you’ll likely use a recoil-enabled dry fire pistol at some point.
They function a lot like laser pistols, but they also simulate the recoil of a real firearm during dry-fire training, providing a more realistic experience and helping users develop the necessary skills to manage recoil effectively. These systems can either be standalone training guns or attachments that can be added to a real firearm.
Typically, the recoil simulation mechanism relies on compressed gas, such as CO2 or gas, that creates a force that pushes the slide backward, mimicking the recoil experienced during live fire.
Airsoft pistols that have been converted to shoot a laser with every trigger pull are the most common option in the market. They are replicas of real firearms in design and weight, so everything will feel the same when you practice while saving your actual firearm from wear and tear. We like and recommend Laser Ammo’s Recoil Enabled Pistols.
If you want to use your own pistol instead of an airsoft pistol, a great option is the Cool Fire Trainer. It replaces your live fire barrel inside your real pistol, and each trigger squeeze will activate a CO2-powered mechanism to cycle your pistol’s slide and provide recoil (while emitting a laser with each shot).
Advantages of Recoil Systems
The big advantage is the ability to simulate recoil.
One of the challenges to proper dry fire training, in general, is for shooters to use the same technique and grip pressures they would when firing a real gun with live ammo.
When a shooter fires live ammo, they tend to grip harder because of the little explosion in their hands. This is needed to help control the gun.
For the average shooter, during dry fire drills, they may not have a proper grip. They likely aren’t gripping their gun hard enough with the same consistent pressure applied during live fire, which can engrain bad habits during one’s dry fire session.
Using a recoil-enabled pistol will provide some blowback, reminding the shooter to grip their gun as if using a real gun.
In addition, the simulated recoil will make one’s sights or red dot lift/move as if they were shooting live ammo. The shooter must learn to manage this blowback so that their sights return to their target efficiently and effectively, so they can take follow-up shots quickly.
Lastly, recoil systems allow users to practice their trigger control, specifically resetting and prepping their triggers as they would during live fire.
Disadvantages of Recoil Systems
Although recoil-enabled dry-fire pistols provide blowback, the recoil does not match the amount of force applied by ‘real’ recoil.
The recoil impulse from compressed gas is better than nothing and serves as a reminder to grip a firearm properly, but shooters must understand that they need to invest ample time in shooting live ammo to learn how to manage recoil.
Another disadvantage is that any training tool that uses compress gas to simulate recoil must be ‘kept warm’ to use for long periods of time.
For example, airsoft pistols typically use magazines filled with green gas. Initially, a shooter might be able to take 50 to 60 rapid-fire shots before having to refill the magazine.
When one refills the magazine with green gas, they’ll notice it’s cold. The colder the magazine, or wherever compressed gas is being stored, the fewer shots one will be able to take before having to refill the gas again.
Specialized Training Tools That Will Take Your Shooting Skills to the Next Level
Specialized dry-fire training tools are designed to help gun enthusiasts improve specific shooting skills and techniques without using live ammunition. These tools can be used independently or with other dry-fire training systems to enhance the overall training experience.
While some specialized training tools overlap with the preceding categories, specialized tools can offer more focused and in-depth training around a specific skill set or skill sets.
There are several dry fire training systems in our top 10 list above that fall into this category that we highly recommend, namely:
The DryFireMag: An automatic pistol trigger resetting magazine.
Laser Ammo’s Smokeless Range 2.0: A virtual range that you can use indoors.
Laser Ammo’s Reactive Laser Targets: Great, versatile targets to use with all major laser cartridges and laser firearms.
Dummy Rounds: They are low-cost and provide great training value, especially for beginners.
Are Dry Fire Systems Worth It?
You’re reading this article because you likely understand the value of dry-fire practice. But, you might wonder if these training aids are worth the money.
Dry fire training systems offer many benefits for shooters looking to improve their skills and maintain proficiency without using live ammunition. Here are some of the key features and benefits:
Safe Practice: Dry fire training eliminates the need for live ammunition, allowing you to practice shooting skills safely at home or in other non-range environments without the risk of accidental discharge or injury.
Cost Savings: Dry fire training systems do not require live ammunition, which can be expensive, especially for regular practice sessions. By eliminating this expense, you can save money while still honing your skills.
Convenience: With dry fire training systems, you can practice at your own pace and in the comfort of your home or any suitable space. This eliminates the need to travel to a shooting range and allows for more flexible practice sessions.
Real-time Feedback: Many dry-fire training systems provide instant feedback on shot placement, accuracy, and speed, allowing you to identify areas for improvement and adjust your technique more effectively than with traditional dry-fire practice.
Customizable Training: Dry fire training systems often include a variety of drills and scenarios designed to improve specific shooting skills. This allows users to tailor their practice sessions to focus on the skills they want to develop.
Eco-friendly: Since dry fire training systems do not use live ammunition, they are an environmentally friendly option for practicing shooting skills, reducing lead pollution and waste associated with spent casings.
Reduced Wear and Tear: Dry fire training typically causes less wear and tear on your firearm compared to live-fire training. This can help extend the life of your firearm and reduce maintenance costs. For example, when using recoil-enabled pistols, I prefer using airsoft replicas such as those from Laser Ammo.
Tips for Making the Most Out of Your Dry Fire Practice
Whether or not you use any of the products on our list or just an unloaded firearm when dry firing, keep these tips in mind to make the most out of your practice sessions.
Have a plan: Before starting your dry fire practice, determine what specific skills you want to focus on, such as trigger control, drawing from a holster, or target transitions. Having clear goals will help you concentrate on the areas that need improvement.
Create a dedicated practice space: Designate a specific area in your home or another indoor location for dry fire training. Ensure it’s free from distractions and has enough space for you to perform various drills comfortably.
Use a ‘real’ grip: Maintain the exact grip and stance you use during live-fire training to ensure consistency and build muscle memory.
Incorporate training aids: Utilize dry-fire training tools, such as the ones we’ve recommended in this article, to enhance your practice session and receive real-time feedback on your performance.
Focus on trigger control: Pay close attention to your trigger pull, ensuring a smooth and consistent press without disturbing your iron sights or red dot. This will help improve your accuracy during live-fire sessions.
Make dry fire a habit: Establish a regular dry fire training schedule to maintain and improve your shooting skills. Consistent practice is essential to getting better fast. In our War Room community, we conducted a challenge to have members dry fire every day for a month. After the challenge, dry firing became a habit.
Mix up your drills and exercises: Vary your drills, exercises, and scenarios to keep your training sessions engaging and challenging. This will help you develop a well-rounded skill set and prevent boredom during practice.
Record your progress: Keep track of your performance and improvements over time to stay motivated and identify areas that may require additional focus.
Here’s a video that will help make your dry fire training more realistic.
By following these tips, you can maximize the effectiveness of your dry fire training sessions and continually improve your shooting skills.
Frequently Asked Questions
Does dry firing damage a gun?
Dry firing generally does not cause damage to centerfire guns. These firearms are designed to withstand the impact of the firing pin hitting the chamber without a cartridge in place.
However, for rimfire guns like .22 caliber models, repeated dry firing can potentially cause damage because the firing pin in these guns may strike the edge of the chamber, causing it to degrade over time.
How much should you dry fire per day?
There is no minimum or maximum number of times a day. It will all depend on your time and how much you can remain focused during your practice sessions.
Many serious shooters dry fire at least 15-30 minutes a day, 3-5 times a week. Professional shooters may dry fire daily and for 30 or more minutes each session.
The key is to be consistent, depending on your time and attention span. If you can only dry fire once a week, then be consistent.
Regarding the session length, you can keep going as long as your technique doesn’t get sloppy. If this happens, it’s a good indicator that you should stop for the day.
Can dry fire training improve my shooting?
It absolutely can! I don’t understand those who say they don’t want to dry fire or that they only shoot live ammunition.
The best shooters in the world all dry fire. It allows you to work on practically everything you can when shooting live rounds, except recoil management.
Do I need any special equipment for dry fire training?
Not at all. You can use an unloaded firearm if you want.
That said, I highly recommend using different training tools like the ones on our list.
They will make practice more enjoyable and help you improve faster, especially for beginner to intermediate shooters.
Is dry fire practice effective for both beginners and experienced shooters?
Absolutely. Regardless of your skill level, dry fire practice allows you to get in countless repetitions for free, practically anywhere.
If you use proper technique, each perfect rep will help you improve and burn your movements into your subconscious.
Can dry fire training replace live fire training?
You can accomplish a lot with dry fire training alone, but it will never replace live fire training, regardless of using a laser pistol with an integrated recoil system.
Technology has gone a long way to simulating recoil using compressed gas, but it isn’t the same as live fire when it comes to learning and improving recoil management.
In addition, for a lot of shooters shooting live ammo, the sound of a gun going off (i.e. the bang) and the face that they are using actual ammo can cause stress and anxiety. This can’t really be replicated during dry fire, so shooters need to practice at a live range, too.
Though dry fire training can’t replace live fire training, they complement each other, and serious shooters will do both.
Get Started with the Best Dry Fire Training Systems Today
The best shooters in the world will agree. Dry practice will make you a better shooter.
But, many people find it boring. Dry fire training systems can help make practice fun while helping you improve faster.
We’ve tried practically every major dry fire product, but the list we provided are the best. Check them out and start practicing!
If we left out a major tool that you’ve used, let us know in the comments section below.
Our Comprehensive List of the Dry Fire Training Tools We’ve Used
In coming up with our list of the top dry fire training products, we went through a lot of different tools. Here the the other popular training aids we tested.
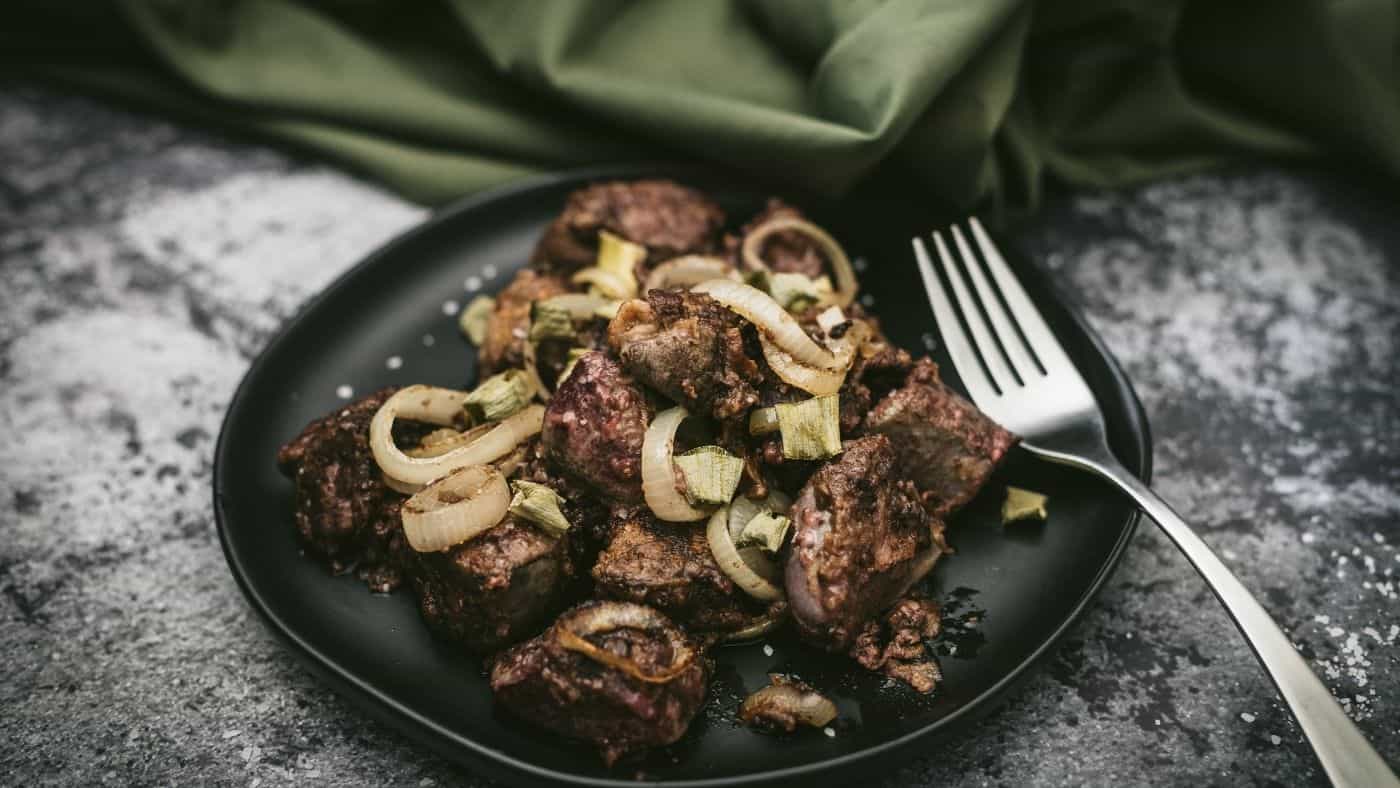
When my husband first started hunting large game over a decade ago, I wanted nothing to do with the gut pile. Now? I’m rummaging through it trying to find all the good, often overlooked cuts of meat, and put as much of that animal to use as possible. This includes the almighty venison liver.
When it comes to nutrient-dense organ meats, the liver is the next logical step after trying venison heart. While the heart is very mild in flavor and most reminiscent of a really good steak, the liver takes a bit of a stronger palate and a more acquired taste. But, there are plenty of ways to make the often pungent flavor of the liver much more mild and worth the effort.
Historically, hunters would sautee the heart and liver at deer camp, eating the nutrient-dense organ meats before they ever left for home. But, today, that doesn’t happen as much. The liver, however, is arguably one of the most nutritionally dense foods on the planet, full of essential nutrients like Vitamin A, Vitamin B, copper, folate, and iron. But because of its often pungent flavor, it’s often overlooked.
The liver is full of blood vessels, which gives it a pretty pungent flavor. This is especially true for large animals, but if you’ve had calves liver, or pig liver and enjoyed it, you’ll probably like deer liver.
The flavor profile for liver is pretty iron-like and a bit bitter, this is especially true of older bucks, while the flavor of younger bucks (less than 2 years) and does flavor is a bit milder from the start.
While the flavor in and of itself can be enough to turn some folks off from it if it’s prepared correctly you can turn any liver hater into someone who enjoys this nutrient-dense food.
So, how do you prepare it properly? To begin, you’ll want to simply remove the liver from your deer. While most animals have a bile duct you need to worry about and remove, deer actually don’t possess a gallbladder, so all you need to do is remove it. Once removed, you’ll want to thoroughly rinse it with cool water.
Next, you’ll want to slice or cube your liver. Not only will this increase the surface area for soaking out some of that pungent flavor, but it will also enable you to remove any gristly bits and veins from the liver tissues.
Then, you’re on to soaking. I recommend soaking your liver for 12-48 hours, changing the liquid at least once. For the mildest flavor, I recommend soaking the liver in milk, but you can also use saltwater. Saltwater doesn’t seem to pull out as much flavor as milk, though.
Of course, you can just eat fresh liver without soaking it, soaking it isn’t a safety concern, but a taste concern. We usually harvest, rinse, and soak it and eat it the next day, but it’s really a personal choice.
The longer you soak it, up to two full days from harvest, the more mild the flavor. What you use and for how long you soak is up to you, but if you’re trying deer liver for the first time, I suggest soaking it for at least 12 hours in milk or buttermilk before cooking it.
After soaking, you’ll simply remove the liver and rinse it off. I pour mine in a colander and rinse it under cool water until the milk is off and pat dry.
Cooking Venison Liver & Onions
After you’ve soaked and rinsed the liver, it’s just a matter of frying a little bacon, slicing up some onion, dredging the liver in seasoned flour, and frying it in butter in a cast-iron skillet.
Begin by dicing up bacon and frying it in a couple of tablespoons of butter. Once crispy, remove the bacon to a plate lined with paper towels to dry, leaving the grease in the skillet.
Meanwhile, combine flour, seasoning salt, black pepper, garlic powder, and paprika to make your dredge.
Dredge the liver pieces in seasoned flour, coating each side well. Continue until all of the pieces are well coated.
Slice onion into thick rings and brown them in the hot skillet of bacon grease over low heat.
Once the onions are nice and browned, move them to the side of the skillet away from the heat. Melt more butter and add your liver to the skillet, being sure not to crowd the skillet.
Brown the liver slices to a golden brown, over medium-high heat, for about four to five minutes for each side and remove to a plate lined with paper towels, until you’ve finished the entire batch, adding more butter as necessary.
The trick to flavorful, tender liver is to allow each side to brown, flipping the liver as little as possible, while not overcooking it (which results in tough liver).
Add all of the liver, onions, and bacon back to the skillet and toss together until mixed thoroughly.
Tips for Cooking Deer Liver
Soak the liver for a minimum of 12 hours to remove the bitter flavors. Whole milk works well, or you can try salt water or a buttermilk soak.
Keep the onion slices large, you want them similar in size to a bite of liver.
Don’t overcook your liver. To keep it tender, you’ll want to cook it until there’s still a tiny hint of pink in the center.
Pull the liver out of the refrigerator, drain, rinse and leave out while you prepare the rest of the ingredients so it’s warmer when you cook it.
Cooking this dish in a cast iron skillet will yield the best results, but if you don’t have one any large skillet will work equally well.
If you’re looking for ideas on how to reconnect with your food, nature, and the heritage way of life, you’ve come to the right place.
Join over 40,000 like-minded folks in my Facebook group, The Self Sufficient Life. You can join by clicking here.
"Unleash the Power: Mastering Break Barrel Air Rifles for Maximum Performance. Discover expert tips and techniques to enhance the power and precision of your...
")
")
")
")
")


 The presence or absence of a brow tine, or the G-1 as they are referred to on a score sheet, are the most inheritable trait for antlers. Bucks that are missing one or both brow tines should be candidates for management by harvest. You don’t want the gene for missing G-1 passed on. The next time one of the hunters sees him while deer hunting they need to remove this buck as quick as possible.